1
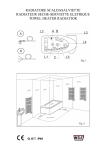
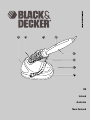
UK
Ireland
Australia
New Zealand
2
Intended use
Your Black & Decker craft soldering Iron has been designed
for leisure and DIY activities in the home including soldering,
woodburning, scrapbooking and image transfer.
This tool is intended for consumer use only.
Safety instructions
Warning! When using mains-powered appliances, basic
safety precautions, including the following, should always be
followed to reduce the risk of fire, electric shock, personal injury
and material damage.
X
Read all of this manual carefully before using the
appliance.
X
The intended use is described in this manual. The use of
any accessory or attachment or the performance of any
operation with this appliance other than those
recommended in this instruction manual may present a risk
of personal injury.
X
Retain this manual for future reference.
Using your appliance
X
Keep work area clean and well lit. Cluttered and dark areas
invite accidents.
X
Do not expose the appliance to rain or wet conditions.
Water entering the appliance will increase the risk of
electric shock.
X
Stay alert, watch what you are doing and use common
sense when operating the appliance. Do not use a power
tool while you are tired or under the influence of drugs,
alcohol or medication. A moment of inattention while
operating power tools may result in serious personal injury.
X
Never pull the power supply cord to disconnect the plug
from the socket. Keep the power supply cord away from
heat, oil and sharp edges.
X
If the power supply cord is damaged during use, disconnect
the appliance from the power supply immediately. Do not
touch the power supply cord before disconnecting from the
power supply.
X
Disconnect the appliance from the power supply when not
in use, before fitting or removing parts and before cleaning.
Safety of others
X
Do not allow children or any person unfamiliar with these
instructions to use the appliance.
X
Do not allow children or animals to come near the work
area or to touch the appliance or power supply cord. Close
supervision is necessary when the appliance is used near
children.
After use
X
Switch off and remove the plug from the socket before
leaving the appliance unattended and before changing,
cleaning or inspecting any parts of the appliance.
X
When not in use, the appliance should be stored in a dry
place. Children should not have access to stored
appliances.
Inspection and repairs
X
Before use, check the appliance for damaged or defective
parts. Check for breakage of parts, damage to switches and
any other conditions that may affect its operation.
X
Do not use the appliance if any part is damaged or
defective.
X
Have any damaged or defective parts repaired or replaced
by an authorised repair agent.
X
Before use, check the power supply cord for signs of
damage, ageing and wear.
X
Do not use the appliance if the power supply cord or mains
plug is damaged or defective.
X
If the power supply cord or mains plug is damaged or
defective it must be repaired by an authorised repair agent
in order to avoid a hazard. Do not cut the power supply cord
and do not attempt to repair it yourself.
X
Never attempt to remove or replace any parts other than
those specified in this manual.
Specific safety instructions for craft soldering irons
Warning! This appliance must be placed on the stand (8) when
not in use.
DO NOT TOUCH THE HEATED TIP OF THE TOOL OR THE
HOT MELTED SOLDER. The operating temperature of this
appliance is approximately 465°C on the high (II) setting and
300°C on the low (I) setting.
The Heating element will begin to heat up as soon as
the appliance is plugged in. To avoid injury or damage to
property always assume that the appliance is hot and return
it to the protective stand (8).
Before cleaning, adjustment or changing the
attachments. Unplug the appliance and allow the
attachment to cool.
Keep the appliance away from all flammable material.
Be aware that this product may ignite material. Where this
is a concern, test a piece of scrap material.
Never leave the appliance plugged in and unattended.
After use, unplug the appliance, allow the attachment to
cool and store in a safe place out of the reach of children.
Fumes resulting from heating materials for craft
activities may be hazardous. Always work in a well
ventilated area. Seek advice on the materials being used.
Do not dip the tool into a liquid.
3
Keep hands away from the heated attachment and
work area. Heat may be conducted through the work piece.
Use clamps or pliers to hold the work piece.
Protect the work surface and materials from heat
damage. Heat may be conducted through the work piece.
Use a heat resistant material to protect the work surface.
The operator should not attempt specialised
applications or repairs (e.g. repairing electrical
appliances) unless qualified or trained to do so.
This appliance is not a toy. Keep out of the reach of
children.
Safety symbols marked on your appliance
Hot surface do not touch.
Fitting the craft soldering iron support (fig. A)
Insert the coiled spring support (2) into the craft soldering
iron stand (8) by aligning the protrusions on the support with
the slots in the opening. Push the support straight in until it
"clicks" into place.
Cable storage
The channel around the bottom of the stand (8) serves as a
cord wrap for the cord.
Heating attachment storage (fig. B)
A handy storage (1) bin is built-in to the base of the craft
soldering iron stand (8). To remove the bin from the base of
the stand (8), press in on the sides and pull out.
Fitting and removal of a heating attachment
Electrical safety
This product must be earthed. Always check that
the power supply corresponds to the voltage on
the rating plate.
Power plugs must match the outlet. Never modify the plug in
any way. Do not use any adapter plugs with earthed (Class
1) appliances. Unmodified plugs and matching outlets will
reduce the risk of electric shock.
Extension cables & Class 1 product
X
A 3-core cable must be used as your appliance is earthed
and of Class 1 construction.
X
Up to 30m (100 ft) can be used without loss of power.
X
This appliance is not intended for use by young or infirm
persons without supervision. Children must be supervised
to ensure they do not play with the appliance.
X
If the supply cord is damaged, it must be replaced by the
manufacturer or an authorised Black & Decker Service
Centre in order to avoid a hazard.
Features
1.
2.
3.
4.
5.
6.
7.
8.
Handy storage bin
Coiled spring support
Ready-for-use indicator
Temperature selector
Handle
Flexible arm grippers
Sponge
Soldering iron stand
To fit a heating attachment to the craft soldering iron, select
the attachment required. Ensure the attachment is clean and
that the handle socket is free from debris.
Insert the threaded end into the craft soldering iron and
rotate clockwise. Tighten by hand to secure. Do not use
pliers or hand tools.
To remove the heating attachment, unplug the craft
soldering iron and allow the attachment to cool. Rotate the
tip anticlockwise.
Fitting and removing the knife point (fig. C)
Warning! Cut hazard. The knife blade is razor sharp. Use extra
care when handling the knife blade at all times.
Place the knife into the holder, and then place the holder into
the sleeve.
Carefully thread the assembly onto the craft soldering iron
handle. Rotate the holder clockwise and hand-tighten.
To remove the knife point
Unplug the craft soldering iron and allow the attachment to
cool. Rotate the holder anticlockwise.
Use
Warning! Be aware that this product may ignite material.
Where this is a concern, test a piece of scrap material.
Turning the appliance on
To turn the appliance on, insert the plug into an appropriate
socket. The heating element will begin to heat up as soon as
the appliance is plugged in.
Assembly
Heat selection (fig. D)
Warning! Before cleaning, adjustment or changing the
attachments. Unplug the appliance and allow the attachment to
cool.
Push the switch (4) to select either the low (I) setting or high
setting (II).
4
Use the high setting (II) for wood burning and soldering
applications and the low setting (I) for iron-on/plastics,
paper and fabric.
Set the craft soldering iron to the high setting (II) and wait
until the ready-to-use indicator (3) shows red, indicating that
the iron has reached the desired temperature.
Ready for use indicator (fig. D)
Use wire wool or an abrasive paper to clean and remove any
dirt, paint or rust from the materials to be joined.
A ready-for-use indicator (3) is built in to the handle (5) of the
craft soldering iron.
At room temperature the indicator (3) is grey.
When the Iron has reached the low (I) setting (approximately
5 min.) the indicator (3) is yellow.
When the indicator (3) shows red, the tip has reached the
high (II) temperature setting (approximately 10 min).
Flexible arm grippers and sponge (fig. B)
Your craft soldering iron stand (8) includes two flexible arm
grippers (6) for holding small work pieces. The clips which
grip the work piece may become hot when heat is applied to
the work piece. Allow the clips to cool before touching the
grips or storing the craft soldering iron.
The sponge (7), located in the craft soldering iron stand (8),
is helpful for keeping the interchangeable tips clean. The
sponge (7) must be thoroughly dampened before use and
checked frequently to make sure that it has not dried out.
Do not touch a dry sponge with a hot iron point. Avoid hot tip
contact with the plastic parts of the stand (8).
Hints for optimum use
The basic instructions given below are provided as a guide to
craft and DIY applications. The operator should practise the
various applications on scrap materials to obtain the
required effect and prevent damage to the work piece.
Warning! The operator should not attempt specialised
applications or repairs (e.g. repairing electrical appliances)
unless qualified or trained to do so.
Warning!Fumes resulting from soldering and craft activities
may be hazardous. Always work in a well ventilated area.
Seek advice on the materials being used.
Soldering
A soldered joint is a method of joining two pieces of thin
metal wire or foil. The best results are obtained on metals
such as copper, silver or steel. The materials are heated to a
point where a lead/tin solder will melt onto the surface or
into the joint.
A flux is required to clean the materials being joined and
assist the solder flow. Solders can be purchased containing
flux or the flux can be purchased separately. The operator is
advised to seek advice on the application and solder type
from the retailer when purchasing.
Hold the soldering attachment against the larger work piece,
near to the joint area. The objective is to heat the two work
pieces until they are hot enough to melt the solder. Hold the
solder against the work piece near the joint, but not touching
the soldering attachment.
When the work piece is hot enough, the solder will flow into
the joint. Remove the craft soldering iron as soon as the
solder flows. Wipe the soldering attachment on the
moistened sponge to remove excess solder.
Decoration
Use your craft soldering iron to decorate and personalize a
variety of different materials by applying heat to the surface
to remove part of the material or burn in markings.
X
Use the high temperature (II) for wood, leather, gourds,
heavy weight paper, paper-mache, wicker-rattan and
heavy plastics.
X
Use the low temperature (I) for lighter paper, no-nap fabric,
thin plastics, foam, candle wax, and soaps.
Always practise on scrap material to obtain the required
effect to prevent damage to the work piece.
Attachment identification and typical applications
UNIVERSAL (9) - Ideal for wide and thin lines in a variety of
materials.
TEAR DROP (10) - Use for detail or large area shading.
Make an easy flower design with this petal shape.
ROUND (11) - Ideal for dots, curves and cursive writing.
Make a border on your next scrapbook page.
TAPERED (12) - Use for stencil cutting or detail wood
burning applications.
Use the craft soldering iron in high (II) temperature to cut
stencil blanks or plastics. The tapered tip can also be used
for detail work on all the materials listed above.
SOLDERING (13) – Use the soldering tip in high (II)
temperature for joining metal and wire e.g. for jewellery
making & repair, assembling electronic kits.
HOT KNIFE (14) - Use a non heat conducting straight edge
for straight cutting foam.
The hot knife is perfect for hot cutting and carving a variety
of materials. Leather, rope, foam, matte board, plastics,
candle wax & soap. Also use the hot knife to fuse recently
cut materials to prevent fraying.
5
MINI-IRON (15) - Use for iron-ons, fusible webbing and
tapes, applique quilting, seams and hems, paper crafts and
image transfer.
Use the mini-iron in low (I) temperature to detail press paper,
ribbon or fabrics. Also in low (I) temperature, the mini iron
will transfer the toner from any black & white or colour
photocopy or printout onto wood, glass, ceramic, paper or
fabric.
Emboss fabrics with images from rubber stamps by placing
the fabric "right side down" on the stamp and covering with
a piece of paper and heating until the rubber stamp image
appears on the paper.
Warning! Before cleaning, adjustment or changing the
attachments. Unplug the appliance and allow the attachment to
cool.
Maintenance
Your Black & Decker appliance has been designed to operate
over a long period of time with a minimum of maintenance.
Continuous satisfactory operation depends upon proper care
and regular cleaning.
X
Regularly clean the appliance using a damp cloth. Do not
use any abrasive or solvent-based cleaner. Never let any
liquid get inside the appliance and never immerse any part
of the appliance into liquid.
Mains plug replacement (U.K. & Ireland only)
If a new mains plug needs to be fitted:
X
Safely dispose of the old plug.
X
Connect the brown lead to the live terminal in the new plug.
X
Connect the blue lead to the neutral terminal.
X
Connect the green/yellow lead to the earth terminal.
Warning! Follow the fitting instructions supplied with good
quality plugs. Recommended fuse: 3 A.
Protecting the environment
Should you find one day that your appliance needs
replacement, or if it is of no further use to you,
think of the protection of the environment. Black &
Decker repair agents will accept old Black &
Decker tools and ensure that they are disposed of
in an environmentally safe way.
Separate collection of used products and
packaging allows materials to be recycled and
used again. Re-use of recycled materials helps
prevent environmental pollution and reduces the
demand for raw materials.
Local regulations may provide for separate collection of
electrical products from the household, at municipal waste
sites or by the retailer when you purchase a new product.
6
Black & Decker provides a facility for the collection and
recycling of Black & Decker products once they have reached
the end of their working life. To take advantage of this
service please return your product to any authorised repair
agent who will collect them on our behalf.
You can check the location of your nearest authorised repair
agent by contacting your local Black & Decker office at the
address indicated in this manual. Alternatively, a list of
authorised Black & Decker repair agents and full details of
our after-sales service and contacts are available on the
Internet at: www.2helpU.com.
Technical data
Voltage
Frequency
Rated Input
Temp high
Temp low
Construction
Weight
Vac
Hz
W
°C
°C
Class
kg
CI500
230-240
50
20
465
300
1
0.7
EC declaration of conformity
CI500
Black & Decker declares that these products conform to:
Standards & Legislation.
89/336/EEC, 73/23/EC, EN60335, EN55014, EN50336
Kevin Hewitt
Director of Consumer Engineering
Spennymoor, County Durham
DL16 6JG,
United Kingdom
31-09-2006
Guarantee
Black & Decker is confident of the quality of its products and
offers an outstanding guarantee. This guarantee statement
is in addition to and in no way prejudices your statutory
rights. The guarantee is valid within the territories of the
Member States of the European Union and the European
Free Trade Area.
If a Black & Decker product becomes defective due to faulty
materials, workmanship or lack of conformity, within 24
months from the date of purchase, Black & Decker
guarantees to replace defective parts, repair products
subjected to fair wear and tear or replace such products to
make sure of the minimum inconvenience to the customer
unless:
X
The product has been used for trade, professional or hire
purposes.
X
The product has been subjected to misuse or neglect.
X
The product has sustained damage through foreign objects,
substances or accidents.
X
Repairs have been attempted by persons other than
authorised repair agents or Black & Decker service staff.
To claim on the guarantee, you will need to submit proof of
purchase to the seller or an authorised repair agent. You can
check the location of your nearest authorised repair agent by
contacting your local Black & Decker office at the address
indicated in this manual. Alternatively, a list of authorised
Black & Decker repair agents and full details of our aftersales service and contacts are available on the Internet at:
www.2helpU.com
Please visit our website www.blackanddecker.co.uk to
register your new Black & Decker product and to be kept up
to date on new products and special offers. Further
information on the Black & Decker brand and our range of
products is available at www.blackanddecker.co.uk.
7
8
9
10
11
496007-00
10/06