1
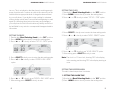
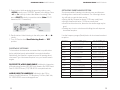
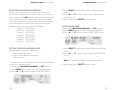
SOLARLINK FR600
Self-Powered and Solar-Powered AM/FM/Shortwave Radio with
NOAA Weatherband, Flashlight, Siren and Cell Phone Charger
Owner’s manual
SOLARLINLK FR600 OWNER’S MANUAL
DO YOU NEED HELP?
If you need help, please contact us, Monday-Friday, 8:30 a.m.-4:00
p.m., North American Pacic Time. 1-800-872-2228 from the U.S;
1-800-637-1648 from Canada; 650-903-3866, worldwide; FAX:
650-903-3867; web site, www.etoncorp.com; Etón Corporation,
1015 Corporation Way, Palo Alto, CA 94303, USA
WARNING
• Do not expose this appliance to rain or moisture.
• Do not submerge or expose for extended period to water.
• Protect from high humidity and rain.
• Unplug immediately if liquid has been spilled or object have
fallen into the apparatus.
• Clean only with a dry cloth. Do not use detergents or chemical
solvents as this might damage the nish.
• Unplug and disconnect external antennas (not included) during
lightning storms.
• Do not remove cover [or back].
• Refer servicing to qualied service personnel.
Environment
Disposal
According to the European Directive 2002/96/EC all
electrical and electronic products must be collected
separately by a local collection system.
Please act according to your local rules and do not
dispose of your old products with your normal household waste.
3
SOLARLINLK FR600 OWNER’S MANUAL
LOCATION OF CONTROLS
14) Power Supply Knob
15) Band Selecting Knob
16) Volume Adjusting Knob
17) Speaker
1.
2.
3.
9.
10.
11.
12.
13.
4.
14.
5.
5.
5.
5.
6.
SOLARLINLK FR600 OWNER’S MANUAL
18.
20.
19.
21.
22.
15.
7.
16.
8.
23.
17.
1) Snooze: 5 Min Snooze
2) Alarm ON/OFF: actiivate/deactivate alarm function
3) ALERT ON/OFF:open/close alert bell
4) Select Button
5) Direction Buttons
6) Flashlight
7) Hand Crank
8) Multifunctional Knob
9) Alert Indicator Light
10) Statement Indicator Light
11) Emergency Indicator Light
12) Watch Indicator Light
13) Warning Indicator Light
4
18) PHONE CHARGER:USB Jack for Charging the Cellphone
19) DC in:USB Jack for charging the Radio(small)
20) DC in Jack (Adaptor)
21) Earphone Jack
22) Audio Jack
23) Battery Compartment
POWERING AND TURNING ON THE RADIO
The unit is powered with 3 AA batteries, the solar cell, the Dynamo (rechargeable Ni-MH battery), the AC adaptor (not included)
or the DC computer input. Select BATTERY, SOLAR or DYNAMO
power with the Power Supply Knob on the upper right side of the
radio. The power sockets are on the back of the radio, under the
5
SOLARLINLK FR600 OWNER’S MANUAL
rubber covers. After applying power, select the correct position
with the Power Supply Knob and place the Band Selecting Knob
in the AM, FM, SW, WB or Alert position to turn it on. Turn it off by
placing the Band Selecting Knob in the OFF position.
SOLARLINLK FR600 OWNER’S MANUAL
DC-IN 5V ADAPTOR (not included)
This socket is located on the back of the radio, under the rubber
plugs. Plug in the AC adapter to the DC IN 5 volt socket. This also
charges the Ni-MH battery.
Note: The radio can be played while it’s charging.
BATTERY POWER
Open the battery compartment cover, you can nd two groups of
sockets for installing the batteries. One group of sockets is for the
rechargeable Ni-MH batteries and the other group of sockets is for
the AA batteries.
Install 3 AA batteries and set the power selector switch to the
BATTERY position.
SOLAR POWER
When you’re in sunlight set the power switch to the SOLAR position. This position also recharges the Ni-MH rechargeable battery.
Note: The rechargeable Ni-MH batteries have been disconnect
for transportation purposes. To use the crank-charge system,
open the battery compartment cover and connect the rechargeable batteries’ plug into its socket.
DYNAMO POWER
The rechargeable Ni-MH (nickel-metal-hydride) battery is in the
battery compartment. To use it plug the battery into the socket
adjacent to it, then set the power switch to the DYNAMO position.
You may have to charge the battery; to do this turn the crank for
90 seconds. The rechargeable battery will eventually lose its ability to hold a charge.
6
DC-IN USB COMPUTER SOCKET (USB cord not included)
This socket is located on the back of the radio, under the rubber
plugs. Plug in the USB cord to the DC IN socket. This also charges
the Ni-MH battery.
VOLUME CONTROL
Turning the Volume Adjusting Knob (located on the lower right of
the radio) clockwise turns up the volume; counterclockwise turns
down the volume. Always turn down the volume before using
earphones.
CHARGING CELL PHONES (cell phone charging cord included)
If you revolve the Power Supply Knob to the OFF/PHONE CHARGER position the radio will charge cell phones. Plug the cell phone
charging cord into the USB PHONE CHARGER jack at the rear of
the radio. Plug the cell phone charging adapter tip into the other
end of the cord and then into the jack of the cell phone. Then put
the radio in the sun or revolve the hand crank to charge the cell
phone. About 10 minutes of cranking results in one or two short
emergency calls.
NOTE: When charging a cell phone via the USB cell phone charger,
it is important to turn the crank at least 2 revolutions per second,
or until you see the green or orange LED above the crank handle
7
SOLARLINLK FR600 OWNER’S MANUAL
turn on. This is an indication that the phone is receiving enough
power from the radio. Continue to crank at this rate until you are
satised that an appropriate level of charge has been received
by your cell phone. If you decide to stop cranking for whatever
reason, please wait at least 5 seconds before beginning to crank
again. Not following these instructions may cause damage to
your cell phone for which Eton disclaims any liability and will not
be held liable for any actual or consequential damages related to
this matter.
SETTING THE DATE
1. Revolve the <Band Selecting Knob> to the “OFF” position.
2. Press <MENU> button shortly to enter the setting menu.
3. Press <p> or <q> shortly to select “SET UP---DATE” option.
SOLARLINLK FR600 OWNER’S MANUAL
SETTING THE CLOCK
1. Revolve the <Band Selecting Knob> to the “OFF” position.
2. Press <MENU> button shortly to enter the setting menu.
3. Press <p> or <q> shortly to select “SET UP---TIME” option.
4. Press <SELECT> shortly once to enter the time setting mode.
5. Press <t> or <u> shortly to select “HOUR : MINUTE” option.
6. Press <p> or <q> shortly to set “HOUR : MINUTE” option.
7. After setting, press <SELECT> shortly to save.
4. Press <SELECT> shortly once to enter the date setting mode.
5. Press <t> or <u> shortly to select “MONTH--DAY--YEAR”
option.
Note: The clock is a 12-hour clock, showing “AM” in the display
in the morning, and showing “PM” in the display starting at
noon.
SETTING THE BEEPER ALARM
This radio’s alarm beeps when it activates.
6. Press <p> or <q> shortly to set “MONTH--DAY--YEAR” option.
7. After setting, press <SELECT> shortly to save.
8
1. SETTING THE ALARM TIME
1) Revolve the <Band Selecting Knob> to the “OFF” position.
2) Press <MENU> button shortly to enter the setting menu.
9
SOLARLINLK FR600 OWNER’S MANUAL
3) Press <p> or <q> shortly to select “SET UP ALARM--ALM”
option.
SOLARLINLK FR600 OWNER’S MANUAL
3. SNOOZE BUTTON
When the alarm activates, pressing the <SNOOZE> button
shortly deactivates it for 5 minutes (“
“ appears in the display), then it starts again.
4) Press <SELECT> shortly once to enter the date setting mode.
5) Press <t> or <u> shortly to select “HOUR : MINUTE” option.
6) Press <p> or <q> shortly to set “HOUR : MINUTE” option.
7) After setting, press <SELECT> shortly to save.
2. ACTIVATING AND DEACTIVATING THE ALARM
Press <ALARM ON/OFF> shortly to activate or deactivate the
alarm.
If the alarm function is activated, the alarm symbol “
AL”
and alarm time will appear in the display. When the alarm time is
reached, the unit will beep.
If the alarm function is deactivated, the alarm symbol “
AL “
and alarm time will disappear from the display.
%
%
10
BROADCAST RECEPTION
1. Select the power supply mode.
2. Select the band:
FM Band: Revolve the <Band Selecting Knob> to “FM”
position.
AM Band: Revolve the <Band Selecting Knob> to “AM”
position.
SW Band: Revolve the <Band Selecting Knob> to “SW”
position.
3. Adjust the volume: Revolve <Volume Adjusting Knob> to
adjust the volume level.
4. Tuning in stations:
Manual Tuning: Press <p> or <q> shortly to tune.
Auto Tuning: Press and hold <p> or <q> to tune.
Note: When listening to FM, pull up the telescopic antenna all
the way. When tuning AM stations the telescopic antenna is not
needed and can be lowered.
11
SOLARLINLK FR600 OWNER’S MANUAL
SOLARLINLK FR600 OWNER’S MANUAL
5. Save stations: While receiving the approving station, press
<MENU> shortly once, “MEMORY” appears in the display. Press
<t> or <u> shortly to select the address for saving. Then
press <SELECT> shortly to save the station. (Note: FM: 20
memories; AM: 10 memories.)
OPTIMIZING SHORTWAVE RECEPTION
Shortwave enables listening to broadcasts over vast distances
including other countries and continents. The following information will help you get the best results.
• During the day, frequencies above 13 MHz are usually best.
• At night, frequencies below 13 MHz are usually best.
• Around sunset and sunrise, the entire shortwave range may be
good.
• Getting very close to a window and holding the radio improves
shortwave reception.
6. Recall stations: When listening to the radio, press <t> or <u>
shortly.
7. Turn off: Revolve the <Band Selecting Knob> to “OFF”
position.
Use the frequency ranges (Bands) below for shortwave broadcast
reception:
SHORTWAVE LISTENING
To learn about shortwave we recommend the two publications
below, published yearly and available from major booksellers.
Additionally, the Internet is a great resource for learning about
shortwave. Type ‘shortwave reception’ into your favorite search
engine.
PASSPORT TO WORLD BAND RADIO Published by International Broadcasting Services (IBS); IBS North America, Box 300, Penn’s
Park PA 18943. Phone: (215) 598-9018. www.passband.com.
WORLD RADIO TV HANDBOOK Published in the USA by
Watson-Guptill Publications, 770 Broadway, 7th Floor, New York,
NY 10003-9595. www.watsonguptill.com.
12
BANDE
120 m
90 m
75 m
MEGAHERTZ (MHz)
2.300-2.495 MHz
3.20-3.40 MHz
3.90-4.05 MHz
KILOHERTZ (KHz)
2300- 2495 KHz
3200- 3400 KHz
3900- 4050 KHz
60 m
49 m
41 m
31 m
4.750-5.1 MHz
5.8-6.2 MHz
7.1-7.60 MHz
9.4-10 MHz
4750- 5100 KHz
5730- 6300 KHz
6890-7600 KHz
9250-9995 KHz
25 m
22 m
19 m
16 m
15 m
11.5-12.2 MHz
13.57-13.87 MHz
15.000-15.800 MHz
17.55-18 MHz
18.9-19.02 MHz
11500-12200 KHz
13570-13870 KHz
15005-15825 KHz
17480-17900 KHz
18900-19020 KHz
13 m
21.45-21.85 MHz
21450-21850 KHz
13
SOLARLINLK FR600 OWNER’S MANUAL
SOLARLINLK FR600 OWNER’S MANUAL
RECEPTION OF WEATHER FREQUENCIES
To hear your local weather station, pull up the antenna, turn
on the radio and select WB with the band selector. Turn up the
volume and press the pqbuttons to hear all 7 weather channels.
You’ll probably only hear one channel, but if you hear a weather
broadcast on more than one, select the strongest. The strongest
one will usually be your local weather station. Below are the
frequencies that correspond to the radio’s channels:
Channel 1 162.400 MHz
Channel 2 162.425 MHz
Channel 3 162.450 MHz
Channel 4 162.475 MHz
Channel 5 162.500 MHz
Channel 6 162.525 MHz
Channel 7 162.550 MHz
4) Press <SELECT> shortly once to enter the weather setting
mode.
5) Press <p> or <q> shortly to select the strongest weather
channel (CH1~7).
6) After setting, press <SELECT> shortly to save.
SETTING TO RECEIVE WEATHER ALERTS
Weather alerts are received in three ways:
1. Alert indicator light is on.
2. Alert forecast appears in the display.
3. Alert bell rings.
4) Press <SELECT> shortly once to enter the alert mode setting
mode.
5) Press <p> or <q> shortly to select the alert mode (SIREN &
VOICE).
SETTING ALERT MODE
1) Revolve the <Band Selecting Knob> to “OFF” position.
2) Press <MENU> button shortly to enter the setting menu.
3) Press <p> or <q> shortly to select “ALERT MODE” option.
Note: The selected alert mode will appear in the display.
To set the channel for receiving alerts, use the method below and
set it to your strongest channel.
1) Revolve the <Band Selecting Knob> to “OFF” position.
2) Press <MENU> button shortly to enter the setting menu.
3) Press <p> or <q> shortly to select “WEATHER” option.
14
6) After setting, press <SELECT> shortly to save.
15
SOLARLINLK FR600 OWNER’S MANUAL
SOLARLINLK FR600 OWNER’S MANUAL
SETTING COUNTY CODES (CLC CODES IN CANADA)
County code setting is described below.
A county code instructs the radio only to receive an ALERT when
the code is programmed in. Look up a United States county code at
the following web site:
http://www.nws.noaa.gov/nwr/indexnw.htm#sametable
4) Press <SELECT> shortly once to enter the county code setting
mode (MULTI, SINGL or ALL), which blinks in the display.
5) If you don’t know your county code, select ALL with por qand
press <SELECT> and then <MENU> TO EXIT. If you know your
code, don’t press SELECT and go to the next section.
6) Press p or q shortly to select MULTI or SINGL and press
<SELECT>.
7) Press <SELECT> shortly again to enter the code. CODE 01
XXXXXX appears in the display, with 01 ashing.
8) Press <SELECT> again and the rst digit of six starts ashing.
Press por q to set the rst digit and then press uto go to the
second digit, doing this again and again until all six digits are
entered.
9) If you’re in SINGL, press <SELECT> and then <MENU> to exit.
If in MULTI, go to the next step.
10) If you’re in MULTI and wish to enter more codes, press
<ENTER>.
11) 01 ashes. Press por q to go to another code setting number (1-23 ashes) and press <ENTER>.
12) The rst digit of six ashes, use or to set it and press to
enter the next number, doing this again and again until all six
digits are entered.
13) Press <ENTER> to choose another code number (1-23) and
when your nished press <ENTER> and then MENU to exit.
Look up a Canadian CLC code at:
http://www.msc-smc.ec.gc.ca/msb/weatheradio/transmitter/
index_e.cfm
Your radio can be set for one (SINGL) to 23 (MULTI) codes, or can
be set to receive ALL coded information sent from any transmitter, if your within range. When you set codes, it will only pick up
alerts when you’re in that county or within reception distance of
the signal.
To set codes:
1) Revolve the <Band Selecting Knob> to the “OFF”
position.
2) Press the <MENU> button shortly to enter the setting
menu.
3) Press p or qshortly to select the “COUNTY CODE” option.
RECEPTION OF EVENT CODES
Your radio can receive ‘event code’ information during weather
alerts. These codes are identied at http://www.nws.noaa.gov/os/
eas_codes.shtml.
Canadian Weather Alerts are addressed at: http://www.msc-smc.
ec.gc.ca/cd/brochures/warning_e.cfm#top.
16
17
SOLARLINLK FR600 OWNER’S MANUAL
SELECTING DISABLE/ENABLE
Alert modes can be selected to not appear by selecting DISABLE
or to appear by selecting ENABLE.
1) Revolve the <Band Selecting Knob> to “OFF” position.
2) Press <MENU> button shortly to enter the setting menu.
3) Press <p> or <q> shortly to select “DEFEAT” option.
SOLARLINLK FR600 OWNER’S MANUAL
MULTIFUNCTION KNOB
The function switch has four positions. The top position is the
OFF position, then the FLASHLIGHT, SOS and SIREN position.
All positions except OFF are labeled with an icon.
The OFF position turns the function switch off.
The FLASHLIGHT position “
“ turns the white lights on (left
side of radio) with the radio on or off.
The SOS position “
“ turns the red ashing light on. Can be
used with the radio on or off.
The SIREN position “ “ turns on the siren. Can be used with the
radio on or off.
4) Press <SELECT> shortly once to enter the DEFEAT setting
mode.
5) Press <p> or <q> shortly to select the alert message you
wish to defeat or enable.
6) Press <p> or <q> to select DISABLE or ENABLE (printed
under the message on right side of display).
7) After setting, press <SELECT> shortly to save.
ALERT
Before using the ALERT function, set the radio to the strongest
weather band station. After setting, revolve the <Band Selecting Knob> to “ALERT” position. The alert indicator light will be
on.
WARRANTY REGISTRATION
To ensure full warranty coverage or product updates, registration
of your product should be completed as soon as possible after
purchase or receipt. You may use one of the following options to
register your product:
1. By visiting our website at http://www.etoncorp.com.
2. Mail in enclosed warranty card.
3. Mail your registration card or information to following address;
include your name, full mailing address, phone number, email
address, model purchased, date purchased, retail vendor name:
Etón Corporation
1015 Corporation Way
Palo Alto, CA 94303 USA
OPEN / CLOSE THE ALERT BELL
While the alert bell is ringing, you can press the <ALERT-ON/
OFF> button (in the space above the display – right side) shortly
to shut off the ringing, then press it shortly again to resume
ringing.
18
19
SOLARLINLK FR600 OWNER’S MANUAL
SOLARLINLK FR600 OWNER’S MANUAL
LIMITED WARRANTY
Retain the warranty information from your warranty card with
your proof of purchase or the Limited Warranty information can
also be viewed at www.etoncorp.com.
SERVICE FOR YOUR PRODUCT
To obtain service for your product, we recommend rst contacting
an Etón service representative at 1-800-872-2228 US, 1-800637-1648 Canada, (650) 903-3866 US, customersvc@etoncorp.
com or your respective country distributor in Europe (see enclosed
list) for problem determination and trouble-shooting. If further
service is required, the technical staff will instruct how to proceed
based on whether the radio is still under warranty or needs nonwarranty service.
WARRANTY – If your product is still in warranty and the Etón
service representative determines warranty service is needed,
a return authorization will be issued and instructions will be
given. DO NOT ship your radio back without obtaining the return
authorization.
NON-WARRANTY – If your product is no longer under warranty
and requires service, the Etón service representative will refer you
to the nearest repair facility that will best handle the repair.
For service outside North America, please refer to the distributor
information included at time of purchase/receipt.
20
21
Etón Corporation
Corporate Headquarters
1015 Corporation Way
Palo Alto, California 94303 USA
tel +1 650-903-3866
tel +1 800-872-2228
fax +1 650-903-3867
Etón Canada
1 Yonge Street, Suite 1801
Toronto, Ontario M5E 1W7 Canada
tel +1 416-214-6885
Designed by Etón Corporation and assembled in China. I © Copyright 2009 Etón Corporation. All rights reserved.
v. 030509
•
G QUESTIONS
READ THIS FIRST
The rechargeable NiMh battery has been disconnected for
transportation purposes. To use the crank-charge system,
open the battery compartment and connect the rechargeable
battery's plug into its socket. as per the diagram below:
o
Etan Corporation
1015 Corporation Way
Palo Alto, CA 94303, USA
1.800.872.2228 U.S.
1.800.637.1648 Canada
1.650.903.3866 World-Wide
www.etoncorp.com
[email protected]
*Denotes Required Field
Etan Product Registration
Go to: www.etoncorp.com/productregistration. or mail this form today.
Cell Phone Model #*:
Serial number*:
(located in the back of the unit)
Date of purchase*:
1. Your annual income?
o Under $14,999
o $15.000 to $30.000
o $30.001 to $50.000
o
o
$50,001 to $75,000
$75,001 to $150,000
o Over $150,001
2. Your age?
o Under 16
o 16-20
o 21-25
o 26-30
o 31-35
051-55
056-60
61 and over
036-40
041-45
046-50
o
Dealers name*:
3. What are your listening interests? (Check all that apply)
City*:
o Satellite Radio
o Local AM/FM
0
Shortwave/International Broadcast
Country/Territory*:
4. Did you consider another unit before choosing this product?
o Yes (Please Specify Model):
Name*:
_
o No
Address*:
5. What is your occupation?-------
City*:
6. How did you hear about Eton?
State/Provice*:
o Newspaper ad
o Radio ad
o Through a retailer
0
0
0
_
Article
Web Search
Other
_
Postal Code/ZIP Code*:
Country/Territory*:
Telephone Number*:
Email*:
o Yes! I would like Et6n to send me information
on products including special offers, new product
launches, and product updates/information:
o
Email
0
Mail
....
elan
reJnventing radio
www.etoncorp.com
LIMITED WARRANTY
Etan Corporatiol1 (Etan) offers a limited warranty to the original customer against manufacturing
defects in material and workmanship on this product. This warranty is valid only for the original
purchaser and is not transferable.
TWO (2) YEARS PARTS AND LABOR - Europe
ONE (1) YEAR PARTS AND LABOR - North America
This limited warranty begins on the original date of purchase, and is valid only on products
purchased through an authorized Etan retailer. Warranty repairs must be performed by Etan or an
authorized service center. To receive warranty service, the original dated bill of sale, or a copy,
must be presented upon request as proof of purchase. Installation, removal or reinstallation of the
product is not included under this warranty. Shipping to Etan or the authorized service center is
the responsibility of the purchaser. For products purchased in Europe, please return to your dealer
or the distributor of your country, which is listed on a sheet included in the packaging.
returning any product for warranty service, the purchaser must contact Etan or the designated
service center for troubleshooting and service procedure instructions. Damaged parts or products
become the property of Etan. Parts and products replaced by Etan assume the remaining original
warranty, or ninety (90) days, whichever is longer.
This limited warranty covers manufacturing defects in material and workmanship encountered in
normal, noncommercial use of this product and shall not apply to the following, including, but not
limited to: damage that occurs due to applications and uses for which the product was not
intended; failures or problems that are caused by products or equipment not supplied by Etan;
accidents, misuse, abuse, neglect, misapplication, fire, water, lightning, or other acts of nature;
incorrect line voltage, fluctuations, or surges; damage caused by improper or faulty installation;
damage caused by acid leakage from improperly installed or defective batteries; product alteration
or modification; or use of unauthorized parts, supplies, accessories, or equipment that damage this
product or result in service problems.
SERVICE INFORMATION
Etan will repair or replace this product at our option and at no charge, with new or reconditioned
parts if this product is found to be defective during the limited warranty period To be eligible for
warranty coverage, the product must be returned with shipping charges prepaid no later than 15
days af ter the expiration of the warranty period to Etan or the designated service center. Prior to
To obtain service for your Etan product, first contact an Etan service representative at
1-800-872-2228 US, 1-800-637-1648 Canada or your respective country distributor in Europe
(see enclosed list) for troubleshooting. Many common questions and problems can be resolved
over the phone.
WARRANTY REGISTRATION
To ensure full warranty coverage or product updates, registration of your
product should be completed as soon as possible after purchase or receipt.
You may use one of the following options to register your product:
SERVICE FOR YOUR PRODUCT
To obtain service for your product we recommend first contacting an Et6n
service representative at: 1-800-872-2228 US, 1-800-637-1648 Canada,
(650) 903-3866 or [email protected] for problem determination
and trouble-shooting. If further service is required, the technical staff will
instruct how to proceed based on whether the radio is still under warranty or
needs non-warranty service.
1. By visiting our website at http://www.etoncorp.com.
2. Mail in enclosed warranty card.
3. Mail your registration card or information to following address; include your
name, full mailing address, phone number, email address, model purchased,
date purchased, retail vendor name:
Et6n Corporation
101 5 Corporation Way
Palo Alto, CA 94303 USA
LIMITED WARRANTY
Retain the warranty information from your warranty card with your proof of
purchase or the Limited Warranty information can also be viewed at
www.etoncorp.com.
WARRANTY - If your product is still in warranty and the Et6n service
representative determines warranty service is needed, a return authorization
will be issued and instructions will be given. DO NOT ship your radio back
without obtaining the return authorization.
NON-WARRANTY - If your product is no longer under warranty and requires
service, the Et6n service representative will refer you to the nearest repair
facility that will best handle the repair.
For service outside North America, please refer to the distributor information
included at time of purchase/receipt.