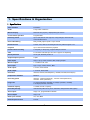
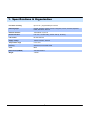
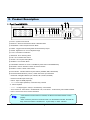
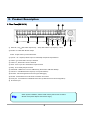
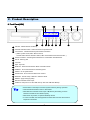
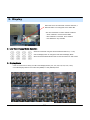
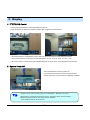
1
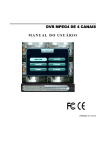
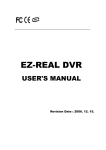
4 / 8 / 16 Channel Stand-Alone
DIGITAL VIDEO RECORDER
DR-Series DVR
USER’S MANUAL
• INDEX
• CHAPTER 1. Specifications & System Organization
1. Specifications ------------------------------------------------------------ 3
2. Product Contents List -------------------------------------------------------- 5
3. System Organization --------------------------------------------------------- 6
• CHAPTER 2. Product Description
1. Front Panel(8&16CH) -------------------------------------------------------- 7
2. Rear Panel(8&16CH) --------------------------------------------------------- 8
3. Front Panel(4CH) ----------------------------------------------------------- 9
4. Rear Panel(4CH) ---------------------------------------------------------- 10
5. Remote Controller ------------------------------------------------------- 11
• CHAPTER 3. Display
1. System Power ON ---------------------------------------------------------- 12
2. Live View Display Mode Selection --------------------------------------------- 13
3.Display
Mode
------------------------------------------------
13
4. PTZ/FOCUS Control -------------------------------------------------------- 14
5. System Power OFF --------------------------------------------------------- 14
• CHAPTER 4. Search
⊙ Go to Search Mode --------------------------------------------------------- 15
1. Search by Time ----------------------------------------------------------- 15
2. Search by Event ----------------------------------------------------------- 16
1
• INDEX
• CHAPTER 5. MENU
⊙ Go to Menu -------------------------------------------------------------- 17
⊙ Go to System Setup -------------------------------------------------------- 17
1. Display ------------------------------------------------------------------ 18
2.
Camera
----------------------------------------------------------------- 21
3.
Sound
----------------------------------------------------------------- 24
4.
System
------------------------------------------------------------------ 25
5. Event/Sensor ------------------------------------------------------------- 30
6. Disk Management ---------------------------------------------------------- 33
⊙ Go to Record Menu -------------------------------------------------------- 34
1. Recording Operations ------------------------------------------------------- 34
2. Continuous/Motion Record Schedule -------------------------------------------- 35
3. Alarm Recording Schedule --------------------------------------------------- 36
4.
Panic
Setup
---------------------------------------------------------- 37
⊙ Go to Archiving ----------------------------------------------------------- 38
1. CD-RW and USB Archiving/Back up ----------------------------------------- 38
• CHAPTER 6. CLIENT
⊙ DVR Remote Agent Installation Process --------------------------------------- 39
1.
Introduction
------------------------------------------------------------ 41
2. Configuration ------------------------------------------------------------- 42
3. Monitoring --------------------------------------------------------------- 51
4.
Search
------------------------------------------------------------------ 54
5. Web Client --------------------------------------------------------------- 61
2
1. Specifications & Organization
1. Specifications
Video standard
PAL/NTSC
Audio
2-way Audio conference
Monitor display
Real time:25 Fps (PAL), 30Fps(NTSC) per camera
Covert camera operation
Programmable
Event/Log search
Up to 1,000,000 for user login/out, config changes, remote access,
connects/disconnects
Record Scheduling
Daily, Weekly adjust specific Hr per channel
Remote Access
TCP/IP, View, Search, Recording & Control by Client Program or I.E.
Playback
Up to 16Channel simultaneous playback
Pre/Post alarm recording
5 secs(Pre), 3 mins(Post), programmable per camera
VGA
For monitors with Multi Sync Function only(1024 X 768(60Hz))
Activity detection
16x16 grid, Sensitivity levels: 10
Simplex/Duplex operation
Triplex
Video inputs
16(8) x 1Vp-p, CVBS, 75ohms, BNC, looping outputs
Monitor outputs
1 x CVBS/S-VHS, VGA
Spot output
4(2) x 1Vp-p, CVBS, 75ohms, BNC
Audio inputs
4 x line-in, RCA sockets
Audio output
1 x line-out, RCA socket
Resolution
352x240,704x240,704x480(NTSC), 352x288,704x288,704x576(PAL)
Compression standard
MPEG-4
Recording speed
352x240 : 120/100 (NTSC/PAL) , 704x240 : 60/50 (NTSC/PAL)
704x480 : 30/25 (NTSC/PAL)
Image size
3-5 Kbyte (352x240, 352x288), 5-10 Kbyte (704x240, 704x288)
6-16 Kbyte (704x480, 704x576)
Hard disk capacity
3 X HDD, No limit in capacity
Secondary Storage
USB default (USB memory stick, USB HDD, ODD),DVD/CD-RW (option)
Alarm inputs
16(8)x TTL, programmable as NC/NO
Alarm outputs
16(8) x TTL
Back-up file formats
AVI, JPG, BMP
Network Speed Control
8 levels
3
1. Specifications & Organization
Pre-alarm recording
Up to 5 sec., programmable per camera
OSD languages
English, Spanish, Chinese, Dutch, Portuguese, French, Russian,Japanese,
Polish, Romanian, German
Ethernet interface
10/100-Base-TX, RJ-45
Remote Function
Live View, Live Recording, Search, Set-up, Archiving
PTZ Control
RS-485 interface
Supply voltage
100VAC-240VAC, 60/50Hz
Temperature range
5℃ to 50℃
Housing
Steel metal, Front Plastic Mold
Color
Black
Dimensions (HxWxD)
43cmX46cmX9cm
Weight
7.3KGS
4
1. Specifications & Organization
2. Product Contents List
Please confirm that all product contents are present after opening the package.
① Basic Contents
DR8N or DR16N Unit
AC Power Cable
8 / 16 Channel Stand-Alone
DIGITAL VIDEO RECORDER
DR-Series DVR
USER’S MANUAL
Revision Date : 09.20.2006
Firmware Version : 5.7.6.100
User’s Manual
Remote Controller
Remote Agent
Installation CD
AAA Battery x 2
② Optional Contents
Internal Hard Disk Drive
Internal CD-RW Drive
5
USB Thumb Drive
1. Specifications & Organization
3. System Organization
Alarm Sensor #1-16
Camera #1-16
Remote Client PC
Relay Out
Image Printer
Alarm Input/Out
NETWORK
TCP/IP
AVI Backup
Video In
WEB Client
Video Out
Backup
Remote
Controller
VCR
VGA
Monitor
CD-RW
A/V Monitor
6
USB
2. Product Description
1. Front Panel(8&16CH)
12
4
8
5
13
15
1
11
14
2
3
9
7 10
6
① Power : System Power On/Off
② DISPLAY : Select Screen Division Mode or Rotation Mode
③ SEQUENCE : Select Sequence Screen Mode
④ PANIC : Trigger Panic Recording Mode and Panic Relay Output
⑤ ZOOM : Digital Zoom on Live or Playback Image
⑥ LOCK : Front Panel Lock Button
⑦ ARCHIVE : Go to Archiving Menu
⑧ PTZ : Go to Camera PTZ Control
⑨ SETUP : Go to System Setup Menu
⑩ SEARCH : Go to Search Menu
⑪ USB PORT: USB Port for use of a USB Memory Stick and/or USB HDD Backup.
⑫ RETURN : Cancel / Deselect / Return to Previous Screen
⑬ ENTER : Confirm / Select / Next Screen
⑭ LED Indicator : Indicates Present System Status. (POWER, REC, NETWORK)
⑮ Channel Selection Buttons (1~8/16) : Select Channel or Input Password
- Directional / Navigation Buttons (UP, DOWN, LEFT, RIGHT, ENTER)
- Remote Controller Input Sensor (IR)
- EJECT : Eject CD-ROM (Optional)
- ◀ ◀ / ◀ : Focus Adjust (Near/Far) or Reverse Play / Rewind
- Ⅱ: Pause Playback
- ▶ / ▶ ▶ : Iris Adjust (Open / Close) or Forward Play / Fast Forward
- JOG / SHUTTLE : Outer wheel – variable REW or FF; Inner wheel – scroll frame-by frame while PAUSED.
- HOLD : Hold Current JOG / SHUTTLE Position
Tip
• If the Remote Control IR Sensor is blocked, the Remote Controller will NOT function
properly.
• When a button is pressed on the Front Panel or on the Remote Controller, the DVR will
beep, unless this feature is disabled from : System Setup Æ Audio Æ Buzzer
7
2. Product Description
2. Rear Panel(8&16CH)
4
1
5
2
6
7
3
11
8
9
10
12
① Video IN / Loop : BNC Video Input Port (1 ~ 8/16), BNC Video Loop Output (1 ~ 8/16)
② Monitor out : BNC Main Monitor Output
SVHS : Output Video by Connected SVHS.
③ Spot #1 ~ #4 : 4/2(8CH) x BNC Output to Individually-Sequenced Spot Monitors
④ Audio In : 4 x RCA Audio Line Input Terminal
⑤ Audio Out : RCA Audio Line Out Terminal
⑥ Alarm : 8/16 x Input TTL Alarm/Sensor Input Terminal
⑦ Relay : 8/16 x Relay Output Terminal
⑧ USB PORT: USB Port for use of a USB Memory Stick and/or USB HDD Backup
⑨ VGA OUT : VGA Main Monitor Output (to a Computer Monitor)
⑩ RS-232C : Serial Configuration Port for Program Debugging
⑪ RS-485 : Serial Interface for PTZ device connection and control
⑫ RJ-45 jack : 10/100 Ethernet LAN/WAN connection (for Remote Access and Configuration)
⑬ AC Power Input
Tip
• When System Installation, Please Install under System Power Off Status.
• Please Use Specific Adaptor when Power Supply.
8
13
2. Product Description
3. Front Panel(4CH)
14
1
7
2
15
3
8
9
10
1
CD-RW : CD-RW Device for Backup.
2
Channel Selection Button : Select Channel or Input Password.
3
Led Indicator : Indicate Present System Status Information.
( PWR: System On/Off, REC: Record On/Off,
4
11
12
5
13
ALARM: Alarm Sensor Detection Status, NET: Client Network Connection Status, )
4
Search Controller : Searching Recorded Data or Control Menu & PTZ/FOCUS.
5
HOLD : Hold Jog dial.
6
JOG dial
7
Eject : Eject CD
8
DISPLAY : Select Screen Division Mode or Rotation Mode.
9
SEARCH : Go to Search Mode for Searching Data.
10
SETUP : Go to System Menu.
11
PTZ/FOCUS : Go to Camera PTZ/FOCUS Control.
12
RETURN : Cancel Setup or Return to Previous Mode.
13
ENTER : Apply Changing Setup.
14
Remote Controller Sensor Input.
15
USB Port: USB port for use the USB memory stick and USB HDD Backup
Tip
• Power Button is Soft Style to Prevent System Failure by Wrong Operation.
• Channel Selection Button is Prior to SCR Mode.
• When Remote Controller Sensor Input is Blocked by Something, it Cause
1 Remote Controller do NOT Work Properly.
• When Press any Button, it Operate with Beep Sound.
• In Case of CD-RW, the Real Appearance will be Differ from the above Picture
1 Depends on its Model.
9
6
2. Product Description
4. Rear Panel(4CH)
1
3
2
4
6
5
7
11
8
9
10
12
1
Video In : BNC Port for Connection of DVR & Camera. (4 Camera Connectable)
2
Loop Back : Output DVR Camera Video to Loop Back Port. (4 BNC Port)
3
Monitor Out : Output DVR Video to AV Monitor.
4
Spot Out : Output Spot-out Video to AV Monitor.
5
NTSC/PAL : Select NTSC or PAL Type.
6
VGA OUT : Output Video to a Computer Monitor by Connected VGA (Option)
7
SVHS : Output Video by Connected SVHS.
8
Audio Out : Output Audio Data.
9
Audio In : Audio Input Terminal Related with #1~4 Camera.
10
Ethernet (TCP/IP) : Port for Cross cable. (Possible to Remote Surveillance.)
11
Alarm/Relay/RS-485 : Connect Port for Sensor, Relay, & PTZ.
12
RS-232C : Connect Port for Program Debug.
13
DC Power Input : Power Supply by DC 12V Adaptor.
Tip
• When System Installation, Please Install under System Power Off Status.
• Please Use Specific Adaptor when Power Supply.
10
13
2. Product Description
5. Remote Controller
POWER
MENU: Open System Setup Menu
System
ON/OFF
Channel Selection Buttons
RETURN
ENTER: Apply / Select / Go to Next Screen
Cancel /
Deselect /
Previous Screen
Navigation Buttons : used for Playback Control,
Menu Navigation, and PTZ/Focus Control
Change
Display Mode
Search Menu
PTZ/IRIS Control
• There are buttons on the controller that are unused, and their descriptions have been omitted.
• Every Button on the controller will function the same as its corresponding button on the Front Panel.
• The controller will only work when used within line-of-sight of the IR Remote Sensor on the DVR.
※ If there are many DVRs within line-of-sight of the controller, they will all respond to the controller.
11
3. Display
1. System Power ON
• Press Power Button to Startup the DVR.
• After the Power-On Self-Test, the system will ask the user to
input a password to begin operation.
• Initial Display Mode is 8ch / 16ch Live View Mode.
• DVR will startup with Continuous Recording enabled on all
channels by default.
Initial System Startup - Login Screen
• Each channel indicates Camera Name and Recording Status.
• Present Date/Time shown on Status Bar at bottom of screen.
Camera Name
Date/Timestamp
CAMERA
2005/01/01 00:00:00
16-Channel Live View Display Mode
Tip
• Check System Status LEDs
POWER : Indicates System (On/Off)
RECORD : Indicates Recording (On/Off)
NETWORK : Indicates Network/LAN Client Connection Status
12
Recording Icon(s)
3. Display
When this unit is connected with a remote client PC, a
Network Status Icon will appear on the Status Bar.
• This icon indicates the current network conditions.
- Green: Network is connected and stable.
- Blue: Network is connected, but is unstable.
- Red: Network is very unstable.
2. Live View Display Mode Selection
• Select One Channel using the Channel Selection Buttons (1 ~ 8/16).
• Use the Display button to change the multi-channel Display Mode.
• Press Channel Selection Button twice to view the channel on Full Screen.
3. Display Mode
• User can select from a variety of multi-screen Display Modes (1ch, 4ch, 6ch, 8ch, 9ch, 13ch, 16ch)
• The initial Display Mode is set to either 8ch (DR8N) or 16ch (DR16N) mode.
13
3. Display
4. PTZ/FOCUS Control
• Control Camera Movements of PTZ (Pan/Tilt/Zoom) Devices
• Press PTZ Button to switch into PTZ mode. (Status Bar is replaced by PTZ controls)
• Each PTZ function is manipulated by using a button on the Front Panel or on the Remote Controller.
• Some of the notations on the PTZ menu are abbreviated. (P: Pan, T: Tilt, Z: Zoom, F: Focus, I: Iris)
• All of the functions on the PTZ menu are labeled along with the Front Panel / Controller button that controls it.
5. System Power Off
• Press Power Button to Power System Off.
• Input Password and Press Enter to Shutdown System.
• Do not disconnect AC power without completing Shutdown.
Tip
• System Log-On User Account Types are: ‘Administrator’, ‘Manager’, and ‘User’.
-Administrator: Access All Functions (Power On, Shutdown, Setup, Search, Backup) Manager: System Power On, Live View, Search, Playback
- User: System Power On and Live View
14
4. Search
⊙ Go to Search Mode
• Press Search Button and Log-In as
Administrator or Manager.
• Use Directional Keys to Navigate Search Menu.
• To Open/Advance Each Submenu, Press Enter.
• To Return to a Previous Menu Screen, Press Return.
(Repeatedly Pressing Return will exit out of all menus.)
1. Search by Time
- Ability to Search by a Recorded Date/Time
① Move Cursor to Select the Date on the Calendar.
② Press Enter to Open Selected Date.
③ The Recording Timeline will appear.
④ Move Cursor to the Selected Time, and Press Enter.
(The timeline is divided into 15-minute segments)
⑤ The menu will be hidden from view, and Playback will
start playing from the selected Date/Time forward.
• The Recorded Date & Time is shown on the Status Bar.
• The current Playback Mode (Play, Pause, FF, REW) is
indicated with an icon on the bottom-right of the screen.
• The Channel Selection and Display buttons will work the
same as in Live View Mode. Setup, PTZ and Archive buttons
do not work while in Playback Mode.
15
2004/01/01
00:00:00
>
4. Search
• Video Playback Controls
①
: Basic Playback Mode (Normal Speed (1x) Forward Playing)
②
: Normal Speed (1x) Backward Playing
③
: Pause Playback
④
: Fast Forward (2x ~ 64x Speed)
⑤
: Fast Rewind (2x ~ 64x Speed)
⑥
(enables the JOG wheel)
: Variable FF/REW Speed, same as # ④,⑤
※ Use JOG or Press Normal Forward/Backward Button while Paused, to advance Previous/Next frame.
2. Search by Event
- Ability to Search Video with based on Alarm/Sensor Events, Motion Recording Events and System Events
Select Start Date & End Date of the Event Search.
Alarm: Search for Alarm/Sensor Events within the selected
Date/Time Period.
Motion: Search for Motion Recording Events within
the selected period.
1
Timer: Search for Schedule Change or Recording
Setup Change Events with the selected period.
1
System: Search for Power On/Off Events or other System
Events within the selected period.
Event Search Results Display in the lower window.
Channel Selection: Choose the channels to search.
Tip
• Alarm, Motion, System Options can be selected at the same time by checking the
checkbox next to each of the desired options (V)-(ENTER).
• To Change Date/Time Selection, Press Enter and use the Directional Keys to
increase or decrease the value. When desired value is set, Press Enter.
16
5. Menu
⊙ Go to Menu
① Press the SETUP Button.
② Unit will ask for Login/Password Entry.
③ Input Password Using by Channel Selection Buttons.
④ After Login, Select a submenu and Press Enter.
-System Setup : Edit System Setup/Configuration
-Record Menu : Edit Recording Schedule/Settings
- Archiving : Setup and Initiate Archive/Backup Process
Tip
• The initial Password for the ADMIN account is 1234.
• On-Screen Display will show the Password digits as: * * * *
• To Setup or Edit User Accounts, or Login / Password info, go to:
System Setup --> System --> User Management submenu.
• You may only enter into the Setup Menu from Live View Mode.
⊙ Go to System Setup
• Choose “System Setup” to enter the Setup Menu.
17
5. Menu
1. Display
- Allows Configuration of Display Properties
• Live View Display options are edited within this submenu.
• Navigate menus by using Directional Buttons
1-1. OSD
•
ENTER
•
RETURN
Select the desired menu category and press ‘Enter’.
Return to Previous Menu (or Live View Mode)
• Status Bar : Recording Mode Icon (On/Off)
(Recording: Red, Pre-Recording : Green)
• Camera Title: Show/Hide Camera Name (On/Off)
• Event Icon: Show/Hide Event Icon (On/Off)
• Border : Show/Hide Border Grid (On/Off) in multi-channel mode
• Border Color : Select Color of Border Grid
Blue, Red, Yellow, Green, Gray)
(White,
• Menu transparency : Setup menu transparency(0~80)
• Motion Sensor : Toggle Motion Detection (Off/Active/Inactive)
• Motion Color : Set color of Motion Flags (Red/Blue/Yellow/Green)
• Motion transparency : Setup motion transparency(0~3)
1-2. MONITOR
• Sequence Dwell : Setup Channel Sequence Cycle Time (1 ~ 60 sec)
• Spot-Out Dwell : Setup Spot-Out Sequence Cycle Time (1 ~ 60 sec)
• De-Interlace Mode : Removes Interlacing in High Res & Low Frame
※ This Applies only in 4CIF Resolution (704 x 480)
• Alarm Pop-Up Mode: Alarm Channel will go Full Screen on activation
• Alarm Pop-Up Dwell: Alarm Pop-up Time (1 ~ 60 sec)
• Motion pop-up mode : When motion detected, motion detected
channel pop-up.
• Motion pop-up dwell : Motion pop-up time(1~60sec.)
• Display mode : Select display mode. (VGA/AV)
Tip
18
• When have finished changing settings,
Press
to confirm the changes.
5. Menu
1-3. SEQUENCE
• Activation : Activation On/Off
• List : Sequence Title
• Created By: User who programmed the sequence
• Choose Add to Add a New Sequence
• Input the Sequence Title
• Choose Activation (On/Off)
• Save and Exit
• To input the Sequence Title, you can open the
Virtual Keyboard by pressing the Enter button.
• You can navigate the Virtual Keyboard using the
Directional buttons, and type with the Enter button
19
5. Menu
* Setup sequence
① Press enter then red border line
disappear. Setup mode activated.
④ Setup next mode as before.
Total 16 mode can be selected.
② Select display mode among 16 mode. ③ Display mode selected, press
1set can be made by 16 mode.
channel selection button as you want.
Input all channel NO.
⑤ When finish setup, press return.
(Save & Exit / Exit / Cancel)
⑥ By SEQ button of front panel,
can see setup mode.
1-4. SPOT OUT
• Channel : Select spot out channel(1~4).
• Select channel from the list by V check. (#1~#16)
• User can see the selected channel on spot out channel.
20
5. Menu
2. Camera
- Allows Setup of Camera Parameters and Options
2-1. Camera Title
• Covert : Set Channel as Covert Channel (On/Off)
(When a channel is set to Covert, it will be hidden from Live View and Playback, but video will still be recorded.)
• Title : Setup Camera Name using the Virtual Keyboard
• Use the directional buttons to
move around the keyboard.
• Use the ENTER button to click
the keyboard.
2-2. Color Setup
• Adjust the Brightness, Contrast, Color, and Tint of each channel.
• All values range from 0 ~100 (all values are 50 by default)
• You need to set these values on each channel individually.
21
5. Menu
Tip
※ How to use the Virtual Keyboard
• Use the directional buttons to select keys on the Virtual Keyboard
• Press ENTER to press a key on the keyboard
• Press the
button to shift for CAPS and punctuation.
2-3. PTZ Setup
• Address : Set the PTZ Camera Address (0 ~ 255)
• PTZ Protocol : Select Type of PTZ Camera
• Baud Rate : Setup PTZ Communication Speed
(2400, 4800, 9600,19200, 38400 bps)
• Click the
button to setup the PTZ details.
※ Supported PTZ Protocols : GANZ-PT, Samsung (MRX-1000), Samsung (SCC641),Honeywell (SD1)
Honeywell (GMC), Lilin (Fastdome), Fastrax (Ⅱ), GC (655N),
D-MAX, Sunin DSC-230, Scan Dome-Ⅱ, Vicon, Philips 8560-700
Sensormatic, Panasonic (WV-CS850), Panasonic (WV-CSR604), VRX-2101
Kalatel (KTD-312), PELCO-D, PELCO-P, Dynacolor (D7722)
22
5. Menu
2-4. Motion Detection
• Adjust the Motion Sensitivity Level (1 ~10)
• Move Cursor over grid using the Directional Keys.
• Click AREA SETUP to define motion-sensitive area
• Press ENTER, and then use the Directional Keys to
select an area of targets on the grid.
• Area is selected on a 16 x 16 target grid. (The entire
viewing area is selected on all channels by default)
• Press ENTER again to mark the selected area.
area that is already marked will be unmarked.
• Press the RETURN key to step back out of AREA SETUP.
• Select All : Select Entire Area for Motion Sensitivity
• Deselect All : De-Select Entire Area
• Cancel : Cancel Changes to Setup & Exit
• Save & Exit : Save the Changes & Exit
23
(An
5. Menu
3. Sound
3-1. Audio
- Allows for configuration of Audio parameters and options
• Live Audio : Audio Output to Audio Out Terminal (ON/OFF)
(Live Audio Output is from Audio In Terminal)
• Audio Monitoring Channel: Select Channel for Audio Output.
1
(1 ~ 4 Channels of Audio Input)
• Network Audio TX: Allow transmission of Live Audio over Network.
• Network Audio RX: Allow reception of Audio talkback from PC.
3-2. Buzzer
- System Buzzer Setup
• Keypad : Buzzer will chirp when button is pressed on Front Panel
• Remote : Buzzer will chirp when button is pressed on Controller
24
5. Menu
4. System
- Basic System Environment Setup
4-1. Date/Time
※ You should set the proper Time Zone for your geographic location before adjusting the other settings.
• Date / Time: Set the Present Date and Time
• Date Format : Select the style of Date Display. (Ex: YYYY/MM/DD or MM/DD/YYYY)
• Time Format : Setup Time Display as either 12 Hour or 24 Hour Base.
• Network Time Server: Setup an NTP Time Server, to synchronize Date/Time with other devices on the Network.
• D.S.T: Daylight Savings Time Function (On/Off)
• Time Zone Setup : Choose the Time Zone (relative to GMT standard).
• If the desired Date/Time setting is set to an earlier Date/Time than
present, the system will prompt the user to delete the past Recording
Data from the HDD.
(All data recorded before the desired Date/Time will be preserved.)
[ OK -> Delete Past Data and Change the Date/Time. ]
[ CANCEL -> No Changes to Date/Time setting. ]
Tip
※ How to perform Date/Time Setup via Network (NTP) Time Server:
1. Set the Time Zone for your geographic location.
2. Setup the Network Time server information and press the “Sync” button.
3. If correct time is not retrieved automatically, set the Date/Time manually.
4. If the correct Date/Time is not set, you may experience problems when using Date/Time Search.
25
5. Menu
4-2. Network
• IP Address : Input the unit IP Address
• Gateway : Input the IP Address of Internet-Connected Router
• Subnet Mask : Input the Subnet Mask IP
• DNS Server: Input the 1st and 2nd DNS Server IP Addresses
• DDNS Server: Input the DDNS Server IP Address
• Net Client Port : Input the Client Service Port # (Default: 6100)
• Web Server Port : Input the Web Server Port # (Default: 80)
• Max TX Speed : Setup Max Network Tx Speed (56k ~ 8Mbps)
※ After making changes to the Network Setup, click APPLY.
(The system will prompt you to reboot in order to save changes.)
• DHCP (Dynamic Host Configuration Protocol) : IP Address is set on the DVR automatically by DHCP server/router.
1. Set DHCP setting (On/Off)
2. DHCP Off : User will Input IP Address manually.
3. DHCP On : IP Address will be assigned automatically. After DHCP is set to On, the system will reboot.
4. After the system has restarted, you can view the new IP Address from this menu or in ‘System Information’.
• DDNS (Dynamic DNS): This is used with a Dynamic IP Address, which may be changed by the ISP at any time.
※ With DDNS, there is no need to enter the IP Address on every connection. A name server address is used instead.
※ You will need to establish an account with a 3rd Party DDNS provider, who will issue the name server address.
1. Set DHCP to On or manually input the unit IP Address.
2. Set DDNS to On, set the DDNS properties (username, password, and domain name) and reboot the system.
3. To access the DVR using the name server address, the format for the address is:
http://[username].[domain]
(Example: http://mydvr.dyndns.org) (username: mydvr, domain: dyndns.org)
4. You will need to input all of the correct DDNS information into the Network Setup in order for the DVR to be able to update
its new IP Address to the DDNS server whenever a change occurs.
5. If you are using a router in your network configuration, it is the router which must be setup for DDNS, not the DVR.
Tip
※ About Network Configuration
1. If your DVR is connected to the Internet via a Router, you must use Port Forwarding in order for
users outside of your Local Area Network (LAN) to access the DVR remotely over the Internet.
2. Forward the Web and Client Service Port #’s to the Private (LAN) IP Address of the DVR.
3. The Router and DVR must have IP Addresses that are located on the same network subnet.
Example: Router IP: 192.168.0.1 DVR IP: 192.168.0.x (x is any number from 2 ~ 254)
4. Users connect to the DVR over the Internet using the Router’s Public (WAN) IP Address.
5. If the Port Forwarding settings are correct in the Router, it will forward all data to/from the DVR.
6. If the DVR is the only device using your Internet Connection, it will be assigned the Public (WAN) IP
Address that is given to you by your Internet Service Provider (ISP).
26
5. Menu
4-3. Mail
These settings allow the DVR to send outgoing E-Mail Notifications to the list of recipients listed within the DVR.
• Server: Setup the outgoing Mail Server Address
• Input the server address using the Virtual Keyboard.
• Port: Mail Server Port Number (default is Port 25)
• Security: For a Mail Server the requires outgoing SMTP Authorization (On/Off)
• User & Password: Input the username and password (if required for outgoing SMTP Authorization).
27
5. Menu
4-4. User Management
DVR User Account Setup
• There are 3 groups of User Account types:
- Administrator, Manager, and User
• A total of 7 users can be established for each account type.
• Input the new User ID,
• Input a Password, using Channel Selection Buttons (0 ~ 9).
• Choose the Group which the user belongs to.
• Input the E-mail Address of the new user.
• Turn E-mail Notification (On/Off)
• Input User ID and E-mail Address using the Virtual Keyboard.
28
5. Menu
4-5. System Information
• S/W Version: DVR Firmware Version
• H/W Version : DVR Hardware Version
• Video Signal Type: NTSC or PAL
• Disk Capacity: used HDD capacity / total HDD capacity
• IP Address: The current IP Address of the DVR
• MAC Address: Fixed Hardware (MAC) Address of the DVR
• System name : Input system name by virtual keyboard.
• F/W update
- User can do F/W update by USB device.
- Press ‘PRESS’
- Select F/W from the list.
- Press ‘START’
• Factory default
- Click the button marked “Press” to Set DVR to the original
Factory Default Settings.
-The system will show a Warning Message. Press OK to
continue, or CANCEL to keep the current settings.
- If you set DVR to Factory Default, all settings are initialized,
but Recorded Video Data will not be erased.
• System data
- User can save/load settings.
- Press ‘SAVE’ to save current setup without message.
- Press ‘LOAD’ to load saved setup from USB device without message.
29
5. Menu
4-6. Control device
• System ID : Select system ID. (1~254)
• Protocol : Select protocol.
• Baud rate : Setup baud rate.
5. Event/Sensor
5-1. HDD Event
• Drive: All HDDs are listed by IDE Channel Number.
• Smart Alarm: Set Temperature Alarm (On/Off).
• Check Interval: Time between Smart Alarm checks.
30
5. Menu
5-2. Alarm Input
• Operation: Set Alarm/Sensor Connection Status
(Enable/Disable)
• Type : Set Alarm/Sensor as Normally Open or Normally Closed.
(N/O)
(N/C)
5-3. Alarm Out
※ Configure the DVR Alarm Relay Output for each channel to trigger
relay output on alarm activations, video loss, or motion.
• Channel : Select Channel of Alarm Output
• Mode: Setup Relay in Latched or Transparent Mode.
• Type: Setup Relay Type as Normally Open or Normally Closed.
• Operation: Setup the Relay Connection with Alarm Sensor.
• Duration: Set the Amount of Time for Alarm Duration
(5 seconds ~ 5 minutes, or until manually cancelled from DVR)
• HDD Event: Set Alarm (On/Off) when HDD error occurs.
Tip
• Alarm Output Mode (Latched / Transparent)
Latched – When Alarm/Sensor is Activated, the Relay will Output for the Alarm Duration.
Transparent – Relay Output is temporary; only active while Alarm/Sensor is activated.
31
5. Menu
5-4. Buzzer Out
• Operation: Buzzer Out (Enable/Disable).
• Mode: Setup in Latched/Transparent Mode (same as Alarm Out).
• HDD Event: Turn Buzzer (On/Off) when HDD Event occurs.
• Duration: Buzzer time (5 sec ~ 5 min, or manual reset on DVR)
• Setup each channel to trigger Buzzer on Alarm Activation, Video Loss,
and/or Motion Event.
32
5. Menu
5-5. E-Mail Notification
• E-Mail Notification will send an e-mail to a list of recipients, based on
Alarm, Video Loss, Motion, or HDD Events.
• Check or uncheck each type of condition that you want to trigger an EMail Notification, on each channel.
• The list of recipients is configured within the System Æ User
Management menu.
• Make sure that all of the outgoing mail server settings are correct,
within the System Æ Mail menu, in order to ensure delivery.
6. Disk Management
• Disk Overwrite : (ON/OFF) Overwrite Permission (when HDD is full)
ON: Overwrite HDD, starting with the oldest data first (also known as FIFO – first in, first out)
OFF: When HDD is full, Recording will be halted and the system buzzer will activate
• Overwrite : Select Overwrite Permission when Hard Disk Full.
O N: Overwrite Hard Disk from Oldest Data.
OFF: When Hard Disk Full, Stop Recording and Buzzer Activated.
• Format : (Click START to Format HDD). All Recorded Data will be Deleted from the HDD.
[NOTE: Any newly-installed HDDs will be detected during the Power-On Self Test (POST), and the system will prompt
you to Format the new HDD(s) before entering into the DVR system GUI. You can not Format new HDDs from the Disk
Management menu, until they have been formatted first during the startup sequence.]
33
5. Menu
⊙ Go to Record Menu
• Press the Setup button and login as an ADMINISTRATOR.
• Choose “Record Menu”
1. Recording Operations
• Schedule Mode: Choose ‘DAILY’ or ‘WEEKLY’.
- Daily : The recording schedule that you configure will be used for every
day of the week.
- Weekly: You must configure the recording schedule for each day of the
week, individually.
• Pre-Event Recording Time : (1 ~ 5 seconds) Data will be recorded to the
HDD from 1 to 5 seconds before an event is detected.
• Post-Event Recording Time : (5 sec ~ 3 min) Data will be recorded to the
HDD from 5 seconds to 3 minutes after an event has ended.
34
5. Menu
2. Continuous / Motion Record Schedule
2-1. Parameter
• Select a block of time from the 0-24hr Timeline (you may select multiple blocks).
• Press ENTER again to set up the Resolution, FPS, Quality, and Audio on each channel.
2-2. Schedule
• Continuous Recording Icon
• Select an area (channel / time of day) on the schedule grid
and Press Enter to adjust its properties.
• Motion Recording Icon
• Set area as ‘Timer’ (Continuous), ‘Motion’, or None.
• If ‘WEEKLY’ recording is enabled, you must set up each day of the week individually.
• If ‘DAILY’ recording is enabled, you will set up one schedule for every day of the week.
35
5. Menu
3. Alarm Recording Schedule
3-1. Parameter
• Select a block of time from the 0-24hr Timeline (you may select multiple blocks).
• Press ENTER again to set up the Resolution, FPS, Quality, and Audio on each channel.
3-2. Schedule
• Alarm Recording Icon
• Select an area (channel / time of day) on the schedule.
• Press Enter to Select (or Deselect) Alarm Recording.
• If ‘WEEKLY’ recording is enabled, you must set up each day of the week individually.
• If ‘DAILY’ recording is enabled, you will set up one schedule for every day of the week.
36
5. Menu
4. Panic Setup
• To setup each channel, press enter.
• Setup each channel. (Size, FPS, Quality, Audio)
• By panic button of front panel, can record urgently as setup.
37
5. Menu
⊙ Go to Archiving
1. CD-R/W and USB Archiving / Backup
① Device : Choose from available media. (CD-R/W and/or USB Memory Stick are detected automatically.)
② From : Select the Start Date/Time of the video recording that you wish to archive.
③ To : Select the End Date/Time of the video recording that you wish to archive.
④ Channel & Video/Audio Selection : Select (check) the Channel, Video, & Audio to include in the archive.
⑤ Title : Rename the Title of the Archive (uses the Virtual Keyboard)
⑥ Event : Select this option to include the Event Log file in the archive.
⑦ Start : Click START button to begin the Archiving process.
• A confirmation dialog will appear, containing Channels, the Date/Timestamp, and the Data Size of each file.
• Click OK to proceed with the Archiving process.
Tip
• Internal CD-R/W is available as an option on all DR8N / DR16N models.
• A compatible 128MB USB Memory Stick is included with every DR-Series DVR unit.
• Please contact CBC Tech Support to upgrade your DR-Series unit to include an internal CD-R/W.
38
6. Client
• Minimum and Recommended System Requirements for a Client PC
① Main Board (CPU): Pentium III @ 500 MHz (minimum), Pentium 4 @ 1GHz or above (recommended)
② OS: Windows 2000 Pro (minimum), Windows XP Pro (recommended), DirectX version 9.0c (or higher)
③ Memory (System RAM): at least 256MB, 1GB (recommended)
④ Video Card: DirectX-supported video card with at least 32MB RAM (minimum), 64MB (recommended)
※ IMM4 Codec Installed (in order to playback archived AVI files within Windows Media Player)
[The codec installation files are automatically copied onto all Archived media from the DVR]
• DVR Remote Agent Installation Process
① Open CD-ROM Drive and Run DvrRemoteAgentSetup.exe from the DR-Series DVR Installation CD.
② Close All Running Software and Press Next to Move Next Step.
39
6. Client
③ Choose the Folder where the Remote Agent software will be installed.
④ The Remote Agent software files will be copied onto your PC, with a status bar showing the progress.
40
6. Client
1. Introduction
③
①
④
⑤
⑥
⑦
⑧
⑨
⑩
⑪
⑫
⑭
⑬
① Main Display : Shows single or multi-channel view of cameras connected to the DVR.
② Camera Selection Buttons : Indicates Camera #; click button to display a selected camera.
③ Minimize / Exit : Minimize DVR Client Window (to taskbar) or Exit Remote Agent.
④ Date/Time Display : Shows current DVR System Date/Time
⑤ SEARCH : Enter Search Mode to Search and Playback Recorded Video
SETUP : Set up properties of Remote Agent, including the list of DVR units to connect to.
CONFIG : Allows Remote Configuration of a connected DVR unit.
⑥ DVR Selection : Choose a DVR to connect to with the Remote Agent.
⑦ Connect : Connect to selected DVR.
Disconnect : Disconnect from selected DVR.
⑧ Screen Division Selection : Change Screen Division Mode (1/4/9/16ch view, sequence, full screen)
⑨ Begin Saving to AVI file : Begin Saving Live or Playback Images to the local PC in AVI format.
⑩ Event Log Viewer : Display Current Event Log & Jump to Event for Playback.
⑪ PTZ Control Button : Control Camera Pan, Tilt, Zoom, & Focus (for supported PTZ devices only)
⑫ Audio Button and Alarm : Control Bi-Directional Audio, Mute, and Toggle Alarm (On/Off).
⑬ Quit : Exit Remote Agent.
⑭ Connection Status: Indicates the Network Status of a connected DVR.
41
6. Client
2. Configuration
2-1. DVR List
①
②
③
④
⑤
① List of DVRs and DVR Groups
② DVR Information : Enter DVR Name, IP, Port, User ID, Password
③ Camera Position : Set camera positions for multi-channel viewing
④ Miscellaneous Options
⑤ Add, Modify or Delete DVR or DVR Group
42
6. Client
2-2. Add Group
①
① At ‘site’ of left upper side, right click the “Add Group”.
②
② Input the Group name.
43
6. Client
③
③ Input DVR information.(name, IP, port, ID, PW)
④
④ Set camera position, check option and press ‘ADD’
44
6. Client
⑤
⑤ New DVR list is shown on the left upper side.
45
6. Client
2-3. Configuration
① Video OSD : Select screen information. (title, name, date, time)
② Video output : Select video output method.
- Overlay Mixer : Output without passing through CPU.
- Video Renderer : Output through CPU.
- GDI : When you cannot see video by upper 2 way, use this way.
③ Video mode
- Screen switching interval : During the monitoring, select screen rotation interval time(2~300sec.)
- Alarm pop-up : Pop-up time of alarm happened channel on (2~60sec.) /off.
④ Saving Directory : Designate remote PC backup image saving folder.
46
6. Client
Press
button, select DVR name, and press Select.
Password Input Window Open, then input password.
1. Record
• Alarm Recording Schedule
- Click the “Set” Button for Alarm Recording.
- Setup size, rec. rate, quality, audio.
• Record Operations
• Continuous/Motion record Schedule
- Schedule Mode: Weekly or Daily.
(When weekly mode, setup each day.)
- Pre Event Recording Time: When event happen, record
image including setting time before event happened.
(0 ~ 5 Second)
- Post Event Recording Time: When event happen, record
image including setting time after event happened.
(5 ~ 180Second)
47
- Click the “Set” Button for Continuous/Motion
record Schedule.
- Setup size, rec. rate, quality, audio.
6. Client
2. Camera
• Status/Title Setup
- Setup for Each Camera
(Covert function On/Off, Camera Name).
• Color Setup
- Setup Color for Each Screen.
• Covert/PTZ Setup
- Setup for Each Camera PTZ Protocol, Baud rate.
• Motion Area
- Click the “Properties” button.
- Click the “Camera” Button.
- Setup about PTZ camera.
- Select area by mouse drag, and Choose menu
(Select/Deselect/Cancel).
3. Sound
• Live Audio Setup
- Live Audio : On/Off.
- Audio monitoring channel : Select channel.
- Network Audio TX : Choose the Audio transmission.
- Network Audio RX : Choose the Audio receive.
48
6. Client
2-4. Event/sensor
• Alarm Input
- Setup for Each Channel Alarm Connection & Type.
• Alarm Out
- Setup each channel when alarm, videoloss, motion are happened.
- Disk Event: Alarm On/Off when HDD has the problem.
- Operation: Setup Relay Connect with Alarm Sensor.
- Mode: Setup Reacted Relay as Latched/Transparent Mode.
- Type: Setup Relay Type N/Open or N/Close.
- Duration: Setup Reacted Relay Time. (5sec~5min or Until key-in)
• Buzzer out
- Setup each channel when alarm, videoloss, motion are happened.
- Buzzer: On/Off
- Duration: Buzzer time(5sec~5min or Until key-in).
- Disk Event: Buzzer On/Off when HDD event happen.
- Keypad : Setup Key Input Sound.
- Remocon: Setup remocon Input Sound.
• HDD Event
- Smart Alarm: On/Off.
- Temperature: HDD Temperature.
- Polling Time: HDD Checking Time.
• E-mail Notification
- If happen the alarm, videoloss, motion and HDD event, setup the notification at the E-mail.
- Disk Event: E-mail notification On/Off when HDD event is happened.
- Notification: On/Off.
49
6. Client
2-5. System
• System Info
- Possible to Watch DVR System Status.
• SMTP
- Setup the mail server and user’s E-mail.
• Users
- Setup the Users.
- Click the “Add” or “Modify” button.
• Disk Overwrite
- Setup DVR HDD Overwrite On/Off.
• Network Speed
50
6. Client
3. Monitoring
3-1. Select Remote DVR to Connect
• Select I/D to Connect Server.
• I/D can be Add, Change, and Delete at Setup.
3-2. Screen Division Selection
• 1*1 View : Showing One (1) Video which User Selected.
(Selection Video by Camera Selection Button)
• 4*4 View : 4 Screen Division Mode.
• 9*9 View : 9 Screen Division Mode.
• 16*16 View : 16 Screen Division Mode.(Only in 16ch product)
• Auto switch : Screen Mode Showing One by One (Same at division mode)
• Manual switch : Screen Mode Showing One by One by click manually.
• Full Screen View : Present Video Move to Full Screen Mode.
Mouse Double Click when Return Previous.
*Mouse Double Click Make the Same Function as Full Screen.
Tip
※ Multi DVR Client
• 4EA DVRs can be control the live view, search the data, backup data and
setup about each channel at the same time.
51
6. Client
• 9-Channel View Mode
• 16-Channel View Mode
3-3. PTZ Control
• Press the PTZ Control Button
• PTZ Controller : Use the directional buttons to
control camera Pan, Tilt, and Zoom functions
• FOCUS/ZOOM : Select Focus or Zoom Control
• + / - Use buttons to adjust Focus / Zoom
• Swing Menu – Choose and Run a PTZ Tour
• Preset Menu – Setup and Run PTZ Presets
• Speed – Adjust PTZ Speed
52
6. Client
3-4. AVI Video Conversion
• Click AVI Conversion Button to Begin AVI File Conversion.
• During AVI Conversion, a message is displayed.
• Click ‘Stop” to Stop Conversion and Save AVI File.
• The path and filename of your saved AVI file is displayed.
• AVI files are played within Windows Media Player or the
‘Backup Player’ program that installed with ‘Remote Agent’.
• In order to play the AVI files within Windows Media Player, the
user must install the IMM4 Codec.
3-5. Event Log Viewer
① Indicates the order in which events occurred.
② Indicates the DVR # where an event occurred.
③ Indicates the Camera # on which an event occurred.
④ Indicates the Date/Time of the event.
⑤ Description of the event.
⑥ Select event and click to go to Date/Time on timeline.
⑦ Return to the Search / Timeline window.
① ②
③
④
⑤
⑥
⑦
53
6. Client
4. Search
4-1. Introduction
①
③
④
⑤
⑥
⑦
⑧
②
① Search Screen : View Playback of Selected Video
② Search Bar/Timeline : Search Recorded Video on Timeline (also indicates Recording Mode)
③ LIVE : Return to Live View Mode
SETUP : Edit Options
④ Screen Division Selection : Change Channel Display Mode (1/4/9/16-channel views)
⑤ Searching Options : Options to Search and Backup Recorded Video
⑥ Camera Selection Button : Select a channel to view in Full Screen Mode
⑦ Quick Search : Choose Date/Time to Search
⑧ Search Controller : Control Video Playback (Forward, Stop, Reverse and Speed Control)
54
6. Client
4-2. Search Method
①
⑥
⑤
②
④
③
⑦
① Indicates the Time of Day (0 ~ 24 hours) on Search Timeline.
② Indicates Recording Mode (Blue : No Recording, Red: Recorded Images Present)
③ Search Bar : Drag bar with the mouse to search through recorded video on the timeline.
④ Indicates each individual channel on the timeline.
⑤ If there are 5 or more channels, you may scroll through the channels using the arrow buttons.
⑥ Adjust the volume of the audio playback (if audio is present in the recording).
⑦ Refresh Recording Information Window
Select Date
Search Bar will Move to
Selected Date/Time
Playback Control Buttons
(Forward Play, Stop, Reverse Play)
Playback Speed Control
(1x ~ 64x, Forward or Backward)
Exit Remote Agent
55
6. Client
4-3. SEARCH Options
③Save Image
①Archive
⑤Log Viewer
②Backup Play
⑥Event Viewer
④Print
① Archive – Backup Image from Server to Remote PC.
• Time Range
- Enter the Starting and Ending Date/Time.
• Channel : Check each channel to include in the Archive.
• Include Audio : (check/uncheck) to include Audio in Archive.
• Select All / Deselect All : Select/Deselect All Channels.
• Press OK to begin the Archiving process. As each AVI file is written to the PC, the system will display status.
• When the Archiving process has completed, the newly-created AVI files will be available for viewing.
56
6. Client
② Backup Play (DVR Player) – Transfer to DVR Player
①
②
③
④
⑤
① Video Display (Single-Channel Mode available only)
② Open Backup File for Viewing
③ Indicates Playback Channel
④ Indicates Present Date/Time and Searchable Dates/Times
⑤ Playback Control (Forward and Reverse Play, FF, REW, Frame Forward/Reverse, Stop, Pause, Play Speed)
Tip
• Backup Player can be run independently of the Remote Agent software.
57
6. Client
③ Save Image – Capture Image and Save to Local PC
• Click ‘Save Image’ Icon during Video Playback.
• Chose Filename and File Type (JPG, BMP), and Save Location, and click ‘Save’.
④ Print Image – Present Image Capture and Print Out Image
• Click ‘Print Image’ during Video Playback.
• After Selecting Printer, Click ‘OK’ to start Image Printing
58
6. Client
⑤ Log Viewer – Find Video from the DVR Event Log.
②
①
③
④
⑤
⑥
⑦
⑧
⑨
⑩
⑪
① Select Starting Date/Time and Ending Date/Time from which to search for Event Log events.
- Press Search Button to Search and View Search Results.
② Choose the DVR to Search.
③ Indicates the order in which events in the Event Log occurred.
④ Indicates the Camera # on which the event occurred.
⑤ Indicates the Date/Time when the event occurred.
⑥ Description of the event.
⑦ Move to Previous Page of Search results.
⑧ Move to Next Page of Search results.
⑨ Select a page of Search results to view.
⑩ Go to Selected Event on the Search Timeline.
⑪ Return to Search Window.
59
6. Client
⑥ Event Viewer - Showing Present Event in Server & Find Image
① Indicates the order in which events occurred.
② Indicates the DVR # on which an event occurred.
③ Indicates the Camera # on which an event occurred.
④ The Date/Time during which the event occurred.
⑤ Description of event.
⑥ Go to Selected Event on the Search Timeline.
⑦ Return to Search Window.
① ②
③
④
⑤
⑥
60
6. Client
5. Web Client
• WEB Client Connection
① Input the IP Address or URL of the DVR in the Internet Explorer Address Bar.
② A dialog will appear to confirm download of an ActiveX control. Please click ‘Confirm’ or ‘Continue’.
③ Web Client Window will appear in Internet Explorer.
④ All functions are the same as within the Remote Agent software.
61
6. Client
62