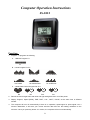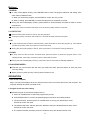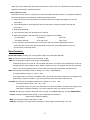
1
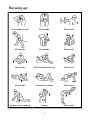
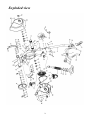
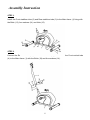
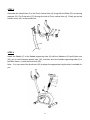
MAGNETIC BIKE
Model no. A790P
OWNER’S MANUAL
Important Safety Notice
Note the following precaution before assembling and operating the machine.
1. Assemble the machine exactly as the descriptions in the instruction manual.
2. Check all the bolts, nuts and other connections before using the machine for the first
time to ensure the machine is in the safe condition.
3. Set up the machine in a dry level place and keep it away from moisture and water.
4. Place a suitable base (e.g. rubber mat, wooden board etc.) beneath the machine in the
area of assembly to avoid dirt.
5. Before beginning the training, remove all objects within a radius of 2 meters from the
machine.
6. Do not use aggressive cleaning articles to clean the machine. Only use the supplied
tools or suitable tools of your own to assemble the machine or repair any parts of
machine. Remove drops of sweat from the machine immediately after finishing training.
7. Your health can be affected by incorrect or excessive training. Consult a doctor before
beginning the training program. He can define the maximum setting (Pulse, Watts,
Duration of training etc) to which you may train yourself and can get precise information
during training. This machine is not suitable for therapeutic purpose.
8. Only do training on the machine when it is in correct working way. Use only original
spare parts for any necessary repairs.
9. This machine can be used for only one person’s training at a time.
10. Wear training clothes and shoes that are suitable for fitness training with the machine.
Your training shoes should be appropriate for the trainer.
11 If you have a feeling of dizziness, sickness or other abnormal symptoms, please stop
training and consult a doctor immediately.
12. People such as children and handicapped persons should only use the machine in the
presence of another person who can give aid and advice.
13. The power of the machine increases with increasing the speed, and the reverse. The
machine is equipped with adjustable knob that can adjust the resistance.
14. Maximum user’s weight is 100KGS.
1
Warming up:
15 seconds for each
20 seconds
20 seconds
25 seconds
20 seconds
20 seconds
30 seconds
25 seconds for each lag
30 seconds
20 seconds
5 seconds x 3 times
20 seconds
20 seconds for each leg
5 times
15 seconds
2
Exploded view
3
Part List
No.
Description
Qty
No.
1
Main frame
1
37L/R
2
Front stabilizer tube
1
3
Rear stabilizer tube
4
Description
Qty
Chain cover
2
38
Screw
10
1
39
Nut
1
Front vertical tube
1
40
Washer
1
5
Handle bar
1
41
Nut
1
6
Saddle supporting tube
1
42
Ball bracket
2
7
Saddle
1
43
Collar housing
2
8
Bolt combination
2
44
Screw
2
9
Computer
1
45
Bushing
2
2
46
Nut
1
10L/R Pedal(L/R)
11
End cap
2
47
Nut
1
12
End cap
2
48
Washer
1
13
Bolt
4
49
Small wheel
1
14
Arc washer
8
50
Belt
1
15
Nut
4
51
Flywheel
1
16
Sensor wire
1
52
Flywheel axle
1
17
Nut
1
53
Bearing
2
18
Bolt
4
54
Idler wheel
1
19
Spacer
1
55
Bolt
1
20
Bearing
2
56
Idler tube
1
21
Extended wire
1
57
Spring
1
22
Spring washer
3
58
Nut
1
23
Bolt
2
59
Bolt
1
24
Handle cover
1
60
Bolt
2
25
Round cap
2
61
Washer
2
26
Foam grip
2
62
Spring washer
2
27
Pulse wire
1
63
Spring washer
2
28
Knob ole
1
64
Magnetic bracket axle
1
29
Bushing
1
65
Magnetic bracket
1
30
Extension plastic tube
1
66
Magnetic
8
31
Washer
3
67
Spring
1
32
Nylon nut
5
68
Nut
2
33
Spacer
2
69
Adapter
1
34
Screw
2
70
Screw
4
35
Crank
1
71
Power company
1
36
Small plastic cover
2
72
Spacer
1
4
Assembly Instruction
STEP 1.
Install the Front stabilizer tube (2) and Rear stabilizer tube (3) to the Main frame (1) fixing with
the Bolts (13), Arc washers (14) and Nuts (15).
STEP 2.
Connect the Extended wire (21) with the Sensor wire (16), and then fix the Front vertical tube
(4) to the Main frame (1) with the Bolts (18) and Arc washers (14).
5
STEP 3.
Assemble the Handle bar (5) to the Front vertical tube (4) fixing with the Bolts (23) and spring
washers (22). Put Pulse wire (27) through the hole of Front vertical tube (4). Finally put on the
Handle cover (24) to the handle bar.
.
STEP 4.
Install the Saddle (7) to the Saddle supporting tube (6) with the Washers (31) and Nylon nuts
(32), put on the Extension plastic tube (30), and then stick the Saddle supporting tube (6) to
the Main frame (1) with the Knob bolt (28).
Note:You can control the Knob bolt (28) to adjust the appropriate height which is suitable for
you.
6
STEP 5.
Assemble the Pedals (10L, 10R) to the Crank (35L/R).
Note: The right pedal should be fixed by clockwise. However, the left pedal should be fixed by
counter-clockwise.
STEP 6.
Pull out the extended wire (21) to connect with the wire on the computer (9). Finally fix the
computer (9) onto the top of the Front vertical tube (4) with screws (34), washers (33).
7
Computer Operation Instructions
JS-1012
Function:
1. Program: 11 programs as following
A. 1 Manual Program P1
P1
B. 6 Auto Program P2~P7
R2: ROLLING
R3: VALLEY
R4: FATBURN
R5: RAMP
R6: MOUNTAIN
R7: INTERVAL
C. 4 Heart Rate Control Program P8~P11
R8
R9
R10
R11
2. Record the user's target heart rate value and age setting data even cut off the power.
3. Display Program, Speed (RPM), TIME, DIST., CAL., WATT, PULSE, at the same time in different
window.
4. The computer will turn off automatically if there is no operation, speed signal or pulse signal over 4
minutes. Meanwhile, it will store your current exercise data and turn the loading resistance to the
minimum. Once you press any button or in motion, the computer will turn on automatically.
8
Buttons:
1. ENTER:
● In "stop" mode (display STOP), press ENTER button to enter into program selection and setting value
which flash in related window.
A: When you choose the program, press ENTER to confirm the one you like.
B: When in setting, press ENTER to confirm the value that you would like to preset.
● During the start mode(display START), press ENTER to choose display the speed or RPM, or switch
automatically.
● During any mode, hold down this button for 2 seconds to totally reset the computer.
2. START/STOP:
Press START/STOP button to start or stop the programs.
During any mode, hold down this button for 2 seconds to totally reset the computer.
3. UP:
● In stop mode and the dot matrix character flash, press this button to select the program up. If the related
window value flash, press this button to increase the value.
● During the start mode (display START), press this button to increase the training resistance.
4. DOWN:
● In stop mode and the dot matrix character flash, press this button to select the program down. If the
related window value flash, press this button to decrease the value.
● During the start mode(display START), press this button to decrease the training resistance.
5. PULSE RECOVERY:
● First test your current heart rate and show your heart rate value, press this button to enter into pulse
recovery testing.
● When you are in pulse recovery mode, press this button to exit.
OPERATION
1. Turn on the computer
Plug in one end of the adaptor to the AC electrical source and connect the other end to the computer. The
computer will beep and enter into initial mode.
2. Program select and value setting
● Manual Program P1 and Preset Program P2~P7
ٛ
A. Press UP, DOWN button to select the program that you like.
ٛ
B. Press ENTER button to confirm the selected program and enter time setting window.
ٛ
C. The time will flash, and then press UP, DOWN button to set up your desired time. Press
ٛ
ٛ
ٛ
ٛ
ENTER to confirm the value.
D. The distance will flash, and then press UP, DOWN to set up the desired distance value. Press
ENTER to confirm the value.
E. The calories will flash, and then press UP, DOWN to set up the desired calories to be
9
ٛ
ٛ
consumed. Press ENTER to confirm the value.
F. Press START/ STOP to begin exercise.
● HEART RATE CONTROL PROGRAM P8
ٛ
User can set the target heart rate to do healthy exercise within the training zone.
A. Press UP, DOWN to choose the heart rate control program P8
B. Press ENTER to confirm the heart rate control program, and enter into time setting window.
ٛ
ٛ
.C. The time will flash, and then press UP, DOWN button to set up the desired time. Press ENTER
to confirm the value.
D. The distance will flash, and then press UP, DOWN to set up the desired distance value. Press
ENTER to confirm the value.
ٛ
ٛ
E. The calories will flash, and then press UP, DOWN to set up the desired calories to be
Consumed. Press ENTER to confirm the value.
F. When the target heart rate control program flash, and then press UP, DOWN to set up the
target heart rate. Press ENTER to confirm the value.
ٛ
G. Press START/ STOP to begin exercise.
● HEART RATE CONTROL PROGRAM P9~P11
User can set the age, according to which, there is the maximum heart rate. You can choose Program P9
(55% of max. heart rate), P10 (75% of max. heart rate), P11 (90% of max. heart rate) to do the exercise.
ٛ
A. Press UP, DOWN to choose the heart rate control program P9, P10 or P11.
ٛ
B. Press ENTER to confirm the heart rate control program, and enter into time setting window.
ٛ
C. The time will flash, and then press UP, DOWN button to set up the desired time. Press ENTER
ٛ
to confirm the value.
D. The distance will flash, and then press UP, DOWN to set up the desired distance value. Press
ENTER to confirm the value.
ٛ
ٛ
ٛ
ٛ
ٛ
E. The calories will flash, and then press UP, DOWN to set up the desired calories to be
consumed. Press ENTER to confirm the value.
F. The age value will flash, and then press UP, DOWN to set up your age. Press ENTER to
confirm the value.
G. Press START/ STOP to begin exercise.
NOTE: During exercise, the user's heart rate value depends on resistance level and speed. The heart rate
control program is to ensure your heart rate within the preset value. When the computer detect your
current heart rate is higher than preset, it will decrease the resistance level automatically or you may
slow down exercise. If your current heart rate is lower than preset, it will increase resistance and you
may speed up.
ٛ 3. Pulse Measurement
Please place both your palms on the contact pads and the computer will show your current heart beat
rate in beats per minute (BPM) on the LCD after 3~4 seconds. During the measurement, heart icon will
flash when detect the heart rate signal.
Remark: During the process of pulse measurement, because of the contact jamming, the measurement
10
value may not be stable when start, then it will return to normal level. The measurement value cannot be
regarded as the basis of medical treatment.
ٛ 4. Pulse Recovery Test
The pulse recovery test is to compare your heart rate before and after exercise. It is target to determine
your heart strength via the measuring. Please do the test as below:
A. Both your hands hold the pulse sensor to test the pulse, the computer will display your current
pulse value.
B. Press RECOVERY to enter the pulse recovery test and the computer program will enter the
stop status.
C. Keep pulse detecting.
D. Time will count down from 60 seconds to 0 second.
E. When time reaches 0, the test result (F1.0-F6.0) appears on the display
ٛ
F1.0=Excellent
F2.0=Good
F3.0=Fair
F4.0=below average
F5.0= No Good
F6.0= Poor
F. If the computer does not detect your current heart rate first, pressing RECOVERY will not
ٛ
enter into pulse recovery test. During the pulse recovery test, press RECOVERY to exit the
ٛ
test and return to the stop status.
Specifications
Speed KM/H (M/H): showing your current speed. Range: 0.0~99.9 KM/H (MILE/H)
RPM: showing the current rotate per minute. Range: 0~999.
TIME: the accumulative exercise time, range: 0:00~99M59S.
Preset time range is 5:00- 99:00. The computer will start to count down from preset time to 0:00 with
average time for each resistance level. When it reaches to zero, the program will stop and computer
alarm. If you do not preset the time, it will run with one minute decrement each resistance level.
DIST: the exercise accumulative distance. Range: 0.0 ~ 99.9 ~ 999KM (MILE)
The preset distance range: 1.0 ~ 99.0 ~ 999.
If the preset value is not zero, the distance will count down and when it reaches 0, the program will
stop and the computer will alarm. If you don't preset the value, the distance will count up.
CALORIE: the exercise accumulative calories burnt. Range: 0.0 ~ 99.9 ~ 999
The preset calories range: 10.0 - 90.0 - 990.
If the preset value is not zero, the calorie will count down and when it reaches 0, the program will
stop and the computer will alarm. If you don't preset the value, the calorie will count up
PULSE: showing the exercise heart rate value. Range: 30-240BPM (beat per minute) RESISTANCE
LEVEL: showing resistance level. Range: 1~8(or 16 depends on customer’s
request) with 8 segments display.
WATT: showing the exercise watt. Rang: 0~999
AGE (A): showing the user age when in heart rate control program and the range is 10~100.
11
BREAKDOWN DISPLAY
When the computer displays ERROR1, please check if the motor is good and if the motor wires connect well.
ADAPTOR
INPUT: AC (The voltage depends on different countries.)
OUTPUT: 8V DC 500Ma
12
Distributed Exclusively by :
GPI Sports & Fitness
275 Wellington Road
Mulgrave, VIC, 3170
Australia.
13