1
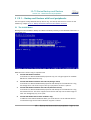
I/A 70 Series Backup and Restore
Version 3.0 - Network and local peripherals
R. Deen, Invensys
Baarn / The Netherlands
e-mail: [email protected]
Version 3.0 / Februari 9 / 2006
This document is copyright 2001-2006 Invensys.
Foxboro, I/A Series are trademarks of Invensys, its subsidiaries and affiliates.
All other brand names may be trademarks of their respective owners.
I/A 70 Series Backup and Restore
Version 3.0 - Network and local peripherals
Page 2 of 51
I/A 70 Series Backup and Restore
Version 3.0 - Network and local peripherals
Contents
1 Introduction................................................................. ........................................................................................7
1.1 Disclaimer........................................................................ ............................................................................7
1.2 Conventions............................................................ ....................................................................................7
1.3 Revision history.......................................................... ................................................................................8
2 The I/A 70 Series Backup and Restore CD...................................................................................................11
2.1 The System Requirements.................................................................... ..................................................11
2.2 Backup methods......................................................................................... ..............................................11
2.2.1 Backup to tape.................................................................. ..............................................................12
2.2.2 Backup to CD-R(W) and DVD +/- R(W).....................................................................................12
2.2.3 Backup to removable media........................................................................................................13
2.2.4 Backup to a network share............................................................. ..............................................13
2.2.5 Cloning the system disk....................................................................... ..........................................14
3 Hardware setup................................................................ .................................................................................15
3.1 I/A 70 Series style “A” stations............................................................ ..................................................15
3.2 I/A 70 Series style “B” stations................................................ ..............................................................15
3.3 I/A 70 Series style “C” stations.................................................... ..........................................................15
4 The I/A 70 Series Backup and Restore CD's................................................................................................17
5 CD 1 – Backup and Restore with local peripherals....................................................................................19
5.1 The Initial Menu..................................................................... ..................................................................19
5.2 The Main Menu...................................................................... ..................................................................20
5.3 The Backup menu.................................................................. ..................................................................20
5.4 The Restore menu...................................................................................... ..............................................22
5.5 The Verify menu......................................................................................... ..............................................22
5.6 The Clone menu............................................................................. ..........................................................23
5.7 Start Norton Ghost in manual mode...................................................................................................25
5.8 Utilities............................................................................. ..........................................................................25
6 CD 2 – Backup and Restore with shared network resources...................................................................27
6.1 The initial boot menu................................................. ............................................................................27
6.2 Local IDE/SCSI peripherals and other functions. (no network)......................................................28
6.2.1 Utilities.................................................................................... ..........................................................29
6.2.2 The Support Diskette menu.........................................................................................................29
6.3 Backup to shared drive (Network interface.....).................................................................................30
7 Quick start............................................................................ ..............................................................................37
7.1 Backing up an I/A 70 Series workstation............................................................................................37
7.1.1 Backup to tape.................................................................. ..............................................................37
7.1.2 Backup to removable medium............................................................. ........................................37
7.1.3 Backup to CD-R(W)........................................................ ................................................................38
7.1.4 Backup to network share.................................................... ..........................................................39
7.2 Restoring an I/A 70 Series workstation...............................................................................................39
7.2.1 Restore from tape..........................................................................................................................39
7.2.2 Restore from a removable medium............................................................................................40
Page 3 of 51
I/A 70 Series Backup and Restore
Version 3.0 - Network and local peripherals
7.2.3 Restore from DVD/CD-ROM........................................................................................................40
7.2.4 Restore from share....................................................................... ..................................................41
8 Background information.................................................................................. ................................................43
8.1 Documentation........................................................................................... ..............................................43
8.2 Detailed Specifications.................................................................................. ..........................................43
8.2.1 Software versions.................................................................................. ..........................................43
8.2.2 Preferred boot sequence.............................................. ................................................................43
8.2.3 Unsupported devices..................................................... ................................................................43
8.3 Checking the system drive(s)..................................................................... ............................................44
8.4 Creating support diskettes from the CD files..................................................... ................................45
9 FAQ’s / Troubleshooting............................................................................ ......................................................47
9.1 How do I connect the Jaz Traveler?............................................. ........................................................47
9.2 After the backup, the system won’t boot...........................................................................................47
9.3 During first boot: “Your drive may be corrupt”................................................................................47
9.4 Backup goes to the C: drive..................................................................... ..............................................47
9.5 My ATAPI ZIP drive does not work......................................................................................................47
9.6 The CD is using the wrong drive for images......................................................................................48
9.7 Backup drive is not FAT formatted......................................................................................................48
9.8 The tape drive is not recognized...................................................... ....................................................48
9.9 After a restore, system reports problems with file system..............................................................48
9.10 Ghost reports NTFS errors........................................................... ........................................................48
9.11 Cannot use the mouse........................................................................ ..................................................49
9.12 MO disks are not formatted.............................................................. ..................................................49
Illustration Index
Illustration 1 CD1 - Initial boot menu screen
Illustration 2 CD1 - Local peripherals: Main Menu
Illustration 3 CD1 - The Backup menu.
Illustration 4 CD1 - The Restore Menu
Illustration 5 CD1 - The Verify menu
Illustration 6 CD1 - The Disk Clone menu.
Illustration 7 CD1 - The Utilities menu.
Illustration 8 CD2 - Initial boot menu, choose your cards...
Illustration 9 CD2 - Main menu without network support
Illustration 10 CD2 - Utilities menu.
Illustration 11 CD2 -Support diskette menu
Illustration 12 CD2 - Define share, backup directory and image filename.
Illustration 13 CD2 - Modify the defaults...
Illustration 14 CD2 - Choose your network settings.
Illustration 15 CD2 - Change the TCP/IP related settings.
Illustration 16 CD2 - Main menu.
Illustration 17 Shutdown from the Foxview menu.
Page 4 of 51
19
20
21
22
23
24
25
27
28
29
30
31
32
33
34
35
44
I/A 70 Series Backup and Restore
Version 3.0 - Network and local peripherals
Illustration 18 Perform a clean shutdown.
45
Page 5 of 51
I/A 70 Series Backup and Restore
Version 3.0 - Network and local peripherals
Page 6 of 51
I/A 70 Series Backup and Restore
Version 3.0 - Network and local peripherals
1 Introduction.
This manual and software is for the I/A 70 Series NT and XP platform only.
Please note that this is NOT an Official Foxboro product. It is a personal project from the author to
introduce an easy and reproducible way to backup an I/A 70 Series station (and there’s a big chance
that you will never read this!).
This is the user manual for “The I/A 70 Series Backup and Restore CD - Version 3.0.” This CD and
the optional diskettes are designed for The Foxboro I/A 70 Series platform exclusively. The Backup
and Restore CD uses the Norton Ghost program to create the backup image files for the 70 Series
platform. Since the document was completely rewritten most of the menus differ from previous
versions.
If you have any comments or would like to see other hardware supported, send a message to
[email protected] and I will be glad to look into it.
1.1 Disclaimer.
Due to the inherently complex nature of computer software and the fact that third party software is
involved, Invensys does not warrant that the software described in this document or this
documentation is completely error free, will operate without interruption, is compatible with all
equipment and software configurations, or will otherwise meet your needs. Accordingly, this
documentation is provided as-is, and you assume all risks associated with its use. Invensys makes no
warranties expressed or implied, with respect to this document. In no event will Invensys be liable
for indirect, incidental or consequential damages, including, without limitation, loss of income, use,
or information.
1.2 Conventions.
The conventions used in this document are listed below.
When you see this:
It means this:
[Filename]
This typeface indicates a filename of which the
contents start on the next line.
This line is not part of the file contents
STATION# command to type<cr>
This typeface is text as shown on screen or when
placed under [Filename] indicated the file
contents
Follow these steps
Indicates a procedure to follow
<Alt_F4>
Text between <> signs indicate a key
combination: Press the Alt key together with the
Function key F4 in this case
Introduction. Page 7 of 51
I/A 70 Series Backup and Restore
Version 3.0 - Network and local peripherals
1.3 Revision history
Revision number:
Description
Revision 1.0
•
Prototype version 1.0
• Initial release for Review only. Testing in progress with all types of NT
configurations.
Version 1.0
•
Version 1.1
August, 2000
• Minor changes to layout.Added parallel port support for Iomega Jaz
Traveler and Adaptec’s APA-348 and APA-358 SCSI to parallel adapters,
through the use of the Parallel Port Support diskette.
• Cleanup.
Version 1.1.1
September 6, 2000
•
Version 1.1.2
September 18, 2000
For version 1.1 of the CD-ROM:
• Updated Norton Ghost to version 6.0.3.
• Updated Partition Magic to version 5.0.
• Added Adaptec SCSI utilities to allow partitioning and formatting of
SCSI drives attached to a non-bootable host adapter (like the AVA2904),
• Fixed missing drivers for ATAPI and IDE ZIP drives.
• Removed support for the VL-Bus and EISA SCSI host adapters (had to
make room for the ZIP device drivers).
General:
• Updated Trouble shooting section. It’s getting bigger :-<
• Trouble shooting is now a separate chapter.
•
•
Page 8 of 51 Introduction.
Initial release
Well, it is version 1.0 folks!
Missed a menu conversion (day-0 section), was updated.
Some typos fixed.
Added Trouble shooting section
I/A 70 Series Backup and Restore
Version 3.0 - Network and local peripherals
Revision number:
Description
Version 1.2
January 30, 2000
For version 1.2 of the CD-ROM:
• Added Acrobat Reader (32-bit) for the PDF files on the CD-ROM.
• Moved ZIP support to separate diskette image. (Not used very often).
So ZIP is NOT supported directly from CD-ROM boots anymore.
• Added support for 70 Series style “C”. NON-RAID only.
• Driver for the Adaptec AVA-2904 (ASPI8DOS.SYS) is always loaded
during boot from CD and diskettes.
• After booting, the diskettes and the CD-ROM can be removed from the
system after exiting the menu program. This to allow restoring from
multiple CD-ROM’s manually.
• Updated ASPI8U2.SYS to latest version to support Ultra-160 host
adapters.
• Added Multicast Support Diskette to allow easier backups to a
Multicast Server.
•
•
•
•
The Backup and Restore CD Version 1.2 comes in two flavors:
A “Standard Edition” without “Day-0 installs” (licensing issue).
A “Limited Edition” for Foxboro Internal use.
Version 1.2.1
January, 2002
Added Invensys logo and some Foxboro to Invensys stuff.
• Changed e-mail to Invensys style.
• Fixed some errors in the Restore section.
Version 2.0
February, 2002
Sort of rewritten the manual. Thanks Stephen Mize and Vern Conrad for
their inputs:
• Upgraded the core program Norton Ghost to version 7.5.
• New cover page and some new functionality documented.
• Added Quick start section.
• New design CD Jewel box + CD label.
• Tested various new backup devices: DDS-1, 2, 3 and 4, Fujitsu Dynamo
1300 external SCSI, Dynamo 640 ATAPI internal etc. and RAID1 disks.
• Enhanced Quick start section.
Version 2.0.1
January, 2003
•
Removed Partition Magic. License issue
Version 2.0.2
March, 2003
•
Some cleaning up
Version 3.0
January 2006
This version is a two CD set.
• Supports DVD/CD burning devices.
• Using Ghost 2003
• Supports backups to Shared network resources.
• Supports backup to Firewire and USB burning devices.
Introduction. Page 9 of 51
I/A 70 Series Backup and Restore
Version 3.0 - Network and local peripherals
Page 10 of 51 Introduction.
I/A 70 Series Backup and Restore
Version 3.0 - Network and local peripherals
2 The I/A 70 Series Backup and Restore CD.
The I/A 70 Series Backup and Restore CD makes maintaining a current backup of your 70 Series
Workstations easy. The reason for making it was mainly the frustration with the time consuming
standard NT backup and restore procedure for the Foxboro 70 Series product. The standard
Windows NT procedure would always require the Windows NT Operating system to be installed
before the restore software (which is NT/GUI based) can be used. This is by itself already a timeconsuming task which is complicated even more by expiring program licenses that may be linked to
the systems (now changed) hostid.
Any alternative would have to minimize downtime and allow fast recovery in case of a system
failure and this is where the I/A 70 Series Backup and Restore CD comes in.
Extensive experience in the field with various software packages has led to the decision to use
Norton Ghost as the backup software solution. Another important requirement for the I/A 70 Series
Backup and Restore CD was to provide a simple and easy to understand operator interface while
still allowing access to all features of the core programs using their native command line or GUI.
This has resulted in the I/A 70 Series Backup and Restore CD.
2.1 The System Requirements.
We will start with the basic requirements for backups and restores on an I/A 70 Series station using
the I/A 70 Series Backup and Restore CD. Assuming that I/A Series software is already installed, you
have a system that meets the basic requirements to use the I/A 70 Series Backup and Restore CD.
To make use of the Backup and Restore CD you need:
• An I/A 70 Series Workstation Processor.
• The I/A 70 Series Backup and Restore CD with optionally a boot diskette.
• One of the backup options: a SCSI tape drive, a disk drive for cloning OR a removable disk drive
(MO, Iomega SCSI ZIP, Iomega SCSI Jaz) connected to the system either already provided with
the system after shipping or to be acquired later.
• A CD-ROM drive is required run the backup software.
• If you can't boot from CD-ROM, a floppy drive is required in conjunction with the CD-ROM drive
Note:
The preferred boot order for the devices as set in the system BIOS is:
1. Floppy disk drive.
2. CD-ROM
3. Hard disk.
2.2 Backup methods.
For the backup and restore steps please refer to chapter “7 Quick start.“.
I/A 70 Series Workstations are not always equipped with all the hardware to support an easy backup
strategy. This chapter will attempt to explain some of the roads you can go down in order to fix that
The I/A 70 Series Backup and Restore CD. Page 11 of 51
I/A 70 Series Backup and Restore
Version 3.0 - Network and local peripherals
issue.
To start with the backup, some additional hardware and software may be needed. We have put
together some examples to help you on the way. These examples list all the soft- and hardware you
will need to get the first station ready for the backup task.
The options you have are: Backup to a tape, Backup to removable media, Backup to CD-R(W),
Create a clone of the system disk or Backup to a server on the network.
2.2.1 Backup to tape.
This is the good old-fashioned way to make backups of course. The tape drive which is still
unbeatable in storage capacity. The standard Travan tape drive currently supports up to 20Gb of
data, DDS and AIT drives support up to 120Gb compressed.
The advantages:
• You do not have to swap media as long as the data amount fits one tape.
• Tapes are relatively cheap compared to MO, Jaz and regular disk drives.
• You can (maybe) use the tape drives available on site for other (Unix) I/A Series systems.
The disadvantages:
• All the data has to fit on one tape because multiple tapes are not supported!
• The backup must be restored before the system can be taken into operation.
• Tape drives are relatively slow although this is compensated by eliminating media swapping.
• You can’t access Ghost data direct from tape which:
• Requires another system to restore to before you can retrieve the individual files.
2.2.2 Backup to CD-R(W) and DVD +/- R(W).
Making a backup directly to CD-R(W) is a very efficient way to maintain a current backup of the
system. Most stations will fit on one or two CD’s or DVD’s so the backup is a very low-cost option.
When opting for an external burning device, only one is required per system. Systems that feature
both a CD-ROM and a burning device, make creating a bootable backup very easy indeed.
What do you need?
• The I/A 70 Series Backup and Restore CD this includes the license for one station.
• A CD-ROM drive as then main CD drive (optional).
• A burning device like CD-R(W) or DVD +/- R(W) drive installed in your 70 Series station or
attached via USB or Firewire interface.
• Sufficient Media to complete the backup.
The advantages:
• The Ghost images can be viewed on another system that has Ghost Explorer installed, this way
files can be retrieved individually.
• Very low cost as the images are written directly on CD-R or CD-RW media..
• The backup media can be made bootable requiring ONLY the backup to restore the system.
• The current I/A 70 Series stations like DELL GX240 have the CD-R(W) drive built in.
Page 12 of 51 The I/A 70 Series Backup and Restore CD.
I/A 70 Series Backup and Restore
Version 3.0 - Network and local peripherals
•
•
The I/A 70 Series 360 and 370’s feature a DVD+/-RW drive.
Most modern systems feature USB 2.0 ports
The disadvantages:
• The backup must be restored before the system can be taken into operation.
• May require an additional burning device to be installed in the station.
• Needs another PC to view the Ghost files (optional).
2.2.3 Backup to removable media.
This solution will in most cases provide a very convenient way to maintain backups which can be
archived to the network, CD-ROM or DVD. The backups created this way are “images” that are
basically large files that contain the backup data. The approach is very similar to backup to CD-R(W)
but the media differs. Requires other drivers and that is why it is mentioned here separately.
What do you need if?
• The I/A 70 Series Backup and Restore CD this includes the license for one station.
• A SCSI host adapter (optional for SCSI peripherals only).
• A Removable ATAPI backup device or SCSI backup device with cable.
• Media for the drive of your choice.
The advantages:
• The Ghost images can be viewed on another system that has Ghost Explorer installed, this way
files can be retrieved individually.
• Can be very low cost if the images are archived on CD-R or CD-RW media. The more expensive
removable medium can be re-used.
The disadvantages:
• The backup must be restored before the system can be taken into operation.
• Archiving the images to for example CD-R takes extra time although the production system does
not suffer from this.
• An additional SCSI card may be needed to support the removable disk drive.
• Needs another PC to view the Ghost files (optional).
2.2.4 Backup to a network share.
This option (which is new for version 3.0) allows you to create a backup to a shared drive on the
network. (like a share on Windows XP). Most network interfaces found in I/A Series systems are
supported. In addition to this we have added supported for the Realtek 8139 based network
interfaces. These are very common and are well supported. All I/A 70 Series platforms feature at
least one PCI slot to accommodate this interface.
What will you need?
• The I/A 70 Series Backup and Restore CD this includes the license for one station.
• A supported network interface.
The I/A 70 Series Backup and Restore CD. Page 13 of 51
I/A 70 Series Backup and Restore
Version 3.0 - Network and local peripherals
•
A server on the network that shares “backup space”.
The advantages:
• The Ghost images can be viewed on another system that has Ghost Explorer installed, this way
files can be retrieved individually.
• Very low cost solution apart from the initial server hardware.
• Very fast.
• No hardware changes required on the system unless you want a dedicated network interface for
the backup jobs.
• Your server can be UNIX or Linux based with Samba or Windows based.
The disadvantages:
• May require you setup the initial network topology.
2.2.5 Cloning the system disk.
With this option you will “clone” the internal system disk to an identical one that can be stored in a
safe place. To make optimal use of this option you will need to make both the original system drive
and the clone removable. Using this solution will provide a very fast way to create a spare disk,
which can replace the system disk in a matter of seconds.
Note: Brackets that support removable industry standard IDE and SCSI hard disks are commonly
available.
What will you need?
• The I/A 70 Series Backup and Restore CD (includes license for a single station).
• Two brackets to support a removable system disk and a backup/clone disk.
• A second disk drive similar type to the system disk drive.
The advantages:
• When the system drive fails, it takes only a few seconds (the record is 3.1415926 seconds) to
replace it with your spare drive which is ready to roll from the very start.
• Drive cloning requires only one medium per backup.
• Cloning is very fast!
The disadvantages:
• You need a relative expensive comparable disk drive for every backup.
• The system must be modified to accommodate the two disk brackets.
• Requires another PC with bracket to accommodate the drive to retrieve single files from it.
Page 14 of 51 The I/A 70 Series Backup and Restore CD.
I/A 70 Series Backup and Restore
Version 3.0 - Network and local peripherals
3 Hardware setup.
When a SCSI based backup peripheral is going to be used a SCSI host adapter is required in the
system. Depending on the style of the 70 Series station, you may have to install one.
ATAPI peripherals may require some internal IDE channel modifications.
3.1 I/A 70 Series style “A” stations.
The I/A 70 Series style “A” stations are IDE/Atapi based. Unless you are using an Atapi backup device
(like an ATAPI CD-R(W), Iomega ZIP drive or Fujitsu MO drive) or are satisfied with the parallel port
performance, an additional SCSI host adapter is required. This installation is a one time event and
requires the station to be taken off-line and powered down. At this moment we recommend the
use of the low cost AVA-2904 host adapter from Adaptec. This model is fully supported by the
Backup and Restore CD. (No additional drivers are required). To install the card, open the system
cabinet and find a free PCI slot. Insert the SCSI interface in this slot and close the cabinet. No
changes are required to the system software for the 70 Series station.
3.2 I/A 70 Series style “B” stations.
The I/A 70 Series Style “B” stations have a SCSI interface built in. This style comes with two possible
external SCSI connections: It can be either a 50-pin high-density connector (Ultra SCSI) or a 68-pin
connector (Ultra Wide SCSI). Get the matching cable between your system and the backup
peripheral of your choice. All SCSI interfaces in style “B” stations are fully supported by the I/A 70
Series Backup and Restore CD 2.0. No changes are required to the system software or hardware for
the 70 Series station.
3.3 I/A 70 Series style “C” stations.
The I/A 70 Series Style “C” station (the Server 70 platform) also has a SCSI interface built in. This
station does however not provide an external SCSI connector. The 70 Series style “C” provides RAID
options in addition to the standard SCSI internal disk drive.
To accommodate the backup SCSI devices you have three options:
• If you have one internal disk drive or a RAID 1/0 solution: Install the recommended AVA-2904
from Adaptec. Requires a 50/50-pin SCSI cable.
• Your system can be configured with a RAID 5 drive, (which is external to the Server). The RAID
unit is connected using an additional Adaptec ASC-29160 SCSI host adapter. Advised is to install
an additional SCSI interface (actually the third one) next to the ASC-29160 (for instance the
Adaptec AVA-2904).
• Use an internal backup device connected to the internal 50-pin ribbon SCSI cable.
All standard SCSI interfaces in style “C” stations are fully supported by the I/A 70 Series Backup and
Restore CD version 2.0. When the additional SCSI interface needs to be installed, the station has to
be taken off-line and powered down. No changes are required to the system software for the 70
Series station.
Hardware setup. Page 15 of 51
I/A 70 Series Backup and Restore
Version 3.0 - Network and local peripherals
Page 16 of 51 Hardware setup.
I/A 70 Series Backup and Restore
Version 3.0 - Network and local peripherals
4 The I/A 70 Series Backup and Restore CD's
The I/A 70 Series Backup and Restore CD is a menu driven tool. The different selection options are
explained in detail in this manual.
Starting with this version, there are 2 CD's that are both described in these chapters:
• 5 CD 1 - Backups and Restore with local peripherals.
• 6 CD 2 - Backups and Restore with shared network resources.
See those chapters for more details.
The I/A 70 Series Backup and Restore CD's Page 17 of 51
I/A 70 Series Backup and Restore
Version 3.0 - Network and local peripherals
Page 18 of 51 The I/A 70 Series Backup and Restore CD's
I/A 70 Series Backup and Restore
Version 3.0 - Network and local peripherals
5 CD 1 – Backup and Restore with local peripherals.
This CD supports locally attached backup devices only. For backup and restore to a share on the
network try chapter 6 CD 2 - Backup and Restore with shared network resources.
5.1 The Initial Menu.
Booting from the CD-ROM or Backup and Restore diskette provides you the MS-DOS initial menu. It
is displayed here:
Illustration 1 CD1 - Initial boot menu screen
What the menu choices imply is explained next.
1.
Internal IDE/ATAPI hardware.
Load drivers for IDE and ATAPI based peripherals only. You will get support for CD/DVD
RW devices, ATAPI MO drives only.
2.
Internal IDE/ATAPI hardware and USB 2.0 (Iomega driver)
Load drivers for IDE and ATAPI based peripherals and attempt to find USB devices using
the Iomega driver. This driver may not find your peripherals so there is option 3.
3.
Internal IDE/ATAPI hardware and USB 2.0 (Panasonic driver)
Load drivers for IDE and ATAPI based peripherals and attempt to find USB devices using
the Panasonic driver. This driver supports more devices and chip sets but takes longer to
load. You mileage may vary so to speak.
4.
Internal IDE/ATAPI and Firewire hardware only.
In addition to the IDE and ATAPI hardware you will be able to use CD and DVD devices
connected through some Firewire interfaces. Support is limited.
CD 1 – Backup and Restore with local peripherals. Page 19 of 51
I/A 70 Series Backup and Restore
Version 3.0 - Network and local peripherals
5.
Internal IDE/ATAPI and SCSI hardware only.
Use this option if you want backup to SCSI devices like Tape, Jaz or SCSI MO drives.
6.
Internal IDE/ATAPI, SCSI, Firewire and USB 2.0 hardware.
Be brave and try them all in one go. Do not use this if you do not have to.
5.2 The Main Menu.
After you have made you basic configuration choices, this is the second menu presented to you. It
gives you the options indicated here:
Illustration 2 CD1 - Local peripherals: Main Menu
The menus are explained in more detail next.
5.3 The Backup menu.
This will probably and hopefully be the most used menu option. Here you can choose to make a
backup of your system to one of the backup devices. This menu does NOT deal with cloning!
Page 20 of 51 CD 1 – Backup and Restore with local peripherals.
I/A 70 Series Backup and Restore
Version 3.0 - Network and local peripherals
Illustration 3 CD1 - The Backup menu.
[A]
Backup to SCSI tape.
This will make a backup to a SCSI tape drive.
[B]
Backup to MO or Jaz drive.
This option will backup to a SCSI or ATAPI MO drive (depending on the choice at the boot
menu or a SCSI Jaz drive.
[C]
Backup to first CD or DVD.
This will make a backup to the first detected CD/DVD device found. You will usually find
your USB/Firewire burner here.
[D]
Backup to second CD or DVD.
This will make a backup to the second detected CD/DVD device found. Choose this option
if you have two drives internally and the burner is drive 2.
[R]
Return to the Main menu.
Brings you back to the main menu.
Warning!:
After the backup always remove the backup device from the system before you reboot or else
your system may behave unpredictable and probably will not boot.
This does not apply to internal peripherals and tape drives.
CD 1 – Backup and Restore with local peripherals. Page 21 of 51
I/A 70 Series Backup and Restore
Version 3.0 - Network and local peripherals
5.4 The Restore menu.
In this menu you have a choice of several restore options.
Illustration 4 CD1 - The Restore Menu
[A]
Restore from tape.
This option will restore the first physical drive from tape.
[B]
Restore from MO or Jaz.
This option will restore the first physical drive from an image named “\DRIVE1.GHO”, from
a MO or Jaz drive.
[C]
Restore from CD or DVD.
This option will restore the first physical drive from an image named “CDR00001.GHO”, or
“DRIVE1.GHO” from a previously created backup CD or DVD.
[R]
Return to the Main menu.
Brings you back to the main menu.
Note:
You can extract a single partition from a backup created with the Backup and Restore CD but this
requires manual intervention using the Ghost user interface.
5.5 The Verify menu.
Via this menu you will be able to check your Ghost image prior to a restore operation or after a
backup. You will be prompted for a verify after each backup by default. This option allows you to
performs this separately.
Page 22 of 51 CD 1 – Backup and Restore with local peripherals.
I/A 70 Series Backup and Restore
Version 3.0 - Network and local peripherals
Illustration 5 CD1 - The Verify menu
The option speak for themselves but just in case they don't:
[A]
Verify image on SCSI tape.
Check the image integrity on the tape.
[B]
Verify image on MO or Jaz drive.
Check image on the media on the Jaz or MO drive.
[C]
Verify image on first CD or DVD.
In a two drive system, check the image in the first drive found.
[D]
Verify image on second CD or DVD.
In a two drive system, check the image in the second drive found
[R]
Return to the Main menu.
Return “home”
Note:
With certain configurations it is not possible to verify the image in the drive you created the
backup with. Some USB and Firewire drives can be used for backups but the image must be
verified using the internal drive.
5.6 The Clone menu.
The fastest way of restoring the system in case of a disk crash is installing a “clone” of the original
CD 1 – Backup and Restore with local peripherals. Page 23 of 51
I/A 70 Series Backup and Restore
Version 3.0 - Network and local peripherals
disk. This menu provides the options to create a clone from a system disk.
Illustration 6 CD1 - The Disk Clone menu.
[A]
Clone drive 1 to drive 2.
This first option will clone the first physical drive to the second physical drive. This could
be called a backup, but please read the comments below very careful when attempting to
use this Cloning feature.
[B]
Clone drive 2 to drive 1.
This first option will clone the second physical drive to the first physical drive. The same
comment as in option [A] applies to this option.
[R]
Return to the Main menu.
Brings you back to the main menu.
Warning!, Please read this carefully.
When you are considering cloning here are some things to bear in mind:
• Cloning must be done on similar drives. This means: when the original is an IDE type of drive,
the clone drive MUST be an IDE drive.
• The sizes of the drives may differ. It is possible to clone from a larger to a smaller drive as long
as the amount of data fits the target drive. Norton Ghost will attempt to adjust partition sizes
accordingly!
Page 24 of 51 CD 1 – Backup and Restore with local peripherals.
I/A 70 Series Backup and Restore
Version 3.0 - Network and local peripherals
•
Be very careful in choosing your options (even in manual mode). When you choose to clone
Drive 1 to Drive 2, this implies: Copy the First Physical drive to the Second Physical Drive. This
can be something different from what you expect, especially in SCSI systems. Unless you are
very familiar with you hardware, I cannot recommend this option. (RD)
5.7 Start Norton Ghost in manual mode.
If, for whatever reason you have a system that the standard procedure cannot deal with there is the
possibility to use Ghost manually. This will allow the use of Norton Ghost as if started from the
command prompt. Please refer to the Norton Ghost documentation if you need more information.
5.8 Utilities.
When the system was booted from the I/A 70 Series Backup and Restore CD with CD-ROM support,
there are some extras available.
Illustration 7 CD1 - The Utilities menu.
[A
Run the MS-DOS shell.
The MS-DOS shell, where is it when you need it? Use this to view the files on the backup
medium or the RAM-drive. Rename the Ghost image file here, if you create multiple
backups on the same medium.
[B]
Start Microsoft diagnostics. (MSD).
May be of use to diagnose problems you may have.
CD 1 – Backup and Restore with local peripherals. Page 25 of 51
I/A 70 Series Backup and Restore
Version 3.0 - Network and local peripherals
[C]
Create Backup and Restore Diskette.
When you can't boot from CD, create the boot floppy here. The CD must be placed in the
CD-ROM drive!
[D]
Create PC-DOS FW/USB 2.0 diskette for backup to USB hardiness.
When you want to make a backup using a USB hard disk, you will need this floppy.
Provides support for FAT32 formatted drives only.
[E]
Fujitsu MO Formatter.
You will need this utility to initialize your media for first time use.
[R]
Return to main menu.
Page 26 of 51 CD 1 – Backup and Restore with local peripherals.
I/A 70 Series Backup and Restore
Version 3.0 - Network and local peripherals
6 CD 2 – Backup and Restore with shared network resources.
This CD supports several network interface families in addition to some locally attached backup
devices. This CD support only a limited range of locally attached peripherals. More specific: there is
no support for Firewire and USB devices here. If that is what you need, see the information in
chapter 5 CD 1 - Backup and Restore with local peripherals.
6.1 The initial boot menu.
Booting from the CD-ROM or Backup and Restore diskette provides you the MS-DOS initial menu.
Here you will make the initial choice of the network interface that will be used for the data
transport. After this step your interface will be configured and you will get more options to choose
from next.
Illustration 8 CD2 - Initial boot menu, choose your cards...
1.
Local IDE/SCSI peripherals and other functions. (no network)
This options allows you to make backups using some of the local peripherals that are
supported through this version. Included are SCSI devices like tape, MO, Jaz drives.
Choose this option too if you need to configure your Etherlink II ISA interface.
2.
Backup to shared drive (3Com Etherlink III ISA – Model: 3C509).
This is a 10Mb ISA bus network interface. The configuration tool can be accessed from the
first menu option.
3.
Backup to shared drive (3Com Etherlink III PCI – Model: 3C59x).
This is a 10Mb PCI bus network interface.
4.
Backup to shared drive (3Com Etherlink XL PCI – Model: 3C90x/92x).
This is a 10/100Mb PCI bus network interface.
CD 2 – Backup and Restore with shared network resources. Page 27 of 51
I/A 70 Series Backup and Restore
Version 3.0 - Network and local peripherals
5.
Backup to shared drive (3Com mini PCI I'face – Model: 3C556).
This is a 10/100Mb PCI bus network interface found in some notebooks.
6.
Backup to shared drive (Intel/Pro1000).
This is a 10/100/1000Mb PCI bus network interface.
7.
Backup to shared drive (Realtek 8139x or 810x PCI interface).
This is a 10/100Mb/sec PCI bus network interface.
When you choose option 1:
You will load some default hardware drivers that will allow you to make a backup or restore using
some locally attached devices like CD and DVD burners (ATAPI, SCSI), MO drives (ATAPI/SCSI) or
Jaz and tape drives (SCSI only).
When you choose option 2, 3, 4, 5, 6 or 7 you are going to load and configure network
software.
6.2 Local IDE/SCSI peripherals and other functions. (no network)
Just to be complete we will handle the Menu option1 here first:
Illustration 9 CD2 - Main menu without network support
Most options are similar to the ones you will find with CD1,
Two of the menu options differ from the CD1 layout: [E] Utilities and [F] Support diskette menu.
We will show these two next:
Page 28 of 51 CD 2 – Backup and Restore with shared network resources.
I/A 70 Series Backup and Restore
Version 3.0 - Network and local peripherals
6.2.1 Utilities
Illustration 10 CD2 - Utilities menu.
[A]
Run the MS-DOS shell.
The MS-DOS shell, where is it when you need it? Use this to view the files on the backup
medium or the RAM-drive. Rename the Ghost image file here, if you create multiple
backups on the same medium.
[B]
Start Microsoft diagnostics. (MSD).
May be of use to diagnose problems you may have.
[C]
Fujitsu MO Formatter
Allows you to initialize your MO media prior to a backup.
[D]
Configure a 3Com Etherlink III.
The 3Com Etherlink III is an ISA based network interface. You may have to make some
changes to the interrupt and media setting to make use of this card. This utility allows you
to configure the NIC. Reboot the system to activate the settings.
[Q]
Return to Main menu.
You are returned to the main menu.
6.2.2 The Support Diskette menu.
This menu will allow to to create some additional diskettes:
CD 2 – Backup and Restore with shared network resources. Page 29 of 51
I/A 70 Series Backup and Restore
Version 3.0 - Network and local peripherals
Illustration 11 CD2 -Support diskette menu
[A]
Create a Backup and Restore diskette.
If you system does not allow you to boot directly from CD, here you can create a boot
floppy that may be a workaround. You will still need the Backup and Restore CD in the CDROM drive.
[B]
Create a PC-DOS FW/USB 2.0 disk for backup to USB hard disks.
When you want to create a backup to a USB FAT32 formatted drive, you may need this
floppy and boot from that.
[R]
Return to the Main menu MO Formatter
Allows you to initialize your MO media prior to a backup.
6.3 Backup to shared drive (Network interface.....)
From the main menu all options except 1 will configure a certain (familly of) network interface(s).
If you are not sure you have hooked up the correct interface make sure you observe the messages
passing by as you boot the system. They may indicate problems.
When all goes well you should end up with the screen below. This shows you the defaults.
By default, the driver letter assigned to the network share is M:
Page 30 of 51 CD 2 – Backup and Restore with shared network resources.
I/A 70 Series Backup and Restore
Version 3.0 - Network and local peripherals
Illustration 12 CD2 - Define share, backup directory and image filename.
[A]
Use defaults.
Continue with the preparation using the defaults as shown on screen.
[B]
Modify defaults.
Presents you the edit box as shown next where you can make changes to the “share” , the
backup directory and the backup image name.
Please note that, from the prompt or the DOS shell, you should be able to access the share through
drive letter “M:”.On the next screen make sure you only change the lines that start with the word
“SET”.
You are editing a batch file that will be processed after you have completed the edits. If you change
things beyond repair, a reboot is the safest way out.
These are the parameters to edit safely:
SET NETDRV= \\SERVER\SYSTEMBU
Your server syntax \\yourserver\sharename 8
characters each.
SET WHERE= IABACKUP
The directory to create, 8 characters max.
SET IMAGE= DRIVE1
Your Ghost image file name, no extention required. 8
characters max.
CD 2 – Backup and Restore with shared network resources. Page 31 of 51
I/A 70 Series Backup and Restore
Version 3.0 - Network and local peripherals
Illustration 13 CD2 - Modify the defaults...
In the example above you can see, we have modified the defaults to:
\\POOKIE\PUBLIC
IABACKUP
AWNT01
for the share name
for the directory to create for the backups
for the image name.
This will result in a directory :”IABACKUP” that will be created in the share \\POOKIE\PUBLIC
Note that since drive “M:” is mapped to this share, you end with a directory from the prompt that
is shown like this:
M:\IABACKUP
Your backups will be created here. When you accept the defaults or exit the screen above (ALT F,
save and exit) you go to the next screen. In this screen you will select you local IP address, the net
mask (there are three network classes to choose from, and if you wish you can either choose DHCP
or manual selection.
Page 32 of 51 CD 2 – Backup and Restore with shared network resources.
I/A 70 Series Backup and Restore
Version 3.0 - Network and local peripherals
Illustration 14 CD2 - Choose your network settings.
[A]
IP: 10.0.0.100 / Netmask: 255.0.0.0.
This is a setting that will likely fit into a CLASS A network configuration.
[B]
IP: 128.128.0.100 / Netmask: 255.255.0.0.
This is a setting that will likely fit into a CLASS B network configuration.
[C]
IP: 192.168.1.100 / Netmask: 255.255.255.0.
This is a setting that will likely fit into a CLASS C network configuration. This range is very
popular with many brands of small routers.
[D]
Use DHCP to configure this NIC.
If you are connected to a network that features a DHCP server. Choose this option as this
will likely give you a working setup.
[E]
Manually set TCP/IP settings
This option will open a text editor where you can edit the config file to be used.
[Q]
Quit
Most options will bring you to the backup menu except option [E] which brings you this screen:
CD 2 – Backup and Restore with shared network resources. Page 33 of 51
I/A 70 Series Backup and Restore
Version 3.0 - Network and local peripherals
Illustration 15 CD2 - Change the TCP/IP related settings.
It is best to limit yourself to the lines dealing with IP configuration in the file above:
DNSaddr=[192.168.1.1]
GatewayAddr=[192.168.1.1]
NetSubNetMask=[255.255.255.0]
IPAddr=[192.168.1.100]
Make the changes you need for your setup save the file and exit. The file is then executed and the
parameters are installed.
Page 34 of 51 CD 2 – Backup and Restore with shared network resources.
I/A 70 Series Backup and Restore
Version 3.0 - Network and local peripherals
Illustration 16 CD2 - Main menu.
[A]
Backup to shared drive.
Make a backup using the setting as they are provided above the menu options.
In this example: create DRIVE1.gho on M:\IABACKUP. (the drive letter mapped on
\\SERVER\SYSTEMBU
[B]
Restore from shared drive.
Restore the image as shown above from the location shown on this screen.
In this example: Restore the image “DRIVE1.gho” from M:\IABACKUP. (the drive letter
mapped on \\SERVER\SYSTEMBU
[C]
Verify image on shared drive.
Verify image integrity on the shared drive.
[D]
Start Norton Ghost in manual mode.
Allow you to choose your own options with the Ghost interface.
[E]
Reconfigure network settings.
Brings you back the Network configuration menu.
[F]
Change server, Backup directory and/or Image name.
Takes you back to the menu where you can make these changes.
[G]
Logout and exit.
Logs you out and unloads the network
CD 2 – Backup and Restore with shared network resources. Page 35 of 51
I/A 70 Series Backup and Restore
Version 3.0 - Network and local peripherals
[Q]
Quit
Brings you to the prompt. The network is still running and you have access to the “M:”
drive where you should be able to see what is there. From the command prompt you can
issue the command “net use <cr>” to see what you have.
Page 36 of 51 CD 2 – Backup and Restore with shared network resources.
I/A 70 Series Backup and Restore
Version 3.0 - Network and local peripherals
7 Quick start.
This is the quick-start section providing step by step procedures to perform the different backup
and restore tasks. I assume you know how to make the backup device available to the system.
7.1 Backing up an I/A 70 Series workstation.
The I/A 70 Series Backup and Restore CD supports several ways to create a backup. Amongst these
are: backup to an internal or external SCSI tape drive in the 70 Series stations, backing up to a local
removable medium or backup over a network connection. All methods are presented here.
This Quick start section assumes you are booting from CD-ROM.
Note:
To make a valid backup for an NT or XP machine, a properly shutdown system is a requirement.
Do not power down or reset the system when it is running NT/XP with or without IA Series. You
will run the risk of corrupting valuable process data and you will not be able to make a valid
backup.
7.1.1 Backup to tape.
The steps to create a backup on tape:
1.
2.
3.
4.
5.
Identify the tape drive (only SCSI tape drives are supported).
Check the hard disk using the standard Windows tools.
Properly shutdown the system to allow the file system to be cleanly unmounted.
Attach the tape drive if it is external.
Insert the I/A 70 Series Backup and Restore CD in the CD-ROM drive and boot the station from
CD-ROM.
6. Choose the first menu option: 5. Internal IDE/ATAPI and SCSI hardware only. and allow the
station to finish booting. In the Main menu choose: [A] The Backup menu. And next choose:
[A] Backup to SCSI tape. (If you get the “Timeout” dialog during this step, press “wait”. Ghost
appears to be a little impatient with tape drives)
7. The backup will start and after a successful backup you are prompted to verify the image on
tape.
8. After verification you are returned to the main menu.
9. Remove the tape from the drive. Label the backup tape and store it in a safe place.
10. Disconnect the tape drive if applicable.
11. Remove the I/A 70 Series Backup and Restore CD from the drive.
12. Reboot the station.
7.1.2 Backup to removable medium.
The steps to create a backup to a MO or Jaz disk are:
1. Identify the backup drive drive and make it available to the system.
2. Check the hard disk using the standard Windows tools.
Quick start. Page 37 of 51
I/A 70 Series Backup and Restore
Version 3.0 - Network and local peripherals
3. Properly shutdown the system to allow the file system to be cleanly unmounted.
4. Attach the backup drive to the system if it is an external device. (for instance a Jaz or MO drive).
5. Insert the I/A 70 Series Backup and Restore CD in the CD-ROM drive and boot the system from
CD-ROM.
6. Choose one of the menu options that matches you hardware (likely option 1 Internal
IDE/ATAPI hardware. or 5. Internal IDE/ATAPI and SCSI hardware only.). And allow the
station to finish booting.
7. In the Main menu choose: [A] The Backup menu. And next choose: [B] Backup to MO or Jaz
drive
8. The backup will start and after a successful backup, you are prompter to verify the image
9. After completion you are returned to the main menu.
10. You may get a warning that the target is too small to hold the backup. Ghost suggests enabling
“spanning”. Accept this to make the backup on multiple media.
11. Remove the drive from the system if applicable.
12. Remove the I/A 70 Series Backup and Restore CD from the CD-ROM drive.
13. Label the backup medium and store it in a safe place.
14. Reboot the station.
7.1.3 Backup to CD-R(W).
Warning!:
You may not be able to restore from copies you have made from the CD/DVD's created with
Ghost.
To create a backup to one or more CD/DVD's take the following steps:
1.
2.
3.
4.
5.
Make sure the CD-R(W) drive is working.
Check the hard disk using the standard Windows tools.
Properly shutdown the AW to allow the file system to be cleanly unmounted.
Insert the I/A 70 Series Backup and Restore CD in the CD-ROM drive and boot the AW.
Choose the menu option that matches your hardware. (ATAPI, USB or Firewire drivers may be
required)
6. In the Main menu choose: [A] The Backup options menu. And next choose: option [C] or [D]
to backup to CD/DVD media.
7. You will get the option to make the DVD/CD-R(W) bootable. This option will make the backup a
bootable CD which is very convenient. The boot floppy that Ghost is requesting is going to be
read from the I/A 70 Series Backup and Restore CD so you won’t need a floppy.
8. When prompted: “Copy a bootable floppy to the CD-R disk?” answer “Yes”.
9. When prompted: “Is the floppy disk ready in drive a:?” answer “Yes” (The boot image will be
read from the Backup and Restore CD).
10. When prompted: “Proceed with Drive Backup to CD-R?”: If the CD-R(W) drive is the one you
have booted from, replace the I/A 70 Series Backup and Restore CD with an empty CD/DVD disk
and press “Yes”.
11. After a successful backup, you are returned to the main menu.
Page 38 of 51 Quick start.
I/A 70 Series Backup and Restore
Version 3.0 - Network and local peripherals
12. Remove the backup CD-R(W) from the drive.
13. Label the backup and store in a safe place.
14. Remove the I/A 70 Series Backup and Restore CD from the CD-ROM drive.
15. Reboot the station.
7.1.4 Backup to network share.
This requires you to boot from CD2
The steps to perform a backup to a network share. (assuming the network share is available).
1.
2.
3.
4.
5.
6.
7.
Check the hard disk using the standard Windows tools.
Properly shutdown the AW to allow the file system to be cleanly unmounted.
Insert the I/A 70 Series Backup and Restore CD in the CD-ROM drive and boot the AW.
On the initial menu choose the correct network interface to be used.
On the next menu accept the default s or make the appropriate changes.
Next, select your network properties. (IP ,net mast, DHCP etc.)
On the main menu choose option [A] Backup to shared drive. to start the backup to the
share.
8. After a successful backup, you are prompted to verify the image.
9. After the verification you are returned to the main menu.
10. Remove the I/A 70 Series Backup and Restore CD from the CD-ROM drive.
11. Reboot the station.
7.2 Restoring an I/A 70 Series workstation.
The I/A 70 Backup and Restore CD supports several ways to restore from a malfunctioning system.
Amongst these are: restoring from SCSI tape, removable disks, cloned disk, CD-ROM and from a
network connection. All methods are presented here.
The Backup and Restore CD allows for a Bare metal restore. This implies that you can start your
restore operations without installing an OS or anything else on the stations.
Please note that following applies for all restore options:
• If you are restoring to a replacement of a crashed hard drive, make sure the drive is configured
correct and check the SCSI ID, termination settings, parity etc for SCSI drives and Master/slave
settings for IDE drives.
• No preparations are required prior to the restore process. Partitioning and formatting is done
during the restore.
• If the image was written to CD-RW media, beware of the fact that some older CD-ROM drives
are not able to read CD-RW media. (This also applies to older drives that are officially capable of
this.).
7.2.1 Restore from tape.
To restore a station from a backup tape:
Quick start. Page 39 of 51
I/A 70 Series Backup and Restore
Version 3.0 - Network and local peripherals
1.
2.
3.
4.
5.
6.
7.
8.
Identify the system drive and make sure it is working, replace if necessary.
Locate the most recent valid backup tape and have it ready for the restore.
Attach the tape drive if it is an external version.
Insert the I/A 70 Series Backup and Restore CD in the CD-ROM drive and boot the station and
insert the tape in the tape drive.
Choose the first menu option: 5. Internal IDE/ATAPI and SCSI hardware only. and allow the
station to finish booting.
In the Main menu choose: [B] The Restore menu. And next choose: [A] Restore from tape. (If
you get the “Timeout” dialog during this step, press “wait”. Ghost appears to be a little impatient
with tape drives)
The restore will present the Norton Ghost menu where the user must confirm the restore and
after this, the restore is started. After a successful completion you are prompted to either
“Continue” or “Reset” the system. If you choose “Reset” please remove the CD-ROM from the
drive first. “Continue” returns you to the main menu.
Reboot the station and, if applicable, allow the “check disk” program to finish.
7.2.2 Restore from a removable medium.
To restore the system from one or more removable media:
1.
2.
3.
4.
Identify the system drive and make sure it is working and replace if necessary.
Attach the backup drive if it is an external version. (For example a SCSI MO or Jaz drive).
Insert the I/A 70 Series Backup and Restore CD in the CD-ROM drive and boot the station.
Choose one of the menus options that covers you hardware: (likely option 1 Internal
IDE/ATAPI hardware. or 5. Internal IDE/ATAPI and SCSI hardware only.) and allow the
station to finish booting.
5. In the Main menu choose: [B] The Restore menu. and next choose: [B] Restore first drive
from MO or Jaz drive.
6. The restore will present the Norton Ghost menu where you must confirm the restore and after
this, the procedure is started. After a successful completion you are prompted to either
“Continue” or “Reset” the system. If you choose “Reset” please remove the CD-ROM from the
drive first. “Continue” returns you to the main menu.
7. Reboot the station and, if applicable, allow the “check disk” program to finish.
7.2.3 Restore from DVD/CD-ROM.
The “restore from CD-ROM” of course requires a CD/DVD-ROM drive to be present in the system.
The steps to restore from a CD/DVD are:
1. Identify the system drive and make sure it is working.
2. Insert the I/A 70 Series Backup and Restore CD or the bootable first Backup CD in the CD-ROM
drive and boot the AW.
3. Choose the matching menu option and allow the station to finish booting.
4. When you have booted from the I/A 70 Series Backup and Restore CD replace the I/A 70 Series
Backup and Restore CD with the CD containing the backup image. (The image name should be
Page 40 of 51 Quick start.
I/A 70 Series Backup and Restore
Version 3.0 - Network and local peripherals
CDR0001.GHO or DRIVE1.GHO for automatic restores).
5. In the Main menu choose: [B] The Restore menu. And next choose: [C] Restore from CD or
DVD.
6. The restore will present the Norton Ghost menu where the user must confirm the restore and
after this, the restore is started. After a successful completion you are prompted to either
“Continue” or “Reset” the system. If you choose “Reset” please remove the CD-ROM from the
drive first. “Continue” returns you to the main menu.
7. Reboot the station and allow the “check disk” program to finish.
7.2.4 Restore from share.
1.
2.
3.
4.
5.
6.
7.
Identify the system drive and make sure it is working and replace if necessary.
Make sure the CD-R(W) drive is working.
Insert the I/A 70 Series Backup and Restore CD in the CD-ROM drive and boot the station.
On the initial menu choose the correct network interface to be used.
On the next menu accept the default s make your changes.
Next, select your network properties.
On the main menu choose option [B] Restore from shared drive. to start the restore from the
share.
8. Remove the I/A 70 Series Backup and Restore CD from the CD-ROM drive.
9. Reboot the station.
Quick start. Page 41 of 51
I/A 70 Series Backup and Restore
Version 3.0 - Network and local peripherals
Page 42 of 51 Quick start.
I/A 70 Series Backup and Restore
Version 3.0 - Network and local peripherals
8 Background information.
This chapter provides some background information related to the I/A 70 Series Backup and
Restore CD. Maybe it will be of help if you encounter problems or maybe you just would like some
background information....
8.1 Documentation.
Apart from the manual you are reading now, you will find some other documents on the CD-ROM
in “\doc”. All the documents are in Adobe Acrobat format. If your system does not have the Adobe
Acrobat Reader you can install one by using the installer that is in “\acrobat” on the CD-ROM.
With this version of the I/A 70 Series Backup and Restore CD the manuals are:
•
•
ghost.pdf
NTXPBU.pdf
The Norton Ghost implementation guide.
This document.
Check the \doc directory on the CD-ROM for supplied documentation.
8.2 Detailed Specifications.
Assuming you have made up your mind on the backup solution(s) and your system_to_backup
meets the minimum system requirements and your backup selection is available, you are ready for
the next step: More reading!
8.2.1 Software versions.
What is the backup solution offering in this version?
As mentioned before, this CD offers a convenient method to make a backup using Norton Ghost .
For version 3.0 of the Backup and Restore CD's it is Symantec’s Norton Ghost version 2003.
8.2.2 Preferred boot sequence.
In order to have the greatest convenience in using the I/A 70 Series Backup and Restore CD you
should have the following boot sequence set in the BIOS of your workstation:
● First boot device
floppy disk drive.
● Second boot device
CD-ROM
● Third boot device
hard disk.
In this way you system will have the most comfortable setup to be used with Backup and Restore
tool.
8.2.3 Unsupported devices.
Not all hardware delivered with the 70 Series stations is supported. The main cause is Norton Ghost
that does not support all the hardware available in I/A 70 Series stations. Also some devices require
drivers that are not installed either because the hardware was not available, the device is not very
common, the device is not supported in the MS-DOS environment, or some other reason. Since
Background information. Page 43 of 51
I/A 70 Series Backup and Restore
Version 3.0 - Network and local peripherals
Norton Ghost is the “backup application” used this generally implies: Hardware that is not
supported by Norton Ghost is not supported by the I/A 70 Series Backup and Restore CD.
Hardware Not supported with this release:
● Any PCMCIA device (no DOS support)
● Floppy and IDE tape drives. This includes the different TR-3 and TR-4 tape drives. (Typical
storage capacity is 1.6 or 3.2 Gb).
● Floppy disk drives for use as a backup device.
● The Imation LS-120 superfloppy drives. (No DOS drivers on the CD)
8.3 Checking the system drive(s).
It is strongly advised to check the integrity of the system drive(s) prior to making a backup.
Windows NT provides the tools for this and this section attempts to explain the procedure.
Repeat the steps below for drive D:
1. To check the C: drive go to “My Computer” and “right click” on the icon for drive C:
2. Select the “Tools” tab and click in Check Now…
You will get a new window where you check both boxes reading Automatically fix file system
errors and Scan and attempt recovery of bad sectors.
3. When you press Start you will receive a prompt stating that the drive will be checked after the
next reboot. Select Yes to perform the check during the next reboot.
Repeat the steps above for drive D:
After doing this the system must be rebooted. Follow the Foxboro guidelines for this by either:
Selecting “SftMnt/Shutdown/Reboot…/Shutdown and Reboot“ from the top menu bar in
FoxView or see here:
Illustration 17 Shutdown from the Foxview menu.
Or you can run “foxshutdown 1 1 1 “ in the “run” dialog. (Start/Run…) as shown here.
Page 44 of 51 Background information.
I/A 70 Series Backup and Restore
Version 3.0 - Network and local peripherals
Illustration 18 Perform a clean shutdown.
This last option will save you the default 30 seconds pre-shutdown delay.
Allow the station to shutdown and reboot and this will take some time (expect up to several
minutes to completion). When the system is on line again shutdown the system once more and
proceed with the backup procedure.
8.4 Creating support diskettes from the CD files.
On the CD-ROM you can find some files with the “.DSK” extension. These are image files created
from diskettes. They can be used to create diskettes again by using this procedure.
If you need any of the additional diskettes, you can create them directly from the CD-ROM menus.
From the Main menu option select “F] Utilities.“. Here you will find the options to create the most
common diskettes for this tool.
There may be some reason you can not use this or maybe you have the need to create them on a
system that can not be booted. In that case there is another way to create the diskettes:
Insert the CD-ROM in a Windows machine (preferably in the CD-ROM drive) open a command tool
and change directories to where the diskette images are located, for instance:
E:<cr> (Where E: is the drive letter of the CD-ROM drive).
cd \diskette<cr>.
Find the image for the diskette you want to create and type
\tools\file2dsk fcomp_20.dsk<cr>.
This command will write the file ”fcomp_12.dsk“ to a 3.5” diskette in the ”a:“ drive of the machine.
Background information. Page 45 of 51
I/A 70 Series Backup and Restore
Version 3.0 - Network and local peripherals
Page 46 of 51 Background information.
I/A 70 Series Backup and Restore
Version 3.0 - Network and local peripherals
9 FAQ’s / Troubleshooting.
This section covers all previous versions of the I/A 70 Series Backup and Restore CD.
Check it out before you give up. Problem not solved? Contact [email protected].
9.1 How do I connect the Jaz Traveler?
The Jaz Traveler is the name for the Parallel port connection for the Jaz drive. The Traveler package
from Iomega contains the documentation and two connectors, which are used in conjunction with
the supplied SCSI cable from the Jaz drive. The two supplied connectors go to both ends of the 50pin SCSI cable.
9.2 After the backup, the system won’t boot.
When the backup drive is a SCSI or IDE drive (Not a drive on the parallel port or a tape drive), the
backup drive MUST be removed/detached from the system. I/A will not finish booting when there
are two or more drives in the system. (Drive letters are mixed up and NT/Nutcracker crashes, has to
do with the FOXGINA.DLL file).
On the other hand you may just have cloned your empty backup drive to the system disk in which
case I wish you luck (and lots of it).
9.3 During first boot: “Your drive may be corrupt”.
Don’t worry, this is normal!!!
A message like:
Warning: your drive may be corrupt. Please let AUTOCHECK run etc......
appears on the console. You should only see this whenever you have done a restore or you have a
Jaz drive (or something like it) still connected to the system and it was never “seen” by NT before.
In these cases the file system was left in an “unknown” state causing NT to report this message.
Allow NT to check the file system. The system will reboot afterwards and should not complain
anymore. Detach the backup drive though. It’s better that way.
9.4 Backup goes to the C: drive.
This is because the backup software is DOS based and as a result does not assign a drive letter to
the NTFS partitions since MS-DOS does NOT recognize these.
The removable drives and FAT partitions are accounted for and this explains why the backup usually
goes to the C: drive.
9.5 My ATAPI ZIP drive does not work.
ATAPI ZIP drives are no longer supported
FAQ’s / Troubleshooting. Page 47 of 51
I/A 70 Series Backup and Restore
Version 3.0 - Network and local peripherals
9.6 The CD is using the wrong drive for images.
In standard Foxboro configurations this should not happen, but when it does…
In the specific case where your system has more than one removable drive, let’s say both a SCSI ZIP
and SCSI Jaz drive you can encounter this problem.
This is because the CD uses the highest available drive-letter it finds. Removable SCSI devices are
assigned drive-letters, which are based on the SCSI id of the device. So if you have more than one
removable device, the lower SCSI id gets the first available drive letter assigned, the next SCSI id
gets the next drive letter etc. When the ZIP drive has a lower SCSI id than the Jaz drive, the Jaz drive
will be used for the backups and everything works fine. In the case where the Jaz has a lower SCSI
id, and is reported before the ZIP you have the situation where the ZIP has the highest drive letter
and will be the cause for the CD to use the ZIP as the image drive. Either reconfigure the SCSI bus
or use the manual mode Ghost option in the Main Menu in this case to backup or restore.
9.7 Backup drive is not FAT formatted.
This is only for hard disks connected to a NON-bootable SCSI host adapter. (It does not apply to the
Jaz or ZIP drive).
In case you have a SCSI disk attached to the Foxboro supplied “non-bootable” SCSI adapter; the
“fdisk” program will not show the SCSI disk. The disk is not under BIOS control and the “fdisk”
program will not be able to find it. In this case use the “afdisk” program located on the CD-ROM in
\adaptec to add a FAT partition on the disk.
After the “afdisk” actions, an MS-DOS format command is not required to create the FAT file
system in the partition and the drive is then ready to be used with the Backup and Restore CDROM.
If all of the above does not make sense to you, get help from someone with some experience on
the subject of disk partitioning etc.
9.8 The tape drive is not recognized.
There can be some causes for this. If you have a SCSI tape drive, you should check if you are using a
supported SCSI host adapter. The list is in this document on page 30 (Supported SCSI Adapters and
Devices.).
If you do not have a SCSI tape drive, then you have an unsupported tape drive. Norton Ghost (and
as a result the Backup and Restore CD) does not support NON SCSI tape drives.
9.9 After a restore, system reports problems with file system.
When installing an NT system from a Ghost Image, the file system is marked “unchecked”. As a
result NT will notify the user that the file system needs to be checked. This is normal behavior after
a restore. When the file system check was completed, the system reboots, after which the system
should come up normally.
9.10 Ghost reports NTFS errors.
Ghost can report the following error when creating a backup, in case you did not properly
Page 48 of 51 FAQ’s / Troubleshooting.
I/A 70 Series Backup and Restore
Version 3.0 - Network and local peripherals
shutdown the system:
NTFS Error: NTFS Logfile has not been flushed (f1=1)
Restart Windows then try again.
After this message you can still continue to make the backup. Ghost will suggest doing a sector
copy. I would suggest NOT to do this unless in an emergency.
Instead take the advice to restart NT and, after booting the system, shutdown properly and try
again. This will probably be much faster than doing a sector copy anyway.
9.11 Cannot use the mouse.
Norton Ghost and Partition Magic both support the use of a mouse. For this a “DOS” mouse driver
is loaded at boot time. However, this driver only supports Microsoft serial and PS/2 mice.
The other most common problem is of course: the mouse used is not compatible with the installed
DOS driver.
9.12 MO disks are not formatted.
MO disk are not formatted from the factory. The tool to make them usable for the backup are
provided on the backup CD in the location \fujitsu. The program to launch is FJFDISK.EXE which will
prepare the MO disk.
The program can also be run direct from the CD and is found under the Utilities menu:
Executing menu option “Fujitsu MO Formatter“ (or the command line tool as indicated) to start
the formatter, will display the following initial screen:
+--------------------------------------------------------------+
|
MO Disk Formatter VerX.XX
|
| All Rights Reserved. Copyright(C) FUJITSU LIMITED 199X-199X |
+--------------------------------------------------------------+
+--------------------------------------------------------------+
|
Select a MO drive
|
+--------------------------------------------------------------+
| HA#X - SCSI ID X : XXXXXXX MCD3130SS
D:
|
| XX
: XXXXXXX MCD3130AP
E:
|
| Quit
|
+--------------------------------------------------------------+
Move the cursor on the screen and select the drive to be formatted. (Select "Quit" to terminate the
program.) Once a drive is selected, the format selection screen is displayed:
+--------------------------------------+
| Select the Format Type to Make.
|
| The mark * shows the existing format.|
+--------------------------------------|
|
*S Floppy type
|
|
A Hard Disk type
|
|
|
FAQ’s / Troubleshooting. Page 49 of 51
I/A 70 Series Backup and Restore
Version 3.0 - Network and local peripherals
|
1 Low Level Formatting
|
|
2 Drive Select Menu
|
+--------------------------------------+
Select either "S Floppy type" or "A Hard Disk type" and next choose “Execute” to format the disk.
Enter the volume label or simply press [Enter] to set NO NAME as the volume label.
After formatting is complete, the following message is displayed and the formatting ends.
+------------------------------------+
| Formatting successfully completed. |
| Push any key.
|
+------------------------------------+
The MO disk is now ready for use.
Page 50 of 51 FAQ’s / Troubleshooting.
I/A 70 Series Backup and Restore
Version 3.0 - Network and local peripherals
FAQ’s / Troubleshooting. Page 51 of 51


![[MI 020-495] Intelligent Field Device Configurator (IFDC](http://vs1.manualzilla.com/store/data/005940861_1-a7935b4637e46504f46a4e10b51d80ec-150x150.png)