1
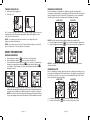
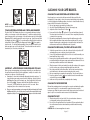
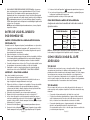
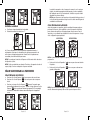
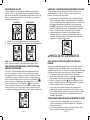
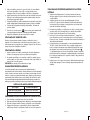
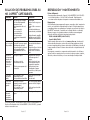
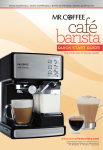
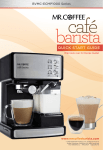
User Manual /
Manual del Usuario
Espresso, Cappuccino and Latte Maker
Para preparar café espresso, capuchino y latte
BVMC-ECMP1000 / BVMC-ECMP1001C / BVMC-ECMP1001R
BVMC-ECMP1001W
© 2012 Sunbeam Products, Inc. doing business as Jarden Consumer Solutions.
All rights reserved. Distributed by Sunbeam Products, Inc. doing business as Jarden
Consumer Solutions, Boca Raton, Florida 33431.
U.S. 1-800-MR COFFEE (1-800-672-6333) Canada 1-800-667-8623
Visit us at www.mrcoffee.com
You will find exciting and entertaining tips and ideas,
including great recipes!
© 2012 Sunbeam Products, Inc. operando bajo el nombre de Jarden Consumer
Solutions. Todos los derechos reservados. Distribuido por Sunbeam Products, Inc.
operando bajo el nombre de Jarden Consumer Solutions, Boca Raton, Florida 33431.
Visítenos en www.mrcoffee.com
Ahí encontrará consejos e ideas excitantes y entretenidos,
¡incluyendo excelentes recetas!
Printed in China/Impreso en China
GCDS-MRC25992-SZ
P.N.152655 Rev C
www.mrcoffee.com
www.mrcoffeebarista.com
IMPORTANT SAFEGUARDS
When using electrical appliances, basic safety precautions should always be
followed to reduce the risk of fire, electric shock and/or injury to persons,
including the following:
1. READ ALL INSTRUCTIONS BEFORE USING THE APPLIANCE.
2. DO NOT touch hot surfaces
. Use handles or knobs.
3. To protect against electric shock, DO NOT immerse cord, plug or
appliance in water or other liquids.
4. Press the switch located on the side of the unit to the off position
“O” and unplug unit from electrical outlet when not in use and before
cleaning. Allow it to cool before putting on or taking off parts and before
cleaning it.
5. DO NOT operate any appliance with a damaged cord or plug or after the
appliance malfunctions or has been damaged in any manner. Return this
appliance only to the nearest Authorized MR. COFFEE® Service Center for
examination, repair or adjustment.
6. The use of accessory attachments not recommended for MR. COFFEE®
products may result in fire, electric shock or injury to persons.
7. DO NOT use outdoors or for commercial purposes.
8. DO NOT let cord hang over edge of table or countertop or touch hot
surfaces.
9. DO NOT place this appliance on or near a hot gas or electric burner or in
a heated oven.
10. To disconnect, press the switch located on the side of the unit to the off
position “O” and then remove plug from outlet.
11. DO NOT use appliance for anything other than its intended use.
12. Use on a hard, flat level surface only, to avoid interruption of airflow
underneath the appliance.
13. Always be sure to place the water reservoir back on the unit tightly with
the lid closed and water filled up to, but not surpassing, the MAX line.
14. DO NOT remove the porta-filter while brewing coffee. Please make
sure the three lights are on before you remove the porta-filter to make
additional coffee. Caution should also be taken while removing the portafilter since the metal parts will be hot. Please make sure to hold it by the
handle and to use the filter retention clip to dispose the grounds. Caution
should be taken when moving unit with hot liquids.
15. DO NOT remove the water reservoir or milk reservoir until the unit has
stopped brewing and/or frothing.
16. This appliance is not intended for use by persons (including children)
with reduced physical, sensory or mental capabilities, or lack of
experience and knowledge, unless they have been given supervision or
instruction concerning use of the appliance by a person responsible for
their safety. Children should be supervised to ensure that they DO NOT
play with the appliance.
English 2
THIS UNIT IS
FOR HOUSEHOLD USE ONLY.
SAVE THESE INSTRUCTIONS
SPECIAL CORD SET INSTRUCTIONS
1. A short power supply cord is provided to reduce the hazards resulting
from becoming entangled in or tripping over a longer cord.
2. An extension cord may be purchased and used if care is exercised in its use.
3. If an extension cord is used, the marked electrical rating of the extension
cord must be at least 10 amps and 120 volts. The resulting extended cord
must be arranged so that it will not drape over a countertop or tabletop
where it can be pulled on by children or tripped over accidentally.
4. This appliance has a polarized plug (one blade is wider than the other).
To reduce the risk of electric shock, this plug will fit in a polarized outlet
only one way. If the plug does not fit fully in the outlet, reverse the plug.
If it still does not fit, contact a qualified electrician. Do not modify the
plug in any way.
CAUTION: PRESSURE
In order to avoid possible burns to body parts and/or other injury from
hot steam and water or damages to the unit, never remove the water
reservoir, milk reservoir or the porta-filter while your MR. COFFEE® Café Barista
(espresso, cappuccino and latte maker) is brewing coffee or frothing. Wait
until the brew cycle is complete before removing any of these parts.
CORRECT USE OF GROUND COFFEE FOR ESPRESSO MAKERS
Do not use sugar roasted* ground coffee or sugar roasted coffee beans as
these will clog the filter and damage the appliance. If sugar roasted coffee is
accidentally used, stop using the unit and bring it to the closest service center
for maintenance.
We recommend descaling the machine periodically to keep it in good
working condition. Contact us toll-free at the Consumer Service Department,
1-800-MR COFFEE (1-800-672-6333) to learn about this process.
(*) GROUND WITH SUGAR
English 3
TABLE OF CONTENTS
DIAGRAM OF PARTS
Important Safeguards
2
Diagram Of Parts
5
6
12
Introduction7
Important Safety Instructions
13
7
Before Using Your Appliance For The First Time
8
Selecting The Right Coffee
9
Operating Instructions
10
Cleaning Your Mr. Coffee® Café Barista
15
Troubleshooting Your Mr. Coffee® Café Barista
17
Service And Maintenance
18
Warranty Information
18
7
1
8
2
9
3
10
4
5
11
15 16
17
14
2
1. Brew Head
2.Porta-Filter
3. Frothed Milk Dispensing Tube
4. Cup Height Adjusting Tray
5. Removable Drip Tray and Lid
6. Control Panel (See Understanding
the Controls section for more
details)
7. Milk Reservoir Lid
8. Froth Control Knob
9. Frothing Tube Lever
English 4
10.Removable Milk Resevoir
11.On/Off Switch “I/O” (see right side
of appliance)
12.Water Reservoir Lid
13.Removable Water Reservoir
14.Porta-Filter Retention Clip
15.Filter for Single Shot of Espresso
(1-Cup)
16.Filter for Double Shot of Espresso
(2-Cup)
17.Measuring Scoop/Tamper
English 5
INTRODUCTION
Control panel
A
B
C
D
E
Congratulations! You have selected the new and innovative
Mr. Coffee® Café Barista (espresso, cappuccino & latte maker). This unique
appliance has been designed to help you prepare delicious espressos,
cappuccinos and lattes quickly, conveniently, and automatically with the
touch of a button.
ESPRESSO
A unique method of coffee brewing in which hot water is forced through
finely ground coffee. Popular in Europe, it is a far richer and more full-bodied
brew than regular drip coffee. Because of its richness, espresso is usually
served in 44 to 59 mL (1.5 to 2 oz.) portions, in demitasse cups.
CAPPUCCINO
A drink made with about 1/3 espresso, 1/3 steamed milk, and 1/3 frothed milk.
Understanding the Controls
Your control panel is divided into 2 parts. The left side of each button indicates
the automatic brewing functions (See D in Figure). The right side indicates the
manual function of each button (See E in Figure).
Lights Indicate:
-Button Light Pulses
- Unit is heating up
- Unit is brewing/frothing/cleaning
-Button Light Remains Illuminated
- Unit is ready for use
-Cappuccino and Latte Button Lights do not illuminate
- Milk Reservoir not fully inserted in unit.
-Icon Lights illuminate
-Indicates your brew selection
-Button Light Flashes
-Water Reservoir is empty
-Function selected before unit is ready
Espresso (Button A):
-Automatic: Select espresso size.
-Manual: Customize the amount of espresso in your beverage.
Cappuccino (Button B):
-Automatic: Select cappuccino size.
-Manual: Customize the amount of frothed milk in your beverage.
Latte (Button C):
-Automatic: Select latte size.
-Manual: The manual function of this button controls the cleaning cycle for
the frothed milk dispensing tube.
NOTE: Please read the rest of the instructions before operating the MR. COFFEE®
Café Barista (espresso, cappuccino & latte maker).
English 6
LATTE
A drink made with about 1/4 espresso and 3/4 steamed milk.
Please read ALL of the instructions, cautions, notes and warnings included in this
instruction manual carefully before you begin to use this appliance. When this
unit is used, some parts and accessories get hot and need to cool down. Proper
care and maintenance will ensure the long life of the MR. COFFEE® Café Barista
and its trouble-free operation. Save these instructions and refer to them often for
cleaning and care tips.
IMPORTANT SAFETY INSTRUCTIONS
Please follow these important safety instructions while using your unit:
1. Before removing any of the parts and accessories, make sure the unit is
not brewing or frothing.
2. Do not remove the porta-filter at any time during the brewing process.
3. Use caution when removing the porta-filter. The metal parts may still be
very hot. Also, there may be hot water floating on the top of the filter.
Hold the porta-filter only by its handle and dispose of the brewed coffee
ground by using the filter retention clip.
4. If coffee does not drip, the filter is blocked. Turn off the appliance and
allow it to cool down. The blockage may be caused by the coffee being
too finely ground. See the “TROUBLESHOOTING” section.
5. WHEN CLEANING THE FROTHED MILK DISPENSING TUBE: Place a large cup under
the tube. Using the Frothing Tube Lever, aim the Frothed Milk Dispensing Tube
towards the center of the cup. Turn the Froth Control Knob clockwise to the
clean position “ ” then press the latte/clean button for 3 seconds and release
to activate the clean function. The unit will dispense the water through the
tube for approximately 30 seconds.
NOTE: In order for your unit to work properly time after time, clean it
after every use.
English 7
BEFORE USING YOUR APPLIANCE
FOR THE FIRST TIME
HOW TO SELECT THE RIGHT CUP
Please make sure to select your cup according to the following chart:
BEVERAGE
CLEANING AND PRIMING THE UNIT PRIOR TO FIRST USE
Please refer to the “Diagram of Parts” section to familiarize yourself with the
product.
1. Please make sure the unit is off “O” by pressing the on/off “I/O” button
located on the right side of the unit. Make sure it is unplugged from the
electrical outlet.
2. Remove stickers and labels from the unit.
3. First remove and then wash the water reservoir, the milk reservoir,
the porta-filter, the 2 filters and measuring scoop in a mixture of mild
detergent and water. Rinse each thoroughly and place them back into
the unit.
4. Refer to the instructions in “Placing the Porta-Filter” section before
placing or removing the porta-filter and filter from the unit.
5. To clean/prime the internal components of unit, follow the instructions in
the “IMPORTANT - Prime the Unit” section of the manual.
IMPORTANT - PRIME THE UNIT
To prime the unit, follow these steps:
1. Fill water reservoir up to the “MAX” level.
2. Fill the milk reservoir with water up to the MAX level and slide the milk
reservoir in place. Be sure to push firmly in place.
3. Select one of the filters and place it on the porta-filter. Place the portafilter in the unit ensuring it is properly locked and place a cup under it.
Also, make sure the tip of the frothed milk dispensing tube is pointing
inside the cup.
4. Plug the appliance into the appropriate outlet.
5. Turn the power button on “I”.
6. The 3 control panel lights will start pulsing. Once these lights become
solid, press the espresso button “
” and hold it for 3 seconds, then
release it. Once the pump starts, let the water flow for up to 90 seconds.
7. Press the espresso button “
” once again to stop the process.
8. Press the cappuccino button“
” and hold it for 3 seconds, then release
it. Once the pump starts, let the water flow for up to 90 seconds.
9. Press the cappuccino button “
” once again to stop the process.
10. The 3 control panel lights will turn on solid indicating that the unit is
ready to be used.
Now your unit has been primed and is ready to be used.
English 8
AMOUNT
Espresso
Single ( )
Double ( )
1.25 oz
2.5 oz
Cappuccino
Single ( )
Double ( )
6 oz
10 oz
Latte
Single ( )
Double ( )
12 oz
15 oz
NOTE: The total amount of the beverage can vary depending on the type of
milk used and Froth Control Knob setting.
SELECTING THE RIGHT COFFEE
THE COFFEE
The coffee should be freshly ground and dark roasted. You may want to try a
French or Italian roast ground for espresso. Pre-ground coffee will only retain
its flavor for 7 – 8 days, provided it is stored in an airtight container and in
a cool, dark area. Do not store in a refrigerator or freezer. Whole beans
are recommended to be ground just before use. Coffee beans stored in an
airtight container will keep its flavor for up to 4 weeks.
THE GRIND
This is a vital step in the espresso making process if you are grinding your
own coffee and takes practice. The coffee must be of a fine grind.
•
•
The correct grind should look like salt.
If the grind is too fine, the water will not flow through the coffee even
under pressure. These grinds look like powder and feel like flour when
rubbed between fingers.
• If the grind is too coarse, the water flows through the coffee too fast,
preventing a full-flavored extraction.
Be sure to use a quality grinder for uniform consistency. A conical or burr mill
grinder is recommended for a consistent and fine espresso grind.
English 9
FILLING WITH COFFEE
OPERATING INSTRUCTIONS
FILLING THE WATER RESERVOIR
A. Lift the removable water reservoir from the unit and
fill with fresh water up to the “MAX” line. Do not fill
past the “MAX” line. Never use warm or hot water
to fill the water reservoir.
B. Close the water reservoir lid and place it back in the
unit ensuring it fits tightly.
Figure 1
a. Fill the filter with fresh, fine ground espresso coffee (do not overfill).
b. Tamp and compress the ground coffee firmly and evenly. Coffee should
be 1/8-inch below top of filter after tamping.
c. Clean any excess coffee from the rim to ensure proper fit under brew head
and avoid leaks.
a.
b.
c.
FILLING THE MILK RESERVOIR
If you plan to prepare cappuccino or latte, remove the
milk reservoir from the unit. Lift the lid and pour the quantity of cold milk
you estimate you will need. Do not fill past the “MAX”
line. When done, place the milk reservoir back in the
Figure 2
unit ensuring it fits tightly and the Cappucino and Latte
buttons are illuminated or pulsing.
NOTE: You can use any type of milk, i.e. whole milk, low
fat milk, organic or soy milk.
CHOOSING THE FILTER
Select the filter to be used as follows:
a. FOR A SINGLE SHOT – use the filter
for a single shot of espresso if using
ground coffee.
b. FOR A DOUBLE SHOT OR TWO SINGLE
SHOTS – use filter for a double shot.
PLACING THE PORTA-FILTER
a. Position porta-filter underneath the brew head, attach porta-filter by first
moving retainer clip back.
b. Position handle so that the handle lines up with the open lock icon “ ”
on the unit and fits into the groove.
c. Then, slowly turn it to the right until the retention clip is aligned with the
closed lock symbol “ ” on the unit.
a.
a.
b.
c.
b.
INSERTING THE FILTER
a. To insert the selected filter in the porta-filter, make sure to align the notch
on the filter with the groove inside the porta-filter.
b. Turn the filter to the left or right to lock in place. This will help secure the
filter in the porta-filter.
PLACING THE CUP(S)
a. Pull out the height adjustment tray if you are using a small “demitasse”
cup to brew espresso.
b. Keep the height adjustment tray inside its compartment if you are using a
larger cup to brew cappuccino.
c. Keep the height adjustment tray inside its compartment if you are using a
larger cup to brew latte.
CAUTION: When brewing cappuccino or latte, make sure to adjust the frothing
tube lever to aim the frothed milk dispensing tube inside of your cup.
a.
c.
b.
NOTE: To remove and clean the filter, turn filter to the left or right to align the
filter notch with the groove inside the porta-filter.
WARNING: Make sure the filter has cooled before attempting to remove the filter.
English 10
English 11
TURNING THE UNIT ON
PREPARING CAPPUCCINO
a. Make sure unit is plugged in.
b. Turn unit on “I”.
Prior to preparing your cappuccino, adjust the amount of frothing milk
according to your preference by turning the Froth Control Knob to the right for
more froth and to the left for less froth. For Cappuccino, it is recommended
that the Froth Control Knob be turned to the Cappuccino setting.
MORE FROTH
LESS FROTH
b.
a.
The 3 control panel lights will start pulsing during heating until the brew and
steam heaters reach the perfect temperature. Once these lights become
solid, the unit is ready to use.
NOTE: It is normal for the Espresso function to be ready before the
Cappuccino and Latte functions.
NOTE: If you leave your unit on for 15 minutes without using, your unit will
go into sleep mode. Press any button to reactivate.
NOTE: The froth intensity can be adjusted during the brewing cycle.
a. Press the Cappuccino Button “
” once to brew a small cup of cappuccino.
b. Press the Cappuccino Button “
” twice to brew a large cup of cappuccino.
a.
SELECT THE FUNCTION
x1
PREPARING ESPRESSO
a. Press the Espresso Button “
” once to brew one single shot.
b. Press the Espresso Button “
” twice to brew a double shot.
c. Press and hold the Espresso Button “
” for 3 seconds to customize the
brewing to your preference. When done, press the Espresso Button “
”
once again to stop brewing. For safety, unit will automatically stop after
brewing 5 ounces.
a.
b.
x1
b.
c.
x2
hold for
3 sec.
x2
NOTE: For a small cup, use the single shot filter. For a large cup, use the
double shot filter.
PREPARING LATTE
Prior to preparing your latte, adjust the amount of frothing according to your
preference by turning the Froth Control Knob to the right for more froth and
to the left for less froth. For Latte, it is recommended that the Froth Control
Knob be turned to the Latte setting.
MORE FROTH
LESS FROTH
The unit will start brewing the espresso according to your selection. The unit
will turn off automatically and the lights will become solid indicating that the
cycle has been completed. Your delicious espresso is ready to be enjoyed.
NOTE: To brew less coffee than the preset serving, press the function button
to stop the brewing process when the amount of coffee desired is reached.
a. Press the Latte Button “
b. Press the Latte Button “
English 12
” once to brew a small cup of latte.
” twice to brew a large cup of latte.
English 13
a.
b.
x1
CLEANING YOUR CAFÉ BARISTA
x2
NOTE: For a small cup, use the single shot filter. For a large cup, use the
double shot filter.
TO ADD ADDITIONAL FROTHED MILK / FROTH MILK SEPARATELY
The Mr. Coffee® Café Barista also allows you to manually add more frothed
milk to your beverage or froth milk separately. To add more frothed milk to
your beverage, place your beverage on the unit and ensure the Frothed Milk
Dispensing Tube is aimed towards the center of your cup. Next, Press and Hold
the Cappuccino Button “
” for 3 seconds and the unit will begin to add more
frothed milk. When done, press the Cappuccino Button “
” once again to
stop the unit. For frothing milk separately, follow the same instructions but
place an empty cup on the unit instead. The frothed milk can be used for
macchiato, hot chocolate, chai latte, etc.
hold for
3 sec.
IMPORTANT - AFTER PREPARING YOUR BEVERAGES WITH MILK
Once you are done preparing your beverage with milk, you can either store
the unit’s milk reservoir directly in the refrigerator (ready to be used for the
next time) or dispose of the leftover milk.
a. Remember to clean the frothed milk dispensing tube after each use. To
clean, first place an empty cup on the unit’s drip tray. Aim the Frothed
Milk Dispensing Tube into the empty cup. Next, adjust the Froth Control
Knob to Clean “ ”. Then press and hold the Latte/Clean button for
3 seconds. The unit will run the clean cycle for 30 seconds. Once
completed, throw the contents in the cup away.
b. Once you are done preparing your beverage with milk and cleaning the Frothed
Milk Dispensing Tube, you can either store the unit’s milk reservoir directly in the
refrigerator (ready to be used for the next time) or dispose of the leftover milk.
CLEANING THE MILK RESERVOIR AND FROTHING TUBE
Even though you can store the milk reservoir with leftover milk in the
refrigerator, it is important to clean the reservoir and frothing tube regularly
to avoid clogging and building residues. In order to clean the milk reservoir,
please follow the instructions listed below:
1. Place a large empty cup under the frothing tube.
2. Aim the Frothed Milk Dispensing Tube into the empty cup.
3. Adjust the Froth Control Knob to Clean “ ”.
4. Press and hold the Clean “ ” button for 3 seconds and then release it.
The clean function will run for 30 seconds. Once completed, throw the
contents in the cup away.
5. Discard any remaining milk, rinse and wash the milk reservoir and its
lid thoroughly with warm soapy water. Rinse and dry well. Do not use
abrasive cleaners and scouring pads, as they will scratch the finish. The
milk reservoir and lid is also dishwasher safe (top rack).
CLEANING THE BREW HEAD, THE PORTA-FILTER AND FILTER
1. Switch the power button on the side of the unit to the off position “O”
and unplug the power cord from the electrical outlet.
2. Some of the metal parts might still be hot. Do not touch them with your
hands until they have cooled.
3. Remove the porta-filter and discard the coffee grounds. Wash both the
porta-filter and filter with warm soapy water and rinse them well. Do not
wash the porta-filter and filters in the dishwasher.
4. Wipe lower part of the brew head in the unit with a damp cloth or paper
towel to remove any coffee grounds that might have been left.
5. Place the porta-filter (without any filter) back in the brew head in the
unit. Add water to the water reservoir and place back on unit.
6. Place an empty large cup under the porta-filter. Turn the unit back on.
7. Press the espresso button “
” once and let the unit brew with water
only until it stops automatically.
8. Make sure to let porta-filter dry completely after cleaning.
CLEANING THE WATER RESERVOIR
Discard the remaining water by removing the reservoir and turning it upside
down over the sink. It is recommended to empty the water reservoir
between uses. Wash the water reservoir with soapy water, rinse it well and
wipe it dry. Do not wash the water reservoir in the dishwasher.
CLEANING THE UNIT
1. Wipe housing with a soft wet cloth. Do not use abrasive cleaners or
scouring pads, as they will scratch the finish.
2. Do not store the porta-filter in the brew head. This can adversely affect
the seal between the brew head and the porta-filter while brewing
espresso.
CAUTION: Do not immerse appliance in water.
English 14
English 15
DELIMING
Mineral deposits built-up in the unit will affect the operation of the appliance.
Your appliance must be delimed when you begin to notice an increase in the
time required to brew espresso, or when there is excessive steaming. Also,
you may notice a build-up of white deposits on the surface of the brew head.
The frequency of cleaning depends upon the hardness of the water used. The
following table gives the suggested cleaning intervals.
SUGGESTED CLEANING INTERVALS
Type of Water
Cleaning Frequency
Soft Water (Filtered Water)
Every 80 Brew Cycles
Hard Water (Tap Water)
Every 40 Brew Cycles
TO DELIME WATER RESERVOIR:
1. Fill the reservoir with fresh, undiluted white household vinegar.
2. Allow appliance to sit overnight with the vinegar solution in the water
reservoir.
3. Discard vinegar by removing the reservoir and turning it upside down
over the sink.
4. Rinse the water reservoir thoroughly with tap water by filling tank half full
with water and then pouring the water back out into the sink, repeating
this step twice.
TO DELIME INTERNAL PARTS:
1. Make sure you delime the inside of the water reservoir first by following
the “Deliming” steps above.
2. Make sure to switch the on/off button to the off “O” position and the
power cord is disconnected from the electrical outlet. Fill the reservoir
half way with white vinegar.
3. Insert the porta-filter (with filter and no coffee) and place jar/carafe or
regular cup on top of the drip tray and under the porta-filter.
4. Plug the power cord into the electrical outlet.
5. Press the on/off button to switch the unit on “I”, once the 3 control
panel illuminates solidly, press the the Espresso/Custom Button twice. The
vinegar will start flowing through the unit and it will stop automatically.
6. Place a pitcher or large cup (with at least 325 mL/ 11-ounce capacity)
under the tube. Fill the milk reservoir with water and place it back on
the unit. Turn the Froth Control Knob clockwise to the clean position “
” then press the latte/clean button for 3 seconds to activate the clean
function. The unit will start releasing steam through the frothing tube for
30 seconds. When done, throw the contents of the cup away.
7. Repeat Steps 1 – 6 as necessary using only tap water to rinse any
remaining traces of vinegar out of the machine.
English 16
TROUBLESHOOTING YOUR
MR. COFFEE® CAFÉ BARISTA
PROBLEM
CAUSES
SOLUTIONS
Coffee does not
come out.
•No water in reservoir.
•Coffee grind is too fine.
•Too much coffee in the filter.
•Appliance was not turned
on or plugged in.
•Coffee has been tamped/
compressed too much.
•Add water.
•Grind medium ground coffee.
•Fill filter with less coffee.
•Plug unit into electrical
outlet and turn it on.
•Refill filter basket with coffee
DO NOT TAMP too much.
Coffee comes
out around the
edge of the
porta-filter.
•Porta-filter not rotated to •Rotate filter holder to full
full lock position.
lock position.
•Coffee grounds around
•Wipe off rim and shower
the filter basket rim.
head seal.
•Too much coffee in the filter. •Fill with less coffee.
Milk is not foamy •Ran out of steam.
after frothing or
it is not coming
out of the
•Milk is not cold enough.
frothing tube.
•Frothing tube is blocked.
•Ensure there is enough
water in the water
reservoir.
•Chill milk and frothing
pitcher prior to making
cappuccino or latte.
•Follow the instructions to
clean the milk reservoir &
frothing tube.
Coffee comes
out too quickly.
•Ground coffee is too
•Use a finer grind.
coarse.
•Not enough coffee in filter. •Use more coffee.
Coffee is too
weak.
•Using small filter for double •Use large filter for double
shot of espresso.
shot of espresso.
•Ground coffee is too coarse. •Use a finer grind.
The three
control
panel lights
are flashing
alternatively.
•Water tank is out of water.
•Add water to reservoir.
Do you still have questions? You can call us toll-free at the Consumer Service
Department, 1-800-MR COFFEE (1-800-672-6333) or you can visit us at www.mrcoffee.com.
English 17
SERVICE AND MAINTENANCE
Replacement Parts
• For other replacement parts – Call 1-800-MR COFFEE (1-800-672-6333)
in the U.S. or 1-800-667-8623 in Canada. You may also find a list of
replacement parts at www.mrcoffeebarista.com.
Repairs
If your Café Barista (espresso, cappuccino & latte maker) requires service,
do not return it to the store where you purchased it. All repairs and
replacements must be made by Sunbeam or by an authorized MR. COFFEE®
Products Service Center. If you live in the U.S. or Canada, please call us at
the following toll-free telephone numbers to find the location of the nearest
authorized service center:
U.S. 1-800-MR COFFEE (1-800-672-6333)
Canada 1-800-667-8623
You may also visit our website at www.mrcoffee.com for a list of service centers. To
assist us in serving you, please have the model number and date of purchase available
when you call. The model number is on the bottom of the unit.
We welcome your questions, comments or suggestions. In all your communications,
please include your complete name, address and telephone number and a description
of the problem.
1-YEAR LIMITED WARRANTY
Sunbeam Products, Inc. doing business as Jarden Consumer Solutions or if
in Canada, Sunbeam Corporation (Canada) Limited doing business as Jarden
Consumer Solutions (collectively “JCS”) warrants that for a period of one year
from the date of purchase, this product will be free from defects in material
and workmanship. JCS, at its option, will repair or replace this product or
any component of the product found to be defective during the warranty
period. Replacement will be made with a new or remanufactured product or
component. If the product is no longer available, replacement may be made
with a similar product of equal or greater value. This is your exclusive warranty.
Do NOT attempt to repair or adjust any electrical or mechanical functions on
this product. Doing so will void this warranty.
This warranty is valid for the original retail purchaser from the date of initial
retail purchase and is not transferable. Keep the original sales receipt. Proof
of purchase is required to obtain warranty performance. JCS dealers, service
centers, or retail stores selling JCS products do not have the right to alter,
modify or any way change the terms and conditions of this warranty.
This warranty does not cover normal wear of parts or damage resulting from
any of the following: negligent use or misuse of the product, use on improper
voltage or current, use contrary to the operating instructions, disassembly,
repair or alteration by anyone other than JCS or an authorized JCS service
center. Further, the warranty does not cover: Acts of God, such as fire, flood,
hurricanes and tornadoes.
English 18
What are the limits on JCS’s Liability?
JCS shall not be liable for any incidental or consequential damages caused by
the breach of any express, implied or statutory warranty or condition.
Except to the extent prohibited by applicable law, any implied warranty or
condition of merchantability or fitness for a particular purpose is limited in
duration to the duration of the above warranty.
JCS disclaims all other warranties, conditions or representations, express,
implied, statutory or otherwise.
JCS shall not be liable for any damages of any kind resulting from the
purchase, use or misuse of, or inability to use the product including
incidental, special, consequential or similar damages or loss of profits, or for
any breach of contract, fundamental or otherwise, or for any claim brought
against purchaser by any other party.
Some provinces, states or jurisdictions do not allow the exclusion or limitation
of incidental or consequential damages or limitations on how long an implied
warranty lasts, so the above limitations or exclusion may not apply to you.
This warranty gives you specific legal rights, and you may also have other
rights that vary from province to province, state to state or jurisdiction to
jurisdiction.
How to Obtain Warranty Service
In the U.S.A.
If you have any question regarding this warranty or would like to obtain
warranty service, please call 1-800-672-6333 and a convenient service center
address will be provided to you.
In Canada
If you have any question regarding this warranty or would like to obtain
warranty service, please call 1-800-667-8623 and a convenient service center
address will be provided to you.
In the U.S.A., this warranty is offered by Sunbeam Products, Inc. doing
business as Jarden Consumer Solutions located in Boca Raton, Florida 33431.
In Canada, this warranty is offered by Sunbeam Corporation (Canada) Limited
doing business as Jarden Consumer Solutions, located at 20 B Hereford
Street, Brampton, Ontario L6Y 0M1. If you have any other problem or claim in
connection with this product, please write our Consumer Service Department.
PLEASE DO NOT RETURN THIS PRODUCT TO ANY OF THESE ADDRESSES OR
TO THE PLACE OF PURCHASE.
English 19
PRECAUCIONES IMPORTANTES
Para disminuir el riesgo de incendios, descargas eléctricas o lesiones
personales, se deben seguir siempre las precauciones básicas de seguridad al
utilizar artefactos eléctricos, incluyendo las siguientes:
1. LEA TODAS LAS INSTRUCCIONES ANTES DE UTILIZAR EL
ELECTRODOMÉSTICO.
2. NO toque las superficies calientes
. Utilice las asas o las perillas.
3. Para protegerse contra descargas eléctricas, NO sumerja el cable, el
enchufe ni el electrodoméstico en agua ni en ningún otro líquido.
4. Presione el interruptor rojo ubicado en el costado de la unidad para
colocarlo en la posición de apagado “O” y desenchufe la unidad
del tomacorriente cuando no esté en uso o antes de limpiarla. Deje
que se enfríe antes de colocar o sacar piezas y antes de limpiar el
electrodoméstico.
5. NO utilice un electrodoméstico que tenga un cable o un enchufe dañado,
ni después de que el artefacto haya presentado fallas, o haya sufrido
cualquier otro daño. Devuelva el artefacto al Centro de Servicio Autorizado
MR. COFFEE® más cercano para su inspección, reparación o ajuste.
6. El uso de aditamentos no recomendados para productos MR. COFFEE®
puede ocasionar incendios, descargas eléctricas o lesiones personales.
7. NO utilice en exteriores ni para fines comerciales.
8. NO deje que el cable cuelgue del borde de la mesa o el mostrador, ni
que entre en contacto con superficies calientes.
9. NO coloque este artefacto sobre un quemador caliente, ni cerca de él,
ya sea de gas o eléctrico, ni dentro de un horno caliente.
10. Para desconectar, oprima el interruptor ubicado al lado de la unidad en
la posición “O” y luego desconecte del tomacorriente.
11. NO utilice este artefacto para fines distintos a los recomendados.
12. Coloque sobre una superficie plana y nivelada para evitar interrumpir el
flujo de aire por debajo del electrodoméstico.
13. Asegúrese siempre de volver a colocar con firmeza el tanque de agua en
la unidad con la tapa cerrada y con agua, pero que no sobrepase la línea
MAX.
14. NO saque el portafiltro mientras esté colando café. Verifique que las
tres luces estén encendidas antes de sacar el portafiltro para hacer café
nuevamente. Asimismo, debe tener precaución al sacar el portafiltro ya
que las piezas metálicas estarán calientes. Asegúrese de sujetarlo por el asa
y de utilizar el gancho de retención del filtro para desechar el café molido
usado. Debe tener precaución al mover la unidad con líquidos calientes.
15. NO quite el tanque de agua ni el de leche hasta que la unidad haya
dejado de preparar o dar vapor a la leche.
16. Este aparato eléctrico no está destinado para ser usado por personas (lo
que incluye niños) cuyas capacidades físicas, sensoriales o mentales estén
disminuidas, o carezcan de experiencia y conocimiento, a menos que una
persona responsable de su seguridad los haya supervisado o instruido en
el uso de este electrodoméstico. Los niños deberán estar bajo supervisión
para cerciorarse de que NO jueguen con el aparato eléctrico.
Español 1
ESTA UNIDAD ESTÁ DISEÑADA
SOLO PARA USO DOMÉSTICO.
CONSERVE ESTAS INSTRUCCIONES
INSTRUCCIONES ESPECIALES PARA EL CABLE
1. Se proporciona un cable de alimentación corto para disminuir los
peligros originados por enredos o tropiezos con cables largos.
2. Se puede comprar y utilizar una extensión si se emplean las debidas
precauciones.
3. Si se usa un cable de extensión, el valor nominal indicado en el cable
debe ser de por lo menos 10 amperios y 120 voltios. La extensión deberá
colocarse de forma que no cuelgue de la mesa o la encimera donde un
niño podría jalarla o tropezarse con ella por accidente.
4. Esta unidad tiene un enchufe polarizado (un polo es más ancho que
otro). Con la finalidad de reducir el riesgo de una descarga eléctrica,
este enchufe se diseñó para ajustarse de una sola forma en un
tomacorriente polarizado. Si el enchufe no se ajusta completamente en
el tomacorriente, invierta su posición. Si todavía no se ajusta, contacte a
un electricista calificado. No modifique el enchufe de ninguna forma.
PRECAUCIÓN: PRESIÓN
Con el fin de evitar posibles quemaduras en el cuerpo u otras lesiones
debidas al vapor y al agua calientes o daños a la unidad, nunca quite el
tanque de agua, el tanque de leche ni el portafiltros mientras su MR. COFFEE®
Café Barista (para preparar café espresso, capuchino y late) esté preparando
café o aplicando vapor a la leche. Espere hasta que el ciclo de preparación
se complete antes de quitar cualquiera de estas partes.
USO DEL CAFÉ MOLIDO ADECUADO PARA CAFETERAS DE ESPRESSO
No utilice café molido tostado con azúcar (*) ni granos de café tostados con
azúcar ya que estos obstruirán el filtro y dañarán el electrodoméstico. Si se
usa accidentalmente café molido tostado con azúcar, suspenda el uso de la
unidad y llévela al centro de servicio más cercano para darle mantenimiento.
Recomendamos eliminar periódicamente los residuos minerales acumulados
en la máquina para mantener su buen funcionamiento. Comuníquese con
nosotros al número gratuito del Departamento de Servicio al Consumidor
1-800-MR COFFEE (1-800-672-6333) para conocer el proceso.
(*) MOLIDO CON AZÚCAR
Español 2
CONTENIDO
DESCRIPCION DEL APARATO
Precauciones importantes
1
Descripcion del aparato
4
6
Introducción6
Instrucciones de seguridad importantes
13
6
Antes de usar el aparato por primera vez
7
Cómo seleccionar el café adecuado
8
Instrucciones para el funcionamiento
9
Limpieza de su Mr. Coffee® Café Barista 14
Solución de problemas para su Mr. Coffee® Café Barista 17
Reparación y mantenimiento
18
Información de garantía
19
12
7
1
8
2
9
3
10
4
5
11
15 16
17
14
2
1. Cabezal de colado
2.Portafiltro
3. Tubo dispensador de leche
espumada
4. Bandeja de ajuste de altura de la
taza
5. Tapa y bandeja de goteo
desmontables
6. Panel de control (Consulte
la sección Explicación de los
controles para más detalles)
7. Tapa del tanque de leche
8. Perilla de control de espumado
Español 3
9. Palanca del tubo de espumado
10.Tanque de leche desmontable
11.Botón de encendido/apagado “I/O”
(vea el lado derecho del aparato)
12.Tapa del tanque de agua
13.Tanque de agua desmontable
14.Gancho de retención del
portafiltro
15.Filtro para un espresso sencillo
(1-Cup)
16.Filtro para un espresso doble
(2-Cup)
17.Cuchara medidora
Español 4
INTRODUCCIÓN
Panel de control
A
B
C
D
E
¡Felicitaciones! Ha seleccionado el nuevo e innovador Mr. Coffee® Café Barista
(para preparar café espresso, capuchino y latte). Este electrodoméstico
excepcional ha sido diseñado para brindarle deliciosas tazas de café espresso,
capuchinos o lattes de forma rápida y automáticamente con el toque de un botón.
ESPRESSO
El espresso es un método exclusivo para colar café en el cual el agua caliente
penetra a presión a través de un café molido finamente. El café colado mediante
este método es mucho más concentrado y tiene más cuerpo que el café común por
goteo, y resulta muy popular en Europa. Debido a su concentración, el café espresso
por lo general se sirve en tacitas, en porciones de 44 a 59 mL (1.5 a 2 onzas).
CAPUCHINO
La bebida está compuesta por 1/3 de café espresso, 1/3 de leche calentada al
vapor y 1/3 de leche espumada.
Explicación de los controles
Su panel de control está dividido en 2 partes. El lado izquierdo de cada botón
indica las funciones de preparación automática (vea D en la Figura). El lado
derecho indica las funciones manuales de cada botón (vea E en la Figura).
Las luces indican:
-La luz del botón parpadea
- La unidad se está calentando
- La unidad está preparando café/dando vapor a la leche/
limpiándose
-La luz del botón permanece encendida
- La unidad está lista para usarse
-Las luces de los botones de capuchino y latte no se encienden
- El tanque de leche no está bien insertado en la unidad.
-Las luces de iconos se encienden
-Indica su selección de preparación
-La luz del botón parpadea
-El tanque de agua está vacío
-Se seleccionó una función antes de que la unidad estuviera lista
Espresso (Botón A):
-Automático: Seleccionar tamaño del café espresso.
-Manual: Personalice la cantidad de espresso en su bebida.
Capuchino (Botón B):
-Automático: Seleccionar el tamaño del café capuchino.
-Manual: Personalice la cantidad de leche espumosa en su bebida.
Latte (Botón C):
-Automático: Seleccionar el tamaño del café latte.
-Manual: La función manual de este botón controla el ciclo de limpieza
para el tubo dispensador de leche con espuma.
LATTE
Una bebida compuesta por aproximadamente 1/4 de espresso y 3/4 de leche
al vapor.
Antes de empezar a utilizar este electrodoméstico, le rogamos que lea
cuidadosamente TODAS las instrucciones, precauciones, notas y advertencias
contenidas en este manual de instrucciones. Cuando se usa la unidad,
algunas piezas y accesorios se calientan y deben enfriarse. El mantenimiento
y cuidado correctos le asegurará una larga vida útil a su MR. COFFEE® Café Barista
y un funcionamiento sin problemas. Guarde este instructivo y consúltelo con
frecuencia para encontrar consejos de limpieza y cuidado.
INSTRUCCIONES DE SEGURIDAD
IMPORTANTES
Le rogamos que respete estas instrucciones de seguridad importantes al
utilizar su unidad:
1. Antes de quitar alguna de las partes o accesorios, asegúrese de que la
unidad no esté en funcionamiento.
2. No saque el portafiltro en ningún momento durante el proceso de colado.
3. Tenga cuidado al sacar el portafiltro. Las piezas metálicas podrían estar
todavía muy calientes. Además, podría haber agua caliente en la superficie
del filtro. Sostenga el portafiltro sólo por su mango y elimine los granos de
café usados mediante el clip de soporte del filtro.
4. Si el café no gotea, el filtro está obstruido. Apague el electrodoméstico y
deje que se enfríe. La obstrucción podría deberse a que el café se haya
molido muy finamente. Consulte la sección “SOLUCIONES DE PROBLEMAS
(TROUBLESHOOTING)”.
NOTA: Lea el resto de las instrucciones antes de utilizar el
MR. COFFEE® Café Barista (para preparar café espresso, capuchino y latte).
Español 5
Español 6
5. PARA LIMPIAR EL TUBO DISPENSADOR DE LECHE ESPUMADA: coloque una
jarra o una taza grande (con una capacidad mínima de 325 mL/11 onzas)
debajo del tubo. Use la palanca del tubo para espumar, dirija el tubo
dispensador de leche con espuma hacia el centro de la taza. Gire la perilla
de control de espumado en el sentido horario, hacia la posición de limpieza
“ ” y seguidamente presione el botón de Latte/Limp. durante 3 segundos y
suéltelo para activar la función de limpieza. La unidad dirigirá el agua hacia el
tubo por unos 30 segundos.
NOTA: para que la unidad trabaje adecuadamente una y otra vez, límpiela
después de cada uso.
9. Presione el botón de Capuchino “
” nuevamente para detener el proceso.
10. Las tres luces del panel de control se encenderán y quedarán fijas para
indicar que la unidad está lista para usar.
La unidad ha quedado cebada y está lista para usarla.
CÓMO SELECCIONAR LA MEDIDA DE TAZA ADECUADA
Asegúrese de seleccionar la medida de la taza de acuerdo al
siguiente cuadro:
ANTES DE USAR EL APARATO
POR PRIMERA VEZ
TIPO DE PREPARACIÓN
LIMPIEZA Y PREPARACIÓN DE LA UNIDAD ANTES DE USARLA
POR PRIMERA VEZ
Consulte la sección “Diagrama de partes” para familiarizarse con el producto.
1. Compruebe que la unidad esté apagada en “O” presionando el botón
“I/O” ubicado en el lado derecho de la unidad. Asegúrese de que esté
desenchufada del tomacorriente.
2. Retire las etiquetas y los rótulos de la unidad.
3. Primero saque el tanque de agua, el tanque de leche, el portafiltro, los 2 filtros
y la cuchara medidora y seguidamente lávelos en una mezcla de detergente
suave y agua. Enjuague bien cada pieza y vuelva a colocarla en la unidad.
4. Consulte las instrucciones de la sección “Colocación del portafiltro” antes
de reemplazar o desmontar el portafiltro y el filtro de la unidad.
5. Para limpiar o cebar los componentes internos de la unidad, siga las
instrucciones de la sección “IMPORTANTE – PARA CEBAR LA UNIDAD”.
IMPORTANTE – PARA CEBAR LA UNIDAD
Para cebar la unidad, siga estos pasos:
1. Llene el tanque de agua hasta el nivel “MAX”.
2. Llene el tanque de leche con agua hasta el nivel MAX y deslice en su
lugar. Asegúrese de empujar firmemente en su lugar.
3. Elija uno de los filtros y colóquelo en el portafiltro. Coloque el portafiltro
en la unidad asegurándose de que quede debidamente ajustado y
coloque una taza debajo. Además, asegúrese de que la punta del tubo
dispensador de espuma quede dentro de la taza.
4. Enchufe el electrodoméstico en un tomacorriente adecuado.
5. Oprima el botón de encendido para colocarlo en la posición “I”.
6. Las tres luces del panel de control empezarán a pulsar. Una vez que
estas luces queden fijas, presione el botón de espresso “
” durante 3
segundos y luego suéltelo. Cuando arranque la bomba, deje que el agua
fluya hasta por 90 segundos.
7. Presione el botón de Espresso “
” nuevamente para detener el proceso.
8. Presione el botón de Capuchino “
” durante 3 segundos y luego suéltelo.
Cuando arranque la bomba, deje que el agua fluya hasta por 90 segundos.
Español 7
CANTIDAD
Espresso
Sencillo ( )
Doble ( )
1.25 oz
2.5 oz
Capuchino
Sencillo ( )
Doble ( )
6 oz
10 oz
Latte
Sencillo ( )
Doble ( )
12 oz
15 oz
NOTA: La cantidad total de bebida puede variar dependiendo del tipo de
leche usada y la configuración de la perilla de control de espuma.
CÓMO SELECCIONAR EL CAFÉ
ADECUADO
TIPO DE CAFÉ
El café debe tener un tostado oscuro y estar recién molido. Tal vez convendría
que probara un tostado francés o italiano molido para espresso. El café
previamente molido retendrá su sabor únicamente durante 7 a 8 días, siempre
que se almacene en un envase de cierre hermético y en un lugar fresco y
oscuro. No lo guarde en el refrigerador ni en el congelador. Se recomienda
moler los granos enteros justo antes de usarlos. Los granos de café guardados
en un envase hermético conservarán su sabor hasta 4 semanas.
TIPO DE MOLIDO
Este es un paso vital en el proceso de la elaboración del café espresso si
muele su propio café y requiere de práctica. El café debe estar molido muy
finamente.
•
•
•
Si se muele de forma adecuada, el café debe lucir como la sal.
Si el tipo de molienda es demasiado fina, el agua no fluirá a través del
café, ni siquiera a presión. Estos tipos de molido tienen el aspecto de
talco y se sienten como harina cuando se frota entre los dedos.
Si se muele demasiado grueso, el agua penetrará el café demasiado
rápido lo cual impedirá la extracción completa del sabor.
Se recomienda un molino cónico o de erizo para obtener un molido fino
y consistente para el espresso.
Español 8
NOTA: Para remover y limpiar el filtro, gírelo hacia la izquierda o hacia la
derecha para alinear la muesca del filtro en el orificio del portafiltro.
ADVERTENCIA: Asegúrese que el filtro se haya enfriado antes de tratar de
removerlo del portafiltro.
INSTRUCCIONES PARA EL
FUNCIONAMIENTO
CÓMO LLENAR CON EL CAFÉ
CÓMO LLENAR EL TANQUE DE AGUA
A. Levante el tanque de agua desmontable de la unidad y llénelo con agua
fresca hasta la línea “MAX”. No sobrepase la línea “MAX”. Nunca use agua
tibia ni caliente para llenar el tanque de agua.
B. Cierre la tapa del tanque de agua y colóquela nuevamente en la unidad,
comprobando que ajuste adecuadamente.
Figura 1
CÓMO LLENAR EL TANQUE PARA LECHE
Si va a preparar café capuchino o latte, quite el
tanque de leche de la unidad. Levante la tapa y vierta
la cantidad de leche fría que calcule necesaria. No
sobrepase la línea “MAX”. Cuando lo haga, vuelva a
colocar el tanque de leche en la unidad y asegúrese de
que esté bien ajustada y que los botones de capuchino
y latte estén encendidos o parpadeando.
a.
c.
CÓMO COLOCAR EL PORTAFILTRO
CÓMO ELEGIR EL FILTRO
Elija el filtro que utilizará de acuerdo con lo siguiente:
a.
b.
Figura 2
NOTA: Puede usar cualquier tipo de leche, como leche
entera, baja en grasa, orgánica o de soya.
a. PARA UN ESPRESSO SENCILLO: – use
el filtro para un solo disparo de
espresso.
b. PARA UN ESPRESSO DOBLE O DOS
SENCILLOS: use el filtro para un
espresso doble.
a. Llene el filtro con café recién molido finamente para espresso (no llene
excesivamente).
b. Apisone y comprima el café molido para distribuirlo de manera uniforme
y firme. El café deberá estar a 1/8 de pulgada por debajo de la parte
superior del filtro después de apisonarlo.
c. Limpie el exceso de café del borde para asegurarse que la cabeza de
colado ajuste bien y evitar fugas.
b.
a. Coloque el portafiltro debajo del cabezal de colado, fije el portafiltro
moviendo primero el gancho de sujeción hacia atrás.
b. Coloque el asa de modo que quede alineada con el ícono de candado
abierto “ ” de la unidad y encaje en la ranura.
c. A continuación, gírelo lentamente hacia la derecha hasta que el gancho
de retención quede alineado con el símbolo del candado cerrado “ ”
de la unidad.
a.
b.
c.
PARA INSERTAR EL FILTRO
a. Inserte el filtro en el portafiltro, asegurándose de alinear la muesca del
filtro en la hendidura del porta-filtro.
CÓMO COLOCAR LA(S) TAZA(S)
b. Gire el filtro hacia la izquierda o hacia la derecha para asegurarlo en su
lugar.
Español 9
a. Hale la bandeja de regulación de la altura si utiliza una tacita para café
para colar el espresso.
b. Conserve la bandeja de regulación de la altura dentro de su
compartimiento si utiliza una taza más grande para colar un capuchino.
c. Conserve la bandeja de regulación de la altura dentro de su
compartimiento si utiliza una taza más grande para colar un latte.
PRECAUCIÓN: Cuando prepare café capuchino o late, asegúrese de ajustar
la palanca del tubo para espumar con el fin de que el tubo
dispensador de leche espumosa apunte dentro de su taza.
Español 10
a.
c.
b.
La unidad comenzará a colar el espresso de acuerdo con lo que haya
elegido. La unidad se apagará automáticamente y las luces quedarán
fijas indicando que el ciclo ha terminado. Su delicioso espresso habrá
quedado listo para su disfrute.
NOTA: para colar menos café que la porción preestablecida, presione el
botón de función para detener el proceso de colado cuando llegue a la
cantidad de café deseada.
CÓMO PREPARAR UN CAPUCHINO
ENCIENDA LA UNIDAD
Antes de preparar su capuchino, ajuste la cantidad de espuma según su
preferencia. Para esto, gire la perilla de control de espuma a la derecha
para obtener más espuma y a la izquierda para obtener menos. Para el
capuchino, se recomienda que la perilla de control de espuma se coloque
en la configuración para capuchino.
a. Cerciórese de que la unidad esté enchufada.
b. Encienda la unidad colocándola en “I”.
b.
a.
MÁS ESPUMA
Las 3 luces del panel de control empezarán a parpadear durante el
calentamiento hasta que los calentadores de espuma y preparación de
café alcancen la temperatura perfecta. Cuando las luces permanezcan
encendidas, la unidad está lista para usarse.
NOTA: Es normal que la función de Espresso esté lista antes de las funciones
de Capuchino y Latte.
NOTA: Si deja su unidad sin usar durante 15 minutos, ésta pasará al modo de
espera (sleep). Presione cualquier botón para reactivarla.
CÓMO SELECCIONAR LAS FUNCIONES
a. Presione el botón de Espresso “
” una vez para colar una sola taza.
b. Presione el botón de Espresso “
” dos veces para colar un espresso
doble.
c. Presione y sostenga el botón Espresso “
” durante 3 segundos para
personalizar la preparación a su gusto. Cuando lo haga, oprima el botón
Espresso “
” una vez más para detener la preparación. Por seguridad,
la unidad sec.detendrá de manera automática después de preparar 5
onzas.
b.
x1
NOTA: La intensidad de la espuma se puede ajustar durante el ciclo de
preparación.
a. Presione el botón de Capuchino “
Capuchino.
b. Presione el botón de Capuchino “
grande de Capuchino.
” una vez para colar una tacita de
” dos veces para colar una taza
a.
CÓMO PREPARAR UN ESPRESSO
a.
MENOS ESPUMA
b.
x1
x2
NOTA: Para obtener una taza pequeña, utilice el filtro para un espresso
sencillo. Para una taza grande, utilice el filtro para un espresso doble.
c.
x2
Español 11
hold for
3 sec.
Español 12
CÓMO PREPARAR UN LATTE
IMPORTANTE - DESPUÉS DE PREPARAR SUS BEBIDAS CON LECHE
Antes de preparar su café latte, ajuste la cantidad de espuma según su
preferencia. Para esto, gire la perilla de control de espuma a la derecha
para obtener más espuma y a la izquierda para obtener menos. Para el café
latte, se recomienda que la perilla de control de espuma se coloque en la
configuración para café latte.
MÁS ESPUMA
MENOS ESPUMA
Una vez que haya terminado de preparar su bebida con leche, puede
guardar directamente el depósito de leche en la nevera (para su uso
posterior) o tirar la leche que haya sobrado.
a. Recuerde limpiar el tubo dispensador de leche con espuma después de
cada uso. Para limpiarlo, primero coloque una taza vacía en la bandeja de
goteo de la unidad. Apunte el tubo dispensador de leche con espuma hacia
una taza vacía. Enseguida, ajuste la perilla de control de espuma para
limpiar “ ”. Luego, presione y sostenga el botón Latte/Clean durante tres
segundos. La unidad ejecutará un ciclo de limpieza durante 30 segundos.
Cuando se complete, elimine el contenido que recogió la bandeja.
b. Cuando haya preparado su bebida con leche y limpiado el tubo
dispensador de leche con espuma, puede almacenar el tanque de
leche de la unidad directamente en el refrigerador (listo para usarse la
siguiente vez) o eliminar la leche sobrante.
a. Presione el botón de Latte “ ” una vez para colar una tacita de latte.
b. Presione el botón de Latte “ ” dos veces para colar una taza grande de latte.
a.
b.
x1
x2
LIMPIEZA DE SU CAFÉ BARISTA
NOTA: Para obtener una taza pequeña, utilice el filtro para un espresso
sencillo. Para una taza grande, utilice el filtro para un espresso doble.
PARA AGREGAR LECHE CON ESPUMA / LECHE CON ESPUMA
ADICIONAL POR SEPARADO
La Mr. Coffee® Café Barista también permite que agregue manualmente
más leche con espuma a su bebida o leche con espuma por separado.
Para agregar más leche con espuma a su bebida, colóquela en la unidad
y asegúrese de que el tubo dispensador de leche con espuma apunte al
centro de la taza. Enseguida, oprima y sostenga el botón Capuchino “
”
durante 3 segundos y la unidad empezará a agregar más leche con espuma.
Cuando lo haga, presione el botón Capuchino “
” una vez más para
detener la unidad. Para preparar leche con espuma por separado, siga las
mismas instrucciones, pero coloque una taza vacía en la unidad. La leche
con espuma se puede usar para machiato, chocolate caliente, chai latte, etc.
pres. por
3 seg.
Español 13
CÓMO LIMPIAR EL TANQUE PARA LECHE Y EL TUBO PARA
ESPUMAR
Aunque puede guardar el tanque para leche con la que haya sobrado en
el refrigerador, es importante limpiar el tanque y el tubo para espumar
regularmente para evitar que se obstruya y se acumulen residuos. Para limpiar
el tanque para leche, siga las instrucciones que se indican a continuación:
1. Coloque una taza grande vacía debajo del tubo para espumar.
2. Apunte el tubo dispensador de leche con espuma hacia una taza vacía.
3. Ajuste la perilla de control de espuma para limpiar “ ”.
4. Presione y sostenga el botón Clean “ ” durante tres segundos y luego
suéltelo. La unidad ejecutará un ciclo de limpieza durante 30 segundos.
Cuando se completa, elimine el contenido de la taza.
5. Deseche toda la leche restante, enjuague y lave completamente el
tanque de leche y su tapa con agua jabonosa tibia. Enjuague y seque
bien. No utilice limpiadores abrasivos ni estropajos ya que estos podrían
rayar el acabado. El tanque de leche y la tapa pueden lavarse en un
lavavajillas (rejilla superior).
CÓMO LIMPIAR EL CABEZAL DE COLADO, EL PORTAFILTRO Y EL FILTRO
1. Coloque el botón de encendido/apagado que se encuentra en el
costado de la unidad en la posición off (apagado) “O” y desenchufe el
cable del tomacorriente.
2. Es posible que algunas partes metálicas estén todavía calientes. No las
toque con las manos hasta que se hayan enfriado.
Español 14
3. Retire el portafiltro y deseche los posos del café o el sobre utilizado.
Lave tanto el portafiltro como el filtro con agua tibia jabonosa y
enjuáguelos bien. No lave el portafiltro ni los filtros en el lavaplatos.
4. Limpie la parte inferior del cabezal de colado de la unidad con un paño
húmedo o una toalla de papel para retirar cualquier residuo de posos
del café que haya podido quedar.
5. Coloque el portafiltro (sin el filtro) nuevamente en el cabezal de colado de la
unidad. Agregue agua al tanque de agua y vuelva a colocarlo en la unidad.
6. Coloque una taza grande vacía debajo del portafiltro. Encienda de
nuevo la unidad.
7. Presione el botón de espresso “
” una vez y deje que la unidad cuele
con agua únicamente hasta que se detenga automáticamente.
8. Después de la limpieza, deje que el porta-filtro se seque.
CÓMO LIMPIAR EL TANQUE DE AGUA
Deseche el agua restante sacando el tanque y volteándolo sobre el
fregadero. Se recomienda vaciar el tanque de agua entre cada uso. Lave
el tanque de agua con agua jabonosa, enjuague y séquelo bien. No lave el
tanque de agua en el lavaplatos automático.
CÓMO LIMPIAR LA UNIDAD
1. Limpie la carcasa con un paño suave húmedo. No utilice limpiadores
abrasivos ni estropajos ya que estos podrían rayar la superficie.
2. No guarde el portafiltro en el cabezal de colado. Esto podría tener un
efecto negativo en el sello entre el cabezal de colado y el portafiltro al
momento de colar café espresso.
PRECAUCIÓN: no sumerja el electrodoméstico en agua.
PARA ELIMINAR LOS RESIDUOS MINERALES DE LAS PIEZAS
INTERNAS:
1. Asegúrese de eliminar primero los residuos minerales del tanque
de agua, siguiendo los pasos descritos anteriormente en la sección
correspondiente.
2. Asegúrese de que el botón de encendido/apagado esté en la
posición “O” y que el cable de alimentación esté desenchufado del
tomacorriente. Llene el tanque con vinagre blanco por encima de la
marca de nivel mínimo del tanque.
3. Introduzca el portafiltro (con el filtro pero sin café) y coloque la jarra o
una taza común sobre la bandeja de goteo, debajo del portafiltro.
4. Enchufe el cable de alimentación en el tomacorriente.
5. Presione el botón on/off para cambiar la unidad en “l”, cuando las 3
luces del panel de control se enciendan, presione el botón Expresso/
Custom dos veces. El vinagre comenzará a fluir a través de la unidad y se
detendrá automáticamente.
6. Coloque una jarra o una taza grande (con una capacidad mínima de
325 mL/11 onzas) debajo del tubo. Llene con agua el tanque para
leche y colóquelo nuevamente en la unidad. Gire la perilla de control
de espumado en el sentido horario hacia la posición de limpieza “
” y seguidamente presione el botón de Latte/Limp. durante 3 segundos
para activar la función de limpieza. La unidad empezará a soltar espuma
por el tubo para espumar por 30 segundos. Cuando lo haga, deseche el
contenido de la taza.
7. Repita los pasos 1 al 6 según sea necesario, utilizando únicamente agua
del grifo para enjuagar los restos de vinagre que puedan quedar en la
máquina.
ELIMINACIÓN DE RESIDUOS MINERALES
Los residuos minerales que se acumulen en la unidad afectarán el
funcionamiento del electrodoméstico. Deben eliminarse los residuos minerales
cuando comience a notar un aumento en el tiempo necesario para colar café
espresso o cuando se produzca demasiado vapor. Asimismo, podría observar
una acumulación de residuos blancos en la superficie del cabezal de colado.
La frecuencia de limpieza dependerá de la dureza del agua que se emplee. La
tabla que se presenta a continuación ofrece unos intervalos de limpieza sugeridos.
INTERVALOS DE LIMPIEZA SUGERIDO
Tipo de agua
Frecuencia de limpieza
Agua blanda (agua filtrada)
Cada 80 ciclos de colado
Agua dura (agua del grifo)
Cada 40 ciclos de colado
PARA ELIMINAR LOS RESIDUOS MINERALES DEL TANQUE DE AGUA:
1.
2.
3.
4.
Llene el tanque con vinagre blanco de cocina sin diluir.
Deje reposar la solución de vinagre de un día para otro en el tanque de agua.
Deseche el vinagre sacando el tanque y volteándolo sobre el fregadero.
Enjuague bien el tanque con agua del grifo; llénelo de agua hasta la
mitad y luego viértalo en el fregadero; repita dos veces esta operación.
Español 15
Español 16
SOLUCIÓN DE
PROBLEMAS PARA SU
®
MR. COFFEE CAFÉ BARISTA
PROBLEMA
CAUSAS
SOLUCIONES
No sale café.
•No hay agua en el tanque.
•Se ha molido demasiado
finamente el café.
•Hay demasiado café en el
filtro.
•No se encendió o
no se enchufó el
electrodoméstico.
•Se ha prensado o
compactado demasiado el
café.
•Añada agua.
•Muela el café a un grosor
medio.
•Llene el filtro con menos
café.
•Enchufe la unidad en un
tomacorriente y enciéndala.
•Vuelva a llenar la canastilla
del filtro con café. NO LO
COMPACTE excesivamente.
El café se sale •No se ha girado bien el
por los bordes portafiltro para que quede
del portafiltro.
debidamente ajustado.
•Hay café molido en el borde
de la canastilla del filtro.
•Hay demasiado café en el
filtro.
•Gire el portafiltro para
que quede debidamente
ajustado.
•Limpie la orilla y el sello de
la cabeza del aspersor.
•Llene el filtro con menos
café.
La leche no
•Se agotó el vapor.
está espumosa
después del
espumado o
•La leche no está lo
no sale por
suficientemente fría.
el tubo para
espumar.
•El tubo para espumar está
obstruido.
•Asegúrese de que haya
suficiente agua en el
tanque.
•Enfríe la leche y la jarra
para espumar antes de
preparar el capuchino.
•Siga las instrucciones
para limpiar el tanque
para leche y el tubo para
espumar.
El café sale
demasiado
rápido.
•Se ha molido el café
•Utilice un tipo de molido
demasiado grueso.
más fino.
•No hay suficiente café en el filtro. •Use más café.
El café está
demasiado
aguado.
•Está usando el filtro
pequeño para el espresso
doble (Doppio).
•Se ha molido el café
demasiado grueso.
Las tres luces
•El tanque de agua no tiene
del panel
agua.
de control
parpadean
alternativamente.
REPARACIÓN Y MANTENIMIENTO
Partes de Repuesto
• Para otras piezas de recambio – llame al 1-800-MR COFFEE (1-800-672-6333)
en los Estados Unidos o 1-800-667-8623 en Canadá. También puede
encontrar una lista de partes de repuesto en www.mrcoffeebarista.com.
Reparaciones
Si su Café Barista (para preparar café espresso, capuchino y latte) requiere de
servicio, no la devuelva a la tienda donde la compró. Todas las reparaciones
y reemplazos deben ser realizados por Sunbeam o por un Centro de Servicio
MR. COFFEE® autorizado. Si usted vive en los Estados Unidos o en Canadá,
llámenos sin cargo a los siguientes números de teléfono para averiguar la
ubicación del Centro de Servicio Autorizado más próximo:
EE.UU. 1-800-MR COFFEE (1-800-672-6333)
Canadá 1-800-667-8623
También puede visitar nuestro sitio web, www.mrcoffee.com, donde podrá
obtener una lista de nuestros centros de servicio.Para ayudarnos a servirle,
por favor tenga disponible el número del modelo de Café Barista y la fecha de
compra cuando nos llame. El número de modelo está en la parte inferior del
Iced Café.
Sus preguntas, comentarios o sugerencias serán bienvenidos. Le solicitamos
que en todas sus comunicaciones con nosotros incluya su nombre completo,
dirección y número de teléfono, así como una descripción del problema.
•Use el filtro grande para el
espresso doble (Doppio).
•Utilice un tipo de molido
más fino.
•Añada agua al tanque.
¿Aún tiene preguntas? Puede llamarnos libre de cargos al Departamento de
Servicios al Consumidor de al 1-800-MR COFFEE (1-800-672-6333), o puede
visitarnos en mrcoffee.com.
Español 17
Español 18
GARANTÍA LIMITADA DE 1 AÑO
Sunbeam Products, Inc. operando bajo el nombre de Jarden Consumer
Solutions, o en Canadá, Sunbeam Corporation (Canada) Limited operando bajo
el nombre de Jarden Consumer Solutions, (en forma conjunta, “JCS”), garantiza
que por un período de un año a partir de la fecha de compra, este producto
estará libre de defectos de materiales y mano de obra. JCS, a su elección,
reparará o reemplazará este producto o cualquier componente del mismo que
presente defectos durante el período de garantía. El reemplazo se realizará por
un producto o componente nuevo o reparado. Si el producto ya no estuviera
disponible, se lo reemplazará por un producto similar de valor igual o superior.
Ésta es su garantía exclusiva. No intente reparar o ajustar ninguna función
eléctrica o mecánica de este producto. Al hacerlo elimínará ésta garantía.
La garantía es válida para el comprador minorista original a partir de la fecha
de compra inicial y la misma no es transferible. Conserve el recibo de compra
original. Para solicitar servicio en garantía se requiere presentar un recibo de
compra. Los agentes y centros de servicio de JCS o las tiendas minoristas que
venden productos de JCS no tienen derecho a alterar, modificar ni cambiar
de ningún otro modo los términos y las condiciones de esta garantía.
Esta garantía no cubre el desgaste normal de las piezas ni los daños que se
produzcan como resultado de uso negligente o mal uso del producto, uso de
voltaje incorrecto o corriente inapropiada, uso contrario a las instrucciones
operativas, y desarme, reparación o alteración por parte de un tercero ajeno a
JCS o a un Centro de Servicio autorizado por JCS. Asimismo, la garantía no cubre
actos fortuitos tales como incendios, inundaciones, huracanes y tornados.
Cómo Solicitar el Servicio en Garantía
En los Estados Unidos
Si tiene alguna pregunta sobre esta garantía o desea recibir servicio de
garantía, llame al 1-800-672-6333 y podrá obtener la dirección del centro de
servicio que le resulte más conveniente.
En Canadá
Si tiene alguna pregunta sobre esta garantía o desea recibir servicio de
garantía, llame al 1-800-667-8623 y podrá obtener la dirección del centro de
servicio que le resulte más conveniente.
En los Estados Unidos, esta garantía es ofrecida por Sunbeam Products,
Inc. operando bajo el nombre de Jarden Consumer Solutions, Boca Ratón,
Florida 33431. En Canadá, esta garantía es ofrecida por Sunbeam Corporation
(Canada) Limited operando bajo el nombre de Jarden Consumer Solutions,
20 B Hereford Street, Brampton, Ontario L6Y 0M1. Si usted tiene otro
problema o reclamo en conexión con este producto, por favor escriba al
Departamento de Servicio al Consumidor
POR FAVOR NO DEVUELVA ESTE PRODUCTO A NINGUNA DE ESTAS
DIRECCIONES NI AL LUGAR DE COMPRA.
¿Cuál es el Límite de Responsabilidad de JCS?
JCS no será responsable de daños incidentales o emergentes causados por el
incumplimiento de alguna garantía o condición expresa, implícita o legal.
Excepto en la medida en que lo prohíba la ley aplicable, cualquier garantía o
condición implícita de comerciabilidad o aptitud para un fin determinado se
limita, en cuanto a su duración, al plazo de la garantía antes mencionada.
JCS queda exenta de toda otra garantías, condiciones o manifestaciones,
expresa, implícita, legal o de cualquier otra naturaleza.
JCS no será responsable de ningún tipo de daño que resulte de la compra,
uso o mal uso del producto, o por la imposibilidad de usar el producto,
incluidos los daños incidentales, especiales, emergentes o similares, o la
pérdida de ganancias, ni de ningún incumplimiento contractual, sea de una
obligación esencial o de otra naturaleza, ni de ningún reclamo iniciado contra
el comprador por un tercero.
Algunas provincias, estados o jurisdicciones no permiten la exclusión o
limitación de los daños incidentales o emergentes ni las limitaciones a la
duración de las garantías implícitas, de modo que es posible que la exclusión
o las limitaciones antes mencionadas no se apliquen en su caso.
Esta garantía le otorga derechos legales específicos y es posible que usted
tenga otros derechos que varían de un estado, provincia o jurisdicción a otro.
Español 19
Español 20