1
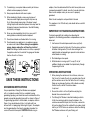
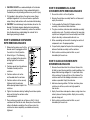
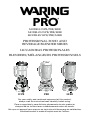
Models WPB/PBB/mbb
Modelos WPB/PBB/MBB
Modèles WPB/PBB/MMB
Professional food and
beverage Blender Series
LICUADORAS PROFESIONALES
Blenders/Mélangeurs professionnels
WPB
PBB
MBB
For your safety and continued enjoyment of this product,
always read the instruction book carefully before using.
Para su seguridad y para disfrutar plenamente de este producto,
siempre lea las instrucciones cuidadosamente antes de usarlo.
Afin que cet appareil vous procure en toute sécurité beaucoup de satisfaction,
lire attentivement le mode d’emploi avant de l’utiliser.
IMPORTANT UNPACKING
INSTRUCTIONS
1.Place the gift box containing your Waring Pro® Blender on a
flat, sturdy surface before unpacking.
2.Open corrugated flap. Remove blender container assembly,
instruction booklet and other printed materials from top of
corrugated box. Please use caution not to tip the container
when removing. CAUTION: Sharp blade inside blender jar.
3.Next, remove the top corrugated insert. Carefully lift
blender base from box and set aside.
4.Replace all corrugated inserts in the box and save the box
for repacking.
Note: for WPB Series blenders, follow instructions, How to
Assemble Containers with Removable Blades, page 5.
REPACKING INSTRUCTIONS
IMPORTANT: Always unplug the Waring Pro
®
Blender from outlet when disassembling and assembling.
IMPORTANT SAFEGUARDS
When using electrical appliances, basic safety precautions
should always be followed, including the following:
1.READ
ALL INSTRUCTIONS.
2.
Unplug from outlet when not in use, before putting on
or taking off parts, and before cleaning.
3.To protect against risk of electrical shock, do not put appliance in water or other liquid.
4.
Do not use carbonated liquids in the blender jar, or
any blending container. Using carbonated liquids in
the blender jar or any blending container may result
in injury.
1. Place the unit on a large, sturdy flat surface.
5.This appliance should not be used by or near children or
individuals with certain disabilities.
2. Carefully place blender base in bottom of box.
6. Avoid contact with moving parts.
3. Place corrugated insert over base.
7.Do not operate the Waring Pro® Blender or any other
electrical appliances with a damaged cord or plug, or after
the unit malfunctions, or is dropped or damaged in any
manner. Return it to the nearest authorized service facility
for examination, repair, or adjustment.
4.Place blender container assembly over corrugated insert
and cover with corrugated flap.
5. Close box for shipping.
CONTENTS
Important Safeguards. . . . . . . . . . . . . . . . . . . . .3
Grounding Instructions . . . . . . . . . . . . . . . . . . . . 4
Important Hot Blending Instructions . . . . . . . . . . . . . 4
Operating Instructions. . . . . . . . . . . . . . . . . . . . .5
How To Assemble Containers With Removable Blades. . . 5
How To Disassemble And Clean Containers With
Removable Blades . . . . . . . . . . . . . . . . . . . . . . 6
How To Clean Containers With Nonremovable Blades. . . .7
How To Clean Unit Base . . . . . . . . . . . . . . . . . . . 7
Recipes . . . . . . . . . . . . . . . . . . . . . . . . . . . .7
2
8.The use of attachments, including canning jars, not
recommended or sold by Waring Pro may cause fire,
electric shock, or injury.
9. Do not use outdoors.
10.Do not let cord hang over edge of table or counter, or
touch hot surfaces.
11.Keep hands and utensils out of jar while blending to
prevent the possibility of severe personal injury and/or
damage to the blender. A rubber spatula may be used,
but must be used only when the blender is not running.
12. Blades are sharp. Handle carefully.
3
13.To avoid injury, never place blade assembly on the base
without container properly attached.
14. Always operate blender with cover in place.
15.When blending hot liquids, remove center piece of
two-piece cover. Begin processing with only one cup
(8 oz.). Always begin processing at the lowest speed
setting. Keep hands and other exposed skin away from the
lid opening to prevent possible burns. See Hot Blending
instructions, next page.
16.Screw on container bottom firmly. Injury can result if moving blades accidentally become exposed.
17. Do not leave blender unattended while it is running.
18.Do not operate your appliance in an appliance garage
or under a wall cabinet. When storing in an appliance
garage, always unplug the unit from the electrical
outlet. Not doing so could create a risk of fire, especially if
the appliance touches the walls of the garage or the door
touches the unit as it closes.
adapter, it must be determined that the outlet cover plate screw
is properly grounded. If in doubt, consult a licensed electrician.
Never use an adapter unless you are sure it is properly
grounded.
Note: Use of an adapter is not permitted in Canada.
This appliance is for 120 volts only and should not be used with
a converter.
Important: Hot Blending Instructions
To minimize possibility of scalding when blending hot
ingredients, the following precautions and procedures must be
observed:
1. Limit amount of material processed to one cup (8 oz.).
2.Completely remove the lid insert of the two-piece container
lid before starting motor. (This will allow venting of the
rapidly heated and expanding air present inside container
when blender is running.)
3. Start blending on low speed.
4.While blender is running, up to 1½ cups (12 oz.) of
additional liquid can be added. Pour liquid slowly through
the opening in the lid.
Operating Instructions
SAVE THESE INSTRUCTIONS
Grounding Instructions
For your protection, Waring Pro® Blenders are equipped
with a 3-conductor cordset that has a molded 3-prong
grounding-type plug, and should be used in combination with a
properly connected grounding-type outlet as shown in Figure 1.
If a grounding-type outlet is not available, an adapter, shown in
Figure 2, may be obtained so that a 2-slot wall outlet can
be used with a 3-prong plug. Referring to Figure 3, the adapter
must be grounded by attaching its grounding lug under the
screw of the outlet cover plate. CAUTION: Before using an
4
1.When placing the container on the unit base, make sure
that the unit is turned off and is at a complete stop. Do not
put the container on or take it off while the unit is running.
Doing so may damage the drive shaft or blade assembly.
For best results, do not fill container above
3-cup level.
2.Be sure the switch is in the off position and plug the
blender into a convenient outlet.
3.The Waring Pro® Blender is ideal for blending ice drinks.
A hint when mixing ice drinks: keep the blades in the
container covered with liquid, turn the unit on, remove the
lid insert on top of the jar lid, and feed the ice cubes slowly
into the jar. NOTE: Never use containers other than Waring
Pro® Blender containers with your Waring unit.
5
4.
CAUTION: DO NOT use carbonated liquids in the blender
jar or any blending container. Using carbonated liquids in
the blender jar or any blending container may result in injury.
How To Disassemble & Clean
Containers with Removable Blades
5.Put ingredients into container, then put on cover. Always
add liquid ingredients first, unless otherwise specified in
recipe. Always hold container with one hand while blending.
2.Remove the container assembly from the unit base and
empty the contents.
1. Be sure the switch is in the off position.
6.
CAUTION: To avoid damage to your blender, do not run the
blender if the blades become blocked or jammed during
use. Turn the blender off immediately, remove the container
from the blender base and dislodge the material that is
blocking or jamming the blade.
3.To disassemble the Waring Pro® Blender container
assembly, turn container collar clockwise.
How To Assemble Containers
with Removable Blades
5.When assembling container after cleaning, be certain all
components are in the proper position.
1.Before starting, make sure that the
blender cord is unplugged and that
the switch is in the off position.
6.It is particularly important to place the container gasket
between the blade assembly and the container.
7.Wash and rinse container prior to initial use, and
immediately after each use.
2.Refer to Figure 1. The following
points are important to note when
putting together the container
assembly:
How To Clean Containers with
Nonremovable Blades
3.Container gasket must be between
the blade assembly and the
container.
1.Remove the container from the unit base. Remove the
lid. Add a cup of cleaning solution, made by adding a few
drops of dishwashing detergent to 1 cup of cool water,
to the container. Scrub and flush out the interior of the
container and the lid to dislodge and remove as much
residue as possible. Empty the container.
4.Container collar must not be
misthreaded onto the container.
5.Container collar must be securely
tightened onto the container
before placing food or liquid in the
container.
4.The glass container, container collar and blade assembly
are dishwasher safe. The plastic container, lid, measuring
cup lid insert and gasket must be washed by hand. Allow
all parts to air dry, and reassemble for next use.
Fig.1
2.Add more cleaning solution. Put lid on container, place
container on unit base, and run on high speed for
two minutes.
6.Tighten the container collar by holding the container upside
down and turning the container collar
counterclockwise.
3.Empty the container and repeat as above, using clean rinse
water in place of cleaning solution. Empty, rinse and dry,
prior to storing unit.
7.Place container assembly on unit base so that it is firmly
seated and not tilted to one side. Never place the container
collar or the blade assembly on the unit base unless the
container has been completely assembled and securely
tightened.
4.Wash and rinse container prior to initial use, and
immediately after each use.
6
7
How To Clean unit Base
o clean the unit base, unplug the power cord. Wipe the exterior
T
surfaces with a soft cloth or sponge dampened with cleaning
solution. Rinse with clean water. Do not immerse the base in
cleaning solution or water. Wipe the base with dry towel.
Any other servicing should be performed by an authorized
service representative.
Recipes
SHAKES
Chocolate Malted Shake – 2 servings
½ cup whole milk
1 tablespoon chocolate syrup
1 cup chocolate ice cream
3 tablespoons malt powder
1 teaspoon vanilla
Place ingredients in blender jar in order listed. Blend for 2 minutes
on HI.
Nutritional information per serving:
Calories 335 (31% from fat) • carb. 51g • pro. 8g • fat 12g • sat. fat 7g
chol. 37mg • sod. 242mg • calc. 239mg • fiber 0g
Power Shake – 2 servings
½ cup orange juice
1 ripe banana
1½ cups fresh or frozen strawberries
1 tablespoon sugar (optional)
6-8 ice cubes
Place ingredients in blender jar in order listed. Blend for 1-2 minutes
on HI.
Nutritional information per serving (with sugar):
Calories 138 (5% from fat) • carb. 34g • pro. 2g • fat 1g • chol. 0mg
sod. 5mg • calc. 28mg • fiber 4g
SMOOTHIES
Strawberry Banana Smoothie – 2 servings
¾ cup nonfat milk
1 cup strawberries, hulled, cut in half
½ cup banana slices (½-inch slices)
1 tablespoon plain fat-free yogurt
10 ice cubes
Place ingredients in blender jar in order listed. Cover and blend on LO
for about 20 seconds, then on HI for another 40 seconds. Serve
immediately.
Nutritional information per serving:
Calories 84 (6% from fat) • carb. 17g • pro. 4g • fat 1g • chol. 2mg
sod. 56mg • calc. 139mg • fiber 2g
Mango Lime Smoothie – 4 servings
2 mangoes, peeled, pitted, and cut into 1-inch pieces
½ cup lime juice
¼ cup apple juice
¼ cup mango juice
6 tablespoons sugar
9 ice cubes
¼ cup rum (optional)
Place all ingredients in blender jar in order listed, cover, and blend for
1–2 minutes on HI.
Nutritional information per serving:
Calories 196 (2% from fat) • carb. 43g • pro. 1g • fat 0g • chol. 0mg
sod. 6mg • calc. 16mg • fiber 2g
Citrus Julius - 2 servings
1 cup milk
¼ cup tangerine juice
¼ cup orange juice
2 tablespoons sugar
10 ice cubes
½ egg white
½ teaspoon vanilla
Place all ingredients in blender jar in order listed, cover, and blend for
1-2 minutes on HI.
Nutritional information per serving:
Calories 175 (21% from fat) • carb. 24g • pro. 10g • fat 4g
chol. 17mg • sod. 151mg • calc. 162mg • fiber 0g
8
9
BREAKFAST
APPETIZERS
Oatmeal Banana Waffles – makes 8 - 10 waffles
Guacamole – 8 servings
1 cup old-fashioned oatmeal (not instant)
1 cup flour
1 tablespoon baking powder
½ teaspoon baking soda
½ teaspoon ground cinnamon
1⁄8 teaspoon ground nutmeg
3 tablespoons brown sugar
1½ cups buttermilk
2 large eggs
2 medium size ripe bananas, sliced
4 tablespoons butter (melted)
1 tablespoon vanilla
pinch salt
Blend ½ cup oats on HI until they reach a powdery consistency. Put
blended oats into a bowl with remaining oats and set aside. Blend the
remainder of dry ingredients until thoroughly mixed. Add to oats.
Blend buttermilk, eggs, banana, butter and vanilla on LO until smooth.
Pour wet ingredients over dry ingredients, and stir until just mixed. Do
not overmix.
Pour ½ cup of batter per waffle onto hot waffle iron. Cook. Serve
immediately, or reserve baked waffles in 200°F degree oven until all
waffles have been baked.
Nutritional information per waffle (10-waffle yield):
Calories 183 (32% from fat) • carb. 26g • pro. 5g • fat 7g • chol. 56mg
sod. 777mg • calc. 142mg • fiber 2g
1 ripe avocado, peeled, halved, and pitted
1 lime, juiced
1 garlic clove, chopped
1 plum tomato, quartered
1 8
⁄ cup fresh cilantro leaves
1 8
⁄ teaspoon salt
1 green onion, sliced
2–3 drops Tabasco ® sauce or other hot sauce
Place all ingredients in a bowl and mash slightly with fork. Transfer to
blender and blend on LO just until combined. Do not overblend.
For a chunkier texture: Blend all ingredients except avocado. Mash
avocado by hand and stir into blended mixture.
Nutritional information per serving:
Calories 43 (66% from fat) • carb. 4g • pro. 1g • fat 4g • chol. 0mg
sod. 44mg • calc. 6mg • fiber 2g
Sun-dried Tomato Tapenade – 16 servings
8 ounces sun-dried tomatoes in oil, drained
2 garlic cloves
2 tablespoons grated Parmesan cheese
½ teaspoon oregano
½ teaspoon basil
¼ teaspoon salt
3 tablespoons extra virgin olive oil
Place all ingredients in blender. Mix on HI, stopping frequently to
scrape down the sides of blender jar. Tapenade is best when paired
with cheese and bread.
Nutritional information per serving:
Calories 56 (70% from fat) • carb. 4g • pro. 1g • fat 5g • chol. 1mg
sod. 83mg • calc. 17mg • fiber 0g
10
11
VINAIGRETTE
Balsamic Vinaigrette – 20 servings
1 tablespoon Dijon mustard
3 tablespoons balsamic vinegar
2 garlic cloves
½ teaspoon salt
1 cup olive oil
pepper to taste
Blend first 4 ingredients on HI for a few seconds. Then, with blender
running, remove small lid insert and pour in oil VERY SLOWLY. It will
take a while, but the results are worth it! Season with pepper.
Nutritional information per serving:
Calories 97 (98% from fat) • carb. 0g • pro. 0g • fat 11g • chol. 0mg
sod. 77mg • calc. 1mg • fiber 0g
Tangy Blue Cheese Dressing – Makes 1¾ cups
1 garlic clove, peeled
1 shallot, peeled and cut into ½ inch-pieces
2 tablespoons fresh Italian parsley leaves
1 cup lowfat mayonnaise
½ cup buttermilk or fat-free plain yogurt
¼ cup crumbled blue cheese
½ teaspoon kosher salt
¼ teaspoon ground white pepper
dash Tabasco ® or other hot sauce to taste
Place garlic, shallot and parsley in blender container. Blend on HI for
10 seconds. Scrape blender jar and add remaining ingredients. Blend
on HI for 30–40 seconds until smooth and creamy. Let stand for 30
minutes before serving, to allow flavors to develop.
Nutritional information per tablespoon:
Calories 31 (84% from fat) • carb. 1g • pro. 0g • fat 3g • chol. 4mg
sod. 112mg • calc. 13mg • fiber 0g
SOUPS
Gazpacho – 8 servings
1 can (12 ounces) spicy vegetable juice
4–5 fresh plum tomatoes, quartered
1 can (14 ounces) crushed tomatoes with
roasted garlic (if available)
2 garlic cloves
1 medium onion, chopped
1 celery stalk with leaves, cut into 1-inch chunks
1 teaspoon Worcestershire sauce
1 teaspoon balsamic vinegar
½ teaspoon lemon juice
red pepper flakes to taste
salt to taste
pepper to taste
5–6 drops Tabasco ®
Place all ingredients in blender and run for 2–3 minutes on HI. If the
blender is too full, you may want to make this recipe in 2 batches.
Nutritional information per serving:
Calories 22 (7% from fat) • carb. 5g • pro. 1g • fat 0g • chol. 0mg
sod. 166mg • calc. 13mg • fiber 1g
Cream of Carrot Soup – 8 servings
½ cup cooked white rice
4 carrots, peeled and sliced
1 medium onion, sliced
1 celery stalk, cut into 1-inch chunks
1½ cups chicken stock
1 teaspoon salt
¾ cup light cream
cayenne pepper to taste
sour cream and diced roasted red peppers (garnish)
In a small stockpot, bring vegetables and one cup of chicken stock to
a simmer, and cook for 20–25 minutes. Let cool for 15–20 minutes.
Pour soup into blender with remaining stock, rice, salt and cayenne.
Blend on LO for 1–2 minutes, until smooth. Add cream and chill in
refrigerator to serve cold, or reheat to just below a simmer to serve
hot. Garnish with diced peppers and a dollop of sour cream.
Nutritional information per serving:
Calories 88 (45% from fat) • carb. 10g • pro. 2g • fat 4g • chol. 15mg
sod. 143mg • calc. 37mg • fiber 1g
12
13
DESSERTS
Notes
Berry Cobbler – 8 servings
3
1
¾
1
½
1
3
eggs
cup milk
tablespoon baking powder
cup flour
cup sugar
teaspoon vanilla
nutmeg to taste
cinnamon to taste
lemon zest to taste
cups berries – tossed with sugar
Mix all ingredients, except fruit, in blender on LO. Grease
individual ramekins with butter. Place fruit on the bottom and
pour in batter to cover the fruit. Sprinkle with sugar and bake in
350°F degree oven for 30 minutes. Serve warm.
Note: Cobbler can be made with peaches, pears, apples, and
other fruits.
Nutritional information per serving (cobbler batter only):
Calories 152 (18% from fat) • carb. 26g • pro. 5g • fat 3g • chol. 84mg
sod. 39mg • calc. 89mg • fiber 0g
Amazing Chocolate Silk Pie – 12 slices
12 ounces bittersweet or semisweet chocolate, broken
into small pieces
1 tablespoon vanilla extract
1 package (19 ounces) silken tofu
1 nine-inch graham cracker or chocolate cookie crust
(purchased or homemade)
Melt chocolate in double boiler over barely simmering water (may also
be done in microwave); stir in vanilla. Place tofu in blender jar; blend
on HI until smooth, 10–15 seconds. Remove small lid, and, with
blender running on HI, add melted chocolate mixture in a steady
stream; blend 15 seconds. Stop blender and scrape sides of blender
jar with a spatula. Blend on HI 10–15 seconds longer. Pour into crust.
Cover and chill at least 4 hours before serving. May be served with
slightly sweetened whipped cream.
Nutritional information per serving:
Calories 281 (53% from fat) • carb. 28g • pro. 8g • fat 18g • chol. 0mg
sod. 145mg • calc. 90mg • fiber 1g
14
15
Any other trademarks or service marks of
third parties referred to herein are the trademarks or
service marks of their respective owners.
Todas marcas registradas o marcas de comercio mencionadas
en ésta pertenecen a sus titulares respectivos.
Toutes marques déposées ou marques de commerce
ci-incluses appartiennent à leurs propriétaires respectifs.
Printed in USA
Impreso en los EE.UU.
Imprimé aux É.–U.
©2012 Waring Consumer Products
150 Milford Road
East Windsor, NJ 08520
www.waringpro.com
MBB/PBB/WPB IB
12WR134329
026177
REV06 1207