1
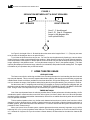
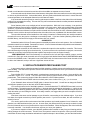
operation manual
Bookshelf-75
LCR-55 MkII
Center-55 MkII
LCR-45
Miller & Kreisel Sound Corporation
10391 Jefferson Boulevard
Culver City, CA 90232 USA
(310) 204-2854 FAX (310) 202-8782
www.mksound.com
© 1999 MILLER & KREISEL SOUND CORP.
Bookshelf-75/Center-75/LCR-75/LCR-55
Bookshelf-75/LCR-55MkII/Center-55MkII/LCR-45
page 2
TABLE OF CONTENTS
1.
2.
3.
4.
5.
6.
7.
8.
9.
10.
11.
12.
13.
14.
15.
INTRODUCTION..................................................................................................................3
PLACEMENT OF YOUR SPEAKERS..................................................................3
SPEAKER HOOK-UP..........................................................................................................3
BOOKSHELF-75 FRONT BAFFLE FOAM PLUG...........................................................4
HIGH-FREQUENCY PRISM SYSTEM (LCR-55MkII, Center-55MkII).......................................4
OPTIMIZING SPEAKER PLACEMENT..............................................................................5
HOME THEATRE USAGE..................................................................................................6
CENTER CHANNEL ..................................................................................................................7
SURROUND CHANNEL .............................................................................................................7
SATELLITE/SUBWOOFER PHASING TEST....................................................................8
SPEAKER DAMAGE & HOW TO AVOID IT....................................................................9
BI - AMPLIFYING YOUR SPEAKERS WITH M&K HIGH-PASS FILTERS....................9
M&K 5.1 MULTICHANNEL & PRO-LOGIC SYSTEM SETUP GUIDE......................................10
IF YOU NEED SERVICE OR SET-UP ASSISTANCE......................................................12
CABINET MAINTENANCE................................................................................................12
USE WITH M&K STANDS & BRACKETS..................................................................12
SPECIFICATIONS.......................................................................................................12
DIAGRAMS
FIGURE 1
FIGURE 2
SPEAKER WIRING..................................................................................4
SEPARATION BETWEEN LEFT & RIGHT SPEAKERS............................6
BOOKSHELF-75 OWNERS:
IF YOU ARE USING A SUBWOOFER
DO NOT REMOVE THE SPECIAL FOAM PLUG
ON THE FRONT BAFFLE OF YOUR SPEAKERS.
This special foam plug tunes the perfomance of your loudspeaker system. If you are using
your Bookshelf-75 speaker with a separate subwoofer, leave the plug in place. If you do not
have a subwoofer, you may want to remove the plug, because its removal will produce more
bass output from the Bookshelf-75. See Section 4 on page 4 for more information.
DO NOT DISCARD THE FOAM PLUG
page 3
Bookshelf-75/LCR-55MkII/Center-55MkII/LCR-45
Bookshelf-75/Center-75/LCR-75/LCR-55
1. INTRODUCTION
Congratulations! Your new M&K speaker system will give you years of unmatched enjoyment and excitement
while listening to your favorite musical and audio/video sources.
We encourage you to read this owner’s manual, as there is a great deal of information provided here to help you
achieve the best possible performance.
If you have any questions about your speaker system, please contact your M&K dealer or call the M&K factory
directly at (310) 204-2854, from 8:30 AM to 5:00 PM Pacific Time, Monday through Friday. We will be happy to help
you with any question, no matter how simple or complex it may be. Additional information may also be obtained on
our web site: www.mksound.com or you may send us an e-mail at [email protected].
This manual gives you basic hook-up instructions first, followed by more detailed technical, installation, and
service information.
2. PLACEMENT OF YOUR SPEAKERS
Your M&K speakers can be installed in a wide variety of locations. Their compact size gives you great flexibility
in installation. They can be placed on stands, shelves, or bookcases, or more permanently mounted using brackets,
through direct attachment to a wall, or with a ceiling suspension system.
If you want to mount your speakers permanently using wood screws, their cabinet thickness is 3/4". Do not use
longer screws, as you may damage the internally mounted crossover.
You can place the left and right speakers virtually anywhere in the room, but certain locations are better than
others. In general, locate them away from obstructions that would interfere with the direct path from the speakers to
your ears (such as walls, furniture, lighting, plants, etc.). Center channel speakers should be located close to the
television screen (see Home Theater Usage on page 6). Your speakers will sound better when they are around ear
height, or when angled towards your listening location. They sound better when they are not sitting on the floor.
Your speakers can be used with OmniMount® Systems brackets, without the use of wood screws, because their
cabinets have integral threaded hardware in patterns for OmniMount brackets. These brackets offer tremendous
flexibility for installation in a wide variety of environments. For more information, see Section 13 (page 10), or contact
OmniMount at (602) 829-8000.
For more detailed information on placement of your speakers, see Section 6 (page 5).
SPECIAL NOTE - THE Bookshelf-75, LCR-55MkII, Center-55MkII and LCR-45 ARE TV SHIELDED
Your speakers are magnetically shielded. This means that you can locate them close to a television set or even
directly on top of the set.
In some rare instances, a small amount of residual magnetism at a specific angle to your TV set may cause a
slight geometric or color distortion of the picture on your television set. If you do get this distortion, try moving the
speaker slightly until the distortion is reduced or disappears. Then turn the set off and wait 10 minutes before turning
it back on to trigger the set's degaussing circuitry. If you cannot solve any magnetic problems, contact the M&K factory.
3. SPEAKER HOOK-UP
Please follow these instructions carefully, to avoid any possible damage to the speakers or your amplifier, and
to get the best possible sound.
The sound quality of your speakers can be affected by the type of speaker wire that you use to connect them.
While it is possible to use speaker wire as thin as 22 gauge to hook your speakers up, we recommend using the largest
diameter wire that you can. This means a minimum of 18 gauge wire. Over 10 feet, you should use 16 gauge, and
for more than 30 feet, we recommend using 14 gauge or heavier. The smaller the number, the thicker the wire.
There are a very wide variety of premium speaker cables available from a number of specialist manufacturers.
We do not endorse any specific brand of premium cable, but we do recommend using as high quality a cable as fits
your budget. Using better quality cables will improve the sound of your Satellites.
Your M&K Speakers are not designed for bi-wiring. If you wish to bi-amplify your speakers in combination with
an M&K Powered Subwoofer, see Section 10 (page 9) for more details.
HOOKUP
For each speaker, connect the Positive (+) lead from your amplifier or receiver to the RED (+) INPUT terminal
page 4
Bookshelf-75/Center-75/LCR-75/LCR-55
Bookshelf-75/LCR-55MkII/Center-55MkII/LCR-45
FIGURE 1
SPEAKER WIRING
and connect the Negative (-) lead from your amplifier or receiver to the BLACK (-) INPUT terminal. See Figure 1.
4. CABINET ALIGNMENT TUNING PLUG (BOOKSHELF-75 ONLY)
On the front baffle of the Bookshelf-75 speaker is a large (2" diameter) plug that can be easily removed or inserted.
DO NOT THROW THIS PLUG AWAY. This plug can be used to adjust the performance of the speaker to fit your system
needs or personal preferences.
When the plug is inserted into the speaker cabinet, the plug seals the speaker port, making the Bookshelf-75 a
SEALED BOX speaker. When the plug is removed from the speaker cabinet, the port is open, making it a VENTED
BOX speaker. When you use the Bookshelf-75 as a vented box speaker, the port adds a couple of dB extra midbass
output around 80 Hz. Here are the advantages and disadvantages of each mode, with recommended applications.
Feel free to experiment with both configurations to see which one you prefer.
SEALED BOX (Plug inserted in port):
If you are using a subwoofer with your Bookshelf-75s, operate the Bookshelf-75 as a sealed box. This will give
you the best transition of sound between the Bookshelf-75 and the subwoofer. If you are using a high-pass filter (M&K
HP-80 or VF-80), you must operate the Bookshelf-75 as a sealed box in order for the filter to operate optimally.
The sealed box configuration gives you the best transient response, the tightest mid-bass, and the flattest
frequency response. If you are using the Bookshelf-75 as a full-range speaker (without a subwoofer), we recommend
that you use the Bookshelf-75 as a vented box speaker. Again, we encourage experimentation.
VENTED BOX (Plug removed from port):
Removing the plug increases the mid-bass output of the Bookshelf-75 by a couple of decibels in the 80 Hz region,
which increases the perceived bass. This is recommended when the system has no subwoofer. The vented box
configuration generally gives the most satisfying bass when the Bookshelf-75 is being used as a full-range speaker.
5. THE M&K HIGH-FREQUENCY PRISM SYSTEM
Your LCR-55MkII and Center-55MkII speakers utilize M&K's exclusive High-Frequency Prism System to
optimize imaging and coverage of sound throughout the listening area. This system is designed to take into account
the effect of the curved mesh metal grilles on your speakers. Therefore, your speakers are designed for the best sound
Bookshelf-75/LCR-55MkII/Center-55MkII/LCR-45
Bookshelf-75/Center-75/LCR-75/LCR-55
page 5
You will note that the tweeter in your LCR-55MkII and Center-55MkII speakers is mounted at a slight angle (4.7
degrees). This mounting is an integral part of the High-Frequency Prism System.
When the speakers are mounted properly, the tweeter will be angled away from the listening position. That
means that the surround channel speakers should be mounted with the tweeter angled towards the back wall of the
room (when the speakers are mounted on the side walls), and with the tweeter angled toward the closest side wall
(when the speakers are mounted on the back wall of the room).
When the speaker is mounted in this fashion, its stereo imaging and coverage of sound are optimized for a very
wide listening window that extends from the on-axis position towards the center of the room. If the speaker is mounted
with the tweeter pointed in the other direction, its sound quality will be adversely affected.
6. OPTIMIZING SPEAKER PLACEMENT
The sound quality produced by your speakers can be significantly enhanced by careful attention to their
placement. While we understand that you may not redesign your room to accommodate your speakers, coming as
close as possible to the ideal placement will give you much better sound.
The left and right channel speakers can be oriented either horizontally or vertically. The Center channel speaker
is designed for horizontal orientation (tweeter and woofer drivers next to each other), and can be angled (vertically)
towards your listening position.
Three factors are important in getting the best sound. They are:
A.
Height (or angle).
B.
Location away from room walls or reflecting surfaces.
C.
Separation between Left and Right speakers.
A. HEIGHT (OR ANGLE)
Your M&K Speakers will always deliver sound superior to conventional speakers, regardless of where you locate
them. However, because they are designed for very fast and accurate transient response, they achieve even better
sound quality, and the flattest frequency response when properly oriented relative to your ear.
Ideally, the tweeters should be at the same height from the floor as your ears, when you are sitting in your main
listening position.
If you have the speakers mounted above or below this height, they sound their best when you angle the speakers
so that the tweeters are aimed at your ears when you are in the main listening position.
If you have a helper move the speakers while you sit and listen, you should be able to hear the difference when
the speakers are in the best location by listening for the brightest high frequencies and for the best "focus" of sound,
where you hear the sharpest sonic imaging of voices and instruments.
B. LOCATION AWAY FROM REFLECTING SURFACES
Your Speakers should be located, whenever practical, away from walls, the floor, furniture, or any other reflecting
surfaces. Do the best you can. Objects close to the speaker will reflect sound, and this reflected sound arrives at your
ear slightly later than the direct sound, which blurs sonic imaging and makes transients seem muted.
The delay is very slight, so instead of hearing an echo, you hear a "blurred" sound with less clarity that is not as
sharp and distinct as it should be. This time delay also affects frequency response and sonic imaging.
If the speakers are on a television set or shelves, locate them on the front edge, so there is no flat surface directly
in front of them. If the speakers will sit close to walls or other large objects, leave as much space as possible between
the speaker and the object. Ideally, your Speakers will be several feet from the nearest surface, but in most rooms
compromise is necessary.
C. SEPARATION BETWEEN LEFT AND RIGHT SPEAKERS
Here is a formula for achieving the ideal left to right stereo imaging. Think of a triangle formed by the locations
of the Left and Right speakers and your listening position. Ideally, the subtended angle formed should be between
45 and 50 degrees. Roughly, this means that the Left and Right speakers should be separated by about the same
distance that you are sitting back from the speakers. In other words, if the distance from your listening position to the
point directly between the speakers is 10 feet, place the speakers so their centers are 10 feet apart. See Figure 2 on
page 6.
page 6
Bookshelf-75/Center-75/LCR-75/LCR-55
Bookshelf-75/LCR-55MkII/Center-55MkII/LCR-45
FIGURE 2
SEPARATION BETWEEN LEFT & RIGHT SPEAKERS
X
A
Y
LEFT SPEAKER
RIGHT SPEAKER
Line X - Y should equal
line A - B. (line A - B appears
longer in this diagram due
to an optical illusion).
B
On Figure 2, the length of line A - B should be about the same as the length of line X - Y. (They may not seem
to be the same in this diagram due to an optical illusion).
Try to follow the formula as close as you can. You can fine tune the placement by listening to a source with an
image (such as a vocalist) centered between the speakers. When listening in stereo (no Center Channel speaker),
move the speakers closer together or farther apart in small increments until you hear the sharpest and most cohesive
image, especially in the phantom center. You may also want to angle (or "toe-in") the speakers slightly. This often
improves the sharpness of the stereo image, reduces room colorations, and provides a wider seating area. The angled
front baffles of your Speakers also provide this benefit.
7. HOME THEATRE USAGE
LEVEL-MATCHING
The factor most critical to achieving excellent Home Theatre performance is level-matching the three front and
two surround channels. This is even more important than timbre-matching. We strongly recommend that you purchase
a Radio Shack Sound Level Meter (available for less than about $40, and get the analog meter, not the digital) and
use it to measure the output of the speakers when playing the test tones generated by your processor or receiver.
Set the meter to the "C" weighting scale, and using your amplifier or receiver's internal noise calibration test, set
the levels so that all channels measure the same level. WHENEVER POSSIBLE, DO NOT CALIBRATE LEVELS BY
EAR! Using a meter is an inexpensive way to be certain that your system is calibrated properly.
TIMBRE-MATCHING
One of the most important factors in achieving excellent Home Theatre performance is timbre-matching. On film
soundtracks, specific sounds are often moved from left to right or from front to back in the room. When the speakers
reproducing these sounds have dissimilar characteristics, there will be an audible discontinuity when the sound shifts
from one speaker to another.
Timbre-matched speakers have very similar tonal characteristics and sound, which come from three critical
elements: similar or identical drivers; similar or identical crossovers; and similar or identical frequency response. In
full M&K systems, these elements have been addressed. You can be assured that the system can achieve the full
potential of Home Theatre sound.
When you have a Home Theatre system, speaker placement becomes extremely important, as you will be
balancing four or five (or more) speakers rather than two. The following guidelines are for a five-channel Pro-Logic
or 5.1 channel AC-3 system, but if you do not have a Center channel, the instructions for the other four channels still
apply.
Bookshelf-75/Center-75/LCR-75/LCR-55
Bookshelf-75/LCR-55MkII/Center-55MkII/LCR-45
page 7
CENTER CHANNEL
The Center channel speaker in a Pro-Logic or AC-3 system is the most important speaker in the system. This
speaker often produces more output than the left and right speakers combined. This speaker should be of the highest
possible quality, and as similar as possible in response and radiation pattern to the left and right speakers. Three
identical speakers are best, unless the center channel is designed to work with a set of left and right speakers.
It is also important to have as much amplifier power as possible for the Center channel. As a minimum, the three
front channels should be identical in power output, but it is better if the Center channel has more. If you have less power
in the Center channel, this will be the limiting factor in the total output capability of the system when watching and
listening to video sources.
The Center channel speaker should be located as close as physically possible to the television or projection
screen, preferably just above or below the screen. If that is not possible, then just to the left or the right of the screen
may be acceptable.
If the television is not in the center of the room (or not centered between the Left and Right speakers), the Center
channel speaker should still be as close as possible to the screen -- even if it is outside the left and right speakers (such
as a TV located in a corner of the room outside the stereo spread of the left and right speakers). Good results can
be achieved in unusual configurations when the Center speaker is as close as possible to the screen.
The Left and Right front channel speakers in a Home Theatre system should be placed the same as the left and
right speakers in a stereo setup. Some listeners, however, may prefer to reduce the distance between the left and
right speakers to bring the size of the acoustic image closer to the size of the screen image.
For example, with a 25" direct-view television, you would want the speakers closer together than you would with
a 100" projector. One recommendation is to separate the speakers by 1.5 times the diagonal screen size; another
is to place the left and right speakers to create a 45 degree angle with the main listening position.
There is a great deal of latitude in this area, as it is one of personal preference (especially if you will listen to music
without video).
It is also preferred that the speakers be equidistant from the listening position. Equidistant usually means that
when the center speaker is on top of the television, the left and right speakers will sit in front of the set (they will be
farther from the wall behind the TV than the center speaker). Ideally, the speakers should be at the same height as
the screen, but it is much more important that all three speakers be at as close to each other's height as possible. If
the center is much higher or lower than the other speakers, the effect can be distracting. Angling, or toeing-in the
speakers, to aim at the listening position often improves imaging.
When using a Center channel speaker, you have extra flexibility in placing the left and right speakers, as the
Center channel speaker will tie most dialog and effects directly to the screen.
SURROUND CHANNELS
You can achieve good performance with your surround speaker placed in a wide variety of room locations. In
general, they should be either adjacent to or behind the main listening position, located higher than the listener's heads.
They can be mounted on either the side walls or on the back wall, flush to the wall, on shelves, on brackets, etc.
The goal is to achieve an enveloping sound. The surround channels should seem to come from all around you,
rather than seeming to come from behind you only or directly from a speaker.
This section discusses non-THX surround speakers. THX system requirements call for dipolar surround
speakers mounted to the sides of the listening position above the listeners' heads. See M&K's THX surround speaker
instruction manual and the THX Installation Guide for detailed instructions.
For non-THX surrounds, we recommend starting with speakers on the side walls of the room, two to three feet
above the listeners' heads, either directly adjacent to the listening position or behind it. You can aim the speakers
to fire towards each other (across the listening area), or you can aim them to fire towards the back wall at an angle.
The surround speakers should not be in front of the main listening position if possible.
If you mount the surrounds on the side wall behind the listening position, they can be aimed towards each other
or angled towards the back wall or the side wall surface directly behind them. By reflecting sound behind the listening
position, you may increase the sense of envelopment in the sound.
If you want or need to mount speakers on the back wall of the room, there are several options. You can aim them
so that they fire towards each other (so they fire along the back wall); you can aim them towards the front wall of the
room; or you can angle them so they fire toward the side walls. Symmetrical arrangements work best.
The speakers should be a minimum of a few feet away from the nearest listener. If the speaker is located too
close to a listener, its sound will become too directional and may distract that listener. Ideally, the surround speakers
Bookshelf-75/LCR-55MkII/Center-55MkII/LCR-45
Bookshelf-75/Center-75/LCR-75/LCR-55
page 8
should not call attention to themselves and should not be audible as separate sources of sound.
If the surrounds must be located close to the listeners, aiming them at the room walls or even the ceiling can help
to reduce any directional effect. As described above, this can produce a desirable result even in rooms where the
surround speakers are an adequate distance from the listeners' heads.
If the surrounds cannot be placed on a wall, try placement on tables or the floor to the sides of the main listening
position, firing up towards the ceiling. This can work very well in environments that do not allow permanent attachment
of speakers to the walls.
Some listeners prefer to use multiple pairs of surround speakers. While this is not necessary, it can provide a
broader and deeper surround effect, with better coverage in very large rooms. When using multiple pairs of surround
speakers, a symmetrical installation pattern works best. For example, if you are using two pairs of Bookshelf-75
Speakers for the surround channel, one pair could be mounted on the back wall of the room, mounted equidistant from
the back corners, with the other pair mounted on the side walls of the room, equidistant from the same back corners.
The surround channels can be installed in a wide variety of locations, but because they are usually mounted on
the walls of the room, they can be a challenge to successfully install. If you have further questions, please call us at
the M&K factory, and we will be happy to discuss them with you in detail.
SUBWOOFER
Subwoofer location for Home Theatre systems is essentially the same as for music systems. See our Subwoofer
operation manual for more details. Remember to leave 2 - 3 feet of clearance between any television and subwoofer,
unless the subwoofer is magnetically shielded.
The preferred connection for the subwoofer is a subwoofer output from the amplifier or controller. This insures
that a full bass signal is being fed to the subwoofer. If you do not have such a subwoofer output jack, connect the
subwoofer to the front Left and Right channel amplifier outputs (do not use the Center channel).
VERY IMPORTANT: When the Subwoofer is connected to the Left and Right amplifier outputs, and the
controller is in Pro-Logic mode, the switch on the Pro-Logic control unit labelled Center channel WIDE/NORMAL must
be set to the NORMAL mode. If the switch is set to the WIDE mode, the bass content of the Center channel will not
be fed to the Subwoofer, and you will lose a significant amount of bass.
8. SATELLITE/SUBWOOFER PHASING TEST
In any system using a subwoofer separate from Main speakers, a phasing test must be performed to insure good
bass blending. This test insures optimum sound in the critical bass frequencies where your Subwoofer and Main
speakers overlap.
Play a familiar CD, LP, or tape with steady, consistent bass content through your system. Listen carefully to the
"mid-bass" region of 75 - 125 Hz. This is the part of the spectrum where electric or string basses and drums
predominate. Then reverse the phase of either the subwoofer or BOTH Main speakers.
If your Subwoofer has a PHASE switch on its back panel, move it either from (+) to (—) or vice versa.
If your Subwoofer does not have a PHASE switch, it takes a bit more work. You will have to change the Positive
and Negative speaker inputs on the back of BOTH Main speakers.
You can do this at the back of both Main speakers, or at the Subwoofer's TO SPEAKERS terminals, but never
at both locations. The lead that was on the Positive (+) terminal should be switched to the Negative (—) terminal, and
vice versa. When switching speaker wires, take care to protect your amplifier. Make sure that the wires do not touch
each other when you are making the switch. As a safety measure, we suggest that you turn the amplifier off before
making the switch.
Now listen to the same musical passage as you did earlier, concentrating on the mid-bass region. If you hear
less bass, the original connection (or switch position) was correct. If you hear more bass, the new connection (or
switch) is correct.
You need to perform this test because when Main speakers are located separate from a Subwoofer, each
speaker is at a different distance from your ear. In some cases, the difference will be just enough so that the output
from the Subwoofer arrives out of phase with the output of the Satellites. When this happens, that critical mid-bass
is actually cancelled. You should re-do this test any time you move your speakers.
If you want to experiment further, move the Main speakers either towards or away from your listening position,
making changes in small increments. This will "focus" the system's sound to its optimum. When you hear the best
combination of stereo image localization and maximum impact and output in the mid-bass, you have the ideal location.
Bookshelf-75/Center-75/LCR-75/LCR-55
Bookshelf-75/LCR-55MkII/Center-55MkII/LCR-45
page 9
9. SPEAKER DAMAGE & HOW TO AVOID IT
An important factor to consider with any loudspeaker system is the potential for speaker damage. Even though
your M&K Speakers have extremely high power handling ability (especially for Main speakers), they still can be
damaged by relatively low powered amplifiers.
While very few M&K Speakers are actually returned for service, the vast majority of those returned are not for
manufacturing defects. Instead, they are returned because they have been overdriven, almost always because the
amplifier or receiver used was driven into clipping distortion. This damage is considered abuse, and is not
necessarily covered under warranty.
This clipping distortion occurs when the demands of the music are greater than the amplifier's available power.
It can occur at 20 watts with a small amplifier, or at 400 watts with a large amplifier. When this happens, the amplifier's
output waveform (which should look like a smooth arc) is "clipped" off, exhibiting a flat top instead of the arc.
This "clipped" waveform contains multiples of the original amplified frequencies, sometimes at higher levels than
the original signal itself. For tweeters, this can be very damaging, as this distortion is well above the audible range
(where you are unable to hear it), and where the tweeter is most vulnerable to damage.
When an amplifier "clips", it generates a high level of high frequency energy (much higher than normal program
material) which passes through the crossover to the tweeter. This energy can overheat the tweeter in a matter of
seconds and destroy it.
When this happens, the sound becomes harsh and grating, and a break-up is often audible in the bass
frequencies. It will become uncomfortable to listen to, especially when compared to a slightly lower volume level.
When you are listening at high volume levels, be aware of the onset of clipping distortion, and turn the volume down
slightly if the sound takes on the character described above.
When tone controls or equalizers are used to boost frequencies, the problem occurs much more rapidly. Even
a small boost of low or high frequencies can easily double the power requirement and lead to amplifier clipping at
moderate levels. Therefore, you should use your tone controls judiciously, avoiding extreme boosts of the bass and
treble controls, especially when you are listening at high volume levels.
The best way to avoid speaker damage is to use common sense. Use moderate boosts of tone controls or
equalizers, at the very most. Listen carefully for any harshness and break-up, especially at high volume levels, and
turn down the volume when needed. If you cannot get enough volume, you may need to consider a higher-powered
amplifier. If you have any questions about this, please contact M&K, and we will be happy to discuss it with you further.
10. BI- AMPLIFYING YOUR SPEAKERS
WITH M&K HIGH PASS FILTERS
One excellent way to improve the sound of your Main speakers (and protect them if you listen at high volume
levels to music with substantial deep bass output), is by using an M&K High-Pass Filter. M&K's HP-80 and VF-80 HighPass Filters improve the performance of any system that allows for separation of its preamp and power amp stages,
by filtering the bass signal fed to the main amplifier and Main speakers.
These filters will give you greater dynamic range, lower distortion, and an increased maximum output level. If
you have any questions about the suitability of your components, please contact your M&K dealer or the factory.
To use these filters with an integrated amp or receiver, the amp/receiver MUST have back panel RCA jacks
labelled Preamp/Main Output AND Power Amp/Main Input (or Front Out/Front In) for all of the channels you want to
filter (including the center channel). You may have to operate a switch or remove jumper connections on the amplifier.
If you can use one of these filters, you simply connect one set of shielded RCA - RCA interconnect cables between
the receiver, amp or preamp's Main Output and the HP-80 or VF-80, with a second set between the HP-80 or VF-80
and the Main Input of the receiver or amplifier, and a third set from the HP-80 or VF-80 to the Subwoofer. See the
instruction sheet that comes with the High-Pass Filter for more information.
Bookshelf-75/LCR-55MkII/Center-55MkII/LCR-45
Bookshelf-75/Center-75/LCR-75/LCR-55
page 10
11. M&K 5.1 MULTICHANNEL & PRO-LOGIC SYSTEM SETUP GUIDE
The 5 Most Important Items In System Setup:
1. Find the best location for the subwoofer for maximum output and flattest response
(usually the corner closest to the listening position)
2. Aim the front speakers (and the surrounds, if possible)
vertically for the flattest response and best imaging
3. Set all speakers to the Small setting for proper High-Pass and Low-Pass Filter
operation to get the lowest distortion and maximum dynamic range
4. Calibrate all speakers and the subwoofer to the identical level for proper
imaging and balance
5. Make sure all speakers are in phase for proper imaging and impact
These instructions will help you make sure that you cover all steps in setting up a 5.1 multichannel or Pro-Logic
surround sound system. In addition to following this list, make certain that you study and understand the owner’s
manual for each and every component used in the system, especially the processor/receiver’s manual. Have fun and
good luck!
A useful tool for system setup is the Laserdisc or DVD called Video Essentials. If you don’t have one, you can
order it by calling 1-561-997-9073 or visit the web site at www.imagingscience.com.
Here are the instructions for speaker setup.
1. Locate the front speakers. The left, right, and center speakers should be equidistant from the main listening
position. Try to set up the speakers so that they are reasonably symmetrical to room surfaces. A tape measure may
be very helpful.
2. Locate the subwoofer.
A.
The best place for the subwoofer is the corner with the best structural strength. If the
corners are roughly equal in construction, use the corner nearest the listening position.
If the listening position is in the front half of the room, place the subwoofer in a front
corner. If it is in the back of the room, place the subwoofer in a back corner.
If possible, avoid corners near doorways or openings.
B.
If you are willing to experiment, another option is to place the subwoofer at the listening
position and walk around the room. Stand in and near each corner. The location where
you hear the tightest bass with the most impact is probably the best location in the room
for the subwoofer.
C.
If multiple subwoofers are used, place them in the same location. Stacking is best, but
you can also put them side by side.
Another option for multiple subwoofers is to place them in different locations. This is appropriate when you have
limited choices in locating the subwoofer and none of the available locations work well. Try to place multiple
subwoofers at equal distances from the listening position to avoid phase cancellation.
2. Locate the surrounds. Determine the best position in the room. It will probably be the position used for THX
speaker, directly to the right and left of the main listening position on the side walls (so that a listener in the center seat
is directly between the speakers). If that doesn’t work or is not practical because of the room, try these locations: on
the ceiling; on the back wall, or in the back corners (using an M&K ST Corner bracket).
3. Install all wiring and interconnects.
4. Connect the subwoofer. Always use the processor/receiver’s subwoofer output.
5. Aim the front speakers (this is a must for THX front speakers). Use a laser level to align each speaker. Place
the level on the flat surface between the midranges and tweeters that is roughly in the center of the front baffle. The
red dot of the laser should be aligned to the center of the listener’s forehead at ear height. Make sure that the volunteer
Bookshelf-75/LCR-55MkII/Center-55MkII/LCR-45
Bookshelf-75/Center-75/LCR-75/LCR-55
page 11
who sits in the main listening position keeps their eyes closed!
Make sure that you aim the left and right speakers in both the horizontal and vertical planes. Horizontal toe-in
is important for the best possible imaging.
6. If you have a Dolby Digital AC-3 5.1 channel processor/receiver, follow these instructions. If you have
a Pro-Logic processor/receiver, go to item 7 below.
SPECIAL NOTE: Always check the processor/receiver’s owner’s manual. Different manufacturers use different
descriptions for the same function, and sometimes the same description for different functions!. Your component may
use terminology different from that used below.
A.
High-Pass Filters: All Dolby Digital processor/receivers have built-in high-pass filters for
the Left, Center, Right, Left Surround, and Right Surround channels. Always turn these
filters ON by using the SMALL setting. If you have a THX component, use the THX
setting. See the owner’s manual of the processor/receiver for instructions.
B.
Bass Management: If the processor/receiver has a setting to turn the Subwoofer off or
on, make sure that it is set to SUBWOOFER YES or ON.
C.
Dialog Normalization: If your component has this function, turn it off to avoid any
possible effect on sound quality.
D.
THX Dolby Digital units have an adjustable limiter for the subwoofer feed, called “Bass
Peak Level Management”. Turn it off, or set it for the highest possible level. M&K
subwoofers do not need this limiter.
7. If you have a Pro-Logic only processor/receiver, follow these instructions.
SPECIAL NOTE: Always check the processor/receiver/receiver’s owner’s manual. Different manufacturers use
different descriptions for the same function, and sometimes the same description for different functions! Your
component may use terminology different from that used below.
A.
If the component has high-pass filters for the Left, Center, and Right channels (usually
only THX components have these filters), they should be turned on or set to THX (if you
have a choice, use the frequency closest to 80 Hz. The surround channels in a Pro-Logic
only system do not have switchable filters.
B.
Set the center channel to Normal, unless you have a THX controller. With a THX
controller, set the center channel to the THX setting.
C.
Turn off all limiters and compressors, auto azimuth controls, auto balance controls, etc.
D.
If the processor/receiver/receiver has an input level control, calibrate it per the
manufacturer’s instructions.
E.
If the component has a digital input, and you are using a source component with a digital
output, always use the digital input, not the analog input.
8. Set levels for each channel. You can take a measurement at the listening position to establish the reference
level, but it is usually more accurate to take levels at about one meter from each speaker. Set all channels to exactly
the same level.
Use a Sound Level Meter. Point it directly at the speaker being measured. Set all channels to the same level,
using the processor/receiver/receiver’s internal test signal. Set the meter to “C” weighting and “Slow” response. Set
the levels to 75 dB if you have a THX processor/receiver/receiver or are using the Video Essentials disc as a source
for setting levels.
NOTE: If you using identical speakers anywhere in your system (e.g., S-150THX speakers for the left, center,
and right channels), all of those channels should be set to the same level. If your meter measures a different level,
it is probably a limitation of this type of meter measurement method and not an actual audible level difference. Set
the channels using identical speakers to the same level, unless you actually hear a difference later when you are doing
listening to verify the system setup.
9. Check phase. Make sure that all five main channel speakers are wired in phase. The Video Essentials disc
has tests for main speaker phase.
10. Make sure that the subwoofer and main speakers are in phase at the 80 Hz crossover point. Listen to
something with a consistent bass line around 80 Hz while a partner switches the “Phase” control on the subwoofer
from “+” to “-”. The switch position that results in the greatest bass at the listening position is the correct setting.
11. Play something that is familiar to you through the system to verify the system’s overall performance. If
Bookshelf-75/LCR-55MkII/Center-55MkII/LCR-45
Bookshelf-75/Center-75/LCR-75/LCR-55
page 12
something does no sound right, recheck your connections and settings. Re-measure, re-check, re-align.
12. Switch the processor/receiver to each input that you will use. Check your settings for each input and each
mode. Some processor/receivers require that you enter settings separately for each mode and/or input.
13. Before playing the system, check levels and speaker alignment one last time. Make sure that you write down
all processor settings for future reference.
12. IF YOU NEED SERVICE OR SET-UP ASSISTANCE
Contact your dealer or M&K with a complete description of the problem. Please have the unit's model and serial
numbers (found on the back of the cabinet), date of purchase, and your dealer's name. You can call M&K between
8:30 AM and 5:00 PM Pacific Time, Monday through Friday, at (310) 204-2854. If you call outside these hours, leave
a message, and we will return your call promptly. Alternatively, an email can be sent to [email protected].
DO NOT RETURN YOUR SPEAKERS TO THE FACTORY FOR
SERVICE WITHOUT OBTAINING PRIOR AUTHORIZATION
All M&K Satellite speakers carry a ten year limited parts and labor warranty. This warranty is transferable to new
owners up to ten years from the date of original purchase. It does not cover abuse, misuse, repairs by unauthorized
service stations, speakers without M&K serial numbers, speakers not sold by authorized M&K dealers, and those
damages in shipping or by accident. If you have any questions about the warranty, please contact M&K.
13. CABINET MAINTENANCE
Treat the cabinet as you would any piece of fine furniture. Its black or white vinyl finish does not require any
special maintenance; regular dusting with a lint-free cloth and periodic cleaning is all that is required. Do not use any
solvent based cleaners, as they may damage the cabinet surface.
14. USE WITH M&K ST-WALL BRACKETS
The Bookshelf-75 and LCR-55MkII speakers contain a threaded (3/8") insert, as well as a set ot two threaded
1/4"-20 inserts, located on the speaker's back baffle. Using the appropriate screws, you can fasten the speaker to an
M&K ST-series speaker stand or M&K ST wall mount brackets. The LCR-45 will require the ST-BT5 bracket. Both the
M&K stands and brackets offer tremendous flexibility for installation in a wide variety of environments and both are
available in several configurations. This mounting scheme can also be used with Omnimount brackets.
15. SPECIFICATIONS
Bookshelf-75:
IMPEDANCE
MINIMUM POWER:
RECOMMENDED POWER:
MAXIMUM POWER:
FREQUENCY RESPONSE:
DIMENSIONS (H x W x D):
WEIGHT
4 ohms
10 watts RMS
amplifiers with between 50 and 200 watts RMS or more (see below)
200 watts RMS unclipped peaks
72 Hz - 20 KHz ± 2 dB
14 3/4" x 8 3/8" x 8"(HWD)
14 lbs.
LCR-55MkII/Center-55MkII:
IMPEDANCE
MINIMUM POWER:
RECOMMENDED POWER:
MAXIMUM POWER:
FREQUENCY RESPONSE:
DIMENSIONS (H x W x D):
WEIGHT
4 ohms
10 watts RMS
amplifiers with between 50 and 150 watts RMS or more (see below)
200 watts max unclipped peaks
100 Hz - 20 KHz ± 3 dB
LCR-55MkII
10 1/2" x 7" x 8 1/2" (HWD)
Center-55MkII 7" x 10 1/2" x 8 1/2" (HWD)
11 lbs.
LCR-45:
IMPEDANCE
MINIMUM POWER:
RECOMMENDED POWER:
MAXIMUM POWER:
FREQUENCY RESPONSE:
DIMENSIONS (H x W x D):
8 ohms
10 watts RMS
amplifiers with between 50 and 150 watts RMS
150 watts max unclipped peaks
100 Hz - 20 KHz ± 3 dB
7 7/8" x 4 7/8" x 4 1/4" (HWD)
Bookshelf75/LCR55MkII/
LCR45.pm65
rev 1
11/30/1999