1
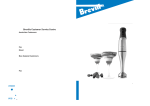
TYPESET V1
the Control Grip
Instruction Booklet
BSB510
TYPESET V1
CONGRATULATIONS
on the purchase of your new
Breville Control Grip
Contents
4
Breville recommends safety first
6
Know your Breville
Control Grip
8
Operating your Breville
Control Grip
14
Care, cleaning & storage for your
Breville Control Grip
16
Food preparation guide for your
Breville Control Grip
18
Recipes
3
Breville recommends safety first
At Breville we are very safety conscious. We design and manufacture consumer products with
the safety of you, our valued customer, foremost in mind. In addition we ask that you exercise
a degree of care when using any electrical appliance and adhere to the following precautions.
Important safeguards
Read all instructions
BEFORE USE AND SAVE FOR
FUTURE REFERENCE
• Remove any packaging material and
promotional stickers before using the
stick mixer for the first time.
• Do not place the stick mixer near
the edge of a bench or table during
operation. Ensure the surface is level,
clean and free of water, flour, etc.
• Do not place the stick mixer on or near
a hot gas or electric burner, or where it
could touch a heated oven.
• If using the stick mixer to blend hot
food in a saucepan over heat, remove
the saucepan from the heat source and
ensure the power cord and body of
appliance are also kept away from any
heat source.
• Handle the stick mixer and
attachments with care – remember the
blade is very sharp and should be kept
out of reach of children.
• Always make sure the stick mixer is
completely and properly assembled
before operating.
• Ensure the Stick mixer is turned off
at the trigger switch, the power is
switched off at the power outlet and
the cord is unplugged from the power
outlet before attempting to attach any
of the accessories.
• Always ensure the Blending Leg is
securely fitted onto the blender motor
body before operating.
• Do not use attachments other than those
provided with the Stick mixer.
4
• Please only use the whisk attachment
for the recipes contained in this
instruction booklet.
• Do not use the whisk attachment for
anything other than its intended use.
• Do not attempt to operate the stick
mixer by any method other than those
described in this booklet.
• Do not process hot or boiling liquids in
the chopping bowl – allow liquids to cool
before placing into the chopper bowl.
• Do not operate the appliance
continuously for more than 1 minute.
Allow the motor to rest for 1 minute
between each use.
• Never mix dry, thick or heavy mixtures
for more than 30 seconds. Stop the
operation and stir the ingredients before
continuing. Allow the motor to rest for 1
minute between each use.
• When using heavy loads, the appliance
should not be operated for more than
30 seconds.
• Recipes in this instruction booklet are
not considered heavy loads.
• Always ensure the Stick mixer is turned
off, the power is switched off at the
power outlet and the cord is unplugged
from the power outlet before attempting
to move the appliance, when not in
use, if left unattended and before
disassembling, cleaning or storing.
• If food becomes lodged around the
processing blade or in the blade
guard, release the ON button, switch
the power off at the power outlet and
unplug the cord. Use a spatula to
Breville recommends safety first
•
•
•
•
•
dislodge the food. Do not use fingers as
the blades are sharp.
To protect against electric shock do not
immerse the motor body, cord or power
plug in water or any other liquid.
Do not remove the stick mixer from
ingredients during operation. Ensure the
appliance is switched off and has stopped
turning before removing, to avoid contact
with moving blade or whisk.
Do not leave the stick mixer unattended
when in use.
Keep the appliance clean. Follow
the cleaning instructions provided in
this book.
Do not use the stick mixer/stick blender
with wet hands.
IMPORTANT SAFEGUARDS FOR
ALL ELECTRICAL APPLIANCES
• Unwind the cord fully before use.
• Do not let the cord hang over the edge of
a table or counter, touch hot surfaces or
become knotted.
• This appliance is not intended for use
by young children or infirm persons
without supervision.
• Young children should be supervised
to ensure that they do not play with
the appliance.
• It is recommended to regularly inspect
the appliance. Do not use the appliance
if power supply cord, plug or appliance
becomes damaged in any way. Return
the entire appliance to the nearest
authorised Breville service centre for
examination and/or repair.
• Any maintenance, other than cleaning,
should be performed at an authorised
Breville Service Centre.
• This appliance is for household use
only. Do not use this appliance for
anything other than its intended use.
Do not use in moving vehicles or boats.
Do not use outdoors.
• The installation of a residual current
device (safety switch) is recommended
to provide additional safety protection
when using electrical appliances. It
is advisable that a safety switch with
a rated residual operating current
not exceeding 30mA be installed in
the electrical circuit supplying the
appliance. See your electrician for
professional advice.
SAVE THESE
INSTRUCTIONS
5
5
TYPESET V1
KNOW
your Breville Control Grip
KNOW your Breville Control Grip
B
H
C
F
A
J
G
D
K
I
E
A.
B.
C.
D.
E.
F.
Motor Body
Speed Control Dial
Easy Grip Trigger Switch
Detachable blending leg
Stainless steel blending blade
Chopping bowl
G.
H.
I.
J.
K.
Chopping blade
Chopper bowl lid
Blending Jug
Whisk
Dual-purpose storage lid and
anti-slip mat
7
TYPESET V1
ASSEMBLY & OPERATION
of your Breville Control Grip
ASSEMBLY & OPERATION
Before first use
Remove any packaging material and
promotional labels. Remove the blending
leg from the mixer motor body and wash
it in warm soapy water (refer to assembly
instructions in this booklet). Rinse and dry
thoroughly. Ensure no water remains inside
the blending leg to avoid water running into
the motor body when reattached.
Disassemble and wash the chopping blade,
chopper bowl, chopper bowl lid, whisk,
storage lid, and blending jug in warm soapy
water, rinse and dry thoroughly. Ensure no
water remains on the chopper bowl lid or
whisk attachment to avoid water running
into the motor body when reattached.
NOTE
The detachable blending leg, chopping
bowl, chopping blade, blending jug,
whisk and dual purpose storage lid/
anti-slip mat can also be washed in
the dishwasher. The chopper bowl lid,
whisk gearbox and motor body are
not dishwasher safe – see the care and
cleaning section of this booklet for
cleaning instructions of these parts.
This stick mixer is a versatile appliance
that can be attached to:
• The stainless steel blending leg– for use
as a stick mixer
• The chopper bowl with chopping blade
and lid – for use as a mini chopper
• The whisk attachment – for use as a
hand whisk
To attach the blending leg
Hold the blending leg with the blades down,
and align the top end of the blending leg
with the corresponding end of the motor
body and push until the blending leg ‘clicks’
and locks onto the motor body.
Always ensure blending leg is dry, and no
water left inside, before reattaching.
Using as a stick mixer
Ensure the blending leg is assembled to the
motor body as detailed above.
1. Place food to be processed into the
blending jug provided (or a sufficiently
large mixing bowl or saucepan). The jug
provided should be only be ½ full or less
when blending liquids or when making a
puree of fruit and/or vegetables.
2. Insert the plug into a 230/240V power
outlet and turn the power on.
3. By turning the dial at the top of motor
body, select a speed between 1 and 15.
Low Speed : 1
High Speed : 15
NOTE
If selecting a high speed, it is
recommended that you start with a
slow speed and gradually increase to
the higher speed to avoid splattering
and over-processing.
4. Place the blending leg as deeply as
possible into the jug and press the
trigger switch to turn the stick mixer on.
The button must be held for the required
duration of operation.
9
ASSEMBLY & OPERATION
5. Work through the ingredients in
the jug with a gentle raising and
lowering motion.
6. Switch off the motor by releasing the
trigger switch
7. Ensure the motor has completely
stopped before lifting the blender out of
the jug.
8. When processing has finished, switch
off at the power outlet and remove the
power plug.
To detach the blending leg
Ensure the trigger switch is released, the
power is turned off at power point and the
appliance is unplugged.
Hold the motor body with one hand, and
using thumb and finger of the other hand,
press on the two EJECT buttons on either
side of the motor body. Pull the motor body
away from the blending leg to detach.
Recommendations when using
as a stick mixer
• The stick mixer blends foods and liquids
rapidly, therefore it is easy to overprocess. Remember when using the
blending leg to stop the stick mixer and
check food throughout the operation.
• Allow food to cool before blending.
• The stainless steel blending leg allows
for hot food to be processed directly
in the saucepan. This makes blending
soups and sauces very easy.
• For safety reasons remove saucepan
away from the heat before processing.
• Ensure the body of the appliance and
power cord are kept away from any
heat source.
• When pureeing and blending, cut food
into uniform sizes. This will ensure
smooth and consistent results.
• Warm all liquids to be added to
soups and purees, this will ensure
even blending.
• Place the blending jug on the anti-slip
mat during blending. This will keep the
jug stable.
• Do not operate the appliance
continuously for more than 1 minute.
Allow the motor to rest for 1 minute
between each use.
If food becomes lodged around the
processing blade or in the blade guard,
follow the following safety instructions:
1. Release the Trigger switch the power off
at the power outlet and unplug the cord.
2. Use a spatula to carefully dislodge the
food. Do not use fingers as the blades
are sharp.
3. After the food has been removed and
blades are clear, plug the appliance back
into the power supply, switch the power
on and continue blending.
10
ASSEMBLY & OPERATION
Using as a mini chopper
To attach the chopping blade, chopping
bowl and chopper bowl lid
Remove the blending leg from the motor
body (follow the instructions on page 10 “To
detach the blending leg”)
Place the chopping blade onto the metal
pivot pin in the base of the chopper bowl.
Place the food inside the chopper bowl. Do
not exceed the maximum (MAX) marking.
NOTE
Always place the chopping blade
on the pivot pin on the bottom of
the chopper bowl BEFORE placing
any food in the bowl. Do not lift the
blade before the complete chopping
operation is finished.
Place the lid onto the chopper bowl.
To use the chopping bowl
For food preparation tips and recipes refer
to page 17 and the recipes section of this
booklet.
Ensure the chopper is completely and
properly assembled.
1. Insert the plug into a 230/240V power
outlet and turn the power on.
2. Select a speed between 1-15 on the speed
control dial.
3. Depress the Trigger Switch to turn
the appliance on and start the
chopping blade.
Align the motor body with the chopper
bowl lid and push down until the motor
body ‘clicks’ into place. Ensure the chopper
bowl lid is dry with no water left inside
before reattaching.
4. When processing has finished switch
off the motor by releasing the Trigger
Switch, switch off at the power outlet
and remove the power plug.
11
ASSEMBLY & OPERATION
5. Detach the chopping bowl and lid (refer
to instructions). Remove the lid from
the chopper bowl. Carefully remove the
chopping blade and use a spatula to
scrape off any attached food back into
chopping bowl. Use a spatula to remove
food from the chopping bowl.
To detach the chopping
bowl and lid
Ensure the switch is released, power is
turned off at power point and the appliance
is unplugged.
Hold the motor body with one hand, and,
using thumb and finger of the other hand,
press on the two EJECT buttons on either
side of the motor body. Pull the motor body
away from the chopper bowl lid to detach.
•
•
•
•
sizes to ensure quicker, even and more
consistent results.
DO NOT process hard foods such as
coffee, cereal or chocolate in lumps, as
damage to the blade may result.
DO NOT process boiling or hot foods in
the chopping bowl.
NEVER remove the blade from the bowl
before food processing is completed.
The stick mixer blends foods and
liquids rapidly, therefore it is easy to
over process. Remember to check food
throughout the operation.
Using as a whisk
Remove blending leg from motor body
(follow the instructions on page 10 “To
detach the blending leg”)
Align the stainless steel whisk to the hole in
the underside of the motor body and push the
whisk in until it ‘clicks’ and locks into place.
Recommendations when using
the stick mixer with the
chopping bowl
• Do not operate the stick mixer when the
chopping bowl is empty.
• The anti-slip mat keeps the chopping
bowl stable, however it is recommended
during processing to hold the motor
body with one hand and the chopping
bowl and lid with the other.
• When processing, cut food into uniform
12
Ensure the whisk is dry with no water left
inside before re-attaching.
ASSEMBLY & OPERATION
To use the whisk
For food preparation tips and recipes refer to
page 17 and the recipes section.
Ensure the whisk is completely and properly
assembled.
1. Place food to be processed into the
blending jug or a sufficiently large
mixing bowl or container.
2. Insert the plug into a 230/240V power
outlet and turn the power on.
3. Select a speed between 1-15 on the speed
control dial.
4. Place the whisk into food and depress
the trigger switch to turn the whisk on.
5. Move the whisk through the ingredients
with a gentle raising and lowering action
until desired texture is achieved.
6. Switch off the motor by releasing the
trigger switch before lifting the whisk
out of the bowl. Switch off at the power
outlet and remove the power plug.
To detach the whisk
Ensure the trigger switch is released, the
power is turned off at power point and the
appliance is unplugged.
Hold the motor body with one hand, and,
using thumb and finger of the other hand,
press on the two EJECT buttons on either
side of the motor body. Pull the motor body
away from the whisk to detach.
Recommendations when using
the stick mixer with the
whisk attachment
• Do not allow the whisk to hit the bottom
or sides of mixing bowl while the
appliance is in operation, as this may
damage the whisk.
• To incorporate air into the ingredients
when whisking, use a sufficiently deep,
wide container and move the whisk
through the ingredients with a gentle
raising and lowering action.
• Release the trigger switch and ensure
the whisk has completely stopped
turning before removing the whisk from
the food during operation.
• Place the mixing bowl on a damp cloth
during whisking. This will keep the
mixing bowl stable.
• Always use fresh chilled cream and fresh
eggs at room temperature to achieve
greater and more stable volume when
whisking.
• Always ensure the whisk and mixing
bowl are completely clean and free of fat
before whisking egg whites.
• It is recommended to use the highest
speed when whisking egg whites and
cream.
13
TYPESET V1
CARE, CLEANING
& STORAGE
of your Breville Control Grip
Care, Cleaning & Storage
Motor body
Whisk
To remove any food residue wipe the motor
body and cord with a damp cloth only. Do
not use abrasive cleaners or steel wool.
Never immerse the motor body in water or
any other liquid. Do not place motor body
in dishwasher.
Before cleaning, turn the power off at the
power outlet and then remove the plug.
Remove the motor body from the chopping
bowl lid, then remove the whisk. The whisk
can be hand washed in hot soapy water,
rinsed and dried thoroughly after each use.
Alternatively, the whisk can also be washed
in the dishwasher. Do not use abrasive
cleaners or steel wool.
Whisk gear box is not dishwasher safe.
Blending Leg
Before cleaning, turn the power off at the
power outlet and then remove the plug.
Remove the motor body from the stainless
steel blending leg. The stainless steel
blending leg can be hand washed in hot
soapy water, rinsed and dried thoroughly
after each use. Alternatively, the blending
leg can also be washed in the dishwasher. Do
not use abrasive cleaners or steel wool.
QUICK WASH: Between each processing
task, with the motor body attached and
turned on at the power outlet, place the
stainless steel blending leg and blade
assembly only in to a jug of water and press
the trigger switch to turn on for 5 seconds.
This will remove any food on the blade and
leg and allow you to continue onto the next
processing task.
Chopping bowl, Chopper
bowl lid, chopping blade and
storage lid/anti-slip mat
Before cleaning, turn the power off at the
power outlet and then remove the plug.
Remove the motor body from the chopping
bowl lid, and then remove the chopper
bowl lid and chopping blade from the
chopping bowl.
The chopping bowl, chopping bowl lid and
chopping blade should be hand washed in
hot soapy water, rinsed and dried thoroughly
after each use. Alternatively, the chopping
bowl, chopping blade and storage lid/
anti-slip mat can also be washed in the
dishwasher. Do not wash the Chopper bowl
lid in the dishwasher. Do not use abrasive
cleaners or steel wool.
Whisk Gear Box
Blending jug
The blending jug can be hand washed in hot
soapy water, rinsed and dried thoroughly
after each use. Alternatively, the blending
jug can also be washed in the dishwasher.
Do not use abrasive cleaners or steel wool.
Storage
Before storage, turn the power off at
the power outlet and then remove the
plug. Ensure the appliance is clean and
completely dry.
Attach/assemble chopper bowl lid to the
chopper bowl, place chopper bowl inside
blending jug, attach storage lid to the
bottom of blending jug (non slip base).
15
TYPESET V1
FOOD PREPARATION
GUIDE
for your Breville Control Grip
Food Preparation Guide
Food Preparation Guide
Milkshakes, smoothies, cocktails,
fruit frappes
Blending leg
Use Chilled milk. Blend until
desired consistency is cocktails,
fruit frappes achieved. Use mid to
maximum speed for 30 seconds.
Soups, dips, baby food
Blending leg
Blend until smooth, Use mid to
maximum speed for 30 seconds.
Cheese (maximum weight 200g,
pre cut into 2cm cubes)
Chopper bowl
Use maximum speed for
20-30 seconds.
Carrot (maximum weight 200g, pre
cut into 2cm cubes)
Chopper bowl
Use maximum speed for
20-30 seconds.
Onion, herb (maximum weight 30g) Chopper bowl
Use mid speed for 20 seconds.
Nuts (grind) (maximum weight 150g) Chopper bowl
Use mid to maximum speed for
20-30 seconds.
Red meat, chicken fillets, fish fillets,
(maximum weight, 250g, pre-cut
into 2cm cubes)
Chopper bowl
Use mid to maximum speed with
fish fillets, for 20-30 seconds.
Ice
Chopper bowl
Use maximum speed for
20-30 seconds.
Cream (400mL maximum) egg
whites (4 eggs maximum) between
each use). light batters
Whisk
Using mid to maximum speed
(do not use whisk for more than
1 minute then allow 1 minute rest
between each use).
17
TYPESET V1
RECIPES
Soup
Pumpkin and kumera soup
Mediterranean soup
Serves 4-6
Serves 4-6
INGREDIENTS
INGREDIENTS
2 tablespoons light olive oil
2 cloves garlic, crushed
2 large leeks, washed and thinly sliced
1.5kg pumpkin, peeled and chopped
750g kumera (sweet potato), peeled and chopped
6 cups chicken stock
2 teaspoons ground cumin
Pepper, to taste
1 cup light sour cream
2 tablespoons olive oil
2 large Spanish onions, chopped
2 eggplants (500g), chopped
5 zucchinis, chopped
500g tomatoes, chopped
3 cloves garlic
3 red capsicum, seeded and chopped
2 green capsicum, seeded and chopped
1 tablespoon pesto paste
6 cups chicken stock
Pepper, to taste
METHOD
1. Heat oil in a large saucepan over
medium heat, sauté garlic and leeks
until transparent and golden.
2. Add the next 4 ingredients, bring to the
boil, and then reduce heat to simmer.
3. Simmer until vegetables have softened.
4. Remove from heat, cool slightly.
5. Place Stick Mixer into saucepan and
blend until soup is smooth. Fold in the
remaining ingredients.
Serve.
METHOD
1. Heat oil in a large saucepan over
medium heat, sauté onions until slightly
golden.
2. Add remaining ingredients and bring to
the boil, then reduce heat to simmer.
3. Simmer until vegetables are tender.
4. Remove from heat, cool slightly.
5. Place Stick Mixer into saucepan and
blend until soup is smooth.
Serve with crusty Italian bread.
19
SOUP
Sweet coconut and
spinach soup
Serves 4-6
INGREDIENTS
2 tablespoons olive oil
2 cloves garlic, crushed
3 leeks, thinly sliced
1 tablespoon red curry paste
1 teaspoon ground cumin
800g English spinach, chopped
600ml chicken stock
200g kumara, peeled and chopped
3 Kaffir lime leaves or 1 teaspoon grated
lime rind
METHOD
1. Heat oil in a large saucepan over
medium heat, sauté garlic and leeks
until lightly softened.
2. Add the curry paste and cumin; cook,
stirring regularly over a high heat for 1
minute, add remaining ingredients.
3. Bring to the boil, and then reduce heat
to simmer.
4. Simmer until all vegetables have
softened.
5. Remove from heat, cool slightly.
6. Place Stick Mixer in the saucepan and
blend soup until smooth.
Serve.
20
Zucchini and potato soup
Serves 4-6
INGREDIENTS
2 tablespoons olive oil
2 leeks, thinly sliced
500g washed potatoes, peeled and chopped
8 zucchinis, chopped
8 cups chicken stock
Pepper, to taste
1 cup cream
METHOD
1. Heat oil in a large saucepan over
medium heat, sauté leeks until they have
softened.
2. Add the next 3 ingredients.
3. Bring to the boil, and then reduce heat
to simmer.
4. Simmer until vegetables have softened.
5. Stir in cream and bring to the boil.
6. Remove from heat, cool slightly.
7. Place Stick Mixer in the saucepan and
blend until soup is smooth.
Serve.
SOUP
PUMPKIN SOUP
Serves 2-4
INGREDIENTS
2 tablespoons oil
1 brown onion, peeled and diced
2 cloves garlic, peeled and crushed
400g butternut pumpkin, peeled and diced
4 cups/1 liter chicken stock
METHOD
1. Heat oil in a large saucepan; add onion
and garlic, sauté for 5 minutes.
2. Add the pumpkin to the pan and stir to
coat with the onion mix, and then add
the stock, bring the mixture to the boil.
3. Reduce to a simmer for 20 minutes,
cook with the lid on until the pumpkin
is cooked.
4. Allow the mix to cool slightly.
5. Place Stick mixer into saucepan and
blend until soup is smooth.
Serve.
Variations
Moroccan Pumpkin Soup
Add the following spices to the onion
when sautéing.
Serve with coriander leaves and yoghurt.
1 teaspoon ground cumin
1 teaspoon garam marsala
1 teaspoons paprika
½ teaspoon ground white pepper
Curried Pumpkin Soup
Add 1 tablespoon curry powder to the
onions when sauteing.
Creamy Pumpkin Soup
Add ½ cup cream when adding the stock.
Thai style Pumpkin Soup
Add 2 small fresh red chillies and 1
tablespoon chopped lemon grass to the
onion mixture. Add ½ cup/125ml coconut
milk before pureeing the mix.
Pumpkin and red lentil soup
Add ½ cup thoroughly washed red lentils
when adding the chicken stock to the
saucepan. You may need to add a little more
water to thin if mixture becomes to thick.
21
DIPS & SAUCES
GUACAMOLE
Tomato and red pepper dip
Makes approx. 1¼ cups
Makes approx. 1¼ cups
INGREDIENTS
INGREDIENTS
1 large avocado, peeled, de-stoned and chopped
3 tablespoons lemon juice
½ cup sour cream
1 teaspoon minced garlic
1 teaspoon chilli
2 tablespoons olive oil
4 red capsicums, roasted, seeded and peeled
1 Spanish onion, chopped
3 cloves garlic, crushed
100g sundried tomatoes, drained
2 teaspoons sweet paprika
2 small red chillies
METHOD
1. Place all ingredients into the chopper
bowl
2. Assemble STICK MIXER and pulse until
mixture is combined.
Serve with tacos, burritos or with carrot and
celery sticks
PESTO DIP
Makes approx. 1½ cups
INGREDIENTS
1 cup fresh basil leaves
1 clove garlic, peeled and chopped
2 tablespoons lemon juice
¼ cup pine nuts
¼ cup olive oil
½ cup cottage cheese
¼ cup grated fresh Parmesan cheese
1. Place basil leaves, garlic, lemon juice
and pine nuts into blender jug and blend
using speed 2 until finely chopped.
2. With motor running, remove the inner
measuring cup, slowly pour in oil and
blend until smooth.
3. Remove mixture, stir in cheeses, cover
and chill until ready to use.
Serve with toasted Turkish bread
22
METHOD
4. Place all ingredients into the blending
jug or a large mixing bowl.
5. Place the Stick Mixer into the
ingredients and blend until smooth.
DIPS & SAUCES
Basic bechamal sauce
Makes approx. 1 ½ cups
INGREDIENTS
3 tablespoons butter
3 tablespoons plain flour
1¼ cups milk
Pepper and salt, to taste
METHOD
1. Melt butter in a small saucepan over
medium heat.
2. Stir in flour and cook for a 1 minute.
3. Remove from heat.
4. Gradually add the milk, using the Stick
Mixer to blend the ingredients.
5. Return to the heat and continue
blending mixture until sauce starts to
bubble gently and thickens.
6. Season with pepper and salt, if desired.
Spicy tomato & bacon
pasta sauce
Makes approx. 1½ cups
INGREDIENTS
15 Roma Italian tomatoes, chopped
2 Spanish onions, chopped
3 tablespoons extra virgin olive oil
2 cloves garlic, crushed
6 rashers bacon, finely chopped and lightly fried
¼ cup sweet Thai chilli sauce
¼ cup balsamic vinegar
Freshly ground black pepper
METHOD
1. Place all ingredients into the blending
jug a large mixing bowl.
2. Place the Stick Mixer into the
ingredients and blend until smooth.
3. Stir through cooked pasta and serve with
shavings of fresh parmesan.
Variations:
Cheese sauce
1 cup grated Cheddar cheese
1 teaspoon English mustard
Herb sauce
3 shallots, thinly sliced
3 tablespoons parsley, chopped
1 tablespoon dill, finely chopped
23
DIPS & SAUCES
Smoked salmon & dill
pasta sauce
Makes approx. 2 cups
INGREDIENTS
300g smoked salmon
2 tablespoons dill, chopped
1 teaspoon lemon rind, grated
300ml sour cream
1 tablespoon lemon juice
200g light cream cheese
2 teaspoons French mustard
METHOD
1. Place all ingredients into a large mixing
bowl.
2. Place the Stick Mixer into the
ingredients and blend until smooth.
3. Serve with fresh pasta.
Basic mayonnaise
INGREDIENTS
2 x 60g eggs
½ teaspoon salt
1-2 teaspoons mustard (optional)
½ teaspoon sugar
Pinch cayenne pepper
3 tablespoons lemon juice
1 ½ cup vegetable oil
METHOD
1. Place all ingredients except oil into the
blending jug or a medium mixing bowl.
2. Place the Stick Mixer into the
ingredients and blend for 10 seconds or
until well combined.
3. With Stick Mixer still blending,
gradually drizzle oil into egg mixture;
blend until thick and smooth.
Flavour variations for mayonnaise
2 tablespoons freshly prepared pesto
Or
2 tablespoons sundried tomatoes, finely diced
1 tablespoon freshly snipped chives
Or
1 teaspoon tandoori paste
1 tablespoon mango chutney
Or
½ cup corn relish
Or
3-4 garlic cloves, roasted, peeled
1. Blend in a selected flavour variation
when the mayonnaise is thick and smooth.
24
DIPS & SAUCES
Spicy tartare sauce
Olive and herb tapenade
Makes approx. 2 cups
Makes approx. 1 ½ cups
INGREDIENTS
INGREDIENTS
300ml egg mayonnaise
2 tablespoons lime juice
2 small red chillies, chopped
1 teaspoon lime rind, grated
¾ cup pickled gerkins, chopped
2 tablespoons chives, chopped
2 tablespoons capers, drained
250g black olives, pitted
2 tablespoons sweet Thai chilli sauce
2 cloves garlic
2 tablespoons olive oil
1 tablespoon balsamic vinegar
2 tablespoons coriander
2 shallots, chopped
METHOD
METHOD
1. Place all ingredients into the blending
jug or a medium mixing bowl.
2. Place the Stick Mixer into the
ingredients and blend until smooth.
3. Serve with seafood, fish or steak.
1. Place all ingredients into the chopping
bowl.
2. Assemble the Stick Mixer on the
chopping bowl and blend the
ingredients until smooth.
3. Serve on warm crusty bread.
Citrus and coriander dressing
Makes approx. 1 ¼ cups
INGREDIENTS
¾ cup orange juice, freshly squeezed
2 tablespoons lime juice
3 tablespoons sweet Thai chilli sauce
2 tablespoons coriander leaves
2 tablespoons rice wine vinegar
2 tablespoons extra virgin olive oil
METHOD
1. Place all ingredients into the blending
jug or a medium mixing bowl.
2. Place the Stick Mixer into the
ingredients and blend until smooth.
3. Serve over salad.
Basic pesto sauce
Makes approx. 1 ½ cups
INGREDIENTS
1 cup fresh basil leaves
1 tablespoon fresh lemon juice
2 tablespoons extra virgin olive oil
2 cloves garlic
¼ cup roasted pine nuts
Freshly ground black pepper
METHOD
1. Place all ingredients into the chopping
bowl.
2. Assemble the Stick Mixer on the
chopping bowl and blend the
ingredients until smooth.
25
DIPS & SAUCES
Spicy satay sauce
INGREDIENTS
2 cups shelled peanuts (500g)
3 tablespoons lemon juice
1 cup chicken stock
250ml coconut cream
¼ cup sweet Thai chilli sauce
¼ cup fruit chutney
1 tablespoon Mussaman curry paste
METHOD
1. Place all ingredients into a medium
mixing bowl.
2. Place the Stick Mixer into the
ingredients and blend until smooth.
3. Serve with barbecued steak, chicken or
lamb.
Cucumber and mint raita
INGREDIENTS
600ml thick Greek style yogurt
2 Lebanese cucumbers, seeded, chopped
1 teaspoon flaked sea salt
1 teaspoon ground cumin
1⁄3 cup mint leaves
METHOD
1. Place all ingredients into the blending
jug or a medium mixing bowl.
2. Place the Stick Mixer into the
ingredients and blend until smooth.
3. Serve as an accompaniment with curries.
26
DRINKS
Vanilla Milkshake
INGREDIENTS
1 cup chilled milk
2 scoops vanilla ice cream
¼ teaspoon vanilla essence
METHOD
1. Place all ingredients into jug.
2. Place the Stick Mixer into the
ingredients and blend until smooth and
frothy (about 30 seconds).
3. Flavour variations
Get up and go breakfast shake
½ cup chilled milk
½ cup chilled fruit juice
1 x 60g egg
1 tablespoon honey
1. Place all ingredients into the
blending jug.
2. Place the Stick Mixer into the
ingredients and blend until smooth and
creamy (about 30 seconds)
Flavour variations
Chocolate
Add 1 tablespoon chocolate syrup
Or
½ tablespoon cocoa and ½ tablespoon malt.
Strawberry
Add 5 fresh strawberries and 1 tablespoon
strawberry syrup.
Strawberry smoothie
5 fresh strawberries, washed, hulled
50g natural yoghurt
1 scoop vanilla ice cream
1 cup chilled milk
1 tablespoon honey
1. Place all ingredients into the
blending jug.
2. Place the Stick Mixer into the
ingredients and blend until thick and
smooth (about 30 seconds)
Strawberries can be substituted with
seasonal fruit of your choice; mangoes,
blueberries, raspberries or bananas
27
EASY CAKES & DESSERTS
One bowl cake
Crepe batter
INGREDIENTS
Makes approx. 8-10 crepes
1½ cups self raising flour
1 cup castor sugar
125g butter, melted
2 x 60g eggs, lightly beaten
1 teaspoon vanilla
½ cup milk
INGREDIENTS
METHOD
1. Place flour, sugar, butter and eggs into a
medium mixing bowl.
2. Place the Stick Mixer Whisk into
the ingredients and whisk until just
combined (about 30 seconds).
3. Add combined vanilla and milk and
whisk into flour mixture until just
combined (about 30 seconds).
4. Pour cake mixture into a greased and
base line 20cm round cake pan.
5. Bake in preheated moderate 180ºC oven
for 30-35 minutes or until cooked and
golden brown.
Flavour variations
Chocolate
Substitute ¼ cup self raising flour with ¼
cup cocoa.
Banana
Add ¼ cup mashed bananas and ½
teaspoon bicarbonate of soda with vanilla
and milk.
28
1½ cups plain flour
Pinch salt
2 x 60g eggs
1½ cups milk
1 tablespoon oil
METHOD
1. Place all ingredients into a medium
mixing bowl.
2. Place the Stick Mixer into the
ingredients and blend until just
combined (about 40 seconds).
3. Pour ¼ cup of mixture into a preheated
and lightly greased fry pan. Cook until
light golden brown, turn and cook other
side. Remove, keep warm. Repeat with
remaining mixture.
4. Serve hot drizzled with lemon juice and
sprinkled with castor sugar.
EASY CAKES & DESSERTS
PANCAKES
Makes approx. 8-10 pancakes
INGREDIENTS
1 cup/150g plain flour
¼ teaspoon salt
1 x 60g egg
1¼ cups/312ml milk
2 tablespoons butter, softened
METHOD
1. Combine the flour, salt, egg and milk
in the blender jug, mix on speed 4 with
the lid firmly held in position, to form a
smooth batter.
2. Heat a small greased frying pan over a
moderate heat; pour a small quantity
of batter into frying pan to cover base
of pan.
3. Cook until bubbles come to the surface
and break.
4. Carefully turn the pancake over and
cook until golden brown. Remove
from pan.
Easy Swiss chocolate mousse
INGREDIENTS
800ml thickened cream
3 x 60g eggs
2 x 200gms dark Toblerone chocolate, melted
METHOD
1. Place cream into a medium mixing bowl.
2. Place the Stick Mixer Whisk into the
ingredients and whisk until cream has
doubled in size and soft peaks formed.
3. Place the eggs into a separate mixing
bowl and whisk until smooth and
creamy. Slowly whisk in the cooled
chocolate.
4. Fold the whipped cream into chocolate
and egg mixture.
5. Pour mixture into individual serving
dishes, cover and refrigerate for several
hours or overnight before serving.
Repeat with remaining batter mixture.
Serve with maple syrup and ice cream.
29
BABY FOOD
Vegetable blend
INGREDIENTS
1 cup steamed vegetables; carrots, pumpkin,
potato, cauliflower
METHOD
1. Place vegetables into the blending jug.
2. Place the Stick Mixer into vegetables
and blend until smooth
(about 30 seconds)
Liquids (for example milk, formula or
water) may be added to thin the mixture
down depending on the age of the child.
TIP: Freeze single serve baby food portions in
ice cube trays.
30
NOTES
31
Breville Customer Service Centre
Australian Customers
New Zealand Customers
Mail:
Mail:
PO Box 22
Botany, NSW, 2019
AUSTRALIA
Private Bag 94411
Greenmount, Auckland
NEW ZEALAND
Phone: 1300 139 798
Phone: 0800 273 845
Fax:
Fax:
(02) 9384 9601
Email: Customer Service:
[email protected]
0800 288 513
Email: Customer Service:
[email protected]
www.breville.com.au
Breville is a registered trademark of Breville Pty. Ltd. A.B.N. 98 000 092 928.
Copyright Breville Pty. Ltd. 2010.
Due to continued product improvement, the products illustrated/photographed
in this brochure may vary slightly from the actual product.
BSB510 Issue - A10