1
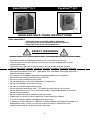
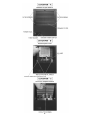
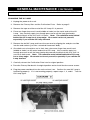
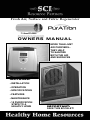
Fresh Air, Surface and Fabric Regenerator
Air-Surface Sanitizer
OWNERS MANUAL
MORE THAN JUST
AIR PURIFIERS...
THEY HELP
TO SANITIZE
BOTH THE AIR
AND SURFACES
INCLUDES:
• INSTALLATION
• OPERATION
• SPECIFICATIONS
• FEATURES
• MAINTENANCE
• 10 PURIFICATION
STEPS TO A
HEALTHY HOME
IMPORTANT:
SAVE THIS BOOKLET!
CONTENTS
EdenPURE G-7 & PURATRON B-7 (WHOLE HOUSE MODELS)
SPECIFICATIONS.......................................................................................1
SAFETY WARNINGS..................................................................................2
FEATURES..................................................................................................3
INSPECTION & INSTALLATION.................................................................3
GENERAL OPERATION..............................................................................4
GENERAL MAINTENANCE.........................................................................5
MAINTENANCE DIAGRAMS.......................................................................6
CHANGING THE UV LAMP.........................................................................7
CHANGING THE FUSE...............................................................................8
TROUBLESHOOTING.................................................................................9
WARRANTY................................................................................................18
EdenPURE AREA MODEL
SPECIFICATIONS.......................................................................................1
SAFETY WARNINGS..................................................................................10
FEATURES..................................................................................................11
INSPECTION & INSTALLATION.................................................................11
ADVANCED FUNCTIONS...........................................................................12
GENERAL OPERATION..............................................................................13
FUNCTION OVERVIEW..............................................................................13
GENERAL MAINTENANCE.........................................................................14
WARRANTY................................................................................................ 18
10 Purification Steps To A Healthy Home................................................15-17
Parts and Supplies: Contact the dealer you purchased your product from or visit
www.rppurchase.com to locate your closest dealer.
SPECIFICATIONS
EdenPURE™ G-7
Power
Fuse
Total Watts
Anion Ion Generator
Fan
Dimensions
Weight
Activated Oxygen Output
Coverage
110v AC, 60Hz
1.6 amp slow blow fuse
5 - 70
Yes
5 Speeds
12 3/4” (H) x 8 7/8” (W) x 8 3/4” (D)
16 pounds
Up to 360 mg per hour
Up to 3000 sq. ft.
Power
Fuse
Total Watts
Anion Ion Generator
Fan
Dimensions
Weight
Activated Oxygen Output
Coverage
110v AC, 60Hz
1.6 amp slow blow fuse
5 - 70
Yes
5 Speeds
12 3/4” (H) x 8 7/8” (W) x 8 3/4” (D)
16 pounds
Up to 360 mg per hour
Up to 3000 sq. ft.
Power
Total Watts
Anion Ion Generator
Fan
Dimensions
Weight
Activated Oxygen Output
Coverage
120v AC, 60Hz
30 - 45
Yes
3 Speeds
11 5/8” (H) x 12 5/8” (W) x 6 3/8” (D)
11 pounds
Up to 50 mg per hour
Up to 1000 sq. ft.
Puratron™ B-7
EdenPURE™ Area Model
l
1
EdenPURE™ G-7
Puratron™ B-7
READ AND SAVE THESE INSTRUCTIONS
VERY IMPORTANT:
• Read this manual carefully before operating.
• Do not operate unit if unfamiliar with this manual.
• Keep this manual for future reference.
SAFETY WARNINGS
TO REDUCE THE RISK OF FIRE, ELECTRIC SHOCK OR INJURY, BASIC PRECAUTIONS SHOULD BE FOLLOWED INCLUDING:
• Disconnect power cord before performing any maintenance or service.
• The rear of the unit should always have at least one inch of open area to allow
unrestricted airflow.
• To prevent injury be sure the power cord is not accessible to small children.
• The supplied power voltage must be uniform with the appliance’s permitted voltage
indicated on the back of the unit. Appliances with 110v/60Hz cannot be used with a
220v/50 Hz power supply.
• Only connect to a properly grounded 3 prong grounded circuit receptacle.
• Do not alter the cord or any other part of the unit.
• Do not use with a broken ceramic plate.
• Do not look directly at the UVC bulb while it is operating.
• Do not use outdoors or on wet surfaces.
• Do not use with damaged cord or plug.
• Do not unplug by pulling on cord. To unplug, grasp the plug, not the cord.
• Do not operate the unit in areas where flammable, combustible products, or where
vapors may be present.
• Do not handle the plug or appliance with wet hands.
• Supervision is necessary when appliance is operated near children.
• Turn off all controls before unplugging unit from outlet.
• If appliance is not working as it should, has been dropped, damaged, left outdoors, or
dropped into water, return it to your local service center or contact the sales
representative where you purchased the unit from.
2
FEATURES
· QUIET FIVE SPEED FAN
· ADJUSTABLE 24 HOUR CLOCK
· ADJUSTABLE POWER OFF TIMER
· ADJUSTABLE PURIFIER CONTROL (USED FOR RAPID ODOR REMOVAL AND
SURFACE STERILIZATION)
· ANION - NEGATIVE ION GENERATOR (NEGATIVE IONS CAUSE THE FLOATING
·
·
·
·
·
·
·
·
·
·
·
·
·
PARTICULATES TO MAGNETIZE TOGETHER FORMING A MASS WHICH DROPS
THEM TO THE FLOOR TO BE SWEPT UP)
STERILIZE (UVC LIGHT HELPS REDUCE AIRBORNE GERMS AS THEY PASS
THROUGH THE UNIT)
HELPS REDUCE SMOKE AND ODORS FROM YOUR HOME, OFFICE, CAR, BOAT,
RV, ETC...
REDUCES MOLD, MILDEW AND BACTERIA
REPLACEABLE UV LAMP
REMOTE CONTROL OR MANUAL OPERATION VIA FRONT PANEL CONTROLS
USER INTERFACE DISPLAY
MAINTENANCE REMINDERS
WASHABLE PURIFICATION PLATE
WASHABLE PHOTO-CATALYTIC PROCESS SCREEN
WASHABLE PRIMARY FILTER
SLEEP MODE (DISABLES MOST OF THE DISPLAY LIGHTS, BUT CONTINUES TO
OPERATE)
IMPROVES INDOOR AIR QUALITY
USES STANDARD HOUSEHOLD CURRENT
INSPECTION & INSTALLATION
1. Remove unit from shipping carton.
2. Check for shipping damage and loose or broken parts.
3. Remove any protective materials from the outside of the unit.
4. Read Owners Manual thoroughly prior to operating or servicing the unit.
5. Insert the battery into the remote by sliding the battery compartment open and placing
the battery with the positive side (+) facing the bottom of the remote.
6. Open the Primary Filter by removing the four corner screws and remove all protective
materials from the inside of the unit, i.e. tape used to hold the Catalytic Screen and/or
UV Lamp in place.
7. Make sure Catalytic Screen is secure. (Refer to: “GENERAL MAINTENANCE”, page 5)
8. Make sure the purification plate is secure and fully inserted in its slot. (Refer to: Page 6
Diagram B)
9. Reinstall the Primary Filter and any other temporarily removed parts before continuing.
10. Determine placement location for the unit. We recommend placing it up higher if
possible. A wall shelf would be an ideal location.
11. Plug the unit into a 3 prong grounded circuit receptacle.
3
GENERAL OPERATION
The unit can be operated using either the wireless remote or the front control panel.
OFF
1. On the rear of the purifier, switch the master power to the on position (the front display
will light up).
ON
2. Press the ON/OFF button on the front of purifier to power on the unit. The fan will start.
3. Press the Fan▲ and Fan▼ buttons to adjust the airflow speed to your desired level.
4. Press the Purify▲ and Purify▼ buttons to set the purifier setting from Stage 1 thru
Stage 5 to accommodate your desired level. You can operate the Purify feature and
the Sterilize feature simultaneously, but you cannot operate the Purify feature
and the Anion feature simultaneously.
5. Press the Sterilize button to operate the UVC and Photo Catalyst sanitize feature.
Press the Sterilize button again to stop its operation. The UVC bulb will produce a
light blue glow on the inside of the unit when this feature is on. Note: Do not look
directly at the UV Bulb while it is operating.
6. Press the Anion button to turn on the negative ion generator. A neon bulb in the unit
(behind the fan) will glow to indicate the negative ion generator is functioning properly.
The purify feature will stop automatically when the Anion feature is started. Press the
Anion button again to stop the negative ion generator function. You can operate the
Anion feature and the Sterilize feature simultaneously, but you cannot operate
the Anion feature and the Purify feature simultaneously.
Sleep Button
Press the Sleep button to use the screen saving mode. This will turn most of the
display lights off. Press any button on the front panel to deactivate the sleep mode.
The working mode of Anion, Purify, Sterilize, and fan speed will not change while in
sleep mode. If the timer function is set to turn the power off at a set time, do not use
the sleep function. The timer will only deactivate the sleep mode instead of shutting
down the unit if the sleep mode is on.
Time/Set Button
Read these instructions thoroughly before setting the time.
*** After 5 seconds of inactivity the clock will be set or you will have to start the process again. ***
The clock is a 24 hour clock; 13:00 would be 1:00p.m.
To set the current time:
1. Press the Time/Set button 2 times. “Time” on the display will blink.
2. The Purify▲ and Purify▼ buttons adjust the hours. The Fan▲ and Fan▼ buttons
adjust the minutes.
To set the power off timer:
1. While the unit is operating, press the Time/Set button 1 time. “Time/Set” on the
display will blink.
2. The Purify▲ and Purify▼ buttons adjust the hours. The Fan▲ and Fan▼ buttons
adjust the minutes.
Sterilizer Feature
Power Switch Time
Purifier Feature (5 Stages)
Fan Speed
Anion Feature
Operating Display
4
Operating Buttons
GENERAL MAINTENANCE
UNPLUG THE UNIT BEFORE PERFORMING ANY MAINTENANCE PROCEDURES
Recommended Monthly Maintenance
• Clean the Primary Filter
• Clean the Purifier Plate
• Clean the Catalytic Screen
PRIMARY FILTER & CATALYTIC SCREEN CLEANING
You have three options to clean the Primary filter and the Catalytic Screen:
1. When visibly dirty or after 30 days, remove the primary filter and the catalytic screen
from the unit. With a hand-held vacuum, remove the heavy particulate from both
filters. This method will extend the life of the filters and ensure proper function of the
catalytic screen.
2. If vacuuming does not clean the filter sufficiently, remove the primary filter and the
catalytic screen from the unit and wash them in warm water. Brush gently with a
toothbrush to remove particulate. Allow to dry thoroughly before re-installing.
NOTE: Do not use soap because it could damage the filters.
3. Replace the filter and/or catalytic screen. Contact the dealer you purchased your
product from or visit www.rppurchase.com to locate your closest dealer.
CLEANING THE PURIFICATION PLATE
1. Remove the Purification Plate (see Purification Plate and Catalytic Screen Removal).
2. Wash the Purification Plate with about 1 drop of mild dish soap (per side) and a toothbrush.
3. Use the toothbrush to make small circular motions over all of the metal mesh areas.
Be careful not to drop or break the Purification Plate while cleaning.
4. Rinse with water and allow it to air dry completely before reinstalling.
PRIMARY FILTER REMOVAL
1. Unplug the power to the unit
2. Unscrew the four rear corner screws from the Primary filter and pull the filter handle
to remove. Refer to Diagram A
3. After servicing Primary filter place it back in its original position and re-install the
four corner screws.
PURIFICATION PLATE AND CATALYTIC SCREEN REMOVAL
1. Remove Primary filter first.
2. Carefully remove the Purification Plate by lifting it straight up and then turn at an
angle to pull it out. This is an ideal time to clean the Purification Plate. Refer to
Diagram B.
3. Gently pull the Catalytic Screen handle to remove it for cleaning. Refer to Diagram C.
4. After servicing Catalytic Screen, place it back in its original position by placing the
bottom of screen in first. The bottom of the Catalytic Screen frame has raised place
holders. The place holders need to be reinserted into their original place. The
Screen should be secure and not move when installed properly.
5. Carefully reinsert the Purification Plate into its original position.
6. Place the Primary filter back in its original position and re-install the four corner screws.
5
6
GENERAL MAINTENANCE CONTINUED
UNPLUG THE UNIT BEFORE PERFORMING ANY MAINTENANCE PROCEDURES
CHANGING THE UV LAMP
1. Unplug the power to the unit.
2. Remove the Primary filter and the Purification Plate. Refer to page 5.
3. Remove the tape on either end of the UV Lamp if it is present.
4. Place one finger from each hand (middle or index) on the metal ends of the UV
Lamp. Very carefully apply just enough pressure to roll the lamp (preferably
towards the back of the unit) until it is loose. Note: The reflective metal shield
behind the UV Lamp has a sharp edge. Be careful not to cut yourself,
especially if you roll the UV Lamp forward.
5. Remove the old UV Lamp and insert the new one by aligning the end pins to slide
into the end sockets (just like a standard fluorescent bulb).
6. Once both sets of end pins are in their slots, place one finger from each hand
(middle or index) on the metal ends of the UV Lamp. Very carefully apply just
enough pressure to roll the lamp (preferably towards the back of the unit) until it is
secure on both ends. Note: The reflective metal shield behind the UV Lamp
has a sharp edge. Be careful not to cut yourself, especially if you roll the UV
Lamp forward.
7. Carefully reinsert the Purification Plate into its original position.
8. Place the Primary filter back in its original position and re-install the four corner screws.
9. Plug the power cord back into the unit and turn it on. Confirm the new UV Lamp is
functioning properly. If it is not working properly, repeat steps 1, 2, and 6. Test the
UV Lamp again.
7
GENERAL MAINTENANCE CONTINUED
UNPLUG THE UNIT BEFORE PERFORMING ANY MAINTENANCE PROCEDURES
CHANGING THE FUSE
1. Unplug the power to the unit.
2. Remove the fuse holder by using your fingernail or a flat blade screwdriver.
3. Remove the blown fuse and use it to push out the spare fuse.
4. Place the new fuse into place and re-insert fuse holder.
5. Plug the power cord back into the unit and turn the master power on.
8
TROUBLESHOOTING
1. I have plugged in the unit, turned “ON” the main power switch (on the back of
unit), pressed the ON/OFF button on the remote (or the front panel) and nothing
happens. What’s wrong?
• Make sure the power cord is inserted completely into the receptacle on the back of
the unit.
• Make sure the electrical outlet is capable of providing power to the unit.
• Check the primary filter located on the back of the unit to ensure that the safety switch
activator clip (see Diagram B) depresses the safety switch.
• Check to see if the proper fuse is installed and that it is operational.
2. The fan is operating but the purifier plate is not working or the Purifier lights are
blinking. What’s wrong?
• Check the purifier plate to see if it is cracked or broken. If so, the purifier plate will
need replaced.
• Ensure maintenance procedures required for the purifier plate have been performed
according to the “General Maintenance” section of this Owners Manual. Order new
plates from your dealer if needed.
• Electrical contacts are not contacting the screen portion of the purifier plate. Unplug
and inspect the unit for any loose connections.
• Do not attempt to disassemble or service the unit or you will void the warranty.
3. The purifier plate is making a noise, has a burning smell, and/or appears to
arc/spark. What is the problem?
• The purifier plate is most likely cracked. Refer to the answers for question # 2.
4. The UV lamp is not functioning or the Sterilize display light is blinking.
• Check lamp for proper installation. See General Maintenance section of this Owners Manual.
• Replace UV Lamp. Order a new UV bulb from your dealer if needed.
5. What are the most typical application problems?
• Symptom: A belief that the equipment is placed in the proper environment, but
appears unsuccessful.
Problem: Lack of air movement, improper placement of the unit.
• Symptom: Strong odors still remain within the environment after operating the unit.
Problem: Purifier setting is too low or improper placement of the unit.
• Symptom: A strong odor of activated oxygen is present within the environment.
Problem: Purifier setting is too high and/or a lack of air movement.
• Symptom: Visual haze of smoke and/or particulate remains within the environment.
Problem:
Lack of air movement, Anion feature is not turned on, or improper
placement of the unit.
6. How can I tell if the UV lamp is functioning?
• The UV lamp will produce a glow that is visible through the front grill under low light
conditions.
• CAUTION: Do not look directly at the glowing lamp.
7. The unit does not operate.
• Is the unit plugged in?
• Are you sure the outlet is active?
• Is the main power switch turned on?
• Is the rear primary filter installed properly and depressing the safety switch inward?
• Does the fuse need to be replaced?
• Is the unit properly placed away from objects that may obstruct airflow?
• Is the primary filter clean?
• Is the catalytic screen clean?
• Is the purifier plate clean?
If your unit fails to operate properly after performing troubleshooting, contact your Sales
Representative or Service Center for further assistance.
A list of available Sales Representatives and Service Centers can be located by visiting
our website at www.rppurchase.com or by calling 866-786-8946.
9
EdenPURE™ Area Model
READ AND SAVE THESE INSTRUCTIONS
VERY IMPORTANT:
• Read this manual carefully before operating.
• Do not operate unit if unfamiliar with this manual.
• Keep this manual for future reference.
SAFETY WARNINGS
TO REDUCE THE RISK OF FIRE, ELECTRIC SHOCK OR INJURY, BASIC PRECAUTIONS SHOULD BE FOLLOWED INCLUDING:
• Disconnect power cord before performing any maintenance or service.
• The rear of the unit should always have at least one inch of open area to allow
unrestricted airflow.
• To prevent injury be sure the power cord is not accessible to small children.
• The supplied power voltage must be uniform with the appliance’s permitted voltage
indicated on the back of the unit. Appliances with 110v/60Hz cannot be used with a
220v/50 Hz power supply.
• Only connect to a properly grounded 3 prong grounded circuit receptacle.
• Do not alter the cord or any other part of the unit.
• Do not look directly at the UVC bulb while it is operating.
• Do not use outdoors or on wet surfaces.
• Do not use with damaged cord or plug.
• Do not unplug by pulling on cord. To unplug, grasp the plug, not the cord.
• Do not operate the unit in areas where flammable, combustible products, or where
vapors may be present.
• Do not handle the plug or appliance with wet hands.
• Supervision is necessary when appliance is operated near children.
• Turn off all controls before unplugging unit from outlet.
• If appliance is not working as it should, has been dropped, damaged, left outdoors, or
dropped into water, return it to your local service center or contact the sales
representative where you purchased the unit from.
10
FEATURES
· QUIET THREE SPEED FAN
· AUTO MODE CYCLES OZONE OR ANION (ION GENERATOR) ON AND OFF
AUTOMATICALLY
· MANUAL MODE AUTOMATICALLY DEFAULTS TO ANION FEATURE AFTER 2
HOURS
· 2 OR 4 HOUR TIMER MODE OPERATES UNIT FOR 2 OR 4 HOURS AND THEN
SHUTS OFF AUTOMATICALLY
· OZONE GENERATOR (USED FOR RAPID ODOR REMOVAL AND SURFACE
STERILIZATION)
· ANION - NEGATIVE ION GENERATOR (NEGATIVE IONS CAUSE THE FLOATING
·
·
·
·
·
·
·
·
·
·
PARTICULATES TO MAGNETIZE TOGETHER FORMING A MASS WHICH DROPS
THEM TO THE FLOOR TO BE SWEPT UP)
STERILIZE (UV LIGHT HELPS REDUCE AIRBORNE GERMS AS THEY PASS
THROUGH THE UNIT)
HELPS REDUCE SMOKE AND ODORS FROM YOUR HOME, OFFICE, CAR, BOAT,
RV, ETC...
REDUCES MOLD, MILDEW AND BACTERIA
REPLACEABLE UV LAMP
WIRELESS REMOTE CONTROL OR MANUAL OPERATION VIA FRONT PANEL
CONTROLS
WASHABLE PRE-FILTER
WASHABLE HEPA FILTER
DIGITAL DISPLAY WITH SLEEP MODE (THE BACKLIGHT TURNS ITSELF OFF
AFTER ADJUSTING SETTINGS)
IMPROVES INDOOR AIR QUALITY
USES STANDARD HOUSEHOLD CURRENT
INSPECTION & INSTALLATION
1. Remove unit from shipping carton.
2. Check for shipping damage and loose or broken parts.
3. Remove any protective materials from the outside of the unit.
4. Remove the filter panel on the right side of the machine and make sure the plastic
cover has been removed from the filter.
5. Read Owners Manual thoroughly prior to operating or servicing the unit.
6. Insert the battery into the remote by sliding the battery compartment open and placing
the battery with the positive side (+) facing the bottom of the remote.
7. Determine placement location for the unit. We recommend you place it as high as
possible, this will maximize the coverage area.
8. Plug the unit into an unused power outlet.
11
ADVANCED FUNCTIONS
Ozone Function (use is optional)
Used for rapid odor removal and surface sterilization. Select this feature by pressing the
“FUNCTION” button until you see “OZONE” on the digital display.
Anion Function
This unit includes a negative ion generator. Negative ions literally sweep your breathing
space clean of many lung damaging pollutants by causing the floating particulates to
magnetize (attract) together forming a mass which drops them to the floor to be swept up.
Select this feature by pressing the “FUNCTION” button until you see “ANION” on the
digital display.
UV/Ti02 (UV Bulb Sterilizer)
An advanced UV Bulb sterilizes the air that passes through the unit. You should allow this
feature to run continuously to achieve optimal fresh air output. Turn this feature on or off
by pressing the “UV/Ti02” button until you see “UV: ON” or “UV: OFF” on the digital
display.
Fan Speed
This unit has a quiet 3-speed fan. Adjust the fan speed by pressing the “SPEED” button.
The display will show 1 - 3 bars under “SPEED:” on the display. The smallest bar
represents the lowest speed and the largest bar represents the highest speed.
Manual Mode
This mode will automatically set the function to Anion after operating for 2 hours. This
mode will only disable the Ozone function (not the fan speed or UV Bulb). Select this
feature by pressing the “MODE” button until you see “MANU” on the digital display.
Auto Mode
This mode will operate the unit for 20 minutes at your desired settings, turn itself off for 40
minutes, and then repeat this cycle continuously. Select this feature by pressing the
“MODE” button until you see “AUTO” on the digital display.
2 Hours Mode
This mode will operate the unit at your desired settings and turn itself off automatically after
2 hours. Select this feature by pressing the “MODE” button until you see “2HOURS” on
the digital display.
4 Hours Mode
This mode will operate the unit at your desired settings and turn itself off automatically after
4 hours. Select this feature by pressing the “MODE” button until you see “4HOURS” on
the digital display.
12
GENERAL OPERATION
The unit can be operated using either the wireless remote or the front control panel.
1. Press the POWER button. This starts the unit and turns on the LED display. The soft blue
backlight will turn off after approximately 20 seconds.
2. Press the MODE button successively to select your desired mode; MANUAL, AUTO, 2
HOURS, 4 HOURS (see Advanced Features). Note: Ozone setting will operate for 2
hours and then revert to ANION.
3. Press the FUNCTION button successively to select ANION or OZONE. If the unit is set to
OZONE, it will convert automatically to ANION after 2 hours. However, if set to AUTO mode
the Ozone will operate for 20 minutes, turn off for 40 minutes, and then continue to repeat the
same cycle until you stop the AUTO mode.
4. Press the UV/Ti02 button to power the UV Bulb sterilizer ON and OFF. We recommend you
leave this feature turned on. Note: Do not look directly at the UV Bulb while it is operating.
5. Press the FAN button successively to adjust the fan speed to low, medium, or high.
FUNCTION OVERVIEW
Fan
Exhaust
LCD
Screen
Mode
Pre-filter
Panel
Function
UV/TIO2
Fan Speed
Front
Panel
Power Switch
Infrared
Receiver
13
GENERAL MAINTENANCE
UNPLUG THE UNIT BEFORE PERFORMING ANY MAINTENANCE PROCEDURES
Recommended Monthly Maintenance
• Clean the Pre-Filter
• Clean the HEPA Filter
CLEANING THE PRE-FILTER & THE HEPA FILTER
When visibly dirty or after 30 days:
1. Unplug the power to the unit.
2. Remove the pre-filter by lifting up on the bottom center of the pre-filter panel. Diagram 1
3. Remove the HEPA filter by pulling on its ribbon handle. Diagram 2
4. With a hand-held vacuum, remove the heavy particulate from both sides of the filters.
5. Re-install the HEPA filter leaving the ribbon handle facing out.
6. Re-install the pre-filter panel. Diagram 1
If vacuuming does not clean the filters sufficiently:
1. Rinse both filters in warm water. NOTE: DO NOT use soap, soak in water, scrub with
brush, or squeeze the filters.
2. Shake the excess water off of the filters.
3. Allow both filters to dry thoroughly before re-installing. NOTE: DO NOT force the filters to
dry using any alternative methods.
4. Re-install the HEPA filter leaving the ribbon handle facing out.
5. Re-install the pre-filter panel. Diagram 1
Contact your dealer for replacement filters:
1. Contact the dealer you purchased your product from or visit www.rppurchase.com to
locate your closest dealer.
CHANGING THE UV LAMP
1. Unplug the power to the unit.
2. Remove the pre-filter by lifting up on the bottom center of the pre-filter panel. Diagram 1
3. Remove the HEPA filter by pulling on its ribbon handle. Diagram 2
4. Carefully roll the UV Bulb until it is loose (bulb fitting is similar to a fluorescent bulb).
Diagram 3
5. Remove the UV Bulb. Diagram 4
6. Insert new UV Bulb making sure the ends slide into their slots.
7. Carefully roll the UV Bulb until it is not loose. Diagram 3
8. Re-install the HEPA filter leaving the ribbon handle facing out.
9. Re-install the pre-filter panel. Diagram 1
10. Plug the power back in and then test the bulb to make sure it is functioning properly. If it
doesn’t light up, repeat the above steps again to make sure the bulb is properly installed
into its slots.
Diagram 1
Diagram 2
Diagram 3
14
Diagram 4
10 PURIFICATION STEPS TO A HEALTHY HOME
These 10 Purification tips are designed to demonstrate immediate results and help expedite the
purifying process in your home or office. These steps can provide amazing results and are well worth
recommending to family and friends!
Please note that with everyday normal use, the air purifier should be located on the highest piece of
furniture in your main living area.
NOTICE: During the purification process you may get a "Bleach" smell, that's good! It tells you that the
air purifier is working and the O3 is oxidizing (breaking down) the toxins, chemicals and bacteria into
pure Oxygen, H2O, and Carbon Dioxide. This purification process turns your stale, toxic, sick home air
into a vibrant healthy home environment.
NOTE: Some steps work best with the EdenPURE™ G-7 and Puratron B-7.
PUT YOUR AIR PURIFIER TO THE TEST...
THREE RULES TO REMEMBER
Your new air purifier does not only help purify indoor air, but all your home surfaces as well. That's right,
your carpets, clothes, towels, shoes, cat, dog, you, your children and the list goes on and on.
A. HAVE FUN! Experiment! Your air purifier is portable! Move it around! But be considerate of the
other people in the house. It is rare, but occasionally some people initially do not like the smell of
the Activated Oxygen and that's O.K., they eventually will. Once you sanitize and bathe your entire
home with nature's cleaning elements, only a small, undetectable amount of O3 is necessary to
maintain the natural level of purity. Put it through its paces and marvel at the magic of nature's
purification at work indoors.
B. ALWAYS keep the back (B-7 / G-7) or sides (area model) of your air purifier clear of obstructions so
at to allow it to properly draw air through it.
C. ALWAYS be watchful of the electric cord. Keep away from water, excessive heat and prevent
pinching the cord.
RV Vehicles
(Boats and other target items)
Have you ever taken the cover off your boat and been blown away by the musty smells? This tip will purify
your musty seasonal clothing, tenting and camping gear, as well as RVs. Do this step if you want to protect
them from nasty odors and potentially harmful mold and mildew while your valuables are in storage.
A. Place opened items or opened hanging items in front of your air purifier in a closet or storage unit.
Or, lay the gear out on the floor tented with a sheet leaving the back (B-7 / G-7) or sides (area
model) open for ventilation.
B. Turn the air purifier on. Set the purify setting to its highest level (B-7 / G-7). Select the ozone option
for the area model.
C. Allow this set-up to run for 1 to 2 hours. Let your nose be the judge.
D. For RVs, Campers, Tents and Boats, place the unit inside and make sure there is a small window or
a vent open for ventilation. Leave the purifier in the unit for 2 to 24 hours depending on the severity
of the mold or odor problem. NOTE: If you are allergic to the outdoor pollen and mold that finds its
way into the RV or camper at night or you are an avid camper, consider investing in a second
Purifier for the road. Remember when mold oxidizes, it smells like Chlorine. Wait for the after
thunderstorm fresh air smell before removing the unit or turning it down/off.
Automobiles
Keep your car smelling fresh or "detox" a new car
This step can help you reduce or eliminate that stale smell your car can get as it ages, as well as help
eliminate the hazardous toxic fumes left behind in a new car or odors from a smoker or a pet
passenger. This is a single treatment that will have to be repeated again and again as fumes build up.
A. Place your air purifier on the front seat of your car.
B. Make sure the back (B-7 / G-7) or sides (area model) of your air purifier are clear so you maintain
good airflow through the machine.
C. Turn your car ignition to the "on" position and turn your car's heating/cooling ventilation fan on.
D. Turn the air purifier on. Set the purify setting to its highest level (B-7 / G-7). Select the ozone option
for the area model. Set the fan to medium.
E. Watch the cord as you close the door or put it through the window.
F. Allow this set-up to run 1 to 2 hours or longer depending on the smells. Your nose knows.
15
Keep your pores healthy with naturally sanitized clothes
Dry cleaning making you sneeze?
This step can help reduce and eliminate that nasty toxic residue and odor left behind in your clothing by
your cleaning solutions or by the dry cleaner.
A. Remove any plastic or paper wrap and hang the clothing in a closet or bathroom.
B. Place your air purifier as high as possible (B-7 / G-7) or under (area model) and blowing directly (if
possible) on the clothing to be sanitized.
C. Turn the air purifier on. Set the purify setting to its highest level (B-7 / G-7). Select the ozone option
for the area model. Set the fan to medium.
D. Make sure the back (B-7 / G-7) or sides (area model) of your air purifier are clear so you maintain
good airflow through the machine. Watch the cord as you dose the door.
E. Allow this set-up to run for 1 to 2 hours depending on the smell. Again, let your nose be your judge.
Cleaning Up Heating and Cooling With Purification!
This is your home's lungs
This step takes the most time and is the most beneficial to you. Purifying your heating and cooling
ventilation system could alone pay for your air purifier. It costs up to $700.00 to have your home
ventilation ductwork chemically treated to prevent infection and breathing disorders. This step alone will
more than pay for your air purifier and is worth recommending to those you love! Your air purifier will
help keep your house environmentally spic-n-span, continuously. This step works best with the
EdenPURE™ G-7 and Puratron B-7.
A. Just place your air purifier directly in front of and facing the cold air return or intake of your
ventilation system.
B. Turn the air purifier on. Set the purify setting to its highest level (B-7 / G-7). Select the ozone option
for the area model. Set the fan to low.
C. Now turn on your Heating/Cooling system fan for continuous operation.
D. Allow the set-up to run at least 12 hours or until you smell the sweet smell of Fresh Activated
Oxygen coming out the vents farthest away from the central air/fan unit. The longer the better. You
can let it run this way all day while you're away. If you do leave it on all day, open all your closet
doors to freshen them up at the same time.
Sound, healthy sleep environment
This step won't take long and has the potential to give you the best night's sleep ever! You spend one
third of your life here. Your overall quality of sleep may be impacted by the freshness of your mattress.
A mattress can be so filthy that it is illegal in some states to resell. This step works best with the
EdenPURE™ G-7 and Puratron B-7.
A. Simply pull the blankets back to expose the mattress and pillows.
B. Set the air purifier on the foot of your bed, pointed toward the headboard.
C. Turn your air purifier on high.
D. Cover your air purifier and your whole bed with a light sheet to make a "tent" over everything except
the back of the air purifier (so it can breathe). This will concentrate the Activated Oxygen deep into
your bedding to reduce or oxidize the gross stuff (dust mite excretion) in your beds that affects your
breathing and thus reduces your ability to get a good night sleep.
E. Make sure the back (B-7 / G-7) or sides (area model) of your air purifier are clear so you maintain
good airflow through the machine.
F. Then close the door to the room and allow the air purifier to disinfect for 2 to 4 hours or all day while
you're away, and then walk into an environmentally pure room.
NOTE: You will be tempted to sleep with the unit in your room. However, that is not necessary once the room
is sanitized. You will normally get a smaller amount of concentration with the purifier when it is placed in a
main living area. The higher concentration won't harm you, but those who are sensitive may find it annoying.
Tame Pet Odors
This step can help you reduce or eliminate that obnoxious smell that our loving pets sometimes leave
us to deal with in our lives. This step can be amazing and is worth recommending to friends if they
have pet odor problems. If you need to treat a whole room, follow the steps below. This step works
best with the EdenPURE™ G-7 and Puratron B-7.
A. Place your air purifier in front of and facing the problem spot directly on the floor.
B. Turn the air purifier on. Set the purify setting to its highest level (B-7 / G-7). Select the ozone option
for the area model. Set the fan to low.
C. Make sure the back (B-7 / G-7) or sides (area model) of your air purifier are clear so you maintain
good airflow through the machine.
D. Allow this set-up to run for 2 to 24 hours, or longer, depending on the smell. Let your nose be the judge.
16
NOTE: To purify a stinky spot on the carpet, cover the air purifier and the spot with a light sheet creating the
tent effect as we did with your bedding. Make sure you don’t block the airflow through the air purifier.
Mold Blast the Basement
This step will amaze you as your nasty, mold and mildew-smelling basement becomes transformed into
a sweet smelling pleasant place to spend time. Now, you may have to run a dehumidifier if the
basement environment is really damp. Mold and mildew love dampness.
A. Place your air purifier in the center of the basement about 5 to 6 feet above the floor or as high as possible.
B. Turn the air purifier on. Set the purify setting to its highest level (B-7 / G-7). Select the ozone option
for the area model. Set the fan to high.
C. Place an additional fan in the room if necessary to circulate the Activated Oxygen to every corner of
the basement if the basement has poor airflow.
D. Allow the set-up to run for 6 to 8 hours for mild/moderate problems. Allow it to operate from 2 to 4
days if you have a serious problem in your basement. Remember, according to experts, if you can
smell the mold or mildew, you could be at risk! So, let's remove and/or significantly reduce deadly mold!
NOTE: For severely infected or damp areas; consider a second air purifier. ALSO REMEMBER:
When you set up for initial purifying for purging purposes and when oxidizing mold you will normally
smell a detergent like smell resembling chlorine until there is a reduction in the amount of mold.
Hammer Remodeling Fumes
This step can help reduce and eliminate those hazardous toxic fumes and dust created in your home
during and after you paint, lay carpet, install cabinetry or after almost any remodeling job! This
procedure can be amazing and is worth recommending to friends who are also remodeling or building.
A. Place your air purifier in the center of the room about 5 to 6 feet above the floor.
B. Turn the air purifier on. Set the purify setting to its highest level (B-7 / G-7). Select the ozone option
for the area model. Set the fan to medium.
C. Place an additional fan in the room to circulate the Activated Oxygen to every corner of the room if
the area has poor airflow.
D. Allow this set-up to run for 2 to 24 hours, or longer, depending on the smell. Let your nose be the judge.
NOTE: You may initially get a "bleach" smell, that's good! It tells you the O3 is transforming the toxins,
chemicals and bacteria into pure oxygen, H2O, O2 and carbon dioxide.
Flush Your Bathroom
This step can help reduce that nasty mold and mildew; it will also help keep those gross infectious
microscopic bacteria and creatures from taking over your bathroom!
A. Place your air purifier in the center of the bathroom about 5 to 6 feet above the floor.
B. Turn the air purifier on. Set the purify setting to its highest level (B-7 / G-7). Select the ozone option
for the area model. Set the fan to medium.
C. Allow the set-up to run for 2 to 4 hours.
D. This procedure should be repeated at least once per month to help maintain a safe and healthy
bathroom. Also keep in mind that when you have the purifier on, it is for purging purposes and when
oxidizing mold you will normally smell a detergent-like smell resembling chlorine until there is a
reduction in the amount of mold. However, the air purifier does not produce Chlorine, it only
produces activated oxygen. This is the same natural process the sun and thunderstorms produce to
clean up the outdoor air pollution.
Spring Clean the Closet
Oxidize chemicals from dry cleaning or smelly clothes in general
This step can help you reduce or eliminate that stale old smell from all of your closets and storage units.
A. Place your air purifier in the center of the closet or storage space up as high as you can get it. If
what you're purifying is a small item like a chest or trunk, close the lid within 1 inch of fully closed.
You must allow some fresh air in for your air purifier to work best.
B. Turn the air purifier on. Set the purify setting to its highest level (B-7 / G-7). Select the ozone option
for the area model. Set the fan to high.
C. Make sure the back of the air purifier is clear and watch the cord as you close the door.
D. Make sure the back (B-7 / G-7) or sides (area model) of your air purifier are clear so you maintain
good airflow through the machine.
E. Allow this set up to run for 1 to 2 hours depending on how fully you pack your closet or the size of
the storage area. It is OK to run it all day.
NOTE: For stinky, smelly shoes or a smoke drenched jacket, place the item in front of your air purifier
for an extra hour or so.
17
WARRANTY
WARRANTY:
SCI Resource Partners warrants this product, to the original purchaser or gift recipient, to be free from defects in workmanship
and materials under normal use and service, for a period of one year from the date of purchase.
LIMITATIONS:
ALL WARRANTIES IMPLIED BY LAW, INCLUDING THE IMPLIED WARRANTIES OF MERCHANTABILITY AND FITNESS FOR A
PARTICULAR PURPOSE, ARE EXPRESSLY LIMITED TO THE DURATION OF THE WARRANTY SET FORTH ABOVE. Some
jurisdictions do not allow limitations on the length of the implied warranty, so the above limitation may not apply to you.
IN NO EVENT SHALL SCI RESOURCE PARTNERS BE LIABLE FOR ANY INCIDENTAL OR CONSEQUENTIAL DAMAGES, LOSS
OF PROFIT, OR MEDICAL EXPENSES CAUSED BY ANY DEFECT, FAILURE, MISUSE, OR MALFUNCTION OF THE PRODUCT.
Some jurisdictions do not allow the exclusion of limitation of incidental or consequential damages, so the above limitation or
exclusion may not apply to you. The Company will not be responsible for damages or losses, direct or indirect, caused by
misuse, abuse, accident, negligence, conditions of transportation or storage, or failure to follow instructions. The Company will
not be responsible for any statements that are made or published, written or oral, that are inconsistent with this written warranty,
or which are misleading or inconsistent with the facts as published by the Company in the literature or specifications.
WARRANTY RESTRICTION:
This warranty is invalid if the factory-applied serial number has been altered or removed from the product.
To obtain warranty service customer must:
1)
2)
WARRANTY CLAIM PROCEDURE:
Provide proof of purchase in the form of a Bill of Sale or receipted invoice, evidence unit is within the warranty period.
Contact the Dealer you purchased your equipment from.
If the original order was shipped from our facility within 30 days, SCI Resource Partners will pay shipping both ways.
Within 31-60 days the customer will pay shipping charges back to the point of purchase for repair or replacement. SCI Resource Partners will pay for return
shipping to the customer.
After 61 days the customer will be responsible for shipping expensed incurred both ways.
If the original order was purchased from a local dealer - return to your local dealer for service
EXTENDED WARRANTY:
Within 30 days from date of purchase customer will have the option of purchasing extended warranty coverage through their Authorized local Service Center.
Please clip and return warranty card below
SCI Resource Partners’ Warranty Registration
Please return this card within 30 days of purchase to
activate your warranty. Thank You.
E-mail Address _________________________@ ____________________
Firstname _________________ M.I. _____ Lastname ________________
Street ______________________________ Apt.# ____________________
City ____________________ State _________ Zip code _______________
Model purchased ______________ Serial# __________________________
Date of purchase: ______________ Place of Purchase: ________________
Name of Representative or Service Center: __________________________
Are you interested in your own Distribution Business? Yes____ No _____
Phone : _____-_____-_______ Best time to contact you _______________
18
Suarez Corporation Industries
Resource Partners
7800 Whipple Ave. NW
North Canton, Ohio 44720-6928
1-866-786-8946
www.rppurchase.com
First-Class
Postage
Required
Post Office
will not deliver
without proper
postage.
Suarez Corporation Industries
Resource Partners
7800 Whipple Ave. NW
North Canton, Ohio 44720-6928
©2006 Resource Partners B-6279 BR7247R-1 A-5
19