1
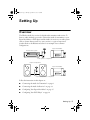
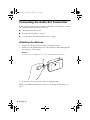
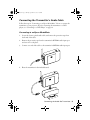
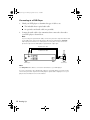
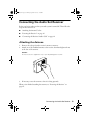
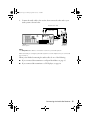
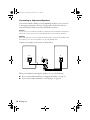
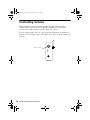
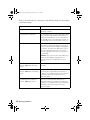
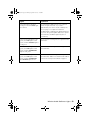
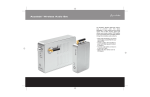
Joplin.book Page 1 Monday, September 18, 2006 2:43 PM
Quick Guide
Joplin.book Page 2 Monday, September 18, 2006 2:43 PM
Contents
Welcome . . . . . . . . . . . . . . . . . . . . . . . . . . . . . . . . . . . . . . . . . . . . . . 3
Unpacking the Wireless Audio Set. . . . . . . . . . . . . . . . . . . . . . . . . . . . . . . 4
Setting Up . . . . . . . . . . . . . . . . . . . . . . . . . . . . . . . . . . . . . . . . . . . . 5
Overview . . . . . . . . . . . . . . . . . . . . . . . . . . . . . . . . . . . . . . . . . . . . . . . . 5
Connecting the Audio Set Transmitter. . . . . . . . . . . . . . . . . . . . . . . . . . . . 6
Connecting the Audio Set Receiver . . . . . . . . . . . . . . . . . . . . . . . . . . . . . 13
Configuring Your Epson MovieMate . . . . . . . . . . . . . . . . . . . . . . . . . . . . 17
Configuring Your DVD Player . . . . . . . . . . . . . . . . . . . . . . . . . . . . . . . . 18
Using the Wireless Audio Set . . . . . . . . . . . . . . . . . . . . . . . . . . 19
Powering On Your Equipment . . . . . . . . . . . . . . . . . . . . . . . . . . . . . . . . 19
Controlling Volume . . . . . . . . . . . . . . . . . . . . . . . . . . . . . . . . . . . . . . . 20
Solving Problems . . . . . . . . . . . . . . . . . . . . . . . . . . . . . . . . . . . . . 21
Wireless Audio Set Status Lights . . . . . . . . . . . . . . . . . . . . . . . . . . . . . . . 21
Problems and Solutions . . . . . . . . . . . . . . . . . . . . . . . . . . . . . . . . . . . . . 24
Help . . . . . . . . . . . . . . . . . . . . . . . . . . . . . . . . . . . . . . . . . . . . . . . . . . 26
Notices. . . . . . . . . . . . . . . . . . . . . . . . . . . . . . . . . . . . . . . . . . . . . . . 27
Trademarks . . . . . . . . . . . . . . . . . . . . . . . . . . . . . . . . . . . . . . . . . . . . . 31
2 Contents
Joplin.book Page 3 Monday, September 18, 2006 2:43 PM
Welcome
The Accolade™ Wireless Audio Set allows you to transmit digital audio from an
Epson MovieMate™ projector to an audio system (such as a home theater system
or a stereo receiver). If you don’t have access to an audio system, you can use the
Wireless Audio Set’s built-in 15-watt amplifier to power a pair of unpowered
speakers.
You can also use the Wireless Audio Set to transmit audio from a standard DVD
player with an optical or coaxial audio output to an audio system or a pair of
unpowered speakers. This allows you to conveniently transmit audio wirelessly to
your audio system while using a projector and DVD player that are not in close
proximity to your audio system.
Welcome 3
Joplin.book Page 4 Monday, September 18, 2006 2:43 PM
Unpacking the Wireless Audio Set
Unpack the Wireless Audio Set, and make sure you have all the parts shown:
Receiver power
adapter
Transmitter
power adapter
Receiver
4 AA batteries
Transmitter stand
Transmitter
2 optical audio cables
RCA cable
2 antennas
If anything is missing, contact technical support as described on page 26.
4 Welcome
Joplin.book Page 5 Monday, September 18, 2006 2:43 PM
Setting Up
Overview
The Wireless Audio Set consists of a digital audio transmitter and receiver. To
listen to audio wirelessly, you need to connect the Audio Set transmitter to your
Epson MovieMate or DVD player and the Audio Set receiver to an audio system
(such as a home theater system or a stereo receiver) or a pair of unpowered
speakers. Refer to the illustrations below for an example of two common
configurations:
Epson MovieMate
Home theater system
Audio system configuration
Unpowered speakers
Epson MovieMate
Unpowered speakers configuration
Follow the instructions in this chapter on:
■
“Connecting the Audio Set Transmitter” on page 6
■
“Connecting the Audio Set Receiver” on page 13
■
“Configuring Your Epson MovieMate” on page 17
■
“Configuring Your DVD Player” on page 18
Setting Up 5
Joplin.book Page 6 Monday, September 18, 2006 2:43 PM
Connecting the Audio Set Transmitter
Before you begin, make sure that your Epson MovieMate or DVD player is turned
off. Then follow the steps in these sections on:
■
“Attaching the Antenna” below
■
“Powering the Transmitter” on page 7
■
“Connecting the Transmitter’s Audio Cable” on page 9
Attaching the Antenna
1. Remove the red cap from the transmitter’s antenna connector.
2. Attach one of the included antennas to the transmitter, then hand-tighten the
nut at the base of the antenna.
Caution:
Do not use a tool to tighten the nut, or you may damage the transmitter.
3. If necessary, rotate the antenna so that it is facing upwards.
When you’re finished attaching the antenna, see “Powering the Transmitter” on
page 7.
6 Setting Up
Joplin.book Page 7 Monday, September 18, 2006 2:43 PM
Powering the Transmitter
The transmitter can be powered using the included power adapter or four AA
batteries. To use batteries, see “Installing Batteries” below. To use the power
adapter, see “Connecting the Power Adapter” on page 8.
Caution:
Use only batteries or the power adapter to power the transmitter. Using both at the
same time may damage the transmitter.
Installing Batteries
1. Remove the battery cover by sliding it as shown below.
2. If necessary, remove the old batteries and insert four AA batteries as
shown below.
3. Replace the battery cover.
Connecting the Audio Set Transmitter 7
Joplin.book Page 8 Monday, September 18, 2006 2:43 PM
Battery Precautions
■
Replace the batteries as soon as they run out. If the batteries leak, dispose of
them, and wipe away the battery fluid with a soft cloth. If fluid gets on your
hands, wash them immediately.
■
Dispose of used batteries according to local regulations.
■
Do not expose batteries to heat or flame.
■
Remove the batteries if you won’t be using the Wireless Audio Set for a long
period of time.
When you’re finished installing batteries, see “Connecting the Transmitter’s Audio
Cable” on page 9.
Connecting the Power Adapter
Connect the smaller power adapter to the transmitter’s power port, then plug the
other end into a standard electrical outlet.
Caution:
Before plugging in the power adapter, make sure to remove any batteries from the
transmitter, if installed. Using both at the same time may damage the transmitter.
When you’re finished connecting the power adapter, see “Connecting the
Transmitter’s Audio Cable” on page 9.
8 Setting Up
Joplin.book Page 9 Monday, September 18, 2006 2:43 PM
Connecting the Transmitter’s Audio Cable
Follow the steps in “Connecting to an Epson MovieMate,” below, to connect the
transmitter to your projector. If you’re connecting the transmitter to a DVD
player, see “Connecting to a DVD Player” on page 12.
Connecting to an Epson MovieMate
1. Locate the shorter optical audio cable, and remove the protective caps from
both ends of the cable.
2. Remove the protective cap from the transmitter’s OPTICAL audio input port
and store it in a safe place.
3. Connect one end of the cable to the transmitter’s OPTICAL audio input port.
4. Place the transmitter in the included stand.
Connecting the Audio Set Transmitter 9
Joplin.book Page 10 Monday, September 18, 2006 2:43 PM
5. Slide the stand under the side of the projector near the front port cover as
shown below.
Caution:
Make sure that the transmitter is not covering the air vents on the side of the
projector and that it is close enough to the front of the projector to connect the
optical audio cable.
6. Open the projector’s front port cover.
7. Remove the protective cap from the projector’s Optical-Audio-Out port and
store it in a safe place.
10 Setting Up
Joplin.book Page 11 Monday, September 18, 2006 2:43 PM
8. Connect the other end of the optical audio cable to the projector’s OpticalAudio-Out port.
When you’re finished connecting the audio cable, see “Connecting the Audio Set
Receiver” on page 13.
Connecting the Audio Set Transmitter 11
Joplin.book Page 12 Monday, September 18, 2006 2:43 PM
Connecting to a DVD Player
1. Check your DVD player to determine the type of cable to use:
■
The included shorter optical audio cable
■
An optional coaxial audio cable (not provided)
2. Connect the audio cable to the transmitter, then connect the other end to
your DVD player as shown below.
Note:
If you’re using the optical audio cable, remove the protective caps from both ends
of the cable. Then remove the protective cap from the transmitter’s OPTICAL
audio input port and store it in a safe place. You may also need to remove the
protective cap from the DVD player’s optical audio output port.
Optical audio cable
Coaxial audio cable
Optical Coaxial
DVD Player
Transmitter
Note:
Use only one audio cable to connect the transmitter to your DVD player.
If you’re connecting to the optical audio output on your DVD player, you may need to
remove the protective cap from the DVD player’s optical audio output port. See your
player’s documentation for more information.
12 Setting Up
Joplin.book Page 13 Monday, September 18, 2006 2:43 PM
Connecting the Audio Set Receiver
Before you begin, make sure that your audio system is turned off. Then follow the
steps in these sections on:
■
“Attaching the Antenna” below
■
“Powering the Receiver” on page 14
■
“Connecting the Receiver’s Audio Cable” on page 14
Attaching the Antenna
1. Remove the red cap from the receiver’s antenna connector.
2. Attach one of the included antennas to the receiver, then hand-tighten the nut
at the base of the antenna.
Caution:
Do not use a tool to tighten the nut, or you may damage the receiver.
3. If necessary, rotate the antenna so that it is facing upwards.
When you’re finished attaching the antenna, see “Powering the Receiver” on
page 14.
Connecting the Audio Set Receiver 13
Joplin.book Page 14 Monday, September 18, 2006 2:43 PM
Powering the Receiver
Connect the larger power adapter to the receiver’s power port, then plug the other
end into an electrical outlet.
When you’re done connecting the power adapter, see “Connecting the Receiver’s
Audio Cable” below.
Connecting the Receiver’s Audio Cable
Follow the steps below to connect the receiver to an audio system. If you don’t
have access to an audio system, and want to connect the receiver to a pair of
unpowered speakers, see page 16 for details.
Connecting to an Audio System
Before you begin, make sure that the receiver and your audio system are turned off
and the audio system’s volume is turned all the way down.
1. Depending on the type of audio system you have, you will need to connect
the receiver to it using only one of the following cables:
■
The included RCA cable (stereo)
■
The included optical audio cable (surround)
■
An optional coaxial audio cable (surround)
Caution:
Make sure that the receiver and your audio system are turned off and the audio
system’s volume is turned all the way down before you connect the audio cable or
you may damage your speakers.
14 Setting Up
Joplin.book Page 15 Monday, September 18, 2006 2:43 PM
2. Connect the audio cable to the receiver, then connect the other end to your
audio system as shown below.
Optical audio cable
Coaxial
audio cable
Optical Coaxial
CD/DVD
RCA cable
(stereo)
Audio system
Receiver
Note:
Use only one audio cable to connect the receiver to your audio system.
Make sure that you configure your audio system to use the input source you connected
the receiver to.
When you’re finished connecting the audio cable, do one of the following:
■
If you connected the transmitter to an Epson MovieMate, see page 17.
■
If you connected the transmitter to a DVD player, see page 18.
Connecting the Audio Set Receiver 15
Joplin.book Page 16 Monday, September 18, 2006 2:43 PM
Connecting to Unpowered Speakers
The receiver includes a built-in 15-watt amplifier that allows you to power two
6 ohm unpowered speakers. Before you begin, make sure that the receiver is
turned off and the volume control is turned all the way down.
Caution:
Do not connect more than two speakers or speakers with an impedance rating lower
than 6 ohms to the receiver or you may damage the receiver and your speakers.
Warning:
Make sure that the receiver is turned off and the volume control is turned all the way
down before you connect the speakers or you may damage them.
Connect your speakers to the receiver as shown below.
R
L
When you’re finished connecting the speakers, do one of the following:
■
If you connected the transmitter to an Epson MovieMate, see page 17.
■
If you connected the transmitter to a DVD player, see page 18.
16 Setting Up
Joplin.book Page 17 Monday, September 18, 2006 2:43 PM
Configuring Your Epson MovieMate
1. Turn on your Epson MovieMate.
Setup button on the remote control.
2. Press the
3. Press the
button to highlight
4. Press the
press the
and display the AUDIO setup menu.
or
button to highlight DIGITAL AUDIO OUTPUT, then
Enter button.
5. Press the
or
button to select the setting that matches the type of
connection you used to connect the receiver to your audio system from the
table below, then press the
Enter button.
Connection
Setting
Optical
STREAM/PCM
Coaxial
STREAM/PCM
RCA
PCM ONLY
Speaker wire
PCM ONLY
6. Press
to highlight DOWN MIX, then press the
Enter button.
7. Select the setting that matches the type of connection you used to connect the
Enter
receiver to your audio system from the table below, then press the
button.
Connection
Setting
Optical
DOLBY SURROUND
Coaxial
DOLBY SURROUND
RCA
STEREO
Speaker wire
STEREO
8. When you have finished selecting settings, press the
the menu system.
Setup button to exit
You’re finished setting up the Wireless Audio Set. See “Using the Wireless Audio
Set” on page 19.
Configuring Your Epson MovieMate 17
Joplin.book Page 18 Monday, September 18, 2006 2:43 PM
Configuring Your DVD Player
Some DVD players may require you to go into a setup or configuration menu to
activate the optical or coaxial audio port and select audio setting for it. Refer to the
documentation for your DVD player to select the setting that matches the type of
connection you used to connect the receiver to your audio system from the table
below.
Connection
Setting
Optical
SPDIF/DOLBY/DTS
Coaxial
SPDIF/DOLBY/DTS
RCA
PCM or STEREO
Speaker wire
PCM or STEREO
Note:
Your DVD player’s settings may differ from the ones shown above. Refer to the
documentation for your DVD player to select an equivalent setting.
You’re finished setting up the Wireless Audio Set. See “Using the Wireless Audio
Set” on page 19.
18 Setting Up
Joplin.book Page 19 Monday, September 18, 2006 2:43 PM
Using the Wireless Audio Set
Powering On Your Equipment
1. Push the P button on the transmitter. The P light turns solid green.
2. Push the P button on the receiver. The P light turns solid green.
3. Make sure that the LINK light on the transmitter and receiver is solid green.
Note:
If the LINK lights are not solid green, there is no connection between the
transmitter and receiver. Make sure that there is direct line of sight between
the two antennas and that the transmitter and receiver are less than 19.7 feet
(6 meters) apart. If the LINK lights are still not solid green, see “Solving Problems”
on page 21.
4. Turn on your Epson MovieMate or DVD player.
5. Turn on your audio system. You’re ready to start watching a movie.
Note:
If the transmitter doesn’t receive an audio signal for more than 5 minutes, it will
automatically go into standby mode. If it still hasn’t received an audio signal after
25 minutes, it will turn off automatically. Press the P button to turn it back on again.
If you don’t have any audio output, make sure that the volume control on your
audio system is not turned all the way down or muted; see “Controlling Volume”
on page 20. If you still don’t hear any audio, see “Solving Problems” on page 21.
Using the Wireless Audio Set 19
Joplin.book Page 20 Monday, September 18, 2006 2:43 PM
Controlling Volume
When connected to an audio system, the Wireless Audio Set acts just like a
standard cable connection to your audio/video equipment. Use the volume
control on your audio system to turn the volume up or down.
If you’ve connected the receiver to a pair of unpowered speakers (as described on
page 16), use the volume control on the Audio Set receiver to turn the volume up
or down.
Volume control
20 Using the Wireless Audio Set
Joplin.book Page 21 Monday, September 18, 2006 2:43 PM
Solving Problems
Wireless Audio Set Status Lights
LINK light
STEREO light
SURROUND light
LINK light
BATT light
P light
P light
Transmitter
Receiver
Solving Problems 21
Joplin.book Page 22 Monday, September 18, 2006 2:43 PM
Refer to the table below for a description of the Wireless Audio Set’s status lights
and their meanings:
Lights
Explanation
The P lights are solid green
The transmitter and receiver are powered on and
operating normally.
The P light is solid yellow
The transmitter has not received an audio signal
from your Epson MovieMate or DVD player or
hasn’t had a link with the receiver and has gone
into standby mode. The transmitter will turn on
automatically when an audio signal is sent to it.
The P lights are off
Transmitter: The transmitter is turned off. Make
sure that you installed the batteries correctly or
make sure that the power adapter is plugged in;
see page 8. Then press the P button to turn it
back on. If the transmitter has not received
an audio signal after 25 minutes, it will turn off
automatically.
Receiver: The receiver is turned off. Make sure
that the power adapter is plugged in; see
page 14. Then press the P button to turn it
back on.
The P lights are solid green
and the LINK lights are solid
green
The transmitter and receiver are communicating
normally.
The P lights are solid green
and the LINK lights are flashing
green
The transmitter and receiver have a weak
communication signal. Make sure that there
is direct line of sight between the two antennas
and that the units are less than 19.7 feet
(6 meters) apart.
The P lights are solid green
and the LINK lights are off
There is no communication between the
transmitter and receiver. Make sure that there
is direct line of sight between the two antennas
and that the units are less than 19.7 feet
(6 meters) apart.
22 Solving Problems
Joplin.book Page 23 Monday, September 18, 2006 2:43 PM
Lights
Explanation
The transmitter’s P light is
solid green and the BATT light
is solid red
The transmitter’s batteries are low on power.
When the light first turns on you have
approximately four to five hours of battery life
left. See page 7 to replace the batteries.
The BATT light is calibrated for alkaline batteries.
If you are using rechargeable batteries to power
the transmitter, the BATT light may turn on
prematurely.
The receiver’s P light is solid
green, the LINK light is solid
green, and the STEREO light is
solid green
The receiver is receiving a stereo signal from the
transmitter.
The receiver’s P light is solid
green, the LINK light is solid
green, and the SURROUND
light is solid green
The receiver is receiving a surround signal from
the transmitter.
The receiver’s P light is solid
green, the LINK light is solid
green, and the SURROUND
and STEREO lights are off
The receiver is not receiving an audio signal from
the transmitter. Make sure that the audio cable is
connected correctly as described on page 9.
Wireless Audio Set Status Lights 23
Joplin.book Page 24 Monday, September 18, 2006 2:43 PM
Problems and Solutions
No Sound
■
Make sure that the transmitter is turned on.
■
Try adjusting the volume on your home theater system. If you’ve connected
the Wireless Audio Set to a pair of unpowered speakers, adjust the volume
control on the receiver.
■
Make sure that all of the audio cables are securely connected.
■
Make sure that your Epson MovieMate has been configured for your audio
device as described on page 17.
■
Make sure that the settings on your audio system are configured correctly for
the type of audio you are transmitting. See the documentation for your audio
system for details.
■
The transmitter’s batteries may not be installed correctly or may be low on
power. To change the batteries, see page 7.
Poor Sound Quality
■
Make sure that the transmitter and receiver are less than 19.7 feet (6 meters)
apart and that there is direct line of sight between the antennas.
■
If the LINK lights are flashing, make sure that the transmitter and receiver are
no further than 19.7 feet (6 meters) and that there is a direct line of sight
between their antennas.
■
The transmitter’s batteries may be low on power. To change the batteries,
see page 7.
24 Solving Problems
Joplin.book Page 25 Monday, September 18, 2006 2:43 PM
No Surround Output
■
If the SURROUND light on the receiver is not solid green, make sure that your
Epson MovieMate or DVD player has been configured correctly and that the
DVD you’re playing supports surround audio; see page 17.
■
Make sure that the settings on your audio system are configured correctly for
the type of audio you are transmitting. See the documentation for your audio
system for details.
Problems and Solutions 25
Joplin.book Page 26 Monday, September 18, 2006 2:43 PM
Help
Internet Support
Visit our support website at epson.com/support and select your product for
solutions to common problems. You can download product documentation, get
FAQs and troubleshooting advice, or e-mail us with your questions.
Speak to a Support Representative
Before you call for support, please have the following information ready:
■
Product name (Accolade Wireless Audio Set)
■
Product serial number (located on the bottom of the units)
■
Description of the problem
Then call:
■
U.S.: (562) 276-4394, 6 AM to 8 PM, Pacific Time, Monday–Friday and
7 AM to 4 PM, Saturday
■
Canada: (905) 709-3839, 6 AM to 6 PM, Pacific Time, Monday–Friday
Once connected, follow the voice prompts to video projector support. Toll or long
distance charges may apply.
Purchase Supplies and Accessories
You can purchase projectors and accessories from an Epson® authorized reseller.
To find the nearest reseller, call 800-GO-EPSON (800-463-7766). Or you can
purchase online at www.epsonstore.com (U.S. sales) or www.epson.ca
(Canadian sales).
26 Solving Problems
Joplin.book Page 27 Monday, September 18, 2006 2:43 PM
Notices
Important Safety Instructions
Before using your Wireless Audio Set, read and follow these safety instructions:
■
Be sure to follow all warnings and instructions marked on the Wireless Audio Set.
■
Use only the types of power sources indicated on the Wireless Audio Set’s labels.
■
Use only the power adapters that come with the Wireless Audio Set. Use of other
adapters may cause fires or shock. Do not use the adapters with any other equipment.
■
Place the Wireless Audio Set near a wall outlet where the plugs can be easily
unplugged.
■
Do not let the power adapters’ cords become damaged or frayed.
■
If you use an extension cord with the Wireless Audio Set, make sure the total ampere
rating of the devices plugged into the extension cord does not exceed the cord’s
ampere rating. Also, make sure the total ampere rating of all devices plugged into the
wall outlet does not exceed the wall outlet’s ampere rating.
■
Avoid locations that are subject to rapid changes in heat or humidity, shocks or
vibrations, or dust.
■
Leave enough room around the Wireless Audio Set for sufficient ventilation. Do not
block or cover openings in the Wireless Audio Set’s case or insert objects through the
slots.
■
Do not place the Wireless Audio Set near a radiator or heating vent or in direct
sunlight.
■
Do not spill liquid on the Wireless Audio Set.
■
Except as specifically explained in your documentation, do not attempt to service the
Wireless Audio Set yourself.
■
Unplug the Wireless Audio Set and refer servicing to qualified service personnel
under the following conditions: if the power adapter’s cord or plug is damaged; if
liquid has entered the product; if the product has been dropped or the case damaged;
if the product does not operate normally or exhibits a distinct change in performance.
Adjust only those controls that are covered by the operating instructions.
WARNING: The cords included with this product contain chemicals, including lead,
known to the State of California to cause birth defects or other reproductive harm. Wash
hands after handling. (provided in accordance with Proposition 65 in Cal. Health & Safety
Code § 25249.5 et seq)
Notices 27
Joplin.book Page 28 Monday, September 18, 2006 2:43 PM
FCC Compliance Statement
For United States Users
This equipment has been tested and found to comply with the limits pursuant to Part 15
of the FCC Rules. These limits are designed to provide reasonable protection against
harmful interference in a residential installation. This equipment generates, uses, and can
radiate radio frequency energy and, if not installed and used in accordance with the
instructions, may cause harmful interference to radio or television reception. However,
there is no guarantee that interference will not occur in a particular installation. If this
equipment does cause interference to radio and television reception, which can be
determined by turning the equipment off and on, the user is encouraged to try to correct
the interference by one or more of the following measures:
■
Reorient or relocate the receiving antenna.
■
Increase the separation between the equipment and receiver.
■
Connect the equipment into an outlet on a circuit different from that to which the
receiver is connected.
■
Consult the dealer or an experienced radio/TV technician for help.
WARNING
The connection of a non-shielded equipment interface cable to this equipment will
invalidate the FCC Certification of this device and may cause interference levels which
exceed the limits established by the FCC for this equipment. It is the responsibility of the
user to obtain and use a shielded equipment interface cable with this device. If this
equipment has more than one interface connector, do not leave cables connected to
unused interfaces. Changes or modifications not expressly approved by the manufacturer
could void the user’s authority to operate the equipment.
28 Notices
Joplin.book Page 29 Monday, September 18, 2006 2:43 PM
Declaration of Conformity
We:
Located at:
Epson America, Inc.
MS 3-13
3840 Kilroy Airport Way
Long Beach, CA 90806
Telephone: (562) 290-5254
Declare under sole responsibility that the product identified herein, complies with Part 15
of the FCC rules. Operation is subject to the following two conditions: (1) this device may
not cause harmful interference, and (2) this device must accept any interference received,
including interference that may cause undesired operation.
Trade Name:
Epson
Type of Product: Wireless Audio Transmitter/Receiver
Model:
ELPWA01T/ELPWA02R
Notices 29
Joplin.book Page 30 Monday, September 18, 2006 2:43 PM
Warranty
Limited Warranty for Wireless Audio Set Accessory Product
What Is Covered: Epson America, Inc. (“Epson”) warrants to the first retail purchaser that
the product enclosed with this limited warranty statement, if purchased new and operated
in the United States or Canada, will be free from defects in workmanship and materials for
a period of one (1) year from the date of original purchase. For warranty service, you must
provide proof of the date of original purchase.
What Epson Will Do To Correct Problems: Should this product prove defective during
the warranty period, please call the Epson ConnectionSM at (562) 276-4394 in the U.S.
and (905) 709-3839 in Canada for warranty instructions and return authorization. An
Epson service technician will provide telephone diagnostic service to determine whether
the product requires service. If service is needed, Epson will, at its option, exchange or
repair the product without charge for parts or labor. When Epson authorizes an exchange
for the defective unit, Epson will ship a replacement product to you, freight prepaid, so
long as you use an address in Canada or the U.S. (excluding Puerto Rico and U.S.
Possessions). Shipments to other locations will be made freight collect. You are responsible
for securely packaging the defective unit and returning it to Epson within five (5) working
days of receipt of the replacement. Epson requires a debit or a credit card number to secure
the cost of the replacement product in the event that you fail to return the defective one.
When warranty service involves the exchange of the product or of a part, the item replaced
becomes Epson property. The replacement product or part may be new or refurbished to
the Epson standard of quality, and, at Epson’s option, may be another model of like kind
and quality. Epson’s liability for replacement of the covered product will not exceed the
original retail selling price of the covered product. Exchange products and parts assume the
remaining warranty period of your original product covered by this limited warranty.
What This Warranty Does Not Cover: This warranty does not apply to refurbished or
reconditioned products. This warranty covers only normal use in the United States and
Canada. This warranty is not transferable and will not apply to products purchased from
an end user. This warranty does not cover damage to the Epson product caused by parts or
supplies not manufactured, distributed or certified by Epson. This warranty does not cover
third party parts, components or peripheral devices added to the Epson product after its
shipment from Epson. Epson is not responsible for warranty service should any labels,
logos or serial numbers be removed or should the product fail to be properly maintained or
fail to function properly as a result of misuse, abuse, improper installation, neglect,
improper shipping, damage caused by disasters such as fire, flood, and lightning, improper
electrical current, interaction with non-Epson products, or service other than by an Epson
Authorized Servicer. If a claimed defect cannot be identified or reproduced, you will be
held responsible for costs incurred.
30 Notices
Joplin.book Page 31 Monday, September 18, 2006 2:43 PM
THE WARRANTY AND REMEDY PROVIDED ABOVE ARE EXCLUSIVE AND IN
LIEU OF ALL OTHER EXPRESS OR IMPLIED WARRANTIES INCLUDING, BUT
NOT LIMITED TO, THE IMPLIED WARRANTIES OF MERCHANTABILITY,
NON-INFRINGEMENT OR FITNESS FOR A PARTICULAR PURPOSE. SOME
LAWS DO NOT ALLOW THE EXCLUSION OF IMPLIED WARRANTIES. IF
THESE LAWS APPLY, THEN ALL EXPRESS AND IMPLIED WARRANTIES ARE
LIMITED TO THE WARRANTY PERIOD IDENTIFIED ABOVE. UNLESS
STATED HEREIN, ANY STATEMENT OR REPRESENTATIONS MADE BY ANY
OTHER PERSON OR FIRM ARE VOID. EXCEPT AS PROVIDED IN THIS
WRITTEN WARRANTY, NEITHER EPSON AMERICA, INC., NOR ITS
AFFILIATES SHALL BE LIABLE FOR ANY LOSS, INCONVENIENCE, OR
DAMAGE, INCLUDING DIRECT, SPECIAL, INCIDENTAL OR
CONSEQUENTIAL DAMAGES, RESULTING FROM THE USE OR INABILITY
TO USE THE EPSON PRODUCT, OR FOR LOST DATA OR LOST SOFTWARE
WHETHER RESULTING FROM BREACH OF WARRANTY OR ANY OTHER
LEGAL THEORY.
In Canada, warranties include both warranties and conditions. Some jurisdictions do not
allow limitations on how long an implied warranty lasts and some jurisdictions do not
allow the exclusion or limitation of incidental or consequential damages, so the above
limitations and exclusions may not apply to you. This warranty gives you specific legal
rights, and you may also have other rights which vary from jurisdiction to jurisdiction.
To find the Epson Authorized Reseller nearest you, visit our website at
www.epsonstore.com (U.S. sales) or www.epson.ca (Canadian sales).
To find the Epson Customer Care Center nearest you, visit http://support.epson.com or
write to:
Epson America, Inc., P. O. Box 93012, Long Beach, CA 90809-3012
Trademarks
Epson is a registered trademark of Seiko Epson Corporation.
Accolade and Epson MovieMate are trademarks and Epson Connection is a service mark of
Epson America, Inc.
General Notice: Other product names used herein are for identification purposes only and may
be trademarks of their respective owners. Epson disclaims any and all rights in those marks.
© 2006 Epson America, Inc. 8/06
Trademarks 31
Joplin.book Page 32 Monday, September 18, 2006 2:43 PM
Printed in XXX
CPD-22659