1
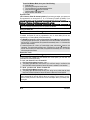
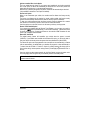
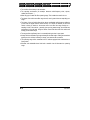
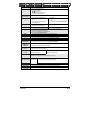
MANUAL / AUTOMATIC TRANSMISSION MULTI-CHANNEL REMOTE STARTER SYSTEM AS-1251 / AS-1252 User Guide WARNING It is the responsibility of the vehicle operator to ensure their vehicle is parked in a safe and responsible manner. 1. a) Manual transmission: When leaving the vehicle, it is the user’s responsibility to ensure that the gearshift lever is in the NEUTRAL position and the parking brake is engaged in order to avoid accidents upon remote starting. b) Automatic transmission: When leaving the vehicle, it is the user’s responsibility to ensure that the gearshift lever is in “Park” in order to avoid accidents upon remote starting. 2. It is the user's responsibility to ensure that the remote starter is disabled or put into valet mode before servicing. FCC USER NOTICE (U.S.A.): This device complies with Part 15 of the FCC Rules. Operation is subject to the following two conditions: (1) this device may not cause harmful interference, and (2) this device must accept any interference received, including interference that may cause undesired operation. NOTE: The manufacturer is not responsible for any radio or TV interference caused by unauthorized modifications to this equipment. Such modifications could void the user's authority to operate the equipment. DOC.1.00 DL Lp October 6, 2006 Manufactured in Canada by Autostart Table of contents Table of contents .....................2 Introduction .......................................................2 Vehicle Presets .................................................2 Heater and Heated Seat ...............................2 Windshield Wipers, Radio and Headlights....2 Remote-starting Your Vehicle ...........................3 Setting Your Vehicle Into Ready Mode.........3 Remaining In Ready Mode ...........................3 Remote-Starting............................................3 Driving Off .....................................................3 Enter the vehicle and do the following:.........3 Remote starter features ....................................3 Idle Mode ......................................................3 Turbo Mode...................................................3 Valet Modes ..................................................3 Panic Mode ...................................................3 Cold Weather Mode ......................................3 Engine Run Time ..........................................3 Advanced Features: Installation-programmable options ...............................................................3 Arming the Starter Kill ...................................3 Remote Door Locks ......................................3 Ignition-controlled Door Locks Option...........3 Secure Lock Option.......................................3 Remote Trunk Release Option......................3 Starter Kill / Anti-Grind ..................................3 Troubleshooting Poor Transmitting Range Issues ...........................................................................3 Diagnostics – Parking Light Flash Table...........3 LIMITED LIFETIME WARRANTY .....................3 Introduction This Module is a state-of-the-art remote car starter system. With many advanced functions, this product will satisfy any one of the user’s expectations from high-end commodity systems, without neglecting the standard features commonly offered by entry-level starters. Please note: Button Ι is for the START functions (by default). Button ΙΙ is for the STOP functions (by default). Buttons Ι & ΙΙ (together) is for the TRUNK release function. The LED and the valet button are optional. Vehicle Presets Heater and Heated Seat When leaving the vehicle it is recommended to preset the accessory controls in preparation for the next remote start. Settings for the blower motor (fan), front and rear, as well as heated seats (if equipped) should not be left on HIGH. It is recommended to leave the settings on LOW or MEDIUM instead. Windshield Wipers, Radio and Headlights Certain vehicles require the radio and / or windshield wiper and / or headlight circuits to become energized while running under remote start. When leaving the vehicle you must ensure that the windshield wiper and headlight switches are OFF. Leaving the headlight switch ON on certain types of vehicles could cause them to remain ON even after the remote starter shuts down, resulting in a dead battery. P. 2 User Guide Remote-starting Your Vehicle If your vehicle has an automatic transmission, simply press the Ι button to remote start or the ΙΙ button to stop your vehicle. Skip the next steps on to “Remote-starting”. Warning: If your vehicle has an automatic transmission and the parking lights flash 15 times after pressing the ΙΙ button, the parking brake is connected to ground. It is imperative that you see your installer and have him disconnect the wire. Setting Your Vehicle Into Ready Mode If your vehicle has a manual transmission you must read the following indications. In order to start the vehicle by remote, the unit must first be set to Ready Mode. If the unit is not set to Ready Mode, it cannot remote-start the vehicle. Once the system is set to Ready Mode, the vehicle can be remote-started and stopped at wish. To set the system to Ready Mode: 1. Ensure that all the doors are closed and that the shifter is in the NEUTRAL position. 2. With the engine already running, apply the parking brake and release the brake pedal. • Make sure to release the brake pedal. 3. Within 20 sec. press Ι or ΙΙ on the transmitter. • The parking lights will flash 3 times quickly and remain lit. 4. Remove the key: the engine will go on running. 5. Exit the vehicle and close the door. 6. Press and hold either: a. ΙΙ to shut down the engine without affecting the doors. b. Ι & ΙΙ to lock the door and activate idle mode. NOTE: If button Ι is programmed as LOCK or UNLOCK, press and hold either a. Ι to lock the doors and shutdown the engine or lock and enter turbo mode, b. ΙΙ to shut down the engine without affecting the doors, c. Ι & ΙΙ to lock the doors and activate idle mode. Remaining In Ready Mode Once the vehicle is in Ready Mode you can start and stop the vehicle at wish. However, should any of the following occur, the vehicle will exit Ready Mode – thus eliminating the remote start option until Ready Mode is restored: • Door opened; • Hood opened; • Brake pedal pressed; • Parking brake disengaged; • Ignition key turned to the IGNITION ON (RUN) position. Note: The unit will notify the user that it has exited Ready Mode by giving 3 slow flashes (parking lights). Remote-Starting Press the Ι button for approx. 1 second. The parking lights will come ON, informing you that the unit has received your signal. Approx. 5 seconds later, the engine will start. The Parking Lights will remain ON during the pre-programmed run time. For manual transmission if the vehicle doesn’t start the first time, the system will shut down. For automatic transmission if the vehicle doesn’t start the first time, wait a few seconds, and try to start the engine again. It will try to start the engine 3 times before giving up. User Guide P. 3 Driving Off Enter the vehicle and do the following: • Turn the ignition key to the IGNITION ON (RUN) position. • Press the brakes to disengage the remote starter unit. You are now ready to drive off. Note: Press button Ι to DISARM the module and to UNLOCK the doors (if button Ι is programmed as LOCK or UNLOCK button). Caution: do not turn the key to the CRANK position with the engine running. This will cause the starter motor to re-engage, unless your vehicle is equipped with the Start Kill / AntiGrind Feature (Optional). Remote starter features Idle Mode This feature allows the user to engage the remote starter to take over the vehicle while it is already running with the key in the IGNITION switch. The vehicle will keep running for the preprogrammed run time, or until it is shut down by remote. Caution: Do not leave children or pets unattended in a car running in Idle Mode. To activate Idle Mode: To enable Idle Mode if your vehicle has an automatic transmission, press and hold the Ι button on your remote transmitter while the engine is running. To leave the vehicle in Idle Mode if your vehicle has an automatic transmission: 1. While the engine is running, press the Ι button on the remote control until the parking lights come on. 2. Remove the key and exit the vehicle. The engine will go on running. Lock the doors (if button Ι is programmed as LOCK or UNLOCK button). If your vehicle has a manual transmission, Idle Mode can be activated through the same routine as that used for Ready Mode; at the last step, the Ι & ΙΙ button are pressed together. Turbo Mode If Turbo Mode is configured at installation, it will allow a turbocharger to idle down after the user leaves the vehicle: the unit will take over the vehicle and keep it running for 60 seconds (or until it is shut down by remote control), then shut down the engine. Proceed as follows to set the system to Turbo Mode if your vehicle has an automatic transmission: 1. With the engine already running, press the Ι & ΙΙ button on the transmitter until the parking lights come ON. 2. Remove the ignition key from the ignition switch. The engine will go on running. 3. Exit the vehicle and close the door. 4. Press the Ι & ΙΙ button to lock the doors; the engine will shut down after 60 seconds of Turbo Mode. Note: If your vehicle has a manual transmission, Turbo Mode can be activated only if button Ι is programmed as LOCK or UNLOCK button. Turbo Mode is activated through the same routine as that used for Ready Mode; at the last step, the Ι button is pressed. Valet Modes When your vehicle is in Valet Mode, the remote starter functionalities are disabled. If the vehicle needs to be serviced, or if you park it indoors, the Valet Mode will prevent the engine from being remote-started accidentally. P. 4 User Guide Ignition Valet The system can be placed in Valet Mode to disable the remote starting capabilities. If the vehicle needs to be serviced, or if you park it indoors, Valet Mode will prevent the engine from being accidentally started by remote control. To ENTER Valet Mode 1. With the key in the Ignition switch, turn the key to the ON (RUN/IGNITION) and then OFF positions 5 times within 10 seconds. 2. The Parking Light will flash 3 times indicating the Module is now in Valet Mode. The LED will turn ON solid. To EXIT Valet Mode 1. With the key in the Ignition switch, turn the key to the ON (RUN/IGNITION) and then OFF positions 5 times within 10 seconds. 2. The Parking Light will flash twice indicating the Module is now out of Valet Mode. The LED will turn OFF. Valet Mode using the Valet Button (If installed) To put the system into Valet Mode: 1. Turn the key to the IGNITION ON (RUN) position. 2. Press (for at least 1 second) and release the Valet Button. Then turn the ignition key to OFF position. The L.E.D. will come ON. To take the system out of Valet Mode: 1. Turn the key to the IGNITION ON (RUN) position. 2. Press (for at least 1 second) and release the Valet Button. The L.E.D. will go OUT. The Valet button can only be used if the vehicle keys are in the IGNITION ON (RUN) position. Panic Mode Note: Panic mode can only be activated if the horn has been adequately configured by your installer and if button Ι is programmed as LOCK or UNLOCK button. In an emergency situation, you can activate panic mode using the Ι button. This will: • shut down the engine, • unlock the doors (with the Ι button) • or lock the doors (with the Ι button), • disarm the Starter Kill and • activate the horn for 25sec. Note: See the description of the starter kill option later in this Guide. To activate panic mode: • Press and hold the Ι, button for approximately 3 sec. until the sound signal starts and the parking lights flash: this will unlock the doors before the sound signal starts. • Or press and hold the Ι, button for approximately 3 seconds until the sound signal starts and the parking lights flash: this will lock the doors before the sound signal starts. Panic Mode will automatically shut down after 25 sec. Note: To stop panic mode before the end of its delay, press the Ι button until the sound signal stops. Cold Weather Mode When Cold Weather Mode is active, the engine starts every 2 hours and runs for 3 minutes (or for 8 or 20 minutes with Diesel engines); the routine goes on for a period of 24 hours. To enter Cold Weather Mode: • With the vehicle already in Ready Mode, press and hold the ΙΙ button until the parking lights flash 3 times. User Guide P. 5 To exit Cold Weather Mode, do any one of the following: • Open the hood. • Start the engine using the remote control. • Turn the ignition key to the IGNITION ON (RUN) position. • Press and hold the ΙΙ button for 3 seconds (until the parking Lights flash once) • Set the vehicle to Valet Mode. Engine Run Time (Gas 15 minutes, Diesel 20 minutes by default) If you have a gas engine, your system can be programmed to run the engine for 3, 15, or 25 minutes (15 minutes by default). If you have a diesel engine, it can be programmed to run the engine for 8, 20, or 30 minutes). Advanced Features: Installation-programmable options Note: The programming of these features should be left to a professional. Changing any one of the settings may adversely affect the operation the Module. Arming the Starter Kill Note: It can only be activated if button Ι is programmed as LOCK or UNLOCK button. If installed, the Starter Kill can be programmed to arm in Active Mode (will not arm automatically) or in Passive Mode (will arm automatically). • To disarm the Starter Kill in Active or Passive Mode, press the Ι button on the transmitter. The parking lights will flash twice. (If Remote Door Locks were installed, this will also unlock the doors.) In Passive Mode, the system will automatically rearm 1 or 3 minutes after the doors were unlocked. • To arm the Starter Kill in Active or Passive Mode, press and hold the Ι button on the transmitter. The parking lights will flash once. (If Remote Door Locks were installed, this will also lock the doors). In Passive Mode, the system will automatically arm 1 or 3 minutes after the engine is shut down. Remote Door Locks Note: It can only be activated if button Ι is programmed as LOCK or UNLOCK button. If your system was installed with the Remote Door Locks option, you will have the convenience of remote keyless entry. To lock your doors and arm the starter kill: 1. Press and hold the Ι button for approx. 1 sec. 2. The parking lights will flash once and the L.E.D. will flash slowly to confirm that the doors have been locked and that the Starter Kill feature is enabled if it was installed. To unlock your doors and disarm the starter kill: 1. Press and hold the Ι button for approx. 1 sec. 2. The parking lights will flash twice and the L.E.D. will go out to confirm that the doors have been unlocked and that the Starter Kill feature is disarmed if it was installed. Note: If installed and configured in passive mode at installation, the starter kill feature will rearm automatically 60 seconds after the doors are unlocked. For that reason, you may have to unlock your doors a second time if some time elapses before you actually start the engine. P. 6 User Guide Ignition-controlled Door Locks Option This is an added security feature. If your system was installed with the Ignition-controlled Door Locks option, the doors will automatically be locked as soon as the user presses the brakes while the ignition key is in the IGNITION ON (RUN) position. When the key is turned to the Ignition OFF position, the doors will automatically be unlocked. (Only available if remote Door Lock Option is installed) Secure Lock Option Before it can remote-start your vehicle, the module must first disarm the factory security system. The Secure Lock feature may be required on certain vehicle models with factory security systems that automatically unlock the doors when the security system is disarmed. To keep your vehicle protected when the factory security system is disarmed for a remote start, Secure Lock will relock your doors as soon as the vehicle has started. Once the engine run cycle ends, Secure Lock will rearm your factory security system. Remote Trunk Release Option If your system was installed with the Remote Trunk Release, you can open your trunk by pressing the Ι & ΙΙ buttons (simultaneously) on the remote transmitter. Vehicles must have an electric trunk switch or a remote trunk button on the vehicle’s OEM Transmitter for this option to be compatible with the Module. Starter Kill / Anti-Grind This added security feature will immobilize your vehicle when the system is armed (LOCKED). If your Module was installed with the Starter Kill option, you will not be able to start your vehicle with the key unless the system has been disarmed first (UNLOCKED). The Starter Kill option can be programmed to be ACTIVE (will not arm automatically) or PASSIVE (will arm automatically). In PASSIVE Mode, your installer can program it to arm automatically in 1 minute. Note that in Mode 1- Function 3- Option 3, pressing button Ι will always give an Unlock pulse during 1minute passive arming timeout (if button Ι is programmed as LOCK or UNLOCK). Once the vehicle has been remote started, the Anti-Grind feature prevents the starter motor from re-engaging when the ignition key is accidentally turned to the CRANK position. Note: Automobile insurance companies sometimes offer a rebate for vehicles with a passive starter kill device. User Guide P. 7 Troubleshooting Poor Transmitting Range Issues Many factors may affect the operating range of the transmitter. Some of these are: • The condition of the battery in the transmitter. • The operating environment (for example: downtown radio-frequency noise, airports, cellular phone towers…) • Metal: any type of metal will affect operating range. This includes the metal in the car. • The shape of the vehicle can affect range as well; vans in general have an especially poor range. • The shape of the roof and A-pillars brings about considerable radio-frequency deflection (in this case the signal from the remote control). As a result, the direction in which the vehicle is facing in relation to the remote control can affect the range. Straight on – standing in front of the vehicle – generally gives you the greatest range; the second best performance is from the back. Using the remote control from either side of the vehicle will usually give the lowest range. • The range will be significantly lower in a crowded parking lot than in open space. • Always hold the transmitter high, approximately at shoulder height. Holding the transmitter against your chin will also increase your range: your head acts as an antenna. • The operating range will be somewhat lower on vehicles equipped with an aftermarket or factory alarm. • Windows and windshields tinted with lead or metallic tints will decrease the operating range. P. 8 User Guide Diagnostics – Parking Light Flash Table Flashes Description • • • 1 • • 2 slow flashes followed • by 8 quick flashes Doors locked, starter kill armed. Run time has expired. Ι & ΙΙ button pressed. Start signal received by the module. Cold weather mode cancelled. Reset from manual to automatic 2 • Doors unlocked, starter kill disarmed. • Remote start attempt cancelled by remote. • Doors unlocked, starter kill disarmed. • Exiting ignition valet 3 • Entering cold weather mode. • Entering and exiting ready mode. 3 slow flashes… 4 5 Slow 5 Fast 6 8 10 When pressing ΙΙ 15 quick flashes… • Power-up reset • Board set from manual to automatic; power ON. • Power ON to OFF (automatic transmission). Entering ignition valet …after a failed start attempt The module did not detect a tach signal. • +12 V detected on the brake input wire either while cranking or during run time. • Entering multi-speed tach programming. • Board set from automatic to manual; power ON. Power ON to OFF (manual transmission). • Start attempt failed because no tach signal has been programmed. • Tach signal programmed. • A remote start was attempted while a tach-before-crank signal was detected before cranking. • Unit reset see “Resetting the Module” (p.Error! Bookmark not defined.) • A ground (-) signal was detected on the hood pin input wire. • The parking brake is connected to ground (automatic transmission). 1 pause 1pause 5 flashes • Transmitter has been programmed. • [During the transmitter programming procedure] 1 – pause – 2 • There was a remote start attempt while the vehicle was in valet mode. Failed start: vehicle’s low battery voltage. ON SOLID for 3 seconds…. …followed by 1 flash …followed by 3 flashes ON continuously • Idle mode: Idle mode is engaged Run time: The vehicle has been remote started and is in run time While the brake ON continuously pedal is pressed. ON 2 seconds ON 4 seconds ON 20 seconds Constantly flashing up to 25 sec. User Guide Exiting cold weather mode Entering cold weather mode • Confirms that cold weather mode is engaged • The hood has been opened and a ground (-) signal has been detected on the hood pin input wire. • Locking or unlocking a door (with Door pulses configured to 4 sec.) • The hood pin has been flashed and you are now in the programming centre. • Panic mode is triggered. P. 9 LIMITED LIFETIME WARRANTY REMOTE STARTERS: As the manufacturer, 160031 Canada Inc. (“Autostart”) warrants to the original consumer purchaser only (non-transferable) that the remote starter module (control box) shall be free from defects in materials and workmanship for as long as the original consumer purchaser continuously owns the vehicle in which the remote starter was originally installed, as specified below: • 1) For the first year after the date of manufacture, as specified by the serial number on the module, Autostart will replace the remote starter module free of charge with a new remote starter module. 2) For the second year after the date of manufacture, as specified by the serial number on the module, Autostart will replace the remote starter module free of charge with a repaired or refurbished remote starter module. 3) For the third year and any consecutive year after the date of manufacture, as specified by the serial number on the module, Autostart will provide to the original consumer purchaser a repaired or refurbished remote starter module, for a repair charge of $35.00 plus applicable taxes. In all cases, the consumer must return the remote starter module to the point of purchase, and must provide a copy of the proof of purchase to said retailer. A remote starter module will be returned to the retailer for the consumer to claim within a 4 (four)week period. For case (3), a cheque in the amount of $35.00 plus applicable taxes must accompany the remote starter module, or the retailer may refuse the return. ACCESSORIES: Autostart warrants to the original consumer purchaser only (non-transferable) that it will replace any Autostart accessory part for a one-year period from date of purchase. Accessories will only be replaced if proven defective in material or workmanship, and if, when the accessory is returned to the point of purchase, the retailer is provided with a copy of the proof of purchase. The accessory will be sent to the retailer for the consumer to claim within a 4 (four)-week period. THE WARRANTY IS VOID IF: 1) The product has been damaged, altered in any way or tampered with, without the explicit written consent of an Autostart technician. For remote starter modules, this includes the opening or removal of the plastic covering of the module, or the removal or alteration of the barcode label on the plastic covering of the module. 2) The product is damaged due to accident, fire, flood, shipping and handling, misuse, neglect, or other conditions beyond the control of Autostart. 3) The product has been installed or repaired by anyone other than a certified technician. 4) The product has been improperly installed or used. THE WARRANTY DOES NOT COVER: 1) Batteries. 2) Scratched or worn transmitter cases. 3) Installation and/or removal charges for all remote starter modules and accessories. 4) Shipping and handling charges incurred for product exchange or replacement. 5) Any material damages other than to the product itself. 6) Harnessing, L.E.D. lights, switches, inverters, relays, etc. THIS LIMITED LIFETIME WARRANTY SHALL CONSTITUTE THE SOLE LIABILITY OF AUTOSTART FOR OUR PRODUCTS, AND IS IN LIEU OF ALL OTHER WARRANTIES, EXPRESSED OR IMPLIED. THERE ARE NO WARRANTIES OF MERCHANTABILITY AND FITNESS FOR A PARTICULAR PURPOSE. NO PERSON, FIRM OR CORPORATION IS AUTHORIZED TO ASSUME FOR AUTOSTART ANY OTHER LIABILITY WITH RESPECT TO THE SALE OR USE OF OUR PRODUCTS. AUTOSTART’S LIABILITY, WHETHER BASED ON CONTRACT, TORT, WARRANTY, STRICT LIABILITY, OR ANY OTHER THEORY, SHALL NOT EXCEED THE PRICE OF THE INDIVIDUAL UNIT WHOSE DEFECT FOR DAMAGE IS THE BASIS OF THE CLAIM. UNDER NO CIRCUMSTANCE WILL AUTOSTART, ITS DISTRIBUTORS OR THEIR AGENTS BEAR ANY LIABILITY WHATSOEVER FOR INCIDENTAL OR CONSEQUENTIAL DAMAGES. The parties hereto elect that any dispute regarding the present document be submitted to the appropriate Court located in the Province of Quebec, District of Montreal. The parties hereto agree that this document is governed by and interpreted in accordance with the law of Quebec. If the purchaser is located in a province of Canada other than Quebec, all matters dealing with the warranty of quality will be governed by and interpreted in accordance with the law of Ontario. If the purchaser is located outside Canada, all matters dealing with the warranty of quality will be governed by and interpreted in accordance with the United Nations Convention on Contracts for the International Sale of Goods (the “Vienna Convention”). P. 10 User Guide