1
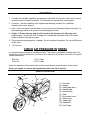
MODEL: 31700 OWNERS MANUAL WARNING: Read Tecumseh Engine Owners Manual and Important Rules for Safe Operation before Operating Vehicle WARNING: YOU MUST ADD OIL TO THE ENGINE PRIOR TO USE!!! 1 ¼ PINTS OF SAE 30 MOTOR OIL This vehicle is sold for off-road use only. Before operating this vehicle, read all the instructions for safe assembly and operation as well as the instructions governing the engine and other portions of the vehicle. Pay close attention to all caution and warning labels on the vehicle. For Replacements Parts Call: 1-888-389-5522 (U.S.) 1-888-707-1880 (Canada) 8/23/02 Rev B 01424 Read These Important Rules For Safe Operation NOTE: All the items (1-31) below should be read and understood by the operator and parent. Failure to follow these instructions could endanger personal safety of the operator. 1. This vehicle is not licensable. IT IS NOT TO BE OPERATED ON ANY PUBLIC ROAD, STREET, SIDEWALK or ALLEY. To do so would be a violation of local law. This vehicle may be operated only on private property and upon areas approved by local law. 2. This vehicle should NEVER be operated indoors. The exhaust from the engine contains carbon monoxide, which is tasteless, odorless, and poisonous gas. 3. This vehicle is not intended nor designed for racing. 4. The operator of this vehicle should always wear a D.O.T approved helmet and other protective equipment as recommended by state and local laws. The operator should also wear face shields or goggles, boots, gloves, and other appropriate protective clothing. 5. Unless otherwise specified in this manual, all screws, nuts, and bolts must be kept tight to ensure that the vehicle is in safe operating condition. The engine must be kept free of all dirt and other accumulations, paying particular attention to throttle linkage area. 6. Prevailing Torque type locknuts lose their locking capability with repeated use and require replacement. Ensure locknuts are functioning properly. 2 7. The tire pressure should be checked prior to each use. The recommended inflation pressure is the maximum tire pressure which is printed on the tires sidewall. Improper tire pressure may cause instability and may prevent proper braking or steering. 8. Modification of this vehicle or removal of any original equipment or safety decals may render the vehicle unsafe or illegal. Never remove the drive chain cover, or clutch cover unless for service or maintenance. These covers are for the riders protection. 9. The vehicle should never be started without first checking to see that the throttle is in idle position. Do not start engine without verifying proper function of the throttle. 10. Never attempt to start this vehicle without having the operator sitting in the proper position to ensure control of the bike. 11. The operators ability to operate this off-road vehicle safely is largely dependent upon the operators ability to exercise proper judgement. An operator also must not be too small or too large for controlled operation. The operator must be at least 16 years of age and have understanding, mental capacity and physical capability to safely operate this vehicle. This vehicle should only be operated after mature, supervised instruction and sufficient practice in non-congested areas. 12. This vehicle is designed for one operator. A operator on any vehicle must be sufficient age, understanding, mental capacity, and physical capability to act to protect himself/herself, and wear a D.O.T approved helmet at all times. This vehicle is not recommended for weights exceeding 200 pounds. 13. The engine should be stopped when the vehicle is not in use. 14. Loose clothing, long hair, or articles worn by any riders must be fully contained, or covered to prevent them from possibly being caught in rotating parts of the vehicle or the surrounding environment while riding. Failure to obey could endanger the personal safety of the Rider. 15. Do not place hands, feet, or any other part of the body or any clothing near the engine, muffler, wheels, chain, and other rotating parts of the vehicle while riding or running the engine. Caution must be used in performing required maintenance on or near an operating engine. Special caution should be taken after the engine has been running, since the engine and other drive components may be extremely hot. 16. Wet, slippery, rough, or steep terrain is potentially dangerous and may result in injury if proper caution is not observed. Slow speeds are required to safely operate this vehicle under those conditions. The Operator must use mature judgement, skill, and experience to choose a speed suitable for the terrain and riding conditions. 17. The Governor settings for this vehicles engine must not be tampered with, altered or changed. The governor is set by the engine manufacturer and limits the maximum speed of the engine (and vehicle) and protects the engine from damage. Excessive speeds are potentially dangerous to the rider and the engine. The top speed for this vehicle is 25 m.p.h.. 18. Each time before using this vehicle, the fuel supply should be checked. The fuel tank should never be filled while the engine is running or while the engine is hot. Do not fill tank in closed area such as a garage, while smoking, or in the vicinity of an open flame. Do not overfill the tank. Always allow at 3 least ¼ inch of space at the top of the tank for expansion. Never top off tank. Replace cap tightly to prevent spillage of fuel and potential fire hazard. After filling tank, move the vehicle at least 15 feet away from spot of filling before starting. 19. If the vehicle should start making unusual noise or vibrating abnormally, the engine should be stopped and the spark plug wire disconnected. The vehicle should then be checked for damage. Excessive noise or vibration is generally a warning of loose or worn parts. 20. Always perform a Pre-Ride Inspection before starting the engine. See Pre-Ride Inspection in the manual. 21. When making repairs or adjustments to the vehicle which do not involve adjustments to the engine, the spark plug wire must be disconnected and kept away from the spark plug to prevent accidental starting. When working on or around or when restarting engine, use extreme caution to avoid contact with the muffler, cylinder head, or any other potentially hot area on or around the engine. 22. When storing the vehicle, it must be kept in a place where gasoline fumes will not reach an open flame or spark. For long periods of storage, such as for winter, the fuel tank should be drained in the open, cool area. The engine must be allowed to cool before storage in any enclosure. Read and keep all printed material supplied with this vehicle. Timely and specific instructions and an Operators Manual revisions are included in supplements. If any printed material included is unclear, please call 1-888-389-5522 for assistance. 23. Never operate this vehicle while under the influence of alcohol, drugs, or medication of any kind. Such operation could be dangerous to you and/or others. 24. Always slow down while turning. High speed turning may cause loss of control, possible injury to the operator. 25. Do not race, jump, and perform stunt riding or spinouts when operating this vehicle. This vehicle is not designed or intended for such operation. 26. This manual provides guidelines for the assembly, maintenance, and operation of this vehicle and is not intended as a service manual. 27. Assembly, maintenance, and/or repair of this vehicle should only be performed by persons of sufficient mechanical skill, experience, and judgment (such as outdoor equipment dealers, motorcycle dealer/shops, or small engine dealers) so that no unsafe condition or modification is made. 28. Always use extreme caution when starting the engine. Avoid touching the engine, muffler, or drive components. These areas could cause burns on contact. 29. Operator must always be appropriately supervised at all times while operating this vehicle. 30. Riding this vehicle requires skill acquired through practice over a period of time. Take the time to learn the basic techniques before attempting to ride the vehicle. 31. Ride only on safe and familiar terrain. Avoid loose gravel and rocks. Be careful on wet surfaces and allow for extra braking distance. 32. This vehicle must not be used on slopes greater than 15°. 4 Pay close attention to all Caution and Warning labels on the vehicle. ASSUMPTIONS OF RISK The Owner Or Operator Assumes All The Risks Incident To Or Arising Out Of The Operation Of This Vehicle. Failure To Follow And Comply With All Warnings May Cause Serious Injury Or Death 5 YERF-DOG Mini-Bike by Flexible Flyer LIMITED WARRANTY The Limited Warranty on this vehicle is in two (2) parts: We offer the original purchaser of this product the following warranty: PART 1 ENGINE Tecumseh warrants the engine for (2) years, not Flexible Flyer. See Tecumseh Engine Owners Manual. Engine repair, replacement parts, and warranty claims must be handled through an authorized dealer in your locality. Tecumseh has an extensive authorized sales and service dealer network. (See yellow pages of phone directory under Engine-Gas). PART 2 FRAME The frame and related components are warranted by Flexible Flyer and are applied to any part found to be defective due to material and/or workmanship when inspected at the Flexible Flyer factory. Flexible Flyer will at its option, repair or replace the defective parts to the original purchaser at no charge. The warranty periods are as follows from the date of purchase: A. Frame for 90 days, Void if: 1. Frame is broken or bent due to abuse (underside scraped abusively). 2. Wheels are bent or broken due to impact. 3. Front fork is bent due to impact. 4. Non-Factory altering of engine or its components B. Bearings and sprocket for 30 days C. Clutch for 30 days against breakage of its parts. No warranty is applied for wear of clutch shoes or clutch bearings due to service. D. Throttle cable, brake cable, brake band, chain, tires, seat, fasteners and other components are not warranted because due to normal service they are subject to excessive wear and abuse. All Warranties are voided if the vehicle has been altered in any way or is used in racing or competition, rented, used under abnormal conditions, or subject to abuse, misuse, neglect, or improper maintenance. Flexible Flyer is not liable for any damage claim or liability claim, personal or otherwise resulting from the operation of this vehicle in any way. FLEXIBLE FLYER 100 Tubb Avenue West Point, MS 39773 FOR REPLACEMENT PARTS PLEASE CALL: 1-888-389-5522 (U.S.) 1-888-707-1880 (Canada) 6 ASSEMBLY 1. Complete the mini-bike registration and warranty confirmation on the back of this owners manual and mail in within 10 days of purchase. The information is required when ordering parts. 2. Handlebar - Bolt the handlebar to the top plate with fasteners provided. See Handlebar Assembly Instructions page 12. 3. Bolts - Check the screws, nuts and bolts on your vehicle to see that all are tightened securely. For safe operating conditions, do periodic checks and tighten securely. 4. Engine - Fill the crankcase with oil until it reaches the threads in the filler plug neck. (Approximately 1¼ pints) with SAE 30 weight oil. For additional information refer to Tecumseh engine manual for servicing the engine. 5. Fill fuel tank with regular gasoline, unleaded. Do not use premium gasoline. Do not overfill (No fuel in filler neck). 6. Tire Pressure CHECK AIR PRESSURE IN TIRES!! It is common industry practice to overinflate the tires. This is done to guarantee an airtight seal. Prior to riding the vehicle for the first time, you may need to reduce the air pressure in the tires to the specifications stated below: Rear Tire Front Tire 10 P.S.I. Max. 10 P.S.I. Max. Proper tire pressures will increase the life of the tire and enhance the performance of the vehicle. Driving on asphalt or concrete will significantly reduce the life of the tire!! PART LOCATION 4 6 5 3 9 7 10 2 8 1 11 7 (1) Fuel tank (2) Engine (3) Hand brake lever (4) Hand throttle (5) On/off switch (6) Seat (7) Drive chain cover (8) Clutch cover (9) Head Light (10) Kickstand (11) Foot Pegs PRE-RIDE INSPECTION WARNING - Perform this pre-ride inspection everyday before riding the vehicle. If not performed, serious damage to the vehicle and personal injury may result. 1. Engine Oil Level Add oil if required. Check for leaks. Tighten filler cap securely. 2. Fuel Level Add fuel if necessary. Do not overfill (no fuel in filler neck). Replace cap tightly. Check for leaks. Do not mix oil with gas. Only refuel when engine is off and cool. 3. Brakes Perform a Brake Test: Sit on the vehicle with the brake actuated, grip and squeeze the brake lever. Have an assistant push the vehicle forward. If the rear wheel turns, the brake band needs to be adjusted tighter - see Adjustment Instructions. Do not operate this vehicle unless the brake is working properly. 4. Tires Check conditions and pressure. 5. Drive and Clutch Chain Check condition, tension, lubricate as necessary. 6. Throttle Check throttle for smooth operation. Assure throttle snaps back to idle. Also, check for frayed cable or damaged cable conduit. If either condition exists replace the throttle cable assembly before riding. 7. On/Off Switch Perform this on/off switch test. While the engine is running, move the handlebar remote on/off switch to the OFF position. If this does not stop the engine, move the engine remote on/off switch to the OFF position. If the engine is not equipped with an engine remote on/off switch, pull the spark plug wire. Check to insure that the on/off switch wire is attached to the terminal on the engine. Do not operate this vehicle with a on/off switch that is not functioning properly. 8. All Nuts, Bolts and Fasteners Check wheels to assure that all axle bolts and nuts are tightened properly. Check and tighten all other fasteners as necessary. 9. Covers Ensure all protective covers are in place. Never remove the drive chain cover or clutch cover unless for service or maintenance, then always reattach the covers. Each of these covers have a protective purpose, if removed, it could endanger the personal safety of the operator. 10. Steering System Turn the handlebars to make certain your vehicle will turn smoothly and properly. STARTING INSTRUCTIONS NOTE: Do not attempt to start or operate this vehicle without being completely familiar with all controls necessary to operate this vehicle safely. Do not start the engine before reading and understanding all the rules, warnings, and instructions in this 8 manual. 1. Before starting the engine, the operator should be seated on the vehicle. 2. Do not start the engine before checking to make sure the throttle assembly is in the idle position. Warning Each time prior to starting the engine, check throttle assembly to ensure that when the hand throttle (right-hand side) is twisted all the way backward the assembly is working smoothly and returns forward to idle when released. Do not operate if hand throttle and engine throttle linkage fail to return to idle. 3. To start a cold engine, pump the engine primer 3 times. If the engine is hot, priming may not be necessary to restart the engine. 4. Switch the on/off switch to the ON position and pull recoil starter rope sharply. See Tecumseh engine owners manual. Do not flood the engine by continuously pulling the starter rope. If engine does not start after two or three pulls of the starter rope, wait a few minutes then repeat the above procedures. OPERATIONAL SAFETY TIPS RIDING MANEUVERS . New riders tend to have more trouble turning than more experienced riders do. The best way to learn to make smooth, safe turns is to practice. Defer increased speeds until you are confident of your proficiency and are intimately familiar with the terrain. Your body must be in the right position in order for you to properly control your vehicle. Keep your body fairly erect. This enables you to use your arms to steer the vehicle rather than to hold yourself up. Sit close enough to the handlebars so you can reach them with your arms bent slightly. This allows you to turn the bike without having to stretch your arms. Hold the hand grips firmly so you wont lose your grip if you hit a bump and the vehicle bounces. Start with your wrists down. This prevents you from using too much throttle. Keep your head up and your eyes on where you want to be after a turn or swerve. Keep your feet firmly on the foot pegs. A firm footing helps you maintain balance. Dont drag your feet on the ground. You could be injured or lose control if your foot catches on something. Hold your knees in. This helps you keep your balance when you turn. Reduce speed before a turn using the throttle and if necessary, applying the brakes. Then turn the handlebars into the direction of the turn, and lean with the vehicle into the direction of the turn. Use the throttle to maintain posture throughout the turn. Accelerate slightly coming out of the turn to help keep your balance. If swerving to avoid obstacles, begin the swerve with a small, quick turn to get away from the hazard, and then make another quick turn in the opposite direction to correct your balance and direction. If the front wheels tend to skid in mud, or sand, you may be able to improve control by releasing the throttle and allowing the vehicle to coast through the turn. If the rear wheel inadvertently skid sideways, correct your slide by steering in the direction of the skid, if you have room to perform this maneuver safely. Avoid braking or accelerating until you have control. To avoid skids while traveling on slippery terrain, the rider must exercise a high degree of caution. Turning maneuvers on slippery terrain are more hazardous than those performed under full traction and must be 9 done slowly. PREVENTIVE MAINTENANCE STORAGE In the event your vehicle is not to be operated for a period in excess of 30 days and at the end of riding season prepare for storage as follows: WARNING - Do not drain fuel while engine is hot. Be sure to move vehicle outside before draining fuel. 1. Drain fuel tank and remove all fuel remaining in the tank by using a suction device or by soaking up the fuel with a clean rag or towel. Remove all fuel remaining in the carburetor by allowing engine to run out of fuel. Do not perform any fuel removal procedure while smoking or near an open flame. Dispose of any rags or towels properly. 2. Lubricate engine cylinder by removing the spark plug and pouring an ounce of lean lubricating oil through the spark plug hole into the cylinder. Crank the engine slowly to spread oil and replace spark plug. 3. Do not save or store gasoline over winter. Using old gasoline that has deteriorated from storage will cause hard starting and affect engine performance. 4. When the vehicle is removed from storage reread the owners manual, perform any assembly required, and perform a pre-ride inspection. See Pre-Ride Inspection section of this manual. GENERAL Just as your automobile needs professional, mechanical maintenance from time to time, so does this vehicle. Replacement of the spark plug and ignition points is made necessary by normal use. Professional air-cooled engine service is easily obtained. Check your phone book yellow pages under Engine Gasoline. SERVICE INSTRUCTIONS Front Wheel Replacement See illustration on page 14. 1. Elevate the front end using wooden box or concrete blocks under the frame. 2. Remove the 5/8 Nylock nut (33), Washers (54) and Axle Bolt (6) and remove the Front Wheel (55). 3. Replace Front Wheel and reattach with hardware. Do not over tighten 5/8 Locknut on Axle Bolt. Note: It is only necessary to tighten the nut so that the wheel turns freely on the axle bolt with minimum endplay. If the wheel does not turn freely the nut is too tight. Rear Wheel Replacement See illustration on page 14. 1. Elevate the rear end using wooden box or concrete blocks under the frame. 2. Remove the Spring Clip (17) holding the Drive Chain Guard (18) onto frame and remove Chain Guard 3. Loosen Drive Chain (16) by loosening the four Nylock nuts (30) attaching the Engine (20) to the frame and slide the Engine backward, then remove Drive Chain from Sprocket (43). 4. Remove the Spring Clip (17) holding the Brake Band (9) onto the Frame Pin, slide the Washer (49) and Brake Band off of the Frame Pin. 5. Remove the 5/8 Nylock nut (33), Axle Bolt (6) and Washers (54), then remove the Rear Wheel (56). 6. Remove eight 3/8 Nylock nuts (31) attaching the Brake Drum (11) and Sprocket (43) to Rear Wheel 7. Replace and reattach Rear Wheel by following these steps in reverse order. Tighten 3/8 Nylock nuts attaching Brake Drum and Sprocket to Rear Wheel securely. Do not over tighten 5/8 Nylock nut on Axle Bolt. Note: It is only necessary to tighten the 5/8 nylock nut so that the wheel turns freely on the 10 axle bolt with minimum endplay. If the wheel does not turn freely the nut is too tight. Engine Lubrication You must change the oil in the crankcase after the first two hours of operating your new engine and after each 25 hours of use thereafter. That will insure proper lubrication in internal parts and prevent costly repairs due to excessive wear. Refer to Engine Maintenance Instructions. Chain Lubrication (Clutch and Drive Chain) For the best chain life, it should be lubricated with a graphite type of lubricant such as the spray-on type which evaporates leaving the graphite on the chain. Using oil or grease on the chain in dusty or sandy riding conditions may cause dirt particles to stick to the chain resulting in rapid wear from abrasion. Clutch Lubrication There are two main elements that can shorten the life of a clutch poor lubrication and dirt/sand. The Centrifugal Clutch (14) contains an oil-impregnated bronze bushing. It is press fitted on the sprocket and surrounds a steel sleeve onto which a snap ring clips. The small Snap Ring at the end of the Sprocket holds the clutch together, and for this reason the snap ring should not be removed. With the engine off, apply (4 or 5 Drops) of oil (SAE 30 motor oil) to the Snap Ring area, try to manually roll the mini-bike along while applying the oil. If you lift the rear end and support it on the frame you can rotate the rear wheel to work the oil into the bushing. Never apply grease to this bushing, because it will clog the pores and retard proper lubrication. For best results, oil every two hours of running time. 14 C e n t r i f u g a l Clutch SAE 30 Motor Oil (4 or 5 Drops) Snap Ring Sprocket ADJUSTMENT INSTRUCTIONS Brake Test Always do a brake test before operating vehicle. To test brake function: Sit on the vehicle with the brake actuated, grip and squeeze the Brake Lever (12). Have an assistant push the vehicle forward. If the rear wheel turns, the Brake needs to be adjusted. Do not operate this vehicle unless the brake is properly adjusted and working. Locking Nut Brake Band 9 Pad Brake Drum 11 Adjuster Nut 10 Brake Cable Frame Pin BRAKE ASSEMBLY 2. Tighten Brake Band (9): -Loosen the Locking Nut on the Brake Cable (10). -Turn the Adjuster Nut counterclockwise to tighten the Brake Band on the Brake Drum (11). -Tighten the Locking Nut. 3. Check the Brake Lever (12) for Reach Distance, so the Brake Lever is comfortable for the rider, and for Minimum Clearance when fully actuated, the Brake Lever must have no less than 1/2 clearance. To change the Reach Distance: -Turn the Reach Adjuster Screw. To change the Clearance: -Turn the Clearance Adjuster. -Retighten the Locking Nut. 4. Test brake function - see Brake Test. Brake Adjustment Always test brake before and after adjusting - see Brake Test. To adjust the Brake: 1. Check the Pad thickness on the Brake Band (9). Make sure the Pad is not excessively worn. If excessively worn, less than 1/16 inch of Pad remaining, replace the Brake Band. Reach Distance 1/2 Inch Min. Clearance 12 Brake Lever Locking Nut Clearance Adjuster 10 Brake Cable Reach Adjuster Screw Grip 26 11 BRAKE LEVER To adjust the Drive Chain tension: 1. Loosen the engine Nylock Nuts (30) see page 14. 2. Slide the Engine (20) forward to tighten Drive Chain (16). 3. Retighten engine Nylock Nuts (30). Drive Chain Adjustment After the first two hours of operation, check the tension of the Drive Chain. Note: Your vehicle is equipped with a spring activated chain tensioner to remove slack in the drive chain. HANDLEBAR ASSEMBLY INSTRUCTIONS 1. Remove the vehicle from the carton. NOTE: For shipping purposes, the HANDLEBAR is not installed. 3. With the GRIPS angled to back, align the square holes on the HANDLEBAR BRACKET to the square holes on the TOP PLATE of the FRONT FORK. 2. Remove the four CARRIAGE BOLTS (3) and NYLOCK NUTS (30) located on the TOP PLATE of the FRONT FORK. GRIP THROTTLE 4. Mount the HANDLEBAR onto the TOP PLATE of the FRONT FORK with the CARRIAGE BOLTS (3) and NYLOCK NUTS (30) as shown. Tighten NYLOCK NUTS securely. NOTE: make sure the BRAKE LEVER and THROTTLE cables are correctly positioned, are not bent and function correctly. HANDLEBAR CARRIAGE BOLTS TOP PLATE NYLOCK NUTS FRONT FORK 12 BRAKE LEVER GRIP 31700 REPLACEMENT PARTS IDENTIFICATION Item Part No. Description 1 2 3 4 5 6 7 8 9 10 11 12 13 14 15 16 17 18 19 20 22 23 24 25 26 27 28 29 30 01424 H99502W H95188W H33136W H33135W 01413 01389 01491 01747 01748 01746 01749 01409 Q41412W 01466 01402 00204 01417 01420 01406 01545 01414 01378 01360 01395 01391 01405 01563 HH1256T Item Part No. Description 31700 MINI-BIKE OWNER’S MANUAL BEARING, 5/8" I.D. BOLT, 5/16-18 X 3/4" CARRIAGE BOLT, 5/16-24 X 1/2" HEX BOLT, 5/16-18 X 1-3/4" HEX BOLT, 5/8-11 X 10" HEX BOLT, 5/8-11 X 11" HEX BRACKET, ON/OFF SWITCH BRAKE BAND, 6" BRAKE CABLE BRAKE DRUM, 6" DIA BRAKE LEVER, HAND CENTRIFUGAL CLUTCH KIT CENTRIFUGAL CLUTCH ONLY CHAIN, CLUTCH CHAIN, DRIVE CLIP, SPRING COVER, CHAIN DECAL ENGINE, 5.0 HP TECUMSEH FENDER, FRONT FOOT PEG FORK, FRONT FRAME GRIP HANDLEBAR HEADLIGHT,ROUND KICKSTAND NUT, 5/16-18 NYLOCK 31 32 33 34 35 36 37 38 39 40 41 42 43 44 45 46 48 49 50 51 52 53 54 55 56 57 58 HH37524 01437 01891 01428 01387 01429 01529 01471 01581 01418 H91950W 01750 01407 01398 01419 01396 M12501W 001616P 001618P H53441W H53132W 00891P H56251W 01421 01422 01411 01583 NUT, 3/8-24 THIN NYLOCK NUT, 5/8-11 THIN NYLOCK PIN, 5/16" X 1-1/2" CLEVIS PIN, 3/8" X 1-3/8" CLEVIS PLUG, 1-1/4" ROLLER, IDLER SPRING, CHAIN TENSIONER SPRING, KICKSTAND SCREW, #10-1/2" SEAT SPACER, 0.782 I.D. X .63 DRIVE SPACER, 0.385 I.D. X .63 BRAKE SPROCKET, 60 TOOTH SWITCH, ON/OFF TANK, DUMMY FUEL THROTTLE, TWIST TIE, CABLE 11" WASHER, 3/8" FLAT WASHER, 5/16" FLAT WASHER, 5/16" FENDER WASHER, 5/16" INTERNAL TOOTH WASHER, 5/16" LOCK WASHER, 5/8" NARROW FLAT WHEEL, FRONT WHEEL, REAR WIRING HARNESS WIRE, GROUND For Replacement Parts Please Call: 1-888-389-5522 (U.S.) 1-888-707-1880 (Canada) 13 14 MODEL 31700 VEHICLE REGISTRATION AND WARRANTY CONFIRMATION IMPORTANT! Please return this information within 10 days of purchase to validate your warranty. Return to: F.F. Acquisition Corp. YERF-DOG Warranty Dept. 4014-E Broadway Suite #405 Phoeniz, AZ 85040 Thank-you for purchasing this fine YERF-DOG product. With proper use, maintenance and service this vehicle will bring many years of fun and enjoyment. Please complete this vehicle registration and warranty confirmation form to ensure protection under the terms and conditions of the warranty and to verify ownership of this product. To ensure maximum safety while operating your YERF-DOG mini-bike, observe the following precautions: OPERATE THIS VEHICLE OFF ROAD ONLY ADULT SUPERVISION FOR OPERATORS UNDER 16 YEARS OLD WEAR A D.O.T. APPROVED HELMET, PROTECTIVE EYE WEAR, AND CLOTHING SECURE LONG HAIR AND LOOSE CLOTHING; KEEP KNEES IN AND YOUR FEET ON THE FOOTPEGS DO NOT OPERATE UNDER THE INFLUENCE OF DRUGS OR ALCOHOL To ensure maximum owner satisfaction and understanding of this product, you should: READ OWNERS MANUAL BEFORE OPERATING MINI-BIKE REVIEW AND FULLY UNDERSTAND THE MINI-BIKE AND ENGINE WARRANTIES INSPECT THE MINI-BIKE UPON DELIVERY SECURE A COMPLETED COPY OF THIS CERTIFICATE FOR YOUR RECORDS In signing this document, the purchaser acknowledges that he/she understands the warranty limitations, safety, and maintenance guidelines outlined above and in the owners manual and, therefore, agrees that all operators will adhere to these specifications. Model No. Serial No. First Name Initial Date of Purchase Last Name Street Address City State Zip Code Home Telephone Number Parents Signature (Please enclose a copy of your proof of purchase.) 15 16