1
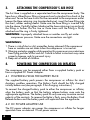
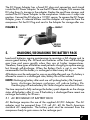
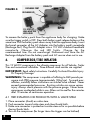
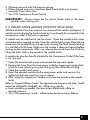
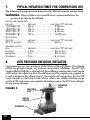
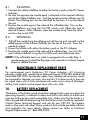
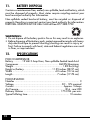
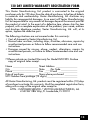
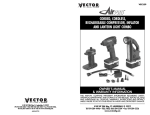
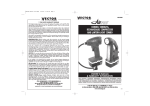
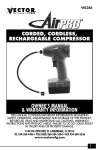
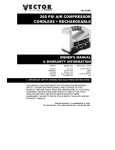
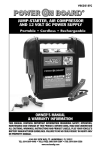
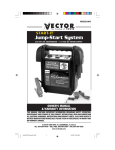
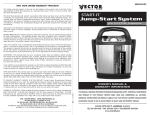
VEC255
CORDED, CORDLESS,
RECHARGEABLE COMPRESSOR
AND INFLATOR COMBO
OWNER’S MANUAL
& WARRANTY INFORMATION
THIS MANUAL CONTAINS IMPORTANT INFORMATION REGARDING
SAFETY, OPERATION, MAINTENANCE AND STORAGE OF THIS PRODUCT.
BEFORE USE, READ AND UNDERSTAND ALL CAUTIONS, WARNINGS,
INSTRUCTIONS AND PRODUCT LABELS. FAILURE TO DO SO COULD
RESULT IN INJURY AND/OR PROPERTY DAMAGE.
4140 SW 28TH WAY, FT. LAUDERDALE, FL 33312
TEL 954-584-4446 • TOLL FREE: 866-584-5504 • FAX 954-584-5556
www.vectormfg.com
1
IMPORTANT SAFETY INFORMATION
Be sure to read and understand all WARNINGS and CAUTIONS before using
this product. Please read this guide carefully before use to ensure optimum
performance and avoid damage to the system or items that you are using it
with. Failure to follow instructions may cause property damage, and/or
personal injury. Warnings define conditions that can cause injury to people.
Cautions define conditions that may cause damage to equipment.
WARNINGS:
1. Improperly attached hoses or nozzles can fly out under compressor pressure. Make sure all connections are tight before turning compressor ON.
2. There is risk of dust or dirt projectiles being released if the compressor
hose or nozzles are not clean when the compressor is turned on.
3. Wearing protective goggles while operating these appliances can
protect eyes from flying particles of dust and dirt.
4. Keep out of reach of children. These appliances are not toys!
5. Replace worn or defective parts immediately - contact Vector® Customer
Service Department at (954)584-4446 or toll free at 866-584-5504.
6. During AC recharge, make sure that the AC Charging Adapter is kept
away from water or moisture during use. If recharging around water,
make sure the 110 VAC outlet is GFCI protected.
7. Make sure all cords and adapter wires are placed so they are not tripped
over or damaged by pinching, abrading or cutting. Do not place wires
near moving objects, doors or sharp objects.
8. Never exceed recommended pressures - bursting articles can cause
serious injury. Always check pressure with the pressure gauge.
9. Do not carry charger and adapters by their cords, carry items by the
body of unit itself.
10. There are no user serviceable parts except for a replaceable battery
pack, AC Recharge Adapter and Hose.
11. Do not operate unit if there is any evidence of damage.
12. Never use air compressor or inflator near flammable liquids, gas or
open flames.
13. Keep working area well lit.
14. Do not direct air into eyes, ears, nose or other parts of the body.
2
2
CAUTIONS:
1. When the compressor or inflator is powered from external DC, make sure
the voltage is rated at 12 VDC. Do not operate with 6 volts or 24 volts.
2. Make sure that the appliances are not operated continuously for more
than 10 minutes. Allow them to cool for at least five minutes before
turning it back on.
3. Make sure battery pack is fully charged before operating. Recharge
every 60 days for the recommended time to extend life of batter y pack’s
internal battery. For immediate use, attach the DC adapter and operate
the appliances from an external 12 volt DC source.
4. To avoid over-inflation, carefully follow instructions on articles to be inflated.
5. Never leave appliances unattended while in use. Allow appliance to cool
for five minutes after 10 minutes of continuous operation.
6. Do not use accessories that are not designed to be used with these
appliances.
7. Do not place battery pack on heater and keep it out of sunlight.
8. Do not charge battery when it is at or above 122° F (50° C). Allow the
battery pack to cool before charging.
CONTENTS
1.
2.
3.
4.
INTRODUCTION .................................................... 4
ADDITIONAL KEY FEATURES .................................. 5
ATTACHING THE COMPRESSOR’S AIR HOSE .......... 6
POWERING THE COMPRESSOR OR INFLATOR ....... 6
4.1 Powering from the battery pack ........................
4.2 DC Power Adapter Use .................................. 6
5. CHARGING/RECHARGING THE BATTERY PACK ...... 7
5.1 AC Recharge of battery pack .......................... 7
6. COMPRESSOR/TIRE INFLATOR ............................... 8
6.1 Tire inflation or products with a valve stem ....... 8
6.2 Inflate other articles (without valve stem) .......... 9
7. TYPICAL INFLATION TIMES ..................................... 9
8. LOW PRESSURE INFLATOR ................................... 10
8.1 Inflator ........................................................ 11
8.2 Deflator ...................................................... 11
9. MAINTENANCE/REPLACEMENT PARTS ................ 11
10. BATTERY REPLACEMENT ....................................... 11
11. BATTERY DISPOSAL .............................................. 12
12. SPECIFICATIONS ................................................. 12
WARRANTIES ................................................. 13,14
3
1.
INTRODUCTION
Congratulations on selecting the Vector Air Pro™ Model VEC255
Compressor & Inflator Combo. This system is an advanced high-pressure
(up to 260 PSI) multi-use air compressor system with unique features that set
it far above the value and utility of ordinary compressors for mobile use. It is
supplied with a standard tire valve chuck for filling auto, truck, bike, and
motorcycle tires. Additionally, two different adapters are supplied to inflate
soccer balls, footballs, and popular inflatables. These adapters are conveniently stored in a hatch in the compressor body. It is powered from its own
snap-on/off powerful battery to be used anywhere it is needed. It can also
operate from a standard 12 volt DC electrical system found on: trucks, cars,
boats, airplanes, RVs and tractors, using the supplied DC Power Adapter. A
supplied standard 110 VAC charger recharges the battery when required.
Typically, up to three completely flat tires can be inflated before the snap-on
battery has to be recharged.
A separate Inflator shares the battery pack and DC Power Adapter. The inflator
is used to inflate: air mattresses; beach balls, etc.(See Sections 8 thru 10)
A customer can purchase extra snap-on battery packs if completely cordless
operation is required (Part VEC194). Operating these appliances with the
snap-on DC Power Adapters is ideal for use with Vector 12 volt DC cordless,
portable, rechargeable DC Power supplies if extended operating time in the
field is required.
FIGURE 1
HOSE RETAINING
COMPRESSOR RING
OUTLET
RIBBED BRASS
FITTING
TRIGGER LOCK
COMPRESSOR
HOSE
TRIGGER
SWITCH
TIRE CHUCK
4
4
NOZZLE HATCH
COVER
The Compressor On/Off Switch controls operation of the compressor. It
conveniently is depressed and released to control inflation. An exact pressure is obtained by observing the gauge and releasing the trigger when the
correct pressure is achieved. For longer inflation operations, the Trigger
Lock can be moved laterally to lock the trigger in the ON position. Pushing
the trigger lock to the opposite direction releases the trigger (OFF) and
inflation stops.
2.
ADDITIONAL KEY FEATURES
• Trigger Switch with lock to allow hands free operation
• Corded -includes a DC power adapter for use with standard 12 volt power
supply
• Battery Pack includes non-spillable, maintenance-free, heavy duty, sealed,
high-density lead-acid battery
• Requires no maintenance (other than recharging and cleaning) for
optimum operation
• Supplied 110 volt AC charger is Underwriter Laboratories (UL) safety
tested and listed
• Battery Charging LED on batter y automatically activated during
AC recharge
• Analog Pressure Gauge to 260 PSI Compressor
• Nozzle Hatch for storing nozzles in compressor
• 3 nozzles for inflator
FIGURE 2
NOZZLE HATCH
COVER
NOZZLES
PRESSURE
GAUGE
CAUTION: This battery pack is delivered in a partially charged state - you
must fully charge it before using it for the first time. Initial AC Charge
should be for 10 hours. Refer to Section 6 for use of AC Adapter and
detailed charging instructions.
5
3.
ATTACHING THE COMPRESSOR’S AIR HOSE
The Air Hose is supplied as a separate item from the compressor body. The
hose has a ribbed brass fitting at one end and a standard tire chuck at the
other end. To use the hose it must first be connected to the compressor outlet.
Loosen the Hose retaining ring (counterclockwise), insert the hose fitting into
the short, rubber sealing sleeve. Make sure the hose fitting is inserted fully
into the sleeve. Partially tighten (clockwise) the hose-retaining ring and push
the fitting in further. Do this two or three times until the fitting is firmly
attached and the ring is firmly tightened.
WARNING: Improperly attached hoses or nozzles can fly out under
compressor pressure. Make sure the connections are tight.
WARNINGS:
1. There is risk of dust or dirt projectiles being released if the compressor
hose or nozzles are not clean when the compressor is turned on.
2. Wearing protective goggles while operating this compressor can protect eyes
from flying particles of dust and dirt. Failure to follow instructions may cause
property damage, and/or personal injury.
3. Keep out of reach of children.
4.
POWERING THE COMPRESSOR OR INFLATOR
The compressor can be powered either from a supplied batter y pack or
from a supplied DC Power Adapter.
4.1 POWERING FROM THE BATTERY PACK
The supplied battery pack powers the compressor or inflator for short
duration, cordless operation. The Battery Pack should be fully charged
initially before use (see paragraph 5 for charging instructions.)
To connect the charged battery pack to either the compressor or inflator,
align the battery pack so that the battery release buttons snap onto the
appropriate appliance. The battery pack fits only one way to ensure correct
polarity of the contacts. To remove the Battery Pack, press the Battery Pack
Release buttons and the battery pack will separate from the appliance.
4.2 DC POWER ADAPTER USE
The DC power adapter can power the compressor or inflator for longer
operation from an external 12 volt power source.
6
6
The DC Power Adapter has a fused DC plug and connecting cord stored
inside the DC Power Adapter. To use the DC Power Adapter, first remove the
DC plug from it’s storage in the adapter. Deploy the cord from storage, and
connect the DC Power Adapter to the compressor. Make sure it snaps into
position. Connect the DC plug to a 12 VDC source. To remove the DC Power
Adapter, press it’s release buttons and the Adapter will separate from the
compressor. Put the DC Plug and cord in the Adapter for storage after use.
FIGURE 3
CONTACT
FUSED DC
PLUG
RELEASE
BUTTON
5.
CHARGING/RECHARGING THE BATTERY PACK
Lead-acid batteries require maintenance to maintain a full charge and to
ensure good battery life. All lead-acid batteries suffer from self-discharge
over time and more rapidly when they are at higher temperatures.
Therefore, these types of batteries need periodic charging to replace energy
lost through self-discharge. When the Battery Pack is not in use Vector
recommends that the battery is recharged at least every 60 days.
All batteries must be recharged as soon as possible after each use. If a battery is
allowed to remain in a discharged state, battery life will be reduced.
NOTE: Recharging battery after each use will prolong battery life; frequent
heavy discharges between recharges will reduce battery life.
Overcharging will reduce battery life. Never charge for more than 24 hours.
The time required to fully recharge the battery pack depends on the charge
status of the battery after it’s use. If the battery is discharged from recent use
recharge the battery for 8 hours.
5.1 AC RECHARGE OF BATTERY PACK
AC Recharge requires the use of the supplied AC/DC Adapter. The AC
adapter must be powered from 110 volt AC, 60 Hz North American
standard AC receptacles. The battery pack must be removed from the
compressor body to gain access to the recharge port.
7
CONTACTS
FIGURE 4
RECHARGE PORT
RECHARGE LED
110 VOLT AC
WALL ADAPTOR
WITH CORD
RELEASE
BUTTON
To remove the battery pack from the appliance body for charging: Make
sure the trigger switch is OFF. Press both battery pack release buttons at the
same time. Pull the battery pack down away from the appliance body. Insert
the barrel connector of the AC Adapter into the battery pack’s receptacle
(Recharge Port). Plug the AC Adapter into a 110 VAC standard household
receptacle. Obser ve the red LED lights. Charge for the
recommended time. Do not overcharge! Disconnect and store the AC
Recharge Adapter from the battery pack and AC source when not in use.
6.
COMPRESSOR/TIRE INFLATOR
This 12 Volt DC compressor is the ultimate compressor for all Vehicles, Trailer
Tires and recreational inflatables. Three different sized nozzles are supplied.
IMPORTANT: Read safety Instructions Carefully To Avoid Possible Injury
Or Property Damage.
WARNINGS: The compressor is capable of inflating to 260 pounds per
square inch (PSI) pressure (approximately 18 kg/cm). To avoid overinflation, carefully follow instructions on articles to be inflated. Never
exceed recommended pressures. Bursting articles can cause serious
injury. Always check pressure with the pressure gauge. Never leave
compressor unattended while in use. Allow unit to cool for five minutes
after 10 minutes of continuous operation.
6.1 TIRE INFLATION OR PRODUCTS WITH A VALVE STEM
8
8
1. Place connector (chuck) on valve stem.
2. Push connector toward valve stem and close thumb latch.
3. Make sure connector is pushed on to valve stem as far as possible before
closing thumb latch.
4. Turn on the compressor (for larger items the trigger can be latched)
5. Observe pressure with the pressure gauge.
6. When desired pressure is reached, open thumb latch and remove
connector from valve stem.
7. Turn OFF Compressor Power Switch
IMPORTANT: Always leave the tire chuck thumb latch in the open
position when storing unit.
6.2 INFLATE OTHER ARTICLES (WITHOUT VALVE STEM)
Inflation of other than tires requires use of one of the nozzles (adapters). A
nozzle can be attached to the tire chuck or it can directly be connected to the
compressors outlet if the hose is removed.
A nozzle can be attached to the tire chuck. Open the nozzle hatch cover
and remove the required nozzle. Close the nozzle hatch cover. Place the tire
chuck over the nozzle fitting and secure by moving the chuck thumb latch so
it is parallel with the hose. Make sure the nozzle is clean and secure before
turning on the compressor. After use, release the nozzle from the chuck by
lifting the latch. Return the nozzle to the nozzle hatch.
A nozzle can also be directly attached to the Compressor Outlet if the hose
is not required.
1. Open the nozzle hatch cover and remove the required nozzle.
2. Remove the hose from the compressor outlet by loosening (counterclock
wise) the hose retaining ring and sliding out the ribbed brass fitting.
3. Close the nozzle hatch cover.
4. Insert the selected nozzle into the compressor outlet and secure it by
tightening the hose-retaining ring as above.
5. After using the compressor, remove and store the nozzle in the nozzle
hatch.
Refer to “Typical Inflation Times” for approximate pressure and time. Small
items like volleyballs, footballs, etc. inflate very rapidly.
6. Insert nozzle (e.g needle) into item to be inflated and inflate to
desired pressure.
7. Turn ON compressor switch - inflate to desired pressure or fullness.
9
7.
TYPICAL INFLATION TIMES FOR COMPRESSOR USE
The following are approximate pressure and inflation times for various items.
WARNING: Always follow tire manufacturers recommendations for
pressure on item to be inflated.
VEHICLE AND TRAILER TIRES
TIRE SIZE ................... PRESSURE ................... TIME FROM “0” PRESSURE
155/80R 13" ......... 26 PSI ........................... 2.50 MIN.
185/70R 14" ......... 30 PSI ........................... 4.50 MIN.
235/75R 15" ......... 30 PSI ........................... 6.50 MIN.
235/85R 16" ......... 50 PSI ........................... 16.00 MIN.
BICYCLE TIRES
TIRE SIZE ................... PRESSURE ................... TIME FROM “0” PRESSURE
27 X 1" RACING ........ 10 PSI ........................... 40 SEC.
INFLATABLE ARTICLES
..................... PRESSURE ................... TIME FROM “0” PRESSURE
ITEM
FOOTBALL ................. 13 PSI ........................... 24 SECONDS
BASKETBALL ................ 9 PSI ............................. 20 SECONDS
VOLLEYBALL ............... 5 PSI ............................. 6 SECONDS
8.
LOW PRESSURE INFLATOR/DEFLATOR
Congratulations on your purchase of the Vector Inflator/Deflator -The ultimate
inflator for all high volume, low-pressure recreational inflatables. The VEC255
Combo Inflator/Deflator is supplied with three different sized nozzles. Each nozzle
will fit either the inflation port or the deflation port.The nozzles are supplied on
a cord attached to the inflator’s body. The nozzles will not get lost. An On/Off
switch located on the body of the inflator allows the Inflator/ Deflator to be
switched OFF and remain connected to the battery pack or the DC Power Adapter
during nozzle changes
FIGURE 3
INFLATION
PORT
ON/OFF
SWITCH
3 NOZZLES
10
10
DEFLATION
PORT
8.1
INFLATING
1. Connect the inflator/deflator to either the battery pack or the DC Power
Adapter.
2. Be sure the appropriate nozzle head is attached to the tapered inflating
port of the inflator/deflator unit. Push the nozzle onto the inflation port to
attach. The inflating port can be identified by location. It is on the side of
the unit.
3. Position the nozzle against the valve of the inflatable item. Turn on the
Inflator/Deflator on using the On/Off switch, and inflate the item to
desired firmness. After inflation, move the nozzle away from the valve
and turn the switch OFF.
8.2
DEFLATING
1. Pull off the nozzle from the inflating port of the unit and reinstall it at the
deflating port of the Inflator/Deflator (on the top of the unit). Press the
nozzle to attach.
2. Power the Inflator with either the battery pack or the DC Adapter.
3. Position the nozzle against the valve of the inflated item. Turn On the
sport inflator/deflator using the On/Off switch and deflate the item.
NOTE: If the inflatable item’s air valve is equipped with a safety flap, it
maybe necessary to hold the flap open with a pencil or similarly shaped
object to deflate the item.
9.
MAINTENANCE/REPLACEMENT PARTS
For replacement parts (batteries, DC Power Adapters, AC charging
adapters, cables, etc.), contact Vector Technical Support: (954) 584-4446 or toll
free at 866-584-5504. Periodically, cables, hose, nozzles and connectors should
be inspected for damage, corrosion, dust and dirt. If surfaces are dirty, they can
be wiped clean with a cloth moistened with water and a drop of detergent.
Battery Pack contacts can be wiped clean with a dry cloth.
10.
BATTERY REPLACEMENT
The battery in the battery pack should be replaced with a new one when the
operating capacity is reduced to about one half or the ability to inflate one
and one half average sized automobile tires. Make sure that the batter y is
fully charged before determining that the battery pack should be replaced.
Contact Vector Technical Support and ask for part VEC194. This battery
pack is also used with other Vector products that include portable inflators
and spotlights. For more details, please contact our Sales or Technical
Support Department at 1-866-584-5504.
11
11.
BATTERY DISPOSAL
Contains a maintenance-free, sealed, non-spillable, lead acid batter y, which
must be disposed of properly. Most states require recycling-contact your
local municipal authority for information.
PR
BA
Non-spillable sealed lead-acid battery, must be recycled or disposed of
properly. Recycling is required -contact your local authority for information.
DISPOSAL QUESTIONS FOR USA CALL toll-free 877-288-7722.
PR
BA
ALWAYS RECYCLE
WARNINGS:
• Do not dispose of the battery pack in fire as this may result in an explosion
• Before disposing of the battery pack, protect exposed terminals with heavyduty electrical tape to prevent shorting (shorting can result in injury or
fire). Failure to comply with local, state and federal regulations can result
in fines, or imprisonment
12.
SPECIFICATIONS
FOR COMPRESSOR:
Battery ........... 12 Volt 3 Amp Hour, Non-spillable Sealed Lead-Acid
Compressor ...................................................... 260 PSI Maximum
Weight ................................................................... 1.82 lbs (4 kg)
Height w/battery ..................................... 11.25 inches (28.57 cm)
Width ......................................................... 4.0 inches (10.16 cm)
Length ............................................................ 7 inches (17.78 cm)
FOR INFLATOR:
Nozzles ........................................................................................ 3
Voltage ................................................................. DC - 12V nominal
Current ................................................................... Approx. 5 Amps
Air Pressure ............................................................... 816 - mm H20
Delivery Volume .................................................. 175 CFM per min.
Typical Inflating time ........................................................ 10 minutes
12
12
120 DAY LIMITED WARRANTY REGISTRATION FORM
This Vector Manufacturing, Ltd. product is warranted to the original
purchaser only for 120 days from the date of purchase, to be free of defects
in materials and workmanship. Vector Manufacturing, Ltd. disclaims any
liability for consequential damages. In no event will Vector Manufacturing,
Ltd. be responsible for any amount of damages beyond the amount paid for
the product at retail. In the event of a defective item, please ship the item
prepaid, with a complete explanation of the problem, your name, address
and daytime telephone number. Vector Manufacturing, Ltd. will, at its
option, replace the defective part.
The following situations are not covered under this warranty:
✓ Cost of shipment to Vector Manufacturing, Ltd.
✓ Normal wear and tear, including chips, scratches, abrasions, repairs by
unauthorized persons or failure to follow recommended care and use
instructions.
✓ Damage caused by misuse, abuse, neglect, alterations, repairs by
unauthorized persons, or failure to follow recommended care and use
instructions.
❒ Please activate my Limited Warranty for Model #VEC255. Enclose
copy of original sales receipt.
Name ____________________ Street Address _________________
City ______________________ State ___ Zip Code _____________
Phone ____________________ Fax ____ E-mail _______________
Date of purchase ___________ Store where purchased __________
UPC Number from package (12 digits) ________________________
All Vector Manufacturing, Ltd. products must be registered within (10) days
of purchase to activate this warranty. Mail the completed registration form,
along with a copy of the original sales receipt to:
ATTN.: CUSTOMER SERVICE / VECTOR MANUFACTURING, Ltd.
4140 SW 28th Way, Ft. Lauderdale, FL 33312
13
3 YEAR EXTENDED WARRANTY REGISTRATION FORM
This limited warranty program is the only one that applies to this product, and it sets forth all the responsibilities of Vector Manufacturing, Ltd., regarding this product. There is no other warranty, other than those described herein. This Vector Manufacturing, Ltd. product is warranted, to the original purchaser only, to be free
of defects in materials and workmanship for three years from the date of purchase without additional charge.
The warranty does not extend to subsequent purchasers or users. Vector Manufacturing, Ltd. will not be
responsible for any amount of damage in excess of the retail purchase price of the product under any
circumstances. Incidental and consequential damages are specifically excluded from coverage under this
warranty. This product is not intended for commercial use. This warranty does not apply to accessories or
damage to units from misuse or incorrect installation. Misuse includes wiring or connecting to improper
polarity power sources.
RETURN/REPAIR POLICY: Defective products, other than accessories, may be returned postage prepaid to
Vector Manufacturing. Any defective product, other than accessories, that is returned to Vector Manufacturing
within 30 days of the date of purchase will be replaced free of charge. If such a product is returned more than
30 days but less than three years from the purchase date, Vector Manufacturing will repair the unit or, at its
option, replace it free of charge. If the unit is repaired, new or reconditioned replacement parts may be used,
at Vector Manufacturing’s option. A unit may be replaced with a new or reconditioned unit of the same or
comparable design. The repaired or replaced unit will then be warranted under the terms of the remainder of
the warranty period. The customer is responsible for the shipping charges on all returned items after 30 days.
During the warranty period, Vector Manufacturing, Ltd. will be responsible for the return shipping charges.
LIMITATIONS: This warranty does not cover accessories, bulbs, fuses and batteries, defects resulting from
normal wear and tear (including chips, scratches, abrasions, discoloration or fading due to usage or exposure to sunlight), accidents, damage during shipping to our service facility, alterations, unauthorized use or
repair, neglect, misuse, abuse, failure to follow instructions for care and maintenance, fire, flood and Acts of
God. If your problem is not covered by this warranty, call our Technical Support Department at (954) 5844446 or Toll Free at (866) 584-5504 for general repair information and charges if applicable. You may also
contact us through our website at www.vectormfg.com.
STATE LAW RIGHTS: This warranty gives you specific legal rights. Some states do not allow limitations on how
long an implied warranty lasts or the exclusion or limitation of incidental or consequential damages, so the
exclusions or limitations stated herein may not apply. This warranty gives the purchaser specific legal rights;
other rights, which vary from state to state, may apply.
TO REQUEST WARRANTY SERVICE FOR THIS PRODUCT: Contact Vector Manufacturing Technical Support
by telephone, fax or mail. We suggest that you keep the original packaging in case you need to ship the unit.
When returning a product, include your name, address, phone number, dated sales receipt (or copy) and a
description of the reason for return and product serial number. After repairing or replacing the unit, we will
make every effort to return it to you within four weeks.
WARRANTY ACTIVATION: Please complete Warranty Activation Card and mail to Vector Manufacturing.
Enter “VEC255” as Model and “Rechargeable Compressor /Inflator Combo” as Product Type. All Vector
Manufacturing, Ltd. products must be registered within 10 days of purchase to activate this warranty. Mail the
completed registration form, along with a copy of the original sales receipt to:
ATTN.: CUSTOMER SERVICE / VECTOR MANUFACTURING, Ltd.
4140 SW 28th Way, Ft. Lauderdale, FL 33312
PH: 954-584-4446 • TOLL FREE: 866-584-5504 • Fax: 954-584-5556.
You may also contact us at our web site www.vectormfg.com.
WARRANTY IS NON-TRANSFERABLE AND NON-REFUNDABLE.
14
14
15
16
16
© 2003 VECTOR MANUFACTURING, Ltd.
FT. LAUDERDALE, FL 33312 MADE IN CHINA