1
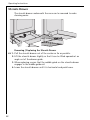
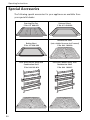
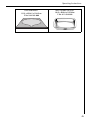
COMPETENCE 5033 V
The Electric Free-Standing Cooker
Operating Instructions
Dear Customer,
Please read these operating instructions through carefully.
Above all, please take note of the “Safety” section on the first few
pages. Please keep these operating instructions for later reference. Pass
them on to any subsequent owner of the appliance.
The warning triangle and/or specific words (Warning!, Caution!,
Important!) are used to highlight instructions that are important for
your safety or for the function of the appliance. It is imperative that
these instructions are observed.
0 1. This symbol guides you step by step when operating the appliance.
2. ...
3. ...
1
3
Next to this symbol you receive additional information and practical
tips on using the appliance.
2
Tips and information about the economical and ecological use of the
machine are marked with a cloverleaf.
In the event of a malfunction, these operating instructions contain
information on how to rectify faults yourself, see the "What to do, if..."
section.
In the event of technical problems, our local FACTORY CUSTOMER
SERVICE CENTRE is always available to provide assistance (you will find
addresses and telephone numbers in the “Customer Service Centres”
section).
Please also take note of the contents of the “Service” section.
Printed on paper manufactured with environmentally sound processes.
He who thinks ecologically acts accordingly ...
2
Contents
CONTENTS
Operating Instructions
....................................
5
Safety Instructions . . . . . . . . . . . . . . . . . . . . . . . . . . . . . . . . . . . . . . . . . . . .
5
Disposal . . . . . . . . . . . . . . . . . . . . . . . . . . . . . . . . . . . . . . . . . . . . . . . . . . . . . .
8
Appliance structure . . . . . . . . . . . . . . . . . . . . . . . . . . . . . . . . . . . . . . . . . . . .
Control panel . . . . . . . . . . . . . . . . . . . . . . . . . . . . . . . . . . . . . . . . . . . . . . . . .
Cooking Surface Features . . . . . . . . . . . . . . . . . . . . . . . . . . . . . . . . . . . . . . . .
Oven Features . . . . . . . . . . . . . . . . . . . . . . . . . . . . . . . . . . . . . . . . . . . . . . . . . .
Oven Accessories . . . . . . . . . . . . . . . . . . . . . . . . . . . . . . . . . . . . . . . . . . . . . . .
Utensils Drawer . . . . . . . . . . . . . . . . . . . . . . . . . . . . . . . . . . . . . . . . . . . . . . . .
9
9
10
11
12
12
Oven Functions . . . . . . . . . . . . . . . . . . . . . . . . . . . . . . . . . . . . . . . . . . . . . . . . 13
Before Using for the First Time . . . . . . . . . . . . . . . . . . . . . . . . . . . . . . . . . 15
Initial Cleaning . . . . . . . . . . . . . . . . . . . . . . . . . . . . . . . . . . . . . . . . . . . . . . . . . 15
Suitable Pans . . . . . . . . . . . . . . . . . . . . . . . . . . . . . . . . . . . . . . . . . . . . . . . . . . 15
Using the Rings . . . . . . . . . . . . . . . . . . . . . . . . . . . . . . . . . . . . . . . . . . . . . . . 16
Cooking with the Rings . . . . . . . . . . . . . . . . . . . . . . . . . . . . . . . . . . . . . . . . . . 17
Switching On the Double Ring/Casserole Cooking Zone . . . . . . . . . . . . . . . 17
Operating the Oven . . . . . . . . . . . . . . . . . . . . . . . . . . . . . . . . . . . . . . . . . . . .
Inserting/Removing the Fat Filter . . . . . . . . . . . . . . . . . . . . . . . . . . . . . . . . .
Inserting the Shelf and Universal Sheet . . . . . . . . . . . . . . . . . . . . . . . . . . . .
Switching the Oven On and Off . . . . . . . . . . . . . . . . . . . . . . . . . . . . . . . . . . .
18
18
18
19
Usage, Tables and Tips . . . . . . . . . . . . . . . . . . . . . . . . . . . . . . . . . . . . . . . . .
Pans . . . . . . . . . . . . . . . . . . . . . . . . . . . . . . . . . . . . . . . . . . . . . . . . . . . . . . . . . .
Cooking . . . . . . . . . . . . . . . . . . . . . . . . . . . . . . . . . . . . . . . . . . . . . . . . . . . . . . .
Typical Heat Settings . . . . . . . . . . . . . . . . . . . . . . . . . . . . . . . . . . . . . . . . .
Baking . . . . . . . . . . . . . . . . . . . . . . . . . . . . . . . . . . . . . . . . . . . . . . . . . . . . . . . .
Baking Tables . . . . . . . . . . . . . . . . . . . . . . . . . . . . . . . . . . . . . . . . . . . . . . .
Pies and Gratins Table . . . . . . . . . . . . . . . . . . . . . . . . . . . . . . . . . . . . . . . . . . .
Frozen Ready Meals Table . . . . . . . . . . . . . . . . . . . . . . . . . . . . . . . . . . . . .
Roasting . . . . . . . . . . . . . . . . . . . . . . . . . . . . . . . . . . . . . . . . . . . . . . . . . . . . . .
Roasting Table . . . . . . . . . . . . . . . . . . . . . . . . . . . . . . . . . . . . . . . . . . . . . .
Grilling . . . . . . . . . . . . . . . . . . . . . . . . . . . . . . . . . . . . . . . . . . . . . . . . . . . . . . .
Grilling Table . . . . . . . . . . . . . . . . . . . . . . . . . . . . . . . . . . . . . . . . . . . . . . .
Defrosting . . . . . . . . . . . . . . . . . . . . . . . . . . . . . . . . . . . . . . . . . . . . . . . . . . . . .
Defrosting Table . . . . . . . . . . . . . . . . . . . . . . . . . . . . . . . . . . . . . . . . . . . . .
20
20
21
21
22
24
27
27
28
29
31
31
32
32
3
Contents
Preserving . . . . . . . . . . . . . . . . . . . . . . . . . . . . . . . . . . . . . . . . . . . . . . . . . . . . . 33
Preserving Times . . . . . . . . . . . . . . . . . . . . . . . . . . . . . . . . . . . . . . . . . . . . . 33
Cleaning and Care . . . . . . . . . . . . . . . . . . . . . . . . . . . . . . . . . . . . . . . . . . . . .
Hob . . . . . . . . . . . . . . . . . . . . . . . . . . . . . . . . . . . . . . . . . . . . . . . . . . . . . . . . . .
Exterior of the Appliance . . . . . . . . . . . . . . . . . . . . . . . . . . . . . . . . . . . . . . . .
Oven Interior . . . . . . . . . . . . . . . . . . . . . . . . . . . . . . . . . . . . . . . . . . . . . . . . . .
Accessories . . . . . . . . . . . . . . . . . . . . . . . . . . . . . . . . . . . . . . . . . . . . . . . . . . . .
Side Rails . . . . . . . . . . . . . . . . . . . . . . . . . . . . . . . . . . . . . . . . . . . . . . . . . . . . . .
Oven Light . . . . . . . . . . . . . . . . . . . . . . . . . . . . . . . . . . . . . . . . . . . . . . . . . . . .
Grill Element . . . . . . . . . . . . . . . . . . . . . . . . . . . . . . . . . . . . . . . . . . . . . . . . . . .
Oven Door . . . . . . . . . . . . . . . . . . . . . . . . . . . . . . . . . . . . . . . . . . . . . . . . . . . . .
Oven Door Glass . . . . . . . . . . . . . . . . . . . . . . . . . . . . . . . . . . . . . . . . . . . . . . . .
Utensils Drawer . . . . . . . . . . . . . . . . . . . . . . . . . . . . . . . . . . . . . . . . . . . . . . . .
34
34
36
36
36
37
38
39
40
41
42
What to do if ... . . . . . . . . . . . . . . . . . . . . . . . . . . . . . . . . . . . . . . . . . . . . . . . 43
Special Accessories . . . . . . . . . . . . . . . . . . . . . . . . . . . . . . . . . . . . . . . . . . . . 44
Installing and Connecting
................................
Installation . . . . . . . . . . . . . . . . . . . . . . . . . . . . . . . . . . . . . . . . . . . . . . . . . . . .
Appliance Alignment . . . . . . . . . . . . . . . . . . . . . . . . . . . . . . . . . . . . . . . . .
Technical Data . . . . . . . . . . . . . . . . . . . . . . . . . . . . . . . . . . . . . . . . . . . . . . . . .
Regulations, Standards, Directives . . . . . . . . . . . . . . . . . . . . . . . . . . . . . . . . .
Safety Instructions for the Installer . . . . . . . . . . . . . . . . . . . . . . . . . . . . . . . .
Service
4
46
46
46
47
47
48
. . . . . . . . . . . . . . . . . . . . . . . . . . . . . . . . . . . . . . . . . . . . . . . . . . . . . . 51
Operating Instructions
OPERATING INSTRUCTIONS
1
Safety Instructions
The new appliance may only be assembled and connected by an
approved installer.
Please observe this instruction, otherwise the warranty will not cover
any damage that may occur.
The safety features of AEG electrical appliances comply with accepted
technical standards and the German Appliance Safety Law. However, we
also consider it our obligation as a manufacturer to make you aware of
the following safety information.
General Safety
• Take care when plugging in electrical appliances near the appliance.
Mains cables must not be allowed to fall on hot rings and must not
be trapped under the hot oven door.
• Do not store flammable substances in the oven. They could ignite
when the oven is switched on.
• Cleaning the appliance with a steam or high pressure cleaner is forbidden for safety reasons.
• If force is used, especially on the edges of the front pane of glass, the
glass may break.
• If fractures, cracks or splits appear in the cooking surface:
– switch off all cooking zones,
– switch off the fuse for the cooking surface,
– inform customer service immediately.
• When cooking, roasting and grilling, the oven door will become hot.
Therefore always keep small children away from the door.
• Overheated fat and oil can catch fire quickly. Please always stay close
to the cooking surface when preparing food in fat or oil (e.g. chips).
• If you use alcoholic ingredients in the oven, it is possible that an easily ignitable alcohol-air mixture might be produced. In this case open
the door carefully. When doing so, avoid having any hot embers,
sparks or open flames in the immediate vicinity. We recommend leaving the cooked food to cool in the oven with the door shut for
approx. 10-15 minutes after switching off the oven.
5
Operating Instructions
• Repairs to the appliance may only be performed by qualified service
engineers. Improper repairs can give rise to significant hazards. If
your appliance needs repairing, please contact our Customer Service
or your specialist dealer.
• In the case of the appliance malfunctioning: remove the fuses or
switch off the circuit breaker.
Intended use
• This appliance must not be used for purposes other than that
intended, it must only be used for the cooking, roasting and baking
of food in the home.
• Only use the appliance to prepare food.
• Do not use the oven to heat the room.
6
Operating Instructions
In this way you avoid damaging your appliance
• Do not use the cooking surface for storage. In this way you will avoid
damaging the glass ceramic surface.
• If sugar or plastic comes into contact with the hot cooking surface
and melts, remove it immediately whilst still hot! If it cools, splits
may occur in the glass ceramic cooking surface.
• The glass ceramic cooking surface is insensitive to temperature shock
and very robust, however it is not unbreakable. Hard and sharp
objects, in particular, can damage the cooking surface if they fall on
it.
• Only use utensils with flat, smooth bases that are neither rough nor
burred. Otherwise permanent scratching may occur when the utensils
are slid.
• Do not place hot frying pans or saucepans on the cooking surface
frame and do not cover the cooking surface with protective foil.
• Do not place any pans or other items over the oven steam outlet in
the cooking surface frame.
• Do not place aluminium foil or plastic containers on the hot rings and
do not prepare food in aluminium foil or plastic containers on the hot
cooking surface.
• Do not line your oven with aluminium foil and do not place a baking
sheet or dish on the oven floor, otherwise the oven enamel will be
damaged by the resulting build up of heat.
• Clean the appliance after each use. Spills are then easier to clean up
and do not become burnt onto the surface.
• Any drops of fruit juice that fall from the baking sheet will leave
spots that cannot be removed. Use the universal sheet for very moist
cakes.
• Never pour water directly into the hot oven. The enamel may be damaged.
• Do not sit on the open oven door/oven drawer.
• Do not store moist food in the oven.
Eco-Insulation
In the factory the oven is fitted with eco-insulation. This insulation has
been tested for pollutants by independent test institutes and categorised as harmless
7
Operating Instructions
2
Disposal
Disposing of the packaging materials
All materials used can be fully recycled.
The plastics are marked as follows:
• >PE< for polyethylene, e.g. as used for the outer wrapping and the
bags inside.
• >PS< for polystyrene foam, e.g. as used for the packing pieces, completely free of CFCs.
The cardboard is made from 80% recycled paper.
Disposal of old appliances
All old appliances must be correctly disposed of for environmental reasons.
8
1
Warning! When disposing of an old appliance, make it unusable by
cutting off the cable. Remove any door catches to prevent small children being trapped inside.
2
Information on disposal
• The appliance must not be disposed of in the household rubbish.
• You can obtain information about collection dates or public tips from
your local refuse department or council.
Operating Instructions
Appliance structure
Control panel
Oven Functions
Rotary switch used for selecting the required oven function. The
selected oven function can be read off on the switch from above.
Temperature Selection
Rotary switch used for selecting the required oven temperature. The
selected oven temperature can be read off on the switch from above.
Oven Power Indicator
The oven power indicator illuminates as soon as the oven or rings are
switched on.
Temperature Pilot Light
The temperature pilot light illuminates while the oven is heating up
and extinguishes when the selected temperature is reached. It then
cycles on and off during cooking to show that the temperature is being
maintained.
Ring Switches
Rotary switches for switching on the cooking zones. The selected heat
setting can be read off on the switch from above.
9
Operating Instructions
Cooking Surface Features
Oven Steam Outlet
The steam from the oven is fed directly to the extraction hood via the
duct in the rear of the cooking surface.
Single Ring Cooking Zone
Switching on and regulation is
performed using the associated
switch on the control panel.
Double Ring and Casserole
Cooking Zone
On the double ring and casserole
cooking zone, the heated area
can be adapted to the diameter
of the pan base.
Residual Heat Indicator
Each of the glass ceramic cooking
zones is equipped with an indicator light that illuminates when
the corresponding cooking zone
is hot. Once the cooking zone has
cooled down, the light goes out.
As long as the light is illuminated,
the residual heat can be utilised.
10
Operating Instructions
Oven Features
Shelf Positions
There are side rails on both sides of
the oven, each of these has 6 shelf
positions.
Please note that the shelf positions
are counted from top to bottom.
Anti-Tip Device
All slide-in parts are fitted with an
anti-tip device to prevent them
being unintentionally pulled all
the way out.
When inserting slide-in parts, the
anti-tip device must be at the rear.
✘
Fat Filter
The fat filter supplied with your
appliance protects the fan in the
rear wall of the oven from soiling.
Always use the filter when roasting uncovered food or using hot
air or Rotitherm.
11
Operating Instructions
Oven Accessories
The following items are supplied:
Baking Sheet
For cakes and biscuits
Combination Shelf
For dishes, cake tins,
items for roasting and grilling
Universal Sheet
For cakes or roasts with a high
juice content or as a baking sheet
or as a tray for collecting fat
Utensils Drawer
Underneath the oven door there is
a drawer that can be pulled out. It
is used for storing utensils and
accessories.
1
12
WARNING: Heat can build up in
the utensils drawer when the oven
is in use. Therefore do not store
any flammable utensils in the
drawer, e.g.:
– cleaner,
– plastic bags,
– oven cloths,
– paper, etc.
– Under no circumstances should oven cleaner spray be stored in
the drawer!
Operating Instructions
Oven Functions
The following functions are available for the oven:
U Fan Cooking
Fan cooking is particularly suited to baking on several levels at the
same time.
Oven temperatures are generally 20-40 °C lower than for conventional
heat.
A ring heater and part of the bottom element are used.
In addition a fan in the rear wall of the oven ensures that the hot air in
the oven is circulated continuously. The food is heated from all sides.
O Conventional
Conventional is suited to baking and roasting on one level.
Heat is supplied evenly from above and below.
I Rotitherm
Rotitherm is particularly suited to grilling or roasting larger pieces of
meat or game on one level. This function is also suitable for ’au gratin’
dishes and browning.
The grill element and fan are used simultaneously.
R Fast Warm Up
Using the fast warm up function you can very quickly pre-heat the
empty oven for the other cooking functions.
Several elements operate simultaneously for the fast warm up
function.
13
Operating Instructions
S Pizza & Baking
Using this function you can bake cakes on one level.
This function is also suitable for dishes that require more intensive
browning and a crispy base, e.g. pizzas , quiche Lorraine, cheesecakes,
etc.
Oven temperatures are generally 20-40 °C lower than for conventional
heat.
Conventional heat is used and the fan is also switched on.
F Grill
Grilling is particularly suited to the grilling or toasting of flat foods,
for example, steaks, cutlets, fish or toast.
The heat is provided by the grill element on the roof of the oven.
A Defrosting
The oven's defrosting function allows you to evenly start to defrost or
to defrost. It is particularly suitable for delicate foods, for example,
flans, butter ice cream, bread, fruit.
With this function, the fan is in operation without heat.
14
Operating Instructions
Before Using for the First Time
Initial Cleaning
Hob
0
Wipe the glass ceramic surface with a damp cloth and then rub dry to
remove any possible residues from manufacture.
Oven
Before using the oven for the first time, you should clean it thoroughly.
You can switch on the oven lighting to make cleaning easier.
0 1. Set the oven function switch to oven lighting L.
2. Remove all accessories and the side rails and clean with warm water
and washing-up liquid.
3. Also wash out the oven with warm water and washing-up liquid, and
dry it.
4. Wipe off the front of the unit with a damp cloth only.
1
Important: Do not use any caustic or abrasive cleaners! The surface
may be damaged.
Suitable Pans
By using the right pans you avoid damage to the appliance.
• The base should be as thick and flat as possible. Rough bases scratch
the cooking surface when slid.
• Pans made of cast iron or with rough edges and burrs can leave
permanent scratches.
1
Important: Avoid boiling pans dry! The bases could be irreparably
damaged in the process and the glass ceramic cooking surface
damaged.
15
Operating Instructions
Using the Rings
3
When the cooking zones are switched on, they may hum briefly. This is
a characteristic of all glass ceramic cooking zones and does not impair
the function or life of the appliance.
Heat Settings
• Over the ranges 1-9, you can set 14 heat settings (including intermediate settings).
• You can select intermediate settings in the ranges 2 to 7. They are
marked with a dot between the heat settings.
1 = lowest setting
9 = highest setting
K = double ring zone/casserole zone switched on
16
Operating Instructions
Cooking with the Rings
0 1. To use, press the ring switch.
The switch protrudes.
2. As soon as steam starts to form or the oil is hot,
turn back to the heat setting necessary for further cooking.
3. To stop cooking, turn back to the zero position.
2
Switch off the cooking zone approx. 5-10 minutes before the end of cooking to make use of the residual heat. By this
means you can save electricity.
Switching On the Double Ring/Casserole Cooking Zone
0 1. Turn the switch for the double ring/casserole coo-
king zone clockwise. Turn past the symbol K and
continue past a light resistance to a clearly noticeable stop.
2. Then turn back to the required setting for cooking.
3. To stop cooking, turn back to the off position.
3
The next time the double ring/casserole cooking zone is switched on,
the larger ring must be switched on again.
17
Operating Instructions
Operating the Oven
Inserting/Removing the Fat Filter
Always use the fat filter when roasting without any covering in open
roasting dishes.
0
Inserting the Fat Filter
Take hold of the fat filter by the
tab and insert the two retainers in
the opening on the rear wall of the
oven (fan opening) from the top
downwards.
0
Removing the Fat Filter
Take hold of the tab on the fat filter and remove upwards.
Inserting the Shelf and Universal Sheet
All slide-in parts have a small protrusion on the right and left. This
protrusion is an anti-tip device
and must point downwards.
0
0
18
Inserting a Shelf
Insert the shelf such that the two
guide rails point upwards. The
anti-tip device must point downwards and be in the rear of the
oven.
Inserting the Shelf and Sheet
When the shelf and universal
sheet are used together, carefully
place the shelf anti-tip device in
the protuberances on the sheet.
Operating Instructions
Switching the Oven On and Off
0 1. Set the required function by turning the „Oven Functions“ switch.
2. Set the required temperature by turning the „Temperature Selection“
switch.
The oven power indicator illuminates as long as the oven or rings are in
use.
The temperature pilot light illuminates as long as the oven is warming
up and extinguishes as soon as the temperature set is reached.
3. To switch off the oven, turn the „Oven Functions“ switch and the „Temperature Selection“ switch to the zero position.
19
Operating Instructions
Usage, Tables and Tips
Pans
The better the pan, the better the results.
• You can recognise good pans by their bases. The base should be thick
and as flat as possible.
• Pans with aluminium or copper bases can leave metal discoloration
on the glass ceramic surface that is very difficult or impossible to
remove.
• Do not use cast iron pans or pans with damaged bases that are rough or burred. Permanent
scratching may occur when the pans are slid.
• When cold, pan bases are normally bowed
slightly inwards (concave). They should under
no circumstances be bowed outwards (convex).
2
Energy Saving Tips
You will save valuable energy if you observe the
following tips:
• Always place pans on the cooking zone before switching on.
• Soiled cooking zones and pan bases increase the electricity consumption.
• If possible, always fit pans with a lid.
• Switch off the cooking zones before the end of
cooking to make use of the residual heat, e.g. to
keep food warm or for melting.
• The pan base and cooking zone should be the
same size.
When purchasing pans pay attention to the diameter of the base. Manufacturers often state the
diameter of the top of the pan.
• Cooking times are reduced by up to 50% when a
pressure cooker is used.
20
Operating Instructions
Cooking
The information given in the following tables is for guidance only. The
heat setting necessary for cooking is dependent on the quality of the
pans, and the type and quantity of the food.
Typical Heat Settings
Switch
Setting
Cooking Process/
Setting
Suitable for
9
Heating Up
Heating up large amounts of water, boiling pasta
7-8
Fast
Frying
Frying chips,
browning meat, e.g. goulash,
frying, e.g. potato pancakes
frying pieces of loin, steaks
6-7
Slow
Frying
Frying meat, schnitzels, cordon bleu
cutlets, rissoles, sausages, liver roux,
mild frying of
eggs, omelettes, frying doughnuts
4-5
Boiling
Boiling larger quantities of food,
stews and soups,
steaming potatoes,
boiling meat stock
3-4
Steaming,
Braising
Braising vegetables,
braising meat
cooking rice pudding
2-3
Simmering
Simmering rice and milk dishes
(stir occasionally),
Steaming smaller quantities of potatoes or
vegetables,
warming ready meals
1-2
Melting
Omelette, egg garnish, hollandaise sauce,
keeping dishes warm,
melting butter, chocolate, gelatine
0
3
Residual heat, off position
When heating up or frying, we recommend heat setting “9“ and then
continue cooking foods at an appropriate lower heat setting.
21
Operating Instructions
Baking
Use the pizza & baking S, fan cooking U or conventional heat O oven
function for baking.
1
Important! Do not use a fat filter when baking!
Cake Tins
• Cake tins made of dark metal and coated tins are suitable for conventional heat O.
• Light tins are also suitable for pizza & baking S and fan cooking U.
Shelf Positions
• When using pizza & baking S or conventional heat O is it only possible to bake on one level.
• You can bake on up to 3 baking sheets simultaneously using fan
cooking U:
1 Baking Sheet:
1 Cake Tin:
Shelf Position 3
Shelf Position 5
2 Baking Sheets:
Shelf Positions 2 and 5
22
3 Baking Sheets:
Shelf Positions 1, 3 and 5
Operating Instructions
General information
• Please note that the shelf positions are counted from top to bottom.
• Insert baking sheets with the bevelled edge to the front!
• Slide the baking sheet to the rear wall.
• Always place cakes in cake tins in the middle of the shelf.
You can also bake two cakes simultaneously using pizza & baking S
or conventional heat O. In this case place the tins side by side on the
shelf. The cooking time is then increased only slightly.
Notes on the Baking Tables
In the tables you will find information on temperatures, cooking times
and shelf positions for a selection of recipes.
• Ranges are given for the temperature and cooking time since these
are dependent on the mixture, quantity and cake tin used.
• When baking several cakes on baking sheets or in cake tins, the cooking time can be 10-15 minutes longer.
• Moist items (e.g. pizzas & baking, fruit cakes, etc.) should be cooked
on a maximum of two levels.
• When using for the first time, we recommend setting the lower temperature, and only if necessary, e.g. if increased browning is required
or the cooking time is too long, selecting a higher temperature.
• If you cannot find any specific information for one of your own recipes, use information on a similar recipe for guidance.
• Variations in the height of the item to be baked can lead to different
degrees of browning at the start of baking. In this case, please do
not change the temperature setting. Variations in the amount of
browning will even themselves out during baking.
2
Switch off the oven 10-15 minutes before the end of the cooking time
to make use of the residual heat.
The information in the tables applies, when not otherwise stated, for a
cold oven.
23
Operating Instructions
Baking Tables
Baking on one level
Type of Cake or Pastry
Pizza & Baking S
Conventional O
Shelf
Shelf
TemperaTemperaPosition
Position
ture
ture
from the
from the
ºC
ºC
Top
Top
Time
for both
functions
Hr.: Min.
Cakes in Cake Tins
Ring Cakes
5.
150-160
5.
160-180
0:50-1:10
Madeira Cake/
Koenigskuchen
5.
140-160
5.
150-170
1:10-1:30
Sponge Cake
4.
150-160
5.
160-180
0:25-0:40
Shortcrust Pastry Flan
Base
3.
170-180
5.
190-2101
0:10-0:25
Sponge Flan Base
3.
150-170
5.
170-190
0:20-0:25
Covered Apple Flan
5.
150-170
5.
170-190
0:50-1:00
Savoury Flan
(e.g. quiche Lorraine)
5.
180-200
5./6.
180-200
0:30-1:10
Cheesecake
5.
140-160
5.
160-180
1:00-1:30
Plaited Roll/Ring
3.
160-170
3.
170-190
0:30-0:40
Christmas Stollen
3.
.160-1701
3.
160-1801 0:40-1:00
Bread (rye bread) first
...................................then
5.
.180-2001
140-160
5.
2501
160-180
0:20
0:30-1:00
Cream Puffs/Eclairs
3.
160-1701
3.
190-210
0:15-0:30
Swiss Roll
3.
160-170
3.
Dry Streusel Cake
3.
150-160
3.
Butter Cake/Sugar Cake,
Bienenstich
3.
160-1701
3.
Fruit Flan (on yeast
pastry/sponge base)2
3.
150-170
3.
Cakes and Pastries on
Baking Sheets
24
180-2001 0:10-0:20
160-180
0:20-0:40
190-2101 0:15-0:30
170-190
0:25-0:50
Operating Instructions
Type of Cake or Pastry
Pizza & Baking S
Conventional O
Shelf
Shelf
TemperaTemperaPosition
Position
ture
ture
from the
from the
ºC
ºC
Top
Top
Time
for both
functions
Hr.: Min.
Fruit Flans on Shortcrust
Pastry Base1
3.
160-170
3.
170-190
0:40-1:20
Flat Cakes with
Delicate Toppings
(e.g. curd cheese, cream)
3.
140-160
3.
160-180
0:40-1:20
Pizza & baking
(with deep topping)
5.
180-200
5.
190-2101
0:30-1:00
Pizza & baking (thin)
5.
200-220
5.
230-3001
0:10-0:25
Unleavened Bread
3.
200-220
3.
270-3001
0:08-0:15
Wähen (CH)
3.
180-2001
5.
210-2301
0:35-0:50
Shortcrust Biscuits
3.
150-160
3.
170-1901
0:06-0:20
Small Piped Biscuits
3.
140-150
3.
160-1801
0:10-0:40
Sponge Fingers
3.
150-160
3.
170-190
0:15-0:20
Meringues
3.
80-100
3.
100-120
2:00-2:30
Macaroons
3.
100-120
3.
120-140
0:30-0:60
Small Pastries with Yeast
3.
160-170
3.
170-190
0:20-0:40
Small Pastries made from
Puff Pastry
3.
170-1801
3.
190-2101
0:20-0:30
Bread Rolls
3.
180-2001
5.
180-2201
0:20-0:35
Biscuits
1) Pre-heat the oven
2) Use the combination/fat tray or the fat tray!
The information given in bold shows you the best oven function to use in each
case.
25
Operating Instructions
Baking at several shelf positions
Fan Cooking U
Type of Cake or Pastry
Shelf Position from the Top
Time
Hr.: Min.
2 Levels
3 Levels
Temperature ºC
Cream Puffs/Eclairs
2. and 5.
-
170-180
0:35-0:60
Dry Streusel Cake
2. and 5.
-
140-160
0:30-0:60
Pizza & baking
2. and 5.
-
170-190
0:40-0:70
Shortcrust Biscuits
2. and 5.
1. 3. and 5.
150-160
0:15-0:35
Small Piped Biscuits
2. and 5.
1. 3. and 5.
140-150
0:20-0:60
Sponge Fingers
2. and 5.
1. 3. and 5.
160-170
0:25-0:40
Meringues
2. and 5.
-
80-100
2:10-2:50
Macaroons
2. and 5.
1. 3. and 5.
100-120
0:40-1:20
Small Pastries with Yeast
2. and 5.
-
160-170
0:30-0:60
Small Pastries made from
Puff Pastry
2. and 5.
-
170-1801
0:30-0:50
Bread Rolls
2. and 5.
-
180-1901
0:30-0:55
Cakes and Pastries on
Baking Sheets
Biscuits
Tips on Baking
Tip
Push a wooden skewer into the highest point of the
This is how to tell if your cake cake. When no more cake mixture sticks to the wood,
you can switch off the oven and utilise the residual
is cooked through
heat.
The cake collapses (is sticky,
Check your recipe. Next time use less liquid. Observe
not properly cooked through, mixing times, particularly when using kitchen appliwater marks)
ances.
26
The cake is too light
Next time select a dark cake tin or place the cake one
level lower.
Cake with moist topping/
cake is not cooked through,
is unevenly browned
Next time bake at a lower temperature and increase
the cooking time.
Operating Instructions
Pies and Gratins Table
Conventional O
Rothitherm I
Time
Shelf
Position
from the
top
Temperature
°C
Shelf
Position
from the
top
Temperature
°C
Hr.: Min.
Pasta Bake
4.
200-220
3.
160-170
0:45-1:00
Lasagne
3.
180-200
3.
160-170
0:25-0:40
Gratinated
Vegetables
3.
22-230
3.
160-170
0:15-0:30
Browned
Baguettes
3.
230-240
3.
160-170
0:15-0:30
Sweet
Puddings
4.
200-220
–
–
0:40-0:60
Fish Pies
3.
210-220
3.
160-170
0:30-1:00
Stuffed
Vegetables
3.
220-250
3.
160-170
0:30-1:00
Frozen Ready Meals Table
Food to be
Cooked
Shelf
Position from Oven Function
the Top
Temperature
Time
Frozen Pizza
3.
Conventional
O
In accordance
with maker’s
instructions
In accordance
with maker’s
instructions
Chips1
(300-600 g)
2.
Rothitherm I
200-220 °C
15-25 Min.
Baguettes
2./3.
Conventional
O
In accordance
with maker’s
instructions
In accordance
with maker’s
instructions
Fruit Flan
2./3.
Conventional
O
In accordance
with maker’s
instructions
In accordance
with maker’s
instructions
1) Comment: Turn chips 2-3 times during cooking.
27
Operating Instructions
Roasting
For roasting, use the rothitherm I or conventional O oven function.
1
Important: Use the fat filter when roasting!
Roasting Dishes
• Any heat-resistant dish is suitable for roasting.
• In the case of dishes with plastic handles, ensure that the handles are
heat-resistant.
• Large roasts can be roasted directly on the universal sheet or on
the shelf with the universal sheet underneath (e.g. turkey, goose,
3-4 chickens, 3-4 knuckles).
• We recommend roasting all lean types of meat in a casserole with a
lid (e.g. veal, pork or beef pot roasts, frozen meat). This way the meat
will remain juicier.
• You can roast all types of meat that should have a crispy exterior in a
casserole without a lid (e.g. pork, meat loaf, lamb, mutton, duck,
1-2 knuckles, 1-2 chickens, small poultry, sirloin, fillet, game).
• Tip: If you use dishes for roasting (particularly for small amounts), the
oven will not get so dirty!
Shelf Positions
• Please see the following table for the shelf positions to use.
Notes on the Roasting Tables
Information is given in the table on suitable oven functions, temperature settings, cooking times and shelf positions for various types of
meat. The cooking times are only for guidance.
• We recommend roasting meat and fish in the oven from a weight of
1 kg.
• In general the conventional O function is suitable for very lean meat,
fish and game. For all other types of meat (particularly poultry) we
recommend the rothitherm I function.
• The cooking time required is dependent on the type and quality of the meat.
• To stop juices that exude from the meat burning onto dishes, we
recommend adding a little liquid in the roasting dish.
• Turn the roast after approx. 2/3 of the cooking time.
2
28
Switch off the oven 10-15 minutes before the end of the cooking time
to make use of the residual heat.
Operating Instructions
Roasting Table
Type of Meat
Quantity
Weight
Conventional O
Rothitherm I
Time
Shelf
Shelf
TemperaTemperaPosition
Position
ture
ture
Hr.:Min.
from the
from the
ºC
ºC
Top
Top
Beef
Pot Roast
1-1.5 kg
4.
200-250
–
–
2:00-2:30
per cm
height
Sirloin or Fillet
- red inside
per cm
height
4.
250-270 1
4.
190-200 0:05-0:06
- pink inside
per cm
height
4.
250-2701
4.
180-190 0:06-0:08
- cooked
through
per cm
height
4.
210-2501
4.
170-180 0:08-0:10
Schoulder, Neck
Joint of Ham
1-1.5 kg
4.
210-220
4.
160-180 1:30-2:00
Chop, Kassler
1-1.5 kg
4.
180-190
4.
170-180 1:00-1:30
Meat Loaf
750 g-1 kg
4.
170-180
4.
160-170 0:45-1:00
Knuckle of Pork
(pre-cooked)
750 g-1 kg
4.
210-220
4.
150-170 1:30-2:00
1 kg
4.
210-220
4.
150-170 1:30-2:00
1,5-2 kg
4.
210-225
4.
150-170 2:00-2:30
Leg of Lamb,
Roast Lamb
1-1.5 kg
4.
210-220
4.
150-170 1:15-2:00
Saddle of Lamb
1-1.5 kg
4.
210-220
4.
160-180 1:00-1:30
Pork
Veal
Roast Veal
Knuckle of Veal
Lamb
29
Operating Instructions
Type of Meat
Quantity
Weight
Conventional O
Rothitherm I
Time
Shelf
Shelf
TemperaTemperaPosition
Position
Hr.:Min.
ture
ture
from the
from the
ºC
ºC
Top
Top
Game
Saddle of Hare,
Leg of Hare
up to
1 kg
3.
220-2501
3.
160-170 0:25-0:40
Saddle of Venison
1,5-2 kg
4.
210-220
4.
160-170 1:00-1:30
Leg of Venison
1,5-2 kg
4.
200-210
4.
150-160 1:15-1:50
Poultry Pieces
4-6 pieces
per
200-250g
3.
220-250
3.
180-200 0:35-0:50
Chicken Halves
2-4 pieces
per
400-500 g
3.
220-250
3.
180-200 0:35-0:50
Chicken,
Poulard
1-1.5 kg
4.
220-250
4.
170-180 0:45-1:15
Duck
1,5-2 kg
4.
210-220
4.
160-180 1:00-1:30
Goose
3.5-5 kg
5.
200-210
5.
150-160 2:30-3:00
Turkey
2.5-3.5 kg
4-6 kg
5.
5.
200-210
180-200
5.
5.
150-160 1:30-2:00
140-150 2:30-4:00
1-1.5 kg
4.
210-220
4.
160-170 0:45-1:15
Poultry
Fish (steaming)
Whole Fish
1) Pre-heat oven.
The information given in bold shows you the best oven function for the respective dish.
30
Operating Instructions
Grilling
Use the grill F oven function with a temperature of 275 °C for grilling.
1
Important: Always pre-heat the empty oven for 5 minutes using the
grill function!
It is not necessary to use the fat filter.
Ovenware for Grilling
• Use the shelf and universal tray together for grilling.
Shelf Positions
• For grilling flatter foods, always use the 2nd shelf position from the
top.
Notes on the Grilling Table
The grilling times are only for guidance and are dependent on the type
and quality of the meat or fish.
• Grilling is particularly suitable for flat pieces of meat and fish.
• Turn pieces of meat or fish halfway through grilling.
1
Warning: Always grill with the oven door shut.
There is a risk of burns!
Grilling Table
Food for Grilling
Shelf Position
from the Top
Grilling Time
1st Side
2nd Side
Rissoles
2.
8-10 Min.
6-8 Min.
Fillet of Pork
2.
10-12 Min.
6-10 Min.
Grilled Sausages
2.
8-10 Min.
6-8 Min.
Beef Fillet Steaks,
Veal Steaks
2.
6-7 Min.
5-6 Min.
Fillet of Beef, Sirloin
(approx. 1 kg)
2.
10-12 Min.
10-12 Min.
Bread for Toasting
2.
2-3 Min.
2-3 Min.
Toast with Topping
2.
6-8 Min.
–
31
Operating Instructions
Defrosting
Use the defrost oven function A for defrosting.
Defrosting Dishes
• Put the food on a plate and put the plate on the tray.
• Use only parchment paper or film to cover the food. Do not use
plates or dishes as they significantly increase the defrosting time.
Shelf Positions
• For defrosting, insert the tray in the 4th level from the top.
Notes on the Defrosting Table
The table below gives you a few reference points on the defrosting
times.
Defrosting Table
Dish
Post
defrosting
time Min.
Comment
Chicken, 1000 g
100-140
20-30
Place the chicken on an upside-down
saucer on a large plate. Defrost open
and turn after half the time, or defrost covered with film.
Meat, 1000 g
100-140
20-30
Defrost open and turn after half the
time or cover with film.
Meat, 500 g
90-120
20-30
Defrost open and turn after half the
time or cover with film.
Trout, 150 g
25-35
10-15
Defrost open.
Strawberries,
300 g
30-40
10-20
Defrost open.
Butter, 250 g
30-40
10-15
Defrost open.
Cream, 2 x 200 g
80-100
10-15
Defrost open
(Cream can also be whipped well if
parts of it are still slightly frozen).
60
60
Flan, 1400 g
32
Defrosting time
Min.
Defrost open.
Operating Instructions
Preserving
Use the fan cooking oven function U for preserving.
Preserving Jars
• Only use commercially available preserving jars (preserving jars with a
rubber ring and glass lid) for preserving.
• Jars with screw or bayonet tops are unsuitable, as are metal tins.
Shelf Positions
• For preserving use the 4th shelf position from the top.
Notes on Preserving
• Use the universal sheet for preserving. There is room for up to 6 preserving jars of 1-litre content on this sheet.
• Pour a cup of water onto the universal sheet to ensure that there is
sufficient humidity.
• Position the preserving jars on the universal sheet such that they do
not touch each other.
• The preserving jars should all be filled the same amount and closed.
Preserving Times
Fruit and Pickled Gherkins
0 1. Select the fan cooking oven function U and set the temperature to
160 °C.
2. As soon as bubbles begin to form in the liquid in some of the jars (in
the case of 1-litre jars after approx. 45 minutes), switch off the oven.
3. Leave the jars to stand in the closed oven for a further 30 minutes, in
the case of delicate fruits, e.g. strawberries approx. 15 minutes.
Vegetables and Meat
0 1. Select the fan cooking oven function U and set the temperature to
160 °C.
1. As soon as bubbles begin to form in the first jars, lower the temperature
to 100 °C.
2. Continue to cook at 100 °C for approx. 60-90 minutes.
3. Then switch off the oven and leave the preserving jars to stand in the
closed oven for a further 30 minutes.
33
Operating Instructions
Cleaning and Care
Hob
1
Important: Cleaners must not come into contact with the hot glass
ceramic cooking surface! All cleaners must be removed with plenty of
clean water after cleaning because they can have a caustic effect when
the rings are next heated!
Do not use any aggressive cleaners such as, e.g. grill or oven sprays,
coarse scourers or abrasive pan cleaners.
3
Clean the glass ceramic cooking surface after each use, when it is still
hand-hot or is cold. By this means you will avoid soiling becoming
burnt on.
Remove scale and water marks, fat spots and metallic shimmering discoloration with a commercially available glass ceramic or stainless steel
cleaner, e.g. with „Sidol-Edelstahlglanz“, „Stahl-Fix“, „WK-Top“ or „Cillit“.
Light Soiling
0 1. Wipe the glass ceramic surface with a damp cloth and a little washing
up liquid.
2. Then rub dry with a clean cloth. Remnants of cleaner must not be left
on the surface.
3. Thoroughly clean the entire glass ceramic cooking surface once a week
with a commercially available glass ceramic or stainless steel cleaner.
4. Then wipe the glass ceramic surface with plenty of clean water and rub
dry with a clean fluff-free cloth.
Stubborn Soiling
0 1. To remove food that has boiled over or
stubborn splashes, use a glass scraper.
2. Hold the glass scraper at an angle to the
glass ceramic surface.
3. Remove soiling by sliding the blade.
3
34
You can obtain glass scrapers and glass
ceramic cleaner from specialist retailers.
Operating Instructions
1 Problem Dirt
0 1. Remove burnt on sugar, melted plastic,
aluminium foil or other materials that
can melt immediately, whilst still hot,
using a glass scraper.
Important: When using the glass scraper
on the hot cooking zone, there is a risk of
burns!
2. Then clean the cooking surface normally
when it has cooled down.
1
3
If the cooking zone on which something
has melted has already cooled down, warm it up again for cleaning.
Scratches or dark marks on the glass ceramic cooking surface caused,
e.g. by pan bases with sharp edges, cannot be removed. However, they
do not impair the function of the cooking surface.
Cooking Surface Frame
Important! Do not put vinegar, lemons or scale removers on the hob
frame, otherwise mat spots will appear.
0 1. Wipe the frame with a damp cloth and a little washing up liquid.
2. Soften dried dirt with a wet cloth. Then wipe off and rub dry.
1
35
Operating Instructions
Exterior of the Appliance
0
Wipe the front of the appliance with a damp cloth and warm water
with washing up liquid.
Do not use scourers, caustic cleaners or abrasive items.
Oven Interior
Oven Lighting
You can switch on the oven light to make cleaning easier.
Cleaning
0 1. Wipe the oven clean after each use with water and washing up liquid
with a little vinegar added.
2. Then rub the oven dry with a cloth.
3. Remove stubborn marks with special oven cleaner.
1
Warning: Do not clean the appliance with a steam or high pressure
cleaner for safety reasons.
Important: When using oven spray, please ensure that you follow the
manufacturer’s instructions.
Accessories
0
36
After each use rinse all slide-in parts (shelf, etc.) and dry well. Soak
briefly to make them easier to clean.
Operating Instructions
Side Rails
The side rails on the left and right hand sides of the oven can removed
for cleaning the side walls.
Removing and Fitting the Side Rails.
0 1. Undo the bolt (if necessary use a coin).
2. Pull the base of the side rail forwards and unhook at the top.
3. To refit, insert the side rail at the top and place against the side of the
oven.
4. Re-fit the bolt.
37
Operating Instructions
Oven Light
1
Warning: There is a risk of electric shock! Before changing the light
bulb in the oven:
– Switch off the oven!
– Isolate the oven from the power supply.
Replacing the Light Bulb in the Oven/Cleaning the Glass
0 1. Place a cloth on the floor of the
oven.
2. Remove the glass cover by turning
it anti-clockwise and then clean it.
3. Oven lighting replace with
40 Watt, 230 V, 300 °C
heat resistant light bulb.
4. Refit the glass cover.
5. Remove the cloth from the oven.
38
Operating Instructions
Grill Element
To make the cleaning of the oven roof easier, the grill element can be
folded down.
1
0
1
Warning: Only fold down the grill when the oven is switched off and is
cold.
Folding Down the Grill Element
Turn the two retaining hooks 90° (a quarter of a turn) towards the middle.
The heater element swings downwards.
Important: Do not use excessive force to lower the heater element. The
heater element can break off if excessive force is used.
2 x 90˚
0
1
Fitting the Grill Element
Press the heater element gently upwards and turn the retaining hooks
90° towards the rear so that the heater element bracket is between the
retaining hooks.
Important: Never slide the retaining hooks onto the heater element.
There is a risk of fire.
39
Operating Instructions
Oven Door
The oven door on your appliance can be removed for cleaning.
Removing the Oven Door
0 1. Open the oven door completely.
2. Lift up fully the coloured clamping lever on both door hinges (1).
3. Close the oven door around 3/4 of the way, overcoming the resistance
(2).
4. Take hold of the side of the oven door with both hands. Lift the door
upwards (Caution: heavy!) and remove from the oven (3).
5. Place the door, with the outer surface downwards, on a soft, flat
surface, for example a blanket, to avoid scratches.
Hanging the Oven Door
0 1. Take hold of the sides of the door with both hands from the handle
side.
2. Hold the door at an angle of approx. 60°.
3. Slide the door hinges as far as possible into the two cut-outs on the
right and left on the bottom of the oven (1).
4. Lift the door up until resistance is met and then open fully (2).
5. Turn the clamping levers on both door hinges back into their original
position (3), so that the coloured marks again point upwards.
6. Close the oven door.
40
Operating Instructions
Oven Door Glass
The oven door is fitted with two panes of glass, these are fitted one
behind the other. The inner pane can be removed for cleaning.
1
Warning: Please only perform the following steps on the oven door
when it has been removed from the oven! When the door is fitted, the
reduction in the weight of the door when the glass is removed could
lead to the door suddenly closing and creating a hazard.
Removing the Door Inner Glass
0 1. Remove the oven door and place
on a soft, level surface with the
handle downwards.
2. Take hold of the pane of glass at
the upper edge and slide it against
the spring pressure in the direction
of the oven door handle until it is
free at the base (1).
3. Lift the pane gently at the base
and remove (2).
Replacing the Inner Door Glass
0 1. Guide the pane of glass at an angle
from above into the door section
on the handle side (1).
2. Lower the pane of glass (2). Place
the pane, against the force of the
spring on handle side, in front of
the retaining section on the lower
edge of the door and slide it
under the retaining section.
The pane of glass must sit securely!
3. Refit the oven door.
41
Operating Instructions
Utensils Drawer
The utensils drawer underneath the oven can be removed to make
cleaning easier.
Removing / Replacing the Utensils Drawer
0 1. Pull the utensils drawer out of the cooker as far as possible.
2. Lift the utensils drawer slightly so that it can be lifted upwards at an
angle out of the drawer guide.
3. When replacing, ensure that the middle guide on the utensils drawer
engages in the middle guide rail.
4. Lower the utensils drawer until it is horizontal and push home.
42
Operating Instructions
What to do if ...
0
0
.... the oven does not heat up?
Check whether
– the appliance is switched on,
– all the necessary settings have been made,
– the mains fuse (fuse box) has blown.
If the fuse blows several times, please call an approved electrician.
.... the oven lighting ceases to function?
Replace the light bulb in the oven (see Cleaning and Care).
If you call in an engineer to resolve a problem listed in these notes, or
to rectify an error in the operation of the appliance, the customer service engineer’s visit will not be free of charge, even during the
warranty period.
If this information does not provide you with the necessary
assistance, please seek specialist advice.
1
Warning: Repairs to the appliance must be carried out by qualified
service engineers! Improper repairs can give rise to significant hazards
for the user. If your appliance needs repairing, please contact local AEG
Service Force Centre.
43
Operating Instructions
Special Accessories
The following special accessories for your appliance are available from
your specialist dealer:
44
Roasting/Fat Tray
E No. 611 898 624
Universal Sheet
E No. 611 898 626
Baking Sheet
E No. 611 898 620
Combination Shelf
(not suitable for oven shelf runner)
E No. 944 189 010
Oven Shelf Runner BAZ2 with
Combination Shelf
E No. 944 189 014
Oven Shelf Runner BAZ3 with
Combination Shelf
E No. 944 189 015
Operating Instructions
Pizza Stoneware:
H1.2 x W34.5 x D34.5cm
E No. 944 189 008
Glass Ceramic Fat Tray:
H6.5 x B32.0 x D27.0cm
E No. 611 899 660
45
Installing and Connecting
INSTALLING AND CONNECTING
1
Important: Assembly and connection of the new appliance may only
be performed by an approved installer.
Please observe this instruction, otherwise the warranty will not cover
any damage that may occur.
Installation
Important Information
• The veneer or plastic coverings on kitchen furniture around the
appliance must be bonded with heat resistant adhesive (100 °C). If
plastic coverings or the adhesive are not sufficiently temperature
resistant, then the covering may distort or come loose.
• In respect of fire protection, this appliance corresponds to type Y
(EN 60335-2-6). Only this type of appliance may built into positions
with a high cupboard or wall on one side.
• The separation between the hob and the extractor hood must be at
least as large as that given in the extractor hood installation instructions.
Appliance Alignment
Underneath the appliance there
are 4 adjustable feet with the aid
of which you can compensate for
small amounts of unevenness in
the floor.
0 1. Remove the utensils drawer
2. Turn the adjustable feet to raise
or lower them until the cooker is
level.
3. Replace the utensils drawer.
3
46
The adjustable feet are easier to
turn if the cooker is tilted slightly
to take the load off the feet.
_
_
+
+
Installing and Connecting
Technical Data
Oven Exterior Dimensions
Height x Breadth x Depth
Depth with the door open
85 cm x 60 cm x 60 cm
105 cm
Oven Interior Dimensions
Height x Breadth x Depth
31 cm x 39.6 x 41.5 cm
Power Consumption of the Cooking Zones
Single ring cooking zone ø 145 mm
Double ring cooking zone ø 120/210 mm
Casserole cooking zone ø 170/265 mm
1200 W
2200 W
2300 W
Regulations, Standards, Directives
This appliance meets the following standards:
• EN 60 335-1 and EN 60 335-2-6
in respect of the safety of electrical appliances for household use and
similar purposes and
• DIN 44546 / 44547 / 44548
in respect of the operating features of electric cookers for household
use.
• EN 55014-2 / VDE 0875 part 14-2
• EN 55014 / VDE 0875 part 14/12.93
• EN 61000-3-2 / VDE 0838 part 2
• EN 61000-3-3 / VDE 0838 part 3
in respect of the basic protection requirements for electromagnetic
compatibility (EMC).
4
This appliance complies with the following EU directives:
• 73/23/EWG dated 19.02.1973 (Low Voltage Directive)
• 89/336/EWG dated 03.05.1989 (EMC Directive including
Directive Amendment 92/31/EWG).
47
Installing and Connecting
1 Safety Instructions for the Installer
• A device is to be included in the electrical installation that makes it
possible to isolate the appliance from the mains supply with a minimum contact separation of 3 mm. Suitable isolation devices are e.g.
cut-outs, fuses (remove screw type fuses from the holder), earth leakage trips and circuit breakers.
• Make the electrical connection
to the appliance in accordance
with the wiring diagram on the
outside of the connector cover.
1
48
Important: Do not feed cable
through the holes!
Installing and Connecting
49
Installing and Connecting
50
Service
SERVICE
In the “What to do, if …” section a number of malfunctions are listed
that you can rectify yourself. In the event of a malfunction, look there
first.
Is it a technical malfunction?
Then please contact your customer service centre. (You will find
addresses and telephone numbers in the "Customer Service Centres"
list.)
Always take the time to prepare yourself for the call. By this means you
will make diagnosis of the problem easier and also make it easier to
decide if a customer service visit is necessary:
Please determine as accurately as
possible:
• How is the malfunction noticeable ?
• Under what circumstances does
the malfunction occur?
Prior to the telephone call it is
imperative that you make a note of
the following appliance code numbers that are given on the rating
plate:
• PNC Code (9 digits),
• S-No Code (8 digits).
We recommend you to record the code numbers here so that you
always have them at hand:
PNC
S-No
. . .
. . .
. . .
. . . . . . . .
When will you be charged, also during the warranty period?
• when you could have rectified the malfunction with aid of the Table
of Malfunctions (see “What to do, if ...” section),
• if the customer service engineer has to make several calls because he
was not given important information prior to his visit, and therefore,
e.g., had to fetch replacement parts. You can avoid multiple calls if
you prepare yourself well for the telephone call, as described above.
51
From the Electrolux Group. The world´s No.1 choice.
The Electrolux Group is the world´s largest producer of powered appliances for kitchen, cleaning and outdoor
use. More than 55 million Electrolux Group products (such as refrigerators, cookers, washing machines,
vacuum cleaners, chain saws and lawn mowers) are sold each year to a value of approx. USD 14 billion in more
than 150 countries around the world.
AEG Hausgeräte GmbH
Postfach 1036
D-90327 Nürnberg
http://www.aeg.hausgeraete.de
© Copyright by AEG
822 947 318 -05- 0403
Subject to change without notice