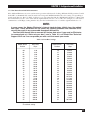
1
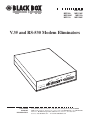
ME110A
ME110AE
ME111A
MAY 1998
ME111AE
ME112A
ME112AE
V.35 and RS-530 Modem Eliminators
ITOR
MON
5
r V.3
inato
lim
em E
Mod
S
S CT
D RT
SD R
CUSTOMER
SUPPORT
INFORMATION
LB
Y
DELA
D
BAU
DCD
Order toll-free in the U.S. 24 hours, 7 A.M. Monday to midnight Friday: 877-877-BBOX
FREE technical support, 24 hours a day, 7 days a week: Call 724-746-5500 or fax 724-746-0746
Mail order: Black Box Corporation, 1000 Park Drive, Lawrence, PA 15055-1018
Web site: www.blackbox.com • E-mail: [email protected]
FCC/IC RFI STATEMENTS
FEDERAL COMMUNICATIONS COMMISSION
AND
INDUSTRY CANADA
RADIO FREQUENCY INTERFERENCE STATEMENTS
This equipment generates, uses, and can radiate radio frequency energy and if not installed and used properly,
that is, in strict accordance with the manufacturer’s instructions, may cause interference to radio communication.
It has been tested and found to comply with the limits for a Class A computing device in accordance with the
specifications in Subpart J of Part 15 of FCC rules, which are designed to provide reasonable protection against
such interference when the equipment is operated in a commercial environment. Operation of this equipment
in a residential area is likely to cause interference, in which case the user at his own expense will be required to
take whatever measures may be necessary to correct the interference.
Changes or modifications not expressly approved by the party responsible for compliance could void the user’s
authority to operate the equipment.
This digital apparatus does not exceed the Class A limits for radio noise emission from digital apparatus set out in the Radio
Interference Regulation of Industry Canada.
Le présent appareil numérique n’émet pas de bruits radioélectriques dépassant les limites applicables aux appareils numériques
de la classe A prescrites dans le Règlement sur le brouillage radioélectrique publié par Industrie Canada.
3
V.35 AND RS-530 MODEM ELIMINATORS
INSTRUCCIONES DE SEGURIDAD (Normas Oficiales Mexicanas Electrical Safety Statement)
1. Todas las instrucciones de seguridad y operación deberán ser leídas antes de que el aparato eléctrico sea operado.
2. Las instrucciones de seguridad y operación deberán ser guardadas para referencia futura.
3. Todas las advertencias en el aparato eléctrico y en sus instrucciones de operación deben ser respetadas.
4. Todas las instrucciones de operación y uso deben ser seguidas.
5. El aparato eléctrico no deberá ser usado cerca del agua—por ejemplo, cerca de la tina de baño, lavabo, sótano mojado o
cerca de una alberca, etc..
6. El aparato eléctrico debe ser usado únicamente con carritos o pedestales que sean recomendados por el fabricante.
7. El parato eléctrico debe ser montado a la pared o al techo sólo como sea recomendado por el fabricante.
8. Servicio—El usuario no debe intentar dar servicio al equipo eléctrico más allá a lo descrito en las instrucciones de
operación. Todo otro servicio deberá ser referido a personal de servicio calificado.
9. El aparato eléctrico debe ser situado de tal manera que su posición no interfiera su uso. La colocación del aparato
eléctrico sobre una cama, sofá, alfombra o superficie similar puede bloquea la ventilación, no se debe colocar en libreros
o gabinetes que impidan el flujo de aire por los orificios de ventilación.
10. El equipo eléctrico deber ser situado fuera del alcance de fuentes de calor como radiadores, registros de calor, estufas u
otros aparatos (incluyendo amplificadores) que producen calor.
11. El aparato eléctrico deberá ser connectado a una fuente de poder sólo del tipo descrito en el instructivo de operación, o
como se indique en el aparato.
12. Precaución debe ser tomada de tal manera que la tierra fisica y la polarización del equipo no sea eliminada.
13. Los cables de la fuente de poder deben ser guiados de tal manera que no sean pisados ni pellizcados por objetos
colocados sobre o contra ellos, poniendo particular atención a los contactos y receptáculos donde salen del aparato.
14. El equipo eléctrico debe ser limpiado únicamente de acuerdo a las recomendaciones del fabricante.
15. En caso de existir, una antena externa deberá ser localizada lejos de las lineas de energia.
16. El cable de corriente deberá ser desconectado del cuando el equipo no sea usado por un largo periodo de tiempo.
17. Cuidado debe ser tomado de tal manera que objectos liquidos no sean derramados sobre la cubierta u orificios de
ventilación.
18. Servicio por personal calificado deberá ser provisto cuando:
A: El cable de poder o el contacto ha sido dañado; u
B: Objectos han caído o líquido ha sido derramado dentro del aparato; o
C: El aparato ha sido expuesto a la lluvia; o
D: El aparato parece no operar normalmente o muestra un cambio en su desempeño; o
E: El aparato ha sido tirado o su cubierta ha sido dañada.
4
TABLE OF CONTENTS
Contents
Chapter
Page
1. Specifications .................................................................................................................................................. 6
2. Introduction .................................................................................................................................................... 8
3. Configuration and Installation ...................................................................................................................... 9
3.1 Switch Setting ........................................................................................................................................... 9
3.1.1 DIP Switch SW5 ............................................................................................................................... 9
3.1.2 The Front-Panel DELAY Thumbwheel ........................................................................................ 10
3.1.3 The Front-Panel BAUD Thumbwheels ........................................................................................ 11
3.2. Cabling ................................................................................................................................................... 12
4. Operation ...................................................................................................................................................... 13
4.1 The LEDs ................................................................................................................................................ 13
4.2 The Monitor Port ................................................................................................................................... 13
4.3 The Loopback Switch ............................................................................................................................ 14
5. Troubleshooting ........................................................................................................................................... 15
5.1 Contacting Black Box ............................................................................................................................. 15
5.2 Shipping and Packaging ......................................................................................................................... 15
Appendix: Connector Pinouts ............................................................................................................................ 16
5
V.35 AND RS-530 MODEM ELIMINATORS
1. Specifications
Compliance —
FCC Part 15 Class A, DOC Class/MDC classe A
Interface —
ME110A: ITU-TSS V.35 (data ports standard, monitor port proprietarily
pinned out on DB25);
ME111A: ITU-TSS V.35, all ports proprietarily pinned out on DB25;
ME112A: TIA RS-530
Protocol —
Synchronous or asynchronous
Clock Source —
Internal or external from either DTE (user-selectable)
Data Format —
Synchronous: 8 data bits;
Asynchronous: Transparent to data format
Flow Control —
Transparent to software flow control; does not support hardware flow
control, but emulates RTS/CTS delay
Operation —
Point-to-point
Data Rate —
Any of 52 user-selectable data rates from 2.4 Kbps to 6.144 Mbps (see
Section 3.1.3)
Maximum Distance —
From data or monitor port to attached device: 4000 ft. (1219.2 m) with
24-AWG cable at data rates up to 100 Kbps; above 100 Kbps, drops
proportionally as data rate rises, down to 65 ft. (19.8 m) at 6.144 Mbps
User Controls —
(4) Front-mounted:
(2) “BAUD” thumbwheel switches for data rate;
(1) “DELAY” thumbwheel switch for RTS/CTS delay;
(1) Recessed “LB” slide switch to start/stop bidirectional loopback;
(2) Internal:
(1) 8-position DIP switch for sync/async, clock source, RTS/CTS and
RTS/DCD operation, and reclocking enable/disable;
(1) Reclock-mode jumper
Indicators —
(5) Front-mounted LEDs that show the state of SD/TD, RD, CTS, RTS, and
DCD on data port J1
Connectors —
Data ports:
ME110A: (2) M/34 (“34-pin M-block”) female;
ME111A, ME112A: (2) DB25 female;
Monitor port (all units): (1) DB25 female
Leads Supported —
See Appendix
6
CHAPTER 1: Specifications
MTBF —
263,000 hours
Temperature Tolerance —
Operating: 32 to 104˚F (0 to 40˚C);
Storage: –4 to 158˚F (–20 to 70˚C)
Humidity Tolerance —
Up to 95% noncondensing
Enclosure —
Steel
Power —
ME110A, ME111A, ME112A: Input: 115 VAC at 50 to 60 Hz, directly from AC
outlet through detachable
6-ft. (1.8-m) power cord, IEC 320 inlet, and internal power supply;
Consumption: 5 watts
ME110AE, ME111AE, ME112AE: Internal, 230 VAC ±5%, 47–60 Hz, 0.025 A
Size —
1.5"H x 6.9"W x 8.6"D (3.8 x 17.5 x 21.8 cm)
Weight —
5 lb. (2.3 kg)
7
V.35 AND RS-530 MODEM ELIMINATORS
2. Introduction
You can use your V.35 or RS-530 Modem Eliminator to connect one DTE (host, PC, or terminal) directly to another
without needing to use modems or line drivers, as shown in Figure 2-1 below. You’ll just run cables from each of the
DTEs and attach them to the Modem Eliminators’ data ports.
Figure 2-1. Typical application.
The units have a full-featured front panel, shown in Figure 2-2 below. The DB25 “MONITOR” port is for
connection to a data-line monitor. The “BAUD” and “DELAY” controls are thumbwheel switches for selecting clock
speed and RTS/CTS delay. The “LB” control is a slide switch, recessed to prevent accidental movement, that you
can use to start and stop bidirectional loopback signaling. The indicators are LEDs that reflect the states of five
signals or signal pairs: “SD” (Send Data A & B, called Transmit Data [TD] A & B in RS-530), “RD” (Receive Data A
& B), “RTS” (Request to Send—both A & B in RS-530), “CTS” (Clear to Send—both A & B in RS-530), and “DCD”
(Data Carrier Detect, also called Received Line Signal Detector—both A & B in RS-530).
LB
MONITOR
0
DELAY
0
SD RD RTS CTS DCD
0
BAUD
Figure 2-2. The front panel.
The standard Modem Eliminators are 110-VAC standalone (desktop) models. 220-VAC and rackmount models are
available as special quotes. An X.21 version of the Modem Eliminator is also available as a special quote, as are
adapter cables that patch the RS-530 (ME112A) model’s DB25 data ports to DB37 connectors for fully compatible
RS-449 communication.
8
CHAPTER 3: Configuration and Installation
3. Configuration and Installation
3.1 Switch Setting
Place the V.35 or RS-530 Modem Eliminator between the DTE devices you want to connect, in a cool, dry place
close to an AC outlet. Once you’ve done so, scan Section 3.1.1 below and on the next page for the default settings
of the unit’s DIP-switch positions. If you need to change any of these settings, first make absolutely sure that the
unit is disconnected from AC power, then open the unit: Unscrew the four side-mounted Phillips screws (two on
each side) that secure the unit’s top cover, then remove the cover. Then set the internal 8-position DIP switch
labeled “SW5” to the required settings for your application.
3.1.1 DIP SWITCH SW5
The first configuration variable you should set with DIP switch SW5 is the clocking. This is determined by the
settings of positions 7 and 8:
• Positions 7 and 8 both OFF (default setting): The Modem Eliminator uses its own internal clock (data rate
determined by front-panel BAUD thumbwheel) and expresses this signal on both its Transmit Clock and
Receive Clock leads (V.35 SCT and SCR, RS-530 TSETC and RSETC; see Table 3-1 below). The DTEs must
be configured to accept the clock signal from one of these leads.
• Position 7 ON, position 8 OFF: The Modem Eliminator gets external clock from the DTE on port J1;
specifically, from the External Clock lead (V.35 SCTE, RS.530 TSETT; see Table 3-1 below). It expresses this
signal on its Receive Clock lead on ports J1 and J2. The DTE on J1 must be configured to use internal clock,
the DTE on J2 to accept receive clock.
• Position 7 OFF, position 8 ON: The Modem Eliminator gets external clock from the DTE on port J2;
specifically, from the External Clock lead (V.35 SCTE, RS.530 TSETT; see Table 3-1 below). It expresses this
signal on its Receive Clock lead on port J1 and J2. The DTE on J1 must be configured to accept receive clock,
the DTE on J2 to use internal clock.
• Positions 7 and 8 both ON: The Modem Eliminator operates asynchronously, as must both DTEs (data rate
determined by DTEs).
Table 3-1. Clocking-Pin Assignments
Model
Interface
Connector
Transmit Clock
Receive Clock
External Clock
ME110A
V.35
M/34
SCT A, Pin Y
SCT B, Pin AA
SCR A, Pin V
SCR B, Pin X
SCTE A, Pin U
SCTE B, Pin W
ME111A
V.35
DB25
SCT A, Pin 15
SCT B, Pin 14
SCR A, Pin 17
SCR B, Pin 12
SCTE A, Pin 24
SCTE B, Pin 23
ME112A
RS-530
DB25
TSETC A, Pin 15
TSETC B, Pin 12
RSETC A, Pin 17
RSETC B, Pin 9
TSETT A, Pin 24
TSETT B, Pin 11
9
V.35 AND RS-530 MODEM ELIMINATORS
Once you’ve finished setting positions 7 and 8, set the other positions of switch SW5 as necessary. Positions 1 and 2
determine how the Modem Eliminator handles the CTS signal:
• Position 1 ON: On data port J1, CTS is permanently ON (held high).
• Position 1 OFF (default setting): On data port J1, CTS follows RTS after a delay (user-selectable through
the front-panel DELAY switch; see the next section) elapses.
• Position 2 ON: On data port J2, CTS is permanently ON (held high).
• Position 2 OFF (default setting): On data port J2, CTS follows RTS after a delay (user-selectable through
the front-panel DELAY switch; see the next section) elapses.
Positions 3 and 4 determine how the Modem Eliminator handles the DCD (RLSD) signal:
• Position 3 ON: On data port J1, DCD is permanently ON (held high).
• Position 3 OFF (default setting): On data port J1, DCD follows RTS with no delay (default setting).
• Position 4 ON: On data port J2, DCD is permanently ON (held high).
• Position 4 OFF (default setting): On data port J2, DCD follows RTS with no delay (default setting).
NOTE
No matter what, the Modem Eliminator always keeps the DSR signal permanently ON (held
high) on both data ports.
Use position 5 to set the unit for reclocking if necessary:
• Position 5 ON (default setting): Data reclocking disabled (normal operation).
• Position 5 OFF: Data reclocking enabled. Only select this if your equipment inverts the clock polarity. If you
select this, you also need to invert the Modem Eliminator’s data-reclocking circuitry; do so by moving the
internal Reclock Mode jumper (located behind one of the other internal DIP switches, SW3) from posts 1
and 2 (normal, default) to posts 2 and 3 (inverted).
Position 6 is reserved.
Once you’ve entirely finished setting this switch, close the unit back up, screw the cover back on, and set the
unit’s external controls.
3.1.2 THE FRONT-PANEL DELAY THUMBWHEEL
If you’ve enabled RTS-to-CTS delay on either of the data ports by setting position 1 or 2 of SW5 to OFF, turn the
DELAY thumbwheel on the Modem Eliminator’s front panel to the single digit corresponding to your desired delay
time. The delay value can be set in 10-ms increments, from “0” (x 10 ms = 0 ms, no delay—the default setting)
through “9” (x 10 ms = 90-ms delay). For example, if you need at least a 55-ms delay, turn the wheel to “6” (for 60
ms). If RTS-to-CTS delay is turned ON for both data ports, they must both use the same delay value.
NOTE
This delay affects OFF-to-ON transitions of CTS only; ON-to-OFF transitions of CTS are
never delayed (the Modem Eliminator always drops CTS immediately when it detects that
the DTE has dropped RTS).
10
CHAPTER 3: Configuration and Installation
3.1.3 THE FRONT-PANEL BAUD THUMBWHEELS
If the Modem Eliminator is set for synchronous operation with internal clocking (DIP switch SW5 positions 7 and 8
both OFF—see Section 3.1.1), turn the unit’s two front-panel BAUD thumbwheels to the setting corresponding to
your desired data rate. Refer to Table 3-2 below; to get any setting listed in the “BAUD-Switch Position” column, turn
the left-hand wheel to the “tens” value and the right-hand wheel to the “ones” value. For example, to set the unit to
communicate at 512 Kbps (setting number 28), turn the left-hand wheel to “2” and the right-hand wheel to “8”.
NOTES
In some cases, the Modem Eliminator’s internal clock deviates slightly from the optimal
data rates. These deviations will not cause any clocking problems with common DTEs,
nor will they result in any measurable throughput differences.
Positions #52 through 99 are reserved for custom data rates. If you need an Eliminator
to communicate at a data rate you don’t see in Table 3-2, call Black Box Technical
Support. We’ll see if we can provide you with a unit that meets your needs.
Table 3-2. Data-Rate Settings
BAUD-Switch
Position
00*
01
02
03
04
05
06
07
08
09
10
11
12
13
14
15
16
17
18
19
20
21
22
23
24
25
Data Rate,
Kbps
2.40
3.59
4.80
7.19
9.60
14.37
16.80
19.20
28.00
28.75
38.40
48.00
56.00
64.00
71.86
112.00
128.00
143.36
168.00
192.00
224.00
228.77
256.00
279.27
336.00
384.00
BAUD-Switch
Position
26
27
28
29
30
31
32
33
34
35
36
37
38
39
40
41
42
43
44
45
46
47
48
49
50
51
Data Rate,
Kbps
396.39
448.00
512.00
558.55
565.89
614.40
672.00
722.82
768.00
827.08
896.00
945.23
1024.00
1075.20
1117.09
1228.80
1344.00
1536.00
2048.00
4096.00
6144.00
96.00
57.60
76.80
114.84
3072.00
*The default setting.
11
V.35 AND RS-530 MODEM ELIMINATORS
3.2 Cabling
After you’ve finished setting the V.35 or RS-530 Modem Eliminator’s controls, run cables from the two DTEs to the
J1 and J2 connectors on the unit’s rear panel. The length of these data cables should not exceed the maximum
recommended in the RS-530 and V.35 specifications: 4000 feet (1219.2 meters) with 24-AWG twisted-pair wire at
data rates up to 100 Kbps. Above 100 Kbps, the maximum recommended distance drops in inverse proportion
as the data rate rises:
Data Rate
Max. Distance
128 Kbps
3125 ft. (952.5)
192 Kbps
2083 ft. (635 m)
256 Kbps
1562 ft. (476.2 m)
384 Kbps
1041 ft. (317.5 m)
512 Kbps
781 ft. (238.1 m)
768 Kbps
520 ft. (158.7 m)
1024 Kbps
390 ft. (119 m)
1536 Kbps
260 ft. (79.3 m)
2048 Kbps
195 ft. (59.5 m)
3072 Kbps
130 ft. (39.7 m)
6144 Kbps
65 ft. (19.8 m)
Attach the AC power cord to the Modem Eliminator’s rear-mounted IEC 320 male inlet, then plug it into an
AC outlet. The unit should begin operating immediately (it has no ON/OFF switch). It should now be ready
for continuous operation.
12
CHAPTER 4: Operation
4. Operation
4.1 The LEDs
While your V.35 or RS-530 Modem Eliminator is operating, you can watch its five front-panel LEDs to monitor the
data and contol signals sent from, and received by, data port J1. The five LEDs indicate the states of these signals:
LED
SD
RD
RTS
CTS
DCD
V.35 Signal
SD A
RD A
RTS
CTS
DCD (RLSD)
RS-530 Signal
TD A
RD A
RTS A
CTS A
DCD (RLSD) A
4.2 The Monitor Port
There is also a DB25 female connector on the front panel to which you can attach a data-line monitor in order
to keep tabs on the device connected to data port J2. On V.35 (ME110A and ME111A) models, this connector is
proprietarily pinned to carry V.35 monitor outputs; on RS-530 (ME112A) models, it’s pinned for standard RS-530:
Pin
1
2
3
4
5
6
7
8
12
13
14
15
16
17
23
24
V.35 Signal
SHIELD
SD A
RD A
RTS
CTS
DSR
SGND
DCD (RLSD)
SCR B
SD B
SCT B
SCT A
RD B
SCR A
SCTE B
SCTE A
Pin
1
2
3
4
5
6
7
8
9
10
11
12
13
14
15
16
17
18
19
20
21
22
23
24
25
RS-530 Signal
SHIELD
TD A
RD A
RTS A
CTS A
DCR A
SGND
DCD (RLSD) A
RSETC B
DCD (RLSD) B
TSETT B
TSETC B
CTS B
TD B
TSETC A
RD B
RSETC A
LL
RTS B
DTR A
RL
DCR B
DTR B
TSETT A
TM
13
V.35 AND RS-530 MODEM ELIMINATORS
4.3 The Loopback Switch
The front panel also contains a slide switch marked “LB” (“loopback”). If ever your data doesn’t seem to be getting
across the Modem Eliminator link properly, you can temporarily move this switch to the left-hand (ON) position to
have the unit loop the data signals from the devices attached to data ports J1 and J2 back to those devices. That is,
on both data ports, the Modem Eliminator takes the data it receives on its RD lead (Pin 3) and echoes it back to
the sending device on its SD/TD lead (Pin 2). In loopback mode, you can compare the version of the data that
the devices get back (if any) against the version they sent out. If the data a device gets back has been corrupted,
or if no data comes back at all, check the cables involved first, then the device’s transmitter hardware and circuitry;
if these are OK, there might be a problem with the Modem Eliminator—call Black Box for technical support (see
Section 5.1.).
This loopback switch is recessed into the front panel to prevent it from being moved accidentally.
14
CHAPTER 5: Troubleshooting
5. Troubleshooting
5.1 Contacting Black Box
If you determine that your V.35 or RS-530 Modem Eliminator is malfunctioning, do not attempt to alter or repair
the unit. It contains no user-serviceable parts. Contact Black Box Technical Support at 724-746-5500.
Before you do, make a record of the history of the problem. We will be able to provide more efficient
and accurate assistance if you have a complete description, including:
• the nature and duration of the problem.
• when the problem occurs.
• the components involved in the problem.
• any particular application that, when used, appears to create the problem or make it worse.
• the results of any testing you’ve already done.
5.2 Shipping and Packaging
If you need to transport or ship your Modem Eliminator:
• Package it carefully. We recommend that you use the original container.
• If you are shipping the unit for repair, make sure you include its power cord. If you are returning the unit,
make sure you include everything you received with it. Before you ship the unit back to us for whatever reason,
contact Black Box to get a Return Materials Authorization (RMA) number.
15
V.35 AND RS-530 MODEM ELIMINATORS
Appendix: Connector Pinouts
The table below and on the next page shows the pin assignments for the Modem Eliminator’s interfaces and
connectors:
The data ports of the ME110A models are M/34 female connectors pinned for V.35; the monitor port
is a DB25 female connector pinned for V.35.
The data ports and monitor port of the ME111A models are DB25 female connectors pinned for V.35.
The data ports and monitor port of the ME112A models are DB25 female connectors pinned for RS-530.
Table A-1. Pinouts of the Modem Eliminator’s Connectors
V.24
Circ.
Ref.
V.35
Signal
Name
Abbr.
RS-530
Signal
Name
Abbr.
DB25
Pin
101
Shield
SHD
A
1
Shield
SHD
1
102
Signal Ground
SGND
B
7
Signal Ground
SGND
7
103
Send Data A
Send Data B
SD A
SD B
P
S
2
13
Transmit Data A
Transmit Data B
TD A
TD B
2
14
104
Receive Data A
Receive Data B
RD A
RD B
R
T
3
16
Receive Data A
Receive Data B
RD A
RD B
3
16
105
Request to Send
RTS
C
4
Request to Send A
Request to Send B
RTS A
RTS B
4
19
106
Clear to Send
CTS
D
5
Clear to Send A
Clear to Send B
CTS A
CTS B
5
13
107
Data Set Ready
DSR
E
6
DCE Ready A
DCE Ready B
DCR A
DCR B
6
22
108.2 Data Terminal Ready
DTR
H
20
DTE Ready A
DTE Ready B
DTR A
DTR B
20
23
109
RLSD
F
8
Received Line Signal
Detector A
Received Line Signal
Detector B
RLSD A
8
RLSD B
10
113
16
Received Line Signal
Detector
Serial Clock Transmit
External A
Serial Clock Transmit
External B
M/34 DB25
Pin Pin
SCTE A
U
24
SCTE B
W
23
Transmitter Sgnl. Elmt. TSETT A
Timing (DTE Src.) A
Transmitter Sgnl. Elmt. TSETT B
Timing (DTE Src.) B
24
11
APPENDIX: Connector Pinouts
Table A-1. Pinouts of the Modem Eliminator’s Connectors (Continued)
V.24
Circ.
Ref.
V.35
Signal
Name
Abbr.
114
Serial Clock Transmit A
SCT A
Y
15
Serial Clock Transmit B
SCT B
AA
14
Serial Clock Receive A
SCR A
V
17
Serial Clock Receive B
SCR B
X
12
115
M/34 DB25
Pin Pin
RS-530
Signal
Name
Abbr.
Transmitter Sgnl. Elmt. TSETC A
Timing (DCE Src.) A
Transmitter Sgnl. Elmt. TSETC B
Timing (DCE Src.) B
DB25
Pin
15
12
Receiver Signal Elmt. RSETC A 17
Timing (DCE Src.) A
Receiver Signal Elmt. RSETC B
9
Timing (DCE Src.) B
140
Remote Loopback
RL
21
141
Local Loopback
LL
18
142
Test Mode
TM
25
17
©Copyright 1998. Black Box Corporation. All rights reserved.
1000 Park Drive • Lawrence, PA 15055-1018 • 724-746-5500 • Fax 724-746-0746