1
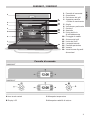
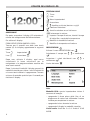
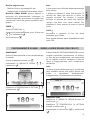
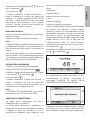
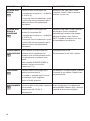
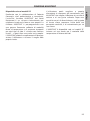
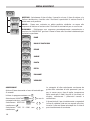
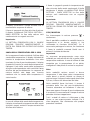
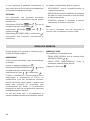
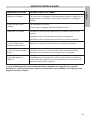
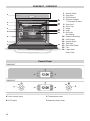
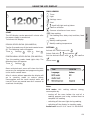
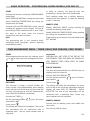
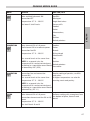
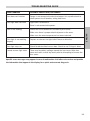
F60CONXT
F60PROXT
Specifiche tecniche
Feature List
FROM THE DESK OF THE PRESIDENT
Dear new owner of a Bertazzoni product,
Our company brings to homeowners around the world
beautiful, high-performance kitchen appliances, which
make their dreams come true.
We marry the finest Italian craftsmanship with
technical precision using state-of-the-art
manufacturing, which give our customers peace of
mind.
BERTAZZONI SpA
Via Palazzina 8
42016 Guastalla RE
ITALY
WWW.BERTAZZONI.COM
Our brand elevates food – preparing it, sharing it,
enjoying it – to a new dimension where taste, fun, and
lifestyle - the values of our land - come together.
We have built this company with the unique passion
and dedication of family entrepreneurship. Our fathers
handed it to us. Our children will inherit it. It’s in our
minds, our hearts, our soul.
Since 1882 our name is on the products we build. We
are proud – and at the same time humbled – by our
heritage. This company is Bertazzoni. We are
Bertazzoni. And we vow to continue building this great
enterprise into the future.
DALLA SCRIVANIA DEL PRESIDENTE
Gentile proprietario di un prodotto Bertazzoni,
Abbiamo costruito un’impresa che porta nelle case di
tutto il mondo prodotti con altissime prestazioni, il
meglio del Design italiano, con sicurezza e rispetto per
l’ambiente.
Abbiamo costruito un’impresa che eleva la
preparazione e la condivisione della buona cucina ad
una nuova dimensione, dove il gusto, il saper vivere ed
i valori della nostra terra sono portati a fattor comune.
Abbiamo costruito questa impresa con la passione
personale, la serietà e la dedizione
dell’imprenditorialità familiare. I nostri padri ce l’hanno
trasmessa, i nostri figli, speriamo con personale merito,
la porteranno ancor più in alto. E’ nelle nostre menti,
nel nostro cuore, nella nostra anima.
Dal 1882 il nostro nome è sui prodotti che costruiamo,
siamo orgogliosi ed allo stesso tempo consapevoli della
responsabilità che la nostra tradizione comporta.
Questa azienda è Bertazzoni. Ci impegniamo per la
continuazione di questa grande impresa nel futuro.
Grazie!
1
9
10
2
11
12
3
4
13
14
15
5
6
7
8
16
1
2
3
4
5
6
7
8
9
10
11
12
13
14
15
16
Pannello di comando
Guarnizione
Resistenza del grill
Supporto cromato
+ Guide di scorrimento
Griglia
Vassoio per pasticceria
Cerniera
Sportello
Uscita dell’aria
di raffreddamento
Fissaggio al mobile
Schermo del grill
Uscita dei fumi
Lampada laterale
Pannello posteriore
Ventola
Vetro interno di grandi
dimensioni
Pannello di comando
FX60CONXT
FX60PROXT
A Aree touch control
C Manopola temperature
B Display LCD
D Manopola modalità di cottura
3
ITALIANO
F60CONXT / F60PROXT
UTILIZZO DEL DISPLAY LCD
LEGENDA ICONE
Timer
Luce
Menu impostazioni
Accensione
Scrolling a sinistra/destra e su/giù
Conferma selezione
Annulla selezione o esci dal menu
ACCENSIONE
Interrompe la cottura
Per poter accendere il display LCD attendere 1
minuto dal collegamento dell'alimentazione.
Imposta il tempo di cottura, ritarda il tempo
di inizio/fine, sonda della temperatura
Per attivare il display:
Modifica la modalità di cottura
FORNI SERIE DESIGN (MODELLI CON)
Toccare per 2 secondi una delle aree touch
control (A). Sul display appariranno le seguenti
icone:
Modifica la temperatura di cottura
Timer
Impostazioni
Luce
Accensione
Dopo aver attivato il display, ogni menu
visualizzerà le icone necessarie per la
navigazione e la programmazione accanto alle
aree touch control.
IMPOSTAZIONI
Attivare il menu IMPOSTAZIONI con
Selezionare il campo con
e confermare
Impostare i valori desiderati con
confermare
e
Uscire dal menu
Dopo 1 minuto di inattività il display passerà in
modalità stand-by per ridurre i costi di elettricità
e le aree touch control si spegneranno. Toccare
un’area di controllo qualsiasi per 2 secondi per
riattivare il display.
Note
Modalità ECO: questa impostazione riduce il
consumo di energia:
– spegnendo il forno prima della fine di un
programma di cottura ed utilizzando il calore
residuo per completare la cottura
– spegnendo la luce durante la cottura
– spegnendo il display in modalità stand-by.
Livello audio: Livelli da 1 a 3. Il livello 1 è NO
AUDIO
4
Nota
Metrico: Celsius/kg/orologio 24 ore
Anglosassone: Fahrenheit/lb/orologio 12 ore
Modalità SHOW ROOM: questa opzione è
destinata alla dimostrazione showroom. In
modalità showroom gli elementi riscaldanti non
sono attivati. Non usare questa modalità a casa
propria.
TIMER
Attivare il TIMER con
Il timer può essere utilizzato indipendentemente
dalla cottura.
Il display visualizzerà il conto alla rovescia. Al
termine del conto alla rovescia si attiva un
segnale acustico. Per fermare il segnale
acustico al termine del conto alla rovescia
toccare una delle aree touch control. Per
modificare il timer entrare di nuovo in questo
menu.
LUCE
Impostare il tempo desiderato (max. 10 ore) con
e confermare
Uscire dal menu
Accendere e spegnere la luce del forno
premendo quest’icona.
Nota: questa funzione non è disponibile nei forni
serie PRO.
FUNZIONAMENTO DI BASE – MODELLI SERIE DESIGN (F60 CON XT)
ACCENSIONE
Attivare il forno toccando un’area di controllo per
2 secondi.
Iniziare la programmazione con
Selezionare la MODALITÀ FORNO
confermare
e
Il forno inizierà il PRE-RISCALDAMENTO in alcuni
secondi mostrando l’avanzamento sul display.
La fine del pre-riscaldamento sarà confermata
da un segnale acustico. Introdurre il cibo nel
forno al raggiungimento della temperatura
desiderata.
Nota
La barra di preriscaldamento non è visualizzata
nelle modalità cottura alla griglia, cottura alla
griglia
a
convezione,
disidratazione,
scongelamento, riscaldamento e lievitazione.
Impostare la TEMPERATURA DI COTTURA
e confermare
MODIFICA/STOP
Modificare la MODALITÀ FORNO durante la
cottura con
Modificare la TEMPERATURA DI COTTURA
durante la cottura con
Interrompere la cottura con
e confermare
5
ITALIANO
Metrico/anglosassone
FUNZIONAMENTO DI BASE – MODELLI SERIE PROFESSIONALE (F60 PRO XT)
ACCENSIONE
Attivare il forno ruotando la manopola
MODALITÀ FORNO (destra)
Selezionare la MODALITÀ FORNO ruotando la
manopola a destra
Selezionare la TEMPERATURA DI COTTURA
ruotando la manopola della temperatura a
sinistra
Il forno inizia il PRE-RISCALDAMENTO in alcuni
secondi mostrando l’avanzamento nel display.
La fine del pre-riscaldamento sarà confermata
da un segnale acustico. Introdurre il cibo nel
forno al raggiungimento della temperatura
desiderata.
Nota
La barra del preriscaldamento non è visualizzata
nelle modalità cottura alla griglia, cottura alla
griglia
a
convezione,
disidratazione,
scongelamento, riscaldamento e lievitazione.
Per ridurre il tempo di riscaldamento, il
preriscaldamento avviene sempre in modalità
turbo.
Ogni modalità forno ha una temperatura di
default ottimale che compare contestualmente
alla selezione della modalità forno.
MODIFICA/STOP
Modificare la MODALITÀ FORNO durante la
cottura ruotando la manopola delle modalità
forno.
Modificare la TEMPERATURA DI COTTURA
durante la cottura ruotando la manopola della
temperatura.
Interrompere la cottura ruotando la manopola
della funzione sulla posizione OFF.
MENU’ DI GESTIONE DEL TEMPO – TIMER, RITARDO/FINE COTTURA, SONDA
TEMPERATURA
ACCENSIONE
Attivare il TIMER
Dopo aver programmato il forno per la cottura,
premere
o
per entrare nel menu di
gestione del tempo.
Impostare la durata desiderata
ore) e confermare
(max. 10
Uscire dal menu
Il display visualizzerà il conto alla rovescia. La
fine del conto alla rovescia sarà confermata da
un segnale acustico. Premere un'area touch
control per interrompere il segnale acustico.
Importante!
IMPOSTAZIONE DEL TIMER
Questa funzione è semplicemente un timer
contaminuti: il timer può essere usato
indipendentemente dalla cottura e non
spegnerà il forno al termine del tempo
impostato. Per lo spegnimento automatico del
forno, selezionare FINE DELLA COTTURA (v. di
seguito).
6
LA COTTURA NON SI FERMERÀ ALLA FINE DEL
CONTO
ALLA
ROVESCIA.
SPEGNERE
MANUALMENTE IL FORNO E TOGLIERE IL CIBO
DAL FORNO PER EVITARE CHE SI CUOCIA
TROPPO.
FINE DELLA COTTURA
Il forno si spegnerà automaticamente al termine
del tempo di cottura impostato.
Attivare FINE DELLA COTTURA
(max. 10
essere utilizzata SOLO con le seguenti modalità
forno:
Uscire dal menu
Convezione
Il display visualizzerà il conto alla rovescia. Il
forno si spegnerà al termine del conto alla
rovescia e il display visualizzerà FINE DELLA
COTTURA – BUON APPETITO! La fine del conto
alla rovescia sarà confermata da un segnale
acustico. Toccare un'area touch control per
interrompere il segnale acustico.
Cottura in forno
MODIFICA/ANNULLA
Attivare il menu fine della cottura e modificare il
valore del tempo.
Impostare il tempo su 0:00 per annullare.
Nota
Il tempo di cottura è calcolato dalla fine del preriscaldamento. Durante il pre-riscaldamento la
fine del tempo di cottura non è visualizzata sul
display.
ITALIANO
Impostare la durata desiderata
ore) e confermare
Cottura in forno a convezione
Turbo
Cottura alla griglia
Cottura alla griglia a convezione
Inserire la sonda della temperatura nel prodotto
da cuocere. Per ottenere i risultati migliori,
inserire la sonda il più vicino possibile al cuore
del prodotto e accertarsi che non sia a contatto
con ossa o grasso. Un posizionamento non
corretto della sonda potrebbe spegnere il forno
troppo presto e far sì che il cibo non sia
sufficientemente cotto. In caso di pollame
verificare che la sonda non sosti in una cavità.
Attivazione della
Selezionare la temperatura del cibo desiderata
con
e confermare
Non è possibile impostare la fine del tempo di
cottura mentre si usa la sonda della temperatura.
Se s’imposta una temperatura della sonda per il
cibo, la fine della cottura sarà cancellata.
RITARDO DELL’ACCENSIONE
Il forno si accenderà all’orario desiderato.
Attivare RITARDO DELL’ACCENSIONE
Impostare l’orario desiderato prima che il forno
si accenda
e confermare
Uscire dal menu
Il display visualizzerà il conto alla rovescia. Il
forno si accenderà alla fine del conto alla
rovescia. La fine del conto alla rovescia sarà
confermata da un segnale acustico.
Al completamento della sequenza di preriscaldamento, il display visualizzerà il
messaggio INSERIRE LA SONDA DELLA
TEMPERATURA PER CIBO. CONTINUARE?
Nota
Il RITARDO DELL’ACCENSIONE può essere
combinato con la FINE DELLA COTTURA.
SONDA DELLA TEMPERATURA
La sonda della temperatura del cibo è
disponibile solo sui modelli XT.
La sonda della temperatura monitorizza la
temperatura al cuore del cibo durante la cottura
e spegne il forno nel momento in cui la
temperatura desiderata viene raggiunta. Può
Collegare il jack della sonda alla presa ubicata
nella parte in alto a sinistra della cavità del
forno. Introdurre il cibo nel forno e confermare
7
Il display mostrerà la temperatura impostata e la
temperatura effettiva misurata dalla sonda. Il
forno si spegnerà quando il cibo avrà raggiunto
la temperatura desiderata. Il display visualizzerà
FINE DELLA COTTURA – BUON APPETITO! La fine
della cottura sarà confermata da un segnale
acustico. Per fermare il segnale acustico toccare
un’area touch control.
Se il jack della sonda non è inserito nella
rispettiva presa, il display visualizzerà un
messaggio che richiede la conferma
dell’inserimento della sonda. La cottura si
fermerà se non s’inserisce la sonda. Selezionare
NO nella schermata di conferma per continuare
la cottura senza sonda.
Nota
NON LASCIARE LA SONDA NEL CAVITÀ DEL
FORNO QUANDO NON VIENE UTILIZZATA
La temperatura della sonda del cibo è
selezionabile in ogni momento della cottura.
8
Importante
GUIDA SULLE MODALITÀ FORNO
DETTAGLI
COTTURA IN
FORNO
Elementi cottura in forno e cottura alla Soufflé
griglia ON
Meringhe
Convezione OFF
Pane degli angeli
Temperatura 37°C – 260°C
Bignè alla crema
Biscotti
Usare i 2 livelli inferiori dei ripiani.
Torte
Cheesecake
Crostate
Torte salate
Patate al forno
COTTURA IN
FORNO A
CONVEZIONE
Elemento cottura in forno ON a
potenza massima
Biscotti
Elemento cottura alla griglia ON a
potenza media
Pane
Ventola di convezione ON
Temperatura 37°C – 260°C
DA USARE PER /CONSIGLI
ITALIANO
MODALITÀ
Torte
Impasto con lievito
Cheesecake
Crostate
Usare più livelli contemporaneamente. Torte salate
CONVEZIONE
NOTA: Come regola generale, la
temperatura di una ricetta non
destinata alla cottura in un forno a
convezione dovrebbe essere
abbassata di 20°F (15°C)
Patate al forno
Ventola di convezione ed elemento
convezione ON
Cottura lenta di pasticceria, soufflé e
torte.
Pasticcio
Usare più livelli contemporaneamente. A temperatura superiore usare anche
per carni e pollame arrosto.
Temperatura 37°C – 260°C
NOTA: Come regola generale, la
temperatura di una ricetta non
destinata alla cottura in un forno a
convezione dovrebbe essere
abbassata di 20°F (15°C)
TURBO
Elemento cottura in forno ON a
potenza massima
Cottura uniforme con forte calore dal
basso di pizza, focaccia e pane.
Elemento convezione e ventola ON a
massima potenza
Temperatura 37°C – 260°C
Usare i livelli per ripiani 2 e 3
9
MODALITÀ
DETTAGLI
COTTURA ALLA
GRIGLIA
Elemento cottura alla griglia ON
DA USARE PER /CONSIGLI
Rosolatura del cibo solo sul lato
4 impostazioni di potenza – da BASSA superiore. Girare il cibo se occorre
rosolare sui due lati.
(1) a ALTA (4)
L’elemento viene riscaldato per i primi
3 minuti alla massima potenza poi si
abbassa in base all'impostazione
selezionata.
COTTURA ALLA
GRIGLIA A
CONVEZIONE
Elemento cottura alla griglia ON
Rosolatura del cibo sul lato superiore
ed inferiore. Questa modalità è
preferibile per rosolare cibo troppo
4 impostazioni di potenza – da BASSA
delicato da girare come il pesce.
(1) a ALTA (4)
NOTE: Il grado di rosolatura sui due
L’elemento viene riscaldato per i primi
lati potrebbe essere diverso.
3 minuti alla massima potenza poi si
abbassa in base all'impostazione
selezionata.
Ventola di convezione ON
SCONGELAMENTO Nella modalità SCONGELAMENTO
/DISIDRATAZIONE funziona sola la ventola per far
circolare l’aria all’interno della cavità.
Tutti gli elementi riscaldanti sono
spenti.
Scongelamento di cibi
Disidratazione di cibi, fiori, verdure.
Nella modalità DISIDRATAZIONE la
ventola è accesa e la cavità è
mantenuta 37°C.
LIEVITAZIONE
Elemento cottura alla griglia ON a
potenza costante bassa
La ventola si accende ogni 5 minuti
per eliminare l’aria stagnante.
Per ottenere i risultati migliori, mettere
l’impasto in una ciotola e coprire con
un panno pulito.
Usare un livello qualsiasi.
RISCALDAMENTO Elemento cottura alla griglia a potenza Usare il programma riscaldamento
bassa/media.
nella Modalità Sabbath (M.S.) durante
i periodi di osservanza religiosa.
Temperatura 60/76/93°C
preimpostata.
10
L’elemento cottura alla griglia funziona su 4
diversi livelli di potenza.
L’elemento viene riscaldato per i primi 3 minuti
alla massima potenza poi si abbassa in base ai
diversi effetti desiderati.
Il livello 1 produce una rosolatura lieve della
superficie del cibo
Il livello 4 produce un calore irradiato intenso
che determina una rosolatura veloce del cibo.
Selezionare COTTURA ALLA GRIGLIA per rosolare
il cibo solo sul lato superiore. In questa modalità
occorre girare il cibo se è prevista una rosolatura
sui due lati.
Selezionare GRILL A CONVEZIONE per rosolare
leggermente il cibo anche sul lato inferiore.
Questa modalità è preferibile per rosolare sui
due lati un cibo troppo delicato per essere girato
come ad es. il pesce. Il grado di rosolatura sui
due lati potrebbe essere diverso.
Selezionare il livello di potenza in base all’effetto
desiderato sul cibo.
11
ITALIANO
COTTURA ALLA GRIGLIA/ COTTURA ALLA GRIGLIA A CONVEZIONE
CONSIGLI PER OTTENERE I MIGLIORI RISULTATI – COTTURA ALLA GRIGLIA E
COTTURA ARROSTI REGOLAZIONE SUL GRADO DI COTTURA DESIDERATO
CIBO
POSIZIONE
TEMPEMODALITÀ FORNO
RIPIANO
RATURA
Hamburger,
spessore ½”
6
Bistecca alla
fiorentina
6
Entrecote
6
Griglia
da 15 a 20
minuti
Grigliare finché non è
rosa al centro
LIV 4
da 12 a 20
minuti
Grigliare finché la
cottura non raggiunge
il livello desiderato
LIV 4
da 12 a 20
minuti
Grigliare finché la
cottura non raggiunge
il livello desiderato
Griglia a convezione
Griglia
Griglia a convezione
Magatello
5
Cottura in forno
165°C
da 20 a 25 min Gli arrosti piccoli
per ½ kg
richiedono un tempo
più lungo per ogni ½
chilo; ridurre il tempo
in caso di cottura in
forno a convezione
165°C
da 20 a 25 min Cuocere finché i
per 0,5 kg
succhi non risultano
chiari
Cottura in forno a
convezione
Lombata
arrosto
5
Petti di pollo
senza osso e
senza pelle
6
Cosce
di pollo
5
Mezzo pollo
5
Cottura in forno
Cottura in forno a
convezione
Griglia
LIV 3
da 20 a 25
minuti
Cuocere finché i
succhi non risultano
chiari
LIV 3
da 25 a 30
minuti
Togliere la pelle e
cuocere finché i succhi
non risultano chiari
LIV 4
da 30 a 45
minuti
Girare con molla e
cuocere finché i succhi
non risultano chiari
175°C
da 75 a 90
minuti
Ridurre il tempo con
l’uso della cottura in
un forno a convezione.
Il tempo può variare
se il pollo è farcito.
Griglia a
convezione
Griglia
Griglia a
convezione
Griglia
Griglia a
convezione
Pollo arrosto
4
Cottura in forno
Cottura in forno a
convezione
Tacchino
12
4
Cottura in forno o
cottura in forno a
convezione
SUGGERIMENTI
LIV 4
Griglia a convezione
Griglia
TEMPO DI
COTTURA
APPROSSIMATIVO
165°C
da 20 a 25 min Ridurre il tempo con
per 0,5 kg
l’uso della cottura in
un forno a convezione.
Il tempo può variare
se farcito.
CIBO
MISURA TEGLIA
TEMPERATU TEMPO DI COTTURA
RA
(minuti)
ITALIANO
CONSIGLI PER OTTENERE I MIGLIORI RISULTATI – COTTURA IN FORNO
CONTROLLARE LE ISTRUZIONI SULLA CONFEZIONE
LIVELLO
Biscotti
Placca biscotti 30x38
185°
da 8 a 12
2..5
Torte a strati
Tonda 20 o 22”
175°
da 25 a 35
2..5
Torte basse e
sottili
Teglia 22x33
175°
da 30 a 40
2..5
Ciambelle
Stampo per
ciambella30
160°
da 60 a 75
2..5
Biscotti a barre
Teglia 22x22
160°
da 20 a 25
2..5
Biscotti
Placca biscotti 30x38
215°
da 10 a 15
2..5
Pane veloce
Stampo da pane
20x10
175°
da 55 a 70
2..5
Muffin
Stampo da muffin 12
coppette
215°
da 14 a 19
2..5
Crostate alla
frutta
Diametro 22
215°
da 35 a 45
2..5
Torte alla frutta
Teglia 22x22
200°
da 25 a 30
2..5
Pane lievitato
Stampo da pane
20x10
185°
da 25 a 30
2..5
Panini morbidi
Teglia 22x32"
200°
da 12 a 18
2..5
Panini alla
cannella
Teglia 22x32"
185°
da 25 a 30
2..5
Torta lievitata
Placca biscotti 30x38
200°
da 20 a 30
2..5
13
CONSIGLI PER OTTENERE I MIGLIORI RISULTATI – DISIDRATAZIONE
CIBO
PREPARAZIONE
TEMPO
APPROSSIMATIVO PRONTO QUANDO…
(ORE)
11-15
Leggermente morbide
Mele
Tagliare a fette da 5mm ed
immergere in ¼ di tazza di succo di
limone + 2 tazze di acqua
Banane
Tagliare a fette da 5mm ed
immergere in ¼ di tazza di succo di
limone + 2 tazze di acqua
10-15
Soffici, morbide
Ciliegie
Lavare e asciugare con telo
assorbente. Togliere i noccioli
10-15
morbide, avvizzite,
gommose
Scorze e fette
di arance
Sbucciare e tagliare in fette da 5mm
Scorze:2-4
Scorza d’arancia:
secca e friabile.
Fette: 12-16
Fette d’arancia: le
bucce sono secche e
friabili, il frutto è
leggermente morbido
Anelli d’ananas Asciugare con telo assorbente
In scatola: 9-13
Soffici e morbidi
Freschi: 8-12
Fragole
Peperoni rossi
Funghi
Pomodori
Lavare e asciugare con telo
assorbente. Tagliare in fette da 1cm.
Appoggiare la parte esterna sulla
griglia
Lavare e asciugare con telo
assorbente. Togliere i gambi,
tagliare grossolanamente in pezzi di
circa 2,5cm
Lavare e asciugare con telo
assorbente. Togliere l’estremità dei
gambi. Tagliare in fette da 2mm
12-17
Secche, friabili
16-20
Avvizziti senza
umidità all’interno
7-12
Stopposi e avvizziti,
secchi
Lavare, scolare bene e asciugare
con telo assorbente. Tagliare in fette
da 2mm.
16-23
Secchi, di colore
rosso mattone
Origano, salvia, Lavare e asciugare con carta
prezzemolo,
assorbente
timo, finocchio
3-5
Croccanti e friabili
Basilico
3-5
Croccante e friabile
14
Usare le foglie di basilico a 8 – 10
cm dalla cima. Spruzzare con acqua,
togliere l’umidità e tamponare
Disponibile solo sui modelli XT
Realizzato con la collaborazione di Roberto
Carcangiu, chef professionista e consulente,
l’esclusiva funzione ASSISTANT del forno
Bertazzoni è un sistema rivoluzionario per
migliorare la cottura in forno a casa propria. La
funzione ASSISTANT è pre-programmata con
una gamma finemente calibrata di modalità
forno, di temperature e di sequenze temporali
per ogni tipo di cibo. Il sistema non fornisce
ricette – si dovrà fare una scelta tra le proprie.
L’ASSISTANT piloterà semplicemente il forno per
aiutare l’utilizzatore a ricavare il meglio dalle
proprie ricette.
L’utilizzatore potrà scegliere a propria
discrezione le sequenze già memorizzate nell’
ASSISTANT che meglio si adattano al suo stile di
cottura e al suo gusto culinario. Dopo aver
acquisito un po’ di dimestichezza, sarà in grado
di creare nuove sequenze, frutto della sua
personale creatività, e di memorizzarle per un
uso futuro.
L’ASSISTANT è disponibile solo sui modelli XT,
insieme ad una sonda per il controllo della
temperatura all’interno dei cibi.
15
ITALIANO
FUNZIONE ASSISTANT
MENU ASSISTANT
GESTISCI - Selezionare il tipo di cibo, il peso/la misura, il tipo di cottura e la
finitura desiderata e lasciare che l’Assistant supervisioni la cottura finché il
piatto non sarà perfetto.
SALVA – Dopo aver cucinato un piatto perfetto, attribuire un nome alla
sequenza di cottura e lasciare che l’Assistant lo memorizzi per un uso futuro.
RICHIAMA – Richiamare una sequenza precedentemente memorizzata e
lasciare che l’ASSISTANT gestisca il forno in base alle istruzioni selezionate per
il piatto in questione.
PANE
DOLCI E PASTICCINI
PESCE
CARNE
PASTA
PIZZA
POLLAME
VERDURE
ACCENSIONE
Attivare il forno toccando un’area di controllo per
2 secondi.
Iniziare la programmazione con
Selezionare ASSISTANT
con
manopola destra e confermare
Selezionare GESTISCI
confermare
o con la
con
e
Selezionare TIPO DI CIBO con
confermare
e
16
Le categorie di cibo selezionate serviranno da
guida nella selezione di altri parametri (ad es.
per la carne: peso, tipo di taglio, temperatura
della sonda per il cibo). Seguire le istruzioni sul
display, selezionare i parametri corretti e
confermare.
Il forno inizierà il pre-riscaldamento e segnalerà
la fine di suddetto ciclo con un segnale acustico.
Inserire il cibo nel forno solo dopo che il ciclo di
pre-riscaldamento è terminato.
Importante:
Il display visualizzerà il tempo restante fino al
termine della sequenza di cottura.
Il forno si spegnerà alla fine del ciclo di cottura.
Il display visualizzerà FINE DELLA COTTURA –
BUON APPETITO! La fine della cottura sarà
confermata da un segnale acustico.
Importante:
LA COTTURA PROSEGUIRÀ CON IL CALORE
RESIDUO. TOGLIERE IMMEDIATAMENTE IL
PIATTO DAL FORNO PER EVITARE CHE CUOCIA
TROPPO.
SONDA DELLA TEMPERATURA PER IL CIBO
Se la sequenza di cottura richiede l’utilizzo della
sonda della temperatura, il display richiederà di
inserire la temperatura desiderata. Una volta
terminato il ciclo di pre-riscaldamento, il display
ricorderà di inserire la sonda della temperatura.
Collegare il jack della sonda della temperatura
alla presa corrispondente nella cavità del forno
alla fine del pre-riscaldamento. La sequenza di
cottura inizierà solo dopo aver ricevuto
conferma che la sonda della temperatura è
stata inserita.
LA COTTURA PROSEGUIRÀ CON IL CALORE
RESIDUO. TOGLIERE IMMEDIATAMENTE IL
PIATTO DAL FORNO PER EVITARE CHE CUOCIA
TROPPO.
STOP/MODIFICA
Per interrompere la cottura premere
confermare.
e
Non è possibile cambiare la modalità forno, la
temperatura o la durata mentre si sta
utilizzando la funzione ASSISTANT. Se è
necessario prolungare la cottura, far funzionare
il forno in modalità manuale finché non si
ottiene il risultato desiderato.
Importante
Le sequenze pre-programmate sono state
calibrate per una cottura dei cibi a partire dalla
temperatura ambiente. In caso di utilizzo di cibo
congelato per la preparazione di un piatto,
scongelare il cibo prima di avviare la sequenza.
Nota:
Nella modalità cottura arrosti a bassa
temperatura, il cibo viene cotto a temperatura
molto bassa e quindi richiede un tempo di
cottura lungo. Il tempo di cottura può durare fino
5/6 ore, in base alle dimensioni del cibo.
Nella modalità forno Assistant, il tempo è
calcolato dalla fine del pre-riscaldamento.
Prestare attenzione ad introdurre il cibo nel
forno non appena il tempo di pre-riscaldamento
è terminato, in caso contrario il tempo di cottura
potrebbe risultare troppo breve.
In caso di utilizzo della sonda della temperatura,
il display visualizzerà la temperatura della sonda
(attuale e target) anziché il tempo restante fino
alla fine della cottura.
Tutti i metodi di cottura si riferiscono a cibo
fresco, se non espressamente indicato. Per il
cibo congelato, fare riferimento alla propria
procedura standard
17
ITALIANO
Il forno si spegnerà quando la temperatura del
cibo misurata dalla sonda raggiungerà il livello
desiderato. Il display visualizzerà FINE DELLA
COTTURA – BUON APPETITO! La fine della
cottura sarà confermata con un segnale
acustico.
FUNZIONE ASSISTANT – SCHEDA OPZIONI
Cibo
Carne
Preparazione
Sonda della tem- Tempo di cottura preperatura
programmato*
Cottura arrosto tradizionale
sì
Cottura arrosto bassa temp.
sì
Brasatura
Cottura lenta
90 min.
sì
Cottura al forno
Pollame
Pesche
6 min.
Cottura arrosto tradizionale
sì
Cottura lenta
sì
Cottura arrosto tradizionale
sì
Cottura al forno
Grigliato – sonda temp.
Torte
Pane
7 min.
Impasto con lievito
35 min.
Pasta frolla
25 min.
Manuale
22 min.
Pizza
Pizza fatta in casa
Pasta
Surgelata al gratin
sì
14 min.
sì
Fresca al gratin
35 min.
Stufata / saltata
20 min.
Grigliata
7 min.
Patate arrosto
50 min.
* Il tempo indicato non comprende il pre-riscaldamento
18
sì
Grigliato – manuale
Sonda temperatura
Verdura
12 min.
La cottura lenta consente la preparazione di
pezzi di carne o di pollame molto grossi (più di 4
kg) per diverse ore a temperatura molto bassa.
Questa modalità forno non termina quando la
temperatura impostata sulla sonda viene
raggiunta, ma il cibo continua ad essere
mantenuto alla temperatura indicata. La
temperatura indicata sulla sonda sarà
continuamente regolata dopo che il valore
impostato è stato raggiunto.
Il display visualizzerà l’ultima sequenza di
cottura eseguita, indicando la serie di modalità
forno, le temperature e i tempi utilizzati per
questo ciclo.
Il forno dovrà essere spento manualmente. Si
consiglia un tempo di cottura di 12 ore. Il
programma si spegne automaticamente dopo
24h.
Confermare
TIPO DI TAGLIO
Inserire un nome per questa sequenza di cottura
– fare lo scrolling sulla tastiera con
e
confermare ogni lettera con
Tipo di taglio
Tipo di carne
Collo e sottospalla di
manzo
Selezionare CATEGORIA CIBO e confermare
NOTA: lo scrolling si velocizza premendo con un
dito sulla touch area.
Petto di manzo
Meno tenero
Carne di manzo
conservata sotto sale
Punte di manzo
Spalla di maiale
Garretto di agnello
Capocollo di maiale
Tenero
Filetto di manzo
Confermare con
Entrecote
Premere
per uscire da questo menu senza
salvare la sequenza.
Filetto di maiale
Cosciotto di vitello
Dopo aver salvato una sequenza, il display
tornerà al menu principale ASSISTANT.
Cosce di pollo
Importante
SALVA
L’ASSISTANT salva l’ultima sequenza di cottura
per un utilizzo futuro.
Selezionare ASSISTANT
con
manopola destra e confermare
Selezionare SALVA
con
o con la
e confermare
La memoria è in grado di salvare fino a un
massimo di 32 sequenze di cottura
personalizzate oltre a quelle pre-programmate.
Quando la memoria è piena e si cerca di
memorizzare un’altra sequenza di cottura, il
display visualizza un messaggio che richiede di
cancellare una delle sequenze memorizzate in
precedenza.
L’interfaccia eliminerà fasi che non sono
significative ai fini dei risultati della cottura,
come ad es. funzioni usate per meno di 1
minuto.
19
ITALIANO
COTTURA LENTA
In una sequenza si potranno memorizzare al
massimo 4 diverse fasi di cottura (combinazione
di funzione/temperatura/tempo).
RICHIAMA
Per richiamare una sequenza personale
precedentemente memorizzata seguire queste
semplici fasi.
Selezionare ASSISTANT
con
manopola destra e confermare
Selezionare RICHIAMA
confermare
Le opzioni a disposizione sono le seguenti:
– ACCENSIONE: avvierà immediatamente la
sequenza di cottura.
– MODIFICA: consente di modificare la categoria
del cibo e il nome associato ad una sequenza
di cottura personale
– CANCELLA: cancella la sequenza di cottura
selezionata. È richiesta conferma.
o con la
Nota:
con
e
Se non si seleziona nessuna sequenza di
cottura, sarà visualizzato un menu vuoto.
Selezionare CATEGORIA CIBO e confermare
Selezionare una sequenza memorizzata e
confermare
MODALITÀ SABBATH
Questo programma speciale è concepito per il
rispetto di regole religiose.
Attivare il forno toccando un’area di controllo per
2 secondi.
Iniziare la programmazione con
Selezionare RISCALDAMENTO con
manopola destra e confermare
– FORNI SERIE PROFESSIONALE: usare la
manopola modalità forno (destra)
Spegnere il forno con
o con la
e confermare
Il forno si accenderà e si pre-riscalderà fino a
raggiungere la temperatura di 100°C. La
temperatura sarà poi mantenuta costante
finché il forno non verrà spento. L’apertura del
forno non causerà un immediato preriscaldamento del forno: il riscaldamento
proseguirà in base ad una procedura impostata
indipendentemente dall’uso.
Le luci del forno non si accenderanno in
modalità Sabbath anche se lo sportello è aperto.
20
Per modificare la modalità forno:
– FORNI SERIE DESIGN: fare lo scrolling delle
MODALITÀ FORNO
ACCENSIONE
Selezionare M.S.con
MODIFICA/STOP
PROBLEMA DEL FORNO
POSSIBILI CAUSE E/O RIMEDI
Il forno non funziona
La cucina non è collegata all’alimentazione elettrica. Chiedere a un
professionista di verificare l’interruttore automatico, i cablaggi e i
fusibili.
La luce del forno non
funziona
La lampadina è bruciata.
Il forno non si riscalda
Controllare l’interruttore automatico o la scatola fusibili di casa
propria.
Il forno non è collegato all’alimentazione elettrica.
Controllare che l’alimentazione del forno sia adeguata.
Controllare che la temperatura del forno sia stata selezionata.
La luce del forno non
funziona correttamente
Sostituire e reinserire la lampadina se allentata o difettosa.
La luce del forno rimane
accesa
Verificare che non ci siano ostruzioni nello sportello del forno.
Controllare per verificare che la cerniera non sia piegata.
Impossibile togliere il
copriluce
Potrebbero essersi depositati residui o gocce intorno al copriluce.
Pulire l’area del copriluce con un panno pulito e asciutto prima di
provare a rimuovere il copriluce.
In caso di funzionamento non corretto potrebbero comparire messaggi d’errore specifici.
Contattare il servizio post-vendita e fornire le informazioni che compaiono sul display per una
diagnosi accurata e rapida.
21
ITALIANO
MODALITÀ RICERCA GUASTI
F60CONXT / F60PROXT
1
9
10
2
11
12
3
4
13
14
15
5
6
7
8
16
11
12
13
14
15
16
17
18
19
10
11
12
13
14
15
16
Control Panel
FX60CONXT
FX60PROXT
A Touch control areas
C Temperature knob
B LCD Display
D Cooking modes knob
22
Control Panel
Oven Seal
Grill Element
Chrome Support
+ Telescopic Guides
Oven Grid
Cake Tray
Hinge
Door
Air Outlet
for Cooling
Cabinet Mounting
Grill Screen
Smoke Outlet
Side light
Back Wall Panel
Fan
Large Inner
Glass Door
USING THE LCD DISPLAY
ICONS LEGEND
Timer
Light
Settings menu
Start
Scroll left/right and up/down
Confirm selection
Stop cooking
The LCD display can be operated 1 minute after
the power supply is connected.
Set cooking time, delay start/end time, food
probe
To activate the display:
Modify cooking mode
DESIGN SERIES OVENS (CON MODELS)
Modify cooking temperature
Tap for 2 seconds any of the touch control areas
(A). The following icons will appear:
Timer
Settings
Light
Start
SETTINGS
Activate SETTINGS menu with
Select field with
and confirm
PROFESSIONAL SERIES OVENS (PRO MODELS)
Set the desired values with
Turn the cooking modes knob (right side). The
following icons will appear:
Leave menu
Timer
and confirm
Settings
Once activated each menu will show the icons
necessary for navigation and programming next
to the touch control areas.
After 1 minute without operation the display will
go in stand-by mode to reduce power
consumption and the touch control areas will
turn off. Touch any control area for 2 seconds to
reactivate the display.
Notes
ECO mode: this setting reduces energy
consumption by:
– turning off the oven before the end of a
cooking program and using residual heat to
complete the cooking
– switching off the oven light during cooking
– switching off the display in stand-by mode.
Audio Level: Level 1 to 3. Level 1 is NO AUDIO
23
ENGLISH
Remove selection or leave menu
START
Metric /Imperial
Note
Metric: Celsius/Kg/24 hour clock
The timer can be used independently from
cooking.
Imperial:Farenheit/Lbs/12 hour clock
SHOW ROOM mode: this option is for showroom
demonstration. In showroom mode the heating
elements are not activated. Never use this at
home.
The display will show the countdown. A tone
sound will be heard at the end of the countdown.
To stop sound at the end of the countdown tap
any touch control areas. To modify the timer
enter this menu again.
TIMER
LIGHT
Activate TIMER with
Set desired time (max 10 hours) with
confirm
and
Turn the oven light on and off by tapping this
icon.
Note : this function is not available in the PRO
series ovens.
Leave menu
BASIC OPERATION - DESIGN SERIES MODELS ( F60 CON XT)
START
Activate the oven by touching any control area
for 2 seconds.
Start programming with
Select COOKING MODES
and confirm
The oven will start PRE-HEATING in a few second
showing the progress in the display. The end of
pre-heating will be confirmed with a tone. Place
the food in the oven when the desired
temperature has been reached.
Note
The preheating bar is not shown.in broil,
convection broil, dehydrate, defrost, warming
and proofing modes.
Set desired COOKING TEMPERATURE
confirm
and
MODIFY/STOP
Modify COOKING MODE during cooking with
Modify COOKING TEMPERATURE during cooking
with
STOP cooking with
24
and confirm
BASIC OPERATION – PROFESSIONAL SERIES MODELS (F60 PRO XT)
Activate the oven by turning the COOKING MODE
knob (right)
Select COOKING MODE by turning the right knob
Select COOKING TEMPERATURE by turning the
temperature left knob
The oven will start PRE-HEATING in a few second
showing the progress in the display. The end of
pre-heating will be confirmed with a tone. Place
the food in the oven when the desired
temperature has been reached.
Note
The preheating bar is not shown-in broil,
convection broil, dehydrate, defrost, warming
and proofing modes.
In order to shorten the heat-up time the
preheating is always done with turbo mode
Each cooking mode has a default optimum
temperature that appears as soon the cooking
mode is selected
MODIFY/STOP
Modify COOKING MODE during cooking by
turning the cooking mode knob
Modify COOKING TEMPERATURE during cooking
by turning the temperature knob
Stop cooking by turning the function knob in the
OFF position
TIME MANAGEMENT MENU – TIMER, DELAY/END COOKING, FOOD PROBE
START
Important!
After programming the oven for cooking, touch
or
to enter the time management menu.
COOKING WILL NOT STOP AT THE END OF THE
COUNTDOWN. TURN THE OVEN OFF MANUALLY
AND REMOVE FOOD FROM OVEN TO AVOID
OVERCOOKING.
END OF COOKING
The oven will automatically turn off after the set
cooking time has elapsed.
Activate END OF COOKING
Set the desired duration
and confirm
(max 10 hours)
SET TIMER
Leave menu
This function is simply a minute minder: the
timer can be used independently from cooking
and it will not turn off the oven at the end of the
set time. For the oven to shut off automatically,
select END OF COOKING (see below).
The display will show the countdown. the oven
will turn off at the end of the countdown and the
display will show END OF COOKING – BUON
APPETITO! The end of the countdown will be
confirmed with a repeating tone. Touch any
touch control area to stop tone.
Activate the TIMER
Set the desired duration
and confirm
(max 10 hours)
Leave menu
The display will show the countdown. The end of
the countdown will be confirmed with a
repeating tone. Tap any touch control area to
stop tone.
MODIFY/CANCEL
Activate end of cooking menu and modify the
time value.
Set time to 0:00 to cancel
25
ENGLISH
START
Note
Cooking time is calculated from the end of
preheating. During preheating the end of
cooking time is not shown in the display.
Select the desired food temperature with
and confirm
It is not possible to set end of cooking when
using the food probe. If a food probe
temperature is set, the end of cooking will be
deleted.
DELAY START
The oven will start at a desired time.
Activate DELAY START
Set desired time before oven will turn on
and confirm
After the preheating sequence is completed, the
display will show the message INSERT FOOD
PROBE. CONTINUE?
Leave menu
The display will show the countdown. The oven
will turn on at the end of a count down. The end
of the countdown will be confirmed with a
repeating tone.
Note
DELAY START can be combined with the END OF
COOKING.
FOOD PROBE
The food probe is only available on XT models.
The food probe monitors the core temperature
of the food during cooking and turns off the oven
when the desired temperature is reached. It can
be used ONLY with the following cooking modes:
Connect the probe jack to the port located in the
upper left side of the oven cavity. Place the food
in the oven and confirm
Convection bake
The display will show the set temperature and
the actual temperature measured by the probe.
The oven will turn off when the desired food
temperature is reached. The display will show
END OF COOKING – BUON APPETITO! End of
cooking will be confirmed with a tone. To stop
tone tap any touch control area.
Turbo
Note
Broil
Food probe temperature can be selected at any
time while cooking.
Convection
Bake
Convection Broil
Insert the food probe in the item to be cooked.
For best results, insert the probe as close as
possible to the center of the item and make sure
it is not in contact with bones or fat. Improper
placement of the probe could shut the oven off
too early and result in uncooked food. With
poultry, make sure the probe does not rest in a
cavity.
If the probe jack is not inserted in its port, a
message will appear on the display requiring
confirmation of the probe insertion. Cooking will
stop if the probe is not inserted. Select NO on
the confirmation screen to continue cooking
without probe.
Activate
DO NOT LEAVE THE PROBE IN THE OVEN CAVITY
WHEN NOT IN USE.
26
Important
COOKING MODES GUIDE
MODE
DETAILS
USE FOR/TIPS
BAKE
Bake and broil elements ON
Soufflés
Convection OFF
Meringues
Temperature 37°C – 260°C
Angel food cakes
Use lower 2 shelf levels.
Cream puffs
Cookies
Cakes
ENGLISH
Cheesecakes,
Pies
Quiches
Baked potatoes
CONVECTION
BAKE
Bake element ON at full power
Cookies
Broil element ON at moderate power
Cakes
Convection fan ON
Breads
Temperature 37°C – 260°C
Rising dough
Cheesecake
Use several levels at the same time.
Pies
NOTE: As a general rule, the
Quiches
temperature of a recipe not designed Baked potatoes
for baking in a convection oven should
Casseroles
be lowered by 20F (15C)
CONVECTION
Convection fan and convection
element ON
Gentle cooking of pastries, soufflés
and cakes.
Use several levels at the same time.
At higher temperature use also for
roasting meats and poultry.
Temperature 37°C – 260°C
NOTE: As a general rule, the
temperature of a recipe not designed
for baking in a convection oven should
belowered by (15 °C.)
TURBO
Bake element ON at full power
Uniform cooking with strong heat from
Convection element and fan ON at full the bottom of pizza, focaccia and
bread.
power
Temperature 37°C – 260°C
Use shelf levels 2 and 3
27
MODE
DETAILS
BROIL
Broil element ON
CONVECTION
BROIL
Broil element ON
DEFROST/
DEHYDRATE
In DEFROST mode only the fan is
active to circulate air in the cavity. All
heating elements are turned off.
USE FOR/TIPS
Brown food on the top side only. Turn
4 power settings – LOW (1) to HIGH (4) food over if browning is required on
both sides.
The element is heated for the first 3
minutes at maximum power and then
the power is reduced according to the
selected power setting.
Brown food on top and bottom side.
This mode is preferred for browning
food that is too delicate for turning
4 power settings – LOW (1) to HIGH (4)
such as fish.
The element is heated for the first 3
NOTE: The degree of browning on each
minutes at maximum power and then
side might be different.
the power is reduced according to the
selected power setting.
Convection fan ON
Defrost food
Dehydrate food, flowers, vegetables.
In DEHYDRATE mode the fan is on and
the cavity is maintained at 37°C.
PROOFING
Bake element ON at low constant heat For best results, place dough in bowl
power
and cover with a clean towel.
Fan on every 5 minutes to eliminate
stagnant air.
Use any shelf level.
WARMING
Bake element at low to moderate
power.
Temperature 60/76/93°C preset.
28
Use the warming program in Sabbath
mode (S.M.) during religious
observance.
BROIL / CONVECTION BROIL
The broil element operates on 4 different power
levels.
The element is heated for the first 3 minutes at
maximum power and then the power is reduced
according to different desired effects.
Level 1 produce a mild browning of the food
surface
Level 4 produce an intense irradiated heat that
cause a fast browning of food.
Select BROIL to brown food on the top side only.
This mode requires turning food if browning is
required on both sides
Select CONVECTION BROILER to brown food
slightly also on the bottom side. This mode is
preferred for browning food on both sides that is
too delicate for turning such as fish. The degree
of browning on each side might be different
ENGLISH
Select the power level according to the desired
effect on food.
29
TIPS FOR BEST RESULTS – BROILING AND ROASTING
ADJUST TO DESIRE LEVEL OF ‘DONENESS’
FOOD
SHELF
POSITION
Ground beef
patties, ½” thick
6
T-Bone steak
6
COOKING MODE
Broiler
TEMPE- APPROXIMATE
RATURE COOKING TIME
LEV 4
15 to 20
minutes
Broil until not
pink in center
LEV 4
12 to 20
minutes
Broil until done to
desired level
LEV 4
12 to 20
minutes
Broil until done to
desired level
165°C
20 to 25 min
per pound
Small roasts
require longer
time per pound;
reduce time
using Convection
Bake
165°C
20 to 25 min
per pound
Cook until juices
are clear
LEV 3
20 to 25
minutes
Cook until juices
are clear
LEV 3
25 to 30
minutes
Remove skin and
ook until juices
are clear
LEV 4
30 to 45
minutes
Turn with tongs
and cook until
juices are clear
175°C
75 to 90
minutes
Reduce time
using Convection
Bake. Time may
vary if stuffed.
165°C
20 to 25 min
per pound
Reduce time
using Convection
Bake. Time may
vary if stuffed.
Convection Broiler
Broiler
Convection Broiler
Flank steak
6
Broiler
Convection Broiler
Eye of round roast
5
Bake
Convection bake
Loin roast
5
Bake
Convection bake
Boneless skinless
6
chicken breasts
Chicken thighs
Broiler
Convection Broiler
5
Broiler
Convection Broiler
Half chicken
5
Broiler
Convection Broiler
Roast chicken
4
Bake
Convection bake
Turkey
30
4
Bake or
Convection bake
SUGGESTIONS
FOOD
PAN
TEMPERATURE
COOKING TIME
(minutes)
LEVEL
Cookies
30x38 Cookie Sheet
185°
8 to 12
2..5
Layer Cakes
20 or 22”Round
175°
25 to 35
2..5
Sheet Cakes
22x33 Pan
175°
30 to 40
2..5
Bunt Cakes
30 Cup
160°
60 to 75
2..5
Brownies, Bar
Cookies
22x22 Pan
160°
20 to 25
2..5
Biscuits
30x38 Cookie Sheet
215°
10 to 15
2..5
Quick Bread
20x10 Loaf Pan
175°
55 to 70
2..5
Muffins
12 cup Muffin Pan
215°
14 to 19
2..5
Fruit Pies
22 Diameter
215°
35 to 45
2..5
Fruit Cobblers
22x22 Pan
200°
25 to 30
2..5
Yeast Bread
20x10 Loaf Pan
185°
25 to 30
2..5
Dinner Rolls
22x32" Pan
200°
12 to 18
2..5
Cinnamon Rolls
22x32" Pan
185°
25 to 30
2..5
Yeast Cake
30x38 Cookie Sheet
200°
20 to 30
2..5
ENGLISH
TIPS FOR BEST RESULTS - BAKING
CHECK PACKAGE DIRECTIONS
31
TIPS FOR BEST RESULTS - DEHYDRATE
FOOD
PREPARATION
APPROXIMATE
TIME (hrs)
DONE WHEN…
Apples
Cut in 5mm slices and dip in 1/4
cup lemon juice + 2 cups water
solution
11-15
Slightly pliable
Bananas
Cut in 5mm slices and dip in 1/4
cup lemon juice + 2 cups water
solution
10-15
Soft, pliable
Cherries
Wash and towel dry. Remove pits
10-15
Pliable, leathery,
chewy
Orange peels and
slices
Peel and cut in 1/4" slices
Peels:2-4
Slices: 12-16
Orange peel: dry and
brittle.
Orange slices: skins
are dry and brittle,
fruit is slightly
Pineapple rings
Towel dry
Canned: 9-13
Soft and pliable
Fresh: 8-12
Strawberries
Wash and towel dry. Cut in 1cm
slices. Place skin (outside) down
on rack
12-17
Dry, brittle
Red peppers
Wash and towel dry. Remove
stems, chop coarsely about 2,5cm
pieces
16-20
Leathery with no
moisture inside
Mushrooms
Wash and towel dry. Cut off stem
end. Cut into 2mm slices
7-12
Tough and leathery,
dry
Tomatoes
Wash, drain well.and towel dry.
Cut in 2mm slices.
16-23
Dry, brick red colour
Oregano, sage,
parsley, thyme,
fennel
Rinse and dry with paper towel
3-5
Crisp and brittle
Basil
Use basil leaves 3 to 4 inches
from top. Spray with water, shake
off moisture and pat dry
3-5
Crisp and brittle
32
ASSISTANT FUNCTION
Developed with the help of Italian professional
chef consultant Roberto Carcangiu, Bertazzoni’s
exclusive ASSISTANT function is a revolutionary
system for upgrading oven cooking in the home.
The ASSISTANT is pre-programmed with finely
calibrated sets of cooking modes, temperatures
and times sequences for each type of food. The
system does not provide recipes – those are
yours to choose from. The ASSISTANT will simply
‘pilot’ the oven to help you make the best of your
oven recipes.
Enjoy selecting the sequences already stored in
the ASSISTANT that best suit your own style of
cooking and culinary taste. After you have
familiarized with them, you will be able to build
new sequences of your own creation and store
them for future use.
The ASSISTANT is available on XT models only
together with a food probe for temperature
control.
ENGLISH
Available on XT models only
33
ASSISTANT MENU
MANAGE - Selected the food type, weigh/size, type of cooking and desired
finish and let the Assistant oversee the cooking until your dish is perfect.
SAVE – After you cook a perfect dish, name the cooking sequence and let the
Assistant store it for future use.
RETRIEVE – Retrieve a previously stored set and let the ASSISTANT manage the
oven according to the instructions you selected for that dish.
BREAD
CAKES AND PASTRY
FISH
MEAT
PASTA
PIZZA
POULTRY
VEGETABLES
START
Activate the oven by touching any control area
for 2 seconds.
Start programming with
Select ASSISTANT
knob and confirm
Select MANAGE
with
or with right
with
and confirm
Select TYPE OF FOOD with
and confirm
34
Selected food categories will guide you through
the selection of additional parameters (e.g. for
meat: weight, type of cut, food probe
temperature). Follow the directions on the
display, select the appropriate parameters and
confirm.
The oven will begin pre-heating and signal the
end of the pre-heating cycle with a tone. Insert
the food in the oven only after the pre-heating is
complete.
The oven will turn off when the food temperature
measured by the probe reaches the desired
level. The display will show END OF COOKING –
BUON APPETITO! End of cooking will be
confirmed with a tone.
Important:
The oven will turn off at the end of the cooking
cycle. The display will show END OF COOKING –
BUON APPETITO! End of cooking will be
confirmed with a tone.
Important:
COOKING WILL CONTINUE WITH RESIDUAL
HEAT. REMOVE THE DISH FROM THE OVEN
IMMEDIATELY TO AVOID OVERCOOKING.
FOOD PROBE
If the cooking sequence requires the use of the
food probe, the display will ask you to input the
desired food temperature (lower = rare, higher =
well done). Once the pre-heating cycle is
completed, the display will remind you to insert
the food probe. Connect the food probe jack to
the appropriate port in the oven cavity at the end
of preheating. The cooking sequence will start
only after confirmation that the food probe has
been inserted.
STOP/MODIFY
To STOP cooking tap
and confirm.
It is not possible to change cooking mode,
temperature or duration while cooking with the
ASSISTANT function. If additional cooking is
needed, operate the oven in manual mode until
the desired result is obtained.
Important
Pre-programmed sequences have been
calibrated for cooking food starting from room
temperature. If using frozen food for a dish,
defrost it before starting a sequence.
Note :
In low temp roasting mode, food is baked at a
very low temperature then requiring long
cooking time. Baking time can last up to 5/6
hours, according to food dimensions.
In assistant cooking mode, the time is
calculated from the end of preheating. Make
sure to introduce food in the oven as soon as the
preheating time is finished, otherwise the
cooking time can result too short.
All cooking methods refer to fresh food, except
where indicated. For frozen food, refer to your
standard procedure
When using the food probe, the display will show
the food probe temperature (actual and target)
instead of the remaining time until the end of
cooking.
35
ENGLISH
The display will show the time remaining until
the end of the cooking sequence.
COOKING WILL CONTINUE WITH RESIDUAL
HEAT. REMOVE THE DISH FROM THE OVEN
IMMEDIATELY TO AVOID OVERCOOKING.
ASSISTANT FUNCTION - OPTIONS CHART
Food
Meat
Preparation
Food probe
Traditional Roasting
yes
Low Temp. Roasting
yes
Braising
Slow cooking
90 min.
yes
Oven Fried
Poultry
Fish
6 min.
Traditional Roasting
yes
Slow cooking
yes
Traditional Roasting
yes
Oven Fried
Grilled - food temp. probe
Cakes
Bread
yes
7 min.
Rising pastry dough
35 min.
Shortbread dough
25 min.
Manual
22 min.
Pizza
Homemade pizza
Pasta
Frozen au gratin
yes
14 min.
yes
Fresh au gratin
35 min.
Stew / Sautè
20 min.
Grilled
7 min.
Roasted potatoes
50 min.
* Time indicated excludes pre-heating
36
12 min.
Grilled – manual
Food temp. probe
Vegetables
Pre-programmed
cooking time*
SLOW COOKING
A manual switch off of the oven is then required.
A cooking time of 12 hours is suggested. The
program is automatically switched off after 24h.
CUT TYPE
Cut type
Type of meat
Confirm
Select FOOD CATEGORY and confirm
Enter a name for this cooking sequence - scroll
through the keyboard with
and confirm
each letter with
NOTE: scrolling accelerates by keeping the finger
on the touch area.
Beef chuck
Beef brisket
Corned beef
Less tender
Short ribs
Pork shoulder
Lamb shank
Pork blade roast
Tender
Beef tenderloin
Confirm with
Prime rib
Touch
to leave this menu without saving the
sequence.
Pork tenderloin
Leg of lamb
After saving a sequence, the display will return
to the main ASSISTANT menu.
Chicken legs/thighs
Important
SAVE
The ASSISTANT stores your latest cooking
sequence for future use.
Select ASSISTANT
knob and confirm
Select SAVE
with
with
or with right
and confirm
The display will show the last cooking sequence
performed, indicating the set of cooking modes,
temperatures and times used for the cycle.
The memory can store up to a maximum of 32
personalized cooking sequences in addition to
those pre-programmed. When the memory is full
and you attempt to store another cooking
sequence, a message will prompt you to delete
one of the previously stored sequences.
The interface will eliminate steps that are not
significant for cooking results, such as functions
used for less then 1 minute.
A maximum of 4 different cooking steps
(combination of function/temperature/time) can
be recorded in a sequence.
37
ENGLISH
Slow cooking allows cooking of very large pieces
of meat and poultry (over 4Kg.) for several hours
at a very low temperature. This cooking mode
does not end when the temperature set on the
food probe is reached, but the food is then
continuously kept at this temperature. The
temperature shown on the food probe will them
continuously be adjusted once the set valve has
been reached.
RETRIEVE
You will have the following options:
To retrieve a previously stored personal
sequence follow these simple steps.
– START: will immediately start the cooking
sequence.
Select ASSISTANT
knob and confirm
with
or with right
Select RETRIEVE
with
and confirm
– MODIFY: allows to modify food category and
name associated to a personal cooking
sequence
Select FOOD CATEGORY and confirm
– DELETE: delete the selected cooking
sequence. Confirmation is required.
Select a stored sequence and confirm
Note:
if no cooking sequence is saved an empty menu
will be displayed.
SABBATH MODE
This special program is designed for religious
observances.
The oven lights will not turn on in Sabbath Mode
even if the door is open.
START
MODIFY/STOP
Activate the oven by touching any control area
for 2 seconds.
To modify cooking mode:
Start programming with
Select WARMING with
and confirm
Select S.M. with
or with right knob
and confirm
The oven will turn on and pre-heat until the
temperature of 100°C is reached. Then, the
temperature will be held constant until the oven
is switched off. Opening of the door will not
cause an immediate re-heating of the oven: the
heating will continue according to a set
procedure independent from use.
38
– DESIGN SERIES OVEN: Scroll COOKING
MODES
– PROFESSIONAL SERIES OVENS: use the
cooking mode knob (right)
Turn off the oven with
TROUBLESHOOTING GUIDE
OVEN PROBLEM
POSSIBLE CAUSES AND/OR REMEDY
Oven does not function
Range is not connected to electrical power. Ask a professional to
check power circuit breaker, wiring and fuses.
Oven light does not work
Light bulb is burned out.
Oven is not connected to power.
Oven is not heating
Check the circuit breaker or fuse box to your house.
ENGLISH
Make sure there is proper electrical power to the oven.
Make sure the oven temperature has been selected.
Oven light is not working
properly
Replace or reinsert the light bulb if loose or defective.
Oven light stays on
Check for obstruction in oven door. Check to see if hinge is bent.
Cannot remove light cover
There may be debris/spillage around the lens cover. Wipe lens
cover area with a clean dry towel prior to attempting to remove the
lens cover.
Specific error messages may appear in case of malfunction. Call after sale service and provide
the information that appear in the display for a quick and accurate diagnosis.
39
Desideriamo anche noi dare il nostro contributo all'ambiente; per questo la carta che utilizziamo è riciclata.
Our contribution to protecting the environment - we use recycled paper.
Cod.: 3172590-000