1
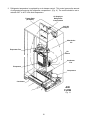
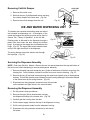
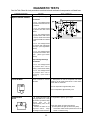
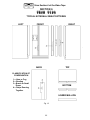
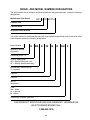
CONSUMER SERVICES TECHNICAL
EDUCATION GROUP PRESENTS
R-84
26" DEEP
SIDE - BY SIDE
REFRIGERA
TOR/ FREEZERS
REFRIGERAT
MODELS
KSBS20QEWH0
KSBS20QEAL0
KSBS20QEBL0
KSFS20QEWH0
KSFS20QEAL0
KSFS20QEBL0
ED20DBXEW00
ED20DBXEN00
ED20DBXEB00
ED20DFXEW00
ED20DFXEN00
ED20DFXEB00
JOB AID
Part No. 4321940
i
INTRODUCTION
This Job Aid, 26" DEEP SIDE-BY-SIDE REFRIGERATOR/FREEZERS, (Part No. 4321940), and the
companion video tape, 26" DEEP SIDE-BY-SIDE REFRIGERATOR/FREEZERS, (Part No. 4321970),
provides specific information on for the installation, service and repair of 20 cu. ft. side-by-side
refrigerator/freezers with 26" deep cabinets.
26" DEEP SIDE-BY-SIDE REFRIGERATOR/FREEZERS has been compiled to provide the most
recent information on design, features, troubleshooting, service and repair procedures. Whirlpool
required sweep charge procedures are to be strictly adhered to when repairing the sealed system.
For a complete explanation of those procedures, refer to the Job Aid, SWEEP CHARGE
PROCEDURES FOR THE 90's, (Part No. 4321717) and its companion video (Part No. 4321718.)
GOALS AND OBJECTIVES
The goal of this Job Aid is to provide detailed information that will enable the service technician to
properly diagnose malfunctions and repair 22 cu. ft. side-by-side refrigerator/freezers with 26" deep
cabinets.
The objectives of the Job Aid are:
The service technician will •
•
•
•
•
Understand proper safety precautions.
Follow proper refrigerant recovery procedures.
Successfully troubleshoot and diagnose malfunction.
Successfully perform necessary repairs.
Successfully return the refrigerator/freezer to proper operational status.
TO THE INSTRUCTOR/INDEPENDENT STUDENT
At the end of certain sections of this Job Aid you will find a "Confirmation of Learning Exercise." A
symbol that looks like this ( ✎) indicates that a pencil and two "Hi-Light" markers may be necessary
to complete the exercise. Certain exercises may require that service procedures be performed if an
appropriate appliance is available.
WHIRLPOOL CORPORATION ASSUMES NO RESPONSIBILITY
FOR ANY REPAIRS MADE ON OUR PRODUCTS BY ANYONE
OTHER THAN AUTHORIZED SERVICE TECHNICIANS.
© 1996 Whirlpool Corporation, Benton Harbor, MI 49022
ii
TABLE OF CONTENTS
INTRODUCTION .................................................................................................................. ii
TABLE OF CONTENTS ...................................................................................................... iii
SECTION ONE
FEATURES AND DESIGN .............................................. 1
Safety .............................................................................................................................. 1
R134a Service Information ............................................................................................. 2
SECTION TWO
Installation Considerations ...................................... 3
SECTION THREE
THEORY OF OPERATION .............................................. 5
Temperature Controlled Meat Locker .......................................................................................... 5
Ice and Water Dispensers ............................................................................................................ 5
Temperature Control Operation ................................................................................................... 9
Adaptive Defrost Function ......................................................................................................... 10
SECTION FOUR
COMPONENT ACCESS ................................................ 13
SECTION FIVE
DIAGNOSIS AND TROUBLESHOOTING ................................... 21
Troubleshooting Guide ............................................................................................................... 21
Dignostic Tests ........................................................................................................................... 23
SECTION SIX
TECH TIPS ....................................................... 25
Condensation Patterns ..............................................................................................................
Wiring Diagram ..........................................................................................................................
Strip Circuits ...............................................................................................................................
Model Number Designation .......................................................................................................
Product Specification and Warranty Information Sources .........................................................
iii
25
26
27
29
29
iv
>>
View Section 1 of the Video Tape
SECTION 1
GENERAL INFORMATION
SAFETY
! WARNING
▲
To avoid the risk of electrical shock,
property damage, personal injury or death:
•
The power cord must be plugged into a 3-prong grounding-type wall receptacle, grounded
in accordance with the National Electrical Code, ANSI/NFPA 70 - latest edition and local
codes and ordinances.
•
It is the personal responsibility of the consumer to have a proper 3-prong wall receptacle
installed by a qualified electrician.
•
DO NOT, UNDER ANY CIRCUMSTANCES, REMOVE
THE POWER CORD GROUNDING PRONG.
•
A separate adequately fused and grounded circuit
should be available for this appliance.
•
Do not remove any grounding wires from individual
components while servicing, unless the component
is to be removed and replaced. It is extremely
important to replace all grounding wires when
components are replaced.
!
▲
CAUTION
To avoid the risk of
property damage OR personal injury:
•
Tape doors closed when adjusting hinges or doors.
•
do not dispense ice into thin glass, fine china or delicate crystal. Cracks or chips may
result from ice dropping into container and from combined pressure of hands and
dispenser
bar.
•
When servicing the ice dispenser system, unplug the refrigerator and remove the ice
storage bin.
1
R134a REFRIGERANT
SERVICE INFORMATION
This product uses R134a refrigerant. This refrigerant requires synthetic Ester Oil in the compressor.
This cooling system does not tolerate contamination from any of the following:
•
•
•
•
•
•
•
•
Other Refrigerants
Moisture
Petroleum-based Lubricants
Silicone Lubricants
Cleaning Compounds
Rust Inhibitors
Leak Detection Dyes
Any Other Type of Additive
As a result the following precautions should be observed:
•
•
•
•
•
•
Use equipment dedicated to R134a sealed system service only.
Do not leave a replacement compressor open to the atmosphere for more than 10 minutes.
Always replace the filter-drier when performing any repairs on the sealed system.
USE ONLY R134a REFRIGERANT FOR BACKFLUSHING AND SWEEP PROCEDURES.
If the rubber plugs on the service replacement compressor appear to have been tampered
with or removed, DO NOT USE THE COMPRESSOR. Get another one.
The filter-drier MUST be cut from the sealed system. Never unbraze the filter-drier from
system tubing. Applying heat will drive moisture back into the sealed system.
HEALTH AND SAFETY HANDLING
Allowable Overall Exposure Limit
Vapor Exposure to Skin
Liquid Exposure to Skin
Vapor Exposure to Eyes
Liquid Exposure to Eyes
Above Minimum Exposure Limit
Safety and Handling
Spill Management
Fire and Explosion Hazards
Storage Conditions
Disposal Procedure
R134a
1,000 ppm
No Effect
Can Cause Frostbite
Very Slight Irritation
Can Cause Frostbite
Can Cause Asphyxiation,
Tachycardia and Cardiac
Arrhythmias.
Wear appropriate Skin and
Eye protection. Use adequate
Ventilation.
Remove or Extinguish Ignition
or Combustible Sources.
Evacuate or Ventilate Area.
May Decompose if contact with
Flames and Heating
elements. Container May
Explode IF Heated Due to
Pressure Rise. Combustion
Products are Toxic.
The Procedures/Rules for R12
also Apply to R134a.
Reclaim
SEE SWEEP CHARGE PROCEDURES FOR THE 90's,
Part No. 4321717 FOR COMPLETE INSTRUCTION ON
SERVICING THE SEALED SYSTEM.
2
>>
View Section 2 of the Video Tape
SECTION 2
GENERAL INFORMATION
INSTALLATION CONSIDERATIONS
LEVELING THE UNIT AND ALIGNING THE DOORS
▲
▲
Top Hinge
Locations
▲
Rear Roller
Adjustment
Screw
Fig. 1
▲
Toe Grille
Location
Front Roller
Adjustment
Screw
▲
Door Too
Low
▲
▲
▲
▲
▲
▲
Door Too
Low
Fig. 3
Fig. 2
Shim
Shim
Hinge
Cover
Door Closer
Fig. 4
Top
Hinge
Bottom
Hinge
Shim
3
Shim
Shim
ALIGNMENT AND LEVELING PROCEDURES FLOW CHART
Slide Unit
into
Final Location.
▲
Is
Unit
Stable?
NO
▲
YES
1. Remove toe grille by
pulling forward at
each end.
2. Turn roller adjustment screw(s) clockwise until unit is
firmly on all
roller(s). (Fig. 6)
3. If unit is not stable
due to uneven flooring, use shims under
rear roller(s).
▲
NO
▲
▲
Are Tops of Doors
Aligned with Each
Other?
(Fig. 7)
1. Remove toe grille by
pulling forward at
each end.
2. Turn roller adjustment screw for the
door that is lower
clockwise.
3. Open and close both
doors to confirm
doors are aligned.
4. Repeat until doors
are aligned.
YES
▲
▲
▲
YES
Is
Unit
Stable?
NO
▲
Replace Toe Grille.
▲
▲
4
▲
YES
▲
1. Remove top hinge
cover. Loosen top
hinge screws. (Fig. 9)
2. Adjust both doors so
tops are aligned and
gap is consistent
from top to bottom.
3. Tighten top hinge
screws and replace
the covers.
NO
Is Center Gap
Consistent from
Top to
Bottom?
(Fig. 8)
1. Turn roller adjustment screw(s) counterclockwise until
unit is firmly on all
rollers.
2. If unit is not stable
due to uneven flooring, use shims under
rear rollers.
>>
View Section 3 of the Video Tape
SECTION 3
THEORY OF OPERATION
TEMPERATURE CONTROLLED MEAT LOCKER
The 26" deep side-by-side refrigerator/freezer is equipped with a chilled meat locker which will keep
the contents of the drawer approximately 5°F colder than the rest of the refrigerator section. (Fig. 5)
A slide on the front of the drawer operates a damper which directly controls the amount of freezer air
drawn into the drawer through an air duct.
AIR
DUCT
▲
▲
DAMPER
▲
Fig. 5
SLIDE
CONTROL
ICE AND WATER DISPENSER
For ice and water dispensing, a plumbing connection must be made between the household water
supply and the dual solenoid valve mounted on the rear cabinet rail.
Ice dispensing operates as follows:
1. The automatic ice maker is mounted on the
back wall of the freezer liner. Water automatically
fills the mold, freezes into ice and dumps ice into the
the storage bin.
2. When the storage bin is full, a shut-off arm prevents
additional ice production until ice has been removed,
which lowers the shut-off arm. The storage bin will hold
approximately 8 pounds of ice. A motor driven helix is
mounted near the bottom of the storage bin. (Fig. 7)
When energized, the helix moves the ice to the front of
the storage bin where ice is directed into a lift wheel
mechanism. (Fig. 8)
Fig. 6
3. In cube mode, the helix turns ice lift wheel counter-clockwise.
Ice bypasses the crusher blades and is dispensed into a glass.
4. In crushed mode, the helix turns clockwise forcing the ice into the crusher blades. Crushed ice
pieces will vary in size and shape.
5. Keep bits of ice from being sprayed beyond glass by placing a glass with a large opening close to
the ice chute.
5
AUGER MOTOR
AUGER MOTOR
ASSEMBLY
DRIVER
LOCKING NUT
CAPACITOR
AUGER MOTOR
SUPPORT
AUGER MOTOR
COVER
Fig. 7
ICE BUCKET
ICE BUCKET
ASSEMBLY
HELIX CAP
CRUSHED ICE LIFT
WHEEL
ICE AGITATOR
CRUSHED ICE BAR
STEPPED WASHER
WAVED WASHERS
STEPPED WASHER
STATIC BLADE
ROTATING BLADE
STATIC BLADE
ICE DAMPER
ROTATING BLADE
BLADE ANCHOR
ROLL PIN
WAVED WASHER
STEPPED WASHER
WAVED WASHER
ICE DAMPER
ROTATING BLADE
LOCKING NUT
BLADE COVER
ICE CRUSHER FRONT
CRUSHED ICE BUCKET
FRONT
Fig. 8
6
6. Dispense ice by holding glass against ice lever arm. The mechanically operated ice chute door
opens, and the motor driven helix is energized and ice is automatically dispensed into glass.
When glass is withdrawn, a delay mechanism slowly closes the ice chute door.
!
▲
WARNING
To avoid risk of personal Injury or property damage, refrigerator must be
unplugged and ice storage bin must be removed before attempting to service
dispenser system. Never put fingers, hands, or foreign objects Into Ice dispenser
opening while attempting to manually clear stalls or jams. Never use sharp
objects to break Ice. In case of stall or jam in cube or crushed mode, dispense in
opposite mode several times. There may be a delay when switching between
cube and crushed ice. This is normal. It takes a few seconds for cubes to be
moved from storage bin.
7. Sometimes a mound of “snow” will form on the door and/or ice chute. This condition is normal and
usually occurs with the repeated dispensing of crushed ice. “Snow” will eventually evaporate or
moisture can be wiped dry.
8. If the dispenser bar is held for long periods, the dispenser motor shuts off automatically after 2 to
3 minutes to prevent overload. The motor resets automatically after 3 minutes and ice dispensing
can continue.
9. Use only ice from internal automatic ice maker. Do not add purchased ice cubes or cubes made
in any other manner. Dispenser operates only with cubes of proper size and shape.
10. Allow 12 hours after installation before first harvest of ice. Time required depends on freezer
temperature and amounts of food in freezer and refrigerator compartments.
11. The storage bin fills in three to four days depending on frequency of use. Two to 4 pounds of ice
will be made in a 24-hour period with a 0°F to 2°F freezer food temperature.
12. To temporarily meet demands for increased ice production, turn freezer control to colder setting.
Return freezer control to normal setting as soon as possible.
Water dispenser operates as follows:
1. The reservoir is located in the refrigerator section directly behind the crisper drawers. The reservoir
inlet tube comes from a solenoid valve mounted on the rear cabinet rail.
2. The reservoir holds approximately 40 ounces of water.
3. The outlet tube exits through the refrigerator floor and travels through a conduit foamed into the
cabinet bottom to a location just short of the freezer door bottom hinge. 5/16 inch tube is reduced
to 1/4 inch by means of a coupling. The tube enters the freezer door through the center of the
hinge pin and runs up the left flange of the door and crosses over the top of the cavity behind the
water dispensing lever. (Fig. 9) NOTE: The first glass of water will be somewhat warmer than
following glasses, since the water tube leading to the dispenser from the water reservoir is not
refrigerated.
4. The reservoir is filled by holding a glass against water the lever arm until water flows into a glass.
5. If household plumbing has been disturbed, thoroughly flush the water system. This will help
remove foreign materials in the water and also flush plumbing in refrigerator.
7
6. If odor, taste and sediment are a problem, a granulated activated carbon filter should be installed
on the household plumbing line.
7. Underneath the ice and water dispenser is a small sump to catch any spillage that may occur.
This is not a drain. However the sump is heated to speed up water evaporation. A removable
grille is provided as a sump cover.
8. A six watt lamp is activated each time the water or ice dispensing lever arms are depressed.
Turning cavity night light switch off does not affect lamp being activated by ice or water levers.
9. The night light is activated by a photoelectric cell mounted in the dispenser front cover plaque.
Depending on ambient light, the night light may not always be on at full brightness. This is
normal. The night light can be turned off manually.
WATER FLOW
DIAGRAM
Automatic Ice Maker
Fig. 9
¼" O.D.
Plastic Tubing
Night Light
Automatic
Switch
▲
▲
Photoelectric
Cell
Incoming Water
Line Connection
(Hose Coupling
x ¼" O.D.
Copper Tube
Fitting)
Ice & Water
Dispenser
¼" O.D.
Plastic Tubing
Water Inlet Valve
Water Reservoir
¼" O.D. x 5/16" O.D.
Plastic Compression
Union
5/16" O.D.
Plastic Tubing
½" O.D.
Plastic Conduit
(foamed in Place)
8
¼" O.D.
Plastic
Tubing
TEMPERATURE CONTROL OPERATION
1. Freezer temperature is regulated by an air sensing thermostat located at the top rear of the
refrigerator compartment. A sensing tube goes into a well which routes the tube into the freezer
section. This thermostat actuates the compressor to circulate refrigerant through the sealed
system. (Fig. 10) The thermostat should be set to maintain 0°F to 2°F freezer food temperature.
REFRIGERANT
FLOW
Freezer
Temperature
Sensor
Fig. 10
Thermostat
Capillary/Suction Line
Heat Exchanger
Evaporator Inlet
Flange
Loop
Capillary Tube
Compressor
Suction Line
Center
Mullion Loop
Process Stub
Evaporator
Outlet
High-Side
Filter/Drier
Evaporator
Condenser Fan
Compressor
Process Stub
Condenser
Outlet
Condenser
Center Mullion
Loop
Compressor
Discharge Line
9
2. Refrigerator temperature is regulated by an air damper control. This control governs the amount
of refrigerated air entering the refrigerator compartment. (Fig. 11) The control should be set to
maintain 28°F to 40°F fresh food temperature.
Air Supply to
Refrigerator
Compartment
Freezer Back
(Air Baffle)
Cold Air
Damper
Meat locker
Air
Evaporator Fan
Air
Return
Condenser
Fan
Evaporator
Compressor
Condenser
AIR
FLOW
Fig. 11
10
ADAPTIVE DEFROST OPERATION
1. This unit is equipped with Adaptive Defrost Control (ADC). (Fig. 12) A defrost cycle occurs after
a predetermined length of compressor run time. The length of accumulated compressor run time
is determined by a microprocessor that monitors the length of a defrost cycle (the time) interval
between energizing the defrost heater and the defrost thermostat opening). The microprocessor
then adapts or changes the amount of accumulated compressor run time between defrost cycles.
Fig. 12
2. The accumulated Compressor Run Time between Defrost (CRTD) will be one of the five values
under normal operation:
CRTD (0) = 4 hours (Start Up)
CRTD (1) = 8 hours
CRTD (2) = 12 hours
CRTD (3) = 16 hours
CRTD (4) = 72 hours (Vacation)
•
If the defrost cycle length is low, (19 minutes or less), indicating a small frost load, the CRTD
for the next defrost cycle is advanced to the next level.
•
If the defrost cycle length is 19 to 24 minutes, indicating a normal frost load, the CRTD for the
next defrost cycle is not changed.
•
If the defrost cycle length is 24 minutes or more, the CRTD for the next defrost cycle is lowered
one level.
•
When the product is first installed or after a power interruption, the first CRTD will be 4 hours.
3. Vacation Mode: A CRTD of 72 hours will be initiated when the following three conditions exist:
•
The defrost interval must have advanced to CRTD (3) = 16 hours.
•
Both the refrigerator and freezers doors must have remained closed since the last defrost
cycle.
•
The defrost thermostat must have opened in less than 19 minutes during the last defrost cycle.
11
4. Vacation Mode Defrost Interval Interruption: The Vacation Mode Defrost Interval will be
interrupted when either the freezer or refrigerator door is opened.
•
The next defrost cycle will occur 8 hours after the door is opened and the ADC will revert to
CRTD (1) = 8 hours.
•
If the defrost thermostat remains closed for 19 minutes or more, the ADC will revert the CRTD
back one level.
5. A six minute dwell time occurs after the defrost thermostat opens before the compressor and
condenser fan motor operate.
6. If the defrost thermostat does not open within 29 minutes from the start of a defrost cycle, the
ADC will terminate the defrost cycle automatically.
7. Forced Defrost: To force a defrost cycle to occur, open and close the refrigerator or freezer
door light switch four times in eight seconds allowing ½ second between each action.
IMPORTANT:
•
The compressor must be running when forcing defrost.
•
The evaporator fan motor is delayed through the defrost thermostat and will not operate until
the defrost thermostat closes.
•
To by-bass the 6 minute dwell time after a defrost cycle or to terminate a forced defrost, disconnect power to the unit for 30 seconds.
8. When Defrost Mode terminates (the defrost bi-metal opens) the evaporator fan motor will not
operate until the defrost bi-metal resets. This could take approximately five minutes.
Section Three
CONFIRMATION OF LEARNING
EXERCISES
12
>>
View Section 4 of the Video Tape
SECTION 4
COMPONENT ACCESS
Accessing the components in the 26" Deep Side-by-Side Refrigerator/Freezer is generally quite similar
to other typical Whirlpool units.
COMPONENT COMPARTMENT
Components located in the component compartment are assembled on a slide out tray at the bottom
of the unit. The compressor, condenser, condenser fan and water valves are located in this area.
Accessing the Component Compartment
To gain access to these components the compartment cover must be removed and the tray slid out.
(Fig. 13)
1. Remove the seven (7) hex-head screws securing the compartment cover to the cabinet.
2. Remove the eight (8) screws securing the heat exchanger cover to the back of the unit.
3. Remove the double water valve from its mounting bracket by releasing the retainer clip and
sliding the valve assembly out of the bracket.
4. Remove the hex-head screw securing the filter-drier bracket to the right side of the cabinet
and push the filter-drier gently out of the way of the slide out tray mounting screw.
5. Remove the two (2) hex-head screws securing the slide out tray to the lower cabinet frame
rail.
6. Carefully slide the tray out from the unit.
NOTE: Be sure none of the tubing is excessively bent or kinked while pulling the tray out.
Fig. 13
13
Accessing the Heat Exchanger and Wiring Harness
The heat exchanger, water supply tube to the automatic ice maker and wiring harness are located
under two (2) metal heat exchanger covers on the back of the cabinet.
1. Remove the seven (7) hex-head screws securing the component compartment cover to the
cabinet.
2. Remove the eight (8) hex-head screws securing the long metal cover to the back of the
cabinet.
3. Remove the six (6) hex-head screws securing the L-shaped cover to the back of the cabinet.
FREEZER SECTION
The evaporator, automatic ice maker, ice crusher and other associated components are all accessible
inside the freezer section.
Removing the Automatic Ice Maker
1. Remove the extension from the water inlet tube.
LOOSEN
THESE SCREWS
2. Remove the hex-head screw securing the bottom
bracket to the back of the freezer section.
3. Loosen the two (2) screws in the slotted brackets at
the top of the automatic ice maker three or four turns.
(These screws must be removed if the rear cover is
to be removed.) (Fig. 14)
4. Slide the automatic ice maker up and off the screws.
Fig. 14
REMOVE
THIS SCREW
5. Disconnect the automatic ice maker wiring harness
connector and remove the automatic ice maker from
the unit.
Servicing the Ice Dispenser Motor
The ice dispenser motor box contains the motor and start capacitor that turns the helix in the ice
container to deliver ice to the "Through The Door" ice dispenser.
Removal:
NOTE: It may be necessary to remove the freezer
compartment light and shelving brackets before the
ice dispenser motor box is to be removed.
(Fig. 15)
LOCATOR
TABS
1. Remove the four (4) hex-head screws
securing the motor box to the sides
of the freezer compartment.
2. Disconnect the wiring harness connectors from the motor and capacitor
terminals.
Fig. 15
WIRING
HARNESS
PATH
3. Carefully slide the motor box straight forward and out of the freezer compartment.
14
NOTE: When replacing the motor box be sure the wiring harness routes through the box correctly.
Portions of the harness are covered with a plastic sheath that allows the wiring to pass into and out
of the box at the top (down from the automatic ice maker) and right side (to the light fixture.)
Replacement:
1. Reconnect the wiring harness connectors to the motor and start capacitor.
2. Align the four (4) locator tabs at the back of the motor box with the four slots in the rear cover
of the freezer section.
3. Replace the four (4) hex-head screws to secure the box to the sides of the freezer section.
Accessing the Freezer Compartment Temperature Sensing Tube
The freezer compartment temperature sensing tube can be accessed by removing the rear freezer
compartment cover. (Fig. 16)
1. Remove the automatic ice
maker.
2. Remove the ice dispenser motor box.
3. Remove the hex-head screw securing the
air supply cover to the right side of the
freezer compartment.
4. Remove the nine (9) screws securing the
rear cover from the back wall of the freezer
compartment.
Fig. 16
NOTE: It may be necessary to remove the shelving
brackets before the rear cover is removed.
5. Carefully pull one side of the rear cover
forward and remove the cover from the
freezer.
6. The temperature sensing tube is located at
the top of the compartment encased in a
plastic sensor well.
Servicing the Evaporator and Other Related Components
The evaporator, evaporator fan, defrost bi-metal and defrost
heater are located behind the evaporator cover. (Fig. 17)
1. Remove the rear cover. (See procedure above.)
2. Remove the eight (8) screws securing the evaporator cover
in the freezer section.
3. Pull the evaporator cover up and out of the unit.
Fig. 17
15
Removing the Evaporator Fan Motor
EVAPORATOR
FAN SHROUD
The evaporator fan motor is mounted on a bracket that is
attached to a shroud mounted to the back wall of the
freezer section. (Fig. 18)
1. Removing the two (2) hex-head screws that secure
the fan motor bracket to the shroud.
Fig. 18
FAN
MOTOR
BRACKET
2. Disconnect the wiring harness connectors from the
evaporator fan motor terminals.
Servicing the Evaporator, Defrost Bi-Metal and Defrost Heater
The evaporator, defrost bi-metal (Fig. 19) and defrost heater (Fig. 20) are servicable parts on these
units.
Removing the Defrost Bi-Metal
1. Disconnect the wiring harness connectors from the defrost bi-metal leads.
2. Slide the bi-metal mounting clip from the inlet tubing of the evaporator.
Removing the Defrost Heater Element
1. Disconnect the wiring harness connectors from the defrost heater element leads.
2. Carefully unsnap the evaporator tubing from the four (4) plastic clips that secure the evaporator
to the heat shield at the back of the freezer compartment and remove the styrofoam blocks on
both sides of the evaporator. Do not break these blocks. They will need to be reinstalled
when replacing the evaporator in the freezer section.
3. Tip the bottom of the evaporator up and, with a pair of needlenose pliers, remove the clips that
secure the heater element to the bottom of the evaporator. This will free the heater element
from the evaporator.
STYROFOAM
BLOCKS
Fig. 20
Fig. 19
HEATER
ELEMENT
HEATER
ELEMENT
CLIPS
16
Refrigerator Section
The thermostat, air ducts and drinking water reservoir are all accessible from inside the refrigerator
section.
Removing the Drinking Water Reservoir
The drinking water reservoir (Fig. 21) is located at the bottom of the refrigerator section. NOTE: The
bottom shelf and vegetable crispers must be removed.
1. Depress the top tabs on the drinking water
reservoir cover.
RESERVOIR
COVER
2. Pull the top of the cover forward and
dislodge the bottom tabs.
3. Pull the cover up and out of the unit.
4. Remove the hex-head screw securing the
reservoir to the back wall of the refrigerator
section.
Fig. 21
5. Pull the water supply and feed tubes from
their foamed in conduits and remove the
reservoir from the unit.
DRINKING
WATER
RESERVOIR
Accessing the Thermostat and Cold Air Control Damper
The thermostat and cold air control damper are located behind the control cover at the top of the
refrigerator section. (Fig. 22)
1. Remove the thermostat and control damper
knobs.
2. Remove the hex-head screw securing the
control cover bracket to the left side of the
refrigerator section.
KNOBS
3. Dislodge the four (4) tabs securing the
control cover to the top and back of the
refrigerator section.
BRACKET
Removing the Thermostat
Fig. 22
1. Remove the two screws securing the
thermostat to the thermostat bracket.
(Fig. 23)
THERMOSTAT
BRACKET
2. Remove the sealer material from the end
of the sensor well.
SENSOR
WELL
Fig. 23
3. Carefully pull the temperature sensing tube
from the sensor well.
4. Remove the thermostat from the unit.
THERMOSTAT
17
COLD AIR
DUCT
Removing Cold Air Damper
1. Remove the control cover.
2. Remove the two (2) phillips-head screws securing
the cold air damper to the duct work. (Fig. 24)
3. Remove the cold air damper from the unit.
Fig. 24
DAMPER
ASSEMBLY
ICE AND WATER DISPENSING UNIT
The freezer door contains the drinking water and cubed
and crushed ice dispensing unit. A description of the
cubed and crushed ice delivery process can be found in
Section Two, "Theory of Operation", in this Job Aid.
Drinking water is delivered to the dispenser through a
plastic tube that enters the door through the bottom
hinge. A coupling in the supply tube is located near the
hinge. (Fig. 25) The supply tube travels inside the door
cavity to the right hand lever in the dispenser.
Fig. 25
The wiring harness enters the freezer door through
the top hinge. (Fig. 26)
Fig. 26
Servicing the Dispenser Assembly
NOTE: Flush Look (Built-In) Models - Remove the two trim-panel channels at the top and bottom of
the front cover before attempting to remove the dispenser assembly.
1. Remove the switch cap and unsnap the two (2) tabs at the bottom of the front cover from the
housing first. Pull the bottom out and lift and the front cover from the housing. (Fig. 27)
2. Remove the two (2) hex-head screws securing the metal control panel cover to the dispenser
housing. This will also free the control bracket from the housing although it will remain tethered
to the freezer door by the wiring harness. (Fig. 28)
3. Disconnect the wiring harness connectors from the terminals
on the switches and light fixture in the control bracket.
Fig. 27
Removing the Dispenser Assembly
1. Do the previous three procedures.
2. Remove the eight (8) hex-head screws securing
the dispenser housing to the freezer door. (Fig. 29)
3. Carefully pull the housing from the door.
4. Pull the water supply tube from the top of the dispenser housing.
5. Pull the wiring harness leads from the dispenser housing.
6. Disconnect the wiring harness connectors to the electric
foil heater.
18
Fig. 29
Fig. 28
FLUSH LOOK MODELS
Factory Installed Flush Look Trim Package
A FLUSH LOOK (BUILT-IN) model can be purchased with factory
installed perimeter molding around the doors. This molding extends
beyond the top of the door to hide the top hinges and is designed to
accommodate custom panels for both the refrigerator and freezer
doors.
These models have a modified top hinge to allow the door to open
fully with the perimeter molding in place.
CUT OUT FOR
DOOR
TRIM
HINGE
COVER
Fig. 30
HINGE
A perimeter kit (Fig. 31) is supplied with these models that can be
attached to the front edge of the refrigerator cabinet to fill any possible gaps up to 3/4" on
the sides and top of the unit.
TOP
PERIMETER
MOLDING
SIDE
PERIMETER
MOLDING
Fig. 31
Adapting Free Standing Models
Free Standing models can be adapted to have a similar appearance to factory-built Flush Look
models. The custom panel molding kit for the refrigerator and freezer doors can be ordered separately
and installed on the unit. These moldings do not extend beyond the top of the door. Therefore the
hinges will be visible.
19
Section Four
CONFIRMATION OF LEARNING
EXERCISES
20
>>
View Section 5 of the Video Tape
SECTION 5
TROUBLESHOOTING AND DIAGNOSTICS
TROUBLESHOOTING GUIDE
POSSIBLE CAUSE
PROBLEM
1.
Operating Sound Level
A.
See Owners manual for explanation of normal operating sounds.
2.
Freezer Warm - Compressor Off
A.
B.
C.
D.
Temperature Control defective or setting too warm.
Defrost control stalled in defrost mode (defective).
Compressor defective.
Overload and/or relay defective.
3.
Too Cold in Refrigerator
A. Refrigerator damper control knob set too cold.
B. Refrigerator damper control not closing.
C. Deli control set too cold. Also check for misalignment - causing
air bypass of meatkeeper.
D. Freezer temperature control knob set too cold.
E. Restricted condenser air.
F. Refrigerant shortage or restriction.
G. Overcharge
4.
Freezer Warm - Compressor Cuts
Off on Overload
A
B.
C.
D.
E
F.
G.
H.
I.
J.
K.
Heavy usage and/or high ambient
Restricted condenser air
Compressor machine compartment back cover missing.
Cabinet elevated off floor.
Condenser fan motor inoperative.
Condenser fan blade loose or missing.
Improper voltage.
Relay or overload faulty.
Compressor motor winding open.
Non-condensables in system
Overcharge
5.
Freezer Too Warm - Compressor
Operating
A.
B.
C.
D
E.
F.
G.
H.
I.
J.
K.
L.
M.
N.
O.
Control knob set too warm.
Control out of calibration
Restricted condenser air
Inoperative condenser fan motor
Door left open.
Heavy usage
Freezer fan motor inoperative.
Defrost thermostat open.
Defrost heater open
Freezer or condenser fan blade loose or off.
Evaporator heavily frosted (See D,F,G,H,I,J, OR L).
Defrost control stuck in compressor nun mode.
Drain plugged.
Loss of refrigerant or restriction.
Inefficient compressor
6.
Too Warm in Refrigerator
A.
B.
C
D.
E.
F
G.
Refrigerator setting too warm
Damper doesn’t open.
Freezer control set too warm.
Supply air duct blocked.
Return air duct blocked.
Forced air deli control set too warm or air supply tube blocked.
Heavy usage or high ambient temperature
7.
Freezer Too Cold
A.
B.
Freezer temperature control knob set too cold.
Freezer temperature control out of calibration.
21
TROUBLESHOOTING
POSSIBLE CAUSE
PROBLEM
8.
Long off Cycle - Too Warm at Start
A. Low ambient temperature
B. Freezer temperature control knob set too warm.
C. Freezer temperature control out of calibration
9.
Short off Cycle
A.
B.
C.
D.
E.
High ambient and/or heavy usage
Freezer control knob set too cold.
Freezer control out of calibration.
Light on constantly
Poor door seal
10. Long or Continuous Operation
A.
B.
C.
D.
E.
F.
High ambient and/or heavy usage
Inadequate condenser air flow
Freezer temperature set too cold.
Freezer temperature control out of calibration.
Freezer temperature control relay frozen closed.
Loss of refrigerant or restriction
11. Short Run Cycle
A.
B.
Low ambient and/or light usage
Freezer temperature control setting too warm or control out of
calibration
12. Condensation on Cabinet Exterior
A.
High humidity installation (design accepts bead of water on
exterior of cabinet after 4 hours with a 0° to 2°F. (-18° to -17°C.)
freezer food temperature and 38° to 40°F. (3°C to 4°C) refrigerator food temperature in 84% R.H. conditions (See example
of typical sweat pattern under above conditions. Fig. 13)
B. Freezer control set too cold.
C. Freezer control out of calibration
D. Poor door gasket seal.
E. Insulation void.
13. Unit will not Deliver Ice Cubes
A.
No power to auger drive motor. Check circuitry through ice actuator switch and upper freezer breaker auger motor switch.
B. Drive Motor open
C. Run Capacitor inoperative.
D. Drive motor tripped out on overload after 90 seconds of continuous use. Allow three minutes to reset.
E. Nonelectrical malfunctions. Power off for a period of time lets
the cubes refreeze together. No use for a period of time lets the
cubes freeze together. Improperly sealing chute door (check with
flash light). Malfunction in drive train components of bucket
assembly.
14. Unit will not Deliver Water
A.
No power to water dispensing solenoid vase. Check circuitry
through water dispensing switch.
B. Water dispensing solenoid valve coil open
C. Water dispensing switch open
D. Water dispensing arm does not close water dispensing switch.
E. Water line or tank frozen.
F. Freezer door interlock switch is open.
15. Water Delivery Slow
A.
A kink in the tubing may restrict the water flow. Replace the
water line. Flow rate should be 1.7 to 3.5 liter per minute with
inlet pressure from 20 to 120 PSI (1.38 to 8.2 BAR).
16. Water Accumulating in the
Refrigerator Bottom Area
A
Leak in the water tank or connection
22
DIAGNOSTIC TESTS
See the Tech Sheet for test procedures on electrical and mechanical components not listed here.
COMPONENT
Adaptive Defrost Control
TEST
SOLUTION
Input Voltage Readings
and Checks
L1 to L2 - Line voltage should
be present whenever the unit
is powered.
K to L2 - Line voltage chould
be present with cold control
closed.
T to L2 - Line voltage should
be present when cold control
is closed, defrost thermostat
is closed and ADC is in defrost
mode.
R to L2 - Line voltage should
be present with refrigerator
door open. (Door light switch
closed)
F to L2 - Line voltage should
be present with freezer door
open. (Door light switch
closed)
Output Voltage Readings
and Checks
C to L2 - Line voltage should
be present when unit is
cooling. (Cold control closed)
D to L2 - Line voltage should
be present when unit is
defrosting. (Cold control
closed)
Defrost Bi-Metal
Check resistance across
terminals.
1. With power off and the evaporator coil below
freezing, the bi-metal should show 0 ohms when
check with an ohmmeter.
Cut out temperature approximately 48°F
Cut in temperature approximately 13°F
Photosensative
Switch
1. To check light sensor with 1. If light fails to light up, go to step 2.
cavity light switch "on", cover
light sensor eye and the lamp
should
light
up
at
approximately 50% of full
illumination.
2.a) If lamp lights up replace light sensor
2. Activate the water or ice
b) If lamp does not light up check cavity lamp
dispenser switch. Lamp
and socket. Either the lamp is burned out or the
should light at full illumination.
socket is malfunctioning.
23
CONFIRMATION OF LEARNING EXERCISES
24
>>
View Section 6 of the Video Tape
SECTION 6
TECH TIPS
TYPICAL EXTERNAL SWEAT PATTERNS
LEFT
FRONT
RIGHT
BACK
TOP
CLASSIFICATION OF
CONDENSATION
1 = Haze or Fog
2 = Beading
3 = Beads or Small
Drops
4 = Drops Running
Together
BOTTOM
LOWER MULLION
Fig. 13
25
WIRING DIAGRAM
26
STRIP CIRCUITS
AUTOMATIC DEFROST CONTROL ENERGIZING CIRCUIT
COMPRESSOR RUN CIRCUIT
EVAPORATOR FAN CIRCUIT
DEFROST CIRCUIT
27
DEFROST RUN TIME MONITOR CIRCUIT
REFRIGERATOR AND FREEZER LIGHT MONITOR CIRCUIT
ICE & WATER DISPENSER AND AUTOMATIC ICE MAKER CIRCUIT
28
SERIAL AND MODEL NUMBER DESIGNATORS
The serial number for all Whirlpool and KitchenAid brand refrigerator/freezers contain the following
designations:
EC E 39 40174
Manufacturer Site/Source
Calendar Year
Calendar Week
Sequential Serial Number
The model number for the KitchenAid brand 26" deep freestanding and flush look side-by-side refrigerator/freezers contain the following designations:
Model Number
K
SB
S
20
Q
E
WH
0
Marketing Channel
(if present)
KitchenAid Brand = K
Product Identification
SB = Side-by-Side/Flush Look
SF = Side-by-Side/Freestanding
Merchandise Scheme/Series
S = Superba
Capacity
Features
Year of
Introduction
Color
WH = White
AL = Almond
BL = Black
Engineering Changes (Numeric)
FOR PRODUCT SPECIFICATIONS AND WARRANTY INFORMATION
ON KITCHENAID BRAND CALL:
1-800-422-1230
29
The model number for the Whirlpool brand 26" deep freestanding and flush look side-by-side refrigerator/freezers contain the following designations:
E
Model Number
D
20
D
B
X
E
W
0
0
Marketing Channel
(if present)
Product Group
E = Refrigeration
Product Identification
Capacity
Model Series
D = DesignerStyle
Feature Code
B = Built-In
F = Freestanding
Door Swing
Year of Introduction
Color
W = White
N = Almond
B = Black
Energy/Power Designator
Engineering Changes (Numeric)
FOR PRODUCT SPECIFICATIONS AND WARRANTY INFORMATION
ON WHIRLPOOL BRAND CALL:
800-253-1301
FOR TECHNICAL ASSISTANCE
ON WHIRLPOOL AND KITCHENAID BRANDS
WHILE AT THE CUSTOMER'S HOME CALL;
THE TECHNICAL ASSISTANCE LINE: 800-253-2870
Have your store number ready to identify you as an Authorized Servicer
30
ANSWER SHEET
CONFIRMATION OF LEARNING
EXERCISES
31
v