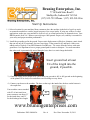
1
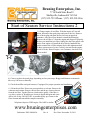
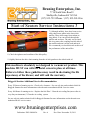
Bruning Enterprises, Inc.
7718 North State Road 9
Shelbyville, Indiana 46176 USA
(317) 835-7591 Phone / (317) 835-2814 Fax
BRUNeumatic Seed Blower / Vacuum
Owners Manual
Models: 316-9G, 423-11G & 423-12G
www.bruningenterprises.com
Pubication: ENG-OM-SV-001A
Rev A
Rev. Date: November 29, 2011
Bruning Enterprises, Inc.
7718 North State Road 9
Shelbyville, Indiana 46176 USA
(317) 835-7591 Phone / (317) 835-2814 Fax
Thank you for your purchase of the BRUNeumatic Seed Blower / Vac.
Our product has been engineered to be robust, solid and dependable for many
seasons of use.
It is important to read this manual completely and fully understand how your
machine works prior to the first use. Any questions? Contact us.
This would be a good place to record your machine model # and serial #.
Joe Bruning
Owner
Bruning Enterprises, Inc.
Model #_________________________ S/N:_________________________
Date of purchase:_____________ Purchased from:_____________________
Additional copies of this owners manual may be obtained by contacting us. If you sell, trade or loan your
machine to someone else, ensure this manual goes with the machine.
Bruning Enterprises, Inc., recommends OEM parts for your machine. Failure to use OEM parts, or
modifications, changes, retrofits or anything that disturbs the original design content of this machine will
void the warranty and may cause severe injury.
DO NOT OPERATE YOUR MACHINE UNLESS YOU HAVE ALL GUARDS AND PARTS INSTALLED.
This machine is designed to move seed from bulk containers or wagons to your planter or drill holding tanks.
It is important to remember that all types of seeds are different. This machine will move corn seed different
than it will move soybean seed for example. Estimated rated capacities are based upon seed corn. Your
actual performance of this machine may vary from posted rated capacities.
FOLLOW ALL WARNING PLAQUES ON THIS EQUIPMENT, READ AND FOLLOW INSTRUCTIONS
FOUND ON THE MACHINE AND IN THIS MANUAL.
WARRANTY POLICY
Bruning Enterprises, Inc., warrants this product manufactured and sold by it against defect in material. This warranty being expressly
limited to replacement at the factory of such parts or products as shall appear to be defective after inspection. This warranty does not
obligate the Company to bear cost of labor in replacement of parts. It is the policy of the company to make improvements without
incurring obligations to add them to any unit already sold. No warranty is made or authorized to be made other than herein set forth.
This warranty is in effect for 1 year after purchase. Bruning Enterprises warrants its own products only and cannot be responsible for
damage to equipment on which it is mounted.
www.bruningenterprises.com
Pubication: ENG-OM-005A
Rev A
Rev. Date: November 29, 2011
Bruning Enterprises, Inc.
7718 North State Road 9
Shelbyville, Indiana 46176 USA
(317) 835-7591 Phone / (317) 835-2814 Fax
Read these instructions carefully to acquaint yourself with your BRUNeumatic Seed Blower / Vacuum.
Working with unfamiliar equipment can lead to accidents.
* Safety shields and all guards and removable machine pieces must always be in place during operation.
* If installed on additional equipment, never park the equipment on a steep incline or leave the equipment
running unattended.
* Never clean, lubricate or adjust a machine that is in motion. Always shut off the engine and remove the
ignition key before performing service.
* Be sure the park brake is set before operating, if installed on additional equipment.
* Do not allow children to operate this equipment.
* Do not allow riders on the wagon or pickup, if so installed.
* Use speeds and caution dictated by the terrain being traversed. Do not operate on any slope steep enough
to cause tipping or loss of control.
* Be sure all personnel are clear of the immediate area before operating.
* Read and understand the operator’s manual and require all other persons who will operate the equipment
to do the same.
* If operating on public roadways, where legal, be certain all lighting is operating properly and observe all
traffic laws.
* Attach a slow moving vehicle emblem to the rear of the trailing implement, if needed.
* Beware of increased stopping distances and control effort when operating with implements attached.
* Be familiar with all controls and be prepared to stop engine and equipment quickly in an emergency.
* If seed or seed treatment is dusty or dirty, wear a full-face respirator.
ALWAYS REMEMBER TO SHUT OFF THE
GASOLINE PETCOCK WHEN MACHINE IS
NOT IN USE!
www.bruningenterprises.com
Pubication: ENG-OM-005A
Rev A
Rev. Date: November 29, 2011
Bruning Enterprises, Inc.
7718 North State Road 9
Shelbyville, Indiana 46176 USA
(317) 835-7591 Phone / (317) 835-2814 Fax
NOTE: Briggs & Stratton does not recommend the use of gasoline, which contains
alcohol such as gasohol. If gasoline with alcohol is used, it must not contain
more than 10% Ethanol and MUST be removed from the engine during
storage. DO NOT use gasoline-containing methanol.
Your BRUNeumatic Seed Blower / Vacuum has been pre-filled at the factory with all
needed lubricants, However, it is recommended that you check these items as
outlined in the individual user manuals that can be found on our website,
www.bruningenterprises.com in our technical information pages for each related item.
CAUTION: SAFETY SIGNS
Safety decals are placed on the implement to alert the operator and others to the risk of personal injury or
unsafe operation during normal operations and servicing.
1. The safety decals must be kept clean and in good condition to ensure that they are legible.
2. Safety decals must be replaced if they are missing or illegible.
3. When components are replaced during repair or servicing, check that the new components include the
necessary safety signs.
4. Replacement safety decals may be obtained from your local dealer or from us.
The user is responsible for inspecting his
machine and for having parts repaired or
replaced when continued use of the product
would cause damage or excessive wear to
the other parts.
www.bruningenterprises.com
Pubication: ENG-OM-005A
Rev A
Rev. Date: November 29, 2011
Bruning Enterprises, Inc.
7718 North State Road 9
Shelbyville, Indiana 46176 USA
(317) 835-7591 Phone / (317) 835-2814 Fax
Start Up Instructions
1.) Select a location for your machine. Many customers place the machine in the back of a pick up truck,
or mount the machine to a trailer, hopper wagon or even a semi trailer. If using any of these, or other
applications, make sure your machine is close to level, on a firm hard surface or mounted secure. Your
BRUNeumatic Seed Vac / Blower can weigh up to 1000 pounds. Proper, safe, stability is essential for
your safety and proper machine performance.
2.) Install the grounding rod in the ground. Proper static displacement will help to eliminate a static shock
that can not only be of a nuisance, but can cause injury. If the ground is dry and hard, a little water
added can be a big help. Your BRUNeumatic Seed Blower / Vac comes from the factory with static
guard hose. It is important to have a proper ground path for static to dissipate. You must remember
that when seed is pneumatically moved though a hose, there is a static charge that builds.
Insert ground rod at least
3/4 of the length into the
ground, if possible.
3.) Check the engine oil for proper level. Check that your gas tank is full. A full gas tank at the beginning
of the planter fill is always nice and allows one less thing to worry about.
4.) Connect your hoses to the machine. The hose on the top is the intake line, the hose on the bottom is
the output line.
Your machine comes standard
with 50’ of anti-static hose,
some customers cut about 15’
for the intake hose, and 35’
for the discharge hose length.
IN
OUT
www.bruningenterprises.com
Pubication: ENG-OM-005A
Rev A
Rev. Date: November 29, 2011
Bruning Enterprises, Inc.
7718 North State Road 9
Shelbyville, Indiana 46176 USA
(317) 835-7591 Phone / (317) 835-2814 Fax
5.) Your BRUNeumatic Seed Blower / Vac has a wireless remote control vacuum breaker that works up to
100 feet from your machine. Before starting the engine, make sure the butterfly is open. If you open the
butterfly valve using your remote before shutting down the machine, this will help ensure it is open the
next time you start the machine. If you run out of gasoline while the valve is closed, you must open the
butterfly valve using the remote, it will not automatically open.
6.) With your hoses and cyclone in place, if you use a cyclone, ensure the gas valve petcock is in the ON
position. Place the choke lever in the ON position for cold starting of the engine, and place the throttle
in a position other than idle. Turn on the key and crank for no more than 5 to 10 seconds or until engine
starts. If you crank the engine longer than 10 seconds and it does not start, wait 1 minute before attempting
to start the engine again. The will help save the starter motor from overheating. You may call
1-800-999-9333 in the USA for help if engine does not start, or visit www.VanguardEngines.com.
7.) Once engine has started, turn OFF the choke and set desired throttle speed, normally full throttle.
8.) Allow the seed to enter into the suction tube area, either from your pro-box, wagon slide gate, or other
means.
9.) Holding the discharge cyclone in place, or if using the AIR Boom, make sure it is in position, depress
the button on the wireless remote control to start seed flow.
Linear actuator shown with butterfly in closed position.
The machine would draw seed into the cyclone and be
dispensed through the rotary airlock.
Either button on the remote will open or close the butterfly.
NOTE:
The Linear Actuator will take 2 seconds to open or close fully. The machine will still dispense seed for
a short time duration if opening the valve while dispensing product. Once you get familiar with the length
of this time, you should be able to judge just how much more seed is dispensed after you shut off seed flow.
www.bruningenterprises.com
Pubication: ENG-OM-005A
Rev A
Rev. Date: November 29, 2011
Bruning Enterprises, Inc.
7718 North State Road 9
Shelbyville, Indiana 46176 USA
(317) 835-7591 Phone / (317) 835-2814 Fax
10.) After completing the filling of the planter or drill box, you might want to shut off the supply of seed to
the unit and allow all the seed to fully dispense prior to opening the vacuum breaker butterfly, then
shutting down the machine. All product is now out of the machine and lines.
The BRUNeumatic Seed Blower / Vacuum is a very versatile machine and has many uses other than just
filling your planter hopper. The machine is very useful for removing seed from existing hoppers to a
different container when changing seed brands or types.
You may use this machine for grain spills, HOWEVER, remember that everything runs through the rotary
air lock. This is a very precision made, tight tolerance, expensive piece of equipment and while certain items
can pass through the air lock with no issues, there may be things that you just do not want to run through the
air lock. Gravel, sticks, stalks, dirt, highly dusty products all can have ill effects on your air lock.
Dusty items can enter into the air pump itself, thus shorting the life expectancy of the pump, another
precision made, tight tolerance, expensive piece of equipment.
With all that being said, Bruning Enterprises, Inc., expressly suggests you use the machine as designed for
moving seed and items such as clean soybeans and corn. Using this machine for other applications, while
at times, feasible, will void the warranty and the end user is expressly responsible for their actions.
With the engine off, key removed, you can remove this band clamp
To gain access to the screen. It is important to keep this screen clean.
If you see a drop in suction, this screen would be a good place to check.
Removing this clamp allows you access to the rotary air lock, this will be
a good place to access the air lock to clear a jam.
VERY IMPORTANT!
The shear action of the rotary air lock will injure you, even if turning by
hand and you get a body part into the air lock, the potential exists to lose a
finger or hand.
www.bruningenterprises.com
Pubication: ENG-OM-005A
Rev A
Rev. Date: November 29, 2011
Bruning Enterprises, Inc.
7718 North State Road 9
Shelbyville, Indiana 46176 USA
(317) 835-7591 Phone / (317) 835-2814 Fax
Maintenance & Service Instructions
Prior to each use
1.) Check to see that the engine oil is is at proper level. Fill as needed. See owners manual for oil. At 40 deg
Fahrenheit or below, SAE 30 will result in hard starting, above 80 deg F and hotter, SAE 30 will increase
oil consumption. HOW TO CHECK: Place cold engine level. Clean around the dipstick. Remove the
dip stick and wipe with a clean cloth. Fully insert the dip stick. Remove the dip stick and check the oil level.
It should be at the top of the full indicator on the dip stick. If low, add oil slowly into the engine oil fill. DO
NOT OVERFILL! After adding oil, wait one minute and recheck level.
2.) Check the operation of the wireless vacuum remote prior to starting the engine.
3.) Check that all guards are secure and in place.
4.) Check the tension of the drive belts. They should be snug (about 1/2” deflection at center) but not so tight
that they could damage expensive equipment.
5.) Check the fuel filter. It should look clear and ensure there are no leaks in the entire fuel system.
6.) Check and clean, if needed, the screen located on top of the inlet cyclone as shown on the previous page.
WARNING: FUEL AND THE VAPORS FROM FUEL ARE EXTREMELY FLAMMABLE AND CAN
BE EXPLOSIVE. FIRE OR EXPLOSION CAN CAUSE SEVERE BURNS AND EVEN DEATH.
When adding fuel, turn off the engine and allow to cool for at least 2 minutes before removing the fuel cap.
Fill the tank outdoors or in a very well ventilated area. Do not overfill fuel tank, there needs to be some
expansion room. Fill only to the bottom of the fill neck or to the full line. Keep all fuel away from sparks and
flames. If fuel spills, allow it to evaporate prior to starting the engine.
WARNING: ENGINES GIVE OFF CARBON MONOXIDE, AN ODORLESS, COLORLESS AND
POISONOUS GAS. BREATHING THIS CAN CAUSE NAUSEA, FAINTING OR DEATH.
Always start and run engines outdoors. Do not start engine in enclosed area, even if the doors or windows
are open.
Engines when running produce heat. There are parts of the engine and exhaust system that get extremely
hot. Severe thermal burns can occur on contact, AND the heat may ignite combustible debris such as
leaves, grass, brush, paper, etc.
www.bruningenterprises.com
Pubication: ENG-OM-005A
Rev A
Rev. Date: November 29, 2011
Bruning Enterprises, Inc.
7718 North State Road 9
Shelbyville, Indiana 46176 USA
(317) 835-7591 Phone / (317) 835-2814 Fax
End / Start of Season Service Instructions
End of Season:
1.) Always shut off fuel petcock to off for any extended period of non service.
2.) Remove battery posts and clean, trickle charge the battery as needed for service next year.
3.) Add fuel stabilizer or drain fuel tank.
4.) Replace the fuel filter as needed.
5.) Remove cyclone from the top of the air lock, add corn oil to all areas of the air lock to prevent rust.
6.) Add a small amount of corn oil to the blower unit through the intake pipe and manually turn the blower.
Start of Season:
1.) Reconnect battery post to fully charged battery. Positive first, then negative.
2.) Change the lubrication in the blower.
Clean around all plugs before
removing them.
Fil
Ve l Plu
Drain lube in a suitable container
nt
Ca g
and dispose of properly.
p
Reinstall the drain plug.
flow
Over g.
plu
Add a good 15W40 oil via the
fill plug until oil wicks from the
overflow plug.
Reinstall all plugs, cleaning the
vent plug screen, if equipped.
Oil recommendation
is based upon ambient
temperature being above
60 degrees.
Drain plug on bottom
of the blower unit
www.bruningenterprises.com
Pubication: ENG-OM-005A
Rev A
Rev. Date: November 29, 2011
Bruning Enterprises, Inc.
7718 North State Road 9
Shelbyville, Indiana 46176 USA
(317) 835-7591 Phone / (317) 835-2814 Fax
Start of Season Service Instructions 2
C
3.) Change engine oil and filter. With the engine off, but still
warm, disconnect the spark plugs and remove the key. Remove
the oil drain plug and drain the used oil into an approved
container. After the oil has drained, reinstall the drain plug.
Remove the oil filter (C) from the engine and dispose of properly.
Before you install the new filter, lightly lube the filter gasket with
fresh, clean engine oil. Install the new filter by hand until the
gasket contacts the oil filter adapter block, then tighten one half
to three quarter more of a turn. Add oil, start and run the engine,
check for leaks. Shut off engine, wait 2 minutes, check oil level,
fill as needed.
Ad d Oi
l
Here
k
tic
s
p
Di
4.) Clean or replace the spark plugs, depending on last years usage. Briggs and Stratton recommends
this every 100 hours or annually.
5.) Check the muffler and spark arrestor, if equipped, for proper operation and installation.
6.) Clean the air filter. Do not use pressurized air or solvents. Remove the
center nut and retainer. Remove the air filter and the pre cleaner element
from the air filter. Tap the filter on a hard surface gently, if the filter is
very dirty, replace it. Wash the pre cleaner in liquid detergent and water.
Allow it to air dry. DO NOT OIL. Assemble the dry pre cleaner to the
and
B
r
filter element and reinstall the complete assembly.
ne
lea
C
P re
*all pictures depict a 23HP engine. The 16HP is similar.
er
ilt
F
r
Ai
www.bruningenterprises.com
Pubication: ENG-OM-005A
Rev A
Rev. Date: November 29, 2011
Bruning Enterprises, Inc.
7718 North State Road 9
Shelbyville, Indiana 46176 USA
(317) 835-7591 Phone / (317) 835-2814 Fax
Start of Season Service Instructions 3
7.) Although unlikely, there have been service
calls where items gather in the lower inlet
muffler. These items range from rodents to
large debris. You can not look through the
muffler and see these. The only way to check
this is to remove the couplings on each side of
the muffler and turn it on the ends and tap it.
We recommend you check this each season or if
the performance of the unit suffers.
8.) Check the tightness and condition of the idler pulley.
9.) Lightly lubricate the drive chain running from the air lock gearbox to the airlock with oil.
This machine is absolutely not designed to vacuum wet product. This
machine MUST run with the metal screen in place at all times.
Failure to follow these guidelines may result in shortening the life
expectancy of the blower, and will void the warranty.
Briggs & Stratton Additional Service Recommendation
Every 250 hours of running service - Check valve clearance - See our web site under technical info for
Briggs & Stratton for more information or take the unit to an authorized B & S service center.
Every 400 Hours of running service - Replace the fuel filter * Clean the air cooling fins (more often in
very dirty environments) * Clean the air cooling system.
See our web site under technical info for Briggs & Stratton for more information or take the unit to an
authorized B & S service center.
www.bruningenterprises.com
Pubication: ENG-OM-005A
Rev A
Rev. Date: November 29, 2011