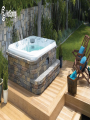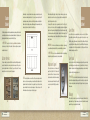
1
©2007 Watkins Manufacturing Corporation. Specifications, colors, and surface materials subject to change without
notice. Hot Spring, Built for a lifetime of relaxation, Vista, Grandee, IQ 2020, SpaStone, and UpRite are trademarks
of Watkins Manufacturing Corporation. Printed in USA.
11/07
PN 62611
If you’re wondering if it is safe and practical to recess
your Hot Spring spa in a deck, patio or other landscape
element, the answer is yes! And, it’s easy!
Table of Contents
Custom Installation Guidelines
Installation Possibilities..................................7
• If you plan to recess your new Hot Spring® spa in a deck, patio, or other hardscape element, please take the
time to read this guide carefully. It provides you with installation ideas, planning information, and recommendations
needed to ensure the safe, secure, and timely installation of your new spa.
• This guide also provides you with the information needed to ensure that access to your spa for maintenance
and operational reasons will not become problematic in the future. Providing this access is the homeowner’s
responsibility.
• You will also want to carefully read the Owner’s Manual that comes with your spa and Pre-Delivery Instructions
in conjunction with this guide. These documents can be found online at www.hotspring.com in the customer
service section and the Deck Tool Online Reference on the Hot Spring spa website.
Conventions Used in this Guide
NOTE: A note is useful information, but is not mandatory for your spa installation.
+ IMPORTANT: This information is necessary to properly prepare for your spa installation, maintenance, and
usage. Important information is placed strategically within this document to help you prevent avoidable expenses
after installation is complete.
WARNING: This information warns you about items pertaining to your spa installation that are safety or hazard
concerns, as well as actions that may void your spa’s warranty.
Why Select a Hot Spring® Spa.......................6
Basic Installation Considerations....................9
Landscape Integration Methods
• Custom Cabinet ......................................11
• Partially-Recessed Spa ...........................14
• Fully-Recessed Spa.................................20
Installation Checklist....................................25
General Safety..............................................26
When investigating your options for a
spa, you’ll soon find that there are
two distinct types.
One is a built-in spa that generally sits alongside a swimming pool. While this type of
spa integrates easily into a backyard, most people don’t realize that a traditional builtin spa quickly loses heat and can take up to 45 minutes to
reach your preferred temperature before it is ready for use.
Many built-in spas remain uncovered and require frequent
®
cleaning of dirt and debris. Also, their rough concrete
surface material, basic straight-back seating and limited
jets don’t provide significant hydromassage.
The alternative is a Hot Spring spa, the number one selling
brand in the world. It is made with a smooth acrylic shell that offers contoured seating,
and also offers jet variety and energy efficiency. Because the spa is totally insulated, its
water temperature is dependably maintained, so your Hot Spring spa is ready whenever
you are. In addition to the therapeutic value of a Hot Spring spa, we offer a great
after-sales service network with over 1,000 locations throughout the U.S. and around
the world.
Some people considering spa ownership have concerns about integrating the spa’s
look into their backyard. With a Hot Spring spa, it’s easy! This document provides
solutions to help you easily and successfully blend your new Hot Spring spa into your
landscaped environment.
Not only can a Hot Spring spa be integrated easily and seamlessly into your backyard,
its portability allows for it to be moved or upgraded as desired. There are several
installation options to be considered such as custom cabinetry, or partially-recessed/
fully-recessed into a deck or patio.
Custom Cabinet
NOTE:
The SpaStone custom cabinet is available for the Vista® and Grandee®
Hot Spring models only.
Why Select a
Hot Spring
Spa?
6
WHY SELECT A HOT SPRING SPA?
www.hotspring.com
Installation
Possibilities
One way to integrate a Hot Spring® spa into the living space is to apply a custom
cabinet after delivery. This can be a Hot Spring SpaStone™ application, or you and
your landscape contractor can customize your spa’s exterior. For more information on a
Custom Cabinet installation, refer to page 12.
A Hot Spring spa with
Standard Spa Cabinet
®
Partially-Recessed
The spa is installed into a deck or patio
where some combination of the spa
sides are partially-recessed. This can
be a standard spa cabinet, a Hot Spring
custom cabinet with SpaStone siding
(Vista and Grandee models only) or a
consumer/contractor-designed custom
siding. These installations adapt to
your desired environment. For more
information on a partially-recessed spa
installation, refer to page 14.
A Hot Spring partially-recessed spa
with SpaStone Siding
®
™
A Hot Spring spa with contractor
designed custom surround
®
A Hot Spring custom cabinet spa with SpaStone Siding
®
™
INSTALLATION POSSIBLITIES
www.hotspring.com
7
Basic Spa
Installation
Considerations
Installation
Possibilities
Fully-Recessed
Location of the subpanel
The spa is installed so that the deck or patio conceals the cabinet. These installations
fully integrate the spa into the ground and provide beauty and a complete blending
with your décor. For more information on a fully-recessed spa installation, refer to
page 20.
For spas that require 230v, a subpanel is provided with the Hot Spring® spa. The subpanel
is an intermediate electrical connection box between your home’s electrical panel
and the spa. The subpanel houses the spa’s circuit breakers, which you will need to
access when draining and cleaning your spa. Typically, the subpanel needs to be 5 feet
to 50 feet away from the spa and visible from the spa, as shown in the diagram below.
Be sure to check local electrical codes when planning the location of your subpanel.
When selecting your spa’s location, the following
factors should be considered during the planning stage.
NOTE: It is highly recommended to adhere to the information provided so you do not
void the warranty of your spa or incur additional expenses in the unlikely event that
plumbing or other repairs are needed.
Location of the electrical connections
Electrical connections to the Equipment Compartment are made through the Electrical
Cutout on the front face of the spa. If you are planning on a partially- or fully-recessed
spa installation that covers the Electrical Access Panel, service access will need to be
provided. This is covered in more detail in the partially-recessed and fully-recessed
sections of this document.
8
INSTALLATION POSSIBLITIES
www.hotspring.com
INSTALLATION CONSIDERATIONS
www.hotspring.com
9
Basic Spa
Installation
Considerations
Type of structural support
For any type of installation, the spa needs to sit on a concrete slab.
Drain locations of spa
Ensure that there is access to the drain locations pictured below. Regular maintenance
of your spa requires draining the water approximately every 4 months. The location
you choose for your spa needs to allow for this water to drain away from the spa and
any other structures, landscape or hardscape that could be negatively impacted by
water flow. Please note that during transportation, the spa’s drain caps are removed
and placed in the owner’s packet. This prevents stagnant water from remaining within
the system for long periods of time. Ensure that these drains are capped prior to
installing your spa into your deck or patio.
Drainage for excess water around spa
For all types of installations, ensure any exterior water will drain away from the spa.
Standing water around a spa can be dangerous, especially if the water rises to the
equipment compartment level. Select the location of your spa with the possibility of
standing water/drainage in mind.
Access to side and back panels for plumbing
repairs or stereo equipment replacement
In the unlikely event of an internal plumbing or stereo component problem, it is
necessary to have access to the side and back panels in order to make repairs. In any
recessed application, access to internal plumbing components requires a minimum of
24 inches of clearance around the entire spa. In some rare cases, the spa may need
to be removed from the installation site entirely, depending on the type of installation
and complexity of repair required. Utilizing a trapdoor/access panel can be an easy
way to accomplish this goal. This is covered in more detail in the partially-recessed
and fully-recessed sections of this document.
Cover locks
Cover locks or some form of safety barrier are
required by law. All spas must include a locking
device (typically a cover with cover locks) to ensure
the safety of family, pets and friends. Depending on
the installation, you and your landscape contractor
will need to consider a method to lock your spa
cover.
10
INSTALLATION CONSIDERATIONS
www.hotspring.com
Landscape
Integration
Methods
Custom Cabinet (CC)
A custom spa cabinet is just that. You get to decide how to make it blend in with your
home and its surroundings. The Custom Cabinet versions of the Vista® and Grandee®
spas give you the option of installing a custom covering such as Hot Spring® SpaStone™,
wood siding, brick, etc. With this option, the possibilities are endless.
Attaching and creating a unique exterior to your spa that is custom-made to your
home’s décor makes it a versatile and beautiful option for your environment.
NOTE:
Only the Vista-CC and Grandee-CC models are available for custom cabinet
installations.
+ IMPORTANT: Your custom cabinet spa can be fully-recessed, partially-recessed or
not recessed at all. Whatever installation is selected, the exposed portion of the custom
cabinet spa can then be “decorated” in whatever style and with whatever material you
desire. If you plan on partially- or fully-recessing your custom cabinet spa, please refer
to the sections on partially- and/or fully-recessed spa installations on pages 14 and
20, respectively.
For example, go from this…
...to this.
CUSTOM CABINET
www.hotspring.com
11
Another option is to use an alternate exterior covering such as faux brick, faux slate
rock, teakwood, aluminum, brushed steel, etc. to create your own custom look. The
plywood façade provides a solid surface to which custom sidings can be attached. In
addition, the vertical structure provides additional support for heavier materials (such
as flagstone) that can be attached to the side of the spa.
Custom
Cabinet
The following addresses installation considerations and provides you with information
recommendations and solutions for you and your installation team to help guide you in
the planning and installation of your customized Hot Spring® spa.
+ IMPORTANT: Please refer to the Basic Spa Installation Considerations
► WARNING: A 2-inch screw is the maximum screw length to use. Using a longer
section on page 9 for details on the location of the main control panel, equipment
compartment, drains, etc.
screw could damage the functionality of the spa and would void the spa’s warranty.
+ IMPORTANT: Be sure to discuss hardware/screw length with your landscape
Custom exteriors
contractor when planning for your custom spa siding installation.
The custom cabinet spa is shipped with 3/4-inch, sealant-treated BCX plywood sheets
covering the inner structure, plumbing, and electrical components of the spa. For a
customized solution tailored for the Hot Spring® spa, select the SpaStone™ covering,
available in two color choices from your Hot Spring dealer.
Main control panel
NOTE: Remember to provide access on all sides of the spa in case repairs are needed.
If you choose to create a unique siding, you may want to mount the siding on sheets of
plywood which can then be fastened to the spa exterior. Access to the spa’s internal
components would then be achieved by removing one of these custom panels. This
method would save time and expense in the event of a repair.
Earth
12
CUSTOM CABINET
www.hotspring.com
When attaching alternate types of siding to the custom cabinet spa, plan on using
drywall or deck screws. Be sure to use the correct-length screw applicable to the
depth of the custom exterior selected.
For example, if the siding of choice is approximately ¾-inch to 1-inch thick, it is
best to use a 2-inch screw so that the exterior siding and custom cabinet plywood
protection on the spa can be penetrated. Using the correct-length screw ensures that
the internal spa workings will not be harmed. In addition, the vertical supports (see
above) surrounding your spa can be used as attachment points for any custom exterior
siding, if needed.
Gray
If the custom exterior covers the main control
panel, the Hot Spring® IQ 2020® remote control
provides all of the same functions as the main
control panel. Also, most models have an auxiliary
control panel accessable from inside the spa that
can be used to control the lights, jets and music
system.
Cover lifters
Custom
Cabinet
A cover lifter allows for easy opening/closing of your spa cover. Cover lifters are
easily installed in conjunction with the SpaStone™ product. You can also use a cover
lifter with a custom exterior covering. Just ensure that the top/bartop of the exterior
covering is designed in a way that allows for the cover, AND fits with the dimensions
of a standard cover lifter. Talk to your authorized Hot Spring® spa dealer for more
information regarding spa cover lifters.
Cover locks
Cover locks or some form of safety barrier are required by law. All spas must include
a locking device (typically a cover with cover locks) to ensure the safety of family, pets,
and friends. Depending on the installation, you and your landscape contractor will need
to consider a method for locking your spa cover.
+ IMPORTANT: Some form of safety barrier is required by law. If cover locks are not
feasible with your particular installation, you will need to install a gate or fence (similar
to a pool) in order to provide a barrier for your Hot Spring spa. Please check your local
building codes.
Drainage
When selecting the location for your custom exterior spa, ensure that water will not
puddle around the spa. Provide a drainage system where the water flows down and
away from the spa to an appropriate outlet or drain.
CUSTOM CABINET
www.hotspring.com
13
PartiallyRecessed
Spa
PartiallyRecessed
Spa
Or, design your partially-recessed installation so
that the upper, front face of the spa is exposed to
provide access to the main control panel.
A partially-recessed spa is one where the deck or patio begins somewhere below the
main control panel or some combination of sides are recessed and the control panel
is exposed. It can fit nicely into your deck or patio, allowing for easy access to the
electrical equipment and drains.
NOTE: ALL models of Hot Spring® spas can be partially-recessed.
You also can choose to use the SpaStone™ spa
surround offered by Hot Spring® Spas, which
is designed to allow access to the main control
panel.
Considerations
The following addresses possible installation considerations and provides you with
information as well as recommendations and solutions for you and your installation
team to help guide you in the planning and installation of your partially-recessed
Hot Spring spa.
Safe entry and exit
Easy and safe access are important when entering and exiting your spa.
+ IMPORTANT: Please refer to the Basic Spa Installation Considerations
section on page 9 for details on the location of the main control panel, equipment panel,
drains, etc.
NOTE: When partially-recessing a Hot Spring Custom Cabinet (CC) spa it is important
to leave access to any exposed plywood that is below the deck or patio level, as
periodically treating the exposed areas of the plywood siding is recommended.
14
PARTIALLY-RECESSED SPA
www.hotspring.com
Cover lifters
A cover lifter allows for the easy opening and closing of your spa cover. The UpRite®
cover lifter is easily installed in conjunction with the SpaStone partial-surround cabinet.
This cover lifter stands the cover straight up behind the spa so as not to interfere with
the decorative ledge of the SpaStone partial-surround cabinet.
NOTE: If you have maintained a 24-inch service space around your entire spa, you
will have no difficulty storing the spa cover behind the spa, since you only need to
maintain a minimum of 10 inches of space behind the spa to accommodate the
thickness of the cover. If there is at least 16 inches of clearance between the top of
your spa and the decking or patio, 10 inches between your spa and the nearest wall,
and you are not using the SpaStone partially-recessed surround cabinet, then the Lift
‘n Glide® cover lifter is also an option.
WARNING: Safe entry is especially crucial in a partially-recessed environment,
Main control panel
The main control panel is located on the front face of the spa and is approximately
6 inches below the bartop of the spa. Hot Spring offers the hand-held, IQ 2020®
remote control that provides all of the same features (and more) as the main
control panel, allowing you to control your Hot Spring spa remotely if your
partially-recessed installation covers the main control panel. Most models have an
auxiliary control panel that can be used to control the lights, jets and music system.
because you are stepping down into the spa. Installing a handrail will assist with safe
footing. Hot Spring offers a Spa Side Handrail developed for the spa environment.
Or, custom handrails can be constructed at the entry point of the spa by a qualified,
licensed contractor applying local building and construction codes.
NOTE: The Hot Spring handrail swings inward or outward for both in and out of spa
use. A baseplate slips securely under the spa, and the handrail comes up through an
opening in the patio or decking.
PARTIALLY-RECESSED SPA
www.hotspring.com
15
PartiallyRecessed
Spa
Access to the equipment compartment,
internal plumbing and stereo components
The spa’s equipment compartment is on the front face of the spa (see diagram below).
The following are several suggested options.
Cover locks
Cover locks or some form of safety barrier are required by law. All spas must include
a locking device (typically a cover with cover locks) to ensure the safety of family, pets,
and friends. Depending on the installation, you and your landscape contractor will
need to consider a method for locking your spa cover.
When planning your partially-recessed spa within a deck or patio surrounding, if the
length of the cover straps require that the locks be positioned below deck or patio
level, provide cutouts at each corner of the spa to allow access (for your hand in order
to lock/unlock the cover locks) between the deck/patio surrounding the spa.
Or, provide four recessed points in the deck at each corner of the spa. Mount the
locking portion of the clip inside the recessed points. Be sure to measure the distance
from the cover to the end of the male cover clip to determine how far away to install
the recessed cover locks.
NOTE:
If the above suggestions are
not possible, you need to provide proper
safeguards required by local codes and
regulations to prevent unwanted access to
your spa. These safeguards may include,
but are not limited to, security enclosure
fencing and exterior doorway alarms.
16
PARTIALLY-RECESSED SPA
www.hotspring.com
Option 1:
Design your partially-recessed installation
so that the front face of the spa is exposed,
providing access, while the decking/patio
covers the remaining two or three sides
of your spa. (See image to the right.
Steps are removable, providing access to
the front panel.) Then, to provide access
to the internal plumbing and stereo equipment, install access panels along the sides
and back of the spa. These access panels should be the length of the sides and be
24 inches wide (large enough to enable someone to drop into the opening and work
on the spa).
PartiallyRecessed
Spa
Option 2:
Design a removable or hinged access panel for all sides of the spa. The access
panel in the decking at the front face of the spa will provide access to the equipment
compartment. The access panel should run the width of the spa and provide enough
space for someone to drop through the opening and safely work with the electrical
equipment. In some states, electrical codes require a 36-inch area in order to safely
work on electrical equipment (36 inches being the dimension between the spa and the
decking when the access panel is removed or opened).
NOTE: Please check your state’s electrical codes.
Option 3:
If you are partially recessing a Custom Cabinet spa that will have a unique siding,
please refer to the custom spa section of this guide for the locations of the support
structure. However, the preferred method for creating a custom environment for your
Custom Cabinet partially-recessed spa is to simply build around it, rather than attach
material directly to the body of the Custom Cabinet spa. You or a qualified landscape
contractor can plan for and create a structure that would allow you to attach any type
of siding to that structure. Then, the Custom Cabinet spa could be placed inside this
customized structure, similar to a fully-recessed spa installation.
PARTIALLY-RECESSED SPA
www.hotspring.com
17
PartiallyRecessed
Spa
NOTE: If the base of the spa is located either below an appropriate outlet/drain or in
a vault-type location, then a sump pump is necessary.
If your spa is installed in a vault or your decking cannot be constructed to
accommodate removal, a crane can be used to remove the spa. In preparation
for removal, even if a crane is not required, it’s good practice to pour a concrete
pad with removal of the spa in mind. When planning the foundation for your spa,
lay two 2’ x 6’s in the wet concrete to form recesses as shown below. These
recesses create two strap slots. Straps can then be snaked underneath the
spa in the unlikely event that the spa must be completely removed for repairs.
There are two scenarios for a partially-recessed spa. The first is a spa that is recessed
into a raised deck, where the spa sits above grade on a cement pad. The second is a
spa that actually sits below grade and is surrounded by ground-level decking or a patio.
Scenario 1:
+
Assumes that the spa is above grade. When selecting the location for your spa, ensure
that water will not puddle around the base of the spa. Consider a drainage system in
which the water flows down and away from the spa to an appropriate outlet or drain.
Assumes that some portion of the spa is below grade. An installation below grade
requires careful planning. Since water flows downhill and water tables tend to rise, it’s
important to install your spa in a way that will protect it from rising water levels. At a
minimum, a drainage system should be installed. If you live in an area that is prone to
high water tables or flooding, a sump pump should be considered.
The optimal solution for this type of installation is a vault. Placing the spa in a vault will
allow access to all equipment and components. Access panels in the decking or patio
will be needed. The diagram below shows an example of a fully-recessed spa within a
vault; similar considerations are important for a partially-recessed spa.
18
PARTIALLY-RECESSED SPA
www.hotspring.com
Construct a modular decking system that allows you to remove sections of your decking
to enable the spa to slide out (also see concrete pad diagram below).
Option 3:
Drainage
Scenario 2:
Option 2:
PartiallyRecessed
Spa
IMPORTANT: BE SURE TO REMOVE THE 2’x 6’s BEFORE THE
CONCRETE DRIES.
Removal
It is best to plan for potential removal at the time of installation. There are a few options
to consider.
Option 1:
Construct your partially-recessed patio or decking so that the entire front face of the
spa is exposed. This will allow movers to slide the spa out of the surrounding decking
or patio surface (also see concrete pad diagram).
PARTIALLY-RECESSED SPA
www.hotspring.com
19
FullyRecessed
Spa
A fully-recessed spa is an in-ground installation where the spa is fully-recessed in the
deck or patio, concealing the electrical equipment, drains, and control panels. This
provides an attractive, fully integrated installation.
NOTE: All models of Hot Spring® spas can be fully-recessed.
Considerations
There are two slightly different definitions of the term fully-recessed. The first is when
a spa is recessed into a deck or patio with only its bartop (see diagram on page 9 for
the location of the bartop) exposed. The second is when a spa is recessed into a deck
or patio without ANY of the bartop exposed. In this case, the spa is flush with the top
of the deck or patio.
If you want to fully recess your spa into a deck or patio, we recommend the first
definition. Why? Because by leaving the bartop exposed above the deck or patio
level, you are able to use a Hot Spring cover. The Hot Spring cover provided with your
spa is insulated, meaning less energy is required to keep your spa at the preferred
temperature.
The following addresses possible installation considerations and provides you with
information as well as recommendations and solutions for you and your installation
team to help guide you in the planning and installation of your fully-recessed
Hot Spring spa.
+ IMPORTANT: Please refer to the BASIC SPA INSTALLATION CONSIDERATIONS
section on page 9 for details on the location of the main control panel, equipment
panel, drains, etc.
NOTE: When fully-recessing a Hot Spring Custom Cabinet (CC) spa it is important to
leave access to any exposed plywood that is below the deck or patio level, as periodically
treating the exposed areas of the plywood siding is recommended.
NOTE: A fully-recessed spa, with no bartop exposed, will not work with a Hot Spring
FullyRecessed
Spa
Main control panel
The main control panel is located on the front face of the
spa and is approximately 6 inches below the spa’s bartop.
Hot Spring® offers the hand-held, IQ 2020® remote
control that provides all of the same features (and more)
as the main control panel, allowing you to control your
Hot Spring spa remotely. And, most models have an
auxiliary control panel that can be used to control the lights, jets and music system.
Safe entry and exit
Easy and safe access are important when entering and exiting your spa. This is
particularly crucial in a fully-recessed environment because you are stepping down
into the spa. Installing a handrail will assist with
safe footing. Hot Spring Spas offer a Spa Side
Handrail developed for the spa environment.
Or, custom handrails can be constructed
at the entry point of the spa by a qualified,
licensed contractor applying local building and
construction codes.
Cover lifters
A cover lifter allows for the easy opening and closing of your spa cover. An UpRite® cover
lifter is the recommended solution, as this lifter can be installed on the decking.
Because this cover lifter stands your cover straight up behind the spa, it can be used
with a fully-recessed spa.
NOTE: If you have elected to disregard the recommendation of leaving a 24 inch
service space around your entire spa, a minimum of 10 inches of space is required
behind the spa to accommodate the thickness of the cover.
NOTE:
This Hot Spring handrail swings
inward or outward for both in and out of spa
use. A base plate slips securely under the spa
cabinet, and the handrail comes up through an
opening in the patio or decking.
spa cover. If this is the installation you are planning, please talk to your Hot Spring
dealer for more information and options for covers on a fully-recessed spa.
20
FULLY-RECESSED SPA
www.hotspring.com
FULLY-RECESSED SPA
www.hotspring.com
21
FullyRecessed
Spa
Drainage
There are two scenarios for a fully-recessed spa. The first is a spa that is recessed into
a raised deck, where the spa is able to sit above grade on a cement pad. The second is
a spa that sits below grade and is surrounded by ground level decking or a patio.
Cover locks
Cover locks or some form of safety barrier are required by law. All spas must include
a locking device (typically a cover with cover locks) to ensure the safety of family, pets,
and friends. Depending on the installation, you and your landscape contractor will
need to consider a method for locking your spa cover.
When planning your fully-recessed spa within a raised deck or patio surrounding, if
the length of the cover straps require that the locks be positioned below deck or patio
level, provide cutouts at each corner of the spa to allow access (for your hand in order
to lock/unlock the cover locks) between the deck/patio surrounding the spa.
Or, if your spa is below grade, provide four recessed points in the deck at each corner
of the spa. Mount the locking portion of the clip inside the recessed points. Be sure to
measure the distance from the cover to the end of the male cover clip to determine
how far away to install the recessed cover locks.
22
FULLY-RECESSED SPA
www.hotspring.com
Scenario 2:
Assumes that the spa is below grade. An installation below grade requires careful
planning. Since water flows downhill and water tables tend to rise, it’s important to
install your spa in a way that will protect it from rising water levels. At a minimum,
a drainage system should be installed. If you live in an area that is prone to high
water tables or flooding, a submersible pump should be considered.
The optimal solution for this type of installation is a vault. Placing the spa in a vault
will allow access to all equipment and components. Access panels in the decking or
patio will be needed. Be sure to follow local codes and laws when designing for your
fully-recessed spa.
NOTE: If the base of the spa is located either below an appropriate outlet/drain or in
a vault-type location, a sump pump is necessary.
Removal
It is best to plan for possible removal at the time of installation. There are a few options
to consider.
Option 1:
NOTE:
If the above suggestions are
not possible, you need to provide proper
safeguards required by local codes and
regulations to prevent unwanted access to
your spa. These safeguards may include, but
are not limited to, security enclosure fencing
and exterior doorway alarms.
FullyRecessed
Spa
Scenario 1:
Assumes that the entire spa is above grade. When selecting the location for your spa,
ensure that water will not puddle around the base of the spa. Consider a drainage system
where the water flows down and away from the spa to an appropriate outlet or drain.
If you are planning to fully-recess your spa into a raised deck, meaning that the spa
is actually above grade and the decking is built up around it, you have a few options.
First, leave one side of the spa exposed (spa not fully surrounded by the decking).
Second, design a modular deck so that portions can be removed in order to remove
the spa.
Option 2:
If you are fully recessing your spa below grade, in a vault scenario as shown above,
your best option is to plan for removal by crane. In preparation for removal, even if a
crane is not required, it’s good practice to pour a concrete pad with removal of the
spa in mind. When planning the foundation for your spa, lay two 2’x6’s in the wet
concrete to form recesses as shown below. These recesses create two strap slots.
Straps can then be snaked underneath the spa in the unlikely event that the spa must
be completely removed for repairs.
+ IMPORTANT: BE SURE TO REMOVE THE 2’x6’s BEFORE THE
CONCRETE DRIES.
FULLY-RECESSED SPA
www.hotspring.com
23
Access to
equipment,
plumbing & stereo
To assist you in planning and installing your Hot Spring spa, the following checklist can be used as a guide to help
simplify the overall process. Contact your local Hot Spring dealer as you develop your plans. It may be of value
to contact a Landscape Architect/Designer/Contractor to help you create your perfect outdoor solution.
®
Installation
checklist
• Review this document to determine which application best suits your needs
The spa’s equipment compartment is on the front face of the unit (see diagram below).
To access the equipment compartment or the internal plumbing or stereo components,
removable or hinged access panels are needed for all sides of the spa. The access panel
in the deck or patio at the front face of the spa will provide access to the equipment
compartment. This access panel should run the width of the spa and provide enough
space for a person to drop through the opening and safely work with the electrical
equipment. Some states’ electrical codes require a 36 inch area in order to safely
work on electrical equipment (36-inches being the dimension between the spa and
the decking when the access panel is removed or open). Access panels at the sides
and back of the spa should run the width of the spa and provide enough space for a
person to drop through the opening. The standard requirement is a 24-inch work area
(24 inches being the dimension between the spa and the decking when the access
panel is removed or open).
NOTE: Please check your state’s electrical codes.
• Identify where you would like your spa to be located
• Identify the direction you would like the spa to face
• Identify how to maintain optimum access to all the necessary panels
• Identify from where the electrical will be drawn (contact an Electrical Contractor for installation and to ensure that the electrical installation meets the electrical codes for your area)
• Identify possible locations for the subpanel (if required)
• Ensure that there will be access to the spa drains and that the water will drain away from the spa or secure a submersible pump for quick draining
• Plan for correct drainage around your spa
• Select a Hot Spring® spa model - see your local dealer to select the best model for your application
• Determine what type of cover lifter you would like to use
• Read the Pre-Delivery Instructions
• Fill spa and enjoy!
24
ACCESS TO EQUIPMENT
www.hotspring.com
INSTALLATION CHECKLIST
www.hotspring.com
25
General
Safety
+ IMPORTANT: It is the responsibility of the spa owner and installer to become
thoroughly familiar with the Hot Spring® limited warranty, the appropriate construction
methods and techniques, as well as all governing agency codes and regulations. All
builders and installers should hold current licenses for their respective professions
within the state the work is being performed.
+ IMPORTANT: Because every deck and patio is constructed in a different manner
and no two design scenarios are alike, the information in this document is intended to
be used as an installation guideline.
WARNING: To ensure you will have an opportunity to use your spa soon after
delivery, it is very important that the required electrical service has been installed.
Unless otherwise stipulated by your dealer, THIS IS YOUR RESPONSIBILITY. Never let
water get into the subpanel (230v models), or into the electrical outlet to which your
spa is connected.
WARNING: Watkins Manufacturing Corporation REQUIRES THE USE OF A SUBPANEL
FOR ALL 230v INSTALLATIONS TO SUPPLY POWER AND PROTECT THE SPA.
WARNING: Removing the GFCI breakers in the subpanel at any time will result
in an unsafe spa and will void the warranty. Bypassing the GFCI breakers could result
in an unsafe spa and will void the warranty.
26
GENERAL SAFETY
www.hotspring.com
+ IMPORTANT:
All 230v spas include a GFCI electrical subpanel; however, the
115/230v conversion models do not. If a 115/230v conversion model is purchased,
and you decide to convert your spa from 115v to 230v, be sure a qualified electrician
provides a GFCI electrical subpanel during the conversion process.
+ IMPORTANT: All
electrical circuits must be installed by a qualified, licensed
electrician. If you require the services of a licensed electrician, your Hot Spring® dealer
should be able to suggest one for you.
+ IMPORTANT: If you have questions or concerns about whether or not the main
circuit breaker box for your home has the appropriate amperage circuits (specified
in the Owner’s Manual), please contact a qualified, licensed electrician to check the
voltage levels and amperage for your home before supplying power to your spa.
+ IMPORTANT:
To ensure a safe installation with regard to your spa’s power
connections, please adhere to ALL the electrical requirements provided in the Predelivery instructions provided by your Hot Spring dealer. Pre-delivery instructions can
also be found online at www.hotspring.com in the customer service section.
WARNING: To be certain that your deck can support your spa, you must know the
deck’s maximum load capacity. It is recommended that you consult a qualified building
contractor or structural engineer before you place the spa on an elevated deck. This
weight (per square foot) must not exceed the structure’s rated capacity, or serious
structural damage to the deck and/or spa could result. Please refer to your User’s
Manual for the specific filled weight of your spa.