1
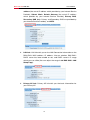
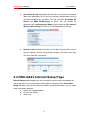
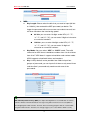
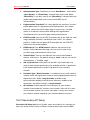
Wireless Router RNX-GX4 User’s Manual Wireless Router RNX-GX4 User’s Manual Table of Content: Safety Warning ...............................................................................................4 Before We Begin ............................................................................................6 1. Installing RNX-GX4 .................................................................................8 1.1 Network + System Requirements .......................................................8 1.2 Installation Environment .....................................................................8 1.3 Establish Hardware Connection .........................................................8 2. Connect RNX-GX4 with your PC/NB...................................................10 2.1 Setup for Window XP .......................................................................10 2.2 Setup for Window Vista ....................................................................13 2.2 Connect test with the Router............................................................18 2.3 Accessing RNX-GX4 with Web Browser ..........................................19 3. Managing RNX-GX4 with Web Browser..............................................21 3.1 Navigating the Web Management Page ...........................................21 3.2 RNX-GX4’s Convenient Setup Page.................................................22 3.2.1 DHCP user (for Cable modem) in Convenient Setup..............22 3.2.2 PPPoE user (for DSL modem) in Convenient Setup ...............22 3.2.3 Static user in Convenient Setup .............................................23 3.3 RNX-GX4’s System information Page ..............................................23 3.4 RNX-GX4’s Internet Setup Page.......................................................25 3.4.1 DHCP user (for Cable modem) in Internet Setup....................26 3.4.2 PPPoE user (for DSL modem) in Internet Setup .....................26 3.4.3 Static user in Internet Setup ...................................................27 3.5 Wireless Management ......................................................................28 3.5.1 Primary AP Setup ...................................................................29 3.5.2 Secondary AP Setup ..............................................................36 3.5.3 AP Sharing Technique ............................................................37 3.6 RNX-GX4’s LAN Setup Page ............................................................38 3.7 RNX-GX4’s Advance Usage - Applications and Gaming Page.........39 3.7.1 Virtual Service.........................................................................39 3.7.2 DMZ........................................................................................40 3.7.3 UPNP......................................................................................41 3.8 RNX-GX4’s Advance Usage - Application Gateway Page................41 3.8.1 FTP Pass-through...................................................................42 3.8.2 VPN Pass-through ..................................................................42 3.9 RNX-GX4’s Advance Usage - Security Management Page..............43 3.9.1 Internet Access Control ..........................................................43 2 Wireless Router RNX-GX4 User’s Manual 3.9.2 Firewall ...................................................................................45 3.10 RNX-GX4’s Advance Usage - DDNS Page .....................................46 3.11 RNX-GX4’s Advance Usage - Routing Page ..................................46 3.12 RNX-GX4’s System Management Page..........................................47 3.12.1 Manually Restore Default......................................................48 Appendix A – Product Specification ..............................................................49 Appendix B – Troubleshooting.......................................................................50 3 Wireless Router RNX-GX4 User’s Manual Safety Warning • Place connecting cables carefully so that no one will step on them or stumble over them. • Always disconnect all cables from this device before servicing or disassembling. • Use ONLY an appropriate power adaptor or cord for your device. • Connect the power adaptor or cord to the right supply voltage (for example, 110V AC in North America or 230V AC in Europe). • Do not allow anything to rest on the power adaptor or cord and do not place the product where anyone can walk on the power adaptor or cord. • Do not use the device if the power adaptor or cord is damaged as it might cause electrocution. • If the power adaptor or cord is damaged, remove it from the power outlet. • Do not attempt to repair the power adaptor or cord. Contact your local vendor to order a new one. • Do not use the device outside, and make sure all the connections are indoors. • Do not obstruct the device ventilation slots, as insufficient airflow may harm your device. • Do not use this product near water, eg, in wet basement, or near a swimming pool. • Do not expose your device to dampness, dust or corrosive liquids. • Do not install, use, or service this device during a thunderstorm. There is a remote risk of electric shock from lightning. • Connect ONLY suitable accessories to the device. • Do not open the device or unit. Opening or removing covers can expose you to dangerous high voltage points or other risks. ONLY qualified service personnel should service or disassemble this device. Please contact your vendor for further information. • Make sure to connect the cables to the correct ports. • If you wall mount your device, make sure that no electrical lines, gas or water pipes will be damaged. Your product is marked with this symbol, which is known as the WEEE mark. WEEE stands for Waste Electronics and Electrical Equipment. It means that used electrical and electronic products should not be mixed with general waste. Used electrical and electronic equipment should be treated separately. 4 Wireless Router RNX-GX4 User’s Manual FCC Certifications Federal Communication Commission Interference Statement This equipment has been tested and found to comply with the limits for a Class B digital device, pursuant to Part 15 of the FCC Rules. These limits are designed to provide reasonable protection against harmful interference in a residential installation. This equipment generates uses and can radiate radio frequency energy and, if not installed and used in accordance with the instructions, may cause harmful interference to radio communications. However, there is no guarantee that interference will not occur in a particular installation. If this equipment does cause harmful interference to radio or television reception, which can be determined by turning the equipment off and on, the user is encouraged to try to correct the interference by one of the following measures: z Reorient or relocate the receiving antenna. z Increase the separation between the equipment and receiver. z Connect the equipment into an outlet on a circuit different from that to which the receiver is connected. z Consult the dealer or an experienced radio/TV technician for help. This device complies with Part 15 of the FCC Rules. Operation is subject to the following two conditions: (1) This device may not cause harmful interference, and (2) this device must accept any interference received, including interference that may cause undesired operation. FCC Caution: Any changes or modifications not expressly approved by the party responsible for compliance could void the user's authority to operate this equipment. IMPORTANT NOTE: FCC Radiation Exposure Statement: This equipment complies with FCC radiation exposure limits set forth for an uncontrolled environment. This equipment should be installed and operated with minimum distance 20cm between the radiator & your body. This transmitter must not be co-located or operating in conjunction with any other antenna or transmitter. CE Mark Warning This equipment complies with the requirements relating to electromagnetic compatibility, EN 55022 Class B for ITE, the essential protection requirement of Council Directive 89/336/EEC on the approximation of the laws of the Member States relating to electromagnetic compatibility. Company has an on-going policy of upgrading its products and it may be possible that information in this document is not up-to-date. Please check with your local distributors for the latest information. No part of this document can be copied or reproduced in any form without written consent from the company. 5 Wireless Router RNX-GX4 User’s Manual Before We Begin Thank you for purchasing this product, this manual will help you know more about your RNX-GX4. COPYRIGHT & TRADEMARKS Specifications are subject to change without notice. is a registered trademark of ROSEWILL INC. Other brands and product names are trademarks or registered trademarks of their respective holders. No part of the specifications may be reproduced in any form or by any means or used to make any derivative such as translation, transformation, or adaptation without permission from ROSEWILL INC. Copyright © 2009 ROSEWILL INC. All rights reserved. http://www.rosewill.com 6 Wireless Router RNX-GX4 User’s Manual Package Contents The following items should be found in your package: z RNX-GX4 Wireless G Router x 1 z Quick Installation Guide x 1 z 2.4Ghz 2dBi External Antenna x 2 z Output DC 9V Power Adapter x 1 z CAT 5 Cable x 1 z Resource CD for RNX-GX4 x 1 Conventions The “Router” or “Wireless Router” mentioned in this user guide stands for RNX-GX4 Wireless G Router without any explanations. Note: When using this manual, the following signs will be use to assist you: : This sign refers to issues when using the router. : This sign refers to IMPORTANT issues when using the router. : This sign refers to explanations when using the router 7 Wireless Router RNX-GX4 User’s Manual 1. Installing RNX-GX4 1.1 Network + System Requirements To begin using the RNX-GX4, make sure you have the following as minimum requirements: h PC/Notebook. h Operating System – Microsoft Windows 98SE/ME/XP/2000/VISTA, Mac OS, and Linux OS h 1 Free Ethernet port on your PC/NB. h WiFi card/USB dongle (802.11b/g/n) – optional. h External xDSL (ADSL) or Cable modem with an Ethernet port (RJ-45) for internet connection. h Web-Browser (Internet Explorer, Safari, Firefox, Opera, and etc) h Two or more Ethernet compatible CAT5 cables. 1.2 Installation Environment We suggest you to select a suitable environment for the best usage functionality of your wireless router: h Please place your router close to the center of your usage area. h Please maintain your antenna positioned horizontally for better performance of the signal. h Please make sure not to place your router in a small closed area. h Please keep away your router from the potential signal interference devices like microwave, 2.4 Ghz coreless phone, and etc. 1.3 Establish Hardware Connection Please follow below steps to establish your Hardware cable connection: 8 Wireless Router RNX-GX4 h User’s Manual Please connect the LAN port of your router to your PC/NB through CAT5 Cable. h Please connect the WAN port of your router to your modem. h Plug in the power and turn on the power as follow z h First power on your Router, modem, then your PC. Your Router should automatically finish the initial start-up process within 20 seconds. z The LED indication should show in follow steps: 1. SYS LED starts up 2. All LED flash 3. WAN port and LAN port will continue to light up when cable connected to WAN port and LAN port. 4. Flashing WAN LED and LAN LED show that data is going through the router and router is in process. If you are connecting the Router with an already power-on modem, you should see the WAN LED lights on, and if the WAN LED flashes, this indicates the Router is transmitting Data. 9 Wireless Router RNX-GX4 User’s Manual 2. Connect RNX-GX4 with your PC/NB 2.1 Setup for Window XP To setup your Router, you will first need to wire connect your Router. Then you can either manually set your IP address or let your PC/NB automatically obtain the IP address assigned by your Router. The follow steps will help you on setting your IP address both automatically and manually. h Start Æ Connect To Æ Show all connections h Right click on “Local Area Connection” Æ Select “Properties” 10 Wireless Router RNX-GX4 h User’s Manual Pull down to select “Internet Protocol (TCP/IP)” Æ Select “Properties” h To set your computer obtain IP automatically: z Select “Obtain an IP address automatically” and “Obtain DNS server address automatically”; then click “OK” in the “Internet Protocol (TCP/IP) Properties” window 11 Wireless Router RNX-GX4 z User’s Manual Click “OK” again in the “Local Area Connection Properties” to finish this process. h To set IP manually: z Select “Use the following IP address”; then type in: IP address: 192.168.1.x (2<x<128; system default in IP range 192.168.1.2~192.168.1.128) z Subnet mask: 225.225.225.0 Default gateway: 192.168.1.1 Select “Use the following DNS server addresses”; then type in: z Preferred DNS server: 192.168.1.1 click “OK” in the “Internet Protocol (TCP/IP) Properties” window 12 Wireless Router RNX-GX4 z User’s Manual Click “OK” again in the “Local Area Connection Properties” to finish this process. IP address refers to a specific computer within the network. So when manually set your computers’ IP, please remember to assign different IP address for different computer within the IP range. 2.2 Setup for Window Vista h Start Æ Connect To 13 Wireless Router RNX-GX4 User’s Manual h Click on “Open Network and Sharing Center” h Select “View status” 14 Wireless Router RNX-GX4 h User’s Manual You should be a window pop up showing as “Local Area Connection Status” Æ “Properties” h Select “Internet Protocol Version 4 (TCP/IPv4)” Æ “Properties” 15 Wireless Router RNX-GX4 h User’s Manual To let your computer automatically receive IP address Click select “Obtain an IP address automatically” and “Obtain DNS Server address automatically” h Click “OK” on “Internet Protocol Version 4 (TCP/IPv4)” window, then 16 Wireless Router RNX-GX4 User’s Manual “OK” again in the “Local Area Connection Properties” to finish this process. h To set IP manually: z Select “Use the following IP address”; then type in: IP address: 192.168.1.x (2<x<128; system default in IP range 192.168.1.2~192.168.1.128) z Subnet mask: 225.225.225.0 Default gateway: 192.168.1.1 Select “Use the following DNS server addresses”; then type in: z Preferred DNS server: 192.168.1.1 click “OK” in the “Internet Protocol (TCP/IPv4) Properties” window z Click “OK” again in the “Local Area Connection Properties” to finish this process. IP address refers to a specific computer within the network. So when manually set your computers’ IP, please remember to assign different IP address for different computer within the IP range. 17 Wireless Router RNX-GX4 User’s Manual 2.2 Connect test with the Router After completing the above steps, you can use “Ping” command to test if your computer has connected with your Router. h Start Æ Run Æ Type “cmd” Æ Click “OK” h Type “ping 192.168.1.1” and press Enter h If you see below message, this means the connection is set correctly. Your PC/NB is now able to link to your Router. h If you see below message, this means the connection is not set correctly. Please check your network connection and setup. 18 Wireless Router RNX-GX4 User’s Manual When you are able to ping your Wireless Router from your PC/NB, this means your PC/NB is now connecting to your Router. However, due to the complexity of a network environment, this does not guarantee you are able to connect to the internet. Because your internet can be limited due to the examples like: 1. Modem Setup 2. DSL (PPPoE) Static IP, Account name, and password setup 3. Cable Static IP address setup Please first follow below Setup, then confirm with your Internet Service Provider or Rosewill’s Customer service on connection methods if you are still unable to connect to the internet. 2.3 Accessing RNX-GX4 with Web Browser After finishing previous steps, you can type “http://192.168.1.1” in your Web Browser’s address bar. A window will pop up and ask you to enter Account name and password, the default account name is “admin” and default password is “guest”. 19 Wireless Router RNX-GX4 User’s Manual 20 Wireless Router RNX-GX4 User’s Manual 3. Managing RNX-GX4 with Web Browser 3.1 Navigating the Web Management Page Web Management page has provided you with choices to select different areas to start functions on managing your RNX-GX4, detailed functions’ management section on each areas, and Help Menus for the commands that you will be use on each pages for your quick reference. You will find the left hand side of the Web Management Page as the all functionalities of your RNX-GX4. You can see Convenient Setup, System Information, Internet Setup, Wireless Management, LAN Setup, Applications and Gaming, Application Gateway, Security Management, DDNS, Routing, and System Management for you to select from and to manage RNX-GX4. The center section provides you with the detailed management tools for each of the area that you want to set your RNX-GX4. For example, when you click on Internet Setup, you will see a detailed selection menu for you to set your RNX-GX4’s Internet. Help section locates on the right hand side of the Web Management Page. It will provide you with quick references of the commands that you will be using on each 21 Wireless Router RNX-GX4 User’s Manual page. You can click on “More……” to see a popup page for more help. 3.2 RNX-GX4’s Convenient Setup Page “Convenient Setup” provides you with a quick startup for getting your wireless to work. You can select from the three options for your specific network environment. However, this section is a simple version from the "Internet Setup”, if you are looking to have a more detail control options please see "3.3 RNX-GX4’s Internet Setup Page”. Convenient Setup: provides you with One-Click to enable the Wireless function. However the default Wireless Enable does not contains Wireless Encryption. Please do follow the Section 3.5.2 Router’s Wireless Security Setup on how to set your RNX-GX4 from unauthorized connection. h DHCP user (Cable Modem) h PPPoE user (ADSL) h Static user 3.2.1 DHCP user (for Cable modem) in Convenient Setup When selecting “DHCP user (Cable Modem)” as your internet connection method, please enter the DNS server address as the Primary DNS and Secondary DNS provided by your Internet Service Provider. You may also be required to enter the MAC address in some cases depending if your ISP requires. When complete entering, please click “Save Settings” to save and complete your basic setup. 3.2.2 PPPoE user (for DSL modem) in Convenient Setup 22 Wireless Router RNX-GX4 User’s Manual When selecting “PPPoE user (ADSL)” as your internet connection method, please enter your PPPoE Username and PPPoE Password provided by your Internet Service Provider. When complete entering, please click “Save Settings” to save and complete your basic setup. 3.2.3 Static user in Convenient Setup When selecting “Static user” as your internet connection method, you will need to enter WAN IP address, Subnet Mask, Default Gateway, Primary DNS, and Secondary DNS provided by your Internet Service Provider. 3.3 RNX-GX4’s System information Page System information provides the Access information on Internet Access Info, LAN Info, Primary AP Info, Secondary AP Info, and Statistics Info which helps you understand more of RNX-GX4’s current status. h Internet Access Info: This Section provides with Information on your Connection Type, Physical Address (RNX-GX4’s MAC address), IP 23 Wireless Router RNX-GX4 User’s Manual address (the actual IP address which provides by your Internet Service Provider), Subnet Mask, Default Gateway (the actual IP address which provides by your Internet Service Provider), Primary DNS, Secondary DNS (both Primary and Secondary DNS are provided by your Internet Service Provider), and MTU. h LAN Info: LAN Info tells you on the LAN Connection information on the RNX-GX4’s MAC address, IP address. Also on whether RNX-GX4’s DHCP server has been enable or not, and DHCP server’s IP range which you can utilize (You can adjust the range in 3.6 RNX-GX4’s LAN Setup Page). h Primary AP Info: Primary AP Info tells you the basic information for your Primary AP. 24 Wireless Router RNX-GX4 h User’s Manual Secondary AP Info: Secondary AP Info tells you the basic information about your Secondary AP. As you may see here, the Secondary AP has not been enabling yet, therefore, you will see both Secondary AP Status and SSID Broadcasting as Deny. You can enable the Secondary AP in Secondary AP Setup (Please refers to 3.5.1 Router’s Wireless Basic Setup for Primary AP and Secondary AP Setup) h Statistics Info: Statistics Info tells you the basic System data such as System Uptime, Packets transmitting numbers, and how much data you have send out and receive. 3.4 RNX-GX4’s Internet Setup Page Internet Setup page provides you with more detail controls and setup options on how to connect to your Internet Service Provider as compare to the Convenient Setup. Based on your Internet Service Provider’s internet information, you can select three connection methods. h h h DHCP user (Cable Modem) PPPoE user (ADSL) Static user 25 Wireless Router RNX-GX4 User’s Manual 3.4.1 DHCP user (for Cable modem) in Internet Setup When selecting “DHCP user (Cable Modem)” as your internet connection method, please enter the DNS server address as the Primary DNS and Secondary DNS provided by your Internet Service Provider. You may also be required to enter the MAC address in some cases depending if your ISP requires. When complete entering, please click “Save Settings” to save and complete your basic setup. 3.4.2 PPPoE user (for DSL modem) in Internet Setup When selecting “PPPoE user (ADSL)” as your internet connection method, please enter your PPPoE Username and PPPoE Password provided by your Internet Service Provider. You may also be required to enter the MAC address, Primary DNS, and Secondary DNS in some cases depending if your ISP requirements. You can also select three connection methods as you desired: h h h Connect to Internet automatically (Default) Auto disconnect when idle within your desired time limits Connect to Internet manually 26 Wireless Router RNX-GX4 User’s Manual When complete entering, please click “Save Settings” to save and complete your basic setup. PPPoE provides three connection methods: Connect to Internet automatically (Default): This is suitable for DSL connecting method charged by month; once the Router’s power-on, your internet connection will be establish automatically. Auto disconnect when idle within your desired time limits: This is suitable for DSL connecting method charged by the time you connect online. Your router will not be connect automatically, however, once your Router detect you are visiting the internet, it will automatically connect your service and it will automatically disconnect internet with the time you set (5~30 minutes), if no internet visiting. Connect to Internet manually: This is suggested to be use by Network Administrator to provide internet when needed. Router will not connect internet automatically but manually connect thought visiting the web management page. 3.4.3 Static user in Internet Setup When selecting “Static user” as your internet connection method, you will need to enter WAN IP address, Subnet Mask, Default Gateway, Primary DNS, and Secondary DNS provided by your Internet Service Provider. 27 Wireless Router RNX-GX4 User’s Manual Clone MAC address: Normally this doesn’t require being set. However for some modems, such as cable modem, DSL modem, or ISP’s system will recorded the MAC address of the original adapter which causes internet unusable. So Cloning original adapter’s MAC address will help to solve this issue. MTU(Maximum Transfer Units): This is to set the transfer size of the packet. The suggested range is from 1200~1500. For most DSL user, please select to use 1492. 3.5 Wireless Management “Wireless Management” includes Wireless Network setup and Dual-AP Wireless Clients setup; please follow a step by step guide to setup your Router. 28 Wireless Router RNX-GX4 User’s Manual Dual-AP Function: We provide Dual-AP function for you to setup two SSID as two wireless networks for the ease of control on your network management. You can set both Primary AP and Secondary AP as different Network. The settings for Dual-AP are fundamentally the same. 3.5.1 Primary AP Setup 3.5.1.1 Router’s Wireless Basic Setup First please use Cable connection connected to the Wireless Router’s LAN port. After established the connection and login into the web management page, please select “Primary AP Setup” option under “Wireless Management”. Then you should see the same as below diagram. (The default “Wireless Network Status” is “Enable”.) You can also select to start the “Secondary AP Setup” which defaults as Disable. You will need to assign the below wireless options: h Wireless Network Status: You can choose “enable” or “disable” to enable or disable the “Wireless Network Status”, if what you choose is “Disable”, the AP function of wireless router will be turned off. h Radio Band: You can select the wireless standards running on your network, if you have Wireless-G, and Wireless-B devices in your network, keep the default setting, 802.11b/g Mixed. h SSID: This is the broadcasting name for your wireless connection. You can change SSID to the name you desire. Your PC/NB will need to connect to the same SSID that your Wireless Router uses. The Default SSID is “ROSEWILL”. h SSID Broadcasting: 29 Wireless Router RNX-GX4 User’s Manual You can select whether to broadcast your SSID. The default setting is “Enable”. z Enable: All Wireless Adapter will be able to see your SSID within your Wireless Router’s broadcasting range. z Disable: You will need to manually setup the connection between your wireless adapter and SSID. h Channel: You can select one channel from auto or manually from 1 to 11, which provides a choice of avoiding interference. After complete, please click “Save Setting”. Your Basic Wireless setting will be complete. Wireless Network Security: Upon completing the basic wireless network setting. Please do remember to change the default security setting from “None” to the Security mode that you desire to prevent your wireless network from unauthorized access. 3.5.1.2 Router’s Wireless Security Setup Please select “Primary AP Setup” under “Wireless Management”, then click select “Security” tab. This “Security” Tab allows you to encrypt your wireless communication also to protect your wireless network from unauthorized user access. Security Mode provides you with five encryption selections, “None”, “WEP”, “WPA SOHO USER”, “WPA2 SOHO USER” and “WPA & WPA2 SOHO USER”. h None: When selecting “None”, you choose not to set any encryption on your wireless network. Your wireless network will not be protected. You can use this selection when setting for a public wireless network. 30 Wireless Router RNX-GX4 h User’s Manual WEP: z Key Length: Please select the bits that you want to input (64 bits or 128 bits), then entered the WEP password you desire. The longer the password will ensure a more secure data transmit, but will also slow down the transferring speed. 64 bits: you can enter 10 digits under HEX (“A”~”F”; “a”~”f”; and “0”~”9”); you can enter 5 digits of character or numerical numbers. 128 bits: you can enter 26 digits under HEX (“A”~”F”; “a”~”f”; and “0”~”9”); you can enter 10 digits of character or numerical numbers. z Key Mode: You can select “HEX” or “ASCII” mode. The valid character for HEX format should be numbers from 0 to 9 or letters from A to F. HEX doesn't support mixed letter and number mode. ASCII supports mixed both letters and numbers. z Key 1~4: By default, router provides four fields to input four groups of password, you can input all of them or only one of them and the client’s password only need to match one of the passwords. WEP: Wired Equivalent Privacy (WEP) is a deprecated algorithm to secure IEEE 802.11 wireless networks. Wireless networks broadcast messages using radio and are thus more susceptible to eavesdropping than wired networks. However, there are hacking programs able to crack the WEP encryption within minutes. Therefore, we strongly suggest you to select WPA or WPA2 security 31 Wireless Router RNX-GX4 User’s Manual mode. h WPA SOHO USER: Wi-Fi Protected Access (WPA and WPA2) is a certification program created by the Wi-Fi Alliance to indicate compliance with the security protocol created by the Wi-Fi Alliance to secure wireless computer networks. In WPA SOHO method, you can choose from the TKIP (Temporal Key Integrity Protocol) or AES (Advanced Encryption System) which both are stronger encryption method for your security needs. You can enter passwords between 8~63 digits under either TKIP or AES. WPA SOHO: WPA is a more advance encryption mode than WEP. When selecting WPA SOHO mode, please make sure that the password you entered will be the password you use when linking your wireless adapter with the internet. h WPA2 SOHO USER: WPA2 is a more advanced encryption from WPA. You can also choose from the TKIP (Temporal Key Integrity Protocol) or AES (Advanced Encryption System) which both are stronger encryption method for your security needs. You can enter passwords between 8~63 digits under either TKIP or AES. 32 Wireless Router RNX-GX4 User’s Manual WPA2 SOHO: WPA2 is the advance encryption mode from WPA. When selecting WPA2 SOHO mode, please make sure that the password you entered will be the password you use when linking your wireless adapter with the internet. h WPA & WPA2 SOHO USER: This mode mixed WPA SOHO USER and WPA2 SOHO USER, which provides higher security level; you can configure it according with WPA SOHO USER or WPA2 SOHO USER. Wireless Security Mode: Wireless Security will help you encrypt your wireless signal to prevent unauthorized access. However, higher the security mode may reduce the speed of your internet connection. WEP is a deprecated algorithm to secure IEEE 802.11 wireless networks. Wireless networks broadcast messages using radio and are thus more susceptible to eavesdropping than wired networks. However, there are hacking programs able to crack the WEP encryption within minutes. Therefore, we strongly suggest you to select WPA or WPA2 security mode. When complete the wireless setting, you can click on “Primary AP Info” under “System Information” to see your wireless setup. (picture below as your 33 Wireless Router RNX-GX4 User’s Manual reference) 3.5.1.3 Router’s Host Filter Setup You can filter wireless users by enable this function; unauthorized users will not be able to access the network. To enable the “Host Filter” function, please follow the below steps: 1. Select “Enable” on the “Wireless Access Control Status”; This will bring up the “Wireless Access Control Rule” 2. Under “Wireless Access Control Rule”, you select two options as “Permit wireless connection for MAC address listed (others are Denied)” and “Deny wireless connection for MAC address listed (others are Permitted)”. They work as white list or black list which allows you to set as permitted only or deny only. However, these two options can only be apply at one time. 3. Select to enter the MAC address you want control in the “MAC address” field. (MAC address should look like AA-BB-CC-DD-EE-FF, but composed by letters and numbers), then click “Add”, and you will see the MAC address has displayed in the MAC list. 4. When complete adding the MAC address, please click “Save Settings”, and filter list will be done. 34 Wireless Router RNX-GX4 User’s Manual 3.5.1.4 Association Table “Association Table” will display the Wireless Client which associates to your router. You can also add the Wireless Clients that you are not authorized directly into the Filter List. 3.5.1.5 Advanced We provide advanced control for your wireless router. However, these values might interfere with each other. Therefore, we suggest using the default values for all options, unless you understand and confirm on these values. 35 Wireless Router RNX-GX4 h User’s Manual Authentication Type: The default is set to “Auto Select”, which allows “Open System” or “Shared Key” authentication to be used. Select “Shared Key” if you only want to use “Shared Key” authentication (the sender and recipient both must use the same WEP key for authentication). h Fragmentation Threshold: This value specifies the maximum size for a packet before data is fragmented into multiple packets. You should leave this value in the 256 to 2346 range. In most cases, it should remain as its default value of 2346. Setting the Fragmentation Threshold too low may result in poor network performance. h RTS Threshold: You can set RTS Threshold value in this field, the valid range should be 256-2347 and default value is 2347. If a network packet is smaller than the preset RTS threshold size, the RTS/CTS mechanism will not be enabled. h DTIM Interval: The “DTIM Interval” indicates the interval of the Delivery Traffic Indication Message, you can set this value in the 20-1000 range, and the default value is 100. h Transmit Rate: Transmit rate indicates the transmission speed of wireless LAN access .The default setting is “Auto” and you can set this value between 1 – 54Mbps range. h 802.11g Protection: Using 802.11b and 802.11g mixed mode may result in poor network performance. By enabling the 802.11 protection, it will improve performance of 802.11g devices in your wireless network. h Preamble Type: "Short Preamble" is suitable for heavy traffic wireless network which will significantly increase the throughput performance at higher data rates. While "Long Preamble" provides more communication reliability and will ensure maximum stability of the connection; the default setting is “Long Preamble”. h AP Isolation: Create separate virtual networks for your wireless network. After enable this function, every wireless client will in its own virtual network and can not access each other. If many users access your wireless network frequently, you should enable this function. 3.5.2 Secondary AP Setup Secondary AP Setup defaults as Disable, when you enable it, this function will look very similar to the Primary AP Setup. However, please do name the SSID 36 Wireless Router RNX-GX4 User’s Manual differently from the Primary SSID; otherwise, you might not be able to direct your Wireless Adapter to connect to it. 3.5.3 AP Sharing Technique By default, the primary AP and the secondary AP are sharing under same IP Range; as “AP Sharing Technique” is Enable. You can also “Disable” the AP Sharing Technique to have the Primary AP and the Secondary AP use different sets of IP range. You will then be asking to set another IP segment for your secondary SSID. 37 Wireless Router RNX-GX4 User’s Manual 3.6 RNX-GX4’s LAN Setup Page You can click on “LAN Setup” to manage your Router’s Local network IP address “LAN IP address” (LAN port’s IP address) and DHCP server. When finish setup, this IP Address will be use as the Default Gateway IP address for your computer (Router’s factory setting for IP Address/Subnet Mask is 192.168.1.1/225.225.225.0) h IP Address: This is the IP address of your Router in the Local Network h Subnet Mask: This is the Subnet Mask of your Router in Local Network. “LAN Setup” also provides you with the management ability for “DHCP server”. h DHCP Server Status: to enable or disable your Router’s DHCP server function (Factory default as Enable) h IP Address Pool: the IP address range can be distributed by your Router’s DHCP server. 38 Wireless Router RNX-GX4 User’s Manual Dynamic Host Configuration Protocol (DHCP) server will automatically assign an IP address for all computers that connect to it. Internet protocol (TCP/IP) includes IP address, subnet mask, Gateway, DNS server, and other information. It is very complicated to set TCP/IP for all computers within the Local Network, therefore many Routers will set to enable DHCP server as default. When enable DHCP server, your computer will also need to set “Obtain an IP address automatically” and “Obtain DNS server address automatically”. If you changed “LAN IP Address” in the Router, you will need to use the new set of IP address to log back in to the Router, and all of your computers’ IP addresses will need to change, in order to access internet. When finish setting the “LAN Setup”, you can double check the “LAN Info” in “System Information” 3.7 RNX-GX4’s Advance Usage Applications and Gaming Page This section provides functions which you can utilize to help optimize the internet speed for some of the games and applications. 3.7.1 Virtual Service The Virtual Service of RNX-GX4 provides port mapping from LAN to WAN where all outside visits to this port will be redirect to the designated computer within this service. You can set different protocol and for both the external and internal port range depending on your needs. 39 Wireless Router RNX-GX4 h User’s Manual Description: This is for your reference of the name of the Virtual Server you will be using. You can type in your preferences. h Internal Host IP Address: Internal Host IP Address refers to the internal computer’s IP address that you want to use. This internal computer’s IP address preferable to be manually set so you won’t have to change every time you restart the computer. h Protocol: Protocols are the protocol type that you want to set for your internal host. For example, if you have a web server, you can set the protocol as HTTP. h External Port: This is referring to the port which broadcast by your RNX-GX4. You can enter a range of the port for this setting. For example, 80~90. h Internal Port: This is referring to the specific service TCP/UDP port of your internal host. For example, if you have a web server IP as 192.168.1.110, internal port 80, then you can set this virtual service like the picture above. IMPORTANT: If you set your port as 8080, you will need to change the 8080 port in the “Remote Management Port” under “Firewall” of “Security Management” to the other port. Otherwise, this may cause a conflict between the Virtual Service and Remote Management. 3.7.2 DMZ Some programs require having multiple port connection, such as Internet Gaming programs, Video Conferencing programs, and Internet Phones. Due to the firewall limitation, these programs will not be able to work under virtual service. The purpose of a DMZ is to add an additional layer of security to your Local Area Network (LAN); an external attacker only has access to equipment in the DMZ, rather than the whole of the network. 40 Wireless Router RNX-GX4 User’s Manual IMPORTANT: When designated the DMZ function to your computer, your computer will expose to the internet. Please be careful when choosing this DMZ function due to the security concern. 3.7.3 UPNP UPNP (Universal Plug and Play) is a set of networking protocols promulgated by the UPnP Forum. UPnP will help devices connect seamlessly and simplify the implementation of networks in the home environment such as data sharing, communications, and entertainment; and in corporate environments for simplified installation of computer components. Enabling UPNP will help easier connections among your PCs, network home appliances, CE devices, and wireless devices. 3.8 RNX-GX4’s Advance Usage Application Gateway Page Application Gateway provides some of the programs’ port mapping function. 41 Wireless Router RNX-GX4 User’s Manual RNX-GX4 provides two gateways, as FTP pass-through and VPN pass-through. 3.8.1 FTP Pass-through FTP Pass-through allows users within your network to connect normally to the FTP server which does not use standard port in the internet. You can choose “Enable” and entered the FTP server’s specific port when needed. 3.8.2 VPN Pass-through VPN Pass-through function in RNX-GX4 supports PPTP pass-through, L2TP pass-through, and IPSEC pass-through. h PPTP pass-through: PPTP stands for “Point to Point Tunneling Protocol”. Enabling this service, you can allow PPTP pass-through the RNX-GX4. h L2TP pass-through: L2TP stands for “Layer 2 Tunneling Protocol”. Enabling this service, you can allow L2TP pass-through the RNX-GX4. h IPSEC pass-through: IPSEC stands for “Internet Protocol Security” 42 Wireless Router RNX-GX4 User’s Manual which is a suite of protocol used to implement secure exchange. Enabling this service, you can allow PPTP pass-through the RNX-GX4. 3.9 RNX-GX4’s Advance Usage - Security Management Page Security Management provides with two security options as Internet Access Control and Firewall. 3.9.1 Internet Access Control Internet Access Control provides you with MAC Filter, Internet Access Control, and DNS Filter. h MAC Filter: Provides you with MAC address control over your network. You can control whether to enable or disable this function. By enabling this rule, you can set: z Access Control: Access Control lets you decide whether to permit only your designated MAC address list or to deny only your designated MAC address list. When finishing setting, please click “Save Settings” to confirm. 43 Wireless Router RNX-GX4 z User’s Manual MAC Filter Management: MAC Filter Management allows you to enter and manage the MAC addresses that you desire. Example for entering the MAC address is “xx:xx:xx:xx:xx:xx” where MAC address is composed by numerical number and letters. When finishing setting, please click “Add” to add the MAC address into your list. h Internet Access Control: RNX-GX4 provides you with basic online control management tools for you to decide what can be access and what can’t. The rules of “Internet access control” based on source IP, port number and protocol. Follow these steps to set Internet Access Control: 1. You can select “Enable” and click “Save Settings” to enable the “Internet Access Control” function. 2. Input description information for current access control rule in the “Description” field. Input the IP address of host you want to restrict. If the rule has already existed in “Protocol Template”. You can select appropriate item and apply it. Or you can input protocol type and port number manually, click “add” button, then the item will displayed in the list. 3. If you want to delete certain item on the list, select appropriate 44 Wireless Router RNX-GX4 User’s Manual item on the list, click “delete” to delete it. h DNS Filter: DNS Filter allows you to permit or deny the website that you listed. You can enter the web address in the “DNS Filter Key words” so RNX-GX4 will filter it based on whether you permit or deny it. 3.9.2 Firewall RNX-GX4 provides basic firewall functions to help you protect your network. You can disable WAN ping and/or Remote Management Port. WAN ping prevents 45 Wireless Router RNX-GX4 User’s Manual other users on the internet to ping your PC/NB and gaining your IP address. Your PC/NB will appear “non-exist” in the internet. Enabling WAN ping can make your network invisible from the outside user, but this may cause some side-effect. For example, your Internet Service provider may need to be able to ping your network to provide service. Please make sure enabling this will not discontinue the use of your network service 3.10 RNX-GX4’s Advance Usage - DDNS Page DDNS (Dynamic Domain Name Server) allows you to use domain name (instead of IP address) to access Internet. You will need to register accounts for DDNS service at DDNS service provider. 3.11 RNX-GX4’s Advance Usage - Routing Page In order for the client computers in different LAN segment communicate through different routers and/or layer 3 switches under a complicated network environment, 46 Wireless Router RNX-GX4 User’s Manual network administrator will need to assign routing table for routers. So the router will know how to assign the clients for the ease of Network Management. h Destination Network or IP address: Specify a certain destination Network or IP address which static route forward to. h Subnet Mask: Subnet Mask is used to define Network portion and Host portion for an IP address. h Next-Hop IP address: Using 802.11b and 802.11g mixed mode may result in poor network performance. By enabling the 802.11 protection, it will improve performance of 802.11g devices in your wireless network. 3.12 RNX-GX4’s System Management Page System Management provides you with Password setting, Firmware upgrade, System restart, and Restore Default options. h Restore Default: By clicking the “Restore Default” button, your RNX-GX4 will start restore back to factory default setting. Please do not remove power when Router is resetting. 47 Wireless Router RNX-GX4 User’s Manual 3.12.1 Manually Restore Default You can also manually reset RNX-GX4. In order to do this, you will need to follow the below steps: 1. Unplug the power of RNX-GX4 2. Using a sharp item to press on the “Default” button at the back of the RNX-GX4. 3. Plug the power back to the “PWR” hole, while still pressing the “Default” button. 4. Release the “Default” button when you see the “SYS” LED (red LED) start flashing. 5. After releasing the Default button, please wait for 1 min for the reset to take effect. Password Setting: RNX-GX4’s Username is default as “admin”. We strongly recommend you when first login to the Web management page, please change the Password right away. If you lost your password, you will need to restore back to Default to access back to RNX-GX4. Firmware Upgrade: It will take around 1 min to upgrade the router, please do not disconnect RNX-GX4 from the power to avoid possible damage while updating firmware. Restore Default: When restore back to default, all of your RNX-GX4’s previous setting will be lost. 48 Wireless Router RNX-GX4 User’s Manual Appendix A – Product Specification Standard IEEE 802.3/3u, IEEE 802.11b/g Device Management Web-Based Security MAC Filter, Internet Access Control, DNS Filter, 64/128-bit WEP, WPA(TKIP & AES) PSK (Personal Mode), WPA2(TKIP & AES) PSK (Personal Mode), WPA & WPA2 PSK (Personal Mode) Ports 1 x 10/100M WAN; 4 x 10/100M LAN LEDs SYS(PWR), WLAN, LAN (PC1-PC4), Buttons Default Button Wireless Data Rates Up to 54Mbps Frequency Band 2.4GHz - 2.4835GHz Antenna 2 dBi External Detachable Antenna X 2 Channels 11 Channels Media Access Protocol CSMA/CA with ACK Modulation OFDM, CCK Transmitted Power 20dBm±2dBm Receiver Sensitivity 54Mbps OFDM, 10% PER, -68dBm 48Mbps OFDM, 10% PER, -68dBm 36Mbps OFDM, 10% PER, -75dBm 24Mbps OFDM, 10% PER, -79dBm 18Mbps OFDM, 10% PER, -82dBm 12Mbps OFDM, 10% PER, -84dBm 11Mbps CCK, 8% PER, -82dBm 9Mbps OFDM, 10% PER, -87dBm 6Mbps OFDM, 10% PER, -88dBm 5.5Mbps CCK, 8% PER, -85dBm 2Mbps QPSK, 8% PER, -86dBm 1Mbps BPSK, 8% PER, -89dBm Interface Ethernet Port Gateway support FTP pass-through VPN pass-through: PPTP / L2TP / IPSec pass-through Power Input External, 9V DC, 0.7A Dimension 5.9” x 5.3” x 1.29” Weight 0.46 lbs Temperature 0°C ~50°C (32°F - 122°F) Humidity 10% - 95%, Non-Condensing 49 Wireless Router RNX-GX4 User’s Manual Appendix B – Troubleshooting Q: What is the IP address of my RNX-GX4? A: The default IP address is 192.168.1.1. However If you changed the IP address in “LAN IP address” of “LAN Setup” and have forgot, you might get the IP address of RNX-GX4 by looking up the IP address of the default gateway for your computer. To do this in most Windows OS computers, click Start > Run, Type “cmd”, and then enter “ipconfig”. The IP address of the Default Gateway should be the IP address of the RNX-GX4 (This applies to most home network environments). If your RNX-GX4 is a DHCP client, you can find your IP address from the DHCP server. This information is only available from the DHCP server which allocates IP addresses in your network. Find this information directly from the DHCP server or contact your system administrator for more information. Or you will need to reset your RNX-GX4 to default. This means your current settings will be lost. Q: I don’t remember my password. A: The default password is “guest”. If this doesn’t work, you have to reset your RNX-GX4 using the “Default” button on the back of the RNX-GX4, Please see Section 3.12.1, page 46 for detailed steps in resetting your RNX-GX4 manually. Q: I cannot see or access the Login screen in the Web Management page. A: Make sure you are using the correct IP address. You can also try below methods. h The default IP address is 192.168.1.1. h If you changed the default IP address, please use your changed IP address. h If you changed the IP address and have forgotten it, see the Question 1 on how to find the IP address of your RNX-GX4. h Reset the device to its factory defaults, and try to access the RNX-GX4 with the default IP address h If the problem continues, contact the network administrator or Rosewill. Q: I cannot access the Internet. A: Check the hardware connections, and make sure the LEDs are behaving as 50 Wireless Router RNX-GX4 User’s Manual expected. Please follow the steps below to make sure the RNX-GX4 is connected with you modem. h Configure your settings correctly i.e. DHCP, SSID, Password. h Save your settings. h Reboot your RNX-GX4 and your ADSL/Cable modem. h If rebooting your ADSL/Cable modem doesn’t work, please call your ADSL/Cable provider and ask them to reset and restart your ADSL/Cable Modem. (This is due to some newer ADSL/Cable modems are now equipped with a battery for when power is lost, i.e. Time Warner Cable Modems, will keep the modem on and connected. Due to the ADSL/Cable modem not assigning the correct DHCP information, the Rosewill Routers can not work correctly and assign DHCP to the client computers.) h Make sure you entered your ISP account information correctly. These fields are case-sensitive, so make sure [Caps Lock] is not on. h If you are trying to access the Internet wirelessly, make sure the wireless settings in the PC/NB are the same as the settings in the Router. h If the problem continues, contact your ISP. Q: I cannot access the Internet anymore. I had access to the Internet (with the RNX-GX4), but my Internet connection is not available anymore even if I use wired connection. A: Check the hardware connections, and make sure the LEDs are behaving as expected. h Reboot the RNX-GX4. h Check if your modem is flashing any red lights, if it does, please contact your ISP. Q: My internet connection is slow. A: There might be a lot of traffic on the network. h Look at the LEDs, to see if RNX-GX4 is transferring and receiving a lot of information. LED will flash rapidly under heavy transmitting. Try closing some programs that using the Internet, especially peer-to-peer applications such as BT, eDonkey, and etc. h Check the signal strength. If the signal strength is low, try moving the RNX-GX4 closer to the AP if possible, and look around to see if there 51 Wireless Router RNX-GX4 User’s Manual are any devices that might be interfering with the wireless network (for example, microwaves, other wireless networks, and so on). h Reboot the RNX-GX4. h Please update the Wireless Adapter’s Firmware of your Notebook and PC to the latest version to ensure the best connection. h If problem remains, please contact the network administrator or Rosewill. Q: I cannot access the RNX-GX4 or ping any computer from the WLAN (wireless AP or router). A: Make sure the wireless LAN is enabled on the RNX-GX4 h Make sure the wireless adapter is working properly. h Make sure your wireless adapter has the most current firmware. h Make sure your computer (with a wireless adapter installed) is within the transmission range of the RNX-GX4. h Check that both the RNX-GX4 and your wireless adapter are using the same wireless and wireless security settings. h Make sure traffic between the WLAN and the LAN is not blocked by the firewall. h Make sure you allow the RNX-GX4 to be remotely accessed through the WLAN interface. Check your remote management settings. Thank you for purchasing a quality Rosewill Product. Please register your product at : www.rosewill.com for complete warranty information and future support for your product. 52