1
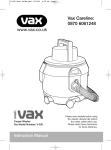
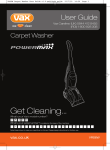
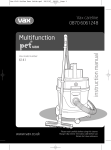
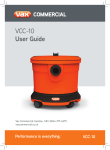
V-037 Easy Guide
UK SERVICE & HELP - VAX CARE 0870 6061248
Mon-Fri. 9.00am to 5.00pm. An answer phone is available out of these hours. If you have queries or concerns about using your VAX, call the HELPLINE. Calls are charged at the UK national rate.
Please make a note of the serial number and model number of your VAX before calling. There are over 400 approved VAX Service Agents in the UK . For your nearest Service Agent please call VAX Care.
Parts checklist
2
FRONT
1
3
10
BACK
13
4
2
4
11
5
5
12
15
6
14
16
7
8
9
1
2
3
4
5
6
7
8
9
10
Hanging loop
Vac on/off button
Vac on/off lock
Mid-handle grip
Cleaning solution tank
Dust canister release button
Dust canister
Mop head
Vacuum cleaner nozzle
Cleaning pads
11
12
13
14
15
16
Charger
Multi Hard Floor cleaner
Solution dispensing trigger
Solution tank release button
Charger input
Charging indicator
*NOT MEANT FOR USE
WITH WAX BASED FLOORS
Putting your cleaner together
Charging
NOTE: Only use the charger supplied.
CHARGE 24 HOURS BEFORE FIRST USE.
Top view of cleaner
Notch
3
To assemble the handle:
Insert the handle into the body of the unit and
push down firmly until it locks into place. Be sure
to line up the button on the handle with the notch
on the body, to help guide the lower handle into
the body. The pin should be visible in the hole on
the body. NOTE: The vacuum may turn on during
handle assembly. To turn the vacuum off, press
the trigger on the handle once.
To disassemble the handle: Use a ball point
pen to push the button in while pulling the handle
up and out of the body of the cleaner.
Connect the charger to a wall socket.
NOTE: Charge for 24 hours before first use.
Plug the charger end into the side of the unit.
NOTE: The indicator light will come on to
indicate that the appliance is charging. Unit
will be charged in 16-24 hours. The light will
not change colour when the unit is charged.
Storage
1
Recommended use
2
3
4
Use the storage hook to hang the cleaner up.
NOTE: Hang in a place convenient for charging.
Use the dry vacuum to remove loose dirt and debris
from floors.
Wet mop by dispensing the cleaning solution and
using an absorbent pad to remove dirt and grime.
Operating the Vac ‘n’ Mop
FOR ADVICE ON CLEANING SOLUTIONS AND ABSORBENT CLEANING PADS, PLEASE CALL VAX CARE ON 0870 6061248.
NOTE: This product is intended for dry pick up only. Do not attempt to vacuum up any liquids with this cleaner.
Prepare Vac’n’Mop
4
5
6
5
Lift the vacuum nozzle. It should lock into position.
Place one absorbent cleaning pad on to the mop
head of the unit. Secure by pushing the edge of the
cloth into the tabs.
Push the vacuum nozzle back to the floor cleaning
position.
Operating the Vac ‘n’ Mop
Prepare Vac’n’Mop
7
8
9
6
Unscrew the cap from the top of the cleaning solution
tank.
Mix one cupful of the Multi Hard Floor cleaner per litre
of water and pour into the solution tank. Replace the
cap on the solution tank.
NOTE: If needed, the solution tank can be removed
from the body of the unit. When the bottle is removed
from the appliance, cleaning solution may be visible in
the bottle recess. This is normal and will not cause any
problems with your appliance.
To remove: Push the tank release button and pull the
tank up and out of the housing.
To return: Firmly push the tank down until it locks into
place.
Operating the Vac ‘n’ Mop
Vacuum
Mop
11
10
a
7
b
c
To turn the vacuum on: Push the on/off button down (a).
To lock the vacuum on: Slide the lock button forward (b).
Pull back with the thumb to unlock.
To dispense the solution: Pull the trigger on the back of the handle (c).
For best results, clean one small area at a time. Spray the solution by holding the
trigger down for 3-4 seconds. This will dispense enough solution to clean approx 1
square yard. Mop as you normally would, using the absorbent cleaning pad. NOTE:
For tough spots and stains, spray the solution directly on to the spot or stain. Allow
the solution to soak for a few minutes, then mop with an absorbent cleaning pad.
Dust canister and filter: removal
IMPORTANT: FOR BEST RESULTS, CLEAN THE FILTER AFTER EACH USE. FOR ADVICE ON FILTER REPLACEMENT, PLEASE CALL VAX CARE ON 0870 6061248
NOTE: This product is intended for dry pick up only. However, if a wet spill is accidentally vacuumed into the dust canister, the filter should be rinsed thoroughly, then allowed to
air dry completely before re-using.
12
13
14
8
Press the dust canister release button located above
the cup on the body of the unit. Tip the dust canister
out to remove.
Grasp the centre tab on the filter and pull it out of
the dust canister. Pull the filter away from the
protector. Remove debris from the filter and filter
protector.
Empty the contents into a waste bin.
For best results, shake and lightly
tap the filter against the waste bin to
remove remaining dirt.
Dust canister and filter: removal
15
16
17
Slot
9
Return the filter to the filter protector and return to the
dust canister.
Tab
Re-attach by aligning the tab on the dust canister with
the slot on the body of the unit.
Tilt and push the dust canister until it locks into place.
Troubleshooting
WARNING: TO REDUCE RISK OF PERSONAL INJURY - UNPLUG CLEANER BEFORE SERVICING.
PROBLEM
POSSIBLE REASONS
POSSIBLE CAUSES
Cleaner won’t run
1. Battery not charged.
1. Charge battery. For first use, charge for at least 24
hours.
2. Make sure handle is pushed firmly all the way into
housing and pin is visible in the hole in the body.
3. Call VAX CARE on 0870 6061248.
4. Call VAX CARE on 0870 6061248.
2. Handle not pushed into housing.
10
3. Battery dead - won’t hold a charge.
4. Needs service.
Cleaner won’t pick-up/loss of suction
1.
2.
3.
4.
Dust canister full.
Filter dirty.
Battery charge getting weak.
Hose clogged.
1. Empty dust canister
2. Remove filter and clean.
3. Charge battery.
4. Remove dust canister and check inside hose for
any obstruction(s).
Cleaner won’t spray solution
1.
2.
3.
4.
Battery charge getting weak.
Nozzle clogged.
Solution tank not fully engaged.
Solution tank empty.
1.
2.
3.
4.
Dust escaping from cleaner
1. Dust canister full.
2. Filter dirty.
Charge battery.
Call VAX CARE on 0870 6061248.
Remove and replace solution tank.
Refill solution tank.
1. Empty dust canister.
2. Clean or replace filter.
Battery Disposal
NOTE: You must never use ordinary batteries for replacement, as these may leak and cause damage.
This product contains Nickel-Cadmium battery and must be disposed of properly. For disposal information, call the VAX care helpline on 0870 6061248
VAX CARE 0870 6061248
Safety
• Do not use or charge the unit outdoors.
• Do not allow to be used as a toy. Close attention is necessary when used by or near children.
• Use only as described in this user guidel.
• Use only the manufacturer’s recommended attachments.
• Do not use the charger with a damaged cord or plug.
• Do not pull or carry by the cord, use the cord as a handle, allow the cord to come into contact with hot or sharp surfaces or close a door on the cord.
• Do not unplug by pulling on the cord.
• Do not handle the plug or appliance with wet hands.
• Do not put any object into openings or operate with openings blocked; keep them free of anything that may reduce airflow.
• This product includes rechargeable nickel cadmium batteries. Do not incinerate the batteries or expose them to high temperatures, as they may explode.
• Unplug the charger from the outlet before any routine cleaning or maintenance.
• Keep hair, loose clothing, fingers and all parts of body away from openings and moving parts.
11
• Do not vacuum any glowing, burning or smoking particles
• Do not use without the dust canister and filters in place.
• Use extra care when cleaning on stairs.
• Do not use to pick up flammable or combustible liquids such as petrol, or use in areas where they may be present.
• Leaks from battery cells can occur under extreme conditions. If the liquid, which is 20-35% solution of potassium hydroxide, gets on the skin (1) wash
quickly with soap and water or (2) neutralise with a mild acid such as lemon juice or vinegar. If the liquid gets into the eyes, flush them immediately with
clean water for a minimum of 10 minutes. Seek medical attention.
• Use only the charger supplied by the manufacturer to recharge.
• Store the vacuum cleaner indoors. Put the vacuum cleaner away after use to prevent tripping accidents.
• To prevent solution from running into the motor, do not hold the cleaner upside down or lay flat. Use cleaner in a normal, mopping position.
• Keep out of reach of toddlers and pets to avoid accidental ingestion.
• Do not spray solution toward people or pets.
• If your VAX fails to operate, never attempt to repair it yourself, as repairs carried out by an unauthorised or inexperienced person may cause injury to you or
damage to your VAX. Never alter the specification or modify your VAX in any way.
For further information in the UK, call the VAX HELPLINE on 0870 6061248
EEC STATEMENT OF COMPLIANCE
Manufacturer/EEC importer: VAX Limited, hereby on our own responsibility declare that the product Vac ‘n’ Mop is manufactured in compliance with the following:
Safety: 72/23/EEC Low Voltage Directive as modified by 93/68/EEC
EMC: 89/336/EEC Electromagnetic compatibility Directive as modified by 93/68/EEC
VAX Ltd., Kingswood Road, Hampton Lovett, Droitwich, Worcestershire, WR9 0QH, UK
email: [email protected] - website: www.vax.co.uk
Version 1