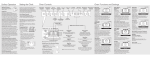
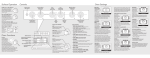
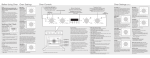
1
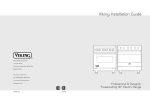
Viking Installation Guide
®
Viking Range Corporation
111 Front Street
Greenwood, Mississippi 38930 USA
(662) 455-1200
For product information,
call 1-888-VIKING1 (845-4641)
or visit the Viking Web site at
vikingrange.com
F20508G EN
Professional & Designer
Freestanding 30” Electric Range
(102909J)
Table of Contents
IMPORTANT–Read and Follow!
Warnings & Important Safety Instructions _______________________________________________3
Dimensions _________________________________________________________________________6
Specifications _______________________________________________________________________7
Clearance Dimensions (Proximity to Cabinets) ___________________________________________8
Clearance Dimensions (Wood/Composite Overlay) ______________________________________9
Electrical Requirements _____________________________________________________________10
General Information ________________________________________________________________11
Installation _________________________________________________________________________12
Door Removal ______________________________________________________________12
Leg Installation______________________________________________________________13
Electrical Connection (3-wire) _________________________________________________14
Electrical Connection (4-wire) _________________________________________________16
Leveling/Adjustments/Alignment ______________________________________________18
Anti-tip Device Installation____________________________________________________19
Final Installation _____________________________________________________________20
Door Replacement and Adjustment ___________________________________________21
Final Preparation ___________________________________________________________________22
Performance Checklist ______________________________________________________________22
Service & Registration_______________________________________________________________23
• Before beginning, please read these
instructions completely and carefully.
Your safety and the safety of others is
very important.
We have provided many important safety
messages in this manual and on your
appliance. Always read and obey all
safety messages.
• Do not remove permanently affixed labels,
warnings, or plates from product. This may
void the warranty.
• All local and national codes and ordinances
must be observed. Installation must
conform with local codes.
This is the safety alert symbol. This
symbol alerts you to hazards that
can kill or hurt you and others.
All safety messages will be preceded by
the safety alert symbol and the word
“DANGER,” “WARNING” or “CAUTION.”
These words mean:
• The installer must leave these instructions
with the consumer who should retain for
local inspector’s use and for future reference.
DANGER
In Canada: Installation must be in accordance
with the current CSA C22.1 Canadian
Electrical Codes Part 1 and/or local codes.
Hazards or unsafe practices
which WILL result in severe personal
injury or death
WARNING
Hazards or unsafe practices
which COULD result in severe personal
injury or death
CAUTION
Hazards or unsafe practices which
COULD result in minor personal injury or
property damage.
All safety messages will identify the
hazard, tell you how to reduce the chance
of injury, and tell you what can happen if
the instructions are not followed.
2
3
IMPORTANT–Read and Follow!
A GFI shall be used if required by NFPA-70 (National Electric Code), federal/state/local
laws, or local ordinances.
• The required use of a GFI is normally related to the location of a receptacle with respect to
any significant sources of water or moisture.
• Viking Range Corporation will NOT warranty any problems resulting from GFI outlets which
are not installed properly or do not meet the requirements below.
the use of a GFI is required, it should be:
Of the receptacle type (breaker type or portable type NOT recommended)
Used with permanent wiring only (temporary or portable wiring NOT recommended)
On a dedicated circuit (no other receptacles, switches or loads in the circuit)
Connected to a standard breaker of appropriate size (GFI breaker of the same size NOT
recommended)
• Rated for Class A (5 mA +/- 1 mA trip current) as per UL 943 standard
• In good condition and free from any loose-fitting gaskets (if applicable in outdoor situations)
• Protected from moisture (water, steam, high humidity) as much as reasonably possible
If
•
•
•
•
WARNING
To prevent possible damage to cabinets
and cabinet finishes, use only materials
and finishes that will not discolor or
delaminate and will withstand temperatures
up to 194°F (90°C). Heat resistant
adhesive must be used if the product is to
be installed in laminated cabinetry. Check
with your builder or cabinet supplier to
make sure that the materials meet these
requirements.
DANGER
ELECTRICAL SHOCK
HAZARD
To avoid risk of electrical shock,
personal injury or death; verify
your appliance has been properly
grounded in accordance with local codes
or in absence of codes, with the National
Electrical Code (NEC). ANSI/NFPA 70latest edition.
WARNING
MOVING HAZARD
To avoid risk of severe
personal injury; this appliance
requires two or more personnel while
handling and moving. Possible use of
appliance moving devices is recommended.
WARNING
TIPPING HAZARD
To reduce the risk of the
appliance tipping, it must be
secured by a properly installed
anti-tip bracket(s). To make sure
the bracket has been installed
properly, look behind the range
with a flashlight to verify proper
installation engaged in the rear
top left corner of the range.
• THIS RANGE CAN TIP.
• INJURIES TO PERSONS CAN RESULT.
• INSTALL ANTI-TIP DEVICE PACKED
WITH RANGE.
• SEE INSTALLATION INSTRUCTIONS.
4
5
Specifications
Dimensions
VESC/DSCE
Electric 30” Range
29
VESC530-4B
Description
(75-7/8
.9 ”
cm
)
1”
(2.
5
Overall width
29-7/8” (75.9 cm)
Overall height
To top of glass frame
35-7/8” (91.1 cm) min.
37” (94.0 cm) max.
Legs adjust 1-1/8” (2.9 cm)
Overall depth from
rear
To
To
To
To
Additions to base
height
To top of island trim—add 1” (2.5 cm)
To top of island trim—add 0” (0.0 cm)
To top of backguard—add 8” (20.3 cm)
To top of backguard—add 6” (15.2 cm)
To top of high-shelf—add 23-1/2” (59.7 cm) To top of high-shelf—add 18-3/16” (46.2 cm)
cm
)
*
3
(91 5-7
.1 /8”
cm
)
to min
.
(94 37
.0 ”
cm
)m
ax
.
DSCE130-4B
Electrical
requirements
end of side panel—24-5/16” (61.8 cm)
front of door—25-3/4” (65.4 cm)
end of landing ledge—28-1/16” (71.3 cm)
end of door handle—28-11/16” (72.9 cm)
VESC
DSCE
26-1/2” (67.3 cm)
28-1/16” (71.2 cm)
1-1/2”
1-5/8”
(4.1 cm)
26-7/16” (67.2 cm)
25” (63.5 cm)
1” (2.5 cm)
(3.8 cm)
6”
(15.2 cm)
35-7/8”
35-7/8”
25” (63.5 cm)
(91.1 cm) min.
to
37”
(94.0 cm) max.
19-3/8”
(91.1 cm) min.
to
37”
(94 cm) max.
25-3/4” (65.4 cm)
19-1/4”
(49.2 cm)
1,500 watts
NA
2,500 watts/1,000 watts
1,800 watts
800 watts
1,800 watts
Oven interior height
16-1/2” (41.9 cm)
Oven interior depth
AHAM 16-13/16” (42.7 cm) Overall—19-1/2” (49.5 cm)
Total oven capacity—4.7 cu. ft.
Measure to AHAM standards 4.1 cu. ft.
Approximate
shipping weight
426 lbs. (193.2 kg)
Minimum clearances from adjacent combustible construction
• Cooking surface and below, i.e., 36” (91.4 cm) and below
o Sides—0”
o Rear—0” with backguard or highshelf; 0” with island trim and noncombustible rear wall; 6” (15.2 cm) with island
trim and combustible rear wall.
• Above cooking surface, i.e. above 36" (91.4 cm)
o Sides—6” (15.2 cm)
o Within 6” (15.2 cm) side clearance, wall cabinets no deeper than 13” (33.0 cm) must be minimum 18” (45.7 cm)
above cooking surface.
o Wall cabinets directly above product must be minimum 36” (91.4 cm) for open top burners above cooking surface.
25-3/4” (65.4 cm)
(48.9 cm)
45” (114.3 cm)
45-1/8” (114.6 cm)
24-5/16” (61.8 cm)
24” (61.0 cm)
*Note: Units shown with standard island trim.
6
1,800 watts
800 watts
1,800 watts
1,500 watts
NA
2,500 watts/1,000 watts
25-5/16” (64.6 cm)
(20.6 cm)
28-1/4” (71.8 cm)
240V—59.0 amps
208V—51.3 amps
Oven interior width
Oven volume
8-1/8”
end of side panel—25” (63.5 cm)
front of door—25-3/4” (65.4 cm)
end of landing ledge—26-1/2” (67.3 cm)
end of door handle—28-1/4” (71.8 cm)
240-208 VAC, 60 Hz electrical connection box on product, connect with locally
supplied 3-wire, flexible cord or “pigtail” rated 60 amp 125-250 VAC minimum.
Cord must be agency approved for use with household electric ranges.
Maximum amp usage
Surface element rating
Left front
Bridge
Left rear
Right front
Bridge
Right rear
To
To
To
To
7
Clearance Dimensions
• Wall cabinets above the range must be a
minimum of 42” (106.7 cm) above the
range cooking surface for the full width
of the range. This minimum height
requirement does not apply if a range
hood is installed over the cooking surface.
• This range may be installed directly
adjacent to existing 36” (91.4 cm) high
base cabinets.
IMPORTANT: The side trim MUST be
3/8” (.95 cm) above the adjacent base
cabinet countertop. This can be
accomplished by raising the unit using
the adjustment spindles on the legs.
Clearance Dimensions (Wood/Composite Overlay)
The bottom of a standard hood should be
30” (76.2 cm) min. to 36” (91.4 cm) max.
above the countertop. This would typically
result in the bottom of the hood being
66” (167.6 cm) to 72” (182.9 cm) above the
floor. Refer to the range hood installation
instructions for additional information. These
dimensions provide for safe and efficient
operation of the hood.
Wo
od
/Co
Ov mpo
erl sit
ay e
”
24 cm)
.0
(61 or
66
(16 ”mi
7.6 n.
c
to m)
• The range CANNOT be installed
directly adjacent to sidewalls, tall
cabinets, tall appliances, or other
side vertical surfaces above 36”
(91.4 cm) high. There must be a
minimum of 6” (15.2 cm) side
clearance from the range to such
combustible surfaces above the
36” (91.4 cm) counter height.
• Within the 6” (15.2 cm) side
clearance to combustible vertical
surfaces above 36” (91.4 cm), the
maximum wall cabinet depth
must be 13” (33.0 cm) and wall
cabinets within this 6” (15.2 cm)
side clearance must be 18”
(45.7 cm) above the 36”
(91.4 cm) high countertop.
(Proximity to Cabinets)
”
27 cm)
.6
(38
72
(18 ”ma
2.9 x.
cm
)
29
(75-7/8
.9 ”
cm
)
x.
a
m
)
” cm
3
1 3.0
(3
6”
(15 min
.2 .
cm
)
”
36 cm)
.4
(91
in.
” mcm)
2
4 .7
0” )
m
c
(0
30
(76”min
.2 .
cm
36 to )
”
m
(91 a
.4 x.
cm
)
Wo
od
/Co
Ov mpo
erl sit
ay e
6
(10
in.
”m )
18 .7 cm
(45
”
3/8cm)
95
(0.
”
30 cm)
66
.2
(76
72
6” m)
.2 c
5
(1
(16 ”mi
7.6 n.
c
to m)
(18 ”ma
2.9 x.
cm
)
Wall Installation
30
(76”min
.2 .
cm
3 6 to )
”
(91 ma
.4 x.
cm
)
Note: Minimum clearance for back wall
is 0” with backguard or high-shelf.
CAUTION
Burn hazard.
To avoid risk of personal injury;
the use of cabinets for storage
above the appliance may result
in a potential burn hazard. Combustible
items may ignite, metallic items may
become hot and cause burns. If a cabinet
storage is to be provided the risk can be
reduced by installing a rangehood that
projects horizontally a minimum 5” (12.7 cm)
beyond the bottom of cabinets.
Note: Minimum clearance for back wall is 0” with
backguard or high-shelf.
Note: If a range hood is installed, wall cabinets
above the range have a different minimum
clearance height.
8
Note: 6” (15.2 cm) min. with island trim and
combustible rear wall. 0” with island trim
and non-combustible rear wall.
Island Installation
9
Electrical Requirements
Electrical Requirements
General Information
WARNING
Check your national and local codes
regarding this unit. This range requires
3 wire or 4 wire, 240-208 VAC/60 Hz. See
“Electrical Connection” section for
grounding instructions. Must be fused
seperately from any other circuit.
Electrical shock hazard.
To avoid the risk of electrical
shock, personal injury or death;
verify electrical power is turned
off at the breaker box until the range is
installed and ready to operate, installation
by an authorized installer only.
Electric 30” Range
• All openings in the wall behind the
appliance and in the floor under the
appliance must be sealed.
Range – Do not discard the anti-tip
metal bracket supplied with the
range. This is the anti-tip device and
must be installed with the unit. Refer
to “Anti-tip Device Installation”
section.
• DO NOT obstruct the flow of combustion
and ventilation air.
Some stainless steel parts may have a plastic
protective wrap which must be peeled off.
The interior should be washed thoroughly
with hot, soapy water to remove film
residues and any dust or debris before being
used, then rinsed and wiped dry. Solutions
stronger than soap and water are rarely
needed.
CAUTION
6”
6”
(15.2 cm)
10
Remove and discard all packing materials,
including cardboard and tape on the outside
and inside of the range.
Avoid any damage to oven vents. The vents
need to be unobstructed and open to provide
proper airflow for optimal oven performance.
(15.2 cm)
4-3/8”
Moving, Handling, and Unpacking
CAUTION
Electrical
connection
in this area
(11.1 cm)
READ AND FOLLOW ALL WARNING
AND CAUTION INFORMATION WHEN
INSTALLING THIS APPLIANCE.
The cooling fan should be operating when
the unit is in operation. If you notice the
cooling fan is not operating or you observe
unusual or excessive noise coming from the
cooling fan, contact a Viking Authorized
Service Center before continuing operation.
Failure to do so can result in damage to the
oven or surrounding cabinets.
11
DANGER
Leg Installation
Installation
2
1
CAUTION
To avoid risk of personal injury or product
damages, DO NOT use the handle or
oven door to lift the oven. Remove door
before installation to ensure that it is not
used to lift the unit. DO NOT lift or carry
the door by the handle.
1
1
3
Removing the door must be done by your
dealer, or a qualified licensed plumber.
2
2
Legs are packed in styrofoam top pack.
Note: Legs should be installed near to where
appliance is to be used, as they are
not secure for long transit.
Door Removal
1FOR YOUR SAFETY
2
Open door completely. Place pins,
supplied with unit, in pin hole. For personal safety,
ONLY use pins supplied with the unit.
4
3
Remove hinge trim screws. Take off hinge trim. Identify
right and left hinge for future re-installation.
3
Note: It is strongly recommended
that a pallet or lift jack be used rather than tilting.
Raise unit about a foot. Unscrew temporary legs from
couplings.
Lower range gently to keep any undue strain from
legs and internal mounting hardware.
Screw legs into couplings on all
four corners.
4
Close until pins stop door.
Lift door up and out.
12
13
Electrical Connection (3-wire)
Note: If you have a 4-wire connection, see following section for
4-wire connection instructions.
WARNING
5
4
WARNING
Electrical shock hazard.
Electrical shock hazard.
To avoid risk of electrical shock,
personal injury or death; verify
your appliance has been
properly grounded in accordance with
local codes or in absence of codes, with
the National Electrical Code (NEC).
ANSI/NFPA 70-latest edition.
To avoid risk or electrical
shock, personal injury or death;
grounding product to the frame
of the unit may or may not be permitted
through your local codes. If ground to the
frame is not permitted then a 4 conductor
power cord must be used.
1
2
3
Push supply cord toward terminal
block to relieve strain, reattach supply cord strain
relief bracket over supply cord.
Attach line #1 (black) and line #2 (red)
leads to outside terminal. Attach neutral wire (white)
to center terminal on the terminal block.
This unit requires a 60 Amp, 240 - 208
VAC/60 Hz service. Check your national and
local codes before connecting this unit. This
unit can be hard wired or connected by the
use of a 3 wire 60 Amp cable, a 60 Amp
flush mount wall receptacle (purchased
separately) and a matching 90 degree angle
plug (purchased separately).
6
1
1
2
Where local codes do not permit grounding
through neutral, use a 4-wire power supply
cord. The cord or conduit must be secured
to the range with the strain relief bracket.
1
The electrical connection is made at the
terminal block, which is located behind the
access door on the back of the range.
2
Remove access door.
Reattach access door.
3
2
3
1
1
2
Remove supply cord strain relief
bracket and three supply cord mounting screws
on terminal block.
Feed supply cord up through hole in bottom
of range back.
14
15
Electrical Connection (4-wire)
5
4
WARNING
WARNING
Electrical shock hazard.
Electrical shock hazard.
To avoid risk of electrical shock,
personal injury or death; verify
your appliance has been
properly grounded in accordance with
local codes or in absence of codes, with
the National Electrical Code (NEC).
ANSI/NFPA 70-latest edition.
To avoid risk or electrical
shock, personal injury or death;
grounding product to the frame
of the unit may or may not be permitted
through your local codes. If ground to the
frame is not permitted then a 4 conductor
power cord must be used.
This unit requires a 60 Amp, 240 - 208
VAC/60 Hz service. Check your national and
local codes before connecting this unit. This
unit can be hard wired or connected by the
use of a 3 wire 60 Amp cable, a 60 Amp
flush mount wall receptacle (purchased
separately) and a matching 90 degree angle
plug (purchased separately).
1
2
Feed supply cord up through hole in bottom
of range back.
Attach ground wire (green)
with ground screw that was removed.
6
1
7
2
1
Where local codes do not permit grounding
through neutral, use a 4-wire power supply
cord. The cord or conduit must be secured
to the range with the strain relief bracket.
2
1
The electrical connection is made at the
terminal block, which is located behind the
access door on the back of the range.
Remove access door.
3
2
3
Attach line #1 (black) and line #2 (red)
leads to outside terminal. Attach neutral wire (white)
to center terminal on terminal block.
Push supply cord toward terminal
block to relieve strain, reattach supply cord strain
relief bracket over supply cord.
8
1
3
1
1
2
1
2
Remove supply cord strain relief
bracket and three supply cord mounting screws
on the terminal block.
2
Remove grounding screw. Cut-off
and discard ground strap.
16
Reattach access door.
17
Leveling/Adjustments/Alignment
2
1
Measure the four corners in cutout area to
verify if flooring is level.
7
For uneven or sloped floors, level unit with
metal shims only, as the adjustment required may
exceed the thread available in the leg.
Set the high corner of range so that the top of side trim is
3/8” (0.95 cm) above countertop. Level range to high corner.
Anti-tip Device Installation
4
3
Tipping hazard.
”
3/8cm)
95
(0.
Check that unit is level side to
side and front to back. Side trim of the high corner
must be 3/8” (0.95 cm) above countertop.
Move unit into opening.
6
5
1
WARNING
•
•
•
•
To reduce the risk of the appliance
tipping, it must be secured by a
properly installed anti-tip bracket(s).
To make sure the bracket has been
installed properly, look behind the
range with a flashlight to verify
proper installation engaged in the
rear top left corner of the range.
THIS RANGE CAN TIP.
INJURIES TO PERSONS CAN RESULT.
INSTALL ANTI-TIP DEVICE PACKED
WITH RANGE.
SEE INSTALLATION INSTRUCTIONS.
2
(A
)
Measure from floor to bottom
of the anit-tip opening located on the back of range.
This will be measurement (A).
3
3-5
(9. /8”
2
cm
)
1
1
+1
)
)
(A .3 cm
1
(
/2”
2
If leveling is required, move unit out of opening.
Lift unit and prop on wood blocks.
18
Locate anti-tip bracket on rear wall with the top left corner at
measurement (A) plus 1/2” (1.3 cm) from the floor and 3-5/8” (9.2 cm)
from where the right side of range (facing range) is to be located.
19
Mark and drill holes where bracket
will be located.
Door Replacement and Adjustment
Anti-tip Device Installation (cont.)
4
2
1
1
2
1
2
2
3
Reattach door to range.
Attach bracket with
mounting hardware provided.
Open door completely. Reattach hinge trim.
Final Installation
3
1
4
Note: Refer to range electrical
requirements section for proper
installation information.
Remove pins from hole in hinges.
Connect electrical in shaded area. See the “Electrical
Requirements” section for more information.
3
2
Close door.
5
”
3/8cm)
95
(0.
Check that unit is level side to side
and front to back. The side trim must be 3/8” (0.95 cm)
above countertop. If unit is not level repeat steps 5-7
of “Leveling/Adjustments/Alignment” section.
Slide range into place. Be sure anti-tip
bracket slides into the anit-tip opening.
20
If the door needs to be adjusted, loosen hinge trim screws (see step 2).
Adjust the screws located between the door and kickplate using a 5/32”
hex head allen wrench. After adjustment, tighten hinge trim screws.
21
Service & Registration
Final Preparation
• All stainless steel body parts should be
wiped with hot, soapy water and with a
liquid cleaner designed for this material.
If buildup occurs, DO NOT use steel wool,
abrasive cloths, cleansers, or powders!
If it is necessary to scrape stainless steel
to remove encrusted materials, soak with
hot, wet cloths to loosen the material, then
use a wool or nylon scraper. DO NOT use
a metal knife, spatula, or any other
material tool to scrape stainless steel!
Scratches are almost impossible to
remove.
Performance Checklist
A qualified installer should carry out the
following checks:
h Check self-clean function—door will lock
in approximately 30 seconds, the center
and outside broil elements will turn on and
the bake element will turn on at partial
power. Check broil elements through
window to make sure they are on, then
abort self-clean cycle to unlock door.
h Check top surface elements—glow red
when turned on.
h Check hot surface indicator lights—glow
red when corresponding element is on.
NOTICE
h Check oven bake function—bake element
on full power, center and outside broil
elements at partial power.
When conducting performance test,
DO NOT run self-clean cycle for more
than 10 minutes with oven racks inside
oven. This could cause them to discolor
due to the high temperature required
for self-cleaning.
h Convection bake function—bake and broil
elements the same with the convection fan
on.
Only authorized replacement parts may be used in performing service on the appliance.
All servicing should be referred to a qualified technician.
Contact Viking Range Corporation, 1-888-VIKING1 (845-4641), for the nearest service parts
distributor in your area or write to:
VIKING RANGE CORPORATION
PREFERRED SERVICE
1803 Hwy 82W
Greenwood, Mississippi 38930 USA
Range – The serial number and model number for your appliance can be
found by opening the door and looking under the control panel.
Record the following information indicated below. You will need it if
service is ever required.
Model number ____________________________________________________________________________________
Serial number _____________________________________________________________________________________
Date of purchase __________________________________________________________________________________
Date installed ______________________________________________________________________________________
h Check TruConvec™ function—TruConvec
element (behind convection fan cover) on
and convection fan on.
Dealer's name _____________________________________________________________________________________
h Check HI broil function–both broil
elements at full power.
Address ___________________________________________________________________________________________
These installation instructions should remain with the unit for future reference.
h Check LOW broil function—inner broil
element only.
h Check convection broil function—both
broil elements at full power with convection
fan on.
22
23
Surface Operation
Single Front or Rear Element
Push in and turn the control knob
counterclockwise to the desired
setting. The element will cycle on
and off to maintain the desired
heat setting. When finished, turn all
controls to “OFF.”
Controls
Oven Settings
Self-Clean
Indicator
Light
Surface
Indicator
Light
Interior Oven
Light Switch
Oven
Indicator
Light
BAKE (TwoElement Bake)
Full power heat is
radiated from the bake
element in
the bottom of the
oven cavity and
supplemental heat is
two-element bake
radiated from the broil
element. This function is recommended for single rack
baking. Many cookbooks contain recipes to be cooked in
the conventional manner. Conventional baking/roasting is
particularly suitable for dishes that require a high
temperature. Use this setting for baking, roasting,
and casseroles.
Surface
Front and Bridge Element
Push in and turn the right rear
control knob clockwise to the
desired setting. The rear element
and the bridge element will cycle
on and off to maintain the desired
heat setting. When finished, turn all
controls “OFF.”
Hot Surface Indicator Lights
The range has four hot surface indicator lights. They
are located in the front center of the glass rangetop.
The hot surface indicator light will
glow red when the corresponding
element is heated. The light will
remain on after turning off the
control knob
until the
corresponding
element has
cooled to a safe
temperature.
Oven Functions
Preheat
For best results, it is
extremely important
that you preheat your
oven to the desired
cooking temperature
before placing food items in
the oven to begin cooking. In
OV
many cooking modes, partial power
TE EN
MP
ER
from the broiler is used to bring the oven to the
AT
UR
E
preheat temperature. Therefore, placing food items
in the oven during the preheat mode is not
recommended. The Viking Rapid Ready™ Preheat
System is engineered so that the oven is brought to
the desired set temperature in a manner which will
provide the optimum cooking environment based on
the selected cooking mode in the shortest possible
time.
Left Rear Burner
Control Knob
(1,800 watt)
Left Front Burner
Control Knob
(1,800 watt)
Oven
Function
Selector Knob
Oven
Temperature
Control Knob
Surface Heat Settings*
Heat
Setting
Three tilt-proof racks
Concealed bake
element
Right Front Burner
Control Knob
(1,500 watt)
Oven Functions
• BAKE (Two-Element Bake)
Use
Use this setting for baking, roasting, and casseroles.
Melting small quantities
Steaming rice
Simmering sauces
• CONV BAKE (Convection Bake)
Low
(setting 2)
Melting large quantities
• TRU CONV (TruConvec™)
Med Low
(settings 3-4)
Low-temperature frying (eggs, etc.)
Simmering large quantities
Heating milk, cream sauces, gravies,
and puddings
Simmer
Broil element
Oven light
TruConvec™ element
(behind baffle)
Right Rear Burner
Control Knob
(2,500/1,000 watt)
Med
(setting 5)
Sautéing and browning, braising,
and pan-frying
Maintaining slow boil on large quantities
Use this setting to bake and roast foods at the same time
with minimal taste transfer.
Use this bake setting for multi-rack baking for
breads, cakes, cookies (up to 6 racks of cookies
at once).
• CONV ROAST (Convection Roast)
Use this setting for roasting whole turkeys, whole chickens,
hams, etc.
• CONV BROIL (Convection Broil)
Use this setting to broil thick cuts of meat.
Med High
(settings 7-8)
High-temperature frying
Pan broiling
Maintaining fast boil on large quantities
• HI BROIL
High
Boiling water quickly
Deep-fat frying in large cookware
• MED BROIL
*Note: The above information is given as a guide only.
You may need to vary the heat settings to suit your
personal requirements.
Use this setting for broiling dark meats at 1” thickness or
less where rare or medium doneness is desired.
Use this setting for broiling white meats such as chicken or meats
greater than 1” thick that would be over-browned in high broil.
• LOW BROIL
Use this setting for delicate broiling such as meringue.
• SELF CLEAN
Use this function to clean oven.
• Convection Dehydration (TRU CONV)
Use this function to dehydrate fruits and vegetables.
• Convection Defrost (TRU CONV)
Use this function to defrost foods.
CONV BAKE
(Convection
Bake)
The bottom element
operates at full power,
and the top broil
element operates at
supplemental power.
convection bake
The heated air is
circulated by the motorized fan in the rear of the oven
providing a more even heat distribution. This even
circulation of air equalizes the temperature throughout the
oven cavity and eliminates the hot and cold spots found in
conventional ovens. A major benefit of convection baking is
the ability to prepare food in quantity using multiple
racks—a feature not possible in a standard oven.
When roasting using this setting, cool air is quickly
replaced, searing meats on the outside and retaining more
juices and natural flavor on the inside with less shrinkage.
With this heating method, foods can be baked and roasted
at the same time with minimal taste transfer, even when
different dishes are involved, such as cakes, fish or meat.
The hot air system is especially economical when thawing
frozen food. Use this setting for baking and roasting.
TRU CONV
(TruConvec™)
The rear element only
operates at full power.
There is no direct heat
from the bottom or top
elements. The
motorized fan in the
rear of the oven
TruConvec
circulates air in the
oven cavity for even heating. Use this setting for foods that
require gentle cooking such as pastries, souffles, yeast
breads, quick breads, and cakes. Breads, cookies, and other
baked goods come out evenly textured with golden crusts.
No special bakeware is required. Use this function for single
rack baking, multiple rack baking, roasting, and preparation
of complete meals. This setting is also recommended when
baking large quantities of baked goods at one time.
CONV ROAST (Convection Roast)
The convection
element runs in
conjunction with the
inner and outer broil
elements. The
reversible convection
fan runs at a higher
speed in each
direction. This transfer
convection roast
of heat (mainly from
the convection element) seals moisture inside of large
roasts. A time savings is gained over existing, single fan
convection roast modes. Use this setting for whole turkeys,
whole chickens, hams, etc.
CONV BROIL (Convection Broil)
The top element
operates at full power.
This function is exactly
the same as regular
broiling with the
additional benefit of
air circulation by the
motorized fan in the
rear of the oven.
convection broil
Smoke is reduced
since the airflow also reduces peak temperatures on the
food. Use this setting for broiling thick cuts of meats.
MED BROIL
Inner and outer broil
elements pulse on
and off to produce
less heat for slow
broiling. Allow about
4 inches (10 cm)
medium broil
between the top
surface of the food
and the broil element. Slow broiling is best for chicken
and ham in order to broil food without over-browning it.
Use this setting for broiling small and average cuts of
meat.
LOW BROIL
This mode uses only
a fraction of the
available power to
the inner broil
element for delicate
top-browning. The
inner broil element is
low broil
on for only part of
the time. Use this setting to gently brown meringue on
racks 3 or 4 in 3-4 minutes.
Convection Dehydration
This oven is designed not only to cook, but also to
dehydrate fruits and vegetables.
1. Prepare the food as recommended.
2. Arrange the food on drying racks (not included with
the oven; contact a local store handling speciality
cooking utensils).
3. Set the appropriate low temperature and turn the
selector to “TRU CONV”.
Convection Defrost
HI BROIL
Heat radiates from
both broil elements,
located in the top of
the oven cavity, at full
power. The distance
between the foods
and the broil elements
determines broiling
high broil
speed. For fast
broiling, food may be as close as 2 inches (5 cm) to the
broil element or on the top rack. Fast broiling is best for
meats where rare to medium doneness is desired. Use this
setting for broiling small and average cuts of meat.
1. Place the frozen food on a baking sheet.
2. Set the temperature control to “OFF”.
3. Turn the selector to “TRU CONV”.
Self-Clean Cycle
This range features a self-cleaning cycle. During this cycle,
the oven reaches elevated temperatures in order to burn
off soil and deposits. A powder ash residue is left in the
bottom of the oven after completion of the self-clean
cycle. See Use and Care Manual for self-clean cycle
instructions.
Warnings (cont.)
Warnings
Warning and Important Safety Instructions appearing
in this manual are not meant to cover all possible
conditions and situations that may occur. Common
sense, caution, and care must be exercised when
installing, maintaining, or operating the appliance.
ALWAYS contact the manufacturer about problems or
conditions you do not understand.
Recognize Safety Symbols, Words, Labels
DANGER
Hazards or unsafe practices which WILL result in
severe personal injury or death
WARNING
Hazards or unsafe practices which COULD result in
death, severe personal injury or property damage
CAUTION
Hazards or unsafe practices which COULD
result in minor personal injury.
All safety messages will identify the hazard, tell you
how to reduce the chance of injury, and tell you what
can happen if the instructions are not followed.
Read and follow all instructions before using this
appliance to prevent the potential risk of fire, electric
shock, personal injury or damage to the appliance as
a result of improper usage of the appliance. Use
appliance only for its intended purpose as described
in this manual.
To ensure proper and safe operation: Appliance
must be properly installed and grounded by a
qualified technician. DO NOT attempt to adjust,
repair, service, or replace any part of your appliance
unless it is specifically recommended in this manual.
All other servicing should be referred to a qualified
servicer.
CAUTION
To prevent possible damage to cabinets and
cabinet finishes, use only materials and finishes
that will not discolor or delaminate and will
withstand temperatures up to 194° F (90° C). Heat
and moisture resistant adhesive must be used if the
product is to be installed in laminated cabinetry.
Check with your builder or cabinet supplier to make
sure that the materials meet these requirements.
Important Safety Notice and Warning
The California Safe Drinking Water and Toxic
Enforcement Act of 1986 (Proposition 65) requires the
Governor of California to publish a list of substances
known to the State of California to cause cancer or
reproductive harm, and requires businesses to warn
customers of potential exposures to such substances.
Users of this appliance are hereby warned that when
the oven is engaged in the self-clean cycle, there may
be some low-level exposure to some of the listed
substances, including carbon monoxide. Exposure to
these substances can be minimized by properly
venting the oven to the outdoors by opening the
windows and/or door in the room where the appliance
is located during the self-clean cycle.
Important notice regarding pet birds:
NEVER keep pet birds in the kitchen or in rooms
where the fumes from the kitchen could reach. Birds
have a very sensitive respiratory system. Fumes
released during an oven self-cleaning cycle may be
harmful or fatal to birds. Fumes released due to
overheated cooking oil, fat, margarine and overheated
non-stick cookware may be equally harmful.
About Your Appliance
• Avoid touching oven vent area while oven is on and
for several minutes after oven is turned off. When
the oven is in use, the vent and surrounding area
become hot enough to cause burns. After oven is
turned off, DO NOT touch the oven vent or
surrounding areas until they have had sufficient time
to cool.
• Other potentially hot surfaces include range top,
areas facing the range top, oven vent, surfaces near
the vent opening, oven door, areas around the oven
door and oven window.
• The misuse of oven doors (e.g. stepping, sitting,
or leaning on them) can result in potential hazards
and/or injuries.
Heating Elements and Glass Ceramic
Cooking Surfaces
• Surface areas on or adjacent to the unit may be hot
enough to cause burns.
• NEVER touch oven heating elements, areas near
elements, or interior surfaces of oven.
• Heating elements may be hot even though they are
dark in color. Areas near elements and interior
surfaces of an oven may become hot enough to
cause burns.
• During and after use, DO NOT touch or let clothing
or other flammable material contact surface of unit
or areas near unit, heating elements, or interior
surfaces of oven until they have had sufficient time
to cool.
• DO NOT COOK ON BROKEN COOKING
SURFACE – If cooking surface should break,
cleaning solutions and spillovers may penetrate the
broken cooking surface and create a risk of electric
shock. Contact a qualified technician immediately.
CAUTION
DO NOT touch the exterior portions of
the oven after self-cleaning cycle has
begun, since some parts become
extremely hot to the touch!
During the first few times the self-cleaning feature
is used, there may be some odor and smoking
from the “curing” of the binder in the high-density
insulation used in the oven. When the insulation is
thoroughly cured, this odor will disappear. During
subsequent self-cleaning cycles, you may sense
an odor characteristic of high temperatures.
KEEP THE KITCHEN WELL-VENTED DURING
THE SELF-CLEAN CYCLE.
WARNING
This range features a self-cleaning cycle. During
this cycle, the oven reaches elevated temperatures
in order to burn off soil and deposits. A powder ash
residue is left in the bottom of the oven after
completion of the self-clean cycle.
Note: DO NOT use commercial oven cleaners
inside the oven. Use of these cleaners can
produce hazardous fumes or can damage the
porcelain finishes. DO NOT line the oven with
aluminum foil or other materials. These items can
melt or burn during a self-clean cycle, causing
permanent damage to the oven.
Viking Quick Reference Guide
Warnings (cont.)
WARNING
CAUTION
BURN HAZARD
BURN HAZARD
The oven door, especially the glass, can
get hot. Danger of burning: DO NOT
touch the glass!
When self-cleaning, surfaces may get
hotter than usual. Therefore, children
should be kept away.
CAUTION
You must carefully check the food during the
dehydration process to ensure that it does not
catch fire.
CAUTION
WARNING
NEVER use appliance as a space heater to heat or
warm a room to prevent potential hazard to the user
and damage to the appliance. Also, DO NOT use the
range top or oven as a storage area for food or
cooking utensils.
DO NOT store items of interest to children over
the unit. Children climbing to reach items could
be seriously injured.
ELECTRICAL SHOCK HAZARD
Disconnect the electric power at the
main fuse or circuit breaker before
replacing bulb.
TIPPING HAZARD
WARNING
To avoid risk of property damage,
personal injury or death; follow
information in this manual exactly to
prevent a fire or explosion. DO NOT
store or use gasoline or other flammable vapors
and liquids in the vicinity of this or any appliance.
CAUTION
BURN OR ELECTRICAL
SHOCK HAZARD
Make sure all controls are OFF and oven
is COOL before cleaning. Failure to do
so can result in burns or electrical shock.
WARNING
DO NOT use commercial oven cleaners inside the
oven. Use of these cleaners can produce hazardous
fumes or can damage the porcelain finishes.
WARNING
WARNING
To reduce the risk of the
appliance tipping, it must be
secured by a properly installed
anti-tip bracket(s). To make sure the bracket has
been installed properly, look behind the range with
a flashlight to verify proper installation engaged in
the rear top left corner of the range.
• THIS RANGE CAN TIP
• INJURIES TO PERSONS CAN RESULT
• INSTALL ANTI-TIP DEVICE PACKED WITH
RANGE
• SEE INSTALLATION INSTRUCTIONS
WARNING
WARNING
ELECTRICAL SHOCK HAZARD
DO NOT touch a hot oven light bulb with
a damp cloth as the bulb could break.
Should the bulb break, disconnect power
to the appliance before removing bulb to avoid
electrical shock.
NOTICE
Avoid any damage to oven vents. The vents need
to be unobstructed and open to provide proper
airflow for optimal oven performance.
NOTICE
The Cooling Fan should be operating when the
unit is in operation. If you notice the cooling fan is
not operating or you observe unusual or excessive
noise coming from the cooling fan, contact a
Viking Authorized Service Center before
continuing operation. Failure to do so can result in
damage to the oven or surrounding cabinets.
CAUTION
To avoid sickness and food waste, DO NOT allow
defrosted food to remain in the oven for more than
two hours.
NOTICE
DO NOT turn the Temperature Control on during
defrosting. Turning the convection fan on will
accelerate the natural defrosting of the food
without the heat.
DO NOT heat empty cookware or let cookware boil
dry. The cookware can absorb an excessive
amount of heat very quickly, resulting in possible
damage to the cookware and ceramic glass.
Designer Freestanding
30”W. Electric Range
F20656 EN
VIKING RANGE CORPORATION
111 Front Street • Greenwood, Mississippi
38930 USA • (662) 455-1200
(101209J)