1
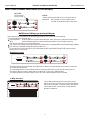
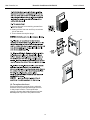
CD-101J
CD-121J
Owner’s Manual
Room Air Conditioner with R-410A
Heat Controller, Inc.
CONTENTS
1. SAFETY PRECAUTIONS..................................................................2
2. IMPORTANT SAFETY INSTRUCTIONS ..........................................4
3. NORMAL SOUNDS ...........................................................................5
4. AIR CONDITIONER FEATURES .......................................................5
5. INSTALLATION INSTRUCTIONS......................................................10
6. CARE AND CLEANING ....................................................................14
19
7. TROUBLESHOOTING TIPS...............................................................15
20
R ead This Manual
Inside you will find many helpful hints on how to use and maintain your air conditioner
properly. Just a little preventive care on your part can save you a great deal of time
and money over the life of your air conditioner. You'll find many answers to common
problems in the chart of troubleshooting tips. If you review our chart of Troubleshooting
Tips first, you may not need to call for service at all.
! CAUTION
the
technician
forfor
repair
or or
maintenance
of this
unit.
• Contact
Contact
anauthorised
authorizedservice
service
technician
repair
maintenance
of this
unit.
Contact the installer for installation of this unit.
• The
Contact
an authorized
of this
unit. or infirm persons
air conditioner
is not installer
intendedfor
forinstallation
use by young
children
supervision.
• without
If the power
cord needs to be replaced, replacement work shall be performed by
Young
children
should
be supervised
authorized
service
personnel
only. to ensure that they do not play with the air
conditioner.
• If Installation
workismust
performed
in accordance
with the
national and
the power cord
to bebe
replaced,
replacement
work shall
be performed
by local
electric codes
and must
authorised
personnel
only.be performed by authorized personnel only.
Installation work must be performed in accordance with the national wiring
standards by authorised personnel only.
1
1
Room Air Conditioner with R-410A
Heat Controller, Inc.
Owner’s Manual
IMPORTANT SAFETY
SAFETY INSTRUCTIONS
INSTRUCTIONS
IMPORTANT
WARNING
WARNING
NOTEThe
For power
some models,
the power
NOTE
supply cord
with
supply
cord with this
air conditioner
this
air conditioner
contains
a current
contains device
a current
detection
device
detection
designed
to reduce
designed
to reduce the risk of fire.
the
risk of fire.
Pleaserefer
referto
tothe
thesection
sectionOperation
Operation
Please
Please
refer
to
the
“Operation
, , section
Current
Device”
fordetails.
details.
ofCurrent
CurrentDevice
Devicefor
for
details.
ofof
theevent
eventthat
thatthe
thepower
powersupply
supply
InInthe
cordisisdamaged,
damaged,ititcannot
cannotbe
be
cord
repaired-itmust
mustbe
bereplaced
replacedwith
withaa
repaired-it
cordfrom
fromthe
theProduct
ProductManufacturer.
Manufacturer.
cord
,,
Donot,
not,under
underany
any
Do
circumstances,cut,
cut,
circumstances,
remove,or
orbypass
bypass
remove,
thegrounding
groundingprong.
prong.
the
Powersupply
supplycord
cord
Power
with3-prong
3-pronggrounding
groundingplug
plug
with
andcurrent
currentdetection
detectiondevice
device
and
Foryour
yoursafety
safety
For
Donot
notstore
storeororuse
usegasoline
gasolineororother
otherflammable
flammablevapors
vaporsand
andliquids
liquidsinin
Do
the
vicinity
of
this
or
any
other
appliance.
the vicinity of this or any other appliance.
Avoidfire
firehazard
hazardororelectric
electricshock.
shock.Do
Donot
notuse
usean
anextension
extensioncord
cordororan
an
Avoid
adaptorplug.
plug.Do
Donot
notremove
removeany
anyprong
prongfrom
fromthe
thepower
powercord.
cord.
adaptor
WARNING
WARNING
ElectricalInfor
Information
mation
Electrical
Besure
surethe
theelectrical
electricalservice
serviceisisadequate
adequatefor
forthe
themodel
modelyou
youhave
have
Be
chosen.This
Thisinformation
informationcan
canbe
befound
foundon
onthe
theserial
serialplate,
plate,which
which
chosen.
locatedon
onthe
theside
sideofofthe
thecabinet
cabinetand
andbehind
behindthe
thegrille.
grille.
isis located
Besure
surethe
theair
airconditioner
conditionerisisproperly
properlygrounded.
grounded.To
Tominimize
minimize
Be
shockand
andfire
firehazards,
hazards,proper
propergrounding
groundingisisimportant.
important.The
Thepower
power
shock
cordisisequipped
equippedwith
withaathree-prong
three-pronggrounding
groundingplug
plugfor
forprotection
protection
cord
againstshock
shockhazards.
hazards.
against
Yourair
airconditioner
conditionermust
mustbe
beused
usedininaaproperly
properlygrounded
groundedwall
wall
Your
receptacle.IfIfthe
thewall
wallreceptacle
receptacleyou
youintend
intendtotouse
useisisnot
notadequately
adequately
receptacle.
groundedororprotected
protectedby
byaatime
timedelay
delayfuse
fuseororcircuit
circuitbreaker,
breaker,
grounded
haveaaqualified
qualifiedelectrician
electricianinstall
installthe
theproper
properreceptacle.
receptacle.
have
Ensurethe
thereceptacle
receptacleisisaccessible
accessibleafter
afterthe
theunit
unitinstallation.
installation.
Ensure
Do
not
run
air
conditioner
without
side
protective
cover
place.
Do not run air conditioner without side protective cover ininplace.
Thiscould
couldresult
resultininmechanical
mechanicaldamage
damagewithin
withinthe
theair
airconditioner.
conditioner.
This
Donot
notuse
usean
anextension
extensioncord
cordor
oran
anadapter
adapterplug.
plug.
Do
Operation of Cur rent Device
Operation
of Cur
rent
Device
The
power supply cord
contains
a current
device that senses damage to the power cord. To test your power
(Applicable
unit adopts current detection device only )
supply
cord do to
thethe
following:
The power supply cord contains a current
device
that
damage to the power cord. To test your power
1. Plug
in the
Airsenses
Conditioner.
supply
cord
do
the
following:
2. The power supply cord will have TWO buttons on the plug head.
Plug in &
1.press
PlugRESET
in the Air Conditioner.
Press the TEST button, you will notice a click as the RESET
2. The power supply cord will have TWObutton
buttons
on the
pops
out.plug head. Press the TEST button, you will notice a
click as the TEST
RESET button pops out.
3. Press the RESET button, again you will notice a click as the button
3. Press the RESET button, again you will
notice a click as the button engages.
engages.
RESET
4. The power supply cord is now supplying
to thecord
unit.is(On
products
this it also
indicated
4. Theelectricity
power supply
nowsome
supplying
electricity
to the
unit. by
a light on the plug head.)
(On some products this it also indicated by a light on the plug head.)
NOTE: Some plugs have
NOTES:
buttons on the top.
Do not use this device to turn the unit on or off.
Always make sure the RESET button is pushed in for correct operation.
NOTES:
Thenot
power
musttobe
replaced
it fails
reset when either the TEST button is pushed, or it cannot be
Do
use supply
this device
turn
the unitif on
or off.
reset.
A
new
one
can
be
obtained
from
the
product
manufacturer.
Always make sure the RESET button is pushed in for
correct operation.
If
power
supply
cord
is
damaged,
it
cannot
be
repaired.
MUST
replaced
byisone
obtained
thebe
The power supply must be replaced if it fails reset when Iteither
thebeTEST
button
pushed,
or itfrom
cannot
product
manufacturer.
reset. A new one can be obtained from the product manufacturer.
If power supply cord is damaged, it cannot be repaired. It MUST be replaced by one obtained from the
product manufacturer.
44
4
Room Air Conditioner with R-410A
Owner’s Manual
Heat Controller, Inc.
NORMAL SOUNDS
- TYPE
WINDOW/WALL
AIR CONDITIONER FEATURES
ROOM AIR CONDITIONER
High Pitched Chatter
High efficiency compressors
may have a high pitched chatter
during the cooling cycle.
Normal sounds
Vibration
Unit
make
noise
Unitmay
mayvibrate
vibrateand
and
make
noise
because
oror
window
becauseofofpoor
poorwall
wall
window
construction
incorrect
installation.
constructionoror
incorrect
installation.
High Pitched Chatter
High efficiency compressors
may have a high pitched chatter
during the cooling cycle.
Sound of Rushing Air
At the front of the unit, you may
hear the sound of rushing air
beingSound
moved of
by Rushing
the fan Air
Vibration
Unit may vibrate and make noise
because of poor wall or window
construction
or incorrect
installation.
Pinging
or Swishing
Switching
At the front of the unit, you may
hear the sound of rushing air
being moved by the fan
Gurgle/Hiss
Closed
ENERGY
SAVER
EXHAUST
S
Droplets of water hitting condenser
during normal operation may cause
pinging or switching
swishing sounds.
CHECK
FILTER
SLEEP
Open
DOWN
UP
CLEAN
MODE
Auto Cool
Dry
Fan
ON/OFF
FAN
Auto
Low
Med High
ON
OFF
TIMER
Follow me
Gurgling or hissing noise may
be heard
due to refrigerant
Gurgle/Hiss
passing
throughorevaporator
Gurgling
hissing noise may
duringbe
normal
heardoperation.
due to refrigerant
Pinging or Switching
Droplets of water hitting condenser
during normal operation may cause
pinging or switching sounds.
passing through evaporator
during normal operation.
MULTI-STEP SPEED ELECTRONIC
CONTROL
AIR CONDITIONER
FEATURES
THIS AIR CONDITIONER IS EQUIPPED WITH A NEW INDUSTRY
STANDARD
POWER SUPPLY
CORD WITH A TEST-RESET FUNCTION
ELECTRONIC CONTROL
OPERATING
INSTRUCTIONS
ELECTRONIC CONTROL OPERATING INSTRUCTIONS
Before you begin, thoroughly familiarize yourself with the control panel and remote as shown below
Before
begin,thoroughly
thoroughly
familiarize
yourself
withthe
thecontrol
control
panels
as
shown
below
and
Before
begin,
familiarize
yourself
panel
as
shown
below
allall the
and
all you
itsyou
functions,
then follow
the symbol
for thewith
functions
you desire.
The
unit
can
be and
controlled
functions,
then
follow
the
symbol
for
the
functions
you
desire.
The
unit
can
be
controlled
by
the
by
the
unit
control
alone
or
with
the
remote.
its functions, then follow the symbol for the functions you desire. The unit can be controlled by
unit
control
alone
or
with
the
remote
controller.
the unit control alone or with the remote.
Energy Saver
Mode
ADJUSTS
TEMPERATURE
OR TIME
ENERGY
SAVER
Closed
EXHAUST
ACTIVATES
Open
TIMER
S
Temp
Temp
Timer
Timer
On
Off
MODE
Check
Auto Cool
Filter
Dry
ADJUSTS
TEMPERATURE
OR TIME
SLEEP
Fan
DOWN
DISPLAYS
TEMPERATURE
OR TIME
ON/OFF
SLEEP
Turns Unit
Auto
On/
Off
Low
Clean
Air
Dry
SETS MODE
Mode
Auto
Low
Med
High
ON
OFF
TIMER
Med
CLEAN AIR MODE
Activates Timer
FOLLOW ME INDICATOR
(on some models)
Fan
TURNS UNIT
ON OR OFF
S
Open
FAN
Sets Fan
(on some models)
Remote Signal Follow me
Speed
Receptor
Indicator
(on some models)
ENERGY
SAVER MODE
Closed
MODE
CLEAN
AIR
Unit High
control panel(1)
SET FAN SPEED
Fan
EXHAUST
UP
Follow me
Sets Mode
Auto
Cool
CHECK
FILTER
Sleep
Timer
CHECK FILTER
RESET BUTTON
Exhaust Selector
BeforeTemp./Timer
using your air conditioner,
please read
Clean air mode
Activates Check
Adjustment
(onkeep
someit models)
this manual carefully and
for future reference.
Filter
Sleep Mode
Energy
ENERGYSaver
SAVER
Follow
Me
Auto Cool
On/Off
SLEEP
Dry
DOWN
UP
ON/OFF
FAN
Fan
UNIT CONTROL
MODE
Follow me
Unit control panel(2)
5
5
6
CLEAN
AIR
Auto Low
Med
High
CHECK
FILTER
On
Off
TIMER
Room Air Conditioner with R-410A
Owner’s Manual
AIR CONDITIONER FEATURES(CONTINUED)
AIR CONDITIONER
Heat Controller, Inc.
FEATURES
NOTE:
TOCONDITIONER
SELECT
TO SELECT
THETHE
AIR
FEATURES(CONTINUED)
To NOTE:
choose operating mode, press the Mode
OPERATING
MODE:
OPERATING
MODE:
To choose
operating
mode,
theaMode
button.
Each time
you press
thepress
button,
mode
NOTE:
button. Each
time you press
the button,
a mode
is selected
in a sequence
that goes
from Auto,
AIR CONDITIONER
FEATURES(CONTINUED)
TO SELECT
THE
AIR
CONDITIONER
FEATURES
To
choose
operating
mode,
press
the
Mode
is Dry
selected
in a
sequence
thatlight
goes
from
AIR
CONDITIONER
FEATURES(CONTINUED)
Cool,
Dry
and
Fan.
The
indicator
beside
Cool,
and
Fan.
The
indicator
light
beside
eachAuto,
OPERATING MODE:
S
TOExhaust
SELECT
THE
S
TO
SELECT
THE
TO SELECT
THE
OPERATING MODE:
OPERATING
MODE:
OPERATING
MODE:
Mode
ENERGY
SAVER
Timer
off
Energy
SLEEP
Saver
Timer
on
open
closed
Auto Cool
Dry
Auto
Cool
Dry
Fan
S
Timer
off
Energy
Saver
Timer
on
open
closed
Auto Cool
S Mode
ENERGY
SAVER
Auto
Dry
Timer
Timer
Fan
MODE
Exhaust
DOWN
Temp.
Temp.
ON/OFF
Follow me
Timer
Temp.
Auto
Timer
off
S Low
Timer
Fan
Temp.
DO THIS: DO THIS:
Med
DO
THIS:
Fan
High
Press
the Mode
Press the Mode
Mode
Press
the Mode
button.
button.
button.
Mode
Fan
DO THIS:
Press the Mode
DO THIS:
button.
Follow
Me
DO
THIS:
Press
the Mode
Energy
On/Off
Saver
TO USE THE ENERGY
button.
Press
the Mode
button.
SAVER
FEATURE:
TO USE
THE
ENERGY
FEATURE:
TO SAVER
USE THE
ENERGY
Exhaust
Cool
closed
open
Dry
Energy
SLEEP
Saver
Clean
Air
Auto Cool
MODE
Auto
Cool
Dry
Timer
on
Dry
DOWN
Timer
Timer
Fan
Fan
Temp.
Temp.
ON/OFF
Follow me
SAVER FEATURE:
DO THIS:
TO USE THE ENERGY
DO THIS:
TOUSE
USE
THEENERGY
ENERGY
TO
THE
Press Press
the button
SAVER
FEATURE:
the button
SAVER
FEATURE:
SAVER FEATURE: DO THIS:
Press the button
TO USE THE
S ENERGY
SAVERExhaust
FEATURE:S DO THIS:
DO THIS:
ENERGY
SAVER
closed
Mode
Dry
Timer
off
High
Energy
Saver
S Mode
Mode
Fan
S
Exhaust
Auto
Cool
Follow
Mode
Me
Dry
Auto Cool
Fan
ENERGY
SAVER
SLEEP
Timer
Timer
Auto
Temp
ENERGY
SAVER
Check
Filter
Sleep
MODE
S
Timer
Cool
Dry
Temp.
Fan
Timer
Timer
On
Off
MODE
Auto
Cool
Check
Filter
Dry
Fan
Sleep
Auto
Auto
Dry
Fan
Timer
Timer
Fan
DO THIS:
Press Sleep
button
Temp.
ON/
OFF
Clean
Air
DO THIS:
Press Sleep
ON/
Fan
OFF
button
Follow
Me Auto Low
Med High
DOWN
Clean
Air
Follow me
ON/
OFF
Clean
Air
Fan
DO THIS:
Press Sleep
button Fan
DO THIS:
Press Sleep
DO THIS:
button
DO THIS:
Press Sleep
Press Sleep
button
7
button
Follow
Me Auto Low
Med High
DOWN
ON/OFF
Follow me
Timer
Cool
Dry
Follow
Med High
Me Auto Low ON/OFF
Check
Filter
Sleep
Temp.
Temp.
DOWN
Temp
SLEEP
Temp.
Temp.
Follow me
SLEEP FEATURE:
SLEEP FEATURE:
Check
Sleep
Filter
SLEEPTimer
FEATURE:
Timer
S
SLEEP FEATURE:
Temp.
Timer
ON/OFF
Temp.
Energy
SLEEP FEATURE:
On/Off
Saver
Temp.
Timer
Fan
Timer
on
open
MODE
Temp.
Follow me
Timer
off
SLEEP
Energy
Saver
SLEEP FEATURE:
Temp.
Dry
Temp.
ON/OFF
DO THIS:
Press the button
Timer
on
Auto Cool
ENERGY
SAVER
Timer
Fan
Med
open
closed
Timer
Dry
Fan
S
Fan
Exhaust
DOWN
Timer
Press Press
the button
the button
Low
Auto Cool
CleanCool
Air
Auto
Dry
Timer
on
Auto
open
MODE
Cool
closed
Timer
off
SLEEP
Energy
Saver
Auto
Low
Clean
Air
Med
High
7
NOTE:
button.
Each
time Fan.
you
press
the on
button,
a the
mode
Dry
and
The
indicator
lightthe
beside
will Cool,
bewill
illuminated
andand
remained
ononce
once
mode
be
illumniated
remain
mode
NOTE:
is
selected
in
a
sequence
that
goes
from
Auto,
will
be
illuminated
and
remained
on
once
the
To
choose
operating
mode,
press
the
Mode
button.
mode
is
selected.
is selected.
NOTE:
Cool,
Dry is
and
Fan.
indicator
beside
mode
selected.
To
choose
operating
mode,
press
the Mode
Each
time
you
pressThe
the
button,
alight
mode
is selected
To
operating
mode,
press
theaDry
Mode
To
operate
ontime
Auto
feature:
will
be choose
illuminated
and
remained
onCool,
once
the
button.
Each
you
press
the
button,
mode
in
a
sequence
that
goes
from
Auto,
and
To
operate
ontime
Auto
feature:
In
this
mode,
the
fan
speed
cannot
be
adjusted,
button.
Each
you
press
the
button,
a mode
mode
is
selected.
is selected
in
a
sequence
that
goes
from
Auto,
Fan.
The
indicator
light
beside
will
be
illuminated
this mode,
fan
speed
cannot
be
adjusted,
it starts
atindicator
a speed
according
to
isIn
selected
in once
athe
sequence
that
goes
from
Auto,
Cool,
Dryautomatically
and
Fan.
Thethe
beside
and
remained
on
mode
islight
selected.
it
starts
automatically
at
aroom
speed
according
to
To
operate
on
Auto
feature:
the
room
temperature.
If
the
does
not
get
Cool,
Dry
and
Fan.
The
indicator
light
beside
willthis
be
illuminated
andspeed
remained
on be
once
thenot get
mode,
thestay
fan
adjusted,
the
room
temperature.
Ifcannot
the room
does
ToIn
operate
on
Auto
feature:
too
warm,
it
will
at
Low
speed.
will
be
illuminated
and
remained
on
once
the
mode
selected.
it starts
automatically
at at
a speed
according
to it
tooismode,
warm,
it will
Low
speed.
mode
is selected.
In
this
the
fanstay
speed
cannot
be adjusted,
To
operate
on
Fan
Only:
the
room
temperature.
If
the
room
does
not
get
To
operate
on
Auto
feature:
starts
automatically
atOnly:
a speed according to the
To
operate
on
Fan
To
operate
onstay
Auto
feature:
too
warm,
it will
Low
speed.
Use
this
function
only
when
cooling
is adjusted,
not
In
this
mode,
the
fan
speed
cannot
room
temperature.
If at
the
room
doesbe
not
get too
In
this
mode,
the
fan
speed
cannot
be
Use
this
function
only
cooling
isoradjusted,
not
desired,
such
as at
forLow
room
air
circulation
to
it
startsit automatically
atspeed.
awhen
speed
according
to
warm,
will
stay
Toexhaust
operate
on
Fan
Only:
it
starts
automatically
at
a
speed
according
desired,
such
as
for
room
air
circulation
or toto
stale
air(on
some
models).
the room temperature. If the room does not get
the
temperature.
Ifspeed.
the
room
does
not get
ToUse
operate
on
Fan
Only:
thisroom
function
only
cooling
is
notfunction,
exhaust
air(on
some
models).
(Remember
to
open
the
vent
during
this
too
warm,
it stale
will
stay
atwhen
Low
too
itaswill
stay
atcooling
Low
speed.
desired,
such
room
air
circulation
ordesired,
tofunction,
tofor
open
the
vent
during
this
Use
thiswarm,
function
only
when
cooling
not
but (Remember
keep
it closed
during
forismaximum
Tosuch
operate
on
Fan
Only:
exhaust
stale
air(on
some
models).
but
keep
it
closed
during
cooling
for
maximum
as efficiency.)
for room
airYou
circulation
or to any
exhaust
cooling
can choose
fan stale
To operate
on Fan
Only:
(Remember
to open
vent
during
this
function,
cooling
efficiency.)
You
can
choose
any
fanvent
Use
this
function
onlythe
when
cooling
not
air(on
some
models).
(Remember
tois
open
the
speed
you
prefer.
Use
this
function
only
when
cooling
isornot
but
keep
ityou
closed
during
cooling
forshow
maximum
speed
prefer.
desired,
such
as
for
room
air circulation
to
during
this
function,
but
it closed
during
During
this
function,
the keep
display
will
the
desired,
such
asYou
for
room
air
to
efficiency.)
can
choose
any
fan
During
this
function,
the
display
show
the
exhaust
stale
air(on
some
models).
cooling
for
maximum
cooling
efficiency.)
Youorcan
actual
room
temperature,
not
thecirculation
setwill
temperexhaust
stale
air(on
some
models).
speed
you
prefer.
actual
room
temperature,
not
the
set
temper(Remember
to cooling
open
the
vent
during this function,
choose
fan
speed
you
prefer.
ature
asany
in the
mode.
(Remember
to cooling
open
vent will
during
thisthe
function,
During
this
function,
thethe
display
ature
asclosed
in the
mode.
but
keep
it
during
cooling
forshow
maximum
actual
but
keep
it
closed
during
cooling
for
maximum
To
operate
on
Dry
mode:
actual
room
temperature,
not
the
setany
tempercooling
efficiency.)
You
can
choose
fanas in the
room
temperature,
not
the
set
temperature
To
operate
on
Dry
mode:
cooling
efficiency.)
You can
anyoperate
fan in
ature
as
in the
cooling
mode.
Inthe
this
mode,
the
conditioner
will
generally
speed
you
prefer.
In
mode,
the
airair
conditioner
willchoose
generally
cooling
mode.
In
this
mode,
the
air
conditioner
will
generally
speed
you
prefer.
operate
inathe
form ofthe
a dehumidifier.
Since
the the air.
During
function,
display
will
show
the
the
formthis
of
dehumidifier
to
remove
moisture
from
To
operate
on
Dry
mode:
Toconditioned
operate
on
Dry
mode:
operate
inspace
the
form
a dehumidifier.
Since
During
this
function,
the
display
show
the
isspace
aof
closed
or sealed
area,
actual
room
temperature,
not
the
setwill
temperSince
the
conditioned
is
a
closed
or
sealed
area,
themode,
conditioned
is a
closed
or sealed
actual
room
temperature,
not
thegenerally
set
temperIn
this
the
air
conditioner
will
In
this
mode,
the
airspace
conditioner
will
generally
some
degree
of
cooling
will
continue.
ature
as
in
the
cooling
mode.
some
degree
of
cooling
will
continue.
area,inin
some
degree
cooling
ature
as
in form
the
cooling
mode. will continue.
operate
the
ofofaaof
dehumidifier.
Since
operate
the
form
dehumidifier.
Sincethe
the
To
operate
on
Dry
mode:
conditioned
space
is
a
closed
or
sealed
area,
conditioned
space
is
a
closed
or
sealed
area,some
To
operate
on
Dry
mode:
NOTE:
NOTE:
degree
of cooling
will
continue.
some
degree
of cooling
will continue.
In
this
mode,
the
air air
conditioner
willwill
generally
In this
mode,
the
conditioner
generally
In
this
mode,
the
fan
will
continue
to
for for
operate
in
the
form
of
a
dehumidifier.
Since
the
In this mode,
fanofwill
continuerun
to
run
operate
in thethe
form
a dehumidifier.
Since
3conditioned
minutes
after
the the
compressor
shuts
off.area,
TheThe
space
is
a
closed
or
sealed
3
minutes
after
compressor
shuts
off.
the conditioned space is a closed or sealed
NOTE:
fan
then
cycles
on
for
minutes
at 10
minute
some
degree
ofdegree
cooling
continue.
fan
then
cycles
on 2for
2 minutes
atcontinue.
10 minute
NOTE:
area,
some
ofwill
cooling
will
In
this
mode,
the
will
continue
to run
forabove
intervals
untiluntil
thefan
room
temperature
is above
intervals
the
room
temperature
is
In 3
this
mode,
the fan
will
continue
to run
for 3The
minutes
minutes
after
the
compressor
shuts
off.
the
set
temperature,
at
which
time
the
the
set temperature, at which time the
NOTE:
NOTE:
after
the
compressor
shuts
off.
The
fan
then
cycles
fan
then cycles
on
for back
2 on
minutes
at cooling
10 minute
compressor
turns
back
and
cooling
stars.
compressor
turns
on and
stars.
onIn
for
minutes
at the
10
minute
intervals
until
thefor
room
intervals
until
the
room
is
this
mode,
the
fan
willtemperature
continue
to run
for
In2 this
mode,
fan
will
continue
toabove
run
temperature
is above
the
set temperature,
which
the
temperature,
atcompressor
which
time
the
3
minutes
after
the the
compressor
shuts
off.at
The
3set
minutes
after
shuts
off.
The
NOTE:
time
the
compressor
turns
back
on
Stars.
NOTE:
compressor
turns
on
cooling
stars.
starts.
fan
then
cycles
on back
for
minutes
atand
10
minute
fan
then
cycles
on 2for
2and
minutes
atCooling
10
minute
intervals
until
the
room
temperature
is
above
In
this
mode
the
selected
temperature
will
intervals
until
the
room
temperature
is
above
In this mode the selected temperature will
theincrease
set set
temperature,
atFwhich
the
increase
bytemperature,
2by
degrees
30
minutes
after
the the
the
atFwhich
time
the
2 degrees
30time
minutes
after
NOTE:
compressor
turns
back
ontemperature
and
cooling
mode
is selected.
The
temperature
will stars.
then
compressor
turns
back
on and
cooling
stars.
mode
is selected.
The
will
then
In
this
mode
the
selected
willan
increase
by another
2 degrees
F after
an
increase
by another
2 temperature
degrees
F after
increase
by302 minutes.
degrees
F
30This
minutes
after the
additional
This
newnew
temperature
additional
30 minutes.
temperature
NOTE:
NOTE:
NOTE:
mode
selected.
The
temperature
will
then
will
beismaintained
for 7for
hours
before
it returns
will
be
maintained
7 hours
before
it returns
In In
this
mode
the
selected
temperature
will
increase
by
increase
by
another
2
degrees
F
after
an
this
mode
the
selected
temperature
will
In
this
mode
the
selected
temperature
will
to
the
originally
selected
temperature.
This
to
the
originally
selected
temperature.
This
O
O
4 Oincrease
F(2
or
3
C)
in
the
first
hour
after
the
mode
is
selected.
additional
30
minutes.
This
new
temperature
by
2
degrees
F
30
minutes
after
the
increase
by
2
degrees
F
30
minutes
after
the
ends
the the
Sleep
mode
andand
the the
unitunit
will will
continue
ends
Sleep
mode
continue
This
new
temperature
betemperature
maintained
for
another
6
will
beoperate
forwill
7temperature
hours
beforewill
itThe
returns
mode
ismaintained
selected.
The
then
mode
isas
selected.
The
will
then
to operate
originally
programmed.
to
as originally
programmed.
The
hours
before
itanother
returns
tocan
the
originally
selected
to
the
originally
selected
temperature.
This
increase
by
2
degrees
F
after
an
increase
by
another
2
degrees
F
after
an
Sleep
mode
program
be
cancelled
at
any
Sleep mode program can be cancelled at any
temperature.
This
ends
the
Sleep
mode
and
the unit
ends
theduring
Sleep
mode
and
the
unit
will
continue
additional
30
minutes.
This
new
temperature
30
minutes.
This
new
temperature
timeadditional
during
operation
by
again
pressing
the
time
operation
by
again
pressing
the
will
continue
to
operate
as
originally
programmed.
to
operate
as
originally
programmed.
The
will
be
maintained
for
7
hours
before
it
returns
will
be
maintained
for
7
hours
before
it
returns
Sleep
button.
Sleep
button.
The
Sleep
mode
program
can
cancelled
any
Sleep
mode
program
can
bebe
cancelled
at at
any
to
the
originally
selected
temperature.
This
to the
originally
selected
temperature.
This
time
during
operation
byand
again
thethe
Sleep
time
during
operation
by
again
pressing
ends
the the
Sleep
mode
thepressing
unit
will will
continue
ends
Sleep
mode
and
the
unit
continue
button.
Sleep
button.
to
operate
as originally
programmed.
TheThe
to operate
as originally
programmed.
Sleep
mode
program
can
be
cancelled
at any
Sleep
mode
program
can
be
cancelled
at any
8
timetime
during
operation
by again
pressing
the the
during
operation
by again
pressing
button.
Sleep
button.
7Sleep
Room Air Conditioner with R-410A
Heat Controller, Inc.
Owner’s Manual
AIR CONDITIONER FEATURES (CONTINUED)
AIR CONDITIONER
AIR CONDITIONER FEATURES(CONTINUED)
AIR CONDITIONER FEATURES(CONTINUED)
TIMER: AUTO START/
TIMER:AUTO
AUTOSTART/
START/
TIMER:
STOP
FEATURE:
STOPFEATURE:
FEATURE:
STOP
DO THIS:
Press Timer
button
UP
DOWN
Temp
CLEAN
Temp
Auto
FAN
ON/OFF
Timer
CHECK
FILTER
Exhaust
Low
Med
S
On
Energy
Saver
Off
Timer
on
Sleep
Timer
Auto
Auto
OFF
TIMER
DO THIS:
Press Timer
DObutton
THIS:
Press Timer
button
Auto Cool
Mode
Check
Filter
ON
Timer
off
open
closed
High
Timer
Follow me
Dry
Timer
Timer
Temp.
Temp.
Fan
Low
Cool
Clean
Air
Dry
Med
Fan
High
CHECK FILTER FEATURE:
FEATURES
NOTE:
NOTE:
NOTE:
First press the Timer button, the Timer on indicator
Press
the Timer
button,
the indicator
lightStart
First
press
theTimer
Timer
button,
theAuto
indicator
light
light
illuminates.
It indicates
the
program
First
press
the
button,
the
Timer
on indicator
word OnItilluminates.
It indicates
Auto
isbesides
initiated.
light
illuminates.
indicates the
Auto Startthe
program
Start
program
is initiated.
Press
or hold the
Left arrow or Right arrow to change
is
initiated.
Press
ortime
holdby
the
Left
arrow
Right arrow
arrow
to change
change
the
Auto
0.5
hour
increments,
up to 10
hours,
Press
or
hold
the
UP
arrow
oror
DOWN
to
the
time
by
0.5
hour
increments,
up
to
10
hours
the
Auto
time
by
0.5
hour
increments,
up
to
10
hours,
then
at
1
hour
increments
up
to
24
hours.
The
control
the Auto time by 0.5 hour increments, up to 10 hours,
then
at
1
hour
increments
up
to
24
hours.
The
control
will
count
down
the
time
remaining
until
start.
then at 1 hour increments up to 24 hours. The control
willcount
countdown
down
the
time
remaining
untilstart.
start.
The
selected
time
will
register
in 5 second
and the
will
the
time
remaining
until
seconds
andthe
the
Theselected
selected
timewill
willregister
register
second
and
the
system
will automatically
revert
to display
The
time
ininback
55second
and
system
will
automatically
revert
back
to
display
the
previous
temperature
setting.
system will automatically revert back to display the
previous
temperature
setting.
Perform
the
same
procedures
as
above
to
set
the
previous temperature setting.
Turning
the
unit ON
or OFF atas
any
time will
cancel
Timer
offthe
settings.
Perform
same
procedures
above
to set
the the
Auto Start/Stop
function.
Press
thesettings.
Temp./Timer
adjust button to adjust the
Timer
off
settingthe
time
to 0.0 at any
timebutton
will cancel
the the
Press
Temp./Timer
adjust
to adjust
Auto
Start/Stop
function.
setting
time to 0.0
at any time will cancel the
Auto Start/Stop function.
CHECK FILTER FEATURE:
CHECK FILTER FEATURE:
DO THIS:ON/
OFF
Press Check
Filter button
Check
Filter
Sleep
Timer
Timer
Temp.
Temp.
Temp
Follow
Me Auto Low
Clean
Air
Med High
Fan
CHECK
FILTER
Temp
DO THIS:
On
DOPress
THIS:Check
Off
Filter button
Press Check
Sleep
Filter button
Timer
FOLLOW ME FEATURE:
(on some models)
FOLLOW
ME FEATURE:
Auto
Auto
DOWN
UP
Timer
CLEAN
Timer
FAN
ON/OFF
Auto
Low
Med
High
ON
OFF
TIMER
Follow me
Check
Filter
Low
Cool
(on some
models)
Clean
Air
Dry
Med
Fan
High
Sleep
Timer
DOWN
Timer
ON/
OFF
Check
Filter
UP
Follow
CLEAN
Me Auto Low
CLEAN AIR FEATURE:
(on some models)
Temp.
Temp.
FAN
ON/OFF
Auto
Low
Med
High
CHECK
FILTER
Clean
Air
Med High
Fan
ON
OFF
Follow me
Light flashing
Temp
Temp
Light flashing
Timer
Timer
On
Off
Check
Filter
Sleep
Timer
Auto
Cool
Dry
Fan
Clean
Air
Med
DO THIS:
Press Clean
Air button
TIMER
NOTE:
This feature is a reminder to clean the Air Filter for
NOTE:
morefeature
efficient
LED(light)
illumiThis
is operation.
a reminderThe
to clean
the Airwill
Filter
for
nate after
250 operation.
hours of operation.
To reset
after
more
efficient
The LED(light)
will
illumicleaning
press
the CheckToFilter
NOTE:
nate
afterthe
250filter,
hours
of operation.
resetbutton
after and
the
light
will
off.
cleaning
the go
filter,
press the
Filter
and
This
feature
is a
reminder
toCheck
clean the
Airbutton
Filter for
the
light
will gooperation.
off.
more
efficient
The LED(light) will illuminate after 250 hours of operation. To reset after
cleaning the filter, press the Check Filter button and
the light will go off.
NOTE:
This
feature can be activated from the remote
NOTE:
control
ONLY.
The
control
as a
This feature
can
beremote
activated
fromserves
the remote
remote
thermostat
allowing
for
the
precise
control ONLY. The remote control serves as a
temperature
control
at its location.
remote
thermostat
allowing
for the precise
To
activate thecontrol
Follow at
Meits
feature,
point the remote
temperature
location.
control
towards
the unit
and
press point
the Follow
Me
To
activate
the Follow
Me
feature,
the remote
button. towards
The lightthe
on unit
the unit
panel
will Me
pulse
control
and control
press the
Follow
to indicate
received
signal.
It will
continue
to
button.
Theitlight
on thethe
unit
control
panel
will pulse
send
this signal
until the
to
indicate
it received
thefeature
signal. is
It deactivated
will continueby
to
pressing
Follow
again.
If the unit by
does
send
this the
signal
untilMe
thebutton
feature
is deactivated
not
receive
Follow
signal
during
anyunit
7 minutes
pressing
thethe
Follow
MeMe
button
again.
If the
does
NOTE:
interval,
theClean
unitFollow
will
to indicate
theany
Follow
not
receive
the
Me signal
7 minutes
Press
the
Airbeep
button,
the during
ion generator
isMe
enermode
ended.
The
on
the remote
control
interval,
the
unithelp
will
beep
to indicate
the
Me
gizedhas
and
will
todisplay
remove
pollen
andFollow
impurities
indicates
at in
the
remote
ONLY.
mode
ended.
on
the
remote
control
from has
thethe
air,temperature
and The
trapdisplay
them
the
filter.
The actualthe
temperature
can
at the unit
indicates
temperature
atbe
thedisplayed
remote ONLY.
by pressing
the Fan Onlycan
mode.
When in at
thethe
Cool
The
actual temperature
be displayed
unit
mode,
the
unit
display
indicates
the
set
temperature.
by pressing the Fan Only mode. When in the Cool
mode, the unit display indicates the set temperature.
High
9
8
8
8
Room Air Conditioner with R-410A
Owner’s Manual
Heat Controller, Inc.
AIR CONDITIONER
AIR CONDITIONER FEATURES (CONTINUED)
DO THIS:
Press Check
Filter button
NOTE:
Press the Clean Air button, the ion generator is
ener
gized and will help to remove pollen and
energized
impurities from the air, and trap them in the filter.
CHECK
FILTER
UP
DOWN
CLEAN
FAN
ON/OFF
FEATURES
Auto
Low
Med
High
ON
OFF
TIMER
Follow me
Additional things you should know
Now that you have mastered the operating procedure, here are more features that
in your control that
you should become familiar with.
The compressor
Cool circuit has an automatic 3 minute time delayed start if the unit is turned off and on again
quickly. This prevents overheating of the compressor and possible circuit breaker tripping.
The fan will continue to run during this time.
2°F
between
(16°C)
90°F (32°C) degress.
The control will maintain any set temperature within 2
F,(1°C),
between
60 60°F
F and
90 Fand
degrees.
The control is capable of displaying temperature in degrees Fahrenheit or degrees Celsius.
To convert from one to the other, press and hold the UP and DOWN Temp/Timer buttons at the
same time, for 3 seconds.
Exhaust Control
CHECK
FILTER
EXHAUST
Closed
ENERGY
SAVER
S
SLEEP
Open
UP
DOWN
CLEAN
MODE
Auto
Cool
Dry
Fan
FAN
ON/OFF
Auto
Low
Med
High
ON
OFF
TIMER
Follow me
This Exhaust Control allows the air conditioner to either circulate inside air (Closed) or exhaust
air to the outside (Open).
The Closed position is used when maximum cooling is desired. It may also be used for air recirculation without cooling when the air conditioner is set in any FAN position.
The Open position removes stale air from the room and exhausts it to the outside. Fresh air is
drawn in through normal passages in the home.
4-Way Louvers
CHECK
FILTER
EXHAUST
Closed
ENERGY
SAVER
S
SLEEP
Open
UP
DOWN
CLEAN
MODE
Auto
Cool
Dry
Fan
FAN
ON/OFF
Follow me
Auto
Low
Med
High
ON
OFF
TIMER
The 4-Way air directional louvers allow you to
direct air flow up or down, left or right throughout
the room as needed. To adjust the air directional
louvers
side-to-side,
handle
as
louvers side-to-side,
useuse
the the
levercenter
until the
desired
you
move
side-to-side.
direction
is it
obtained.
10
9
Room Air Conditioner with R-410A
Heat Controller, Inc.
Owner’s Manual
INSTALLATION INSTRUCTIONS
NOTE: These instructions describe installation in a typical wood framed window with a wood SLIDE
-BY sash, or installation in a metal CASEMENT window. Modification may be necessary when installing
in windows made differently than those shown in these instructions.
,,
A high widow accessory kit is available for window heights up to 62 (1575mm).
Meeting Electrical Requirements
Observe all
and localcodes
Observe
all national
local governing
governing
codes and ordinances.
and
ordinances.
! WARNING
Electrical Shock and Personal Injury Hazard
Electrical ground is required on this appliance.
DO NOT ground to a gas line.
If cold water pipe is interrupted by plastic,
non-metallic gaskets, or other insulating
materials, DO NOT use for grounding.
Check with a qualified electrician if you are
in doubt as to whether the appliance is properly grounded.
DO NOT modify power supply cord plug. If it
does not fit outlet, have a proper outlet
installed by a qualified electrician.
DO NOT have a fuse in the neutral or
grounding circuit. A fuse in the neutral, or
grounding circuit could result in an electrical
shock.
DO NOT use an extension cord with this
appliance.
Do not, under any circumstances,
remove the power supply cord
grounding prong.
NOTE: If codes permit, and a separate grounding
wire is used; it is recommended that a qualified
electrican determine that the grounding path is
adequate and not interrupted by plastic, nonmetallic gaskets, or other insulating materials.
Receptacle wiring
Receptacle wiring should be a minimum of 14
gauge. Use copper wire only. It is your responsibility
to provide proper and adequate receptacle wiring,
installed by a qualified electrician.
Electrical requirements
A time delay fuse or time delay circuit breaker is
also required. A separate circuit, serving only this
appliance, MUST be provided.
Failure to follow these instructions could result
in electrical shock, serious injury, or death.
Preparing for Installation
Installation Tips
For wood-frame casement windows: It may be necessary to construct a frame, using at least
1-inch thick wood, with a 15-1/2-inch wide opening.
For brick or cement building construction: It may be necessary to put a wood stool strip under
AC, for mounting purposes.
Tools Required:
Flat-head screwdriver
Phillips-head screwdriver
Carpenter`s level
Tape measure
Fine tooth saw
Electric or hand drill
10
10
Room Air Conditioner with R-410A
Owner’s Manual
Heat Controller, Inc.
1. Make sure you have all the necessary parts.
Installation kit contents:
1. Platform(1)
2. Support brace(1)
3. Adjustment bolt(1)
4. Hex flange nut -1/4”
1 /(1)4 (1)
5. Track seal(1)
6. Side channel seal(1)
7. Foam seal strip/Sash seal
8. Safety bracket(1)
9.
9-11.Screw-2-1/2
(2), or
10. Screw-1-3/4 (2), or
11. Screw-1 (2)
12. Screw-3/4 (6)
13. Screw-3/4 self-threading(7)
14. Window locking bracket(1)
15. Plastic window panel(1)
16. Side channel(2)
17. Screw-3/8 (6)
18. Panel frame/seal assembly(1)
NOTE: Use scale below to measure length
of your screws. The scale will come in handy
when separating screws for installation.
Identify Screws
By Length
(25mm)
1
(44mm)
134
(63mm)
212
38
34
(10mm) (19mm)
2. Choose a proper sized window, as shown right.
15-1 2 inches minimum width
16-1 4 inches maximum width(for casement
windows)
21-1 4 inches minimum height (with window
panel retainer)
20-5 16 inches minimum height (window panel
retainer removed)
39-7 16 inches maximum height
NOTE: Height measurement must be of a clear opening
above mounting platform. In some cases, due to a variety
of stop and track arrangements, the above dimensions
may vary slightly. If necessary, installation can be made
by alternating window jambs.(See Alternate Window Jamb
Applications.) (continued)
11
11
1
1
2
5
7
16
16
4
Room Air Conditioner with R-410A
Heat Controller, Inc.
1
Owner’s Manual
4
11
16
Alternate screw location
depth)
(depending on the sill
stool
depth)
sill.
Platform tab
Window track
12
12
Window seal
Owner’s Manual
Room Air Conditioner with R-410A
13
13
Heat Controller, Inc.
Heat Controller, Inc.
Room Air Conditioner with R-410A
1 Remove the two front retaining screws from
the front frame.
2. Gently pull the front out and lift up to release
it from the case.
3. Then release the coupler plugs.
14
14
Owner’s Manual
Owner’s Manual
Room Air Conditioner with R-410A
Heat Controller, Inc.
Insert
20. To replace the front
First reconnect the coupler plugs, make the
Exhaust control positioned through the front
in the proper location. Then replace the
retaining screws that holds the panel in place.
Do not push or pull the front panel louvers.
or
3
15
15
4 or 1
3
4 or 1
Heat Controller, Inc.
Room Air Conditioner with R-410A
glass panels must be removed before installation.
16
16
Owner’s Manual
Owner’s Manual
Room Air Conditioner with R-410A
17
17
Heat Controller, Inc.
Heat Controller, Inc.
Room Air Conditioner with R-410A
1 Remove the two front retaining screws from
the front frame.
2. Gently pull the front out and lift up to release
it from the case.
3. Then release the coupler plugs.
16. To replace the front
First reconnect the coupler plugs, make the
Exhaust control positioned through the front
in the proper location. Then replace the
retaining screws that holds the panel in place.
Do not push or pull the front panel louvers.
18
18
Owner’s Manual
Owner’s Manual
Room Air Conditioner with R-410A
Heat Controller, Inc.
CARE
CARE AND
AND CLEANING
CLEANING
CAUTION
WARNING!
CAUTION
Clean
Clean your
your air
air conditioner
conditioner occasionally
occasionally to
to keep
keep itit looking
looking new.
new. Be
Be sure
sure to
to unplug
unplug the
the unit
unit
before
cleaning
to
prevent
shock
or
fire
hazards.
shock or fire hazards.
before cleaning to prevent chock
Air
Air Filter
Filter Cleaning
Cleaning
The air filter should be checked at least once a
month
seeshould
if cleaning
is necessary.
Trapped
The airtofilter
be checked
at least
once a
particles
theiffilter
can build
up and cause
an
month toinsee
cleaning
is necessary.
Trapped
accumulation
frostcan
on the
cooling
particles in theoffilter
build
up andcoils.
cause an
Grasp the filter
by the
center
and coils.
pull up and out.
accumulation
of frost
on the
cooling
Wash
thethe
filterfilter
using
Remove
by liquid
slidingdishwashing
out from thedeterrightgent
warm water. Rinse filter thoroughly.
handand
side.
Gently
shake
from the filter.deterBe
Wash the
filterexcess
using water
liquid dishwashing
sure
is thoroughly
dryfilter
before
replacing.
gent the
andfilter
warm
water. Rinse
thoroughly.
Or,
instead
of washing
you may
Gently
shake
excess water
fromvacuum
the filter.the
Be
filter the
clean.
sure
filter is thoroughly dry before replacing.
104°F
(40°C)
use
wateryou
overmay
40 vacuum
C(104
F)the
to
Note:
Or,Never
instead
of hot
washing
cleanfilter
the clean.
air filter. Never attempt to operate the
unit
without
airhot
filter.
Neverthe
use
water over 40 C(104 F) to
Note:
clean the air filter. Never attempt to operate the
unit
withoutCleaning
the air filter.
Cabinet
Be sure to unplug the air conditioner to prevent
Cabinet
shock or Cleaning
fire hazard. The cabinet and front may
be
an oil-free
cloth or washed
with
Bedusted
sure towith
unplug
the air conditioner
to prevent
ashock
cloth or
dampened
in aThe
solution
of warm
water
fire hazard.
cabinet
and front
may
and
mild liquid
detergent.
Rinse
be dusted
withdishwashing
an oil-free cloth
or washed
with
thoroughly
and wipeindry.
a cloth dampened
a solution of warm water
Never
useliquid
harshdishwashing
cleaners, wax
or polishRinse
on the
and mild
detergent.
cabinet
front.
thoroughly
and wipe dry.
Be
sureuse
to wring
water
the cloth
before
Never
harshexcess
cleaners,
waxfrom
or polish
on the
wiping
cabinetaround
front. the controls. Excess water in or around
the
may cause
to the
conditioner.
Be controls
sure to wring
excessdamage
water from
theair
cloth
before
Plug
in around
air conditioner.
wiping
the controls. Excess water in or around
the controls may cause damage to the air conditioner.
Winter
Plug in airStorage
conditioner.
If you plan to store the air conditioner during the winter,
Winterit Storage
remove
carefully from the window according to the
installation
Cover
it with plastic
return
it
If you plan instructions.
to store the air
conditioner
duringorthe
winter,
to
the original
carton.
remove
it carefully
from the window according to the
installation
instructions.
Cover
it withconnections
plastic or return
NOTE:
To prevent
rust or
electrical
from itbeing
to
the
original
carton.
damaged, store air conditioner in an upright position and in
a dry place.
19
15
19
Room Air Conditioner with R-410A
Heat Controller, Inc.
Owner’s Manual
TROUBLESHOOTING TIPS
Before calling for service, review this list. It may save you time and expense. This list includes common
occurrences that are not the result of defective workman-ship or materials in this appliance.
Problem
Solution
Air conditioner
does not start
Wall plug disconnected. Push plug firmly into wall outlet.
House fuse blown or circuit breaker tripped. Replace fuse with time delay type or
reset circuit breaker.
Plug Current Device Tripped. Press the RESET button.
Control is OFF. Turn Control ON and set to desired setting.
O
Air from unit does
not feel cold
enough
Room temperature below 64°F
17 C(62
F). Cooling may not occur until room temperature
(18°C).
O
O
64°F
(18°C).
rises above 17
C(62
F).
O
Temperature sensing element touching cold coil, located behind air filter. Straighten
tube away from coil.
Reset to a Lower temperature.
Compressor shut-off by changing modes. Wait approximately 3 minutes and listen for
compressor to restart when set in the COOL mode.
Air conditioner
cooling, but room
is too warm- ice
forming on cooling
coil behind
decorative front.
Air conditioner
cooling, but room
is too warm- NO
ice forming on
cooling coil behind
decorative front.
O
O
64°F
(18°C).
Outdoor temperature below 18
C(64
F). To defrost the coil, set FAN ONLY mode.
Air filter may be dirty. Clean filter. Refer to Care and Cleaning section. To defrost,
set to FAN ONLY mode.
Thermostat set too cold for night-time cooling. To defrost the coil, set to FAN ONLY
mode. Then, set temperature to a Higher setting.
Dirty air filter- air restricted. Clean air filter. Refer to Care and Cleaning section.
Temperature is set too High, set temperature to a Lower setting.
Air directional louvers positioned improperly. Position louvers for better air distribution.
Front of units is blocked by drapes, blinds, furniture, etc. - restricts air distribution.
Clear blockage in front of unit.
Doors, windows, registers, etc. Open- cold air escapes. Close doors, windows, registers.
Unit recently turned on in hot room. Allow additional time to remove Stored heat from
walls, ceiling, floor and furniture.
Air conditioner turns on
and off rapidly
Noise when unit is
cooling
Water dripping
INSIDE when
unit is cooling.
Dirty air filter- air restricted. Clean air filter.
Outside temperature extremely hot. Set FAN speed to a Higher setting to bring air past
cooling coils more frequently.
Air movement sound. This is normal . If too loud, set to a slower FAN setting.
Window vibration - poor installation. Refer to installation instructions or check with installer.
rear/outside
allow water
drainage.
Improper installation. Tilt air conditioner slightly to the the
outside
to allowtowater
drainage.
Refer to installation instructions - check with installer.
1520
Owner’s Manual
Problem
Water dripping
OUTSIDE when
unit is cooling.
Remote Sensing
Deactivating
Prematurely
(some models)
Room too cold
Room Air Conditioner with R-410A
Heat Controller, Inc.
Solution
Unit removing large quantity of moisture from humid room. This is normal during
excessively humid days.
Remote control not located within range. Place remote control within 20 feet & 180 ,
radius of the front of the unit.
Remote control signal obstructed. Remove obstruction.
Set temperature too low. Increase set temperature.
16
21
11/2011