1
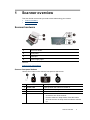
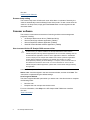
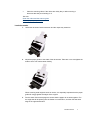
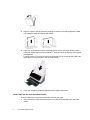
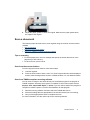
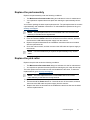
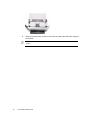
HP Scanjet Professional 3000 Scanner
User Guide
ii
Contents
1 Scanner overview ............................................................................................................ 3
Scanner hardware............................................................................................................. 3
Scanner front panel buttons....................................................................................... 3
Scanner lamp setting ................................................................................................. 4
Scanner software .............................................................................................................. 4
How to scan with the HP Scanjet 3000 scanner driver .............................................. 4
2 Use the scanner............................................................................................................... 5
Load originals ................................................................................................................... 5
Document loading tips ............................................................................................... 5
Load documents ........................................................................................................ 7
Load cards into the auto document feeder ................................................................ 8
Scan a document .............................................................................................................. 9
Tips on scanning........................................................................................................ 9
Scan from the scanner buttons .................................................................................. 9
Scan from TWAIN-compliant scanning software........................................................ 9
3 Useful scanner features................................................................................................ 10
Scan long documents ..................................................................................................... 10
Filter out a color from a document (color channel dropout)............................................. 10
4 Care and maintenance .................................................................................................. 12
Order maintenance and scanning supplies..................................................................... 12
Clean the scanner glass ................................................................................................. 12
Clean the paper path ...................................................................................................... 13
Clean the rollers and pad assembly................................................................................ 14
Replace the pad assembly.............................................................................................. 15
Replace the pick roller .................................................................................................... 15
5 Troubleshooting ............................................................................................................ 17
Basic troubleshooting tips ............................................................................................... 17
Scanner Installation troubleshooting ............................................................................... 18
Check the cables ..................................................................................................... 18
Uninstall and then reinstall the HP Scanjet 3000 scanner driver ............................. 18
Scanner initialization or hardware problems ................................................................... 19
Check the USB connection ...................................................................................... 19
Check that the scanner has power .......................................................................... 20
Reset the scanner.................................................................................................... 20
Scanner has stopped working correctly ................................................................... 20
Scanner operation problems ........................................................................................... 21
Scanner will not turn on ........................................................................................... 21
Scanner lamp stays on ............................................................................................ 22
Scanner does not scan right away........................................................................... 22
Scanner scans only one side of a two-sided page................................................... 22
Scanned image is fuzzy........................................................................................... 22
1
Scanned pages are out of order .............................................................................. 22
Optimize scanning and task speeds ........................................................................ 22
The scan is completely black or completely white ................................................... 23
Scanned images are not straight ............................................................................. 23
Vertical black stripes appear on the scanned image................................................ 23
Scan files are too large ............................................................................................ 23
Scanner buttons are not working correctly...................................................................... 24
Scanner paper path problems......................................................................................... 24
Paper jamming, skewing, misfeeds ......................................................................... 24
Scanning fragile originals......................................................................................... 25
Paper does not feed successfully ............................................................................ 25
Originals are curling up in the scanner output tray................................................... 26
The bottom of the scanned image is cut off ............................................................. 26
The scanned images have streaks or scratches...................................................... 26
An item loaded in the scanner jams repeatedly ....................................................... 26
Clear jams from the scanner paper path.................................................................. 26
6 Product support............................................................................................................. 28
Control of the scanner buttons ........................................................................................ 28
Getting assistance .......................................................................................................... 28
Where to get additional information ................................................................................ 29
HP Scanjet 3000 driver help .................................................................................... 29
Technical resources ................................................................................................. 29
7 Specifications ................................................................................................................ 30
Scanner Specifications ................................................................................................... 30
Environmental specifications .......................................................................................... 31
Regulatory information.................................................................................................... 31
Disposal of Waste Equipment by Users in Private Households in the European Union.. 31
Index.................................................................................................................................... 33
2
1
Scanner overview
This User Guide covers what you need to know about using your scanner.
•
•
Scanner hardware
Scanner software
Scanner hardware
1
Document feeder
2
Front panel
3
USB input
4
Power supply input
See also
Scanner front panel buttons
Scanner front panel buttons
Use the Scan button on the scanner front panel to start a scan.
n
1
2
3
4
o
Button/LED name
Power LED
Cancel
Scan
Power
p
q
Description
Lights up when the scanner is turned on.
Cancels a scan in progress.
Starts a scan.
• Turns on the scanner. Press and hold the button for 3
seconds to turn off the scanner.
• Puts the scanner in sleep mode. Press this button
while the scanner in sleep mode to wake the scanner
up.
Scanner overview
3
See also
Useful scanner features
Scanner lamp setting
The scanner lamp turns off after each scan. After about 15 minutes of inactivity, the
scanner automatically enters its Sleep (Power Save) mode. To start a scan when the
scanner is in Sleep mode, simply press the Power button or load originals into the
document feeder.
Scanner software
The scanner comes with an assortment of scanning and document-management
programs, including:
•
HP Scanjet 3000 scanner driver (TWAIN and WIA))
•
Nuance OmniPage software application (TWAIN)
•
Nuance PaperPort software application (TWAIN)
•
NewSoft Presto! BizCard software application (TWAIN)
How to scan with the HP Scanjet 3000 scanner driver
To start a scan, you need to install the HP Scanjet 3000 scanner driver and the
TWAIN-compliant scanning software applications. HP recommends installing all of the
bundled software applications. Start one of the applications. Select the TWAIN data
source to display the HP Scanjet 3000 TWAIN user interface. (Different applications
provide different methods for displaying the TWAIN user interface. It is often
accomplished by selecting "Scanner Settings" or "Acquire".) Click the Scan button on
the TWAIN user interface to start a scan. For more information on how to use the
TWAIN-compliant software application, please refer to the Software Help provided by
the application.
Use the HP Scanjet 3000 TWAIN user interface to start a scan:
Start a scan: Load the original in the auto document feeder, and then click Scan. The
scan will be completed using the default settings.
Scan Progress Window
The Scan Progress Window opens when you start a scan. Use this window to complete
the following tasks:
•
Cancel a scan.
•
Complete the scan and process the document
For more information, click Help on the HP Scanjet 3000 TWAIN user interface.
See also
Scan a document
4
HP Scanjet 3000 Scanner
2
Use the scanner
The following topics describe the HP Scanjet scanner as well as how to scan an
original document.
•
Load originals
•
Scan a document
Load originals
For helpful information on loading your documents properly, refer to the following topics.
•
Document loading tips
•
Load documents
•
Load a card into the auto document feeder
Document loading tips
•
Be sure that your documents are within these guidelines:
Width:
74 mm to 216 mm (2.9 in to 8.5 in)
Length:
52 mm to 864 mm (2.1 in to 34 in)
Weight:
50 g/m2 to 120 g/m2 (13.3 to 32 lb)
•
In the HP Scanjet 3000 TWAIN user interface, set the page size to match the width
and length of the paper that you are scanning.
•
The scanner auto document feeder can process cards that meet the following
specifications:
Minimum size:
74 mm x 52 mm (2.9 in x 2.1 in)
Maximum size:
210 mm x 269 mm (8.3 in x 10.6 in)
Minimum weight:
50 g/m (13.3 lbs)
Maximum weight:
120 g/m (32 lbs)
2
2
Use the scanner
5
•
Scanning the following types of documents might result in paper jams or damage to
the documents.
Wrinkled or creased
documents
Curled documents
Torn documents
Documents with paper
clips or staples
Carbon paper
Coated paper
Extremely thin,
translucent paper
Paper with adhesive
notes or flags attached
Photos
Overhead transparencies
Papers that are stuck
together
Paper with wet
substances such as glue
or correction fluid
How to avoid paper jams
•
•
•
Smooth out any folds or curls in your documents before placing them into the
auto document feeder. If the leading edge of a document is curled or folded,
it may cause a paper jam.
When loading paper that is smaller than 74 mm (2.9 in) in one dimension
(such as business cards), place the pages with the long side parallel to the
paper guides.
To scan fragile documents (such as photos or documents on wrinkled or very
lightweight paper), place the document in a clear, heavyweight document sleeve
no wider than 216 mm (8.5 in) before loading them into the auto document
feeder.
TIP: If you do not have an appropriately-sized document sleeve, consider
using a sleeve intended for use in a ring binder. Trim the ring-side edge so the
sleeve is no more than 216 mm (8.5 in) wide.
•
Make sure that the hatch on the document feeder is securely latched. To properly
close the hatch, press until you hear a click.
•
Adjust the paper guides to the width of the documents. Make sure that the paper
guides touch the edges of the original. If there is any clearance between the
paper guides and the edges of the documents, the scanned image might be
skewed.
When placing a stack of documents into the feeder, gently set the stack in the
document feeder. Do not drop the stack into the feeder and do not tap the top
edge of the stack after you have placed the stack in the document feeder.
•
6
HP Scanjet 3000 Scanner
•
Clean the scanning rollers if the rollers are visibly dirty or after scanning a
document that has pencil writing on it.
See also
Clean the rollers and the scanner glass
Scanner paper path problems
Load documents
1.
Unfold the document feeder extension and the output tray extension.
2.
Adjust the paper guides to the width of the documents. Take care not to overtighten the
guides, which can restrict paper feeding.
When scanning small originals such as checks, it is especially important that the paper
guides fit snugly against the edges of the original.
3.
Fan the stack of document pages to ensure that the pages do not stick together. Fan
the edge that will be pointing into the feeder in one direction, and then fan that same
edge in the opposite direction.
Use the scanner
7
4.
Align the edges of the documents by tapping the bottom of the stack against the table
top. Rotate the stack 90 degrees and repeat.
5.
Load your single-side documents face down with the top of the pages pointing down.
Load your double-side documents with the 1st page face down and the top of the pages
pointing down.
For best results, do not drop the stack into the feeder and do not tap the top edge of the
stack after you have placed it in the document feeder.
6.
Verify that the paper guides are aligned with the edges of the stack.
Load cards into the auto document feeder
To load a card into the auto document feeder, follow these steps:
1.
8
Place the stack of cards face down with the long dimension parallel to the document
feeder.
HP Scanjet 3000 Scanner
2.
Adjust the paper guides to center the original. Make sure the paper guides touch
the edges of the original.
Scan a document
The following topics describe how to scan originals using the scanner and the scanner
software.
• Tips on scanning
• Scan from the scanner button
• Scan from TWAIN-compliant scanning software
Tips on scanning
• To reduce paper jams, use scan settings that specify the actual dimensions of the
page that you are scanning.
• To cancel a scan, press Cancel.
Scan from the scanner buttons
To scan using the scanner buttons, follow these steps:
1.
2.
Load the originals.
Press the Scan button to start a scan. The Scan Progress Window will be displayed
and the scanned image will be saved in a default location or a user defined location.
Scan from TWAIN-compliant scanning software
You can scan an image or document directly into a software program if the program is
TWAIN compliant. Generally, the program is compliant if it has a menu option such as
Acquire, Scan, Import New Object, or Insert. If you are unsure whether the program is
compliant or what the option is, see the documentation for that program.
1.
2.
3.
Start the scanning software, and then select the TWAIN data source.
Select the settings that are appropriate for the documents that you are scanning.
Carry out the appropriate actions to complete the scan.
For more information, see the online help for the scanning software.
Use the scanner
9
3
Useful scanner features
Experienced document management professionals might be interested in the
following scan features. These features are available from any document
TWAIN application that allows you to modify the scan settings in its user interface.
•
•
Scan long documents
Filter out color from a document (color dropout)
Scan long documents
By default, the HP Scanjet 3000 scanner accepts originals up to 216mm x 356 mm
(8.5 in x 14 in). You can choose to scan a single page up to 216 mm x 864 mm (8.5 in
x 34 in).
NOTE: To scan pages longer than 355mm(14 in), select Long Page in the
Scan size option from the Paper tab of the HP Scanjet 3000 TWAIN user
interface. Be sure to enter the width and length of your long document or the
scanner will scan a maximum length of 34".
To enable long-page scan in HP Scanjet 3000 TWAIN user interface, follow these
steps:
1. Open your TWAIN-compliant software application.
2. Select your TWAIN data source. Different applications provide different methods
for displaying the TWAIN user interface. It is often accomplished by selecting
"Scanner Settings" or "Acquire". The HP Scanjet 3000 TWAIN user interface will
be displayed.
3. Press the Paper tab, choose Custom from the Cropping drop-down list.
4. Choose Long Page from the Scan Size drop-down list.
5. Enter your width and length in the Size option.
6. Choose your measurement system from the Unit drop-down list box.
NOTE: Some scanning and destination software might not support all of the
page sizes that the scanner accepts.
NOTE: HP recommends scanning long page individually at a resolution of
300 dpi or lower.
Filter out a color from a document (color channel dropout)
With HP Scanjet 3000, you can filter out a color channel (red, green, or blue).
Removing colors from the scan might reduce the scan file size and improve optical
character recognition (OCR) results.
To select colors to eliminate from a scan in the HP Scanjet 3000 TWAIN user interface,
follows these steps:
10
HP Scanjet 3000 Scanner
1.
2.
Start the scanning software, and then select the TWAIN data source.
On the TWAIN user interface, press the Color Dropout tab, choose the color
channel you wish to remove from the Color drop-down list.
For information about the color dropout settings, see the online help for the scanning
software that you are using.
NOTE: The color channel filter only applies to grayscale scans and to black
and white scans.
Useful scanner features
11
4
Care and maintenance
This section presents information about how to care for and maintain the scanner.
•
•
•
•
•
•
Order maintenance and scanning supplies
Clean the scanner glass
Clean the paper path
Clean the rollers and pad assembly
Replace the pad assembly
Replace the pick roller
Occasional cleaning of the scanner helps ensure high-quality scans. The amount of
care necessary depends upon several factors, including the amount of use and the
environment. You should perform routine cleaning as necessary.
CAUTION: Before placing an item in the auto document feeder, make sure that
the item does not contain wet glue, correction fluid, or other substances that can
be transferred to the interior of the scanner.
Make sure there are no curls, wrinkles, staples, paper clips, or any other attached
material.
Order maintenance and scanning supplies
You can purchase maintenance parts for your scanner.
1. Visit the HP scanner parts Web site at www.hp.com/buy/parts
2. Select your language, and then click the arrow.
Clean the scanner glass
Both strips of glass in the scanner should be cleaned periodically. The two small strips of
gray reflective material should be lightly dusted if debris is present.
To clean the strips of glass, follow these steps:
1. Press and hold the Power button for 3 seconds to turn off the scanner, and then
disconnect the USB cable and power supply from the scanner.
2. Open the scanner hatch.
3. Clean the glass by using a soft, lint-free cloth that has been sprayed with a mild glass
cleaner.
CAUTION: Use only glass cleaner to clean the scanner glass. Avoid cleaners
that contain abrasives, acetone, benzene, and carbon tetrachloride, all of which
can damage the scanner glass. Avoid isopropyl alcohol because it can leave
streaks on the glass.
Do not spray the glass cleaner directly on the glass. If too much glass cleaner is
applied, the cleaner could leak under the glass and damage the scanner.
12
HP Scanjet 3000 Scanner
4.
5.
6.
Dry the glass with a dry, soft, lint-free cloth.
With a light touch, dust the two small strips of gray reflective material with a dry, soft,
lint-free cloth.
Close the scanner hatch, and then reconnect the USB cable and power supply to the
scanner.
Clean the paper path
If the scanned images have streaks or scratches, use the HP paper-path cleaning cloth to
clean the paper path.
NOTE:
If you experience repeated document jams, clean the rollers.
To clean the paper path, follow these steps.
1. Open the sealed HP paper-path cleaning cloth container, starting at the notch. Take
care not to tear the cleaning cloth.
2. Remove the cleaning cloth and unfold it.
3. Place the unfolded cloth into the document feeder.
4.
Press the Scan button on the scanner to feed the cloth through the scanner.
CAUTION: Wait two minutes for the components to dry before inserting
paper into the document feeder.
5.
Place up to five pages of printed paper in the scanner. Scan and view the results.
Care and support
13
6.
If streaks still appear, repeat steps 3 through 4. The cleaning cloth can be cycled
through the scanner up to five times within 30 minutes. After that the cloth will dry
out.
If repeated cycling of the cleaning cloth does not remove the streaks from the
scanned image, clean the rollers.
Clean the rollers and pad assembly
Clean the rollers and pad assembly on the following conditions:
•
As a guideline, clean the rollers and pad assembly after every 5,000 scans. Note that
this guideline might vary based on the type of documents you are scanning.
•
Cleaning the paper path did not remove the streaks or scratches from the scanned
images.
•
You experience repeated document jams.
To clean the rollers, follow these steps:
1. Press and hold the Power button for 3 seconds to turn off the scanner, and then
disconnect the USB cable and power supply from the scanner.
2. Open the scanner hatch.
3. Remove any visible lint or dust from the rollers and pad assembly using either
compressed air or a clean lint-free cloth moistened with isopropyl alcohol.
4.
5.
1
Pad assembly
2
Rollers
Close the scanner hatch, and then reconnect the USB cable and power supply to the
scanner.
Press the Power button to turn on the scanner.
CAUTION: When cleaning the pad assembly, take care to prevent the cloth
from catching on the metal parts.
14
HP Scanjet 3000 Scanner
Replace the pad assembly
Replace the pad assembly under the following conditions:
•
The Maintenance Recommended dialog box indicates it is due for maintenance.
•
You experience repeated document jams and cleaning the pad assembly did not
help.
Your scanner package includes a pad replacement kit. The pad replacement kit contains
a pad assembly and installation instructions. To order additional replacement kit, go to
www.hp.com/support.
NOTE: The pad replacement kit is a consumable and is not covered under
warranty or standard service agreements.
To replace the pad assembly, follow these steps:
1. Press and hold the Power button for 3 seconds to turn off the scanner, and then
disconnect the USB cable and power supply from the scanner.
2. Replace the pad as described in the installation instructions that were included
with the replacement kit.
3. Close the scanner hatch, and then reconnect the USB cable and power supply to
the scanner.
NOTE:
scans.
HP recommends that you replace the pad assembly every 30,000
Replace the pick roller
Replace the pick roller under the following conditions:
•
The Maintenance Recommended dialog box indicates it is due for maintenance.
•
You experience repeated document jams and cleaning the pick roller did not help.
The roller replacement kit contains a roller and installation instructions. To order the
replacement kit, go to www.hp.com/support.
NOTE: The roller replacement kit is a consumable and is not covered
under warranty or standard service agreements.
To replace the rollers, follow these steps:
1. Press and hold the Power button for 3 seconds to turn off the scanner, and then
disconnect the USB cable and power supply from the scanner.
2. Replace the rollers as described in the installation instructions that were included
with the replacement kit.
Care and support
15
3.
Close the scanner hatch, and then reconnect the USB cable and power supply to
the scanner.
NOTE:
scans.
16
HP recommends that you replace the pick roller every 100,000
HP Scanjet 3000 Scanner
5
Troubleshooting
This section contains solutions for common problems with the scanner.
•
•
•
•
•
•
Basic troubleshooting tips
Scanner installation troubleshooting
Scanner initialization or hardware problems
Scanner operation problems
Scanner buttons are not working correctly
Scanner paper path problems
For additional troubleshooting, press the Help button of the HP Scanjet 3000 TWAIN
user interface.
Basic troubleshooting tips
Simple issues such as smudges on the scanner glass or loose cables can cause your
scanner to produce fuzzy scans, operate in an unexpected manner, or fail to operate.
Always check the following items when you encounter scanning problems.
•
If scans are fuzzy, check to see if the glass strips inside the document feeder are
dirty or smudged. If so, clean the glass strips.
•
If you are scanning a document for OCR (Optical Character Recognition), the text must
be clear and legible to enable good OCR results.
•
Make sure that the USB and power cables are firmly seated in their respective
connectors on the back of the scanner, and that the power cord is plugged into a
working electrical outlet.
•
If you have connected the scanner to the computer through a USB hub or through a
USB port on the front of the computer, disconnect the scanner and then reconnect it
to a USB port on the back of the computer.
•
Make sure that the scanner buttons are enabled.
•
Turn off the scanner, wait 60 seconds, and then turn on the scanner.
•
Make sure the scanner latch is closed.
•
Restart the computer.
If you continue to have problems, it is possible that your HP scanner firmware, or
associated driver are out of date or have become corrupted. See www.hp.com/support to
locate firmware, and driver updates for your scanner.
See also
•
•
•
•
•
Clean the rollers and pad assembly
Reset the scanner
Check that the scanner has power
Check the cables
Scanner front panel buttons
Troubleshooting
17
Scanner Installation troubleshooting
If the scanner does not work after installation, you might see a message on the
computer screen that is similar to one of the following:
y
The computer cannot communicate with the scanner. To fix the problem, check
the scanner cables and software as described here.
y
The scanner could not be initialized.
y
The scanner could not be found.
y
An internal error has occurred.
y
The computer cannot communicate with the scanner.
To fix the problem, check the scanner cable and software as described here.
•
Check the USB cable.
•
Uninstall and then reinstall the HP Scanjet 3000 scanner driver.
Check the cables
Cable type
Action
Power cable
The power cable is connected between the scanner and a power
outlet.
•
Ensure that the power cable is securely connected between the
scanner and a live electrical outlet or surge protector.
•
If the power cable is connected to a surge protector, ensure
that the surge protector is plugged into an outlet and turned on.
•
Press and hold the Power button for 3 seconds to turn off the
scanner and turn off the computer. After 60 seconds, turn the
scanner back on and then turn on the computer, in that order.
USB cable
The USB cable is connected between the scanner and the
computer.
y
Use the cable that was included with the scanner.
Another USB cable might not be compatible with the
scanner.
y
Ensure that the USB cable is securely connected
between the scanner and the computer. The trident
icon on the USB cable faces up when the cable is
properly connected to the scanner.
y
If the USB cable is connected to a USB port on the
front of the computer, move it to a USB port on the
back of the computer.
For additional USB troubleshooting information, see
www.hp.com/support, select your country/region, and then use the
search tool to find USB troubleshooting topics.
Uninstall and then reinstall the HP Scanjet 3000 scanner driver
If checking the scanner cable connection did not solve the problem, the problem might
have occurred because of an incomplete installation. Try uninstalling and then
reinstalling the HP Scanjet 3000 scanner driver.
1. Press and hold the Power button for 3 seconds to turn off the scanner, and then
disconnect the USB cable and power cable from the scanner.
18
HP Scanjet 3000 Scanner
2.
3.
4.
5.
Use the Add/Remove tool (in Windows Vista or Windows 7, the Programs and
Features tool) from the Control Panel to uninstall the HP Scanjet 3000 scanner
driver.
Restart the computer.
Use the HP Software CD that came with the scanner to reinstall the HP Scanjet 3000
scanner driver.
Reconnect the USB cable and power cable to the scanner, and then press the
Power button to turn on the scanner.
Scanner initialization or hardware problems
•
•
•
•
Check the USB connection
Check that the scanner has power
Reset the scanner
Scanner has stopped working correctly
Check the USB connection
Check the physical connection to the scanner.
•
Use the cable that was included with the scanner. Another USB cable might not be
compatible with the scanner.
•
Ensure that the USB cable is securely connected between the scanner and the
computer. The trident icon on the USB cable faces up when the cable is properly
connected to the scanner.
If the problem persists after verifying the above items, try the following:
1. Do one of the following tasks depending on how the scanner is connected to the
computer:
• If the USB cable is connected to a USB hub or a docking station for a laptop,
disconnect the USB cable from the USB hub or the docking station, and
then connect the USB cable to a USB port on the back of the computer.
• If the USB cable is directly connected to the computer, plug it into another
USB port on the back of the computer.
• Remove all other USB devices from the computer except for the keyboard
and the mouse.
2. Press and hold the Power button for 3 seconds to turn off the scanner, wait 30
seconds, and then press the Power button to turn on the scanner.
3. Restart the computer.
4. After the computer has restarted, try using the scanner.
• If the scanner works, reconnect any additional USB devices one at a time; try
the scanner after connecting each additional device. Disconnect any USB
devices that prevent the scanner from working.
• If the scanner does not work, uninstall and then reinstall the HP scanner driver.
See also
Uninstall and then reinstall the HP Scanjet 3000 scanner driver
Troubleshooting
19
Check that the scanner has power
The power cable is connected between the scanner and a power outlet.
•
Ensure that the power cable is securely connected between the scanner and a live
electrical outlet.
•
If the power cable is connected to a surge protector, ensure that the surge protector
is plugged into an outlet and turned on.
If the problem persists after verifying the above items, follow these steps:
•
Press and hold the Power button for 3 seconds to turn off the scanner, and then
disconnect the power cable from the scanner.
•
Wait 30 seconds.
•
Reconnect the power cable to the scanner, and then press the Power button to turn
on the scanner.
See also
Check the cables
Reset the scanner
If you receive an error message similar to Scanner initialization failed or Scanner
not found when trying to use the scanner, you should reset the scanner. To reset the
scanner, follow these steps:
1. Close your TWAIN-compliant software, if it is open.
2. Disconnect the USB cable that connects the scanner to the computer.
3. Turn the computer off, wait 60 seconds, and then turn on the computer.
4. Reconnect the USB cable to a USB port on the back of the computer.
• Make sure that the USB cable is connected to the back of the scanner
correctly. The trident icon on the USB cable faces up when the cable is
properly connected to the scanner.
• Try connecting the USB cable to a different USB port on the back of the
computer.
Scanner has stopped working correctly
If the scanner stops scanning, follow these steps. After each step, start a scan to see
if the scanner is working. If the problem persists, proceed with the next step.
1.
A cable might be loose. Ensure that both the USB cable and power supply are
properly connected.
Use the cable that was included with the scanner. Another USB cable might
not be compatible with the scanner.
2.
Ensure that the scanner is receiving power.
a. Check that the green LED on the power supply case is on.
b. If the green LED is not on, ensure that power is available to the power
outlet or surge protector that the power supply is plugged into.
c. If power is available to the power outlet or surge protector but the green
LED is still not on, the power supply might be defective. Contact
www.hp.com/support for assistance.
20
HP Scanjet 3000 Scanner
3.
4.
Unplug the power cable from the power source, wait 60 seconds, and then
plug it back in.
Restart your computer.
Use the Windows Device Manager tool to verify that the computer recognizes
the scanner.
•
•
5.
6.
7.
8.
9.
Windows 2000/XP/XP, 64 bit: The Windows Device Manager tool is
available on the Hardware tab of the Systems tool in the Control Panel.
Vista/Vista, 64 bit/Windows 7: If you have the categorized Control Panel
view, select Control Panel, select Hardware and Sound, and then select
Device Manager. If you have the Classic view, select Control Panel,
then select Device Manager.
Disconnect the USB cable.
Restart your computer.
Use the Add/Remove tool (in Windows Vista or Windows 7, the Programs and
Features tool) from the Control Panel to uninstall the HP Scanjet 3000 scanner
driver.
Reinstall using the HP Software CD that came with your scanner.
Reconnect the USB cable and power cable to the scanner, and then press the
Power button to turn on the scanner.
Scanner operation problems
•
•
•
•
•
•
•
•
•
•
•
Scanner will not turn on
Scanner lamp stays on
Scanner does not scan right away
Scanner scans only one side of a two-sided page
Scanned image is fuzzy
Scanned pages are out of order
Optimize scanning and task speeds
The scan is completely black or completely white
Scanned images are not straight
Vertical black strips appear on the scanned image
Scan files are too large
Scanner will not turn on
If the scanner will not turn on when you press the Power button on the front panel, check
the following:
•
The scanner may have been unplugged. Check to see that the power supply has not
become disconnected from the scanner or unplugged from the power source.
•
The power supply may not be working.
°
Check that the green LED on the power supply case is on.
°
If the green LED is not on, ensure that power is available to the power outlet or
surge protector that the power supply is plugged into.
°
If power is available to the power outlet or surge protector but the green LED is
still not on, the power supply might be defective. Contact the manufacturer of
your computer for assistance.
Troubleshooting
21
Scanner lamp stays on
The scanner lamp turns off after each scan. After about 15 minutes of inactivity, the
scanner automatically enters its Sleep (Power Save) mode.
If the scanner lamp remains on after a long period of inactivity, turn off the scanner, wait
30 seconds, and then turn the scanner back on.
Scanner does not scan right away
Make sure the scanner hatch is closed, and that the scanner is turned on.
If the scanner is in sleep mode, press the Power button to wake the scanner up.
Scanner scans only one side of a two-sided page
Verify the TWAIN-compliant application supports duplex scanning and that the duplex
option has been selected.
Scanned image is fuzzy
y
y
Verify that the original document is not fuzzy.
Check for any obstructions in the scanner paper path and make sure the paper width
guides are positioned appropriately. Try another scan.
y
Clean the glass strips inside the scanner.
See also
Clean the scanner glass
Scanned pages are out of order
•
•
•
•
Verify that the page order of the original document is correct before inserting into the
document feeder.
Make sure that there are no staples, paper clips, or any other attached material
(such as adhesive notes) that may cause the pages to feed incorrectly.
Verify that pages are not stuck together.
Place the first page of a multiple page document toward the back of the document
feeder.
Optimize scanning and task speeds
Several settings influence the total time for a scanning job. When you want to optimize
scanning performance, consider the following information.
y To optimize performance, make sure your computer meets the recommended
system requirements. To view minimum and recommended system requirements,
see www.hp.com, select your country/region, search on your scanner model, and
then search on datasheet.
y
In the scanning software, choose the layout setting that matches the orientation of
the originals in the document feeder.
y
If you are scanning to editable text, the optical character recognition (OCR) software
requires more processing time than for non-OCR scans, which is normal. Wait for
the item to scan.
22
HP Scanjet 3000 Scanner
NOTE: For the best OCR results, scanner compression should be set to a
low compression level or disabled. Resolution should be set to 300 ppi (dpi)
for English and European languages and 400 ppi (dpi) for Chinese or Korean
character recognition.
y
Scanning at a higher resolution than necessary increases scanning time and
creates a larger file with no additional benefit. If you are scanning at a high
resolution, set the resolution to a lower level to increase scanning speed.
See also
Scan files are too large
The scan is completely black or completely white
The item might not be placed correctly in the document feeder. Make sure that the item
you are trying to scan is placed face down.
Scanned images are not straight
Verify that the document feeder guides are centered on the scanner and set to an
appropriate width for the original being scanned. Make sure the paper guides touch the
edges of the original. In addition, the application used for scanning may support "deskew" to
straighten the scanned images. Note that performance may be negatively affected but the
results may be superior.
Vertical black stripes appear on the scanned image
There is dirt on the scanner glass. Clean the scanner glass.
See also
Clean the scanner glass
Scan files are too large
If the saved scan files are very large, try the following:
•
Verify the scan resolution setting:
°
200 dpi is sufficient for storing documents as images.
°
For most fonts, 300 dpi is sufficient for using optical character recognition
(OCR) to create editable text.
°
For Asian fonts and small fonts, 400 dpi is the recommended resolution.
Scanning at a higher resolution than necessary creates a larger file with no additional
benefit.
•
Color scans create larger files than do black and white scans.
•
If you are scanning a large number of pages at one time, consider scanning fewer
pages at a time to create more smaller files.
•
Most scanning applications allow users to control the compression used for output
files. Refer to the documentation for the scanning application for more information.
Troubleshooting
23
Scanner buttons are not working correctly
After each step, press a button to see if it is working correctly. If the problem persists,
proceed with the next step.
1.
2.
A cable might be loose. Ensure that the USB cable is securely connected.
The HP Scanjet Button Utility might have been used to disable the buttons. If so, use
the HP Scanjet Button Utility to re-enable the button. (The HP Scanjet Button Utility
is part of the scanner driver. When the HP Scanjet 3000 driver is successfully
installed, the HP Scanjet Button Utility icon will be displayed at the bottom-right
corner of your system tray.)
3. Press and hold the Power button for 3 seconds to turn off the scanner, wait 30 seconds,
and then press the Power button to turn the scanner back on.
4. Restart your computer.
5. If the problem persists, the buttons might be disabled outside of the HP Scanjet
Button Utility. Try the following procedure:
a. Open Control Panel, select Scanners and Cameras (In Windows 7, the
Devices and Printers tool), and then select your scanner model from the list.
b. Display the scanner properties:
y Windows 2000: Click Properties.
y Windows XP and Vista: Right-click your scanner model, and then click
Properties.
c. Examine the buttons setting for your scanner:
• Windows 2000: Ensure that the Disable Device Events option is not
selected.
• Windows XP, Vista, and 7: Ensure the Take No Action option is not
selected.
d. Make sure that the application selected for the scan button is installed and
functioning on your system.
See also
HP Scanjet 3000 scanner driver
Scanner paper path problems
y
y
y
y
y
y
y
y
Paper jamming, skewing, misfeeds
Scanning fragile originals
Paper does not feed successfully
Originals are curling up in the scanner output tray
The bottom of the scanned image is cut off
The scanned images have streaks or scratches
An item loaded in the scanner jams repeatedly
Clear jams from the scanner paper path
Paper jamming, skewing, misfeeds
y
24
Check that all rollers are in place and that the roller doors and scanner hatch are
closed.
HP Scanjet 3000 Scanner
y
y
y
y
y
If the page looks skewed as they feed into the scanner paper path, check the
resulting scanned image in the software to ensure that it is not skewed.
The pages might not be placed correctly. Straighten the pages and adjust the paper
guides to center the stack.
The paper guides must be touching the sides of the paper stack to work properly.
Please ensure that the paper stack is straight and the guides are against the paper
stack.
The document feeder or output tray might contain more than the maximum number of
pages. Load fewer pages in the document feeder, and remove pages from the output
tray.
Clean the scanner paper path to help reduce misfeeds. If misfeeds still occur, clean
the rollers. If misfeeds still occur, replace the rollers.
See also
y Document loading tips
y Clean the paper path
y Clean the rollers
y Replace the pick roller
Scanning fragile originals
To safely scan fragile originals (photographs or documents on wrinkled or very lightweight
paper) place originals in a clear, heavyweight document sleeve that is no more than 216
mm (8.5 in) wide before inserting into the document feeder.
TIP: If you do not have an appropriately-sized document sleeve,
consider using a sheet protector intended for use in a ring binder. Trim the
ring-side edge so the sleeve is no more than 216 mm (8.5 in) wide.
Paper does not feed successfully
Re-load the pages into the document feeder, ensuring that it makes contact with the
rollers.
The scanner hatch might not be securely latched. Open the scanner hatch and then
close it by pressing firmly.
A problem with the scanner hardware might exist. Follow this procedure to test the
scanner:
1. Ensure that the power supply is securely connected between the scanner and a live
electrical outlet or surge protector. Check that the green LED on the power supply case
is on to verify that the power supply is functional.
2. If the power supply is connected to a surge protector, ensure that the surge
protector is plugged into an outlet and turned on.
3. Disconnect the power supply from the scanner and turn off the computer. After 60
seconds, reconnect the power supply to the scanner and then turn on the computer,
in that order.
4. Try to rescan.
See also
Clean the rollers
Replace the pick roller
Troubleshooting
25
Originals are curling up in the scanner output tray
Under dry conditions, lightweight originals such as those printed on carbonless copy
paper may curl in the output tray. To minimize curl, flatten curled edges on the originals
before placing them in the document feeder. If you cannot flatten curled edges, make
sure the curled edges are facing down when you place the originals in the document
feeder.
The bottom of the scanned image is cut off
By default, the scanning software can scan media that is up to 356 mm (14 in) long. For
longer pages, the end of the document is not included in the scanned image.
Verify that you have specified an appropriate page size in the scanning software.
See also
Scan long documents
The scanned images have streaks or scratches
After each step, try another scan to see if the streaks or scratches are still apparent. If so,
then try the next step. For information on cleaning the scanner, see the Care and
maintenance section.
y Check that the originals are clean and unwrinkled.
y Clean the glass strips inside the document feeder.
y Clean the rollers.
See also
Care and maintenance
An item loaded in the scanner jams repeatedly
y
y
y
The item might not meet the guidelines for acceptable originals.
The item might have something on it, such as staples or self-adhesive notes on the
original that must be removed.
Make sure the paper guides touch the edges of the original.
See also
Load originals
Clear jams from the scanner paper path
To clear a paper jam:
1.
2.
26
Open the scanner hatch.
Remove the originals or any obstructions from the paper path.
HP Scanjet 3000 Scanner
3.
4.
5.
6.
7.
Smooth out any wrinkles caused by the jam.
Remove any debris (paper, staples, clips, etc.) that you see in the paper path.
Close the scanner hatch until it snaps into place.
Reload the unscanned originals in the document feeder.
Resume scanning.
See also
y Clean the rollers and pad assembly
y Document loading tips
Troubleshooting
27
6
Product support
Accessibility options on this scanner include the ability to enable and disable
scanner buttons.
See also
Control of the scanner buttons
Getting assistance
Where to get additional information
Control of the scanner buttons
To prevent buttons from being pushed accidentally, you can disable the buttons on the
scanner front panel.
When the buttons are disabled, you always start scans from the computer using scanning
software. You can press the Cancel ( ) button on the scanner front panel to stop a scan
and press the Power button to put the scanner into Power Save mode.
To turn off the scanner buttons, follow these steps:
1. After the HP Scanjet 3000 scanner driver has been installed successfully,
the HP Button Utility icon will be displayed on the bottom-right corner of
your system tray.
2. Right-click the HP Button Utility icon and check Disable. To enable scanner buttons,
uncheck Disable.
Getting assistance
In order to get the best results from your HP product, please consult the following HP
support offerings:
1. Review the troubleshooting chapter in this guide.
2. See the HP online support website at www.hp.com/support, or contact your point
of purchase. HP online support is available to all HP customers. It is the fastest
source for up-to-date product information and expert assistance, including the
following features:
y Online chat and email access to qualified online support specialists
y Software, firmware, and driver updates for your product
y Valuable product and troubleshooting information for technical issues
y Proactive product updates, support alerts, and HP newsletters (available
when you register your product)
3. HP support by phone
y
Support options and fees vary by product, country/region, and language.
y
Fees and policies are subject to change without notice. Please see
www.hp.com/support for the latest information.
4. Post-warranty period
After the limited warranty period, help is available online at www.hp.com/support.
5. Extending or upgrading your warranty
If you would like to extend or upgrade the product’s warranty, please contact your
point of purchase or see the HP Care Pack Services at www.hp.com/support.
28
HP Scanjet 3000 Scanner
6.
If you already purchased an HP Care Pack Service, please check the support
conditions in your contract.
Where to get additional information
There are several sources of information that describe using the scanner and the
scanning software.
HP Scanjet 3000 driver help
The HP Scanjet 3000 Scanner Driver Help explains how to use HP Scanjet 3000
scanner driver features such as removing color and changing basic scanning
settings.
To open HP Scanjet 3000 Scanner Driver Help, follow these steps:
1.
Start your TWAIN-compliant scanning software application.
2.
Select the HP Scanjet 3000 TWAIN data source. Different applications
provide different methods for displaying the TWAIN user interface. It is often
accomplished by selecting "Scanner Settings" or "Acquire". The HP Scanjet
3000 TWAIN user interface will be displayed.
3.
Click the help button (the question mark in the upper right corner of the title
bar) or press the F1 function key.
Technical resources
See www.hp.com/support for updated information about the scanner.
Product support
29
7
Specifications
This section contains regulatory information and product specifications for your
scanner.
Scanner Specifications
Name
Description
Scanner type
Duplex sheetfed scanner
Size
Width: 285 mm (11.22 in), Depth: 157 (6.18), Height: 163 mm
(6.42 in)
Weight
2.5 kgs
Scanning element
Contact image sensor (CIS)
Interface
USB 2.0 high speed (compatible with USB 1.1)
Optical resolution
600 x 600 dpi hardware
Power consumption
For power consumption information, see the
regulatory_supplement.pdf file on the HP Scanning Software
CD.
Energy information
Hewlett-Packard printing and imaging equipment marked with
®
the ENERGY STAR logo is qualified to the U.S. Environmental
Protection Agency’s ENERGY STAR specifications for imaging
equipment. The following mark will appear on ENERGY STAR
qualified imaging products:
Additional ENERGY STAR qualified imaging product model
information is listed at: http://www.hp.com/go/energystar
System
requirements
30
HP Scanjet 3000 Scanner
To view minimum and recommended system requirements, go
to www.hp.com, select your country/region, search on your
scanner model, and then search on datasheet.
Document specifications
Name
Description
Minimum paper size
74 x 52 mm (2.9 x 2.1 in)
Maximum paper size
215.9 x 864 (8.5 x 34 in)
Minimum paper weight
50 g/m (13.3 lbs)
Maximum paper weight
120 g/m (32 lbs)
2
2
Environmental specifications
Name
Description
Temperature
Operating the scanner: 10° to 35° C (50° to 95° F)
Storage: -40° to 65° C (-40° to 149° F)
Relative humidity
Operating the scanner: 10% to 80° C noncondensing 10° to
35° C(50° to 95° F)
Storage: up to 90% at 0° to 65° C (32° to 149° F)
NOTE: In the presence of high electromagnetic fields, it is possible the
output from the HP scanner may be slightly distorted.
NOTE: HP is committed to providing our customers with information about
the chemical substances in our products as needed to comply with legal
requirements such as REACH (Regulation EC No. 1907/2006 of the
European Parliament and the Council). A chemical information report for
this product can be found at www.hp.com/go/reach.
Regulatory information
Regulatory Model Identification Number: For regulatory identification purposes your
product is assigned a Regulatory Model Number. The Regulatory Model Number for your
product is FCLSD-1001. This regulatory number should not be confused with the
marketing name (HP Scanjet Professional 3000 Sheet Feed Scanner) or product number
(L2723A). Additional regulatory information about your scanner can be found on the
regulatory_supplement.pdf file on the CD shipped with your product.
Disposal of Waste Equipment by Users in Private
Households in the European Union
Specifications
31
This symbol on the product or on its packaging indicates that this product must not be
disposed of with your other household waste. Instead, it is your responsibility to dispose of
your waste equipment by handing it over to a designated collection point for the recycling of
waste electrical and electronic equipment. The separate collection and recycling of your
waste equipment at the time of disposal will help to conserve natural resources and ensure
that it is recycled in a manner that protects human health and the environment. For more
information about where you can drop off your waste equipment for recycling, please
contact your local city office, your household waste disposal service or the shop where you
purchased the product.
32
HP Scanjet 3000 Scanner
Index
A
Accessibility, 28
auto document feeder, 5
B
black stripes
troubleshooting, 23
C
Care Pack Service, 29
clean
rollers, pad assembly, 14
Clean the rollers, 14
clear a paper jam, 26
Color Dropout, 11
create more smaller files, 23
D
clean the scanner glass, clean rollers, 12
P
pages are out of order, 22
paper
jams, skew, misfeed, 25
parts
order, 12
power supply
troubleshooting, 21
S
scan button
scanner front panel, 3
scanning programs
scan from, 4
scanning software, 9
disable the buttons, 28
sleep mode, 3
document feeder
stripes
load paper, load cards, 7
F
features
scan extra long page, color dropout, 10
troubleshooting, 23
supplies
order, 12
T
fragile originals, 25
TWAIN and WIA, 4
front panel
TWAIN-compliant software application, 4
Scan button, Power button, Cancel button,
3
U
user interface
Front panel, 3
TWAIN, 4
fuzzy scans, 17
V
I
image
cut-off, 26
L
long-page, 10
M
maintenance
Vertical black stripes
troubleshooting, 23
W
warranty
extend, 28
Web site
order supplies, 12