1
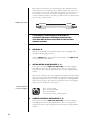
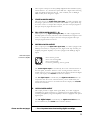
Operating Manual
Mark Levinson®
Nº30.6
Reference Digital
Processor
Madrigal Audio Laboratories, Inc.
WARNING: TO REDUCE THE RISK OF FIRE OR ELECTRIC SHOCK, DO
NOT EXPOSE THIS APPLIANCE TO RAIN OR MOISTURE.
CAUTION
RISK OF ELECTRIC SHOCK
DO NOT OPEN
CAUTION: TO REDUCE THE RISK OF ELECTRICAL SHOCK, DO
NOT REMOVE COVER. NO USER-SERVICEABLE PARTS INSIDE.
REFER SERVICING TO QUALIFIED PERSONNEL.
The lightning flash with arrowhead symbol, within an equilateral triangle, is intended to
alert the user to the presence of uninsulated “dangerous voltage” within the product’s enclosure that may be of sufficient magnitude to constitute a risk of electric shock to persons.
The exclamation point within an equilateral triangle is intended to alert the user to the
presence of important operating and maintenance (servicing) instructions in the literature
accompanying the appliance.
Marking by the “CE” symbol (shown left) indicates compliance of this device with the EMC
(Electromagnetic Compatibility) and LVD (Low Voltage Directive) standards of the
European Community.
NOTICE
This equipment has been tested and found to comply with the limits for a Class B digital device, pursuant to Part 15 of the
FCC Rules. These limits are designed to provide reasonable protection against harmful interference in a residential
installation. This equipment generates, uses and can radiate radio frequency energy and, if not installed and used in
accordance with the instructions, may cause harmful interference to radio communications. However, there is no guarantee
that interference will not occur in a particular installation. If this equipment does cause interference to radio or television
reception, which can be determined by turning the equipment on and off, the user is encouraged to try to correct the
interference by one or more of the following measures:
•
•
•
•
Reorient or relocate the receiving antenna;
Increase the separation between the equipment and the receiver;
Connect the equipment into an outlet on a circuit different from that to which the receiver is connected;
Consult the dealer or an experienced radio/TV technician for help.
CAUTION: Changes or modifications to this equipment not expressly approved by the manufacturer could void the user’s
authority to operate the equipment.
HDCD® and High Definition Compatible Digital® are registered trademarks of Pacific Microsonics, Inc.
The information contained in the manual is subject to change without notice. The most current version of this manual will
be posted on our web site at http://www.madrigal.com.
Important Safety Instructions
Please read all instructions and precautions carefully and completely before operating your Mark Levinson component.
1.
ALWAYS disconnect your entire system from the AC mains before connecting or disconnecting
any cables, or when cleaning any component.
2.
This product is equipped with a three-conductor AC mains power cord which includes an earth
ground connection. To prevent shock hazard, all three connections must ALWAYS be used. If your
electrical outlets will not accept this type of plug, an adapter may be purchased. If an adapter is
necessary, be sure it is an approved type and is used properly, supplying an earth ground. If you
are not sure of the integrity of your home electrical system, contact a licensed electrician for assistance.
3.
AC extension cords are not recommended for use with this product. If an extension cord must be
used, be sure it is an approved type and has sufficient current-carrying capacity to power this
product.
4.
NEVER use flammable or combustible chemicals for cleaning audio components.
5.
NEVER operate this product with any covers removed.
6.
NEVER wet the inside of this product with any liquid.
7.
NEVER pour or spill liquids directly onto this unit.
8.
NEVER block air flow through ventilation slots or heatsinks.
9.
NEVER bypass any fuse.
10. NEVER replace any fuse with a value or type other than those specified.
11. NEVER attempt to repair this product. If a problem occurs, contact your Mark Levinson® retailer.
12. NEVER expose this product to extremely high or low temperatures.
13. NEVER operate this product in an explosive atmosphere.
14. ALWAYS keep electrical equipment out of the reach of children.
15. ALWAYS unplug sensitive electronic equipment during lightning storms.
From all of us at Madrigal Audio Laboratories, thank you for choosing the Mark
Levinson Nº30.6 Reference Digital Audio Processor.
A great deal of effort went into the design and construction of this precision device. Used properly, it will give you many years of enjoyment.
4
Table of Contents
Unpacking and Placement .................................................................
6
Unpacking the Nº30.6 ........................................................................................ 6
Placement of the Nº30.6 .................................................................................... 6
Operating Voltage ..............................................................................
A Quick Start… ...................................................................................
7
8
Warm up/break-in period ................................................................................. 9
Special Design Features .....................................................................
10
Powerful DSP Capabilities ................................................................................ 10
24/96” capability & HDCD® ............................................................................ 10
An Intelligent FIFO™ ......................................................................................... 10
Superior isolation between sources ................................................................. 11
Fully balanced design ...................................................................................... 11
HDCD® Gain-Matching ......................................................................
Front pan el, Nº30.6 .............................................................................
Display, Nº30.6 ....................................................................................
Rear pan el, Nº30.6 .............................................................................
12
13
16
18
Male XLR output connector (digital) ....................................................... 18
Linking connections .................................................................................. 19
Building link cables .................................................................................... 19
Female XLR input connector (digital) ...................................................... 20
Male XLR output connector (digital) ........................................................ 21
Rear pan el, PLS-330 ..........................................................................
22
AC power cord polarity ............................................................................ 22
Setup and Installation .......................................................................
23
Nº30.6 Input Names .......................................................................................... 23
Making Digital Connections ............................................................................ 23
Making Analog Connections .......................................................................... 24
Making Link Connections ................................................................................ 24
Making Power Supply Connections ................................................................ 25
Naming Your Inputs .......................................................................................... 25
Linked fun ctions .................................................................................
27
Record link ........................................................................................................ 27
Standby link ....................................................................................................... 27
Alias link ............................................................................................................. 27
Play link ............................................................................................................. 27
Display Link ....................................................................................................... 27
Polarity link ........................................................................................................ 28
HDCD Link ......................................................................................................... 28
Troubleshooting .................................................................................
Care and maintenance .....................................................................
U.S. and Canadian Warranty ...............................................................
29
31
32
90-Day Limited Warranty .................................................................................. 32
Five Year Extended Warranty ........................................................................... 32
Obtaining Service .............................................................................
Specifications ...................................................................................
Dimensions .......................................................................................
33
34
35
Nº30.6 Front Dimensions ............................................................................ 35
Nº30.6 Rear Dimensions ............................................................................ 35
Nº30.6 Top Dimensions .............................................................................. 36
PLS-330 Front Dimensions .......................................................................... 36
PLS-330 Rear Dimensions .......................................................................... 36
PLS-330 Top Dimensions ............................................................................ 37
5
Unpacking and Placement
Unpacking the Nº30.6
Unpack your Nº30.6 Reference Digital Processor and PLS-330 Power Supply and
remove all accessories from the cartons. Keep all packing materials for future
transport.
Included with your new Mark Levinson processor is a pair of knit, white gloves
designed to assist you in the initial unpacking and placement of your new purchase. Please accept them as a token of our appreciation for having purchased
one of our products.
Placement of the Nº30.6
The Nº30.6 should be placed as close as possible to your digital source equipment, thus keeping interconnect cabling short. We strongly recommend shelf
mounting to allow for proper ventilation. The Nº30.6 is designed for continuous
operation, which is why it features a standby mode rather than a full “off”
mode—it is designed to be connected to the AC mains at all times for the best
performance.
Three DC cables are provided to connect the PLS-330 to the Nº30.6. Their lengths
allow you to place the PLS-330 so that it won’t induce hum in the Nº30.6 and
other sensitive components. (The best location for the PLS-330 is often near the
floor, since it does not require any day to day user interaction). Other associated
equipment should also be placed so that it doesn’t induce hum in the Nº30.6 and
other sensitive components.
Be sure to allow 3 to 4 inches of clearance above both the Nº30.6 and the PLS330, to allow heat dissipation through air circulation.
Drawings are included in this manual to facilitate special installations and custom
cabinetry (see “Dimensions”).
6
Operating Voltage
The PLS-330 is set at the factory (internally) for 100V, 120V, 220V, 230V, or 240V AC
mains operation at either 50 or 60Hz. (230V/50Hz only in European Union countries, in compliance with CE regulations.) This voltage setting cannot be changed
by the user. Make sure that the label on the rear panel of the PLS-330 (above the
AC cord) indicates the correct AC operating voltage for your location.
If the voltage indicated on your PLS-330 is incorrect, or if you wish to change the
AC operating voltage of your Nº30.6/PLS-330 as the result of moving to a different
country than the one in which you purchased your digital audio processor, see
your Mark Levinson dealer.
The Nº30.6/PLS-330 can be powered by a normal 15-ampere AC mains line. If
other devices are also powered from the same AC line, their additional power
consumption should be taken into account.
For optimal sonic performance and longevity, the Nº30.6 is designed to remain
powered at all times (the standby switch merely mutes the processor’s outputs
and turns off the display). There is an initial break-in period of approximately
300 hours before the Nº30.6 achieves optimum performance.
7
A Quick Start…
We recognize that many people are understandably eager to begin listening to
their new components, and that reading the manual is often done (if at all) at a
later time—perhaps while listening to music through the new product itself. We
strongly recommend that you read this manual thoroughly, as the Nº30.6 Reference Digital Audio Processor incorporates several unusual features which enhance its operation.
Fortunately, we can help you get some music up and running on your system
quickly, so that you may begin enjoying your new digital to analog converter
while reading more about it. The goal here is simply to make some music as
quickly as possible.
The following procedure assumes that the rest of your system is already connected (e.g., preamplifier to power amplifier, to speakers, etc.).
8
1
TURN OFF YOUR ASSOCIATED COMPONENTS
This minimizes the opportunity for a momentary electrical surge disturbing
your system while making connections. If you have a large power amplifier,
allow its power supply to fully discharge before proceeding (which may
take as long as several minutes).
2
CONNECT A DIGITAL SOURCE TO EITHER INPUT 1 OR 5
Inputs 1 and 5 on the Nº30.6 are configured from the factory for CD transports, the most common type of digital transport. Input 1 is an AES/EBU
(XLR-type) digital input; Input 5 is an S/PDIF (RCA-type) digital input. These
digital inputs are found on the rear of the center section of the Nº30.6. Use
high quality digital cable such as Madrigal MDC-1 for XLR-type, or MDC-2
for RCA-type connections.
3
CONNECT A SET OF ANALOG OUTPUTS TO YOUR PREAMPLIFIER
The Nº30.6 has two identical sets of balanced (XLR) analog outputs and
one set of single-ended (RCA) outputs. They are found on the two towers
(which house the analog circuitry). As viewed from the front, the left tower
contains the Left channel and the right tower contains the Right channel.
Use high quality cable such as Madrigal CZ Gel.
4
CONNECT THE POWER SUPPLY LEADS FROM THE PLS-330 TO THE Nº30.6
There are three power supply leads which run from the rear of the PLS-330
to the rear of the Nº30.6. The analog DC cables for the left channel and the
right channel towers use special five-pin connectors on both ends. The digital DC cable for the center section uses a two conductor connector at each
end. These cables are not directional.
Warm up/break-in period
5
CONNECT THE AC CORD TO THE PLS-330 AND TO YOUR AC OUTLET
The AC recepticle for the power cord is located underneath the PLS-330, in
the center of the unit. (This design reduces noise by bringing the power
into the chassis precisely where it is needed, rather than routing it throughout the unit.) The Nº30.6 will take a few moments to initialize and will then
be ready to use.
6
SELECT THE INPUT YOU ARE USING BY PRESSING ITS FRONT PANEL BUTTON
7
TURN ON THE OTHER COMPONENTS; SLOWLY RAISE THE VOLUME
Congratulations! You should now be able to enjoy your favorite music while
reading the rest of this manual.
Although your Mark Levinson Nº30.6 digital processor delivers outstanding performance straight out of the box, you should expect to hear it continue to improve
as it reaches its normal operating temperatures and its various components
“break-in.” It has been out experience that the greatest changes occur within the
first 25-50 hours, but that the Nº30.6 will continue to improve in sound quality for
about 300 hours, after which time it remains quite constant.
The only exception to this rule is if power is removed from the unit for an extended period, allowing it to cool down. In this case you should expect a brief
warm-up period before the Nº30.6’s sound quality is at its best.
9
Special Design Features
Congratulations on your purchase of the Nº30.6 Reference Digital Audio Processor.
The Madrigal design team is confident you will enjoy the outstanding performance of the Nº30.6 for many years. In case you are interested in technical details, what follows is a brief outline of some of the key technologies in your new
processor.
Powerful DSP Capabilities
“24/96” capability & HDCD®
Your Nº30.6 employs four powerful SHARC® digital signal processors to deliver
exceptional flexibility and versatility. Together, they form a single DSP “engine” that
can handle the myriad of processing duties required in today’s rapidly-changing
world of digital audio. These duties include decoding HDCD™ and “24/96” decoding, and may be expanded to include many other signal formats over time.
In addition to the common 16 bit at either 44.1 and 48 kHz sampling rates used
by digital sources such as CD and DAT, your Nº30.6 also supports the two channel 24-bit/96 kHz signal that was defined as part of the DVD-Video standard
(and which will certainly be included as part of a larger DVD-Audio standard
when the industry agrees to such a thing). As of the writing of this manual, such
“24/96” material is just beginning to become available, and we expect availability
to grow quickly over time.
In addition to true 24-bit capability, the Nº30.6 also incorporates High Definition
Compatible Digital® decoding to take full advantage of the increased resolution
available from HDCD-encoded 16-bit CDs. The High Definition Compatible Digital® format retains much of the resolution inherent in professional twenty bit recordings, by encoding this information more efficiently within the sixteen bit
space available within the Compact Disc format.
An Intelligent FIFO™
Unlike previous processors which were highly dependent on the quality of the
digital signal they were fed, the Nº30.6 Reference Digital Audio Processor delivers
outstanding performance with even less-than-ideal digital signals.
“FIFO” stands for “First In, First Out.” It describes a simple buffer in which the
digital information is stored temporarily on its way to being converted to analog.
Just as a large water tower can provide a steady source of water to a small town,
despite hour-to-hour variations in the supply of water from the well, a FIFO can
provide a steady, consistent source of digital data to the converters which are responsible for changing that data into music. Even if there is significant “jitter” (inconsistencies in timing) in the incoming digital information, the output of the
FIFO is controlled by a special clock with tremendous accuracy. The result largely
eliminates the jitter and allows the musical information to be reproduced cleanly,
without jitter-induced distortions.
The trouble with most FIFOs lies in their behavior when the incoming signal is
poor enough to cause the “water tank” to overflow or to be emptied. Normally, a
FIFO would then have to “invent” false data to fill the gap, throw away excess
data, or revert to non-FIFO operation. None of these approaches are acceptable.
Of course, you could simply use an extremely large buffer. Unfortunately, this solution is a poor one.
10
A larger buffer implies a longer delay between when information goes in and
when it starts coming back out. With laserdiscs, for example, you must keep the
in/out delay small so as to keep the soundtrack synchronized with the picture on
the screen. An oversized buffer would make every movie’s audio out of step with
its video, an unacceptable situation. It is possible to bypass the FIFO for movies,
but you then lose all of its distortion-reducing benefits.
Madrigal engineers have developed a proprietary buffer management scheme
which reduces reproduced jitter to less than 20 picoseconds while maintaining
the synchronization of sound and picture in movies. It employs a buffer large
enough to absorb the jitter found in transports of reasonable quality, yet small
enough to have impreceptible delay. The rate at which data is released from the
FIFO buffer is controlled by software to track the long-term data rate of the incoming signal, allowing the buffer to absorb all the short-term variations which
cause sonic degradation. This approach yields a “smart” FIFO buffering scheme
which rejects virtually all incoming jitter without requiring an enormous buffer
and the consequent audible delay. It also avoids the sonic penalties associated
with the usual strategies used when a buffer overflows or empties.
The Intelligent FIFO operates at all sampling rates, improving the quality of every
connected digital source component.
Superior isolation
between sources
One of the advantages of a separate digital audio processor is that you can take
the money which might have otherwise been spent on several built-in D/A converters and put it into one, superior processor which will enhance the performance of all the transports with which it is used. Ironically, many outboard processors fail to live up to this potential due to interference between their various
digital inputs.
The Nº30.6 provides outstanding isolation between its inputs, realizing the full
potential of the various digital transports with which it is used. In fact, every
source has its own dedicated digital interface receiver. As a result, the selected
input effectively has the Nº30.6 “all to itself” for its conversion to analog.
Fully balanced design
The Nº30.6 is fully balanced in both the analog and digital domains. All digital
filtering and processing is implemented in a balanced configuration, and conversion to analog is accomplished in two opposing polarity 24-bit converters per
channel.
This approach maintains the integrity of the signal, reducing the opportunities for
music-destroying noise and digital artifacts to enter the signal path.
We strongly recommend the use of quality balanced interconnects such as
Madrigal’s CZ Gel-1 for the best performance. The improvements are both measurable and readily audible.
11
HDCD® Gain-Matching
Some HDCD-encoded recordings are mastered at a level which is noticeably lower
(6 dB) than conventional recordings, to allow for greater dynamic peaks. To avoid
unexpected changes in average volume when going from one disc to another, the
Nº30.6 can automatically reduce the volume of all recordings by six decibels. To remind you of of when it is in this mode of operation, the Nº30.6 will display the
input’s name and “6 dB PAD” when locking on a digital input signal in the HDCD
AUTO mode.
In our listening tests, we have determined that the only sonically transparent gainmatching technique is to raise the volume of the preamplifier by the requisite 6 dB
when playing those few discs that require it. All other design options introdu ce
a compromise in sound qu ality.
For Best Performance:
We strongly recommend that you use the HDCD MANUAL gainmatching in your Nº30.6 digital audio processor.
If you are u sing the Nº30.6 with a Mark Levinson preamplifier, simply name
the appropriate input on the preamplifier “No30” (explained in the preamp manual),
and connect the two products with a Communications Link cable. In this case, the
Nº30.6 will tell the preamplifier to change its volume setting as necessary to compensate for differing CD mastering techniques, and you never have to think about it.
(The preamp’s display will show “HD+6” to indicate a change required by the HDCD
recording being played through the Nº360S; it will revert to normal and show
“HD+0” when you return to conventional recordings. Older Nº38 and Nº38S preamplifiers may require a new EPROM to take advantage of this feature.) This technique
ensures that you always get the best possible sound from your system, without any
unexpected changes in level, regardless of the recordings you play.
If you are u sing the Nº3 0.6 with any other preamplifier, follow the steps below. (You will have to adjust the volume on some HDCD recordings manually.)
1
PRESS AND HOLD THE DIGITAL RECORD SELECT BUTTON ON THE FRONT
PANEL
After a few seconds, the display will change to show NAME= and the current
name of the selected input. When you let go, it will still show NAME= and the
current name of the input. (Ignore this for now. You’ll learn how to rename
your inputs to match your sources later on in this manual.)
2
PRESS THE POLARITY BUTTON SO THE DISPLAY SHOWS “HDCD MANUAL”
Repeatedly pressing the polarity button will toggle the display between “HDCD
AUTO” (meaning that the Nº360S automatically lowers its volume on conventionally-mastered discs) and “HDCD MANUAL” (meaning that gain-matching is
turned off; HDCD-encoded discs will still be decoded properly). If you try to
change from one to the other while a Nº380 is Linked, the Nº30.6 will display
“No38 ACTIVE!” (indicating that the equipment already knows what to do).
Using manual gain-matching ensures that the HDCD digital filter always operates
at its maximum resolution, although you may now have to manually turn up the
volume on some HDCD recordings, beyond your usual settings.
12
5
4
6
display
intensity
2
digital record
select
MADRIGAL AUDIO LABORATORIES
polarity
invert
7
copy protect
1
aes/ebu
2
3
4
9
8
REFERENCE DIGITAL
PROCESSOR
Nº 30.6
emphasis
5
3
6
7
8
10
standby
1
Front panel, Nº30.6
1
STANDBY
Provided the Nº30.6 is connected to AC power (via the PLS-330), pressing
this button takes the Nº30.6 out of “standby” mode, turns the display on,
and enables the front-panel controls.
Pressing standby again places the Nº30.6 into standby mode, turns the display off, turns off all outputs (including the record outputs), and disables
the front-panel controls.
2
STANDBY LED
While the Nº30.6 is in standby mode, this LED flashes approximately every
five seconds. When the Nº30.6 is ready to operate (that is, when it is not in
standby mode), this LED remains lit.
3
SOURCE SELECTION BUTTONS
Pressing these buttons selects the digital source, according to the input connections on the rear panel (see “Rear panel, Nº30.6”). Only one source at a
time may be selected.
When power is first applied to the Nº30.6 (or when power is restored after
an interruption), it will search for and select the first input with an active
digital signal. If none is found, it will select the first named source. As delivered from the factory, this input will be “CD1.”
When the Nº30.6 is taken out of standby mode, the source last selected before going into standby will be automatically selected.
4
DISPLAY
See “Display, Nº30.6” beginning on page 16.
13
5
DISPLAY INTENSITY
Pressing this button varies the brightness of the display. Four brightness levels are available.
When power is first applied to the Nº30.6 (or when power is restored after
an interruption), the display is automatically set to its brightest level.
Pressing the display intensity button once dims the display one level;
pressing it again dims it further; pressing it again turns the display off.
Pressing display intensity once more returns the display to its brightest
level.
6
DIGITAL RECORD SELECT
Pressing digital record select button allows you to select the digital source
you want to record to your digital recorder. It is possible to record a different digital source than the one selected for listening.
To record a digital source connected to the Nº30.6, press digital record select. The Nº30.6’s display will show RECORD followed by the source currently selected. For example:
If you want to record a different source than the one currently selected,
press the corresponding source selection button; the display will then show
the input number of that source (for example, RECORD CD2).
To disable the record output, press the button again for the source which is
currently selected to be recorded. The display will read RECORD OFF and
the digital output of the Nº30.6 will be temporarily disabled, eliminating any
potential interaction between the record output circuitry of the Nº30.6 and
the rest of your system. Repeatedly pressing the button for the currently selected recording source will toggle the Nº30.6 between RECORD OFF and
that source.
After a few seconds, the Display will return to normal.
Caution!
14
When using a digital recorder (like a DAT) that also allows
recording of analog signals, a specific combination of
interconnections and settings on the digital recorder, the
Nº30.6, and an associated preamplifier may create a
“feedback loop” that may damage your system’s
loudspeakers. For guidance in avoiding such a feedback
loop, consult your Mark Levinson dealer.
7
POLARITY INVERT
Pressing this button inverts the polarity of the digital signal, to compensate
for polarity differences during the recording process. Some recordings may
simply “sound better” when this function is active.
While polarity invert is selected, the LED above the button will light.
Note: polarity invert doesn’t affect the digital outputs, and isn’t available
for inverting the polarity of digital signals to be recorded.
Note: polarity invert may be operated by infrared remote control, but
only when the Nº30.6 is connected to compatible Mark Levinson
components such as the Nº31.5 Reference CD Transport. Complete instructions are included in those components’ operating
manuals.
8
COPY PROTECT LED
This LED lights when the Nº30.6 detects encoded copy protection in the
digital program being processed.
9
AES/EBU LED
The aes/ebu LED lights when the Nº30.6 detects that the digital program
being processed conforms to the AES/EBU (Audio Engineering Society/European Broadcast Union) professional standard. This LED indicates the presence or absence of certain encoded information in the digital signal. It does
not indicate that the AES/EBU connections (a connection standard written by
the same group) are being used. Playback of non-AES/EBU CDs or DATs
won’t activate the aes/ebu LED, even if the associated transport is connected according to the AES/EBU standard
10
EMPHASIS LED
The compact disc standard, as created by Sony and Philips, allows a highfrequency boost to be employed during recording. This boost, called recording pre-emphasis, increases the signal-to-noise ratio at high frequencies,
but must be countered by a high-frequency cut before playback to restore a
recording’s normal frequency response. De-emphasis may be done as the
recording is being mastered, or the compact disc (or digital audio tape)
may be made with the pre-emphasis still on, and the de-emphasis performed in the playback unit.
In the Nº30.6, the de-emphasis filtering is done in the digital domain.
The emphasis LED lights when the Nº30.6 detects recording pre-emphasis
in the digital program being processed, and subsequently employs its deemphasis circuitry (see “Specifications”).
Note:
The de-emphasis circuitry of the Nº30.6 is designed to be
compatible with all known digital standards. However, it is
possible for the emphasis LED to light in error when there is
no disc being played. This is not a malfunction of the Nº30.6.
Rather, it is the result of the transport generating ambiguous
signals in the absence of a spinning disc to read. You may
never see this condition. Even when the condition exists, it
has no effect on sonic quality, as it can only occur when
there is no disc playing.
15
1
2
3
Display, Nº30.6
1
INPUT ALIAS
This part of the Nº30.6’s display shows the name of the input selected, as
determined during setup (see “Assigning input names” in the “Installation”
section of this manual).
To facilitate operation in complex, multi-source systems, the Nº30.6 is capable of displaying a wide variety of names for each of its eight inputs.
They are listed below.
NOT USED
CD
DVD
LD
DAT
DCC
MD
CDR
CDI
DBS
DSS
AUX
DCR
2
16
(any unused input)
Compact Disc
Digital Video (or “Versatile”) Disc
Laser Disc
Digital Audio Tape
Digital Compact Cassette
Mini Disc
Compact Disc, Recordable
Compact Disc, Interactive
Direct Broadcast Satellite
Digital Satellite System (“DirecTV” or “USSB”)
Auxiliary (other digital sources)
Digital Cable Radio
INPUT NUMBER
This part of the Nº30.6’s display shows the input number of the selected
digital source, according to the connections on the rear panel (see “Rear
panel, Nº30.6”).
3
SAMPLING FREQUENCY
This part of the Nº30.6’s display shows the sampling frequency of the digital input being processed, expressed in kilohertz (kHz). One of five sampling frequencies will be shown: 32kHz, 44.1kHz, 48kHz, 88.2kHz, 96kHz.
After you press one of the source selection buttons, the Nº30.6 will reduce
the volume and the display will show:
While the Nº30.6 is attempting to lock onto a digital signal, the display will
show:
If no digital signal is present (if the source is turned off, is improperly connected, or is disconnected), the display will show:
17
1
right channel
left channel
2
analog output
analog output
3
balanced analog
output
balanced analog
output
control ports
REFERENCE DIGITAL PROCESSOR Nº30.6
PHASTLink® compatible
d e s i g n e d a n d m a nu fa c t u r e d i n U. S. A .
MADRIGAL
by
S/N
digital outputs
balanced analog
output
digital inputs
communication
ports
master
RS-232
electrical
digital
dc in
1
2
3
PUSH
PUSH
PUSH
optical
4
5
6
7
electrical
8
rec
monitor
optical
rec
analog dc in
4
balanced analog
output
analog dc in
5
6
7
8
9
10
11
12
4
Rear panel, Nº30.6
1
SINGLE-ENDED ANALOG OUT
These outputs provide single-ended line-level analog audio (via cables
equipped with RCA-type connectors) to a preamplifier, integrated amplifier,
or receiver.
2
BALANCED ANALOG OUTPUTS
These outputs provide balanced line-level analog audio (via cables
equipped with XLR-type connectors) to a preamplifier, integrated amplifier,
or receiver equipped with balanced inputs (see “Set-up and installation”).
The pin assignments used are AES-standard, as shown below:
Male XLR output
connector (digital)
1 2
3
18
Pin 1: signal ground
Pin 2: non-inverting signal
Pin 3: inverting signal
Connector ground lug: chassis ground
3
PHASTLINK® CONTROL PORTS
In addition to the Mark Levinson Linking system described above, the
Nº30.6 can, as an extra-cost option, support the PHASTLink® communications system. This system is designed to facilitate complete systems integration with PHAST® controllers. For more information on PHAST® (a division
of AMX®), please refer to the internet at http://www.phast.com.
4
ANALOG DC IN
These inputs, one for each channel, accept DC power from the PLS-330 (via
the supplied cables equipped with five-pin connectors).
Connect the left channel’s analog dc in on the rear panel of the Nº30.6 to
the left analog dc out on the rear panel of the PLS-330; likewise, connect
the right channel’s analog dc in on the rear panel of the Nº30.6 to the right
analog dc out on the rear panel of the PLS-330.
5
COMMUNICATION PORTS
Your Nº30.6 includes both RS-232 and the Mark Levinson Linking system
communications ports.
The RS-232 port may also be used to update the operating software of the
Nº30.6, so that your system will be able to handle new digital audio formats
as they are introduced. (Think of updating the software in the Nº30.6 as
being like installing new software in your computer… only much less painful.) Once again, your dealer can assist you in taking advantage of these
advanced features, should the need arise.
The “pinout” connections used on the RJ-11 connector used for the RS-232
port is as follows:
in
out
232
ir
input
123456
DC
triggers
1
2
pin 2 = Rx from PC
pin 3 = Tx to PC
pin 5 = ground
c o n t r o l
Note that only qualified technicians should attempt to make use of the special capabilities afforded by this RS-232 communications port.
Linking connections
analog output
Nº30.6
digital inputs
master
Audio
connections
Link
cable
digital output
slave in
Nº31.5
slave out
Link
cable
digital output
Thus, if the only other Mark Levinson Link-compatible component you
have is the preamplifier, connect the Nº30.6’s master port to the
preamplifier’s slave port using a “straight-through” RJ-45 cable. If there are
additional Mark Levinson Link-compatible components in the system, place
the preamplifier at the end of the chain by connecting the last slave out
port to the Nº38’s slave port. See the diagram at left for clarification.
slave in
Nº31.5
slave out
Link
cable
any input
The Mark Levinson Linking system uses the Nº30.6 as the Master of (and
central clearinghouse for) inter-component communications. Other components such as digital transports are connected to the Master as “Slaves,” and
can be “daisy-chained” using their Slave In and Slave Out jacks. As the ultimate destination of all source signals, the Nº38 or Nº38S Preamplifier (if
owned) must be the final “Slave” in the chain. (In technical terms, it terminates the communications bus.) In turn, the Nº38 can serve as a master to
an associated compatible Mark Levinson power amplifier—hence its “Master” communications port.
The RJ-45 cable needed for the Link connection between the Nº30.6 and
other Link components may be purchased from your Mark Levinson dealer.
It may also be made to length using two RJ-45 connectors and the appropriate length (up to 100 feet/30 meters) of RJ-45 (flat, eight conductor)
cable.
slave
Nº380S
19
RJ-45 cables and connectors are used throughout the world for both telecommunications and computers, and are widely available. The connectors
are crimped on to the ends of the cable such that pin 1 at one end is connected to pin 1 at the other end. Such a “straight-through” connection is
(counter-intuitively) made by introducing a 180° twist in the cable between
the two ends, as shown below.
Building link cables
From Nº30.6
Locking tab
To Nº31.5
Locking tab
Connecting the communication ports other than as
described in this manual will damage the Nº38 and the
associated Mark Levinson components, and will void those
products’ warranties.
6
DIGITAL DC IN
This input accepts DC power from the PLS-330 (via the supplied cable
equipped with two-pin connectors).
Connect digital dc in on the rear panel of the Nº30.6 to the digital dc out
on the rear panel of the PLS-330.
7
AES/EBU ELECTRICAL DIGITAL INPUTS (1 – 3)
These inputs accept the digital audio signal (DAS), via cables equipped
with XLR-type connectors, from digital sources such as a compact disc
transport, laser disc transport, digital audio tape transport, digital broadcast
receiver.
These inputs conform to the AES/EBU digital interconnection standard, which
calls for a 110Ω transmission of the DAS. Use a digital interconnecting cable
specifically designed for the 110Ω AES/EBU standard, such as Madrigal MDC-1
cable, when using these inputs. The pin assignments for the AES/EBU digital
interconnection standard are shown below.
Female XLR input
connector (digital)
PUSH
2 1
3
8
20
Pin 1: chassis ground
Pin 2: non-inverted DAS
Pin 3: inverted DAS
Connector ground lug: chassis ground
S/PDIF RCA ELECTRICAL DIGITAL INPUTS (4 – 5)
These inputs accept the digital audio signal (DAS), via cables equipped
with XLR-type connectors, from digital sources such as a compact disc
transport, laser disc transport, digital audio tape transport, digital broadcast
receiver.
These inputs conform to the Sony/Philips Digital Interface Standard (S/PDIF),
which calls for a 75Ω transmission of the DAS. Use a digital interconnecting
cable specifically designed for the 75Ω S/PDIF standard, such as Madrigal
MDC-2 cable, when using these inputs.
9
ST OPTICAL DIGITAL INPUT (6)
This input accepts the digital audio signal (DAS), via cables equipped with
the ST-type optical connector, sometimes called “AT&T” or “glass,” from digital sources such as a compact disc transport, laser disc transport, digital audio tape transport, digital broadcast receiver.
10
EIAJ OPTICAL DIGITAL INPUTS (7 – 8)
These inputs accept digital audio signal (DAS), via cables equipped with
the EIAJ optical connector, sometimes called “Toslink™”, from digital sources
such as a compact disc transport, laser disc transport, digital audio tape
transport, digital broadcast receiver.
11
ELECTRICAL DIGITAL OUTPUTS
These outputs provide digital audio signal (DAS), via cables equipped with
XLR-type connectors, to a digital processor, digital audio tape recorder, preamplifier, integrated amplifier, or receiver equipped with XLR-type digital
inputs.
Male XLR output
connector (digital)
1 2
3
Pin 1: Chassis ground
Pin 2: non-inverting DAS
Pin 3: inverting DAS
Connector ground lug: chassis ground
The monitor digital output is controlled by the source selection buttons on
the front panel, and tracks whatever source is being listened to from the
Nº30.6. It can be used as a “pass-through” for the selected, monitored digital
source, and employs the aes/ebu transmission standard.
The rec digital output is controlled by the digital record select button (in
conjunction with the source selection buttons), and is unaffected by the
normal selection of sources to be monitored. It also employs the aes/ebu
transmission standard.
12
OPTICAL DIGITAL OUTPUT
This output provides a digital audio signal (DAS), via a cable equipped
with EIAJ-type optical connectors, to a digital processor, digital audio tape
recorder, preamplifier, integrated amplifier, or receiver equipped with optical
digital inputs.
This rec digital output is controlled by the digital record select button,
and is unaffected by the monitor source selection buttons.
Please see the next page!
… for an important note about making digital recordings.
21
Caution!
22
When using a digital recorder (like a DAT) that also allows
recording of analog signals, a specific combination of
interconnections and settings on the digital recorder, the
Nº30.6, and an associated preamplifier may create a
“feedback loop” that may damage your system’s
loudspeakers. For guidance in avoiding such a feedback
loop, consult your Mark Levinson dealer.
right analog dc
out
digital dc
out
left analog dc
out
WARNING: BEFORE ATTEMPTING TO OPERATE
operating voltage:
THIS DEVICE, REFER TO OWNER'S MANUAL FOR
PROPER OPERATING INSTRUCTIONS AND SAFETY
PRECAUTIONS. HAZARDOUS VOLTAGE AVAILABLE
INSIDE; DISCONECT AC ~ MAINS CABLE BEFORE
REMOVING COVER.
1
2
90 – 110VAC
105 – 125VAC
180 – 220VAC
4
~
~
~
210 – 240VAC
230 – 250VAC
~
50 – 60HZ
3
~
~
1
Rear panel, PLS-330
1
RIGHT ANALOG DC OUT, LEFT ANALOG DC OUT
These outputs, one for each channel, provide DC power to the Nº30.6 (via
the supplied cables equipped with five-pin connectors).
Connect the left channel’s analog dc in on the rear panel of the Nº30.6 to
the left analog dc out on the rear panel of the PLS-330; likewise, connect
the right channel’s analog dc in on the rear panel of the Nº30.6 to the right
analog dc out on the rear panel of the PLS-330.
2
DIGITAL DC OUT
This output provides DC power to the Nº30.6 (via the supplied cable
equipped with two-pin connectors).
Connect digital dc in on the rear panel of the Nº30.6 to the digital dc out
on the rear panel of the PLS-330.
3
AC power cord polarity
AC POWER CONNECTOR (ON BOTTOM)
This input accepts AC power from the AC mains (via the supplied AC
cable). Connect the female end of this cable to the PLS-330. Connect the
male end of this cable to wall outlet or to an “unswitched” convenience
outlet like those found on many audio components.
To PLS-330
To AC mains
1
2
3
2
1
1 = Line (hot)
2 = Neutral
3 = Earth ground
3
23
Setup and Installation
Caution!
Nº30.6 Input Names
For your protection, review “Important Safety Instructions”
before you install your Nº30.6/PLS-330.
The Nº30.6 allows you to assign any of a wide variety of names to each of the
eight digital inputs, shown below:
NOT USED
CD
DVD
LD
DAT
DCC
MD
CDR
CDI
DBS
DSS
AUX
DCR
(any unused input)
Compact Disc
Digital Video (or “Versatile”) Disc
Laser Disc
Digital Audio Tape
Digital Compact Cassette
Mini Disc
Compact Disc, Recordable
Compact Disc, Interactive
Direct Broadcast Satellite
Digital Satellite System (“DirecTV” or “USSB”)
Auxiliary (other digital sources)
Digital Cable Radio
The name you assign to an input is shown on the display when a source is selected (see “Display, Nº30.6”). Before operating your Nº30.6, you’ll want to customize it to match the digital sources in your system.
The Nº30.6 digital audio processor is shipped with inputs 1 and 5 named CD,
since you will probably want to hook up your new component and start using it
right away. CD1 is an AES/EBU (XLR) digital input, and CD5 is a S/PDIF (RCA) digital
input, and both are ready for use as soon as the Nº30.6 is powered up and connected to the rest of the system. Other inputs are named NOT USED and must be
renamed before they may be used. (See “Making Digital Connections” and “Making Analog Connections” below.)
Making Digital Connections
The Nº30.6 incorporates RCA-type and XLR-type electrical connectors, and ST-type
and EIAJ-type optical connectors for digital audio signal input. Digital outputs are
available in both XLR-type electrical and EIAJ-type optical connectors. (See “Rear
panel, Nº30.6,” above.)
Unlike previous generations of digital audio processors, the performance of which
was highly dependent on the digital interface and the digital interconnect, the
technology of the Nº30.6 allows it to deliver optimal performance despite the inherent limitations of interfaces such as the EIAJ standard (sometimes called
“Toslink™”). As a consequence, you can feel free to use whichever interconnection standard is convenient, given the provisions of your various digital sources.
For electrical digital interconnection, we recommend Madrigal MDC cable. MDC-1
is designed for AES/EBU interconnection (via XLR-type connectors); MDC-2 is de-
24
signed for S/PDIF interconnection (via RCA-type connectors). Both are available in
various lengths from your Mark Levinson dealer.
Using appropriate cables, connect all your digital source components to suitable
inputs on the rear panel of the Nº30.6 processor. If you have several such components, you might want to make a note of which component is plugged into
which input on a piece of scrap paper. (You will rename the various inputs in
software shortly, making it easier to remember which input goes with which
transport once the installation is complete.)
If you have several digital sources which have only S/PDIF (RCA) outputs, it is possible to use an RCA-to-XLR cable for connection to one of the Nº30.6’s XLR-type
digital inputs. For the best performance in these circumstances, we recommend
using a high-bandwidth (300 MHz), three conductor, 110Ω cable such as Madrigal
MDC-1 (available from your Mark Levinson dealer). You may also fashion one according to the diagram below.
Shield
1
2
3
Male XLR
(connect to Nº30.6)
Making Analog Connections
Male RCA
(connect to source)
The Nº30.6 includes two sets of balanced and and one set of single-ended analog
outputs. The balanced outputs are generally preferred for their superior immunity
to noise. All outputs operate at a line level.
Note: the standard line level for balanced interconnection is six
decibels higher than for single-ended interconnections.
For analog audio interconnection, we recommend Madrigal CZ GEL Interconnect
Cable. CZ GEL is available from your Mark Levinson dealer, in various lengths and
terminated with RCA, XLR, and Camac connectors.
Using high quality cable, connect the appropriate output of the Nº30.6 to an input
of your preamplifier. The output impedance of the Nº30.6 is extremely low, which
allows you to use more than one output simultaneously without degrading performance, should you have any reason to do so. For example, you might supply a
multi-room system with the signal of the Nº30.6 as well as your main music system.
Making Link Connections
The Nº30.6 incorporates sophisticated inter-component communications capabilities when Linked to compatible Mark Levinson components. (See “Communications Ports” in ”Rear Panel.”) If you own compatible Mark Levinson digital source
components or preamplifiers, connect them to the Nº30.6 with an eight-conductor
RJ-45 cable as described on page 18. You may find that you need to cycle power
off and on once after making this connection for the first time (if making the
connection to a previously oeprating component), in order to ensure that all
components in the chain are aware of each other’s presence.
25
Making Power Supply
Connections
After making all signal connections, connect the left channel’s analog dc in on
the rear panel of the Nº30.6 to the left analog dc out on the rear panel of the
PLS-330; likewise, connect the right channel’s analog dc in on the rear panel of
the Nº30.6 to the right analog dc out on the rear panel of the PLS-330.
Connect digital dc in on the rear panel of the Nº30.6 to the digital dc out on the
rear panel of the PLS-330.
Connect the AC cord to the AC power connector on the bottom panel of the PLS330, then connect the AC cord to the AC mains; the LED on the PLS-330 and the
standby LED on the Nº30.6 will light. After a few seconds, the Nº30.6 will begin
its self-test, after which it shows CD1 LOCKING to indicate that it is attempting to
lock onto input 1’s digital signal.
The Nº30.6 is now ready to operate.
For optimal sonic performance and longevity, the Nº30.6/PLS-330 is designed to
remain powered at all times. The standby button is provided so that you may
turn off the display and disable the front-panel controls when the Nº30.6 isn’t in
use (see “Front panel, Nº30.6”).
Naming Your Inputs
All inputs other than 1 and 5 are labelled NOT USED as delivered from the factory,
and will need to be given appropriate names before they are used. Giving inputs
appropriate names is simple and greatly enhances the ease of use of your new
Nº30.6, especially for occasional users of the system. The available names are
shown on page 24. To give an input a new name:
1
SELECT THE INPUT YOU WISH TO RENAME
Note that the input to be renamed needs to be the selected monitored input. The input which is currently selected to be sent out the digital record
path is irrelevant to the renaming process.
2
PRESS AND HOLD THE DIGITAL RECORD SELECT BUTTON
After a delay of approximately five seconds, the display will change to
NAME = (the current name), as shown below. If the current name for the
input is NOT USED, it will be abbreviated to N.U.
This message informs you that the Nº30.6 is ready for you to change the
input’s name. (Note that pressing and holding the digital record select button performs a different function than simply pressing it momentarily, which
would allow you to select a source for the digital record path.)
26
3
PRESS THE SELECTED INPUT BUTTON REPEATEDLY UNTIL YOU SEE THE
NAME YOU WISH TO USE
This action will cause the display to cycle through the list of available
names, with the input number appended to the end of each name. For example, you might wish to change CD4 to LD4 if the digital output of your
laserdisc player is plugged into the fourth input, in which case the display
would appear as follows:
4
PRESS AND HOLD THE DIGITAL RECORD SELECT BUTTON AGAIN, UNTIL
“NAME CHOSEN” IS DISPLAYED
Pressing and holding the digital record select button a second time confirms that you would like to make this change, that it is a conscious choice
rather than an accidental change caused by an inquisitive four year old.
5
REPEAT THIS PROCESS FOR ALL INPUTS
27
Linked functions
The Nº30.6 has the ability to “link” six of its functions to compatible Mark
Levinson components (like the Nº31.5 Reference CD Transport and the Nº380 or
Nº380S Preamplifier).
Note: To take advantage of linked functions, you must connect the
Nº30.6 to the other components via their communication ports. (See
“Rear panel” and “Set-up and installation.”)
There are six linked functions.
Record link
■ Record l ink: While the Nº31.5 is selected as the Nº30.6’s recording
source (a CD must be in play), this link helps prevent you from
inadvertently disrupting the recording process.
If you attempt to use any of the Nº31’s functions that might disrupt
the recording process (Stop, LID Open/Close, etc.), the Nº30.6/31
combination will block that function and the Nº31’s display will
show RECORDING.
Likewise, if you attempt to place the Nº30.6 into standby, the
Nº30.6 will block that function and display will show RECORDING.
To override the record link, press the function button twice. (For
example, if you do want to stop the CD that’s playing, even though
it is being recorded, press the Stop button twice in succession.)
Standby link
■ Standby l ink: This feature links the standby modes of the various
Mark Levinson Linked components. For example:
• If transport, digital processor and preamplifier are in standby
mode, pressing the transport’s standby button will take all three
components out of standby mode (making them ready to use).
• If transport, digital processor and preamplifier are in standby
mode, pressing the Nº30.6’s standby button will bring only the
preamp out of standby mode (presuming that you plan to use the
Nº30.6 with some digital source other than the Nº31).
• If transport, digital processor and preamplifier are “on” (not in
standby mode), pressing the preamp’s standby button will place all
three components into standby mode.
Alias link
■ Alias l ink: The Nº31.5’s alias link automatically overrides the
name setting for its input. When you select the Nº31.5’s input, the
Nº30.6 will show No31 on its display.
Play link
■ Play l ink: When you press the Nº31.5’s Play button, this link automatically selects the Nº31.5’s input on the Nº30.6 and on the Nº380
or Nº380S.
Note: If you’ve connected the Nº31.5 to two or more of your
Nº30.6’s inputs, the play link will look first for AES/EBU interconnection, then S/PDIF, then ST, and finally EIAJ.
Display Link
28
■ Display l ink: This links the display intensity functions of the
Nº30.6 and the other Linked components.
When the components are linked, all displays will be set to the
same brightness. Pressing display intensity on either component
will affect both displays.
Polarity link
■ Polarity l ink: This links the d/a polarity button on the Nº31.5’s
Remote Control to the polarity invert function of the Nº30.6.
The polarity link also allows inverted polarity to be saved with a
program, via the Nº31.5.
The following Link is not a selectable option. Instead, it operates automatically
and transparently between your processor and preamplifier.
HDCD Link
■ HDCD l ink: When HDCD recordings are made, one of the encoding options chosen by the recording engineer results in a playback
level that is six decibels lower than normal. This change in volume
from one CD to the next is automatically compensated for when
the Nº30.6 is connected to a Mark Levinson preamplifier such as
the Nº380 or Nº380S. When such a HDCD is played, the Linked
preamplifier (acting on instructions from the digital processor) will
automatically raise its volume setting by exactly six decibels. It will
also reduce its volume setting by 6 dB when the low-output
HDCD recording is no longer being processed. In this fashion, the
perceived volume in the room is maintained at a constant level
despite a fundamental change in the recording being played.
29
Troubleshooting
In general, refer any service problems to your Mark Levinson dealer. Before contacting your dealer, however, check to see if the problem is listed here. If it is, try
the suggested solutions. If none of these solves the problem, contact your Mark
Levinson dealer.
30
1.
THE Nº30.6 WON’T FUNCTION, AND THE DISPLAY IS DARK.
✓
The standby button on the front panel isn’t turned on.
✓
The PLS-330 isn’t plugged into the AC mains.
✓
The center (digital) section of the Nº30.6 isn’t receiving DC from
the PLS-330 (double check the center section DC connection).
✓
The wall socket, adapter, or extension cord is faulty.
✓
There’s a tripped circuit breaker or blown fuse in the wall
outlet’s circuit.
✓
A fuse is blown in your PLS-330 (contact your Mark Levinson
dealer).
2.
THE DISPLAY IS LIT, BUT THERE IS NO OUTPUT
✓
The proper source isn’t selected on your Nº30.6.
✓
The proper source isn’t selected on your preamplifier.
✓
The interconnecting cables are connected incorrectly.
✓
The Left and Right towers of the Nº30.6 aren’t receiving DC from
the PLS-330 (double check their DC connections).
3.
THE Nº30.6 DISPLAY READS “NO DAS.”
✓
The selected digital source component is turned off.
✓
The digital connection between the digital source and the
Nº30.6 is faulty.
✓
The CD is inserted upside down in the CD transport.
4.
THE LINKED FUNCTIONS DON’T WORK.
✓
The Link cable is disconnected, or is connected incorrectly.
✓
The digital audio cable is disconnected, or is connected incorrectly (in which case the Linked function would work correctly,
but you might not be able to hear the results).
✓
Try turning off/disconnecting AC power from both the Nº31.5
and the Nº30.6. After several seconds, restore AC power to the
digital processor, then turn on the Nº31.5’s main power switch.
✓
You may have older versions of the system software in your associated Mark Levinson components which do not fully support
all Linked functions. Contact your Mark Levinson dealer with the
model and serial numbers of your Mark Levinson components.
If needed, new EPROMs will be provided at no charge.
5.
THE DISPLAY FLASHES “RECORDING”
✓
The Record Link is preventing you from interrupting an active
digital record loop. Change the selected record input, or press
the function button twice. (See Record link, page 28.)
6.
I HAVE A 24/96 DVD THAT WILL NOT PLAY AT 96K
✓
You probably have a problem with CSS. When invoked, the CSS
copy-protection system on DVD requires the transport either:
•
to mute its digital output entirely, or
•
to downsample (to a maximum of 16 bits/48 kHz).
Conveying the full 24/96 digital material out of a transport when
the CSS flag has been invoked is a violation of copyright, and
illegal. It may be that you are trying to listen to a disc which
invokes CSS.
Depending on your transport, the result will probably either be
a 48k lock (indicating downsampling in your transport due to
CSS), or no output at all (either “No DAS” or digital silence,
again due to CSS and how it is implemented in your transport).
7
I HAVE NEVER SEEN 96KHZ ON ANY DVD I PLAY, INCLUDING SOME
THAT I KNOW HAVE IT, AND PLAY ON OTHER SYSTEMS. WHY?
Many transports downsample everything to 48kHz (although this is not required by CSS). If your DVD transport does this, there is nothing the Nº30.6
can do to reverse the limitation being placed on the signal by the transport.
Rest assured that the 48kHz signal is being reproduced with the greatest
possible fidelity, and consider changing transports to one that can output
96 kHz when it is legal to do so.
31
Care and maintenance
To remove dust from the cabinet of the Nº30.6, use a feather duster. To remove
dirt and fingerprints, we recommend isopropyl alcohol and a soft cloth.
Caution!
32
Always apply the isopropyl alcohol to the soft cloth and then
wipe the Nº30.6 with the dampened cloth. Never pour even
small amounts of any liquid directly on the Nº30.6, as doing so
may allow the liquid to reach the circuitry inside the unit. Any
liquid inside the unit poses a hazard to both the user and to
the unit, and must be avoided.
U.S. and Canadian Warranty
90-Day Limited Warranty
This Mark Levinson® product is warranted to be free from defects in material and
workmanship under normal use for a period of ninety (90) days from the date of
purchase. To extend the warranty of this Mark Levinson product, return the warranty registration card along with a copy of the original receipt of purchase to
Madrigal Audio Laboratories, Inc., P. O. Box 781, Middletown, CT 06457.
Five Year Extended Warranty
The extended warranty for this Mark Levinson product is five (5) years from the
date of purchase. During the warranty period, any Mark Levinson component exhibiting defects in materials and/or workmanship will be repaired or replaced, at
our option, without charge for either parts or labor, at our factory. The warranty
will not apply to any Mark Levinson component that has been misused, abused
or altered.
Any Mark Levinson component not performing satisfactorily may be returned to
the factory for evaluation. Return authorization must first be obtained by either
calling or writing the factory prior to shipping the component. The factory will
pay for return shipping charges only in the event that the component is found to
be defective as above mentioned. There are other stipulations that may apply to
shipping charges.
There is no other express warranty on this component. Neither this warranty nor
any other warranty, express or implied, including any implied warranties of merchantability or fitness, shall extend beyond the warranty period. No responsibility
is assumed for any incidental or consequential damages. Some states do not allow limitations on how long an implied warranty lasts and other states do not
allow the exclusion or limitation of incidental or consequential damages, so that
the above limitation or exclusion may not apply to you.
This warranty gives you specific legal rights, and you may also have other rights
which vary from state to state. This warranty is applicable in the United States and
Canada only. Outside of the U.S. and Canada, please contact your local, authorized Mark Levinson distributor for warranty and service information.
33
Obtaining Service
We take great pride in our dealers. Experience, dedication, and integrity make
these professionals ideally suited to assist with our customers’ service needs.
If your Mark Levinson component must be serviced, please contact your dealer.
Your dealer will then decide whether the problem can be remedied locally, or
whether to contact Madrigal for further service information or parts, or to obtain
a Return Authorization. The Madrigal Technical Services Department works
closely with your dealer to solve your service needs expediently.
Important!
Return authorization must be obtained from Madrigal’s
Technical Services Department BEFORE a unit is shipped for
service.
It is extremely important that information about a problem be explicit and complete. A specific, comprehensive description of the problem helps your dealer and
the Madrigal Technical Services Department locate and repair the difficulty as
quickly as possible.
A copy of the original bill of sale will serve to verify warranty status. Please include it with the unit when it is brought in for warranty service.
Warning!
All returned units must be properly packaged (preferably in
their original packing material), and the proper return
authorization numbers must be marked on the outer carton
for identification. If the packaging to protect the unit is, in our
opinion or that of our dealer, inadequate to protect the unit,
we reserve the right to repackage it for return shipment at the
owner’s expense. Neither Madrigal nor your dealer can be
responsible for shipping damage due to improper (that is,
non-original) packaging.
Your dealer can order a new set of shipping materials for you if you need to ship
your component and no longer have the original materials. There will be a
charge for this service. We strongly recommend saving all packing materials in
case you need to ship your unit some day.
34
Specifications
The correlation between published specifications and sonic quality is unreliable. A
list of numbers reveals virtually nothing. All technical measurements must be subject to qualitative as well as quantitative interpretation.
Measurements of the Nº30.6 yield excellent results by any standards. However,
only those specifications that apply to its actual operation are included here.
■
■
■
■
■
■
■
■
■
■
■
■
■
■
■
■
■
■
■
■
Frequency response:
10Hz - 20kHz +0dB, –0.2dB
Total harmonic distortion (THD):
0.001% @ 1 kHz, 0dB, A-weighted
Dynamic range:
98dB (or better)
Signal-to-noise ratio:
105dB
Channel separation:
Better than 110 dB
Intermodulation distortion (SMPTE IMD):
Less than 0.005%
Digital-to-analog conversion:
Two custom 24-bit DACs
Digital filter:
16x oversampling
Analog filter:
Bessel-tuned, linear phase to 40kHz
Low-level linearity:
Deviation unmeasurable to below –70dB,
approximately +1.7dB below –90dB
(undithered, referenced to 0dB @ 1kHz)
Intelligent FIFO™ jitter:
under 20 ps, uncorrelated
Output impedance:
Less than 6Ω
Mains voltage:
100V, 120V, 220V, 230V 240V
Mains frequency:
50/60 Hz
Mains consumption:
72 watts
Overall dimensions:
See “Dimensions”
Shipping weight (2 boxes):
89 lbs. (40.37kg)
Input complement, Nº30.6:
3 XLR-type female connectors
2 RCA-type female connectors
1 ST-type connector
2 EIAJ-type connectors
2 five-pin female DC connectors
1 two-pin female DC connector
2 RJ-45 communications ports
1 RJ-45 PHASTLink® port
Output complement, Nº30.6: 2 pairs XLR-type male connectors (analog)
1 pair RCA-type female connectors (analog)
2 XLR-type male connectors (digital)
1 EIAJ-type connector (digital)
2 RJ-45 communications ports
1 RJ-45 PHASTLink® port
Connector complement, PLS-330:
2 five-pin female DC connectors
1 two-pin female DC connector
1 IEC mains connector
Madrigal provides an owner-transferable, five year extended warranty on all
Mark Levinson products within the U. S. and Canada ONLY. Warranty and
service policies outside the U. S. and Canada are set by the local, authorized
distributor and are applicable in the country of purchase ONLY. Madrigal
products are designed to operate at set voltages appropriate for the country
of sale and may be damaged if operated at the wrong voltage.
35
Dimensions
Nº30.6 Front Dimensions
1-3/4"
(44.5mm)
2-1/8"
(54mm)
15-3/4"
(400.1mm)
7-1/4"
(184.2mm)
4-1/4"
(108mm)
1
7/8"
(22.2mm)
2-1/4"
(57.2mm)
1/8"
(3.2mm)
4"
(101.6mm)
11-5/8"
(295.3mm)
7/8"
(22.2mm)
19-3/8"
(492.1mm)
Nº30.6 Rear Dimensions
1-15/16"
(49.2mm)
1-13/16"
(46mm)
2-1/16"
(52.4mm)
analog output
analog output
5/16"
(7.9mm)
balanced analog
output
balanced analog
output
control ports
15-1/2"
(393.7mm)
S/N
REFERENCE DIGITAL PROCESSOR Nº30.6
PHASTLink® compatible
d e s i g n e d a n d m a nu fa c t u r e d i n U. S. A .
by
balanced analog
output
communication
ports
master
2-3/16"
(55.6mm)
RS-232
3/16"
(4.8mm)
MADRIGAL
3-5/16"
(84.1mm)
digital inputs
electrical
digital
dc in
1
2
3
PUSH
PUSH
PUSH
4
5
6
7
8
electrical
rec
balanced analog
output
rec
analog dc in
7/8"
(22.2mm)
36
monitor
optical
5/16"
(7.9mm)
analog dc in
2-1/4"
(57.2mm)
7"
(177.8mm)
digital outputs
4-1/16"
(103.2mm)
optical
3/4"
(19.1mm)
1/4"
(6.4mm)
11-5/8"
(295.3mm)
19"
(482.6mm)
3-3/4"
(95.3mm)
Nº30.6 Top Dimensions
1/16"
(1.6mm)
1-1/2"
(38.1mm)
15/16"
(23.8mm)
1-1/16"
(27mm)
15-7/16"
(392.1mm)
7-1/4"
(184.2mm)
11-5/16"
(287.3mm)
11-5/8"
(295.3mm)
2-1/4"
(57.2mm)
7/8"
(22.2mm)
7/16"
(11.1mm)
2-9/16"
(65.1mm)
3/4"
(19.1mm)
5/16"
(7.9mm)
3/16"
(4.8mm)
PLS-330 Front Dimensions
15-3/4"
(400.1mm)
4-1/4"
(108mm)
1"
(25.4mm)
1-1/4"
(31.8mm)
2-1/4"
(57.2mm)
PLS-330 Rear Dimensions
15-1/2"
(393.7mm)
4"
(101.6mm)
1-1/16"
(27mm)
1-3/16"
(30.2mm)
2-1/4"
(57.2mm)
37
Madrigal Audio Laboratories, Inc.
2081 South Main Street, P.O. Box 781
Middletown, Connecticut 06457 USA
Telephone: (860) 346-0896
Fax: (860) 346-1540
http://www.madrigal.com/
R
MADRIGAL AUDIO LABORATORIES
is a registered trademark of Madrigal Audio Laboratories, Inc.
a Harman International company
HDCD® and High Definition Compatible Digital® are registered trademarks of Pacific Microsonics, Inc.
630342
© 9/1998 Madrigal Audio Laboratories, Inc. All rights reserved.
Printed in U.S.A.