1
Model ADF-212
Instruction Manual
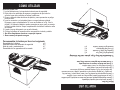
SmartFry XL ™
FREIDORA DE INMERSIÓN
•Canastas Dobles •Digital •Programable
•Double Capacity •Digital •Programmable
DEEP FRYER
SmartFry XL™
Manual de Instrucciones
Modelo: ADF-212
Congratulations!
Your
Digital Stainless Steel Deep Fryer with Frying Capacity will
give your kitchen a professional look, while providing you with delicious meals
night after night.
Please read the following instructions carefully before your first use.
© 2006 Aroma Housewares Company
Aroma Housewares Co.
6469 Flanders Drive
San Diego, CA 92121
U.S.A.
www.aromaco.com
Published By:
Aroma Housewares Co.
6469 Flanders Drive
San Diego, CA 92121
U.S.A.
1-800-276-6286
www.aromaco.com
© 2006 Aroma Housewares Company All rights reserved.
Antes de utilizar la freidora por primera vez, lea con atención las siguientes instrucciones.
Su freidora digital de acero inoxidable de
le dará a su cocina una
apariencia profesional mientras le proporciona alimentos deliciosos noche tras
noche.
¡Felicitaciones!
INSTRUCCIONES DE SEGURIDAD IMPORTANTES
Siempre se deben seguir las precauciones de seguridad básicas al usar electrodomésticos,
incluidas las siguientes:
1. Antes de usar esta unidad, lea las instrucciones.
2. No toque las superficies calientes. Utilice las asas o manijas.
3. Para protegerse de descargas eléctricas, no sumerja la unidad, el cable o los enchufes
en agua o en otros líquidos.
4. Este aparato electrodoméstico no está diseñado para ser utilizado por niños. Cuando el
aparato electrodoméstico es utilizado cerca de niños, es necesaria una atenta supervisión.
5. No deje la freidora de inmersión sin supervisión durante su funcionamiento.
6. Cuando el aparato no esté en uso y antes de limpiarlo, retire el enchufe del tomacorriente.
Antes de limpiarlo y de colocar o quitar piezas, permita que el aparato se enfríe.
7. No opere ningún aparato electrodoméstico que tenga un cable o un enchufe dañados,
que haya dejado de funcionar correctamente o que se encuentre dañado de cualquier
manera. Lleve el aparato al centro de servicio autorizado más próximo para que sea
revisado, reparado o ajustado.
8. El uso de accesorios agregados no recomendados por el fabricante del aparato puede
causar lesiones.
9. No lo utilice en exteriores.
10. No permita que el cable cuelgue del borde de la mesa o mostrador ni que toque
superficies calientes.
11. No lo coloque sobre una hornilla de gas o eléctrico caliente, ni cerca del mismo o
dentro de un horno caliente.
12. Sea sumamente precavido al utilizar o trasladar un aparato que contenga aceite
caliente u otros líquidos a alta temperatura.
13. Siempre coloque el enchufe primero en el aparato electrodoméstico y luego conecte el
cable al tomacorriente de la pared. Para desconectarlo, gire todos los controles hasta la
posición de apagado ("OFF") y luego retire el enchufe del tomacorriente de la pared.
14. No utilice el aparato de ninguna manera que no sea el uso indicado.
15. Utilice sólo utensilios de cocina de metal en la freidora, ya que los utensilios de goma o
plástico pueden resultar dañados por el aceite caliente. No deje los utensilios de metal
en la freidora, pues podrían calentarse y causar lesiones.
16. Para garantizar un funcionamiento seguro y evitar incendios, no coloque porciones
grandes de alimentos en el aparato.
17. Asegúrese de que las agarraderas estén colocadas correctamente en la
canasta y sujetas en su lugar. Vea las instrucciones de "Ensamblado de las
agarraderas de la canasta" en la página 8.
GUARDE ESTAS INSTRUCCIONES
1
1
SAVE THESE INSTRUCTIONS
Basic safety precautions should always be followed when using electrical
appliances, including the following:
1. Read all Instructions.
2. Do not touch hot surfaces. Use handles or knobs.
3. To protect against electrical shock, do not immerse cord, plug or appliance in
water or any other liquid.
4. This appliance is not intended to be used by children. Close supervision is
necessary when the appliance is used near children.
5. Do not leave this appliance unattended while in use.
6. Unplug from outlet when not in use and before cleaning. Allow to cool
before putting on or taking off parts, and before cleaning the appliance.
7. Do not operate any appliance with a damaged cord or plug or after the
appliance malfunctions or has been damaged in any manner. Return
appliance to the nearest authorized service facility for examination, repair or
adjustment.
8. The use of accessory attachments not recommended by the appliance
manufacturer may cause injuries.
9. Do not use outdoors.
10. Do not let cord hang over the edge of counter or table, or touch hot surfaces.
11. Do not place on or near a hot gas or electric burner, or in a heated oven.
12. Extreme caution must be used when using or moving an appliance
containing hot oil or any other hot liquids.
13. Always attach plug to appliance first, then plug cord into the wall outlet. To
disconnect, turn any control to “off”, then remove plug from wall outlet.
14. Do not use appliance for anything other than its intended use.
15. Use only metal cooking utensils in the fryer as rubber or plastic utensils will
become damaged from the hot oil. Do not leave metal utensils in the fryer
as they will become very hot and may cause injuries.
16. To assure safe operation and avoid possible fire, oversized foods must not
be inserted into the appliance.
17. Be sure the handles are properly attached to basket and locked in place.
See “Assembling the Fry Basket Handles” instructions on page 8.
IMPORTANT SAFEGUARDS
This appliance is for household use only.
1. Se proporciona un cable eléctrico corto con el propósito de reducir el riesgo
de tropezarse o enredarse con un cable más largo.
2
INSTRUCCIONES PARA USAR EL CABLE CORTO
CLAVIJA POLARIZADA
Este aparato cuenta con una clavija polarizada (una espiga es más ancha que la
otra); siga las siguientes instrucciones:
Para reducir el riesgo de choque eléctrico, esta clavija debe ser conectada a una
salida o enchufe eléctrico polarizado solamente de una manera. Si la clavija no
entra completamente en el enchufe, voltee la clavija.
Si aún no queda bien en el enchufe, póngase en contacto con un electricista
especializado. No trate de modificar la clavija.
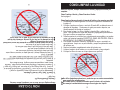
¡NO DEJE QUE EL CABLE CUELGUE!
To reduce the risk of electric shock, this plug is intended to fit into a polarized
outlet only one way. If plug does not fit fully into the outlet, reverse the plug.
If it still does not fit, contact a qualified electrician. Do not attempt to modify
the plug in any way.
¡MANTÉNGASE
LEJOS DE LOS NIÑOS!
This appliance has a polarized plug (one blade is wider than the other);
follow the instructions below:
POLARIZED PLUG
SHORT CORD INSTRUCTIONS
2
1. A short power-supply cord is provided to reduce risk resulting from becoming
entangled in or tripping over a longer cord.
Este aparato fue diseñado
Solamente para Uso Doméstico.
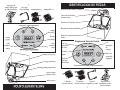
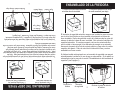
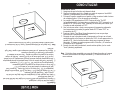
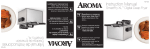
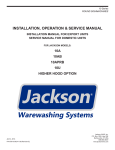
IDENTIFICACIÓN DE PIEZAS
3
Panel de control
1 Large Basket
2 Small Baskets
Magnetic Plug
and Cord
Stainless Steel Lid
with Double Filters
and Window
Control de la freidora/
Unidad eléctrica
Resistencia sumergible
Increase/Decrease Time/Temp
Bandeja de aceite esmaltada
Manija con cuerpo de aislamiento
térmico
Luz
indicadora
de calor
Diagrama de Panel de Control
Luz
indicadora
de
energía
Pantalla
digital
Botón de
encendido
/apagado
Tecla de
"Tiempo/
Termostato"
Aumento/disminución de tiempo/temperatura
Time/Temp
Button
Digital
Display
On/Off
Button
Heat
Indicator
Light
Control Panel Diagram
Cool Touch Handles
Enameled Oil Pan
Immersible Heating Element
Fryer Control/
Electrical Unit
1 Grande
Conector
2 Pequeño
Tapa de acero
Canasto para freír Canasto para freír magnético y cable inoxidable con dos
3
filtros y ventana
Control Panel
PARTS IDENTIFICATION
Power
Indicator
Light
4
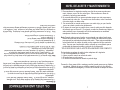
CÓMO UTILIZAR
Antes del primer uso:
1. Lea las indicaciones y las importantes instrucciones de seguridad.
2. Retire todos los materiales de empaque y asegúrese de que todos los
artículos hayan sido recibidos en buenas condiciones.
3. Rompa y deseche todas las bolsas de plástico, pues representan un peligro
para los niños.
4. Lave los accesorios y el recipiente interno con agua jabonosa caliente.
Enjuague y seque completamente. Tal como se muestra en la Fig. 2 de la
página 4, el elemento calefactor puede sumergirse en agua, pero no sumerja
nunca la unidad eléctrica. Seque completamente el elemento calefactor antes
de utilizarlo.
5. Limpie el cuerpo del aparato con un paño húmedo.
6. Coloque la freidora de inmersión sobre una superficie nivelada y estable.
¾ No utilice limpiadores abrasivos o esponjas ásperas.
¾ Nunca sumerja el aparato en agua.
Para ensamblar la freidora por favor lea lo siguiente:
p.5
p.6
p.6
p.8
p.5
p.6
p.7
p.8
Assembling the Deep Fryer
Resetting the Safety Thermostat
Oil Level and Maintenance
Assembling the Basket Handles
Ensamblado de la freidora
Reestablecimiento del termostato de seguridad
Nivel de aceite y mantenimiento
Ensamblado de las agarraderas de la canasta
To Assemble the Deep Fryer, please read the following:
Before First Use:
1. Read all instructions and important safeguards.
2. Remove all packaging materials and make sure items are received in good condition.
3. Tear up and discard all plastic bags as they can pose a risk to children.
4. Wash accessories and enameled oil pan in warm soapy water. Rinse and dry
thoroughly. The heating element can be immersed in water, but never immerse
the electrical unit. Dry the heating element thoroughly before use.
5. Wipe the body clean with a damp cloth.
6. Place the deep fryer on a level, stable surface.
¾ Do not use abrasive cleaners or scouring pads.
¾ Do not immerse the appliance in water at any time.
HOW TO USE
4
5
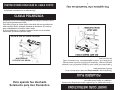
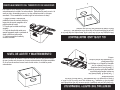
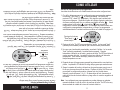
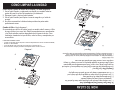
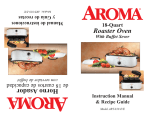
ENSAMBLADO DE LA FREIDORA
1. Coloque el tanque de aceite esmaltado
en la base de acero inoxidable
2. Coloque la resistencia en el tanque
de aceite esmaltado (vea abajo)
Fryer Control
Safety Switch
Guides on back of deep fryer
Guides on
Deep Fryer
El interruptor de seguridad automático asegura que la unidad no opere a menos
que el control de la freidora se haya insertado correctamente en la base de
acero inoxidable. Deslice las guías del control de la freidora sobre las guías del
extremo de atrás de la base de acero inoxidable. Esto activará el interruptor de
seguridad automático. Si conecta su aparato a la toma de corriente eléctrica
pero la unidad no tiene energía (la luz indicadora de energía no se enciende),
desconecte el aparato de la toma de corriente eléctrica y luego retire el conector
magnético del aparato. Retire el control de la freidora de la base y vuelva a
ensamblarlo en forma correcta.
Su freidora también está equipada con un termostato de seguridad que apagará
automáticamente la unidad en el caso de que se sobrecaliente. Si su aparato se
sobrecalienta, siga los pasos de la sección "Reestablecimiento del termostato de
seguridad" (vea la página 6).
Your deep fryer is also equipped with a safety thermostat that will automatically
shut down the unit in the event that it overheats. If your appliance overheats,
follow the steps in “Resetting the Safety Thermostat” (See page 6.)
The automatic safety switch ensures that the unit will not operate unless the fryer
control has been inserted correctly onto the stainless steel base. Slide the
guides on the fryer control onto the guides on the back end of the stainless steel
base. This will activate the automatic safety switch. If you plug your appliance
into the electric outlet but the unit does not have power (power indicator light
does not illuminate), unplug the appliance from the electric outlet and then
remove the magnetic plug from the appliance. Remove the fryer control from the
base and reassemble correctly.
Guías en
la freidora
Control de la
freidora
Interruptor
de seguridad
5
Guías en la parte de atrás de
la freidora
1. Place enameled oil tank
into stainless steel base
2. Set heating element into
enameled oil tank (see below)
ASSEMBLING THE DEEP FRYER
Before plugging the unit into the electric outlet, always make sure that the oil is at
least at the minimum marking on the inside of the enameled tank. If oil is not
filled to at least the minimum level, the unit may overheat.
OIL LEVEL AND MAINTENANCE
Esta freidora se ha diseñado para incluir un sensor que apagará
automáticamente la unidad si se sobrecalienta. Esta situación puede ocurrir si el
aceite es viejo, demasiado grueso o si no hay suficiente aceite en el tanque
esmaltado. Para reestablecer la unidad, siga las instrucciones de abajo.
1. Apague la unidad. Desconecte la
unidad de la toma de corriente eléctrica y
luego retire el conector magnético de la
parte de atrás del control.
2. Permita que la unidad se enfríe por
completo
3. Corrija la situación del aceite en su
aparato agregando aceite o cambiando el
aceite conforme se indica arriba.
4. Vuelva a ensamblar la unidad y
continúe cocinando.
6
REESTABLECIMIENTO DEL TERMOSTATO DE SEGURIDAD
NIVEL DE ACEITE Y MANTENIMIENTO
RESETTING THE SAFETY THERMOSTAT
6
This deep fryer has been designed to include a sensor that will automatically shut
down the unit if it overheats. This situation may occur if the oil is old, too thick, or
if there is not enough oil in the enameled tank. To reset the unit, follow the
instructions below.
1. Turn the unit off. Unplug the unit from
the electric outlet and then remove the
magnetic plug from the back of the control.
2. Allow the unit to cool completely
3. Correct the oil situation in your
appliance by adding oil or changing the
oil as stated above.
4. Reassemble the unit and continue
cooking.
Antes de conectar la unidad a la toma de corriente eléctrica, asegúrese siempre
de que el aceite esté al menos en la marca mínima dentro del tanque esmaltado.
Si no se llena de aceite al menos hasta el nivel mínimo, la unidad se puede
sobrecalentar.
NIVEL DE ACEITE Y MANTENIMIENTO
Selección del aceite:
1. Recomendamos los siguientes aceites para freír de una manera más sana:
maíz, cártamo, soya o de olivo extra ligero. Estos aceites son libres de
colesterol y bajos en grasa saturada.
2. No recomendamos freír con grasas animales porque son más propensas a
deteriorarse bajo calor alto. Los aceites con mucho sabor, como el aceite de
olivo extra virgen, se deben evitar.
3. Se recomienda no mezclar aceite nuevo con aceite viejo, ya que el aceite
nuevo se echará a perder más rápidamente.
4. El número de veces que se puede volver a usar el aceite para freír depende
del alimento que se fría en él. Por ejemplo, cuando los alimentos que dejan un
sabor residual (como el pescado) se fríen frecuentemente, se necesitará
reemplazar el aceite con más frecuencia.
Nota: Cuando vuelva a usar el aceite, se recomienda que cuele el aceite para
retirarle las partículas de alimentos. Use un colador de malla sobre un tazón
para separar las partículas de alimento del aceite. * Para mejores resultados,
usted puede forrar el colador de malla con dos capas de tela tipo manta de
cielo. Una vez que el aceite esté colado, colóquelo en un recipiente que se
pueda sellar de manera hermética y póngalo en el refrigerador.
* SÓLO DESPUÉS DE QUE EL ACEITE SE HA ENFRIADO POR COMPLETO
Es importante reemplazar el aceite si nota cualquiera de lo siguiente:
¾ Un olor desagradable en el aceite
¾ Humo excesivo cuando se calienta el aceite
¾ El aceite tiene un color oscuro
¾ El aceite se ha almacenado durante un periodo largo
Precaución: Usar grasa sólida o manteca para freír puede causar que su freidora
se caliente. Además de que se solidifica cuando se enfría, lo que dificulta
retirar la resistencia sumergida y el control de la freidora del tanque de aceite.
7
7
Note: We do no recommend frying with animal fats or shortening. Using solid fat
or shortening to fry may cause your deep fryer to overheat. Also, it solidifies as it
cools, which makes it difficult to remove the submerged heating element and fryer
control from the oil tank.
It is important to replace the oil if you notice any of the following:
¾ An unpleasant odor to the oil
¾ Excessive smoking when heating the oil.
¾ Oil is dark in color.
¾ Oil has been stored for a long period of time.
Note: When reusing oil, it is recommended that you strain the oil to remove food
particles. Use a mesh strainer over a bowl to separate food particles from the
oil.* For best results, you can line the mesh strainer with two layers of
cheesecloth. Once the oil is strained, place in a container that can be sealed
tightly and place in the refrigerator.
* ONLY AFTER THE OIL HAS COMPLETELY COOLED
Oil Selection:
1. We recommend the following oils for healthier deep-frying: corn, safflower,
soybean, or extra light olive oil. These oils are cholesterol free and low in
saturated fat.
2. We do not recommend frying with animal fats as they are more prone to
deteriorate under high heat. Heavily flavored oils such as extra virgin olive oil
should also be avoided.
3. We do not recommend mixing old and new oil together as this taints the new oil.
4. The number of times that the frying oil can be reused depends on the food that
is fried in it. For example, when foods that leave a residual flavor (such as fish)
are fried frequently, the oil will need to be replaced more often.
OIL LEVEL AND MAINTENANCE
ENSAMBLADO DE LAS AGARRADERAS DE LA CANASTA
8
Las agarraderas de la canasta vendrán ensambladas en las dos canastas
pequeñas. Usted necesitará colocar la agarradera en la canasta grande y fijar
las agarraderas de las canastas pequeñas en su lugar antes de usarlas.
Canasta grande
Canasta grande
¾ Apriete juntas las clavijas de la
agarradera y deslice los extremos de la
clavija de la agarradera a través de los
orificios para los extremos de la clavija de
la agarradera.
¾ Jale la agarradera hacia usted,
apretándola y rotándola ligeramente
desde un extremo hacia el otro para fijar
las clavijas de la agarradera en su lugar.
Canasta Pequeño
Canasta Pequeño
¾ Jale la agarradera hacia usted,
apretándola y rotándola ligeramente
desde un extremo hacia el otro para fijar
las clavijas de la agarradera en su lugar.
Para quitar la agarradera para limpieza y
almacenamiento, simplemente lleve a
cabo este proceso a la inversa.
PRECAUCIÓN: Asegúrese de que las agarraderas estén colocadas correctamente
en la canasta y sujetas en su lugar.
Always attach the magnetic plug to the appliance first and then to the wall outlet.
After use, unplug from the wall outlet first, and then remove the magnetic plug from
the appliance.
This stainless steel deep fryer has been specially designed with a “breakaway”
cord, making deep frying safer than ever. The magnetic plug will only attach to
the appliance in one direction. The plug is clearly marked “This Side Up.” The
bottom of the plug also has a notch, which will prevent you from attaching the
plug the wrong way. The magnets on the plug and appliance automatically make
the connection. Should you accidentally move or tug on the power cord while in
use, it will automatically pull away from the appliance, breaking the connection
and preventing the hot oil tank from tipping over. DO NOT place the appliance
on top of the cord or run the cord around the unit. This will prevent the magnetic
cord from detaching easily if the cord is accidentally tugged on.
MAGNETIC CORD INSTRUCTIONS
CAUTION: Always check basket handles to ensure that the handles are secured
before cooking with hot oil. This will help to prevent personal injury.
To remove handle for cleaning and
storage, simply reverse this process.
Your basket handles will come assembled on the two small baskets. You will
need to attach the handle to the large basket and lock the small basket
handles in place before use.
Large Basket
Large Basket
¾ Squeeze handle prongs together and
slip the handle prong wings through
the handle prong wing slots.
¾ Pull handle back toward you,
squeezing and rotating slightly from
one side to the other to lock the handle
prongs into place.
ASSEMBLING THE BASKET HANDLES
Coloque siempre primero el conector magnético en el aparato y luego conéctelo a la
toma de corriente eléctrica. Después de usarse, desconéctelo primero de la toma
de corriente eléctrica de la pared y luego retire el conector magnético del aparato.
8
Small Basket
Esta freidora de acero inoxidable se ha diseñado especialmente con un cable de
"separación", lo que hace que freír sea más seguro que nunca. El conector
magnético sólo se conecta al aparato en una sola dirección. El conector está
claramente marcado con "This Side Up" (Este lado para arriba). La parte de
abajo del conector también tiene una muesca, misma que evitará que lo coloque
de manera incorrecta. Los imanes del conector y el aparato harán la conexión de
forma automática. En caso de que mueva o jale accidentalmente el cable de la
corriente mientras esté en uso, éste se separará automáticamente del aparato,
interrumpiendo la conexión y evitando que el tanque de aceite caliente se voltee.
NO coloque el aparato sobre el cable ni enrede el cable alrededor de la unidad.
Esto evitará que el cable magnético se desprenda con facilidad si el cable se jala
accidentalmente.
Small Basket
¾ Pull handle back toward you,
squeezing and rotating slightly from
one side to the other side to lock the
handle prongs into place
CONECTOR MAGNÉTICO Y CABLE
CÓMO UTILIZAR
Precaliente el aceite:
1. Asegúrese de que la freidora esté desenchufada.
2. Seque el recipiente para freír y llénelo con aceite sin superar el nivel MAX
(máximo) y sobrepasando el nivel MIN (mínimo).
3. Coloque el conector magnético en el aparato y luego conecte el cable a la toma
de corriente eléctrica. La luz de energía se encenderá.
4. La pantalla LCD parpadeará en 00:00. Presione el botón "On/Off"
(encendido/apagado) y la temperatura por defecto de 375°F aparecerá en la
pantalla LCD. La luz verde "heat" (calentar) se encenderá para indicar que
el aceite se está calentando a 375°F.
5. Use los botones arriba o abajo para programar la temperatura adecuada.
Las temperaturas se pueden programar desde 300°F hasta 375°F en
incrementos de 5°F.
6. Presione el botón Time/Temp (tiempo/temperatura) una vez que haya
seleccionado la temperatura deseada.
7. Después de que haya seleccionado la temperatura, el tiempo se colocará
automáticamente en el tiempo por defecto de 10:00, el cual aparecerá en la
pantalla LCD. Use los botones arriba o abajo para programar el tiempo
adecuado. El tiempo se puede programar entre 2 minutos y 30 minutos en
incrementos de 30 segundos.
8. Cuando el aceite esté precalentado, escuchará tres pitidos y la luz verde
"heat" (calentar) parpadeará.
Nota: Su freidora tiene capacidad para cerca de 9 tazas de aceite en la marca
de aceite mínima dentro del tanque esmaltado y 12 tazas de aceite en la
marca máxima.
9
9
Note: Your deep fryer will hold approximately 9 cups of oil at the minimum oil
mark inside the enamel tank and 12 cups of oil at the maximum mark.
Preheat Oil:
1. Make sure that the fryer is unplugged.
2. Wipe dry the enameled pot and fill it with oil no higher than the MAX level and
no lower than MIN level.
3. Attach the magnetic plug to the appliance and then plug the cord into the
electric outlet. The power light will illuminate.
4. The LCD display will flash 00:00. Press the “On/Off” button and the default
temperature of 375° F will show up on the LCD screen. The green “Heat”
light will illuminate to indicate that the oil is heating to 375° F.
5. Use the up or down buttons to program the proper temperature.
Temperatures can be set from 300° F to 375° F in 5° F increments.
6. Press the Time/Temp button once you have selected the desired temperature.
7. After temperature has been selected, time will automatically go to the default
time of 10:00, which will show up on the LCD screen. Use the up or down
buttons to program the proper time setting. Time can be set between 2
minutes and 30 minutes in 30 second increments.
8. When oil is preheated, you will hear three beeps and the green “Heat” light
will flash.
HOW TO USE
10
CÓMO UTILIZAR
Nota: Antes de freír, sacuda siempre los alimentos congelados para quitar las partículas
de hielo. Antes de freír, seque con leves golpecitos las papas fritas recién cortadas y
otros alimentos húmedos, ya que éstos pueden causar exceso de espuma y
salpicaduras de aceite.
Ganchos para
escurrir
10
HOW TO USE
8.
9.
Retire con cuidado los alimentos del canasto. Sea precavido, ya que el aceite
caliente puede salpicar hacia fuera del recipiente.
Para apagar la freidora de inmersión, desconéctela del tomacorriente de pared.
Permita que el aceite se enfríe por completo antes de mover o limpiar la freidora. (3
a 4 horas)
To fry:
1. For foods that are not coated with batter, place directly in the basket. Be sure
not to fill basket more than 1/2 full. Over filling will cause food to cook
improperly and could cause the oil to bubble over.
2. Lower basket carefully into oil.
3. For foods coated with batter, first lower basket into oil and gently place foods
directly into oil. This will prevent the food coated with batter from sticking to
the bottom of the basket.
4. Replace the lid securely.
5. The display will default back to temperature reading. To check time, press the
time/temperature control once.
6. When the programmed time has run its course, you will hear three beeps.
The LCD display will read 00:00. Lift basket up out of the oil and place on
drain hooks to allow excess oil to drain away. Press the On/Off button once to
repeat the previous setting if another batch of the same food is desired and
repeat steps 1-5. If you wish to discontinue frying, unplug the cord from the
electric outlet and then remove the magnetic end from the unit.
7. Carefully remove the fried food from the basket. Be cautious of the hot oil
that might spatter from the frying pot.
8. To turn off the deep fryer, you must unplug it from the electric outlet.
9. Allow the oil to cool completely before moving or cleaning the appliance. (3-4
hours)
7.
Note: Always shake frozen foods to remove ice particles prior to frying. Pat dry
fresh-cut French fries and other damp foods before frying as moist food may
cause excess foaming and spattering of oil.
5. La pantalla volverá por defecto a la lectura de temperatura. Para verificar el
tiempo, presione el control de tiempo/temperatura una vez.
6. Cuando el tiempo programado haya transcurrido, escuchará tres pitidos. La
pantalla LCD indicará 00:00. Saque la canasta del aceite y colóquela en los
ganchos para escurrir con el fin de que el exceso de aceite se escurra.
Presione el botón On/Off (encendido/apagado) una vez para repetir la
configuración anterior si desea freír otro lote del mismo alimento y repita los
pasos del 1 al 5. Si desea dejar de freír, desconecte el cable de la toma de
corriente eléctrica y luego retire el conector magnético de la unidad.
Drain Hooks
Para freír:
1. Los alimentos que no estén rebozados pueden colocarse directamente en el
canasto para freír. Asegúrese de no llenar el canasto más de 2/3 de su capacidad.
Si llena el canasto en exceso, los alimentos no se cocinarán correctamente y el
aceite podría burbujear hacia afuera.
2. Sumerja el canasto con cuidado en el aceite.
3. En el caso de alimentos rebozados, primero sumerja el canasto en el aceite y luego
coloque con cuidado los alimentos directamente en el aceite. De esta manera,
evitará que los alimentos rebozados se adhieran al fondo del canasto para freír.
4. Vuelva a colocar la tapa.
11
CÓMO UTILIZAR
Uso de las configuraciones preprogramadas
Lea todas las instrucciones con cuidado antes de usar estas configuraciones.
1. Con el fin de tener acceso a las configuraciones preprogramadas, presione
los botones "Time/Temp" y
en forma simultánea. La lectura LED
mostrará "P00", donde "00" parpadeará. Esto significa que la unidad está
lista para configurarse. Siguiendo la tabla de la página siguiente, seleccione
el número preconfigurado que va a utilizar presionando el botón
. Usted
puede recorrer hacia arriba
o hacia abajo
para encontrar la
configuración correcta que desea usar. Una vez que haya seleccionado una
configuración preprogramada, la temperatura y el tiempo se programarán
automáticamente en la unidad conforme se indica en la tabla de la página 12.
Presione los botones
"Time/Temp" y
al
mismo tiempo.
2. Presione el botón "On/Off" para precalentar el aceite. La luz verde "heat"
(calentar) se encenderá para indicar que el aceite se está precalentando.
3. Una vez que el aceite esté precalentado, escuchará 3 pitidos. La luz verde
"heat" (calentar) parpadeará y la unidad hará una pausa. Sumerja
lentamente el alimento en el aceite y presione el botón "On/Off" para iniciar el
conteo regresivo del reloj. La pantalla volverá por defecto a la lectura de
temperatura. Para verificar el tiempo, presione el control de
tiempo/temperatura una vez.
Note: The preset settings can be stopped at anytime during the cooking cycle
by pressing the “On/Off” button once and unplugging the unit from the electric
outlet.
5. Lift the basket up out of the oil and place on drain hooks to allow excess oil to
drain away. Press the On/Off button once to repeat the previous setting if
another batch of the same food is desired and repeat steps three, four and
five. If you wish to discontinue frying, unplug the cord from the electric outlet
and then remove the magnetic end from the unit.
4. After the preset time has run its course, you will hear three beeps. The LCD
display will read the program code that you just used.
3. Once the oil is preheated, it will beep 3 times. The green “Heat” light will flash
and the unit will pause. Lower the food slowly into the oil and press the
“On/Off” button to begin the countdown timer. The display will default back to
temperature reading. To check time, press the time/temperature control once.
2. Press the “On/Off” button to preheat the oil. The green “Heat” light will
illuminate to indicate that the oil is preheating.
Press the
“Time/Temp”
and
buttons at the
same time.
1. To access the preprogrammed settings, press the “Time/Temp” and
buttons simultaneously. The LED readout will display “P00”, with the “00”
flashing. This signifies that the unit is ready to be set. Following the chart on
the next page, select the preset number you are going to use by using the
button. You can scroll up
or down
to find the correct setting you
want to use. Once you have selected a preset setting, the temperature and
time will be automatically programmed into the unit as outlined in the chart on
page 12.
4. Después de que el tiempo preprogramado haya transcurrido, escuchará tres
pitidos. La pantalla LCD indicará el código del programa que acaba de usar.
Using the Preprogrammed Settings
Read all directions carefully before using these settings.
Nota: Las configuraciones preprogramadas se pueden detener en cualquier
momento durante el ciclo de cocción al presionar el botón "On/Off" una vez y
desconectando la unidad de la toma de corriente eléctrica.
5. Saque la canasta del aceite y colóquela en los ganchos para escurrir con el
fin de que el exceso de aceite se escurra. Presione el botón On/Off una vez
para repetir la configuración anterior si desea freír otro lote del mismo
alimento y repita los pasos 3, 4 y 5. Si desea dejar de freír, desconecte el
cable de la toma de corriente eléctrica y luego retire el conector magnético de
la unidad.
11
HOW TO USE
12
CÓMO UTILIZAR
Uso de las configuraciones preprogramadas
Código
P01
P02
P03
P04
P05
Tiempo (min)
3
Champiñones congelados
4
Deditos de queso congelados
2:30
Aros de cebolla congelados
3
Deditos de pescado congelados/
5
Alimento
Camarones congelados
Temperatura (OF)
355
355
375
375
375
Trocitos de pollo congelados
P06
Alitas de pollo sin hueso
congeladas
9:30
375
P07
P08
P09
Papas fritas congeladas
Papas fritas
4
5
375
375
10:30
375
When the unit is first plugged on, it automatically defaults to the manual mode. If
you wish to switch to the Preset Mode, simply press the Time/Temp Button and
the
button simultaneously.
10
375
Changing Between Manual and Preset Mode
Frozen Onion Rings
Frozen Fish Sticks/
Frozen Chicken Nuggets
P04
P05
Frozen Mushrooms
Frozen Cheese Sticks
P02
P03
Frozen Shrimp
P01
Food
3
5
4
2:30
3
Time (min)
375
375
375
375
375
375
375
355
375
355
Temp (OF)
Using the Preprogrammed Settings
HOW TO USE
12
Code
9:30
4
5
10:30
10
Para cambiar de nuevo al modo manual del modo preconfigurado, presione el
botón Time/Temp y el botón
al mismo tiempo una vez más.
Frozen Boneless Chicken Wings
Frozen French Fries
Fresh French Fries
Frozen Chicken Wings w/ Bone
Fresh Chicken Wings w/ Bone
Cuando la unidad se conecta por primera vez, automáticamente se coloca en el
modo manual. Si desea encenderla en el modo preconfigurado, sólo presione el
botón Time/Temp y el botón
en forma simultánea.
P06
P07
P08
P09
P10
Cambio entre el modo manual y preconfigurado
To switch back to manual mode from Preset Mode, press the Time/Temp Button
and the
button at the same time once again.
P10
Alitas de pollo con hueso
congeladas
Alitas de pollo con hueso
frescas
CÓMO LIMPIAR LA UNIDAD
13
Antes de limpiarla, siempre desenchufe la unidad y deje que se enfríe por
completo.
Cómo Cambiar el Aceite y Cómo Guardar el Aceite:
Vea la página 7.
Cómo limpiar el tanque de aceite, la tapa de la freidora y las canastas para freír:
1. Desensamble la unidad siguiendo a la inversa los pasos de ensamblado de
la página 5.
2. Coloque el aceite en un frasco o una lata. El aceite NO se debe echar en el
desagüe del fregadero. Si almacena el aceite para usarlo después, vea
Almacenamiento del Aceite en la página 7.
3. Para limpiar la tapa y los filtros, levante la tapa del filtro y retire los dos
filtros. Lave los filtros con agua tibia jabonosa y enjuáguelos perfectamente.
Deje que los filtros se sequen por completo.
4. Todas las partes de su freidora son completamente sumergibles y se pueden
meter a la máquina lavaplatos EXCEPTO EL PANEL DE CONTROL CON LA
RESISTENCIA Y EL CONECTOR MAGNÉTICO.
5. Para limpiar el elemento calefactor, enjuáguelo con agua o sumérjalo en
agua jabonosa. Limpie con un paño húmedo y seque completamente antes
del próximo uso.
6. Seque el recipiente completamente antes del próximo uso.
7. Limpie el armazón de la freidora con un paño húmedo y luego séquelo.
8. Coloque los filtros de nuevo en la tapa para su uso posterior.
¾ No utilice limpiadores abrasivos o productos que no estén recomendados
para superficies antiadherentes.
¾ No intente enfriar la unidad colocando agua fría dentro del recipiente.
¾ No sumerja la unidad eléctrica en agua o en ningún otro líquido.
13
.
To Clean Oil Tank, Fryer Lid and Fry Baskets:
1. Disassemble the unit by reversing the steps of assembly on page 5.
2. Dispose of the oil in a jar or can. Oil should NOT be poured into the drain of
your sink. If you are storing your oil for future use, see Storing Oil on page 7.
3. To clean the lid and filters, lift the filter lid and remove the two filters. Wash the
filters in warm, soapy water and rise thoroughly. Allow the filters to dry
completely.
4. All parts of your fryer are fully immersible and dishwasher safe EXCEPT FOR
THE CONTROL PANEL WITH THE HEATING ELEMENT AND THE
MAGNETIC PLUG.
5. To clean the heating element, rinse with water or immerse in soapy water.
Wipe with damp cloth and dry thoroughly before next use.
6. Dry the pot completely before next use.
7. Clean the body of the fryer with a damp cloth and then dry.
8. Place filters back into the lid for future use.
¾ Do not use harsh abrasive cleaners or products that are not considered
safe to use on nonstick coatings.
¾ Do not attempt to cool the unit by pouring cold water into the pot.
¾ Do not immerse the electrical unit in water or any other liquid.
Changing Oil and Storing Oil:
See page 7.
Always unplug unit and allow to cool completely before cleaning.
HOW TO CLEAN
14
CÓMO LIMPIAR LA UNIDAD
Cómo limpiar el panel de control de la freidora y el cable magnético:
1. Use un paño húmedo y enjabonado para limpiar por completo todas las
partes del panel de control de temperatura y la resistencia.
2. Enjuague el paño y limpie el jabón restante.
3. Use un paño húmedo para limpiar el conector magnético y el cable de
energía.
4. No vuelva a ensamblar la freidora hasta que todas las partes estén
perfectamente secas.
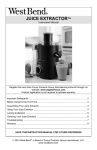
B
Cambio del filtro: Vea la diagrama 1.
Se recomienda que el filtro de carbón (negro) se cambie cada 6 meses y el filtro
de vapor (blanco) una vez al año. Estas recomendaciones son aproximadas
y los filtros se deben cambiar dependiendo de la frecuencia de uso. Para
cambiarlos, desabroche la tapa del filtro, retire los filtros y reemplácelos por
nuevos filtros.
LLAME PARA OBTENER FILTROS
• Los filtros de reemplazo pueden adquirirse a través del Departamento de Servicio al Cliente de AROMA,
llamando al 1-800-276-6286.
• La vida útil del filtro varía según el tipo de comida frita y la frecuencia de uso.
• Aroma Housewares Company recomienda el reemplazo del filtro al cabo de 30 usos.
A
Diagram 1
Diagrama 1
CALL FOR FILTERS
• Replacement filters are available through AROMA Customer Service at 1-800-276-6286.
• The life of the filter varies according to the type of food fried and the frequency of use.
• Aroma Housewares Company recommends the filter be replaced after 30 times of operation.
A
Changing Filter: See Diagram 1
It is recommended that the carbon filter (black) be changed every 6 months and
the vapor filter (white) once a year. These recommendations are approximate
and the filters should be changed depending on amount of usage. To change,
unclip filter cover, remove filters and replace with new ones.
B
To Clean Fryer Control Panel and Magnetic Cord
1. Use a damp, soapy dishcloth and completely wipe down all parts of the
temperature control panel and heating element.
2. Rinse dishrag and wipe off all residual soap.
3. Use a damp cloth to wipe down the magnetic plug with electric cord.
4. Do not reassemble the deep fryer until all parts are thoroughly dry.
HOW TO CLEAN
14
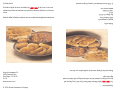
RECETAS
Pimpollos de cebolla fritos
Aceite de canola o vegetal combinado para freír
1 cebolla grande
2 huevos
1/2 taza de cerveza
1/2 taza de leche
2 tazas de harina común
1/2 cucharadita de bicarbonato de sodio
1/2 cucharadita de pimienta negra
Precaliente el aceite a 375 °F. Pele la cebolla y quite la parte inferior de la misma.
Corte la cebolla en gajos de 3/4 de pulg. sin llegar hasta la base de la misma.
Remoje la cebolla en agua fría con hielo hasta que los gajos se abran. Remoje
durante 7 a 12 minutos. Escurra la cebolla y séquela con leves golpecitos.
Mezcle los huevos con la cerveza y la leche. En un bol separado, mezcle la
harina con el bicarbonato de sodio y la pimienta negra.
Espolvoree la cebolla con la mezcla de harina. Coloque la cebolla en la mezcla
para rebozar. Vuelva a espolvorear la cebolla con la mezcla de harina. Sacuda el
exceso. Asegúrese de que la cebolla esté completamente rebozada.
Sumerja el "pimpollo" con cuidado en el aceite caliente tratando de no salpicar.
Cocine por 2 minutos. Dé vuelta la cebolla y cocine por otros 2 minutos o bien hasta
que esté dorada. Retire el pimpollo dorado del aceite. Añada sal y pimienta a gusto.
Arrollado de huevo vegetariano
Aceite de maíz para freír
6 envoltorios para arrollado de huevo
2 cebollines de verdeo picados
1/4 libra de hongos blancos picados
2 oz. de zanahorias ralladas
1 cucharadita de jengibre picado y ajo
2 hongos negros picados y mojados
1 cucharadita de aceite de sésamo
1 cucharadita de sal
1/4 taza de brotes de soja
1 cucharadita de cacahuates tostados y picados
15
15
Vegetarian Egg Rolls
Corn oil for frying
6 egg roll wrappers
2 green onions, minced
¼ lb. minced white button mushrooms
2 oz. grated carrot
1 teaspoon minced ginger and garlic
2 soaked and minced dried black mushrooms
1 teaspoon sesame oil
1 teaspoon salt
¼ cup bean spouts
1 teaspoon chopped roasted peanuts
Cook for 2 minutes. Turn onion and cook for an additional 2 minutes or until
golden brown. Lift the cooked blossom from the oil. Sprinkle with salt and
pepper to taste.
Carefully lower the blossom into hot oil being very careful to avoid splattering.
Dust the onion with the flour mixture. Dip the onion in the batter. Re-dust with the
flour mixture. Shake off the excess. Make sure that the onion is completely coated.
Soak onion in ice cold water until wedges open (approximately 7-12 minutes).
Drain onion and pat dry. Mix together eggs, beer and milk. In a separate bowl
mix flour, baking soda and black pepper.
Preheat oil to 375° F. Peel onion and cut the bottom off. Cut the onion into ¾inch wedges without cutting all the way through the base.
Deep Fried Onion Blossom
Canola oil or blended vegetable oil for frying
1 large onion
2 eggs
½ cup beer
½ cup milk
2 cups all-purpose flour
½ teaspoon baking soda
½ teaspoon black pepper
RECIPES
16
CONTINUACIÓN DE RECETAS
Precaliente el aceite a 375 °F. Caliente 2 cucharaditas de aceite de maíz en una
sartén a fuego mediano. Agregue el ajo, el jengibre y el cebollín de verdeo.
Cocine por 2 minutos. Añada los hongos blancos y negros. Cocine por 3
minutos. Agregue sal a gusto. Incorpore los cacahuates, las zanahorias, los
brotes de soja y el aceite de sésamo y apague el fuego.
Para preparar los arrollados de huevo, coloque 2 1/2 cucharadas de relleno en
cado uno. Arróllelos doblando los bordes sobre el relleno. Selle el borde con una
gota de pasta de harina espesa.
Fría por inmersión las tiritas de pollo a 350 °F durante 8 a 10 minutos. Deje que
escurran en el canasto y sírvalas con mostaza a la miel o salsa agridulce.
Deep fry 3 rolls at a time for approximately 4-6 minutes or until the egg rolls are
golden brown all sides. Carefully lift the cooked egg rolls from the fryer. Let
drain in the basket then pat dry with paper towels.
Reboce las pechugas de pollo con harina y pan rallado.
Fried Chicken Tenders
4 boneless, skinless chicken breasts
1 cup bread crumbs
1 teaspoon lemon juice
1 tablespoon dried basil leaves
1 cup flour
½ teaspoon of salt and pepper
½ cup milk
1 cup vegetable oil
Precaliente el aceite a 350 °F. Corte el pollo en tiritas uniformes de 1 x 2 pulg.
aproximadamente. Adobe el pollo con sal, pimienta, hojas de albahaca y jugo de
limón durante 30 minutos.
Preheat oil to 350°F. Cut the chicken in even strips, about 1 inch wide and 1
inch thick. Marinate chicken with salt, pepper, basil leaves and lemon juice for
about 30 minutes. Coat chicken breasts evenly with flour and bread crumbs.
Trozos tiernos de pollo frito
4 pechugas de pollo deshuesado y sin piel
1 taza de pan rallado
1 cucharadita de jugo de limón
1 cucharadita de hojas de albahaca seca
1 taza de harina
1/2 cucharadita de sal y pimienta
1/2 taza de leche
1 taza de aceite vegetal
Deep fry chicken strips at 350°F for 8-10 minutes. Let drain in the basket and
serve with honey mustard or sweet and sour sauce
Fría por inmersión tres arrollados por vez durante aproximadamente 4 a 6
minutos o bien hasta que los arrollados estén totalmente dorados. Levante con
cuidado los arrollados cocidos para retirarlos de la freidora. Deje que se escurran
en el canasto y luego seque con toallas de papel.
To prepare egg roll wrappers put 2 ½ teaspoons filling in each one. Roll up,
tucking in edges over filling. Seal the edge with a drop of thick flour paste.
Preheat oil to 375 °F. Heat 2 teaspoons of corn oil in a fry pan over medium
heat. Add garlic, ginger and green onions. Cook for 2 minutes. Add button
mushrooms and black mushrooms. Cook for 3 minutes. Add salt to taste. Stir
in peanuts, carrots, bean sprouts and sesame oil, turn off heat.
RECIPES CONTINUED
16
CONTINUACIÓN DE RECETAS
Camarones grandes fritos
Aceite de canola para freír
14 camarones grandes con cáscara
1 cucharadita de sal
1/2 cucharadita de pimienta blanca
3 cucharaditas de almidón de maíz
1 cucharadita de vino de arroz japonés
Precaliente el aceite a 350 °F. Quite las entrañas de los camarones cortando una
hendidura en la cáscara, en la parte trasera del camarón. Condimente los
camarones con vino de arroz y sal y déjelos macerar durante 20 minutos.
Espolvoree uniformemente los camarones con almidón de maíz. Agregue los
camarones al canasto para freír. Sumerja el canasto en el aceite. Fría durante 4
a 5 minutos o hasta que los camarones hayan adquirido el color deseado y estén
crujientes.
Deje que escurran en el canasto y luego seque con toallas de papel.
Decore con hojas de lechuga y rodajas de limón.
Buñuelos de queso fontina
Aceite de maíz para freír
3/4 libra de queso fontina refrigerado
2 yemas de huevo (conserve las claras)
1/2 taza de albahaca fresca picada
1 1/2 tazas de harina sin blanquear
2/3 taza de agua con hielo
1 cucharadita de polvo de hornear
1-2 cloves of finely minced garlic
3 cucharadas de aceite de oliva
Sal a gusto
Precaliente el aceite a 350 °F. Corte el queso en cubos de 1 pulgada. Mezcle el
vino, las yemas de huevo y el ajo en un bol. Agregue el polvo para hornear, la
harina, 1/2 cucharadita de sal, el aceite de oliva y el agua. Mezcle hasta obtener
una pasta suave. Deje reposar a temperatura ambiente durante 2 horas.
Bata las claras de huevo con una pizca de sal hasta punto nieve. Agréguelas a
la pasta para rebozar junto con la albahaca picada.
Coloque los trozos de queso en la pasta para rebozar. Retire el exceso de pasta
para rebozar. Coloque los trozos de queso en el aceite hasta que estén dorados.
Esto demora de 1 minuto a 1 minuto y medio. Escurra el canasto y retírelos del
canasto para freír. Sírvalos inmediatamente.
17
Dip cheese chunks into batter. Drip off excess batter. Lower cheese chunks into
oil until golden. Approximately 1-1 ½ minutes. Drain and remove from basket
and serve immediately.
17
Beat egg whites with a pinch of salt until barely stiff. Fold into batter along with
minced basil.
Preheat corn oil to 350°F. Cut cheese into 1-inch cubes. Mix wine, egg yolks
and garlic in a bowl. Add baking powder, flour, ½ teaspoon salt , olive oil and
water. Mix until smooth. Let rest at room temperature for 2 hours.
Fontina Cheese Fritos (Fritters)
Corn oil for frying
¾ lb. chilled fontina cheese
2 egg yolks (keep the egg whites)
½ cup minced fresh basil
1 ½ cups unbleached flour
2/3 cup ice water
1 teaspoon baking powder
1-2 cloves of finely minced garlic
3 teaspoon olive oil
salt to taste
Let drain in the basket then pat dry with paper towels.
Garnish with lettuce leaves and lemon slices.
Evenly dust each shrimp with cornstarch. Add shrimps to the frying basket, lower
basket into oil. Fry 4 - 5 minutes or until shrimp has reached desired doneness,
color and crispness.
Preheat oil to 350°F. De-vein shrimp by cutting a slit on the shell along the back
of shrimp. Season shrimp with rice wine and salt and let it sit about 20 minutes.
Fried Jumbo Shrimp
Canola oil for frying
14 large shrimp in the shell
1 teaspoon salt
½ teaspoon white pepper
3 teaspoons corn starch
1 teaspoon rice wine vinegar
RECIPES CONTINUED
18
CONTINUACIÓN DE RECETAS
Bananas frita, el favorito de Aroma
Aceite de canola para freír
1 taza de harina común
1/2 cucharadita de sal
1 cucharada de azúcar
1 huevo, apenas batido
1 taza de leche
1/4 taza de azúcar impalpable
3 tiras de bananas de 1 pulg. de largo
Precaliente el aceite a 370 °F. Mezcle la harina, el azúcar y la sal en un bol
grande. Mezcle el huevo, la leche y 2 cucharaditas de aceite vegetal caliente en
otro bol. Combine la mezcla del huevo con la pasta de harina.
Stir with a fork or whisk until the batter is smooth. Dip each 1-inch long banana
into batter and let the excess batter drip off. Place frying basket in preheated oil
in deep dryer.
Lentamente y de una por vez, coloque las bananas rebozadas utilizando una
cuchara con orificios dentro del canasto para freír. Fría las bananas hasta que
estén doradas, durante 3 a 4 minutos. Escurra el exceso de aceite sobre toallas
de papel. Espolvoree las bananas fritas con azúcar impalpable y sírvalas
inmediatamente.
Slowly place battered banana with a draining spoon into frying basket, one at a
time. Fry all bananas until golden brown, about 3 to 4 minutes. Drain excess oil
in clean paper towel. Sprinkle fried bananas with powder sugar and serve
immediately.
Mezcle con un tenedor o bata hasta que la pasta para rebozar esté suave.
Coloque cada trozo de banana de 1 pulg. de largo en la pasta para rebozar y
retire el exceso de pasta. Coloque el canasto para freír en aceite precalentado
en la freidora por inmersión.
Preheat oil to 370°F. Mix flour, sugar and salt in a large bowl. Combine egg,
milk and 2 tsp. of heated vegetable oil in another bowl and mix well. Combine
egg mixture with flour paste.
Aroma's Favorite Fried Bananas
Canola oil for frying
1 cup all purpose flour
½ tsp. salt
1 tbsp. sugar
1 egg, lightly beaten
1 cup milk
¼ cup powder sugar
3 bananas, cut into 1 inch length
RECIPES CONTINUED
18
19
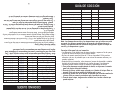
GUÍA DE COCCIÓN
Alimento
Papas fritas
Papas fritas (congeladas)
Tiritas de pollo (fresco)
Trocitos de pollo (congelados)
Patas de pollo
Pescado (fresco)
Pescado (congelado)
Camarones
Aros de cebolla (frescos)
Vegetales frescos
Rosquillas
Temperatura Cantidad Tiempo aproximado
375 °F
350 °F
375 °F
375 °F
300 °F
375 °F
350 °F
375 °F
350 °F
350 °F
325 °F
10 oz.
10 oz.
12 oz.
10 oz.
1/2 canasto
8 oz.
8 oz.
8 oz.
6 oz.
10 oz.
2ó3
5 a 7 minutos
6 a 8 minutos
9 a 11 minutos
3 a 4 minutos
7 a 8 minutos
4 a 6 minutos
5 a 7 minutos
4 a 5 minutos
3 a 4 minutos
2 a 3 minutos
1 minuto cada una
Nota: Los tiempos de cocción y las temperaturas que se indican son sólo
una guía. Los mismos pueden variar de acuerdo con diferencias en la
carne y la temperatura de los alimentos refrigerados. Ajuste el tiempo de
cocción y la temperatura a gusto.
Consejos útiles para freír por inmersión:
• Los alimentos a freír deben tener el mismo tamaño y espesor a fin de que se
cocinen de manera uniforme y en el mismo tiempo.
• No llene el canasto para freír más de 1/2 de su capacidad. Si fríe muchos
alimentos a la vez, es probable que no se cocinen de manera uniforme y no
queden crujientes.
• Antes de freír por inmersión, retire siempre el exceso de humedad o cristales
de hielo de los alimentos frotándolos con toallas de papel. Los alimentos
húmedos pueden causar exceso de espuma y salpicaduras de aceite.
¾ Para evitar derrames o salpicaduras de aceite, no deje caer el canasto
para freír dentro del aceite caliente.
¾ Durante la fritura, saldrá vapor caliente por el borde de la tapa. Esto es
normal. Evite este área cuando la freidora esté en uso.
¾ Durante el primer uso de la unidad, es posible que la freidora emita olor
y humo. Esto es normal y se debe a que el producto es nuevo.
¾ Cuando abra la tapa, tenga mucho cuidado con el aceite caliente que
pueda salpicar.
19
Helpful Hints for Deep Frying:
• Prepare food to be fried in equal size and thickness so that they will fry more
evenly and at the same speed.
• Do not fill the frying basket over 1/2 full. If too much food is fried at the same
time, food may not be fried crispy and evenly.
• Before deep frying, always remove excess moisture or ice crystals from food by
rubbing with paper towel. Moist food may cause excess foaming and
spattering of oil.
¾ To avoid overflow or splashing hot oil, do not drop the frying basket
quickly into the hot oil
¾ During frying, hot steam will escape from the openings of the lid. This is
normal. Avoid touching these area when the fryer is in use.
¾ The fryer may give off a slight odor and smoky haze during the first use.
This is normal.
¾ When opening the lid, be extremely cautious of splashing hot oil.
Note: Cooking times and temperatures given here are only a guide. They
may vary due to differences in meat and temperature of refrigerated food.
Adjust your cooking time and temperature to your preference.
Food Selection
French Fries
French Fries (Frozen)
Chicken Strips (Fresh)
Chicken Nuggets (Frozen)
Chicken Drumsticks
Fish (Fresh)
Fish (Frozen)
Shrimp
Onion Rings (Fresh)
Fresh Vegetables
Doughnuts
Quantity
10 oz.
10 oz.
12 oz.
10 oz.
1/2 Basket
8 oz.
8 oz.
8 oz.
6 oz.
10 oz.
2-3.
Temp.
375OF
350OF
375OF
375OF
300OF
375OF
350OF
375OF
350OF
350OF
325OF
COOKING GUIDES
Approximate Time
5-7 min.
6-8 min.
9-11 min.
3-4 min.
7-8 min.
4-6 min.
5-7 min.
4-5 min.
3-4 min.
2-3 min.
1 min. each
GARANTÍA LIMITADA
Aroma Housewares Company garantiza que este producto esté libre de
defectos de fabricación y en los materiales durante un período de un año de la
fecha comprobable de compra dendro de Los Estados Unidos.
Esta garantía no cubre la instalación incorrecta, uso indebido, maltrato o
negligencia por parte del usuario. La garantía también es inválida en caso de
que el aparato sea desarmado o se le dé mantenimiento por un centro de
servicio no autorizado.
AROMA HOUSEWARES COMPANY
6469 Flanders Drive
San Diego, California 92121
1-800-276-6286
M-F, 8:30 AM - 5:00 PM, Pacific Time
Website: www.aromaco.com
Dentro de este período de garantía, Aroma Housewares Company, a su opción,
reparará o reemplazará gratuitamente cualquier parte que resulte defectuosa,
siempre y cuando el producto sea devuelto a Aroma Housewares Company, con
porte pagado y comprobante de compra y U.S. $8.00 para gastos de envío y
manejo. Sírvase llamar al número telefónico gratuito que se menciona
abajo para obtener un número de autorización de devolución. Espere entre
2-4 semanas para recibir el aparato nuevamente.
Esta garantía le ofrece derechos legales específicos, los cuales podrán variar
de un estado a otro y no cubre fuera de Los Estados Unidos.
This warranty gives you specific legal rights which may vary from state to
state and does not cover areas outside the United States.
This warranty does not cover improper installation, misuse, abuse or neglect
on the part of the owner. Warranty is also invalid in any case that the product
is taken apart or serviced by an unauthorized service station.
Within this warranty period, Aroma Housewares Company will repair or
replace, at its option, defective parts at no charge, provided the product is
returned, freight prepaid with proof of purchase and U.S. $8.00 for shipping
and handling charges payable to Aroma Housewares Company. Before
returning an item, please call the toll free number below for return
authorization number. Allow 2-4 weeks for return shipping.
Aroma Housewares Company warrants this product free from defects in
material and workmanship for one year from provable date of purchase in the
continental United States.
LIMITED WARRANTY
AROMA HOUSEWARES COMPANY
6469 Flanders Drive
San Diego, California 92121
1-800-276-6286
L-V, 8:30 AM - 5:00 PM, Tiempo del Pacífico
Sitio Web: www.aromaco.com