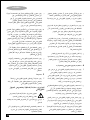
1
www.blackanddecker.ae
KD750
ENGLISH
5
7
4
8
3
6
2
1
2
ENGLISH
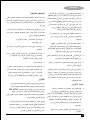
9
5
10
4
11
8
7
3
ENGLISH
Intended use
Your Black & Decker rotary hammer drill has
been designed for drilling in wood, metal,
plastics, and masonry as well as for light
chiselling applications. This tool is intended for
consumer use only.
Safety instructions
b. Avoid body contact with earthed or grounded
surfaces such as pipes, radiators, ranges and
refrigerators. There is an increased risk of
electric shock if your body is earthed or
grounded.
c. Do not expose power tools to rain or wet
conditions. Water entering a power tool will
increase the risk of electric shock.
d. Do not abuse the cord. Never use the cord for
carrying, pulling or unplugging the power tool.
Keep cord away from heat, oil, sharp edges
Warning! Read all safety warnings and
or moving parts. Damaged or entangled cords
all instructions. Failure to follow the
increase the risk of electric shock.
warnings and instructions listed below
e. When operating a power tool outdoors, use
may result in electric shock, fire and/or serious
an extension cord suitable for outdoor use.
injury.
Use of a cord suitable for outdoor use
reduces the risk of electric shock.
Save all warnings and instructions for future
General power tool safety warnings
reference.
The term "power tool" in the warnings refers to
your mains operated (corded) power tool or
battery operated (cordless) power tool.
1. Work area safety
a. Keep work area clean and well lit. Cluttered
or dark areas invite accidents.
f. If operating a power tool in a damp location is
unavoidable, use a residual current device
(RCD) protected supply. Use of an RCD
reduces the risk of electric shock.
3. Personal safety
a. Stay alert, watch what you are doing and use
common sense when operating a power tool.
Do not use a power tool while you are tired or
under the influence of drugs, alcohol or
medication. A moment of inattention while
operating power tools may result in serious
personal injury.
b. Do not operate power tools in explosive
atmospheres, such as in the presence of
flammable liquids, gases or dust. Power
tools create sparks which may ignite the dust b. Use personal protective equipment. Always
or fumes.
wear eye protection. Protective equipment
such as dust mask, non-skid safety shoes,
c. Keep children and bystanders away while
hard hat, or hearing protection used for
operating a power tool. Distractions can
appropriate conditions will reduce personal
cause you to lose control.
injuries.
2. Electrical safety
c. Prevent unintentional starting. Ensure the
switch is in the off-position before connecting
a. Power tool plugs must match the outlet.
to power source and/or battery pack, picking
Never modify the plug in any way. Do not use
up or carrying the tool. Carrying power tools
any adapter plugs with earthed (grounded)
with your finger on the switch or energising
power tools. Unmodified plugs and matching
power tools that have the switch on invites
outlets will reduce risk of electric shock.
accidents.
4
ENGLISH
d. Remove any adjusting key or wrench before
turning the power tool on. A wrench or a key
left attached to a rotating part of the power
tool may result in personal injury.
e. Do not overreach. Keep proper footing and
balance at all times. This enables better
control of the power tool in unexpected
situations.
d. Store idle power tools out of the reach of
children and do not allow persons unfamiliar
with the power tool or these instructions to
operate the power tool. Power tools are
dangerous in the hands of untrained users.
e. Maintain power tools. Check for misalignment
or binding of moving parts, breakage of parts
and any other condition that may affect the
power tools operation. If damaged, have the
power tool repaired before use. Many
f. Dress properly. Do not wear loose clothing or
accidents are caused by poorly maintained
jewellery. Keep your hair, clothing and gloves
power tools.
away from moving parts. Loose clothes,
jewellery or long hair can be caught in
moving parts.
g. If devices are provided for the connection of
dust extraction and collection facilities,
ensure these are connected and properly
used. Use of dust collection can reduce
dust-related hazards.
4. Power tool use and care
a. Do not force the power tool. Use the correct
power tool for your application. The correct
power tool will do the job better and safer at
the rate for which it was designed.
b. Do not use the power tool if the switch does
not turn it on and off. Any power tool that
cannot be controlled with the switch is
dangerous and must be repaired.
c. Disconnect the plug from the power source
and/or the battery pack from the power tool
before making any adjustments, changing
accessories, or storing power tools. Such
preventive safety measures reduce the risk
of starting the power tool accidentally.
f. Keep cutting tools sharp and clean. Properly
maintained cutting tools with sharp cutting
edges are less likely to bind and are easier to
control.
g. Use the power tool, accessories and tool bits
etc. in accordance with these instructions,
taking into account the working conditions
and the work to be performed. Use of the
power tool for operations different from those
intended could result in a hazardous situation.
5. Service
a. Have your power tool serviced by a qualified
repair person using only identical
replacement parts. This will ensure that the
safety of the power tool is maintained.
Additional power tool safety
warnings
Warning! Additional safety warnings
for rotary and chiselling hammers
• Wear ear protectors. Exposure to noise can
cause hearing loss.
• Use auxiliary handles supplied with the tool.
Loss of control can cause personal injury.
5
ENGLISH
• Hold power tool by insulated gripping
surfaces when performing an operation
where the cutting accessory may contact
hidden wiring or its own cord. Cutting
accessory contacting a "live" wire may make
exposed metal parts of the power tool "live"
and could give the operator an electric shock
Residual risks
Additional residual risks may arise when using
the tool which may not be included in the
enclosed safety warnings. These risks can arise
from misuse, prolonged use etc.
Even with the application of the relevant safety
Never use a chisel accessory in rotary mode. regulations and the implementation of safety
devices, certain residual risks can not be
The accessory will bind in the material and
avoided. These include:
rotate the drill.
•
• Use clamps or another practical way to
secure and support the workpiece to a stable
platform. Holding the work by hand or
against your body leaves it unstable and may
lead to loss of control.
• Before drilling into walls, floors or ceilings,
check for the location of wiring and pipes.
• Avoid touching the tip of a drill bit just after
drilling, as it may be hot.
• The intended use is described in this
• Injuries caused by touching any
rotating/moving parts.
• Injuries caused when changing any parts,
blades or accessories.
• Injuries caused by prolonged use of a tool.
When using any tool for prolonged periods
ensure you take regular breaks.
• Impairment of hearing.
• Health hazards caused by breathing dust
developed when using your tool (example:instruction manual. The use of any accessory
working with wood, especially oak, beech and
or attachment or performance of any
MDF.)
operation with this tool other than those
Vibration
recommended in this instruction manual may
The declared vibration emission values stated in
present a risk of personal injury and/or
the technical data and the declaration of
damage to property.
conformity have been measured in accordance
Safety of others
with a standard test method provided by EN
• This appliance is not intended for use by
60745 and may be used for comparing one tool
persons (including children) with reduced
with another. The declared vibration emission
physical, sensory or mental capabilities, or
value may also be used in a preliminary
lack of experience and knowledge, unless
assessment of exposure.
they have been given supervision or
Warning! The vibration emission value during
instruction concerning use of the appliance
actual use of the power tool can differ from the
by a person responsible for their safety.
declared value depending on the ways in which
• Children should be supervised to ensure that the tool is used. The vibration level may increase
they do not play with the appliance.
above the level stated.
6
ENGLISH
When assessing vibration exposure to
determine safety measures required by
2002/44/EC to protect persons regularly using
power tools in employment, an estimation of
vibration exposure should consider, the actual
conditions of use and the way the tool is used,
including taking account of all parts of the
operating cycle such as the times when the tool
is switched off and when it is running idle in
addition to the trigger time.
Labels on tool
The following pictograms are shown on the tool:
Warning! To reduce the risk of injury,
the user must read the instruction
manual.
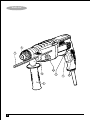
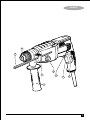
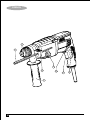
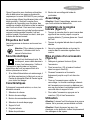
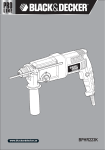
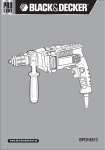
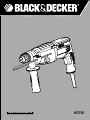
7. Depth stop
8. Depth stop lock button
Assembly
Warning! Before assembly, make sure that the
tool is switched off and unplugged.
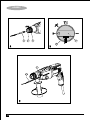
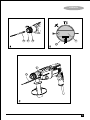
Fitting the side handle (fig. C)
• Turn the grip counterclockwise until you can
slide the side handle (6) onto the front of the
tool.
• Rotate the side handle into the desired
position.
• Tighten the side handle by turning the grip
clockwise.
Electrical safety
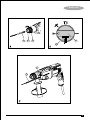
Fitting an accessory (fig. A)
This tool is double insulated; therefore
no earth wire is required. Always check
that the power supply corresponds to
the voltage on the rating plate.
• Clean and grease the shank (9) of the
• If the supply cord is damaged, it must be
replaced by the manufacturer or an
authorised Black & Decker Service Centre in
order to avoid a hazard.
Features
This tool includes some or all of the following
features.
1. Variable speed switch
accessory.
• Pull back the sleeve (10) and insert the shank
into the tool holder (5).
• Push the accessory down and turn it slightly
until it fits into the slots.
• Pull on the accessory to check if it is properly
locked. The hammering function requires the
accessory to be able to move axially several
centimetres when locked in the tool holder.
• To remove the accessory, pull back the
sleeve (10) and pull out the accessory.
2. Lock-on button
Use
3. Forward/reverse switch
Warning! Let the tool work at its own pace. Do
not overload.
4. Drilling mode selector
5. Tool holder
6. Side handle
Warning! Before drilling into walls, floors or
ceilings, check for the location of wiring and
pipes.
7
ENGLISH
Selecting the operating mode
(fig. B)
Selecting the direction of
rotation
The tool can be used in three operating modes.
Press in the button (11) and rotate the drilling
mode selector (4) towards the required position,
as indicated by the symbols.
For drilling, for tightening screws and for
chiselling, use forward (clockwise) rotation. For
loosening screws or removing a jammed drill bit,
use reverse (counterclockwise) rotation.
Drilling
• To select forward rotation, push the
• For drilling in steel, wood and plastics, set
the operating mode selector (4) to the
position.
Hammer drilling
• For hammer drilling in masonry and
concrete, set the operating mode selector (4)
to the
position
• When hammering, the tool should not
bounce and run smoothly. If necessary,
increase the speed.
Hammering
• For hammering with spindle lock, and for
light chiselling and chipping, set the
operating mode selector (4) to the position.
• Make sure the forward/reverse switch is in
the forward position.
• When changing from hammer drilling to
chiselling, turn the chisel to the desired
position. If resistance is felt during mode
change, slightly turn the chisel to engage the
spindle lock.
• When hammering with spindle lock, the
angle of the bit may be changed. Set the
operating mode selector (4) to the
position, the angle of the bit may now be
changed by rotating the tool holder (6). Set
the operating mode selector (4) to the
position, before continuing.
8
forward/reverse slider (3) to the left.
• To select reverse rotation, push the
forward/reverse slider to the right.
Warning! Never change the direction of rotation
while the motor is running.
Setting the drilling depth (fig. C)
• Press in the depth lock button (8).
• Set the depth stop (7) to the desired position.
The maximum drilling depth is equal to the
distance between the tip of the drill bit and the
front end of the depth stop.
• Release the depth lock button.
Switching on and off
• To switch the tool on, press the variable
speed switch (1). The tool speed depends on
how far you press the switch.
• As a general rule, use low speeds for large
diameter drill bits and high speeds for smaller
diameter drill bits.
• For continuous operation, press the lock-on
button (2) and release the variable speed
switch. This option is available only in forward
(clockwise) rotation.
• To switch the tool off, release the variable
speed switch. To switch the tool off when in
continuous operation, press the variable
speed switch once more and release it.
ENGLISH
Accessories
Mains Plug Replacement
The performance of your tool depends on the
accessory used. Black & Decker and Piranha
accessories are engineered to high quality
standards and designed to enhance the
performance of your tool. By using these
accessories you will get the very best from your
tool.
If a new mains plug needs to be fitted:
Maintenance
Your Black & Decker corded/cordless
appliance/tool has been designed to operate
over a long period of time with a minimum of
maintenance. Continuous satisfactory operation
depends upon proper tool care and regular
cleaning.
• Safely dispose of the old plug.
• Connect the brown lead to the live terminal of
the new plug.
• Connect the blue lead to the neutral terminal.
• If the product is class l (earthed), connect the
green / yellow lead to the earth terminal.
Warning! If your product is class ll double
insulated (only 2 wires in the cord set), no
connection is to be made to the earth terminal.
Follow the fitting instructions supplied with good
quality plugs.
Warning! Before performing any maintenance
on corded/cordless power tools:
Any replacement fuse must be of the same rating
as the original fuse supplied with the product.
• Switch off and unplug the appliance/tool.
Technical Data
• Or switch off and remove the battery from the
appliance/tool if the appliance/tool has a
separate battery pack.
• Or run the battery down completely if it is
integral and then switch off.
• Unplug the charger before cleaning it. Your
charger does not require any maintenance
apart from regular cleaning.
• Regularly clean the ventilation slots in your
appliance/tool/charger using a soft brush or
dry cloth.
• Regularly clean the motor housing using a
damp cloth. Do not use any abrasive or
solvent-based cleaner.
KD750
(Type 1)
Input voltage
VAC
220-240
Power input
W
750
No-load speed
min-1
0-1050
Impact rate
min-1
5,200
J
2.7
Concrete
mm
26
Steel
mm
13
Wood
mm
30
Weight
kg
2.3
Impact energy
Max. drilling capacity
• Regularly open the chuck and tap it to
remove any dust from the interior
(when fitted).
9
ENGLISH
Protecting the environment
Warranty
Decker product needs replacement, or if it is of
If a Black & Decker product becomes defective
due to a material or manufacturing defect , within
12 months from the date of purchase, Black &
Decker guarantees to replace defective parts or
replace such products to ensure minimum
inconvenience to the customer unless:
no further use to you, do not dispose of it with
• The product has been subjected to misuse or
Separate collection. This product must not
be disposed of with normal household
waste.
Should you find one day that your Black &
other household waste. Make this product
available for separate collection.
• Black & Decker provides a facility for
recycling Black & Decker products once they
have reached the end of their working life.
This service is provided free of charge. To
take advantage of this service please return
your product to any authorised repair agent
who will collect them on our behalf.
• You can check the location of your nearest
authorised repair agent by contacting your
local Black & Decker office at the address
indicated in this manual. Alternatively, a list of
authorized Black & Decker repair agents and
full details of our after-sales service and
contact are available on the Internet at:
www.2helpU.com.
10
neglect.
• The product has sustained damage through
foreign objects, substances or accidents.
• Repairs have been attempted by persons
other than authorised repair agents or Black
& Decker service staff.
To claim on the warranty, you will need to submit
proof of purchase to the seller or an authorised
repair agent. You can check the location of your
nearest authorised repair agent by contacting
your local Black & Decker office at the address
indicated in this manual. Alternatively, a list of
authorised Black & Decker repair agents and full
details of our after-sales service and contacts are
available on the Internet at: www.2helpU.com.
Please visit our website www.blackanddecker.ae
to register your new Black & Decker product and
to be kept up to date on new products and
special offers. Further information on the Black &
Decker brand and our range of products is
available at www.blackanddecker.ae.
ARABIC
5
7
4
8
3
1
2
6
11
ARABIC
9
5
10
4
11
8
7
12
ARABIC
,áÑWôdG AGƒLC’G hCG ô£ª∏d á«FÉHô¡µdG Iõ¡LC’G ¢Vô©J ’ .ê
¤EG »FÉHô¡µdG RÉ¡÷G πNGO AÉŸG ∫ƒNO …ODƒj ±ƒ°ùa
.á«FÉHô¡c áeó°üH áHÉ°UE’G ôWÉfl IOÉjR
ΩGóîà°S’G ¢VôZ
‘ ôØë∏d ôµjO ófBG ∑ÓH IQGhódG ôØ◊G ábô£e º«ª°üJ ”
∫ɪYC’ ∂dòch AÉæÑdG OGƒeh ∂«à°SÓÑdGh ¿OÉ©ŸGh Ö°ûÿG
¬eGóîà°S’ ºª°üe RÉ¡÷G Gòg ¿CÉH Ék ª∏Y ,áØ«ØÿG âëædG
.§≤a ∂∏¡à°ùŸG ᣰSGƒH
.ÅWÉN πµ°ûH »FÉHô¡µdG QÉ«àdG ∂∏°S ΩGóîà°SG ΩóY Öéj .O
RÉ¡÷G πª◊ »FÉHô¡µdG QÉ«àdG ∂∏°S Ék≤∏£e Ωóîà°ùJ ’
áeÓ°ùdG äGOÉ°TQEG
ɪc .»FÉHô¡µdG QÉ«àdG øY ¬∏°üa hCG ¬Ñë°S hCG »FÉHô¡µdG
á«FÉHô¡µdG Iõ¡LC’G ¢Uƒ°üîH áeÉ©dG áeÓ°ùdG äGôjò–
IQGô◊G øY Gók «©H »FÉHô¡µdG QÉ«àdG ∂∏°ùH ®ÉØàM’G Öéj
Ék ª∏Y .ácôëàŸG AGõLC’G hCG IOÉ◊G ±Gƒ◊G hCG âjõdG hCG
äGOÉ°TQEGh äGôjò– áaÉc IAGôb »¨Ñæj !ôjò–
äGôjòëàdG áaÉc ´ÉÑJEG ΩóY ÖÑ°ùàj ó≤a .áeÓ°ùdG
ôWÉfl øe ójõJ áµHÉ°ûàŸG hCG áØdÉàdG ∑Ó°SC’G ¿CÉH
áeó°U çhóM ‘ √ÉfOCG IQƒcòŸG äGOÉ°TQE’Gh
.á«FÉHô¡c áeó°üH áHÉ°UE’G
AÉ«°TC’G √òg ™«ªL hCG IÒ£N áHÉ°UEG hCG ≥jôM hCG á«FÉHô¡c
Öéj ,êQÉÿG ‘ »FÉHô¡µdG RÉ¡÷G 𫨰ûJ óæY .`g
.kɩe
,»LQÉÿG ΩGóîà°SÓd Ö°SÉæŸG π«°UƒàdG ∂∏°S ΩGóîà°SG
´ƒLô∏d
äGOÉ°TQE
’
Gh
äGôjòëàdG
áaɵH
®ÉØàM’G
≈Lôj
Ö°SÉæŸG »FÉHô¡µdG QÉ«àdG ∂∏°S ΩGóîà°SG ¿C’ kGô¶f
.kÓÑ≤à°ùe É¡«dEG
áeó°üd ¢Vô©àdG ôWÉfl øe π∏≤j »LQÉÿG ΩGóîà°SÓd
áaÉc
‘
OQGƒdG
"»FÉHô¡c
RÉ¡L"
í∏£°üŸG
Ò°ûj
.á«FÉHô¡c
…òdG »FÉHô¡µdG RÉ¡÷G ¤EG √ÉfOCG IQƒcòŸG äGôjòëàdG
Öéj ,ÖWQ ¿Éµe ‘ »FÉHô¡µdG RÉ¡÷G 𫨰ûJ ºà– GPEG .h
»FÉHô¡µdG RÉ¡÷G hCG (É«k µ∏°S) »FÉHô¡µdG QÉ«àdÉH πª©j
¿C’ kGô¶f ,»≤ÑàŸG QÉ«àdG øe ájÉbh RÉ¡L ΩGóîà°SG
.(É«k µ∏°S’) ájQÉ£ÑdÉH πª©j …òdG
øe π∏≤j »≤ÑàŸG QÉ«àdG øe ájÉbh RÉ¡L ΩGóîà°SG
πª©dG á≤£æe áeÓ°S .1
.á«FÉHô¡c áeó°üH áHÉ°UE’G ôWÉfl
É¡JAÉ°VEGh πª©dG á≤£æe áaɶf ≈∏Y ®ÉØ◊G »¨Ñæj .CG
á«°üî°ûdG áeÓ°ùdG .3 ΩÉcôdÉH á¶àµŸG hCG áª∏¶ŸG ≥WÉæŸG ÖÑ°ùàJ PEG ,Gók «L
.çOGƒ◊G ´ƒbh ‘
óæY º«∏°ùdG ¢ù◊G Ωóîà°SGh ¬∏©ØJ ÉŸ ¬ÑàfGh kGQòM øc .CG
á∏HÉb
AGƒLC
G
‘
á«FÉHô¡µdG
Iõ¡LC
’G 𫨰ûàH º≤J ’ .Ü
»FÉHô¡µdG RÉ¡÷G Ωóîà°ùJ ’ .»FÉHô¡µdG RÉ¡÷G 𫨰ûJ
hCG äGRÉZ hCG πFGƒ°S OƒLh ‘ É¡∏«¨°ûJ πãe ;QÉéØfÓd
äÉHhöûŸG hCG ÒbÉ≤©dG ÒKCÉJ â– hCG Ékµ¡æe âæc GPEG
á«FÉHô¡µdG Iõ¡LC’G ¿C’ kGô¶f ,∫É©à°TÓd πHÉb QÉÑZ
AÉæKCG á∏بdG øe á¶◊ ÖÑ°ùàJ ó≤a ,ájhOC’G hCG á«dƒëµdG
hCG QÉѨdG ∫É©à°TG ¤EG …ODƒJ ób äGQGöT É¡æY èàæj
á«°üî°T áHÉ°UEG çhóM ‘ á«FÉHô¡µdG Iõ¡LC’G 𫨰ûJ
.áæNOC’G
.á¨dÉH
RÉ¡÷G 𫨰ûJ AÉæKCG IQÉŸGh ∫ÉØWC’G OÉ©HEG »¨Ñæj .ê
m¥Gh ÉehO
Iô£«°ù∏d ∂fGó≤a ‘ AÉ¡dE’G ÖÑ°ùàj ó≤a ,»FÉHô¡µdG
k …óJQG .á«°üî°ûdG ájÉbƒdG äGó©e Ωóîà°SG .Ü
äÉeɪc πãe ,ájÉbƒdG äGó©e ΩGóîà°SG ¿C’ ,Úæ«©∏d
.RÉ¡÷G ≈∏Y
áÑ∏°üdG äGPƒÿGh ¥’õfÓd á©fÉŸG ájòMC’Gh áHôJC’G
á«FÉHô¡µdG áeÓ°ùdG .2
äÉHÉ°UEG çhóM ôWÉfl øe π∏≤j ,™ª°ùdG ájÉbh äGhOCGh
™e á≤aGƒàe »FÉHô¡µdG RÉ¡÷G ¢ùHGƒb ¿ƒµJ ¿CG Öéj .CG
.á«°üî°T
¢ùHÉ≤dG πjó©J Ék≤∏£e ÖæŒ .»FÉHô¡µdG QÉ«àdG òNCÉe
™e ä’ƒfi ¢ùHGƒb ájCG Ωóîà°ùJ ’h ,á≤jôW ájCÉH
¿hO ∫ƒë∏d áeRÓdG äÉWÉ«àM’G áaÉc PÉîJG Öéj .ê
ádó©ŸG
ÒZ ¢ùHGƒ≤dG ΩGóîà°SG ¿C’ ,á°VQDƒŸG Iõ¡LC’G
óY ™°Vh ‘ ìÉàØŸG ¿CG ócCÉJ .ó°üb ¿hO RÉ¡÷G 𫨰ûJ
π«∏≤J
¤EG …ODƒj á≤aGƒàŸG »FÉHô¡µdG QÉ«àdG òNBÉeh
hCG/h »FÉHô¡µdG QÉ«àdG Qó°üà π«°UƒàdG πÑb 𫨰ûàdG
.á«FÉHô¡c áeó°üd ¢Vô©àdG ôWÉfl
πªM ¿CG PEG .¬∏ªM hCG RÉ¡÷G ™aQ hCG ,äÉjQÉ£ÑdG Ö«côJ
Ö«HÉfC
’
G
πãe
á°VQD
ƒ
ŸG í£°SCÓd ∂ª°ùL á°ùeÓe ÖæŒ .Ü
hCG ìÉàت∏d á°ùeÓe ™HÉ°UC’Gh á«FÉHô¡µdG Iõ¡LC’G
OGOõJ
å«M
,äÉLÓãdGh
óbGƒŸGh áÄaóàdG Iõ¡LCGh
™°Vh ‘ ìÉàØŸGh ábÉ£dÉH á«FÉHô¡µdG Iõ¡LC’G ójhõJ
∂ª°ùL
¿Éc
GPE
G
á«FÉHô¡c
áeó°üH ∂àHÉ°UEG ôWÉfl
.çOGƒM ´ƒbh ¤EG …ODƒj 𫨰ûàdG
.É°VQD
k ƒe
13
ARABIC
Gók «©H áeóîà°ùŸG ÒZ á«FÉHô¡µdG Iõ¡LC’G øjõîJ Öéj O
ÒZ ¢UÉî°TCÓd íª°ùJ ’h ∫ÉØWC’G ∫hÉæàe øY
ÒZ hCG »FÉHô¡µdG RÉ¡÷G ΩGóîà°SG ≈∏Y øjOÉà©ŸG
RÉ¡÷G 𫨰ûàH äGOÉ°TQE’G √òg ≈∏Y Ú©∏£ŸG
ÉeóæY kGô£N πµ°ûJ á«FÉHô¡µdG Iõ¡LC’Éa ,»FÉHô¡µdG
.ÚHQóe ÒZ ¢UÉî°TCG É¡eóîà°ùj
¢üëaG .á«FÉHô¡µdG Iõ¡LCÓd ájQhO áfÉ«°U AGôLEG Öéj .`g
¥ƒ©J »àdG hCG ¬«a áÑ«©ŸG AGõLC’G ≈∏Y ±ô©à∏d RÉ¡÷G
AGõLC’G øe √ƒ∏N øe ócCÉàdGh ácôëàŸG AGõLC’G ácôM
IAÉØc ≈∏Y ôKDƒj ób ôNBG A»°T …CG øeh IQƒ°ùµŸG
RÉ¡÷G ìÓ°UEG Öéj ,∞∏J …CG ±É°ûàcG ” GPEGh .¬∏«¨°ûJ
øe ójó©dG ¿CÉH Ék ª∏Y ,¬eGóîà°SG πÑb »FÉHô¡µdG
.á«FÉHô¡µdG Iõ¡LC’G áfÉ«°U Aƒ°S ÖÑ°ùH ™≤J çOGƒ◊G
¿C’ ,áØ«¶fh Ik OÉM ™£≤dG äGhOCG ≈∏Y ®ÉØ◊G »¨Ñæj .h
Ö°SÉæŸG πµ°ûdÉH É¡«∏Y ®ÉØ◊G ºàj »àdG ™£≤dG äGhOCG
∫É£YCÓd á°VôY πbCG IOÉM á©WÉb äGôØ°ûH IOhõŸGh
.ºµëàdG ‘ π¡°SCGh
¬FGõLCGh ¬JÉ≤ë∏eh »FÉHô¡µdG RÉ¡÷G ΩGóîà°SG Öéj .R
±hôX òNCG ™e ,äGOÉ°TQE’G √ò¡d Ék≤ah ∂dP ¤EG Éeh
ó≤a ,QÉÑàY’G ‘ √ò«ØæJ OGôŸG πª©dGh ᣫëŸG πª©dG
äÉ«∏ªY πLCG øe »FÉHô¡µdG RÉ¡÷G ΩGóîà°SG ÖÑ°ùàj
çhóM ‘ É¡∏LCG øe ºª°üŸG ¢VGôZC’G iƒ°S 𫨰ûJ
.ôWÉfl
áfÉ«°üdG .5
ᣰSGƒH »FÉHô¡µdG RÉ¡÷G ìÓ°UEGh áfÉ«°U Öéj .CG
∂dP ¿C’ ,á≤HÉ£e QÉ«Z ™£b ΩGóîà°SÉH πgDƒe ¢üî°T
.»FÉHô¡µdG RÉ¡÷G áeÓ°S øª°†j
RÉ¡÷G ¢Uƒ°üîH á«aÉ°VEG áeÓ°S äGôjò–
»FÉHô¡µdG
¢Uƒ°üîH á«aÉ°VEG áeÓ°S äGôjò– !ôjò–
.âëædG ¥QÉ£eh IQGhódG ôØ◊G ¥QÉ£e
∑ó≤Øj ób AÉ°Vƒ°†∏d ¢Vô©àdG ¿C’ ,ÚfPCÓd m¥Gh …óJQG •
.™ª°ùdG
¿C’ ,RÉ¡÷G ™e IOhõŸG á«aÉ°VE’G ¢†HÉ≤ŸG Ωóîà°SG •
çhóM ‘ ÖÑ°ùàj ób RÉ¡÷G ≈∏Y Iô£«°ùdG ¿Gó≤a
.á«°üî°T áHÉ°UEG
14
𫨰ûJ πÑb §HQ ìÉàØe hCG πjó©J ìÉàØe …CG ádGREÉH ºb .O
Ék `≤∏©e ìÉàØŸG ∑ôJ ÖÑ°ùàj ó≤a ,»FÉHô¡µdG RÉ¡÷G
áHÉ°UEG çhóM ‘ »FÉHô¡µdG RÉ¡÷G øe QGhódG Aõ÷ÉH
.á«°üî°T
Öéj ɪc ,•ôØe πµ°ûH RÉ¡÷G øe ÜGÎb’G ΩóY Öéj .`g
¿C’ ,πª©dG AÉæKCG ¿RGƒàdGh Úeó≤dG äÉÑK ≈∏Y ®ÉØ◊G
RÉ¡÷G ≈∏Y ó«L πµ°ûH Iô£«°ùdG ∂d í«àj ∂dP
.á©bƒàŸG ÒZ ∞bGƒŸG ‘ »FÉHô¡µdG
¢ùHÓŸG AGóJQG ΩóYh ,áÑ°SÉæŸG ¢ùHÓŸG AGóJQG Öéj .h
∂°ùHÓeh ∑ô©°T AÉ≤HEG Öéj ɪc ,»∏◊G hCG á°VÉØ°†ØdG
¢ùHÓŸG ¿C’ ,ácôëàŸG AGõLC’G øY Gók «©H ∂jRÉØbh
™e ∂HÉ°ûàj ób ‹óàŸG ô©°ûdG hCG »∏◊G hCG á°VÉØ°†ØdG
.ácôëàŸG AGõLC’G
QÉѨdG êGôîà°S’ äGhOCÉH kGOhõe RÉ¡÷G ¿Éc GPEG .R
É¡eGóîà°SGh äGhOC’G ∂∏J π«°UƒJ øe ócCÉJ ,¬©«ªŒh
QÉѨdG ™«ªŒ äGhOCG ΩGóîà°SG ¿CG ɪc .Ö°SÉæe πµ°ûH
.QÉѨdÉH á£ÑJôŸG ôWÉîŸG øe π∏≤j
¬H ájÉæ©dGh »FÉHô¡µdG RÉ¡÷G ΩGóîà°SG .4
ÒZ ¢VôZ ‘ »FÉHô¡µdG RÉ¡÷G ΩGóîà°SG ΩóY Öéj .CG
»FÉHô¡µdG RÉ¡÷G Ωóîà°SG Öéj πH ,¬d ¢ü°üfl
»FÉHô¡µdG RÉ¡÷G ¿C’ ,√ójôJ …òdG ¢Vô¨dÉH ¢UÉÿG
Éfk ÉeCG ÌcCGh π°†aCG πµ°ûH πª©dG …ODƒj ±ƒ°S Ö°SÉæŸG
.¬∏LCG øe ¬ª«ª°üJ ” …òdG ∫ó©ŸÉHh
‘ ºµëàdG ™£à°ùJ ⁄ kGPEG »FÉHô¡µdG RÉ¡÷G Ωóîà°ùJ ’ .Ü
…CG ¿C’ ,ìÉàØŸG ᣰSGƒH ¬∏«¨°ûJ ±É≤jEGh ¬∏«¨°ûJ
ìÉàØŸG ΩGóîà°SÉH ¬«a ºµëàdG øµÁ ’ »FÉHô¡c RÉ¡L
.¬MÓ°UEG Öéjh ôWÉîŸÉH Ék aƒØfi ¿ƒµj
QÉ«àdG Qó°üe øY »FÉHô¡µdG RÉ¡÷G ¢ùHÉb π°üa Öéj .ê
hCG äÓjó©J ájCG AGôLEG πÑb äÉjQÉ£ÑdG hCG/h »FÉHô¡µdG
Iõ¡LC’G ‘ äÉ≤ë∏e ájCG Ö«côJ hCG äGÒ«¨J
á«FÉbƒdG áeÓ°ùdG äGAGôLEG ¿C’ ,É¡æjõîJ hCG á«FÉHô¡µdG
»FÉHô¡µdG RÉ¡÷G 𫨰ûJ AóH ôWÉfl øe π∏≤J √òg
.ó°üb ¿hO ICÉéa
ARABIC
á«≤ÑàŸG ôWÉîŸG
»àdGh RÉ¡÷G ΩGóîà°SG óæY á«aÉ°VEG á«≤Ñàe ôWÉfl CÉ°ûæJ ób
CÉ°ûæJ óbh .á≤aôŸG áeÓ°ùdG äGôjò– ‘ á檰†e ¿ƒµJ ’ ób
Éeh ,∫ƒ£ŸG ΩGóîà°S’G hCG ΩGóîà°S’G Aƒ°S øY ôWÉîŸG ∂∏J
.∂dP ¤EG
äGhOCG ΩGóîà°SGh á∏°üdG äGP áeÓ°ùdG íFGƒd ≥«Ñ£J ™e ≈àM
√òg πª°ûJ .á«≤ÑàŸG ôWÉîŸG ¢†©H ÖæŒ øµÁ ’ ,áeÓ°ùdG
:»∏j Ée á«≤ÑàŸG ôWÉîŸG
AGõLCG ájCG á°ùeÓe øY áŒÉædG äÉHÉ°UE’G •
.ácôëàe/IQGhO
hCG äGôØ°T hCG AGõLCG ájCG Ò«¨J óæY çó– »àdG äÉHÉ°UE’G •
.äÉ≤ë∏e
äGP ∑É°ùeEG äGhOCG ᣰSGƒH »FÉHô¡µdG RÉ¡÷G ∂°ùeG •
™«£≤àdG ≥ë∏e ¿C’ ,Ée á«∏ªY AGOCG óæY ádhõ©e í£°SCG
¢UÉÿG ∂∏°ùdG hCG »Øfl »FÉHô¡c QÉ«J ∂∏°S ¢ùeÓj ób
…öùj ∂∏°ùd ™«£≤àdG ≥ë∏e á°ùeÓe …ODƒJ óbh ,É¡H
‘ á«fó©ŸG AGõLC’G ájô©J ¤EG "»FÉHô¡c QÉ«J" ¬«a
¬«a »Hô¡µdG QÉ«àdG ¿ÉjöSh »FÉHô¡µdG RÉ¡÷G
.á«FÉHô¡c áeó°üd Ωóîà°ùŸG ¢Vô©Jh
¿C’ ,ôØ◊G ™°Vh ‘ âëf ≥ë∏e Ék ≤∏£e Ωóîà°ùJ ’ •
¿GQhO ¤EG …ODƒj ɇ OGƒŸG ‘ öûëæj ób ≥ë∏ŸG
.ábô£ŸG
â«Ñãàd iôNCG ádÉ©a IGOCG …CG hCG ∂HÉ°ûŸG Ωóîà°SG •
â«ÑãJ ¿C’ ,áàHÉK á°üæe ≈∏Y πª©dG á©£b º«YóJh
πª©dG á©£b π©éj º°ù÷G hCG ó«dG ᣰSGƒH πª©dG á©£b
.Iô£«°ùdG ¿Gó≤a ¤EG …ODƒj óbh áàHÉK ÒZ
óæYh .RÉ¡é∏d ∫ƒ£ŸG ΩGóîà°S’G øY áŒÉædG äÉHÉ°UE’G •
≥≤– ,∞≤°SC’G hCG äÉ«°VQC’G hCG §FGƒ◊G ‘ ôØ◊G πÑb •
øY ∞bƒàdG Öéj ,á∏jƒW äGÎØd RÉ¡L …CG ΩGóîà°SG
.Ö«HÉfC’Gh á«FÉHô¡µdG ∑Ó°SC’G ™bGƒe øe
.᪶àæe á∏°UÉa äGÎØd πª©dG
™ª°ùdG ∞©°V •
Å°TÉædG QÉѨdG ¥É°ûæà°SG øY áŒÉædG á«ë°üdG ôWÉîŸG •
™e ΩGóîà°S’G :∫ÉãŸG π«Ñ°S ≈∏Y) RÉ¡÷G ΩGóîà°SG óæY
Ö°ûNh •ƒ∏ÑdG Ö°ûN ¢Uƒ°üÿG ¬Lh ≈∏Yh ,ÜÉ°ûNC’G
.("±EG …O ΩEG" áaÉãµdG ᣰSƒàe á«Ø«∏dG ìGƒdC’Gh ¿GõdG
RGõàg’G
ôØ◊G øe AÉ¡àf’G ó©H ôØ◊G áª≤d ±ôW ¢ùŸ ÖæŒ •
.áæNÉ°S ¿ƒµJ ób É¡fC’
.RÉ¡÷G ΩGóîà°SG ¢VGôZCG Gòg äGOÉ°TQE’G π«dO í°Vƒj •
ò«ØæJ hCG äÉ≤aôe hCG äÉ≤ë∏e …CG ΩGóîà°SG ÖÑ°ùàj óbh
‘ É¡H ≈°UƒŸG ∂∏J ±ÓîH RÉ¡÷G Gò¡H á«∏ªY ájCG
hCG/h á«°üî°T áHÉ°UEG çhóM ‘ Gòg äGOÉ°TQE’G π«dO
.äɵ∏ટG ∞∏J
‘ IQƒcòŸG áæ∏©ŸG äGRGõàg’G çÉ©ÑfG º«b ¢SÉ«b ”
øjôNB’G áeÓ°S
QÉÑàNG á≤jô£d Ék≤ah á≤HÉ£ŸG ¿ÓYEGh á«æØdG äÉfÉ«ÑdG
ᣰSGƒH ¬eGóîà°S’ ¢ü°üfl ÒZ RÉ¡÷G Gòg •
EN 60745 QÉ«©ŸG ÖLƒÃ É¡«∏Y ¢Uƒ°üæe á«°SÉ«b
äGQó≤dG …hP (∫ÉØWC’G ∂dP ‘ ÉÃ) ¢UÉî°TC’G
øµÁh .ôNBG ™e Ée RÉ¡L áfQÉ≤Ÿ É¡eGóîà°SG øµÁh
øjòdG
hC
G
,á«fóàŸG á«∏≤©dGh á«°ù◊Gh á«ægòdGh ájó°ù÷G
‹hCG º««≤J AGôLE’ áæ∏©ŸG äGRGõàg’G çÉ©ÑfG ᪫b ΩGóîà°SG
.äGRGõàgÓd ¢Vô©àdG áÑ°ùæd ‘ ’EG ,ΩGóîà°S’G »MGƒæH á∏«∏b áaô©e hCG IÈN º¡jód
á≤∏©àŸG äɪ«∏©àdG º¡FÉ£YEG hCG º¡«∏Y ±GöTE’G πX
AÉæKCG äGRGõàg’G çÉ©ÑfG ᪫b ∞∏àîJ ¿CG øµÁ !ôjò–
øY ∫hDƒ°ùŸG ¢üî°ûdG πÑ pb øe RÉ¡÷G ΩGóîà°SÉH
áæ∏©ŸG ᪫≤dG øY »FÉHô¡µdG RÉ¡é∏d »∏©ØdG ΩGóîà°S’G
.º¡àeÓ°S
OGOõj óbh ,RÉ¡÷G ΩGóîà°SG ¥ôW ≈∏Y ∂dP ∞bƒàj å«M
º¡ãÑY ΩóY ¿Éª°†d ∫ÉØWC’G ≈∏Y ±GöTE’G Öéj •
.QƒcòŸG iƒà°ùŸG øY RGõàg’G iƒà°ùe
.RÉ¡÷ÉH
15
ARABIC
»ÑfÉL ¢†Ñ≤e .6
ôØ◊G ≥ªY ‘ ºµëàdG õLÉM .7
ôØ◊G ≥ªY ‘ ºµëàdG õLÉM QR .8
Ö«cÎdG
ó«b ¢ù«d RÉ¡÷G ¿CG ócCÉJ ,äÉ≤ë∏e …CG Ö«côJ πÑb !ôjò–
.»Hô¡µdG QÉ«àdG Qó°üà π°Uƒe ÒZh 𫨰ûàdG
(ê πµ°ûdG) »ÑfÉ÷G ¢†Ñ≤ŸG Ö«côJ
¿CG ¤EG áYÉ°ùdG ÜQÉ≤Y √ÉŒG ¢ùµY ‘ ¢†Ñ≤ŸG QOCG •
ÖfÉ÷G ƒëf (6) »ÑfÉ÷G ¢†Ñ≤ŸG ∂jô– øe øµªàJ
.RÉ¡é∏d »eÉeC’G
.܃∏£ŸG ™°VƒdG ¤EG »ÑfÉ÷G ¢†Ñ≤ŸG QOCG •
ôjhóJ ≥jôW øY ΩɵMEÉH »ÑfÉ÷G ¢†Ñ≤ŸG §HQG •
.áYÉ°ùdG ÜQÉ≤Y √ÉŒG ‘ ¢†Ñ≤ŸG
(CG πµ°ûdG) äÉ≤ë∏ŸG Ö«côJ
.(9) ≥ë∏ŸG OƒªY º«ë°ûJh ∞«¶æàH ºb •
RÉ¡÷G πeÉM ‘ Oƒª©dG πNOCGh (10) áÑ∏÷G Öë°SG •
.(5)
™e iPÉëàj ≈àM ≥aôH √QOCGh πØ°SC’ ≥ë∏ŸG ™aOG •
.äÉëàØdG
áØ«Xh Ö∏£àJ .ΩɵMEÉH ¬à«ÑãJ øe ócCÉà∏d ≥ë∏ŸG ÜòLG •
Ió©d Ék jQƒfi ∑ôëàdÉH ≥ë∏ª∏d ìɪ°ùdG ¥ô£dG
.RÉ¡÷G πeÉM ‘ ¬à«ÑãJ óæY äGΪ«àæ°S
áeÓ°ùdG äGAGôLEG ójóëàd RGõàgÓd ¢Vô©àdG º««≤J óæY
ájɪ◊ EC/2002/44 QÉ«©ŸG ÖLƒÃ áHƒ∏£ŸG
πµ°ûH á«FÉHô¡µdG Iõ¡LC’G ¿ƒeóîà°ùj øjòdG ¢UÉî°TC’G
º««≤J á«∏ªY ‘ »∏j Ée IÉYGôe Ωõ∏j ,º¡∏ªY ‘ º¶àæe
á≤jô£dGh ΩGóîà°SÓd á«∏©ØdG ±hô¶dG :RGõàgÓd ¢Vô©àdG
AGõLCG áaÉc òNCG ∂dP ‘ Éà ,É¡H RÉ¡÷G ΩGóîà°SG ºàj »àdG
É¡«a ºàj »àdG äÉbhC’G πãe ;QÉÑàY’G ‘ 𫨰ûàdG IQhO
™°Vh ‘ RÉ¡÷G ¿ƒµj ÉeóæY hCG RÉ¡÷G 𫨰ûJ ±É≤jEG
.𫨰ûàdG äÉbhCG ¤EG áaÉ°VE’ÉH ,¿ƒµ°ùdG
Iõ¡LC’G ≈∏Y äÉ≤°ü∏ŸG
:RÉ¡÷G ≈∏Y á«dÉàdG á«ë«°VƒàdG Qƒ°üdG ô¡¶J
≈∏Y Öéj ,áHÉ°UE’G ôWÉfl π«∏≤àd !ôjò–
.äGOÉ°TQE’G π«dO IAGôb Ωóîà°ùŸG
á«FÉHô¡µdG áeÓ°ùdG
’ ,∂dòdh ;ÉLhOõe
’k õY ∫hõ©e RÉ¡÷G Gòg
k
ɪFGO
ócC
É
àdG
»¨Ñæjh
.»°VQCG ∂∏°S ¤EG áLÉM
k
≈∏Y í°VƒŸG ó¡÷G ™e »FÉHô¡µdG QÉ«àdG Qó°üe ≥aGƒJ øe
.∞«æ°üàdG áMƒd
¬dGóÑà°SG Öéj ,»FÉHô¡µdG QÉ«àdG ∂∏°S ∞∏J ádÉM ‘ •
iód óªà©e áfÉ«°U õcôe hCG á©æ°üŸG ácöûdG πÑ pb øe
.ôWÉîŸG Öæéàd ôµjO ófBG ∑ÓH
ÉjGõŸG
ÜòLGh (10) ∞∏î∏d áÑ∏÷G Öë°SG ,≥ë∏ŸG ádGRE’ •
.≥ë∏ŸG
.É¡©«ªL hCG á«dÉàdG ÉjGõŸG ¢†©H ≈∏Y RÉ¡÷G Gòg πªà°ûj
ΩGóîà°S’G
πØb QR .2
¥ƒa ¬∏ª– ’h ,ájOÉ©dG ¬àYöùH πª©j RÉ¡÷G ∑ôJG !ôjò–
.¬àbÉW
¢ùµ©dÉH / ΩÉeCÓd ¿GQhódG ìÉàØe .3
äÉYöùdG Ò«¨J ìÉàØe .1
ôØ◊G ™°Vh QÉ«àNG ìÉàØe .4
,∞≤°SC’G hCG äÉ«°VQC’G hCG §FGƒ◊G ‘ ôØ◊G πÑb !ôjò–
.Ö«HÉfC’Gh á«FÉHô¡µdG ∑Ó°SC’G ™bGƒe øe ≥≤–
16
RÉ¡÷G πeÉM .5
ARABIC
™°Vh Ωóîà°SÉa ,IQƒ°ûëŸG ôØ◊G º≤d ádGREG hCG »ZGÈdG
.(áYÉ°ùdG ÜQÉ≤Y √ÉŒG ¢ùµY ‘) ¢ùµ©dÉH ¿GQhódG
(Ü πµ°ûdG) 𫨰ûàdG ™°Vh ójó–
.𫨰ûJ ´É°VhCG áKÓK ‘ RÉ¡÷G Gòg ΩGóîà°SG øµÁ
≥dõæŸG ìÉàØŸG ∑ôM ,ΩÉeCÓd ¿GQhódG ™°Vh QÉ«àN’ • (4) ôØ◊G ™°Vh QÉ«àNG ìÉàØe QOCGh (11) QõdG ≈∏Y §¨°VG
.RƒeôdÉH í°Vƒe ƒg ɪc ,܃∏£ŸG ™°VƒdG ¤EG
.QÉ°ù«dG ¤EG (3) ¢ùµ©dÉH / ΩÉeCÓd ¿GQhó∏d
≥dõæŸG ìÉàØŸG ∑ôM ,¢ùµ©dÉH ¿GQhódG ™°Vh QÉ«àN’ •
.Úª«dG ¤EG (3) ¢ùµ©dÉH / ΩÉeCÓd ¿GQhó∏d
ôØ◊G
§Ñ°VG ,∂«à°SÓÑdGh Ö°ûÿGh Ö∏°üdG ójó◊G ‘ ôØë∏d •
. ™°VƒdG ≈∏Y (4) ôØ◊G ™°Vh QÉ«àNG ìÉàØe
∑ôëŸG ¿ƒµj ÉeóæY ¿GQhódG √ÉŒG Ék ≤∏£e Ò¨J ’ !ôjò–
.𫨰ûàdG ó«b
ábô£ŸÉH ôØ◊G
(ê πµ°ûdG) ôØ◊G ≥ªY ójó–
§Ñ°VG ,áfÉ°SôÿGh AÉæÑdG OGƒe ‘ ábô£ŸÉH ôØë∏d •
. ™°VƒdG ≈∏Y (4) ôØ◊G ™°Vh QÉ«àNG ìÉàØe
.(8) ôØ◊G ≥ªY ‘ ºµëàdG õLÉM QR ≈∏Y §¨°VG •
™°VƒdG ‘ (7) ôØ◊G ≥ªY ‘ ºµëàdG õLÉM §Ñ°VG •
Ék jhÉ°ùe ôØ◊G ≥ª©d ≈°übC’G ó◊G ¿ƒµj .܃∏£ŸG
õLÉ◊ »eÉeC’G ±ô£dGh ôØ◊G áª≤d ±ôW ÚH áaÉ°ùª∏d
.ôØ◊G ≥ªY ‘ ºµëàdG
.ôØ◊G ≥ªY ‘ ºµëàdG õLÉM QR QôM •
±É≤jE’Gh 𫨰ûàdG
,(1) äÉYöùdG Ò«¨J ìÉàØe ≈∏Y §¨°VG ,RÉ¡÷G 𫨰ûàd •
Gòg ≈∏Y §¨°†dG Iƒb ≈∏Y óªà©J RÉ¡÷G áYöS ¿CÉH Ék ª∏Y
.ìÉàØŸG
.á°SÓ°ùH πª©j ¿CGh RÉ¡÷G óJôj ’CG Öéj ,¥ô£dG óæY •
.ôeC’G ≈°†àbG GPEG áYöùdG IOÉjR øµÁh
¥ô£dG
âëædGh ,¿GQhódG OƒªY πØb ΩGóîà°SÉH ¥ô£∏d •
ôØ◊G ™°Vh QÉ«àNG ìÉàØe §Ñ°VG ,∞«ØÿG ™«£≤àdGh
. ™°VƒdG ≈∏Y (4)
™°Vh ‘ ¢ùµ©dÉH / ΩÉeCÓd ¿GQhódG ìÉàØe ¿CG ócCÉJ •
.ΩÉeCÓd ¿GQhódG
QOCG ,âëædG ¤EG ábô£ŸÉH ôØ◊G øe ™°VƒdG Ò«¨J óæY •
áehÉ≤à äô©°T GPEGh .܃∏£ŸG ™°VƒŸG ¤EG π«eRC’G
OƒªY ≥«°û©àd ≥aôH π«eRC’G QOCG ,™°VƒdG Ò«¨J óæY
.¿GQhódG
º≤d ™e á°†ØîæŸG äÉYöùdG Ωóîà°SG ,áeÉY IóYÉ≤c •
º≤d ™e á«dÉ©dG äÉYöùdGh ,IÒѵdG QÉ£bC’G äGP ôØ◊G
.áª≤∏dG ájhGR Ò¨àJ ób ,¿GQhódG OƒªY πØ≤H ¥ô£dG óæY •
.IÒ¨°üdG QÉ£bC’G äGP ôØ◊G
, ™°VƒdG ≈∏Y (4) ôØ◊G ™°Vh QÉ«àNG ìÉàØe §Ñ°VG
RÉ¡÷G πeÉM ôjhóàH áª≤∏dG ájhGR Ò«¨J ¿B’G ∂æµÁ
ìÉàØe QôMh (2) πØ≤dG QR ≈∏Y §¨°VG ,ôªà°ùŸG 𫨰ûà∏d •
≈∏Y (4) ôØ◊G ™°Vh QÉ«àNG ìÉàØe §Ñ°VG .(6)
™°Vh ‘ §≤a ôaƒàe QÉ«ÿG Gòg .äÉYöùdG Ò«¨J
.QGôªà°S’G πÑb ™°VƒdG
.(áYÉ°ùdG ÜQÉ≤Y √ÉŒG ‘) ΩÉeCÓd ¿GQhódG
±É≤jE’h .äÉYöùdG Ò«¨J ìÉàØe QôM ,RÉ¡÷G ±É≤jE’ •
§¨°VG ,ôªà°ùŸG 𫨰ûàdG ™°Vh ‘ ¿ƒµj ÉeóæY RÉ¡÷G
.√QôM ºK IóMGh Iôe äÉYöùdG Ò«¨J ìÉàØe ≈∏Y
¿GQhódG √ÉŒG ójó–
™°Vh Ωóîà°SG ,âëædGh ,ΩÉéMEÉH »ZGÈdG §HQh ,ôØë∏d
∂Ød ÉeCG ,(áYÉ°ùdG ÜQÉ≤Y √ÉŒG ‘) ΩÉeCÓd ¿GQhódG
17
ARABIC
.øeBG πµ°ûH Ëó≤dG ¢ùHÉ≤dG øe ¢ü∏îJ •
π°UƒŸG ±ô£dÉH ¿ƒ∏dG »æÑdG π«°UƒàdG ∂∏°S π°U •
.ójó÷G ¢ùHÉ≤dG øe QÉ«àdÉH
äÉ≤ë∏ŸG
.ójÉëŸG ±ô£dÉH ¿ƒ∏dG ¥QRC’G π«°UƒàdG ∂∏°S π°U •
⪪°U ó≤a ,áeóîà°ùŸG äÉ≤ë∏ŸG ≈∏Y RÉ¡÷G AGOCG óªà©j
IOƒ÷G á«dÉY ÒjÉ©e ≥ah ÉfGÒHh ôµjO ófBG ∑ÓH äÉ≤ë∏e
±ƒ°S äÉ≤ë∏ŸG √òg ΩGóîà°SÉHh ,RÉ¡÷G AGOCG õjõ©J ±ó¡H
.RÉ¡÷G øe AGOCG π°†aCG ≈∏Y π°ü–
∂∏°ùdG π°U ,(¢VQDƒe) 1 áÄØdG øe èàæŸG ¿Éc GPEG •
.»°VQC’G ±ô£dÉH ¿ƒ∏dG ôØ°UC’G/ö†NC’G
áfÉ«°üdG
ÉLhOõe
’k õY ádhõ©ŸG 2 áÄØdG øe èàæŸG ¿Éc GPEG !ôjò–
k
π«°UƒJ …C’ òm FóæY áLÉM Óa (πѵdG ‘ §≤a ¿Éµ∏°S)
.»°VQC’G ±ô£dÉH
𪩫d »µ∏°SÓdG hCG »µ∏°ùdG ôµjO ófBG ∑ÓH RÉ¡L ºª°U
óªà©jh .áfÉ«°üdG øe øµ‡ óM πbCÉH á∏jƒW äGÎØd
áÑ°SÉæŸG ájÉæ©dG ≈∏Y ôªà°ùeh ¢Vôe
m AGOCG ≈∏Y ∫ƒ°ü◊G
.ΩɶàfÉH ¬Ø«¶æJh RÉ¡÷ÉH
.IOƒ÷G á«dÉY ¢ùHGƒ≤dG ™e á≤aôŸG Ö«cÎdG äɪ«∏©J ™ÑJG
ô¡°üŸG ≤e ¢ùØf ∫óÑà°ùe ô¡°üe …C’ ¿ƒµj ¿CG »¨Ñæj
.èàæŸG ™e ≥aôŸG »∏°UC’G
á«æØdG äÉfÉ«ÑdG
KD750
(Type 1)
hCG ᫵∏°ùdG Iõ¡LCÓd áfÉ«°U …CG AGôLEG πÑb !ôjò–
:᫵∏°SÓdG
.»FÉHô¡µdG QÉ«àdG øY ¬∏°üah RÉ¡÷G ±É≤jEÉH ºb •
PEG RÉ¡÷G øe ájQÉ£ÑdG ádGREGh RÉ¡÷G ±É≤jEÉH ºb hCG •
.á∏°üØæe äÉjQÉ£H IóMh ≈∏Y πªà°ûj RÉ¡÷G ¿Éc
GPEG Ék eÉ“ ájQÉ£ÑdG ÆôØJ ¿CG ¤EG RÉ¡÷G 𫨰ûàH ºb hCG •
.¬aÉ≤jEÉH ºb ºK RÉ¡÷ÉH á›óe ájQÉ£ÑdG âfÉc
220-240
OOΟG QÉ«àdG Ió°T
750
äGh
1050 – 0
-1á≤«bO
πªM ¿hO ¿GQhódG áYöS
5200
-1á≤«bO
ΩGó£°U’G ∫ó©e
2.7
∫ƒL
ΩGó£°U’G ábÉW
ΩɶàfÉH RÉ¡÷G øMÉ°T ‘ ájƒ¡àdG äÉëàa ∞¶f •
.áaÉL ¢Tɪb á©£b hCG áªYÉf IÉ°Tôa Ék eóîà°ùe
26
13
º∏e
º∏e
ôØë∏d IQób ≈°übCG
áfÉ°SôÿG
Ö∏°üdG
á©£b ΩGóîà°SÉH ΩɶàfÉH ∑ôëŸG ¥hóæ°U ∞¶f •
hCG ᣰTÉc ∞«¶æJ IOÉe …CG Ωóîà°ùJ ’ .áÑWQ ¢Tɪb
.áÑjòe
30
º∏e
Ö°ûÿG
2.3
ºéc
¿RƒdG
QÉÑZ …CG ádGRE’ ≥aôH ¬°†ØfGh º≤∏dG ¢†HÉb íàaG •
.(¬Ñ«côJ ” GPEG) ¬∏NGóH
»Hô¡µdG ó¡÷G
πNGódG »Hô¡µdG QÉ«àdG
’ øMÉ°ûdG ¿CÉH Ék ª∏Y ,¬Ø«¶æJ πÑb øMÉ°ûdG π°üØH ºb •
.ΩɶàfÉH ¬Ø«¶æJ iƒ°S áfÉ«°U …CG ¤EG êÉàëj
»°ù«FôdG òNCÉŸG ¢ùHÉb ∫GóÑà°SG
,»°ù«FôdG òNCɪ∏d ójóL ¢ùHÉb Ö«cÎd áLÉ◊G ádÉM ‘
:»∏j Ée ™ÑJG
18
ARABIC
¿Éª°†dG
OGƒŸG ‘ Ö«Y ÖÑ°ùH ôµjO ófBG ∑ÓH èàæe ‘ π∏N ô¡X GPEG
¿EÉa ,AGöûdG ïjQÉJ øe kGô¡°T 12 ¿ƒ°†Z ‘ ,™«æ°üàdG hCG
∫GóÑà°SG hCG áÑ«©ŸG AGõLC’G ∫GóÑà°SG øª°†J ôµjO ófBG ∑ÓH
:GPEG ’EG ,𫪩∏d áMGôdG øe Qób ≈°übCG Òaƒàd äÉéàæŸG √òg
.∫ɪgE’G hCG ΩGóîà°S’G IAÉ°SE’ èàæŸG ¢Vô©J •
OGƒe hCG ΩÉ°ùLCG ÖÑ°ùH èàæŸÉH ᪫°ùL QGöVCG â≤◊ •
.çOGƒM hCG áÑjôZ
hCG øjóªà©ŸG áfÉ«°üdG AÓch iƒ°S ôNBG ¢üî°T ∫hÉM •
ìÓ°UEG ôµjO ófBG ∑ÓÑd Ú©HÉàdG áfÉ«°üdG »∏eÉY
.èàæŸG
AGöûdG IQƒJÉa Ëó≤J Öéj ,¿Éª°†dG äÉeóN ≈∏Y ∫ƒ°üë∏d
ÜôbCG ™bƒe áaô©e ∂æµÁ .óªà©ŸG áfÉ«°üdG π«ch hCG ™FÉÑ∏d
ófBG ∑ÓH ÖàµÃ ∫É°üJ’G ≥jôW øY óªà©e áfÉ«°U π«ch
øe ’k óHh .π«dódG Gòg ‘ ÚÑŸG ¿Gƒæ©dG ‘ »∏ëŸG ôµjO
ófBG ∑ÓH iód øjóªà©ŸG áfÉ«°üdG AÓcƒH áªFÉb ôaƒàJ ,∂dP
äÉ¡Lh ™«ÑdG ó©H Ée áeóÿ á∏eɵdG π«°UÉØàdGh ôµjO
:âfÎfE’G ≈∏Y Éæ©bƒe ≈∏Y ∫É°üJ’G
.www.2helpU.com
áÄ«ÑdG ájɪM
Gòg øe ¢ü∏îàdG ΩóY Ωõ∏j .π°üØæŸG ™ª÷G
.ájOÉ©dG á«dõæŸG áeɪ≤dG ™e èàæŸG
ôµjO ófBG ∑ÓH èàæe ∫GóÑà°SG ΩÉjC’G øe Ωƒj ‘ Ωõd GPEG
™e ¬æe ¢ü∏îàJ Óa ,¬eóîà°ùJ ó©J ⁄ GPEG hCG ,∂H ¢UÉÿG
èàæŸG Gòg áMÉJEG øe ócCÉJ πH ,iôNC’G á«dõæŸG áeɪ≤dG
.π°üØæŸG ™ªé∏d
ôjhóJ IOÉYE’ ≥aôe ôµjO ófBG ∑ÓH ácöT ôaƒJ •
ájÉ¡f ¤EG É¡dƒ°Uh Oôéà ôµjO ófBG ∑ÓH äÉéàæe
√òg Ëó≤J ºàjh .πª©∏d É¡à«MÓ°U ΩóYh ÉgôªY
≈Lôj ,áeóÿG √òg øe IOÉØà°SÓd .Éfk É› áeóÿG
±ƒ°S …òdGh óªà©e áfÉ«°U π«ch …CG ¤EG èàæŸG IOÉYEG
.ÉæY áHÉ«f äÉéàæŸG ™ªL √QhóH ¤ƒàj
óªà©e áfÉ«°U π«ch ÜôbCG ™bƒe ≈∏Y ±ô©àdG ∂æµÁ •
»∏ëŸG ôµjO ófBG ∑ÓH Öàµe ≈∏Y ∫É°üJ’G ∫ÓN øe
,∂dP øe ’k óHh .π«dódG Gòg ‘ í°VƒŸG ¿Gƒæ©dG ‘
Ú©HÉàdG øjóªà©ŸG áfÉ«°üdG AÓcƒH áªFÉb óLƒJ
Ée äÉeóÿ á∏eɵdG π«°UÉØàdGh ôµjO ófBG ∑ÓH ácöûd
âfÎfE’G ≈∏Y ÉæH á°UÉÿG ∫É°üJ’G πFÉ°Shh ™«ÑdG ó©H
.www.2helpU.com :ÊhεdE’G ™bƒŸG ≈∏Y
π«é°ùàd www.blackanddecker.ae IQÉjõH π°†ØJ
äÉéàæŸG ≈∏Y ´ÓW’Gh ôµjO ófBG ∑ÓH øe ójó÷G ∂éàæe
äÉeƒ∏©ŸG øe ójõŸG ôaƒàJ .á°UÉÿG ¢Vhô©dGh Iójó÷G
≈∏Y ÉæJÉéàæe áYƒª›h ôµjO ófBG ∑ÓH ácöT ∫ƒM
.www.blackanddecker.ae
19
FRENCH
5
7
4
8
3
6
20
1
2
FRENCH
9
5
10
4
11
8
7
21
FRENCH
Utilisation
c. N'exposez pas l'outil électroportatif à la pluie
ou à l'humidité. La pénétration d'eau dans un
Votre perceuse à percussion rotative Black &
outil électroportatif augmente le risque de
Decker peut percer le bois, le métal, le plastique
choc électrique.
et la pierre. Elle peut aussi être utilisée pour les
travaux de vissage et de burinage légers. Cet
d. Préservez le câble d'alimentation. N'utilisez
outil est destiné à une utilisation exclusivement
pas le câble pour porter l'outil, pour
domestique.
l'accrocher. Ne le tirez pas pour le
débrancher. Maintenez le câble éloigné des
Consignes de sécurité
sources de chaleurs, des parties huilées, des
Consignes de sécurité concernant les outils
bords tranchants ou des parties de l'appareil
électroportatifs
en rotation. Le risque de choc électrique
Attention ! Lisez avec attention tous
augmente si les câbles sont endommagés ou
les avertissements et toutes les
emmêlés.
instructions. Le non-respect de cette
consigne peut entraîner une électrocution, un
e. Si vous utilisez l'outil électroportatif à
incendie et/ou de graves blessures.
l'extérieur, utilisez une rallonge homologuée
Conservez tous les avertissements et
pour une utilisation à l'extérieur. L'utilisation
instructions pour référence ultérieure. La notion
d'une rallonge électrique homologuée pour
« d’outil électroportatif » mentionnée dans les
les travaux à l’extérieur réduit le risque de
consignes de sécurité se rapporte à des outils
choc électrique.
électriques raccordés au secteur (avec câble de f. Si l’outil doit être utilisé dans un endroit
raccordement) ou fonctionnant sur piles ou
humide, prenez les précautions nécessaires
batterie (sans fil).
en utilisant un dispositif à courant résiduel
1. Sécurité de la zone de travail
(RCD). L’utilisation d’un tel dispositif réduit
a. Maintenez la zone de travail propre et bien
les risques d’électrocution.
éclairée. Un lieu de travail en désordre ou
3.
Sécurité
personnelle
mal éclairé augmente le risque d'accidents.
b. N'utilisez pas les outils électroportatifs dans a. Restez vigilant, surveillez ce que vous faites.
Faites preuve de bon sens quand vous
un environnement présentant des risques
utilisez un outil électroportatif. N’utilisez pas
d'explosion ni en présence de liquides, gaz
l’outil lorsque vous êtes fatigué ou après
ou poussières inflammables. Les outils
avoir consommé de l’alcool ainsi que des
électroportatifs génèrent des étincelles
médicaments. Un moment d'inattention en
risquant d'enflammer les poussières ou les
utilisant l'outil peut entraîner de graves
vapeurs.
blessures.
c. Tenez les enfants et autres personnes
éloignés durant l'utilisation de l'outil
b. Portez un équipement de protection. Portez
électroportatif. En cas d'inattention, vous
toujours des lunettes de protection. Selon le
risquez de perdre le contrôle de l'outil.
travail à effectuer, le port d'équipement de
protection tels que masque anti-poussières,
2. Sécurité électrique
chaussures de sécurité antidérapantes,
a. La prise de l'outil électroportatif doit être
casque ou protection auditive, réduit le risque
compatible avec la prise d'alimentation. Ne
de blessures.
modifiez en aucun cas la prise. N'utilisez pas
de prises d'adaptateur avec des appareils
c. Évitez un démarrage imprévu. L’appareil doit
ayant une prise de terre. Le respect de ces
être en position OFF (arrêt) avant d'effectuer
consignes réduit le risque de choc électrique.
le branchement à l'alimentation et/ou au
b. Évitez le contact physique avec des surfaces
bloc-batterie, de le ramasser ou de le porter.
mises à la terre telles que tuyaux, radiateurs,
Ne laissez pas votre doigt sur le bouton de
fours et réfrigérateurs. Le risque de choc
commande en le transportant. N'alimentez
électrique augmente si votre corps est relié à
pas l'outil si le bouton est activé. Ceci
la terre.
pourrait être à l’origine d’accident.
22
FRENCH
d. Enlevez tout outil ou clé de réglage avant de
mettre l'appareil en marche. Une clé ou un
outil se trouvant sur une partie en rotation
peut causer des blessures.
e. Adoptez une position confortable. Adoptez
une position stable et gardez votre équilibre
en permanence. Vous contrôlerez ainsi
mieux l'outil dans des situations inattendues.
Les outils électroportatifs sont dangereux
lorsqu'ils sont utilisés par des personnes non
initiées.
e. Entretenez les outils électroportatifs. Vérifiez
que les parties en mouvement fonctionnent
correctement et qu'elles ne sont pas
coincées. Vérifiez qu'il n’y a pas de pièces
cassées ou endommagées susceptibles de
nuire au bon fonctionnement de l'outil. S’il est
endommagé, faites réparer l’outil avant de
l’utiliser. De nombreux accidents sont la
conséquence d’outils mal entretenus.
f. Portez des vêtements appropriés. Ne portez
pas de vêtements amples ou de bijoux.
N’approchez pas les cheveux, vêtements ou
gants des parties des pièces mobiles. Les
vêtements amples, les bijoux ou les cheveux f. Maintenez les outils de coupe aiguisés et
longs peuvent s'accrocher dans les pièces
propres. Des outils soigneusement
en mouvement.
entretenus avec des bords tranchants bien
aiguisés se coincent moins souvent et
g. En cas d’utilisation d’appareils servant à
peuvent être guidés plus facilement.
aspirer ou à recueillir les poussières,
assurez-vous qu’ils sont correctement
g. Utilisez les outils électroportatifs, les
raccordés et utilisés. L'utilisation de tels
accessoires, etc., en suivant ces instructions
dispositifs réduit les dangers dus aux
et en tenant compte des conditions de travail,
poussières.
ainsi que du travail à effectuer. L'utilisation
des outils électroportatifs à d'autres fins que
4. Utilisation des outils électroportatifs et
celles prévues peut vous mettre en situation
précautions
dangereuse.
a. Respectez la capacité de l'outil. Utilisez l'outil
5. Réparations
électroportatif approprié pour le travail à
effectuer. Avec un outil approprié, vous
a. Faites réparer votre outil électroportatif
travaillerez mieux et en toute sécurité.
uniquement par du personnel qualifié et
seulement avec des pièces de rechange
b. N'utilisez pas un outil électroportatif dont
appropriées. Cela garantira le maintien de la
l'interrupteur est défectueux. Un outil
sécurité de votre outil.
électroportatif qui ne répond pas à la
commande marche/arrêt est dangereux et
Consignes de sécurité
doit être réparé.
supplémentaires concernant les
c. Retirez la prise de courant et/ou débranchez
le bloc-batterie avant d'effectuer des
réglages, de changer les accessoires ou de
ranger l'outil. Cette mesure de précaution
empêche de mettre l’outil en marche
accidentellement.
d. Rangez les outils électroportatifs hors de
portée des enfants. Les personnes ne
connaissant pas l’outil ou n’ayant pas lu ces
instructions ne doivent en aucun cas l’utiliser.
outils électroportatifs
Attention ! Prendre encore plus de
précautions avec les marteaux à buriner
et à rotation.
• Portez un serre-tête antibruit. L’exposition au
bruit peut entraîner la perte de l’ouïe.
• Utilisez les poignées auxiliaires livrées avec
l’outil. La perte de contrôle peut entraîner des
blessures.
23
FRENCH
• Tenez l’outil au niveau des surfaces de prise
isolées. Ceci permet d’éviter les accidents
en cas de contact de l’accessoire de coupe
avec des fils cachés ou son propre câble..
En touchant un fil sous tension, la charge
électrique passe dans les parties métalliques
de l'outil électroportatif et il y a risque de
choc électrique.
• N’utilisez jamais un burin en mode rotatif.
L’accessoire peut se tordre à l’intérieur du
matériel et faire tourner le foret.
• Utilisez des pinces ou autres pour fixer et
soutenir la pièce de manière stable. Si vous
la tenez à la main ou contre votre corps, elle
ne sera pas stable et vous pouvez en perdre
le contrôle.
• Avant de percer les murs, les planchers ou
les plafonds, vérifiez l’emplacement des
câblages et des tuyaux.
• Évitez de toucher le bout d’un foret juste
après avoir percé. Il peut être chaud.
• Les consignes d'utilisation sont données
dans ce manuel d’instructions. L’utilisation
d’un accessoire ou d’une fixation, ou bien
l’utilisation de cet outil à d’autres fins que
celles recommandées dans ce manuel
d’instructions peut entraîner des blessures
et/ou des dommages matériels.
Sécurité des personnes
• Cet outil ne doit pas être utilisé par des
personnes (y compris les enfants) ayant des
déficiences physiques, mentales ou
sensorielles. Cette consigne s’applique aussi
aux personnes manquant d'expérience et de
connaissance du matériel, à moins que
celles-ci n’aient reçu les instructions
appropriées ou qu’elles ne soient encadrées
par une personne responsable de leur
sécurité pour utiliser l’outil.
• Ne laissez jamais les enfants sans
surveillance pour éviter qu’ils ne jouent avec
cet outil.
24
Risques résiduels
L'utilisation d'un outil non mentionné dans les
consignes de sécurité données peut entraîner
des risques résiduels supplémentaires. Ces
risques peuvent survenir si l'outil est mal utilisé,
si l'utilisation est prolongée, etc.
Malgré l'application des normes de sécurité
correspondantes et la présence de dispositifs de
sécurité, les risques résiduels suivants ne
peuvent être évités. Ceci comprend :
• Les blessures dues au contact avec une
pièce mobile/en rotation.
• Les blessures causées en changeant des
pièces, lames ou accessoires.
• Les blessures dues à l'utilisation prolongée
d'un outil. Une utilisation prolongée de l'outil
nécessite des pauses régulières.
• Déficience auditive.
• Risques pour la santé causés par l'inhalation
de poussières produites pendant l'utilisation
de l'outil (exemple : travail avec du bois,
surtout le chêne, le hêtre et les panneaux en
MDF).
Vibration
La valeur des émissions de vibration déclarée
dans la section Déclaration/Données techniques
de conformité a été mesurée selon une méthode
d’essai standard fournie par la norme EN 60745
et peut être utilisée pour comparer un outil à un
autre. Elle peut aussi être utilisée pour une
évaluation préliminaire à l’exposition.
Attention ! Selon la manière dont l’outil est
utilisé, la valeur des émissions de vibration
pendant l’utilisation de l’outil peut être différente
de la valeur déclarée. Le niveau de vibration
peut augmenter au-dessus du niveau établi.
FRENCH
Quand l’exposition aux vibrations est évaluée
8. Bouton de verrouillage de butée de
afin de déterminer les mesures de sécurité
profondeur
requises par la norme 2002/44/CE pour protéger
les personnes utilisant régulièrement des outils Assemblage
électroportatifs, il faut tenir compte d'une
Attention ! Avant l'assemblage, assurez-vous
estimation de l’exposition aux vibrations, des
que l'outil est éteint et débranché.
conditions actuelles d’utilisation et de la manière
Installation de la poignée
dont l’outil est utilisé. Il faut aussi tenir compte
de toutes les pièces du cycle de fonctionnement latérale (figure C)
comme la durée pendant laquelle l’outil est
• Tournez le manche dans le sens inverse des
arrêté et quand il fonctionne au ralenti, ainsi que
aiguilles d’une montre jusqu’à ce que la
la durée du déclenchement.
poignée latérale (7) puisse glisser sur l’avant
de l’outil.
Étiquettes de l’outil
Les pictogrammes ci-dessous se trouvent sur
l’appareil :
Attention ! Pour réduire le risque de
blessures, l’utilisateur doit lire le
manuel d’instructions.
Sécurité électrique
Cet outil est doublement isolé. Par
conséquent, aucun câble de mise à
la terre n'est nécessaire. Vérifiez si
l’alimentation mentionnée sur la plaque
signalétique de l'outil correspond bien à la
tension présente sur le lieu.
• Si le câble d'alimentation est endommagé, il
doit être remplacé par le fabricant ou par un
Centre de réparation Black & Decker agréé
pour éviter tout danger.
Caractéristiques
Cet appareil comprend certains, ou tous, les
éléments suivants :
1. Sélecteur de vitesse
2. Bouton de verrouillage
• Tournez la poignée latérale dans la position
désirée.
• Serrez la poignée latérale en tournant le
manche dans le sens des aiguilles d’une
montre.
Mise en place d’un accessoire
(figure A)
• Nettoyez et graissez l’embout (9) de
l’accessoire.
• Tirez le manchon (10) et insérez l’embout
dans le support d’outil (6).
• Poussez l’accessoire et tournez-le
légèrement jusqu’à ce qu’il soit dans les
fentes.
• Tirez sur l’accessoire pour vérifier le
verrouillage. La fonction martelage a besoin
de l’accessoire pour pouvoir se déplacer sur
son axe de plusieurs centimètres quand il est
verrouillé dans le support d’outil.
• Pour retirer l’accessoire, appuyez sur le
manchon (10) et tirez l’accessoire.
3. Bouton de commande avant/arrière
Utilisation
4. Sélecteur de mode de perçage
Attention ! Laissez l'outil fonctionner à sa propre
vitesse. Ne le poussez pas au-delà de sa limite.
5. Support d’outil
6. Poignée latérale
7. Butée de profondeur
Attention ! Avant de percer les murs, les
planchers ou les plafonds, vérifiez l’emplacement
des câblages et des tuyaux.
25
FRENCH
Sélection du mode de
fonctionnement (figure B)
L’outil peut être utilisé dans les trois modes de
fonctionnement. Appuyez sur le bouton (11) et
tournez le sélecteur du mode de perçage (4)
dans la position désirée, comme indiqué par les
symboles.
Sélection du sens de rotation
Pour percer, pour serrer les vis et pour buriner,
utilisez la rotation dans le sens des aiguilles
d’une montre. Pour desserrer les vis ou retirer un
foret bloqué, utilisez la rotation dans le sens
inverse des aiguilles d’une montre.
• Pour sélectionner la rotation dans le sens des
aiguilles d’une montre, poussez le bouton de
commande avant/arrière (3) vers la gauche.
• Pour sélectionner la rotation dans le sens
• Pour percer dans l’acier, le bois et le
inverse des aiguilles d’une montre, poussez
plastique, et pour visser, réglez le sélecteur
le bouton de commande avant/arrière vers la
de mode de fonctionnement (4) en position .
droite.
Perçage au marteau
Attention ! Ne changez jamais le sens de
• Pour percer de la pierre et du béton, réglez rotation quand le moteur tourne.
le sélecteur de mode de fonctionnement (4) Réglage de la profondeur de
en position
.
perçage (figure C)
Perçage
• Pour visser, commencez à vitesse réduite.
Pour retirer les vis, la vitesse est
automatiquement réduite.
Martelage
• Appuyez sur le bouton de verrouillage de
•
• Pour marteler avec l’axe de verrouillage, et
pour les travaux de burinage et d’ébarbage
légers, réglez le sélecteur de mode de
fonctionnement (4) en position .
• Assurez-vous que le bouton de commande
avant/arrière est dans la position avant.
• Pour passer du perçage au burinage,
tournez le burin dans la position désirée. Si
une résistance se fait ressentir pendant le
changement de mode, tournez légèrement le
burin pour enclencher l’axe de verrouillage.
• Pendant le martelage avec l’axe de
verrouillage, l’angle du foret peut être
changé. Réglez le sélecteur de mode de
fonctionnement (4) en position , l’angle du
foret peut maintenant être changé en
tournant le support de l'outil (6). Réglez le
sélecteur de mode de fonctionnement (4) en
position , avant de continuer.
26
butée de profondeur (8).
Réglez la butée de profondeur (7) à la
position désirée. La profondeur de perçage
maximale est égale à la distance entre le bout
du foret et l’extrémité avant de la butée de
profondeur.
• Relâchez le bouton de verrouillage de butée
de profondeur.
Mise en marche et arrêt
• Pour mettre l’outil en marche, appuyez sur le
•
•
•
sélecteur de vitesse (1). La vitesse de l’outil
dépend de la pression sur le bouton.
Normalement, les vitesses lentes
correspondent aux forets à large diamètre et
les vitesses rapides aux forets de faible
diamètre.
En mode continu, appuyez sur le bouton de
verrouillage (2) et relâchez le sélecteur de
vitesse. Cette option n’est disponible qu’en
rotation avant (sens des aiguilles d’une
montre).
Pour arrêter l’outil, relâchez le sélecteur de
vitesse. Pour arrêter l’outil quand celui-ci est
en mode continu, appuyez de nouveau sur le
sélecteur, puis relâchez-le.
FRENCH
Accessoires
Remplacement d’une prise
électrique
La qualité de travail réalisé par votre outil
dépend des accessoires utilisés. Les
En cas d’installation d’une nouvelle prise:
accessoires Black & Decker et Piranha
correspondent aux normes de qualité supérieure • Jetez l’ancienne prise.
et sont conçus pour donner le meilleur résultat
• Connectez le fil marron sur la borne sous
possible. En utilisant ces accessoires, votre outil
tension de la nouvelle prise.
vous donnera entière satisfaction.
• Connectez le fil bleu sur la borne neutre.
Entretien
Votre appareil/outil sans fil/avec fil Black &
Decker a été conçu pour fonctionner pendant
longtemps avec un minimum d'entretien. Un
fonctionnement continu satisfaisant dépend d'un
nettoyage régulier et d'un entretien approprié de
l’outil.
• Si le produit est de classe I (terre), connecter
le fil vert / jaune sur la borne terre.
Attention! Si votre produit est de classe II avec
double isolation (seulement 2 fils dans le cordon
électrique), il n’y a aucune connexion à faire sur
la borne terre.
Attention ! À ne pas oublier avant l’entretien
des appareils électriques sans fil/avec fil :
Suivez les instructions de montage fournies avec
les prises de bonne qualité
• Arrêtez l’appareil/outil, puis débranchez-le.
• Ou, arrêtez l’appareil et retirez la batterie de
Tout fusible de rechange doit être du même
calibre que le fusible d'origine fourni avec le
produit.
l’appareil/outil si celui-ci est muni d’un
bloc-batterie séparé.
Caractéristiques techniques
• Ou bien déchargez complètement la batterie
KD750
(Type 1)
si elle est intégrée au système, puis arrêtez
l’appareil (position Off).
• Débranchez le chargeur avant de le nettoyer.
Aucun entretien particulier n'est nécessaire
pour le chargeur en dehors du nettoyage
régulier.
• Nettoyez régulièrement les orifices de
ventilation de votre appareil/outil/chargeur à
l'aide d'une brosse souple ou d'un chiffon
sec.
• Nettoyez régulièrement le compartiment du
moteur à l'aide d'un chiffon humide. N'utilisez
pas de produit abrasif ou à base de solvant.
• Ouvrez régulièrement le mandrin et retirez la
poussière à l’intérieur en le tapant (si
installé).
Tension d’entrée
Vac
220-240
Puissance
W
750
Aucune vitesse de charge
min-1
0-1050
Résistance au choc
min-1
5,200
J
2.7
Béton
mm
26
Acier
mm
13
Bois
mm
30
Poids
kg
2.3
Force du choc
Capacité max de perçage
27
FRENCH
Protection de l'environnement
Collecte séparée. Ce produit ne doit
pas être jeté avec les déchets
domestiques normaux.
Si vous décidez de remplacer ce produit Black
& Decker, ou si vous n'en avez plus l'utilité, ne
le jetez pas avec vos déchets domestiques
Rendez-le disponible pour une collecte séparée.
• Black & Decker fournit un dispositif
permettant de collecter et de recycler les
produits Black & Decker lorsqu'ils ont atteint
la fin de leur cycle de vie. Pour pouvoir
profiter de ce service, veuillez retourner votre
produit à un réparateur agréé qui se
chargera de le collecter pour nous.
• Pour connaître l'adresse du réparateur agréé
le plus proche de chez vous, contactez le
bureau Black & Decker à l'adresse indiquée
dans ce manuel. Vous pourrez aussi trouvez
un liste des réparateurs agréés de Black &
Decker et de plus amples détails sur notre
service après-vente sur le site Internet à
l'adresse suivante : www.2helpU.com
28
FRENCH
Garantie
Lorsqu’un appareil Black & Decker s’avère
defectueux en raison d’un défaut matériel ou de
fabrication dans les 12 mois à compter de la
date d’achat, Black & Decker garantit le
remplacement des pièces défectueuses ou de
l’appareil afin de minimiser les désagréments
causés au client, à l’exclusion des cas suivants:
• Utilisation abusive de l’appareil ou appareil
endommagé à cause de négligence.
• Appareil endommagé par d’autres appareils,
des substances ou par accident.
• Réparations effectuées par des personnes
autres qu’un réparateur agréé ou le service
technique de Black & Decker.
Pour avoir recours à la garantie, il est
nécessaire de fournir une preuve d’achat à
votre revendeur ou à un réparateur agréé. Pour
connaitre l’adresse du réparateur agréé le plus
proche, contactez le bureau Black & Decker à
l’adresse indiquée dans ce manuel. Vous
pouvez aussi trouver une liste des réparateurs
agréés Black & Decker et de plus amples
détails sur notre service après-vente en visitant
notre site: www.2helpU.com.
Visitez notre site Web www.blackanddecker.ae
pour enregistrer votre nouveau produit Black &
Decker et être informé des nouveaux produits et
des offres spéciales. Pour plus d'informations
concernant la marque Black & Decker et notre
gamme de produits, consultez notre site
www.blackanddecker.ae
29
Names & Addresses for Black & Decker Service Concessionaries
ALGERIA: Sarl Outillage Corporation, 08 Rue Med Boudiaf - Cheraga - Algiers, Algeria. Tel: (213-21) 375130, Fax: (213-21) 369667. AZERBAIJAN:
Royalton Holdings Ltd. 41 Khagani St. Apt. 47 AZ 1001, Baku. Tel: (994-12) 4935544, Fax: (994-12) 5980378. BAHRAIN: Alfouz Services Co. WLL.,
P.O. Box 26562, Tubli, Manama. Tel: (973) 17783562, Fax: (973) 17783479. EGYPT: El-Farab S.A.E 15 - Nabil El Wakkad Street, Dokki, Giza. Tel:
(202) 37603946, Fax: 33352796. ETHIOPIA: Seif Tewfik Sherif, Arada Sub-City, Kebele 01/02, Global Insurance Building, 2nd Floor, Room 43,
P.O. Box 2525, Addis Ababa, Ethiopia. Tel: (251-11) 1563968/ 1563969, Fax: (251-11) 1558009. IRAQ: Al Sard Co. for General Trading Ltd.
Jbara Bldg. 3Flr, Al Rasheed St. Bagdad. Tel: (964) 18184102. Sakhar Group, Arrassat al-hindya Al Masbah, Bagdad. (964) 7400144446. JORDAN:
Palestine Bldg. Matl. (Bashiti Hardware), 93 King Abdullah 2nd Street, Opp. ELBA House, P.O. Box 3005, Amman 11953, Tel: (962-6) 5349098, Fax:
(962-6) 5330731. KENYA: Dextron Tools Ltd., P.O. Box 20121-00200, Shariff House, Kimathi Street, Nairobi. Tel: (254-20) 6905000/ 2358021, Fax:
(254-20) 6905111/ 6905112. KUWAIT: Al Omar Technical Co., P.O. Box 4062, 13041 Safat, Kuwait. Tel: (965) 24848595/ 24840039, Fax:
(965) 24845652. Fawaz Al Zayani Establishment, P.O. Box 42426, Shop No. 18, Al Humaizi Commercial Complex, Khalifa Al Jassim, Shuwaikh, Kuwait.
Tel: (965) 24828710, Fax: (965) 24828716. LEBANON: Est. Shaya & Azar S.A.R.L., Boulvard, Jdeideh, Mar Takla-Bouchrieh, P.O. Box 90545,
Jdeideh, Beirut. Tel: (961-1) 872305/ 872306, Fax: (961-1) 872303. LIBYA: (Benghazi) Sniydel st., Amr Ibn EL-Aas Rd. Tel: (+218) 92 5771120.
(Tripoli) Al Barniq Service Center, Mokhazin elsukar st., ElFallah. Tel: (+218) 21 4808019. (Misrata) Al Hilal Service Center, Tawergha st. Tel:
(+218) 51 2626743. MAURITIUS: Robert le Marie Limited, Old Moka Road, Bell Village, P.O. Box 161, Port Louis. Tel: (230) 2121865/ 2122847, Fax:
(230) 2080843. MOROCCO: Ets. Louis Guillaud & Cie, 31, Rue Pierre Parent, Casablanca-21000. Tel: (+212) 522 305971, Fax: (+212) 522 444518.
NIGERIA: Meridian Power Tools Ltd., Gr. Floor, #1 Alhaji Masha Road, Next to Teslim Balogun Stadium, Near National Stadium, Surulere, Lagos. Tel:
(234-1) 7740431/ 7740410, Fax: (234-1) 7913798. OMAN: Al Jizzi Company LLC, P.O. Box 1704, P.C. 112 Ruwi, Oman. Tel: (968) 24832618/
24835153, Fax: (968) 24831334. Al Hassan Technical & Construction Supplies Co. LLC., P.O. Box 1948, P.C. 112, Ruwi, Oman. Tel: (968) 24810575/
24837054, Fax: (968) 24810287/ 248333080. Khimji Ramdas, P.O. Box 19, Post Code 100, Ghala, Muscat, Oman. Tel: (968) 24595906/ 907, Fax:
(968) 24852752. Oman Hardware Co. LLC., P.O. Box 635, Ruwi-112. Tel: (968) 24815131, Fax: (968) 24816491. Oman Marketing & Service Co.
(Omasco), P.O. Box 2734, Behind Honda Showroom, Wattayah, Oman. Tel: (968) 24560232/ 24560255, Fax: (968) 24560993. Oman Marketing &
Service Co. (Omasco), Al Ohi, Sohar, Oman. Tel: (968) 26846379, Fax: (968) 26846379. Oman Marketing & Service Co. (Omasco), Sanaya, Salalah,
Oman. Tel: (968) 23212290, Fax: (968) 23210936. PAKISTAN: Ammar Service & Spares, 60-Bank Arcade, Serai Road, Karachi, Pakistan. Tel:
(92-21) 32426905, Fax: (92-21) 32427214. ZIT Co., Nasir & Bros., 2nd Floor, Qadri Center, Chowk Dalgran, Railway Road, Lahore. Tel:
(92-42) 37670839, Fax: (92-42) 37652989. QATAR: Al Muftah Service Centre, Al Wakrah Road, P.O. Box 875, Doha, Qatar. Tel: (974) 4650880/
4650110/ 4446868, Fax: (974) 4441415/ 4662599. Shaheen Electrical Works & Trading Co. WLL., Gate 34, St.44 Industriala Area, P.O. Box 9756,
Doha. Tel: (974) 4600230/ 4600525, Fax: (974) 4601338. Teyseer Industrial Supplies & Services Co. WLL., 55, Al Wakalat St. (Between St. 18 & 19)
Salwa Industrial Area, P.O. Box 40523, Doha, Qatar. Tel: (974) 4581536, Fax: (974) 4682024. SAUDI ARABIA: (Al Bahr) Mohamed Ahmed Bin Afif
Est., P.O. Box 530, Yanbu, Al Bahr. Tel: (966-4) 3222626/ 3228867, Fax: (966-4) 3222210. (Al Khobar) Fawaz Ebrahim Al Zayani Trading Est.,
P.O. Box 76026, Al Khobar # 31952, Tel: (966-3) 8140914, Fax: (966-3) 8140824. MSS (Al-Mojil Supply & Services) P.O. Box 450, Jubail 31951,
Opp. Gulf Bridge Library & Riyadh House. Tel: (966-3) 3612850/ 3624487/ 3621729, Fax: (966-3) 3623589/ 3620783. (Dammam) Al Bawardi Tools &
Hardware, P.O. Box 112, Dammam 31411. Tel: (966-3) 8330780/ 8348585 ext. 24, Fax: (966-3) 8336303. (Jeddah) Al Bawardi Tools & Hardware,
P.O. Box 16905, Jeddah-21474. Tel: (966-2) 6444547, Fax: (966-2) 6439024. EAC (Al Yousef Contg. & Trdg. Est.), P.O. Box 30377, Jeddah -21477, Tel:
(966-2) 6519912, Fax: (966-2) 6511153. (Madina) Garziz Trading for Bldg Mat & Decoration, P.O. Box 3364, Madina. Tel: (966-4) 8261490/ 8227636,
Fax: (966-4) 8265741. (Riyadh) Al Bawardi Tools & Hardware, P.O. Box 68, Riyadh 11411. Tel: (966-1) 4484999, Fax: (966-1) 4487877.
Industrial Material Organization (IMO), P.O. Box 623, Rail Street, Riyadh. Tel: (966-1) 4028010, Fax: (966-1) 4037970. Sulatn Garment factory (RSC),
P.O. Box 29912, Riyadh 11467. Tel: (966-1) 4055148/ 4042889, Fax: (966) 4055148. SOUTH AFRICA: Trevco Power Tool Service 14 Steenbok Street,
Koedoespoort, 0186, Pretoria, South Africa. Tel: (27-86) 1873826, Fax: (27-86) 5001771. TANZANIA: General Motors investment Ltd., P.O. Box 16541,
14 Nyerere Road, Vingunguti, Dar-es-Salaam. Tel: (255 22) 2862661/ 2865022, Fax: (255 22) 2862667. TUNISIA: Societe Tunisienne De Maintenance
(STM), Rue de la Physique. Nouvelle Zone Industrielle Ben Arous., 2013 Ben Arous, Tunisia. Tel: (+216) 71 389687, Fax: (+216) 71 385154. UAE:
(Abu Dhabi) Light House Electrical, P.O. Box 120, Abu Dhabi, Tel: (971-2) 6726131, Fax: (971-2) 6720667. (Ajman) Al Sukoon Gen. Trdg. Co. LLC,
P.O. Box 2975, Ajman. Tel: (971-6) 7435725/ 7438317, Fax: (971-6) 7437350. (Al Ain) Zillion Equipment and Spare Parts Trading LLC, P.O. Box 19740,
Opp. Bin Sadal/ Trimix Redymix Sanaiya, Al Ain. Tel: (971-3) 7216690, Fax: (971-3) 7216103. (Dubai) Alebrah Engineering Service, P.O. Box 78954,
Al Qusais, Dubai. Tel: (971-4) 2850044, Fax: (971-4) 2844802. Black & Decker (Overseas) GmbH, P.O. Box 5420, Dubai, Tel: (971-4) 8127400/
8127406, Fax: (971-4)2822765. Ideal Star Workshop Eqpt. trading LLC, P.O. Box 37110, Al Quoz, Dubai. Tel: (971-4) 3474160, Fax: (971-4) 3474157.
(Musaffah) Light House Electrical, P.O. Box 120, Abu Dhabi, Tel: (971-2) 5548315, Fax: (971-2) 5540461. (Sharjah) Mc Coy Middle East LLC,
P.O. Box 25793, Sharjah, Tel: (971-6) 5395931, Fax: (971-6) 5395932. Burj Al Madeena, Industrial Area No.1, Opp. Pakistani Masjid, P.O. Box 37635,
Sharjah. Tel: (971-6) 5337747, Fax: (971-6) 5337719. (Ras Al Khaimah) Mc Coy Middle East LLC, P.O. Box 10584, Ras Al Khaimah, Tel:
(971-7) 2277095, Fax: (971-7) 2277096. UGANDA: The Building Center (U) Ltd., 52 Station Road, Kitgum House, P.O. Box 7436, Kampala, Uganda.
Tel: (256-41) 4234567/ 4259754, Fax: (256-41) 4236413. YEMEN: (Aden) Middle East Trad. Co. Ltd. (METCO), Mualla Dakka, Aden, Yemen. Tel:
(967-2) 222670, Fax: (967-2) 222670. (Sana'a) Middle East Trad. Co. Ltd. (METCO), Hayel St., Sana'a, Yemen. Tel: (967-1) 204201, Fax:
(967-1) 204204. (Taiz) Middle East Trading Co. (METCO), P.O. Box 12363, 5th Flr, Hayel Saeed Anam Bldg, Al-Mugamma St. Taiz, Yemen. Tel:
(967-4) 213455, Fax: (967-4) 219869.
WARRANTY REGISTRATION CARD
YOUR NAME/ rßù«
YOUR ADDRESS Ê«uMF∞«
POSTCODE Íb¥d∂∞« e±d∞«
DATE OF PURCHASE ¡«dA∞« a¥¸U¢
DEALER'S NAME & ADDRESS/ lzU∂∞« Ê«uM´ Ë rß≈
PRODUCT MODEL NO. KD750