1
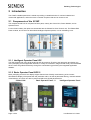
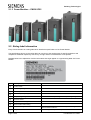
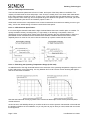
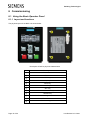
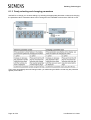
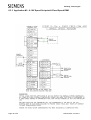
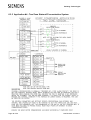
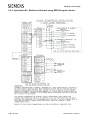
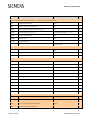
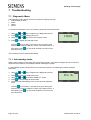
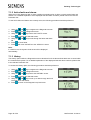
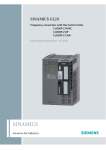
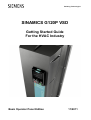
Building Technologies
SINAMICS G120P VSD
Getting Started Guide
For the HVAC Industry
Basic Operator Panel Edition
11/2011
Building Technologies
Table of Contents
1
SAFETY.............................................................................................................................................. 3
2
INTRODUCTION................................................................................................................................. 4
2.1
COMPONENTS OF THE G120P ........................................................................................................ 4
2.1.1 Intelligent Operator Panel IOP................................................................................................. 4
2.1.2 Basic Operator Panel BOP-2................................................................................................... 4
2.1.3 Power Modules – PM230 IP55 ................................................................................................ 5
2.2
RATING LABEL INFORMATION ........................................................................................................... 5
2.3
W EBSITE LINK TO G120P MANUALS ................................................................................................ 6
3
PLANNING ......................................................................................................................................... 6
3.1
SIZING ......................................................................................................................................... 8
3.2
EMC CONSIDERATIONS ................................................................................................................. 9
3.2.1 Category C1 (First Envir.)........................................................................................................ 9
3.2.2 Category C2 (First Envir.)........................................................................................................ 9
3.2.3 Category C3 (Second Envir.)................................................................................................... 9
4
INSTALLATION .................................................................................................................................10
4.1
4.2
4.3
5
DIMENSIONS ................................................................................................................................10
CONNECTIONS .............................................................................................................................10
EMC COMPLIANT INSTALL FOR IP55 UNITS .....................................................................................11
ASSEMBLY - NOTES ........................................................................................................................11
5.1
FITTING THE D-TYPE ADAPTER RETAINING BRACKET .........................................................................12
5.2
FITTING FERRITE RINGS TO THE MOTOR AND MAINS SUPPLY CABLES ...................................................12
5.2.1 Motor cable blue ferrite ring....................................................................................................12
5.2.2 Mains supply cable ferrite rings ..............................................................................................12
5.3
CONTROL UNIT CONNECTIONS.......................................................................................................14
6
COMMISSIONING..............................................................................................................................15
6.1
USING THE BASIC OPERATOR PANEL ..............................................................................................15
6.1.1 Layout and functions ..............................................................................................................15
6.1.2 Menu structure.......................................................................................................................17
6.1.3 Freely selecting and changing parameters .............................................................................18
6.2
COMMISSIONING THE DRIVE ..........................................................................................................19
6.2.1 Commissioning Steps ............................................................................................................19
6.2.2 Additional & Optional Steps....................................................................................................20
6.2.3 Motor Nameplate Data ...........................................................................................................21
6.2.4 Setup Menu ...........................................................................................................................22
6.2.5 Monitoring Screen..................................................................................................................26
6.3
TYPICAL HVAC APPLICATIONS ......................................................................................................27
6.3.1 Application #0 - Default 0-10V Speed Set-point Low Level Control .........................................28
6.3.2 Application #1 - 4 Fixed Speeds & Fixed Speed ESM.............................................................30
6.3.3 Application #2 - 0-10V Speed Set-point & Fixed Speed ESM..................................................32
6.3.4 Application #3 - Stairwell Pressurisation System.....................................................................34
6.3.5 Application #4 - Two Zone Stairwell Pressurisation System ....................................................36
6.3.6 Application #5 - Multi-zone Stairwell using SEZ220 signal selector .........................................38
6.3.7 Application #6 - Cooling Tower Fan using Int. PID & Hibernation Feature ...............................40
6.3.8 Application #8 - Constant Pressure Control with Fixed Speed ESM ........................................42
7
TROUBLESHOOTING .......................................................................................................................44
7.1
DIAGNOSTIC MENU .......................................................................................................................44
7.1.1 Acknowledge faults ................................................................................................................44
7.1.2 Active faults and alarms .........................................................................................................45
7.1.3 History ...................................................................................................................................45
7.2
FAULT AND W ARNING LIST ............................................................................................................46
Building Technologies
1 Safety
Before installing and putting the equipment into operation, read these safety instructions and warnings
carefully.
Also read and obey all warning signs attached to the equipment. Make sure that the warning labels are kept
in a legible condition and replace any missing or damaged labels.
Warning
• This equipment contains dangerous voltages and
controls dangerous rotating mechanical parts.
Loss of life, severe personal injury or property
damage can result if the instructions contained in
this Manual are not followed
• Only suitably qualified personnel should work
on this equipment, and only after being familiar
with all safety notices, installation, operation and
maintenance procedures contained in this Manual
• Use only permanently wired input power
connections. The equipment must be grounded
(IEC 536 Class 1, NEC, and other applicable
standards)
• If a Residual Current Circuit Breaker (RCCB or
ELCB) is required, type B with a 300 mA tripping
current must be used (the RCCB. should only
supply one VSD). An unfiltered VSD should be
used or if the VSD has an EMC filter this must be
disconnected, due to the filter leaking current to
earth. The neutral conductor in the system must
be grounded
• Wait at least 5 minutes after the power has
been turned off, before opening the equipment.
The dc-link capacitor remains charged to
dangerous voltages even when the power is
removed. When working on open equipment, note
that live parts are exposed and do not touch such
parts
• Do not connect machines with a 3-phase power
supply, fitted with EMC filters, to a supply via an
ELCB (Earth Leakage Circuit Breaker - see EN
50 178, section 6.5)
• Note that certain parameter settings may cause
the VSD to restart automatically after an input
power failure
• Do not use this equipment as an “emergency
stop” mechanism (see EN 60 204, 9.2.5.4)
• Note that certain parameter settings may cause
the VSD to start automatically
• Obey all general and regional installation and
safety regulations relating to work on low-voltage
installations, as well as regulations covering
correct use of tools and personal protective
equipment
Page 3 of 50
• This equipment is capable of providing internal
motor overload protection in accordance with
UL508C section 42. An external PTC can also
provide motor overload protection via a special
input
• This equipment is suitable for use in a circuit
capable of delivering not more than 100,000
symmetrical amps (rms) for a maximum voltage of
AC 460 V when protected by a time delay fuse.
• Do not use the unit with a motor of a higher
nominal power rating than the VSD, or a nominal
power less than half that of the VSD. Only operate
the VSD when the nominal current in P0305
exactly matches the motor rating plate nominal
current
• When using the analog inputs, the DIP switches
must be correctly set and the analog inputs correctly configured before enabling them. If this is
not done, the motor may start inadvertently
Caution
• Do not allow children or the general public to
access or approach this equipment
• Do not install the VSD where it will be subjected
to shock, vibration, electromagnetic radiation,
water hazards, or atmospheric pollutants such as
dust or corrosive gasses
• Keep Operating Instructions, etc., with this
equipment or with the end-user
• Use this equipment only for the purpose
specified by the manufacturer. Do not carry out
any modifications or fit any spare parts, which are
not sold or recommended by the manufacturer; as
this could cause fire, electric shock or other
injuries.
Last Revised: 4/11/2011
Building Technologies
2 Introduction
The G120P variable speed drive is aimed at providing a versatile solution for various industrial and
commercial applications, and so there are a number of options that can be chosen to suit.
2.1 Components of the G120P
The complete G120P unit is comprised of three parts, namely the Control Unit, Power Module, and an
Operator Panel.
For the HVAC industry the options recommended are the CU230P-2 HVAC Control unit, The PM230 IP55
Power module, and a choice of either Basic/Intelligent Operator panels, or even a blanking cover.
2.1.1 Intelligent Operator Panel IOP
The IOP supports both entry-level personnel and drive experts. Thanks to the large plain text display, the
menu prompting and the Application Wizards, it is easy to commission, diagnose and locally control standard
drives. Users are guided interactively through the commissioning process by the integrated Application
Wizards.
2.1.2 Basic Operator Panel BOP-2
Menu prompting and the 2-line display support fast and user-friendly commissioning of the inverter.
Simultaneous display of the parameter and parameter value, as well as parameter filtering, means that basic
commissioning of a drive can also be performed without a printed parameter list.
Control Unit
Page 4 of 50
Basic Operator Panel - 2
Intelligent Operator Panel
Last Revised: 4/11/2011
Building Technologies
2.1.3 Power Modules – PM230 IP55
2.2 Rating label information
Every Power Module has a rating label which details the specifications of the Power Module.
The specifications shown on the rating label can vary due to the requirements of specific regulations and
compliance standards imposed by the country of origin and the final destination of the product.
Detailed below is an explanation of all the information that might appear on a typical rating label of a Power
Module.
Item
Description
Notes
Product name
Input voltage range
Rated input current
Nominal input frequency
Output voltage range
This is determined by the range of the input voltage range.
Nominal current
European motor rating
North America motor rating
Protection rating
The IP rating denotes the protection the product has against
environmental conditions.
Weight
It is the weight of the product only.
Page 5 of 50
Last Revised: 4/11/2011
Building Technologies
Temperature range
Is the operating temperature range of the product.
The country of origin and manufacture
Order number
Hardware version
Serial number
2.3 Website link to G120P Manuals
Included is the G120P website link where you can download all of the latest manuals and information. Also
listed are the document ID numbers to make searching easier (The first two are currently supplied in the
boxes).
http://www.automation.siemens.com/mcms/standard-drives/en/low-voltage-inverter/sinamicsg120p/Pages/sinamics-g120p.aspx
CU230P-2 HVAC - Getting Started Guide
G120P Power Module - Getting Started Guide
CU230P-2 HVAC - Control Unit Operating Manual
CU230P-2 HVAC - Control Unit Parameter Manual
PM230 IP55 - Power Module Hardware Installation
BOP2 Manual
IOP Manual
A5E02792536C AB
A5E02923634A
A5E02430659B AD
A5E02297932B AD
A5E02923635A AB
A5E02778927A AB
A5E00110011A AB
3 Planning
The G120P was designed to be flexible and adaptable to suit the needs of the HVAC environment. There are
a number of features that help achieve this and should be considered before installation: 1. The VSD output characteristic can be changed to suit the load type – including energy optimization
and Sensor-less Vector Control. See next page for more information.
2. The VSD overload specification can be selected (LO/HI) to match the dynamic needs of the load.
For more current (and therefore torque) capability, use the High Overload option – which uses the
next size up in power module. See next point, and next page for more information.
3. The standard operating temperature range can be extended (50C with no derating) to suit the
intended install location by using the HI Overload option.
4. There are a number of Human Machine Interface options: a. Blanking plate (usually for use with High Level Interface, or to prevent tampering).
b. Basic Operator Panel - helps on cost critical projects.
c. Intelligent Operator Panel - an intuitive interface option. A very useful tool when combined
with the remote handheld kit for commissioning technicians.
d. Remote control and/or monitoring via the BACnet and Modbus (RS485) protocols that are
included as standard.
5. Can be programmed with: a. BOP – from application sheet or a program memory (i.e. cloned).
b. IOP – from Wizards, Menu, or sixteen program memories (i.e. cloned).
c. Laptop via USB cable (supplied with Power Module) and freely downloadable ‘Starter’
software from Siemens website.
d. SD Card slot – allows up to 100 programs to be stored and cloned (e.g. project back-up).
6. Optional signals cable shield plate – provides a handy fastening and earth bonding point when
using Nylon type cable glands on the shielded signal & communication cables.
7. Free Function Blocks (including 7 day time-switch, logic blocks, and additional PID loops) allow for
flexibility and new application opportunities.
8. HVAC relevant, built-in features like Hibernation, Essential Services Mode, Multi-zone signal
processing, Auto-reset, Flying restart, V-belt failure detection, to name a few.
Page 6 of 50
Last Revised: 4/11/2011
Building Technologies
Point 1 – VSD Output Characteristic
The load characteristic parameter is found in P1300, and is part of the Setup Menu in the BOP2. The
majority of HVAC loads are fans and pumps – both of which normally have a non-linear load characteristic
that is often referred to as the fan curve, or pump curve. This means that at low speeds there is very little
torque required, while at the high end of the speed range the demand is far greater. In this case you would
select the Quadratic (also known as Parabolic) option P1300 = 2.
Other loads such as screw compressors have a linear characteristic that need more starting current to ‘get
away’, and so the default setting of P1300=0 would be the best option.
Point 2 – VSD Overload Specification
It is in these higher demand loads that the High Overload feature becomes a useful option to consider. To
quickly accelerate a heavy centrifugal fan (i.e. high inertia), or for starting a compressor, there is a
requirement for more torque which means more amps. By selecting the high overload option in P205, the
permissible current overload levels are raised and the duration extended. Note that this extra current
capability does not come for free, and in fact the next size up in power module has to be used.
Point 3 – Extending the Operating Temperature Range (at full load)
An added benefit of the High Overload feature is the extension of the operating temperature range from 40°C
to 50°C without any current de-rating. It is only between 50°C to 60°C that a current de-rating still applies.
See the charts below for details.
Note that the base load current [%] refers to the continuous rated output current for the particular power
module selected.
As can be seen, this flexibility allows you to tailor the drive to suit the dynamic characteristic of the load and
the ambient conditions of the installation, so you only have to pay for what you need, rather than a one size
fits all approach.
Page 7 of 50
Last Revised: 4/11/2011
3.1 Sizing
Building Technologies
When sizing drives there is a common misconception that matching the kilowatts of the motor to the drive is the correct method, and while most of the
time it will be satisfactory, there are occasions when there will be a shortfall in current capability due to installation-based derating factors, and special
load requirements. For example, do you need more than the rated Full Load Amps to start the motor? (e.g. certain types of pumps and compressors).
Last Revised: 4/11/2011
Typical 4-pole
Low OL Mode (Default)
High OL mode
Motor FLA
kW
A 40C
A 50C
A 60C
kW
A 50C
A 60C
Frame
Power Module with Class B
1.0
0.37
1.3
1.1
0.5
0.25
0.9
0.45
FSA
6SL3223-0DE13-7BA0
1.4
0.55
1.7
1.4
0.6
0.37
1.3
0.65
FSA
6SL3223-0DE15-5BA0
1.9
0.75
2.2
1.9
0.8
0.55
1.7
0.85
FSA
6SL3223-0DE17-5BA0
2.5
1.1
3.1
2.6
1.1
0.75
2.2
1.1
FSA
6SL3223-0DE21-1BA0
3.3
1.5
4.1
3.5
1.4
1.1
3.1
1.55
FSA
6SL3223-0DE21-5BA0
4.5
2.2
5.9
5.0
2.1
1.5
4.1
2.05
FSA
6SL3223-0DE22-2BA0
5.9
3
7.7
6.5
2.7
2.2
5.9
2.95
FSA
6SL3223-0DE23-0BA0
7.9
4
10.2
8.7
3.6
3
7.7
3.85
FSB
6SL3223-0DE24-0BA0
10.1
5.5
13.2
11.2
4.6
4
10.2
5.1
FSB
6SL3223-0DE25-5BA0
13.6
7.5
18
15.3
6.3
5.5
13.2
6.6
FSB
6SL3223-0DE27-5BA0
20.2
11
26
22.1
9.1
7.5
18
9
FSC
6SL3223-0DE31-1BA0
27.4
15
32
27.2
11.2
11
26
13
FSC
6SL3223-0DE31-5BA0
31.9
18.5
38
32.3
13.3
15
32
16
FSC
* 6SL3223-0DE31-8AA0 *
38.0
22
45
38.3
15.8
18.5
38
19
FSD
6SL3223-0DE32-2BA0
51.8
30
60
51.0
21.0
22
45
22.5
FSD
6SL3223-0DE33-0BA0
63.8
37
75
63.8
26.3
30
60
30
FSE
6SL3223-0DE33-7BA0
75.3
45
90
76.5
31.5
37
75
37.5
FSE
6SL3223-0DE34-5BA0
91.5
55
110
93.5
38.5
45
90
45
FSF
6SL3223-0DE35-5BA0
122.0
75
145
123.3
50.8
55
110
55
FSF
6SL3223-0DE37-5BA0
151.4
90
178
151.3
62.3
75
145
72.5
FSF
6SL3223-0DE38-8BA0
Size PM by the maximum motor current and the desired operating temperature. Sometimes the required current rating can be 3 x FLA.
* 18.5 kW PM is currently only available with an integral class A EMC filter. Ensure you select the appropriate unit for your installation
G120P Selection Table
To ensure the power module is the correct one before bolting it on the wall, you can use the following chart to check suitability. Just read the actual
FLA from the motor nameplate (that matches the connection type, supply voltage, and Hz), and see which power module matches or exceeds the
desired value in the relevant temperature column. Note that the kW and Typical FLA values shown in the first, second, and sixth columns are
provided for comparative information only.
Page 8 of 50
Building Technologies
3.2 EMC Considerations
In 2005 the standards governing the level of acceptable noise emission and immunity (or Electro Magnetic
Compatibility AS/NZS 61800.3) were redefined to ensure that the appropriate level of filtering and installation
methods were used to suit the differing environments that the equipment operated in.
This meant that for industrial areas where the chance of causing disruption to third parties was minimal, the
level of electromagnetic noise allowed to be emitted was greater than for commercial areas where there
might be consumer or medical devices. So the costs of additional filtering and installation methods would
only be incurred when necessary, rather than a one size fits all approach.
These areas are called the First Environment, and Second Environment. For the HVAC Industry the First
Environment is the most common situation, and is defined below. Note that there are sub-categories that
further define the EMC requirements.
First Environment (also known as Domestic)
An environment that includes domestic premises and establishments that are connected directly to a public
low-voltage power supply network (i.e. 240/415V) without the use of an intermediate transformer
(11kV/415V). For example: houses, apartments, commercial premises or offices in a residential building.
Second Environment (Typically Industrial)
All other environments not falling under the First Environment definition. For example a factory supplied by a
dedicated transformer that does not also feed domestic or residential buildings.
3.2.1 Category C1 (First Envir.)
Power Drive System (PDS, i.e. VSD + Motor + Sensors) of rated voltage less than 1000 V intended for use
in the First Environment. This means any equipment that can be connected to a supply shared by
residencies, and is a 'catch-all' that includes portable equipment. This would require Class B EMC
filters.
3.2.2 Category C2 (First Envir.)
Power Drive System (PDS) of rated voltage less than 1000 V, which is neither a plug in device nor a
movable device, and when used in the First Environment, is only intended to be installed and commissioned
by a professional. This is for fixed plant and equipment, and is where the majority of G120P would be
installed. Class A EMC filters would be the first choice, but may need to upgrade to Class B.
Note: A professional is a person or an organization having necessary skills in installing and/or
commissioning a Power Drive System (PDS), including their EMC aspects. This means an electrician with
the relevant competency.
3.2.3 Category C3 (Second Envir.)
Power Drive System rated less than 1000V intended for use in the Second Environment, and not intended
for the First Environment. Industrial rated equipment installed in a building with its own transformer.
G120P Motor Cabling Requirements
The following cabling requirements should be adopted to meet the Category specifications – as indicated in
the table below.
PM230
Cable type
EMC category
Max. cable length
EMC Filter Class B
(standard offering)
Screened
C1 (conducted only)
25 m* (with blue ring)
Screened
C2
50 m (no blue ring)
Unscreened
None (Special Cases Only)
100 m
* Power Modules with Class B integrated filters, frame sizes A to C, must be fitted with a blue ferrite
ring on the motor cable between the Power Module power terminals and the screening plate of the
Power Module to fulfil EMI category C1 conditions.
Power Modules with Class B integrated filters, frame sizes B and C must be fitted with a grey ferrite
ring/s on the mains supply input cable in addition to the ferrite ring on the motor cable.
Page 9 of 50
Last Revised: 4/11/2011
Building Technologies
4 Installation
4.1 Dimensions
G120P
Dimensions (mm)
Clearance Distance
Mounting Holes
Bolts
Frame
kW (LO)
Width (X)
Height (Y)
Depth (Z)
Above
Below
Side
Width (X)
Height (Y)
mm
FSA
0.37…3.0
154
460
264
100
100
0
132
445
4
FSB
4.0…7.5
180
540
264
100
100
0
158
524
4
FSC
11…15
230
620
264
125
125
0
208
604
5
FSD
22…30
320
640
344
300
300
50
285
600
8
FSE
37…45
320
751
344
300
300
50
285
710
8
FSF
55…90
410
915
431
350
350
50
370
870
8
4.2 Connections
WARNING
Power and motor connections
A fixed location, non varying connection is necessary because of a leakage current
> 3.5 mA.
The inverter must always be grounded. If it is not grounded correctly, extremely dangerous conditions may arise which
could prove potentially fatal.
Isolate the mains electrical supply before making or changing connections to the unit.
The terminals of the Inverter can carry dangerous voltages even if the inverter is inoperative. Wait at least 5 minutes to
allow the unit to discharge after switching off the power supply before carrying out any installation work.
When connecting the power supply to the inverter, make sure that the terminal case of the motor is closed.
When changing from the ON to OFF-state of an operation if an LED or other similar display is not lit or active; this does
not indicate that the unit is switched-off or powered-down.
Ensure that the inverter is configured for the correct supply voltage – it must not be connected to a higher voltage supply.
WARNING
Filtered drives can only be used on power systems with grounded star-point.
CAUTION
Cable cross section for protective earthing (not earth bonding)
The material of the protective earthing conductor must be the same as the material of the power cable. If not, the specific
resistance of the protective earthing conductor must not be higher than the specific resistance of the power cables. The
relevant diameter of the power cables is the diameter of the line supply cables, not the diameter of the motor cables.
For power cables up to 10 mm² the earth cable must be at least as big as the power cables.
For power cables larger than 10 mm² the earth cable must be at least 10 mm², but need not exceed these sizes – except
when the diameter is more than 35 mm², the protective earthing conductor must have at least half of the size of the cross
section of the power cable.
Refer to AS/NZS 3000 and AS/NZS 3008 for sizing and tables.
Page 10 of 50
Last Revised: 4/11/2011
Building Technologies
4.3 EMC Compliant Install for IP55 Units
5 Assembly - Notes
Make sure the D-type adapter is not lost! You will need it to connect the operator panel to the control unit
through the front lid on drive units 0.37kW to 15kW.
Using the optional shielding plate will depend on the installer’s preference. You should consider the number
of shielded signal cables - and therefore metal bonding glands required, compared to using nylon cable
glands and the shielding plate. Note that some kind of cable gland will always be required or the IP55/4
rating will be lost. Corrugated conduit adapters are not suitable as they do not seal out the humidity.
Page 11 of 50
Last Revised: 4/11/2011
Building Technologies
5.1 Fitting the D-type adapter retaining bracket
A special bracket has been designed to ensure that the D-type adapter is fixed securely to the enclosure
door. The bracket is fitted as shown in the figure below. The bracket and fixings are supplied with the
product.
5.2 Fitting ferrite rings to the motor and mains supply cables
5.2.1 Motor cable blue ferrite ring
If you are installing the drive into a Category 1 (First Environment) then it is necessary to fit the blue ferrite
ring to the motor cable on the PM230 frame sizes A to C (0.37 kW ... 15.0 kW)
The blue ferrite ring must be fitted between the motor power cable terminals and the screening plate of the
power module.
In this case the maximum motor cable length is 25 m.
The ferrite rings required for PM230 FSA to FSC with integrated Class B filters are supplied with the product.
5.2.2 Mains supply cable ferrite rings
It is necessary to fit the gray ferrite rings to the mains supply cable of the PM230 frame size B (4.0 kW ... 7.5
kW) and frame size C (11.00 kW ... 15.0 kW) with an integrated B class filter to ensure it fulfils the EMI
standard for radiated emissions.
The gray ferrite rings must be fitted between the terminals and the screening plate on the mains supply
cable.
The ferrite rings required for PM230 FSB to FSC with integrated Class B filters are supplied with the product.
Page 12 of 50
Last Revised: 4/11/2011
Building Technologies
The correct fitting of the ferrite rings is shown in the figure below.
As previously noted, you only need to use the blue ferrite rings for EMC Category 1 installations, and doing
so reduces the maximum motor cable length from 50 metres to 25 metres.
Page 13 of 50
Last Revised: 4/11/2011
Building Technologies
5.3 Control Unit Connections
Note that the ratings for the digital outputs are as follows:
DO-0 = 250Vac, 2A Relay output. By default this is set to Fault indication.
DO-1 = 30Vac, 0.5A Transistor (Triac) output. By default this is set to Alarm indication.
DO-2 = 250Vac, 2A Relay output. By default this is set to Run indication.
The default action of these outputs is to energize when showing the desired indication.
All of these default settings can be changed in the relevant parameters.
Page 14 of 50
Last Revised: 4/11/2011
Building Technologies
6 Commissioning
6.1 Using the Basic Operator Panel
6.1.1 Layout and functions
The physical layout of the BOP-2 is shown below:
Description of BOP-2 physical characteristics
Item
Description
Release catch
LCD screen
ESC key
Up key
Down key
OK key
OFF key
HAND/AUTO key
ON/Run key
Door mounting screw recess
RS232 connector
Product rating label
Page 15 of 50
Last Revised: 4/11/2011
Building Technologies
Key
Function
The OK key has the following functions:
When navigating through the menus, pressing the OK key confirms selection of a menu item.
When working with parameters, pressing the OK key allows the parameter to be modified.
Pressing the OK key again will confirm the entered value and return you to the previous
screen.
In the faults screen it is used to clear faults.
The UP key has the following functions:
When navigating a menu, it moves the selection up through the screens available.
When editing a parameter value it increases the displayed value.
If HAND mode is active and Jog is ON, a long press of the UP and DOWN key together has
the following effects:
– If reverse is ON, it switches the reverse function OFF.
– If reverse is OFF, it switches the reverse function ON.
The DOWN key has the following functions:
When navigating a menu, it moves the selection down through the screens available.
When editing a parameter value it decreases the displayed value.
The ESC key has the following functions:
If pressed for less than 2 seconds the BOP-2 returns to the previous screen or if a value has
been edited, the new value is not saved.
If pressed longer than 3 seconds the BOP-2 returns to the status screen.
When using the ESC key in the parameter editing mode, no data is saved unless the OK key is
pressed first.
The ON key has the following functions:
In AUTO mode, the ON key is not active and if pressed it will be ignored.
In HAND mode the Inverter is started - the Inverter will display the drive running icon.
The OFF key has the following functions:
In AUTO mode press the OFF key will have no effect and the key press will be ignored.
If pressed for longer than 2 seconds the Inverter will perform an OFF2; the motor will then
coast down to a standstill.
If pressed for less than 3 seconds the following actions will be performed:
– If the OFF key is press twice in less than 2 seconds on OFF2 will be performed.
– If in HAND mode the Inverter will perform an OFF1; the motor will come to a standstill in
the ramp-down time set in parameter P1121.
The HAND/AUTO key switches the command source between the BOP (HAND) and fieldbus
(AUTO).
If HAND mode is active, pressing the HAND/AUTO key will switch the Inverter to AUTO mode
and disable the ON and OFF keys.
If AUTO mode is active, pressing the HAND/AUTO key will switch the Inverter to HAND mode
and enable the ON and OFF keys.
Changing between HAND mode and AUTO mode is possible while the motor is still running.
Note: Reaction to change between HAND and AUTO mode
When changing from HAND to AUTO mode the Inverter will react in the following way:
If the ON signal is active the new setpoint will become active and the Inverter will automatically ramp the
motor to the new setpoint after the change of mode.
When changing from AUTO to HAND mode the Inverter will react in the following way:
The Inverter will not stop the motor running. The Inverter will run the motor at the same speed that was
set prior to the
Page 16 of 50
key being pressed. Any ramp function that was in progress will be stopped.
Last Revised: 4/11/2011
Building Technologies
Locking and unlocking the keypad
To lock the BOP-2 keypad press
press
and
and
simultaneously for 3 seconds or more. To unlock the keypad
simultaneously for 3 seconds or more.
Screen icons
The BOP-2 displays a number of icons at the left-hand side of the display to indicate the actual state of the
Inverter. These icons are explained in the table below.
Function
Status
Icon
Remarks
Command source
Hand
When the HAND mode is active the icon is
displayed. When AUTO mode is active, no icon
is displayed.
Inverter status
Inverter and motor running
This is a static icon and does not rotate.
Jog
Jog function is active
Fault/alarm
Fault or alarm pending
Flashing symbol = Fault
Steady symbol = Warning
If a fault is detected, the Inverter will be stopped
and the user is required to take the necessary
corrective actions to clear the fault. An alarm is
a condition that will not stop the Inverter, for
example, over temperature.
6.1.2 Menu structure
Page 17 of 50
Last Revised: 4/11/2011
Building Technologies
6.1.3 Freely selecting and changing parameters
Use BOP-2 to change your inverter settings, by selecting the appropriate parameter number and changing
the parameter value. Parameter values can be changed in the "PARAMS" menu and the "SETUP" menu.
The inverter immediately saves all changes which you made using the BOP-2 so that they are protected
against power failure.
Page 18 of 50
Last Revised: 4/11/2011
Building Technologies
6.2 Commissioning the Drive
6.2.1 Commissioning Steps
Here is a suggested commissioning process that shows the various stages of setting up a drive after you
have planned the job and installed the device.
1. Note down the motor nameplate data. It is important that the values entered are correct, or the drive
may not perform optimally. This is shown in section 5.2.3 Motor Nameplate Data
o Voltage (Volts)
o Current (Amps)
o Power (kW)
o Speed (RPM)
2. After connecting the drive and ensuring it is safe, switch on and wait for the Basic Operator Panel
(BOP) to initialize (under a minute).
3. If you chose to use the HI Overload feature (section 2 Planning), then you need to complete the
following:
o In the Parameters area and set P10 = 1
o set P205 = 0
o go back to P10 = 0
o There may be a short delay while the drive recalibrates the effected internal values.
4. Go to the Setup menu and complete the process detailed in section 5.2.4 Setup Menu
o Set the Minimum motor speed to protect it from stalling and overheating. E.g. 450 rpm for a
4 pole motor = 15Hz.
o Enter Ramp up time = 30 seconds as a starting point. For large inertia loads (e.g. large
diameter centrifugal fans) you may need to slow down the ramp up time to prevent overcurrent faults due to the mass x acceleration rule. If you need a fast start, you may need to
install a larger unit – see the HI Overload option on page 7.
o Skip Ramp-down time option (30 seconds is Ok as a starting point). Again, for large inertia
loads, or if there is another fan acting on the same airflow (e.g. AHUs with a return air fan
and a supply air fan), you may need to slow down the ramp down time to prevent
overvoltage faults due to regeneration.
o Note: A warning (A7991) will occur just to let you know the Motor ID option is selected.
o If a fault (Fxxxx) is triggered during this process, proceed to the Diagnostics Menu and
check on the correct course of action. This is shown in section 6 Troubleshooting. In most
cases you just have to acknowledge the fault, although in some instance you may need to
cycle the power to clear the fault (Turn mains isolator off for >10 seconds, then On).
5. To start the Motor ID test (that you selected in the Setup Menu), select Hand and then Start (Green
button). Drive should start a motor testing procedure that will last under a minute. You should hear
the 3 phases being pulsed in turn. When finished the warning symbol disappears from the screen.
6. At this stage I would recommend testing the drive in Hand mode for: o Direction. If wrong either isolate and swap the motor output phase connection, or use
P1820=1 if you prefer not to change the wiring.
o Are there any noise or vibration issues throughout the rev range? If so see the next section.
o Can you achieve maximum speed without exceeding the rated FLA of the motor? If not you
should investigate why. You may need to slow down the ramp up time (P1120), set the
maximum speed (P1082) to a lower figure to prevent current warnings, or resize the v-belt
pulley, fan blade pitch, or pump impeller. If all these options are out, you can install a larger
motor and VSD to match the actual load.
o Is the default maximum speed sufficient for the task? If not, and the motor current is below
the FLA nameplate rating at 50Hz, you can increase the maximum motor speed in P1082. I
would not recommend exceeding 60Hz unless you are sure the mechanical limitations of the
system are not exceeded.
Page 19 of 50
Last Revised: 4/11/2011
Building Technologies
6.2.2 Additional & Optional Steps
1. If you want Start on the fly feature, select Parameters menu (leave in standard filter) and go to
P1200 and set to 1.
2. If you want Auto Restart after mains failure or fault, select Parameters menu (leave in standard filter)
and go to P1210 and set to 26.
3. If you want to avoid specific RPM bands due to noise or vibration issues, you can achieve this by
selecting up to four speeds (P1091, P1092, P1093, P1094), and setting the width of these no-go
areas in P1101.
4. If the motor is located in an environment that requires a low level of audible noise you can
sometimes reduce the perceived noise level by increasing the pulse frequency of the VSD output.
The default switching frequency is 4kHz, and can be increased in steps of 2kHz in P1800 up to
16kHz. Note that higher switching rates result in greater VSD losses in the form of heat, and so derates the maximum current capability. This de-rating also depends on the VSD size and the available
maximum frequency values are reduced as the kW size increases. From a practical standpoint you
should consider this information during the planning stage of the job.
5. In some cases you might need more starting torque (and therefore current) to get the motor spinning
instead of stalling (the warning A7409 is shown during this event). The same is true if you need to
accelerate the motor faster than the standard current limit will allow. You can override the default
setting in P640, which governs the maximum motor current, and is normally set to 1.5 x FLA. The
size of the power module compared to the motor FLA will determine how much of an increase is
available. Note that by doing this you are artificially raising the overload safety level.
6. If you want to copy this program, then select Auto (not Hand), go to Extras menu and then to the ‘To
BOP’ option. Select Yes. There will be a short wait while cloning parameters and zipping the file.
7. If you want to download this program to another drive of the same size (including motor data), then
select Extras menu and go to the From BOP option, select Yes. There will be a short wait
while downloading the parameters. When complete cycle the power and test the drive and motor for
correct operation and direction.
8. If you want to add technological features then go to section 5.3 Typical HVAC Applications and
follow the instructions listed. If the application is not listed, please contact your Siemens Distributor
for technical assistance.
Page 20 of 50
Last Revised: 4/11/2011
Building Technologies
6.2.3 Motor Nameplate Data
Setup menu
The setup menu is a fixed sequence of screens that allow the user to perform the basic commissioning of the
Inverter.
Once a parameter value has been modified, there is no possibility to cancel the basic commissioning
process. In this case, the basic commissioning process must be completed. If no parameter value has been
modified, then a short press of
of
will return to the previous screen and a long press (more than 3 seconds)
will return to the top of the Monitor menu.
When a parameter value has been modified and the new value confirmed by pressing
parameter in the basic commissioning sequence is automatically displayed.
, then the next
Editing parameters
Parameters can be modified use two methods; scrolling through the parameter values or using the single
digit methods. Both these methods are described in section 7 of this manual.
Basic commissioning
Note: Maximum motor RPM (Parameter P1082)
The maximum motor RPM will not be required to be entered by the user during the basic commissioning
process. The maximum motor RPM is automatically calculated during the motor calculation phase of basic
commissioning. Should the user wish to view or edit parameter P1082, it is still available through the
"Parameter" menu.
The basic commissioning process will require the input of data which is specific to the motor to which the
Inverter is connected. The data regarding the attached motor can be gathered from the motor's rating plate.
An example of a typical motor rating plate is shown in the figure below:
Page 21 of 50
Last Revised: 4/11/2011
Building Technologies
6.2.4 Setup Menu
The basic commissioning procedure is shown below.
Setup Menu
1. Using the
2. Press
and
keys navigate to the Setup menu.
to start the basic commissioning sequence.
Reset
1. Using the
Inverter.
and
keys select Yes or No to reset the
2. Press
to confirm selection.
3. The display will automatically display the next parameter in the
commissioning sequence.
The reset will be performed immediately. The reset will ensure that
all parameter values are set to their default values before applying
the new parameter values from the commissioning process.
Control mode
Sets the open and closed loop control mode of the Inverter.
1. Press
to modify the parameter value.
and
keys scroll up or down the list until the
2. Using the
required control mode is displayed.
3. Press
to confirm the selected control mode.
4. The display will automatically display the next parameter in the
commissioning sequence.
The available control modes are described below.
V/f control with linear characteristics. This is the factory default.
V/f control with parabolic (quadratic) characteristics. This is used
with most Fans and Pumps due to their associated load curve.
V/f control for a parabolic (quadratic) characteristic and Energy
Control Optimization (ECO). This can be used to save energy in
non-dynamic, Fan and Pump type loads.
Page 22 of 50
Last Revised: 4/11/2011
Building Technologies
Motor data
Sets the regional settings for the motor, for example kW and Hz.
1. Press
to modify the parameter value.
and
keys scroll up or down the list until the
2. Using the
required units are displayed.
3. Press
to confirm the selected value.
4. The display will automatically display the next parameter in the
commissioning sequence.
Motor voltage
The input of the voltage from the rating label of the motor must
correspond with the wiring of the motor (star/delta).
1. Press
to modify the parameter value..
2. Using the
and
keys (or digit-by-digit method) increase or
decrease the displayed value.
3. Press
to confirm the selected value. The display will
automatically display the next parameter in the commissioning
sequence.
Motor current
Sets the value of the motor current in ampere taken from the motor
rating plate.
1. Press
to modify the parameter value.
2. Using the
and
keys (or digit-by-digit method) increase or
decrease the displayed value.
3. Press
to confirm the selected value. The display will
automatically display the next parameter in the commissioning
sequence.
Motor power
Sets the value of the motor power in kW or hp taken from the motor
rating plate.
1. Press
to modify the parameter value.
2. Using the
and
keys (or digit-by-digit method) increase or
decrease the displayed value.
3. Press
to confirm the selected value. The display will
automatically display the next parameter in the commissioning
sequence.
If P0100 = 0 or 2, data is in kW and if P0100 = 1, the data is in hp.
Page 23 of 50
Last Revised: 4/11/2011
Building Technologies
Motor speed
Sets the value of the motor speed in RPM taken from the motor
rating plate.
1. Press
to modify the parameter value.
2. Using the
and
keys (or digit-by-digit method) increase or
decrease the displayed value.
3. Press
to confirm the selected value. The display will
automatically display the next parameter in the commissioning
sequence.
Motor identification
Sets the motor data identification and speed controller optimization.
1. Press
to modify the parameter value.
2. Using the
and
keys to scroll through the various options
until the required setting is visible.
3. Press
to confirm the selected value. The display will
automatically display the next parameter in the commissioning
sequence.
Motor identification will not start until the basic commissioning
sequence has been completed.
Macro Parameter
Skip over the MAc PAr option. This is a Macro parameter for
automatically setting the basic interface I/O, and normally
would not need to be changed, so leave P15 = 12.
Minimum RPM
Sets the lowest speed to which the motor operates independently of
the frequency setpoint.
1. Press
to modify the parameter value.
2. Using the
and
keys (or digit-by-digit method) increase or
decrease the displayed value.
3. Press
to confirm the selected value. The display will
automatically display the next parameter in the commissioning
sequence.
Page 24 of 50
Last Revised: 4/11/2011
Building Technologies
Ramp up time
Set the time, in seconds, in which the motor should accelerate from
standstill up to the maximum RPM set in P1082.
1. Press
to modify the parameter value.
and
keys (or digit-by-digit method) increase or
2. Using the
decrease the displayed value.
3. Press
to confirm the selected value. The display will
automatically display the next parameter in the commissioning
sequence.
Ramp down time
Set the time, in seconds, in which the motor should decelerate from
maximum RPM (P1082) down to a standstill.
1. Press
to modify the parameter value.
and
keys (or digit-by-digit method) increase or
2. Using the
decrease the displayed value.
3. Press
to confirm the selected value. The display will
automatically display the next parameter in the commissioning
sequence.
Finish
Confirms the end of the commissioning process. The Inverter will
perform a motor calculation change all the relevant parameters
within the Control Module
1. Press
2. Using the
to modify the parameter value.
and
keys to select Yes or No.
3. Press
to confirm the selection and complete the
commissioning process.
Busy
The display during the process of changing the parameter
information of the Inverter will display "BUSY".
Done
When the commissioning process is completed, the BOP-2 will
display "DONE". If a problem has occurred or there has been an
interruption to the final process then the BOP-2 will display
"FAILURE". Should this happen, the Inverter is to be considered
unstable and the reason for the failure should be investigated and
the commissioning process restarted.
At this point you are ready to test the motor. Refer back to point 5 in the Commissioning Steps on page 19.
Page 25 of 50
Last Revised: 4/11/2011
Building Technologies
6.2.5 Monitoring Screen
The details of the information displayed by the various monitoring screens are described below.
The default screen shows the value set for the setpoint, below this
value the actual speed of the motor is displayed.
The voltage out screen displays the actual voltage output of the
Inverter that is being supplied to the connected motor.
The DC Link screen displays the actual direct voltage across the
DC Link terminals.
The current output screen shows the actual Inverter current output
to the motor.
This screen shows the actual frequency (in Hz) at which the motor
is running.
This screen displays the actual rotational speed of the motor in
RPM and the actual output current of the Inverter to the motor.
The voltage and current screen displays the actual voltage being
supplied by the Inverter to the motor and the actual current out of
the Inverter to the motor.
The voltage and rpm screen display the actual voltage being
supplied by the Inverter to the motor and the actual speed of the
motor in rpm.
Page 26 of 50
Last Revised: 4/11/2011
Building Technologies
6.3 Typical HVAC Applications
The following list is comprised of common HVAC orientated applications, and should provide a useful
starting point for most projects.
#0
#1
#2
#3
#4
#5
#6
#7*
#8
#9*
#10*
#11*
#12*
#13*
#14*
#15*
#16*
#17*
-
Default 0-10V Speed Set-point Low Level Control
4 Fixed Speeds & Fixed Speed Essential Services Mode
0-10V Speed Set-point & Fixed Speed Essential Services Mode
Single Zone Stairwell Pressurisation System
Two Zone Stairwell Pressurisation System
Multi-zone Stairwell using external SEZ220 signal selector
Cooling Tower Fan using Internal PID & Hibernation Feature
Cooling Tower Fan with Hibernation & Cond Water Bypass
Constant Pressure Control with Fixed Speed ESM (e.g. Multi-zone VAV App)
Single Zone Carpark Ventilation Standalone Solution
Two Zone Carpark Ventilation Standalone Solution
Three Zone Carpark Ventilation Standalone Solution
Condenser Pump Differential Pressure Control (e.g. multiple water cooled DX units)
CHW Pump Constant Flow Control using int PID & Chiller DP Sensor
CHW Pump Constant Flow Control using int PID & Magflow
Refrigerant Compressor (reciprocating) using HI Overload mode
Fieldbus example using BACnet
Fieldbus example using Modbus
* These applications are planned to be released on an on going basis.
Legend
Tan Colour
Light Green Colour
Light Blue Colour
Dark Blue Colour
Pink Colour
Notes and read only parameters
Quick commissioning parameters
Optional parameters (enhancements), not necessary for every application
Special parameters
In most instances do not change
Notes
Some of the parameters mentioned in the following applications can only be accessed via the Expert list.
Ensure you select this when you enter the Parameter menu.
The Technological Units (PID loop) is a new feature of the current Control unit – firmware version 4.4. At
date of compiling this guide, the BOP-2 does not show these units. This is also the case for the IOP,
however a firmware upgrade will be released soon that will enable this feature. So currently the only way to
see these Tech Units is via the fieldbus interface. For this reason it is not necessary to select the
corresponding parameters P595 and P596 if you are only communicating to the drive via the BOP-2.
If you decide to use the Technological Units, there is a sequence that should be followed to enable this
feature: 1.
2.
3.
4.
5.
Set P10 = 5
Set P596 = 100 (or the scaling factor recommended in the App sheet)
Set P595 = X (e.g. 1 = %, 4 = C, 5 = Pa, etc. - determined by your application)
Set P10 = 0
Continue with the parameters listed in the chosen application.
For additional information, please refer to the manuals listed in the Website Links section on page 6.
Page 27 of 50
Last Revised: 4/11/2011
Building Technologies
6.3.1 Application #0 - Default 0-10V Speed Set-point Low Level Control
Page 28 of 50
Last Revised: 4/11/2011
Building Technologies
Parameter
Parameter text
Parameter Value
Unit
Note: This parameter selects the HI/LO Overload mode for the power module. To change this you first need to set P10=1, and then back to 0
afterwards.
p205
Power unit application
[0] Load duty cycle with high overload for vector drives
Note: Set P210 = 440V for demo units. This is not normally needed with installed drives.
p210
Drive unit line supply voltage
440
V
Note: To start motor commissioning, you must set P10 = 1
p10
Drive commissioning parameter filter
[0] Ready
Note: Parameter 15 calls a macro function that defines the basic command strategy of the drive. I would not recommend changing this from 12, as it
can produce unwanted faults if set incorrectly.
p15
Macro drive unit
12.) Standard I/O with AS
p304[0]
Rated motor voltage
400
Vrms
p305[0]
Rated motor current
0.42
Arms
p307[0]
Rated motor power
0.12
kW
p308[0]
Rated motor power factor
0.79
p309[0]
Rated motor efficiency
0
%
p310[0]
Rated motor frequency
50
Hz
p311[0]
Rated motor speed
1350
rpm
Note: Parameter 500 is a much simplified version of P1300, and if in doubt you can change this anytime.
p500
Technology application
[0] Standard drive
p700[0]
Command source selection
[0] No Macro
Note: Digital Inputs Status
r722
CO/BO: CU digital inputs, status
0000_0000_0000_0000_0000_1000_0000_0000B
Note: Digital Outputs - setup & status
p730
BI: CU signal source for terminal DO 0
Control_Unit : r52.3
p731
BI: CU signal source for terminal DO 1
Control_Unit : r52.7
p732
BI: CU signal source for terminal DO 2
Control_Unit : r52.2
r747
CU, digital outputs status
0000_0000_0000_0000_0000_0000_0000_0000B
Note: Analog Inputs - setup & status
r755[0]
CU analog inputs actual value in percent, AI0 (T. 3/4)
72.04
p756[0]
CU analog inputs type, AI0 (T. 3/4)
[4] Bipolar voltage input (-10 V ... +10 V)
%
Note: Analog Outputs - setup & status
p771[0]
CU analog outputs signal source, AO0 (T 12/13)
Control_Unit : r21
r774[0]
CU analog outputs output voltage/current actual, AO0 (T 12/13)
0
p776[0]
CU analog outputs type, AO0 (T 12/13)
[0] Current output (0 mA ... +20 mA)
Note: The following three parameters are the default internal connections for DI-0 to DI-2 respectively. To reassign these inputs you first have to
'unplug' these parameters by setting to zero.
p840[0]
BI: ON / OFF (OFF1)
Control_Unit : r722.0
p1113[0]
BI: Setpoint inversion
Control_Unit : r722.1
p2103[0]
BI: 1. Acknowledge faults
Control_Unit : r722.2
p1000[0]
Speed setpoint selection
[2] Analog setpoint
Note: The Sinamics range of drives use RPM to define various values, and the Min speed is one of the most common. If in doubt, start with 300rpm
and then fine-tune later.
p1080[0]
Minimum speed
300
rpm
p1082[0]
Maximum speed
1500
rpm
Note: I would recommend setting the ramp-up & ramp-down values to 30 seconds initially, and fine tune as required.
p1120[0]
Ramp-function generator ramp-up time
10
s
p1121[0]
Ramp-function generator ramp-down time
10
s
p1200[0]
FlyRest oper mode
[0] Flying restart inactive
Note: Most customers prefer to set the drive to auto-restart after a fault or power failure. To accomplish this, set P1210 = 6. Note for high-level
interface, additional steps may need to be taken.
p1210
Automatic restart, mode
[0] Inhibit automatic restart
Note: This parameter sets the load characteristic, but unlike P500, there are quite a few options and abbreviations. I would recommend option 2 for the
majority of fans and pumps.
p1300[0]
Open-loop/closed-loop control operating mode
[2] U/f control with parabolic characteristic
Note: To finish motor commissioning (and reset other parameters), set P3900 = 1. If you do not want to reset other parameters, set P3900 = 3.
p3900
Completion of quick commissioning
Page 29 of 50
[0] No quick parameterization
Last Revised: 4/11/2011
Building Technologies
6.3.2 Application #1 - 4 Fixed Speeds & Fixed Speed ESM
Page 30 of 50
Last Revised: 4/11/2011
Building Technologies
Parameter
Parameter text
Parameter Value
p840[0]
BI: ON / OFF (OFF1)
Control_Unit : r1025.0
p1000[0]
Speed setpoint selection
[3] Fixed speed setpoint
Unit
Note: Fixed Frequency setpoints are cumulative, so ensure external relay logic energizes one input at a time. The ESM
overrides this rule and runs to the setpoint defined in P1015.
p1001[0]
CO: Fixed speed setpoint 1
500
rpm
p1002[0]
CO: Fixed speed setpoint 2
750
rpm
p1003[0]
CO: Fixed speed setpoint 3
1000
rpm
p1004[0]
CO: Fixed speed setpoint 4
1250
rpm
p1015[0]
CO: Fixed speed setpoint 15
1500
rpm
p1020[0]
BI: Fixed speed setpoint selection Bit 0
Control_Unit : r722.0
p1021[0]
BI: Fixed speed setpoint selection Bit 1
Control_Unit : r722.1
p1022[0]
BI: Fixed speed setpoint selection Bit 2
Control_Unit : r722.2
p1023[0]
BI: Fixed speed setpoint selection Bit 3
Control_Unit : r722.3
p1113[0]
BI: Setpoint inversion
0
p1210
Automatic restart, mode
[26] Acknowledging all faults and reclosing for an ON
command
p2103[0]
BI: 1. Acknowledge faults
0
p3880
BI: ESM activation
Control_Unit : r722.4
p3881
ESM setp source
[1] Fixed speed setpoint 15 (p1015)
Note: The following read-only parameters are shown as handy points of interest. Do not try to program these into your drive.
r722
CO/BO: CU digital inputs, status
0000_0000_0000_0000_0000_1000_0000_0000B
r1024
CO: Fixed speed setpoint effective
0
Page 31 of 50
rpm
Last Revised: 4/11/2011
Building Technologies
6.3.3 Application #2 - 0-10V Speed Set-point & Fixed Speed ESM
Page 32 of 50
Last Revised: 4/11/2011
Building Technologies
Parameter
Parameter text
Parameter Value
Unit
p1015[0]
CO: Fixed speed setpoint 15
1350
rpm
p1113[0]
BI: Setpoint inversion
0
p1210
Automatic restart, mode
[26] Acknowledging all faults and reclosing for an ON
command
p2103[0]
BI: 1. Acknowledge faults
0
p3880
BI: ESM activation
Control_Unit : r722.1
p3881
ESM setp source
[1] Fixed speed setpoint 15 (p1015)
Note: The following read-only parameters are shown as handy points of interest. Do not try to program these into your drive.
r755[0]
CU analog inputs actual value in percent, AI0
(T. 3/4)
71.48
r722
CO/BO: CU digital inputs, status
0000_0000_0000_0000_0000_1000_0000_0000B
Page 33 of 50
%
Last Revised: 4/11/2011
Building Technologies
6.3.4 Application #3 - Stairwell Pressurisation System
Page 34 of 50
Last Revised: 4/11/2011
Building Technologies
Parameter
Parameter text
Parameter Value
Unit
Note: To change P0595 you first need to set P0010 = 5, and then set P0010 back to 0 afterwards.
p595
Selecting technological units
[5] Pa
p596
Reference quantity, technological units
100
CU analog inputs smoothing time constant, AI0
500
ms
p753[0]
(T. 3/4)
Note: The Ramp-up, Ramp-down, and Minimum Speed parameters are shown for the tuning process of the actual stair-press system, and may
have to be adjusted to suit.
p1080[0]
Minimum speed
450
rpm
p1120[0]
Ramp-function generator ramp-up time
30
s
p1121[0]
Ramp-function generator ramp-down time
30
s
p1210
Automatic restart, mode
[26] Acknowledging all faults and reclosing for an ON
command
p2200[0]
BI: Technology controller enable
Control_Unit : r722.0
p2201[0]
CO: Technology controller, fixed value 1
40
p2253[0]
CI: Technology controller setpoint 1
Control_Unit : p2201
p2264[0]
CI: Technology controller actual value
Control_Unit : r755[0]
p2267
Technology controller upper limit actual value
120
Pa
p2268
Technology controller lower limit actual value
-10
Pa
Pa
Note: The Prop gain and Integral time parameters are shown for the tuning process of the actual stair-press system, and may have to be adjusted
to suit.
p2280
Technology controller proportional gain
1.2
p2285
Technology controller integral time
25
s
Note: Set the PID Loop minimum output value to match the minimum motor speed (P1080). For example; 30% for 15Hz (when the max speed is
50Hz).
p2292
CO: Technology controller minimum limiting
30
%
p2302
Technology controller output signal starting value
35
%
p3880
BI: ESM activation
Control_Unit : r722.0
p3881
ESM setp source
[4] Setpoint from technology controller
p3884
CI: ESM setpoint technology controller
Control_Unit : p2201
Note: The following read-only parameters are shown as handy points of interest. Do not try to program these into your drive.
r755[0]
r2260
CU analog inputs actual value in percent, AI0 (T.
3/4)
CO: Technology controller setpoint after rampfunction generator
71.34
%
40
Pa
r2272
CO: Technology controller actual value scaled
71.34
Pa
r2273
CO: Technology controller error
-31.34
Pa
r2294
CO: Technology controller output signal
0
%
Page 35 of 50
Last Revised: 4/11/2011
Building Technologies
6.3.5 Application #4 - Two Zone Stairwell Pressurisation System
Page 36 of 50
Last Revised: 4/11/2011
Building Technologies
Parameter
Parameter text
Parameter Value
Unit
Note: To change P0595 you first need to set P0010 = 5, and then set P0010 back to 0 afterwards.
p595
Selecting technological units
[5] Pa
p596
Reference quantity, technological units
100
p753
CU analog inputs smoothing time constant
p753[0]
AI0 (T. 3/4)
500
ms
p753[1]
AI1 (T. 10/11)
500
ms
p753[2]
AI2 (T. 50/51)
0
ms
p753[3]
AI3 (T. 52/53)
0
ms
p756
CU analog inputs type
p756[0]
AI0 (T. 3/4)
[0] Unipolar voltage input (0 V ... +10 V)
p756[1]
AI1 (T. 10/11)
[0] Unipolar voltage input (0 V ... +10 V)
p756[2]
AI2 (T. 50/51)
[8] No sensor connected
p756[3]
AI3 (T. 52/53)
[8] No sensor connected
Note: The Ramp-up, Ramp-down, and Minimum Speed parameters are shown for the tuning process of the actual stair-press system, and may have to
be adjusted to suit.
p1080[0]
Minimum speed
450
rpm
p1120[0]
Ramp-function generator ramp-up time
30
s
p1121[0]
Ramp-function generator ramp-down time
30
s
p1210
Automatic restart, mode
[26] Acknowledging all faults and reclosing for an ON
command
p2200[0]
BI: Technology controller enable
Control_Unit : r722.0
p2201[0]
CO: Technology controller, fixed value 1
40
Pa
p2267
Technology controller upper limit actual value
120
Pa
p2268
Technology controller lower limit actual value
-10
Pa
Note: The Prop gain and Integral time parameters are shown for the tuning process of the actual stair-press system, and may have to be adjusted to suit.
p2280
Technology controller proportional gain
1.2
p2285
Technology controller integral time
25
s
Note: Set the PID Loop minimum output value to match the minimum motor speed (P1080). For example; 30% for 15Hz (when the max speed is 50Hz).
p2292
CO: Technology controller minimum limiting
30
%
p2302
Technology controller output signal starting value
35
%
p3880
BI: ESM activation
Control_Unit : r722.0
p3881
ESM setp source
[4] Setpoint from technology controller
p3884
CI: ESM setpoint technology controller
Control_Unit : p2201
p31020
Multi-zone control interconnection
[1] Interconnecting multi-zone control
p31021
Multi-zone control configuration
[0] Setpoint 1 / multiple actual values
p31022
Multi-zone control for actual value processing
[10] Maximum (actual value 1, 2)
p31025
BI: Multi-zone control day/night switchover
0
p31026
CI: Multi-zone control actual-value input
p31026[0]
CI: Multi-zone control actual-value input
Control_Unit : r755[0]
p31026[1]
CI: Multi-zone control actual-value input
Control_Unit : r755[1]
p31026[2]
CI: Multi-zone control actual-value input
0
p31023[0]
CI: Multi-zone control setpoint input
Control_Unit : p2201
Note: The following read-only parameters are shown as handy points of interest. Do not try to program these into your drive.
r755
CO: CU analog inputs actual value in percent
r755[0]
CU analog inputs actual value in percent, AI0 (T. 3/4)
71.36
%
r755[1]
CU analog inputs actual value in percent, AI1 (T. 10/11)
80.4
%
r755[2]
CU analog inputs actual value in percent, AI2 (T. 50/51)
0
%
r755[3]
CU analog inputs actual value in percent, AI3 (T. 52/53)
0
%
r2260
CO: Technology controller setpoint after ramp-function
generator
40
Pa
r2272
CO: Technology controller actual value scaled
80.41
Pa
r2294
CO: Technology controller output signal
0
%
r31027
CO: Multi-zone control actual-value output
80.41
%
Page 37 of 50
Last Revised: 4/11/2011
Building Technologies
6.3.6 Application #5 - Multi-zone Stairwell using SEZ220 signal selector
Page 38 of 50
Last Revised: 4/11/2011
Building Technologies
Parameter
Parameter text
Parameter Value
Unit
Note: To change P0595 you first need to set P0010 = 5, and then set P0010 back to 0 afterwards.
p595
Selecting technological units
[5] Pa
p596
Reference quantity, technological units
100
p753[0]
CU analog inputs smoothing time constant, AI0 (T. 3/4)
500
ms
Note: The Ramp-up, Ramp-down, and Minimum Speed parameters are shown for the tuning process of the actual stair-press system, and may have
to be adjusted to suit.
p1080[0]
Minimum speed
450
rpm
p1120[0]
Ramp-function generator ramp-up time
30
s
p1121[0]
Ramp-function generator ramp-down time
30
s
p1210
Automatic restart, mode
[26] Acknowledging all faults
and reclosing for an ON
command
p2200[0]
BI: Technology controller enable
Control_Unit : r722.0
p2201[0]
CO: Technology controller, fixed value 1
40
p2253[0]
CI: Technology controller setpoint 1
Control_Unit : p2201
p2264[0]
CI: Technology controller actual value
Control_Unit : r755[0]
p2267
Technology controller upper limit actual value
120
Pa
p2268
Technology controller lower limit actual value
-10
Pa
Pa
Note: The Prop gain and Integral time parameters are shown for the tuning process of the actual stair-press system, and may have to be adjusted to
suit.
p2280
Technology controller proportional gain
1.2
p2285
Technology controller integral time
25
s
Note: Set the PID Loop minimum output value to match the minimum motor speed (P1080). For example; 30% for 15Hz (when the max speed is
50Hz).
p2292
CO: Technology controller minimum limiting
30
%
p2302
Technology controller output signal starting value
35
%
p3880
BI: ESM activation
Control_Unit : r722.0
p3881
ESM setp source
[4] Setpoint from technology
controller
p3884
CI: ESM setpoint technology controller
Control_Unit : p2201
Note: The following read-only parameters are shown as handy points of interest. Do not try to program these into your drive.
r755[0]
CU analog inputs actual value in percent, AI0 (T. 3/4)
71.34
%
r2260
CO: Technology controller setpoint after ramp-function generator
40
Pa
r2272
CO: Technology controller actual value scaled
71.34
Pa
r2273
CO: Technology controller error
-31.34
Pa
r2294
CO: Technology controller output signal
0
%
Page 39 of 50
Last Revised: 4/11/2011
Building Technologies
6.3.7 Application #6 - Cooling Tower Fan using Int. PID & Hibernation Feature
Page 40 of 50
Last Revised: 4/11/2011
Building Technologies
Parameter
Parameter text
Parameter Value
Unit
Note: To change P0595 you first need to set P0010 = 5, and then set P0010 back to 0 afterwards.
p595
Selecting technological units
[4] °C
p596
Reference quantity, technological units
100
p753
CU analog inputs smoothing time constant
p753[0]
AI0 (T. 3/4)
0
ms
p753[1]
AI1 (T. 10/11)
0
ms
p753[2]
AI2 (T. 50/51)
0
ms
p753[3]
AI3 (T. 52/53)
100
ms
p756
CU analog inputs type
p756[0]
AI0 (T. 3/4)
[0] Unipolar voltage input (0 V ... +10 V)
p756[1]
AI1 (T. 10/11)
[0] Unipolar voltage input (0 V ... +10 V)
p756[2]
AI2 (T. 50/51)
[2] Unipolar current input (0 mA ... +20 mA)
p756[3]
AI3 (T. 52/53)
[6] Temperature sensor Ni1000
Note: Set P1080 to around 20% of maximum motor RPM (P0311) - i.e. above stalling speed.
p1080[0]
Minimum speed
300
rpm
p1120[0]
Ramp-function generator ramp-up time
30
s
p1121[0]
Ramp-function generator ramp-down time
30
s
p1210
Automatic restart, mode
[26] Acknowledging all faults and reclosing for an
ON command
p2200[0]
BI: Technology controller enable
Control_Unit : r722.0
p2201[0]
CO: Technology controller, fixed value 1
26
p2253[0]
CI: Technology controller setpoint 1
Control_Unit : p2201
p2264[0]
CI: Technology controller actual value
Control_Unit : r755[3]
p2267
Technology controller upper limit actual value
100
°C
p2268
Technology controller lower limit actual value
-10
°C
p2280
Technology controller proportional gain
1.2
p2285
Technology controller integral time
25
s
p2292
CO: Technology controller minimum limiting
20
%
p2306
Technology controller fault signal inversion
[1] Inversion
p2390[0]
Hibernation starting speed
50
rpm
p2391[0]
Hibernation delay time
60
s
p2392
Hibernation restart value with technology controller
1
°C
p2393[0]
Hibernation restart speed relative w/o technology controller
100
rpm
p2398
Hibernation operating mode
[1] Hibernation active
°C
Note: The following read-only parameters are shown as handy points of interest. Do not try to program these into your drive.
r2260
CO: Technology controller setpoint after ramp-function generator
26
°C
r2272
CO: Technology controller actual value scaled
-0.14
°C
r2294
CO: Technology controller output signal
0
%
Optional. Use the following parameters to prevent nuisance fault output during Hibernation trip and ramp down. They introduce a 10 second delay before
any fault is output on DO-0.
p730
BI: CU signal source for terminal DO 0
Control_Unit : r20160.0
p20158
BI: PDE 0 input pulse I
Control_Unit : r52.3
p20159
PDE 0 pulse delay time in ms
10000
r20160
BO: PDE 0 output Q
0
p20161
PDE 0 run-time group
[5] Run-time group 5
p20162
PDE 0 run sequence
430
Page 41 of 50
Last Revised: 4/11/2011
Building Technologies
6.3.8 Application #8 - Constant Pressure Control with Fixed Speed ESM
Page 42 of 50
Last Revised: 4/11/2011
Building Technologies
Parameter
Parameter text
Parameter Value
Unit
Note: To change P0595 you first need to set P0010 = 5, and then set P0010 back to 0 afterwards.
p595
Selecting technological units
[5] Pa
p596
Reference quantity, technological units
500
p753[0]
CU analog inputs smoothing time constant, AI0 (T. 3/4)
500
p756[0]
CU analog inputs type, AI0 (T. 3/4)
[0] Unipolar voltage input (0 V ... +10 V)
p1015[0]
CO: Fixed speed setpoint 15
1350
rpm
p1080[0]
Minimum speed
300
rpm
p1113[0]
BI: Setpoint inversion
0
p1210
Automatic restart, mode
[26] Acknowledging all faults and reclosing for
an ON command
ms
Note: When using ECO mode, set P1335 = 100% to enable slip compensation for correct operation.
p1300[0]
Open-loop/closed-loop control operating mode
[7] U/f control for a parabolic characteristic and
ECO
p1335[0]
Slip compensation, scaling
100
p2200[0]
BI: Technology controller enable
Control_Unit : r722.0
%
Note: Set pressure setpoint to suit application. This example assumes a 0-500Pa range sensor is used (e.g. QBM66.202 hi-range).
p2201[0]
CO: Technology controller, fixed value 1
200
Pa
p2253[0]
CI: Technology controller setpoint 1
Control_Unit : p2201
p2264[0]
CI: Technology controller actual value
Control_Unit : r755[0]
p2267
Technology controller upper limit actual value
600
Pa
p2268
Technology controller lower limit actual value
-50
Pa
p2280
Technology controller proportional gain
1.1
p2285
Technology controller integral time
35
s
p2292
CO: Technology controller minimum limiting
20
%
p2302
Technology controller output signal starting value
50
%
p3880
BI: ESM activation
Control_Unit : r722.1
p3881
ESM setp source
[1] Fixed speed setpoint 15 (p1015)
Note: The following read-only parameters are shown as handy points of interest. Do not try to program these into your drive.
r755[0]
CU analog inputs actual value in percent, AI0 (T. 3/4)
71.34
%
r2260
CO: Technology controller setpoint after ramp-function generator
200
Pa
r2272
CO: Technology controller actual value scaled
356.72
Pa
r2294
CO: Technology controller output signal
0
%
Page 43 of 50
Last Revised: 4/11/2011
Building Technologies
7 Troubleshooting
7.1 Diagnostic Menu
The Diagnostics menu allows the user to access the following function:
Acknowledge all faults
Faults
History
Status
To access the Diagnostics menu, the following actions should be performed:
1. Using the
2. Press
3. Using the
4. Press
and
keys navigate to the Diagnostics screen.
to select the Diagnostics menu.
and
keys select the required screen.
to display the selected screen.
Pressing
for more than 3 seconds at any point during this
sequence will cause the BOP-2 to return to the status screen. A
short press of the
previous screen.
key will cause the BOP-2 to return to the
The individual functions are described below.
7.1.1 Acknowledge faults
When a fault condition occurs within the Inverter/motor system; the system is stopped by the Inverter and
requires that all faults are acknowledged before restarting the system.
To acknowledge all active faults within the Inverter/motor system, the following procedure should be
performed:
1. Using the
2. Press
3. Using the
and
keys navigate to the Diagnostics screen.
to select the Diagnostics menu.
and
keys select ACKN ALL screen.
4. Press
to acknowledge all active faults.
5. The BOP-2 will automatically return to the top level diagnostic
menu.
Pressing
for more than 3 seconds at any point during this
sequence will cause the BOP-2 to return to the status screen. A
short press of the
previous screen.
Page 44 of 50
key will cause the BOP-2 to return to the
Last Revised: 4/11/2011
Building Technologies
7.1.2 Active faults and alarms
When the Inverter detects a fault or alarm condition it maintains a list of all the currently active faults and
alarms. For a detailed explanation of the displayed fault and alarm numbers, please refer to the relevant
Parameter List.
To see which faults and alarms are currently active, the following procedure should be performed:
1. Using the
2. Press
3. Using the
4. Press
5. Using the
list.
and
keys navigate to the Diagnostics screen.
to select the Diagnostics menu.
and
keys select the FAULTS screen.
to display the selected screen.
and
keys scroll through the faults and alarm
6. Press
to clear faults.
7. Press
will return the BOP-2 to the ACKN ALL screen.
Note:
If a fault occurs, the dynamic fault screen will be displayed
automatically.
7.1.3 History
The History option within the Diagnostics menu maintains a list of the last 64 faults that have occurred within
the Inverter/motor system. For a detailed explanation of the displayed fault and alarm numbers, please refer
to the relevant Parameter List.
To access the History option, the following procedure should be performed:
1. Using the
2. Press
3. Using the
4. Press
and
keys navigate to the Diagnostics screen.
to select the Diagnostics menu.
and
keys select the HISTORY screen.
to display the selected screen.
5. Using the
and
keys scroll up or down through the list of
recorded faults and alarms.
6. Press
Page 45 of 50
to return to the Diagnostic top level menu.
Last Revised: 4/11/2011
Building Technologies
7.2 Fault and Warning List
The following is a condensed list of possible faults and warnings you may encounter.
If the number you are searching for is not listed or you require a more detailed explanation, please refer to
the same section at the back of the Parameter Manual.
This manual can be found and downloaded as shown in the Website link section on page 6.
Page 46 of 50
Last Revised: 4/11/2011
Building Technologies
Page 47 of 50
Last Revised: 4/11/2011
Building Technologies
Page 48 of 50
Last Revised: 4/11/2011
Building Technologies
Page 49 of 50
Last Revised: 4/11/2011
Building Technologies
Page 50 of 50
Last Revised: 4/11/2011