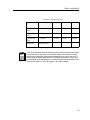
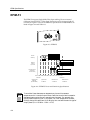
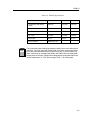
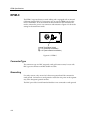
1
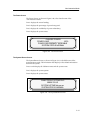
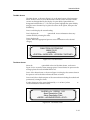
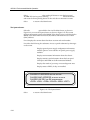
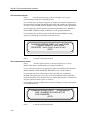
MMAC-Plus™
9C300-1 Environmental Module
User’s Guide
Notice
Notice
Cabletron Systems reserves the right to make changes in specifications and other information
contained in this document without prior notice. The reader should in all cases consult Cabletron
Systems to determine whether any such changes have been made.
The hardware, firmware, or software described in this manual is subject to change without notice.
IN NO EVENT SHALL CABLETRON SYSTEMS BE LIABLE FOR ANY INCIDENTAL, INDIRECT,
SPECIAL, OR CONSEQUENTIAL DAMAGES WHATSOEVER (INCLUDING BUT NOT LIMITED
TO LOST PROFITS) ARISING OUT OF OR RELATED TO THIS MANUAL OR THE INFORMATION
CONTAINED IN IT, EVEN IF CABLETRON SYSTEMS HAS BEEN ADVISED OF, KNOWN, OR
SHOULD HAVE KNOWN, THE POSSIBILITY OF SUCH DAMAGES.
© Copyright November 1994 by:
Cabletron Systems, Inc.
35 Industrial Way
Rochester, NH 03867-0505
All Rights Reserved
Printed in the United States of America
Order Number: 9031155 November 1994
LANVIEW is a registered trademark and MMAC-Plus is a trademark of Cabletron Systems, Inc.
VT100 is a registered trademark of Digital Equipment Corporation.
Ethernet is a trademark of Xerox Corporation.
CompuServe is a registered trademark of CompuServe, Incorporated.
i
Notice
FCC Notice
This device complies with Part 15 of the FCC rules. Operation is subject to the following two
conditions: (1) this device may not cause harmful interference, and (2) this device must accept any
interference received, including interference that may cause undesired operation.
NOTE: This equipment has been tested and found to comply with the limits for a Class A digital
device, pursuant to Part 15 of the FCC rules. These limits are designed to provide reasonable
protection against harmful interference when the equipment is operated in a commercial environment.
This equipment uses, generates, and can radiate radio frequency energy and if not installed in
accordance with the operator’s manual, may cause harmful interference to radio communications.
Operation of this equipment in a residential area is likely to cause interference in which case the user
will be required to correct the interference at his own expense.
WARNING: Changes or modifications made to this device which are not expressly approved by the
party responsible for compliance could void the user’s authority to operate the equipment.
DOC Notice
This digital apparatus does not exceed the Class A limits for radio noise emissions from digital
apparatus set out in the Radio Interference Regulations of the Canadian Department of
Communications.
Le présent appareil numérique n’émet pas de bruits radioélectriques dépassant les limites applicables
aux appareils numériques de la class A prescrites dans le Règlement sur le brouillage radioélectrique
édicté par le ministère des Communications du Canada.
ii
Contents
Chapter 1
Introduction
Using This Manual........................................................................................................ 1-1
The 9C300-1 Environmental Module ......................................................................... 1-1
Features ................................................................................................................... 1-2
Related Manuals............................................................................................................ 1-3
Getting Help .................................................................................................................. 1-4
Chapter 2
Installing the 9C300-1 Environmental Module
Installing the 9C300-1 Environmental Module......................................................... 2-1
Chapter 3
9C300-1 Environmental Module Operation
Monitoring Functions................................................................................................... 3-1
External Ambient Temperature............................................................................ 3-2
Fan Speed ................................................................................................................ 3-3
System Humidity ................................................................................................... 3-4
System Voltages...................................................................................................... 3-4
Internal Operating Temperature.......................................................................... 3-4
LANVIEW LEDs .................................................................................................... 3-5
Out-of-Band Management ........................................................................................... 3-6
COM1 and COM2 Ports........................................................................................ 3-7
The Ethernet™ Port Interface Module (EPIM) .................................................. 3-8
LCD and Keypad ................................................................................................... 3-8
Non-Interactive Mode .................................................................................................. 3-9
Non-Interactive Mode Screens............................................................................. 3-9
The System Screen .......................................................................................... 3-9
The Utilization Screen .................................................................................. 3-10
The Environment Screen.............................................................................. 3-10
The Power Screen ......................................................................................... 3-11
The System Banner Screen........................................................................... 3-11
Interactive Mode ......................................................................................................... 3-12
Interactive Mode Screens.................................................................................... 3-12
The Main Screen............................................................................................ 3-13
The Alarm Screen.......................................................................................... 3-13
The System Screen ........................................................................................ 3-14
The Power Screen ......................................................................................... 3-15
The Power Supply Specific Screen ............................................................. 3-15
The Environment Screen.............................................................................. 3-16
The Communications Screen ...................................................................... 3-16
iii
Contents
The Diagnostic Module Selection Screen .................................................. 3-17
The Diagnostic Results Screen .................................................................... 3-17
The BBU Screen ............................................................................................. 3-18
The Module Selection Screen ...................................................................... 3-18
The Module Specific Screen......................................................................... 3-19
The Module Environment Screen............................................................... 3-20
The Module Memory Screen ....................................................................... 3-20
The Module Backplane Screen .................................................................... 3-21
The Environmental Module Specific Screen ............................................. 3-21
The Environmental Module Environment Screen ................................... 3-22
The LCD Contrast Adjustment Screen....................................................... 3-23
Chapter 4
Specifications
Safety............................................................................................................................... 4-1
Service ............................................................................................................................. 4-1
Physical ........................................................................................................................... 4-2
Environmental ............................................................................................................... 4-2
Appendix A EPIM Specifications
Introduction ..................................................................................................................A-1
EPIM-T ...........................................................................................................................A-1
EPIM-F1 and EPIM-F2.................................................................................................A-2
EPIM-F3 .........................................................................................................................A-4
EPIM-C...........................................................................................................................A-6
Connector Type .....................................................................................................A-6
Grounding..............................................................................................................A-6
EPIM-A and EPIM-X (AUI Port) ................................................................................A-7
Appendix B Uninterruptible Power Supply (UPS)
Introduction ...................................................................................................................B-1
Connecting a UPS to an EM.........................................................................................B-1
Configuring COM Port for UPS ..................................................................................B-2
Verifying Configuration ...............................................................................................B-3
Monitoring UPS.............................................................................................................B-3
iv
Chapter 1
Introduction
Using This Manual
Read through this manual to become familiar with its contents and to gain an
understanding of the features and capabilities of the Environmental Module prior
to installing and operating it.
Chapter 1 Introduction, provides product descriptions and features, gives a brief
description of the 9C300-1 Environmental Module and ends with a list of related
manuals.
Chapter 2 Installing the 9C300-1 Environmental Module, contains detailed
information for unpacking and installing the Environmental Module.
Chapter 3 9C300-1 Environmental Module Operation, contains detailed
information about the Environmental Module operation.
Chapter 4 Specifications, provides detailed specifications for the 9C300-1
Environmental Module.
Appendix A EPIM Specifications, contains detailed information about the
various that can be used with the 9C300-1 Environmental Module.
Appendix B Uninterruptible Power Supply (UPS), contains detailed information
about connecting, configuring, and monitoring a UPS.
The 9C300-1 Environmental Module
The 9C300-1 Environmental Module, shown in Figure 1-1, provides system
cooling, out-of band management capabilities, and environmental/power
monitoring for the MMAC-Plus System. The Environmental Module is inserted in
the slot above the module card cage in the front of the MMAC-Plus chassis.
1-1
Introduction
MMAC
EPIM
STATUS
ALARM
9C300-1
1
2
3
4
5
6
ENTER
COM 1 COM 2
7
8
9
10
11
12 13 14
Figure 1-1. The 9C300-1 Environmental Module
Features
System Cooling
The 9C300-1 Environmental Module houses the cooling fan subsystem. There are
four, high-air flow fans in the assembly to provide necessary chassis cooling. Any
one of these can fail without adversely affecting system operation. The fans’
operation and speed are continuously monitored, allowing network technicians
to be quickly notified if repairs are needed. Control of the fans’ operating speed is
also provided for maximum cooling efficiency and fan life. The fans are protected
from controller failure by a fail-safe circuit. In the event of a controller
malfunction, this circuit forces the fan subsystem to maximum speed and notifies
Network Management.
Out-of-Band Management
Out-of-band management refers to managing the MMAC-Plus via a Local
Management (LM) connection or an SNMP-based management application which
does not use the same network connection to the chassis as “user data.”
Four Out-of-band management interfaces are built into the 9C300-1
Environmental Module. One channel is the 4x40 character backlit LCD and
associated five button keypad. This interface provides a network manager or
technician with the capability to review system status, performance and
configuration information. Two interfaces are serial RS-232 ports. These ports
support local management via a VT100 session, SLIP, or PPP, or monitor an
American Power Conversion Smart UPS.
The remaining out-of-band management interface supports any standard
Cabletron Ethernet Port Interface Module (EPIM). This interface provides a direct
connection to the internal System Management Bus-10 (SMB-10).
1-2
Related Manuals
Environmental/Power Monitoring
The 9C300-1 Environmental Module monitors and reports chassis power
parameters, ambient chassis temperature, chassis humidity, temperature of the
Environmental Module itself, as well as the status and speed of the chassis
cooling fans.
Flash EEPROM
The capability of downloading future firmware upgrades has been built into the
9C300-1 Environmental Module.
Hot Swapping
The 9C300-1 Environmental Module can be removed from the chassis while the
MMAC-Plus is running without interrupting network performance.
LANVIEW® LEDs
Two LEDs, STATUS and ALARM, are built into the front of the 9C300-1
Environmental Module. These LEDs indicate the status of the Environmental
Module and the presence or absence of system alarms.
Related Manuals
The manuals listed below should be used to supplement the procedures and
technical data contained in this manual.
MMAC-Plus Installation Guide
MMAC-Plus Operations Guide
MMAC-Plus 9C214-AC Power Supply User’s Guide
In addition, each Interface Module has a user’s guide.
1-3
Introduction
Getting Help
If you need additional support related to the Environmental Module, or if you
have any questions, comments or suggestions concerning this manual, feel free to
contact Cabletron Systems Technical Support:
By phone:
(603) 332-9400
By CompuServe®: GO CTRON from any ! prompt
1-4
By Internet mail:
[email protected]
By Fax:
(603) 337-3075
By BBS:
(603) 335-3358
By mail:
Cabletron Systems, Inc.
P.O. Box 5005
Rochester, NH 03866-5005
Chapter 2
Installing the 9C300-1
Environmental Module
Installing the 9C300-1 Environmental Module
The 9C300-1 Environmental Module is installed in the slot above the module card
cage in the front of the MMAC-Plus chassis, as shown in Figure 2-1.
Install an Environmental Module by following the steps below:
1.
Unpack the Environmental Module by removing it from the shipping box and
sliding the two foam end caps off the unit. (Save the shipping box and
packing materials in the event the Environmental Module must be
reshipped.)
2.
Remove it from the protective plastic bag. Observe all precautions to prevent
damage from Electrostatic Discharge (ESD). (Save the bag in the event the
Environmental Module must be reshipped.)
3.
Remove the plastic protective cap that covers the connector on the rear of the
Environmental Module.
4.
Examine it carefully, checking for damage. If any damage exists, DO NOT
install it. Immediately contact Cabletron Systems Technical Support.
5.
Hold the left and right sides.
6.
Line up the rails on the left and right sides with the tracks on the left and right
inside panels of the chassis.
7.
Slide the Environmental Module into the chassis until it is completely seated.
If the MMAC-Plus chassis has been powered up, the 9C300-1 Environmental
Module illuminates the STATUS and ALARM LEDs and displays the name
Cabletron on the LCD.
If the LEDs are any color other than green, refer to LANVIEW LEDs in Chapter 3.
If no keypad entries are made within 60 seconds, the LCD scrolls through various
non-interactive mode screens.
2-1
Installing the 9C300-1 Environmental Module
If the MMAC-Plus chassis has not been powered up, make sure that all modules
have been properly installed; then power up the MMAC-Plus chassis by
following the steps in the MMAC-Plus Installation Guide.
MMAC
EPIM
STATUS
ALARM
9C3001
1
2
3
4
5
6
7
8
COM 1
9
10
ENTER
COM 2
11
12
13
14
Figure 2-1. Installing the Environmental Module
2-2
Chapter 3
9C300-1 Environmental Module Operation
The 9C300-1 Environmental Module, as shown in Figure 3-1, performs three main
functions. It monitors several chassis environmental parameters, provides
multiple out-of-band management interfaces, as well as system cooling. The
Environmental Module also includes LANVIEW® LEDs for at-a-glance
diagnostics.
MMAC
EPIM
STATUS
ALARM
9C300-1
1
2
3
4
5
6
7
ENT ER
COM 1 COM 2
8
9
10
11
12 13 14
Figure 3-1. The 9C300-1 Environmental Module
Monitoring Functions
The 9C300-1 Environmental Module monitors the following MMAC-Plus
functions:
•
•
•
•
•
External ambient temperature
Fan speed
System humidity
System voltages
Internal operating temperature
3-1
9C300-1 Environmental Module Operation
External Ambient Temperature
The 9C300-1 Environmental Module includes an external ambient temperature
sensor. This sensor is located on the front of the Environmental Module, as shown
in Figure 3-2. The ambient temperature is monitored and the results of the
monitoring are available to the network manager via the LCD, as well as local and
remote management.
MMAC
EPIM
STATUS
ALARM
9C300-1
1
2
3
4
5
6
ENTER
COM 1 COM 2
7
8
9
10
11
12 13 14
External ambient temperature sensor
Figure 3-2. External Ambient Temperature Sensor
Table 3-1 lists the ambient temperature information available to the network
manager.
Table 3-1. External Ambient Temperature
Temperature Range
3-2
LCD Display
6°C/43°F and below
COLD
7–12°C/44–54°F
COOL
13–32°C/55–90°F
NORM (normal)
33–38°C/91–101°F
WARM
39°C/102°F and above
HOT
Monitoring Functions
Fan Speed
The 9C300-1 Environmental Module adjusts the speed of the system cooling fans
(Figure 3-3) based on the external ambient temperature. Fan speed increases as
ambient temperature rises to ensure adequate cooling for the system. Conversely,
fan speed decreases as ambient temperature decreases. In the event the ambient
temperature sensor, or the Environmental Module itself, fails, fan speed defaults
to maximum speed to ensure adequate cooling.
The ability to control fan speed is useful for two reasons:
•
•
To increase the cooling level of the MMAC-Plus system to accommodate
changing operating environments.
To prolong fan life and limit audible noise when full fan speed is not necessary
for cooling.
Fan Tray Side View
Front panel
Fan Tray Top View
System Cooling Fans
Figure 3-3. The 9C300-1 Environmental Module and Fan Tray
3-3
9C300-1 Environmental Module Operation
System Humidity
The 9C300-1 Environmental Module monitors the non-condensing humidity level
of the MMAC-Plus. The results of the monitoring are available to the network
manager via LCD, as well as local and remote management. The humidity levels
are displayed as shown in Table 3-2.
Table 3-2. System Humidity
Humidity
LCD Display
0–45%
STATIC RISK
46–94%
NORM (normal)
95% and above
MOIST
System Voltages
The 9C300-1 Environmental Module monitors specific system power parameters
to ensure that they are within acceptable limits. The power parameters monitored
from the backplane are the 48 volt DC System Power Bus and the INB
Termination Power Bus. The power parameter monitored within the
Environmental Module is the 12 volt internal line. The results of the monitoring
are available to the network manager via LCD, as well as local and remote
management. Voltages above or below the acceptable voltage limits cause an
alarm to be sent to the network manager. Table 3-3 summarizes these acceptable
voltage limits.
Table 3-3. Acceptable Voltage Limits
Description
Acceptable Voltage Limits
48 volt DC System Power Bus
From 40 volts to 59 volts
INB Termination Power Bus
From 3.1 volts to 5 volts
12 volt internal line
From 11 volts to 13 volts
Internal Operating Temperature
The 9C300-1 Environmental Module monitors its own internal operating
temperature by comparing its current temperature to the ambient temperature
and programmed rise temperatures to determine current temperature status. If
the temperature of the Environmental Module exceeds normal operating limits,
an alarm is sent to the network manager. In addition, if the ambient temperature
sensor fails, pre-established temperature ranges have been programmed to ensure
proper internal temperature monitoring.
3-4
Monitoring Functions
LANVIEW LEDs
The LANVIEW LEDs on the front of the 9C300-1 Environmental Module may be
used as an aid in troubleshooting.
There are two LEDs visible to the user (Figure 3-4): the STATUS LED and the
ALARM LED.
STATUS LED
MMAC
EPIM
STATUS
ALARM
9C300-1
1
2
3
4
5
6
COM 1 COM 2
7
8
9
10
ENT ER
11
12 13 14
ALARM LED
Figure 3-4. 9C300-1 Environmental Module LANVIEW LEDs
The STATUS LED indicates the current status of the Environmental Module
processor and peripherals. The possible states and descriptions of the STATUS
LED are listed in Table 3-4.
Table 3-4. STATUS LED
LED Color
State
Description
Green
Functional
Fully operational.
Yellow/Green
Booting
Flashes green and yellow while booting.
Yellow
Testing
Testing system.
Yellow (Flashing)
Crippled
Not fully operational.
Red
Reset
Normal power-up reset.
Red (Flashing)
Failed
Fatal error has occurred.
Off
Power off
Lack of 5 volt input to the Environmental
Module.
3-5
9C300-1 Environmental Module Operation
The ALARM LED indicates the presence, or absence, of an unread system
alarm(s). Unread system alarms can be read using the LCD and five-function
keypad. The possible states and descriptions of the ALARM LED are listed in
Table 3-5.
Table 3-5. ALARM LED
LED Color
State
Description
Green
Functional
No unread alarms.
Yellow
Functional
Pending unread system alarms, warning.
Red
Functional
Pending unread system alarms, critical.
Out-of-Band Management
Out-of-band management refers to managing the system via a Local Management
(LM) connection or an SNMP-based management application which does not use
the same network connection to the chassis as “user data.”
The 9C300-1 Environmental Module provides four out-of-band management
interfaces for managing the MMAC-Plus system. These interfaces are listed
below:
•
•
•
3-6
Two serial communication ports, COM1 and COM2
One standard Cabletron EPIM interface
Liquid Crystal Display (4 lines by 40 characters) and an associated five button
keypad
Out-of-Band Management
COM1 and COM2 Ports
The 9C300-1 Environmental Module front panel has two RJ-45 communication
ports for RS-232 serial communication to and from the MMAC-Plus. Figure 3-5
illustrates a single RJ-45 communication port connector. COM1 and COM2 can be
configured to run the Serial Line Internet Protocol (SLIP), Point-to-Point Protocol
(PPP), Local Management via a terminal or modem connection, or monitor an
American Power Conversion Smart UPS. Refer to the Local Management Manual
for detailed information on configuring the COM1 or COM2 port.
Pin 1
Figure 3-5. RJ-45 Communication Port Connector
Table 3-1 details the pinout connections for an RJ-45 communication port
connector.
Table 3-6. Pinout Connections RJ-45 Communication Port Connector
Pin
Description
1
TRANSMIT
2
DATA CARRIER DETECT
3
DATASET READY
4
RECEIVE
5
SIGNAL GROUND
6
DATA TERMINAL READY
7
REQUEST TO SEND
8
CLEAR TO SEND
3-7
9C300-1 Environmental Module Operation
The Ethernet™ Port Interface Module (EPIM)
The 9C300-1 Environmental Module provides a port for Cabletron Systems
EPIMs. The EPIM provides a direct connection to the internal SMB-10 bus. This
connection can be used for out-of-band graphical SNMP management of the
MMAC-Plus system or a Telnet session into local management. Any standard
Cabletron EPIM can be installed. Refer to Appendix A for detailed information on
the EPIM.
LCD and Keypad
The LCD functions as a “window” into the MMAC-Plus System, allowing users
to navigate through various screens via the five-function keypad.
The LCD is a 4 line by 40 character, backlit liquid crystal visual display.
The five-function keypad is used to scroll through MMAC-Plus information
screens, and to select option fields within each menu and submenu. The keypad
consists of five buttons, four of which are directional to move the cursor; the fifth
is the Enter button, used to make menu selections. Figure 3-6 shows the LCD with
a System Banner Screen and the five-function keypad on the MMAC-Plus
Environmental Module front panel.
CABLETRON SYSTEMS, INC.
MMAC-PLUS
<ALARMS>
<SYSTEM> <MODULES> <SCREEN CONTRAST>
ENTER
Figure 3-6. The LCD and Five-Function Keypad
3-8
Non-Interactive Mode
Non-Interactive Mode
The LCD defaults to this mode if there is no user input within 60 seconds of
installation of the Environmental Module or system start-up.
Non-Interactive Mode Screens
This section describes the LCD screens that display in the non-interactive mode.
The LCD scrolls through different status screens (depending on MMAC-Plus
configuration), displaying each screen for a period of 7 seconds; or, until user
input is sensed on the keypad.
Line 4 of each screen displays any active alarm conditions that exist within the
system. If no alarm conditions exist, the line displays “SYSTEM STATUS
NORMAL.”
If an alarm condition exists, line 4 displays a message describing the alarm for 5
seconds. The screen then displays a message stating how many alarms are present
in the alarm queue, “XX ALARMS PENDING” and the ALARM LED on the front
of the Environmental Module turns yellow or red indicating unread alarms in the
queue.
The System Screen
The System Screen, as shown in Figure 3-7, is the first screen of the
non-interactive mode.
Lines 1 and 2 display the MMAC-Plus chassis Internet Protocol (IP) address and
Media Access Control (MAC) address.
Line 3 displays the current chassis hardware revision and serial number.
Line 4 displays the system status.
CHASSIS IP ADDRESS xxx.xxx.xxx.xxx
CHASSIS MAC ADDRESS xx-xx-xx-xx-xx-xx
CHASSIS HW REV xxx SN xxxxxxxxxxxx
SYSTEM STATUS NORMAL
Figure 3-7. The System Screen
3-9
9C300-1 Environmental Module Operation
The Utilization Screen
The Utilization Screen, as shown in Figure 3-8, is the second screen of the
non-interactive mode.
Line 1 displays the screen heading.
Line 2 displays the FDDI 1 and FDDI 2 bus utilization.
Line 3 displays the INB A and INB B bus utilization.
Line 4 displays the system status.
SYSTEM UTILIZATION
FDDI 1_ _ _ _ _ 100% FDDI 2 _ _ _ _ _100%
INB A _ _ _ _ _100% INB B _ _ _ _ _ 100%
SYSTEM STATUS NORMAL
Figure 3-8. The Utilization Screen
The Environment Screen
The Environment Screen, as shown in Figure 3-9, is the third screen of the
non-interactive mode.
Line 1 displays the screen heading.
Line 2 displays the external temperature of the chassis in both Fahrenheit and
Celsius and qualifies the temperature as COLD, COOL, NORM (normal), WARM
or HOT based on system parameters.
Line 3 displays the non-condensing humidity level of the chassis and qualifies it
as STATIC RISK, NORM (normal) or MOIST based on system parameters.
Line 4 displays the system status.
CHASSIS ENVIRONMENT
EXTERNAL TEMP xxx˚F xx˚C NORM
HUMIDITY xxx% NORM
SYSTEM STATUS NORMAL
Figure 3-9. The Environment Screen
3-10
Non-Interactive Mode
The Power Screen
The Power Screen, as shown in Figure 3-10, is the fourth screen of the
non-interactive mode.
Line 1 displays the screen heading.
Line 2 displays the percentage of power being used.
Line 3 displays the availability of power redundancy.
Line 4 displays the system status.
CHASSIS POWER
POWER LOAD_ _ _ _ _ _ _ _ _ _ 100%
POWER REDUNDANCY AVAILABLE
SYSTEM STATUS NORMAL
Figure 3-10. The Power Screen
The System Banner Screen
The System Banner Screen, as shown in Figure 3-11, is the fifth screen of the
non-interactive mode. The information that displays is the default information
built into the system.
Lines 1 and 2 display the Cabletron name and the system name.
Line 3 displays the system uptime.
Line 4 displays the system status.
CABLETRON SYSTEMS INC.
MMAC-PLUS
SYSTEM UPTIME hh:mm:ss
SYSTEM STATUS NORMAL
Figure 3-11. The System Banner Screen
3-11
9C300-1 Environmental Module Operation
Interactive Mode
The LCD enters this mode upon installation. This mode allows user input
through the five-function keypad to navigate through MMAC-Plus status screens,
and to make menu selections.
Press any button on the keypad to enter this mode from the non-interactive mode.
Once past the Main screen, the Interactive Mode is maintained for three minutes
without a keypad entry before returning to the non-interactive mode.
Interactive Mode Screens
This section describes the LCD screens that display in the Interactive Mode. The
Interactive Mode screen flow, as shown in Figure 3-12, provides a representation
of the Interactive Mode screen structure hierarchy.
Main Screen
System
Pwr
Pwr
Supply
Specific
Environment
Alarms
Modules
Diag
Com BBU Modules Selection Screen Screen Adjust
Results
Modules/Environmental Module Specific Screen
Environment
Memory
Figure 3-12. Interactive Mode Screen Flow
3-12
Screen Contrast
Backplane
Interactive Mode
The Main Screen
The Main Screen, as shown in Figure 3-13, is the initial screen of the Interactive
Mode. It allows access to all of the Interactive Mode screens. Interactive Mode
screens are distinguished by the display of option fields. Option fields are
designated with brackets (< >). To select an option, highlight the option field by
using the arrow function keys to place the cursor on the option; then press the
ENTER key.
Lines 1 and 2 display the screen heading.
Line 3 displays the <ALARMS> option field. Access information about any
current alarms by selecting this item.
Line 4 displays the <SYSTEM>, <MODULES> and <SCREEN CONTRAST>
options. Select the appropriate option to access information on the desired
category.
CABLETRON SYSTEMS INC
MMAC-PLUS
<ALARMS>
<SYSTEM> <MODULES> <SCREEN CONTRAST>
Figure 3-13. The Main Screen
The Alarm Screen
Select the <ALARMS> option field in line 3 of the Main Screen, as shown in
Figure 3-13, to access the alarm message queue. Unread alarms are present in the
message queue when the ALARM LED is red.
Line 1 of the Alarm Screen, as shown in Figure 3-14, displays the current alarm in
the queue as well as the date and time the alarm occurred.
Lines 2 and 3 show the description of the current alarm including the module and
parameter(s) causing the alarm.
If other alarms are in the queue (indicated by x > 1 on line 1), select <MORE> to
see the information screens for them.
ALARM y of x 11/05/94, 11:23
Alarm Description Field
Alarm Description Field
<MORE> <ACKNOWLEDGE> <EXIT>
Figure 3-14. The Alarm Screen
3-13
9C300-1 Environmental Module Operation
Select <ACKNOWLEDGE> after reading all alarms to reset the front panel
ALARM LED (red to green). Selecting <ACKNOWLEDGE> deletes all alarms
and resets the alarm pending banner on line 4 of the non-interactive screens.
Select <EXIT> to return to the Main Screen.
The System Screen
Select the <SYSTEM> option field in line 4 of the Main Screen, as shown in
Figure 3-13, to access the System Screen as shown in Figure 3-15. This screen
displays information specific to the MMAC-Plus chassis. Lines 1 and 2 display the
MMAC-Plus chassis Internet Protocol (IP) address and Media Access Control
(MAC) address.
Line 3 displays the current chassis hardware revision and serial number.
Line 4 lists the following five submenus. Access a specific submenu by selecting it
on the screen.
<PWR>
Displays general power supply configuration information,
with the option to view statistics on specific power supply
modules.
<ENV>
Displays environmental information about the chassis.
<COM>
Displays statistics and information about the front panel
COM ports and EPIM on the Environmental Module.
<DIAGS>
Displays the results of power-up or restart diagnostic tests.
<BBU>
Displays status of BBUs, if they are installed.
CHASSIS IP ADDRESS xxx.xxx.xxx.xxx
CHASSIS MAC ADDRESS xx-xx-xx-xx-xx-xx
CHASSIS HW REV xxx SN xxxxxxxxxxxx
<PWR> <ENV> <COM> <DIAGS> <BBU> <EXIT>
Figure 3-15. The System Screen
Select <EXIT> to return to the Main Screen.
3-14
Interactive Mode
The Power Screen
Select <PWR> from the System Screen, as shown in Figure 3-15, to access
information about the chassis power supply configuration.
Line 1 of the Power Screen, as shown in Figure 3-16, displays the number of
power supplies currently configured and the availability of power redundancy.
Lines 2 and 3 display the power supply status as either ON, OFF DUE TO
MANAGEMENT, or FAULT.
Line 4 is used to access information about a specific power supply module by
selecting a power supply number.
SUPPLIES INSTALLED 2 PWR REDUNDANCY
STATUS 1 ON 2 ON
<1> <2>
<EXIT>
Figure 3-16. The Power Screen
Select <EXIT> to return to the System Screen.
The Power Supply Specific Screen
Select a power supply number from line 4 of the Power Screen, as shown in
Figure 3-16, to learn about a specific power supply in the MMAC-Plus chassis.
There is an LCD screen available for each installed power supply, as shown in
Figure 3-17.
Line 1 identifies the power supply selected and its serial number.
Line 2 identifies the power supply’s hardware revision, firmware revision of the
diagnostic controller and power loading factor as a percentage of its capacity.
Line 3 provides the input and output voltages of the power supply.
PWR SUPPLY 1 SN xxxxxxxxxxxx
HW REV xxx FW REV x.xx.xx LOAD xxx%
PWR IN 110V PWR OUT 57.1V 5.1V 3.3V
<EXIT>
Figure 3-17. The Power Supply Specific Screen
Select <EXIT> to return to the Power Screen.
3-15
9C300-1 Environmental Module Operation
The Environment Screen
Select <ENV> from the System Screen, as shown in Figure 3-15, to view
environmental parameters of the MMAC-Plus.
Line 1 of this screen, as shown in Figure 3-18, displays the external temperature of
the current chassis in both Fahrenheit and Celsius, and qualifies the temperature
as COLD, COOL, NORM (normal), WARM, or HOT, based on system parameters.
Line 2 displays the current system non-condensing humidity level, qualified as
STATIC RISK, NORM (normal), or MOIST, based on system parameters.
Line 3 displays the current fan speed of the Environmental Module cooling
system as a percentage of maximum rotational velocity.
CHASSIS EXTERNAL TEMP xxx°F xx°C NORM
CHASSIS HUMIDITY xxx% NORM
FAN SPEED 1 xxx% 2 xxx% 3 xxx% 4 xxx%
<EXIT>
Figure 3-18. The Environment Screen
Select <EXIT> to return to the System Screen.
The Communications Screen
Select <COM> from the System Screen, as shown in Figure 3-15, to access
MMAC-Plus chassis communication port status information.
Line 1, as shown in Figure 3-19, displays the status of the Ethernet Port Interface
Module (EPIM) as either ENABLED, DISABLED or N/A if not installed.
Line 2 displays the Port Administration status of COM port 1 (enabled or
disabled), the application in use (such as Local Management (LM), SLIP, PPP or
UPS), the baud rate of the attached device (a VT100 type terminal or modem) and
the port operational status (active or inactive).
Line 3 displays the Port Administration status of COM port 2 in the same manner
as described for line 2.
COMMUNICATIONS PORTS
EPIM ENABLED
COM 1 ENABLED SLIP 9600 ACTIVE
COM 2 ENABLED
<EXIT>
Figure 3-19. The Communications Screen
Select <EXIT> to return to the System Screen.
3-16
Interactive Mode
The Diagnostic Module Selection Screen
Select <DIAGS> from the System Screen, as shown in Figure 3-15, to view the
Diagnostic Module Selection screen.
Line 1, as shown in Figure 3-20, displays the screen heading.
Lines 2 and 3 show the chassis slot locations in which modules have been
installed in the MMAC-Plus.
Line 4 displays Power Supply Units and BBUs configured in the MMAC-Plus.
Diagnostic test results for these units can be viewed individually. The Diagnostic
Results Screen displays the diagnostic test results for the selected modules. It
provides an itemized list of failed tests only.
VIEW DIAG RESULTS ON
<EM> <1> <2> <3> <4> <5> <6> <7>
<8><9> <10> <11> <12> <13> <14>
<PS1> <PS2> <BBU1> <EXIT>
Figure 3-20. The Diagnostic Module Selection Screen
Select <EXIT> to return to the System Screen.
The Diagnostic Results Screen
The Diagnostic Results Screen, as shown in Figure 3-21, displays the results of
failed tests for the modules selected on the Diagnostic Screen.
Line 1 displays the module(s) selected for diagnostics.
Lines 2 and 3 display failed test results; or, if no failures occurred, the message
ALL DIAGNOSTICS TESTS HAVE PASSED.
MODULE xx
Test Results (Left Blank if all pass)
or ALL MODULE DIAGNOSTICS TESTS HAVE PASSED
<MORE> <EXIT>
Figure 3-21. The Diagnostic Results Screen
Select <MORE> to view more failed tests for the current module.
Select <EXIT> to return to the Diagnostic Module Selection Screen.
3-17
9C300-1 Environmental Module Operation
The BBU Screen
Select <BBU> from the System Screen, as shown in Figure 3-15, to view the status
of the Battery Backup Units (BBUs). Figure 3-22 shows the BBU Screen.
Line 1 displays the screen heading.
Line 2 displays BBU status (CHARGING, STANDBY or DISCHARGING) if BBUs
are installed; however, if no BBUs are installed, the message NO BBU
INSTALLED displays.
Line 3 displays the estimated amount of system run time stored in the BBUs if the
system is running on a standard power source; or, if the system is running on
BBUs, the amount of system run time remaining in the BBUs at the current power
load.
BATTERY STATUS
BBU CHARGING
SYSTEM RUN TIME AT PWR LOSS xxx MINUTES
<EXIT>
Figure 3-22. The BBU Screen
Select <EXIT> to return to the System Screen.
The Module Selection Screen
Select <MODULES> from the Main Screen, as shown in Figure 3-13, to display
the chassis slot locations in which modules have been installed.
Line 1, as shown in Figure 3-23, displays the screen heading.
Lines 2 and 3 list all modules in the MMAC-Plus by slot number.
MODULE SELECTION
<EM> <1> <2> <3> <4> <5> <6> <7>
<8> <9> <10> <11> <12> <13> <14>
<EXIT>
Figure 3-23. The Module Selection Screen
Select <EXIT> to return to the main System Screen.
3-18
Interactive Mode
The Module Specific Screen
Select a module on the Module Selection Screen, as shown in Figure 3-23, to
display configuration information on the Module Specific Screen, as shown in
Figure 3-24.
Line 1 identifies the selected module by chassis slot location, current status, and
hardware revision. A module’s status can be one of the following:
ON-LINE
The host processor is operational.
DOWN
The host processor is not operational.
FAULT
The power-up diagnostic tests have failed.
Lines 2 and 3 display a firmware revision and SMB-1 firmware revision, along
with the BOOT PROM revision and the module serial number.
Line 4 lists the following three submenus. Access a specific submenu by selecting
it on the screen.
<ENV>
accesses the Module Environment Screen, showing
environmental parameters for the selected module.
<MEMORY>
accesses the Module Memory Screen, showing the amount of
various memory categories on the module.
<BACKPLANE>
accesses the Module Backplane Screen, showing backplane
configuration parameters.
MODULE xx STATUS ON-LINE HW REV xxx
FW REV x.xx.xx SMB 1 FW REV x.xx.xx
BOOT PROM REV x.xx.xx SN xxxxxxxxxxxx
<ENV> <MEMORY> <BACKPLANE> <EXIT>
Figure 3-24. The Module Specific Screen
Select <EXIT> to return to the Module Selection Screen.
3-19
9C300-1 Environmental Module Operation
The Module Environment Screen
Select <ENV> at the Module Specific Screen, as shown in Figure 3-24, to display
environmental parameters for the specific module.
Line 1 of the Module Environment Screen, as shown in Figure 3-25, identifies the
selected module by chassis slot location.
Line 2 displays the measured input voltage from the 48 volt system power bus to
the module’s DC-to-DC converter. The MMAC-Plus power supply provides
voltage to the module via a chassis backplane. The converter’s 5 volt output line
is also shown on line 2.
Line 3 displays the module’s current temperature in Fahrenheit and Celsius. The
temperature is qualified as either COLD, COOL, NORM (normal), WARM, or
HOT based on system parameters.
MODULE xx
INPUT PWR: xx.xV, OUTPUT PWR x.xV
TEMP: xxx°F, xx°C NORM
<EXIT>
Figure 3-25. The Module Environment Screen
Select <EXIT> to return to the Module Specific Screen.
The Module Memory Screen
Select <MEMORY> at the Module Specific Screen, as shown in Figure 3-24, to
view the memory configuration of a selected module.
Line 1 of the Module Memory Screen, as shown in Figure 3-26, identifies the
module, and its current CPU loading factor, expressed as a percent of capacity.
Line 2 displays the amount of FLASH memory (in megabytes) installed on the
module.
Line 3 displays the amount of SHARED DRAM and LOCAL DRAM (in
megabytes) installed on the module.
MODULE xx, CPU LOAD xxx%
FLASH xx MB
SHARED DRAM xx MB LOCAL DRAM xx MB
<EXIT>
Figure 3-26. The Module Memory Screen
Select <EXIT> to return to the Module Specific Screen.
3-20
Interactive Mode
The Module Backplane Screen
Select <BACKPLANE> on the Module Specific Screen, as shown in Figure 3-24, to
access the Module Backplane Screen, as shown in Figure 3-27. The Module
Backplane Screen displays the current MMAC-Plus backplane configuration for a
selected module.
Line 1 identifies the selected module by chassis slot location.
Line 2 displays the module’s FNB connection (if applicable) and connection
status. Refer to the MMAC-Plus Operation Guide for further information about
FNB configuration.
Line 3 displays the module’s INB connection (if applicable) and connection status.
Refer to the MMAC-Plus Operation Guide for further information about the
INB.
MODULE xx
FDDI 1 INS PRI FDDI 2 BYP
INB A B/W ALLOC xxx MBPS
<EXIT>
Figure 3-27. The Module Backplane Screen
Select <EXIT> to return to the Module Specific Screen.
The Environmental Module Specific Screen
Select <EM> on the Module Selection Screen, as shown in Figure 3-23, to access
the Environmental Module Specific Screen, as shown in Figure 3-28.
Line 1 displays the Environmental Module’s current status (on-line or fault) and
the hardware revision.
Line 2 displays the Environmental Module’s firmware and boot prom revision.
Line 3 displays the Environmental Module serial number.
EM STATUS ON-LINE HW REV xxx
FW REV x.xx.xx BOOT PROM REV x.xx.xx
SN xxxxxxxxxxxx
<ENV> <EXIT>
Figure 3-28. The Environmental Module Specific Screen
Select <ENV> to access the Environmental Module Environment Screen (used to
view Environmental Module electrical and environmental parameters).
Select <EXIT> to return the display to the Module Selection Screen.
3-21
9C300-1 Environmental Module Operation
The Environmental Module Environment Screen
Select <ENV> on the Environmental Module Specific Screen, as shown in
Figure 3-28, to access the Environmental Module Environment Screen, as shown
in Figure 3-29. This screen displays voltage, temperature, and non-condensing
humidity readings for the Environmental Module.
Line 1 displays the measured values for the 48 volt DC power bus and the 3.3 volt
bus for the Internal Network Bus (INB) terminator modules. The MMAC-Plus
power supply system provides these voltages as input to the Environmental
Module. The acceptable limits for the 48 volt line are between 40 and 59 volts. The
acceptable limits for the 3.3 volt line are between 3.1 and 5 volts.
Line 2 displays the temperature of the Environmental Module in Fahrenheit and
Celsius. The temperature is qualified as either COLD, COOL, NORM (normal),
WARM, or HOT based on system parameters.
Line 3 displays the Environmental Module’s non-condensing humidity level as
STATIC RISK, NORM (normal) or MOIST, based on system parameters.
INPUT PWR 56.1V 3.3V
TEMP: xxx°F, xx°C NORM
HUMIDITY: xx% NORM
<EXIT>
Figure 3-29. The Environmental Module Environment Screen
Select <EXIT> to return to the Environmental Module Specific Screen.
3-22
Interactive Mode
The LCD Contrast Adjustment Screen
Select <SCREEN CONTRAST> from the Main Screen, as shown in Figure 3-13, to
access the LCD Contrast Adjustment Screen, as shown in Figure 3-30.
Select <LIGHTER> and press ENTER (repeat as necessary) to make the displayed
characters appear lighter on the screen.
Select <DARKER> and press ENTER (repeat as necessary) to make the displayed
characters appear darker on the screen.
SCREEN CONTRAST ADJUSTMENT
<LIGHTER> ___________ <DARKER>
<EXIT>
Figure 3-30. LCD Contrast Adjustment Screen
Select <EXIT> to return to the Main Screen.
NOTE
The LCD contrast setting reverts to the darkest setting at power-up or restart of the
Environmental Module.
3-23
9C300-1 Environmental Module Operation
3-24
Chapter 4
Specifications
Safety
!
CAUTION
It is the responsibility of the person who sells the system to which the modules will be a
part to ensure that the total system meets allowed limits of conducted and radiated
emissions.
The 9C300-1 Environmental Module, when properly installed in the MMAC-Plus
chassis, complies with the following safety specifications and standards.
•
•
•
•
•
•
•
•
UL 1950
CSA C22.2 No. 950
EN 60950
IEC 950
EMI requirements of FCC Part 15 Class A
EN 55022 Class A
VCCI Class I
EMC requirements of
EN 50082-1
IEC 801-2 ESD
IEC 801-3 Radiated Susceptibility
IEC 8-1-4 EFT
Service
The 9C300-1 Environmental Module is designed with the following service
capability:
MTBF (MIL-STD-217):
>200,000 hours projected
MTTR:
<.50 hour
4-1
Specifications
Physical
Dimensions
12.7 H x 43.2 W x 44.5 D centimeters
(5 H x 17 W x 17.5 D inches)
Weight
Unit:
Shipping:
6.5 kilograms (14 pounds)
7.7 kilograms (17 pounds)
Environmental
Operating Temperature:
5–40°C, 43–100°F
Operating Humidity:
5% to 95% non-condensing
Cooling:
21.8 cubic meters of air per minute drawn through the
chassis
770 cubic feet of air per minute drawn through the
chassis
4-2
Appendix A
EPIM Specifications
Introduction
The 9C300-1 Environmental Module provides a port for Cabletron Systems
EPIMs. EPIMs let you connect to the main network using different media types.
Cabletron Systems offers a variety of EPIMs whose specifications are explained in
the following sections.
EPIM-T
The EPIM-T is an RJ-45 connector supporting UTP cabling. It has an internal
Cabletron Systems TPT-T™ 10BASE-T Twisted Pair Transceiver.
The slide switch on the EPIM-T determines the crossover status of the cable pairs.
If the switch is on the X side, the pairs are internally crossed over. If the switch is
on the = side, the pairs are not internally crossed over. Figure A-1 shows the
pinouts for the EPIM-T in both crossover positions.
Position X
(crossed over)
1. RX+
2. RX3. TX+
4. NC
5. NC
6. TX7. NC
8. NC
Position =
(not crossed over)
1. TX+
2. TX3. RX+
4. NC
5. NC
6. RX7. NC
8. NC
Figure A-1. EPIM-T Pinouts
A-1
EPIM Specifications
EPIM-F1 and EPIM-F2
The EPIM-F1 and EPIM-F2 support Multimode Fiber Optic cabling. Each EPIM
has an internal Cabletron Systems FOT-F™ Fiber Optic Transceiver. The EPIM-F1
is equipped with SMA Connectors and the EPIM-F2 is equipped with ST
Connectors. Figure A-2 shows both EPIMs. Specifications for the EPIMs are listed
in Table A-1.
Figure A-2. EPIM-F1 and EPIM-F2
Table A-1. EPIM-F1 & EPIM-F2 Specifications
Parameter
Typical Value
Worst
Case
Typical
Budget
Receive
Sensitivity
-30.5 dBm
-28.0 dBm
—
—
Peak Input
Power
-7.6 dBm
-8.2 dBm
—
—
Transmitter power parameters are listed Table A-2.
A-2
Worst Case
Budget
EPIM-F1 and EPIM-F2
Table A-2. Transmitter Power
Parameter
NOTE
Typical Value
Worst
Case
Worst Case
Budget
Typical
Budget
50/125 µm
fiber
-13.0 dBm
-15.0 dBm
13.0 dB
17.5 dB
62.5/125 µm
fiber
-10.0 dBm
-12.0 dBm
16.0 dB
20.5 dB
100/140 µm
fiber
-7.0 dBm
-9.0 dBm
19.0 dB
23.5 dB
Error Rate
Better than 10-10
The transmitter power levels and receive sensitivity levels listed are Peak Power
Levels after optical overshoot. A Peak Power Meter must be used to correctly
compare the values given above to those measured on any particular port. If
Power Levels are being measured with an Average Power Meter, then 3 dBm
must be added to the measurement to correctly compare those measured values
to the values listed (i.e., -30.5 dBm peak = -33.5 dBm average).
A-3
EPIM Specifications
EPIM-F3
The EPIM-F3 supports Single Mode Fiber Optic cabling. It has an internal
Cabletron Systems FOT-F™ Fiber Optic Transceiver and is equipped with ST
Connectors. Figure A-3 shows the EPIM-F3. Specifications for the EPIM-F3 are
listed in Figure A-4 and Table A-3.
Figure A-3. EPIM-F3
Maximum Sensitivity (-36.0)
Receive
Sensitivity
Typical Sensitivity (-31.0)
Minimum Sensitivity (-30.0)
Minimum Receive Input (-9.72)
Typical Receive Input (-7.5)
Maximum
Receive
Input Power
Maximum Receive Input (-6.99)
Maximum Transmit Power (-12.0)
Transmitter Power*
(At 25°C into
8.3/125µm fiber)
Typical Transmit Power (-15.5)
Minimum Transmit Power (-21.0)
dBm
-40
-35
-30
-25
-20
-15
-10
Less Power
* Transmit Power
Coefficient
(See Note Below)
-5
0
More Power
Typical Power
Minimum Power
Maximum Power
-0.15dBm/°C
-0.12 dBm/°C
-0.18 dBm/°C
Figure A-4. EPIM-F3 Power and Sensitivity Specifications
NOTE
A-4
Transmitter Power decreases as temperatures rise and increases as
temperatures fall. Use the Output Power Coefficient to calculate increased or
decreased power output for your operating environment. For example, the
typical power output at 25°C is -16.4 dBm. For a 4°C temperature increase,
multiply the typical coefficient (-0.15 dBm) by four and add the result to typical
output power (4 x -0.15 dBm + -16.4 = -17.0).
EPIM-F3
Table A-3. EPIM-F3 Specifications
Parameter
NOTE
Typical
Minimum
1270 nm
Maximum
Transmitter Peak Wave
Length
1300 nm
Spectral Width
60 nm
Rise Time
3.0 nsec
2.7 nsec
5.0 nsec
Fall Time
2.5 nsec
2.2 nsec
5.0 nsec
Duty Cycle
50.1%
49.6%
50.7%
Bit Error Rate
Better than 10-10
-
1330 nm
100 nm
The transmitter power levels given above are Peak Power Levels after optical
overshoot. You must use a Peak Power Meter to correctly compare the values
given above to those measured on any particular port. If you are measuring
power levels with an Average Power Meter, add 3 dBm to the average power
measurement to correctly compare the average power values measured to the
values listed above (i.e., -33.5 dBm average + 3 dB = -30.5 dBm peak).
A-5
EPIM Specifications
EPIM-C
The EPIM-C supports thin-net coaxial cabling and is equipped with an internal
Cabletron Systems TMS-3™ Transceiver. You can use the TERM switch on the
front of the EPIM-C to set the internal 50-ohm terminator. This eliminates the
need to connect the port to a tee-connector and terminator. Figure A-5 shows the
setting for the terminator switch.
Internal Termination Switch
= On (internally terminated)
= Off (need external termination)
Figure A-5. EPIM-C
Connector Type
This connector type is a BNC receptacle, with gold center contact, for use with
BNC type tee-connectors and RG-58 thin-net cable.
Grounding
For safety reasons, only one end of a thin-net segment should be connected to
earth ground. Connection to earth ground at more than one point on the segment
may cause dangerous ground currents.
The BNC port of the Coaxial Interface Modules is not connected to earth ground.
A-6
EPIM-A and EPIM-X (AUI Port)
EPIM-A and EPIM-X (AUI Port)
The EPIM-A is a DB-15 female connector used to attach segments to an external
transceiver. The EPIM-X is equipped with dual internal transceivers. It has a
DB-15 male connector used to attach segments to an AUI cable. Figure A-6 shows
both modules.
Figure A-6. The EPIM-A and EPIM-X
Table A-4 lists the DB-15 pinouts.
Table A-4. DB-15 Pinouts
Pin Number
Represents
Pin Number
Represents
1
Logic Ref.
10
Transmit -
2
Collision +
11
Logic Ref.
3
Transmit
12
Receive -
4
Logic Ref.
13
Power (+12Vdc)
5
Receive
14
Logic Ref.
6
Power Return
15
No Connection
7
No Connection
9
Collision -
*Connector
Shell:
*Connector
Shell
Positive Ground
Protective Ground
A-7
EPIM Specifications
A-8
Appendix B
Uninterruptible Power Supply (UPS)
Introduction
The MMAC-Plus can be connected to a UPS to provide an uninterruptible source
of AC power. Two UPS models are available, the Matrix 3000 and the Matrix 5000.
Either can be monitored via remote SNMP Management after connecting the UPS
to the Environmental Module (EM).
Connecting a UPS to an EM
To connect a UPS to an EM, use the RJ-45/DB-9 adapter labeled “UPS”, the
RJ-45 cable included in the 9372089 kit shipped with the EM, and follow the steps
below.
1.
Plug the RJ-45/DB-9 adapter labeled “UPS” into the receptacle on the rear of
the UPS (Figure B-1).
2.
Plug one end of the cable with the RJ-45 connector into the RJ-45/DB-9
adapter labeled “UPS” on the rear of the UPS (Figure B-1).
3.
Plug the other end of the cable with the RJ-45 connector into the COM2 port
on the front of the EM inserted in the MMAC-Plus Chassis (Figure B-1).
B-1
Uninterruptible Power Supply (UPS)
9 Pin D Connector Receptacle
MMAC
EPIM
STATUS
COM 1
COM 2
ALARM
ENTER
9C3001
1
2
3
4
5
6
7
8
9
10
11
12
13
14
Matrix UPS (Back View)
COM Ports
MMAC-Plus Chassis (Front View)
Figure B-1. Connecting EM to UPS
Configuring COM Port for UPS
After the UPS has been connected to the COM2 port, the COM2 port must be
configured for UPS Management. To configure the COM2 port for UPS
Management, follow the steps below.
1.
Connect the terminal or PC used for local management to the COM1 port on
the Environmental Module (EM) and press RETURN until the Slot Selection
Screen displays.
2.
At the Slot Selection Screen, enter 0 (zero) to display the EM Configuration
Screen.
3.
At the EM Configuration Screen, cursor to the Application Field for the
COM2 port.
4.
Using the space bar, toggle to the UPS option.
5.
Using the tab key, tab to the SAVE option and press RETURN.
If you need additional information about configuring the COM ports, refer to the
Local Management User’s Guide.
B-2
Verifying Configuration
Verifying Configuration
After configuring the COM port for a UPS, verify the configuration was done
correctly by checking the Communications Screen on the EM. Follow the steps
below to verify the configuration.
1.
At the Main Screen select <SYSTEM> and press ENTER.
2.
At the System Screen select <COM> and press ENTER.
3.
At the Communications Screen, verify that the screen displays “ENABLED
UPS 2400 ACTIVE FOR COM PORT 2”.
Monitoring UPS
Information about the operation of the UPS is obtained via Remote SNMP
Management or locally by the LCD on the front of the UPS. Refer to the UPS
User’s Guide, provided by the vendor, for detailed information on the UPS LCD.
B-3
Uninterruptible Power Supply (UPS)
B-4