1
JBoss Enterprise Application
Platform 5
Getting Started on Amazon EC2
for JBoss Enterprise Application Platform 5 and JBoss Enterprise Web
Server 5
Edition 5.2.0
Aleksandar Kostadinov John Doyle
JBoss Enterprise Application Platform 5 Getting Started on Amazon
EC2
for JBoss Enterprise Application Platform 5 and JBoss Enterprise Web
Server 5
Edition 5.2.0
Aleksandar Ko stadino v
Jo hn Do yle
Edited by
Eva Ko palo va
Petr Penicka
Russell Dickenso n
Sco tt Mumfo rd
Legal Notice
Copyright © 2012 Red Hat, Inc.
T his document is licensed by Red Hat under the Creative Commons Attribution-ShareAlike 3.0 Unported
License. If you distribute this document, or a modified version of it, you must provide attribution to Red
Hat, Inc. and provide a link to the original. If the document is modified, all Red Hat trademarks must be
removed.
Red Hat, as the licensor of this document, waives the right to enforce, and agrees not to assert, Section
4d of CC-BY-SA to the fullest extent permitted by applicable law.
Red Hat, Red Hat Enterprise Linux, the Shadowman logo, JBoss, MetaMatrix, Fedora, the Infinity Logo,
and RHCE are trademarks of Red Hat, Inc., registered in the United States and other countries.
Linux ® is the registered trademark of Linus T orvalds in the United States and other countries.
Java ® is a registered trademark of Oracle and/or its affiliates.
XFS ® is a trademark of Silicon Graphics International Corp. or its subsidiaries in the United States
and/or other countries.
MySQL ® is a registered trademark of MySQL AB in the United States, the European Union and other
countries.
Node.js ® is an official trademark of Joyent. Red Hat Software Collections is not formally related to or
endorsed by the official Joyent Node.js open source or commercial project.
T he OpenStack ® Word Mark and OpenStack Logo are either registered trademarks/service marks or
trademarks/service marks of the OpenStack Foundation, in the United States and other countries and
are used with the OpenStack Foundation's permission. We are not affiliated with, endorsed or
sponsored by the OpenStack Foundation, or the OpenStack community.
All other trademarks are the property of their respective owners.
Abstract
T his Getting Started Guide documents information needed to get JBoss Enterprise Application Platform
5 and JBoss Enterprise Web Server 5 running on Amazon's Elastic Computing (EC2) platform.
Table of Contents
Table of Contents
.Preface
. . . . . . . . . . . . . . . . . . . . . . . . . . . . . . . . . . . . . . . . . . . . . . . . . . . . . . . . . . . . . . . . . . . . . . . . . . . . . . . . . . . . . . . . . . .4. . . . . . . . . .
1. Document Conventions
4
1.1. T ypographic Conventions
4
1.2. Pull-quote Conventions
5
1.3. Notes and Warnings
6
2. Getting Help and Giving Feedback
6
2.1. Do You Need Help?
6
2.2. Give us Feedback
7
. . . . . . . . . 1.
Chapter
. . .Introduction
. . . . . . . . . . . . . . . . . . . . . . . . . . . . . . . . . . . . . . . . . . . . . . . . . . . . . . . . . . . . . . . . . . . . . . . . . . . . . . . .8. . . . . . . . . .
.Chapter
. . . . . . . . 2.
. . .Overview
. . . . . . . . . . . . . . . . . . . . . . . . . . . . . . . . . . . . . . . . . . . . . . . . . . . . . . . . . . . . . . . . . . . . . . . . . . . . . . . .9. . . . . . . . . .
2.1. What is provided?
9
2.2. Deployment process
9
.Chapter
. . . . . . . . 3.
. . .Identify
. . . . . . . .a. .suitable
. . . . . . . . .Red
. . . . Hat
. . . . AMI
. . . . . . . . . . . . . . . . . . . . . . . . . . . . . . . . . . . . . . . . . . . . . . . . . . . 10
............
3.1. Supported instance types
10
3.2. Finding the Red Hat AMIs
10
.Chapter
........4
. ...Launching
. . . . . . . . . . . a. . standalone
. . . . . . . . . . . . JBoss
. . . . . . . Enterprise
. . . . . . . . . . . .Web
. . . . .Server
. . . . . . .instance
. . . . . . . . . . . . . . . . . . . . . . 12
............
4.1. Prerequisites
12
4.2. Launcher instance
12
4.3. T est JBoss Enterprise Web Server
12
.Chapter
. . . . . . . . 5.
. . .Launching
. . . . . . . . . . . a. .standalone
. . . . . . . . . . . . JBoss
. . . . . . .Enterprise
. . . . . . . . . . . Application
. . . . . . . . . . . . .Platform
. . . . . . . . .instance
. . . . . . . . . . . . . 14
............
5.1. Prerequisites
14
5.2. Launch instance
14
5.3. T est JBoss Enterprise Application Server
14
.Chapter
. . . . . . . . 6.
. . .Launching
. . . . . . . . . . . clustered
. . . . . . . . . . JBoss
. . . . . . . Enterprise
. . . . . . . . . . . .Application
. . . . . . . . . . . .Platform
. . . . . . . . . instances
. . . . . . . . . . . . . . . . . 16
............
6.1. Launch clustered Enterprise Application Platform
16
6.2. Create a Relational Database Service database instance
16
6.3. Create a Virtual Private Cloud (VPC)
17
6.4. Launch a JBoss Enterprise Web Server instance to serve as a mod_cluster proxy and a NAT
instance for the VPC
17
6.5. Starting instances in a cluster
19
6.5.1. EC2 clustering profiles
19
6.5.2. VPC private subnet default route
19
6.5.3. IAM setup
19
6.5.4. S3 bucket setup
20
6.5.5. Launching the JBoss Enterprise Application Platform AMIs
20
6.6. Verifying everything is connected and running
23
.Chapter
. . . . . . . . 7.
. . .Establish
. . . . . . . . . .monitoring
. . . . . . . . . . . .with
. . . . JBoss
. . . . . . . Operations
. . . . . . . . . . . . Network
. . . . . . . . . (JON)
. . . . . . . . . . . . . . . . . . . . . . . . 25
............
7.1. Connectivity Requirements
25
7.2. Network Address T ranslation (NAT )
25
7.3. DNS
26
7.4. Routing in EC2
26
7.5. T erminating and restarting instances
26
7.6. Configure EAP and EWS instances to register with JON
27
.User
. . . . .Script
. . . . . . Parameters
. . . . . . . . . . . . . . . . . . . . . . . . . . . . . . . . . . . . . . . . . . . . . . . . . . . . . . . . . . . . . . . . . . . . . . . . . . . . . . 28
............
A.1. Permanent Configuration Parameters
28
A.2. Custom Script
29
1
JBoss Enterprise Application Platform 5 Getting Started on Amazon EC2
. .roubleshooting
T
. . . . . . . . . . . . . . . . . . . . . . . . . . . . . . . . . . . . . . . . . . . . . . . . . . . . . . . . . . . . . . . . . . . . . . . . . . . . . . . . . . . . . . . . .30
...........
B.1. Diagnostic Information
30
B.2. JBoss Enterprise Web Server
30
. . . . . . . . . .History
Revision
. . . . . . . . . . . . . . . . . . . . . . . . . . . . . . . . . . . . . . . . . . . . . . . . . . . . . . . . . . . . . . . . . . . . . . . . . . . . . . . . .31
...........
2
Table of Contents
3
JBoss Enterprise Application Platform 5 Getting Started on Amazon EC2
Preface
1. Document Conventions
T his manual uses several conventions to highlight certain words and phrases and draw attention to
specific pieces of information.
In PDF and paper editions, this manual uses typefaces drawn from the Liberation Fonts set. T he
Liberation Fonts set is also used in HT ML editions if the set is installed on your system. If not, alternative
but equivalent typefaces are displayed. Note: Red Hat Enterprise Linux 5 and later include the Liberation
Fonts set by default.
1.1. Typographic Conventions
Four typographic conventions are used to call attention to specific words and phrases. T hese
conventions, and the circumstances they apply to, are as follows.
Mono-spaced Bold
Used to highlight system input, including shell commands, file names and paths. Also used to highlight
keys and key combinations. For example:
T o see the contents of the file m y_next_bestselling_novel in your current working
directory, enter the cat m y_next_bestselling_novel command at the shell prompt
and press Enter to execute the command.
T he above includes a file name, a shell command and a key, all presented in mono-spaced bold and all
distinguishable thanks to context.
Key combinations can be distinguished from an individual key by the plus sign that connects each part of
a key combination. For example:
Press Enter to execute the command.
Press Ctrl+Alt+F2 to switch to a virtual terminal.
T he first example highlights a particular key to press. T he second example highlights a key combination:
a set of three keys pressed simultaneously.
If source code is discussed, class names, methods, functions, variable names and returned values
mentioned within a paragraph will be presented as above, in m ono-spaced bold. For example:
File-related classes include filesystem for file systems, file for files, and dir for
directories. Each class has its own associated set of permissions.
Proportional Bold
T his denotes words or phrases encountered on a system, including application names; dialog box text;
labeled buttons; check-box and radio button labels; menu titles and sub-menu titles. For example:
Choose System → Preferences → Mouse from the main menu bar to launch Mouse
Preferences. In the Buttons tab, select the Left-handed m ouse check box and click
Close to switch the primary mouse button from the left to the right (making the mouse
suitable for use in the left hand).
T o insert a special character into a gedit file, choose Applications → Accessories →
4
Preface
Character Map from the main menu bar. Next, choose Search → Find… from the
Character Map menu bar, type the name of the character in the Search field and click
Next. T he character you sought will be highlighted in the Character T able. Double-click
this highlighted character to place it in the T ext to copy field and then click the Copy
button. Now switch back to your document and choose Edit → Paste from the gedit menu
bar.
T he above text includes application names; system-wide menu names and items; application-specific
menu names; and buttons and text found within a GUI interface, all presented in proportional bold and all
distinguishable by context.
Mono-spaced Bold Italic or Proportional Bold Italic
Whether mono-spaced bold or proportional bold, the addition of italics indicates replaceable or variable
text. Italics denotes text you do not input literally or displayed text that changes depending on
circumstance. For example:
T o connect to a remote machine using ssh, type ssh username@ domain.name at a shell
prompt. If the remote machine is exam ple.com and your username on that machine is
john, type ssh john@ exam ple.com .
T he m ount -o rem ount file-system command remounts the named file system. For
example, to remount the /hom e file system, the command is m ount -o rem ount /hom e.
T o see the version of a currently installed package, use the rpm -q package command. It
will return a result as follows: package-version-release.
Note the words in bold italics above — username, domain.name, file-system, package, version and
release. Each word is a placeholder, either for text you enter when issuing a command or for text
displayed by the system.
Aside from standard usage for presenting the title of a work, italics denotes the first use of a new and
important term. For example:
Publican is a DocBook publishing system.
1.2. Pull-quote Conventions
T erminal output and source code listings are set off visually from the surrounding text.
Output sent to a terminal is set in m ono-spaced rom an and presented thus:
books
books_tests
Desktop
Desktop1
documentation
downloads
drafts
images
mss
notes
photos
scripts
stuff
svgs
svn
Source-code listings are also set in m ono-spaced rom an but add syntax highlighting as follows:
5
JBoss Enterprise Application Platform 5 Getting Started on Amazon EC2
package org.jboss.book.jca.ex1;
import javax.naming.InitialContext;
public class ExClient
{
public static void main(String args[])
throws Exception
{
InitialContext iniCtx = new InitialContext();
Object
ref
= iniCtx.lookup("EchoBean");
EchoHome
home
= (EchoHome) ref;
Echo
echo
= home.create();
System.out.println("Created Echo");
System.out.println("Echo.echo('Hello') = " + echo.echo("Hello"));
}
}
1.3. Notes and Warnings
Finally, we use three visual styles to draw attention to information that might otherwise be overlooked.
Note
Notes are tips, shortcuts or alternative approaches to the task at hand. Ignoring a note should
have no negative consequences, but you might miss out on a trick that makes your life easier.
Important
Important boxes detail things that are easily missed: configuration changes that only apply to the
current session, or services that need restarting before an update will apply. Ignoring a box
labeled 'Important' will not cause data loss but may cause irritation and frustration.
Warning
Warnings should not be ignored. Ignoring warnings will most likely cause data loss.
2. Getting Help and Giving Feedback
2.1. Do You Need Help?
If you experience difficulty with a procedure described in this documentation, visit the Red Hat Customer
Portal at http://access.redhat.com. T hrough the customer portal, you can:
search or browse through a knowledgebase of technical support articles about Red Hat products.
submit a support case to Red Hat Global Support Services (GSS).
access other product documentation.
6
Preface
Red Hat also hosts a large number of electronic mailing lists for discussion of Red Hat software and
technology. You can find a list of publicly available mailing lists at https://www.redhat.com/mailman/listinfo.
Click on the name of any mailing list to subscribe to that list or to access the list archives.
2.2. Give us Feedback
If you find a typographical error, or know how this guide can be improved, we would love to hear from
you. Submit a report in Bugzilla against the product JBoss Enterprise Application Platform
5 and the component doc-EAP_EWS_on_Am azon_EC2. T he following link will take you to a pre-filled
bug report for this product: http://bugzilla.redhat.com/.
Fill out the following template in Bugzilla's Description field. Be as specific as possible when
describing the issue; this will help ensure that we can fix it quickly.
Document URL:
Section Number and Name:
Describe the issue:
Suggestions for improvement:
Additional information:
Be sure to give us your name so that you can receive full credit for reporting the issue.
7
JBoss Enterprise Application Platform 5 Getting Started on Amazon EC2
Chapter 1. Introduction
JBoss Cloud Access is a Red Hat subscription feature which allows you to easily move your JBoss
instances between traditional on-premise servers and JBoss-certified cloud servers. You have the
freedom to choose the best computing resources according to your needs, while keeping your existing
business and support models.
T his industry-leading feature of Red Hat's JBoss subscriptions makes usage of public cloud resources
simpler, more cost-effective, and more reliable than ever before.
Migrating to a cloud-based infrastructure with JBoss Cloud Access is a simple, gradual process that
uses the infrastructure investments you have already made.
Cloud Access allows you to expand your infrastructure as required or move to an external cloud when
your criteria are met. T his enables you to evolve your operational processes at your own pace.
Cloud computing is one of the most fundamental shifts in Information T echnology to happen in decades.
Existing business models must evolve to take advantage of new cloud business and operational
opportunities. T o this end, Red Hat Cloud Access offers enterprise-level software, competitive
subscriptions, and comprehensive support, built into business and operational models that were
designed specifically for the cloud.
8
Chapter 2. Overview
Chapter 2. Overview
2.1. What is provided?
Membership in the JBoss Cloud Access program enables you to access private Amazon Machine
Images (AMIs) created by Red Hat. T hese AMIs have your choice of JBoss Enterprise Application
Platform 5.1.x or JBoss Enterprise Web Server 1.0.x pre-installed and are fully supported by Red
Hat.
For ongoing management and monitoring of the platform, a JBoss Operations Network (JON) 3.0.x
agent is pre-installed. Product updates are managed using RPMs, enabling you to update via Red Hat
Update Infrastructure.
Each of the Red Hat AMIs are only a starting point, requiring further configuration to the requirements of
your application. T his guide assumes knowledge of how to configure the JBoss products, Red Hat
Enterprise Linux and Amazon EC2. Refer to the Red Hat Documentation library and the Amazon EC2
Getting Started Guide.
2.2. Deployment process
Follow this procedure to deploy your application:
Procedure 2.1. Deployment
1. Identify a suitable Red Hat AMI.
2. Configure instance and deploy application.
3. Confirm that the platform is working as expected.
4. Establish monitoring with JBoss Operations Network (JON).
T his guide is structured to match this process, with the aim of getting your application deployed quickly
and easily. It is not possible to document every deployment scenario so this guide provides example
configurations, which should be modified to suit your environment.
9
JBoss Enterprise Application Platform 5 Getting Started on Amazon EC2
Chapter 3. Identify a suitable Red Hat AMI
3.1. Supported instance types
JBoss Cloud Access supports a subset of the instance types available on Amazon EC2, full details of
which can be found in Amazon's User Guide for Amazon Elastic Compute Cloud. Choose from the
following instance types according to your requirements:
Supported Instance T ypes
Standard Instance
Have memory-to-CPU ratios suitable for most general-purpose applications.
High Memory Instance
Have proportionally more memory resources and are well suited for high throughput
applications, such as database and memory caching applications.
High CPU Instance
Have proportionally more CPU resources than memory (RAM) and are well suited for computeintensive applications.
T he instance type "Micro (t1.m icro)" is not suitable for deployment of JBoss Enterprise Application
Platform.
3.2. Finding the Red Hat AMIs
Red Hat's AMIs are identified by their AMI Name which is formatted as:
OperatingSystem-OperatingSystemVersion-JBossProduct-JBossProductVersion-ArchitectureCreationDate.
OperatingSystem
RHEL (Red Hat Enterprise Linux)
OperatingSystemVersion
6.2
JBossProduct
JBEAP (JBoss Enterprise Application Platform) or JBEWS (JBoss Enterprise Web Server)
JBossProductVersion
5.2.0
Architecture
x86_64 or i386
10
Chapter 3. Identify a suitable Red Hat AMI
When searching for the required AMI, you can search with a general criterion ("JBEAP", for example), or
a specific one ("RHEL-6.2-JBEAP-5.1.2-x86_64").
Continue to the appropriate deployment chapter, depending on your desired configuration.
11
JBoss Enterprise Application Platform 5 Getting Started on Amazon EC2
Chapter 4. Launching a standalone JBoss Enterprise Web
Server instance
In this example a sample web application is deployed on Apache T omcat 6 server. An Apache HT T PD
server is used as a reverse proxy.
4.1. Prerequisites
Suitable Red Hat AMI identified in Chapter 3, Identify a suitable Red Hat AMI;
A pre-configured Security Group which allows incoming requests on ports 22 and 80.
4.2. Launcher instance
Launch the Red Hat AMI identified in Chapter 3, Identify a suitable Red Hat AMI, adding the following
lines to the "User Data:" field.
# deploy the hello.war sample application to the Apache Tomcat 6 server
which is part of the JBoss Enterprise Web Server offering
cp /usr/share/java/jboss-ec2-ews-samples/hello-1.0.war
/usr/share/tomcat6/webapps/hello.war
# Configure HTTPd to act as a proxy to the Apache Tomcat 6 server
cat >> /etc/httpd/conf.d/proxy_ajp.conf <<"EOF"
<Location /hello>
ProxyPass
http://localhost:8080/hello
ProxyPassReverse http://localhost:8080/hello
</Location>
ProxyPreserveHost On
EOF
# Start the Apache Tomcat 6 server
service tomcat6 start
# Instruct SELinux to allow HTTPd to serve as a proxy relay
setsebool -P httpd_can_network_relay 1
# Start the HTTPd server
service httpd start
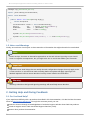
4.3. Test JBoss Enterprise Web Server
Procedure 4 .1. T est JBoss EWS
1. In the instance's details pane, note the instance's "Public DNS".
2. In a browser, navigate to http://<public-DNS>/hello
3. Confirm that the text "Hello World!" appears, otherwise refer to Appendix B, Troubleshooting.
12
Chapter 4. Launching a standalone JBoss Enterprise Web Server instance
Important
In JBoss Enterprise Web Server deployed on EC2, the contents of the User Data field are
treated as a script.
If the first line is "#!" then it is run as any executable file, otherwise its contents are
executed/sourced into the Red Hat Enterprise Linux init shell.
If this is a production instance, add the following text as the first line in the User Data field to ensure
that security updates are applied on boot:
yum -y update
13
JBoss Enterprise Application Platform 5 Getting Started on Amazon EC2
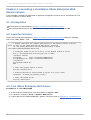
Chapter 5. Launching a standalone JBoss Enterprise
Application Platform instance
In this example a sample web application is deployed to a standalone JBoss Enterprise Application
Platform instance.
For an example using clustering and Amazon's Relational Database Service (RDS), refer to Chapter 6,
Launching clustered JBoss Enterprise Application Platform instances.
5.1. Prerequisites
Suitable Red Hat AMI identified in Chapter 3, Identify a suitable Red Hat AMI;
A pre-configured Security Group which allows incoming requests on at least ports 22 and 8080.
5.2. Launch instance
Launch the Red Hat AMI identified in Chapter 3, Identify a suitable Red Hat AMI, adding the following
lines to the "User Data:" field, inserting your JBoss admin password instead of the placeholder.
JBOSSAS_ADMIN_PASSWORD=<your password for opening admin console>
JBOSS_IP=0.0.0.0 #listen on all IPs and interfaces
cat> $USER_SCRIPT << "EOF"
## Deploy your application from an Internet URL
# wget https://<your_secure_storage_hostname>/<path>/<app_name>.war -O
/var/lib/jbossas/server/$JBOSSCONF/deploy/
## deploy sample application from the local filesystem
cp /usr/share/java/jboss-ec2-eap-samples/hello-1.0.war
/var/lib/jbossas/server/$JBOSSCONF/deploy/hello.war
EOF
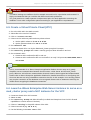
T his example below deploys a sample application already on the Red Hat AMI. T o deploy your own
application instead, comment the line which deploys the sample application and uncomment the line
which deploys your application, modifying the source URL as required.
If this is to be a production instance, add the following command under USER_SCRIPT in the "User
Data:" field, to ensure that security updates are applied on boot:
Also ensure that yum -y update is run regularly to apply security fixes and enhancements.
yum -y update
Important
T here are a number of parameters which can be used in the User Data field to customize the
configuration and deployment of JBoss Enterprise Application Platform. Refer to Appendix A, User
Script Parameters for details.
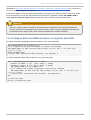
5.3. Test JBoss Enterprise Application Server
14
Chapter 5. Launching a standalone JBoss Enterprise Application Platform instance
If the sample application has been deployed, as per the example, continue testing according to the steps
below. However if your own application has been deployed then follow your own testing methodology.
1. In the instance details pane, note the instance's "Public DNS".
2. In a browser, navigate to http://<public-DNS>:8080/hello.
3. Confirm that the text "Hello World!" appears, otherwise refer to the T roubleshooting section
below.
4. In a browser, navigate to http://<public-DNS>:8080.
5. Confirm that the JBoss Enterprise Application Platform home page appears, including a hyperlink
to the Admin Console.
6. Click on the "Adm in Console" hyperlink and log in with the username "adm in" and the
password you entered in the "User Data" field.
7. Logout of the JBoss Enterprise Application Platform Admin Console.
15
JBoss Enterprise Application Platform 5 Getting Started on Amazon EC2
Chapter 6. Launching clustered JBoss Enterprise Application
Platform instances
In this example clustered JBoss Enterprise Application Platform instances are deployed with a simple
JMS sender and receiver application.
T o support the application, a JBoss Enterprise Web Server instance is deployed as a proxy and a
Relational Database Service instance is deployed to provide the required MySQL DBMS.
6.1. Launch clustered Enterprise Application Platform
Procedure 6.1. Launch clustered EAP
1. Create a Relational Database Service instance.
2. Create a Virtual Private Cloud (VPC).
3. Launch a JBoss Enterprise Web Server instance to serve as a mod_cluster proxy and a NAT
instance for the VPC.
4. Configure VPC routing tables for the JBoss Enterprise Application Platform (EAP) nodes.
5. Launch JBoss Enterprise Application Platform nodes.
6. Verify the JBoss Enterprise Application Platform cluster.
Detailed instructions on each of these steps are contained in the following sections.
6.2. Create a Relational Database Service database instance
Relational Database Service (RDS) is a convenient service provided by Amazon to easily deploy and
manage an RDBMS with failover, back-up and restore capabilities. Currently several versions of Oracle
and MySQL database servers are available. T his example uses the MySQL database server but JBoss
Enterprise Application Platform also supports Oracle Database.
1. Go to the RDS tab in the AWS console.
2. Subscribe to the service if needed.
3. Click on "Launch DB instance".
4. Click on MySQL
a. Select a version (for example 5.5.12).
b. Select sm all instance.
c. Ensure Multi-AZ Deployment and Auto upgrade are off.
d. Set Storage to 5GB.
e. Choose the database administrator's username and password.
f. On the next screen choose a database name to be created with the instance.
g. On the next screen you can disable back-up and maintenance.
h. Confirm your settings.
T he database should initialize and be ready for use after a few minutes.
16
Chapter 6. Launching clustered JBoss Enterprise Application Platform instances
Warning
T he above settings are sufficient for this example scenario but for a production environment it is
highly recommended that you consider the failover and back-up features.
It is good practice to create separate user/password pairs for each application accessing the
database. T une other configuration options according to your application's requirements.
6.3. Create a Virtual Private Cloud (VPC)
1. Go to the VPC tab in the AWS console.
2. Subscribe to the service if needed.
3. Click on "Create new VPC".
4. Choose a VPC with one public and one private subnet.
a. Set the public subnet to be 10.0.0.0/24 .
b. Set the private subnet to be 10.0.1.0/24 .
5. Go to Elastic IPs.
6. Create an elastic IP for use by the EWS mod_cluster proxy/NAT instance.
7. Go to Security groups and create a security group to allow all traffic in and out.
8. Go to Network ACLs
a. Create an ACL to allow all traffic in and out.
b. Create an ACL to allow all traffic out and traffic in on only T CP ports 22, 8009, 8080, 84 4 3
and 16163.
Note
VPC is recommended for a JBoss Enterprise Application Platform cluster setup as it greatly
simplifies secure communication between cluster nodes, a JON Server and the mod_cluster
proxy. Without a VPC all these communication channels need to be encrypted and authenticated.
Please refer to JBoss Enterprise Application Platform for detailed instructions on configuring SSL.
Also note that we are using a database external to the VPC in this example. Your security policies
may require connection to the database to be encrypted. Please refer to Amazon's RDS FAQ for
details about encrypting the database connections.
6.4. Launch a JBoss Enterprise Web Server instance to serve as a
mod_cluster proxy and a NAT instance for the VPC
1. Create an elastic IP for this instance.
2. Select an AMI.
3. Go to Security Group and allow all traffic (use Red Hat Enterprise Linux's built-in firewall
capabilities to restrict access if desired).
4. Choose "running" in the public subnet of the VPC.
5. Choose a static IP (e.g. 10.0.0.4 ).
6. Put the following in the User Data: field:
17
JBoss Enterprise Application Platform 5 Getting Started on Amazon EC2
echo 1 > /proc/sys/net/ipv4/ip_forward
echo 0 > /proc/sys/net/ipv4/conf/all/rp_filter
echo 0 > /proc/sys/net/ipv4/conf/eth0/rp_filter
iptables -I INPUT 4 -s 10.0.1.0/24 -p tcp --dport 7654 -j ACCEPT
iptables -I INPUT 4 -p tcp --dport 80 -j ACCEPT
iptables -I FORWARD -m state --state RELATED,ESTABLISHED -j ACCEPT
iptables -I FORWARD -s 10.0.1.0/24 -j ACCEPT
iptables -t nat -A POSTROUTING -o eth0 ! -s 10.0.0.4 -j MASQUERADE
# balancer module incompatible with mod_cluster
sed -i -e 's/LoadModule proxy_balancer_module/#\0/'
/etc/httpd/conf/httpd.conf
cat > /etc/httpd/conf.d/mod_cluster.conf << "EOF"
#LoadModule proxy_module modules/mod_proxy.so
#LoadModule proxy_ajp_module modules/mod_proxy_ajp.so
LoadModule slotmem_module modules/mod_slotmem.so
LoadModule manager_module modules/mod_manager.so
LoadModule proxy_cluster_module modules/mod_proxy_cluster.so
LoadModule advertise_module modules/mod_advertise.so
Listen 7654
# workaround JBPAPP-4557
MemManagerFile /var/cache/mod_proxy/manager
<VirtualHost *:7654>
<Location /mod_cluster-manager>
SetHandler mod_cluster-manager
Order deny,allow
Deny from all
Allow from 127.0.0.1
</Location>
<Location />
Order deny,allow
Deny from all
Allow from 10.
Allow from 127.0.0.1
</Location>
KeepAliveTimeout 60
MaxKeepAliveRequests 0
ManagerBalancerName mycluster
ServerAdvertise Off
EnableMCPMReceive On
</VirtualHost>
EOF
echo "`hostname | sed -e 's/ip-//' -e 'y/-/./'`
/etc/hosts
`hostname`" >>
semanage port -a -t http_port_t -p tcp 7654 #add port in the apache port list
for the below to work
setsebool -P httpd_can_network_relay 1 #for mod_proxy_cluster to work
chcon -t httpd_config_t -u system_u /etc/httpd/conf.d/mod_cluster.conf
service httpd start
18
Chapter 6. Launching clustered JBoss Enterprise Application Platform instances
7. Disable the Amazon EC2 cloud source/destination checking for this instance so it can act as a
router.
a. Right-click on the running EWS instance and choose "Change Source/Dest check".
b. Click on Yes, Disable.
8. Assign the elastic IP to this instance.
6.5. Starting instances in a cluster
6.5.1. EC2 clustering profiles
T he JBoss Enterprise Application Platform AMIs provided by Red Hat feature two additional server
profiles called cluster_ec2 and mod_cluster-ec2.
T hey both feature the ability to form a cluster inside the EC2 environment where multicast is not
available. T his is done by configuring JGroups to use only T CP unicast for cluster communication and
S3_PING as the discovery protocol.
Additionally mod_cluster-ec2 is pre-configured to easily register with mod_cluster proxies.
T he following sections describe the additional setup required for S3_PING, clustering and mod_cluster.
6.5.2. VPC private subnet default route
Since JBoss Enterprise Application Platform cluster nodes will be run in the private subnet of the VPC,
but cluster nodes require Internet access for S3 connectivity, a default route needs to be set to go
through the NAT instance.
1. Navigate EWS instance in the Amazon AWS console.
2. Go to VPC → route tables and click on the routing table used by the private subnet.
3. In the field for a new route enter 0.0.0.0/0.
4. Click on "select a target" and choose "Enter Instance ID".
5. Choose the ID of the running EWS instance.
6.5.3. IAM setup
T he S3_PING protocol, as suggested by its name, uses an S3 bucket to discover other cluster members.
T he JGroups versions 2.6.x require Amazon AWS account access and secret keys to authenticate
against the S3 service. It is a security risk to enter your main account credentials in the user-data field,
store them online or in an AMI.
T o circumvent this, a separate account can be created using the Amazon IAM feature which would be
only granted access to a single S3 bucket:
1. Go to the IAM tab in the AWS console.
2. Click on users and then "Create New Users".
3. Choose a name (jbosscluster, for example) and ensure the "Generate an access key
for each User" option is checked.
4. Click "Download credentials" and save them in a secure location.
5. Close the window and click on the newly created user.
6. In the summary tab you will see User ARN
(arn:aws:iam::05555555555:user/jbosscluster*, for example). Make a note of this because
19
JBoss Enterprise Application Platform 5 Getting Started on Amazon EC2
it's required to set up the S3 bucket.
6.5.4. S3 bucket setup
1. Open the S3 tab in the AWS console.
2. Click on "Create Bucket".
3. Choose a name (clusterbucket123 for example) and click on Create.
Note that bucket names are unique across the entire S3 so you will not be able to use the chosen
name again.
4. Right click over the new bucket and choose Properties.
5. In the permissions tab click on "Add bucket policy".
6. If you click on "New policy" the policy creation wizard will open.
7. For ease of completion the following can be pasted into the policy, but be sure to replace
arn:aws:iam ::05555555555:user/jbosscluster* with the value noted in the previous
procedure:
{
"Version": "2008-10-17",
"Id": "Policy1312228794320",
"Statement": [
{
"Sid": "Stmt1312228781799",
"Effect": "Allow",
"Principal": {
"AWS": [
"arn:aws:iam::055555555555:user/jbosscluster"
]
},
"Action": [
"s3:ListBucketVersions",
"s3:GetObjectVersion",
"s3:ListBucket",
"s3:PutBucketVersioning",
"s3:DeleteObject",
"s3:DeleteObjectVersion",
"s3:GetObject",
"s3:ListBucketMultipartUploads",
"s3:ListMultipartUploadParts",
"s3:PutObject",
"s3:GetBucketVersioning"
],
"Resource": [
"arn:aws:s3:::clusterbucket123/*",
"arn:aws:s3:::clusterbucket123"
]
}
]
}
6.5.5. Launching the JBoss Enterprise Application Platform AMIs
All necessary preparation for running a cluster are now complete. T he final task is to put the right
configuration in the User Data field.
1. Select an AMI.
20
Chapter 6. Launching clustered JBoss Enterprise Application Platform instances
2. Choose desired number of instances (this will be the cluster size).
3. Choose VPC and instance type.
4. Go to Security Group and allow all traffic from the JBoss Enterprise Application Platform cluster
subnet (set other restrictions as desired).
5. Put the following into the User Data field:
21
JBoss Enterprise Application Platform 5 Getting Started on Amazon EC2
MOD_CLUSTER_PROXY_LIST=10.0.0.4:7654
## clustering setup
JBOSS_JGROUPS_S3_PING_SECRET_ACCESS_KEY=<your secret key>
JBOSS_JGROUPS_S3_PING_ACCESS_KEY=<your access key>
JBOSS_JGROUPS_S3_PING_BUCKET=clusterbucket123
JBOSS_CLUSTER_ID=S3
## database credentials configuration
JAVA_OPTS="$JAVA_OPTS -Ddb.host=instancename.something.rds.amazonaws.com Ddb.database=mydatabase -Ddb.user=<user> -Ddb.passwd=<pass>"
PORTS_ALLOWED="1024:65535"
JBOSSAS_ADMIN_PASSWORD=<your password for opening admin console>
JBOSS_IP=`hostname` #listen on public/private EC2 IP address
cat> $USER_SCRIPT << "EOF"
cp /usr/share/java/jboss-ec2-eap-samples/jmssender-1.0.war
$JBOSS_DEPLOY_DIR/jmssender.war
cp /usr/share/java/jboss-ec2-eap-samples/mdbtest-1.1.jar $JBOSS_DEPLOY_DIR/
yum -y install mysql-connector-java
yum -y install mysql-connector-java
cp -v /usr/share/java/mysql-connector-java-*.jar
/var/lib/jbossas/server/$JBOSSCONF/lib/
## DefaultDS configuration
cd /tmp
rm -f /var/lib/jbossas/server/$JBOSSCONF/deploy/hsqldb-ds.xml
/var/lib/jbossas/server/$JBOSSCONF/deploy/messaging/hsqldb-persistenceservice.xml
sed -e 's#\("Clustered">\)false\(</attribute>\)#\1true\2#' -e
's#\("FailoverOnNodeLeave">\)false\(</attribute>\)#\1true\2#'
/usr/share/doc/jbossas-<version>/examples/jms/mysql-persistence-service.xml >
/var/lib/jbossas/server/$JBOSSCONF/deploy/messaging/mysql-persistence-service.xml
sed -i -e 's#<fk-constraint>false</fk-constraint>#<fk-constraint>true</fkconstraint>#' /var/lib/jbossas/server/$JBOSSCONF/conf/standardjbosscmp-jdbc.xml
cat > /var/lib/jbossas/server/$JBOSSCONF/deploy/mysql-ds.xml << "EODS"
<?xml version="1.0" encoding="UTF-8"?>
<datasources>
<local-tx-datasource>
<jndi-name>DefaultDS</jndi-name>
<connection-url>jdbc:mysql://${db.host}:3306/${db.database}</connection-url>
<driver-class>com.mysql.jdbc.Driver</driver-class>
<user-name>${db.user}</user-name>
<password>${db.passwd}</password>
<metadata>
<type-mapping>mySQL</type-mapping>
</metadata>
<transaction-isolation>TRANSACTION_READ_COMMITTED</transaction-isolation>
</local-tx-datasource>
</datasources>
EODS
cat > /var/lib/jbossas/server/$JBOSSCONF/deploy/sample-destinations-service.xml <<
"EODS"
<server>
<mbean code="org.jboss.jms.server.destination.TopicService"
name="jboss.messaging.destination:service=Topic,name=jms/SampleTopic"
xmbean-dd="xmdesc/Topic-xmbean.xml">
<depends optional-attribute-
22
Chapter 6. Launching clustered JBoss Enterprise Application Platform instances
name="ServerPeer">jboss.messaging:service=ServerPeer</depends>
<depends>jboss.messaging:service=PostOffice</depends>
<attribute name="JNDIName">SampleTopic</attribute>
<attribute name="Clustered">true</attribute>
</mbean>
</server>
EODS
## this will workaround the problem that in a VPC, instance hostname is not
resolvable
grep -q 10.0.1.15 /etc/hosts || \
for (( i=1 ; i<255 ; i++ )); do
echo -e "10.0.1.$i\tip-10-0-1-$i" ;
done >> /etc/hosts
EOF
Running JBoss Enterprise Application Platform cluster in a subnet with network mask smaller than 24
bits or spanning multiple subnets complicates acquiring a unique server peer ID for each cluster
member.
Please refer to the CLUSTER_ID variable in Appendix A, User Script Parameters for information on how to
make such a configuration work reliably.
T he auto-scaling Amazon EC2 feature can be used with JBoss Enterprise Application Platform cluster
nodes. However make sure you test before deployment. You should ensure that your particular
workloads scale to the desired number of nodes and that the performance meets your needs with the
the instance type you are planning to use (different instance types receive a different share of the EC2
cloud resources).
Furthermore instance locality and current network/storage/host machine/RDS utilization can affect
performance of a cluster. T est with your expected real-life loads and try to account for unexpected
conditions.
Down-scaling a cluster
T he Amazon EC2 scale-down action terminates the nodes without any chance to gracefully shut
down, and, as some transactions might be interrupted, other cluster nodes (and load balancers)
will need time to fail over. T his is likely to impact your application users' experience.
It is recommended that you scale down your application cluster manually by disabling the server
from the mod_cluster management interface until processed sessions are completed or shutting
down the JBoss Enterprise Application Platform instance gracefully (SSH access to the instance
or JON can be used).
T est that your chosen procedure for scaling-down does not lead to adverse effects on your
users' experience. Additional measures might be required for particular workloads, load balancers
and setups.
6.6. Verifying everything is connected and running
1. Open http://<elastic IP of EWS> in browser.
2. Open http://<elastic IP of EWS>/jm ssender in browser.
Check that all cluster nodes are logging a message per every jmssender request (no matter
which node jmssender is opened from).
23
JBoss Enterprise Application Platform 5 Getting Started on Amazon EC2
3. Connect to the JBoss Enterprise Web Server instance:
ssh -L7654:localhost:7654 <elastic IP of EWS>
4. Open http://localhost:7654/mod_cluster-manager in a browser.
If these are to be production instances, add the following text to the contents of the User Data field, to
ensure that security updates are applied on boot:
yum -y update
24
Chapter 7. Establish monitoring with JBoss Operations Network (JON)
Chapter 7. Establish monitoring with JBoss Operations
Network (JON)
With your business application deployed to a correctly-configured AMI instance, the next step is to
establish monitoring of the platform with JBoss Operations Network (JON).
T he JON server is commonly located inside a corporate network, so it's necessary to establish a secure
connection between the server and each of its agents. Establishing a VPN between the two points is the
most common solution but this complicates the required networking configuration.
T his chapter provides network configuration guidelines for enabling communication between the JON
agent and JON server. For more extensive information on JBoss Operations Network's configuration,
management and usage refer to the Red Hat documentation.
Figure 7.1. Network connectivity between JON Server and its agents
7.1. Connectivity Requirements
Registering a JON agent with its servers requires two-way communication between agent and servers.
T he JON Agent needs access to port 7080 (or 74 4 3 in case SSL is used) on all JON servers, and
each JON server must be able to access each of the connected agents on a unique IP:T CP port pair
(agent port is usually 16163).
If there are multiple, clustered JON servers, make sure each agent can communicate with all servers in
the JON cluster via the IP/hostname pairs as configured through the JON server administration console.
T he JON server used by the agent to register may not be the server it tries to use after initialization.
7.2. Network Address Translation (NAT)
A corporate VPN gateway acting in routed mode greatly simplifies network configuration. However, if the
25
JBoss Enterprise Application Platform 5 Getting Started on Amazon EC2
corporate VPN gateway is acting in NAT mode, the JON server does not have direct visibility of agents.
Port forwarding needs to be configured so that, for each agent, one port on the gateway is forwarded to
the JON agent's address or port on the managed machine. T he JON agent also needs to be configured
to tell the server the forwarded port number and IP address (see rhq.communications.connector.*
description in agent-configuration.xml for more information).
7.3. DNS
JON servers and JON agents need to be able to resolve each others' hostnames but DNS resolution is
complicated in a VPN configuration. Connected servers can use the Amazon EC2 DNS servers, the
corporate network's DNS servers or use a split DNS configuration where the corporate DNS servers are
used for resolving names in particular domains and the Amazon EC2 DNS servers are used for
resolving all other names.
7.4. Routing in EC2
All EC2 servers have, by default, a "source/destination checking" routing feature activated. T his feature
drops any packets to the server which have a destination different from the machine's IP address. If the
VPN solution selected for connecting agents to the JON Server includes a router, this feature needs to
be turned off for the server(s) acting as routers/VPN gateways. T his configuration setting can be
accessed via the Amazon AWS console by right-clicking on the instance. Disabled source/destination
checking is also required in a Virtual Private Cloud (VPC).
Some VPN configurations, by default, route traffic intended for the Internet through the corporate VPN.
Avoid this for EC2 instances because it's generally much slower and less efficient.
While the use of a proper addressing schema is not a concern specific to JON, poor schemas can affect
it. Amazon EC2 assigns IP addresses from the 10.0.0.0/8 network. Instances usually have a public IP
address also but only network traffic on the internal IP address within the same availability zone is free.
T o avoid using the 10.0.0.0/8 network in private addressing, there are a few things to consider:
When creating a VPC, avoid allocating addresses already in use in the private network to avoid
connectivity problems;
If an instance needs access to availability zone local resources, make sure EC2 private addresses
are used and traffic is not routed through the VPN;
If an EC2 instance will access a small subset of corporate private network addresses (for example
only JON servers), only these addresses should be routed through the VPN for increased security
and a lower chance of EC2/private network address space collisions.
7.5. Terminating and restarting instances
In a cloud environment it is very easy to terminate a machine instance and, if required, launch a new
instance identical to the initial one.
T here is, however, a potential problem if a new instance tries to register with JON servers using the
same agent name as a previously running agent. If this happens the JON server will not allow an agent
to reconnect with a missing or non-matching identification token.
T O avoid this, ensure that terminated agents are removed from the JON inventory before trying to
connect an agent with the same name or specify the correct identification token when starting new agent.
Another problem is when an agent machine is assigned a new VPN IP address (i.e. machine is restarted
or VPN connection is terminated). Refer to the Configuring JON Servers and Agents Guide document
26
Chapter 7. Establish monitoring with JBoss Operations Network (JON)
(available at http://docs.redhat.com/docs/en-US/JBoss_Operations_Network/index.html) for instructions
on how to change the agent's IP address.
If this does happen it is best to bind the JON agent's life cycle to the VPN connection's life cycle. When
the connection drops, stop the agent. When the connection is up again, update JON_AGENT_ADDR in
/etc/sysconfig/jon-agent-ec2 to reflect the new IP address and restart the agent.
Important
If there is a high number of instances launched and/or terminated it can become impractical to
add and remove them manually from the JON inventory. JON's scripting capabilities can be used
for automate these steps. Refer to the JON documentation for further information.
7.6. Configure EAP and EWS instances to register with JON
For JBoss Enterprise Application Platform, add this to the User Data field:
JON_SERVER_ADDR=jon2.it.example.com
## if instance not already configured to resolve its hostname
JON_AGENT_ADDR=`ip addr show dev eth0 primary to 0/0 | sed -n 's#.*inet \([09.]\+\)/.*#\1#p'`
PORTS_ALLOWED=16163
# insert other JON options when necessary, see Appendix I
For JBoss Enterprise Web Server add this to the User Data field:
cat > /etc/sysconfig/jon-agent-ec2 << "EOF"
iptables -D INPUT -p tcp --dport 16163 -j ACCEPT
iptables -I INPUT -p tcp --dport 16163 -j ACCEPT
JON_SERVER_ADDR=jon2.it.example.com
## if instance not already configured to resolve its hostname
JON_AGENT_ADDR=`ip addr show dev eth0 primary to 0/0 | sed -n 's#.*inet \([09.]\+\)/.*#\1#p'`
# insert other JON options when necessary, see Appendix I
EOF
## start the agent
service jon-agent-ec2 start
27
JBoss Enterprise Application Platform 5 Getting Started on Amazon EC2
User Script Parameters
Deploying and configuring JBoss Enterprise Application Platform using the User Data field provides for
flexibility and ease of management of multiple configurations. T he flexibility comes from the use of
various parameters which can be used to configure the platform or in the deployment of your custom
application.
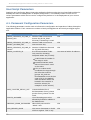
A.1. Permanent Configuration Parameters
T he following parameters can be used to influence the configuration and operation of JBoss Enterprise
Application Platform. T heir contents are written to /etc/sysconfig/jbossas and /etc/sysconfig/jon-agentec2.
Name
Description
Default
JBOSS_JGROUPS_S3_PING_A
CCESS_KEY
Amazon AWS user account
access key for S3_PING
discovery if clustering is used.
N/A
JBOSS_JGROUPS_S3_PING_S
ECRET _ACCESS_KEY
Amazon AWS user account
secret access key.
N/A
JBOSS_JGROUPS_S3_PING_B
UCKET
Amazon S3 bucket to be used
for S3_PING discovery.
N/A
JBOSS_CLUST ER_ID
ID of cluster member nodes.
Only used for clustering.
Accepted values are (in order):
Last octet of eth0's IP address.
a valid cluster ID number in
the range 0-1023
a network interface name
who's IP last octet is used
as the value
"S3" as a value would
coordinate ID usage through
the S3 bucket used for
jgroups' S3_PING It's
recommended to use the last
octet of IP (i.e. the default)
when all cluster nodes are
located in the same 24 or
more bits subnet (for
example in a VPC subnet).
MOD_CLUST ER_PROXY_LIST
Comma-delimited list of
IPs/hostnames of mod_cluster
proxies if mod_cluster is to be
used.
N/A
PORT S_ALLOWED
List of incoming ports to be
allowed by firewall in addition to
the default ones.
N/A
JBOSSAS_ADMIN_PASSWORD
JBoss EAP password for
"admin" user.
N/A
JON_SERVER_ADDR
JON server hostname or IP with
which to register. T his is only
N/A
28
User Script Parameters
used for registration, after that
agent may communicate with
other servers in the JON cluster.
JON_SERVER_PORT
Port used by the agent to
communicate with the server.
7080
JON_AGENT _NAME
Name of JON agent, must be
unique.
Instance's ID
JON_AGENT _PORT
Port that the agent listens on.
16163
JON_AGENT _ADDR
IP address to which the JON
agent is to be bound. T his is
used when the server has more
than one public address, e.g.
VPN.
JON agent chooses the IP of
local hostname by default.
JON_AGENT _OPT S
Additional JON agent system
properties which can be used
for configuring SSL, NAT and
other advanced settings.
N/A
JBOSSCONF
Name of JBoss EAP profile to
start. If S3 config is present,
then cluster-ec2 profile is used.
If
MOD_CLUST ER_PROXY_LIST
is specified, the mod_clusterec2 profile is selected me. If
neither of these options are
used then the 'default' profile is
used.
default, cluster-ec2 or
m od_cluster-ec2 depending
on the other parameters.
JAVA_OPT S
Custom values to be added to
the variable before JBoss
Enterprise Application Platform
starts.
JAVA_OPT S is built from values
of other parameters.
JBOSS_IP
IP address to which server is to
be bound.
127.0.0.1
A.2. Custom Script
T he following parameters can be used in the user customization section of the User Data: field.
JBOSS_DEPLOY_DIR
Deploy directory of the active profile (e.g.
/usr/lib/jbossas/server/cluster-ec2/conf)
JBOSS_CONFIG_DIR
Config directory of the active profile (e.g.
/usr/lib/jbossas/server/cluster-ec2/conf)
JBOSSCONF
Name of EAP active profile
USER_SCRIPT
Path to the custom configuration script, which is
available prior to sourcing user-data configuration
29
JBoss Enterprise Application Platform 5 Getting Started on Amazon EC2
Troubleshooting
EC2 does not provide any method out of the box to indicate an instance has started correctly and
services are running properly. Use of an external system for monitoring and management is
recommended so that you can be proactive. JBoss Operations Network (JON) can automatically
discover, monitor and manage many services on an EC2 instance with the JON agent installed, including
JBoss Enterprise Application Platform and its services, T omcat, Httpd, PostgreSQL, etc. Since there's no
difference between an EC-hosted or locally-hosted instance of JBoss Enterprise Application Platform or
JBoss Enterprise Web Server, established JON monitoring of both types of deployments is identical.
B.1. Diagnostic Information
In case of a problem being detected by JON, Amazon CloudWatch or manual inspection common
sources of diagnostic information are:
/var/log/jboss_user-data.out is the output of the jboss-ec2-(eap|ews) init script and user
custom configuration script;
/var/cache/jboss-ec2-eap/ contains the actual user data and custom script used at instance
start-up (for an EAP instance);
/var/cache/jboss-ec2-ews/contains the actual user data used at instance start-up (for an
EWS instance);
/var/log also contains all the logs collected from machine start up, EAP, T omcat, httpd and most
other services.
Access to these files is only available via an SSH session. Refer to the Amazon EC Getting Started
Guide for details on how to configure and establish an SSH session with an EC2 instance.
B.2. JBoss Enterprise Web Server
Issue
When trying to access the URL http://<public-DNS>:8080/hello, the browser reports a 404 error status
instead of the "Hello world" application.
Action
1. Confirm the instance's state is "running" and if not, start it.
2. Check the Security Group which applies to the instance and confirm that access via ports 22 and
80 are enabled. If not, either modify the applicable Security Group or create a new one which
permits access via these ports.
3. Check the application WAR file is inside the server's deploy directory and check server log for
any errors.
4. Confirm that JBoss Enterprise Web Server is running by navigating to the URL http://<publicDNS>, checking that the "Red Hat Enterprise Web Server T est Page" is loaded.
30
Revision History
Revision History
Revision 5.2.0-100.4 00
Rebuild with publican 4.0.0
2013-10-30
Rüdiger Landmann
Revision 5.2.0-100
Wed 23 Jan 2013
Russell Dickenson
Incorporated changes for JBoss Enterprise Application Platform 5.2.0 GA. For information about
documentation changes to this guide, refer to Release Notes 5.2.0.
Revision 5.1.2-201
First edition.
T ue July 3 2012
Russell Dickenson
31