1
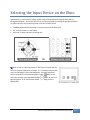
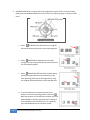
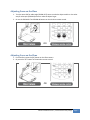
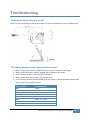
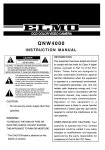
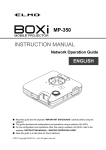
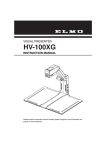
Elmo Basics Table of Contents Setting Up ..................................................................................................................................................... 2 Turning ON the Elmo ................................................................................................................................. 2 Turning ON the Projector .......................................................................................................................... 2 Selecting the Input Device on the Elmo....................................................................................................... 3 Camera (Elmo)........................................................................................................................................... 4 PC (Laptop) ................................................................................................................................................ 4 SD mode (SD card) .................................................................................................................................... 4 Enhancing the Display .................................................................................................................................. 5 Turning ON/OFF Elmo Lamp ..................................................................................................................... 5 Adjusting the Brightness .......................................................................................................................... 5 Adjusting Zoom on the Elmo ..................................................................................................................... 7 Adjusting Focus on the Elmo ..................................................................................................................... 7 Shutting Down .............................................................................................................................................. 8 Turning OFF the Projector ......................................................................................................................... 8 Turning OFF the Elmo................................................................................................................................ 8 Cleaning Up ............................................................................................................................................... 8 Troubleshooting ........................................................................................................................................... 9 Educational Media Center | Leeward Community College Page 1 Setting Up Turning ON the Elmo 1. Plug in the power strip plug into the wall. (This has the Elmo’s and the projector’s power cables plugged into it). 2. If the Elmo’s arms are not upright, pull the arms upright. 3. Turn on the Elmo by pressing the button on the Elmo deck (top-right corner). 4. Wait a few seconds for the Elmo to warm up and turn on. You should see an image of the display in the small LCD screen. Turning ON the Projector 1. Remove the lens cap. 2. Turn on the projector by pressing the STANDBY/ON button on the projector’s control panel. 3. Wait for the display to appear on the screen and for the blinking light to turn to a solid green state. 4. If a menu screen appears, press the ENTER button on the projector’s control panel to exit the menu screen. 5. By default, the projector will auto-detect the Elmo device. a. If not, check the projector’s input device selection by pressing the INPUT ( ) button on the projector’s control panel. b. Use the ( ) and ( ) buttons to select the “Computer” option and press the ENTER button. 6. Wait while the image from the Elmo appears and focuses. 7. If you need to adjust the projector’s focus, use the outer-most ring, called the focus ring. Page 2 Leeward Community College | 20091103_ri --- Projector’s Control Panel --- Selecting the Input Device on the Elmo Input devices (i.e. Elmo camera, laptop, and SD card) will be projected through the Elmo and out through the projector. Choose the device that you want projected by pressing the appropriate button on either the Elmo’s front operating panel or wireless remote control. CAMERA (default device projected): to project what is on the Elmo deck PC: to project what is on the laptop SD mode: to project pictures on the SD card OR Note: If you are switching devices on the Elmo, first check that the On Screen Display (OSD) menu is hidden. If it’s in display, hide the OSD menu by operating the front operating panel. Using the directional arrows on the Elmo’s front operating panel, select BACK on the OSD menu and then press the MENU/ENTER button on the front operating panel. Or on the wireless remote, repeatedly press the BACK button. This is the OSD menu in display mode. Educational Media Center | Leeward Community College Page 3 If you choose to project from the CAMERA (Elmo Camera) 1. Place the document or object that you want projected on the Elmo deck. 2. (By default, the Elmo display is shown when you turn on the Elmo and projector.) To project what is shown by the Elmo camera, press the (‘up’ button) on the Elmo’s front operating panel or button on the wireless remote control. If you choose to project from the PC (Laptop) 1. To connect a laptop to the Elmo’s projector, pull out the cart tray and put your laptop (powered on) on the tray. 2. Plug in the black VGA cable (that is connected to the Elmo) into the VGA port on the laptop. 3. To project what is on the laptop, press the PC button on the Elmo’s front operating panel or wireless remote control. 4. The Elmo will auto-detect the laptop. If not, refer to the Troubleshooting section. If you choose to project from SD mode (SD card) 1. Do not insert the SD card yet! 2. Make sure the input device selection is not the SD option. Instead, press the button on either the Elmo’s front control panel or wireless remote control. 3. Once you are in the Elmo camera viewing mode, insert the SD card into the SD card slot on the upper-left side of the Elmo deck. Do NOT insert the SD card in SD mode. This may corrupt the SD card. 4. Now, you can press the button on either the front operating panel or wireless remote control to switch the mode to SD mode. One image will be displayed at a time. Use the right or left arrow buttons on the front operating panel or on the wireless remote control to go to the next or previous images. Page 4 Leeward Community College | 20091103_ri Enhancing the Display Turning ON/OFF Elmo Lamp 1. If the On Screen Display (OSD) menu is in display, hide the OSD menu by operating the front operating panel or by repeatedly pressing the BACK button on the wireless remote control. 2. Press the button on the Elmo’s front operating panel or wireless remote control to turn the lamp on or off. 3. To adjust the illumination position of the lamp, gently move the lamp arm up or down and/or adjust the angle of the lamp head. Adjusting the Brightness 1. To adjust the lamp’s brightness using the wireless remote control, press the and buttons in the BRIGHTNESS section on the wireless remote control. Educational Media Center | Leeward Community College Page 5 2. ALTERNATIVE OPTION: To adjust the lamp’s brightness using the Elmo’s On Screen Display (OSD), press the MENU/ENTER button on the Elmo’s front operating panel to access the OSD menu. a. Select SETTINGS on the OSD main menu using the directional arrow buttons on the front operating panel. b. Select BRIGHTNESS > MANUAL from the OSD settings menu by using the directional arrow buttons on the front operating panel. c. Select BRIGHTNESS SETTING from the OSD setting menu by using the directional arrow buttons on the front operating panel and set the brightness by using the up/down directional buttons to the intended level. d. To exit the OSD menu, use the directional arrow buttons on the front operating panel to select the BACK menu option on the OSD menu and then press the MENU/ENTER on the front operating panel. Repeat to exit completely out of the OSD menu. Or repeatedly press the BACK button on the wireless remote. Page 6 Leeward Community College | 20091103_ri Adjusting Zoom on the Elmo 1. Turn the zoom dial for wide-angle (ZOOM-OUT) zoom to make the object smaller or the other way for telescopic (ZOOM-IN) zoom to make the object larger. 2. Or use the ZOOM-OUT and ZOOM-IN buttons on the wireless remote control. OR Adjusting Focus on the Elmo 1. For auto-focus press the [AF] button on the Elmo camera. 2. Or press the “AF” button on the wireless remote control. OR Educational Media Center | Leeward Community College Page 7 Shutting Down Turning OFF the Projector 1. Turn off the projector by pressing the STANDBY/ON button on the projector’s control panel. 2. A message, “Enter Standby mode? Yes: Press Again No: Please Wait” will appear. Press the STANDBY/ON button again to confirm shutting down. 3. The display will shut off and the solid green light on the projector’s control panel will start blinking as it is cooling down. You will hear the cooling fans. Once it has cooled down the light will turn off, you will hear an alert sound and the projector will be turned off. 4. Place the lens cap back on the projector. Turning OFF the Elmo 1. Turn off the Elmo by pressing the 2. Place the lens cap back on the Elmo camera. 3. Remove the contents from the Elmo deck. button on the Elmo deck (top-right corner). Cleaning Up 1. Once the projector and the Elmo are properly turned off, unplug the power cord from the wall. 2. Wind the power cord around the power strip on the cart and secure the plug under the cord. 3. Make sure to push in the pull out tray if it was used and return all accessories that belong to cart (i.e. remote, cables, manuals, bag) before rolling the cart out of the classroom. 4. Return the cart to the Math workroom. Page 8 Leeward Community College | 20091103_ri Troubleshooting “The remote doesn’t seem to work.” Make sure you are pointing the remote at the sensor on the Elmo located at the joint of the Elmo arms. “The laptop display doesn’t project on the screen.” 1. 2. 3. 4. 5. Make sure you plug in the black VGA cable securely into the VGA port on the laptop. Make sure the VGA cable is securely plugged into the VGA port on the Elmo. Make sure the Elmo device and projector are turned on. Make sure the input device is set to PC on the Elmo. You may have to activate the external display on your laptop. Find the appropriate combination of keys based on your laptop’s model: Type of Laptop Dell HP or Compaq Toshiba Gateway ThinkPad or Lenovo (IBM) Acer Sony Vaio Apple Mac Key Combination Fn+F8 Fn+F5 or Fn+F4 Fn+F5 Fn+F3 or Fn+F4 or Fn+F7 Fn+F7 Fn+F3 or Fn+F5 Fn+F4 or Fn+F3 Fn+F7 or “Detect Displays” Educational Media Center | Leeward Community College Page 9 a. Once you have determined the key combination, locate the function “Fn” key on your keyboard. b. Hold down the “Fn” key and press the appropriate function key from the table. c. After two seconds, release the keys and the laptop display should be projected on the screen. For other hardware or technical questions, contact the ITG Help Desk Phone: x271 (or 455-0271) Room: BS-109 Note: Images used in this handout were taken from the Elmo and Sharp Projector manuals. Complete manuals can be downloaded online at: http://www.elmousa.com/download-archive.php (Elmo) and http://www.sharpusa.com/ForBusiness/PresentationProducts/ProfessionalProjectors/PGF312X.aspx (Sharp projector). Page 10 Leeward Community College | 20091103_ri