1
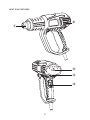
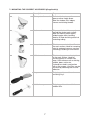
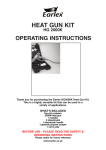
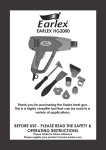
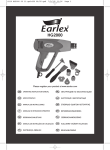
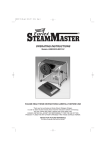
EARLEX HG2000 LED Heat Gun Thank you for purchasing the Earlex Heat Gun. This is a highly versatile tool that can be used for a variety of applications. BEFORE USE - PLEASE READ THE SAFETY & OPERATING INSTRUCTIONS Please retain for future reference Please register your product at www.earlex.com HEAT GUN FEATURES ② ① ⑤ ④ ③ 2 1. APPLICATION Your heat gun has been designed for stripping paint, soldering pipes, shrinking PVC, welding and bending plastic as well as general drying and thawing purposes. WARNING! For your own safety read this manual and general safety instructions carefully before using the appliance, for your own safety. Your power tool should only be passed on together with these instructions. 2. DESCRIPTION ① Nozzle ② Ventilation slots ③ On/off switch (0/1/2/3) ④ Temperature adjusting dial ⑤ LED temperature setting 3. PACKAGE CONTENT LIST Remove all packing materials Remove remaining packaging and transit supports if any. Check the completeness of the packing content. Check the appliance, the power cord, the power plug and all accessories for transportation damage. Keep the packaging materials until the end of the warranty period. Dispose such materials into your local waste disposal system afterwards. WARNING! Packing materials are not toys! Children must not play with plastic bags! Danger of suffocation! 1 Heat gun 1 Set of accessories (See page 7 for a list of accessories) 1 Instruction manual When parts are missing or damaged, please contact your dealer. 4. GENERAL POWER TOOL SAFETY WARNINGS Read all safety warnings and all instructions. Failure to follow all warnings and instructions may result in electric shock, fire and/or serious injury. Save all warnings and instructions for future reference. 3 4.1. WORK AREA Keep work area clean and well lit. Cluttered and dark areas invite accidents. Do not operate power tools in explosive atmospheres, such as in the presence of flammable liquids, gases or dust. Power tools create sparks which may ignite the dust or fumes. Keep children and bystanders away while operating a power tool. Distractions can cause you to lose control. 4.2. ELECTRICAL SAFETY Power tool plugs must match the socket-outlet. Never modify the plug in any way. Avoid body contact with earthed or grounded surfaces such as pipes, radiators, ranges and refrigerators. There is an increased risk of electric shock if your body is earthed or grounded. Do not expose power tools to rain or wet conditions. Do not abuse the cord. Never use the cord for carrying, pulling or unplugging the power tool. Keep cord away from heat, oil, sharp edges or moving parts. When operating a power tool outdoors, use an extension cord suitable for outdoor use. It is recommended a RCD (residual current device) rated at 30mA is fitted into the mains socket-outlet first for added protection against electric shock. 4.3. PERSONAL SAFETY Stay alert, watch what you are doing and use common sense when operating a power tool. Do not use a power tool while you are tired or under the influence of drugs, alcohol or medication. Use safety equipment. It is recommended to wear eye protection. Danger of burns - we recommend wearing a pair of heavy grade non-pvc type work gloves. Avoid accidental starting by ensuring the switch is in the off “0” position before plugging in. Do not overreach. Keep proper footing and balance at all times. Do not wear loose clothing or jewellery. Keep your hair, clothing and gloves away from moving parts. 4.4. POWER TOOL USE AND CARE Do not use the power tool if the switch does not turn it on and off. Any power tool that cannot be controlled with the switch is dangerous and must be repaired. Maintain power tools. Check for misalignment or sticking of moving parts, breakage of parts and other conditions that may affect operation of the power tool. If damaged, have the power tool repaired before use. Use the power tool, accessories and tool bits, etc., in accordance with these instructions and in the manner intended for the particular type of power tool, taking into account the working conditions and the work to be performed. 4 4.5. SERVICE Have your power tool serviced by a qualified repair person using only identical replacement parts. This will ensure that the safety of the power tool is maintained. 5. ADDITIONAL SAFETY INSTRUCTIONS FOR HEAT GUNS Do not place your hand over the air vents or block the vents in any way. The nozzle and accessories of this tool become extremely hot during use. Let these parts cool down before touching. Always switch the tool off before putting it down. Do not leave the tool unattended while it is switched on. A fire may arise if the appliance is not used with care. Heat may be conducted to combustible materials that are out of sight. Do not use in a damp atmosphere where flammable gases may be present or near combustible materials. Allow the tool to cool fully before storing. Ensure adequate ventilation as toxic fumes may be produced. Do not use as a hairdryer. Do not obstruct either the air intake or nozzle outlet, as this may cause excessive heat build-up resulting in damage to the tool. Do not direct the hot air blast at other people or animals. Do not touch the metal nozzle as it becomes very hot during use and remains hot for up to 30 minutes after use. Do not place the nozzle against anything while using or immediately after use. Do not poke anything down the nozzle as it could give you an electric shock. Do not look down the nozzle while the unit is working because of the high temperature being produced. Do not allow paint to adhere to the nozzle or scraper as it could ignite after some time. Do not change/rotate the nozzle while the unit is turned on. Do not allow children to operate or play with the heat gun. Do not allow heat to be directed onto the mains cable. Do not apply to the same place for a long time. 6. REMOVING PAINT Do not use this tool to remove paint containing lead. The peelings, residue and vapours of paint may contain lead, which is poisonous. Any pre-1960 building may have been painted in the past with paint containing lead and covered with additional layers of paint. Once deposited on surfaces, hand-to-mouth contact can result in ingestion of lead. Exposure even to low levels of lead can cause irreversible damage to the brain and nervous system. Young and unborn children are particularly vulnerable. When removing paint, ensure that the work area is enclosed. Preferably wear a dust mask. Do not burn the paint. Use the scraper and keep the nozzle at least 25 mm away from the painted surface. When working in a vertical direction, work downwards to prevent paint from falling into the tool and burning. Dispose of all paint debris safely and ensure that the work area is thoroughly cleaned after completing the work. 5 7. ASSEMBLY AND ADJUSTMENT Prior to assembly and adjustment always unplug the tool and allow to cool fully. The air temperature can be adjusted to suit a wide range of applications. The table below suggests settings for different applications. Setting 1 2 Applications Cooling hot parts Cooling the heat gun before changing the nozzle Drying paint and varnish Removing stickers Waxing and de-waxing Drying wet timber prior to filling Shrinking PVC wrapping and insulation tubes Thawing frozen pipes 3 Lighting charcoal Welding plastics Bending plastic pipes and sheets Loosening rusted or tightly fastened nuts and bolts Removing paint and lacquer Soldering plumbing joints If you are not sure about the correct setting, start with a low temperature setting and gradually increase the temperature until you achieve optimum results. 6 7.1 MOUNTING THE CORRECT ACCESSORY (if applicable) Icon Description Purpose Hook nozzle Disperses the heat flow evenly around the whole work surface. Ideal for thawing frozen pipes, soldering pipe work, bending plastics or heat-shrinking electrical insulating tubing. Concentrator nozzle Directs a concentrated heat flow to the work surface. Ideal for removing paint in awkward corners, crevices, mouldings, beading or architraves. Deflector nozzle Directs a long, narrow heat pattern to the work surface. Ideal for removing paint or varnish from large, flat surfaces such as skirting boards, doors, stairs etc. It should be used in conjunction with a flat scraper. Vinyl tiles can be removed by softening the tile and adhesive. Glass protection nozzle Deflects the heat away from glass or other fragile areas. Ideal for window sills, ledges, frames and skirting boards. Scraper Stripping paint, varnish and removing vinyl. Detailed scraper Stripping paint and varnish from window sills. 7 Make sure that the tool is switched off and the nozzle has cooled down. Dropped nozzles can set objects on fire. Nozzles must be firmly fitted and secure on the unit. Touching a hot nozzle can lead to serious burns. Before attaching or replacing a nozzle allow the unit to cool down completely. A hot nozzle can set a surface on fire. Place down hot nozzles only on fire-proof surfaces. An incorrect or defective nozzle can lead to heat accumulation and damage the unit. Use only original nozzles as shown in the table. 8. INSTRUCTIONS FOR USE Always observe the safety instructions and applicable regulations. Use only one hand to hold the tool, do not place your other hand over the air vents. Prior to operation: Fit the correct accessory ① for the application. 8.1. SWITCHING ON AND OFF To switch the tool on, set the ON/OFF switch ③ to position 1 / 2 / 3. Some smoke may be emitted after switching on; this does not indicate a problem. To switch the tool off, set switch ③ to position ① to cool off, then set the ON/OFF switch to position 0. Let the tool cool down before moving or storing it. 8.2. TEMPERATURE SETTING Turn ON/OFF ③ switch to 1/ 2/ 3 depending on temperature you need. The heat gun will start to blow warm air. Now you can increase or decrease the outlet temperature gradually by adjusting the dial on the back of the gun. Turn anti-clockwise to decrease, clock-wise to increase the temperature. More LED lights turn on when the temperature increases. 8.3. STRIPPING PAINT Fit an appropriate accessory. Set a high air temperature. Switch the tool on. Direct the hot air onto the paint to be removed. When the paint softens, scrape the paint away using a hand scraper. Do not strip metal window frames, as the heat may be conducted onto the glass and crack it. When stripping other window frames, use the glass protection nozzle. To prevent igniting the surface do not keep the tool directed at one spot too long. Avoid collecting paint on the scraper accessory, as it may ignite. If necessary, carefully remove paint debris from the scraper accessory using a knife. 8 8.4. STATIONARY USE This tool can also be used in stationary mode. Place the tool onto the workbench. Secure the cable to prevent pulling the tool off the workbench. Carefully switch the tool on. 8.5. COOLING DOWN The nozzle and accessory become very hot during use. Let these cool down before attempting to move or store the tool. To reduce cooling time, switch the tool to position 1 which is at the lowest air temperature and adjust the air flow to MAX. and let it run for a few minutes. Switch the tool off and let it cool down for at least 30 minutes. 9. MAINTENANCE AND CLEANING ATTENTION! Before performing any work on the equipment, disconnect from the power supply. 9.1. MAINTENANCE Your Power Tool has been designed to operate over a long period of time with a minimum of maintenance. Continuous satisfactory operation depends upon proper tool care and regular cleaning. 9.2. LUBRICATION Your power tool requires no additional lubrication. 9.3. CLEANING Keep the ventilation slots clean and free from dust and dirt to prevent overheating of the engine. Regularly clean the gun housing with a soft cloth, preferably after each use. If the dirt does not come off, use a soft cloth moistened with soapy water. Never use solvents such as petrol, alcohol, ammonia water, etc. These solvents may damage the plastic parts. 10. TECHNICAL DATA Power Supply Max Output Air temperature / Flow 220-240V 50-60Hz 2000W 1) 50˚C; 250L/min 2) 50-600˚C; 300L/min 3) 50-600˚C; 500L/min 11. TROUBLESHOOTING If a problem occurs always switch off the unit immediately at the mains. Heat gun does not turn on Check fuse is sound and is BS1362 13 Amp rated. If necessary, replace with a BS1362 13 Amp fuse. 9 MAINS CONNECTION This unit is a Class II appliance which means it is double-insulated for your protection. No earthing wire is necessary. If the supply cord is damaged, it must be replaced by Earlex Ltd or our appointed agents. Please read the following safety instructions before use:1. If the plug is cut off from the mains lead then the plug must be disposed of safely. NEVER under any circumstances insert such a plug into a 13 Amp socket-outlet. 2. A replacement fuse must be rated at 13 Amp and manufactured and approved to BS 1362. 3. IF IN ANY DOUBT CONTACT A QUALIFIED ELECTRICIAN. If you need to fit a plug to the mains lead, this should be fitted in accordance with the wiring instructions below and will need to be used with a 13 Amp fuse. If in doubt consult a qualified electrician. If you are using an extension lead it must be rated at a minimum of 10 Amps and fully unwound. Do not operate with a lead rated at less than 10 Amps as this will cause premature component failure which is not covered by the guarantee. As the colours of the wires in the mains lead of the application may not correspond with the coloured markings identifying the terminals in your plug, proceed as follows: The wire which is coloured blue must be connected to the terminal which is marked with the letter N or coloured black.The wire which is coloured brown must be connected to the terminal which is marked with the letter L or coloured red. INFORMATION ON THE DISPOSAL OF WASTE ELECTRICAL & ELECTRONIC EQUIPMENT KNOWN AS WEEE Your attention is brought to new directives applicable to the disposal of this electrical equipment, where in accordance with the legislation this product must not be disposed of in your normal household waste. Instead it is your responsibility to dispose of this type of waste by handing it over to special designated collection points for recovery and recycling. This product is marked with a ‘Wheelie bin’ symbol with a cross on it to remind you of this action. The objective of this directive is to help conserve resources and ensure that it is recycled in a manner that protects human health and the environment. For more information about where you can drop off your waste please contact your local authority. Take back facilities are free of charge. GUARANTEE This heat gun is guaranteed for a period of 24 months against faulty manufacture or materials. It is not guaranteed for industrial or hire purposes. The nozzles are classed as consumables and are not covered by guarantee. This guarantee does not affect your statutory rights. In the event of any problem occurring please contact us on our Helpline on 01483 454666 MIN SIZE 5mm WIDE X 7mm Monday-Thursday 08:30 -17:00 and Friday 08:30-15:45 (Excluding Bank Holidays) or e-mail: [email protected] EC Declaration of Conformity We declare that the unit HG2000 conforms to: LVD 2006/95/EC, EN60335-2-45, EN60335-1, EMF EN62233; EMC 2004/108/EC, EN61000-3-2, EN61000-3-3, EN55014-1 & EN55014-2. Tim Hopper - Technical Director Earlex reserves the right to modify or improve this product without prior notice. Colours may vary from those shown. For information on other products in the Earlex range, please contact us at the address below or visit our website at: www.earlex.com 10 Notes 11 ©Earlex Ltd. 2012 Earlex Limited, Opus Park, Moorfield Road, Guildford, Surrey, GU1 1SZ, UK Tel: +44 (0) 1483 454666. Fax: +44 (0) 1483 454548. Email: [email protected] Web: www.earlex.com G151 07/12