1
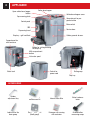
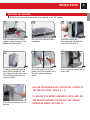
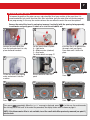
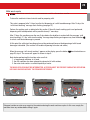
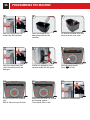
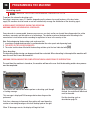
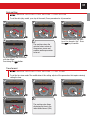
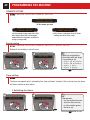
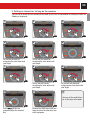
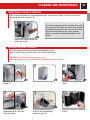
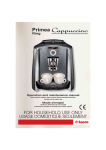
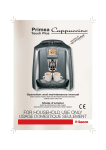
Operation and maintenance manual
Before using the machine, please read the attached operating instructions.
Carefully read the safety rules
FOR HOUSEHOLD USE ONLY
IMPORTANT SAFEGUARDS
When using electrical appliances, basic safety precautions should always be
followed, including the following:
1. Read all instructions.
2. Do not touch hot surfaces. Use handles or knobs.
3. To protect against fire, electric shock and injury to persons do not immerse
cord, plugs, or appliance in water or other liquid.
4. Close supervision is necessary when the appliance is used by or near
children.
5. Unplug from outlet when not in use and before cleaning. Allow to cool before
putting on or taking off parts, and before cleaning the appliance.
6. Do not operate any appliance with a damaged cord or plug or after the
appliance malfunctions, or has been damaged in any manner. Return
appliance to the nearest authorized service facility for examination, repair or
adjustment.
7. The use of accessory attachments not recommended by the appliance
manufacturer may result in fire, electric shock or injury to persons.
8. Do not use outdoors.
9. Do not let cord hang over edge of table or counter, or touch hot surfaces.
10. Do not place on or near a hot gas or electric burner, or in a heated oven.
11. Always attach plug to appliance first, then plug cord into wall outlet. To
disconnect, turn any control to “off”, then remove plug from wall outlet.
12. Do not use appliance for other than intended use.
13. Save these instructions.
SAVE THESE INSTRUCTIONS
CAUTION
This appliance is for household use only. Any servicing, other than cleaning and
user maintenance, should be performed by an authorized service centre. Do
not immerse machine in water. To reduce the risk of fire or electric shock, do not
disassemble the machine. There are no parts inside the machine serviceable
by the user. Repair should be done by authorized service personnel only.
1 Check voltage to be sure that the voltage indicated on the nameplate
corresponds with your voltage.
2 Never use warm or hot water to fill the water tank. Use cold water only.
3 Keep your hands and the cord away from hot parts of the appliance during
operation.
4 Never clean with scrubbing powders or harsh cleaners. Simply use a soft
cloth dampened with water.
5 For optimal taste of your coffee, use purified or bottled water. Periodic
descaling is still recommended every 2-3 months.
6 Do not use caramelized coffee
INSTRUCTIONS FOR THE POWER
SUPPLY CORD
A. A short power-supply cord (or detachable power-supply cord) is to be
provided to reduce risks resulting from becoming entangled in or tripping
over a longer cord.
B. Longer detachable power-supply cords or extension cords are available and
may used if care is exercised in their use.
C. If a long detachable power-supply cord or extension cord is used,
1. The marker electrical rating of the detachable power-supply cord or
extension cord should be at least as great as the electrical rating of the
appliance
2. If the appliance is of the grounded type, the extension cord should be a
grounding-type 3-wire cord, and
3. The longer cord should be arranged so that it will not drape over the counter
top or table top where it can be pulled on by children or tripped over.
2
INDEX
WARNING ......................................................................................................................................2
APPLIANCE ....................................................................................................................................4
ACCESSORIES .................................................................................................................................................4
INSTALLATION ...............................................................................................................................5
STARTING THE MACHINE .....................................................................................................................................5
SETTING THE LANGUAGE .....................................................................................................................................6
INTENZA WATER FILTER ......................................................................................................................................7
DISPLAY ........................................................................................................................................8
COFFEE AROMA ...............................................................................................................................................8
ADJUSTMENTS ..............................................................................................................................9
COFFEE INTENSITIY ...........................................................................................................................................9
ADJUSTING THE HEIGHT OF THE DRIP TRAY ................................................................................................................9
FILLING THE MILK CONTAINER ...............................................................................................................................9
BEVERAGE DISPENSING................................................................................................................10
ESPRESSO / COFFEE / LONG COFFEE .....................................................................................................................10
DISPENSING BEVERAGES WITH GROUND COFFEE .........................................................................................................11
LATTE MACCHIATO .........................................................................................................................................12
ESPRESSO MACCHIATO .....................................................................................................................................14
CAPPUCCINO ................................................................................................................................................14
DISPENSING HOT MILK .....................................................................................................................................15
HOT WATER DISPENSING ...................................................................................................................................15
BEVERAGE PROGRAMMING...........................................................................................................16
1. PROGRAMMING FOR SELF-INSTRUCTING ..............................................................................................................16
2. PROGRAMMING FROM THE “BEVERAGE SETTINGS” MENU ...........................................................................................16
PROGRAMMING THE MACHINE......................................................................................................18
MACHINE SETTINGS ........................................................................................................................................19
LANGUAGE MENU.....................................................................................................................................19
CUP WARMER MENU .................................................................................................................................20
WATER FILTER MENU ................................................................................................................................20
RINSE MENU ..........................................................................................................................................21
WATER HARDNESS MENU - INTENZA AROMA SYSTEM ............................................................................................21
ACOUSTIC ALARM MENU .............................................................................................................................22
MAINTENANCE MENU ......................................................................................................................................23
MILK CIRCUIT RINSE CYCLE..........................................................................................................................23
COFFEE WASH CYCLE ................................................................................................................................24
MILK WASH CYCLE ...................................................................................................................................25
DESCALING CYCLE....................................................................................................................................28
CLOCK SETTINGS ...........................................................................................................................................30
TIME SETTING ........................................................................................................................................30
DATE SETTING ........................................................................................................................................31
TIME FORMAT ........................................................................................................................................31
STANDBY SETTING ..........................................................................................................................................32
ENERGY SAVING ......................................................................................................................................32
TIMER SETTING .......................................................................................................................................32
SPECIAL FUNCTIONS ........................................................................................................................................34
DELETING ALL THE SETTINGS .......................................................................................................................34
COFFEE IN THE WORLD ..............................................................................................................................35
BEVERAGE COUNTERS................................................................................................................................36
CLEANING AND MAINTENANCE .....................................................................................................37
MAINTENANCE DURING OPERATION ........................................................................................................................37
GENERAL MACHINE CLEANING .............................................................................................................................37
MILK CONTAINER MAINTENANCE AND CLEANING .........................................................................................................38
CLEANING THE BREW GROUP. .............................................................................................................................40
GRINDER MAINTENANCE ....................................................................................................................................41
ERROR CODES .............................................................................................................................42
SAFETY RULES ............................................................................................................................43
TECHNICAL DATA .........................................................................................................................45
3
GENERAL INFORMATION
The coffee machine is intended for preparing espresso by using either coffee beans or ground coffee. It
includes an automatic device for preparing milk beverages and a hot water dispenser.
The machine is elegantly designed for domestic use and is not suitable for continuous heavy duty or
professional use.
Warning: no liability is assumed for any damage caused by:
• Incorrect use not in accordance with the intended uses;
• Repairs not carried out by authorized customer service centers;
• Tampering with the power cord;
• Tampering with any part of the machine;
• The use of non-original spare parts and accessories;
• Failure to descale the machine or use at temperatures below 0°C.
IN THESE CASES, THE WARRANTY IS NOT VALID.
A WARNING TRIANGLE DRAWS ATTENTION TO ALL THE INSTRUCTIONS THAT
ARE IMPORTANT FOR USER SAFETY. PLEASE FOLLOW THESE INSTRUCTIONS
CAREFULLY TO AVOID SERIOUS INJURY!
HOW TO USE THESE OPERATING INSTRUCTIONS
Keep these operating instructions in a safe place and make them available to anyone else who may use the coffee
machine. For further information or if you experience problems not completely or sufficiently addressed in these
instructions, please contact an Authorized Customer Service Center.
KEEP THESE INSTRUCTIONS
4
APPLIANCE
Open coffee bean hopper
button
Coffee bean hopper
Coffee bean hopper cover
Cup warming plate
Compartment for preground coffee
Control panel
Main switch
SBS
Service door
Dispensing head
Coffee grounds drawer
Drip tray + grill and float
Compartment for
milk container
Button for raising/lowering
the drip tray
Milk compartment
button
Hot water spout
Water tank
Socket for
power cord
Brew group
Drip tray
ACCESSORIES
Grinder
adjustment key
Lubricant for the
brew group
CCappuccinatore
i t
maintenance kit
Intenza water filter
Water hardness
tester
i ddetergent
t
Cleaning
(Brew group)
Detergent for cleaning
milk container
Ground coffee
measuring scoop
INSTALLATION
5
STARTING THE MACHINE
Make sure that the main power button is not switched to the “ON” position.
1
Press the button on the coffee
hopper to open the cover. Fill the
hopper with coffee beans.
4
Fill the tank with fresh drinking
water. Do not exceed the “max”
level indicated on the water tank.
Once filled place the tank back
into the machine.
2
Close the cover pushing it down
completely.
5
Attach the female end of the
power cord to the machine. Insert
the male end into the power
outlet.
3
Remove the water tank.
We recommend installing the
water filter (see page 7).
6
Place a container beneath the hot
water spout.
7
BEFORE PERFORMING ANY OPERATION, COMPLETE
THE INSTALLATION (PAGES 6 – 7).
TO ADJUST THE WATER HARDNESS LEVEL AND SET
THE INTENZA AROMA SYSTEM SEE THE «WATER
Press the main switch to the “On”
position.
HARDNESS MENU» ON PAGE 21.
6
INSTALLATION
SETTING THE LANGUAGE
When the machine is switched-on for the first time, it requires the selection of the desired language.
This allows you to adjust the parameters of the beverages to the typical parameters of the country
where the machine is used. This is why some languages are differentiated also by country.
1
3
2
english
language
Select the language by navigating
the click wheel with your finger.
4
water filter inserted
yes
english
language
When the desired language is
displayed, press
.
The machine now displays the
messages in the selected
language.
The machine displays the
following menu.
Wait before making the
selection.
5
In this phase you must decide
whether to install the water filter.
Its use is recommended by
Saeco. The water filter purifies
water and allows you to taste the
full aroma of coffee.
If you want to install the water
filter, go to page 7.
7
6
1.
2.
Otherwise, select and press
8
warming up
please wait
When the priming is completed,
wait until the machine has
finished the heating phase.
press ok
boiler filling
water filter inserted
no
.
Press to prime the circuit; wait until
the machine stops.
9
rinsing
please wait
Once the heating phase is
completed, a small quantity of
water is dispensed. Wait for this
cycle to be completed
automatically. Refer to page 21 to
enable/disable the function.
strong aroma
espresso coffee
08:33
The screen for product dispensing
appears on the display.
7
INTENZA WATER FILTER
To improve the quality of the water you use, and extend the life of your machine at the same time, it is
recommended that you install the water filter. After installation, go to the water filter initialization program
(see programming). In this way, the machine informs the user when the water filter must be replaced.
Remove the water filter from its packaging, immerse it vertically (with the opening facing upwards)
in cold water and gently press its sides so as to let the air bubbles out.
1
2
Remove the small white filter
from the tank and store it in a dry
place sheltered from dust.
3
Set the Intenza Aroma System:
A = Light water
B = Medium water (standard)
C = Hard water
For further details see page 21
6
5
4
Insert the filter in its place within
the empty tank (see figure);
Press down until it clicks into
place.
water filter inserted
yes
Fill the tank with fresh drinking
water and reinsert it into the
machine.
7
8
push ok
initialisation
Press
Place a container under the
spout.
again.
Press
.
9
in progress
initialisation
The machine initialises the filter.
done
initialisation
Press
again.
Then, press
repeatedly. When the “exit” message is displayed, press
. In this way, the machine ends
the start-up phase. Wait until at the end of the procedure, the display shows what is shown on page 8.
NOTE: if the Intenza water filter is not available, insert the small white filter previously removed (see point 1)
into the tank.
8
DISPLAY
Enter the
programming menu
strong aroma
espresso coffee
08:33
Click wheel
Confirmation key
Select the coffee
bean dose or the
quantity of preground coffee
• Press the
complete.
Select dispensing of
beverages with milk
Hot water brewing
selection key
key twice to make 2 cups. This operation can be performed until the grinding is
strong aroma
espresso coffee
08:33
Press twice
strong aroma
double espresso
08:33
• To brew 2 cups, the machine dispenses half of the entered quantity and briefly interrupts dispensing in
order to grind the second serving of coffee.
Coffee dispensing is then restarted and completed. If a milk beverage has been chosen, the machine
automatically manages milk dispensing.
COFFEE AROMA
By pressing the
key, there are three
possible selections (strong, medium, mild) that
indicate the aroma (coffee quantity to be ground
by the machine) for the beverage selected. This
key enables you to select also the ground coffee
function.
SELECT THE DESIRED AROMA BEFORE
DISPENSING THE BEVERAGE.
strong aroma
espresso coffee
08:33
medium aroma
espresso coffee
08:33
mild aroma
espresso coffee
08:33
pre-ground
espresso coffee
08:33
ADJUSTMENTS
9
COFFEE INTENSITIY
The SBS system has been carefully designed to give your coffee the intense taste you desire. Simply
turn the dial and you will notice that the coffee goes from mild intensity to strong intensity.
SBS – SAECO BREWING SYSTEM
SBS adjusts the intensity of the brewed coffee,
and can even be adjusted while brewing. Any
adjustment has an immediate effect on the
brewing coffee.
MEDIUM
COFFEE
MILD
COFFEE
STRONG
S
COFFEE
C
ADJUSTING THE HEIGHT OF THE DRIP TRAY
Adjust the drip tray before dispensing any beverages.
Height-adjustable drip tray.
To raise the drip tray, press lightly on the lower part of the button. To lower the tray,
press lightly on the upper part of the button; when the desired height is reached,
release the button.
Note: there is a red floater in the drip tray. When it rises, the tray must be emptied
and washed.
FILLING THE MILK CONTAINER
The container with the cappuccinatore must be filled before preparing any milk beverage. Do not use
milk after the best-before date. (Important! Refer to the instructions for maintenance and cleaning of the
cappuccinatore on page 38).
1
Open the milk compartment by
pressing the button and remove
the milk container.
2
Remove the cover and pour in the
milk. DO NOT EXCEED THE
MAXIMUM LEVEL shown in the
figure.
3
Replace the lid on the container
and place it back in the milk
compartment. Make sure to
carefully close the compartment.
10
BEVERAGE DISPENSING
THE DISPENSING OF COFFEE, HOT WATER AND MILK MAY BE STOPPED AT ANY TIME
BY PRESSING THE
KEY AGAIN.
THE DISPENSED MILK MAY BE VERY HOT: DANGER OF SCALDING. AVOID TOUCHING
IT DIRECTLY WITH YOUR HANDS.
THE USED MILK HAS TO BE PROPERLY PRESERVED.
DO NOT USE IT AFTER THE BEST-BEFORE DATE SHOWN ON THE PACK AGE.
Check that all the containers are clean. To do this operation, follow the instructions in the “Cleaning and
Maintenance” chapter (see page 37)
WHEN YOU HAVE FINISHED PREPARING BEVERAGES CONTAINING MILK, PROCEED BY
CLEANING THE CONTAINER AND THE MACHINE’S CIRCUIT.
To brew 2 cups, the machine dispenses half of the entered quantity and briefly interrupts dispensing in order
to grind the second serving of coffee. Coffee dispensing is then restarted and completed. If a milk beverage
has been chosen, the machine automatically manages milk dispensing.
ESPRESSO / COFFEE / LONG COFFEE
This procedure shows how to dispense an espresso. To dispense another type of coffee, select it by sliding
the click wheel with a finger. Use appropriate espresso or coffee cups so that the coffee will not overflow.
1
2
3
strong aroma
espresso coffee
08:33
strong aroma
espresso coffee
08:33
Select the desired beverage by
navigating the click wheel with
your finger.
Select the coffee aroma by
pressing the
key one or
more times.
brewing in progress
espresso coffee
Press the
key once for 1
cup and twice for 2 cups. The
selected beverage will be brewed.
The machine ends dispensing automatically according to the quantity determined by the manufacturer. It is
possible to customize this quantity. See page 16.
11
DISPENSING BEVERAGES WITH GROUND COFFEE
Pre-ground coffee must be poured into the appropriate compartment positioned next to the coffee bean
hopper. Pour in only coffee ground for espresso machines and never coffee beans or instant coffee. (see the
“Beverage programming” chapter on page 16).
WARNING: PUT PRE-GROUND COFFEE IN THE COMPARTMENT ONLY WHEN YOU WISH TO
DISPENSE THIS TYPE OF BEVERAGE.
INSERT ONLY ONE SCOOP OF GROUND COFFEE AT A TIME. TWO CUPS OF COFFEE CANNOT BE
DISPENSED AT THE SAME TIME.
In the example given below, we chose to dispense an espresso using pre-ground coffee. The customized
choice of using pre-ground coffee is shown on the display.
1
2
strong aroma
espresso coffee
08:33
3
pre-ground
espresso coffee
08:33
add pre-ground coffee
espresso coffee
2.
1.
Select the desired beverage by
navigating the click wheel with
your finger.
4
Select the function by pressing
the
key one or more times.
Press the
key.
A message appears, reminding
the user to pour ground coffee in
the appropriate compartment.
5
brewing in progress
espresso coffee
Pour ground coffee in the
appropriate compartment using
the measuring scoop provided in
the accessories.
Press the
brewing.
key to start
Note:
• After 1 minute from when the message appears (2), if brewing has not started the machine will return to
the main menu and dump any inserted coffee into the coffee grounds drawer
• If no pre-ground coffee is poured into the compartment, only water will be dispensed
• If 2 or more scoops of coffee are added, the machine will not dispense the beverage and the coffee in the
compartment will be dumped into the coffee grounds drawer.
12
BEVERAGE DISPENSING
LATTE MACCHIATO
Fill the milk container
SEE INSTRUCTIONS ON PAGE 38 FOR OPTIMAL MILK DISPENSING
1
2
strong aroma
espresso coffee
08:33
Press the
key.
4
3
strong aroma
latte macchiato
08:33
strong aroma
latte macchiato
08:33
Select latte macchiato by navigating
the click wheel with your finger.
5
brewing in progress
latte macchiato
Press the
key once for 1
cup and twice for 2 cups. The
latte macchiato will be brewed.
Select the aroma by pressing the
key one or more times.
6
add milk?
latte macchiato
rinsing milk circuit
latte macchiato
08:33
After this, the machine allows you to
dispense more milk if you wish.
This option remains active for
approx. 3 seconds.
To activate it, press the
button. Once the desired quantity
has been reached, press the
button again to stop dispensing.
If the user wishes to continue preparing other drinks the
machine will keep the “rinsing milk circuit” signal
active.
The machine will propose cleaning
the milk circuits.
Press the
key to clean the
internal circuits.
milk circuit washing
espresso coffee
08:33
After 20 minutes of inactivity, the machine requires the user to
perform a rinsing cycle as described in Step 7. If the machine is
turned off immediately after dispensing a milk beverage, the
next time the machine is turned on it will require the user to
perform a rinsing cycle.
After 14 days from the first dispensing of
a milk-based beverage, the message
“milk circuit washing” is displayed; it is
advisable to clean the milk circuits as
shown on page 25.
Note: Before performing the “milk rinsing circuit” function
make sure that:
1. a large enough container is positioned under the
dispensing spout;
2. the water tank contains a sufficient quantity of water.
After another 7 days the machine stops
dispensing milk-based beverage only and
the milk circuits must be washed; during
this phase, coffee and hot water may be
dispensed.
13
7
9
8
rinsing milk circuit
Press
cycle.
to perform the rinse
in progress
milk circ. rinse cycle
In this phase the user cannot
intervene and must wait until the
cycle finishes. After this, the
machine returns to the main
menu.
Remove the container, rinse
and dry.
THIS PROCEDURE MUST BE PERFORMED FOR ALL MILK BEVERAGES!
AFTER USE, ALWAYS REMOVE THE MILK CONTAINER AND PUT IT IN THE REFRIGERATOR IF IT
CONTAINS REMAINING MILK.
remove milk
espresso coffee
08:33
After performing the rinse cycle, the machine reminds the user to
remove the container with the remaining milk through the message
“remove milk”.
REMOVE THE MILK CONTAINER ONLY WHEN THE MACHINE IS ON.
THE CONTAINER MAY BE LEFT IN THE MACHINE ONLY IF IT HAS BEEN WASHED WITH
DRINKING WATER AND IT DOES NOT CONTAIN MILK (SEE PAGE 38).
14
BEVERAGE DISPENSING
ESPRESSO MACCHIATO
1
Fill the milk container
2
strong aroma
espresso coffee
08:33
Press the
key.
3
strong aroma
espresso macchiato 08:33
Select espresso macchiato by
navigating the click wheel with
your finger.
strong aroma
espresso macchiato 08:33
Select the aroma by pressing the
key one or more times.
5
4
add milk?
espresso macchiato
strong aroma
espresso macchiato 08:33
key once or twice
Press the
to start brewing.
When the “milk circuit rinsing”
symbol flashes, rinse the milk
circuits as described for the
latte macchiato (see page 12,
step 6).
If you wish, press the
button.
Once the desired milk quantity has
been reached, press the
button again.
CAPPUCCINO
1
Fill the milk container
2
strong aroma
espresso coffee
08:33
Press the
key.
3
strong aroma
cappuccino
08:33
Select cappuccino by navigating the
click wheel with your finger.
strong aroma
cappuccino
08:33
Select the aroma by pressing the
key one or more times.
15
5
4
add milk?
cappuccino
brewing in progress
cappuccino
key once or twice
Press the
to start brewing.
When the “milk circuit rinsing”
symbol flashes, rinse the milk
circuits as described for the
latte macchiato (see page 12,
step 6).
If you wish, press the
button.
Once the desired milk quantity has
been reached, press the
button again.
DISPENSING HOT MILK
1
Fill the milk container
2
strong aroma
espresso coffee
08:33
3
hot milk
08:33
add milk?
hot milk
1.
2.
Press the
Select the hot milk and press the
key.
key.
If you wish, press the
button. Once the desired milk
quantity has been reached, press
the
button again.
Repeat the operation to brew another cup of milk. When the “rinsing milk circuit” symbol flashes, rinse the
milk circuits as described for the latte macchiato (see page 12, step 6).
HOT WATER DISPENSING
AT THE START, SHORT SPURTS OF HOT WATER MAY BE DISPENSED WHICH POSE A RISK
OF SCALDING. THE HOT WATER SPOUT CAN REACH HIGH TEMPERATURES: DO NOT
TOUCH IT WITH BARE HANDS.
1
2
hot water
Press the
08:33
key.
brewing in progress
hot water
Press the key
brewing.
to start
The machine brews the
preset water quantity. Press
the
key after brewing,
to exit the “Hot water”
function.
16
BEVERAGE PROGRAMMING
Every beverage can be programmed according to your own tastes.
1. PROGRAMMING FOR SELF-INSTRUCTING
For all beverages you can quickly program the quantity of coffee and/or milk dispensed in the cups whenever
the key is pressed.
Select the type of beverage you want to program, then press and hold the
key until the display shows
(for example):
self-instruction active
espresso coffee
The machine dispenses coffee or milk.
When the desired amount is reached, press the
The display will show:
new quantity saved
key again.
espresso coffee
(Only beverages with coffee and milk): for beverages with coffee and milk, you need to save the desired
quantity of both milk and coffee by pressing the
button. This adjustment must be performed during the
relevant dispensing phase in the normal beverage dispensing process.
The dispensed quantity of coffee and/or milk remains stored and replaces any previous settings.
2. PROGRAMMING FROM THE “BEVERAGE SETTINGS” MENU
To set the beverage making parameters: press the
turning the click wheel with a finger:
key and select “beverage settings” by
In this phase you can:
exit the program
mode.
beverage settings
By sliding the click wheel with a finger
you can change the settings for:
- the quantity of coffee to be brewed;
- the quantity of milk to be dispensed;
- the coffee temperature;
- the coffee prebrewing.
select the quantity of coffee to be ground (opti-dose),
or select pre-ground coffee,
and/or set:
- coffee temperature
- coffee prebrewing
Select Coffee or Milk to
change the coffee dose per
cup.
save the new settings
restore factory settings
The following page describes how to program a beverage containing milk and coffee; the parameters to program
each beverage may differ according to the type of beverage.
17
1
2
3
strong aroma
espresso coffee
08:33
Check that the water tank and coffee
bean hopper are full; place the cup
under the dispensing spout.
4
Press the
button.
5
beverage settings
latte macchiato
beverage settings
Select “beverage settings”. Press
the
button to confirm.
6
strong aroma
latte macchiato
coffee:¸¿¸¿
latte macchiato
1.
1.
2.
Select the beverage to be
programmed. Press the
button to confirm.
7
2.
2.
3.
1.
button one or more
Press the
times to adjust the aroma or select
the use of pre-ground coffee. Press
the
button to save.
8
milk :¸¿¸¿
latte macchiato
Change the coffee dose (amount of
water to be used) by navigating the
click wheel with your finger;
confirm with
. Press
to
change the parameter from coffee
to milk.
9
temperature: high
latte macchiato
1.
temperature: high
latte macchiato
1.
2.
2.
Change the milk dose by
navigating the click wheel with
your finger; confirm with
.
Press the
button for more than
two seconds to access the other
parameters to be programmed.
10
11
prebrewing: normal
latte macchiato
prebrewing: normal
latte macchiato
1.
2.
button to select the
Press the
parameter prebrewing.
Change the temperature value
(high, medium, low) by navigating
the click wheel with your finger.
Press the
button to save.
Prebrewing: the coffee is
slightly dampened before
brewing to bring out the full
aroma of the coffee which
acquires an excellent taste.
Change the prebrew value (normal, strong, off) by navigating the
click wheel with your finger. Press the
button to save. Press
the
button to exit.
18
PROGRAMMING THE MACHINE
Some of the machine’s functions can be programmed to customize operations according to your
own tastes.
strong aroma
espresso coffee
08:33
Press the
key to:
- confirm the selection;
- save the new settings.
1 Press the
key.
2 Turn the click wheel with your finger to:
-
select the functions
change the function parameters.
beverage settings
Beverage settings
(already described on page 16).
machine settings
Machine settings (see page 19).
special functions
Special functions (see page 34).
To exit the program mode:
exit
exit
or
1.
1.
2.
2.
19
MACHINE SETTINGS
To set the general machine operating parameters, press the
settings”. Turn the click wheel with a finger to:
machine settings
language
key and select “machine
machine settings
acoustic alerts
set the language of the menus.
set/activate the acoustic alarms.
machine settings
water filter
machine settings
maintenance
set the machine operation through the
water filter
clean the machine internal circuits.
machine settings
water hardness
machine settings
clock settings
set the clock.
set the water hardness.
machine settings
rinse cycle
machine settings
stand-by setting
set the circuit rinse cycle.
set the standby and the timers.
machine settings
cup warming plate
set the operation of the cup warming
plate.
machine settings
maintenance
To exit any level of “machine settings” without saving
the changes made, press the
key. For example:
“LANGUAGE” MENU
> machine settings > language . To change the language of the display.
1
2
machine settings
1.
3
machine settings
language
1.
2.
deutsch
sprache
1.
2.
2.
Select the desired language. After
this, the machine displays all the
messages in the language selected.
20
PROGRAMMING THE MACHINE
“CUP WARMER” MENU
> machine settings > cup warming plate.
To turn on/off the operation of the cup warming surface located on the top of the machine. A warm cup
allows you to fully savour the coffee and taste its full aroma.
1
2
machine settings
machine settings
cup warming plate
1.
1.
2.
2.
3
Select by navigating the click
wheel with your finger.
It is possible to set:
- always on
- always off
- off in stand-by
button to save.
Press the
“WATER FILTER” MENU
> machine settings > water filter.
This function provides better management of the filter notifying the user when the filter is to be replaced.
This function must:
• activated when you wish to use the water filter;
• deactivated when you do not wish to use the water filter.
1
2
machine settings
3
machine settings
water filter
1.
water filter
water filter activation
1.
2.
1.
2.
2.
The filter control can be activated or
deactivated from this menu.
4
Select by navigating the click
wheel with your finger.
It is possible to set:
- on
6
water filter
initialization
Refer to the filter
initialisation procedure
described on page 7.
1.
2.
- off
Press the
5
button to save.
A newly installed filter can be
initialised from this menu.
21
“RINSE” MENU
> machine settings > rinse cycle.
To clean the internal tubes in order to guarantee that the beverages are dispensed only with fresh water.
This function has been enabled by the manufacturer on all new appliances.
1
2
machine settings
3
Select by navigating the click
wheel with your finger.
It is possible to set:
- yes
machine settings
rinse cycle
1.
1.
2.
2.
- no
Press the
button to save.
Note: This rinse cycle is performed every time the machine is turned on after the warming phase.
“WATER HARDNESS” MENU - INTENZA AROMA SYSTEM
> machine settings > water hardness.
With the “Water hardness” function you can adjust your machine and the Intenza water filter to the level of
hardness of the water you use, so that the machine will request descaling at the right moment.
The water hardness in the Intenza water filter is expressed on a scale from A to C.
The water hardness in the machine is expressed on a scale from 1 to 4.
2
1
Intenza Aroma System
B
A
1
Immerse the water hardness tester
(included in the accessories) for one
second in water.
2
3
4
Machine water hardness setting
Check the water hardness level obtained from the test.
The measurement can be used to set the Intenza Aroma
System correctly (see page 7). Matching parameters are
described on the upper part.
The test can be used only for
one measurement.
3
4
machine settings
1.
5
machine settings
water hardness
1.
2.
C
3
+
water hardness
1.
2.
2.
Set and store the water hardness
according to the value on the tester.
22
PROGRAMMING THE MACHINE
“ACOUSTIC ALARM” MENU
> machine settings > acoustic alerts
To enable/disable the acoustic alarms of the machine.
1
2
machine settings
1.
3
machine settings
acoustic alerts
1.
2.
4
acoustic alerts
key tone
1.
2.
2.
Select by navigating the click wheel with your finger.
You may set:
- key tone: to activate/deactivate a tone each time a key is pressed.
- milk quality warning: to activate/deactivate a tone when the milk container has been in the machine
for too long.
- confirmation tone: to activate/deactivate a tone to confirm that a command (beverage saved, etc.) has
been performed.
- milk circ. rinsing tone: to activate/deactivate a tone when the machine requires milk circuit
cleaning.
- milk circ. rinse warning: to activate/deactivate a tone when the milk circuits have to be rinsed.
Press the
button to save.
23
“MAINTENANCE” MENU
> machine settings > maintenance.
To clean all the machine’s internal circuits used for making coffee and milk. Turn the click wheel with your
finger to:
maintenance
milk circ. rinse cycle
maintenance
coffee cleaning cycle
rinse the milk circuits after making
the beverages.
clean the brew group.
maintenance
milk cleaning cycle
maintenance
descaling cycle
thoroughly clean the milk circuits. This
must be performed after a fixed time
has elapsed from the first dispensing.
Perform the descaling cycle.
Milk circuit rinse cycle
> machine settings > maintenance > milk circ. rinse cycle
To rinse the machine’s internal circuits used for preparing milk.
This short cycle must be necessarily performed after 20 minutes from the last dispensing of a beverage with
milk.
If it is not performed, the machine comes to a halt and does not allow the dispensing of milk beverages.
Note: before performing this function make sure that:
1. a large enough container is positioned under the spout;
2. the milk container has been correctly inserted in the machine;
3. the water tank contains a sufficient quantity of water.
1
2
machine settings
maintenance
3
maintenance
milk circ. rinse cycle
1.
1.
2.
4
1.
2.
5
in progress
milk circ. rinse cycle
Wait for the cycle to complete.
yes
milk circ. rinse cycle
Remove the container, rinse and
dry.
2.
AFTER USE, ALWAYS REMOVE
THE MILK CONTAINER AND PUT IT
IN THE REFRIGERATOR.
The container may be left in the
machine only if it has been washed with
drinking water and it does not contain
milk; see page 38.
24
PROGRAMMING THE MACHINE
Coffee wash cycle
> machine settings > maintenance > coffee cleaning cycle
To clean the machine’s internal circuit used for brewing coffee.
To wash the Brew Group, simply clean with water as shown on page 40. This wash completes maintenance of
the Brew Group. Packages of Saeco detergent tablets may be purchased at your local dealer or by Authorized
Service Centres.
It is advisable to perform this wash cycle after 500 coffee brewing cycles, or monthly.
Note: before performing this function make sure that:
1. a large enough container is positioned under the spout;
2. the appropriate tablet for cleaning the brew group has been inserted into the
compartment for pre-ground coffee;
3. the water tank contains a sufficient quantity of water
THE WASH CYCLE CANNOT BE INTERRUPTED.
A PERSON MUST BE PRESENT DURING THE OPERATION.
1
2
machine settings
maintenance
3
maintenance
coffee cleaning cycle
1.
yes
coffee cleaning cycle
1.
2.
4
1.
2.
5
insert cleaning tablet
coffee cleaning cycle
Insert the tablet as shown above.
Press
to start.
2.
6
in progress
coffee cleaning cycle
Wait for the cycle to complete.
done
coffee cleaning cycle
When the cleaning cycle has
finished, press
to confirm.
7
THE MAINTENANCE AND CLEANING OF THE BREW GROUP IS
DESCRIBED ON PAGE 40.
Exiting programming mode.
(see page 18)
25
Milk wash cycle
> machine settings > maintenance > milk cleaning cycle
To clean the machine’s internal circuits used for preparing milk.
This cycle is proposed after 14 days from the first dispensing of a milk-based beverage. After 14 days, the
“milk circuit washing” message starts flashing (see page 13).
Perform the washing cycle as indicated in this section. If the milk circuit washing cycle is not performed,
dispensing milk-based products will be possible for only 7 more days.
After 21 days (the machine warns the user 3 days before the deadline is reached with the message “milk
circuit washing -3”), the “milk circuit washing” message stops flashing and appears any time the button
to select a milk-based beverage is pressed.
At this point, the milk circuit washing cycle must be performed, because the dispensing of milk-based
beverages is disabled. (The machine still enables dispensing hot water and coffee).
When the message “milk circuit washing” appears on the display, press the button
page 26, step 4. The screen will appear as shown in step 9.
and instructions on
Note: before performing this function make sure that:
1. a large enough container is at hand;
2. the milk container has been adequately cleaned of all milk residue;
3. the water tank contains a sufficient quantity of water.
THE WASH CYCLE CANNOT BE INTERRUPTED. A PERSON MUST BE PRESENT DURING THE OPERATION.
USE ONLY AND EXCLUSIVELY THE PROVIDED DETERGENT.
1
2
machine settings
maintenance
1.
3
maintenance
milk cleaning cycle
1.
2.
yes
milk cleaning cycle
1.
2.
2.
Select and press
.
Detergent residue or water may remain in the container during the wash and rinse cycles. In this case, empty the
container from any residue before filling it again.
26
PROGRAMMING THE MACHINE
4
5
Open the compartment and
remove the milk container.
7
6
Insert the content of the
detergent packet into the
container.
8
Fill the milk container with fresh
water up to the «max» level.
9
add cleaner into
milk cleaning cycle
Open the compartment and
insert the container with the
detergent.
Position an adequately sized
container under the milk spout.
Close the compartment.
Press
to start.
10
11
12
in progress
milk cleaning cycle
The wash cycle starts automatically.
Wait for the wash cycle to finish.
rinse
milk cleaning cycle
When the wash cycle has finished
the following appears…
The machine emits a tone.
Remove the milk container.
27
14
13
fill with water
milk cleaning cycle
15
push ok
milk cleaning cycle
rinsing
milk cleaning cycle
Rinse the container and fill it
with fresh water.
Insert the container and press
.
Wait…
16
17
18
rinse
milk cleaning cycle
When the rinse cycle is
finished the following
appears…
Perform another rinse cycle as
shown previously.
At the end, press the
key.
fill with water
milk cleaning cycle
Remove the milk container.
Rinse the container and fill it
with fresh water.
28
PROGRAMMING THE MACHINE
Descaling cycle
> machine settings > maintenance > descaling cycle
To perform the automatic descaling cycle.
Descaling is necessary every 2-3 months, depending on the volume of use and hardness of the local water
supply.The machine must be turned on and will automatically manage the distribution of the descaling agent.
A PERSON MUST BE PRESENT DURING THE OPERATION.
WARNING! NEVER USE VINEGAR AS A DESCALER.
Saeco descaler is recommended, however you can use a non-toxic and/or non-harmful descaling product for coffee
machines, commonly available online or in coffeeshops. The solution used must be disposed of according to the
manufacturer’s instructions and/or according to regulations in force in the country of use.
Note: Before beginning the descaling cycle make sure that:
1. a container of adequate dimensions is positioned under the water spout and dispensing head;
2. THE WATER FILTER HAS BEEN REMOVED.
3. The water tank has been filled with the descaling solution up to the level indicated with
.
Pause descaling.
The descaling and/or rinsing can be paused and then restarted. When descaling is interrupted the machine will
warn the user that it must be turned off.
WARNING! DESCALING MUST BE COMPLETED WITHIN 24 HOURS FROM ITS INTERRUPTION.
The next time the machine is turned on, the machine will warn the user that the descaling and/or rinse process
must be completed.
1
2
descale
espresso coffee
200
08:33
The machine will indicate the need to perform a descaling cycle through
a flashing message.
This message is displayed 200 beverages before descaling must be
performed.
Each time a beverage is dispensed, the machine will count down the
number of remaining beverages, which will be displayed on the right.
When 30 beverages remain, the display will begin to flash.
descale
When the remaining beverages are
finished, the machine will block and
must be descaled.
Run the descaling cycle as
described on page 28.
29
To perform descaling before the machine blocks, or before the descaling message appears:
1
2
machine settings
maintenance
3
maintenance
descaling cycle
1.
yes
descaling cycle
1.
2.
Insert the descaler and press
the
key to begin.
4
1.
2.
When the solution is finished
the following message appears
on the display:
5
descaling
descaling cycle
The machine begins to
dispense the descaling solution
through the hot water spout.
The dispensing occurs at
preestablished intervals, in
order to allow the solution to be
more effective.
7
6
fill water tank
descaling cycle
Remove the water tank, rinse
with fresh drinking water to
eliminate traces of descaling
solution, then refill with fresh
drinking water.
8
rinse cycle
descaling cycle
Rinse the machine circuits by
pressing the
key.
2.
insert tank
descaling cycle
Insert the tank with fresh
drinking water.
9
rinsing
descaling cycle
The machine performs the rinse
cycle. During the rinse cycle, the
machine may require the water
tank to be filled.
done
descaling cycle
key and exit the
Press the
programming by pressing the
key. Check the quantity of water
contained in the tank and, if desired,
install the water filter or reinsert the
small white filter (see page 7).
30
PROGRAMMING THE MACHINE
CLOCK SETTINGS
> machine settings > clock settings
To set the current time, date and hour format to display.
machine settings
clock settings
In this menu you can set:
- the current time (hour and minutes)
- the hour format (24 hours - AM/PM)
- the current date (day – month – year – day of the week).
Time setting
> machine settings > clock settings > time settings
To set the current time on the machine
1
2
machine settings
clock settings
1.
3
clock settings
time setting
1.
2.
-
09h (am)
+
time setting
1.
2.
2.
Set the time by navigating the click
wheel with your finger. Save using
the
button.
4
-
43 min
+
time setting
1.
2.
Set the minutes by navigating the
click wheel with your finger.
Save using the
button.
31
Date setting
> machine settings > clock settings > date setting
To set the date (day, month, year, day of the week). Same procedure for all parameters.
1
2
machine settings
clock settings
3
clock settings
date setting
1.
1.
2.
1.
2.
4
5
-
date setting
day
12
day
+
1.
2.
The machine stores the
selected value, returns to
the previous screen and
enables another parameter
to be set.
2.
Select the parameter you want
to set, for example “day”. Press
the
key to confirm.
Set by navigating the click wheel
with your finger.
Save using the
button.
Time format
> machine settings > clock settings > time format
To set the time view mode. The modification of this setting adjusts all the parameters that require viewing/
setting the time.
1
2
machine settings
clock settings
3
clock settings
time format
1.
2.
4
5
am/pm
time format
The machine also allows
displaying the time in the
international format (24h).
1.
2.
clock settings
time format
32
PROGRAMMING THE MACHINE
STANDBY SETTING
> machine settings > stand-by setting
machine settings
stand-by setting
In this menu you can:
stand-by setting
energy saving
stand-by setting
timer setting
set the energy saving mode (time that
must elapse from the last beverage
made before the machine switches to
energy saving mode).
set the timers (activation of on/off times
– setting one on/off time a day)
Energy saving
> machine settings > stand-by setting > energy saving
By default, the off delay is set to 3 hours.
1
2
stand-by setting
energy saving
after 3 hours
energy saving
1.
1.
2.
2.
3
Select by navigating the
click wheel with your finger.
It is possible to set:
- after 15 minuters
- after 30 minuters
- after 1 hour
- after 3 hours
Press the
button to save.
Timer setting
> machine settings > stand-by setting > timer setting
The timers can operate only if activated by the “timer activation” function. If this is not the case, the timers
will have no effect on the machine.
1. Activating the timers
1
2
timer setting
timer activation
1.
3
no
timer activation
1.
2.
2.
You can set:
- yes (the machine turns on
and off at the times set)
- no (the machine ignores
the times set)
Press the
button to save.
33
2. Setting an interval for turning on the machine
You can set an on/off time for each day of the week (in this case, the procedure for setting an interval for
Monday is displayed).
1
2
stand-by setting
timer setting
3
timer setting
monday
1.
monday
switch on
1.
2.
4
1.
2.
5
08h (am)
+
switch on monday
2.
6
00 min
+
switch on monday
1.
monday
switch on
1.
2.
Set the turn on time by
navigating the click wheel with
your finger.
7
2.
Set the turn on minute by
navigating the click wheel with
your finger.
8
monday
switch off
9
09h (am)
+
switch off monday
1.
00 min
+
switch off monday
1.
2.
10
monday
switch off
1.
2.
2.
Set the turn off time by
navigating the click wheel with
your finger.
Set the turn off minute by
navigating the click wheel with
your finger.
11
12
timer setting
monday
You can set the on/off times
for all the days of the week.
Press
to exit the
programming of the selected
day.
Navigate the click wheel with your
finger to select the other days you
want to program.
34
PROGRAMMING THE MACHINE
SPECIAL FUNCTIONS
This menu allows you to access special functions present on the machine.
To access, press the
key and select “special functions”. Turn the click wheel with a
finger to:
special functions
cancel settings
special functions
coffee of the world
restore the factory settings.
prepare coffee according to the
most famous recipes in the world.
special function
product counters
Display how many beverage have been
prepared for each single type of beverage.
DELETING ALL THE SETTINGS
> special funtions > cancel settings
The function for restoring all the factory settings is contained in this menu. This function is particularly
important for restoring the base parameters.
ALL THE CUSTOM SETTINGS WILL BE LOST AND CANNOT BE RECOVERED. AFTER RESTORING FACTORY
SETTINGS, YOU MUST, IF DESIRED, REPROGRAM ALL THE MACHINE’S FUNCTIONS.
1
2
special functions
3
special functions
cancel settings
1.
1.
2.
yes
cancel settings
1.
2.
2.
If “yes” is selected, a subsequent
confirmation is requested to be sure
that you want to perform the reset.
4
5
are you sure?
cancel settings
Press the
key to reset.
all factory settings
have been restored
The display shows for 2 seconds the
parameter reset confirmation.
35
COFFEE IN THE WORLD
> special funtions > coffee of the world
This function enables the user to:
coffee of the world
ristretto
prepare true ristretto all’italiana
coffee of the world
espresso italiano
prepare a typical Italian espresso
coffee of the world
café crème
prepare a typical North European
coffee
coffee of the world
american coffee
prepare a typical American coffee
prepare a typical French/
Swiss coffee
coffee of the world
good night milk
coffee of the world
good morning coffee
prepare a coffee for a day full
of energy
If for example, you want to taste a typical American coffee, you must
select “American coffee”.
prepare a flavourful latte macchiato
without the fear of not being able to sleep
1
coffee of the world
café
2
special functions
coffee of the world
3
coffee of the world
american coffee
1.
yes
american coffee
1.
2.
1.
2.
Select the desired beverage.
4
5
sbs position: crème
american coffee
Set the SBS to the position shown
(see page 9).
Press
to start.
2.
Confirm the selection.
6
brewing in progress
american coffee
The dispensing starts.
strong aroma
espresso coffee
08:33
At the end, the machine returns to
the main screen.
36
PROGRAMMING THE MACHINE
BEVERAGE COUNTERS
> special funtions > product counters
This function shows how many beverages have been prepared for every single type of beverage.
1
2
special functions
1.
3
special function
product counters
23
espresso coffee
1.
2.
2.
You may display the data of every
single type of beverage by
navigating the click wheel with your
finger.
4
special function
product counters
Press
to exit.
CLEANING AND MAINTENANCE
37
MAINTENANCE DURING OPERATION
During normal operation, the “empty grounds drawer” message may appear. This operation must be
performed when the machine is on.
1
If you remove grounds with the machine off or when
not signaled on the display, the count of the grounds
emptied into the drawer is not reset. For this reason
the machine might display the “empty grounds
drawer” message even after preparing just a few
coffees.
Remove the grounds drawer and
empty and wash it.
GENERAL MACHINE CLEANING
The cleaning described below must be performed once a week.
Note: if water remains for several days in the tank, do not reuse it.
WARNING! Do not immerse the machine in water.
Clean the cappuccinatore as shown in the corresponding section on page 38.
1
Switch off the machine and
unplug it.
4
Clean the pre-ground coffee
compartment with a dry cloth.
Clean the display.
2
Clean the tank and the cover.
5
Clean the cappuccinatore as
shown in the corresponding
section on page 38.
3
Remove the drip tray, empty and
wash it
6
Remove the drip tray, empty and
wash it
38
CLEANING AND MAINTENANCE
MILK CONTAINER MAINTENANCE AND CLEANING
The milk container and the cappuccinatore have been designed to optimize the milk froth.
Thorough cleaning and maintenance of the milk container and cappuccinatore will allow you to savour
excellent milk-based beverages.
It is recommended to rinse the cappuccinatore before the first daily dispensing of milk-based
products and however to wash it thoroughly at least once a week.
QUICK MAINTENANCE OF THE CAPPUCCINATORE
If you notice a reduction in the milk froth, simply turn the flow regulator
as shown in the figure.
Turn the regulator 2-3 times to perform quick maintenance.
Note: if the adjusting device installed is missing, replace it with the
adjusting device supplied with the cappuccinatore maintenance kit.
WASHING TO STORE THE CONTAINER IN THE MACHINE.
After using milk to prepare beverages, the container may be stored in the machine only if it has been washed
with fresh drinking water. These few simple steps guarantee that the machine will operate properly.
1
2
Pour any extra milk into a
container.
Rinse all the parts in contact with
milk with lukewarm water.
MAINTENANCE OF O-RING FOR MILK CONTAINER
In the machine there is an O-ring which guarantees the correct
operation of the milk container.
Every 6 months, remove the water tank, open the milk container and
lubricate the O-ring using the grease supplied with the machine.
The grease for the Brew Group’s lubrication may be purchased in
authorized service centres.
3
Dry and replace the milk
container into the compartment.
39
THOROUGH MAINTENANCE OF THE CAPPUCCINATORE
Thoroughly wash the cappuccinatore at least once a week.
The components should be hand-washed with household detergents.
1
2
Remove the cappuccinatore.
4
Separate the upper part of the
cappuccinatore from the lower
part.
5
Remove the cap from the lower
part.
Wash all components. Make sure
that the hole is clean and
unobstructed.
3
Remove the regulator.
6
Reassemble the components and
install the cappuccinatore in the
container.
O-RING REPLACEMENT
When the upper and lower parts of the cappuccinatore move too freely, replace the O-ring with the ones
supplied.
1
Remove the O-ring with a pointy
object.
2
3
Insert the new O-ring pressing it
delicately.
Assemble the upper and lower
part of the cappuccinatore.
40
CLEANING AND MAINTENANCE
CLEANING THE BREW GROUP
The Brew Group must be cleaned at least once a week.
Lubricate the Brew Group after approximately 500 brewing cycles. The grease for the lubrication of the Brew
Group may be purchased by Authorized Service Centres.
Wash the brew group with warm water.
WARNING! Do not wash the brew group with detergents that can compromise its correct operation. Do
not wash in the dishwasher.
1
Press to open the service door.
4
Wash the upper filter with
running water.
7
The lever on the rear part of
the group must be in contact
with the group base.
2
Press the PUSH button to remove
the brew group.
5
Make sure the group is in rest
position; the two references must
match.
8
Lubricate the Brew Group guides
only with the supplied grease.
3
Wash any coffee residues from
the brew group.
6
Make sure the components are in
the correct position. The hook
shown must be in the correct
position; to check its position,
firmly press the “PUSH” button.
9
Apply the grease evenly.
41
10
11
12
Apply the grease evenly.
Reassemble it by pressing the
PUSH! button.
Close the service door and insert
the coffee grounds drawer.
GRINDER MAINTENANCE
The grinder can be adjusted in order to create a finer grind after many grinder cycles (approximately 2000).
WARNING!
This operation should be carried out carefully and by an experienced user. The screw could fall into the
grinder; if this happens, remove it before restarting the machine. Protect the grinder hole with a cloth to
avoid this problem.
The snap is signalled by a message on the coffee bean hopper; refer to these messages when this
adjustment is performed.
EMPTY THE COFFEE BEAN HOPPER.
1
2
strong aroma
espresso coffee
08:33
Press and dispense two coffees.
4
3
out of coffee
espresso coffee
08:33
When the following screen appears,
press
just once.
5
Unscrew the screw that holds the
service door closed.
Remove screws and service door.
Once the cycle has ended, turn
off the machine and unplug it.
6
Adjust until it clicks.
Then reposition the door and attach it with the previously removed screw.
42
ERROR CODES
GUIDE MESSAGE THAT APPEARS
HOW TO REMOVE THE MESSAGE
restart to solving the problem
Turn off and after 30 minutes turn the machine on again
to restore normal operation.
call assistance
Problem that requires the intervention of the customer
service centre.
insert drip tray
Insert drip tray.
close coffee bean lid
Close the coffee bean hopper cover to be able to brew
any beverages.
insert brew group
Insert the brew group in its place.
insert grounds drawer
Insert the coffee grounds drawer.
empty grounds drawer
Remove the grounds drawer and empty out the coffee
grounds.
Note: The grounds drawer must be emptied only when the
machine signals to do so, and when the machine is
turned on. Emptying the drawer with the machine turned
off does not allow the machine to register that it has been
emptied.
close door
In order for the machine to operate, the side door must
be closed.
fill water tank
The tank must be removed and refilled with fresh
drinking water.
empty drip tray
Open the side door and empty the drip tray (under the
brew group).
close milk drawer
Close the milk container in order to dispense the
beverage.
replace filter
The water filter must be replaced in the following cases:
1. 60 litres of water have been dispensed;
2. 60 days have passed since its installation;
3. 20 days have passed and the machine has not been
used.
Note: this message appears only when “inserted” has
been selected in the water filter function (See page 19).
insert cappuccinatore
Insert the cappuccinatore in the milk container.
Insert the milk container in its compartment.
descale
A descaling cycle must be performed on the machine’s
internal circuits.
energy saving
Press the
rinsing milk circuit
see page 13 and 22.
milk circuit washing
see page 13 and 24.
key.
SAFETY RULES
SOS
43
IN CASE OF EMERGENCY
Immediately unplug the cord from the outlet.
ONLY USE THE APPLIANCE
•
•
•
•
Indoors.
For preparing coffee, hot water and for foaming milk.
For domestic use.
This appliance is not intended for use by persons (including children) with reduced physical, sensory or mental
capabilities, or lack of experience and knowledge, unless they have been given supervision or instruction
concerning use of the appliance by a person responsible for their safety.
PRECAUTIONS FOR THE USE OF THE MACHINE
•
•
•
•
•
•
•
•
•
Do not use the machine for purposes other than those indicated above, in order to avoid danger.
Do not introduce any substances other than those indicated in the instruction manual.
During the normal filling of any reservoirs, all nearby reservoirs must be closed.
Fill the water tank only with fresh drinking water: Hot water and/or any other liquid may damage the machine.
Do not use water with carbon dioxide added.
Do not put fingers or any material other than coffee beans in the coffee grinder.
Before manipulating the coffee grinder, turn of the machine's main switch and unplug the cord.
Do not put instant coffee or whole bean coffee in the ground coffee container.
To operate the machine with the touch screen, use only your fingers.
CONNECTION TO ELECTRICAL POWER
The connection to the electrical network must be carried out in accordance with the safety regulations in force in
the user's country.
The machine must be connected to a socket which is:
• compatible with the type of plug installed on the machine;
• suitably sized to comply with the ratings shown on the machine identification plate.
• effectively grounded.
The power cord must not:
• come into contact with any type of liquid: danger of electric shocks and/or fire;
• be crushed and/or come in contact with sharp surfaces;
• be used to move the machine;
• be used if damaged;
• be handled with damp or wet hands;
• be wound in a coil when the machine is being operated.
• be tampered with.
INSTALLATION
•
•
•
•
•
•
•
•
•
•
•
Choose a solid, stationary flat surface (no more than 2° of inclination).
Do not install the machine in areas where water could be sprayed.
Optimal operational temperature: 10°C - 40°C / 50-104 degrees Fahrenheit
maximum humidity: 90%.
The machine should be installed in an adequately lit, ventilated, hygienic location and the electric socket should be
within easy reach.
Do not place on heated surfaces!
Install it at least 10 cm / 4" from the walls and cooking surfaces.
Do not use in places where the temperature may drop to a level equal to and/or lower than 0°C / 32 degrees
Fahrenheit. If the machine has been exposed to such conditions notify the customer service center, who will have to
carry out a safety check.
Do not use the machine near inflammable and/or explosive substances.
The machine must not be used in an explosive or volatile atmosphere or where there is a high concentration of dust
or oily substances suspended in the air.
Do not install the machine on top of other appliances.
44
SAFETY RULES
DANGERS
•
•
•
•
•
•
•
Children should be supervised to ensure that they do not play with the appliance.
The appliance is dangerous to children. When left unattended, unplug from the electrical outlet.
Keep the coffee machine packaging out of the reach of children.
Never direct the jet of hot water and/or steam towards yourself or others. Danger of scalding.
Do not insert objects through the appliance’s openings. (Danger! Electrical Current!).
Do not pull out the plug by yanking on the power cord or touching it with wet hands.
Warning. Danger of burning when in contact with hot water, steam and the hot water spout.
FAILURES
• Do not use the appliance if a failure has been verified or suspected, for example after being dropped.
• Any repairs must be performed by an authorized customer service center.
• Do not use the appliance with a defective power cord. The manufacturer or its customer service center will have to
replace the power cable if damaged. (Caution! Electrical Current!)
• Turn off the appliance before opening the service door. Danger of burns!
CLEANING / DESCALING
• Clean the milk circuit only with the recommended detergent powder supplied with the machine. Carefully follow the
safety instructions given on the packaging.
• Clean the coffee circuit only with the recommended detergent tablets supplied with the machine. Carefully follow
the safety instructions given on the packaging.
• Before cleaning the machine, the main switch must be turned to OFF (0), unplugged from the socket and cooled
down.
• Keep the appliance from coming into contact with splashes of water or immersing in water.
• Do not dry the machine’s parts in conventional or microwave ovens.
• The machine and its components must be cleaned and washed after the machine has not been used for a certain
period.
REPLACEMENT PARTS
For safety reasons, use only original replacement parts and original accessories.
WASTE DISPOSAL
- The packing materials can be recycled.
- Appliance: unplug the appliance and cut the power cord.
- Deliver the appliance and power cord to a service center or public waste disposal facility
This product complies with EU Directive 2002/96/EC.
The symbol on the product or on its packaging indicates that this product may not be treated as household
waste. Instead it shall be handed over to the applicable collection point for the recycling of electrical and
electronic equipment.
By ensuring this product is disposed of correctly, you will help prevent potential negative consequences for the
environment and human health, which could otherwise be caused by inappropriate waste handling of this
product. For more detailed information about recycling of this product, please contact your local city office, your
household waste disposal service or the shop where you purchased the product.
FIRE SAFETY
In case of fire, use Carbon Dioxide extinguishers (CO 2).
Do not use water or dry-powder extinguishers.
TECHNICAL DATA
45
ADDITIONAL INFORMATION FOR THE CORRECT USE OF THE INTENZA WATER FILTER
To correctly use the Intenza water filter, please consider the following instructions:
1. Store the water filter in a cool area in which the room temperature is between +1°C - +50°C (34°F to 122°F). Do not store it in
direct sunlight.
2. Carefully read the operating instructions and the safety warnings provided with each filter.
3. Keep the filter instructions together with the manual.
4. These instructions integrate those contained in the manual, as they focus on the specific application of the filter in the machine.
TECHNICAL DATA
Nominal voltage
Power rating
Power supply
Shell material
Size (w x h x d)
Weight
Cord length
Control panel
Water tank
Milk Tank
Coffee Bean Hopper Capacity
Pump pressure
Boiler
Coffee grinder
Pressure safety device
Temperature safety device
See label on the appliance
See label on the appliance
See label on the appliance
Plastic
355 x 380 x 460 mm - 13.8” x 15.4” x 16.9”
14 Kg - 30.9 lbs
1200 mm - 42.2”
Front (display 2x24)
2 liters - 68 oz. / Removeable
ca. 0.400 liters - 12.5 oz. / Removeable
350 grams - 8.9 oz. / of coffee beans
15 bar
Stainless steel
Ceramic
Boiler pressure safety valve
Boiler thermostats and thermal fuses
Subject to engineering and manufacturing changes due to technological developments.
The machine conforms to European Directive 89/336/EEC (Italian Legislative Decree 476 dated 04/12/92) concerning
electromagnetic compatibility.
46
EC DECLARATION OF CONFORMITY
EC 2006/95, EC 2004/118,
EC 1992/31, EC 1993/68
SAECO INTERNATIONAL GROUP S.P.A
- Via Torretta, 240 - 40041 Gaggio Montano (Bo) - Italy
declare under our responsability that the product:
AUTOMATIC COFFEE MAKER
SUP 030 ND
to which this declaration relates is in conformity with the following standards or other normative documents :
• Safety of household and electrical appliances - General requirements
EN 60335-1(2002) + A1(2004) + A2(2006) + A11(2004) + A12(2006)
• Safety of household and electrical appliances - Part 2-15
Particular requirements for appliances for heating liquids
EN 60335-2-15(2002) + A1(2005)
• Household and similar electrical appliances - Electromagnetic fields - methods
for evaluation and measurement EN 50366 (2003) + A1 (2006).
• Household and similar electrical appliances - safety - Part 2-14
Particular requirements for kitchen machines EN 60335-2-14 (2006).
• Electromagnetic compatibility (EMC) - Requirements for household appliances , electric
tools and similar apparatus - Part 1
Emission EN 55014-1 (2000) + A1 (2001) + A2 (2002).
• Electromagnetic compatibility (EMC)
Part. 3^ Limits - Section 2 : Limits for harmonic current emissions (equipment input
current ≤ 16A for phase) - EN 61000-3-2 (2000)
• Electromagnetic compatibility (EMC)
Part 3^ : Limits - Section 3 : Limitation of voltage changes , voltage fluctuations and flicker
in public low - voltage supply systems , for equipment with rated current ≤ 16 A for phase
and not subject to conditional connection EN 61000-3-3 (1995) + A1 (2001)
• Electromagnetic compatibility - Requirements for household appliances , electric tools
and similar apparatus - Part 2.
Immunity - Product family standard EN 55014-2 (1997) + A1 (2001)
Following the provision of the directives: EC 73/23, EC 89/336, EC 92/31, EC 93/68
R & D Manager
Gaggio Montano - li, 27/06/2007
Mr. Andrea Castellani
Fax: + 39 0534 31025
www.saeco.com
The manufacturer reserves the right to change the features of the product without prior notice.
© Saeco International Group S.p.A.
Cod.15001343 Rev.00 del 15-09-07
Via Torretta, 240
I-40041 Gaggio Montano, Bologna
Tel: + 39 0534 771111
Type SUP030ND
Saeco
International Group S.p.A.