1
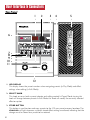
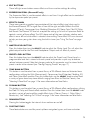
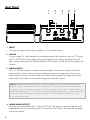
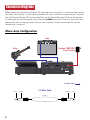
Element / Element XP
Owner’s Manual
IMPORTANT SAFETY INSTRUCTIONS
WARNING FOR YOUR PROTECTION
READ THE FOLLOWING:
KEEP THESE INSTRUCTIONS
HEED ALL WARNINGS
FOLLOW ALL INSTRUCTIONS
The apparatus shall not be exposed to dripping or splashing liquid and no
object filled with liquid, such as vases, shall be placed on the apparatus.
CLEAN ONLY WITH A DRY CLOTH.
FOR INDOOR USE ONLY.
DO NOT BLOCK ANY OF THE VENTILATION OPENINGS. INSTALL IN ACCORDANCE WITH THE MANUFACTURER’S INSTRUCTIONS.
DO NOT INSTALL NEAR ANY HEAT SOURCES SUCH AS RADIATORS, HEAT
REGISTERS, STOVES, OR OTHER APPARATUS (INCLUDING AMPLIFIERS)
THAT PRODUCE HEAT.
ONLY USE ATTACHMENTS/ACCESSORIES SPECIFIED BY THE MANUFACTURER.
UNPLUG THIS APPARATUS DURING LIGHTNING STORMS OR WHEN UNUSED
FOR LONG PERIODS OF TIME.
Do not defeat the safety purpose of the polarized or grounding-type plug. A
polarized plug has two blades with one wider than the other. A grounding
type plug has two blades and a third grounding prong. The wide blade or
third prong are provided for your safety. If the provided plug does not fit
your outlet, consult an electrician for replacement of the obsolete outlet.
Protect the power cord from being walked on or pinched particularly at
plugs, convenience receptacles, and the point where they exit from the
apparatus.
Use only with the cart stand, tripod bracket, or table specified by the manufacture, or sold with the apparatus. When
a cart is used, use caution when moving the cart/apparatus
combination to avoid injury from tip-over.
Refer all servicing to qualified service personnel. Servicing is required when
the apparatus has been damaged in any way, such as power-supply cord
or plug is damaged, liquid has been spilled or objects have fallen into the
apparatus, the apparatus has been exposed to rain or moisture, does not
operate normally, or has been dropped.
POWER ON/OFF SWITCH: The Power switch used in this piece of equipment DOES NOT break the connection from the mains.
MAINS DISCONNECT: The plug shall remain readily operable. For rackmount or installation where plug is not accessible, an all-pole mains switch
with a contact separation of at least 3 mm in each pole shall be incorporated into the electrical installation of the rack or building.
If connected to 240V supply, a suitable CSA/UL certified power cord shall
be used for this supply.
WARNING:
• Apparatet må tilkoples jordet stikkontakt.
• Apparaten skall anslutas till jordat uttag.
• Laite on liitettävä suojakoskettimilla varustettuun pistorasiaan.
DECLARATION OF CONFORMITY
Manufacturer’s Name:
Manufacturer’s Address:
DigiTech
8760 S. Sandy Parkway
Sandy, Utah 84070, USA
declares that the product:
Product name:
ELEMENT and ELEMENT XP
Product option:
all (requires Class II power adapter that conforms
to the requirements of EN60065, EN60742, or equivalent.)
conforms to the following Product Specifications:
Safety:
IEC 60065 -01+Amd 1
EMC:EN 55022:2006
EN 55024:1998
FCC Part 15
Supplementary Information:
The product herewith complies with the requirements of the:
Low Voltage Directive 2006/95/EC
EMC Directive 2004/108/EC.
RoHS Directive 2011/65/EC
WEEE Directive 2002/96/EC
EC Regulation 278/2009
With regard to Directive 2005/32/EC and EC Regulation
1275/2008 of 17 December 2008, this product is
designed, produced, and classified as Professional Audio
Equipment and thus is exempt from this Directive.
Rex C. Reed
Director, Engineering
Signal Processing
8760 S. Sandy Parkway
Sandy, Utah 84070, USA
Date: July 9, 2013
European Contact: Your local DigiTech Sales and Service
Office or
Harman Signal Processing
8760 South Sandy Parkway
Sandy, Utah
84070 USA
Ph: (801) 566-8800
Fax: (801) 568-7583
IMPORTANT SAFETY INSTRUCTIONS
ELECTROMAGNETIC
COMPATIBILITY
The symbols shown above are internationally accepted
symbols that warn of potential hazards with electrical
products. The lightning flash with arrowpoint in an
equilateral triangle means that there are dangerous
voltages present within the unit. The exclamation point
in an equilateral triangle indicates that it is necessary
for the user to refer to the owner’s manual.
These symbols warn that there are no user serviceable
parts inside the unit. Do not open the unit. Do not
attempt to service the unit yourself. Refer all servicing
to qualified personnel. Opening the chassis for any
reason will void the manufacturer’s warranty. Do not
get the unit wet. If liquid is spilled on the unit, shut
it off immediately and take it to a dealer for service.
Disconnect the unit during storms to prevent damage.
This device complies with part
15 of the FCC Rules and the
Product Specifications noted on the
Declaration of Conformity.
Operation is subject to the following
two conditions:
• this device may not cause
harmful interference, and
• this device must accept any
interference received, including
interference that may cause
undesired operation.
Operation of this unit within
significant electromagnetic fields
should be avoided.
• use only shielded interconnecting
cables.
The following is indicative of low
altitude use; do not use this product
above 2000m.
If you want to dispose this product, do not mix it with general household waste. There is a
separate collection system for used electronic products in accordance with legislation that
requires proper treatment, recovery and recycling.
Private households in the 25 member states of the EU, in Switzerland and Norway may return their used
electronic products free of charge to designated collection facilities or to a retailer (if you purchase a similar
new one).
For Countries not mentioned above, please contact your local authorities for a correct method of disposal.
By doing so you will ensure that your disposed product undergoes the necessary treatment, recovery and
recycling and thus prevent potential negative effects on the environment and human health.
Warranty
We at DigiTech® are very proud of our products and back-up each one we sell with the following warranty:
1. Please register online at digitech.com within ten days of purchase to validate this warranty. This warranty is valid only in the
United States.
2. DigiTech warrants this product, when purchased new from an authorized U.S. DigiTech dealer and used solely within the U.S.,
to be free from defects in materials and workmanship under normal use and service. This warranty is valid to the original
purchaser only and is non-transferable.
3. DigiTech liability under this warranty is limited to repairing or replacing defective materials that show evidence of defect,
provided the product is returned to DigiTech WITH RETURN AUTHORIZATION, where all parts and labor will be covered up to a
period of one year. A Return Authorization number may be obtained by contacting DigiTech. The company shall not be liable
for any consequential damage as a result of the product’s use in any circuit or assembly.
4. Proof-of-purchase is considered to be the responsibility of the consumer. A copy of the original purchase receipt must be
provided for any warranty service.
5. DigiTech reserves the right to make changes in design, or make additions to, or improvements upon this product without
incurring any obligation to install the same on products previously manufactured.
6. The consumer forfeits the benefits of this warranty if the product’s main assembly is opened and tampered with by anyone
other than a certified DigiTech technician or, if the product is used with AC voltages outside of the range suggested by the
manufacturer.
7. The foregoing is in lieu of all other warranties, expressed or implied, and DigiTech neither assumes nor authorizes any person
to assume any obligation or liability in connection with the sale of this product. In no event shall DigiTech or its dealers be
liable for special or consequential damages or from any delay in the performance of this warranty due to causes beyond their
control.
NOTE: The information contained in this manual is subject to change at any time without notification. Some information contained
in this manual may also be inaccurate due to undocumented changes in the product since this version of the manual was
completed. The information contained in this version of the owner’s manual supersedes all previous versions.
Service Contact Info
If you require technical support, contact DigiTech Technical Support. Be prepared to accurately describe the problem. Know the
serial number of your device–this is printed on a sticker attached to the chassis. If you have not already taken the time to register
your product, please do so now at digitech.com.
Before you return a product to the factory for service, we recommend you refer to the manual. Make sure you have correctly
followed installation steps and operating procedures. For further technical assistance or service, please visit our support page
at digitech.com. If you need to return a product to the factory for service, you MUST first contact Technical Support to obtain a
Return Authorization Number.
No returned products will be accepted at the factory without a Return Authorization Number.
Please refer to the Warranty information, which extends to the first end-user. After expiration of the warranty, a reasonable charge
will be made for parts, labor, and packing if you choose to use the factory service facility. In all cases, you are responsible for
transportation charges to the factory. DigiTech will pay return shipping if the unit is still under warranty.
Use the original packing material if it is available. Mark the package with the name of the shipper and with these words in red:
DELICATE INSTRUMENT, FRAGILE! Insure the package properly. Ship prepaid, not collect. Do not ship parcel post.
Table of Contents
Overview �����������������������������������������������������2
The Effects �������������������������������������������������25
Introduction��������������������������������������������������������������������� 2
Wah (Element XP Only)����������������������������������������������� 25
Features����������������������������������������������������������������������������� 3
Compressor�������������������������������������������������������������������� 25
User Interface & Connectors ����������������������4
Amp/Distortion Models����������������������������������������������� 26
EQ������������������������������������������������������������������������������������ 27
Top Panel�������������������������������������������������������������������������� 4
Noise Gate����������������������������������������������������������������������� 27
Rear Panel������������������������������������������������������������������������� 6
Mod FX��������������������������������������������������������������������������� 28
Connection Diagrams ��������������������������������8
Mono Amp Configuration��������������������������������������������� 8
Stereo Amp Configuration��������������������������������������������� 9
Stereo Recording Configuration���������������������������������� 10
Headphone/Practice Configuration���������������������������� 11
Operation ��������������������������������������������������12
Modes Explained����������������������������������������������������������� 12
Reverb����������������������������������������������������������������������������� 31
Element Preset List �����������������������������������32
Element XP Preset List �����������������������������33
Technical Information ������������������������������34
Factory Restore�������������������������������������������������������������� 34
Specifications������������������������������������������������������������������ 35
Play Mode����������������������������������������������������������������� 12
Edit Mode������������������������������������������������������������������ 12
Navigating Presets��������������������������������������������������������� 13
Editing Presets���������������������������������������������������������������� 13
Selecting A Tone Bank��������������������������������������������� 14
Selecting An FX Bank���������������������������������������������� 15
Editing Effects����������������������������������������������������������� 16
Turning Effects On & Off���������������������������������������� 16
Storing/Copying Presets����������������������������������������������� 17
Bypassing All Effects����������������������������������������������������� 18
Using The Drum Machine�������������������������������������������� 18
Using The Tuner������������������������������������������������������������� 20
Setup ���������������������������������������������������������21
Mono/Stereo Operation������������������������������������������������ 21
Speaker Cabinet Compensation (SCC)���������������������� 21
Expression Pedal Calibration (Element XP Only)���� 22
Expression Pedal Assignment (Element XP Only)��� 23
1
Overview
Introduction
The Element and Element XP provide a compact and cost-effective guitar effects processing
solution. But don’t let that fool you. The Element Series processors offer a powerful effects
processing platform and complete feature set, so you can tantalize your creativity, improve your
chops, and explore the endless possibilities of guitar effects, all with one simple-to-use, compact
device.
The Element has 31effects to choose from and allows you to run 8 effects simultaneously. The
Element XP has 37 effects to choose from and allows you to run 9 effects simultaneously. The
Element XP adds an Expression Pedal. Use it to control the Wah or Whammy™ effect or assign it
to the effect you want to control for real-time effect changes with your foot.
100 included factory presets allow you to begin exploring immediately and 100 user presets allow
you to store all your favorite sounds. Select between the 20 pre-configured FX Banks and Tone
Banks to explore a multitude of tonal possibilities without even editing any effects!
The built in tuner ensures your guitar is in tune and the built-in drum machine and aux input jack
allow you to play along with a drum loop, metronome, or your favorite music, so you can improve
your skills fast and have fun doing it!
Whether you're a budding artist, or an experienced guitar aficionado, you’ll have fun exploring
the vast sound-shaping options available in the Element and Element XP. Thanks for choosing
DigiTech®.
2
Features
• 37 Effects (Element XP) / 31 Effects (Element)
• 12 Amp & 6 Distortion Models To Choose From
• Built-In Drum Machine With 45 Drum Pattern Loops Including Metronome
• Built-In Tuner
• Built-In Expression Pedal (Element XP Only)
• 200 Presets (100 User Presets / 100 Factory Presets)
• 9 Simultaneous Effects (Element XP) / 8 Simultaneous Effects (Element)
• 20 FX Banks & 20 Tone Banks To Choose From
• Mono / Stereo Output
• Aux Input For Playing Along With Your Favorite Songs
• 1/8” Headphone Output
• Speaker Cabinet Compensation
• Heavy Duty Metal Footswitches
• Power Supply Included
3
User Interface & Connectors
Top Panel
1
2
3
4
5
6
7
8
9
10
11
12
1. LED DISPLAY
This display shows the preset numbers when navigating presets (in Play Mode) and effect
settings when editing (in Edit Mode).
2. SELECT KNOB
This knob serves as both a preset selector and editing control. In Preset Mode, turning this
knob will change between presets. In Edit Mode, this knob will modify the currently selected
effect or option.
3. STORE BUTTON
This button is used to store and copy presets to the 100 user preset memory locations. The
STORE LED will light whenever a preset’s stored effect settings are altered, indicating that the
changes must be stored to a preset to be retained.
4
4. EDIT BUTTONS
These left/right arrow buttons access effects and drum machine settings for editing.
5. EXPRESSION PEDAL (Element XP only)
The Expression Pedal is used to control effects in real time. A single effect can be controlled
by the expression pedal per preset.
6. EFFECTS CHAIN
These icons provide a graphical representation of the internal effect signal chain used in
the Element/Element XP. The signal flow is from left to right and offers effects like Wah
(Element XP only), Compressor, Amp Modeling/Distortion, EQ, Noise Gate, Mod FX, Delay,
and Reverb. The Element XP also has an option for setting up its built-in Expression Pedal to
control a variety of these effects. The LED above each of the icons indicates whether each
effect is on or off and which effect is selected when editing. These effect LEDs are also used
to help you tune your guitar when using the built-in tuner (see "Using The Tuner" on page
20).
7. MASTER LEVEL BUTTON
Press this button then turn the SELECT knob to adjust the Master Level. This will adjust the
global output level for the Main and Headphone Outputs and will affect all presets.
8. PRESET LEVEL BUTTON
Press this button then turn the SELECT knob to adjust the Preset Level. Preset Level is a
programmable level that is stored with each preset and provides a quick way to balance
volume between presets. Note that changes made to this parameter must be stored to the
preset in order to be retained (see "Storing/Copying Presets" on page 17).
9. TONE BANK BUTTON
This button is used to select from a preset library of 20 different clean and distorted tone
configurations utilizing the Wah (Element only), Compressor, Amp/Distortion Modeling, EQ,
and Noise Gate effect modules. Press this button then use the SELECT knob to select from
a variety of genre-based amp tone defaults ranging from Blues to Metal to Country. See
"Selecting A Tone Bank" on page 14 for more information on Tone Banks.
10. FX BANK BUTTON
This button is used to select from a preset library of 20 different effect configurations utilizing
the Mod FX, Delay, and Reverb effect modules. Press this button then turn the SELECT knob
to select a variety of post-amplifier model effect chains (Chorus, Chorus + Delay, Delay +
Reverb, etc.). See "Selecting An FX Bank" on page 15 for more information on Tone Banks.
11. DRUMS BUTTON
Pressing this button toggles the internal drum machine on and off.
12. FOOTSWITCHES
These footswitches are used for preset up/down navigation, bypass, and tuner activation.
5
Rear Panel
1
2
3
4
5
1. INPUT
Connect your guitar to this high impedance 1/4” instrument input.
2. AUX IN
Using a stereo 1/8” cable, connect the headphone output of a portable music or CD player
to this 1/8” TRS jack to play along with all your favorite music. Adjust the output level of
your playback device and the Element/Element XP’s Master Level to achieve the proper mix
balance.
3. MAIN OUTPUT
This 1/4” TRS jack supports mono or stereo operation. Connect this output jack to your
guitar amplifier using a mono instrument cable or connect to stereo inputs of a mixer or
recording device using a stereo Y cable (see "Connection Diagrams" on page 8 for further
information). The Master Level controls the global level of this output.
NOTE: Mono/stereo operation for the Main and Headphone Output jacks is determined by
whether a plug is connected to the Main Output jack. If a plug is connected to this output jack,
all outputs are set to mono for amp use. If no plug is connected to this jack, all outputs default to
stereo for headphone use. This 1/4” Main Output can be forced to operate as a stereo output for
stereo setups, see "Connection Diagrams" on page 8 and "Mono/Stereo Operation" on page
21 for more information.
4. HEADPHONE OUTPUT
Connect your headphones to this 1/8” mini TRS jack. This output is optimized for use with
headphones having an impedance of 60 Ohms or less. The Master Level controls the global
level of this output.
6
NOTE: When only the headphones are connected, Speaker Cabinet Compensation (SCC) will
be enabled to make the audio sound like it is actually being played through an amplifier. When
a plug is connected to the 1/4” Main Output, SCC is disabled in the Headphone Output and all
outputs are set for mono operation. See "Speaker Cabinet Compensation (SCC)" on page 21
and "Mono/Stereo Operation" on page 21 for more information.
5. POWER JACK
Connect the included PS0913DC power supply to this power input jack.
7
Connection Diagrams
Before connecting the Element/Element XP processor to an amplifier, it is recommended that you
turn down the amplifier's master volume control and make sure that the power to your amplifier
and the Element/Element XP are turned off. To turn the Element/Element XP on or off, connect
or disconnect the included power supply from the POWER input jack. Once all is connected and
powered on, you can then gradually increase your amplifier's master volume control until the
desired level is achieved.
Mono Amp Configuration
Amp
Harman PS0913DC
Power Supply
Guitar
INPUT
AUX IN
OUTPUT
1/4” Mono Cable
Hot (+)
Ground (-)
1/4” Mono Cable
Ground (-)
Hot (+)
8
9VDC
300 mA
1/4” Mono Cable
Ground (-)
Hot (+)
Stereo Amp Configuration
Amp 1
Amp 2
Harman PS0913DC
Power Supply
Guitar
INPUT
AUX IN
OUTPUT
9VDC
300 mA
1/4” Stereo Y Cable
1/4” Stereo Y Cable
1/4” Stereo Y Cable
Ground (-) Left (+)
Left
Channel
Left (+)
Left (+)
Ground (-)
Ground (-)
Right
Channel
Right (+)
Right (+)
Ground (-) Right (+)
NOTE: The 1/4" Output must be configured for stereo operation for this type of setup. See "Mono/
Stereo Operation" on page 21 for more information.
9
Stereo Recording Configuration
Computer
Audio Recording Interface
Line In
Line In
1
2
Harman PS0913DC
Power Supply
Guitar
INPUT
AUX IN
OUTPUT
9VDC
300 mA
1/4” Stereo Y Cable
FireWire or USB
1/4” Stereo Y Cable
1/4” Stereo Y Cable
Left (+)
Ground (-) Left (+)
Left
Channel
Left (+)
Ground (-)
Ground (-)
Right
Channel
Right (+)
Right (+)
Ground (-) Right (+)
NOTE: The 1/4" Output must be configured for stereo operation for this type of setup. See "Mono/
Stereo Operation" on page 21 for more information. When connecting directly to a recording
device, SCC must be enabled. See "Speaker Cabinet Compensation (SCC)" on page 21 for more
information.
10
Headphone/Practice Configuration
Harman PS0913DC
Power Supply
Guitar
INPUT
Portable
Music Player
AUX IN
OUTPUT
9VDC
300 mA
Headphones
Optional
11
Operation
Modes Explained
There are two modes of operation in the Element/Element XP: Play Mode and Edit Mode.
Play Mode
When the Element/Element XP is powered on, the unit will
be in Play Mode. Play Mode is indicated by the effect LEDs
being lit for the effects which are active in the currently loaded
preset and the currently loaded preset number being displayed
in the LED display. Play Mode is the normal operating mode
and allows you to navigate presets using the SELECT knob or
FOOTSWITCHES.
Preset Number
Lit LEDs Indicate
Enabled Effects
In Preset
Edit Mode
You enter Edit Mode whenever you press the MASTER LEVEL, PRESET LEVEL, TONE BANK, FX
BANK, DRUMS, or EDIT buttons. Edit Mode allows you to adjust the global Master Level, the
Preset Level, select between the different Tone and FX Banks, edit effect and system settings, and
edit the settings for the built-in drums. To exit Edit Mode and return to Play Mode, simply press
either FOOTSWITCH. You can tell you are back in Play Mode when the effect LEDs are lit for the
effects which are active in the currently loaded preset and the currently loaded preset number is
displayed in the LED display.
NOTE: Effect settings changed in Edit Mode will need to be stored to a preset in order to be
retained. The exceptions are the Master Level and drum machine settings, which are global settings and
are not stored to presets. Whenever you change a stored preset’s effect settings, the STORE button
LED will light, indicating the effect settings have been changed from the stored value in the preset. See
"Storing/Copying Presets" on page 17 for further information on storing presets.
12
Navigating Presets
There are two banks of presets in the Element/Element XP: the user preset bank and the factory
preset bank. From the factory, the user and factory preset banks will contain the same presets.
Therefore, factory preset 45 will be the same as user preset 45 and so on. User presets appear
in the LED display as 1-100 and factory presets appear as F1-F00. Preset banks will automatically
round-robin when navigating. In other words, navigating one preset above user preset 100 will
select factory preset F1 in the factory preset bank. Navigating one preset below user preset 1 will
select factory preset F00 (factory preset 100) in the factory preset bank.
To navigate presets:
1. From Play Mode, press the UP FOOTSWITCH to navigate up through presets or the DOWN
FOOTSWITCH to navigate
the SELECT knob.
down through presets. You can also navigate presets by turning
Editing Presets
The Element Series processors have been engineered to give you more options for shaping your
sounds. Of course you can navigate presets to find sounds which will get you started, and then
edit the effects from there to fine tune your sounds–this is standard operation when using effect
processors. But there is another layer of options available in the Element processors... Banks.
There are two Banks available: Tone Banks and FX Banks. Each of these Banks give you a library of
20 pre-set configurations, allowing you to quickly audition different "tones" without affecting your
"effects" chain or vice versa. Using this "coarse" and "fine" editing environment, you can quickly
experiment with many different sound-shaping options and go only as deep into editing as you
feel comfortable with.
13
Selecting A Tone Bank
Tone Banks allow you to select from a preset library of 20 different tones. These tones consist of
clean, distortion, and amp tones. Select from a variety of genre-based amp tone defaults ranging
from Blues to Metal to Country. Behind the scenes, the Wah (Element XP only), Compressor,
Amp/Distortion, EQ, and Noise Gate are configured to create a specified tone. You can then
further refine the sound by editing each effect’s settings. Note that changing between different
Tone Banks does not change the Mod FX, Delay, or Reverb settings, as these processing modules
belong to the FX Bank.
Available Tone Banks
Available Tone Banks
Display Number
Description
Display Number
Description
1
Overdrive
11
Fuzz
2
Rock 1
12
Chunky
3
Blues 1
13
Smooth
4
Metal 1
14
Heavy
5
Country 1
15
Clean 1
6
Warm Drive
16
British
7
Crunch
17
Distortion
8
Texas Tone
18
Scooped
9
Rockabilly
19
Bright Clean
10
Solo 1
20
Acoustic
To select a Tone Bank:
1. Press the TONE BANK button. The display will read cu for custom.
2. Turn the SELECT knob to select from one of the 20 Tone Bank library defaults. The number
of the selected Tone Bank will appear in the LED display as you turn the SELECT knob.
3. When done, press either FOOTSWITCH to exit Edit Mode. Note that you must store the
changes if you wish to retain the settings. See "Storing/Copying Presets" on page 17 for
further information on storing presets.
14
Selecting An FX Bank
FX Banks allow you to select from a preset library of 20 different effect chains. Behind the scenes
the Mod FX, Delay, and Reverb are configured to create a specified combination of effects. You
can then further refine the sound by editing each effect’s settings. Note that changing between
different FX Banks does not change the Wah (Element XP only), Compressor, Amp/Distortion,
EQ, or Noise Gate settings, as these processing modules belong to the Tone Bank.
Available FX Banks
Available FX Banks
Display Number
Description
Display Number
Description
1
Chorus
11
Hall Reverb
2
Flanger
12
Spring Reverb
3
Phaser
13
Chorus + Digital Delay
4
Pitch
14
Chorus + Delay + Reverb
5
Tremolo
15
Flanger + Analog Delay
6
Rotary
16
Phaser + Tape Delay
7
Envelope Filter
17
Digital Delay + Hall Reverb
8
Digital Delay
18
Analog Delay + Spring
9
Analog Delay
19
Pitch + Room Reverb
10
Tape Delay
20
Vibrato + Tape Delay
To select an FX Bank:
1. Press the FX BANK button. The display will read cu for custom.
2. Turn the SELECT knob to select from one of the 20 FX Bank library defaults. The number of
the selected FX Bank will appear in the LED display as you turn the SELECT knob.
3. When done, press either FOOTSWITCH to exit Edit Mode. Note that you must store the
changes if you wish to retain the settings. See "Storing/Copying Presets" on page 17 for
further information on storing presets.
15
Editing Effects
Selecting a preset and/or Tone/FX Bank is the fastest and easiest way to achieve the sound your
after. However, if you just can’t seem to quite get the sound you're after it’s time to edit some
effects.
To edit effects:
1. Press either of the EDIT buttons repeatedly until the LED for the effect you wish to edit is lit.
For a list of effect settings, see "The Effects" on page 25.
2. Once you have selected the effect for editing, strum your guitar then turn the SELECT knob
to change the effect settings. Repeat this auditioning process until you find the desired setting.
3. To exit Edit Mode, press either FOOTSWITCH.
NOTE: Effects changed in Edit Mode will need to be stored to a preset in order to be retained. The
exceptions are the Master Level and drum machine settings, which are global settings and are not
stored to memory. See "Storing/Copying Presets" on page 17 for further information on storing
presets.
Turning Effects On & Off
The procedure for turning effects on and off is essentially the same as for editing effects.
To turn an effect on or off:
1. Press either of the EDIT buttons repeatedly until the LED for the effect you wish to turn on
or off is lit.
2. Turn the SELECT knob. If the effect is already turned off, turn the SELECT knob to the right
to enable the effect and select between the available options. If the effect is already on and
you wish to turn it off, keep turning the SELECT knob to the left until off is shown in the
LED display.
3. When done, press either FOOTSWITCH to return to Play Mode, indicated by the currently
loaded preset number being displayed in the LED display.
NOTE: Parameters changed in Edit Mode will need to be stored to a preset in order to be retained.
The exceptions are the Master Level and drum machine parameters, which are global parameters and
are not stored to memory. See "Storing/Copying Presets" on page 17 for further information on
storing presets.
16
Storing/Copying Presets
The STORE button is used to save modifications made to a preset’s settings. The STORE button’s
LED will light whenever effect settings have been changed from their stored value, indicating the
changes must be stored to memory to be retained. Preset setting changes must always be stored
to a user preset memory location, since factory presets cannot be overwritten. The Element and
Element XP have 100 user preset memory locations. Factory presets can be accessed at any time,
used as a starting point, edited, then stored to a user preset location. You can also copy a user or
factory preset to any of the available 100 user preset locations.
To quickly store a preset to its current memory location (quick update):
1. Make the desired edits to the preset’s effect settings. See "Editing Effects" on page 16.
2. Press the STORE button twice. Sd will be briefly displayed in the LED display, indicating
the preset is being stored. This will store the newly changed effect settings to the currently
loaded preset memory location.
NOTE: If you perform the above quick update procedure on a factory preset, the changes will be
stored to the equivalent user preset memory location. For example, if you load factory preset 5 (f 5),
make edits, and then press the STORE button twice, you will overwrite user preset 5 (5). Therefore,
use caution when performing this procedure on factory presets to ensure you do not accidentally
overwrite one of your existing user presets.
To store an edited preset to a different memory location:
1. Make the desired edits to the preset’s effects. See "Editing Effects" on page 16.
2. Press the STORE button once. The current preset number will begin flashing in the LED
display.
3. Use the SELECT knob to select the user preset memory location at which you would like to
store the user preset (indicated in the display).
4. Press the STORE button again to complete the store procedure. Sd will be briefly displayed
in the LED display, indicating the preset is being stored.
NOTE: Pressing one of the FOOTSWITCHES or any button (other than the DRUMS button) during
the above procedure will abort the store procedure.
17
To copy a preset:
1. From Play Mode, use the FOOTSWITCHES or SELECT knob to load the preset you wish to
copy.
2. Press the STORE button once. The current preset number will begin flashing in the LED
display.
3. Use the SELECT knob to select the user preset memory location at which you would like to
copy the preset (indicated in the display).
4. Press the STORE button again to complete the copy procedure. Sd will be briefly displayed in
the LED display, indicating the preset is being stored.
NOTE: Pressing one of the FOOTSWITCHES or any button (other than the DRUMS button) during
the above procedure will abort the store procedure.
Bypassing All Effects
The Element and Element XP offer a global preset bypass feature which bypasses all effects in the
currently loaded preset and feeds only the dry/unprocessed signal to the outputs.
To bypass all effects:
1. Press both FOOTSWITCHES simultaneously. The LED display will read bYP, indicating the
effects are bypassed.
2. Press either FOOTSWITCH to exit the preset bypass function.
Using The Drum Machine
Playing along with the built-in drum machine is a great way to improve your timing skills. The
Element and Element XP give you 45 drum and metronome patterns to choose from and allow
you to adjust the tempo and level of the pattern playback.
Available Drum Machine Parameters
LED Lit
Option (Shown In Display)
Description
PATTERN
1-45
Selects from the various drum patterns
TEMPO
1-99
Adjusts the drum machine tempo
LEVEL
1-99
Adjusts the drum machine level
18
Available Drum Patterns
Available Drum Patterns
Display Number
Description
Display Number
Description
1
BEATS 1
24
BLUES 3
2
BEATS 2
25
BLUES 4
3
BEATS 3
26
GROOVE 1
4
BEATS 4
27
GROOVE 2
5
BEATS 5
28
COUNTRY 1
6
BEATS 6
29
COUNTRY 2
7
ROCK 1
30
COUNTRY 3
8
ROCK 2
31
JAZZ 1
9
ROCK 3
32
JAZZ 2
10
ROCK 4
33
JAZZ 3
11
ROCK 5
34
JAZZ 4
12
ROCK 6
35
HIPHOP 1
13
HARD ROCK 1
36
HIPHOP 2
14
HARD ROCK 2
37
HIPHOP 3
15
HARD ROCK 3
38
WORLD 1
16
HARD ROCK 4
39
WORLD 2
17
METAL 1
40
WORLD 3
18
METAL 2
41
METRONOME 4/4
19
METAL 3
42
METRONOME 3/4
20
METAL 4
43
METRONOME 5/8
21
METAL 5
44
METRONOME 7/8
22
BLUES 1
45
METRONOME
23
BLUES 2
To use the built-in drum machine:
1. Press the DRUMS button to turn the drum machine on.
2. Use the EDIT buttons to select the drum setting you want to edit (i.e., Pattern, Tempo or
Level). The corresponding LED will light when a selection is made.
3. Turn the SELECT knob to edit the selected setting.
4. Repeat steps 2-3 to make edits to any of the other drum machine settings.
5. When not using the drum machine, press the DRUMS button to turn the drum machine off.
NOTE: Drum machine settings are global and are not stored to presets.
19
Using The Tuner
The built-in tuner allows you to effortlessly
tune your guitar and offers 4 different tuning
references as shown in the table to the
right. In most cases you will use the standard
tuning reference, which is A440 (A=440Hz).
This is the default tuning reference setting in
the Element/Element XP.
Tuning Reference Options
Option
(Shown In Display)
Reference
40
A=440Hz (Default, standard setting)
Ab
A=A♭ (A flat)
G
A=G
Gb
A=G♭ (G flat)
The tuner can be accessed from either Play
Mode or Edit Mode. As a note is played, the
LED display will show the note. The most
center effect LED (green) will light when
the note is in tune. If an effect LED to the
left of the green LED is lit, the note is flat,
so you must tune the string up. If an LED to
the right of the green LED is lit, the note is
sharp, so you must tune the string down.
Note
♭(Flat)
♯(Sharp)
Tune Up
Tune Down
In Tune
To use the tuner:
1. Press and hold both FOOTSWITCHES simultaneously. The display will read bYP briefly then
tu then ---. The tuner is now active.
2. If you wish to change the tuning reference, turn the SELECT knob. The default tuning
reference is A=440Hz (represented as 40 in the LED display), which is considered to be the
standard tuning reference and will be used in most cases.
3. Tune your guitar.
4. Press either FOOTSWITCH to exit the tuner.
NOTE: If preset modifications had been made prior to entering the tuner, the changes will still be
available and can be stored after exiting the tuner.
20
Setup
Mono/Stereo Operation
Mono/stereo operation, for both the Main Output and Headphone Output, is determined by
whether or not a plug is connected to the 1/4" Main Output jack. If a plug is connected to this
jack, all outputs are automatically configured for mono operation, just plug in your amp and play.
If no plug is connected to the 1/4" Main Output jack, the outputs default to stereo operation
for headphone use. The 1/4” Main Output can be forced to operate in stereo when you need
to connect the Main Output to a stereo destination, such as a pair of amplifiers, a mixer, or a
recording device.
To configure the 1/4" Main Output for stereo operation:
1. Start with the power cable disconnected (unit powered down).
2. Press and hold the FX BANK button while connecting the power cable. Keep the FX BANK
button held down until the display reads StErEo On, then release the button. The 1/4” Main
Output is now configured for stereo (TRS) operation.
3. To configure the 1/4” Main Output back to mono operation, follow the same steps above
and wait for the display to read StErEo oFf.
Speaker Cabinet Compensation (SCC)
The Element Series processors are designed to allow you to play your guitar even if you don't
have an amplifier. The built-in Speaker Cabinet Compensation (SCC) feature is what makes this
possible. If you've ever listened to a direct guitar signal (using no guitar amplifier) then you know
how thin and unnatural it can sound. SCC emulates the frequency response of a guitar speaker
cabinet, providing the much more pleasant tone which a guitar cabinet reproduces. Use SCC
when connecting to headphones, directly to a mixer, or directly to a recording device.
SCC is automatically enabled when only headphones are connected to the Headphone Output
(and no cable is connected to the 1/4" Main Output). If a cable is connected to the Main Output,
SCC is defeated, both in the Headphone Output and Main Output. You must enable the SCC
feature on the Main Output manually if you wish to connect directly to a recording interface or
mixer.
To enable Speaker Cabinet Compensation on the Main Output:
1. Disconnect the power cord from the Element/Element XP processor (unit powered off).
2. Press and hold the TONE BANK button while connecting the power cord. Keep the TONE
BANK button held down until the display reads CabInEt On, then release the button.
21
Speaker Cabinet Compensation is now enabled on all outputs.
NOTE: Once enabled, SCC will remain active only while the unit is powered on. After a power cycle,
the SCC enabling procedure must be performed again if you want SCC to be enabled.
Expression Pedal Calibration (Element XP Only)
The Expression Pedal on the Element XP comes pre-calibrated from the factory. However, in the
event the Expression Pedal does not function properly, it can be re-calibrated using the below
Pedal Calibration procedure.
To calibrate the Element XP Expression Pedal:
1. Press and hold both FOOTSWITCHES simultaneously until PC appears in the LED display. All
effects and button LEDs will be turned off.
2. When tdn appears in the display, rock the EXPRESSION PEDAL forward (toe down) then
press either FOOTSWITCH.
3. When tuP appears in the display, rock the EXPRESSION PEDAL back (toe up) then press
either FOOTSWITCH.
4. If the calibration procedure is successful, the Element XP will return to Play Mode and will be
ready for use. If the calibration procedure fails, Err will appear in the LED display followed by
tdn. If this happens, repeat steps 2 and 3 until calibration is successful.
22
Expression Pedal Assignment (Element XP Only)
The Expression Pedal on the Element XP can be assigned to control the Volume, Wah,
Whammy™, YaYa™, or one of several other effects with your foot. You can also assign Minimum
(pedal toe up) and Maximum (pedal toe down) values. These Min and Max values will set the
range in which the Expression Pedal is allowed to control the assigned effect. The following table
shows the effect controls available for Expression Pedal control.
Effects Assignable For Control (Element XP Only)
Option (Shown In Display)
Effect Controlled (LED Lit)
Description
Off
–
No assignment (Expression Pedal off)
PrE
PRESET LEVEL
Pre-Delay Output Level
(level is adjusted before the Delay effect–delay levels will
not be affected by level change and will decay naturally)
POS
PRESET LEVEL
Post-Delay Output Level
(level is adjusted after the Delay effect–delay levels will
be affected by level change)
AH
WAH
Expression Pedal acts as a Wah pedal
Gan
AMP/DISTORTION
Amp Gain
SPE
MOD FX
Chorus Speed
LEL
MOD FX
Chorus Level
SPE
MOD FX
Flanger Speed
LEL
MOD FX
Flanger Level
SPE
MOD FX
Phaser Speed
LEL
MOD FX
Phaser Level
SPE
MOD FX
Tremolo Speed
dEP
MOD FX
Tremolo Depth
SPE
MOD FX
Panner Speed
dEP
MOD FX
Panner Depth
SPE
MOD FX
Vibrato Speed
dEP
MOD FX
Vibrato Depth
SPE
MOD FX
Rotary Speed
dEP
MOD FX
Rotary Depth
PEd
MOD FX
Expression Pedal acts as a YaYa effect
SPE
MOD FX
AutoYa Speed
dEP
MOD FX
AutoYa Depth
EnS
MOD FX
Envelope Filter Sensitivity
LEL
MOD FX
Detune Level
LEL
MOD FX
Pitch Shift Level
AhY
MOD FX
Expression Pedal acts as a Whammy pedal
dEL
DELAY
Delay Level
dEF
DELAY
Delay Feedback
rEL
REVERB
Reverb Level
23
To assign an effect to the Expression Pedal for control and set the Min/Max values:
1. Any effect you wish to assign to the Expression Pedal must be turned on before it can be
assigned. For information on turning an effect on, see "Turning Effects On & Off" on page
16.
2. From Play Mode, press the right arrow EDIT button repeatedly until the EXP (Expression)
LED is lit. An effect LED will also light indicating which effect the Expression Pedal is currently
assigned to and the LED display will show which effect control the Expression Pedal is
currently assigned to.
3. Turn the SELECT knob to select the effect control you wish to control (see the table on the
previous page for a list of effects selectable for control). As you turn the SELECT knob the
effect’s LED associated with the effect control will light.
4. Once you've selected the effect you want to control, press the right arrow EDIT button
once. You have now selected the Minimum (pedal toe up) control range. Turn the SELECT
knob to set this to the value which you want the Expression Pedal's full toe up position to
represent (the lowest value selectable by the Expression Pedal).
5. Press the right arrow EDIT button once. You have now selected the Maximum (pedal toe
down) control range. Turn the SELECT knob to set this to the value which you want the
Expression Pedal's full toe down position to represent (the highest value selectable by the
Expression Pedal).
6. Store the changes to a preset for later recall. See "Storing/Copying Presets" on page 17 for
further information.
24
The Effects
The Element XP offers 37 different effects with the ability to run 9 effects simultaneously. The
Element offers 31 different effects with the ability to run 8 effects simultaneously. Both provide
12 amp/cabinet models to choose from. The following section describes each of these available
effects and amp/cabinet models.
Wah (Element XP Only)
Wah is an effect controlled by the Expression Pedal and makes the guitar sound as if it’s saying
"Wah." There are three different wah types to choose from in the Element XP as shown in the
below table.
Available Wah Options
Option (Shown In Display)
Description
OFF
Wah effect is turned off
CrY
Dunlop® Cry Baby™ Wah
CLY
Vox® Clyde McCoy™ Wah
FUL
Full Range Wah
Compressor
A compressor is used to compress the dynamic range of a signal (make the loud signals quieter
and quiet signals louder). In the Element/Element XP processors, the Compressor is used to add
sustain and tighten up the dynamics of the guitar. The Compressor can be adjusted between 1-20
or turned off, as shown in the below table. Lower values represent lighter compression and higher
values represent heavier compression (and more sustain). The Compressor’s threshold and gain
settings are controlled simultaneously when adjusting the Compressor value, making it faster and
easier to set. The Compressor’s ratio is fixed at infinity:1.
Available Compressor Options
Option (Shown In Display)
Description
OFF
Compressor is turned off
1-20
Higher values increase compression amount and sustain
25
Amp/Distortion Models
The Element/Element XP have 6 Distortion and 12 Amp/Cabinet models to choose from. Each
Amp/Distortion option is identified by a pair of letters (e.g., td) and has nine settings (i.e., 1-9),
except the Acoustic Guitar Simulator which has only one setting. As the value of the number is
increased, the Amp/Distortion gain increases (the signal becomes more distorted). Each Amp
Model has a Cabinet Model assigned to it as shown in the following table.
Available Amp/Distortion Options
Option
(Shown In Display)
Type
Amp/Distortion Model Description
Cabinet Model Description
OFF
-
Effect turned off
-
tD1-9
Amp/Cabinet
‘57 Fender Tweed Deluxe
bF1-9
Amp/Cabinet
‘65 Fender Blackface Twin Reverb
Fender Twin Reverb 2x12
PL1-9
Amp/Cabinet
’68 Marshall Super Lead (Plexi)
Marshall Slant Celestion® Greenback 4x12
bS1-9
Amp/Cabinet
’77 Marshall Master Volume
Marshall Straight Celestion G12-T70 4x12
JC1-9
Amp/Cabinet
’83 Marshall JCM800
Marshall Straight Celestion G12-T70 4x12
AC1-9
Amp/Cabinet
’63 Vox AC30 Top Boost
AC30 TB Jensen® Blue Back 2x12
rE-1-9
Amp/Cabinet
’01 Mesa/Boogie® Dual Rectifier™
Johnson® Straight Celestion Vintage 30 4x12
CH1-9
Amp/Cabinet
’96 Matchless® DC-30
Johnson Straight Celestion Vintage 30 4x12
SO1-9
Amp/Cabinet
DigiTech Solo
DigiTech Solo 4x12
Et1-9
Amp/Cabinet
DigiTech Metal
DigiTech Metal 4x12
CL1-9
Amp/Cabinet
DigiTech Bright Clean
DigiTech Bright Clean 2x12
Ct1-9
Amp/Cabinet
DigiTech Clean Tube
Fender Twin Reverb 2x12
TS1-9
Distortion
Ibanez TS-9 Tube Screamer™
-
od1-9
Distortion
DOD 250 Preamp/Overdrive
-
dS1-9
Distortion
Boss DS-1™ Distortion
-
Gr1-9
Distortion
DigiTech Grunge
-
dL1-9
Distortion
DigiTech Death Metal
Bp1-9
Distortion
Electro Harmonix Big Muff Pi
-
ACO
Simulator
Acoustic Guitar Simulator
-
26
®
Fender Tweed Deluxe 1x12
®
®
®
®
®
®
®
®
®
®
®
EQ
The 3-band EQ lets you further shape the tone of each preset. Each EQ band is identified with
a pair of letters (e.g., bA represents the bass band) and has nine settings (i.e., 1-9). Settings 1-4
represent EQ cut (1 = 12dB cut, 2 = 9dB cut, 3 = 6dB cut, 4 = 3dB cut). Settings 6-9 represent
EQ boost (6 = 3dB boost, 7 = 6dB boost, 8 = 9dB boost, 9 = 12dB boost). A setting of 5
represents no cut or boost (flat). The following table shows the available EQ options.
Available EQ Options
Option (Shown In Display)
Description
bA1-9
Low frequency (bass) tone control
Id1-9
Mid frequency (midrange) tone control
tR1-9
High frequency (treble) tone control
Noise Gate
The Element and Element XP offer two noise gate types: Silencer and AutoSwell.
• Silencer Gate (noise reduction)
The Silencer Gate is designed to eliminate noise when you are not playing. The Silencer’s nine
settings (GA1-GA9) determine the threshold, with 1 being the lowest threshold and 9 being
the highest. This determines how loud a signal must be before it can open the gate and be
heard. The higher the setting, the louder a signal must be in order to open the gate.
• AutoSwell Gate (pluck detector gate)
The AutoSwell Gate creates an automatic volume swell effect. The AutoSwell’s nine settings
(SL1-SL9) determine the attack time (how quickly the volume swell grows from the note or
chord you play). The higher the setting, the slower the swell grows.
Available Noise Gate Options
Option (Shown In Display)
Description
OFF
Noise Gate effect is turned off
gA1-9
Silencer Gate
SL1-9
AutoSwell Gate
27
Mod FX
The Element/Element XP offer a variety of modulation and pitch effect types to choose from.
Each modulation effect is identified by a pair of letters (e.g., PH for phaser) and has nine settings
(i.e., 1-9). These settings include a variety of configurations that generally range from a more
subtle effect (lower settings) to a more extreme effect (higher settings). The following table shows
the available Mod FX options.
Available Mod FX Options
Option (Shown In Display)
Description
OFF
Mod FX is turned off
cH1-9
Modeled after a Boss® CE-2 Chorus
dC1-9
Dual Chorus
FL1-9
Flanger
PH1-9
Phaser
tr1-9
Tremolo
PA1-9
Panner
br1-9
Vibrato
ro1-9
Rotary
YA1-9
YaYa® (Element XP only)
AY1-9
AutoYa®
SF1-9
Step Filter
EF1-9
Envelope Filter
dt1-9
Detune
Sh1-9
Pitch Shift
HA1-9
Whammy (Element XP only)
The following section describes each of the available modulation and pitch effect types available in
the Element/Element XP.
• Chorus
The chorus effect adds a short delay to your signal. The delayed signal is modulated in and
out of tune and then mixed back with the original signal to create a thicker, more lush sound
which has movement and depth.
• Flanger
The flanger effect uses the same principles as the chorus effect, but uses a shorter delay time
and adds regeneration (or repeats) to the modulating delay. This results in an exaggerated up
and down sweeping motion of the effect.
• Phaser
The phaser effect splits the incoming signal then changes the phasing of the signal. This signal
is then taken in and out of phase and mixed back in with the original signal. As the phasing
changes, different frequencies get canceled resulting in a warm sort of twisting sound.
28
• Tremolo
The tremolo effect modulates the volume of the signal at an even rate.
• Panner
The panner effect modulates the sound from left to right at an even rate.
• Vibrato
The vibrato effect modulates the pitch of the incoming signal at an even rate.
• Rotary Speaker
The rotary speaker effect is an emulation of a classic Leslie amplifier/speaker which included
a spinning horn and woofer or sound-directing duct. The rotation of these two speakers
or duct produces an interesting combination of the sound panning from side to side. This
produces a slight pitch change due to the speed of the sound coming towards, and then
going away from the listener. This is the same effect you experience when a moving car or
train passes you, the pitch increases as the car or train approaches then decreased as it
travels away. This phenomenon is referred to as the Doppler effect.
• YaYa™ (Element XP Only)
The YaYa effect combines the characteristics of a wah and a flanger, creating an almost human
vowel characteristic, as if the guitar were saying "Yah." This effect is controlled using the
Expression Pedal.
• AutoYa™
Similar to the YaYa effect described above, the AutoYa effect automatically modulates the
sound at an even rate, so Expression Pedal control is not required.
• Step Filter
The step filter effect is like an automatic "random wah" with a square waveform.
• Envelope Filter
The envelope filter is a dynamic wah effect that alters your sound based upon how hard you
play.
• Detune
The detune effect makes a copy of your incoming signal, makes the copied signal slightly out
of tune from the original, then mixes the two signals together. The result is a doubling type of
effect as if two guitars were playing the same part together, but slightly out of tune with one
another.
• Pitch Shift
The pitch shift effect copies the incoming signal, then shifts the pitch of the copy to a different
note. The shifted note is then mixed back with the original signal, sounding as if two guitars
were playing together, but playing different notes.
• Whammy™ (Element XP Only)
The Whammy effect is a variable pitch shifter. This effect is basically a pitch shifter, but allows
you to vary the amount of pitch shifting with the Expression Pedal, creating a sweepable pitch
shifting effect.
29
Delay
Delay is an effect that records the incoming signal then plays it back a short time later. The
recorded signal can repeat just once or several times, depending upon the type of delay. The
Element and Element XP offer 4 different delay types: Analog Delay, Digital Delay, Ping Pong
Delay, and Tape Delay. Each of these delay types have 5 seconds of delay time available, with the
exception of the Analog Delay which has up to 350ms.
There are two different effect settings used to program the Delay effect in the Element/Element
XP: Delay Type and Delay Time. The Delay Type setting selects the delay type and varies the
amount of feedback (number of repeats) and level as shown in the following table.
Available Delay Type Options
Available Delay Type Options
Option
(Shown In Display) Delay Type
Variation Description
Option
(Shown In Display) Delay Type
PP1
Ping Pong
Delay
feedback=5%, level=15
Variation Description
OFF
-
Delay effect is turned off
An1
Analog Delay
feedback=5%, level=15
An2
Analog Delay
feedback=5%, level=30
PP2
Ping Pong
Delay
feedback=5%, level=30
An3
Analog Delay
feedback=5%, level=50
feedback=20%, level=15
Ping Pong
Delay
feedback=5%, level=50
Analog Delay
PP3
An4
An5
Analog Delay
feedback=20%, level=30
PP4
feedback=20%, level=15
An6
Analog Delay
feedback=20%, level=50
Ping Pong
Delay
An7
Analog Delay
feedback=45%, level=15
PP5
Ping Pong
Delay
feedback=20%, level=30
An8
Analog Delay
feedback=45%, level=30
PP6
feedback=20%, level=50
An9
Analog Delay
feedback=45%, level=50
Ping Pong
Delay
dd1
Digital Delay
feedback=5%, level=15
PP7
Ping Pong
Delay
feedback=45%, level=15
dd2
Digital Delay
feedback=5%, level=30
feedback=5%, level=50
Ping Pong
Delay
feedback=45%, level=30
Digital Delay
PP8
dd3
dd4
Digital Delay
feedback=20%, level=15
PP9
feedback=45%, level=50
dd5
Digital Delay
feedback=20%, level=30
Ping Pong
Delay
dd6
Digital Delay
feedback=20%, level=50
tA1
Tape Delay
feedback=5%, level=15
dd7
Digital Delay
feedback=45%, level=15
tA2
Tape Delay
feedback=5%, level=30
dd8
Digital Delay
feedback=45%, level=30
tA3
Tape Delay
feedback=5%, level=50
dd9
Digital Delay
feedback=45%, level=50
tA4
Tape Delay
feedback=20%, level=15
tA5
Tape Delay
feedback=20%, level=30
tA6
Tape Delay
feedback=20%, level=50
tA7
Tape Delay
feedback=45%, level=15
tA8
Tape Delay
feedback=45%, level=30
tA9
Tape Delay
feedback=45%, level=50
30
The second delay setting is Delay Time. Delay Time is indicated in the LED display by a value
between 10-990 (10ms-990ms) or 1.0-5.0 (1.0-5.0 seconds respectively in 100ms (0.1
second) increments), as shown in the table below. As previously mentioned, the Analog Delay is
the exception and provides up to 350ms of delay time.
Available Delay Time Options
Option (Shown In Display)
Description
1-35 (Analog Delay)
10ms-350ms in 10ms increments (Analog Delay)
1-99
10ms-990ms in 10ms increments
1.0-5.0
1-5 seconds in 100ms (0.1 sec) increments
Reverb
Reverb can be used for live performance or recording. When recording straight from the output
of the Element/Element XP, the room reverb can be used to add a sense of space, so that the
recorded guitar sounds more like a mic’ed up guitar cabinet in a room. The Element/Element XP
have three different reverb types to choose from, each with 9 varying levels (1-9); the higher the
value, the higher the level of the reverb effect.
Available Reverb Options
Option (Shown In Display)
Name
Description
OFF
-
Reverb effect is turned off
SP1-9
Spring
A classic yet popular effect for guitar players, this spring reverb is modeled after
the spring reverb found in a Fender® Twin Reverb® amplifier and can be used
to add a retro vibe to your guitar sound.
rO1-9
Room
This reverb reproduces the sound of a small to medium sized room. Use this
reverb when you want to create a sense of space without the guitar sounding
too distant. This reverb works well with up-tempo riffs.
HL1-9
Hall
This reverb simulates a large concert hall. Use this reverb with slower riffs
when you really want to create a large, lush, open space.
31
Element Preset List
User
Factory
1
F 1
2
User
Factory
User
Factory
Rectified
35
F35
Big Comfort
69
F69
Funky Flange
F 2
Tough Echo
36
F36
Stacked
70
F70
Guitar Organ
3
F 3
Clean Detune
37
F37
Take the 5th
71
F71
Ultra Detune/Delay
4
F 4
Fuzz Pie
38
F38
Retro Phase/Delay
72
F72
Lenny Flange
5
F 5
Roadhouse
39
F39
Jazz Box
73
F73
Lo Fi
6
F 6
Oh My 80s
40
F40
7 Avenged
74
F74
Soft Attack
7
F 7
Comp Clean
41
F41
Almighty Twin
75
F75
Purple Smog
8
F 8
Big Plexi
42
F42
Smoothy
76
F76
Echo Man
9
F 9
Flange Beast
43
F43
Dog Hair
77
F77
Smiley EQ
10
F10
Phase Rock
44
F44
Step N Time
78
F78
Vibro Wash
11
F11
Super Comp
45
F45
The Edge
79
F79
Run Like Hell
12
F12
Pompadour
46
F46
How Soon Is Now
80
F80
King Buzzo
13
F13
Mighty Distortion
47
F47
Grotto
81
F81
Thicken It
14
F14
Clean Chorus/Delay
48
F48
Lotta Love
82
F82
Punchy
15
F15
British Stack
49
F49
Kill Switch
83
F83
Legato Solo
16
F16
Super Tweed
50
F50
Stone Ages
84
F84
Lonely Heart
17
F17
Crunch Delay
51
F51
Classic Solo
85
F85
Snake Flange
18
F18
Funky Envelope
52
F52
Follow Me
86
F86
Over Drive
19
F19
Metal March
53
F53
Sub Mosh
87
F87
The Triplets
20
F20
Dark 'n Dirty
54
F54
Warm Drive
88
F88
Bounceback
21
F21
High Gain Solo
55
F55
Gain Green
89
F89
Touch Fuzz
22
F22
Screamin' OD
56
F56
Deep Trem
90
F90
Big Bite
23
F23
Top Boost Combo
57
F57
Bluegrass
91
F91
Jangle
24
F24
Rockin'
58
F58
Sustainer
92
F92
Forever 4ths
25
F25
Boogie Woogie
59
F59
Vintage Chorus
93
F93
Black In Back
26
F26
Roto Grind
60
F60
Cool Rhythm
94
F94
Bigfoot
27
F27
Goose Grease
61
F61
Mr Vibe
95
F95
Bluesman
28
F28
OctavePus
62
F62
Gritty Kitty
96
F96
Another Phase
29
F29
Tube Delay
63
F63
Big Punch
97
F97
Trem/Delay
30
F30
Knife's Edge
64
F64
Hole in My Life
98
F98
Mosquito
31
F31
Unplugged
65
F65
Amp Screamer
99
F99
Voxy Clean
32
F32
Megaton
66
F66
Gilmouresque
100
F00
Per-Plexied
33
F33
OctaFuzz
67
F67
El Surf
34
F34
Meditation
68
F68
Acoustic Pong
32
Name
Name
Name
Element XP Preset List
User
Factory
1
F 1
2
Name
User
Factory
Rectified
35
F35
F 2
Tough Echo
36
3
F 3
Clean Detune
4
F 4
5
Name
User
Factory
Name
Big Comfort
69
F69
Funky Flange
F36
Stacked
70
F70
Guitar Organ
37
F37
Take the 5th
71
F71
Ultra Detune/Delay
Fuzz Pie
38
F38
Retro Phase/Delay
72
F72
Lenny Flange
F 5
Roadhouse
39
F39
Jazz Box
73
F73
Lo Fi
6
F 6
Oh My 80s
40
F40
7 Avenged
74
F74
Soft Attack
7
F 7
Comp Clean
41
F41
Almighty Twin
75
F75
Purple Smog
8
F 8
Big Plexi
42
F42
Smoothy
76
F76
Echo Man
9
F 9
Flange Beast
43
F43
Dog Hair
77
F77
Smiley EQ
10
F10
Phase Rock
44
F44
Step N Time
78
F78
Vibro Wash
11
F11
Super Comp
45
F45
The Edge
79
F79
Run Like Hell
12
F12
Pompadour
46
F46
How Soon Is Now
80
F80
King Buzzo
13
F13
Mighty Distortion
47
F47
Grotto
81
F81
Thicken It
14
F14
Clean Chorus/Delay
48
F48
Lotta Love
82
F82
Punchy
15
F15
British Stack
49
F49
Kill Switch
83
F83
Legato Solo
16
F16
Super Tweed
50
F50
Stone Ages
84
F84
Lonely Heart
17
F17
Crunch Delay
51
F51
Classic Solo
85
F85
Snake Flange
18
F18
Funky Envelope
52
F52
Follow Me
86
F86
Over Drive
19
F19
Whammy Up
53
F53
Sub Mosh
87
F87
The Triplets
20
F20
Dark 'n Dirty
54
F54
Warm Drive
88
F88
Bounceback
21
F21
High Gain Solo
55
F55
Gain Green
89
F89
Touch Fuzz
22
F22
Screamin' OD
56
F56
Deep Trem
90
F90
Big Bite
23
F23
Top Boost Combo
57
F57
Bluegrass
91
F91
Jangle
24
F24
Power Wah
58
F58
Sustainer
92
F92
Forever 4ths
25
F25
Boogie Woogie
59
F59
Vintage Chorus
93
F93
Black In Back
26
F26
Roto Grind
60
F60
Cool Rhythm
94
F94
Bigfoot
27
F27
Goose Grease
61
F61
Mr Vibe
95
F95
Bluesman
28
F28
OctavePus
62
F62
Wah Crunch
96
F96
Another Phase
29
F29
Tube Delay
63
F63
Big Punch
97
F97
Trem/Delay
30
F30
Knife's Edge
64
F64
Hole in My Life
98
F98
Mosquito
31
F31
Unplugged
65
F65
Amp Screamer
99
F99
Voxy Clean
32
F32
Megaton
66
F66
Gilmouresque
100
F00
Per-Plexied
33
F33
OctaFuzz
67
F67
El Surf
34
F34
Meditation
68
F68
Acoustic Pong
33
Technical Information
Factory Restore
The Factory Restore procedure will return the Element/Element XP to its factory default state.
WARNING! The Factory Restore procedure will reset all modified user presets and return them to
their factory default settings. This procedure is permanent and cannot be undone.
To perform the Factory Restore procedure:
1. Start with the power cable disconnected (unit powered down).
2. Press and hold the STORE button while connecting the power cable. When Fr appears in the
display, release the STORE button then quickly press and hold the STORE button again for 3
seconds until rSt appears in the LED display then release.
3. The Factory Restore procedure will be performed. Wait for it to finish. At this point the
Factory Restore procedure will be complete if using an Element. When resetting an Element
XP, you must proceed to step 4 to calibrate the Expression Pedal.
4. When tdn appears in the display (Element XP only), the Element XP's Expression Pedal is
ready to be calibrated. Rock the EXPRESSION PEDAL forward (toe down) then press either
FOOTSWITCH.
5. When tuP appears in the display, rock the EXPRESSION PEDAL back (toe up) then press
either FOOTSWITCH.
6. If the calibration procedure is successful, the Element XP will return to Play Mode and will be
ready for use. If the calibration procedure fails, Err will appear in the LED display followed by
tdn. If this happens, repeat steps 4 and 5 until calibration is successful.
34
Specifications
General Specifications
A/D/A Converter: Sampling Frequency: DSP Section: Simultaneous Effects: Preset Memory: Drum Machine: Dimensions: Unit Weight:
24-bit high performance audio
44.1 kHz
AudioDNA2™ DSP Processor
8 (Element)
9 (Element XP)
100 User Presets (1-100) / 100 Factory Presets (F 1-F00)
45 Patterns
6.25" (L) x 4.5" (W) x 2.25" (H) (Element)
6.25" (L) x 8" (W) x 2.25" (H) (Element XP)
0.75 lbs. (Element)
1.20 lbs. (Element XP)
Analog Input Connections
Guitar Input: Input Impedance: 1/4" Unbalanced (TS)
500k Ω
Analog Output Connections
Left/Right Output: Left/Right Output Impedance: Maximum Output: Headphones: 1/4" Stereo TRS
500 Ω per side
+7.0 dBu
1/8" Stereo (TRS), 17.4mW per channel @ 50 Ω
Power
Power Consumption: Power Requirements:
Power Adapter:
1.6 Watts (<175 mA @ 9 VDC)
9 VDC External Adapter
PS0913DC-01 (US, JA, EU)
PS0913DC-02 (AU, UK)
Product specifications are subject to change without notice.
35
8760 South Sandy Parkway
Sandy, Utah 84070
WEB: digitech.com
SUPPORT: digitech.com/en-US/support
Element / Element XP Owner's Manual 5037184-A
DigiTech is a registered trademark of Harman.
© 2013 Harman. All Rights Reserved.
DigiTech, Johnson Amplification, DOD, Grunge, YaYa, AutoYa, and Whammy are trademarks of Harman in the U.S. and other countries.
Dunlop, Cry Baby, Vox, Clyde McCoy, Fender, Tweed Deluxe, Twin Reverb, Marshall, Celestion, Jensen, Mesa/Boogie, Dual Rectifier,
Matchless, Ibanez, Tube Screamer, Boss, DS-1, Electro Harmonix, and Big Muff are trademarks of their respective companies in the U.S.
and other countries and are not associated or affiliated with DigiTech or Harman.