1
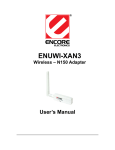
© 2010 Encore Electronics, Inc. All rights reserved.COVER
© 2011 Encore Electronics, Inc.
Product specifications, size, and shape are subject to change without notice, and actual product appearance may differ from that depicted herein.
All trademarks and brand names are the properties of their respective holders.
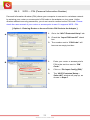
TABLE OF CONTENTS
CHAPTER 1:
OVERVIEW ...................................................................... 3
1.1
PRODUCT OVERVIEW .......................................................... 3
1.2
LED INDICATOR .................................................................. 4
1.3
PACKAGE CONTENTS .......................................................... 4
1.4
SYSTEM REQUIREMENTS ..................................................... 4
CHAPTER 2:
INSTALLATION................................................................ 5
2.1
HARDWARE INSTALLATION ................................................... 5
2.2
SOFTWARE INSTALLATION .................................................... 6
2.2.1
Windows® 7 and Windows Vista® ..................................... 6
2.2.2
Windows® XP ................................................................... 9
2.3
REMOVING THE ENUWI-2XN4X OR ENUWI-1XN4X
SOFTWARE
2.4
UPGRADING THE ENUWI-2XN4X OR ENUWI-1XN4X
SOFTWARE
CHAPTER 3:
....................................................................... 12
....................................................................... 12
CONNECTING TO WIRELESS NETWORKS IN
WINDOWS 7® ................................................................. 13
CHAPTER 4:
CONNECTING TO WIRELESS NETWORKS IN
WINDOWS VISTA® ........................................................ 15
CHAPTER 5:
CONNECTING TO WIRELESS NETWORKS IN
WINDOWS® XP.............................................................. 17
CHAPTER 6:
TECHNICAL SUPPORT ................................................ 20
CHAPTER 7:
WARRANTY INFORMATION......................................... 20
APPENDIX A.
WIRELESS SECURITY OVERVIEW ............................. 21
A1.
WEP, WPA AND WPA2 COMPARISON ................................ 21
1
www.encore-usa.com
A2.
WEP / WPA / WPA2 802.1X ............................................ 21
A3.
ENABLING 802.1X IN WINDOWS® ....................................... 22
APPENDIX B.
USING ENCORE WIRELESS MANAGER IN WINDOWS
XP® ................................................................................. 23
B1.
STARTING ENCORE WIRELESS MANAGER ........................... 23
B2.
ENCORE WIRELESS MANAGER OVERVIEW ......................... 24
B3.
MANUAL CONNECTION ...................................................... 26
B4.
EASY CONNECTION WITH WPS ......................................... 27
B4.1.
WPS — PBC (Push Button Configuration)..................... 28
B4.2.
WPS — PIN (Personal Information Number) ................. 29
B5.
APPENDIX C.
USING 802.1X.................................................................. 32
CONNECTING TO WIRELESS NETWORKS WITH
WIRELESS ZERO CONNECTION IN WINDOWS XP® . 33
APPENDIX D.
D1.
REGULATORY INFORMATION..................................... 35
FEDERAL COMMUNICATION COMMISSION INTERFERENCE
STATEMENT ...................................................................... 35
D2.
EUROPE – EU DECLARATION OF CONFORMITY ................... 36
APPENDIX E.
SOFTWARE END USER LICENSE AGREEMENT....... 38
APPENDIX F.
USER’S NOTICE............................................................ 40
Product specifications, size, and shape are subject to change without notice, and actual
product appearance may differ from that depicted herein.
All trademarks and brand names are the properties of their respective holders.
© 2011 Encore Electronics, Inc. All rights reserved.
2
www.encore-usa.com
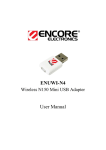
Chapter 1:
Overview
Thank you for choosing Encore Electronics’ Wireless N300/N150 USB Adapter. With just a
few steps, you will be enjoying the convenience of wireless networking at the speed that is
much faster than the prior Wireless G technology. Place the laptop or desktop computer at
any place you want to avoid the hassle and unsightly view of wires. Moreover,
ENUWI-2XN4x and ENUWI-1XN4x support Wi-Fi Protected Access (WPA/WPA2) data
encryption to help protect your data and privacy.
With Encore Electronics’ Wireless N300/N150 USB Adapter, you can smoothly browse
websites, play games, stream video, make phone calls and download files over the
Internet. You also can easily share files with other users and access peripherals, such as
network drives, printers and cameras, in your home or office networks.
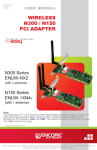
1.1
Product Overview
A.
WPS Button
B.
External Detachable Antennas*
C.
Activity LED
D.
USB 2.0 Connector
E.
Antenna Connectors
Note:
* N300 Series come with two antennas and
N150 Series come with one antenna. The
antennas shown in the picture on the right
are 5dBi antennas. Adapters with other type
of antennas are also available.
3
www.encore-usa.com
1.2
LED Indicator
The Activity LED will be blinking when:
The adapter is scanning for available wireless networks.
The adapter is transferring and/or receiving data.
1.3
Package Contents
N300 Series (ENUWI-2XN4x)
Wireless N300 USB Adapter x 1
External Detachable Antennas* x 2
Quick Installation Guide x 1
Installation CD (User Manual on CD) x 1
N150 Series (ENUWI-1XN4x)
Wireless N150 USB Adapter x 1
External Detachable Antenna* x 1
Quick Installation Guide x 1
Installation CD (User Manual on CD) x 1
Note:
* The antennas shown on the front cover are 5dBi antennas. Other type of antennas, such
as 2dBi and 3dBi antennas, are also available.
1.4
System Requirements
Available USB port
Operating System: Windows® 7, Windows Vista® or Windows® XP
CD-ROM Drive
4
www.encore-usa.com
Chapter 2:
2.1
Installation
Hardware Installation
1.
Attach the antenna(s) to the wireless adapter.
2.
No need to shutdown your computer.
3.
Insert the Wireless N300/150 USB Adapter to an available USB port on your
computer.
5
www.encore-usa.com
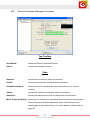
2.2
Software Installation
2.2.1 Windows® 7 and Windows Vista®
The installation procedures are similar between Windows® 7 and Windows Vista®.
A.
1. Click “Cancel,”
if you see the ‘Found New Hardware Wizard’
window.
B. Insert the ‘Installation CD” that comes with the package to the CD-ROM drive. Depending
on your computer’s configuration, one of the following 3 scenarios will happen (B-1 to B-3).
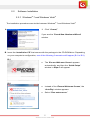
B-1
The ‘Encore Welcome Screen’ appears
automatically, and then the ‘Quick Setup’
window in Step C will appear.
Instead of the ‘Encore Welcome Screen,’ the
‘AutoPlay’ window appears.
Select “Run autorun.exe.”
B-2
6
www.encore-usa.com
B-3
If neither the ‘Encore Welcome
Screen’ nor the ‘AutoPlay’ window
appears, type “D:\autorun.exe” in the
“Run” command window in the Start
menu
(‘D’ is the drive letter of your
CD-ROM drive).
If the “Run” command window is not in
the Start menu, go to the Start menu
→ type “run” in the “search box”
→ select “Run” in the list of results.
Note: You can use “Browse” to find the
CD-ROM drive number.
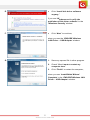
C.
Click “Software & Driver Installation
” in the ‘Quick Setup’ window.
D.
Click “Yes” to continue,
if you see ‘Do you want to allow the
following program to make changes to
this computer?’ in the ‘User Account
Control’ window.
7
www.encore-usa.com
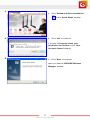
E.
Click “Install this driver software
anyway,”
if you see ‘Windows can’t verify the
publisher of this driver software’ in the
‘Windows Security’ window.
F.
Click “Next” to continue,
when you see the ‘ENCORE Wireless
LAN Driver – USB Adapter’ window.
G.
1. Save any opened file in other program.
2. Check “Yes, I want to restart my
computer now.”
3. Click “Finish” to restart the computer,
when you see ‘InstallShield Wizard
Complete’ in the ‘ENCORE Wireless LAN
Driver – USB Adapter’ window.
8
www.encore-usa.com
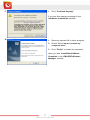
2.2.2 Windows® XP
A.
1.
Click “Cancel,”
if you see the ‘Found New Hardware
Wizard’ window when you start Windows
for the first time after installing the
hardware.
B. Insert the ‘Installation CD” that comes with the package to the CD-ROM drive. Depending
on your computer’s configuration, one of the following 2 scenarios will happen (B-1 or B-2).
B-1
The ‘Encore Welcome Screen’
appears automatically, and then the
‘Quick Setup’ window in Step C will
appear.
B-2
If the ‘Encore Welcome Screen’ does
not appear, type “D:\autorun.exe” in
the “Run” command window in the
Start menu
(‘D’ is the drive letter
of your CD-ROM drive).
Note: You can use “Browse” to find the
CD-ROM drive number.
9
www.encore-usa.com
C.
Click “Software & Driver Installation
” in the ‘Quick Setup’ window.
D.
Click “Yes” to continue,
if you see ‘A program needs your
permission to continue’ in the ‘User
Account Control’ window.
E.
Click ”Next” to continue,
when you see the ‘ENCORE Wireless
Manager’ window.
10
www.encore-usa.com
F.
Click “Continue Anyway,”
if you see this warning message in the
‘Hardware Installation’ window.
G.
1. Save any opened file in other program.
2. Check “Yes, I want to restart my
computer now.”
3. Click “Finish” to restart the computer,
when you see ‘InstallShield Wizard
Complete’ in the ‘ENCORE Wireless
Manager’ window.
11
www.encore-usa.com
2.3
Removing the ENUWI-2XN4x or ENUWI-1XN4x software
In Windows 7® and Windows Vista®
Open the Windows Start menu
→ go to “Control Panel” → click “Uninstall a
program” under the ‘Programs’ category → select the ‘ENCORE Wireless LAN
Driver - USB Adapter’ → click “Uninstall” → follow the on-screen instructions
In Windows XP®
Open the Windows Start menu
→ go to the “Encore Wireless Manager”
program group → select “Uninstall” → follow the on-screen instructions
Alternatively, open the Windows Start menu
→ go to “Control Panel” →
select “Add or Remove Programs” → select the “ENCORE Wireless Manager USB Adapter” → click “Uninstall” → follow the on-screen instructions
2.4
Upgrading the ENUWI-2XN4x or ENUWI-1XN4x software
Upgrades may be available at the Encore Electronics’ website (www.encore-usa.com).
You have to follow the steps below.
1.
Write down the SSID (wireless network name) and password (also called network
security key, passphrase or pre-shared key) for any wireless network you want to
save. The saved network profiles will be erased after the upgrade.
2.
Download the upgrade from ENUWI-2XN4x or ENUWI-1XN4x’s SUPPORT page on
Encore Electronics’ website.
3.
Remove the ENUWI-2XN4x or ENUWI-1XN4x software from your computer.
4.
Restart your computer.
5.
If the upgrade file ends in .zip, you need to extract the .zip file first.
6.
Run the upgrade file (ending in .exe) that you downloaded.
7.
Follow the on-screen instructions.
12
www.encore-usa.com
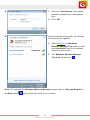
Chapter 3:
Connecting to Wireless Networks in Windows 7®
After installation, please use the Windows Wireless Manager to connect to wireless
networks by following the steps below.
A.
Left-click on the “Windows Wireless
Manager Tray Icon
B.
.”
If you do not see the icon, click the
“Show hidden icons
” arrow in the
system tray.
C.
1. Select the “Wireless Network
Connection” of your choice;
2. Click “Connect.”
Note: The “Connect automatically” check
box is checked by default. Your computer
will automatically connect to the same
wireless network when you are at the same
location next time.
Note: If no wireless security is turned on,
the warning message ‘Information sent
over this network might be visible to
others.’ will appear. Click “Connect” if you
want to proceed. Step D will be skipped.
13
www.encore-usa.com
D.
1. Enter the “Security Key” (also called
password, passphrase or pre-shared
key);
2. Click “OK.”
E.
Once connected successfully, you will see
the following two updates:
1. When Left-click on ‘Windows
Wireless Manager Tray Icon,’ you will
see ‘Connected’ next to the wireless
network of your choice.
2. The ‘Windows Wireless Manager
Tray Icon’ will become
.
Note: For help with the Windows Wireless Manager, please refer to “Help and Support” in
the Start menu
at the lower left corner of your screen.
14
www.encore-usa.com
Chapter 4:
Connecting to Wireless Networks in Windows
Vista®
After installation, please use the Windows Wireless Manager to connect to wireless
networks by following the steps below.
A.
Left-click on ‘Windows Wireless
Manager Tray Icon
.’
Click “Connect to a network.”
(NOT the “Network and Sharing
center.”)
B.
C.
1.
Select the “Wireless Network” of your
choice;
2.
Click “Connect.”
1.
Enter the “Security Key” (also called
password, passphrase or pre-shared
key);
2.
Click “Connect.”
D.
Note: If no wireless security is turned on,
an alternative window with the warning
message ‘Information sent over this
network might be visible to others.’ will
appear. Select “Connect Anyway” if you
want to proceed.
15
www.encore-usa.com
E.
1.
The “Save this network” and “Start
this connection automatically”
checkboxes are checked by default;
2.
Click “Close.”
Note: If “Start this connection
automatically” is checked, your computer
will automatically connect to the same
wireless network when you are at the same
location next time.
F.
The ‘Set Network Location’ window
may appear.
1.
Select one of the three location types:
“Home,” “Work” or “Public.”
2.
Click “Close” in the follow-up window.
Note: Based on your choice, Windows will
automatically configure the appropriate
firewall settings.
G.
The ‘Windows Wireless Manager
Tray Icon’ will show a globe at its lower
right corner (
).
Note: For help with the Windows Wireless Manager, please refer to “Help and Support” in
the Start menu
at the lower left corner of your screen.
16
www.encore-usa.com
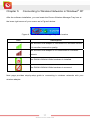
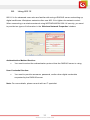
Chapter 5:
Connecting to Wireless Networks in Windows® XP
After the software installation, you can locate the Encore Wireless Manager Tray Icon at
the lower right corner of your screen as in Figure A below.
Figure A. Encore Wireless Manager Tray Icon location
Icon
Description
The wireless USB adapter is connected to a wireless network
with excellent connection quality.
The wireless USB adapter is not connected to a wireless
network.
The ENUWI-2XN4x/1XN4x hardware is installed.
The ENUWI-2XN4x/1XN4x hardware is removed.
Next page provides step-by-step guide to connecting to wireless networks with your
wireless adapter.
17
www.encore-usa.com
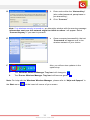
Please follow the steps below to connect to wireless networks.
A.
1. Right-click on the ‘Encore Wireless
Manager Tray Icon’ at the lower right
corner of the screen;
2. Click “Set Wizard.”
B.
1. Check “Wireless Local Area
Networks (Infrastructure);”
2. Click “Next.”
C.
1. Select the ‘SSID’ (wireless network
name) you want to connect to.
2. Click “Next.”
Note: If the selected SSID has wireless
security turned on, the Encore Wireless
Manager will automatically detect the
security option for you.
D.
Only enter and confirm the “Network
Key” (also called password,
passphrase or pre-shared key) of your
router or access point,
when you see the ‘Wireless Network
Properties’ window.
Note: For most users, no need to change
‘Network Authentication’ and ‘Data
encryption.’
18
www.encore-usa.com
E.
1. “Obtain an IP address automatically”
and “Obtain DNS server address
automatically” are checked by default
in the ‘Setup TCP/IP’ window.
Note: For most users, no need to change
these two options.
2. Click “Finish.”
F. Two ways to know the connection is successful:
F-1 Encore Wireless Manager Tray Icon
F-1 The ‘Encore Wireless Manager Tray
Icon’ at the lower right corner of the
screen will become green
.
Note: The ‘Windows Wireless Manager
Tray Icon’ will become
F-2 Encore Wireless Manager
.
F-2 The ‘Signal Strength’ and ‘Link
Quality’ bars in the ‘General’ tab in the
Encore Wireless Manager will
become active and green.
19
www.encore-usa.com
Chapter 6:
Technical Support
If you have other questions, please visit the SUPPORT section on our website at
www.Encore-USA.com first. You can submit your support request directly on our website.
You can also reach us through one of the support hotlines or emails listed on the back of
this user manual. Our experienced support representatives are ready to help you with any
of your technical questions.
Chapter 7:
Warranty Information
Please visit the TERMS AND POLICIES section on our website at www.Encore-USA.com
for detailed information.
20
www.encore-usa.com
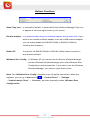
Appendix A. Wireless security Overview
A1.
WEP, WPA and WPA2 comparison
WEP, WPA-PSK and WPA2-PSK are standard wireless security options. When using any
one of them, each device in the wireless network MUST use the SAME wireless security
option and network security key (also called password, passphrase or pre-shared key).
Otherwise, the wireless network will not function properly.
WEP
WPA - PSK
WPA2 - PSK
(Wired Equivalent Privacy)
(Wi-Fi Protected Access
— Pre-Shared Key)
(Wi-Fi Protected Access 2
— Pre-Shared Key)
Name
Also
called
----
WPA - Personal
or WPA
WPA2 - Personal
or WPA2
Security
Level
basic
strong
strongest
Password
Format
10- or 26- character hex key
(A hex key is a combination of
letters, a – f, and numbers, 0 – 9.)
A2.
WEP / WPA / WPA2 802.1X
8- to 63- character passphrase
(A passphrase is a combination of
alphabet letters and numbers.)
802.1X is for advanced users who are familiar with using a RADIUS server and setting up
digital certificates. Each user needs to provide his or her own username, password and
digital certificate in order to access the wireless network.
Name
WEP 802.1X
WPA 802.1X
WPA2 802.1X
Also called
Dynamic WEP
WPA - Enterprise
WPA2 - Enterprise
Security Level
basic
strong
strongest
Note: WEP is a deprecated wireless security algorithm. There are readily available
programs to crack the WEP encryption within minutes. Nonetheless, WEP is widely used
and is often the default wireless security option in older wireless devices.
21
www.encore-usa.com
A3.
Enabling 802.1X in Windows®
802.1X authentication can help enhancing security for 802.11 wireless networks and wired
Ethernet networks with user account verification. A digital certificate or a smart card is
normally required to complete the authentication. 801.1X authentication is typically used
for workplace connections and requires IT professionals to setup the system properly.
Windows® 7 and Windows Vista®
1.
Left-click on the “Windows Network Manager Tray Icon” (
Windows 7 or
or
in
in Windows Vista), and then open “Network and Sharing
Center.”
2.
Open “Manage Wireless Networks.”
3.
Right-click the network that you want to enable 802.1X authentication for, and then
click “Properties.”
4.
Click the “Security” tab, and then, in the “Security Type” list, click “802.1X.”
5.
In the “Encryption Type” list, click the encryption type used by the router or access
point.
6.
In the “Choose a network authentication method” list, click the method that
matches with the RADIUS server.
7.
To configure additional settings, click “Settings.”
Windows® XP
Please refer to the “Help and Support” in the Start menu
22
www.encore-usa.com
.
Appendix B. Using Encore Wireless Manager in Windows XP®
The Encore Wireless Manager is the default wireless manager in Windows XP. While the
Encore Wireless Wizard helps you connecting to wireless networks quickly, the Encore
Wireless Manager offers you more control over your wireless networks.
B1.
Starting Encore Wireless Manager
You can open Encore Wireless Manager in three ways:
1. From Encore Wireless Manager Tray Icon —
Left-click on the ‘Encore Wireless Manager Tray Icon’ at the lower right corner
of your screen, and then select “Open Config Utility.”
2. From Encore Wireless Manager Desktop Icon —
Double-click on the desktop icon.
3. From Windows Start menu —
1.
Open the Windows Start menu at the lower left corner of your screen.
2.
Find the ‘ENCORE Wireless Manager’ program group.
3.
Select the “Wireless Manager” option.
23
www.encore-usa.com
B2.
Encore Wireless Manager Overview
Top Toolbar
Set Wizard:
starts the Encore Wireless Wizard.
About:
shows the software version.
Tabs
General:
shows the connection status information.
Profile:
shows the previously saved wireless networks.
Available Network:
shows the list of available wireless networks at your current
location.
Status:
shows the detailed connection status information.
Statistics:
shows the data amount that is transferred and received.
Wi-Fi Protected Setup: allows you to connect to a wireless network without entering and
memorizing any wireless password (also called network key,
passphrase or pre-shared key). For more details, please refer to
page 27.
24
www.encore-usa.com
Bottom Checkbox
Show Tray Icon: is checked by default. It allows the Encore Wireless Manager Tray Icon
to appear at the lower right corner of your screen.
Disable Adapter: It is recommended using one wireless adapter as the same time. If you
want to use another wireless adapter, such as a USB wireless adapter,
you can easily disable the ENUWI-2XN4x or ENUWI-1XN4x by
checking this checkbox.
Radio Off:
If checked, the ENUWI-2XN4x or ENUWI-1XN4x cannot connect to
any wireless network.
Windows Zero Config: In Windows XP, you cannot use the Encore Wireless Manager
and the Windows Wireless Manager (also called Wireless Zero
Configuration) at the same time. If you want to use the Windows
Wireless Manager, you need to check this box first.
Note: The “Windows Zero Config” checkbox may not appear sometimes. When this
happens, you can go to Start menu
→ “Control Panel” → ”Settings”
→”Administrative Tools” → “Services,” and then manually enable “Wireless Zero
Configuration.”
25
www.encore-usa.com
B3.
Manual Connection
A.
1. Go to the “Available Network” tab;
2. Select the “SSID” (wireless network
name) of your choice;
3. Click “Add to Profile;”
4. If the selected network has wireless
security enabled, Encore Wireless
Manager will automatically detect the
wireless security option.
Note: The ‘Unsecured Network’’ warning
window will appear if there is no wireless
security enabled. Click “OK” if you want to
proceed.
B.
Only enter and confirm the “Network
Key” (also called password,
passphrase or pre-shared key) of the
router or access point,
when you see this ‘Wireless Network
Properties’ window.
Note: For most users, no need to change
‘Network Authentication’ and ‘Data
encryption.’
C.
Once connected, the tab will
automatically switch to the “General”
tab. The ‘Signal Strength’ and ‘Link
Quality’ bars will become active and
green.
Note: The ‘Encore Wireless Manager
Tray Icon’ at the lower right corner of the
screen will become green as well.
26
www.encore-usa.com
B4.
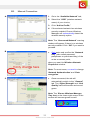
Easy Connection with WPS
Wi-Fi Protected Setup (WPS) allows your computer to connect to a wireless router or
access point without a network security key (also called password, passphrase or
pre-shared key). Please check the user manual of your router or access point to see if it
supports WPS.
Two connection methods are available for WPS:
Push Button Configuration (PBC)
Personal Information Number (PIN).
The instructions are shown in the following pages.
27
www.encore-usa.com
B4.1.
WPS — PBC (Push Button Configuration)
Push Button Configuration (PBC) allows your computer to connect to a wireless network
by the click of a button. You do not need to memorize your router or access point’s wireless
security password. Please check the user manual of your router or access
point to see if it supports WPS - PBC. Normally, the PBC button comes with
an icon like the one on the right.
Note: Before you start, please have your wireless router and your computer in close range.
This is just temporary. You can place your router or computer anywhere you want
afterward.
A.
1. Go to the “Wi-Fi Protected Setup” tab.
2. Click on “Push Button Config (PBC).”
3. Within two minutes, press the
WPS-PBC button on your router or
access point.
Note: Please follow the instructions in the
user manual of your router or access point.
B.
Once connected, the tab will
automatically switch to the “General”
tab. The ‘Signal Strength’ and ‘Link
Quality’ bars will become active and
green.
Note: The ‘Encore Wireless Manager
Tray Icon’ at the lower right corner of the
screen will become green as well.
28
www.encore-usa.com
B4.2.
WPS — PIN (Personal Information Number)
Personal Information Number (PIN) allows your computer to connect to a wireless network
by entering your router or access point’s PIN code to the adapter or vice versa. Unlike
wireless network security passwords, you do not need to memorize the PIN code. Please
check the user manual of your router or access point to see if it supports WPS - PIN.
[ Option 1: Entering Router or Access Point’s PIN Code to the Adapter ]
1. Go to the “Wi-Fi Protected Setup” tab.
A.
2. Check the “Input PIN from AP” check
box.
3. The number next to “PIN Code:” will
become an empty text box.
B.
29
1.
Enter your router or access point’s
PIN to the text box next to “PIN
Code:”
2.
Click on “Pin Input Config (PIN).”
3.
The “Wi-Fi Protected Setup –
Select AP” window will pop-up, as
shown in Step C.
www.encore-usa.com
C.
1.
Choose the network name (SSID) of
the router or access point you want
to connect.
2.
Click “Select.”
D.
Once connected, the tab will
automatically switch to the “General”
tab. The ‘Signal Strength’ and ‘Link
Quality’ bars will become active and
green.
Note: The ‘Encore Wireless Manager
Tray Icon’ at the lower right corner of the
screen will become green as well.
30
www.encore-usa.com
[ Option 2: Entering the Adapter’s PIN Code to the Router or Access Point ]
Note: To enter your adapter’s PIN code to your router or access point, you need to know
your router or access point’s IP address. In addition, you need to have one of the following:
A computer directly connects to the router or access point through wired
connection. This computer can be the one with ENUWI-2XN4 installed on or a
different one.
A computer already connects to the router or access point through wireless
connection. For example, this could be your laptop computer.
A.
1.
Go to the “Wi-Fi Protected Setup”
tab.
2.
Click on “Pin Input Config (PIN)”
3.
Within two minutes, enter the
wireless adapter’s PIN code into
your router or access point’s
Web-based Utility through a web
browser.
Note: To complete Step 3, you need to
know your router or access point’s IP
address to access its Web-based Utility.
B.
Once connected, the tab will
automatically switch to the “General”
tab. The ‘Signal Strength’ and ‘Link
Quality’ bars will become active and
green.
Note: The ‘Encore Wireless Manager
Tray Icon’ at the lower right corner of the
screen will become green as well.
31
www.encore-usa.com
B5.
Using 802.1X
802.1X is for advanced users who are familiar with using a RADIUS server and setting up
digital certificates. Workplace networks often use 802.1X to tighten the network control.
When connecting to a wireless network using WEP/WPA/WPA2 802.1X security, you need
to provide two types of information in the ‘Wireless Network Properties’ window.
Authentication Method Section:
You need to select the authentication protocol that the RADIUS server is using.
User Credential Section:
You need to provide username, password, and/or other digital credentials
requested by the RADIUS server.
Note: For more details, please consult with an IT specialist.
32
www.encore-usa.com
Appendix C. Connecting to Wireless Networks with Wireless
Zero Connection in Windows XP®
Alternatively, you can use Windows Wireless Manager (also called Wireless Zero
Connection or WZC) to connect to wireless networks in Windows XP by following the steps
below.
A.
1.
Open ‘Encore Wireless Manager.’
2.
Check “Windows Zero Config” at the
bottom of the window.
Note: You cannot use Windows ‘Wireless
Zero Connection’ and ‘Encore Wireless
Manager’ to manage wireless networks at
the same time. To give control back to
‘Encore Wireless Manager,’ you need to
uncheck ‘Windows Zero Config.’
Note: If the “Windows Zero Config” checkbox does not appear in Encore Wireless
Manager, you need to go to “Start menu
” → “Control Panel” → ”Settings” →
“Administrative Tools” → “Services,” and then enable “Wireless Zero Configuration.”
B.
C.
33
1.
Right-click on ‘Windows Wireless
Manager Tray Icon
;’
2.
Click “View Available Wireless
Networks.”
1.
Select the ‘Wireless Network Name’
(SSID) of your choice;
2.
Click “Connect.”
www.encore-usa.com
D.
1.
Enter and confirm the “Network key”
(also called password, passphrase or
pre-shared key);
2.
Click “Connect.”
Note: If no wireless security is turned on, an alternative window with the warning message
‘Information sent over this network might be visible to others.’ will appear. Select
“Connect Anyway” if you want to proceed.
Once connected successfully, the text
‘Connected’ will appear next to the
wireless network of your choice.
E.
F.
Also, you will see two updates in the
system tray:
1.
The ‘Windows Wireless Manager Tray Icon’ will change to
2.
The ‘Encore Wireless Manager Tray Icon’ will become green
.
.
Note: For help with the Windows Wireless Manager, please refer to “Help and Support” in
the Start menu
at the lower left corner of your screen.
34
www.encore-usa.com
Appendix D.
D1.
Regulatory Information
Federal Communication Commission Interference Statement
This equipment has been tested and found to comply with the limits for a Class B digital device,
pursuant to Part 15 of the FCC Rules. These limits are designed to provide reasonable
protection against harmful interference in a residential installation. This equipment generates,
uses and can radiate radio frequency energy and, if not installed and used in accordance with
the instructions, may cause harmful interference to radio communications. However, there is
no guarantee that interference will not occur in a particular installation. If this equipment does
cause harmful interference to radio or television reception, which can be determined by turning
the equipment off and on, the user is encouraged to try to correct the interference by one of the
following measures:
-
Reorient or relocate the receiving antenna.
-
Increase the separation between the equipment and receiver.
Connect the equipment into an outlet on a circuit different from that to which the receiver
is connected.
-
Consult the dealer or an experienced radio/TV technician for help.
FCC Caution: Any changes or modifications not expressly approved by the party responsible for
compliance could void the user's authority to operate this equipment.
This device complies with Part 15 of the FCC Rules. Operation is subject to the following two
conditions: (1) This device may not cause harmful interference, and (2) this device must accept
any interference received, including interference that may cause undesired operation.
IMPORTANT NOTE:
FCC Radiation Exposure Statement:
This equipment complies with FCC radiation exposure limits set forth for an uncontrolled
environment. This equipment should be installed and operated with minimum distance 20cm
between the radiator & your body.
This transmitter must not be co-located or operating in conjunction with any other antenna or
transmitter.
The availability of some specific channels and/or operational frequency bands are country
dependent and are firmware programmed at the factory to match the intended destination. The
firmware setting is not accessible by the end user.
35
www.encore-usa.com
D2.
Europe – EU Declaration of Conformity
This device complies with the essential requirements of the R&TTE Directive 1999/5/EC. The
following test methods have been applied in order to prove presumption of conformity with the
essential requirements of the R&TTE Directive 1999/5/EC:
EN 60 950-1: 2001 +A11: 2004
Safety of Information Technology Equipment
EN 50385: 2002
Product standard to demonstrate the compliance of radio base stations and fixed terminal
stations for wireless telecommunication systems with the basic restrictions or the reference
levels related to human exposure to radio frequency electromagnetic fields (110MHz - 40 GHz) General public
EN 300 328 V1.7.1 (2006-10)
Electromagnetic compatibility and Radio spectrum Matters (ERM); Wideband transmission
systems; Data transmission equipment operating in the 2,4 GHz ISM band and using wide band
modulation techniques; Harmonized EN covering essential requirements under article 3.2 of the
R&TTE Directive
EN 301 489-1 V1.6.1 (2005-09)
Electromagnetic compatibility and Radio Spectrum Matters (ERM); ElectroMagnetic
Compatibility (EMC) standard for radio equipment and services; Part 1: Common technical
requirements
EN 301 489-17 V1.2.1 (2002-08)
Electromagnetic compatibility and Radio spectrum Matters (ERM); ElectroMagnetic
Compatibility (EMC) standard for radio equipment and services; Part 17: Specific conditions for
2,4 GHz wideband transmission systems and 5 GHz high performance RLAN equipment
This device is a 2.4 GHz wideband transmission system (transceiver), intended for use in all EU
member states and EFTA countries, except in France and Italy where restrictive use applies.
In Italy the end-user should apply for a license at the national spectrum authorities in order to
obtain authorization to use the device for setting up outdoor radio links and/or for supplying
public access to telecommunications and/or network services.
This device may not be used for setting up outdoor radio links in France and in some areas the
RF output power may be limited to 10 mW EIRP in the frequency range of 2454 – 2483.5 MHz.
For detailed information the end-user should contact the national spectrum authority in France.
0560
36
www.encore-usa.com
Česky [Czech]
Encore Electronics Inc. tímto prohlašuje, že tento ENHWI-G2 je ve shodě se základními
požadavky a dalšími příslušnými ustanoveními směrnice 1999/5/ES.
Dansk [Danish]
Undertegnede Encore Electronics Inc erklærer herved, at følgende udstyr ENHWI-G2
overholder de væsentlige krav og øvrige relevante krav i direktiv 1999/5/EF.
Deutsch [German]
Hiermit erklärt Encore Electronics Inc, dass sich das Gerät ENHWI-G2 in
Übereinstimmung mit den grundlegenden Anforderungen und den übrigen einschlägigen
Bestimmungen der Richtlinie 1999/5/EG befindet.
Eesti [Estonian]
Käesolevaga kinnitab Encore Electronics Inc seadme ENHWI-G2 vastavust direktiivi
1999/5/EÜ põhinõuetele ja nimetatud direktiivist tulenevatele teistele asjakohastele
sätetele.
English
Hereby, Encore Electronics Inc, declares that this ENHWI-G2 is in compliance with the
essential requirements and other relevant provisions of Directive 1999/5/EC.
Español [Spanish]
Por medio de la presente Encore Electronics Inc declara que el ENHWI-G2 cumple con
los requisitos esenciales y cualesquiera otras disposiciones aplicables o exigibles de la
Directiva 1999/5/CE.
Ελληνική [Greek]
ΜΕ ΤΗΝ ΠΑΡΟΥΣΑ Encore Electronics Inc ΔΗΛΩΝΕΙ ΟΤΙ ENHWI-G2
ΣΥΜΜΟΡΦΩΝΕΤΑΙ ΠΡΟΣ ΤΙΣ ΟΥΣΙΩΔΕΙΣ ΑΠΑΙΤΗΣΕΙΣ ΚΑΙ ΤΙΣ ΛΟΙΠΕΣ ΣΧΕΤΙΚΕΣ
ΔΙΑΤΑΞΕΙΣ ΤΗΣ ΟΔΗΓΙΑΣ 1999/5/ΕΚ.
Français [French]
Par la présente Encore Electronics Inc déclare que l'appareil ENHWI-G2 est conforme
aux exigences essentielles et aux autres dispositions pertinentes de la directive
1999/5/CE.
Italiano [Italian]
Con la presente Encore Electronics Inc dichiara che questo ENHWI-G2 è conforme ai
requisiti essenziali ed alle altre disposizioni pertinenti stabilite dalla direttiva 1999/5/CE.
Latviski [Latvian]
Ar šo Encore Electronics Inc deklarē, ka ENHWI-G2 atbilst Direktīvas 1999/5/EK
būtiskajām prasībām un citiem ar to saistītajiem noteikumiem.
Lietuvių [Lithuanian]
Šiuo Encore Electronics Inc deklaruoja, kad šis ENHWI-G2 atitinka esminius reikalavimus
ir kitas 1999/5/EB Direktyvos nuostatas.
Nederlands [Dutch]
Hierbij verklaart Encore Electronics Inc dat het toestel ENHWI-G2 in overeenstemming is
met de essentiële eisen en de andere relevante bepalingen van richtlijn 1999/5/EG.
Malti [Maltese]
Hawnhekk, Encore Electronics Inc, jiddikjara li dan ENHWI-G2 jikkonforma mal-ħtiġijiet
essenzjali u ma provvedimenti oħrajn relevanti li hemm fid-Dirrettiva 1999/5/EC.
Magyar [Hungarian]
Alulírott, Encore Electronics Inc nyilatkozom, hogy a ENHWI-G2 megfelel a vonatkozó
alapvetõ követelményeknek és az 1999/5/EC irányelv egyéb elõírásainak.
Polski [Polish]
Niniejszym Encore Electronics Inc oświadcza, że ENHWI-G2 jest zgodny z zasadniczymi
wymogami oraz pozostałymi stosownymi postanowieniami Dyrektywy 1999/5/EC.
Português [Portuguese]
Encore Electronics Inc declara que este ENHWI-G2 está conforme com os requisitos
essenciais e outras disposições da Directiva 1999/5/CE.
Slovensko [Slovenian]
Encore Electronics Inc izjavlja, da je ta ENHWI-G2 v skladu z bistvenimi zahtevami in
ostalimi relevantnimi določili direktive 1999/5/ES.
Slovensky [Slovak]
Encore Electronics Inc týmto vyhlasuje, že ENHWI-G2 spĺňa základné požiadavky a
všetky príslušné ustanovenia Smernice 1999/5/ES.
Suomi [Finnish]
Encore Electronics Inc vakuuttaa täten että ENHWI-G2 tyyppinen laite on direktiivin
1999/5/EY oleellisten vaatimusten ja sitä koskevien direktiivin muiden ehtojen mukainen.
Svenska [Swedish]
Härmed intygar Encore Electronics Inc att denna ENHWI-G2 står I överensstämmelse
med de väsentliga egenskapskrav och övriga relevanta bestämmelser som framgår av
direktiv 1999/5/EG.
37
www.encore-usa.com
Appendix E. Software End User License Agreement
PLEASE READ THE FOLLOWING TERMS ("Agreement") CAREFULLY. USE OF THE
SOFTWARE (defined below) PROVIDED BY ENCORE ELECTRONICS, INC. IS PERMITTED
ONLY UNDER AND IN ACCORDANCE WITH THIS AGREEMENT. IF YOU DO NOT AGREE
TO BE BOUND BY THIS AGREEMENT, PLEASE DO NOT USE THIS SOFTWARE.
1. Grant of License. This Agreement permits you to use one copy of the Software or the
Software included in this package or device on any single computer ("Software"). For each
software licensee, the program can be "in use" on only one computer or hardware device at any
given time. The Software is "in use" when it is either downloaded, copied, loaded into RAM or
installed into the hard disk or other permanent memory of a computer or other hardware device.
YOU MAY NOT RENT, LEASE, SUBLICENSE, SELL, ASSIGN,
2. License Restrictions.
LOAN OR OTHERWISE TRANSFER THE SOFTWARE OR ANY OF YOUR RIGHTS AND
OBLIGATIONS UNDER THIS AGREEMENT. You may not modify, translate, reverse assemble,
decompile, disassemble or otherwise attempt (i) to defeat, avoid, bypass, remove, deactivate or
otherwise circumvent any software protection mechanisms in the Software, including without
limitation any such mechanism used to restrict or control the functionality of the Software, or (ii)
to derive the source code or the underlying ideas, algorithms, structure or organization from the
Software (except to the extent that such activities may not be prohibited under applicable law).
However, you may transfer all your right to use the Software to another person or organization,
provided that (a) the followings are also transferred with the Software, (i) this Agreement; (ii)
other software if contained in the original package, and/or hardware that the Software is bundled;
(iii) any original or updated version of the Software; (b) no copies including back-up and installed
in your computer or other device are at your possession after the transfer, and (c) the recipient
accepts all the terms of this Agreement. In no event shall you transfer the Software obtained as
a trial, test version, or otherwise specified as not for resale. A special license permit from
Encore Electronics, Inc. is required if the program is going to be installed on a network server for
the sole purpose of distribution to other computers.
3. Copyright. The Software or the Software contained in this package or device is protected
by United States copyright laws, international treaty provisions, and all other applicable national
laws. The Software must be treated like all other copyrighted materials (e.g. books and
musical recordings). This license does not allow the Software to be rented or leased, and the
written materials accompanying the Software (if any) may not be copied.
4. Ownership. Title, ownership rights, and all intellectual property rights in and to the Software
and any accompanying documentation, and any copy of the foregoing, and any sample contents
shall remain the sole and exclusive property of Encore Electronics, Inc. and/or its third party
licensors. You agree to abide by the copyright law and all other applicable laws. You
acknowledge that the Software contains valuable confidential information and trade secrets of
Encore Electronics, Inc. and/or its third party licensors.
5. Warranty Disclaimer. THE SOFTWARE IS MADE AVAILABLE TO YOU ON "AS IS" BASIS.
NO WARRANTIES, EITHER EXPRESS OR IMPLIED, ARE MADE WITH RESPECT TO THIS
SOFTWARE, INCLUDING BUT NOT LIMITED TO THE IMPLIED WARRANTIES OF
38
www.encore-usa.com
MERCHANTABILITY AND FITNESS FOR A PARTICULAR PURPOSE AND WARRANTIES
FOR NON-INFRINGEMENT OF INTELLECTUAL PROPERTY, AND ENCORE ELECTRONICS,
INC. EXPRESSLY DISCLAIMS ALL WARRANTIES NOT STATED HEREIN. YOU ASSUME
THE ENTIRE RISK AS TO THE QUALITY AND PERFORMANCE OF THE SOFTWARE.
SHOULD THE SOFTWARE PROVE DEFECTIVE, YOU, AND NOT ENCORE ELECTRONICS,
INC. OR AN AUTHORIZED RESELLER, ASSUME THE ENTIRE COST OF NECESSARY
SERVICING, REPAIR, OR CORRECTION. SOME STATES DO NOT ALLOW THE
EXCLUSION OF IMPLIED WARRANTIES, SO THE ABOVE EXCLUSION MAY NOT APPLY TO
YOU. THIS WARRANTY GIVES YOU SPECIFIC LEGAL RIGHTS, AND YOU MAY ALSO
HAVE OTHER RIGHTS THAT VARY FROM STATE TO STATE. YOUR SOLE REMEDY AND
THE ENTIRE LIABILITY OF ENCORE ELECTRONICS, INC. ARE SET FORTH ABOVE.
6. No Liability for Consequential Damages. YOU AGREE THAT IN NO EVENT SHALL
ENCORE ELECTRONICS, INC. OR ITS AGENTS BE LIABLE FOR ANY LOSS OF
ANTICIPATED PROFITS, LOSS OF DATA, LOSS OF USE, BUSINESS INTERRUPTION,
COST OF COVER OR ANY OTHER INDIRECT, INCIDENTAL, SPECIAL, PUNITIVE OR
CONSEQUENTIAL DAMAGES WHATSOEVER ARISING OUT OF THE USE OF OR INABILITY
TO USE THE SOFTWARE, HOWEVER CAUSED AND ON ANY THEORY OF LIABILITY
(WHETHER FOR BREACH OF CONTRACT, TORT (INCLUDING NEGLIGENCE) OR
OTHERWISE), EVEN IF ENCORE ELECTRONICS, INC. HAS BEEN ADVISED OF THE
POSSIBILITY OF SUCH DAMAGES. IN NO EVENT WILL ENCORE ELECTRONICS, INC. BE
LIABLE TO YOU FOR DAMAGES IN AN AMOUNT GREATER THAN THE FEES PAID FOR
THE USE
THE FOREGOING LIMITATIONS APPLY TO THE EXTENT PERMITTED BY
APPLICABLE LAWS IN YOUR JURISDICTION.
7. Export. You will not export or re-export the product incorporating the Software without the
appropriate United States or foreign government licenses.
8. U.S. Government Restricted Rights. If you are a unit or agency of the United States
government, the Software and related documentation are deemed to be "commercial computer
software" and "commercial computer software documentation," respectively, pursuant to DFAR
Section 227.7202 and FAR Section 12.212(b), as applicable. Any use, modification,
reproduction, release, performing, displaying or disclosing of the Software and/or the related
documentation by the United States government shall be governed solely by the terms of this
Agreement and shall be prohibited except to the extent expressly permitted by the terms of this
Agreement. Any technical data provided that is not covered by the above provisions is deemed
to be "technical data commercial items" pursuant to DFAR Section 227.7015(a). Any use,
modification, reproduction, release, performing, displaying or disclosing of such technical data
shall be governed by the terms of DFAR Section 227.7015(b).
9. Termination. THIS AGREEMENT SHALL BE EFFECTIVE UPON INSTALLATION OF THE
SOFTWARE AND SHALL TERMINATE UPON THE EARLIER OF: (i) YOUR FAILURE TO
COMPLY WITH ANY TERM OF THIS AGREEMENT; OR (ii) RETURN, DESTRUCTION OR
DELETION OF ALL COPIES OF THE SOFTWARE IN YOUR POSSESSION. Encore
Electronics, Inc.'s rights and your obligations shall survive the termination of this Agreement.
10. High Risk Activities. The Software is not fault-tolerant and is not designed or intended for
use in hazardous environments requiring fail-safe performance, or any other application in which
the failure of the Software could lead directly to death, personal injury, or severe physical or
39
www.encore-usa.com
property damage (collectively, "High Risk Activities"). Encore Electronics, Inc. EXPRESSLY
DISCLAIMS ANY EXPRESS OR IMPLIED WARRANTY OF FITNESS FOR HIGH RISK
ACTIVITIES.
11. Governing Law and Jurisdiction. This Agreement will be governed by and construed
under the laws of the State of California. and the United States as applied to agreements entered
into and to be performed entirely within California., without regard to conflicts of laws provisions
thereof and the parties expressly exclude the application of the United Nations Convention on
Contracts for the International Sales of Goods. Suits or enforcement actions must be brought
within, and each party irrevocably commits to the exclusive jurisdiction of the state and federal
courts located in Santa Clara County.
Appendix F. User’s Notice
No part of this manual, including the products and software described in it, may be
reproduced, transmitted, transcribed, stored in a retrieval system, or translated into any
language in any form or by any means, except documentation kept by the purchaser for backup
purposes, without the express written permission of us.
WE PROVIDES THIS MANUAL “AS IS” WITHOUT WARRANTY OF ANY KIND, EITHER
EXPRESS OR IMPLIED, INCLUDING BUT NOT LIMITED TO THE IMPLIED WARRANTIES OR
CONDITIONS OF MERCHANTABILITY OR FITNESS FOR A PARTICULAR PURPOSE. IN NO
EVENT SHALL US, ITS DIRECTORS, OFFICERS, EMPLOYEES OR AGENTS BE LIABLE
FOR ANY INDIRECT, SPECIAL, INCIDENTAL, OR CONSEQUENTIAL DAMAGES
(INCLUDING DAMAGES FOR LOSS OF PROFITS, LOSS OF BUSINESS, LOSS OF USE OR
DATA, INTERRUPTION OF BUSINESS), EVEN IF WE HAS BEEN ADVISED OF THE
POSSIBILITY OF SUCH DAMAGES ARISING FROM ANY DEFECT OR ERROR IN THIS
MANUAL OR PRODUCT.
Product warranty or service will not be extended if: (1) the product is repaired, modified or
altered, unless such repair, modification of alteration is authorized in writing by us; or (2) the
serial number of the product is defaced or missing.
Products and corporate names appearing in this manual may or may not be registered
trademarks or copyrights of their respective companies, and are used only for identification or
explanation and to the owners’ benefit, without intent infringe.
®
®
®
Windows 7, Windows Vista and Windows XP are registered trademarks of Microsoft
Corporation.
Adobe and Acrobat are registered trademarks of Adobe Systems Incorporated.
®
®
®
SPECIFICATIONS AND INFORMATION CONTAINED IN THIS MANUAL ARE
FURNISHED FOR INFORMATION USE ONLY, AND ARE SUBJECT TO CHANGE AT ANY
TIME WITHOUT NOTICE, AND SHOULD NOT BE CONSTRUED AS A COMMITMENT BY US.
WE ASSUME NO RESPONSIBILITY OR LIABILITY FOR ANY ERRORS OR INACCURACIES
THAT MAY APPEAR IN THIS MANUAL, INCLUDING THE PRODUCTS AND SOFTWARE
DESCRIBED IN IT.
40
www.encore-usa.com
41
www.encore-usa.com