1
Administration Guide
BlackBerry Professional Software for IBM Lotus Domino
Version: 4.1 | Service Pack: 4
SWD-311541-0911043520-001
Contents
1
Managing user accounts...................................................................................................................................................
Add a user account......................................................................................................................................................................
Add a user account manually....................................................................................................................................................
Change user account information............................................................................................................................................
Remove a user account from the BlackBerry Professional Software...................................................................................
7
7
7
7
8
2 Managing BlackBerry devices..........................................................................................................................................
Change how to load existing email messages on to BlackBerry devices............................................................................
Options for assigning a BlackBerry device to a user account..............................................................................................
Assign a BlackBerry device to a user account using the BlackBerry Manager..................................................................
Assigning a BlackBerry device to a user over the wireless network....................................................................................
Specify the wireless activation message and password settings....................................................................................
Create and send a wireless activation message to a user.................................................................................................
Assign a BlackBerry device to a user using the BlackBerry Desktop Manager.................................................................
Protecting lost or stolen BlackBerry devices...........................................................................................................................
Protect a lost BlackBerry device...........................................................................................................................................
Protect a stolen BlackBerry device.......................................................................................................................................
Prepare an existing BlackBerry device for distribution to a new user............................................................................
9
9
9
10
10
10
11
11
11
12
12
13
3 Configuring organizer data synchronization................................................................................................................
Create a roaming user profile to support organizer data synchronization........................................................................
Create a replica of local databases on the messaging server to support personal organizer data synchronization
........................................................................................................................................................................................................
Configure a user as an IBM Lotus Domino Web Access user to support organizer data synchronization....................
Customizing address book synchronization............................................................................................................................
Customize address book synchronization for all user accounts......................................................................................
Turn off address book synchronization for all user accounts...........................................................................................
Customize address book synchronization for a specific user account............................................................................
Turn off address book synchronization for a specific user account................................................................................
Customizing task synchronization............................................................................................................................................
Customize task synchronization for all user accounts.......................................................................................................
Turn off task synchronization for all user accounts...........................................................................................................
Customize task synchronization for a specific user account............................................................................................
Turn off task synchronization for a specific user account.................................................................................................
15
15
15
16
16
16
17
17
17
18
18
18
18
19
Customizing memo synchronization.........................................................................................................................................
Customize memo synchronization for all user accounts...................................................................................................
Turn off memo synchronization for all user accounts........................................................................................................
Customize memo synchronization for a specific user account........................................................................................
Turn off memo synchronization for a specific user account.............................................................................................
Customizing message filter synchronization..........................................................................................................................
Customize message filter synchronization for all user accounts.....................................................................................
Turn off message filter synchronization for all user accounts.........................................................................................
Customize message filter synchronization for a specific user account..........................................................................
Turn off message filter synchronization for a specific user account...............................................................................
Customizing message setting synchronization......................................................................................................................
Customize message setting synchronization for all user accounts.................................................................................
Turn off message setting synchronization for all user accounts......................................................................................
Customize message setting synchronization for a specific user account......................................................................
Turn off message setting synchronization for a specific user account...........................................................................
Turn off synchronization for contact pictures on a user account........................................................................................
Managing the wireless backup and recovery of organizer data..........................................................................................
Turn off the wireless backup of organizer data for a user account.................................................................................
Remove a user’s organizer data from the BlackBerry Professional Software................................................................
Mapping address book fields.....................................................................................................................................................
Map an address book field from the email application to an address book field on all BlackBerry devices............
Map user-defined address book fields to address book fields on all BlackBerry devices............................................
Map an address book field in the email application to an address book field on a specific BlackBerry device.......
Map user-defined address book fields to address book fields on a specific BlackBerry device.................................
19
19
20
20
21
21
21
21
21
22
22
22
22
23
23
23
24
24
24
24
25
25
25
26
4 Configuring message handling........................................................................................................................................
Managing email message filters...............................................................................................................................................
Create an email message filter that applies to all user accounts....................................................................................
Turn on an email message filter that applies to all user accounts..................................................................................
Create an email message filter that applies to a specific user account.........................................................................
Turn on an email message filter that applies to a specific user account........................................................................
Managing how messages are forwarded to a user account..................................................................................................
Forward unfiltered email messages to a BlackBerry device.............................................................................................
Forward email messages from inbox subfolders to a BlackBerry device........................................................................
Turn off synchronization for email messages sent from a BlackBerry device................................................................
27
27
27
28
28
29
30
30
30
31
Turn off email message forwarding to a BlackBerry device.............................................................................................
Managing wireless message reconciliation.............................................................................................................................
Turn off wireless message reconciliation............................................................................................................................
Turn on reconciliation for permanently deleted email messages....................................................................................
Managing message signatures and disclaimers.................................................................................................................
Sending notification messages to users..................................................................................................................................
Specify the administration email address for notification messages.............................................................................
Send a notification message to all users.............................................................................................................................
Send a notification message to specific users....................................................................................................................
Automated notification messages........................................................................................................................................
Managing the incoming message queue.................................................................................................................................
Delete messages for a specific user from the incoming message queue.......................................................................
Monitoring messages sent from BlackBerry devices.............................................................................................................
Configure a blind carbon copy on all messages.................................................................................................................
31
31
31
32
32
33
34
34
34
35
36
36
36
36
5 Configuring support for attachments.............................................................................................................................
Configuring support for attachment file formats...................................................................................................................
File formats that the BlackBerry Attachment Service supports.......................................................................................
Turn off support for an attachment file format...................................................................................................................
Add support for attachment file formats.............................................................................................................................
Controlling the size of attachments that users can receive on their BlackBerry devices................................................
Suggested file sizes for attachments...................................................................................................................................
Configure the maximum file size for attachments.............................................................................................................
Configure the maximum dimensions of image attachments that can display on BlackBerry devices......................
Change the maximum file size of attachments that users can send...............................................................................
Optimize the handling of file attachments.............................................................................................................................
37
37
37
37
38
38
38
39
39
40
40
6 Controlling BlackBerry device behavior using IT policy.............................................................................................
Preconfigured IT policies in the BlackBerry Professional Software.....................................................................................
Enforcing IT policy changes over the wireless network.........................................................................................................
Changing the default behavior of BlackBerry devices and the BlackBerry Desktop Software in your organization
........................................................................................................................................................................................................
Reverting to the default behavior of BlackBerry devices and BlackBerry Desktop Software..........................................
Create an IT policy.......................................................................................................................................................................
Create an IT policy based on an existing IT policy.................................................................................................................
Change an IT policy rule setting in an IT policy......................................................................................................................
43
43
45
46
46
46
47
47
Assign an IT policy to a user account.......................................................................................................................................
Import IT policy definitions........................................................................................................................................................
Delete an IT policy.......................................................................................................................................................................
Resend an IT policy to a BlackBerry device manually............................................................................................................
Resend an IT policy to a BlackBerry device automatically....................................................................................................
48
48
48
49
49
7 Customizing wireless access to enterprise applications............................................................................................
Specify the central push server.................................................................................................................................................
Configuring how BlackBerry devices authenticate with content servers...........................................................................
Configure how BlackBerry devices authenticate with content servers..........................................................................
Configure the BlackBerry MDS Connection Service to authenticate on behalf of BlackBerry devices with content
servers that use NTLM............................................................................................................................................................
Configure the BlackBerry MDS Connection Service to authenticate on behalf of BlackBerry devices with content
servers that use Kerberos.......................................................................................................................................................
Configure the BlackBerry MDS Connection Service to authenticate on behalf of BlackBerry devices with content
servers that use LTPA..............................................................................................................................................................
Configure the BlackBerry MDS Connection Service to authenticate on behalf of BlackBerry devices with the RSA
Authentication Manager........................................................................................................................................................
Allowing push applications on external web servers to make trusted connections to the BlackBerry MDS Connection
Service...........................................................................................................................................................................................
Permit BlackBerry devices to connect to untrusted external web servers.....................................................................
Configure the BlackBerry MDS Connection Service to retrieve certificates for web servers......................................
Configure the BlackBerry MDS Connection Service to retrieve the status of certificates for web servers...............
Install retrieved certificates for web servers.......................................................................................................................
Restricting user access to web content....................................................................................................................................
Restrict web content requests from BlackBerry devices...................................................................................................
Create URL patterns...............................................................................................................................................................
Create a pull rule.....................................................................................................................................................................
Assign URL patterns to a pull rule........................................................................................................................................
Assign a pull rule to a specific user......................................................................................................................................
Restricting user access to media content................................................................................................................................
Prevent users from accessing certain types of media.......................................................................................................
Configure a size restriction for certain types of media.....................................................................................................
Configuring how the BlackBerry MDS Connection Service manages web requests....................................................
Restricting the push content that users can receive on their BlackBerry devices............................................................
51
51
51
51
52
52
52
53
53
54
54
54
55
55
56
56
56
57
57
57
58
58
58
60
Restrict push applications from sending data to BlackBerry devices.............................................................................
Create a push initiator for a push application....................................................................................................................
Turn on push authorization....................................................................................................................................................
Create a push rule...................................................................................................................................................................
Assign push initiators to a push rule....................................................................................................................................
Assign a push rule to a specific user account.....................................................................................................................
Encrypt push requests that push applications send to BlackBerry devices...................................................................
Managing push application requests.......................................................................................................................................
Specify device ports for application-reliable push requests............................................................................................
Store push application requests in the BlackBerry Configuration Database................................................................
Configure storage settings for push requests stored in the BlackBerry Configuration Database.............................
Configure the maximum number of active connections that the BlackBerry MDS Connection Service can process
....................................................................................................................................................................................................
Configure the maximum number of queued connections that the BlackBerry MDS Connection Service can process
....................................................................................................................................................................................................
Clear the push request queue manually on a Microsoft SQL Server...............................................................................
Configuring how the BlackBerry MDS Connection Service connects to BlackBerry devices......................................
60
61
61
62
62
62
63
63
63
64
64
65
66
66
8 Managing BlackBerry Device Software and wireless applications..........................................................................
Making BlackBerry Device Software or applications available to users.............................................................................
Share the network folder........................................................................................................................................................
Install the BlackBerry Device Software files in the shared network folder....................................................................
Add the application files to the shared network folder.....................................................................................................
Indexing applications on a network drive................................................................................................................................
Create a software index for the applications in the shared network folder...................................................................
Reindex the applications in the shared network folder....................................................................................................
Defining software configurations.............................................................................................................................................
Create a software configuration...........................................................................................................................................
Create a software configuration based on an existing software configuration............................................................
Applying application control policies.......................................................................................................................................
Define an application control policy....................................................................................................................................
Assign an application control policy to an application.....................................................................................................
Assign a software configuration to a user account............................................................................................................
Send an application to a BlackBerry device over the wireless network..............................................................................
Load the BlackBerry Device Software or applications on to a BlackBerry device using the BlackBerry Manager......
69
69
69
69
70
70
70
71
71
71
72
72
72
73
73
73
74
65
Managing applications on BlackBerry devices.......................................................................................................................
Change an application control policy..................................................................................................................................
Remove an application from a BlackBerry device..............................................................................................................
Upgrade an application on a BlackBerry device over the wireless network..................................................................
Remove a software configuration from a user account.....................................................................................................
74
74
74
75
75
9 Controlling the BlackBerry environment.......................................................................................................................
Protecting BlackBerry device data in transit...........................................................................................................................
Change the encryption type..................................................................................................................................................
Reading IBM Lotus Notes and S/MIME encrypted messages on the BlackBerry device.................................................
Turning off support for reading IBM Lotus Notes and S/MIME encrypted messages on the BlackBerry device.........
77
77
77
78
78
10 Managing client access license keys..............................................................................................................................
Add a CAL key..............................................................................................................................................................................
Copy a CAL key to a text file......................................................................................................................................................
Remove a CAL key.......................................................................................................................................................................
79
79
79
79
11 Removing the BlackBerry Professional Software from the host server...................................................................
Remove the BlackBerry Professional Software from the host server..................................................................................
Remove the registry entries from the host server..................................................................................................................
81
81
81
12 Legal notice..........................................................................................................................................................................
83
Administration Guide
Managing user accounts
Managing user accounts
1
Add a user account
You must set up user accounts on your messaging server before you set up user accounts in the BlackBerry® Professional
Software.
When you create a user account, you can assign an IT policy to control settings for the account. You can select one of the
preconfigured IT policies, or create your own and select it. For more information about the IT policy rule settings, see the
Policy Reference Guide.
1.
2.
3.
4.
5.
6.
7.
8.
9.
On the server that hosts the BlackBerry Professional Software, on the taskbar, click Start > BlackBerry Manager.
In the BlackBerry Manager, click the Home tab.
In the Account section, click Add New Users Wizard.
In the user list, click the name of the user whose BlackBerry Professional Software user account you want to create.
Click Select.
Click OK.
On the Select IT policy screen, specify the IT policy setting for the user account.
On the Device Deployment screen, specify how to activate the BlackBerry device.
Click Done.
Add a user account manually
1.
2.
3.
4.
5.
6.
In the BlackBerry® Manager, click the Users tab.
In the Account section, click Add Users.
Click Properties.
Type or select the user account name.
Click OK.
Next, you assign an IT policy to the user account and deploy the BlackBerry device associated with the user account.
Change user account information
1.
2.
3.
4.
In the BlackBerry® Manager, click the Users tab.
Double-click the user account that you want to update.
Make your changes.
Click Apply.
7
Administration Guide
Remove a user account from the BlackBerry Professional Software
Remove a user account from the BlackBerry Professional Software
When you remove a user account from the BlackBerry® Professional Software, you can retain the BlackBerry configuration
and permissions information for the user account in the user’s person document so that you can add the user account again
at a later time.
1.
2.
3.
4.
8
In the BlackBerry Manager, click the Users tab.
Right-click the user account that you want to remove. Click Delete User.
Click Yes.
Choose whether to retain the BlackBerry Professional Software configuration and permissions information in the user’s
person document and the state database.
Administration Guide
Managing BlackBerry devices
Managing BlackBerry devices
2
Change how to load existing email messages on to BlackBerry devices
By default, the BlackBerry® Professional Software loads up to 200 message headers from the previous 5 days on to BlackBerry
devices. If you set the BlackBerry Professional Software to load both the email message body and message headers on to a
BlackBerry device, the BlackBerry Professional Software can load up to 750 email messages from the previous 14 days for a
user.
1. In the BlackBerry Manager, click the Home tab.
2. Click Edit Server Properties.
3. In the left pane, click Messaging.
4. In the Send Headers Only drop-down list, perform one of the following actions:
• To load message headers only on to BlackBerry devices, click True.
• To load both the message header and the message body on to BlackBerry devices, click False.
5.
6.
7.
In the Prepopulation By Message Age field, type the number of previous days to load email messages for.
In the Prepopulation By Message Count field, type the maximum number of email messages to load.
Click OK.
Options for assigning a BlackBerry device to a user account
When you assign a BlackBerry® device to a user account, you associate the BlackBerry device with that user’s messaging
account and install service books on the BlackBerry device. You can assign a BlackBerry device to a user account using one
of the following methods:
•
over a wired connection to the server that hosts the BlackBerry® Professional Software; this option provides you with
the greatest control over the timing of each BlackBerry device activation and over wireless network charges
•
over the wireless network, using a wireless enterprise activation password; because users do not require a physical
connection to your organization's network, this option provides a user with the most flexibility in how to activate the
BlackBerry device
•
over a wired connection to the BlackBerry® Desktop Manager on the user's computer; with this option, a user can
activate the BlackBerry device at a convenient time, but the wireless network is available for use by messaging traffic
9
Administration Guide
Assign a BlackBerry device to a user account using the BlackBerry Manager
Assign a BlackBerry device to a user account using the BlackBerry
Manager
You can use this method if you want to assign a BlackBerry® device to a user account and control the activation of the
BlackBerry device before distributing it to the user.
1. Connect the BlackBerry device to the server that hosts the BlackBerry® Professional Software.
2. In the BlackBerry Manager, click the Users tab.
3. Right-click the user account that you want to assign the BlackBerry device to.
4. Click Assign device.
5. Click the BlackBerry device to assign to the user account.
6. Click OK.
Assigning a BlackBerry device to a user over the wireless network
You can assign a BlackBerry® device to a user over the wireless network by generating a wireless activation password,
assigning the password to a user account, and sending the password to the user in an email message. The user types the
password on the BlackBerry device to associate the BlackBerry device with the user's account on the messaging server.
You can use this method to assign either a new or a replacement BlackBerry device without requiring the user to have a
wired connection to the network in your organization.
The wireless activation password is specific to a user account. You can customize the password type and length. The password
expires after 48 hours by default or if the user types the password unsuccessfully 5 times on the BlackBerry device.
You can customize the default wireless activation message so that the message conforms to your organization's messaging
policy. In your message, you can also provide support contact information.
Specify the wireless activation message and password settings
If a user receives a wireless activation password, you cannot generate a new password for the user until the active password
expires. The password expires if the BlackBerry® device is not successfully activated in the BlackBerry® Professional
Software after 48 hours by default, or if the user unsuccessfully types the password 5 times consecutively.
1.
2.
3.
4.
5.
10
In the BlackBerry Manager, click the Home tab.
Click Edit Global Properties.
In the left pane, click General.
Double-click Custom activation email message. Type the message.
Double-click Auto-generated password length. Type the password length.
Administration Guide
6.
7.
Assign a BlackBerry device to a user using the BlackBerry Desktop Manager
In the Auto-generated password type drop-down list, click the password type.
Click OK.
Create and send a wireless activation message to a user
1.
2.
3.
In the BlackBerry® Manager, click the Users tab.
Right-click a user account.
Perform one of the following actions:
• To generate the password automatically and send it to the user in an email message, click Generate and email
activation password. You are notified when the password is sent. Click OK.
• To create your own activation password, in the Set activation password field, type and confirm the activation
password. Provide the password to the user.
Assign a BlackBerry device to a user using the BlackBerry Desktop
Manager
When the BlackBerry® Desktop Manager is installed on a user's computer, the user can control the initial activation of a
BlackBerry device.
During the activation process, the BlackBerry Desktop Manager prompts the user to associate the BlackBerry device with
the user's account on the messaging server and to generate an encryption key.
When the user completes the activation process, the BlackBerry® Professional Software loads messages, address book
information, tasks, and memos on to the BlackBerry device.
1.
2.
Verify that the BlackBerry Desktop Manager is installed on the user’s computer.
Instruct the user to start the BlackBerry Desktop Manager and to connect the BlackBerry device to the computer.
A message prompts the user to assign the BlackBerry device to the mail account. A second message prompts the user
to generate an encryption key.
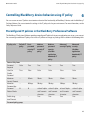
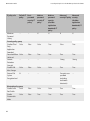
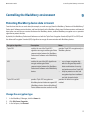
Protecting lost or stolen BlackBerry devices
You can use IT administration commands to immediately protect your organization's confidential data on BlackBerry® devices
over the wireless network.
11
Protecting lost or stolen BlackBerry devices
Administration Guide
IT Admin command
Description
Set a Password and Lock Handheld
This command creates a new password and locks a lost BlackBerry device
remotely. You can communicate the new password to the user when the
user locates the BlackBerry device. When the user unlocks the BlackBerry
device, the BlackBerry device prompts the user to accept or reject the
password change.
This command remotely erases all user information and application data
that the BlackBerry device stores.
Erase Data and Disable Handheld
You can use this command to prepare a BlackBerry device for transfer
between users in your organization or to protect a stolen BlackBerry
device.
Protect a lost BlackBerry device
If a user misplaces a BlackBerry® device, you can help protect the data on the BlackBerry device by issuing commands to
lock the BlackBerry device or to make it unavailable.
1. In the BlackBerry Manager, click the Users tab.
2. Right-click a user account.
3. Click Set Password and Lock Handheld.
4. In the New Password and New Password Again fields, type and confirm a password that is between 4 and 14 characters
long.
Warning: Do not use special characters when you create the password in case the BlackBerry device does not accept
special characters.
5. To display owner information on the BlackBerry device, select the Set user information also check box. Type the
required owner name and information.
6. Click OK.
Protect a stolen BlackBerry device
1.
2.
3.
In the BlackBerry® Manager, click the Users tab.
Right-click a user account. Click Erase Data and Disable Handheld.
Click Yes.
After you finish: Contact your service provider to turn off service for the BlackBerry device.
12
Protecting lost or stolen BlackBerry devices
Administration Guide
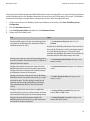
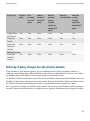
Prepare an existing BlackBerry device for distribution to a new user
To prepare an existing BlackBerry® device for distribution to a new user, delete the previous user’s application data from
the BlackBerry device and add or remove applications. To remove all applications and data from the BlackBerry device, return
the BlackBerry device to its factory default state.
1.
Choose a method to delete the previous user’s application data from the BlackBerry device and make the BlackBerry
device unavailable to that user before assigning the BlackBerry device to a new user.
Task
Steps
Delete the previous user’s application data over a physical
connection to the computer that hosts the BlackBerry®
Professional Software.
a.
b.
c.
d.
e.
f.
g.
Return the BlackBerry device to the factory default state.
a.
b.
c.
d.
e.
f.
g.
h.
i.
2.
Connect the BlackBerry device to the server that hosts the
BlackBerry Professional Software.
In the BlackBerry Manager, click the Local Ports tab.
In the Connection list, click a connection.
Click Wipe Handheld File System.
Click Yes.
If prompted, type the BlackBerry device password to
complete the task.
Assign the BlackBerry device to a user.
Connect the BlackBerry device to the server that hosts the
BlackBerry Professional Software.
In the BlackBerry Manager, click the Local Ports tab.
In the Connection list, click a connection.
Click Nuke Handheld.
Click Yes.
Click Load Device (Interactive).
Click a software configuration.
Click OK.
Complete the application loader wizard.
Replace the applications on the BlackBerry device.
a.
b.
c.
d.
e.
f.
Connect the BlackBerry device to the server that hosts the BlackBerry Professional Software.
In the BlackBerry Manager, click the Local Ports tab.
In the Connection list, click a connection.
Click Load Device (Interactive).
Click a software configuration.
Click OK.
13
Administration Guide
g.
h.
14
Protecting lost or stolen BlackBerry devices
On the Device Software Configuration screen, clear the check boxes beside the applications that you want to
remove. Select the check boxes beside the applications that you want to install.
Complete the application loader wizard.
Administration Guide
Configuring organizer data synchronization
Configuring organizer data synchronization
3
Organizer data includes items such as tasks, memos, and contacts. These are also referred to as personal information
management items, or PIM items. You can change the settings for organizer data items so that the entries on users'
BlackBerry® devices and the entries in the email application on their computers are the same.
You can set synchronization options globally for all user accounts, or you can set synchronization options for a specific user
account. By default, wireless synchronization of organizer data for all user accounts is turned on. If you change the global
settings, the new settings apply to any new user accounts that you set up. The new global settings are not applied to existing
user accounts.
To synchronize organizer data with BlackBerry devices, the BlackBerry® Professional Software requires access to the
organizer data databases that are normally stored on user computers. You can provide this access in one of the following
ways:
•
•
•
create a roaming user profile
create a replica of a user's local databases on the messaging server
configure a user as an IBM® Lotus® Domino® Web Access user
Create a roaming user profile to support organizer data synchronization
Create a roaming user profile to enable users to access their messaging profile using the email application installed on any
computer in the IBM® Lotus® Domino® domain. The roaming feature requires IBM Lotus Domino Version R6 or later.
1.
2.
3.
4.
5.
In IBM Lotus Domino Administrator, on the People and Groups tab, click a user.
In the Tools pane, expand People.
Click Roaming.
In the Assign Roaming Profiles dialog box, specify the roaming settings that you want.
Click OK.
Create a replica of local databases on the messaging server to support
personal organizer data synchronization
When you create a replica of local databases on the messaging server, you make the names.nsf and journal.nsf databases
on the user's computer available remotely.
1. Create a replica of the user’s names.nsf and journal.nsf databases on the messaging server.
2. In the BlackBerry® Manager, click the Users tab.
3. Double-click the user account.
4. Click PIM Sync.
15
Administration Guide
Configure a user as an IBM Lotus Domino Web Access user to support organizer data synchronization
5.
In the Memos and Address Book sections, perform the following actions:
• In the Location - Server field, type the distinguished name, or the canonical name, of the messaging server on which
the replica databases are located (for example, CN=<servername>/OU=<servers>/OU=<companyname>).
• In the Location - Relative Path field, type the path relative to the data directory in which the replica databases
reside (for example, names\cwarren_names.nsf and journal\cwarren_journal.nsf).
6.
Click OK.
Configure a user as an IBM Lotus Domino Web Access user to support
organizer data synchronization
Enable users to access their messaging profiles using a browser and manage organizer data offline.
1. Instruct the user to update the mail template to the correct IBM® Lotus® Domino® Web Access (Version R5 or R6)
template.
2. Instruct the user to synchronize the address book and journal with the IBM Lotus Domino Web Access contacts list and
notebook.
Customizing address book synchronization
Customize address book synchronization for all user accounts
1.
2.
3.
4.
In the BlackBerry® Manager, click the Home tab.
Click Edit Global Properties.
In the left pane, click Global PIM Sync.
In the Address Book section, in the Synchronization Type drop-down list, click one of the following synchronization
options:
• To synchronize address book data from the BlackBerry® Professional Software to the BlackBerry device only, click
Server to Device.
• To synchronize address book data from the BlackBerry device to the BlackBerry Professional Software only, click
Device to Server.
• To synchronize address book data from the BlackBerry device to the BlackBerry Professional Software and from the
BlackBerry Professional Software to the BlackBerry device, click Bidirectional.
5.
If you choose bidirectional synchronization, in the Conflict Resolution drop-down list, click one of the following conflict
resolution options:
• To specify that the BlackBerry Professional Software information overrules the BlackBerry device information, click
Server Wins.
16
Administration Guide
Customizing address book synchronization
• To specify that the BlackBerry device information overrules the BlackBerry Professional Software information, click
Device Wins.
6.
Click Apply.
Turn off address book synchronization for all user accounts
1.
2.
3.
4.
5.
In the BlackBerry® Manager, click the Home tab.
Click Edit Global Properties.
In the left pane, click Global PIM Sync.
In the Address Book section, in the Synchronization Enabled drop-down list, click False.
Click Apply.
Customize address book synchronization for a specific user account
1.
2.
3.
4.
In the BlackBerry® Manager, click the Users tab.
Double-click the user account.
In the left pane, click PIM Sync.
In the Address Book section, in the Synchronization Type drop-down list, click one of the following synchronization
options:
• To synchronize address book data from the BlackBerry® Professional Software to the BlackBerry device only, click
Server to Device.
• To synchronize address book data from the BlackBerry device to the BlackBerry Professional Software only, click
Device to Server.
• To synchronize address book data from the BlackBerry device to the BlackBerry Professional Software and from the
BlackBerry Professional Software to the BlackBerry device, click Bidirectional.
5.
If you choose bidirectional synchronization, in the Conflict Resolution drop-down list, click one of the following conflict
resolution options:
• To specify that the BlackBerry Professional Software information overrules the BlackBerry device information, click
Server Wins.
• To specify that the BlackBerry device information overrules the BlackBerry Professional Software information, click
Device Wins.
6.
Click Apply.
Turn off address book synchronization for a specific user account
1.
2.
In the BlackBerry® Manager, click the Users tab.
Double-click the user account.
17
Administration Guide
3.
4.
5.
Customizing task synchronization
In the left pane, click PIM Sync.
In the Address Book section, in the Synchronization Enabled drop-down list, click False.
Click Apply.
Customizing task synchronization
Customize task synchronization for all user accounts
1.
2.
3.
4.
In the BlackBerry® Manager, click the Home tab.
Click Edit Global Properties.
In the left pane, click Global PIM Sync.
In the Tasks section, in the Synchronization Type drop-down list, click one of the following synchronization options:
• To synchronize task data from the BlackBerry® Professional Software to the BlackBerry device only, click Server to
Device.
• To synchronize task data from the BlackBerry device to the BlackBerry Professional Software only, click Device to
Server.
• To synchronize task data from the BlackBerry device to the BlackBerry Professional Software and from the BlackBerry
Professional Software to the BlackBerry device, click Bidirectional.
5.
If you choose bidirectional synchronization, in the Conflict Resolution drop-down list, click one of the following conflict
resolution options:
• To specify that the BlackBerry Professional Software information overrules the BlackBerry device information, click
Server Wins.
• To specify that the BlackBerry device information overrules the BlackBerry Professional Software information, click
Device Wins.
6.
Click Apply.
Turn off task synchronization for all user accounts
1.
2.
3.
4.
5.
In the BlackBerry® Manager, click the Home tab.
Click Edit Global Properties.
In the left pane, click Global PIM Sync.
In the Tasks section, in the Synchronization Enabled drop-down list, click False.
Click Apply.
Customize task synchronization for a specific user account
1.
18
In the BlackBerry® Manager, click the Users tab.
Administration Guide
Customizing memo synchronization
2.
3.
4.
Double-click the user account.
In the left pane, click PIM Sync.
In the Tasks section, in the Synchronization Type drop-down list, click one of the following synchronization options:
• To synchronize task data from the BlackBerry® Professional Software to the BlackBerry device only, click Server to
Device.
• To synchronize task data from the BlackBerry device to the BlackBerry Professional Software only, click Device to
Server.
• To synchronize task data from the BlackBerry device to the BlackBerry Professional Software and from the BlackBerry
Professional Software to the BlackBerry device, click Bidirectional.
5.
If you choose bidirectional synchronization, in the Conflict Resolution drop-down list, click one of the following conflict
resolution options:
• To specify that the BlackBerry Professional Software information overrules the BlackBerry device information, click
Server Wins.
• To specify that the BlackBerry device information overrules the BlackBerry Professional Software information, click
Device Wins.
6.
Click Apply.
Turn off task synchronization for a specific user account
1.
2.
3.
4.
5.
In the BlackBerry® Manager, click the Users tab.
Double-click the user account.
In the left pane, click PIM Sync.
In the Tasks section, in the Synchronization Enabled drop-down list, click False.
Click Apply.
Customizing memo synchronization
Customize memo synchronization for all user accounts
1.
2.
3.
4.
In the BlackBerry® Manager, click the Home tab.
Click Edit Global Properties.
In the left pane, click Global PIM Sync.
In the Memos section, in the Synchronization Type drop-down list, click one of the following synchronization options:
• To synchronize memo data from the BlackBerry® Professional Software to the BlackBerry device only, click Server
to Device.
19
Administration Guide
Customizing memo synchronization
• To synchronize memo data from the BlackBerry device to the BlackBerry Professional Software only, click Device
to Server.
• To synchronize memo data from the BlackBerry device to the BlackBerry Professional Software and from the
BlackBerry Professional Software to the BlackBerry device, click Bidirectional.
5.
If you choose bidirectional synchronization, in the Conflict Resolution drop-down list, click one of the following conflict
resolution options:
• To specify that the BlackBerry Professional Software information overrules the BlackBerry device information, click
Server Wins.
• To specify that the BlackBerry device information overrules the BlackBerry Professional Software information, click
Device Wins.
6.
Click Apply.
Turn off memo synchronization for all user accounts
1.
2.
3.
4.
5.
In the BlackBerry® Manager, click the Home tab.
Click Edit Global Properties.
In the left pane, click Global PIM Sync.
In the Memos section, in the Synchronization Enabled drop-down list, click False.
Click Apply.
Customize memo synchronization for a specific user account
1.
2.
3.
4.
In the BlackBerry® Manager, click the Users tab.
Double-click the user account.
In the left pane, click PIM Sync.
In the Memos section, in the Synchronization Type drop-down list, click one of the following synchronization options:
• To synchronize memo data from the BlackBerry® Professional Software to the BlackBerry device only, click Server
to Device.
• To synchronize memo data from the BlackBerry device to the BlackBerry Professional Software only, click Device
to Server.
• To synchronize memo data from the BlackBerry device to the BlackBerry Professional Software and from the
BlackBerry Professional Software to the BlackBerry device, click Bidirectional.
5.
If you choose bidirectional synchronization, in the Conflict Resolution drop-down list, click one of the following conflict
resolution options:
• To specify that the BlackBerry Professional Software information overrules the BlackBerry device information, click
Server Wins.
• To specify that the BlackBerry device information overrules the BlackBerry Professional Software information, click
Device Wins.
20
Administration Guide
6.
Customizing message filter synchronization
Click Apply.
Turn off memo synchronization for a specific user account
1.
2.
3.
4.
5.
In the BlackBerry® Manager, click the Users tab.
Double-click the user account.
In the left pane, click PIM Sync.
In the Memos section, in the Synchronization Enabled drop-down list, click False.
Click Apply.
Customizing message filter synchronization
Customize message filter synchronization for all user accounts
1.
2.
3.
4.
5.
In the BlackBerry® Manager, click the Home tab.
Click Edit Global Properties.
In the left pane, click Global PIM Sync.
In the Message Filters section, in the Synchronization Type drop-down list, accept the Bidirectional option.
In the Conflict Resolution drop-down list, click one of the following conflict resolution options:
• To specify that the BlackBerry® Professional Software information overrules the BlackBerry device information, click
Server Wins.
• To specify that the BlackBerry device information overrules the BlackBerry Professional Software information, click
Device Wins.
6.
Click Apply.
Turn off message filter synchronization for all user accounts
1.
2.
3.
4.
5.
In the BlackBerry® Manager, click the Home tab.
Click Edit Global Properties.
In the left pane, click Global PIM Sync.
In the Message Filters section, in the Synchronization Enabled drop-down list, click False.
Click Apply.
Customize message filter synchronization for a specific user account
1.
In the BlackBerry® Manager, click the Users tab.
21
Administration Guide
Customizing message setting synchronization
2.
3.
4.
5.
Double-click the user account.
In the left pane, click PIM Sync.
In the Message Filters section, in the Synchronization Type drop-down list, accept the Bidirectional option.
In the Conflict Resolution drop-down list, click one of the following conflict resolution options:
• To specify that the BlackBerry® Professional Software information overrules the BlackBerry device information, click
Server Wins.
• To specify that the BlackBerry device information overrules the BlackBerry Professional Software information, click
Device Wins.
6.
Click Apply.
Turn off message filter synchronization for a specific user account
1.
2.
3.
4.
5.
In the BlackBerry® Manager, click the Users tab.
Double-click the user account.
In the left pane, click PIM Sync.
In the Message Filters section, in the Synchronization Enabled drop-down list, click False.
Click Apply.
Customizing message setting synchronization
Customize message setting synchronization for all user accounts
1.
2.
3.
4.
5.
In the BlackBerry® Manager, click the Home tab.
Click Edit Global Properties.
In the left pane, click Global PIM Sync.
In the Message Settings section, in the Synchronization Type drop-down list, accept the Bidirectional option.
In the Conflict Resolution drop-down list, click one of the following conflict resolution options:
• To specify that the BlackBerry® Professional Software information overrules the BlackBerry device information, click
Server Wins.
• To specify that the BlackBerry device information overrules the BlackBerry Professional Software information, click
Device Wins.
6.
Click Apply.
Turn off message setting synchronization for all user accounts
1.
22
In the BlackBerry® Manager, click the Home tab.
Administration Guide
2.
3.
4.
5.
Turn off synchronization for contact pictures on a user account
Click Edit Global Properties.
In the left pane, click Global PIM Sync.
In the Message Settings section, in the Synchronization Enabled drop-down list, click False.
Click Apply.
Customize message setting synchronization for a specific user account
1.
2.
3.
4.
5.
In the BlackBerry® Manager, click the Users tab.
Double-click the user account.
In the left pane, click PIM Sync.
In the Message Settings section, in the Synchronization Type drop-down list, accept the Bidirectional option.
In the Conflict Resolution drop-down list, click one of the following conflict resolution options:
• To specify that the BlackBerry® Professional Software information overrules the BlackBerry device information, click
Server Wins.
• To specify that the BlackBerry device information overrules the BlackBerry Professional Software information, click
Device Wins.
6.
Click Apply.
Turn off message setting synchronization for a specific user account
1.
2.
3.
4.
5.
In the BlackBerry® Manager, click the Users tab.
Double-click the user account.
In the left pane, click PIM Sync.
In the Message Settings section, in the Synchronization Enabled drop-down list, click False.
Click Apply.
Turn off synchronization for contact pictures on a user account
By default, pictures that users add to contact entries in their address books are synchronized between their BlackBerry®
devices and the email application on their computers. Users can add, delete, and change pictures in the email application
on their computers or on their BlackBerry devices.
1.
2.
3.
4.
5.
In the BlackBerry Manager, click the Users tab.
Click a user account.
In the Service Control & Customization section, click Edit PIM Sync Field Mapping.
In the Desktop Field column, click Picture.
In the Device Field column, in the drop-down list, click <Clear>.
23
Administration Guide
6.
Managing the wireless backup and recovery of organizer data
Click OK.
Managing the wireless backup and recovery of organizer data
Automatic wireless backup is designed to back up user account settings and data from BlackBerry® devices to the BlackBerry®
Professional Software automatically. You can use the automatic wireless backup feature to synchronize organizer data to
new BlackBerry devices without affecting the performance of the messaging server. Automatic wireless backup is turned on
by default when you add a user account to the BlackBerry Professional Software.
Turn off the wireless backup of organizer data for a user account
1.
2.
3.
4.
5.
6.
In the BlackBerry® Manager, click the Users tab.
Double-click a user account.
In the left pane, click PIM Sync.
Click Automatic Wireless Backup Enabled.
In the drop-down list, click False.
Click OK.
Remove a user’s organizer data from the BlackBerry Professional Software
If the BlackBerry® Professional Software is not writing a user’s organizer data from the BlackBerry device to the BlackBerry
Configuration Database correctly, the existing organizer data in the BlackBerry Professional Software might be corrupted.
You can delete the existing organizer data from the BlackBerry Professional Software. This action forces the user's BlackBerry
device to synchronize the user's current organizer data with the BlackBerry Professional Software over the wireless network.
1. In the BlackBerry Manager, click the Users tab.
2. Click a user account.
3. In the Service Control & Customization section, click Clear PIM Sync Backup Data.
4. Click OK.
Mapping address book fields
The fields for address book contacts can be customized in the email application on users' computers or on users'
BlackBerry® devices. You can map up to four of these custom fields between BlackBerry devices and the email application
on users' computers. You can create both global field mappings that apply to all user accounts and user field mappings that
apply to specific user accounts.
When users request a remote address lookup in the IBM® Lotus Notes® address book, the fields that you configure display
on BlackBerry devices.
24
Administration Guide
Mapping address book fields
Map an address book field from the email application to an address book field on
all BlackBerry devices
1.
2.
3.
4.
5.
In the BlackBerry® Manager, click the Home tab.
In the Service Control & Customization section, click Edit PIM Sync Global Field Mapping.
In the Desktop Field column, click a field.
In the Device Field column, in the drop-down list, click the address book field that you want to map to a field on
BlackBerry devices.
Click OK.
Map user-defined address book fields to address book fields on all BlackBerry
devices
1.
2.
3.
4.
5.
In the BlackBerry® Manager, click the Home tab.
In the Service Control & Customization section, click Edit PIM Sync Global Field Mapping.
In the Desktop Field column, click User Defined String 1.
In the Device Field column, in the drop-down list, click the address book field that you want to map to a field on
BlackBerry devices.
Click OK.
Map an address book field in the email application to an address book field on a
specific BlackBerry device
1.
2.
3.
4.
5.
6.
In the BlackBerry® Manager, click the Users tab.
Click a user account.
In the Service Control & Customization section, click Edit PIM Sync Field Mapping.
In the Desktop Field column, click a field.
In the Device Field column, in the drop-down list, click the address book field that you want to map to a field on the
BlackBerry device.
Click OK.
25
Administration Guide
Mapping address book fields
Map user-defined address book fields to address book fields on a specific BlackBerry
device
You can map up to four address book fields that users define in the email application to a specific field on the BlackBerry®
device.
1. In the BlackBerry Manager, click the Users tab.
2. Click a user account.
3. In the lower pane, click Service Control & Customization.
4. Click Edit PIM Sync Field Mapping.
5. In the Desktop Field column, click User Defined String 1.
6. In the Device Field column, in the drop-down list, click the address book field that you want to map to a field on the
BlackBerry device.
7. Click OK.
26
Configuring message handling
Administration Guide
4
Configuring message handling
Managing email message filters
Email message filters define which email messages the BlackBerry® Professional Software redirects to BlackBerry devices.
When a user receives an email message in the incoming message queue, the BlackBerry Professional Software applies filters
to determine how to direct the message: forward, forward with priority, or do not forward to the user’s BlackBerry device.
Email message filters that you configure in the BlackBerry Professional Software overrule the email message filters that
users define using the BlackBerry® Desktop Manager or their BlackBerry devices.
You can create two types of email message filters in the BlackBerry Professional Software: global filters and user filters.
Global filters apply to all user accounts in the BlackBerry Professional Software. Users cannot view or change global filters.
If you define global filters, inform users so that they understand why some of the email message filter rules that they create
might not apply to incoming messages. If you change global filters, the BlackBerry Professional Software reads and applies
the changes immediately.
User filters apply to specific user accounts in the BlackBerry Professional Software.
Create an email message filter that applies to all user accounts
1.
2.
3.
4.
5.
6.
7.
8.
9.
10.
In the BlackBerry® Manager, click the Home tab.
Click Edit Server Properties.
In the left pane, click Global Filters.
Double-click Global Filter Definition.
Click New.
In the New Message Conditions section, double-click Filter Name.
Type a name for the email message filter.
Configure the options for the email message filter.
Click Action.
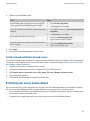
Complete one of the following tasks:
Task
Steps
Create an email message filter that prevents the delivery of
messages that satisfy the filter criteria.
>
In the drop-down list, click Hold.
Create an email message filter that forwards messages that
satisfy the filter criteria.
a.
b.
In the drop-down list, click Forward.
Double-click Forwarding Options.
27
Managing email message filters
Administration Guide
c.
Perform one of the following actions:
•
To forward only the message headers to
BlackBerry devices, select the Header Only
check box.
•
To forward messages to BlackBerry devices
with priority status, select the Level1
Notification check box.
•
To forward only the message headers of
messages with priority status, select both the
Header Only and Level1 Notification check
boxes.
11. Click OK.
12. In the Filter Name list, click the email message filter that you created.
13. Click Move Up or Move Down to move the filter higher or lower in the list.
The BlackBerry® Professional Software applies email message filters based on the order in which they appear. Organize
the email message filters from the least restrictive to the most restrictive.
14. Click OK.
Turn on an email message filter that applies to all user accounts
The BlackBerry® Professional Software applies email message filters based on the order in which they appear.
1.
2.
3.
4.
5.
6.
7.
8.
In the BlackBerry Manager, click the Home tab.
Click Edit Server Properties.
In the left pane, click Global Filters.
Double-click Global Filter Definition.
In the Filter Name list, click an email message filter.
Click Properties.
In the New Message Conditions section, set Enabled to True.
Click OK.
Create an email message filter that applies to a specific user account
1.
2.
3.
4.
5.
28
In the BlackBerry® Manager, click the Users tab.
Double-click a user account.
In the left pane, click Filters.
Double-click Filter Rules.
Click New.
Managing email message filters
Administration Guide
6.
7.
8.
9.
10.
In the New Message Conditions section, double-click Filter Name.
Type a name for the new email message filter.
Configure the options for the email message filter.
Click Action.
Complete one of the following tasks:
Task
Steps
Create an email message filter that prevents the delivery of
messages that satisfy the filter criteria.
>
In the drop-down list, click Hold.
Create an email message filter that forwards messages that
satisfy the filter criteria.
a.
b.
c.
In the drop-down list, click Forward.
Double-click Forwarding Options.
Perform one of the following actions:
•
To forward only the message headers to
BlackBerry devices, select the Header Only
check box.
•
To forward messages to BlackBerry devices
with priority status, select the Level1
Notification check box.
•
To forward only the message headers of
messages with priority status, select both the
Header Only and Level1 Notification check
boxes.
11. Click OK.
12. In the Filter Name list, click the email message filter that you created.
13. Click Move Up or Move Down to move the filter higher or lower in the list.
The BlackBerry® Professional Software applies email message filters based on the order in which they appear. Organize
the email message filters from the least restrictive to the most restrictive.
14. Click OK.
Turn on an email message filter that applies to a specific user account
The BlackBerry® Professional Software applies email message filters based on the order in which they appear.
1. In the BlackBerry Manager, click the Users tab.
2. Double-click a user account.
3. In the left pane, click Filters.
4. Double-click Filter Rules.
29
Administration Guide
5.
6.
7.
8.
Managing how messages are forwarded to a user account
In the Filter Name list, click an email message filter.
Click Properties.
In the New Message Conditions section, set Enabled to True.
Click OK.
Managing how messages are forwarded to a user account
You can configure how the BlackBerry® Professional Software forwards email messages from the email application on users'
computers to their BlackBerry devices. You can also manage individual user accounts, provide support to users, and control
the size of the message queue and the load on the BlackBerry Messaging Agent to process forwarding requests. By default,
email message forwarding is turned on for all user accounts.
Users can configure message forwarding settings on their BlackBerry devices or by using the BlackBerry® Desktop
Manager. The settings that you define override the settings that users define.
Forward unfiltered email messages to a BlackBerry device
You can configure the BlackBerry® Professional Software to deliver incoming email messages to a user’s BlackBerry device
when email message filter rules do not apply.
1. In the BlackBerry Manager, click the Users tab.
2. Double-click a user account.
3. In the left pane, click Filters.
4. In the Default Action section, set Forward messages to BlackBerry device to True.
5. Click OK.
Forward email messages from inbox subfolders to a BlackBerry device
You can specify the subfolders in the email application on a user's computer that the BlackBerry® Professional Software can
forward email messages from. By default, the BlackBerry Professional Software forwards email messages from the inbox
only.
1. In the BlackBerry Manager, click the Users tab.
2. Click a user account.
3. In the Service Access section, click Choose Folders for Redirection.
4. Click Redirect the following selected folders.
5. Select the check boxes beside the folders that you want to forward messages from.
6. Click OK.
30
Administration Guide
Managing wireless message reconciliation
Turn off synchronization for email messages sent from a BlackBerry device
You can configure email message synchronization so that messages that users send from their BlackBerry® devices are not
synchronized in the email application on their computers.
1. In the BlackBerry Manager, click the Users tab.
2. Double-click a user account.
3. In the left pane, click Redirection.
4. In the Message Forwarding section, set Do Not Save Sent Messages to True.
5. Click OK.
Turn off email message forwarding to a BlackBerry device
You can prevent the BlackBerry® Professional Software from forwarding email messages to a BlackBerry device temporarily;
for example, if a user is on vacation and does not want to receive messages during that time. When you turn off message
forwarding for a user account, the user can send email messages but cannot receive them on the BlackBerry device. The user
can later turn on message forwarding on the BlackBerry device manually. When you turn off message forwarding for a user
account, the user cannot send or receive email messages.
1. In the BlackBerry Manager, click the Users tab.
2. Click a user account.
3. In the Service Access section, click Disable Redirection.
Managing wireless message reconciliation
Wireless message reconciliation synchronizes message status changes between the BlackBerry® device and the email
application on users' computers. The BlackBerry® Professional Software reconciles message moves, deletions, and indicators
for read and unread email messages. By default, wireless message reconciliation is turned on in the BlackBerry Professional
Software and scheduled to occur every 15 minutes.
If you are concerned about high volumes of wireless network traffic, you can recommend that users limit their use of the
Reconcile Now menu item in the message list on the BlackBerry device.
Turn off wireless message reconciliation
To reduce wireless network traffic or to manage individual user accounts, you can prevent the reconciliation of messages
between BlackBerry® devices and the email application on users' computers. Users can reconcile their messages by
connecting the BlackBerry device to the BlackBerry® Desktop Manager.
1. In the BlackBerry Manager, click the Home tab.
2. Click Edit Server Properties.
3. In the left pane, click Messaging.
31
Administration Guide
4.
5.
Managing wireless message reconciliation
In the Messaging Options section, in the Wireless Message Reconciliation Enabled drop-down list, click False.
Click OK.
Turn on reconciliation for permanently deleted email messages
Users can permanently delete email messages from the email application on their computers by pressing SHIFT+DELETE. If
you want to remove permanently deleted email messages from users' BlackBerry® devices, you can turn on reconciliation
for these messages. This feature also deletes from BlackBerry devices any email messages that users move into personal
folders or archive in the email application on their computers.
1. In the BlackBerry Manager, click the Home tab.
2. Click Edit Server Properties.
3. In the left pane, click Messaging.
4. In the Messaging Options section, in the Hard Deletes Reconciliation drop-down list, click True.
5. Click OK.
6. On the server that hosts the BlackBerry® Professional Software, in the Microsoft® Windows® Services, restart the
BlackBerry Dispatcher.
Managing message signatures and disclaimers
Add a signature to all messages sent from a specific user’s BlackBerry device
Users can change their message signatures either directly from their BlackBerry® devices or by using the BlackBerry®
Desktop Manager. To enforce any signature format policies in your organization, you can add a signature to your
organization's corporate disclaimer.
1. In the BlackBerry Manager, click the Users tab.
2. Double-click a user account.
3. In the left pane, click Redirection.
4. In the Auto Signature section, double-click the Signature field.
5. Type the signature that you want to appear in the messages that the user sends from the BlackBerry device.
6. Click OK.
Add a disclaimer to all messages sent from all BlackBerry devices
Users cannot change the disclaimers that you define.
1. In the BlackBerry® Manager, click the Home tab.
2. Click Edit Server Properties.
3. In the left pane, click Messaging.
4. In the Messaging Options section, perform one of the following actions:
32
Administration Guide
Sending notification messages to users
• To add a disclaimer before the message body, double-click Prepended Disclaimer Text.
• To add a disclaimer after the user signature, double-click Appended Disclaimer Text.
5.
6.
Type the disclaimer.
Click OK.
Add a disclaimer to all messages sent from a specific user’s BlackBerry device
The user cannot change the disclaimers that you define.
1. In the BlackBerry® Manager, click the Users tab.
2. Double-click a user account.
3. Perform one of the following actions:
• To add a disclaimer before the message body, in the Messaging Options section, double-click Prepended
Disclaimer Text.
• To add a disclaimer after the user signature, in the Messaging Options section, double-click Appended Disclaimer
Text.
4.
5.
Type the disclaimer.
Click OK.
Specify conflict rules for multiple disclaimers
If you add different disclaimers for a single user and for all users, you can specify conflict rules to control how the BlackBerry®
Professional Software applies the disclaimers.
1. In the BlackBerry Manager, click the Home tab.
2. Click Edit Server Properties.
3. In the left pane, click Messaging.
4. In the Messaging Options section, perform one of the following actions:
• To specify conflict rules for prepended disclaimers, click Prepended Disclaimer Conflict Rule.
• To specify conflict rules for appended disclaimers, click Appended Disclaimer Conflict Rule.
5.
6.
In the drop-down list, click a rule.
Click OK.
Sending notification messages to users
You can use the BlackBerry® Manager to send a notification message to an individual user or to all users. You can send
notifications as email messages or as PIN messages. Because the messaging server does not process PIN messages, PIN
notifications are useful for informing users about messaging server outages. BlackBerry devices do not apply filters to PIN
messages.
33
Administration Guide
Sending notification messages to users
When a user replies to a notification email message, the reply is addressed and sent to the administration email account
automatically.
Specify the administration email address for notification messages
Define the address that appears to users when the BlackBerry® Manager sends system messages or messages that contain
wireless enterprise activation passwords.
1.
2.
3.
4.
5.
In the BlackBerry Manager, click the Home tab.
Click Edit Global Properties.
In the Administration section, double-click Email Sender Address .
Type the administration email address to send system messages from.
Click OK.
Send a notification message to all users
1.
2.
3.
4.
5.
In the BlackBerry® Manager, click the Home tab.
In the Account section, click Send Message.
Specify the message type.
Click Next.
Complete the instructions on the screen.
Send a notification message to specific users
1.
2.
3.
4.
5.
6.
7.
8.
9.
34
In the BlackBerry® Manager, click the Home tab.
In the Account section, click Send Message.
Specify the message type.
Click Next.
Select Send to Selected Users.
Click Next.
Select the check box for each user that you want to send the message to.
Click Next.
Complete the instructions on the screen.
Administration Guide
Automated notification messages
If the BlackBerry® Professional Software cannot deliver an email message to users' BlackBerry devices, it sends a PIN
notification message automatically.
Change the subject for automated notification messages
You can customize the subject for automated notification messages that users receive on their BlackBerry® devices. If you
do not create a custom subject, the BlackBerry® Professional Software uses the default subject.
1. On the server that hosts the BlackBerry Professional Software, open the Registry Editor. On the taskbar, click Start >
Run. Type regedit.
2. Navigate to HKEY_LOCAL_MACHINE\SOFTWARE\Research In Motion\BlackBerry Enterprise Server\Agents.
3. Right-click Agents.
4. Click New.
5. Click String Value.
6. Rename the string value to UserSuppliedBBMessageSubject.
7. Double-click the new value.
8. In the Value data field, type a subject that does not exceed the 256 KB limit.
9. Click OK.
Turn off automated notification messages
You might want to turn off automated notification messages if users receive them too frequently.
1. On the server that hosts the BlackBerry® Professional Software, open the Registry Editor. On the taskbar, click Start
> Run. Type regedit.
2. Navigate to HKEY_LOCAL_MACHINE\SOFTWARE\Research In Motion\BlackBerry Enterprise Server\Agents.
3. Right-click Agents.
4. Click New.
5. Click DWORD Value.
6. Rename the DWORD value to MaxSkippedNotificationsPerDay.
7. Double-click the new value.
8. In the Value data field, type 0.
9. Click OK.
35
Administration Guide
Managing the incoming message queue
Managing the incoming message queue
The incoming message queue stores incoming email messages that the BlackBerry® Professional Software will process and
send to BlackBerry devices.
Delete messages for a specific user from the incoming message queue
To manage the size of the incoming message queue and to manage user accounts with high pending message counts, you
can delete email messages for a specific user from the incoming message queue.
When you delete pending messages from the incoming message queue, the BlackBerry® Professional Software does not
send the messages to the user’s BlackBerry device. Messages still appear in the user’s IBM® Lotus Notes® Inbox.
1.
2.
3.
In the BlackBerry Manager, click the Users tab.
Click a user account.
In the Service Control & Customization section, click Purge Pending Data Packets.
If wireless calendar synchronization is turned on, the BlackBerry Professional Software deletes pending calendar messages
from the incoming message queue and re-sends them later. The BlackBerry Professional Software does not delete IT policies
and IT administration commands from the incoming message queue.
Monitoring messages sent from BlackBerry devices
If your organization requires you to retain a copy of all messages that users send from their BlackBerry® devices, use the
auto BCC option in the BlackBerry® Professional Software to send copies of all messages to a specified recipient.
The auto BCC option populates the BCC field of the original message so that the message sender is aware of the blind carbon
copy.
Configure a blind carbon copy on all messages
1.
2.
3.
4.
5.
6.
36
In the BlackBerry® Manager, click the Home tab.
Click Edit Server Properties.
In the left pane, click Messaging.
In the Messaging Options section, double-click Auto BCC Addresses.
Type the email addresses that you want to BCC on all messages. Separate email addresses with a semi-colon ( ; ).
Click OK.
Configuring support for attachments
Administration Guide
Configuring support for attachments
5
Configuring support for attachment file formats
The BlackBerry® Attachment Service in the BlackBerry® Professional Software uses distillers to convert attachments in
supported file formats for display on the BlackBerry device. By default, all supported distillers are turned on.
You can add or turn off support for attachment file formats.
File formats that the BlackBerry Attachment Service supports
Format
Extension
Adobe® Acrobat® Versions 1.1, 1.2, 1.3, and 1.4
ASCII text
audio
WordPerfect Versions 6.0, 7.0, 8.0, 9.0 (2000) and 10.0
HTML
images
Microsoft® Excel® Versions 97, 2000, 2003 and XP
Microsoft® PowerPoint® Versions 97, 2000, 2003 and XP
Microsoft® Word Versions 97, 2000, 2003 and XP
Rich Text Format
ZIP archives
.pdf
.txt
.amr, .wav, .mp3, .wma
.wpd
.htm, .html
.bmp, .gif, .jpeg, .jpg, .png, .tif, .tiff, .wmf
.xls
.pps, .ppt
.doc, .dot
.rtf
.zip
Turn off support for an attachment file format
Turn off a distiller to prevent users from viewing attachments in specific file formats. For example, if you turn off the .pdf
distiller, users can no longer view .pdf file attachments on their BlackBerry® devices.
1. On the server that hosts the BlackBerry® Professional Software, on the taskbar, click Start > BlackBerry Server
Configuration.
2. Click the Attachment Server tab.
3. In the Distiller Settings section, clear the check boxes beside the file formats that you want to turn off.
4. Click OK.
37
Administration Guide
5.
Controlling the size of attachments that users can receive on their BlackBerry devices
On the server that hosts the BlackBerry Professional Software, in the Microsoft® Windows® Services, restart the
BlackBerry Attachment Service and the BlackBerry Dispatcher.
Add support for attachment file formats
If your email server connects to a document management system that renames file format extensions, add the extensions
to the list of file formats to support arbitrary extensions.
1. On the server that hosts the BlackBerry® Professional Software, on the taskbar, click Start > BlackBerry Server
Configuration.
2. Click the Attachment Server tab.
3. In the Configuration Option drop-down list, click Connector Configuration.
4. In the Format Extension field, type the file format extensions that you want to add.
5. Click OK.
6. On the server that hosts the BlackBerry Professional Software, in the Microsoft® Windows® Services, restart the
BlackBerry Dispatcher.
Controlling the size of attachments that users can receive on their
BlackBerry devices
By default, the BlackBerry® Attachment Service in the BlackBerry® Professional Software does not limit the file size of an
attachment that is embedded in a message or retrieved through a link . The BlackBerry Professional Software sends data to
the BlackBerry device in packets that are no larger than 64 KB; however, the BlackBerry Professional Software can send an
unlimited number of packets.
To control attachment file size, you can specify a maximum file size for attachments. You can also configure the maximum
dimension for images.
Suggested file sizes for attachments
File format
Suggested size
Adobe® Acrobat® Versions 1.1, 1.2, 1.3, and 1.4
Microsoft® Excel® Versions 97, 2000, 2003, 2007, and XP
Microsoft® PowerPoint® Versions 97, 2000, 2003, 2007,
and XP
Microsoft® Word Versions 97, 2000, 2003, 2007, and XP
less than 2000 KB
less than 2000 KB
less than 2000 KB
38
less than 2000 KB
Administration Guide
Controlling the size of attachments that users can receive on their BlackBerry devices
File format
Suggested size
Corel® WordPerfect® Versions 6.0, 7.0, 8.0, 9.0 (2000), and
10.0
ASCII text
HTML
ZIP archives
images
audio
MP3
Rich Text Format
less than 2000 KB
less than 100 KB
less than 100 KB
less than 2000 KB
less than 2000 KB
less than 2000 KB
less than 2000 KB
less than 2000 KB
Configure the maximum file size for attachments
You can change the maximum file size of attachment file formats to control the amount of memory that the BlackBerry®
Attachment Service in the BlackBerry® Professional Software uses during the attachment conversion process.
Consider changing the default configuration if the BlackBerry Attachment Service must respond to multiple users who
request conversions for large or complex attachments (especially .pdf files and ASCII text files that are larger than 2 MB),
or if it must respond to multiple users who request large or complex documents within the same period of time (0 to 10
minutes) while the BlackBerry Attachment Service processes large conversions.
1.
2.
3.
4.
5.
On the server that hosts the BlackBerry Professional Software, on the taskbar, click Start > BlackBerry Server
Configuration.
Click the Attachment Server tab.
In the Distiller Settings section, in the Max. File Size (Kb) column, click the value for the distiller that you want to
change.
Type a value in kilobits.
Click OK.
Configure the maximum dimensions of image attachments that can display on
BlackBerry devices
You can control the dimensions of image attachments that users can view on their BlackBerry® devices. By default, the
BlackBerry Attachment Service sets a maximum width of 5000 pixels and a maximum height of 4000 pixels for image
attachments.
1.
On the server that hosts the BlackBerry® Professional Software, open the Registry Editor. On the taskbar, click Start
> Run. Type regedit.
39
Administration Guide
Optimize the handling of file attachments
2.
Navigate to HKEY_LOCAL_MACHINE\SOFTWARE\Research In Motion\BBAttachEngine\Distillers
\LoadImageDistiller.
3. Right-click MaxWidth.
4. Click Modify.
5. Change the value to the maximum width in pixels.
6. Click OK.
7. Right-click MaxHeight.
8. Click Modify.
9. Change the value to the maximum height in pixels.
10. Click OK.
11. In the Microsoft® Windows® Services, restart the BlackBerry Attachment Service.
Change the maximum file size of attachments that users can send
1.
2.
3.
4.
5.
6.
In the BlackBerry® Manager, click the Home tab.
Click Edit Server Properties.
In the left pane, click Messaging.
To change the maximum file size for a single attachment that users can send, in the Messaging Options section, in
the Maximum Upload Attachment Size field, type a value that is between 1 and 3072.
To change the maximum file size for multiple attachments that users can send at one time, in the Messaging
Options section, in the Maximum Upload Total Attachment Size field, type a value that is between 1 and 5120 and
that is greater than the Maximum Upload Attachment Size.
Click OK.
Optimize the handling of file attachments
You can optimize the performance of the BlackBerry® Attachment Service by controlling how it retrieves, distills, and converts
attachment data. Every attachment conversion process allocates memory when it starts, uses memory on conversion, and
locally caches the Document Object Model, also referred to as the DOM. A larger cache size means that more memory is
allocated to each running conversion process. The maximum file size of attachments affects the cached memory that the
BlackBerry Attachment Service uses.
When the BlackBerry® Professional Software receives an attachment, the BlackBerry Attachment Service converts the
attachment into a DOM and caches the DOM locally. By default, the BlackBerry Attachment Service maintains the cache
for 25 minutes or until a new request exceeds the cache limit for that process. If the cache limit is exceeded, the BlackBerry
40
Optimize the handling of file attachments
Administration Guide
Attachment Service deletes the document with the oldest time stamp in the cache. When users request to view an attachment
on their BlackBerry devices, the BlackBerry Attachment Service accesses the DOM to process the request. The BlackBerry
Attachment Service keeps all cached data in memory only and never caches the original document.
1.
2.
3.
4.
On the server that hosts the BlackBerry Professional Software, on the taskbar, click Start > BlackBerry Server
Configuration.
Click the Attachment Server tab.
In the Configuration Option drop-down list, click Attachment Server.
Perform any of the following tasks:
Task
Steps
Prevent multiple requests for the same attachment from >
In the Concurrent Caching drop-down list, click
using the first cached copy of the attachment DOM in a
Disabled.
conversion process for a user.
By default, the BlackBerry Attachment Service maintains
the cache for 25 minutes or until a new request exceeds
the cache limit for that process. If the cache limit is
exceeded, the BlackBerry Attachment Service deletes the
document with the oldest time stamp in the cache.
Configure the maximum number of converted documents >
that can be located in the document cache as DOM for an
individual conversion process.
In the Document Cache Size (docs) field, type a value
between 1 and 128.
Configure the number of conversion requests that the
>
BlackBerry Attachment Service can process concurrently.
Configure the value in relation to the available memory
and competing services on the computer.
In the Conversion Processes field, type a value between 1
and 64.
Configure the number of documents that the BlackBerry >
Attachment Service can convert concurrently in a single
conversion process. Use this setting to control thread
saturation and to manage the BlackBerry Attachment
Service workload with the Busy Threshold (seconds)
setting.
In the Max. Threads Per Process field, type a value
between 2 and 32.
Configure a limit for the time in which an application
>
conversion process can reuse system resources to reclaim
space and prevent failed processes from keeping memory.
In the Recycle Time(s) (seconds) field, type a time
between 300 and 3600 seconds.
Configure the threshold to determine whether the
BlackBerry Attachment Service is busy with conversions
and should not accept new requests.
In the Busy Threshold(s) (seconds) field, type a time
between 60 and 270 seconds.
>
41
Administration Guide
5.
6.
42
Optimize the handling of file attachments
Click OK.
On the server that hosts the BlackBerry Professional Software, in the Microsoft® Windows® Services, restart the
BlackBerry Attachment Service.
Controlling BlackBerry device behavior using IT policy
Administration Guide
Controlling BlackBerry device behavior using IT policy
6
You can use one or more IT policies to customize and control the functionality of BlackBerry® devices and the BlackBerry®
Desktop Software. You can customize the settings in the IT policy rules for your environment. For more information, see the
Policy Reference Guide.
Preconfigured IT policies in the BlackBerry Professional Software
The BlackBerry® Professional Software provides preconfigured IT policies that you can apply when you set up a user account.
You can configure additional IT policy rules in these IT policies or change any settings that are shown in the following table.
IT policy rule
Default IT Basic
policy
password
security IT
policy
Device-Only Items
Password
False
Required
User Can
True
Disable
Password
Maximum
—
Security Timeout
Maximum
—
Password Age
Password
0
Pattern Checks
Enable Long—
term Timeout
Password policy group
Medium
password
security IT
policy
Medium
password
security
(disallow
application
download) IT
policy
Advanced
Advanced
security IT policy security
(disallow
application
downloads) IT
policy
True
True
True
True
True
False
False
False
False
False
30 min.
10 min.
10 min.
10 min.
10 min.
60 days
30 days
30 days
30 days
30 days
0
at least 1 alpha
and 1 numeric
character
True
at least 1 alpha
and 1 numeric
character
True
at least 1 alpha
and 1 numeric
character
True
at least 1 alpha
and 1 numeric
character
True
—
43
Preconfigured IT policies in the BlackBerry Professional Software
Administration Guide
IT policy rule
Default IT Basic
policy
password
security IT
policy
Maximum
—
Password
History
Security policy group
Disallow Third
False
Party
Application
Download
Force Lock When False
Holstered
Content
—
Protection
Strength
Disable USB
False
Mass Storage
External File
0
System
Encryption level
Bluetooth policy group
Disable Serial
False
Port Profile
Disable
False
Discoverable
Mode
44
Medium
password
security IT
policy
Medium
password
security
(disallow
application
download) IT
policy
Advanced
Advanced
security IT policy security
(disallow
application
downloads) IT
policy
—
6
6
6
6
False
False
True
False
True
False
True
True
True
True
—
—
—
Strong
Strong
False
False
False
True
True
—
—
—
Encrypt to user
password
(excluding
multimedia
directories)
—
False
False
False
True
True
False
True
True
True
True
Enforcing IT policy changes over the wireless network
Administration Guide
IT policy rule
Default IT Basic
policy
password
security IT
policy
Disable Address False
Book Transfer
Disable File
False
Transfer
Require LED
False
Connection
Indicator
WLAN policy group
WLAN Allow
True
Handheld
Changes
Medium
password
security IT
policy
Medium
password
security
(disallow
application
download) IT
policy
Advanced
Advanced
security IT policy security
(disallow
application
downloads) IT
policy
False
False
False
True
True
False
False
False
True
True
False
False
False
True
True
False
False
False
False
False
Enforcing IT policy changes over the wireless network
If your BlackBerry® Device Software supports it, you can immediately enforce IT policy rule additions, deletions, or
modifications on BlackBerry devices. When the BlackBerry device receives an updated default IT policy or a new IT policy,
the BlackBerry device and BlackBerry® Desktop Software apply the configuration changes.
The BlackBerry® Professional Software resends the IT policy to the BlackBerry device to update the BlackBerry device and
BlackBerry Desktop Software behavior over the wireless network. By default, the BlackBerry Professional Software resends
the IT policy to the appropriate BlackBerry devices within a short period of time after you update the IT policy.
You can also resend an IT policy to a BlackBerry device manually. You can configure the BlackBerry Professional Software
to resend IT policies to BlackBerry devices at a scheduled interval, regardless of whether you have changed the IT policies.
45
Administration Guide
Changing the default behavior of BlackBerry devices and the BlackBerry Desktop Software in your
organization
Changing the default behavior of BlackBerry devices and the BlackBerry
Desktop Software in your organization
You can use either of the following methods to change the default behavior of BlackBerry® devices and the BlackBerry®
Desktop Software in your organization:
•
•
set the values of IT policy rules in the default IT policy
create a new IT policy, set its IT policy rule values, and assign one or more user accounts or user groups to the new IT
policy
You can change the assigned value of a standard IT policy rule in an IT policy. You cannot add, delete, or change the permitted
values for a standard IT policy rule. You also cannot delete the standard IT policy rules. You can add a new IT policy rule to
an IT policy, delete a new IT policy rule from an IT policy, or change the assigned value of a new IT policy rule in an IT policy.
Some IT policy rules have a corresponding user-accessible field on BlackBerry devices. When you set an IT policy rule to a
True or False value, you prevent a user from selecting another value for a corresponding field on the BlackBerry device. When
you set an IT policy rule by typing a string that simultaneously turns on the IT policy rule and provides the parameters for
its use, the user cannot change the value of a corresponding field on the BlackBerry device. When you select a predefined,
permitted value to assign to an IT policy rule, you restrict the values that the user can set for a corresponding field on the
BlackBerry device. When an IT policy rule allows a numeric range, you can select any numerical value within the permitted
range.
A lock icon next to a field on the BlackBerry device indicates that the IT policy controls the setting and the user cannot
change it.
Reverting to the default behavior of BlackBerry devices and BlackBerry
Desktop Software
To revert to the default behavior that an IT policy rule customizes or controls, you can set that IT policy rule to Default, if
that setting is available, or delete the value that you previously set.
If you assign users to a new IT policy, you can delete that IT policy to revert those users to the default behavior for all
functionality on the BlackBerry® device and the BlackBerry® Desktop Software. The BlackBerry® Professional Software
automatically reassigns the users to the Default IT policy and resends the default IT policy to the BlackBerry device, enforcing
the settings in the Default IT policy.
Create an IT policy
1.
46
In the BlackBerry® Manager, click the Home tab.
Administration Guide
2.
3.
4.
5.
6.
7.
8.
9.
10.
Create an IT policy based on an existing IT policy
In the Common section, click Create IT Policy.
Click New.
Double-click IT Policy Name.
Type a name for the new IT policy.
In the left pane, click a policy group.
In the right pane, double-click the IT policy rule.
Specify a value for the IT policy rule.
Continue with the remaining policy groups that you want to configure.
Click Apply.
Create an IT policy based on an existing IT policy
1.
2.
3.
4.
5.
6.
7.
8.
9.
10.
11.
In the BlackBerry® Manager, click the Home tab.
In the Common section, click Create IT Policy.
In the list of policies, click the IT policy that you want to base the new IT policy on.
Click New Copy.
Double-click IT Policy Name.
Type a name for the new IT policy.
In the left pane, click a policy group.
In the right pane, double-click the IT policy rule.
Specify a value for the IT policy rule.
Continue with the remaining policy groups that you want to configure.
Click Apply.
Change an IT policy rule setting in an IT policy
1.
2.
3.
4.
5.
6.
7.
8.
In the BlackBerry® Manager, click the Home tab.
In the Common section, click Create IT Policy.
In the list of policies, click the IT policy that you want to change.
Click Properties.
In the left pane, click a policy group.
In the right pane, click the IT policy rule.
Specify a value for the IT policy rule.
Click Apply.
47
Administration Guide
Assign an IT policy to a user account
Assign an IT policy to a user account
1.
2.
3.
4.
5.
6.
In the BlackBerry® Manager, click the Users tab.
Click a user acount.
In the IT Admin section, click Assign IT Policy.
In the IT Policy list, select the IT policy that you want to assign.
Click Next.
Click OK.
Import IT policy definitions
The IT policy definitions file is an .xml file that adds new or updated IT policy rules to your existing set of IT policy rules. The
downloaded file might include IT policy rules that control features or services that are not included in your version of the
BlackBerry® Professional Software. Do not edit the IT policy definitions file.
1. Download the .xml file that contains IT policy rule definitions from www.blackberry.com.
2. Unzip the file to a temporary folder.
3. In the BlackBerry Manager, click the Home tab.
4. In the Service Control & Customization section, click Import IT Policy Definitions.
5. Click the .xml file that you downloaded.
6. Click Open.
7. Click OK.
Delete an IT policy
1.
2.
3.
4.
5.
6.
7.
8.
48
In the BlackBerry® Manager, click the Home tab.
Click Edit Global Properties.
In the left pane, click IT Policy.
In the IT Policy Administration section, double-click IT Policies.
Click the IT policy that you want to delete.
Click Remove.
Click Yes.
Click OK.
Administration Guide
Resend an IT policy to a BlackBerry device manually
Resend an IT policy to a BlackBerry device manually
1.
2.
3.
4.
In the BlackBerry® Manager, click the Users tab.
Click the user account that you want to resend the IT policy to.
In the IT Admin section, click Resend IT Policy.
Click OK.
Resend an IT policy to a BlackBerry device automatically
1.
2.
3.
4.
5.
6.
In the BlackBerry® Manager, click the Home tab.
Click Edit Server Properties.
In the left pane, click IT Admin.
Double-click Policy Resend Interval.
Type the interval, in hours, for the automatic resends to occur.
Click Apply.
49
Administration Guide
Customizing wireless access to enterprise applications
Customizing wireless access to enterprise applications
7
Specify the central push server
You can configure the BlackBerry® MDS Connection Service as a central push server. The central push server acts as a single
host that receives content push requests from server-side applications that reside on a corporate application server, web
server, or database. The central push server handles push requests and delivers data and updates from a server-side
application to BlackBerry devices.
1. In the BlackBerry Manager, click the Connection Service tab.
2. In the Common section, click Set as Push Server.
Configuring how BlackBerry devices authenticate with content servers
If you configured the content servers in your environment to use an authentication protocol to authenticate the sources of
data requests that they receive, you can specify how BlackBerry® devices authenticate with those content servers to obtain
application data and updates.
Configure whether BlackBerry devices authenticate with content servers directly, or whether the BlackBerry MDS Connection
Service authenticates with content servers on behalf of BlackBerry devices. If you configure BlackBerry devices to
authenticate directly with content servers, users are prompted to provide login credentials every 30 minutes on their
authenticated BlackBerry devices. If you do not configure an authentication method for BlackBerry MDS Connection Service
connections, users are prompted only if the connection to the content server persists for more than 30 minutes.
Configure how BlackBerry devices authenticate with content servers
1.
2.
3.
4.
5.
In the BlackBerry® Manager, click the Connection Service tab.
Click Edit Connection Service Properties.
In the left pane, click HTTP.
Click Support HTTP Authentication.
In the drop-down list, perform one of the following actions:
• If you want BlackBerry devices to authenticate with content servers directly, click False.
• If you want the BlackBerry MDS Connection Service to store authentication information and perform HTTP
authentication on behalf of BlackBerry devices, click True.
6.
7.
Double-click Authentication Timeout.
Type the length of time, in milliseconds, that you want authentication information for BlackBerry devices to remain
valid on the content server. By default, the authentication timeout limit is 1 hour.
Click Apply.
8.
51
Administration Guide
9.
Configuring how BlackBerry devices authenticate with content servers
If you set Support HTTP Authentication to True, configure the BlackBerry MDS Connection Service to authenticate
on behalf of BlackBerry devices with content servers that use NTLM, Kerberos™, LTPA, or RSA® Authentication Manager.
Configure the BlackBerry MDS Connection Service to authenticate on behalf of
BlackBerry devices with content servers that use NTLM
1.
2.
Navigate to <drive:>\Program Files\Research In Motion\BlackBerry Enterprise Server\MDS\Servers\<Instance>
\config.
Configure the MdsLogin.conf file.
For more information about the Java® Authentication and Authorization Service configuration file, visit http://
java.sun.com/javase/6/docs/technotes/guides/security/jgss/tutorials/LoginConfigFile.html.
Configure the BlackBerry MDS Connection Service to authenticate on behalf of
BlackBerry devices with content servers that use Kerberos
1.
2.
Navigate to <drive:>\Program Files\Research In Motion\BlackBerry Enterprise Server\MDS\Servers\<Instance >
\config.
Configure the krb5.conf file.
For more information about the Kerberos™ 5 configuration file, visit web.mit.edu/kerberos/www/krb5-1.3/krb5-1.3.3/
doc/krb5-admin.html#krb5.conf.
Configure the BlackBerry MDS Connection Service to authenticate on behalf of
BlackBerry devices with content servers that use LTPA
Turn on HTTP cookie storage to allow the BlackBerry® MDS Connection Service to authenticate with content servers that
use LTPA authentication technology.
1. In the BlackBerry Manager, click the Connection Service tab.
2. Click Edit Connection Service Properties.
3. In the left pane, click HTTP.
4. Click Support HTTP Cookie Storage.
5. In the drop-down list, click True.
6. Click Apply.
52
Administration Guide
Allowing push applications on external web servers to make trusted connections to the BlackBerry MDS
Connection Service
Configure the BlackBerry MDS Connection Service to authenticate on behalf of
BlackBerry devices with the RSA Authentication Manager
When you turn on RSA® authentication, users must type their login credentials on their BlackBerry® devices before they can
access intranet or Internet content. After the user is authenticated, if proxy authentication is configured, the BlackBerry
device prompts the user to authenticate with the proxy server. By default, the BlackBerry device is authenticated for 24
hours, and an inactive BlackBerry device remains connected for 60 minutes.
1. In the BlackBerry Manager, click the Connection Service tab.
2. Click Edit Connection Service Properties.
3. In the left pane, click RSA Authentication.
4. Click Enable RSA Authorization Support.
5. In the drop-down list, click True.
6. To specify the length of time that an authenticated BlackBerry device can remain connected to your organization's
network before the user must log in again, double-click RSA Authentication Timeout.
7. Type a value, in minutes.
8. To specify the length of time that an inactive BlackBerry device can remain connected to your organization's network
before the user must log in again, double-click RSA Inactivity Timeout.
9. Type a value, in minutes.
10. Click Apply.
Allowing push applications on external web servers to make trusted
connections to the BlackBerry MDS Connection Service
You can configure the BlackBerry® MDS Connection Service to allow push applications on untrusted web servers to push
content and updates to BlackBerry devices. If you want to establish trusted connections between external web servers and
the BlackBerry MDS Connection Service, you must initialize a key store file (webserver.keystore) on the computer on which
the BlackBerry MDS Connection Service is installed. This allows the BlackBerry MDS Connection Service to accept HTTPS
connections from push applications on external web servers.
Your organization can trust a web server that hosts push applications but is external to your environment if the BlackBerry®
Professional Software stores a certificate for it in the key store file. To trust external web servers, you can configure BlackBerry
devices to use the BlackBerry MDS Connection Service to retrieve certificate information for web servers that host push
applications, and then use the Java® keytool to install the certificates on the computer on which the BlackBerry MDS
Connection Service is installed. Push applications can then use the trusted certificates to authenticate with the BlackBerry
MDS Connection Service.
The BlackBerry MDS Connection Service supports LDAP and OCSP for certificate and certificate status retrieval, and SSL/
TLS for authenticated connections using trusted certificates.
53
Administration Guide
Allowing push applications on external web servers to make trusted connections to the BlackBerry MDS
Connection Service
Permit BlackBerry devices to connect to untrusted external web servers
You can permit BlackBerry® devices to connect to untrusted web servers that push application content to BlackBerry devices.
1. In the BlackBerry Manager, click the Connection Service tab.
2.
3.
4.
Click Edit Connection Service Properties.
Click TLS/HTTPS.
Perform one of the following actions:
• To allow outgoing requests from the BlackBerry device that the BlackBerry MDS Connection Service encrypts with
HTTPS, in the Allow Untrusted HTTPS Connections drop-down list, click True.
• To allow outgoing requests from the BlackBerry device that the BlackBerry MDS Connection Service encrypts with
TLS, in the Allow Untrusted TLS Connections drop-down list, click True.
5.
Click Apply.
Configure the BlackBerry MDS Connection Service to retrieve certificates for web
servers
Define a user name and password for the BlackBerry® MDS Connection Service to authenticate with LDAP servers on behalf
of BlackBerry devices.
Do not change the default LDAP port parameters unless there is a port conflict with another service on the same computer.
If you change port or host information, you must stop and restart the BlackBerry MDS Connection Service to reload the
configuration information.
1.
2.
3.
4.
5.
6.
In the BlackBerry Manager, click the Connection Service tab.
Click Edit Connection Service Properties.
Click LDAP.
Set the LDAP server settings.
Click Apply.
Next, you configure the BlackBerry MDS Connection Service to retrieve the status of certificates for web servers.
Configure the BlackBerry MDS Connection Service to retrieve the status of
certificates for web servers
You can configure the BlackBerry® MDS Connection Service to use the Online Certificate Status Protocol, which is also
referred to as OCSP, to obtain the revocation status of digital security certificates.
1. In the BlackBerry Manager, click the Connection Service tab.
2. Click Edit Connection Service Properties.
3. Click OCSP.
54
Restricting user access to web content
Administration Guide
4.
Perform any of the following tasks:
Task
Steps
Set the BlackBerry MDS Connection Service to accept OCSP
servers (responders) that the BlackBerry device specifies.
a.
b.
Set the OCSP handler to use the OCSP responder extension in a a.
certificate.
b.
If a certificate is present, click Use Certificate Extension
Responders.
In the drop-down list, click True.
a.
b.
Double-click Default Responder URL.
Type the URL of the OCSP responder.
Set the URL of the server on which the certificate revocation list, a.
or CRL, is located.
b.
Double-click Default CRL Server URL.
Type the URL of the CRL server.
Set the default URL of the OCSP responder.
5.
6.
Click Use Device Responders.
In the drop-down list, click True.
Click Apply.
Next, you install retrieved certificates for web servers.
Install retrieved certificates for web servers
Use the Java® keytool to add a certificate for a web server to the BlackBerry® Professional Software key store and permit
connections to the trusted web server. For more information about using the Java keytool, visit java.sun.com/j2se/1.5.0/
docs/tooldocs/windows/keytool.html.
1. Copy the certificate from a secure web site to a .cer file.
2. At a command prompt, browse to <drive:>\Program Files\Java\<JRE version>\bin.
3. Type keytool -import -trustcacerts -alias <alias_name> -file <cert_filename> -keystore cacerts.
4. Type the key store password.
5. At the prompt, click Yes to add the certificate to the key store.
Restricting user access to web content
You can create pull rules to restrict the web servers that users can access from applications on their BlackBerry® devices.
You can use one of the following methods to specify which web servers you want users to be able to access:
•
Turn on the pull authorization access control to restrict access to all types of web content, and then create pull rules
to allow users to access certain web servers.
•
Create pull rules to specify which web servers users cannot access from their BlackBerry devices.
55
Administration Guide
Restricting user access to web content
Restrict web content requests from BlackBerry devices
Turn on pull authorization for the BlackBerry® MDS Connection Service to prevent users from accessing web content on
their BlackBerry devices. If you want to provide access to certain web servers, you can create URL patterns and assign a pull
rule that allows a user to access specified web servers.
1. In the BlackBerry Manager, click the Connection Service tab.
2. Click Edit Connection Service Properties.
3. In the left pane, click Access Control.
4. Click Pull Authorization.
5. In the drop-down list, click True.
6. Click Apply.
Create URL patterns
You can create pull rules that specify the web servers that users can access from applications on their BlackBerry® devices.
To create a pull rule, you must first create URL patterns that specify web servers. You assign these URL patterns to a pull
rule that you create. You can then specify whether users are permitted or denied access to the specified web servers. After
you create a pull rule, you must assign it to a user.
1. In the BlackBerry Manager, click the Home tab.
2. Click Edit Global Properties.
3. In the left pane, click Access Control.
4. Double-click URL Patterns.
5. Click New.
6. Double-click URL pattern.
7. Type the URL pattern of the web server that the pull rule will control access to.
8. Click Service Name.
9. In the drop-down list, click the service that the URL pattern is bound to.
10. Click OK.
11. Next, you create a URL pattern for each web server that you want to allow users to access. You then create a pull rule.
Create a pull rule
1.
2.
3.
4.
56
In the BlackBerry® Manager, click the Home tab.
Click Edit Global Properties.
In the left pane, click Access Control.
Double-click Pull Rules.
Administration Guide
5.
6.
7.
8.
9.
Restricting user access to media content
Click New.
Double-click Name.
Type a name for the pull rule.
Click Apply.
Next, you assign URL patterns to the pull rule.
Assign URL patterns to a pull rule
1.
2.
3.
4.
5.
6.
In the BlackBerry® Manager, click the Home tab.
Click Edit Global Properties.
In the left pane, click Access Control.
Double-click URL Pattern Rules.
In the left pane, click the pull rule you created.
In the right pane, perform any of the following actions:
• To prevent users from accessing a specified URL pattern, select the Deny check box.
• To allow users to access a specified URL pattern, select the Allow check box.
7.
8.
Click Apply.
Next, you assign the pull rule to a user.
Assign a pull rule to a specific user
1.
2.
3.
4.
5.
6.
7.
In the BlackBerry® Manager, click the Home tab.
Click Edit Global Properties.
In the left pane, click Access Control.
Double-click User Rules.
In the left pane, click a pull rule.
In the right pane, click a user.
Click Apply.
Restricting user access to media content
Using standard definitions for MIME media types, you can restrict the types of media—for example, audio and video—that
the BlackBerry® MDS Connection Service can deliver to applications on the BlackBerry device.
For more information about MIME media types, visit www.iana.org.
57
Administration Guide
Restricting user access to media content
Prevent users from accessing certain types of media
You can configure the BlackBerry® MDS Connection Service to prevent users from accessing every format of a media type
(for example, video), or a specific format of a media type (for example, mp4), from the applications on the BlackBerry device.
1. In the BlackBerry Manager, click the Home tab.
2. Click Edit Global Properties.
3. Click Media Content Management.
4. Double-click Media Content Types.
5. Click New.
6. In the Media Content Type field, type the media type and, optionally, a subtype, using standard definitions for MIME
media types. Use the format type/subtype.
7. In the Disallow content drop-down list, click True.
8. Click OK.
Configure a size restriction for certain types of media
You can configure the BlackBerry® MDS Connection Service to prevent users from accessing certain types of media that
exceed a maximum file size.
1. In the BlackBerry Manager, click the Home tab.
2. Click Edit Global Properties.
3. Click Media Content Management.
4. Double-click Media Content Types.
5. Click New.
6. In the Media Content Type field, type the media type and, optionally, a subtype, using standard definitions for MIME
media types. Use the format <type>/<subtype>.
7. In the Maximum KB/Connection field, type the maximum file size.
8. In the Disallow content drop-down list, click False.
9. Click OK.
Configuring how the BlackBerry MDS Connection Service manages web requests
The BlackBerry® MDS Connection Service handles requests for web content from applications on BlackBerry devices. You
can configure how the BlackBerry MDS Connection Service manages these requests.
58
Administration Guide
Restricting user access to media content
Configure the BlackBerry MDS Connection Service to manage HTTP cookie storage
By default, the BlackBerry® MDS Connection Service does not manage HTTP cookie storage. If the BlackBerry device requires
JavaScript® support in its HTTP requests, cookies are processed on the BlackBerry device.
1. In the BlackBerry Manager, click the Connection Service tab.
2. Click Edit Connection Service Properties.
3. In the left pane, click HTTP.
4. Click Support HTTP Cookie Storage.
5. In the drop-down list, click True.
6. Click OK.
Configure the timeout interval for HTTP connections with BlackBerry devices
You can specify the length of time, in milliseconds, that the BlackBerry® MDS Connection Service waits for a BlackBerry
device to send data before it closes the HTTP connection with the BlackBerry device. The default interval is 120,000
milliseconds (2 minutes).
1. In the BlackBerry Manager, click the Connection Service tab.
2. Click Edit Connection Service Properties.
3. In the left pane, click HTTP.
4. Double-click HTTP Device Connection Timeout.
5. Type a number, in milliseconds.
6. Click Apply.
Configure the timeout interval for HTTP connections with web servers
You can specify the length of time, in milliseconds, that the BlackBerry® MDS Connection Service waits for a web server to
send data before it closes the HTTP connection with the web server. The default interval is 120,000 milliseconds (2 minutes).
1. In the BlackBerry Manager, click the Connection Service tab.
2. Click Edit Connection Service Properties.
3. In the left pane, click HTTP.
4. Double-click HTTP Server Connection Timeout.
5. Type a number, in milliseconds.
6. Click Apply.
59
Administration Guide
Restricting the push content that users can receive on their BlackBerry devices
Configure the maximum number of HTTP redirections the BlackBerry MDS Connection Service
supports
HTTP redirections occur when an application on the BlackBerry® device requests a web page from a web server and the web
server returns a redirection status code that indicates a new URL for the web page. The default value is five redirections.
1. In the BlackBerry Manager, click the Connection Service tab.
2. Click Edit Connection Service Properties.
3. In the left pane, click HTTP.
4. Double-click Maximum Number of Redirects.
5. Type a number.
6. Click Apply.
Restricting the push content that users can receive on their BlackBerry
devices
By default, the BlackBerry® MDS Connection Service delivers all push requests from server-side push applications to
applications on BlackBerry devices. As a result, users are able to receive application data and updates without having to
request the content.
If you want to configure your environment so that only certain server-side push applications can send push requests to
BlackBerry devices, you can turn on push authentication to restrict the BlackBerry MDS Connection Service from delivering
push requests, then you can create push initiators that specify which server-side applications are permitted to send push
requests to BlackBerry devices. You can also create and assign push rules to users to specify which users can receive push
requests.
Restrict push applications from sending data to BlackBerry devices
You can turn on push authentication to allow only authenticated push applications to send push requests to applications on
BlackBerry® devices.
1. In the BlackBerry Manager, click the Connection Service tab.
2. Click Edit Connection Service Properties.
3. In the left pane, click Access Control.
4. Click Push Authentication.
5. In the drop-down list, click True.
6. Click Apply.
7. Next, to authenticate and allow certain server-side push applications to send push requests to BlackBerry devices,
create push initiators.
60
Administration Guide
Restricting the push content that users can receive on their BlackBerry devices
Create a push initiator for a push application
A push initiator specifies which server-side push application is authenticated and allowed to send push requests to
applications on BlackBerry® devices when you have push authentication turned on for the BlackBerry MDS Connection
Service. Depending on your development environment, you can configure multiple server-side push applications to use the
same push initiator (that is, to use the same push principal name and password).
1. In the BlackBerry Manager, click the Home tab.
2. Click Edit Global Properties.
3. In the left pane, click Access Control.
4. Double-click Push Initiators.
5. Click New.
6. Double-click Push Principal Name.
7. Type the name of the server-side application that you want to allow to send push requests to BlackBerry devices.
8. Double-click Credentials.
9. Type the password for the server-side push application.
Make sure that the value of the authorization HTTP header in a push request from a server-side push application matches
the push principal name and password that you specified for the push initiator.
10. Click Apply.
11. Next, you create a push initiator for each server-side push application that you want to allow to send push requests to
BlackBerry devices. If you want to restrict which users can receive push requests from authenticated push applications,
turn on push authorization.
Turn on push authorization
After you turn on push authentication and create push initiators to specify which push applications can send push requests,
you can create pull rules to specify which users are allowed to receive push requests. Turn on push authorization for the
BlackBerry® MDS Connection Service to allow the BlackBerry MDS Connection Service to apply the push rules that you
create.
1. In the BlackBerry Manager, click the Connection Service tab.
2. Click Edit Connection Service Properties.
3. In the left pane, click Access Control.
4. Click Push Authorization.
5. In the drop-down list, click True.
6. Click Apply.
7. Next, you create a push rule.
61
Administration Guide
Restricting the push content that users can receive on their BlackBerry devices
Create a push rule
1.
2.
In the BlackBerry® Manager, click the Home tab.
Click Edit Global Properties.
3.
4.
5.
6.
7.
8.
9.
In the left pane, click Access Control.
Double-click Push Rules.
Click New.
Double-click Name.
Type a name for the push rule.
Click Apply.
Next, you assign push initiators to the push rule.
Assign push initiators to a push rule
Before you begin, you must create push initiators to authenticate certain push applications.
1. In the BlackBerry® Manager, click the Home tab.
2. Click Edit Global Properties.
3. In the left pane, click Access Control.
4. Double-click Push Initiator Rules.
5. In the left pane, click a push rule.
6. In the right pane, select the push initiators for the applications that you want to assign to the push rule.
7. Click Apply.
8. Next you, assign the push rule to each user account.
Assign a push rule to a specific user account
Before you begin, create a push rule and assign push initiators to the push rule.
1. In the BlackBerry® Manager, click Edit Global Properties .
2. In the left pane, click Access Control.
3. Double-click User Rules.
4. In the left pane, click a push rule.
5. In the right pane, click a user account.
6. Click OK.
62
Administration Guide
Managing push application requests
Encrypt push requests that push applications send to BlackBerry devices
You can configure the BlackBerry® MDS Connection Service to encrypt the push requests that server-side push applications
send to BlackBerry devices using SSL or TLS. By default, the BlackBerry MDS Connection Service does not encrypt the push
requests that server-side push applications send.
1. In the BlackBerry Manager, click the Connection Service tab.
2. Click Edit Connection Service Properties.
3. Click Access Control.
4. Click Push Encryption.
5. In the drop-down list, click True.
6. Click Apply.
Managing push application requests
The BlackBerry® MDS Connection Service receives push application requests from server-side push applications, then
delivers these requests to applications on BlackBerry devices. You can control how the BlackBerry MDS Connection Service
processes, stores, and delivers push application requests.
Specify device ports for application-reliable push requests
Application developers can design custom BlackBerry® Java® Applications to handle application-reliable push requests.
When a BlackBerry Java Application receives an application-reliable push request, it returns a delivery confirmation to the
BlackBerry MDS Connection Service, which delivers the confirmation to the server-side push application. The application's
developer or the application's documentation can provide information about the ports that are defined for BlackBerry
Applications that support application-reliable push requests. You can then specify the device ports that each BlackBerry
Java Application uses to listen for application-reliable push requests.
1. In the BlackBerry Manager, click the Connection Service tab.
2. Click Edit Connection Service Properties.
3. In the left pane, click Push/PAP.
4. Double-click Device Ports Enabled for Reliable Pushes.
5. Type the device port number. Use commas to separate multiple port numbers.
6. Click Apply.
7. Click Restart Service.
63
Administration Guide
Managing push application requests
Store push application requests in the BlackBerry Configuration Database
To manage memory and system resources in your environment, you can configure the BlackBerry® MDS Connection
Service to store Password Authentical Protocol and RIM® push requests in the BlackBerry Configuration Database. You can
configure storage settings for the BlackBerry Configuration Database.
1. In the BlackBerry Manager, click the Connection Service tab.
2. Click Edit Connection Service Properties.
3. Click Push/PAP.
4. Click Store Push Submissions.
5. In the drop-down list, click True.
6. Click Apply.
7. On the server that hosts the BlackBerry® Professional Software, on the taskbar, click Start > Administrative Tools >
Services.
8. Right-click BlackBerry MDS Connection Service.
9. Click Restart.
10. Next, you configure storage settings for push requests stored in the BlackBerry Configuration Database.
Configure storage settings for push requests stored in the BlackBerry Configuration
Database
You can manage your system resources by configuring storage settings for push requests stored in the BlackBerry®
Configuration Database.
1. In the BlackBerry Manager, click the Home tab.
2. Click Edit Global Properties.
3. Click Push Control.
4. Double-click Maximum Stored Push Messages.
5. Type the maximum number of push requests that can be stored in the BlackBerry Configuration Database.
6. Double-click Maximum Push Message Age.
7. Type the maximum length of time, in minutes, to store a push request before the BlackBerry® Professional Software
purges it from the BlackBerry Configuration Database.
8. Click Apply.
9. On the server that hosts the BlackBerry Professional Software, on the taskbar, click Start > Administrative Tools >
Services.
10. Right-click BlackBerry MDS Connection Service.
11. Click Restart.
64
Administration Guide
Managing push application requests
Configure the maximum number of active connections that the BlackBerry MDS
Connection Service can process
You can configure the maximum number of push connections that the BlackBerry® MDS Connection Service can process at
the same time. When this limit is reached, the BlackBerry MDS Connection Service queues the remaining push connections.
1. In the BlackBerry Manager, click the Connection Service tab.
2. Click Edit Connection Service Properties.
3. Click Push/PAP.
4. Double-click Maximum number of Active Connections.
5. Type a number.
6. Click OK.
7. On the server that hosts the BlackBerry® Professional Software, on the taskbar, click Start > Administrative Tools >
Services.
8. Right-click BlackBerry MDS Connection Service.
9. Click Restart.
Configure the maximum number of queued connections that the BlackBerry MDS
Connection Service can process
The BlackBerry® MDS Connection Service queues push connections when the number of connections reaches the limit that
you specify. You can configure the maximum number of push connections that the BlackBerry MDS Connection Service can
queue. When this limit is reached, the BlackBerry MDS Connection Service sends a "service unavailable" message to
BlackBerry devices that receive push requests.
1. In the BlackBerry Manager, click the Connection Service tab.
2. Click Edit Connection Service Properties.
3. Click Push/PAP.
4. Double-click Maximum number of Queued Connections.
5. Type a number.
6. Click OK.
7. On the server that hosts the BlackBerry® Professional Software, on the taskbar, click Start > Administrative Tools >
Services.
8. Right-click BlackBerry MDS Connection Service.
9. Click Restart.
65
Administration Guide
Managing push application requests
Clear the push request queue manually on a Microsoft SQL Server
An automated process runs daily to clear the push request queue on a Microsoft® SQL Server®. You can also clear the push
request queue manually by running the RIMPurgeMDSMsg<database_name> process from your Microsoft SQL Server
management console.
1.
Perform one of the following actions:
• If you are using Microsoft SQL Server Enterprise Manager, navigate to Console Root\Microsoft SQL Servers\SQL
Server Group\<BlackBerry Configuration Database server>\Management\SQL Server Agent\Jobs.
• If you are using Microsoft SQL Server Management Studio, navigate to SQL Server Agent\Jobs.
2.
Start the RIMPurgeMDSMsg<database_name> process.
Configuring how the BlackBerry MDS Connection Service connects to BlackBerry
devices
Specify the maximum amount of data that the BlackBerry MDS Connection Service can send to
BlackBerry devices
1.
2.
3.
4.
5.
6.
In the BlackBerry® Manager, click the Connection Service tab.
Click Edit Connection Service Properties.
In the left pane, click General.
Double-click Maximum KB/Connection.
Type a number, in kilobytes.
Click Apply.
Specify the BlackBerry MDS Connection Service flow control timeout limit
You can specify how long the BlackBerry® MDS Connection Service waits for acknowledgement from a BlackBerry device
before it discards pending content for that BlackBerry device.
1. In the BlackBerry Manager, click the Connection Service tab.
2. Click Edit Connection Service Properties.
3. In the left pane, click General.
4. Double-click Flow Control Timeout.
5. Type a number, in milliseconds.
6. Click Apply.
66
Administration Guide
Managing push application requests
Specify the thread pool size of the BlackBerry MDS Connection Service
Make sure there is adequate system memory to support the thread pool size that you want to specify. You can specify the
maximum number of threads that the BlackBerry® MDS Connection Service can process at the same time before it rejects
processing requests.
1. In the BlackBerry Manager, click the Connection Service tab.
2. Click Edit Connection Service Properties.
3. In the left pane, click General.
4. Double-click Thread Pool Size.
5. Type a number between 100 and 1000.
6. Click Apply.
Specify the maximum number of persistent socket connections
Make sure there is adequate system memory to support the value that you want to specify. You can specify the maximum
number of persistent socket connections that can be open at the same time between BlackBerry® devices and the BlackBerry
MDS Connection Service. The BlackBerry MDS Connection Service rejects processing requests from BlackBerry devices when
the number of persistent socket connections reaches the maximum number that you specify.
1. In the BlackBerry Manager, click the Connection Service tab.
2. Click Edit Connection Service Properties.
3. In the left pane, click General.
4. Double-click Maximum Simultaneous Persistent Sockets.
5. Type a number between 100 and 3500.
6. Click Apply.
Specify the port on which the web server listens for push application requests
You can specify the port on which the web server listens for HTTP and HTTPS requests from server-side push applications.
Change the default port parameters only if there is a port conflict with another service on the same computer.
1. In the BlackBerry® Manager, click the Connection Service tab.
2. Click Edit Connection Service Properties.
3. In the left pane, click General.
4. Perform one of the following actions:
• To specify the port for HTTP requests from push applications, double-click Web Server Listen Port.
• To specify the port for HTTPS requests from push applications, double-click Web Server SSL Listen Port.
5.
6.
Type the port number.
Click Apply.
67
Administration Guide
7.
8.
Managing push application requests
On the server that hosts the BlackBerry® Professional Software, on the taskbar, click Start > Administrative Tools >
Services. Right-click BlackBerry MDS Connection Service. Click Restart.
Notify any push application developer in your environment that you have changed the port number.
Specify how often the BlackBerry MDS Connection Service polls for configuration information
You can specify how often the BlackBerry® MDS Connection Service polls the BlackBerry Configuration Database for changes
to the BlackBerry MDS Connection Service administrative settings. The default interval is 5 minutes.
1. In the BlackBerry Manager, click the Connection Service tab.
2. Click Edit Connection Service Properties.
3. In the left pane, click General.
4. Double-click Admin Configuration Cycle Timer.
5. Type a number, in minutes.
6. Click Apply.
68
Administration Guide
Managing BlackBerry Device Software and wireless applications
Managing BlackBerry Device Software and wireless
applications
8
Making BlackBerry Device Software or applications available to users
You can make BlackBerry® Device Software or applications available to users in the following ways:
•
install BlackBerry Device Software on or add applications to a BlackBerry device that is connected to the server that
hosts the BlackBerry® Professional Software
•
make the BlackBerry Device Software and applications available so that a user can install the software and add
applications using the application loader tool
You must make the BlackBerry Device Software and applications available in a shared network location.
You can create a software configuration to define how the BlackBerry Professional Software delivers the applications to
BlackBerry devices, and optionally, which applications can be added to certain BlackBerry devices.
Share the network folder
1.
2.
3.
4.
5.
6.
7.
8.
On the server that hosts the BlackBerry® Professional Software, navigate to the following location: <drive>:\Program
Files\Common Files\Research In Motion.
Right-click the Research In Motion folder.
Click Sharing and Security.
On the Sharing tab, select Share this folder.
Click Permissions.
Set the Read permission to Allow.
Click OK.
Create the following network path: <drive>:\Program Files\Common Files\Research In Motion\Shared
\Applications.
After you finish: Add the required applications to the shared network folder.
Install the BlackBerry Device Software files in the shared network folder
1.
2.
3.
4.
Obtain the BlackBerry® Device Software installation file from your wireless service provider.
Copy the BlackBerry Device Software installation file to the shared network folder.
In the folder, double-click the .exe file.
Complete the installation.
69
Administration Guide
5.
Indexing applications on a network drive
Verify that the files are located in <drive>:\Program Files\Common Files\Research In Motion\Shared\Loader Files.
After you finish: Add any additional applications to the shared network folder, and then index the applications.
Add the application files to the shared network folder
Add only .alx and .cod files to the shared network folder.
1. On the server that hosts the BlackBerry® Professional Software, navigate to < drive:>\Program Files\Common Files
\Research In Motion\Shared\Applications
2. In the Applications folder, create a subfolder for the application.
3. Copy the .alx and .cod files for the application to the folder you created, preserving the structure of the application.
After you finish: Index the application files.
Indexing applications on a network drive
You create a software index for the applications that you add to the network drive so that the application loader tool and
software configurations can locate the applications that are available to add to BlackBerry® devices. When you create a
software index, the BlackBerry® Professional Software creates a specification.pkg file and a PkgDBCache.xml index file for
each application.
The index files are created automatically for recent versions of the BlackBerry® Device Software. Check your application
folder for the .xml file and .pkg files.
Create a software index for the applications in the shared network folder
1.
2.
3.
4.
5.
6.
70
Open a command prompt window. On the server that hosts the BlackBerry® Professional Software, on the taskbar, click
Start > Run. Type cmd.
At the command prompt, type cd <drive>:\Program Files\Common Files\Research In Motion\Apploader .
Type loader.exe /index.
The application loader tool builds the software index structure in the network drive and adds any missing index files.
Type exit.
Verify that the folder for the application now contains the following two files: .xml file and .pkg file.
Next, you create the new software configuration.
Administration Guide
Defining software configurations
Reindex the applications in the shared network folder
If you change an .alx file after you create an index for the applications in the shared network folder, you must reindex the
applications.
1.
2.
3.
At the command prompt, navigate to <drive>:\Program Files\Common Files\Research In Motion\Apploader.
Type loader.exe /reindex.
The application loader updates the software index structure in the shared network folde and adds any missing index
files.
Next, you create a software configuration.
Defining software configurations
A software configuration points to the shared network location of the BlackBerry® Device Software and applications that
you plan to install on a specific BlackBerry device model. Using a software configuration, you can remotely add and remove
third-party applications using the application loader tool on BlackBerry devices that are connected to computers running
the BlackBerry® Desktop Manager.
You create a software configuration for each BlackBerry device model in your organization. When you create a software
configuration, you can define application control policies to specify the resources that applications can access on BlackBerry
devices from behind your organization's firewall. You can also use application control policies to monitor the installed
applications and to make sure that certain applications remain installed on, or are removed from, BlackBerry devices.
After you create a software configuration and define any application control policies, you assign the software configuration
to a user account to apply the configuration attributes.
Create a software configuration
If you have more than one BlackBerry® device model in your organization, you must create a different software configuration
for each model.
1. In the BlackBerry Manager, click the Software Configurations tab.
2. In the Common section, click Add New Configuration.
3. Verify that you completed the prerequisite tasks outlined in the Add New Configuration screen. Click OK.
4. In the Configuration Name field, type a name.
5. In the Configuration Description field, type a description.
6. Click Change.
7. Type the location of the BlackBerry® Device Software or applications.
8. Click OK.
71
Administration Guide
Applying application control policies
9.
In the Application Name list, select the check box beside the BlackBerry device models that you want to configure the
BlackBerry Device Software or applications for.
10. Select or clear the check box for each application that you want to install or remove.
11. In the Delivery drop-down list, click the delivery method.
12. In the Policy list, click the Application Control policy rule for the application.
You can click Policies to define new application control policy rules for an application.
13. Click OK.
Create a software configuration based on an existing software configuration
1.
2.
3.
4.
5.
6.
7.
In the BlackBerry® Manager, click the Software Configurations tab.
Click a software configuration.
Click Copy Configuration.
Double-click the copied software configuration.
In the Configuration Name field, rename the software configuration.
Change the software configuration properties as necessary.
Click OK.
Applying application control policies
After you create a software configuration, you can configure an application control policy to control or change the behavior
of an application on the BlackBerry® device. For example, you can use an application control policy to specify that an
application is required on the BlackBerry device.
For more information about application control policies, see the Policy Reference Guide.
Define an application control policy
1.
2.
3.
4.
5.
6.
7.
72
In the BlackBerry® Manager, click the Software Configurations tab.
In the Common section, click Manage Application Policies.
Click New.
Type a new policy name.
Customize the application control policy rules.
Click Apply.
Next, you assign the application control policy to an application.
Administration Guide
Send an application to a BlackBerry device over the wireless network
Assign an application control policy to an application
1.
2.
In the BlackBerry® Manager, click the Software Configurations tab.
In the Configuration Name list, click a software configuration.
3.
4.
5.
6.
In the Common section, click Edit Configuration.
Click the application that you want to assign the application control policy to.
In the Policy drop-down list, click an application control policy.
Perform one of the following actions:
• To assign an application control policy to all applications that are not currently assigned to an application control
policy, click an application control policy at the application software level.
• To assign the application control policy that is assigned at the application software level, click <default>. An asterisk
is added to the policy name.
• To assign the default application control policy rules that are preconfigured on the BlackBerry device, click
<none>.
7.
Click Apply.
Assign a software configuration to a user account
1.
2.
3.
4.
5.
In the BlackBerry® Manager, click the Users tab.
Right-click the user account that you want to assign the software configuration to.
Click Assign Software Configuration.
Click the software configuration that you want to assign.
Click OK.
Send an application to a BlackBerry device over the wireless network
The wireless download to BlackBerry® devices can take up to four hours to start.
1. In the BlackBerry Manager, click the Software Configurations tab.
2. Click a software configuration.
3. Click Edit Configuration.
4. Click the application that you want to send over the wireless network.
5. In the Delivery drop-down list, click Wireless.
6. To make sure that the application remains installed on a BlackBerry device, set the Disposition to Required.
7. Click OK.
73
Administration Guide
Load the BlackBerry Device Software or applications on to a BlackBerry device using the BlackBerry Manager
Load the BlackBerry Device Software or applications on to a BlackBerry
device using the BlackBerry Manager
If you want to install BlackBerry® Device Software or applications on BlackBerry devices before you distribute the BlackBerry
devices to users, you can use the BlackBerry Manager to complete the installation process.
1.
2.
3.
4.
5.
6.
7.
8.
Connect the BlackBerry device to the server that hosts the BlackBerry® Professional Software.
In the BlackBerry Manager, click the Software Configurations tab.
Click a software configuration.
Click Edit Configuration.
Click the application that you want to install.
In the Delivery drop-down list, click Wireline only.
To make sure that the application remains installed on a BlackBerry device, set the Disposition to Required.
Click OK.
Managing applications on BlackBerry devices
Change an application control policy
1.
2.
3.
4.
5.
6.
In the BlackBerry® Manager, click the Software Configurations tab.
Click Manage Application Policies.
Click the application control policy.
Click Properties.
Change the properties of the application control policy.
Click OK.
Remove an application from a BlackBerry device
You cannot remove an application from a BlackBerry® device over the wireless network. You can remove the icon for the
application, and you can make the application inaccessible on the BlackBerry device; however, the application remains
installed on the BlackBerry device.
The BlackBerry® Professional Software might take up to four hours to send the command to the BlackBerry device.
1.
2.
74
In the BlackBerry Manager, click the Software Configurations tab.
Click Manage Application Policies.
Administration Guide
3.
4.
5.
Managing applications on BlackBerry devices
Double-click an application control policy.
In the Disposition drop-down list, click Disallowed.
Click OK.
Upgrade an application on a BlackBerry device over the wireless network
You can upgrade applications on BlackBerry® devices over the wireless network. The BlackBerry® Professional Software
might take up to four hours to upgrade an application on a BlackBerry device. If the Disposition is set to Required in the
application control policy, the application upgrade is also sent over the wireless network.
1. In the network drive, add or upgrade the application.
2. Reindex the application.
Remove a software configuration from a user account
1.
2.
3.
4.
5.
In the BlackBerry® Manager, click the Users tab.
Right-click the user account that you want to delete the software configuration from.
Click Assign Software Configuration .
Click <none>.
Click OK.
75
Controlling the BlackBerry environment
Administration Guide
9
Controlling the BlackBerry environment
Protecting BlackBerry device data in transit
From the time that the user sends data (for example, an email message) from the BlackBerry® device until the BlackBerry®
Professional Software receives the data, and from the time that the BlackBerry Professional Software receives and forwards
data to the user until the user receives the data on the BlackBerry device, standard BlackBerry encryption uses a symmetric
algorithm to protect the data.
By default, the BlackBerry Professional Software uses both the Triple Data Encryption Standard (Triple DES or 3DES) and
the Advanced Encryption Standard (AES) algorithms to encrypt all communication with BlackBerry devices.
Encryption algorithm
Description
Notes
Triple DES
enables the use of the Triple DES
algorithm to encrypt and decrypt all data
communication between the BlackBerry
Professional Software and all BlackBerry
devices
enables the use of the AES algorithm to
encrypt and decrypt all data
communication between the BlackBerry
Professional Software and all BlackBerry
devices
provides Triple DES encryption only on
BlackBerry devices
AES
Triple DES and AES
•
•
uses a longer encryption key,
which is designed to provide a
better combination of security
and performance than Triple DES
helps to protect user data and
encryption keys from traditional
and side-channel attacks
provides Triple DES encryption on
provides the default encryption
BlackBerry device that do not support AES method
(BlackBerry devices that run BlackBerry®
Device Software versions earlier than 4.0)
Change the encryption type
1.
2.
3.
In the BlackBerry® Manager, click the Home tab.
Click Edit Server Properties.
In the left pane, click General.
77
Administration Guide
4.
5.
6.
Reading IBM Lotus Notes and S/MIME encrypted messages on the BlackBerry device
In the Security section, click Encryption Algorithm.
In the drop-down list, click the encryption type that you want to use.
Click OK.
After you finish: If you change the encryption type, you must reactivate the BlackBerry devices in the BlackBerry Domain
under one of the following conditions:
•
The BlackBerry® Professional Software was configured to use Triple DES only, and you change the encryption type to
AES only. To make this change, you must first change to Triple DES or AES, then change to AES only.
•
The BlackBerry Professional Software was configured to use AES only, and you change the encryption type to Triple
DES only.
•
The BlackBerry Professional Software was configured to use Triple DES or AES, and you change the encryption type to
Triple DES only.
Reading IBM Lotus Notes and S/MIME encrypted messages on the
BlackBerry device
If your version of the IBM® Lotus Notes® API supports it, the BlackBerry® Professional Software turns on support automatically
for decrypting and reading messages that are encrypted by either IBM Lotus Notes or S/MIME on the BlackBerry device.
Turning off support for reading IBM Lotus Notes and S/MIME encrypted
messages on the BlackBerry device
To turn off the ability to read IBM® Lotus Notes®encrypted and S/MIME encrypted messages on the BlackBerry® device,
instruct users to detach their Notes .id files from their mail files.
For more information, see the BlackBerry® Desktop Software documentation.
78
Administration Guide
Managing client access license keys
Managing client access license keys
10
Client access license keys, or CAL keys, control the number of user accounts that can exist in the BlackBerry® Professional
Software at the same time. If you exceed the number of permitted user accounts, the BlackBerry Manager notifies you that
you require more CAL keys.
The BlackBerry Professional Software supports a maximum of 30 user accounts, regardless of the number of user accounts
that your CAL key or combination of CAL keys supports.
Add a CAL key
1.
2.
3.
4.
5.
In the BlackBerry® Manager, click the Home tab.
In the Account section, click License Management.
Type the new information for the CAL key.
Click Add License.
Click Close.
Copy a CAL key to a text file
1.
2.
3.
4.
5.
6.
7.
In the BlackBerry® Manager, click the Home tab.
In the Account section, click License Management.
Right-click the CAL key that you want to copy.
Click Copy Key.
Open a text editor.
Paste the CAL key into the file.
Save the file.
Remove a CAL key
You can remove a CAL key only if you have more than one. You must have a CAL key that supports the BlackBerry® Professional
Software user accounts in your organization.
1. In the BlackBerry Manager, click the Home tab.
2. In the Account section, click License Management.
3. Right-click the CAL key that you want to delete.
4. Click Remove License Key.
79
Administration Guide
Removing the BlackBerry Professional Software from the host server
Removing the BlackBerry Professional Software from the
host server
11
Remove the BlackBerry Professional Software from the host server
1.
2.
3.
4.
5.
6.
7.
Turn off the IBM® Lotus® Domino® server.
On the server that hosts the BlackBerry® Professional Software, on the taskbar, click Start > Settings > Control Panel
> Add/Remove Programs.
Click BlackBerry Professional Software.
Click Remove.
Click Yes.
If prompted, perform one of the following actions:
• To save all log files in the log directory, click No.
• To delete all files in the log directory, click Yes.
Perform one of the following actions:
• To save user information for a future BlackBerry Professional Software installation, click No.
• To delete all user information, click Yes.
Remove the registry entries from the host server
1.
2.
On the server that you removed the BlackBerry® Professional Software from, open the Registry Editor. On the taskbar,
click Start > Run. Type regedit.
Delete the following registry keys:
Location
Key
HKEY_LOCAL_MACHINE\SOFTWARE
Research In Motion
HKEY_LOCAL_MACHINE\SYSTEM\CurrentControlSet
\Services
BBAttachServer and any keys starting with “BES” or
“BlackBerry”
HKEY_LOCAL_MACHINE\SYSTEM\ControlSet001
\Services
BBAttachServer and any keys starting with “BlackBerry”
HKEY_LOCAL_MACHINE\SYSTEM \ControlSet00n
\Services
BBAttachServer and any keys starting with “BlackBerry”
HKEY_CURRENT_USER\SOFTWARE
Research In Motion
81
Administration Guide
82
Remove the registry entries from the host server
HKEY_CURRENT_USER\SOFTWARE \Microsoft
\Windows NT\ CurrentVersion\Windows Messaging
SubSystem\Profiles
any keys named BlackBerryServer, BlackBerry Manager,
or listed as the name of your BlackBerry Professional
Software
HKEY_USERS\.DEFAULT\SOFTWARE
Research In Motion
Administration Guide
Legal notice
Legal notice
12
©2008 Research In Motion Limited. All rights reserved. BlackBerry®, RIM®, Research In Motion®, SureType® and related
trademarks, names, and logos are the property of Research In Motion Limited and are registered and/or used in the U.S.
and countries around the world.
Adobe, Acrobat, and Reader are trademarks of Adobe Systems Incorporated. IBM, Domino, Lotus, and Lotus Notes are
trademarks of International Business Machines Corporation. Kerberos is a trademark of Massachusetts Institute of
Technology. Microsoft, Excel, PowerPoint, SQL Server, and Windows are trademarks of Microsoft Corporation. WordPerfect
is a trademark of Morgan Stanley & Company. Java is a trademark of Sun Microsystems, Inc. All other trademarks are the
property of their respective owners.
The BlackBerry smartphone and other devices and/or associated software are protected by copyright, international treaties,
and various patents, including one or more of the following U.S. patents: 6,278,442; 6,271,605; 6,219,694; 6,075,470;
6,073,318; D445,428; D433,460; D416,256. Other patents are registered or pending in the U.S. and in various countries
around the world. Visit www.rim.com/patents for a list of RIM (as hereinafter defined) patents.
This documentation including all documentation incorporated by reference herein such as documentation provided or made
available at www.blackberry.com/go/docs is provided or made accessible "AS IS" and "AS AVAILABLE" and without condition,
endorsement, guarantee, representation, or warranty of any kind by Research In Motion Limited and its affiliated companies
("RIM") and RIM assumes no responsibility for any typographical, technical, or other inaccuracies, errors, or omissions in this
documentation. In order to protect RIM proprietary and confidential information and/or trade secrets, this documentation
may describe some aspects of RIM technology in generalized terms. RIM reserves the right to periodically change information
that is contained in this documentation; however, RIM makes no commitment to provide any such changes, updates,
enhancements, or other additions to this documentation to you in a timely manner or at all.
This documentation might contain references to third-party sources of information, hardware or software, products or services
including components and content such as content protected by copyright and/or third-party web sites (collectively the
"Third Party Products and Services"). RIM does not control, and is not responsible for, any Third Party Products and Services
including, without limitation the content, accuracy, copyright compliance, compatibility, performance, trustworthiness,
legality, decency, links, or any other aspect of Third Party Products and Services. The inclusion of a reference to Third Party
Products and Services in this documentation does not imply endorsement by RIM of the Third Party Products and Services
or the third party in any way.
EXCEPT TO THE EXTENT SPECIFICALLY PROHIBITED BY APPLICABLE LAW IN YOUR JURISDICTION, ALL CONDITIONS,
ENDORSEMENTS, GUARANTEES, REPRESENTATIONS, OR WARRANTIES OF ANY KIND, EXPRESS OR IMPLIED,
INCLUDING WITHOUT LIMITATION, ANY CONDITIONS, ENDORSEMENTS, GUARANTEES, REPRESENTATIONS OR
WARRANTIES OF DURABILITY, FITNESS FOR A PARTICULAR PURPOSE OR USE, MERCHANTABILITY, MERCHANTABLE
QUALITY, NON-INFRINGEMENT, SATISFACTORY QUALITY, OR TITLE, OR ARISING FROM A STATUTE OR CUSTOM OR A
COURSE OF DEALING OR USAGE OF TRADE, OR RELATED TO THE DOCUMENTATION OR ITS USE, OR PERFORMANCE
OR NON-PERFORMANCE OF ANY SOFTWARE, HARDWARE, SERVICE, OR ANY THIRD PARTY PRODUCTS AND SERVICES
REFERENCED HEREIN, ARE HEREBY EXCLUDED. YOU MAY ALSO HAVE OTHER RIGHTS THAT VARY BY STATE OR
PROVINCE. SOME JURISDICTIONS MAY NOT ALLOW THE EXCLUSION OR LIMITATION OF IMPLIED WARRANTIES AND
CONDITIONS. TO THE EXTENT PERMITTED BY LAW, ANY IMPLIED WARRANTIES OR CONDITIONS RELATING TO THE
83
Administration Guide
Legal notice
DOCUMENTATION TO THE EXTENT THEY CANNOT BE EXCLUDED AS SET OUT ABOVE, BUT CAN BE LIMITED, ARE HEREBY
LIMITED TO NINETY (90) DAYS FROM THE DATE YOU FIRST ACQUIRED THE DOCUMENTATION OR THE ITEM THAT IS
THE SUBJECT OF THE CLAIM.
TO THE MAXIMUM EXTENT PERMITTED BY APPLICABLE LAW IN YOUR JURISDICTION, IN NO EVENT SHALL RIM BE LIABLE
FOR ANY TYPE OF DAMAGES RELATED TO THIS DOCUMENTATION OR ITS USE, OR PERFORMANCE OR NONPERFORMANCE OF ANY SOFTWARE, HARDWARE, SERVICE, OR ANY THIRD PARTY PRODUCTS AND SERVICES
REFERENCED HEREIN INCLUDING WITHOUT LIMITATION ANY OF THE FOLLOWING DAMAGES: DIRECT,
CONSEQUENTIAL, EXEMPLARY, INCIDENTAL, INDIRECT, SPECIAL, PUNITIVE, OR AGGRAVATED DAMAGES, DAMAGES
FOR LOSS OF PROFITS OR REVENUES, FAILURE TO REALIZE ANY EXPECTED SAVINGS, BUSINESS INTERRUPTION, LOSS
OF BUSINESS INFORMATION, LOSS OF BUSINESS OPPORTUNITY, OR CORRUPTION OR LOSS OF DATA, FAILURES TO
TRANSMIT OR RECEIVE ANY DATA, PROBLEMS ASSOCIATED WITH ANY APPLICATIONS USED IN CONJUNCTION WITH
RIM PRODUCTS OR SERVICES, DOWNTIME COSTS, LOSS OF THE USE OF RIM PRODUCTS OR SERVICES OR ANY PORTION
THEREOF OR OF ANY AIRTIME SERVICES, COST OF SUBSTITUTE GOODS, COSTS OF COVER, FACILITIES OR SERVICES,
COST OF CAPITAL, OR OTHER SIMILAR PECUNIARY LOSSES, WHETHER OR NOT SUCH DAMAGES WERE FORESEEN OR
UNFORESEEN, AND EVEN IF RIM HAS BEEN ADVISED OF THE POSSIBILITY OF SUCH DAMAGES.
TO THE MAXIMUM EXTENT PERMITTED BY APPLICABLE LAW IN YOUR JURISDICTION, RIM SHALL HAVE NO OTHER
OBLIGATION, DUTY, OR LIABILITY WHATSOEVER IN CONTRACT, TORT, OR OTHERWISE TO YOU INCLUDING ANY
LIABILITY FOR NEGLIGENCE OR STRICT LIABILITY.
THE LIMITATIONS, EXCLUSIONS, AND DISCLAIMERS HEREIN SHALL APPLY: (A) IRRESPECTIVE OF THE NATURE OF THE
CAUSE OF ACTION, DEMAND, OR ACTION BY YOU INCLUDING BUT NOT LIMITED TO BREACH OF CONTRACT,
NEGLIGENCE, TORT, STRICT LIABILITY OR ANY OTHER LEGAL THEORY AND SHALL SURVIVE A FUNDAMENTAL BREACH
OR BREACHES OR THE FAILURE OF THE ESSENTIAL PURPOSE OF THIS AGREEMENT OR OF ANY REMEDY CONTAINED
HEREIN; AND (B) TO RIM AND ITS AFFILIATED COMPANIES, THEIR SUCCESSORS, ASSIGNS, AGENTS, SUPPLIERS
(INCLUDING AIRTIME SERVICE PROVIDERS), AUTHORIZED RIM DISTRIBUTORS (ALSO INCLUDING AIRTIME SERVICE
PROVIDERS) AND THEIR RESPECTIVE DIRECTORS, EMPLOYEES, AND INDEPENDENT CONTRACTORS.
IN ADDITION TO THE LIMITATIONS AND EXCLUSIONS SET OUT ABOVE, IN NO EVENT SHALL ANY DIRECTOR, EMPLOYEE,
AGENT, DISTRIBUTOR, SUPPLIER, INDEPENDENT CONTRACTOR OF RIM OR ANY AFFILIATES OF RIM HAVE ANY LIABILITY
ARISING FROM OR RELATED TO THE DOCUMENTATION.
Prior to subscribing for, installing, or using any Third Party Products and Services, it is your responsibility to ensure that your
airtime service provider has agreed to support all of their features. Installation or use of Third Party Products and Services
with RIM's products and services may require one or more patent, trademark, copyright, or other licenses in order to avoid
infringement or violation of third party rights. You are solely responsible for determining whether to use Third Party Products
and Services and if any third party licenses are required to do so. If required you are responsible for acquiring them. You
should not install or use Third Party Products and Services until all necessary licenses have been acquired. Any Third Party
Products and Services that are provided with RIM's products and services are provided as a convenience to you and are
provided "AS IS" with no express or implied conditions, endorsements, guarantees, representations, or warranties of any
kind by RIM and RIM assumes no liability whatsoever, in relation thereto. Your use of Third Party Products and Services shall
be governed by and subject to you agreeing to the terms of separate licenses and other agreements applicable thereto with
third parties, except to the extent expressly covered by a license or other agreement with RIM.
84
Administration Guide
Legal notice
The terms of use of any RIM product or service are set out in a separate license or other agreement with RIM applicable
thereto. NOTHING IN THIS DOCUMENTATION IS INTENDED TO SUPERSEDE ANY EXPRESS WRITTEN AGREEMENTS OR
WARRANTIES PROVIDED BY RIM FOR PORTIONS OF ANY RIM PRODUCT OR SERVICE OTHER THAN THIS
DOCUMENTATION.
Certain features outlined in this documentation require a minimum version of BlackBerry® Enterprise Server Software,
BlackBerry® Desktop Software, and/or BlackBerry® Device Software and may require additional development or Third Party
Products and Services for access to corporate applications.
This product includes software developed by the Apache Software Foundation (www.apache.org/) and/or licensed pursuant
to Apache License, Version 2.0 (www.apache.org/licenses/). For more information, see the NOTICE.txt file included with the
software. Unless required by applicable law or agreed to in writing, software distributed under the License is distributed on
an "AS IS" BASIS, WITHOUT WARRANTIES OR CONDITIONS OF ANY KIND, either express or implied. See the License for
the specific language governing permissions and limitations under the License.
Research In Motion Limited
295 Phillip Street
Waterloo, ON N2L 3W8
Canada
Research In Motion UK Limited
200 Bath Road
Slough, Berkshire SL1 3XE
United Kingdom
Published in Canada
85