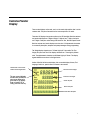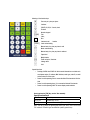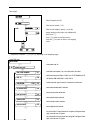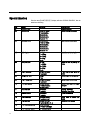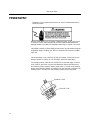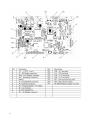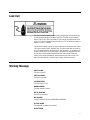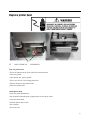
1
bPro
Scale / Printer
Technical Manual
72186164
1
bPro – T2
bPro – C2
bPro – U2
bPro – U3/U4
bPro – R2
bPro – H2
©Mettler-Toledo, Inc. 2000
No part of this manual may be reproduced or transmitted in any form or by any means, electronic or
mechanical, including photocopying and recording, for any purpose without the express written
permission of Mettler-Toledo, Inc.
U.S. Government Restricted Rights: This documentation is furnished with Restricted Rights.
2
INTRODUCTION
This publication is provided solely as a guide for individuals who have received Technical Training in servicing
the METTLER TOLEDO product.
Information regarding METTLER TOLEDO Technical Training may be obtained by writing to:
METTLER TOLEDO
111 West Taihu Road, Xinbei District
Changzhou, Jiangsu, China
(+86) 519 8664-2040
FCC Notice
This device complies with Part 15 of the FCC Rules and the Radio Interference Requirements of the Canadian
Department of Communications. Operation is subject to the following conditions: (1) this device may not cause
harmful interference, and (2) this device must accept any interference received, including interference that
may cause undesired operation.
This equipment has been tested and found to comply with the limits for a Class A digital device, pursuant to
Part 15 of FCC Rules. These limits are designed to provide reasonable protection against harmful interference
when the equipment is operated in a commercial environment. This equipment generates, uses, and can
radiate radio frequency energy and, if not installed and used in accordance with the instruction manual, may
cause harmful interference to radio communications. Operation of this equipment in a residential area is likely
to cause harmful interference in which case the user will be required to correct the interference at his own
expense.
METTLER TOLEDO RESERVES THE RIGHT TO MAKE REFINEMENTS
OR CHANGES WITHOUT NOTICE.
3
PRECAUTIONS
READ this manual BEFORE
operating or servicing this
equipment.
FOLLOW these instructions
carefully.
SAVE this manual for future
reference.
DO NOT allow untrained
personnel to operate, clean,
inspect, maintain, service, or
tamper with this equipment.
ALWAYS DISCONNECT this
equipment from the power
source before cleaning or
performing maintenance.
CALL METTLER TOLEDO for parts,
information, and service.
4
5
CONTENTS
1 Specifications....................................................................................................................................1
General Description .......................................................................................................................1
Features ........................................................................................................................................2
Customer/Vendor Display ...............................................................................................................3
Keyboard .......................................................................................................................................4
Dimensions ...................................................................................................................................7
Weighing Capacity .......................................................................................................................10
Tare ............................................................................................................................................11
Memory Specifications .................................................................................................................11
Agency Approvals.........................................................................................................................11
Electrical .....................................................................................................................................11
Label Printer................................................................................................................................12
Operating & Storage Temperature .................................................................................................14
Database Records ........................................................................................................................14
Major Compont Map.....................................................................................................................16
Index of Specifications .................................................................................................................17
2 Installation ......................................................................................................................................18
Unpack the Shipping Carton..........................................................................................................18
Setup Checklist............................................................................................................................19
Leveling ......................................................................................................................................20
Install Tower................................................................................................................................20
Install Platter...............................................................................................................................21
Power On.....................................................................................................................................21
Label Installation .........................................................................................................................22
Calibration ..................................................................................................................................23
3 Setup ..............................................................................................................................................26
Menu Tree for Scale Setup............................................................................................................26
Navigating within the Setup Menu......................................................................................................... 26
Menu Tree ........................................................................................................................................... 26
Enter setup ..................................................................................................................................29
Exiting setup................................................................................................................................29
Overview of mode functions..........................................................................................................30
SCALE CONFIGURATION................................................................................................................31
DATA ENTRY.................................................................................................................................32
Keyboard configuration.................................................................................................................48
Standard configuration ......................................................................................................................... 48
Function keys ....................................................................................................................................... 48
Special keys ........................................................................................................................................ 48
6
List CONFIG ......................................................................................................................................... 49
Operator configuration..................................................................................................................49
Standard configuration ......................................................................................................................... 49
New configuration ................................................................................................................................ 49
List Config ........................................................................................................................................... 49
Special function ...........................................................................................................................50
Label definition............................................................................................................................53
Password setting..........................................................................................................................53
Service function ...........................................................................................................................54
Function test ........................................................................................................................................ 55
Memory test......................................................................................................................................... 55
Interface test........................................................................................................................................ 55
High resolution display......................................................................................................................... 55
Primary configure................................................................................................................................. 56
Reset ticket number ............................................................................................................................. 56
Clear BRAM ......................................................................................................................................... 56
Fonts tabel........................................................................................................................................... 56
Reset scale as default .......................................................................................................................... 57
Clear all PLU data ................................................................................................................................ 57
Clear Group ......................................................................................................................................... 57
Clear operator...................................................................................................................................... 57
Network configure ................................................................................................................................ 58
Ticket print test .................................................................................................................................... 59
Label Printer Test ................................................................................................................................. 59
Configure RS232.................................................................................................................................. 60
Reports........................................................................................................................................61
PC software .................................................................................................................................64
Flashing Software ........................................................................................................................65
4 Troubleshooting ...............................................................................................................................66
Troubleshooting Guide..................................................................................................................66
POWER SUPPLY ...........................................................................................................................68
Main Logic PCB ...........................................................................................................................69
Load Cell.....................................................................................................................................71
Warning Message ........................................................................................................................71
Error Message .............................................................................................................................73
Interconnecting Diagram ..............................................................................................................75
5 Parts Replacement...........................................................................................................................76
Replace main PCB .......................................................................................................................76
Counter type ................................................................................................................................76
Hanging type: ..............................................................................................................................77
Replace switch power...................................................................................................................78
Counter type: ...............................................................................................................................78
7
Replace display ...........................................................................................................................80
Counter type ................................................................................................................................80
Hanging type: ..............................................................................................................................81
Replace load cell .........................................................................................................................82
Counter type ................................................................................................................................82
Hanging type: ..............................................................................................................................84
Replace keyboard.........................................................................................................................86
Counter type ................................................................................................................................86
Hanging type: ..............................................................................................................................87
Replace printer ............................................................................................................................88
Counter type ................................................................................................................................88
Hanging type: ..............................................................................................................................90
Replace printer head ....................................................................................................................91
Install Wireless card ....................................................................................................................92
Install the memory extension board ..............................................................................................95
6 Maintenance....................................................................................................................................97
External Cleaning ........................................................................................................................97
Cleaning Printhead ......................................................................................................................97
Rezeroing ....................................................................................................................................98
7 GEO Settings ...................................................................................................................................99
8 Replacement Parts.........................................................................................................................100
8
1
Specifications
General Description
The METTLER TOLEDO bPro is a digital computing scale with an integrated
thermal label printer. It is an Ethernet scale with a wireless option, which has
a database containing the PLU’s, Extra Text and etc. A PC program is
available to download or upload the database from the PC. The bPro has 4
MB RAM memory and 4MB Flash ROM. The PLU memory can handle up to
25000 items.
The standard bPro weighing capacity is 15 Kg ( 30 Lbs). Weighting
resolution can be set up for a single range with 0.005 Kg (0.01 Lbs) or a
dual interval option for 0.002 Kg (0.005 Lbs) from 0 to 6 Kg (15 Lbs). In
the dual interval, the single range resolution applies between 6 -15 Kg
(15-30 Lbs). Weighting options for 30 Kg (60 Lbs) are also available.
This scale utilizes a dot matrix display that will display weight, tare, unit
price and total price, as well as item description.
The bPro, like all METTLER TOLEDO products is designed for maximum
durability and reliability in even the most demanding application
environments. The bPro is manufactured in one of METTLER TOLEDO's ISO
9001 and ISO 14001 certified facilities so you are assured to receive a high
quality product.
1
Features
•
6kg, 15kg, 30kg (3000e or 3000e dual range)
•
Full Dot Matrix display with 240x240 resolution on both operator side and
customer's side.
•
Four seven-segment numeric display for: 5 digits weight, 5 digits tare, 7 digits
unit price and 7 digits total price. One 16-character alphanumeric display for
programming and item description.
•
Indicators for zero, net and prepack mode.
•
Compliance with H44 3000e, R76 OIML 3000e and Canadian W&M.
•
Light Touch Tactile feel membrane keyboard and an audible beeper.
•
A 70 position preset keyboard for fast PLU retrieval. (can save 140 PLU in two
levels) Includes QWERTY keypad in programming mode for easy PLU editing.
•
Real time clock and RAM are backed up by a rechargable lithium battery with
at least 1 month memory retention without external power.
•
Push button zero (auto zero at power up) and automatic zero tracking.
•
Price, Shelf Life, Quantity, and Extra Text, Label Format, and SPEC Message
override capability.
•
VOID key for clearing previous transaction from accumulator.
•
Computer interface port (RS232), or Ethernet for use with BSOFT software.
USB port for PLU updates (Future)
•
Integral thermal label printer with 8 dots/mm print head. Adjustable 40 to
60mm width. Supports both UPC and EAN symbology. The printer can use die
cut labels, continuous strip labels and continuous thermal paper.
2
Customer/Vendor
Display
There are two displays on the scale, one is on the vendor side and the other is on the
customer side. They are all mounted on the tower except bPro-C2 model.
These two LCD displays incorporate a yellow color LED backlight. Both the customer
and vendor displays show 5 digits of weight, 5 digits of tare, 7 digits of unit price
and 7 digits of total price values along with cursors for Zero, Net and Prepack mode.
Both the customer and vendor displays can also show 16 alphanumeric characters
for commodity description, marquee and prompt messages during programming.
The Weight display characters are 13.2mm high by 8.16mm wide. The Tare
Weight, Unit price and Total Price display characters are 11mm high by 6.6mm
wide. The alphanumeric characters are 8.36mm high by 4.18mm. The display
legends definitions are shown in the figure below.
Another 240x240 full dot matrix display, this can enable display Chinese, Thai
language, Arabic etc, special offers to increase in-store scales.
Indicates that a tare has been
entered and the weight is NET.
The zero cursor indicates
that the scale is within the
zero range, either net or
gross zero. If the display
does not read 0.00 at
ready, press the zero key.
Shows the normal weight.
Shows the Tare weight.
Shows Unit price.
Shows Total price.
Shows PLU description
3
Keyboard
The keyboard consists of membrane layer, rubber button layer, programming layer,
operating layer and touch pad layer. The multi layer makes it easy to press the key
which we call it light touch tech. The layers are replacable and you can take them
down and wash them with water (except the membrane layer). This will make
maintenance much easier.
The 28 keys on the right keypad are used for entering basic scale functions.
Operating Layer (T2 model)
Programming Layer (T2 model)
The keyboard can be adjusted to 4 levels
according to customers’ wish. Only T2 and C2
models have this function.
4
Meaning of the function keys
Ä
Ó
°
Ô
Ò
Free entry of a price per piece
Continue
(PRINT,V2,V3,V4)Vendor, clerk
Go back
[TARE]
c
Numeric keypad
Tare
Clear;
Zero
0
Ç
Customer total
, Confirm
[CODE] Code and switching
Æ
v
Å
»
x
Manual entry of a price per piece to add
Mode and switching
Manual entry of a price per piece to subtract
Paper feed
Multiplication
Fixed unit price / fixed tare
[FIX]
r
³
Change back
Void
Special functions
o
Pressing CONFIG than PRINT will list the scale information on a label such
as software version, IP address, MAC Address, scale type, scale ID, as well
as the Product ID of the scale.
o
Power On while pressing Print to access the Serial Flash mode for Wait for
Host
o
Power On while pressing clear (C) to access the Network Flash mode
o
Power On while pressing CODE to access display mode selection
Some type has the [TM] key, used to Tare manually.
Special functions keys
1 to 70
preset keys
V2,V3,V4
vender keys V2-V4
[-%]
increase/decrease key (Discount key)
Note: The left 70 keys are preset keys which can store 140 PLUs for fast
PLU retrieval. Different type has different quantity preset keys.
5
Remark :
*V2, V3 and V4 key can be configured as preset keys or vender keys, but
one function is available at one time.
*[-%] key can be configured as preset key or increase/decrease key, but
only one function is available at one time.
The following function keys can be used as word processing keys while entering
PLU description, store address, Extra Text and etc.
Meaning of the 'programming" keyboard keys
h
e
^
]
Ó
Ô
s
Go to beginning of text
Go to end of text
move the cursor one position left in the text edit mode
move the cursor one position right in the text edit mode
Go to next sub-menu
Return to previous sub-menu
Get upper case characters in text edit mode
or select a key's 2nd function
q
b
Alternate: special characters in text edit mode
[DELETE]
[iNSERT]
[ ABC ]
[ENTER]
Delete (delete the character on the cursor)
Insert (insert a character on the cursor)
Center the text in text edit mode
Carriage return (next line)
Ç
Selection of a menu
Backspace (delete the character left of the cursor)
The 70 keys on the left keypad can be programmed as direct access keys (Presets).
There are two levels to the preset keys for a total of 140 PLU Presets. The Preset keys
should be configured first before being used. Please refer to section 3 ‘PLU Preset’ for
programming the Preset keys.
To recall a PLU simply select the proper level and press the desired preset.
6
Dimensions
bPro-T2
bPro-U2
7
bPro-C2
bPro-R2
8
bPro-H2
9
bPro-U3
Weighing Capacity
The bPro can be programmed for 3/6x0.001/0.002, 6/15x0.002/0.005kg,
15/30x0.005/0.010kg capacities. The built-in scale is designed to withstand static
overloads up to five times the rated capacity without sustaining permanent damage.
A weight greater than five increments over capacity causes the weight display to
"-----" and printing is inhibited. If the scale is under zero by more than five
increments, the weight field will display dashes "|_____|". When zero can not be
captured, the weight field will display "-----".
10
Tare
Tare is limited to a maximum of 2/3 full capacity.
Memory Specifications
The Main Logic PCB contains a rechargable lithium battery that will retain backup
PLU's and the time/date in the SRAM memory for up to one month. Other data,
including calibration data are retained in the EEPROM which requires no battery for
memory retention.
Agency Approvals
The model bPro is designed to meet the requirements of the following agencies:
OIML
OIML R76 standard
EC
Euro CE standard
NIST
NTEP requirements for Class III weight device.
NTEP/California Electronic Cash Registers General Code
Requirements
FCC
Requirements for FCC Conducted Emissions and Radiated Emissions
for a Class A device.
Electrical
The bPro requires a dedicated grounded 100/240 VAC, 50/60 HZ supply, and
draws 0.3 amps (scale/printer versions). The AC line (including ground) must not
be shared with noise and surge generating equipment such as, electric motors,
compressors, thermostats, fluorescent lights, etc. A line conditioning device is
11
recommended to provide protection from surges and spikes. The Power supply uses
an electronic overload protection circuit designed to protect the internal electrical
components.
Label Printer
Labels can be printed with the built-in thermal label printer. The printer uses a
60mm wide, high resolution, 8 dots/mm, thermal print head. The printer driver PCB
incorporates a heat detection circuit to ensure the best possible print quality while
eliminating any possibility of overheating the head. Overheating is the major cause
of premature print head failure. The print speed and density can be adjusted via
SERVICE MODE to compensate for varying types of labels.
The printer can use standard label sizes ranging from 25mm to 102mm long, and
continuous strip stock. Labels can be loaded in a stripped or un-stripped mode. In
stripped mode, the labels automatically peel from the backing liner. In the
un-stripped mode, the label and liner will be delivered. A tear/bar allows continuous
stock to be torn to exact length needed. Print specifications for the thermal printer are
as follows:
12
PRINTHEAD TYPE:
Thick Film Thermal Printhead
DOT DENSITY:
8 Dots/mm
PRINT SPEED:
125 mm/sec maximum
Printer 2“ paper dimensions
C
B
A
A
D
D
E
Dimensions Labels
Min.
Max.
A
30 mm
82 mm
B
130 mm
C
40 mm
D
30 mm
82 mm
E
2 mm +/- 0.2 mm
F
25 mm
102 mm
G
56 mm eff. print width,
The print head is centred over
the paper.
E
Print resolution:
8 Pixel/mm
Dimensions Receipt
F
F
A
B
C
52 mm
130 mm
11 mm
Paper length max: 150 m
G
13
Operating & Storage
Temperature
Operating Range:
-10°C to 40°C (14°F to 104°F), humidity from 5% to
85% non-condensing.
Storage Range:
0°C to 70°C (32°F to 158°F), humidity from 5% to 85%
non-condensing.
Database Records
The PLU database file consists of:
Field Name
Description
Range
PLU Number
Price Look Up number used for database
0 – 999999
indexing and to call up a record
Item Number
The product number is a number that is
0 – 9 each
encoded in the EAN Bar Code symbol. This
character
number can be inputted up to 13 digits.
Description 1
Text used to describe the product for line 1
28 char/line
Description 2
Text used to describe the product for line 2
Up to 150
characters,10
lines
Group No
A two digit number between 0 and 99
0 – 99
used for reports; 0 is no group
Unit Price
2nd Unit Price
Price Rule No
Product unit price: Price per lb by weight
0.00 to
or Price per piece
99999.99
Second unit price. Depend on the price
0.00 to
rule
99999.99
0 -10
Decide the Unit Price.
st
nd
0,1: 1 Unit Price 2: 2 Unit Price
3 -10: link to discount number
Label Format
This will contain the label format number.
0 – 199
0 = scale default. 101 through 109 are
fixed formats. Others are custom label
formats.
nd
14
2 Label Format
Number for second label.
0 – 199
Best Before Days
This is the number of days from the current
0 – 999
date that the item can be used
Sell By Days
This is the number of days from the current
0 – 999
date that the item can be sold
PLU Type
By-Weight; By Count;
0/1
Tare/By Count No
Tare number for by weight PLU;
0 – 99/0-9999
Quantity for by count PLU
Fix Weight
The Net Weight of By Count PLU
0.00 – 99.999
Extra Text
This is the extra text number to be used
0 – 999999
Number
with this PLU. ‘0’ means no ET will be
added.
Increase/Decrease
Allow PLU to have a discount
0/1
Allow Price
This allows price changes during normal
YES/NO
Change
operation.
NUTRITION No.
Number of Nutrition
0-999999
Pack date print
Print format for packing date
0-4
Best before print
Print format for Best Before date
0-5
Sell by print
Print format for Sell by date
0-5
Graphic No.
Number of Graphic link to PLU
0-200
15
Major Component Map
External Components
A
E
D
A
C
F
E
B
G
16
D
Ref
Description
A
Display
B
Tower
C
Platter supporter
D
Printer
E
Numeric Keypad
F
Preset Keypad
G
Power switch
Index of Specifications
bPro Type
X
X-
X
XX
X-
X
0X
-X
xxx
T=Tower, C=Compact
U=Upper Keyboard
H=Hanging, R=Terminal
Style
2= Standard, 3=Self service
Display
A=Segment, B=Dot Matrix
CAPACITY
6Kg, 15 Kg, 30 Kg
Load Cell
S=Single D=Dual
Extension Memory
0=Santdard E=With Extension card
Network
0=Ethernet W=Wireless
PRINTER
0=2” printer L=3” (future)
Country finish code
e.g. 071=Singapore
17
2
Installation
Unpack the Shipping Carton
Open up the package box. Take out the platter ,attachments, then take out the scale.
Remove the foam inserts and plastic bag. Put the scale on the working counter and
inspect for damage. Report any damage to the carrier promptly. DO NOT LIFT THE
SCALE USING THE SPIDER OR BACK DISPLAY. Verify you received the accessories
listed below.
Tower
bPro scale
Platter
Power cord
Operator manual
Security Seal and Quality Feedback card etc.
Note: If you choose to dispose of the package, please recycle the
materials. The packaging is recyclable natural fiber with biodegradable
adhesives.
18
Setup Checklist
Leveling
Ievel the unit using the feet for adjustment and
bubble indicator as a guide.
Install Tower
Install Display Tower.
Install platter
Put on the platter to scale.
Install label
Install labels in the printer.
Calibration
New scales must be calibrated on site.
Reset RAM
Initialize the scale and set all softswitches to factory
default.
Password
To configure the passwords of the specific menus.
keyboard
To configure the function keys and directly access
keys of the keyboard.
Operator Configuration
To configure printed media, individual label or ticket
or total label.
Label format
To configure default label format.
Barcode
To select bar code type.
Date/Time
To set up current date and time.
Software
BSOFT program, which can be used to download or
restore the PLU record, configuration, or other data.
19
Leveling
Adjust the four feet until the bubble, located under the scale platter, is in the center of
the bubble level. Then adjust the foot locks until the feet are secure.
Bubble Level
Correct
Incorrect
Install Tower
Tower Model
Take out the tower and insert it into the tower base. Connect the two flat cables
together between the tower and the display base. Install four screws on both
sides of the display base to lock the tower in place.
20
Upper Keyboard Model
Connect the two flat cables together between the tower and the display base.
Install four screws on both sides of the display base to lock the tower in place.
Install Platter
Take out the platter and put on to the scale.
Power On
Note: If unit has been stored or transported in below freezing temperatures, allow the
unit to warm up to room temperature before turning on AC power.
Remove the power cord from the package box. Install the power cord in the
recepticle on the bottom of the scale. Connect the power cord to AC power. Set the
power switch to the ON position. Allow at least 30 minutes warm-up time before
initial calibration.
21
Label Installation
Open the plastic door on the right side of the scale.
Slide out the printer.
Press the trigger to open the printer head.
Install the labels according to the instruction legend on the printer frame.
Pull out the take-up spool Insert the liner into the spool slot. Push back the
spool.
Secure the liner on the take-up spool by spinning the spool clockwise.
Close the printer head gently, until it clicks.
Slide the printer into the scale. Close the plastic door.
Press the ` key to bring the label into the start position.
Note: Please refer to section 3 ‘Label Format’ to set the proper label format.
22
Calibration
Sealing Screw
Base
Calibration Switch
Cal Switch
AD PCB
Sealing screw
Steps:
1. Snip sealing wire
2. Screw out sealing screw
3. Operation:
operation
"[CODE] 9*
display
comments
SERVICE FUNCTION
"05*
Select calibration sub-menu
DO NOT ENTER CAL
"1
"*
SELECT THE FILTER
"*
Enter service mode menu
QUIET
0-1
Enter calibration? 0=NO; 1=YES
0-2
Enter calibration
Filter selection,
0=QUIET;1=NORMAL;2=DISQUIET
PUSH CAL BUTTON
"Push Calibration button
Push the calibration button
SELECT GEO 12
" (Input GEO value)
"*
Input GEO value , 0-31
23
WEIGHT UNIT kg
"*
CAPACITY 15
" (Input capacity)
"*
Input capacity of scale
INC.0.002/0.005
"Select interval with up arrow key [↑]
Select interval of the scale
"*
CAPTURE 0 ———
Read zero
"*
ADD WEIGHT 0.000
"Input the standard weight
value you want to put on scale
"put on the standard weight on
platter
"*
Input the standard weight value you want to
calibrate, at least 2/3 of capacity
DONE
SHUT DOWN
Power off scale and power on again
NOTE:
IN THE PROCESS IF GIVE THE MESSAGE “ INIT. CELL...”, WHICH INDICATE THE FAULTCALIBRATION.
24
3
Setup
Menu Tree for Scale Setup
Navigating within the Setup Menu
•
•
•
•
•
【ENTER】
Selects displayed item and moves to sub menu level, accepts the variable in
the list.
【CODE】
Backs up one menu level, does not accept change.
【↑】
Moves Up to next menu item, will wrap around from the last entry to the first.
【↓】
Moves Down to next menu item, will wrap around to end from the first entry.
【Clear】
Clears inputted Text for that field. Clear is also used to clear the PLU and clear
a warning message
( Direct access numbers
Delete an entry
Code version
Kxxxxxx*xx
C
K*
)
Menu Tree
To enter setup mode, press the [CODE] key
Press [CODE] key to return to the first option in the current menu. Press [CODE] key again to return to
the previous menu. To exit out of SETUP mode, press [CODE] when the display shows normal weigh
state.
26
CODE
DATA ENTRY
REPORTS
KEYBOARD CONFIG
SPECIAL FUNCTION
1
2
3
6
LABEL CONFIG
7
SERVICE MODE
9
101
PRICE CHANGE
201
RESET TO DEFAULT
301
STANDARD CONFIG
601
COUNTRY FINISH
701
SERVICE BY-WEIGHT
901
FUNCTION TEST
102
CREATE PLU
202
SALES REPORT
302
FUNCTION KEYS
602
ROUND PRICE
702
902
MEMORY TEST
103
COPY PLU
203
PLU REPORT
303
SPECIAL KEYS
603
DISCOUNT ROUND
703
106
EDIT EXTRA TEXT
204
PROMOTE RPT
304
LIST CONFIG
605
UNIT OF PRICE
704
SERVICE BY-COUNT
PREPACK
BY-WEIGHT
PREPACK BY-COUNT
305
MENU END
107
LIST PLU
205
GROUP REPORT
108
DELETE PLU
206
GROUP H REPORT
109
DEFINE PRESETS
207
HOURLY REPORT
110
LIST PRESETS
208
SETTLE REPORT
111
STANDARD PRESETS
112
DELETE PRESET
210
ST/VOID REPORT
114
CREAT GROUP
211
401
STANDARD CONFIG
115
LIST GROUP
212
402
NEW CONFIG
116
DELETE GROUP
213
VENDOR REPORT
CASHDRAWER
REPORT
WEEKLY REPORT
403
126
CREATE SP. OFFER
MONTHLY REPORT
404
127
SP. OFFER BACKW.
214
215
128
DELETE SP. OFFER
216
129
LIST SP. OFFER
130
TARE
CLEAR REPORTS
132
CREATE BARCODE
218
219
135
TICKET HEADER
501
136
TICKET BOTTOM
138
139
OPERATOR CONFIG
4
INTERFACE TEST
HIGH RESOLUTION
606
UNIT PRICE PRINT
705
TOTAL LABEL
905
CALIBRATION
607
PRINT PRICE UNIT
706
COPY LABEL
906
ERROR REPORT
608
609
WEIGHT UNIT PRINT
707
DELETE LABEL
907
APPLICATION
708
MENU END
908
909
PRIMARY CONFIG
611
IF PRINT WGT. UNIT
PRINT WITH
MOTION
PRINT LESS 20E
910
SET FILTER
612
AMOUNT 0 PRINT
PASSWORD
PLU FORMAT SKIP
8
912
CLEAR BRAM
913
FONTS TABLE
610
616
LIST CONFIG
617
PLU INPUT TYPE
MENU END
618
PLU NO. LENGTH
YEARLY REPORT
619
PLU NO. PREFIX
802
COMBINE REPORT
620
ET LINK TO PLU
803
SCALE CONFIG
621
PRICE OPEN TYPE
804
5
622
623
DISCOUNT TYPE
805
SPECIAL OFFER
806
STANDARD CONFIG
624
OPEN PRICE MARK
807
502
NEW CONFIG
RUNNING MESSAGE
503
LIST CONFIG
625
626
CREATE OPERATOR
504
MENU END
MENU END
903
904
801
STANDARD CONFIG
MANAGER
PASSWORD
SCALE PASSWORD
TICKET NO. TO 0
915
WORK CONFIG
DELET ALL PLU
CODE PASSWORD
917
918
DELETE ALL GROUP
PRICE CHANGE PSW.
919
DEL. ALL OPERATOR
DISCOUNT PSW.
921
NETWORK CONFIG
CLEAR PASSWORD
922
SOFTWARE LOAD
OPEN PRICE MODE
924
TICKET PRINTER
UNIT OF BY-COUNT
925
LABEL PRINTER
627
FIX KEY
926
CONFIG INTERFACE
140
LIST OPERATOR
DELETE OPERATOR
628
629
FIX KEY IN PREPACK
141
2ND LABEL PRINT
928
HEAD CLEAN ALERT
142
SHOP NAME
630
YEAR LENGTH
929
CHANGE PAPER MSG
143
ADVERISEMENT
932
COMM DEBUG
DATE TEXT
631
632
DATE FORMAT
144
DATE SEPERATOR
933
ASSERT DEBUG
145
DATE / TIME
633
TIME FORMAT
934
CASHDRAW TEST
146
DISCOUNT
MEMORY CHECK
935
WIRELESS CONFIG
147
PACK DATE OFFSET
634
635
SELL BY FORMAT
936
USB TEST
148
149
148
LOGO MESSAGE
STORE LOGO NUM
MENU END
636
637
639
PACK DATE PRINT
WIRELESS OPTION
PLU DESC DISPLAY
937
938
941
PRINT ALL TEXT
PRINT MENU LIST
CHECK FONT
640
PRECIOUS PRICE
641
IP LST BYTE MASK
642
SWITCH NET MODE
DISPLAY NEGA.
WEIGHT
643
27
28
644
CHANGE LANGUAGE
646
PLU NO. Length
648
EAN13 Style
649
PP PLU INPUT
650
CHAIN TARE
651
MARK DOWN
652
PLU DISPLAY FONT
Enter setup
To enter setup mode, press the [CODE] key.
Exiting setup
Press [CODE] key to return to the previous menu. To exit out of setup mode, press
[CODE] when the display shows normal weigh state.
Mode functions
Press
M Call the menu "MODE CHANGE"
29
Overview of mode functions
M Call the menu "MODE CHANGE"
MODE CHANGE
_
00
SERVICE
With
_Q
select the desired sub-menu, or enter the
preset code.
Select/return to service mode.
_
01
VOID Operation
_
02
PREPACK
_
03
CODE-MODE
_
04
LARGE SALES
_
09
Select/return to prepack mode.
Select/return to code mode.
Select/return to training mode.
TRAINING-MODE
_
08
Select/return to void operation mode.
Select/return to large sales mode.
Press _ to continue or
* to return to weighing mode.
MENU END
With _Q or the preset code, select the corresponding menu item, then activate it with the
* key.
Service mode
-For all weighing functions, registering, data entry and sales reporting
Code mode
-Enter the code functions
Training mode
-Learning and practical exercises on the device, without the realized turnover being memorized.
-The display reads "TRAINING"
Void oper. mode
-VOID OPERATION AFTER CHECK OUT means the ticket or label has been printout, and
these transactions will be deleted from the statistics data.
Prepack mode
-For packing fieldwork of the supermarket. In this application, only print label, the small variety but
large quantity print-work.
Large sales mode
-When the article is too big to weigh, operator can enter this mode by inputting the article weight and
count price.
30
SCALE CONFIGURATION
K5* Call the menu "Scale configure", this menu for distributing the memory of scale.
MODE CHANGE
_
01
STANDARD CONFIG.
_
02
NEW CONFIG.
_
03
LIST CONFIG
_
04
MENU END
new configuration:
SCALE CONFIG.
_
02
Enter preset code 02
NEW CONFIG.
Enter the RAM size for the pictures includes STORE LOGO, PLU
*
RAM FOR PICTURE
200
_
plu description 2
28
Graphics, SafeHandling, Screen Saver. Range 0-500.
Enter the quantity of PLU DESCRIPTION 2 characters. Range
0-150.
_
number of plu
12000
Enter the quantity of PLU in the scale. Range 50-25000.
_
100
NF numbers
_
extra text size
200
_
_
config. no
Enter the max. extra text size of each one.
Range 0-500.
Enter the extra test quantity for the scale. Range 0-20000.
1000
extra text
Enter the Nutritional facts quantity. Range 0-100.
(Actual number depends on previous setting, use the rest
memory after previous data).
0-1
whether to save the change 0=no;1=yes
Will show the actual number for PLU QTY, ET size and QTY.
31
DATA ENTRY
K1* Call the "DATA ENTRY" menu
DATA ENTRY
32
01
price change
02
create plu
03
copy plu
06
edit extra text
07
list plu
08
delete plu
09
Define presets
10
list presets
11
standard preset
12
delete preset
14
create group
15
list group
16
delete group
26
create sp. offer
27
sp. offer backw.
28
delete sp. offer
29
list sp. offer
30
tare
32
create barcode
35
ticket header
36
ticket bottom
38
running message
39
create operator
40
list operator
41
delete operator
42
shop name
43
advertisement
44
date text
45
date / time
46
discount
47
pack date offset
48
logo message
49
store logo number
50
menu end
Select desired menu with _Q or enter preset code and activate with
* key.
33
price change:
DATA ENTRY
_
01
enter the preset code 01
PRICE CHANGE
*
plu number or preset
0
enter the PLU number or press the preset key to choose PLU
*
0.00
UNITPRICE
*
enter new price
create plu:(each item can be chosen in menu "code-6-16(plu format skip)"
DATA ENTRY
Press the _ key twice or enter the preset code 02.
_
02
create plu
*
0
plu Number
_
art. Nr.
Enter the PLU number.(1~999999)
0
Enter the article number (up to 13 figures).
-
Enter the commodity text (up to 28 characters)
_
ENTER TEXT
*
ENTER TEXT 2
-
*
0
GROUP NO.
Enter the 2nd commodity text (up to 150 characters, see
SCALE CONFIGURATION, 10 lines as use _ key to change )
Enter the article group number. (1~99)
_
UNIT PRICE
0.00
Enter the unit price. (0~9999.99)
0.00
Enter the second price if necessary.
_
SECOND PRICE
_
price rule no.
0
_
0
label no.
_
second label no.
_
34
2nd Unit Price;3 -10: link to discount number
Input the label number (0-108, 101~108 are fixed label
formats)
0
_
TARE NUMBER/QTY PER ITEM
select which unit price as calling out PLU. 0,1: 1st Unit Price 2:
0
Input the second label number if necessary.
Tare number for by weight PLU 0=no tare, 1~16=tare number
Quantity for by count PLU 0-9999
0
best bef.offset
_
0
sell by offset
_
Enter the best before offset(0~999)
Enter the sell by offset(0~999)
Is it an article per piece or a weighed article ?
by weight
0
0 = weighed article,1 = article per piece
0
Enter the FIX WEIGHT for article per piece
_
fix weight
_
EXTRA TEXT NUMBER
0
_
0-1
no in/decrease
_
0
open price yes
_
Enter the Extra text number
0=don't allow in./decrease
1=allow in./decrease
0=price can't be changed
1=price can be changed by # key
0
NUTRITION NO.
_
0-1
PRINT PACK DATE
_
0-2
SELL BY PRINT
_
Enter the nutrition number
if print the pack date,0- 4
Not print/yymmdd/mmdd/mmddyy/ddmmyy
SELL BY DATE format,0-5
Not print/yymmdd/mmdd/mmddyy/ddmmyy/days
0-2
BESTBEFORE PRINT
BEST BEFORE DATE format,0-5
Not print/yymmdd/mmdd/mmddyy/ddmmyy/days
_
copy PLU:
DATA ENTRY
enter preset code 03
_
03
COPY
plu
*
0
plu Number old
enter PLU number
_
0
plu Number new
enter PLU number
_
copy next plu,
K
K
0.00
0.00
0.00
return to weighing mode
35
Edit Extra text:
DATA ENTRY
enter preset code 06
_
06
edit extra text
*
0
extra text number
enter extra text number
_
-
enter text
enter the Extra text (use the * you can change line)
_
K
K
0.00
return to weighing mode
0.00
0.00
list PLU:
DATA ENTRY
enter preset code 07
_
07
LIST plu
*
FROM PLU NUMBER
0
_
enter PLU number(0=all PLU)
0
TO plu Number
_
enter PLU number(0=all PLU)
K
0.00
0.00
0.00
delete PLU:
DATA ENTRY
enter preset code 08
_
08
delete plu
*
0
PLU NUMBER
enter PLU number
_
0-1
DELETE NO
_
0=not delete;1=delete
clear next PLU
KK
0.00
36
0.00
0.00
return to weighing mode
define preset keys:
DATA ENTRY
enter preset code 09
_
09
DEFINe presets
*
FXX
l1 PLU KEY
0
PLU NUMBER
_
the key Q )L1=level 1 ;L2=level 2
enter the PLU number
define next preset key
K
K
0.00
press a preset key(you can choose the layer L1 or L2 by press
return to weighing mode
0.00
0.00
list preset keys:
DATA ENTRY
enter preset code 10
_
10
LIST presets
*
print the list
K
0.00
0.00
0.00
standard preset key:
DATA ENTRY
enter the preset code 11
_
11
STANDARD preset
*
ALLOCATION
NO
_
0-1
0=not allocate,1=automatic allocation by the system(plu
1-F001)
K
0.00
0.00
0.00
37
delete preset key:
DATA ENTRY
enter the preset code 12
_
12
delete preset
*
DELETE
0-1
NO
_
0=not delete,1=all preset keys are cleared
K
0.00
0.00
return to weighing mode
0.00
create article group:
DATA ENTRY
enter preset code 14
_
14
create Article Group
*
0
ARTICLE group
_
ENTER TEXT
enter group number
enter group name(18 characters)
___
_
VAT
?
0
_
difine next group
KK
0.00
0.00
list article group:
return to weighing mode
0.00
DATA ENTRY
enter preset code 15
_
15
Input the TAX of this group
list Article Group
*
enter group number (0=all group)
0
FROM GROUP
_
0
TO GROUP
_
enter group number (0=all group)
printing the list of group
K
0.00
38
0.00
0.00
return to weighing mode
delete article group:
DATA ENTRY
enter preset code 16
_
16
delete Article Group
*
0
group NUMBER
enter group number
_
0-1
DELETE NO
0=not delete;1=delete
_
delete the next group
K
K
0.00
0.00
retun to weighing mode
0.00
create special offer:
DATA ENTRY
_
26
enter preset code 26
create sp.offer
*
ENTER TEXT
enter the detail of special text
___
from
00-00
enter the start time for all special offer
00-00
enter the end time for all special offer
_
to
?
_
0
Plu number
_
0.00
special offer
enter PLU number
enter the special offer PRICE
_
K
K
0.00
0.00
return to weighing mode
0.00
39
forbid special offer:
DATA ENTRY
enter preset code 27
_
27
sp. offer backw.
*
0
plu number
_
0-1
back NO
enter PLU number
0=No prohibition, 1=Prohibit SP. OFFER for this PLU
_
K
K
0.00
retun to weighing mode
0.00
0.00
delete special offer:
DATA ENTRY
enter preset code 28
_
28
delete sp. offer
*
0-1
delete no
_
delete the special offer
0=not;1=yes
K
0.00
0.00
0.00
return to weighing mode
list special offer:
enter preset code 29
DATA ENTRY
_
29
Print the special offer list
LIST SP. OFFEr
*
KK
0.00
40
0.00
return to weighing mode
0.00
Tara weight:
DATA ENTRY
Enter the preset code 30
_
30
TARE
Enter the tare number (1-16).
*
TARE NUMBER
0
_
TARE
0.000
_
Enter the tare weight in grams *) or put the
empty recipient on the scale, then validate with
the tare key T.
Press _ to affect the next tare memory.
Press the K key twice to return to the weighing
mode.
CODE
CODE
0.00
0.00
0.00
*) Respect the increment (1 g, 2 g or 5 g, depending on the weighing range)
create EAN code:
DATA ENTRY
enter preset code 32
_
32
create ean code
*
0-1
EAN CODE NUMBER
_
enter EAN code number(1-8):1=for ticket and 2-8 for label
select barcode type,0=EAN 8;1=EAN 13;2=ITF 25 NARROW;3=ITF
EAN 13
0-6
25 WIDE;4=EAN128;5=EAN 13+5;6=UPC-A
0-2
Select check sum type,0=normal;1=reverse;2=no check sum
_
CHECKSUM
TYPE
*
art.number shift
0-8
_
total price shift
select total price shift in barcode.
0-2
_
quantity shift
select quantity shift in barcode.
0-3
select unit price shift in barcode.
_
unit price shift
_
select Article number shift in barcode.
0-2
select weight shift in barcode.
As you use EAN 13 code format,max.13 figures,13th figure=check
digit, you must enter 12 figures.
41
(As youuse EAN 25 code format,max.18 figures,18th figure=check
digit, you must enter 17 figures.
0-2
WEIGHT SHIFT
_
EAN CODE
-------
_
KK
0.00
0.00
0.00
LEGEND OF EAN INDENTIFICATION
A=article number
up to 13 figures
C=checkdigit
1 figure
D=date
6 figures
P=PLU code
6 figures
W=group number
2 figures
B=amout
5/6 figures
Q=quantity
4/5 figures
0-9 Figures
12 figures
Example:
Figures 1-6: 0-9,W,P
=Possible entry
Figures 7+8: C
=Possible entry
Figures 8-12: B,Q,0-9
=Possible entry
Figures 13:
=Possible entry
C
Examples:
0AAAAAAAAAA (UPC, Ten digit Item Number)
2AAAAACBBBB (UPC, 5-D Item/Price Check Digit/4-D Price)
2AAAAA0BBBB (UPC, 5-D Item/Zero Fixed/4-D Price)
2AAAAABBBBB (UPC, 5-D Item/No Price Check/5-D Price)
2AAAAACQQQQ (UPC, 5-D Item/Wgt Check Digit/4-D Wgt)
2AAAAAAQQQQ (UPC, 6-D Item/No Price Check/4-D Wgt)
2AAAAAQQQQQ (UPC, 5-D Item/No Price Check/5-D Wgt)
21AAAAABBBBB(EAN,5-D Item/5-D Price)
21AAAABBBBBB(EAN, 4-D Item/6-D Price)
21AAAAACBBBB(EAN,5-D Item/Price Check Digit/4-D Price)
21AAAACBBBBB(EAN,4-D Item/Price Check Digit/5-D Price)
21AAAAAQQQQQ(EAN,5-D Item/5-D Wgt)
21AAAACQQQQQ(EAN,4-D Item/Wgt Check Digit/5-D Wgt)
42
define ticket header:
DATA ENTRY
enter preset code 35
_
35
ticket header
*
enter text(Max.4 lines;100 characters)
ENTER TEXT
___
*
return to weighing mode
K
0.00
0.00
0.00
define ticket bottom:
DATA ENTRY
enter preset code 36
_
36
ticket bottom
*
enter text(Max.4 lines;100 characters)
ENTER TEXT
___
*
return to weighing mode
K
0.00
0.00
0.00
define runing display message:
DATA ENTRY
enter preset code 38
_
38
running message
*
enter text(Max.100 characters)
ENTER TEXT
___
*
return to weighing mode
K
0.00
0.00
0.00
43
create operator:
DATA ENTRY
enter preset code 39
_
39
create operator
enter operator number(1-5)
*
operator NUMBER
0
enter operator name(18 characters)
_
ENTER TEXT
enter password of this operator if necessory
___
_
new
password
0
confirm password
define next vendor
password
0
return to weighing mode
_
confirm
_
KK
0.00
0.00
operator status:
DATA ENTRY
0.00
enter preset code 40
_
48
print the list
list operator
*
K
0.00
0.00
0.00
delete operator:
DATA ENTRY
enter preset code 41
_
41
delete operator
*
0
operator NUMBER
_
0-1
DELETE NO
_
44
0.00
0=nor delete;1=delete
delete next operator
return to weighing mode
KK
0.00
enter operator number(1-5)
0.00
difine shop name:
DATA ENTRY
enter preset code 42
_
42
shop name
*
enter text(4 lines,100 characters)
ENTER TEXT
___
*
return to weighing mode
K
0.00
0.00
0.00
define advertisement text:
DATA ENTRY
enter preset code 43
_
43
advertisement text
1-10 advertise text number
*
0
ARTICLE group
_
enter text(1 lines,60 characters)
ENTER TEXT
___
return to weighing mode
*
KK
0.00
0.00
0.00
define date text :
DATA ENTRY
enter preset code 44
_
44
date text
*
1-3
date text NUMBER
_
0=none ;1-3 date entry
enter text(18 characters)
ENTER TEXT
___
*
return to weighing mode
KK
0.00
0.00
0.00
45
define date/time:
DATA ENTRY
enter preset code 45
_
45
DATE / time
*
0
date
_
0-1
time
_
enter date (the format in [setup]-6-31 menu)
enter time in format:HH-MM-SS (the format in [setup]-6-33
menu)
return to weighing mode
KK
0.00
0.00
0.00
define increase/decrease:
DATA ENTRY
enter preset code 46
_
46
discount
*
enter increase/decrease number(1-16)
0
discount nr.
_
enter increase/decrease name
discount name
___
enter increase/decrease text
*
discount text
enter increase/decrease rate
___
46
return to weighing mode
*
percent
0
xx%
_
KK
0.00
0.00
0.00
define pack date offset:
enter preset code 47
DATA ENTRY
_
47
0
pack date offset
input the pack date offset number.
_
return to weighing mode
K
0.00
0.00
0.00
define LOGO message:
enter preset code 48
DATA ENTRY
_
48
0
LOGO Message
_
K
0.00
0.00
input the message showed after “SYSTEM LOADING”, up to 16
characters.
return to weighing mode
0.00
define store LOGO:
enter preset code 49
DATA ENTRY
_
49
0
LOGO Message
enter store logo number(0-255)
_
return to weighing mode
K
0.00
0.00
0.00
47
Keyboard configuration
Enter the menu【CODE】
【3】
【*】,display will show “KEYBOARD CONFIG”, then do
following operation.
Standard configuration
【01】【*】
display “CONFIG. NO”
press key: 0=NO,1=YES,then press【CODE】 key, and press 【CODE】 key
exit SETUP mode.
Function keys
【02】【*】
display “KEY ST ON 0-1”
to active key “ST”, 0=OFF (disable), 1=ON (enable), press【*】key, display next
option “KEY R ON 0-1”;
to active key “R”, 0=OFF (disable), 1=ON (enable), press 【*】 key, display next
option “KEY X ON 0-1”;
to active key “X”, 0=OFF (disable), 1=ON (enable), press 【*】 key, display next
option “KEY - ON 0-1”;
to active key “-”, 0=OFF (disable), 1=ON (enable), press 【*】 key, display next
option “KEY + ON 0-1”;
to active key “+”, 0=OFF (disable), 1=ON (enable), press 【*】 key, display next
option “KEY # ON 0-1”;
to active key “#”, 0=OFF (disable), 1=ON (enable), press 【*】 key, display next
option “KEY TARE ON 0-1”;
to active key “TARE”, 0=OFF (disable), 1=ON (enable), press 【*】 key, display
next option “KEY FIX ON 0-1”;
to active key “FIX”, 0=OFF (disable), 1=ON (enable), press 【*】 key, then press
key 【CODE】to exit the setting mode.
Special keys
【03】【*】
display “OPERATOR KEYS 1”
input the quantity of operator, then press key 【*】, display “NO IN/DECREASE 0-1”;
to select if use the DISCOUNT key, press key 0=NO (disable),1=YES (enable),as select
“NO”, press key【*】, display “CONFIG NO 0-1”, then press 0(not save)/1(save)
,
press key 【*】to finish. As select “YES” to enable the DISCOUNT key, display “DISCOUNT
NO.”, then show “CONFIG NO 0-1”,press key 0(not save)/1(save), press key 【*】
to finish.
press key 【CODE】 to exit SETUP mode.
48
List CONFIG
Print out current keyboard config.
Operator configuration
Enter the menu【CODE】
【4】
【*】,display will show “OPERATOR CONFIG”, then do following
operation.
Standard configuration
【01】【*】
display “CONFIG. NO”
press key 0=NO,1=YES,then press key 【*】. Press 【CODE】 to exit SETUP mode.
New configuration
【02】【*】
display “SERVICE MODE 0-1”
select the mode as power on: 0=SERVICE MODE, 1=PERPACK MODE, press key 【*】,
then display next option “DATE & TIME 0-2”;
select print paper, 0=TICKET, 1=LABEL, 2=LABEL+TOTAL LABEL , 3=TOTAL LABEL ,
press key 【*】 , then display next option “DATE+TIME 0-2”;
select display contents as idle, 0=RUNNING MESSAGE , 1=DATE+TIME , 2=BOTH OFF ,
then press key 【*】, display next option “SCREEN SAVER 0-5”;
select the idle time before displaying screen saver pictures: 0=NO SCREEN SAVERS, 1=
TWO MINUTES, 2=THREE MINUTES, 3=FOUR MINUTES, 4=FIVE MINUTES, 5=SIX
MINUTES, press key 【*】, then display next option “ONE SECOND 0-5”;
select the interval of screen saver pictures: 0=ONE SECOND, 1=TWO SECONDS,
2=THREE SECONDS, 3=FOUR SECONDS, 4=FIVE SECONDS, 5=SIX SECONDS, press key
【*】, then display next option “TARE DISPLAY 0-1”;
select if show and print tare, 0=TARE DISPLAY , 1=NO TARE , then press key 【*】,
display next option “PR. INPUT W/# 0-1”;
select inputting temporary price method with # key, 0=PR. INPUT W/# , 1=PR.INPUT
W/O # , then press key 【*】. Press key 【CODE】 to exit SETUP mode.
List Config
Print out the OPERATOR CONFIG
49
Special function
Enter the menu【CODE】
【6】
【*】,display will show “SPECIAL FUNCTION”, then do
selection as following.
50
NO.
01
02
NAME
Country Finish
Round Price
03
Discount round
05
Unit of price
06
Unit price print
07
If print price unit
08
Weight unit print
09
If print weight unit
10
Print with motion
11
Print less 20e
12
Amount 0 Print
16
Plu format skip
17
Plu input type
18
PLU NUMBER LENGTH
19
PLU NUMBER PREFIX
OPTIONS
0=do not round;
1=round price;
2=round cut;
3=round carry;
4=round 1/4
0=as default;
1=no not round;
2=round price;
3=round cut;
4=round carry;
5=round 1/4
0= /kg;
1= /500g;
2= /100g;
3= /50g;
4= /g
0= /kg;
1= /500g;
2= /100g;
3= /50g;
4= /g
0= print on label;
1=not print
0=kg;
1=g;
0= print on label;
1=not print
0=back to 20E;
1=without motion
2=with motion
0=disable;
1=enable
0=disable
1=enable
0=default config.;
1=customer zed
0=with [v..] key
1=press [*]then [V..]
0=no limitation
1=enter PLU length
0=with zero prefix
DESCRIPTION
Country selection
Select round price method
After discount, round price
Select the unit of unit price
Select the unit of printing on
label
If print unit of unit price on
label
Select weight unit for printing
If print weight unit on label
Select if print label as weight
changed
6/15Kg, 20e=40g,
15/30Kg, 20e=100g
If print as amount 0
Select items in create PLU
menu
Select call PLU method
1=without zero prefix
0=not link to PLU
1=link to PLU
0=depends on PLU
1=all enable
2=all disable
0=depends on PLU
1=all enable
2=all disable
0=depends on PLU
1=all enable
2=all disable
0=free price
1=lower price
0=temporary
1=permanent
0=as fix weight
1=as by_cnt unit
2=minimum weight
0=fix key active
1=fix key inactive
0=fix key active
1=fix key inactive
0=disable
1=enable
0=YY 2 digits;
1=YYYY 4 digits
0=YYMMDD
1=DDMMYY
2=DDMMYY(CHR)
3=MMDDYY
4=DDMMMYY(CHR)
0=”/”
1=”.”
2=”,”
3=”-”
0=24 hours
1=12 hours
PLU:XXXX,LEFT:YYYY
20
ET LINK TO PLU
21
PRICE OPEN TYPE
22
DISCOUNT TYPE
23
SPECIAL OFFER
24
OPEN PRICE MARK
25
OPEN PRICE MODE
26
FIX WEIGHT
27
FIX KEY
28
FIX KEY IN PREPACK
29
2ND LABEL PRINT
30
Select Year Length
31
DATE FORMAT
32
DATE SEPARATOR
33
TIME FORMAT
34
Memory check
35
SELL BY FORMAT
0=not print today
1=print today
36
PACK DATE FORMAT
37
WIRELESS OPTION
39
PLU DESC.DISPLAY
0=by label
1=by best before
2=by sell by
0=without wireless
1=with wireless
0=no display
1=display PLU l1
2=scrolling PLU l1
3=display PLU l2
4= scrolling PLU 2
Set the Extra text number the
same as the PLU number
Select if all PLUs allow to
change price temporary
Select if all PLUs allow to
discount price
Select SPECIAL OFFER method
Price change limitation
If save the temporary price to
PLU
Select FIX WEIGHT item
function
Select FIX KEY enable or
disable
Select FIX KEY enable or
disable in PREPACK mode
Select if print second label
Select the year format
Select date format on display
and receipt (not label)
Select separator between date
Display the PLU quantity and
left space
Select start date of sell by
Select if print pack date
If use wireless
Select PLU description display
mode
51
52
40
Precious Price
Precious Price 0.00
41
IP VALID CHECK
42
Switch net mode
0=NO
1=YES
0=NO
1=YES
43
Display negative weight
44
Change Language
46
PLU NO. Length
48
EAN 13 Style
49
PP PLU input
50
PLU Display Font
0=NO
1=YES
0=Chinese
1=English
2=France
3=Turkish
4=Polish
0=6 digits
1=8 digits
0=standard
1=special
0=Normal
1=with [*] key
0=Small font
1=Big font
Higher than this price will give
a warning message when sell
a by weight PLU.
If Check the last digit of IP
address
As you set get PLU from
network server, when the scale
can’t get PLU scale will
change to get from local scale
If display negative weight
Select language
Select PLU length
Select call PLU method in
prepack mode
Select PLU display font size
Label definition
Enter the menu【CODE】
【7】
【*】,display will show “LABEL DEFINITION”, then enter
following submenu. Example to set SERVICE BY WEIGHT label:
After press 【CODE】【7】【*】,then press 01【*】, input label number, press 【*】
key confirm.
01SERVICE BY WEIGH
02SERVICE BY COUNT
03PREPACK BY WEIGH
04PREPACK BY COUNT
05TOTAL LABEL
06COPY LABEL
07DELETE LABEL
Password setting
Enter the menu【CODE】
【8】
【*】,display will show “PASSWORD SETTING”, then select
following submenu to set.
NO.
MENU
PARAMETER
01
STANDARD CONFIG
MANAGER PASSWORD?
02
03
04
05
06
MANAGER PASSWORD
SCALE PASSWORD
CODE PASSWORD
PRICE CHANGE PSW
DISCOUNT PSW
NEW PSW _ _ _ _
NEW PSW _ _ _ _
NEW PSW _ _ _ _
NEW PSW _ _ _ _
NEW PSW _ _ _ _
MANAGER PASSWORD?
07
CLEAR PASSWORD
08
SCREENSAVE PSW
09
MENU END
0:NO PASSWORD
1:MANAGER PSW
2:VENDOR PSW
DESCRIPTION
Clear all passwords of the scale. If you have set
the ADMINISTRATOR password you should input
the manager password first.
Set the ADMINIDTRATOR password.
Set the power on password of scale.
Set the password for entering [CODE] menu.
Set the password for changing price.
Set the password for discounting.
Clear each password one by on. If you have set
the ADMINISTRATOR password you should input
the manager password first.
Set the password to exit screensaver.
53
Service function
Enter the menu【CODE】
【9】
【*】,display will show “SERVICE FUNCTION”, then do
following operation..
NO.
MENU
PARAMETER
DESCRIPTION
01
FUNCTION TEST
Test the scale display,keyboard etc
02
MEMEORY TEST
Test scale memory
03
INTERFACE TEST
Test scale RS232
04
HIGH RESOLUTION
Display increment X10
05
CALIBRATION
Calibrate the scale
08
PRIMARY CONFIG
Set the scale number
09
TICKET NO. TO 0
13
FONTS TABLE
15
WORK CONFIG
17
DELETE ALL PLU
18
DELETE ALL GROUP
19
DEL. ALL OPERATOR
21
NETWORK CONFIG
Set IP address of scale
22
SOFTWARE LOAD
Enter update firmware state
24
TICKET PRINTER
Test printer with ticket
25
LABEL PRINTER
Test printer with label
26
CONFIG RS232
28
HEAD CLEAN ALERT
29
CHG PAPER MSG
32
COMM DEBUG
33
ASSERT DEBUG
54
0=no
1=yes
Reset the ticket number to zero.
Print out fonts table
0=CONFIG NO;
1=CONFIG YES
0=no
1=yes
0=no
1=yes
0=no
1=yes
0=NOT CLEAR
1=CLEAR
0=ENABLE IN PP.
1=DISABLE IN PP
0=Enable
1=disable
0=Enable
1=disable
Reset scale
0=DISABLE ALERT
1=ENABLE ALERT
34
CASH DRAW TEST
Test the cash drawer
35
WIRELESS CONFG
If you use wireless scale, please
configure the wireless option here
38
PRINT MENU LIST
41
CHECK FONT
START CHAR – END CHAR
Input the Unicode range of the char you
want to check.
Function test
This function used to test the display, keyboard and printer.
Enter the function, and light on all the display to
check if the display is ok.
Display 1234... testing, then scale will print out a
ticket to check the printer.
At last which will test the keyboards, you should
press the key one by one according to the message.
01【*】
【*】
Memory test
This function used to test scale memory.
Enter the memory test, scale will test it
automatically, then print out the test report, also
give some information if something is wrong.
02【*】
Interface test
This function used to test RS232 com part. Before the test you should shorten the PIN 2
and PIN 3 of the COM port.
Enter the test and scale will give you message in 5
minutes.
03【*】
After the test, take out shorten wire.
High resolution display
This function used to watch the high resolution of the scale. Use it you can check the
55
loadcell and A/D pcb.
04【*】
press the calibration button
"PUSH CAL BUTTON”
Enter the menu,
Display the high resolution. Press key【C】 to exit.
Primary configure
This function used to set the scale number.
08【*】
(scale number)【*】
Enter the menu “Primary Config”
Input scale number
Reset ticket number
This function used to reset ticket number.
09【*】
0or1
Enter the menu
Select if reset it
0:no
1:yes
【*】
Clear BRAM
This function used to clear all the data in BRAM, including the PLU DATA, SET UP DATA
etc.
12【*】
0or1
Enter the menu
Select the item
0:not clear
1:clear
【*】
Fonts tabel
This function used to list the fonts table in scale.
13【*】
56
Enter the menu and print out the fonts list.
Reset scale as default
This function used to reset the scale as factory default. This will clear all programmed
data and reports, but not clear the calibration data.
15【*】
0or1
Enter the menu
Select the item
0:not reset
1:reset
_
Usually we should also make sure that we made the right country selection. Go
to the country finish menu.
【CODE】6【*】01【*】
01【*】
input the Country code
【*】Reset default 0or1
Enter Country Finish menu
Enter Country selection
e.g. 00: China; 04: Singapore.
0: not reset to country default
1: reset to country default
Clear all PLU data
17【*】
0or1
This function used to clear all PLU data in the scale.
Enter the menu
Select item
0:not clear
1:clear
【*】
Clear Group
18【*】
0or1
This function used to clear group in the scale.
Enter the menu
Select item
0:not clear
1:clear
【*】
Clear operator
19【*】
0or1
This function used to clear all the operator data of the scale.
Enter the menu
Select item
0:not clear
1:clear
【*】
57
Network configure
This function used to set IP address, net mask, server IP, and router IP etc.
SERVICE MODE
Enter the preset code 21.
_
21
NETWORK CONFIG
Enter network configure
*
IP ADDRESS
Input IP address
_
_
Input NET MASK address
NET MASK
_
_
Input SERVER IP address (If necessary)
SERVICE IP
_
_
Input ROUTE IP address (If necessary)
ROUTE IP
_
Input IDLE TIME (10 is ok)
_
IDLE TIME
10
_
Scale will restart automatically.
MAC ADDRESS
_
_
After completing setup, if necessary you can choose the PLU SOURCE. The operation as bellow:
K9* Call the menu "Technical service "
SERVICE MODE
Enter the preset code 21.
_
21
0=Get PLU from local scale
1=Get PLU from NETWORK
2=First from network, then from local scale
NETWORK CONFIG
*______
PLU SOURCE
0-2
Press
_
CODE
0.00
58
0.00
0.00
K to exit.
Ticket print test
This function used to test the printer with ticket.
24【*】
DISPLAY
RESIST
600-999
SPEED
105 MM/S
ENERGY
850
0-5
-4 -- +4
PAP.END DET. NO
0
0-1
PRINTERTEST
NO 0-1
SENSORTEST
NO 0-1
PAPER:
SENSOR OK
⇑-⇓
OK=*
Enter the preset code 24.
DESCRIPTION
Select the Ohms Rating marked on the
Print Head.
Select the printer speed:
0=125mm/s; 1=115mm/s;
2=105mm/s; 3=95mm/s; 4=85mm/s;
5=75mm/s
Enter print density (use CNT/WT CHANGE
key to input negative value)
Enable paper end detecting (i.e. enable
the take label sensor)
0= disable; 1=enable
Conduct printer test (To print out test
ticket)
0= No; 1=Yes
Conduct gap sensor test
0= No; 1=Yes
Slowly remove the ticket and insert the
ticket again in 10 seconds. The test result
will be shown.
Label Printer Test
This function is used to test label printer hardware and adjust printer
parameters.
25【*】
DISPLAY
RESIST
600-999
850
SPEED
85 MM/S
0-5
ENERGY
-4 -- +4
0
PAP.END DET. NO
0-1
REWIND
0-1
OFFSET
NO
35
Enter the preset code 25.
DESCRIPTION
Select the Ohms Rating marked on the
Print Head.
Select the printer speed:
0=125mm/s; 1=115mm/s;
2=105mm/s; 3=95mm/s; 4=85mm/s;
5=75mm/s
Enter print density (use CNT/WT CHANGE
key to input negative value)
Enable paper end detecting (i.e. enable
the take label sensor)
0= disable; 1=enable
Enable rewind feature
0= disable; 1=enable
Enter offset length in mm (Eject distance)
59
TAKEUP
100
PRINTERTEST
THRESHOLD Enter the threshold of take up sensor
NO 0-1
SENSORTEST
NO 0-1
LABEL POS
OK=*
LABEL TEAR
SENSOR OK
OK=*
OK=*
Conduct printer test (To print out test
ticket)
0= No; 1=Yes
Conduct gap sensor and take label sensor
test
0= No; 1=Yes
Lead the label to the start position
manually. The scale will test gap sensor.
The scale will test take label sensor
The scale will issue two or three labels
and show the test results.
Configure RS232
This function is used to set the COM Port parameters.
26*
0or1or2or3or4or5or6
_
0or1
_
0or1or2
_
0or1
_
0or1
_
60
Enter the menu
Baud rate
0:300
7:38400
1:600
8:57600
2:1200
9:115200
3:2400
4:4800
5:9600
6:19200
Databits
0:5 digits
1:6 digits
2: 7 digits
3:8 digits
parity
0:no
1:odd
2:even
Stop bit
0:1 digit
1:2 digits
0:Procedure;1:Procedure 7 EIN
Reports
Enter the menu【CODE】【2】【*】,display will show “REPORT CONFIG.”, then do
following operation..
01
RESTORE DEF
"DEFAULT YES"
(press key: 0=YES,1=NO)
【*】
"TODAY
(press key:0=today,1=last day,2=total,3=
all)
【*】
"SIMPLE RPT"
(press key [↓]to select simple or detail report)
【*】
"NOT PRINT"
(press key [↓] to select print or not print report)
【*】
"TODAY
(press key:0=today,1=last day,2=total,3=
all)
【*】
"ALL PLUS"
"FROM PLU NO.0"
([↓] to select the PLU range or all plu)
【*】
"TO PLU NO. 0"(PLU range)
【*】
"SORT BY SUM"
([↓] to sort by PLU or by total)
【*】
"NOT PRINT"
(press key [↓] to select print or not print report)
【*】
"TODAY
(0=today,1=last day,2=total,3=all)
【*】
"NOT PRINT"
((press key [↓] to select print or not print report)
【*】
"TODAY
(0=today,1=last day,2=total,3=all)
【*】
"ALL GROUPS"
【*】
【*】
02
SALES REPORT
"
【*】
03
PLU REPORT
"
【*】
04
PROMOTE RPT
"
【*】
05
GROUP
REPORT
"
([↓] to select GROUP range or all group)
61
"FROM
NO.0"
GROUP
【*】
"TO GROUP NO. 0"(GROUP range)
【*】
"SORT BY SUM"
([↓] to sort by PLU or by total)
【*】
"SIMPLE RPT"
([↓] to select detail report or simple report)
【*】
"NOT PRINT"
(press key [↓] to select print or not print report)
【*】
"TODAY
(0=today,1=last day,2=total,3=all)
【*】
"ALL GROUPS"
"FROM
GROUP
NO.0"
([↓] to select GROUP range or all group)
【*】
"SORT BY SUM"
([↓] to sort by PLU or by total)
【*】
"NOT PRINT"
(press key [↓] to select print or not print report)
【*】
"TODAY
(0=today,1=last day,2=total,3=all)
【*】
"NOT PRINT"
(press key [↓] to select print or not print report)
【*】
"SETTLE $ YES"
(press key [↓] to select YES or NO)
【*】
"TODAY
(0=today,1=last day,2=total,3=all)
【*】
"SIMPLE RPT"
([↓] to select detail report or simple report)
【*】
"NOT PRINT"
(press key [↓] to select print or not print report)
【*】
"TODAY
(0=today,1=last day,2=total,3=all)
【*】
"PRINT"
【*】
06
GROUP H REPORT
"
【*】
"TO GROUP NO. 0"(GROUP range)
【*】
07
HOURLY REPORT
"
【*】
08
SETTLE REPORT
"
【*】
10
62
ST/RETN RPT
"
(press key [↓] to select print or not print report)
【*】
11
VENDOR REPORT
"
(0=today,1=last day,2=total,3=all)
【*】
"TODAY
【*】
"ALL VENDORS"
"FROM VENDOR
NO.0"
([↓] to select VENDOR range or all VENDORs)
"TO VENDOR NO. 0" ( VENDOR
【*】
range)
【*】
"SORT BY VEN"
([↓] to sort by VENDOR or by total)
【*】
"SIMPLE RPT"
([↓] to select detail report or simple report)
【*】
"NOT PRINT"
(press key [↓] to select print or not print report)
【*】
"TODAY
(0=today,1=last day,2=total,3=all)
【*】
"NOT PRINT"
(press key [↓] to select print or not print report)
"NOT PRINT"
(press key [↓] to select print or not print report)
"NOT PRINT"
(press key [↓] to select print or not print report)
"NOT PRINT"
(press key [↓] to select print or not print report)
【*】
12
CASHDRAW
REPORT
"
【*】
13
WEEKLY REPORT
【*】
【*】
14
MONTHLY REPORT
【*】
【*】
15
YEARLY REPORT
【*】
【*】
16
COMBINE REPORT
【*】
【*】
【*】
"202 SALES RPT NO"
"203 PLU RPT
NO"
"204 PROMOTE RPT NO"
63
【*】
【*】
【*】
【*】
【*】
【*】
【*】
【*】
【*】
【*】
"205 GROUP RPT NO"
"206 GROUP H RPT NO"
"207 HOURLY RPT NO"
"208 SETTLE RPT NO"
"210 ST/RETN RPT NO"
"211 VENDOR RPT NO"
"212 CASHDRAW RPT NO"
"213 WEEKLY RPT NO"
"214 MONTHLY RPT NO"
"215 YEARLY RPT NO"
【*】
"NOT PRINT"
(press key [↓] to select print or not print report)
"DELETE NO"
(Press key:0=NO,1=YES)
【*】
18
CLEAR REPORTS
【*】
【*】
PC software
PLU records and setup data of the bPro can be programmed through a PC (Personal
Computer) using the METTLER TOLEDO program bSoft and bLabel New scales can
be easily set up by using this program.
Which requires an IBM or compatible PC with Windows 2000 or higher version
operating system. One serial port or Ethernet port is required. The wiring diagrams
shown in the following figure can be used to make cables from a 9-pin PC serial
port to the 9-pin connector at the bPro. Factory cables are available from METTLER
TOLEDO using the part numbers shown in the figure.
123848OTC Cable, PC DB9 to bPro 10ft/3m
PC
DB9-F
TO 9-PIN SERIAL
RS232 PORT
64
2
3
3
2
5
5
bPro
DB9-F
TO 9-PIN SERIAL
RS232 PORT
Flashing Software
The bPro Operating System Software is retained in Flash EEPROM's on the Main
Logic PCB. The EPROM's can be reprogrammed using a PC and a downloader
program Hyper terminal. Cables and components are the same as above RS232
cable.
Before downloading the software, turn the bPro power OFF. Connect one end of
the cable to the PC's serial port and the other end to the bPro serial port.
Press the 【PRINT】key as power on the scale.
The scale will display “WAIT FOR HOST……” to wati for PC signal.
Then enter the Hyper terminal, to select right COMM port of the computer.
Then set the data as “baud tare 115200, data bits 8, parity none, stop bits
1,flow control none”
After come back main interface of the Hyper terminal, to select “ send file” ,select
the scale code and the protocol as “1K Xmodem”. Send the file to scale.
The PC screen will display a status menu to show the flashing progress. When
the flashing is completed, the scale will reset automatically. Press any key to exit
Hyper terminal program at the PC.
Also you can use a kit made of Mettler-Toledo which can update the firmware
via Ethernet. First connect the Ethernet cable from scale’s RJ45 to computer.
If you use Ethernet to update, hold the [00] key to power on scale, before it you
should set the scale’s IP address.
Also you should make some setting in PC kit, that will be introduced in software.
65
4 Troubleshooting
Troubleshooting Guide
Following is a list of symptoms that could occur, and the recommended action to
correct the problem.
SCALE INOPERATIVE/BLANK DISPLAYS
1. Check AC power at outlet.
2. Check Voltage on Main Logic PCB. If voltages are zero, check Power Supply.
3. If test point voltage is good replace Main Logic PCB.
4. Check Display Cable on Main Logic PCB and Operator Display PCB. Check
Display PCB.
KEYBOARD INOPERATIVE
1. Check keyboard connection on keyboard controller PCB.
2. Check Keyboard controller connection to Main Logic,
ensure all connections are secure.
3. If all connections are secure and keyboard is inoperative:
a)
Replace keyboard controller PCB.
b)
Check keyboard once again.
c)
If Keyboard is still inoperative, replace keyboard.
SCALE WON'T ZERO (DISPLAY "PUT PLATTER ON" or "ZERO NOT CAPTURE")
1. Check platter and spider for obstructions. Turn power off, then back on.
2. Recalibrate.
3. Check Load Cell supply voltage.
4. Replace Load Cell.
LOSING PROGRAMMED DATA
1. Check Error Report of Service Mode.
2. Check Main Logic voltage at test points.
3. Replace Main Logic PCB.
PRINTER WON'T DELIVER LABEL
1. Check printer for obstructions.
2. Check if there is a label which has not been removed.
3. Check Take Label sensor obstructions.
4. Clean Take Label sensor.
5. Test Take label sensor with SENSOR TEST in Service Mode.
6. Check harness from Printer to Main PCB.
7. Check label stepper motor.
8. Replace Main Logic PCB.
INCORRECTLY INDEXES LABELS
1. Check label installation.
2. Check label format and label size.
3. Clean Gap Sensor Lens.
66
4. Check and clean platen roller, stripper bar, and delivery path using MT cleaning
pen.
5. Adjust label Gap Sensor through SENSOR TEST in Service Mode.
6. Replace Gap Sensor Assembly.
7. Replace Main Logic PCB.
LABELS DARK
1. If labels are printed correctly, but are excessively dark, check the ENERGY setting in
Service Mode.
2. Check printhead harnesses for loose wires.
LABELS MISSING DOTS
1. If the labels are streaked by lines from top to bottom, replace the
Printhead.
2. If characters are cut off, check label format programming. If OK, replace printhead.
LABELS ARE EXCESSIVELY LIGHT/DARK
1. Check Print SPEED and ENERGY setting in Service Mode.
2. Check with other known good label stock.
3. If light print, check and clean printhead resistor line and platen roller.
4. Check printhead harness for loose wires.
5. Check Main Logic PCB voltages. If OK, replace Printhead.
LABEL PRINT IS MOTTLED WITH LIGHT SPOTS
1. Check with other known good label stock.
2. Check and clean printhead resistor line and platen.
3. Replace printhead.
LABELS NOT STRIPPING CORRECTLY
1. Check with other known good label stock, e.g. Nashua.
2. Check label format programming.
3. Check rewind spool for wear.
4. Check Gap Sensor and Take Label Sensor with SENSOR TEST in Service Mode.
LABELS PRINTED EVEN IF ONE IS NOT YET TAKEN
1. Check PAP. END DET. option in Service Mode (Paper End Detection)
2. Check Take Label Sensor.
3. Check Main Logic PCB.
OUT OF LABELS ERROR
1. Make sure labels are threaded through the Gap Sensor.
2. Clean/Check Gap Sensor.
3. Check Gap Sensor through SENSOR TEST in Service mode.
4. Replace Gap Sensor.
5. Replace Main Logic PCB.
CAN'T COMMUNICATE WITH PC
1. Test scale serial port through INTERFACE TEST in Service Mode.
2. Check the connection cable.
3. Check which serial port is used at PC.
4. If using bSoft, check the COM PORT SETUP and set to the following parameters:
Bit per second: 9600
Data bits: 8
Parity: None
Stop bits: 1
67
Flow control: None
POWER SUPPLY
Following is a list of symptoms that could occur, and the recommended action to
correct the problem.
Place the Power Switch to the OFF position. Remove the platter, spider, and top cove.
To check the +24VDC output voltage from the Power Supply terminal between the
terminals marked +V and GND, the acceptable output range is +24VDC +/-0.50 VDC.
If the voltage is normal, the Power Supply should be good, and the problem should be
suspected as being in the Main Logic PCB or a component that connects to the Main
Logic PCB.
If the output voltage is zero, check the 120 VAC input voltage. If the correct AC input
voltage is present, but there is no +24 VDC output, replace the Power Supply.
If no voltage is present, check the fuse (240VAC 4A) on the power supply. If the fuse
is OK, check AC input at the Line Cord Jack between the Red wire and Black wire. If
the 120VAC is present, suspect a defective power switch. If 120 VAC is not present at
the jack, check the fuse (240VAC 3A) installed in the Line Cord Jack, as shown in the
following Figure. If the fuse is OK, verify voltage is present at the AC wall outlet.
working fuse
backup fuse
68
Main Logic PCB
The Main Logic PCB receives +24VDC from the Power Supply and uses this to
supply +10VDC and +5VDC to other components. The Main Logic PCB controls
all functions in the unit including the thermal printer. Inputs and Outputs to the
Main Logic include the Label Taken Sensor, Gap Sensor, Printhead, Stepper
Motor, Rewind Motor, Load Cell and etc. The following Figure shows the
locations of the various components and connectors on the Main Logic PCB.
If the volages are not within the range specified, and the Power Supply voltage is
correct, replace the Main Logic PCB.
NOTE: WHEN REPLACING THE MAIN LOGIC PCB, THE UNIT MUST BE
REFLASHED.
69
70
Load Cell
The Load Cell can be tested for proper analog voltage input and millivolt output
by measuring the voltage on the Main Logic PCB. To check the input voltage
across +EXC & -EXC, place your meter on volts and put the positive lead on the
left pin of F1 and the negative lead on the left pin of F4. You should be reading a
steady +10VDC +/- 0.25VDC.
If the Excitation voltage is good, the signal output can be checked across +SIG &
-SIG. Set the meter to read in millivolts (mV). Put the positive lead on the left pin
of F2 and negative lead on the left pin of F3. With no weight on the platter, you
should read zero data. As you add weight to the platter, the voltage should rise
and be linear if equal weight is added each time. If the output is linear and
correct, but no weight is displayed, replace the Main Logic PCB. If there is no
output from the load cell, but correct input voltage, replace the load cell.
Warning Message
INPUT TOO BIG
The input is too big.
INPUT TOO SMALL
The input is too small.
TOO MUCH INPUT
The input is out of limit.
WRONG CODENR.
The code number is invalid.
KEY NO FUNCTION
The key has no function.
KEY BLOCKED
The key is disabled. Check the KEYBOARD CONFIGURE.
PLU NOT FOUND
The entered PLU number does not exist.
AG NOT FOUND
71
The entered Group number does not exist.
OPER.NOT FOUND
The entered Operator number does not exist.
LABEL NOT FOUND
The entered Label Format does not exist.
PLUNR IS OCCUP
You are trying to duplicate a PLU into an exist PLU number.
LABELNR. OCCUP
You are trying to duplicate a label format into an exist label format number.
AG NOT DELETABLE
This Group contains total data and can not be deleted.
OP NOT DELETABLE
This Operator contains total data and can not be deleted.
MEMORY FULL
Memory is full.
WEIGH AGAIN
You are trying to record one item twice. Remove the item from the platter and put
a new item on the platter.
WRONG LABEL
The installed label roll does not match the configured label format.
LABEL MOVED
The stepper motor or the rewind motor is not working properly.
CHANGE PAPERROLL
The label roll is not installed or the label roll is empty.
TAKE LABEL OFF
Take off the current label before printing the next one.
NO FREE OX KEY
All the configured operator keys have been occupied.
PRINT TICKET
Print out the customer ticket before logging out.
OPEN CUST. TICK
You are trying to delete an operator who has total data.
OX NOT LOGGED-IN
The operator has not be assigned to an operator.
PAYMENT TOO LOW
The payment is less than the total amount.
NO FURTHER REG.
72
No further transaction has been recorded.
DISCOUNT IMPOSS
This PLU does not allow to be discounted. Check the PLU Discount configuration,
or this PLU is in special offer.
TARE TOO BIG
The entered tare is too big.
PLU TARE ACTIVE
You are forbidden to override the PLU tare.
NO STABLE WEIGHT
The weight is not stable.
PUT PLATTER ON
The weight is too small and out of power up zero range.
ZERO NOT CAPTURE
The weight is too big and out of power up zero range.
WEIGHT TOO SMALL
The weight is too small to be printed.
ERROR TAKE-SENS
The take label sensor is not working properly.
ERROR POS_SENS
The gap sensor is not working properly.
ERROR INTERFACE
The serial port is not working properly.
Error Message
Listed below are the possible error codes. When an error code appears,
the scale should be switched off and on. In many cases the error will
disappear.
There are 3 different kinds of error messages:
Error Status 1:
Warning! After the warning the scale can still be used.
Error Status 2:
Press "CODE" key. Change to one of the CODE menu. Back to normal
operation mode.
Error Status 3:
Press "CODE" key and enter SERVICE MODE, after returning to normal
operation mode the scale will perform RESET.
73
Error Message
Reason
Status
Action
ERROR 300 PRINTER
Printer driver defect
2
Replace Main Logic PCB
ERROR 301 PRINTER
Printer driver defect
2
1 Reflash the software
2 Replace Main Logic PCB
ERROR 307 PRINTER
Printhead defect
2
1 Replace printhead
2 Replace printhead harness
3 Replace Main Logic PCB
ERROR 308 PRINTER
Printer driver defect
1
Replace Main Logic PCB
ERROR 310 PRINTER
Printer driver defect
2
Replace Main Logic PCB
ERROR 101 AP
Real Time Clock defect
1
Replace Main Logic PCB
ERROR 400 CELL
Load Cell defect
-
1 Replace Main Logic PCB
2 Replace Load Cell
ERROR 401 CELL
Load Cell defect
-
1 Recalibrate
2 Replace Main Logic PCB
3 Replace Load Cell
ERROR 200 DATABASE
Data bank error
3
Reset RAM
ERROR 201 XX DATABASE
XX Data error
2
1 Reset RAM
2 Delete Data XX
ERROR 202 XX DATABASE
XX Data error
2
1 Reset RAM
2 Delete Data XX
ERROR 203 YY DATABASE
YY Data error
2
1 Reset RAM
2 Configure YY
ERROR 205 DATABASE
Data bank error
3
Reset RAM
Meaning of XX
01 Operator
02 Ticket data
03 Time total data
04 Text data
05 Barcode data
06 Tare data
Meaning of YY
01 Operator Configure
03 Keyboard Configure
74
07 Group data
13 Label data
15 Date text data
21 PLU label data
23 Store adress
24 PLU data
04 Password Configure
Interconnecting Diagram
75
5 Parts Replacement
Replace main PCB
!
all the data saved in main PCB, as you change the main PCB you will lose all of them.
Counter type
• Power off and take out the power cable from electrical outlet.
• Take away platter.
• Screw out the 5 bolts (A) from base and take away.
• Show main PCB.
• Pull out all connection from main PCB.
• Screw out 6 bolts (B) from main PCB, take away it.
Install main PCB
• Put the main PCB to right position, screw in 6 bolts of main PCB.
• Put the cover of base then screw in 5 bolts.
76
• Put on platter.
• Power on scale.
Hanging type:
bPro -H2
A3
B3
C3
Take out main PCB
• Power off and take out the power cable from electrical outlet.
• Take away platter.
• Screw out the 2 bolts (A3) from scale and take away.
• Screw out 4 bolts (B3) from scale and show main PCB.
• Pull out all connection from main PCB.
• Screw out 4 bolts (C3) from main PCB, take away it.
Install main PCB
• Put the main PCB to right position, screw in 4 bolts of main PCB.
• Connect all harness to main PCB.
• Put the display and power support kit to position, screw in 4 bolts.
77
• Put the cover of display then screw in 2 bolts.
• Install whole hanging scale.
• Put on platter.
• Power on scale.
Replace switch power
Counter type:
Take out switch power
• Power off and take out the power cable from electrical outlet.
• Take away platter.
• Screw out the 5 bolts (A) from base and take away.
• Pull out the harness in switch power.
• Screw out 4 bolts in the power PCB.
• Take away the switch power.
Install switch power
78
• Put the switch power to the right position.
• Screw in 4 bolts of the power PCB.
• Plug in all the connection harness in the PCB.
• Put the cover of base then screw in 5 bolts.
• Put on platter.
• Power on scale.Hanging type:
bPro -H2
D3
E3
Take out switch power
• Power off and take out the power cable from electrical outlet.
• Take away platter.
• Take away the back display cover and back display kit as before.
• Screw out the 2 bolts (D3) from base and take away.
• Show the switch power.
• Pull out the harness in switch power.
• Screw out 4 bolts (E3) in the power PCB.
• Take away the switch power.
Install switch power
• Put the switch power to the right position.
• Screw in 4 bolts of the power PCB.
• Plug in all the connection harness in the PCB.
• Put the support plate then screw in 2 bolts.
• Install back display kit.
• Install whole hanging scale.
• Put on platter.
• Power on scale.
79
Replace display
Counter type
Take out display
• Power off and take out the power cable from electrical outlet.
• Take away platter.
• Take away the tower kits.
• Screw out 2 bolts in the display cover, and take out the front cover, show the display.
• Screw 5 bolts of the front display, pull out harness and take away the display.
• Screw 4 bolts of back display and pull out harness, take away back display.
Install display
• Put the back display to right position and screw in 4 bolts to fix it.
• Plug in harness of display.
• Also the harness to front display.
• Put on the front display.
• Screw in bolts for installation.
• Put the front display.
• Screw in 2 fix bolts of cover.
80
• Install the tower to base.
• Put on platter.
• Power on scale.
Hanging type:
bPro -H2
F3
Take out display
• Power off and take out the power cable from electrical outlet.
• Take away platter.
• Take out back display kit as previous method.
• Take away display harness in display.
• Screw out 4 bolts (F3) in the display support plate, and take out the back display.
• For front display, you should also take away the main PCB and power PCB, then to
show the front display, screw out 4 installation bolts.
Install display
• Put the back display to right position and screw in 4 bolts to fix it.
• Plug in harness of display.
• Install the back display kit.
• Install back display cover.
• Install whole hanging scale.
• Put on platter.
• Power on scale.
81
Replace load cell
Counter type
82
Take out loadcell
• Power off and take out the power cable from electrical outlet.
• Take away platter.
• Screw out 2 bolts for fix the cover of print paper (D).
• Take out the cover (E).
• Screw out 2 bolts in interface PCB (F).
• Screw out 4 bolts in up spider, and take out it.
• Open the sealing screw (G).
• Take away up cover.
• Pull out loadcell harness from main PCB.(see above to find the main PCB)
• Screw 2 screws in loadcell and take out spacer.
• Also take out loadcell spacer.
• Also screw 2 screws for installing loadcell under the scale.
• Take away loadcell.
Install loadcell
• Put the loadcell to right position.
• Install 2 screws from scale bottom.
83
• Screw down with moment spanner.15kg CAPACITY with 8 NM,
30kg CAPACITY with 10 NM.
• Put the spacer and then screw down 2 screws in it.
• Screw down with moment spanner.15kg CAPACITY with 8 NM,
30kg CAPACITY with 10 NM.
• With X mm ruler to adjust the limit size of back 2 screws. With Y mm ruler to adjust the limit size of front 2
screws inspacer.(capacity:6/15kg X=1.2mmY=0.9mm;capacity:15/30kg X=1.9mmY=1.3mm)
• Insert the loadcell harness to main PCB.
• Install the up cover, print paper cover,up spacer,screws in interface PCB, cover of main PCB at bottom etc.
• Adjust 4 screws in up spacer and let the spacer levelly.
• Put on platter.
• Power on scale.
Hanging type:
G3
bPro-H2
H3
I3
J3
K3
L3
M3
Take out loadcell
84
• Power off and take out the power cable from electrical outlet.
• Take away platter.
• Screw out 2 bolts (G3) for fix the left cover.
• Take out the cover.
• Screw out 2 bolts (H3) in base.
• Take away A/D convertor kit (I3).
• Screw out 2 bolts (J3),take out the cover.
• Screw out bolt (K3) and bolt (L3) for connecting load cell.
• Screw out 2 bolts (M3).
• Take out loadcell.
Install loadcell
• Put the loadcell to right position.
• Use reverse steps to install the load cell as previous take out steps.
85
Replace keyboard
Counter type
Take out keyboard
• Power off and take out the power cable from electrical outlet.
• Take away platter.
• Screw out 3 bolts (H) in keyboard at bottom.
• Take out keyboard and cover kits.
• Pull out the harness of keyboard from the keyboard convert PCB.
• Rip off the keyboard overlay, take out it.
Install keyboard
• Clean the keyboard cover with alcohol, and wait it till dry.
• Let harness through the hole in it and rip off the protect paper in keyboard, then
stick it to the keyboard cover.
• Plug in the harness to keyboard convert PCB.
• Put the keyboard to right position and install 3 bolts in it.
86
• Put on platter.
• Power on scale.
Hanging type:
bPro-H2
Just use new one replace old one and hang it.
87
Replace printer
Counter type
I
88
Take out printer
• Power off and take out the power cable from electrical outlet.
• Take away platter.
• Screw out 2 bolts (I) at the bottom of the scale.
• Open the printer door.
• Pull out printer, also disconnect the harness in printer PCB and connect ground wire.
• Take out printer, also with sliding feet under it.
Install printer
• Put the sliding base to right position.
• Insert the harness of the printer PCB and connect the ground wire.
• Put the printer to right position and insert to scale carefully.
• Insert the sliding feet under the printer. Screw down 2 bolts for fixing the printer at bottom of scale.
• Close printer door.
• Put on platter.
• Power on scale.
89
Hanging type:
N3
bPro-H2
Take out printer
• Power off and take out the power cable from electrical outlet.
• Take away platter.
• Open right door of scale.
• Screw out 3 bolts (N3) at the bottom of the printer.
• Take out all harness in printer PCB.
• Take out printer.
Install printer
• Insert the harness of the printer PCB.
• Put the printer to right position and insert to scale carefully.
• Screw down 3 bolts for fixing the printer.
• Close printer door.
• Install whole hanging scale.
• Put on platter.
• Power on scale.
90
Replace printer head
J
!
DON’T GRIDE THE PRINTER HEAD.
Take out printer head.
• Power off and take out the power cable from electrical outlet.
• Take away platter.
• Open printer door, pull out printer.
• Screw out 2 screws (J) for fixing printer head.
• Pull out the harness from printer head.
• Take away printer head.
Install printer head
• Insert the printer head harness.
• Put the printer head and spacer to right position. Screw down 2 bolts.
• Close the printer head.
• Push the printer back to scale.
• Put on platter.
• Power on scale.
91
Install Wireless card
Counter type
! Steps as below. (counter type as example)
(A1)
(D1)
(G1)
92
(B1)
(C1)
(E1)
(F1)
(H1)
(I1)
(J1)
(M1)
(K1)
(N1)
(L1)
(O1)
(P1)
• Power off and take out the power cable from electrical outlet.
• Take away platter.
• Screw out bolts from up spider (C1) and screw out sealing bolts (D1).
• Take apart the main PCB cover in bottom (F1), also take apart the cover of scale as
screw out the bolts in the bottom of scale.
93
• Put the wireless kit (A1) to the position (G1).
• Install the bolts to it (H1).
• Take out the seal from hole (I1).
• Put the Ethernet harness through the hole (J1).
• Connect the Ethernet harness to the Ethernet port (K) and fix the harness as picture (L1).
• Put the wireless card power harness through the hole (M1).
• Connect the wireless card power harness to the main PCB (O1).
• Then to install the scale cover, the up spider, the main PCB cover in bottom, seal switch bolts etc.
94
Install the memory extension board
A2
C2
B2
E2
D2
95
Install the memory extension board.
• Power off and take out the power cable from electrical outlet.
• Take away platter.
• Screw out bolts from up spider and screw out sealing bolts in scale.
• Get the memory extension board (A2)
• Find socket of extension memory in main PCB (B2).
• Install bolts (C2) to main PCB.
• Insert the memory extension board to it as (E2).
• Fix three install bolts (D2) to main PCB.
• Then to install the scale cover, the up spider, the main PCB cover in bottom, seal switch
bolts etc to resume the scale.
96
6 Maintenance
External Cleaning
Turn the scale power off by placing the power switch to the OFF position (Press
the "0" on the power switch). Disconnect power cord from outlet.
Use a soft clean cloth dampened with a mild detergent and water (or a mild
cleaner) to wipe the exterior surfaces. Do not spray liquid directly on the unit. A
mild spray cleaner can be used by spraying the cleaning cloth.
Cleaning Printhead
CLEAN PRINTHEAD USING METTLER TOLEDO LIQUID CLEANER OR
EQUIVALENT OR THE METTLER TOLEDO CLEAN PEN.
DO NOT SCRAPE THE PRINTHEAD WITH ANY OBJECT TO REMOVE GLUE OR
LABEL DEBRIS OR SEVERE DAMAGE MAY RESULT.
Turn the scale off by placing the power switch to the OFF position.
Disconnect power cord from outlet.
Open the plastic door on the right side of the scale.
Slide out the printer.
Press the trigger to open the print head.
Clean the print head with a soft clean cloth soaked in isopropyl alcohol,
METTLER TOLEDO liquid cleaner or equivalent, or the METTLER
TOLEDO Cleaning Pen.
Push back the print head until it clicks.
97
Slide the printer in.
Close the plastic door.
Rezeroing
This scale is equipped with an automatic zeroing device, which compensates for
small weight change. This device is not activated when a package tare is
compensated. After cleaning the dirt from the platter with the scale on, the display
can read :
• a negative value
• or "_ _ _ _ _" segments can be lit.
Solution :
Press the ZERO key
If the message appears again :
Turn the scale off and back on again with the main power switch.
98
7 GEO Settings
The values for gravity adjustment are a series of two digit numbers in the range 0 to 31, as shown in the table below.
Geo. Value Table
Height above sea level in meters
North or south latitude
in degrees and minutes
00 0’ - 50 46’
50 46’ - 90 52’
90 52’ - 120 44’
120 44’ - 150 6’
150 6’ - 170 10’
170 10’ - 190
2’
190 2’ - 200 45’
200 45’ - 220 22’
220 22’ - 230 54’
230 54’ - 250 21’
250 21’ - 260 45’
260 45’ - 280
6’
280
6’ - 290 25’
290 25’ - 300 41’
300 41’ - 310 56’
310 56’ - 330
9’
330
9’ - 340 21’
340 21’ - 350 31’
350 31’ - 360 41’
360 41’ - 370 50’
370 50’ - 380 58’
380 58’ - 400
5’
400
5’ - 410 12’
410 12’ - 420 19’
420 19’ - 430 26’
430 26’ - 440 32’
440 32’ - 450 38’
450 38’ - 460 45’
460 45’ - 470 51’
470 51’ - 480 58’
480 58’ - 500
6’
500
6’ - 510 13’
510 13’ - 520 22’
520 22’ - 530 31’
530 31’ - 540 41’
540 41’ - 550 52’
550 52’ - 570
4’
570
4’ - 580 17’
0
0
58 17’ - 59 32’
590 32’ - 600 49’
600 49’ - 620
9’
620
9’ - 630 30’
0
0
63 30’ - 64 55’
640 55’ - 660 24’
660 24’ - 670 57’
670 57’ - 690 35’
690 35’ - 710 21’
710 21’ - 730 16’
730 16’ - 750 24’
750 24’ - 770 52’
770 52’ - 800 56’
800 56’ - 850 45’
850 45’ - 900
0’
0
325
325
650
650
975
975
1300
0
1060
5
5
6
6
7
7
8
8
9
9
10
10
11
11
12
12
13
13
14
14
15
15
16
16
17
17
18
18
19
19
20
20
21
21
22
22
23
23
24
24
25
25
26
26
27
27
28
28
29
29
30
30
31
1060
2130
4
5
5
6
6
7
7
8
8
9
9
10
10
11
11
12
12
13
13
14
14
15
15
16
16
17
17
18
18
19
19
20
20
21
21
22
22
23
23
24
24
25
25
26
26
27
27
28
28
29
29
30
30
2130
3200
4
4
5
5
6
6
7
7
8
8
9
9
10
10
11
11
12
12
13
13
14
14
15
15
16
16
17
17
18
18
19
19
20
20
21
21
22
22
23
23
24
24
25
25
26
26
27
27
28
28
29
29
30
3200
4260
3
4
4
5
5
6
6
7
7
8
8
9
9
10
10
11
11
12
12
13
13
14
14
15
15
16
16
17
17
18
18
19
19
20
20
21
21
22
22
23
23
24
24
25
25
26
26
27
27
28
28
29
29
1300
1625
1625
1950
1950
2275
2275
2600
2600
2925
2925
3250
3250
3575
7460
8530
1
2
2
3
3
4
4
5
5
6
6
7
7
8
8
9
9
10
10
11
11
12
12
13
13
14
14
15
15
16
16
17
17
18
18
19
19
20
20
21
21
22
22
23
23
24
24
25
25
26
26
27
27
8530
9600
1
1
2
2
3
3
4
4
5
5
6
6
7
7
8
8
9
9
10
10
11
11
12
12
13
13
14
14
15
15
16
16
17
17
18
18
19
19
20
20
21
21
22
22
23
23
24
24
25
25
26
26
27
9600
10660
0
1
1
2
2
3
3
4
4
5
5
6
6
7
7
8
8
9
9
10
10
11
11
12
12
13
13
14
14
15
15
16
16
17
17
18
18
19
19
20
20
21
21
22
22
23
23
24
24
25
25
26
26
10660
11730
0
0
1
1
2
2
3
3
4
4
5
5
6
6
7
7
8
8
9
9
10
10
11
11
12
12
13
13
14
14
15
15
16
16
17
17
18
18
19
19
20
20
21
21
22
22
23
23
24
24
25
25
26
Height above sea level in feet
4260
5330
3
3
4
4
5
5
6
6
7
7
8
8
9
9
10
10
11
11
12
12
13
13
14
14
15
15
16
16
17
17
18
18
19
19
20
20
21
21
22
22
23
23
24
24
25
25
26
26
27
27
28
28
29
5330
6400
2
3
3
4
4
5
5
6
6
7
7
8
8
9
9
10
10
11
11
12
12
13
13
14
14
15
15
16
16
17
17
18
18
19
19
20
20
21
21
22
22
23
23
24
24
25
25
26
26
27
27
28
28
6400
7460
2
2
3
3
4
4
5
5
6
6
7
7
8
8
9
9
10
10
11
11
12
12
13
13
14
14
15
15
16
16
17
17
18
18
19
19
20
20
21
21
22
22
23
23
24
24
25
25
26
26
27
27
28
99
8 Replacement Parts
72188012
72188012
Item
1
2
3
P/N
180952
183021
102326
100
Description
上盖活动盖板
秤盘组件
水泡
bPro-C2
bPro-C2
Label Roll Housing
Platter
Leveling Bubble
Qty
1
1
1
4
5
6
7
8
9(1)
9(2)
9(3)
9(4)
9(5)
10
11
12
13
14
15
16
17
18
19
20
21
22
23
24
25
26
27
28
29
30
31
32
33
34
124041
154555
180974
180943
174032
72193829
72209741
72193807
72193827
72193825
72188155
173476
182976
183450
180951
72187455
72187456
173307
167391
72186444
72186386
72186387
169795
72186557
183358
183359
180948
150652
182877
183452
180973
72188140
173596
180947
72191431
72191432
182872
72184997
72184996
72186985
72186878
中心橡胶垫
Cap,Spider,,Center
角垫
Cap,Spider,,Corner
托 架
Spider
上盖
Main Housing
A/D 板
PCB Assembly,AD board
键盘,透明硅胶按压层,bPro,C2
Keyboard,Touch pad,Silicon,bPro C2
键盘,编程面板,bPro-C2,英文
Keyboard, Programming layer,bPro C2 ENG
键盘,操作面板,bPro-C2,英文
Keyboard, Operation layer,bPro C2 ENG
键盘,白色橡胶触点层,bPro,C2
Keyboard, Rubber button padding,bPro C2
键盘,银浆电路层,bPro,C2
Keyboard, Membrane layer,bPro C2
键盘盖 C
Keyboard Housing ,compact,top cover
键盘转接板
PCB Assembly,keyboard convert
调节支撑板 A
Sheet Metal,Keyboard Swivel A
支撑轴
Swivel Crutch shaft
开关固定板
Sheet Metal,support ,Power Switch
电源线束
Harness,AC Power Socket
开关
Harness,AC power Switch
接口板
PCB Assembly ,interface
秤脚,秤体左侧长秤脚,bC/bPro FOOT,Long,left
接口固定板
Sheet Metal,Support,interface
开关电源 24v,2.7A
Switching Power Supply,24v,2.7A
开关电源 24v,4.2A
Switching Power Supply,24v,4.2A
主板
PCB Assembly ,Main board,standard
主板
PCB Assembly ,Main board,Premium
基座盖板
Sheet Metal,base cover
键盘调节杆
Swivel adjustment support
键盘座
Keyboard Housing,Base
弹簧
Spring,keyboard Swivel
调节支撑板 B
Sheet Metal,keyboard swivel B
固定轴
Swivel fixed Shaft
基座
Aluminum Base Casting
秤脚,秤体右侧短秤脚
Foot,short,right
直流线束
Harness,DC Power
打印机侧门
Door
打印机组件
Printer Assembly,2" ticket
打印机组件
Printer Assembly,2" Label
立杆固定座
Sheet Metal,support,Tower to base
AMI-22 传感器
Loadcell Assembly,AMI-22 for 6/15kg
AMI-40 传感器
Loadcell Assembly,AMI-40 for 15/30kg
AMI-11 传感器
Loadcell Assembly,AMI-11 for 3/6kg
AMI-40 传感器
Loadcell Assembly,AMI-40 for 30kg 6000e
101
1
4
1
1
1
1
1
1
1
1
1
1
1
2
1
1
1
1
2
1
1
1
1
1
1
2
1
2
1
2
1
2
1
1
1
1
1
1
1
1
1
35
36
37
38
39
40
41
42
43
44
45
46
47
48
49
50
51
52
53
54
55
56
57
58
B1
B2
B3
B4
B5
B6
B7
B8
B9
B10
72186875
72186402
72185419
72185423
72188157
72188192
72188156
180946
180954
180945
155637
72189191
170120
72202239
180944
72189327
183449
72193760
156439
173248
72187458
182252
171790
173345
72193070
72188193
122206
72192054
72224370
72209420
72209419
72204992
119054
118549
72189609
72201470
72201473
72192905
72194324
72201474
72201466
102
AMI-40 传感器
Loadcell Assembly,AMI-22 for 12kg 6000e
导轨座
Printer Rail
垫 块
Loadcell spacer
钣金托架
Spider support
短盖板 B
Plastic cover B,Front,Compact,bC/bPro-C2
立杆 C
Tower, Compact,bC/bPro-C2
短盖板 A
Plastic cover A,Rear,Compact,bC/bPro-C2
压 板B
Sheet Metal,support B,Display
显示盖锁紧件
Sheet Metal,support, disp to Tower
压 板A
Sheet Metal,support A,display
显示屏
Display Assembly,segment,CHN
显示屏
Display Assembly,segment,EURO
显示屏
Display Assembly,segment,ENG
显示屏
Display Assembly,240X240
显示外壳
Display Housing
滤光片
Display lens,CHN
滤光片
Display lens,English
滤光片
Display lens,Euro,bc
立杆线束
Harness,Customer display,
线束,打印-主板
Harness,Main pcb to printer board
线束,接口-主板
Harness,Main pcb to interface
键盘线束
Harness,Main PCB to keyboard
显示转接线束
Harness,Segment Disp. convert
显示转接线束
Harness,240x240 Disp. convert
显示盖板
Display Lens.Opaque,customer,bc/bpro-C2
显示滤光片
Display Lens.Compact,operator,bc/bpro-C2
铅封纸
Sealing Sticker,EU,bC/bPro
铅封盖板
Sealing Cover,EU,bC/bPro
塑料线卡
Clip
小滑块
Slide space
导滑垫板
Slide base
螺钉 M4X12,GB818-85
SCREW M4X12
铅封头
SEALING HEAD
铅封螺钉
SEALING SCREW
螺钉 M4X8,GB818-85
SCREW M4X8
带齿垫螺钉 M4X5
SCREW M4X5
螺钉,M6X20,GB70-85
SCREW M6X20
紧定螺钉,M5X16,GB79-85
SLOT SCREW
螺母,M4
NUT M4
自攻螺钉,M2.9X6.5,GB845
SCREW
螺钉,M3X6,GB818
SCREW
1
1
1
1
1
1
1
1
1
1
2
2
2
2
2
1
1
1
1
1
1
1
1
1
1
1
1
1
1
1
1
9
1
2
15
21
4
4
2
6
18
B11
B12
B13
B14
102661
72201469
142884
143133
弹簧垫圈
螺钉,M4X14,GB819
紧定螺钉,M3X8,GB79-85
螺钉,M3X6,GB819
SPRING WASHERS
SCREW
SLOT SCREW
SCREW
72186380
72186380
Item P/N
1
180952
Description
上盖活动盖板
4
3
2
2
bPro-T2
bPro-T2
Qty
1
Label Roll Housing
103
2
3
4
5
6
7
8
9(1)
9(2)
9(3)
9(4)
9(5)
10
11
12
13
14
15
16
17
18
19
20
21
22
23
24
25
26
27
28
29
30
31
32
33
34
35
183021
102326
124041
154555
180974
180943
174032
72193830
72193808
72193815
72193830
72193826
180949
173476
182976
183450
180951
72187455
72187456
173307
167391
72186444
72186386
72186387
169795
72186557
183358
183359
180948
150652
182877
183452
180973
72188140
180975
173596
180947
72186193
182872
72184997
72184996
104
秤盘组件
Platter
水泡
Leveling Bubble
中心橡胶垫
Cap Spider center
角垫
Cap Spider Corner
托 架
Spider
上盖
Main Housing
A/D 板
PCB Assembly,AD board
键盘 透明硅胶按压层 bPro-T2 Keyboard,Touch pad,Silicon,bPro T2
键盘 操作面板 bPro-T2 英文
Keyboard, Operation layer,bPro T2 ENG
键盘 编程面板 bPro-T2 英文
Keyboard, Programming layer,bPro T2 ENG
键盘 白色橡胶触点层 bPro-T2 Keyboard, Rubber button padding,bPro T2
键盘 银浆电路层 bPro-T2
Keyboard, Membrane layer,bPro T2
键盘盖
Keyboard Housing ,tower,top cover
键盘转接板
PCB Assembly,keyboard convert
调节支撑板 A
Sheet Metal,Keyboard Swivel A
支撑轴
Swivel Crutch shaft
开关固定
Sheet Metal,support ,Power Switch
电源线束
Harness,AC Power Socket
开关
Harness,AC power Switch
接口板
PCB Assembly ,interface
秤脚
FOOT,Long,left
接口固定板
Sheet Metal,Support,interface
开关电源 24v,2.7A
Switching Power Supply,24v,2.7A
开关电源 24v,4.2A
Switching Power Supply,24v,4.2A
主板
PCB Assembly ,Main board,standard
主板
PCB Assembly ,Main board,Premium
基座盖板
Sheet Metal,base cover
键盘调节杆
Swivel adjustment support
键盘座
Keyboard Housing,Base
弹簧
Spring,keyboard Swivel
调节支撑板 B
Sheet Metal,keyboard swivel B
固定轴
Swivel fixed Shaft
基座
Aluminum Base Casting
秤 脚
Foot,short,right
导轨
Printer Rail Slider
直流线束
Harness,DC Power
打印机侧门
Door
打印机组件
Printer Assembly,2" Label
立杆固定座
Sheet Metal,support,Tower to base
AMI-22 传感器
Loadcell Assembly,AMI-22 for 6/15kg
AMI-40 传感器
Loadcell Assembly,AMI-40 for 15/30kg
1
1
1
4
1
1
1
1
1
1
1
1
1
1
1
2
1
1
1
1
2
1
1
1
1
1
1
2
1
2
1
1
1
2
1
1
1
1
1
1
1
53
54
55
72186985
72186878
72186875
72186402
72185419
72185423
182874
180976
180873
180946
180954
180945
155637
72189191
170120
72202239
180944
72189327
183449
72193760
156439
173248
72187458
182252
171790
173345
72209419
72209420
72224370
AMI-11 传感器
AMI-40 传感器
AMI-40 传感器
导轨座
垫 块
钣金托架
立杆盖板 B
立杆
立杆盖板 A
压 板B
显示盖锁紧件
压 板A
显示屏
显示屏
显示屏
显示屏
显示外壳
滤光片
滤光片
滤光片
立杆线束
线束,打印-主板
线束,接口-主板
键盘线束
显示转接线束
显示转接线束
导滑垫板
小滑块
塑料线卡
B1
B2
B3
B4
B5
B6
B7
B8
B9
B10
B11
72204992
119054
118549
72189609
72201470
102504
72204993
72194324
72201474
72201466
102661
螺钉 M4X12,GB818-85
铅封头
铅封螺钉
螺钉 M4X8,GB818-85
螺钉 M4X6
螺钉,M6X20,GB70-85
紧定螺钉,M5X16,GB79-85
方螺母,M4
自攻螺钉,M2.9X10,GB845
螺钉,M3X6,GB818
弹簧垫圈
36
37
38
39
40
41
42
43
44
45
46
47
48
49
50
51
52
Loadcell Assembly,AMI-11 for 3/6kg
Loadcell Assembly,AMI-40 for 30kg 6000e
Loadcell Assembly,AMI-22 for 12kg 6000e
Printer Rail
Loadcell spacer
Spider support
Plastic cover B,Front,Tower,bC/bPro-T2
Tower,bC/bPro-T2
Plastic cover A,Rear,Tower,bC/bPro-T2
Sheet Metal,support B,Display
Sheet Metal,support, disp to Tower
Sheet Metal,support A,display
Display Assembly,segment,CHN
Display Assembly,segment,EURO
Display Assembly,segment,ENG
Display Assembly,240X240
Display Housing
Display lens,CHN
Display lens,English
Display lens,Euro,bc
Harness,Customer display,
Harness,Main pcb to printer board
Harness,Main pcb to interface
Harness,Main PCB to keyboard
Harness,Segment Disp. convert
Harness,240x240 Disp. convert
Slide base
Slide space
Clip
1
1
1
1
1
1
1
1
1
1
1
1
2
2
2
2
2
2
2
2
1
1
1
1
1
1
1
1
1
SCREW M4X12
SEALING HEAD
SEALING SCREW
SCREW M4X8
SCREW M4X6
SCREW M6X20
SLOT SCREW
NUT M4
SCREW
SCREW
SPRING WASHERS
9
1
2
14
24
4
4
2
6
14
4
105
B12
B13
B14
B15
72201469
142884
72201468
133022
106
螺钉,M4X14,GB819
紧定螺钉,M3X8,GB79-85
螺钉,M3X6,GB819
齿垫 ¢4
SCREW
SLOT SCREW
SCREW
WASHERS
6
4
2
2
72187321
72187321
Item P/N
1
180945
Description
压 板A
bPro-U2
bPro-U2
Qty
1
Sheet Metal,support A,display
107
2
3
4
5
6
7
8
9
10
11
12
13
14
15
16
17
18
19
20
21
22
23
24
25
26
27
28
29
30
31
32
108
155637
72189191
170120
72202239
180944
72189327
183449
72193760
180977
173476
72183679
72186085
72186578
72186679
72186581
72193809
72186580
102326
124041
180974
122206
72192054
154555
180943
72185423
174032
180951
72187456
72187455
72186386
72186387
72186444
173307
183358
169795
72186557
72188140
72184997
72184996
72186985
72186878
显示屏
Display Assembly,segment,CHN
显示屏
Display Assembly,segment,EURO
显示屏
Display Assembly,segment,ENG
显示屏
Display Assembly,240X240
显示外壳
Display Housing
滤光片
Display lens,CHN
滤光片
Display lens,English
滤光片
Display lens,Euro,bc
立杆 B
Tower B bPro/bC-U2
键盘转接板
PCB Assembly,keyboard convert
键盘支架
Sheet Metal,support,keyboard
上键盘盖
Keyboard Housing,Top Cover
银浆电路
Keyboard,Membrane layer
键盘挂钉
Keyboard, Pin
键盘,白色橡胶触点层,bPro-U2 Keyboard, Rubber button padding,bPro U2
键盘,操作面板 bPro-U2 英文
Keyboard, Operation layer,bPro U2 ENG
键盘,透明硅胶按压层
Keyboard,Touch pad,Silicon,bPro U2
水泡
Leveling Bubble
中心橡胶垫
Cap,Spider,Center
托 架
Spider
纸铅封
Sealing Sticker,EU
铅封盖板
Sealing Cover
角垫
Cap,Spider,,Corner
上盖
Main Housing Cover
钣金托架
Spider support
A/D 板
PCB Assembly,AD board
开关固定板
Sheet Metal,support ,Power Switch
线束,电源开关 Harness,AC power Switch
电源线束
Harness,AC Power Socket
开关电源 24v
Switch Power Supply,24v,2.7A
开关电源 24v
Switch Power Supply,24v,4.2A
接口固定板
Sheet Metal,Support,interface
接口板
PCB Assembly ,interface
基座盖板
Sheet Metal,base cover
主板
PCB Assembly ,Main board,standard
主板
PCB Assembly ,Main board,Premium
秤 脚
Foot,short,right
AMI-22 传感器
Loadcell Assembly,AMI-22
AMI-40 传感器
Loadcell Assembly,AMI-40
AMI-11 传感器
Loadcell Assembly,AMI-11
AMI-40 传感器
Loadcell Assembly,AMI-40
30kg 6000e
2
2
2
2
2
2
2
2
1
1
1
1
1
2
1
1
1
1
1
1
1
1
4
1
1
1
1
1
1
1
1
1
1
1
1
2
1
1
1
1
33
34
35
36
37
38
39
40
41
42
43
44
45
46
47
48
49
50
51
52
53
54
55
56
57
58
59
B1
B2
B3
B4
B5
B6
B7
B8
B9
B10
B11
72186875
180973
72191369
72191370
180975
72186193
72185419
173251
72191008
182872
72186088
72186087
72183678
72186402
72186086
72187458
180947
173248
173596
167391
183021
182252
171790
173345
180952
72224370
72187457
72209419
72209420
72224168
72201466
72201474
72204992
72204993
72201468
72189609
72201473
72194324
72201464
72201470
150684
AMI-40 传感器
Loadcell Assembly,AMI-22
12kg 6000e
基座
Aluminum Base Casting
基座小盖板 A
COVER A,Base
基座小盖板 B
COVER B,Base
导轨
Printer Rail Slider
打印机组件
Printer Assembly,2" Label
垫 块
Loadcell spacer
立杆线束,点阵 Harness,240x240 Display
线束,IIC(欧元段码)
Harness,segment Display
立杆固定座
Sheet Metal,support,Towertobase
立杆盖板 D
Plastic Cover,Front,UpperKB
立杆盖板 C
Plastic Cover,Rear,UpperKB
显示支架
Sheet Metal,support,display
导轨座
Printer Rail
上键盘座
Keyboard Housing,Base
线束,接口-主板 Harness,Main pcb to interface
打印机侧门
Door
线束,打印-主板 Harness,Main pcb to printer
直流线束
Harness,DC Power
秤脚
FOOT,Long,left
秤盘组件
Platter
键盘线束
Harness,Main PCB to keyboard
显示转接线束
Harness,Segment Disp. convert
显示转接线束
Harness,240x240 Disp. convert
上盖活动盖板
Label Roll Housing
1
1
1
1
1
1
1
1
1
1
1
1
1
1
1
1
1
1
1
2
1
1
1
1
1
1
1
1
1
1
18
6
9
4
2
9
4
2
2
21
2
线束, 键盘转接 Keyboard convert
导滑垫板
Slide base
小滑块
Slide space
显示连接支架,bPro
display support metal
螺钉,M3X6,GB818
SCREW
自攻螺钉,M2.9X6.5,GB845
SCREW
螺钉 M4X12,GB818-85
SCREW M4X12
紧定螺钉,M5X16,GB79-85
SLOT SCREW
螺钉,M3X10,GB819
SCREW
螺钉 M4X8,GB818-85
SCREW M4X8
螺钉,M6X20,GB70-85
SCREW M6X20
螺母,M4
NUT M4
螺钉 M2X6,GB67
SCREW M2X6
带齿垫螺钉 M4X5
SCREW M4X5
开口挡圈 3.2
CIRCLIPS 3.2
109
B12
B13
110
102661
72201469
弹簧垫圈
螺钉,M4X14, GB819
SPRING WASHERS
SCREW
4
3
METTLER TOLEDO
Scales & Systems
1900 Polaris Parkway
Columbus, Ohio 43240
P/N: 72186164
(3/09).02
METTLER TOLEDO®
is a registered trademark of Mettler-Toledo, Inc.
©2000 Mettler-Toledo, Inc.
Printed in China
72186164