1
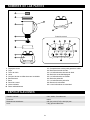
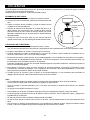
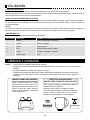
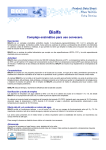
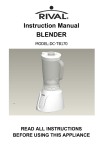
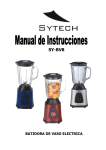
BLENDER
OPERATION MANUAL
BATIDORA MANUAL DE INSTRUCCTIONES
MODEL MODELO
E J - 1 2 G DW
CONTENTS
•
•
•
•
•
•
•
1
For Customer Assistance .........................
2
Consumer Limited Warranty .....................
3
Important Safeguards ...............................
4
Part Names ..............................................
4
Specifications ...........................................
How to Use ............................................... 5-6
6
Cleaning and Care ...................................
INDICE
•
•
•
•
•
7
Normas de seguridad importantes ...........
8
Nombres de las partes .............................
8
Especificaciones ......................................
Utilización ................................................. 9-10
Limpieza y cuidados ................................. 10
READ ALL INSTRUCTIONS CAREFULLY BEFORE USING THE BLENDER.
LEA TODAS LAS INSTRUCCIONES COMPLETAMENTE ANTES DE UTILIZAR EL BATIDORA.
FOR CUSTOMER ASSISTANCE
We suggest recording all the information listed below and saving the original sales receipt for future reference.
Please provide the following information when you write or call: model number, date of purchase, your
complete mailing address (including zip code), your daytime telephone number (including area code) and
description of the problem.
MODEL NUMBER
DATE OF PURCHASE
DEALER
TELEPHONE
TO PHONE:
DIAL 1-800-BE-SHARP (237-4277) for:
SERVICE INFORMATION
ADDITIONAL CUSTOMER INFORMATION
TO WRITE:
Sharp Electronics Corporation
Customer Assistance Center
1300 Naperville Drive
Romeoville, IL 60446-1091
TO ACCESS INTERNET: www.sharp-usa.com
1
CONSUMER LIMITED WARRANTY
SHARP ELECTRONICS CORPORATION warrants to the first consumer purchaser that this Sharp brand
product (the “Product”), when shipped in its original container, will be free from defective workmanship and
materials, and agrees that it will, at its option, either repair the defect or replace the defective Product or
part thereof with a new or remanufactured equivalent at no charge to the purchaser for parts or labor for
the period(s) set forth below.
This warranty does not apply to any appearance items of the Product nor to the additional excluded item(s)
set forth below nor to any Product the exterior of which has been damaged or defaced, which has been
subjected to improper voltage or other misuse, abnormal service or handling, or which has been altered or
modified in design or construction.
In order to enforce the rights under this limited warranty, the purchaser should follow the steps set forth
below and provide proof of purchase to the servicer.
The limited warranty described herein is in addition to whatever implied warranties may be granted to
purchasers by law. ALL IMPLIED WARRANTIES INCLUDING THE WARRANTIES OF
MERCHANTABILITY AND FITNESS FOR USE ARE LIMITED TO THE PERIOD(S) FROM THE DATE OF
PURCHASE SET FORTH BELOW. Some states do not allow limitations on how long an implied warranty
lasts, so the above limitation may not apply to you.
Neither the sales personnel of the seller nor any other person is authorized to make any warranties other
than those described herein, or to extend the duration of any warranties beyond the time period described
herein on behalf of Sharp.
The warranties described herein shall be the sole and exclusive warranties granted by Sharp and shall be
sole and exclusive remedy available to the purchaser. Correction of defects, in the manner and for the
period of time described herein, shall constitute complete fulfillment of all liabilities and responsibilities of
Sharp to the purchaser with respect to the Product, and shall constitute full satisfaction of all claims,
whether based on contract, negligence, strict liability or otherwise. In no event shall Sharp be liable, or in
any way responsible, for any damages or defects in the Product which were caused by repairs or
attempted repairs performed by anyone other than an authorized servicer. Nor shall Sharp be liable or in
any way responsible for any incidental or consequential economic or property damage. Some states do not
allow the exclusion of incidental or consequential damages, so the above exclusion may not apply to you.
THIS WARRANTY GIVES YOU SPECIFIC LEGAL RIGHT. YOU MAY ALSO HAVE OTHER RIGHTS
WHICH VERY FROM STATE TO STATE.
Your Product Model Number
& Description:
EJ-12GDW Blender
(Be sure to have this information available when you request service
for your Product.)
Warranty Period for this Product: One (1) year parts from the date of purchase.
Additional Item(s) Excluded from
Warranty Coverage :
Jar, Jar Base, Lid, Pour Lid, Gasket and Blade Assembly
What to do to Obtain Service:
Exchange service is available in the United States from Sharp. Call
Sharp at 1-800-BE-SHARP to obtain a Return Authorization and
shipping instructions. Be sure to have Proof of Purchase available.
To Obtain Supplies, Accessories or Product Information, call
1-800-BE-SHARP or Visit www.Sharp-usa.com.
2
IMPORTANT SAFEGUARDS
When using electrical appliances, basic safety precautions should always be followed, including the following:
9. Do not let cord hang over edge of table or
counter or touch hot surfaces.
1. Read all instructions.
2. To protect against risk of electrical shock, do not
put base, cord or plug in water or other liquid.
10. Keep hands and utensils out of jar while blending
to reduce the risk of severe injury to a person or
damage to the blender. A rubber or plastic
spatula may be used only when the blender is
not running.
3. Close supervision is necessary when the blender
is used by or near children.
4. Unplug from outlet when not in use, before putting
on or taking off parts and before cleaning.
11. Blades are sharp. Handle with care.
5. Avoid contacting moving parts.
12. To reduce the risk of injury, never place blade
assembly on base without jar properly attached.
6. Do not operate the blender with a damaged cord
or plug or after the blender malfunctions or is
dropped or damaged in any manner.
13. Always operate the blender with lid in place.
Call 1-800-BE-SHARP(237-4277) for service
information.
14. When blending hot liquids, remove pour lid. Be
careful not to spatter any hot liquids when
blending.
7. The use of attachments, including canning jars not
recommended by SHARP, may cause a risk of
injury to persons.
15. Do not use the blender for other than intended
use.
16. Do not leave the blender unattended during use.
8. Do not use outdoors.
SAVE THESE INSTRUCTIONS
and the Operation Manual
This product is intended for household use only.
This blender has a polarized plug (one blade is wider than the other). To reduce the risk of electric shock, this
plug is intended to fit into a polarized outlet only one way. If the plug does not fit fully into the outlet, reverse the
plug. If it still does not fit, contact a qualified electrician. Do not attempt to modify the plug in any way.
3
PART NAMES
Control Panel
1
2
3
4
5
6
7
8
9
10
11
12
13
14
15
16
17
18
19
Pour Lid
Lid
Glass Jar
Gasket
Stainless Steel Blade Assembly
Jar Base
Base
Control Panel
Cushioned Handle
Non-slip Feet
Hidden Cord Storage
Ice Crush Pad
Ice Crush Indicator Light
On/Off Pad
On Indicator Light
Pulse Pad
Pulse Indicator Light
Speed Pads
Speed Indicator Lights
SPECIFICATIONS
Rated Voltage:
120V, 60Hz, AC only
Power Consumption:
350W
Outside Dimensions:
7 5/16”(W) x 7 15/16” (D) x 15 1/16”(H)
Weight:
Approx. 7.7 lb
4
HOW TO USE
Before using the blender for the first time, wash all parts except for the base. (See page 6 for cleaning
instructions.)
After cleaning, reassemble the jar.
HOW TO ASSEMBLE THE JAR:
1. Turn the jar upside down and place it flat on a sturdy surface.
2. Place the gasket on the round opening on the bottom of the jar.
3. Turn the blade assembly upside down and put the blade end
in the jar opening.
4. Place the smaller opening of the jar base on top of the blade
assembly. Engage threads by twisting the jar base clockwise
until tightened. Make sure the jar base is fastened tightly to the
jar.
5. Place the jar on the base so that the jar markings are facing
you and the handle is positioned to one side.
Jar Base
Blade Assembly
Gasket
Jar
HOW TO USE THE BLENDER:
1. Place the blender onto a flat, sturdy dry surface.
Pull the power cord until it is entirely out of the hidden cord storage.
2. Put ingredients into the jar. Put the lid in place.
3. Plug securely into outlet. Use the blender on a 120V, 60Hz only protected electrical supply.
4. To start blending, press the On/Off pad. On Indicator Light will flash.
Press the desired blending speed pad. Blending will start. Both the On Indicator Light and activated Speed
Indicator Light will be on.
It is possible to switch speeds without pressing the On/Off pad by simply pushing the next desired speed pad.
5. To stop blending, press the activated speed pad again. Blending will stop and the Speed Indicator Light will go
off. The On Indicator Light will continue to flash and blending can be restarted by pressing the desired speed
pad.
6. When finished blending, press the On/Off pad. The On Indicator Light will go off. Unplug from the outlet.
Note:
• Liquid ingredients can be measured in the pour lid using the measurement marking.
Replace the pour lid after ingredients have been added.
• Cut food into small pieces (1/2”-1”) before adding to the blender to achieve a more uniform result.
• Never place boiling liquid in the jar.
• For consistent blending, add liquid ingredients first and then add solid ingredients.
• If you want to add ingredients while the blender is operating, remove the pour lid and add the ingredients
through the opening.
• Don’t remove the jar from the base while the blender is on.
• Don’t twist the jar base when removing the jar from the base. Simply lift the jar from the base.
• If blending action stops during blending or ingredients stick to side of the jar, turn blender off. Remove the lid
and use rubber spatula to push mixture toward blades.
5
HOW TO USE
TO CRUSH ICE
The ice crush function automatically operates as a pulse function.
While the blender is turned on (On Indicator Light will be on.), press and release the Ice Crush pad until ice is
crushed.
TO USE PULSE MODE
While the blender is turned on (On Indicator Light will be on.), press the Pulse pad.
Both On Indicator Light and Pulse Indicator light will flash. Press and release the desired speed pad.
NOTE:
The pulse function is effective in starting the blending process when you do not want continuous power or when
processing items which do not require an extended amount of blending.
MIXING GUIDE
Use the following chart for speed selections.
SPEED
1
FUNCTION
EXAMPLE OF INGREDIENT / RECIPE
Mix
Salad dressings, Mayonnaise
2
Chop
Nuts, Vegetables
3
Grate
Bread crumbs
4
Puree
Baby food, Shake
5
Liquefy
Frozen cocktail, Smoothie
Ice crush
Ice
CLEANING AND CARE
NOTE: •
•
•
•
Always clean the blender after using.
Be sure the blender is unplugged from the outlet before removing parts or cleaning.
Do not immerse the body, cord or plug in water.
Be sure to use dish detergent, not cleanser, benzene, thinner, alcohol or a nylon scrubbing brush
because they may cause cracks and rust.
BASE / CONTROL PANEL
Wipe carefully with a cloth dampened
with a mild detergent solution on the
outside of the base.
Wipe again with rinsed cloth and
polish dry.
JAR / LID / POUR LID / JAR BASE
BLADE ASSEMBLY / GASKET
Remove the jar from the base. Twist the jar base
off by turning counter-clockwise.
Remove the blade assembly and the gasket.
Wash in mild, sudsy water. Rinse and polish dry.
The jar is also dishwasher-proof.
6
NORMAS DE SEGURIDAD IMPORTANTES
Cuando se utilicen aparatos eléctricos, deberán seguirse siempre ciertas normas de seguridad básicas, entre las
que se incluyen las siguientes:
9. No deje que el cable cuelgue sobre el borde de
mesas o mostradores, ni que toque superficies
que estén calientes.
1. Lea todas las instrucciones.
2. Para protegerse contra el riesgo de sufrir una
descarga eléctrica, no ponga la base, el cable o la
clavija en el agua o en otro líquido.
10. Mantenga las manos y utensilios fuera del tarro
mientras licua para reducir el riesgo de que se
produzcan lesiones graves a personas o daños
en la batidora. Podrá utilizarse una espátula de
goma o plástico sólo cuando la batidora no esté
funcionando.
3. Cuando la batidora sea utilizada por niños o cerca
de ellos deberá realizarse una atenta supervisión.
4. Desenchufe la batidora de la toma de corriente
cuando no la utilice, antes de colocar o retirar
piezas y antes de limpiarla.
5. Evite tocar las piezas móviles.
11. Las cuchillas están afiladas. Manéjelas con
cuidado.
6. No utilice la batidora si ésta tiene un cable o
clavija estropeado, ni tampoco después de haber
funcionado mal, si se ha caído o si se ha
estropeado de cualquier forma.
12. Para reducir el riesgo de que se produzcan
lesiones, no ponga nunca el conjunto de las
cuchillas en la base sin estar colocado
correctamente el tarro.
13. Utilice siempre la batidora con la tapa colocada.
Llame al 1-800-BE-SHARP(237-4277) para
obtener información relacionada con las
reparaciones.
14. Cuando emplee líquidos calientes retire la tapa
para verter. Tenga cuidado para no derramar
ningún líquido caliente cuando licue.
7. La utilización de accesorios, incluyendo tarros de
conservas, que no hayan sido recomendados por
SHARP puede causar lesiones a las personas.
15. No utilice la batidora para otras cosas que no
sean aquellas para las que ha sido diseñada.
8. No utilice la batidora en exteriores.
16. No deje la batidora sin atender mientras la utilice.
GUARDE ESTAS INSTRUCCIONES
y el manual de instrucciones
Este producto ha sido diseñado para ser utilizado en casa solamente.
Esta batidora tiene una clavija polarizada (una patilla es más ancha que la otra). Para reducir el riesgo de que se
produzcan descargas eléctricas, esta clavija ha sido diseñada para poder enchufarse de una sola forma en una
toma de corriente polarizada. Si la clavija no se puede enchufar completamente en la toma de corriente, dé
vuelta a la clavija. Si sigue sin poder enchufarla, póngase en contacto con un electricista cualificado. No intente
modificar la clavija de ninguna forma.
7
NOMBRES DE LAS PARTES
Panel de control
1
2
3
4
5
6
7
8
9
10
11
12
13
14
15
16
17
18
19
Tapa para verter
Tapa
Tarro de vidrio
Junta
Conjunto de las cuchillas de acero inoxidable
Base del tarro
Base
Panel de control
Asa acolchada
Patas antideslizantes
Compartimiento oculto para guardar el cable
Botón de triturado de hielo
Luz indicadora de triturado de hielo
Botón de encendido/apagado
Luz indicadora de encendido
Botón de pulsación
Luz indicadora de pulsación
Botones de velocidad
Luces indicadoras de velocidad
ESPECIFICACIONES
Tensión nominal:
120V, 60Hz, CA solamente
Consumo:
350W
Dimensiones exteriores:
185 (An) x 201 (Prof) x 383 (Al) mm
Peso:
3.5kg aproximadamente
8
UTILIZACIÓN
Antes de utilizar la batidora por primera vez, lave todas las partes excepto la base. (Consulte la página 10 donde
se indican las instrucciones de limpieza.)
Después de hacer la limpieza, vuelva a ensamblar el tarro.
ENSAMBLAJE DEL TARRO:
1. Voltee el tarro y colóquelo plano sobre una superficie fuerte.
2. Coloque la junta en la abertura redonda de la parte inferior del
tarro.
3. Voltee el conjunto de las cuchillas y ponga el extremo de las
cuchillas en la abertura del tarro.
4. Coloque la abertura más pequeña de la base del tarro en la
parte superior del conjunto de corte. Acople la parte roscada
girando la base del tarro hacia la derecha hasta que quede
apretada. Asegúrese de que la base del tarro esté firmemente
apretada al tarro.
5. Coloque el tarro en la base para que las marcas del tarro
queden hacia usted y el asa quede posicionada hacia un lado.
Base del
tarro
Conjunto de las
cuchillas
Junta
Tarro
UTILIZACIÓN DE LA BATIDORA
1. Coloque la batidora encima de una superficie plana y fuerte.
Tire del cable de alimentación hasta sacarlo completamente del compartimiento oculto para guardar el cable.
2. Ponga los ingredientes en el tarro, Ponga la tapa en su lugar.
3. Enchufe firmemente el cable de alimentación en la toma de corriente. Utilice solamente la batidora con un
suministro eléctrico de 120 V, 60 Hz que esté protegido.
4. Para iniciar la licuación, pulse el botón de encendido/apagado. La luz indicadora de encendido se encenderá.
Pulse el botón de velocidad de licuación deseado. La licuación empezará. La luz indicadora de encendido y la
luz indicadora de la velocidad activada se encenderán.
Pulsando simplemente el botón de velocidad deseado siguiente se puede cambiar de velocidad sin pulsar el
botón de encendido/apagado.
5. Para detener la licuación, pulse de nuevo el botón de velocidad activada. La licuación se detendrá y la luz
indicadora de velocidad se apagará. La luz indicadora de encendido continuará parpadeando y la licuación
podrá reiniciarse pulsando el botón de velocidad deseado.
6. Cuando termine la licuación, pulse el botón de encendido/apagado. La luz indicadora de encendido se
apagará. Desenchufe el cable de alimentación de la toma de corriente.
Nota:
• Los ingredientes líquidos se pueden medir en la tapa para verter utilizando las marcas de medición.
Vuelva a poner la tapa parta verter después de agregar los ingredientes.
• Corte la comida en piezas pequeñas (1-2.5 cm) antes de meterla en batidora para obtener un resultado
uniforme.
• No ponga nunca líquido hirviendo en el tarro.
• Para realizar una licuación consistente, agregue primero los ingredientes líquidos y luego los sólidos.
• Si desea agregar ingredientes mientras la batidora está funcionando, retire la tapa para verter y agregue los
ingredientes por la abertura.
• No retire el tarro de la base mientras la batidora está encendida.
• No gire la base del tarro cuando retire el tarro de la base. Levante simplemente el tarro para separarlo de la
base.
• Si la licuación se detiene inesperadamente o los ingredientes se adhieren al tarro, apague la batidora. Retire
la tapa y utilice una espátula de goma para empujar la mezcla hacia las cuchillas.
9
UTILIZACIÓN
PARA TRITURAR HIELO
La función de trituración de hielo se activa automáticamente como una función de pulsación.
Mientras la batidora está encendida (la luz indicadora de encendido estará encendida), pulse y suelte el botón de
triturado de hielo hasta que el hielo quede triturado.
PARA UTILIZAR EL MODO DE PULSACIÓN
Mientras la batidora está encendida (la luz indicadora de encendido estará encendida), pulse el botón de pulsación.
La luz indicadora de encendido y la luz indicadora de pulsación se encenderán. Pulse y suelte el botón de
velocidad deseado.
NOTA:
La función de pulsación resulta eficaz al empezar el proceso de licuación cuando usted no desea emplear una
potencia continua o cuando procesa alimentos que no requieren un tiempo de licuación prolongado.
GUÍA DE MEZCLA
Utilice la tabla siguiente para seleccionar las velocidades
VELOCIDAD FUNCIÓN
1
Mezcla
EJEMPLO DE INGREDIENTE/RECETA
Aliño de ensaladas, mayonesa
2
Cortar
Nueces, verduras
3
Rayar
Migas de pan
4
Puré
Alimentos para bebés, batidos
5
Licuar
Cócteles congelados, sorbete
Triturar hielo
Hielo
LIMPIEZA Y CUIDADOS
NOTA: • Limpie siempre la batidora después de utilizarla.
• Asegúrese de que la batidora esté desenchufada de la toma de corriente antes de retirar piezas o
limpiarla.
• No meta la batidora, el cable o la clavija en el agua.
• Asegúrese de utilizar detergente para vajillas para limpiar la batidora. No utilice productos de
limpieza, bencina, diluyente, alcohol o un cepillo de nailon porque tal vez produzcan grietas y
oxidación.
BASE / PANEL DE CONTROL
Pase cuidadosamente un paño
humedecido en una solución de
detergente suave por el exterior de la
base y el panel de control. Pase de
nuevo un paño aclarado y finalmente
pase un paño seco.
TARRO / TAPA / TAPA PARA VERTER /
BASE DEL TARRO/ CONJUNTO DE CUCHILLAS/ JUNTA
Retire el tarro de la base. Suelte la base del tarro
girándola hacia la izquierda.
Retire el conjunto de las cuchillas y la junta.
Lave con agua templada y jabonosa. Enjuague
luego y pase un paño para secar. El tarro
también se puede limpiar en un lavavajillas.
10
SHARP ELECTRONICS CORPORATION
Sharp Plaza,Mahwah,NJ 07430-2135
SHARP CORPORATION
Osaka, Japan
TINSEA002RREZ
Printed in China