1
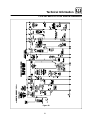
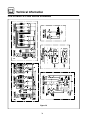
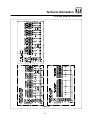
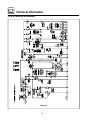
THE BLODGETT COMBI-OVEN/STEAMER
OPERATOR/TECHNICAL MANUAL
NON SELF-FLUSHING MODELS
Models COS-6, COS-101 and COS-101S
(Manufactured before 10/92)
Models COS-201 and COS-20
(Manufactured before 1/95)
BLODGETT COMBI
www.blodgett.com
44 Lakeside Avenue, Burlington, Vermont 05401 USA Telephone (800) 331-5842, (802) 860-3700 Fax: (802)864-0183
PN R5348 Rev F (6/01)
E 2000 --- Blodgett Combi
IMPORTANT
WARNING: IMPROPER INSTALLATION, ADJUSTMENT,
ALTERATION, SERVICE OR MAINTENANCE CAN CAUSE
PROPERTY DAMAGE, INJURY OR DEATH. READ THE INSTALLATION, OPERATING AND MAINTENANCE INSTRUCTIONS THOROUGHLY BEFORE INSTALLING OR
SERVICING THIS EQUIPMENT
FOR YOUR SAFETY
Do not store or use gasoline or other flammable vapors or
liquids in the vicinity of this or any other appliance.
The information contained in this manual is important for the proper
installation, use, and maintenance of this oven. Adherence to these
procedures and instructions will result in satisfactory baking results
and long, trouble free service. Please read this manual carefully and
retain it for future reference.
Errors: Descriptive, typographic or pictorial errors are subject to correction. Specifications are subject to change without notice.
A PERSONAL WORD
FROM BLODGETT COMBI
Congratulations on your purchase of the BLODGETT Combi-Oven/
Steamer. We firmly believe that your choice has been a wise one, and
trust you will receive many years of excellent service from your new multipurpose oven.
The Combi-Oven/Steamer concept offers completely new potential for
cooking which minimizes shrinkage, while maintaining food’s essential
vitamins and valuable nutrients. In addition, you will find that cooking
with the Combi-Oven/Steamer will save time, labor and extensive cleaning of both the kitchen and the appliance.
With the Combi-Oven/Steamer the quality, taste, consistency, and look
of the food are improved, thus endorsing the policy to which we’ve always adhered: “For Better Cooking!”
Once you’ve had a chance to use your multi-purpose oven, please tell
us, your dealer and colleagues about any creative and interesting applications you have discovered; exchange ideas with other users. Be sure
to advise us or your dealer immediately should any mechanical or technical problems be encountered (...we’re here to help!) and above all “Enjoy Cooking the BLODGETT Combi-Oven/Steamer Way!
Model:
Your Service Agency’s Address:
Serial Number:
Your oven was installed by:
Your start-up inspection service was
performed:
Date:
ASAP:
Table of Contents
Introduction
The Blodgett Combi-Oven/Steamer . . . . . . . . . . . . . . . . . . . . . . . . . . . . . . . . .
Description of the Combi-Oven/Steamer . . . . . . . . . . . . . . . . . . . . . . . . . . . .
Oven Features . . . . . . . . . . . . . . . . . . . . . . . . . . . . . . . . . . . . . . . . . . . . . . . . . . .
2
3
4
Installation
Owner’s Responsibilities . . . . . . . . . . . . . . . . . . . . . . . . . . . . . . . . . . . . . . . . . .
Owner’s Responsibilities . . . . . . . . . . . . . . . . . . . . . . . . . . . . . . . . . . . . . . . . . .
Oven Placement . . . . . . . . . . . . . . . . . . . . . . . . . . . . . . . . . . . . . . . . . . . . . . . . .
Plumbing Connections . . . . . . . . . . . . . . . . . . . . . . . . . . . . . . . . . . . . . . . . . . . .
Electrical Connections . . . . . . . . . . . . . . . . . . . . . . . . . . . . . . . . . . . . . . . . . . . .
Stacking --- COS-6 and COS-101 . . . . . . . . . . . . . . . . . . . . . . . . . . . . . . . . . . .
Door Adjustments . . . . . . . . . . . . . . . . . . . . . . . . . . . . . . . . . . . . . . . . . . . . . . . .
Final Check . . . . . . . . . . . . . . . . . . . . . . . . . . . . . . . . . . . . . . . . . . . . . . . . . . . . .
6
7
8
9
11
12
13
14
Operation
Standard Controls . . . . . . . . . . . . . . . . . . . . . . . . . . . . . . . . . . . . . . . . . . . . . . . .
The Steam Mode . . . . . . . . . . . . . . . . . . . . . . . . . . . . . . . . . . . . . . . . . . . . . . . . .
The Hot Air Mode . . . . . . . . . . . . . . . . . . . . . . . . . . . . . . . . . . . . . . . . . . . . . . . .
The Combi Mode (Steam and Hot Air) . . . . . . . . . . . . . . . . . . . . . . . . . . . . . .
General Tips and Procedures . . . . . . . . . . . . . . . . . . . . . . . . . . . . . . . . . . . . . .
16
18
20
21
22
Maintenance
Spray Bottle Operating Procedure . . . . . . . . . . . . . . . . . . . . . . . . . . . . . . . . . .
Cleaning and Preventive Maintenance . . . . . . . . . . . . . . . . . . . . . . . . . . . . . .
Decalcification . . . . . . . . . . . . . . . . . . . . . . . . . . . . . . . . . . . . . . . . . . . . . . . . . . .
Preventative Maintenance . . . . . . . . . . . . . . . . . . . . . . . . . . . . . . . . . . . . . . . . .
23
24
25
26
Technical Information
COS-6 Service Schematics . . . . . . . . . . . . . . . . . . . . . . . . . . . . . . . . . . . . . . . .
COS-101 and COS-101S Service Schematics . . . . . . . . . . . . . . . . . . . . . . . .
COS-201 Service Schematics . . . . . . . . . . . . . . . . . . . . . . . . . . . . . . . . . . . . . .
COS-20 Service Schematics . . . . . . . . . . . . . . . . . . . . . . . . . . . . . . . . . . . . . . .
Oven/Steamer Temperature vs. Relative Humidity . . . . . . . . . . . . . . . . . . . .
Resistance Chart for Elements . . . . . . . . . . . . . . . . . . . . . . . . . . . . . . . . . . . . .
Steam Temperature Controller Probe . . . . . . . . . . . . . . . . . . . . . . . . . . . . . . .
Quenching System . . . . . . . . . . . . . . . . . . . . . . . . . . . . . . . . . . . . . . . . . . . . . . .
Timers --- Old Style . . . . . . . . . . . . . . . . . . . . . . . . . . . . . . . . . . . . . . . . . . . . . . .
Timers --- New Style . . . . . . . . . . . . . . . . . . . . . . . . . . . . . . . . . . . . . . . . . . . . . .
27
29
31
34
37
38
39
40
43
45
Introduction
The Blodgett Combi-Oven/Steamer
For quite some time, commercial cooking equipment has remained more or less unchanged.
There are kettles, deck ovens, the good old range
with its legion of pots and many other extra
appliances. The result: time expenditure, excessive manual work, and countless cleaning processes. The last few years have paved the way for
a revolution in the equipment of restaurant and institutional kitchens.
The combination of circulating hot air and steam
in the space saving, high performance CombiOven/Steamer leads to improvements in the following areas:
--- increased productivity in the kitchen
--- a reduction in capital expenditures for
multiple equipment replacement
--- a wider range of menu choices
--- a simplified cleaning process
The work process is simplified since products are
prepared on or in steam table pans and trays.
Food can be cooked, stored, and transported with
the same pans. Small amounts of product can be
processed efficiently; pre-cooked and convenience foods can be reheated within minutes.
Many frozen foods can be processed without prethawing. This flexibility in preparation reduces the
need for kettles and steam tables since there is no
need for large amounts of food to be kept warm for
long periods of time.
The Blodgett Combi-Oven/Steamer offers a completely new method of cooking. With the Oven/
Steamer you have the choice of two cooking processes: Steam and Hot Air, either...
D
D
D
Separately
Combined, or
In Sequence
And for easy operation you can choose from three
modes:
Steam
Hot Air
Combi
Today the improvement of food quality is more important than ever. Vegetables are cooked in the
Blodgett Combi-Oven/Steamer without water at
the optimal temperature of just under 212_F
(100_C), maintaining valuable vitamins, minerals,
nutrients and trace elements.Cooking meat in the
Combi results in less shrinkage and a firmer, juicier
product. The Blodgett Combi-Oven/Steamer is
being used more and more for baking. Steam and
Hot Air modes make it a general purpose baking
appliance.
(Steam &
Hot Air)
In the Steam mode you can:
steam
D defrost
D blanch
D poach
D rethermalize
In the Hot Air mode you can
D
D
D
roast
broil
D
D
bake
braise
In the Combination Steam and Hot Air mode you
can:
D
D
D
defrost
roast
reheat
D
D
rethermalize
bake
Not only that, you can use two or three functions
in sequence during one cooking process. We call
this:
D
D
D
combi-steaming
combi-roasting
combi-baking
2
Introduction
Description of the Combi-Oven/Steamer
ABOUT THE OVEN/STEAMER
OVEN/STEAMER OPERATION
Blodgett Combi-Oven/Steamers are quality produced using high-grade stainless steel with first
class workmanship.
The practical oven door, with a viewing window,
has a wide swing radius and handle which can be
operated easily, even with wet or greasy hands.
The high performance fresh steam generator with
its control system makes it possible to enjoy all of
the advantages of a high quality steamer at the
flick of a switch. Fresh steam enters the oven cavity without pressure and is circulated at high
speed. This process enables quick and gentle
cooking and ensures high quality food while providing convenient working methods. The steam
generator is completely automatic and protected
from running dry.
Ease of operation is guaranteed through the simple arrangement of the controls. Graphic symbols
make the appliance easy for even inexperienced
kitchen staff to operate. Steam, Hot Air and Combi
modes can be selected with one switch. A fourth
function on the mode selection switch, the Cool
Down mode, allows the oven cavity to cool down
rapidly with the door opened or closed.
Cleaning is kept to a minimum. The interior is
sprayed with a self-acting cleaning solution which
interacts with steam to easily remove crusts and
stains. The oven is designed for easy care and is
welded water tight so that the internal cooking
cavity may be rinsed with a hose after the steam
cleaning process.
A patented quench system keeps the air in the
oven clean. Fumes from roasting and grilling are
removed, quenched, and directed out through the
condenser drain. The exhaust system is effective
in all cooking modes and results in better quality
foods and no flavor transfer. The fan, which is
guarded against accidental finger contact, is driven by a quiet and powerful motor. The condenser
draws out excess steam from the appliance. Condensation and waste water, which result during
steaming and cleaning, are continuously drained.
The use of high quality insulation impedes excessive heat radiation and saves energy.
The Oven/Steamer has optional adjustable legs
which adapt easily to slightly uneven surfaces and
optional floor stands which are designed for use
with all of the table models.
3
Introduction
Oven Features
TABLE MODELS: COS-6, COS-101 AND COS-101S
DO NOT BLOCK
(a) Decalcifier inlet/safety valve 14
(b) To ensure proper function valve
must be free to move.
Standard Features
15
14
15
9
8
6
7
17
5
11
16
10
1
12
2
3
4
13
Figure 1
1 Oven Mode Selector Switch
9 Oven Door
2 Thermostat Dial
10 Door Handle
3 Timer Dial
11 Drip Collector (removable for cleaning)
4 Power Connection (wire fed through back of
oven)
5 Don’t Steam Indicator Lamp (Red)
12 Door Contact Switch
6 Indicator Lamp (Red) “Low Water”
15 Decalcifying Inlet & Pressure Safety Valve
13 Decalcifying Valve Lever
14 Air Vent
7 Power “On” Indicator (Green)
16 Air Vents
8 Heating Indicator (Red)
17 Oven Light
4
Introduction
Oven Features
FLOOR MODELS: COS-20 AND COS-201
DO NOT BLOCK
(a) Decalcifier inlet/safety valve 13
(b) To ensure proper function valve
must be free to move.
Standard Features
16
13
16
5
6
9
8
7
12
10
1
2
3
open
15
close
4
11
14
Figure 2
1 Oven Mode Selector Switch
9 Oven Door
2 Thermostat Dial
10 Door Handle
3 Timer Dial
11 Door Contact Switch (located behind door)
4 Power Connection
12 Vent
5 Indicator Lamp (Red)
13 Decalcifying Inlet Safety Valve
6 Indicator Lamp (Red) “Low Water”
14 Drain Lever
7 Power “On” Indicator (Green)
15 Transport Cart Guide
8 Heating Indicator (Red)
16 Air Vent
5
Installation
Owner’s Responsibilities
Installation responsibilities prior to service
startup inspection
2. The owner/operator must have the following
plumbing and electrical requirements met and
installed.
NOTE: An atmospheric drain kit and water
pressure regulator are provided with
the equipment, failure to utilize this installation kit (or equipment) will void
warranty.
You are entitled to a free start-up inspection service by our factory ASAP. Before a factory representative arrives to perform a startup procedure,
the owner must already have satisfied the following requirements.
1. Oven(s) are uncrated, stacked (if applies) and
put in place.
NOTE: Please refer to Leg Attachment and
Stacking Addendum.
Five to seven working days are needed to schedule a startup inspection service.
PLUMBING
Water
Building Water Pressure (min/max)
40 PSI min / 60 PSI max
Water Connection
3/4” Hose Fitting
Water Regulator Setting
35 PSI
Drainage
Atmospheric Vented Drain
Drain Connection
2” Copper
Avg Water Drain Temp.
Approximately 122_F (50_C)
ELECTRICAL
COS-6
COS-101
COS-101S
COS-201
COS-20
9.4kw
18.4kw
18.4kw
36.6kw
61kw
Amp/Line (max)
Volt
3Φ
1Φ
Volt
3Φ
1Φ
Volt
3Φ
1Φ
Volt
3Φ
1Φ
Volt
3Φ
1Φ
208
26
N/A
208
52
N/A
208
52
N/A
208
102
N/A
208
170
N/A
240
23
40
240
45
77
240
45
77
240
88
153
240
147
N/A
440
N/A
N/A
440
48
N/A
440
80
N/A
480
23
N/A
480
44
N/A
480
74
N/A
480
23
N/A
By Mode
Steam
9kw
18kw
18kw
36kw
45kw
Hot Air
9kw
18kw
18kw
36kw
60kw
Combi
9kw
18kw
18kw
36kw
60kw
.33 HP/0.4kw
.33 HP/0.4kw
.33 HP/0.4kw
.66 HP/0.8kw
.66 HP/0.8kw
Blower Motor
6
Installation
Owner’s Responsibilities
U.S. and Canadian installations
THE INSTALLATION INSTRUCTIONS CONTAINED HEREIN ARE FOR THE USE OF QUALIFIED INSTALLATION AND SERVICE PERSONNEL
ONLY. INSTALLATION OR SERVICE BY OTHER
THAN QUALIFIED PERSONNEL MAY RESULT IN
DAMAGE TO THE OVEN AND/OR INJURY TO
THE OPERATOR.
All ovens, when installed, must be electrically
grounded in accordance with local codes, or in the
absence of local codes, with the National Electrical
Code, ANSI/NFPA 70 ---Latest Edition and/or Canadian National Electric Code C22.2 as applicable.
General export installations
Qualified installation personnel are individuals, a
firm, a corporation, or a company which either in
person or through a representative are engaged
in, and responsible for:
Installation must conform with Local and National
installation standards. Local installation codes
and/or requirements may vary. If you have any
questions regarding the proper installation and/or
operation of your Blodgett Combi-Oven/Steamer,
please contact your local distributor. If you do not
have a local distributor, please call Blodgett Combi
at 0011-802-860-3700.
the installation of electrical wiring from the electric meter, main control box or service outlet to
the electric appliance.
Qualified installation personnel must be experienced in such work, familiar with all precautions
required, and have complied with all requirements
of state or local authorities having jurisdiction.
D
7
Installation
Oven Placement
OVEN LEVELING
OVEN LOCATION
All Units
Follow these guidelines carefully when selecting a
location for your Combi-Oven/Steamer.
Place the Oven/Steamer on a level and solid floor.
Sloping or uneven floors can cause the unit to
function improperly.
Left Side
The vents should have adequate air space. According to our agency listings, a minimum of 4” is
required on the left side of the unit for operation.
However, it is recommended that at least 12” of
space be provided between this and other
appliances, water, heat source, walls, etc. for servicing. Grease or heat sources should not be located near the air vents on the left side of the unit.
Consult the factory for an optional protective side
heat shield.
Minor uneveness of the floor can be corrected by
adjusting the metal leg feet. The maximum adjustment of the leg is 1-3/8”.
COS-20 and COS-201
Uneven floors may create difficulty inserting and
removing the transport cart.
It is important to level the oven to the transport
cart. This ensures that the cart seals to the front of
the oven.
When the transport cart is not entirely beneath the
unit, be sure the right front cart bracket touches
the bottom of the door. This will prevent tearing of
the door gasket.
COS-6
COS-101
COS-101S
COS-20
COS-201
P/N R9047
P/N R9048
P/N R9068
P/N R9050
P/N R9049
COS-6, COS-101 and COS-101S
Right Side
We recommend a Blodgett Combi floor stand for
the installation of the table model Oven/Steamer.
Position the unit a minimum of 1” from the right
wall. DO NOT place within 6” of any heat source
on the right side.
P/N ACS-31
P/N ACS-18
P/N ACS-22S
P/N ACS-18S
Back
The optional hose assembly projects approximately 6” from the back of the oven. Position the
unit so that the hose assembly is a minimum of 6”
from the rear wall.
Wall
Left Side
Minimum
Clearance 12”
Right Side
Minimum
Clearance 1”
Wall or
Heat Source
Heat Source
Right Side
Minimum
Clearance 6”
Maximum
Adjustment
1-3/8”
Foot
Clearance for
Transport Cart
COS-20 Shown --- Clearances the same for all models
Figure 3
Figure 4
8
Installation
Plumbing Connections
COLD WATER CONNECTION
SPRAY HOSE CONNECTION
Connect the appliance to quality cold water via a
pressure hose with 3/4” couplings. A shut off
valve is to be provided adjacent to the oven.
Connect the optional spray hose to the fill solenoid
as shown.
Washer
Regulator Assembly
Regulator
“Y” Fitting
Cold Water
Supply
Fill
Solenoid
washer
1/2” Appliance Hose
with 3/4” Hose Fittings
Hose and Spray
Option
Figure 5
NOTE: Operating the unit without the water regulator installed will invalidate your warranty.
Water must meet the following minimum requirements:
D
D
Figure 6
Total Dissolved Solids (TDS) content will not exceed 30 parts per million.
Water PH must be 7.0 or higher
WARNING!!
The use of poor quality water will invalidate your warranty.
9
Installation
Plumbing Connections
DRAIN CONNECTION
The Drain Vent assembly, included with the unit,
and a 2” pipe with standard drain pitch, should be
run to an open drain or connected to a standpipe
equipped with a vent. The waste water can also be
directed to a nearby floor drain. Flexible hose
which allows trapped water to accumulate in
sagged runs must be avoided.
Use the following directions to properly connect
the drain.
1. Find the drain connection on the lower rear of
the unit. See Figure 7.
2. Loosen the coupling clamps, attach to the
drain connection and retighten.
Oven
Drain
2” Drain
Customer Supplied
To
Drain
NOTE: The open end of the drain should be
installed facing the floor. Copper line,
used for installation to an open drain or
floor sink, must be supplied by the installer.
WARNING!!
This drain should be atmospherically vented at the
exit of the oven with the vent kit provided.
Use of a trap inline will cause drain backup.
10
Figure 7
Installation
Electrical Connections
This unit should be installed by a certified electrician only. Before making any electrical connections to these units, check that the power supply
is adequate for the voltage, amperage, and phase
requirements stated on the rating name plate
mounted on the unit. Electrical specifications and
circuit diagram can be found behind the cover of
the installation cabinet.
All ovens, when installed, must be electrically
grounded in accordance with local codes or in the
absence of local codes, with the National Electrical Code, ANSI/NFPA 70---Latest Edition and/or
Canadian Electrical Code CSA C22.1 as applicable.
Wiring diagrams are located on the inside of the
louvered side panel.
CAUTION! After connecting the appliance, the
fans should be checked to ensure the proper rotation (see diagrams below). If the fans turn in the
wrong direction, the appliance will not function
properly and damage to the unit can occur. Improper connection of the appliance renders the
Blodgett Combi warranty invalid.
NOTE: All manual resets should be restored before connecting power to the appliance.
WARNING!!
Improper installation will invalidate your
warranty.
COS-20 and COS-201
NOTE: Disconnect the Power Supply to the unit
Before Servicing!
COS-6, COS-101 and COS-101S
Direction Of Fan Rotation
Figure 8
Direction Of Fan Rotation
Figure 9
11
Installation
Stacking --- COS-6 and COS-101
TO STACK TWO COS-6’S OR A COS-6 ON A COS-101
2. Lower the upper section onto the spacer. The
1. Attach the stacking spacer (PN R9036) to the
legs of the stand on the upper section will fit
top of the lower section using the screws prointo the fittings attached to the stacking
vided.
spacer.
STEP 1
STEP 2
Figure 10
12
Installation
Door Adjustments
COS-6, COS-101 AND COS-101S
COS-20 AND COS-201
The door latch may be adjusted in two directions,
in and out, and up and down, using the following
procedure:
The hinges may be adjusted as follows:
1. Adjust up and down by loosening the two bolts
holding the latch to the face of the unit (A).
2. Make adjustments so that the leading face of
the latch is centered in the opening of the handle assembly.
3. Tighten the bolts so that there is no further
movement.
4. Adjust in and out by loosening the bolt on top
of the latch (B).
5. The adjustment face is stepped so that movement is limited with the bolt tightened properly.
6. The adjustment is correct when the door closes
firmly and no steam leaks from the gasket.
The hinges can also be adjusted as follows:
1. Be certain the latch is adjusted properly.
2. Adjust hinges so that the door back and the
unit face are parallel (C).
3. The adjustment is correct when no steam
leaks through the gasket.
1. Adjust the top hinge plate by loosening the
three mounting bolts on the top right corner of
the oven.
2. Adjust the bottom hinge pin by loosening the
mounting bolt located under the bottom hinge
plate on the lower right corner of the oven.
3. Adjust the hinges so that the door back and
the unit face are parallel (C).
4. Tighten the bolts so that there is no further
movement.
5. The adjustment is correct when the door closes
firmly and no steam leaks from the gasket.
The catch can also be adjusted as follows:
1. Adjust the door catch by loosening the four
mounting screws located on the inside surface of the oven door.
2. The adjustment is correct when no steam
leaks from the gasket.
Oven
C
Door
Oven
C
Oven
Door
C
Door
B
A
Figure 12
Figure 11
13
Installation
Final Check
BEFORE SWITCHING THE APPLIANCE ON
ELECTRICAL CONTROL COMPARTMENT
Before applying power to the unit for the first time,
check for the following conditions:
Applied voltage to unit voltage/phase suitable for
appliance specified.
1. All electrical safety provisions have been adhered to and the electrical connections are
correct.
j
j
j
j
j
j
j
j
j
2. The circulation fan(s) should turn counterclockwise: check rotation from inside the oven
cavity.
3. Water is connected, turned on and all of the
connections are water tight.
4. The grease filter and holder are in their proper
positions.
COS-6, COS-101 and COS-101S
1. The pan holders on Models COS-6 and
COS-101 are inserted into the oven cavity.
Stationary rack guides are provided with Model COS-101S.
COS-20 and COS-201
1. The transport cart on Models COS-20 and
COS-201 is inserted into the oven cavity.
When the cart is not inserted into the unit, water can spill onto the floor causing it to become
slippery. If the door will not close properly, follow the adjustment directions to the right.
WARNING!!
If the fan turns in the wrong direction, the
appliance will not function properly and
can be damaged.
14
Remove side panel
Reset motor protector
Set motor protector to automatic
Adjust motor protector to maximum
Reset high limit thermostat “F3”
Check fuses
Verify all time delay relay settings
Verify proper fan rotation
Reinstall side panel
PLUMBING FINAL CHECK
j Water pressure within 40 PSI (minimum) --- 50
PSI (maximum)
j Atmospheric vented drain in place
j Water solenoid properly bracketed and not
leaking
j Water feed lines intact without leaks
j Steam boiler drain lever is working and in
closed position
j Optional Spray Hose connected properly.
Installation
Final Check
OVEN OPERATIONAL TESTS
NOTE: Checks to be made by customer or authorized service agent.
Cool Down Mode
j Fan rotation is correct, counter clockwise from
inside of the oven
Hot Air Mode
Turn to HOT AIR mode and set thermostat to
400_F (204_C) and verify:
j Heat demand light is on
j Oven is heating properly
j If incorrect, switch two incoming supply wires
Combi Mode
Steam Mode
Turn on STEAM mode and verify (Control Panel
Removed):
Drain steam generator, close drain, turn to Combi
mode, set thermostat to 450_F (232_C) and verify
j Pre-heat thermostat (P3) and thermostat
switchover is operational
j Steam Generator flushes and fills
j Check timer operation in all three positions
j Thermostat switchover between hot air and
1. Set timer to “OFF” position, buzzer should
sound
2. Set timer in position other than “OFF” or
“STAY ON”, timer should count down
3. Set timer in “STAY ON” position, oven
should operate continuously without timer
j Run light (power light) turns on
j Verify proper fan rotation
j Unit produces steam, window fogs, door seal
does not leak
j Quenching system working
15
steam is functional
Operation
Standard Controls
CONTROLS IDENTIFICATION
1. Indicator Light: Appliance Too Hot, DON’T
STEAM
This light is on when the STEAM function is
turned on and the oven temperature is higher
than 230_F (110_C). Cool the appliance by
turning the mode selector switch to COOL
DOWN mode until the temperature is below
230_F (110_C). This light does not inhibit
steam production.
2. Indicator Light: LOW WATER, FILL
2
1
3
This light flashes when the water level in the
steam generator is too low. The appliance
shuts off automatically in order to avoid damage. In this case, turn on the water tap or
check to see if the flow of water is stopped.
3. Indicator Light: POWER ON
4
Lights up when the appliance is in operation
(HOT AIR, STEAM or COMBI).
4. Mode Selection
5
6
To turn the appliance on, simply turn the Mode
selector switch to the desired function:
5. Indicator Light: Heating Indicator, TEMP
Lights up when the Hot Air heating is in operation and indicates the duration of the heating
period. It can also be used for checking temperature as it shuts off when the desired temperature has been reached.
7
9
§§§
6. TEMPERATURE Selection Dial
7. TIMER 0-100 minutes and “D” for constant
operation
8. Meat Probe Internal Temperature Switch *
9. Meat Probe Temperature Indicator (digital)
*
10. Meat Probe Selector Dial *
8
*
10
Figure 13
16
Optional (not available on COS-6 models)
Operation
Standard Controls
OPERATION
Preheating for the HOT AIR function
1. Toturn the appliance on, simply turn the Mode
Selector Switch (4) to the desired function.
2. The POWER ON Indicator Light (3) will light
up.
3. Set the TIMER (7) for the desired cooking time
or set it to STAY ON. The buzzer will sound and
the unit will shut off when the time has expired.
4. For the HOT AIR and COMBI (Combined
Steam and Hot Air) modes, set the THERMOSTAT Dial (6) to the desired temperature. The
Heating Indicator (5) will light up and stay lit
until the desired temperature is reached. The
Thermostat does not operate during STEAM
(atmospheric steam has a temperature of
approximately 212_F (100_C).
5. The selected mode operates automatically.
The temperature, time and mode can be altered at any time during the cooking process.
The operation can be stopped by the use of
the Mode Selector Switch or by opening the
oven door.
6. At the end of the specified time period, the
buzzer sounds and the appliance will shut off
automatically. Moving the Timer switch to the
“D” position stops the buzzer and restarts the
unit to run continuously.
7. To cool down the oven cavity,switch the Mode
Selector Switch to COOL-DOWN. In COOLDOWN mode, neither the Thermostat Dial or
the Timer will be operational. The blower will
function with the door open or closed.
8. The Mode Selector Switch is also the Main
Power Switch. In the OFF position the
appliance is not operational.
Always preheat the appliance prior to loading.
Open the door and load the product quickly.
NOTE: Always disconnect the power supply before servicing the unit.
NOTE: In setting the internal temperature, be sure
to allow for carry-over cooking after the
roast is removed from the oven.
Preheating for the STEAM function
Before the first use of the appliance, daily or after
the oven has been idle for 3 hours, preheat with
the STEAM function 1-2 minutes until the window
is misted over. The appliance can then be loaded.
Otherwise, there is no need to preheat for the
STEAM function.
17
Preheating for the COMBI (Steam and Hot Air)
function
Same as with HOT AIR function.
OPTIONAL MEAT PROBE
Place the probe through to the middle of the product’s thickest section. The probe should not touch
any bone, nor should the tip be in a fat pocket;
these conditions can cause inaccurate readings.
1. Set the Mode Switch (4) to the desired function: Steam, Hot Air or Combi (buzzer
sounds if Timer Dial (7) is on 0).
2. Turn Meat Probe Temperature Switch (10) to
on (Buzzer stops).
3. Set the desired core temperature with the
Meat Probe’s Temperature Selection Switch
(8) by depressing the small black knob and
turning it to the target internal temperature.
Releasing the knob will display the current
probe temperature.
4. Set the Timer (7) to “D” to run continuously.
5. The cooking process runs automatically.
6. When the selected core temperature is
reached, the buzzer will sound and the
appliance shuts off automatically.
7. The temperature and mode can be altered at
any time during the process.
8. Shut the appliance off by setting all switches
to OFF.
Measuring Temperature With The Probe
Measuring product core temperatures during long
roasting periods is very practical. It is especially
important for products such as Roast Beef to
reach a specific internal temperature.
Operation
The Steam Mode
INFORMATION ABOUT THE STEAM MODE
How steaming works
D
This mode gently cooks food using non-pressurized steam. Fresh steam is directed into the oven
from the generator. It is not necessary to add water
to foods during the cooking process.
What can be steamed
Vegetables, side dishes, fish, meat, poultry, diet
foods, garnishes, dumplings, casseroles, meat
loaf, fruits, desserts and eggs.
D
How to operate the Steam mode
The advantages of steaming
D
Shorter Cooking Times
The continuous processing of large amounts of
product is no problem and long cooking times
are no longer necessary. Even with full loads,
relatively shorter cooking time for food is needed.
18
Vitamin Retention
Vitamins are not destroyed. This is due to the
shorter cooking times, the use of less or little
water and the use of a low temperature; slightly
less than 212_F (100_C).
Simply turn the Mode Selector Switch to the
STEAM position and set the Timer.
Steaming is a well-known cooking process frequently used in restaurant and institutional kitchens. With this appliance it is now possible to enjoy
the many advantages of steaming, some of which
are:
High Quality Foods
With the useof steam, valuable taste and aroma
are preserved since steamed foods retain their
own natural taste. During the steaming process
foods retain the nutrients and vitamins which
are lost in water during boiling. Therefore, when
compared, steamed foods have much better
color than foods that have been boiled. Also, by
using shallow containers the product is not layered as deeply and mushing is avoided.
D
Firmness
With the use of steam, overcooking is not a
problem and firmness can be individually controlled.
D
Simultaneously Steaming Different Foods
There is no flavor transfer when cooking with the
STEAM mode. For this reason, various types of
food with different cooking times can be loaded
or removed at any point during the cooking process.
Operation
The Steam Mode
TIPS AND PROCEDURES
SAMPLE DISHES
Containers
Vegetables
Both solid and perforated steam table pans of varying sizes (full, half, and one-third size) may be
used in the appliance. Small pans may be placed
on wire racks.
Fresh and frozen vegetables may be steamed together. Frozen vegetables should be loosely scattered on the trays. Perforated trays shorten cooking time, although solid trays may be used.
Stocks for Sauces
Cooking times will vary depending on the quality
of the vegetables. When steaming fresh vegetables, check the product 3/4 of the way through the
cooking period.
When trays are used for cooking there is usually
enough stock collected for making sauces. When
using perforated pans, insert a solid pan in the bottom rack to collect the stock.
Seasoning
Since there is no liquid added during the steaming
process, season using one of the following methods:
D
D
Season before cooking: Sprinkle the spice
mixture evenly over the food prior to cooking.
Oil seasoning after cooking: Stir the oil mixture into the product. Steam again for two minutes in some cases.
Blanching and Prep Work
Large amounts of product can be blanched in a
short amount of time. Trays should not be filled
higher than 3 inches.
Steamed vegetables tend to soften after cooking.
Sincethereisadelaybetweencookingandserving,
it is best not to steam vegetables too soft. This is
especially important for foods prepared for transport.
Rice and Potatoes
Rice requires the addition of water for steaming.
Remember that the rice continues to swell after
cooking; plan your quantities accordingly.
Always cook potatoes in perforated pans. Steam
can permeate the potatoes better if they are quartered through the width and not the length.
Eggs
The diameter of the containers must not exceed
4-5 inches when canning.
Eggs are inserted onto wire racks, either in the
cardboard container or placed into perforated
trays (there is no need to puncture them). Cooking
eggs with the STEAM function saves work and results in less waste since steamed eggs do not
break. Also, the degree of hardness can be controlled exactly. Begin timing when the oven window is misted over.
Thawing
Fish
Thawing time is much shorter when using steam
and produces higher quality food.
Reheating
Fish can be steamed in trays without using extra
stock. Use a 1 inch pan for fresh fish (Fillets). For
larger or frozen pieces, use a 2 inch pan.
The use of steam creates an even distribution of
heat, which gives food better taste and retention
of nutrients.
Poached fish can be prepared with aromatic herbs
and vegetables in either solid or perforated pans.
Steam without stock.
Foods are reheated in the trays in which they were
cooked. Reheating times vary according to the
height and content of the containers.
Shell fish can be steamed in perforated pans. Use
a solid pan to catch drippings for stock.
The STEAM mode is excellent for preparing vegetables for peeling.
Canning and Preserving
19
Operation
The Hot Air Mode
INFORMATION ABOUT THE HOT AIR MODE
TIPS AND PROCEDURES
How cooking with hot air works
Hot air is circulated at high speed on all sides of
the product, providing a concentrated cooking
process. This function is extremely effective for intensive browning.
What can be cooked with hot air
Hot air can be used for all foods which need a short
cooking time and intensive browning. For example: steaks, cutlets, fillets, breaded foods, and various baked foods. This function may also be used
for au gratin.
Loading the Oven
COOKING WITH THE HOT AIR MODE
Temperatures
For intensive browning and crispy crusts, preheat
the oven to the maximum temperature of 500_F
(260_C). This is especially important when searing.
Performance
The suggested times and temperatures given at
the end of this section are based on full capacity.
Better results may be obtained by reducing product quantities.
Cooking Times
Due to the constant hot air circulation, this appliance cooks faster than conventional grills and
deck ovens.
Cooking times will vary according to the quality,
weight, and height of the product.
Trays or Racks?
This is a question of individual choice. Racks have
the advantage of browning food on all sides; the
underside of tightly packed foods may be lighter
when using trays.
Place like sized product together on one rack. In
order to ensure proper air circulation, racks and
trays should not be crowded.
Oiling
The quality of some foods, such as steaks and
breaded meats, can be enhanced by coating with
oil or a paprika oil mixture.
Breaded Foods
The degree of browning is dependent on the
amount of raw material in the breading. Oil can be
used to intensify the browning. Press the breading
firmly but don’t overload the oven. Flouring seared
foods is not recommended.
Baking
For baking, the Mode selector switch may be set
to HOT AIR, STEAM, COMBI or any combination
according to the type of product. Steam added to
the baking process opens up a wide range of possibilities: such as hard crusts and good shine on
certain types of breads. Here are some tips for
baking:
D
D
D
D
D
D
D
D
20
Preheat oven to the baking temperature.
Baking temperatures can generally be set
50-75_F (20-25_C) lower than with a conventional baking or roasting oven. When in doubt,
lower the temperature.
The baking time can be shorter than with conventional methods.
Slightly reduce your quantities of mixtures with
excessive moisture.
Use deep trays for light mixtures in order to ensure undisturbed baking. Baking forms should
not be higher than 3 inches.
Cake forms (pans, tins, etc.), should be placed
on racks.
Distribute foods evenly when loading half loads.
Use every second tier for baking bread, heavy
mixtures (yeast doughs, etc.) and well filled
forms.
Operation
The Combi Mode (Steam and Hot Air)
INFORMATION ABOUT THE COMBI (STEAM
AND HOT AIR) MODE
How Combi Mode Works
With this function, the advantages of steam (short
cooking time, less shrinkage) and hot air (intensive aroma, appetizing color) are combined.
Steam and hot air circulate at high speeds, enveloping the product on all sides and providing an intensive cooking process.
What can be cooked in Combi mode?
COOKING IN THE COMBI MODE
The COMBI function can be used for the entire
cooking process or for any portion of the cooking
procedure you desire.
What do Combi-roasting, Combi-steaming and
Combi-baking mean?
We have created these names since both modes,
STEAM and HOT AIR, can be applied in any combination as follows:
D
All types of roasts, duckling, pork, beef, lamb,
meat loaf, ground chuck foods, casseroles, poultry, stuffed vegetables, vegetables au gratin and
yeast doughs.
D
Example: first STEAM and then HOT AIR.
D
Productivity
Previously, several different appliances, and
multiple procedures, were necessary to combine heat andsteam preparation. Now all of
these methods can be used without time wasting interruptions, with one appliance.
D
Less Shrinkage
The usual weight loss during roasting in conventional appliances can be reduced by approximately 13% of the original weight.
D
Or in sequence and then in combination
Example: first HOT AIR and then COMBI
Or conversely: first COMBI and then HOT AIR.
The advantages of Combi mode?
D
Together, as in the COMBI function.
In sequence
Juiciness and Crunchy Crusts
When used at the beginning of the cooking procedure, the searing action of steam instantly
closes all pores. This reduces the loss of protein
and meat juices. Therefore, products with long
roasting times remain juicy. Foods retain their
moisture and roasts develop a pleasing color as
well as an appetizing crust. Meats have a pronounced roasted taste and burning of the surface is almost impossible.
21
D
Or all three functions in sequence
Example: first STEAM, then HOT AIR, then
COMBI.
For additional tips on when to use each of these
Combi Modes see the “Summary of Functions” on
the following page.
Operation
General Tips and Procedures
USING RACKS
LOADING THE OVEN
Use racks for roasts needing a longer roasting
time, large roasts (pork, veal, beef, venison,
lamb), searing, toast, au gratin, (chicken, duck,
goose, legs, chops), cooking in containers, thawing, baking in tins, etc. When cooking in racks it is
important to turn food products.
To ensure that the product will brown on all sides,
do not place foods too close together. Place the
grain of meats parallel to the air stream (left to
right). This ensures better absorption and shortens the cooking process. Place like sized pieces
together on the same rack, smaller pieces cook
more quickly.
USING PANS
D
1I Deep Steam Table Pan
For fried potatoes, hamburgers, au gratin, thawing, meat loaf, meat balls, fried, poached and
steamed fish, baked goods, vegetable casseroles, duck and goose.
D
2I Deep Steam Table Pan
For cabbage rolls, stuffed peppers, stews, rice,
vegetables, sauerkraut, assorted fruits and
compote. Also for collecting stock, preparing
sauces, etc.
D
2½IDeep Perforated Steam Table Pan
For vegetables without stock, side dishes
(breads) and products with shorter cooking
times.
D
4IDeep Perforated Steam Table Pan
For vegetables (blanching spinach for example), potatoes, shelled or unshelled eggs.
D
6IDeep Perforated Steam Table Pan
For potatoes.
COOKING TIMES
The length of the cooking process depends on the
quality, weight and thickness of the food product.
TEMPERATURES
Typically, the longer the cooking process, the lower the temperature.
22
Place the food in the appropriate pans/trays or distribute it on the racks. Insert racks and trays into
the pan rack. It is recommended that the pan rack
be loaded outside of the oven when processing
large amounts of product. The pan rack for table
models is well suited for this purpose; it allows for
a higher hourly production and an efficient work
sequence.
REMOVING THE PRODUCT
Turn the Mode Selector Switch to OFF before
opening the appliance door.
WARNING!!
Open the door slowly after steaming! Hot
Steam Will Be Present!
Maintenance
Spray Bottle Operating Procedure
WARNING!!
1.
2.
3.
4.
5.
6.
Always disconnect the power supply before servicing or cleaning the unit.
Unscrew the sprayer head and fill the container to the MAX mark. Screw the head assembly
on firmly to ensure an airtight seal. The liquid
must be clean and free from foreign matter. Do
not overfill - space must be left for compressing air.
To build up pressure, pump approximately 20
full strokes when the container is filled with liquid. The higher the pressure, the finer the
spray. If the container is only partially filled,
then more pumping is required to compress
the additional air space.
To spray, depress the trigger with your thumb.
After a period of spraying, the pressure will
drop. Restore the pressure by operating the
air pump.
Release pressure after use by inverting the
spray head and depressing the trigger or by
slowly unscrewing the spray head assembly
which will allow air to escape from around the
filling aperture.
After use, rinse the spray bottle with clean water and check that the hole in the nozzle is perfectly clean and clear. Warm water (not hot)
used with a household detergent is a useful
cleaning agent for this purpose.
23
NOTE: Further information can be found in the instruction leaflet supplied with your spray
bottle.
WARNING!!
Protective clothing and eyewear should
be worn while using cleaning agents.
Spray
Head
Pressure Pump
Pump
Spray Trigger
MAX
Pressure
Vessel
Clean the pump 2 or 3 times per week with warm water
Figure 14
Maintenance
Cleaning and Preventive Maintenance
CLEANING THE INTERIOR
Daily cleaning of the appliance is essential for sanitation, and to ensure against operational difficulties. Use an oven cleaning detergent in conjunction with the supplied spray bottle.
For difficult cleaning, allow the spray-on oven
cleaner to work longer before rinsing.
1. Cool the oven down to 140_F (60_C) or, if the
oven has been idle, turn the steam mode on
for 3 to 4 minutes in order to warm the oven
surfaces.
2. Fill the spray bottle and pump air into the container with the pressure pump.
3. Spray the interior of the oven with a cleaning
solution.
NOTE: Never spray water into the unit when
the temperature is above 212_F
(100_C). NEVER SPRAY WATER IN
THE UNIT AFTER USING THE HOT AIR
OR COMBI MODES.
4. Let the cleaner work for 10 to 20 minutes with
the oven off. For difficult, baked on grease,
etc. allow to work over night.
5. Set the timer for 15 to 20 minutes.
6. Set the mode selector switch to Steam. This
will soften all burned on residue.
7. Rinse the oven interior with water (a hose may
be used, but take care that only the oven’s interior cavity is sprayed with water).
8. Set themodeselectorto steamfor anotherfive
minutes to flush out the oven interior and remove all detergent residue.
NOTE: The oven cavity should never be scoured
or scraped.
On stainless interiors, deposits of baked on splatter, oil, grease or light discoloration may be removed with a good non toxic industrial stainless
steel cleaner. Apply cleaners when the oven is
cold and always rub with the grain of the metal.
The racks, rack supports and the blower wheel
may be cleaned in the oven or by removing them
from the oven and soaking them in a solution of
ammonia and water.
NOTE: DO NOT use corrosive cleaners on the
Oven/Steamer.
CLEANING THE EXTERIOR
Oven exteriors may be cleaned and kept in good
condition with a light oil. Saturate a cloth and wipe
the oven when it is cold; wipe dry with a clean
cloth.
NOTE: The outside of the appliance is not to be
sprayed with water.
NOTE: Grease filter and holder must be properly
and securely inserted for correct oven operation.
WARNING!!
Always disconnect the power supply before servicing or cleaning the unit.
24
Maintenance
Decalcification
1. Insert the transport cart into the oven cavity.
(COS-20 and COS-201 only)
2. This unit is equipped with a GENERATOR
DRAIN VALVE located in the lower left hand
corner on the front of the unit. With the
appliance OFF, open the GENERATOR DRAIN
VALVE by moving the DRAIN LEVER (1) to the
right. Drain the generator completely.
3. Close the GENERATOR DRAIN VALVE by
moving the DRAIN LEVER to the left.
4. Lift the SAFETY VALVE WEIGHT and set to
one side, leaving access to the decalcification
inlet (2).
5. Fill with water by turning the MODE SWITCH
(3) to STEAM MODE.
6. Pour concentrated decalcifying solution into
the inlet. Follow the decalcifying manufacturer’s recommended dilution ratios for the decalcifying solution.
COS-6
1 Quart
COS-101 and COS-101S 1.5 Quarts
COS-20
3.5 Quarts
COS-201
3 Quarts
7. 160-175_F (71-80_C) are the working temperatures for the decalcifier. Allow the water and
decalcifier in the steam generator to heat for
approximately 1 minute after the LOW WATER
INDICATOR (4) goes out. Switch to OFF.
8. Allow the chemicals to work for at least 60 minutes. Overnight is preferred.
9. Drain the generator fully by opening the
DRAIN VALVE LEVER. (Swing to the right).
10. Rinse fully by filling and draining the generator. (Generator fills automatically when the unit
is in the STEAM MODE and the DRAIN VALVE
is closed). When the LOW WATER INDICATOR LIGHT goes out, turn the MODE SWITCH
to OFF and open the DRAIN VALVE by swinging it to the right. Repeat several times for thorough rinsing. Run the unit on STEAM MODE
for 5 minutes and drain the generator again.
Close the DRAIN VALVE.
11. The unit is now ready for normal use.
For an accurate measure of the hardness of your
water refer to your state water testing agency.
NOTE: The unit should be decalcified weekly.
25
COS-6, COS-101 and COS-101S
2
4
3
1
COS-20 and COS-201
2
4
3
1
* Areas of the country with very hard water may need to
decalcify on a more frequent schedule. Consult your
service agent or other water hardness authority.
NOTE: Equipment failure due to calcium buildup
in the equipment is not covered under the
warranty.
Maintenance
Preventative Maintenance
PREVENTIVE MAINTENANCE
CHANGING THE LIGHT BULB
The best preventive maintenance measures are
the proper initial installation of the equipment and
a program for cleaning the oven routinely. The
Oven/Steamer requires no lubrication. Contact
the factory, the factory representative or a local
Blodgett Combi service company to perform
maintenence and repairs should they be required.
When replacing the light bulb always use a new
lens gasket. Insert the new bulb with care. See
Figure 15.
Figure 15
26
Technical Information
COS-6 Service Schematics
Figure 16
27
Technical Information
COS-6 Service Schematics
Figure 17
28
Technical Information
COS-101 and COS-101S Service Schematics
Figure 18
29
Technical Information
COS-101 and COS-101S Service Schematics
Figure 19
30
Technical Information
COS-201 Service Schematics
Figure 20
31
Technical Information
COS-201 Service Schematics
Figure 21
32
Technical Information
COS-201 Service Schematics
Figure 22
33
Technical Information
COS-20 Service Schematics
Figure 23
34
Technical Information
COS-20 Service Schematics
Figure 24
35
Technical Information
COS-20 Service Schematics
Figure 25
36
Technical Information
Oven/Steamer Temperature vs. Relative Humidity
600
500
OVEN TEMPERATURE_ F
Below 212_F (100_C)
Complete Saturation
400
300
212_F
(100_C)
200
100
0
10
20
30
40
50
60
RELATIVE HUMIDITY %
Figure 26
37
70
80
90
100
Technical Information
Resistance Chart for Elements
ELEMENT OHM CHART
Voltage
1500 W
Steam
2000 W
Hot Air
2500 W
Hot Air
3000 W
Steam
208
28.8
21.6
17.3
14.4
240
38.4
28.8
23.0
19.2
440
129.1
96.8
77.4
64.5
480
153.6
115.2
92.2
76.8
NOTE: Use these figures +/ --- 5% at room temperature.
38
Technical Information
Steam Temperature Controller Probe
Temperature
Probe Resistance
70_F (21_C)
35670
78_F (26_C)
29290
90_F (32_C)
22030
120_F (49_C)
11260
150_F (66_C)
6125
190_F (88_C)
2937
200_F (93_C)
2476
210_F (99_C)
2112
250_F (121_C)
1127
300_F (149_C)
567.3
350_F (177_C)
309.1
P2 Control Board Potentiometer Position
After 1/91 --- Mounted on plate with external pot
Before 1/91
Figure 27
39
Technical Information
Quenching System
SPRAY
NOZZLE
P2
175_F (80_C)
P5
CONTROLS
F3
P1
FLOAT
P3
F6
BLOWER
COOKING
COMPARTMENT
VENTURI
OPENING
FAT
FILTER
ELEMENT
ELEMENT
SPRAY NOZZLE
STEAM
GENERATOR
FILLING
SOLENOID
QUENCHING
SYSTEM
SOLENOID
P4
SPRAY ON @
100_F (38_C)
ATMOSPHERIC
DRAIN
Figure 28
P1 --- Too hot for steam cavity thermostat opens @
150_F (66_C) , closes @230_F (110_C)
P2 --- Steam production control
P3 --- Steam priority preheat, preheats boiler to
170_F (77_C), then changes state at start of
Combi or Steam mode only
40
P4 --- Quench thermostat opens @ 100_F (38_C)
P5 --- Hot air cavity thermostat 150-500_F
(66-260_C) or 200-500_F (93-260_C)
F3 --- Cavity high limit thermostat opens @ 662_F
(350_C)
F6 --- Boiler high limit opens @ 275_F (135_C)
Technical Information
Quenching System
QUENCHING SYSTEM/NEGATIVE
Steam introduced to cooking compartment condenses on food releasing it’s latent heat of condensation. This condensation from gas to liquid
causes a slight decrease in compartment pressure contributing to the negative pressure at the
Venturi Opening.
P2
175_F (80_C)
“COLD AIR
--- .02 TO --- .05 PSI
NEGATIVE PRESSURE
DUE TO
VENTURI EFFECT
P4
SPRAY ON @
100_F (38_C)
Figure 29
41
FRESH
AIR
Technical Information
Quenching System
QUENCHING SYSTEM/POSITIVE
When food is warmed condensation is reduced or
stopped. Slight positive steam pressure (.08 PSI)
builds in cooking compartment, overcoming negative Venturi pressure. P2 thermostat sensed out-
going steam above 175_F (80_C) and shuts off
steam generator. P4 thermostat senses outgoing
steam in drain about 100_F (38_C) and turns on
quenching system.
P2
175_F (80_C)
Local Limited
Pressire
+.08 PSI
Steam
Flash
P4
SPRAY ON @
100_F (38_C)
Figure 30
42
Technical Information
Timers --- Old Style
P/N R0156
P/N R0153
Note
Pin Position
Note
Pin Position
TOP VIEW
TOP VIEW
A1
15
A1
15
B1
B2
B1
B2
Note
Pin Position
8
Note
Pin Position
7
3
88860 8
88860 8
16
1B
16
1B
B3
A2
B3
A2
FRONT VIEW
FRONT VIEW
Figure 31
Figure 32
Designation:K4
Color:
Beige body, Green label
Function:
Delay on release. Dry up protector
Time:
15 seconds
Designation:K5
Color:
Beige body, Yellow label
Function:
Delay on operate
Time:
6 seconds
43
Technical Information
Timers --- Old Style
P/N R0157
P/N R0156
Note
Pin Position
TOP VIEW
TOP VIEW
A1
15
A1
15
B1
B2
B1
B2
Note
Pin Position
Note
Pin Position
2
4
88860 8
88860 8
16
1B
16
1B
B3
A2
B3
A2
FRONT VIEW
FRONT VIEW
Figure 33
Figure 34
Designation:K6
Color:
Beige body, Yellow label
Function:
Blinking
Time:
0.5 seconds
Designation:K7
Color:
Brown body, Yellow label
Function:
Delay on operate
Time:
1.0 seconds
44
Technical Information
Timers --- New Style
PN R1567 (M2U)
P/N R1568(M2C)
1A
15
B2
.6
.5
.7 .8
1A
15
M2C
.9
B2
1.0
M2U
.6
.4
.3
.2
.1
16
18
A3
A2
16
18
A3
A2
Figure 35
Figure 37
Designation:K4
Color:
White body, Blue knobs
Function:
R2506 Kit, Delay on release dry up
protector
Time:
2.5 second
Designation:K5
Color:
White body, Blue knobs
Function:
R2523 Kit, Delay on operate
Time:
0.6 seconds
P/N R1569 (2ML)
P/N R1567 (M2U)
1A
1A
15
M2L
B2
B2
15
1.0
M2U
0.5
0.5
16
18
16
18
A3
A2
A3
A2
Figure 38
Figure 36
Designation:K7
Color:
White body, Blue knobs
Function:
Delay on operate
Time:
1.0 seconds
Designation:K6
Color:
White body, Blue knobs
Function:
Blinking
Time:
0.5 seconds
45