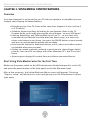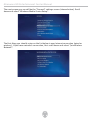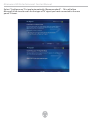
1
ALIENWARE HANGAR 18: HD ENTERTAINMENT CENTER MANUAL
The contents herein are subject to change without notice. ©1996-2007 Alienware
Corporation. All rights reserved.
Reproduction of this manual in any manner without the prior written
permission of Alienware Corporation is strictly prohibited.
Trademarks used in this manual: Alienware, Alienlce, the AlienHead logo, and
AlienAutopsy are trademarks or registered trademarks of Alienware Corporation.
Microsoft and Windows are registered trade-marks of Microsoft Corporation. Other
trademarks and trade names may be used in this manual to refer to either the entities
claiming the marks and names or their products. Alienware Corporation disclaims any
proprietary interest in trademarks and trade names other than its own.
Rev 5.1
DECEMBER 2007
Alienware HD Entertainment Center Manual
CONTENTS
Introduction, 5
Chapter 1 System Preparation and Setup, 7
Overview, 8
When your HD Entertainment Center First Arrives, 9
Items Included in your Hangar18 Packaging, 10
Some Precautions for Initial Setup, 12
Location and Positioning of Your HD Entertainment Center, 12
Connecting Your Hangar18 to Your TV, 13
Connecting Your Hangar18 1080p or Blu-ray System to Your HDTV or SDTV, 14
HDMI or DVI-to-HDMI Connection, 14
S-Video and VGA Connections, 14
Connecting Your Hangar18 720p System To Your HDTV, 15
Connecting Your Hangar18 720p System To Your Standard Definition or
Analog TV, 16
Connecting Speakers, 17
Connecting Your Hangar18 to Your 5.1 Surround Speakers or Amplifier, 17
Powering Up Your Hangar18 and Using Your TV Remote and Keyboard for the
First Time, 18
Setting Up Your TV Remote Control, 19
Connecting Your Hangar18 to Your Cable or Satellite Box, 20
Connecting One Cable or Satellite Box to Your Hangar18, 21
Connecting Two Cable or Two Satellite Boxes to Your Hangar18, 22
Connecting Your Hangar18 to a Digital Over-the-Air Antenna, 23
Getting to Know Your HD Entertainment Center, 24
Front I/O Ports and Features, 24
Rear Panel I/O Ports and Features, 26
Chapter 2 Vista Media Center Features, 29
Overview, 30
Start Using Vista Media Center for the First Time, 30
Setting Up Your Wireless Internet Connection, 33
Setting Up Your TV Signal, 33
Setting Up Your TV Guide Data, 35
Setting Up Your TV Resolution and Speakers, 36
Playing Back and Burning Regular DVDs, 37
Playing Back and Burning Blu-ray DVDs, 38
Putting Your Hangar18 Into Away Mode, 39
Setting Up Your Hangar18 and Gyration TV Remote to Control Your Cable or Satellite Box, 40
Alienware HD Entertainment Center Manual
WebGuide Application, 45
What It Does, 45
How It Works, 45
How to Set It Up, 46
What It Works With, 47
Log In from Any Internet Connected Device, 48
WebGuide on Your Mobile Device, 50
Chapter 3
System Recovery, 52
Chapter 4
Troubleshooting, 55
AlienRespawn 2.0, 53
Before Troubleshooting, 56
Things to Check Before Troubleshooting, 56
Software Diagnostics Tools, 57
Backup and general Maintenance, 57
Answers to Common Problems, 58
CD-ROM, DVD-ROM, CD-RW, DVD±RW or Blu-ray Drive, 58
Website connection is slow, 59
Keyboard, 60
The keyboard is not responding, 60
A keyboard character is repeating, 60
Spills on the Keyboard, 60
Monitor, 60
There is no display on the screen, 60
The color is not uniform, 61
Displayed text is dim, blurry, or otherwise difficult to read, 61
Mouse, 61
The mouse is not working, 61
Power, 62
When the HD Entertainment Center is turned on, nothing happens, 62
Speakers, 62
There is no sound from the speakers (external), 62
Game Controllers, 62
The HD Entertainment Center does not recognize the game controller, 62
WebGuide FAQ, 63
Appendix A General And Electrical Safety Precautions, 66
HD Entertainment Center Setup, 66
HD Entertainment Center Use, 66
When You Should Contact Alienware, 67
Replacement Components or Accessories, 67
Alienware HD Entertainment Center Manual
Appendix B Terms And Conditions Agreement, 69
Appendix C Limited Product Warranty; Disclaimer Of Warranties; And Limitation Of Liability, 71
Limited Product Warranty, 71
Obtaining Warranty Service, 71
Systems Returned to Alienware for Repair, 72
Replacing a Defective Component, 73
Return First, 73
Replace First, 73
Keep in mind, 74
30-day Money Back Guarantee, 75
Appendix D Contacting Alienware, 77
Sales, 77
Customer Service, 77
Technical Support, 78
Corporate Headquarters, 78
Appendix E
Important Information, 80
Alienware HD Entertainment Center Manual
INTRODUCTION
Dear Valued Alienware Customer,
Welcome to the Alienware family. We are thrilled to include you among the growing
number of savvy HD Entertainment Center users.
The Alienware technicians who have crafted your machine have made certain that
your Hangar18: HD Entertainment Center is properly optimized and performs to its
fullest potential. We build machines with one single unwavering purpose: Build It
As If It Were Your Own. The technicians will not rest until your new machine meets
or exceeds our very demanding criteria!
We have tested your machine extensively in order to ensure that you enjoy the
highest levels of performance. In addition to a standard burn-in period, your
system has been evaluated using real-world tools such as synthetic performance
benchmarks.
We invite you to share your experience with your new HD Entertainment Center
with us, so please do not hesitate to either e-mail or call Alienware with any
questions or concerns. The entire staff shares your enthusiasm for new technology
and we hope that you enjoy using your new HD Entertainment Center as much as
Alienware enjoyed building it for you.
Sincerely,
Alienware Staff
Alienware HD Entertainment Center Manual
Alienware HD Entertainment Center Manual
CHAPTER 1: SYSTEM PREPARATION AND SETUP
Alienware HD Entertainment Center Manual
CHAPTER 1: SYSTEM PREPARATION AND SETUP
Overview
Congratulations on the purchase of your Alienware Hangar18: HD Entertainment
Center! The Alienware HD Entertainment Center is the best Media Center solution
available for the living room environment.
From the comfort of your couch you can enjoy all your digital content (TV recordings,
movies, pictures and music) on your main living room HDTV. The HD Entertainment
Center enhances your digital entertainment in your living room by combining all of the
following components into one box:
• High-Definition Digital Video Recorder (DVR) for recording and playing back your
HD content
• Up to 4 TV tuners (two analog and two HD/digital TV tuners):
1. Base platform – (1 analog and 1 digital tuner) allows you to record 1 analog
and 1 digital/High Definition Over-the-Air (OTA) channel at the same time.
2. Optional platform – (2 analog and 2 digital tuners) allows you to record 2
analog and 2 digital/High Definition Over-the-Air (OTA) channels at the same
time.
• Digital amplifier for 5.1 speakers and subwoofer (5 channels- each delivering
200W at peak power)
• Wireless 802.11 b/g
• Gigabit Ethernet connection for downloading movies and other content
from the internet
• AMD Live!TM software applications running with Microsoft Vista OS
• Slim slot loading DVD/CD player/burner
• Bluetooth receiver for use with Bluetooth devices such as keyboards, TV remotes
and headphones
• Accessing your Hangar18 content from any internet connected device.
Chapter 1 explains how to connect your Hangar18 to your:
• TV
• speakers
• amplifier/ receiver
• digital antenna
• cable/satellite box
• TV remote control and wireless keyboard that was included with your Hangar18
Alienware HD Entertainment Center Manual
Chapter 2 guides you through the features of Windows Vista Media Center and how to
setup the following:
• Wireless Internet connection
• TV signal (Over-the-Air, cable, satellite, digital and analog)
• Speakers
• Optimizing your TV or monitor display for the maximum resolution supported by both your Hangar18 and TV (720p or 1080p)
• Setting up your WebGuide application to access and control your Hangar18 from any internet connection.
Chapter 3 explains system recovery.
Chapter 4 explains system troubleshooting.
When Your HD Entertainment Center First Arrives
Before setting up your HD Entertainment Center or components, please inspect all
items for any physical damage that may have occurred during shipment. Report any
damaged items to customer service within 5 days of receiving the shipment. Shipping
damage reported after the first 5 days of receiving the shipment will not be honored.
Alienware HD Entertainment Center Manual
Items Included with your Hangar18 Packaging
The standard components that should be included in your packaging are:
• Gyration RF Wireless Keyboard
• Gyration RF Universal TV remote
• Gyration RF transceiver dongle
• Cables:
S/PDIF Coaxial for connecting your Hangar18 to your amplifier.
S/PDIF Optical (Toslink) for connecting your Hangar18 to your amplifier.
Component (YPrPb) – Red, Green, Blue cables
for supporting SDTVs and HDTVs.
S-Video cable that sends analog video.
HDMI - cable that sends both HD video and digital audio
to your HDTV, supporting up to 1080p.
Composite – red, white, and yellow cables for sending analog
audio and video into your Hangar18.
10
Alienware HD Entertainment Center Manual
Ethernet – for wired connection to Internet or router.
2 IR Blaster cables – for sending IR commands
(such as channel change, and volume up/down to your cable
box or satellite box.)
If you ordered the 1080p or Blu-Ray Hangar18, the DVI-HDMI
adapter should also be included.
• Black Leather binder contains:
User’s Manual
Alien ReSpawn 2.0 system recovery CD
Gyration Universal TV remote and keyboard manual - detailed instructions on how to program your remote to control numerous audio/video devices.
AMD Live! CD - includes applications that you can install to enhance your Media Center experience.
11
Alienware HD Entertainment Center Manual
Some Precautions for Initial Setup
Do not place the HD Entertainment Center near or over a radiator or
heating vent. If all or parts of your HD Entertainment Center are placed
in a cabinet, ensure that adequate ventilation is provided. Do not
place the HD Entertainment Center in a humid location or in any area
the HD Entertainment Center may be exposed to rain or water. Be
careful not to spill liquid of any kind on or into the HD Entertainment
Center.
Do not block the ventilation holes on both the top panel and side
panels of your HD Entertainment Center, or overheating may occur.
Your HD Entertainment Center was designed to operate in an upright
position. Never power on or operate the system when not in an upright
position.
To avoid the risk of electrical shock, do not remove the top panel of your
HD Entertainment Center.
Location and Positioning of Your HD Entertainment Center
When positioning your HD Entertainment Center, be sure that:
• It is placed on an surface that is both level and stable
• Power and other cable connectors are not jammed between the HD Entertainment Center and a wall – or any other object
• Nothing obstructs airflow in front of, on side of, behind, or below the
HD Entertainment Center
12
Alienware HD Entertainment Center Manual
Connecting Your Hangar18 to Your TV
The TV connection options for your Hangar18 depend on which Hangar18 model
you ordered (1080p/Blu-ray, or the 720p model) and what type of TV you have (High
Definition or Standard Definition). Both Hangar18 models and both TV types are
explained next.
13
Alienware HD Entertainment Center Manual
Connecting Your Hangar18 1080p or Blu-ray System to Your HDTV or SDTV
HDMI or DVI-to-HDMI Connection
For the optimal Home Entertainment experience, Alienware recommends connecting
the Hangar18 1080p or Blu-ray model with an HDMI or DVI cable to a 16:9 HDTV that
supports High Bandwidth Digital Content Protection (HDCP). If your HDTV or monitor
does not support HDCP, you will not be able to view encrypted HD video through the
HDMI or DVI connections.
A DVI-HDMI dongle (shown in the diagram below) should be included in your
packaging. The HDMI cable is recommended because the HD video and digital audio
is sent over the same HDMI cable. Using the DVI cable requires you to use the built-in
amplifier or S/PDIF connector to supply the audio.
S-Video and VGA Connections
Use the S-Video or VGA output on the Hangar18 1080p graphics card (shown in the
diagram below) to provide Standard Definition video to your TV. To supply the audio,
you will need to use either the built-in amplifier or S/PDIF digital audio (similarly as if
you were using the DVI connection for your video).
DVI to HDMI adapter
HDTV must be HDCP compliant
1080p HD Connection and Blu-ray Disc™
NOTE: The video outputs shaded below (HDMI,
VGA and Component) will not be functional if
your system has the HDMI 1080p graphics card
installed.
14
Alienware HD Entertainment Center Manual
Connecting Your Hangar18 720p System To Your HDTV
If you purchased a 720p Hangar18 system, use either the HDMI, Component or VGA
cables shown below. The HDMI cable is recommended because the HD video and
digital audio are sent on the same cable. When using the Component or VGA cables
you need to use either the built-in amplifier or S/PDIF digital audio ports to provide
the audio to your HDTV.
HDTV must be HDCP compliant
COMPONENT
720p HD Connection
15
Alienware HD Entertainment Center Manual
Connecting Your Hangar18 720p System To Your Standard Definition or
Analog TV
You can use your Component or VGA connectors (shown below) to connect your
Hangar18 to your SDTV, analog TV, or monitor. With both of these video connectors you
need to use either the built-in amplifier or S/PDIF digital audio ports to provide the
audio.
COMPONENT
16
Alienware HD Entertainment Center Manual
Connecting Speakers
Connecting Your Hangar18 to Your 5.1 Surround Speakers or Amplifier
You can connect your HD Entertainment Center directly to your speakers using the
built-in amplifier, or to your own amplifier with the S/PDIF digital out.
On the built-in amplifier each connector is labeled with one of the following, “FL, FR, C,
RL, RR”. There is also a SUB connector for connecting your subwoofer.
5.1 Surround Sound speakers
(FL) Front Left
(FR) Front Right
(RL) Rear Left
(RR) Rear Right
(C) Center
FL
SUBWOOFER
Connection
FR
RL
FL FR
RR
C
RL
C
RR
SUB
S/PDIF
OUT
17
Alienware HD Entertainment Center Manual
Powering Up Your Hangar18 and Using Your TV Remote and Keyboard
for the First Time
Make sure the power cord is securely plugged into the Hangar18 rear panel and the
Power Switch is set to the ON position as shown below. Then press the POWER button
on the front panel of the Hangar18.
Insert the dongle that came with your Hangar18 into one of the rear USB ports, then
synch your Gyration TV remote control and keyboard to the Hangar18 as shown below.
Press the POWER button
ON
OFF
CONNECT
Press the CONNECT button on
the USB receiver, then press the
CONNECT button on the TV remote
and keyboard to synch them together.
18
Alienware HD Entertainment Center Manual
Setting Up Your TV Remote Control
The Gyration TV remote control that comes standard with your HD Entertainment Center
is a universal remote that will control your HD Entertainment Center, TV, and Cable/
Satellite set top box (if you have them connected to your HD Entertainment Center).
The Gyration remote sends both RF and IR commands. RF is used to control your Vista
Media Center features, and IR is used to control your other devices (including TV and
Cable/Satellite set tops).
Note: IR Blaster cables must be used to send the IR commands from the rear panel of
the HD Entertainment Center to your cable or satellite boxes. Refer to the next section
for details on how to connect the IR blaster cables.
For the RF commands to work, you must plug in the USB RF transceiver that came with
your system. For more information please refer to the Gyration User Manual that came
with your system inside the black leather binder.
This remote also has a special feature that allows you to control a mouse-like cursor
on your TV screen. This feature allows you to navigate any screen that would typically
require a keyboard or mouse to enter information. Now you are free to sit back on your
couch with a TV remote, instead of using a keyboard and mouse.
Gyration mouse pointer:
• press and hold the
center, and move your hand
to move the mouse cursor
on your TV screen
• Release the center
button to “park” the cursor
where you want it
• Right and left buttons
function like standard
mouse buttons
• Refer to the manual
that came with the
remote for more detailed
instructions
Green button displays
Media Center main menu
For more detailed information on how to program and use the Gyration TV remote and
keyboard, refer to the Gyration instructions inside the black leather binder.
19
Alienware HD Entertainment Center Manual
Connecting Your Hangar18 to Your Cable or Satellite Box
You can setup your Hangar18 to control and access your Standard Definition content
on your cable or satellite set-top box. You will be able to control your cable or satellite
box with your Hangar18 Gyration remote control if you setup the connections as shown
in the next section.
Chapter 2 explains how to use the Vista Media Center “Set Up TV Signal” wizard to
enable your Hangar18 TV remote to control your cable or satellite box.
You can connect up to 2 cable or 2 satellite boxes to your Hangar18 (not one of each).
However, if you have the Hangar18 1080p or Blu-ray model, then you can only connect
one cable or one satellite box.
20
Alienware HD Entertainment Center Manual
Connecting One Cable or Satellite Box to Your Hangar18
Connect your cable or satellite composite output cables (red, white, yellow) to the
matching red, white, yellow inputs on the Hangar18 rear panel.
Or, instead you can connect your cable or satellite COAX output to the COAX TV input
on the Hangar18 TV tuner card. The COAX cable is convenient because its only one
cable.
Connect the IR Blaster cable to the port on the Hangar18 rear panel, and attach the
bulb end (has adhesive on it) to the area on your cable or satellite box where the IR
receiver is located. The IR Blaster cable will send the remote commands from your
Gyration TV remote (or keyboard) to the cable/satellite box.
TV IN
COAX input
inputs
IR Blaster Cable
outputs
COAX out
Front panel
Area on your
satellite or cable
box that receives IR
commands.
21
Alienware HD Entertainment Center Manual
Connecting Two Cable or Two Satellite Boxes to Your Hangar18
In order to connect 2 cable set-tops or 2 satellite set-tops to your Hangar18, you must
have the 720p Hangar18 model with the below dual TV tuner configuration. You can
use the composite (red, white, yellow) cables, or the COAX cable for the first set-top
connection. But when connecting the second box to your Hangar18 you must use the
COAX input on the top TV tuner as shown below.
TV IN
COAX input 2
COAX input 1
inputs
IR Blaster Cables
outputs
COAX
output 1
Back panel 1
COAX
output 2
Back panel 2
Front panel 1
Front panel 2
Area on your
satellite or cable
box that receives IR
commands.
22
Alienware HD Entertainment Center Manual
Connecting Your Hangar18 to a Digital Over-the-Air Antenna
You can connect your Hangar18 to an Indoor/Outdoor digital antenna as shown below.
Antenna Input
“ANT IN”
23
Alienware HD Entertainment Center Manual
Getting to Know Your HD Entertainment Center
Pre
vio
Bac us / N
k
Pla Butt ext
y/F on
Rec WD/
ord RW
Bu D/S
Vol
um tton top
eK
nob
This section provides a description of all your Hangar18 inputs and outputs.
Front I/O Ports and Features
Power
USB 2.0
Disc
Eject
DVD/CD
Slot
Headphone
Jack
Microphone
Jack
Fire
Wir
e (I
EEE
S-V
139
i
Aud deo
4)
Inp
io i
npu ut
Aud
Po
t
io i
npu Port ( rt
Lef
t Po
t)
rt (
Rig
ht)
Digital Camera
Memory Card
NOTE: You cannot simultaneously tune two audio/video streams by connecting a
device to both the front panel and rear panel analog a/v inputs. Only one of these
inputs can be tuned to capture analog content coming from an external device (such
as a camcorder or set-top box.)
24
Alienware HD Entertainment Center Manual
Power Button
Press the power button once to turn on your HD Entertainment Center. The Alienware
Head button will illuminate, indicating the system is powered on. Make sure that the
power supply switch on the rear panel of your system is in the ON position.
Push this
side down
I
Note: Image below is located on the rear panel.
0
Disc Eject Button
Press the Eject button once to release DVD’s or CD’s from your HD Entertainment
Center unit.
Previous/Next Knob
Turn knob to scroll to the previous or next selection in your Vista Media Center screens.
Back Button
Press the Back button to navigate back one screen within the Vista Media Center screens.
Playback Button (Play/Forward/Rewind/Stop)
Press the Playback button to control the playback of your currently playing digital
content (ie., the current music track, picture in a slide show, or movie scene).
Record Button
Press the Record button to start recording the TV show you are currently watching.
FireWire (IEEE 1394)
Connect high-speed FireWire (also known as IEEE1394) devices such as digital
camcorders and external hard disk drives, to view the content on your tv.
Microphone Jack
Connect audio devices such as a stereo microphone, MP3 player, or any other audio
source using a 1/8” mini-jack.
Headphone Jack
Connect stereo headphones or other audio device using a 1/8” mini-jack.
USB 2.0
Connect high-speed USB 2.0 devices such as digital cameras, portable flash drives,
MP3 players, and game controllers.
25
Alienware HD Entertainment Center Manual
I
1
2
3 4 5
S-V
ide
o
Ant
e
TV nna I
Inp npu
ut
t
Rear Panel I/O Ports and Features
6
7
8 9
0
10 11
12
13 14 15 16 17
18
19
20 21
SUB (1)
Subwoofer port.
Digital Amplifier (2)
Connect your 5.1 speaker wires directly to this built-in amplifier.
1394 (3)
Connect your high-speed FireWire devices.
Ethernet (4)
Wired connection to the internet.
S/PDIF Output- (Orange RCA plug) (5)
Digital audio output for connecting your stereo components.
Analog Audio Input (6)
1/8 inch plug for analog audio input.
S-Video Input (7)
Input for S-Video feed.
Antenna Input (8)
Port labeled “ANT IN” for connecting your antenna.
26
Optional second
TV tuner, supports
duplicate of features
6, 7, 8, and 9
Alienware HD Entertainment Center Manual
TV Input (9)
TV tuner input labeled “TV IN” for connecting your cable or satellite box.
Power Supply Switch (10)
Push this
side down
I
Make sure the power supply switch is in the ON position before powering on your
Hangar18: HD Entertainment Center.
0
Power Socket (11)
Plug the power cord into the power cord socket and plug the other end into a grounded
power outlet, a grounded power strip or an (UPS) uniterruptible power supply.
Component Output (12)
For connecting your component cables (Y=Green, Pb=Blue, Pr=Red) inputs on your TV.
VGA Output (13)
For connecting your PC or TV monitor.
HDMI Output (14)
Plug the HDMI cord into the HDMI socket for connection to your HDTV (digital video and
audio into one convenient cable).
NOTE: If your HDTV only has a DVI input, you can use an HDMI-to-DVI converter cable.
In this case, you would need to use the S/PDIF or amplifier audio outputs to supply the
sound.
USB 2.0 Ports (15)
Four USB ports for connecting external USB devices. Use one of the these ports for
connecting your USB RF transceiver for receiving commands from you TV remote control.
27
Alienware HD Entertainment Center Manual
S/PDIF Output (Toslink) (16)
Digital audio output for connecting your stereo components.
L/R Analog Audio Inputs (17)
Left and right analog audio inputs.
IR Blaster Ports (18)
Connect IR cables to control other devices like your VCR, Cable or Satellite set top.
Analog A/V Inputs (19)
Connect RCA cables to support inputting external devices like your VCR, Cable or Satellite
set top.
S-Video Input (20)
Input for S-Video feed.
S/PDIF Digital Audio Inputs (21)
Both RCA and Toslink inputs.
28
Alienware HD Entertainment Center Manual
CHAPTER 2: Vista Media Center Features
29
Alienware HD Entertainment Center Manual
CHAPTER 2: Vista Media Center Features
Overview
Once your Hangar18 is connected to your TV and your speakers (or amplifier) you are
ready to start enjoying the below features:
• Recording up to 4 live TV shows at the same time (depends if your unit has 2
or 4 TV tuners)
• Schedule future recordings by looking for your favorite shows in the TV
Program Guide, and simply pressing the record button…no more VCR tapes!
• Pausing, Rewinding, and Catching Back Up to Live TV – so you don’t miss
a moment of your favorite live show when the phone rings, or a mini-crisis
arises some where in your home. Just press the PAUSE button on your remote,
and you can resume watching when you are ready.
• Accessing the internet to download movies, music, videos and other content
on-demand when ever you want.
• Setting up a wired or wireless network in your home to share all your digital
pictures, music and TV recordings with other Alienware PC’s and TVs in your
home.
• Accessing your Hangar18 content from any internet connected device.
Start Using Vista Media Center for the First Time
Make sure the power switch on the HD Entertainment Center back panel is set to ON,
and press the power button on the front panel next to the Alienware head.
After a few moments, the below Welcome Menu screen will appear. Choosing
“Express setup” will allow you to start configuring your HD Entertainment Center
right away.
30
Alienware HD Entertainment Center Manual
The Vista on-screen menus will walk you through setting up your Internet connection,
TV signal, TV resolution and making sure that your speakers are working properly.
From the above main menu, scroll down and select the Tasks/Settings option (shown
below):
Select “General” on the screen below.
31
Alienware HD Entertainment Center Manual
The next screen you see will be the “General” settings screen (shown below). Scroll
down and select “Windows Media Center Setup”.
The first thing you should setup on the list below is your Internet connection (wired or
wireless). If you have a wireless connection, first scroll down and select “Join Wireless
Network”.
32
Alienware HD Entertainment Center Manual
Setting Up Your Wireless Internet Connection
Your Hangar18 has built-in wireless 802.11 b/g, so its very easy to get your Hangar18
connected to your in-home wireless network. 802.11 N is supported if you have a
USB enabled 802.11 N adapter. When you select “Join Wireless Network” the below
screen is displayed. Just follow the on-screen instructions to auto-detect the wireless
connection in your home.
Setting Up Your TV Signal
Select “Set Up Your TV Signal” from the Vista menu below to setup reception of TV
signals coming from your cable/satellite set-top box or your digital antenna.
33
Alienware HD Entertainment Center Manual
Select “Configure my TV signal automatically (Recommended)”. This will allow
Microsoft Vista to auto-scan for the type of TV signal you have connected to the rear
panel TV tuner.
34
Alienware HD Entertainment Center Manual
Setting Up Your TV Guide Data
All TV guide program data is downloaded for free with your internet connection.
Microsoft Vista populates all the TV Guide data for you with real-time updates as long
as you keep your Hangar18 turned on with internet connectivity.
When you finish setting up your TV signal by either using your cable/satellite set-top or
Over-The-Air (OTA) antenna as a TV source, you will see the above screen. Select “Set
Up Guide Listings.”
After selecting “Next” on the screen below, follow the on-screen instructions to
download the TV listings for your signal source and zip code.
35
Alienware HD Entertainment Center Manual
Setting Up Your TV Resolution and Speakers
From the main Windows Media Center Setup screen below, you can easily setup your
speakers and configure your TV or monitor. Just follow the on-screen instructions for
each feature.
When setting up your speakers and you want to use the S/PDIF or amplifier output,
make sure to select one of the digital connection types on the screen below.
36
Alienware HD Entertainment Center Manual
Playing Back and Burning Regular DVDs
You can playback your DVDs from the Vista Media Center menu by selecting the “play
dvd” option shown below.
You can also burn your Standard Definition or analog TV recordings to DVD by
selecting your recording, and then selecting the “Burn” option. NOTE: You cannot
burn DVDs of TV shows that are copy protected. Vista will display an error message if
you try to do this.
37
Alienware HD Entertainment Center Manual
Playing Back and Burning Blu-ray DVDs
If your Hangar18 supports Blu-ray, you can playback your Blu-ray DVDs from the Vista
Media Center menu by selecting the “Play Movie” option shown below.
To burn Blu-ray DVDs you must launch the Nero Blu-ray burning application from the
START menu on the desktop. To launch the Nero Blu-ray DVD burning application
from your desktop go to, Start / All Programs / Nero 7 Essentials / Nero SmartStart
Essentials. The following screen will be displayed.
38
Alienware HD Entertainment Center Manual
Putting Your Hangar18 Into Away Mode
Alienware recommends that you keep the Hangar18 unit ON and connected to the
internet at all times. This ensures that your Hangar18 receives TV program guide
updates, can communicate with other PC devices in your home at any time, and
scheduled TV recordings will occur when you are away from your TV. However, the unit
can be put into “Away” mode where it appears to be turned off, where the front panel
LED lights will be turned off, but the unit is still fully operational to support all these
features.
To put the Hangar18 into Away Mode, simply press the TV remote control POWER
button while in Vista PC mode, or simply press the front panel POWER button on the
Hangar18. The front panel lights will turn OFF, however the unit will still record your
scheduled recordings while your TV is off and you are away.
39
Alienware HD Entertainment Center Manual
Setting Up Your Hangar18 and Gyration TV Remote to Control Your
Cable or Satellite Box
Once your Hangar18 is properly connected to your cable or satellite box, you can
access all your standard definition content on your cable or satellite box with your
Hangar18 and the Gyration TV remote control. The Vista Media Center “Set Up TV
Signal” wizard walks you through the process of enabling your Hangar18 TV remote to
control your cable or satellite box.
Here is how to get started….
Select “Set Up TV Signal” from the Vista MCE Main Menu:
The following screen will be displayed. Select “Configure my TV signal automatically.”
40
Alienware HD Entertainment Center Manual
From this point, just follow the on-screen instructions.
The below screen indicates that Vista found one TV tuner (signal) coming from either
the cable or satellite receiver (set-top box) that you connected via the composite or
Coaxial cable. In all the following screens, the phrase “set-top box” refers to either
your cable receiver or your satellite receiver, whichever one you have connected.
41
Alienware HD Entertainment Center Manual
The following four screens will enable the Hangar18 to learn the IR remote commands
coming from your cable or satellite remote so that the Gyration remote can use them.
Select “Yes” on the screen below to begin the learning process.
42
Alienware HD Entertainment Center Manual
In the below screen, the last sentence “Please pick up your Media Center remote.”
is referring to your Gyration Universal TV remote. Make sure the Gyration remote is in
“PC” mode. You can confirm the remote is in PC mode by pressing any remote button.
If the “PC” button on the top of the remote lights up, then you are is PC mode. If not,
then press and hold the PC button for one second, now you should be in PC mode.
Now you are ready to begin programming your Gyration TV remote so that it can control
the cable or satellite set-top box.
The below screen is asking what is the highest number of digits in your cable or
satellite channel line-up.
43
Alienware HD Entertainment Center Manual
The below screen allows you to test channel change performance.
When you have successfully completed the setup, the below screen will be displayed.
44
Alienware HD Entertainment Center Manual
WebGuide Application
What It Does
WebGuide allows you to remotely view live and recorded TV programs and to remotely
schedule and manage your recorded television programs, music, pictures and videos
on your Hangar 18. WebGuide allows you to access your Hangar18 from any machine
that has a web browser and an internet connection, including your cell phone or
mobile device.
How It Works
The WebGuide install takes only minutes and can be installed on any Windows
Vista or XP based computer. WebGuide utilizes a very easy to use Media Center
interface, giving you an almost seamless transition from your Media Center computer
to WebGuide’s user interface. Unlike other Media Center applications, WebGuide’s
interface has a small learning curve allowing you to install and start using it with little
instructions. Once you’ve installed WebGuide you can begin to watch live, stream,
view photos, manage your media center, or schedule recordings remotely from any
computer or mobile device with a web browser and an internet connection.
WebGuide can also be installed as a Windows Vista Sidebar Gadget, if you want to.
45
Alienware HD Entertainment Center Manual
How to Set It Up
The WebGuide application has been pre-installed on your Hangar18. Launch the
WebGuide application from the Windows Start menu on the desktop. Once you launch
the WebGuide application, you will see the below screen.
Select the Configuration tab to setup your users. The screen below shows how you
can create multiple users that will be able to log into the Hangar18 remotely with an
internet connection. You can assign each user different access and management
rights with the check boxes shown below.
46
Alienware HD Entertainment Center Manual
Once you select “Save Settings” at the bottom of the above screen, the WebGuide
application will automatically assign you a unique URL for accessing the Hangar18
content from an internal (in home) and external internet connection. Click on the
“Network Address” tab to display the below screen with the URLs you can use to log
into your Hangar18 remotely from any internet connected device.
What It Works With
With WebGuide installed on your Hangar18 you can access and view all your Media
Center content from any other computer or mobile device with a web browser and an
internet connection.
47
Alienware HD Entertainment Center Manual
Log In from Any Internet Connected Device
The below screen is displayed when you go to the URL that WebGuide assigned for
your Hangar18. Login using the User ID and Password that you created earlier.
Now you are in control of your Hangar18. The below screen is the Main Menu:
48
Alienware HD Entertainment Center Manual
Below is the WebGuide Scheduling Interface. From here you can schedule new TV
recordings.
Below is the interface to your pictures stored on your Hangar18.
49
Alienware HD Entertainment Center Manual
WebGuide on Your Mobile Device
50
Alienware HD Entertainment Center Manual
51
Alienware HD Entertainment Center Manual
CHAPTER 3: SYSTEM RECOVERY
52
Alienware HD Entertainment Center Manual
CHAPTER 3: SYSTEM RECOVERY
AlienRespawn 2.0
AlienRespawn 2.0 makes it very easy to restore your HD Entertainment Center to its
original state.
1. Remove any CD/DVD media and/or floppy disks from your optical and
floppy drives.
2. Power on your HD Entertainment Center. (If the system is currently in
Windows, restart.)
3. When your HD Entertainment Center boots, it will display a prompt on the
screen for five (5) seconds prior to loading Windows. While this prompt is
on the screen, press [F10].
4. Your HD Entertainment Center will now boot into the AlienRespawn 2.0
environment. If this is the first time you have run AlienRespawn 2.0,
you must accept the license agreement before proceeding.
53
Alienware HD Entertainment Center Manual
54
Alienware HD Entertainment Center Manual
CHAPTER 4: TROUBLESHOOTING
55
Alienware HD Entertainment Center Manual
CHAPTER 4: TROUBLESHOOTING
Before Troubleshooting
When troubleshooting your HD Entertainment Center, please remember the following
safety guidelines:
• Turn off your HD Entertainment Center and any connected peripherals.
• Disconnect any peripherals from your HD Entertainment Center.
• Never attempt to open a monitor’s enclosure. Monitors contain enough power, even unplugged, to cause severe injury and even death.
Things to check before troubleshooting:
• Ensure that the power cord is properly connected between your HD
Entertainment Center and a grounded, three-prong power outlet. Make sure that
the power outlet is working.
• Make sure the UPS or power strip is turned on (if applicable).
• If your peripheral devices (e.g. keyboard, mouse, printer, etc.) are not working, ensure that all connections are secure.
• If any HD Entertainment Center components were added or removed before
the problem began, check to see if you performed the installation procedures properly.
• If an error message appears on the screen, please write down the exact error message prior to calling Alienware Technical Support to aid in diagnosing and resolving your issue.
• If an error occurs in a specific program, refer to the program’s documentation.
56
Alienware HD Entertainment Center Manual
Software Diagnostic Tools
Backup and general Maintenance
• Always backup your important data and keep copies of your operating system and software safe. Don’t forget to note the Serial numbers if you are storing them outside of their original cases - e.g. in a CD Wallet.
• Run maintenance programs as often as you can. You may schedule these programs to run at times when you are not using your HD Entertainment
Center. You can use those provided with your OS, or buy more powerful,
dedicated programs to do so.
• Write down your passwords and keep them safe (away from your HD
Entertainment Center). This is especially important if you choose to passwordprotect your system’s BIOS and operating system.
• Document vital settings such as network, dialup, mail, and internet settings.
57
Alienware HD Entertainment Center Manual
Answers to Common Problems
CD-ROM, DVD-ROM, CD-RW, DVD±RW or Blu-ray Drive
The HD Entertainment Center does not recognize the disc or drive:
• Check to see if the disc is properly inserted into the drive with the label facing up.
• Try another disc.
• Shut down and restart the HD Entertainment Center.
• Clean the disc.
• Restart the HD Entertainment Center and enter the BIOS setup utility
by pressing and holding the Delete or F2 key (key may vary) as the HD
Entertainment Center restarts. Check the BIOS to ensure that the IDE
controllers are enabled.
• Check the drive configuration to make sure it is properly configured; refer to any documentation that may be included with your drive.
An audio CD does not produce sound:
• Check to see if the audio CD is properly inserted into the drive with the label facing up.
• Check the volume controls to ensure they are turned up.
• Make sure that the mute control is not checked.
• Shut down and restart your HD Entertainment Center.
• Clean the CD.
58
Alienware HD Entertainment Center Manual
A DVD or Blu-ray movie does not play:
• Check to see if the disc is properly inserted into the drive with the label facing up.
• Shut down and restart your HD Entertainment Center.
• Clean the Disc.
• Try another disc. Some discs may have conflict with the drive if the encoding on the DVD or Blu-ray disc does not match the encoding recognized by the drive.
Cannot browse the Internet / Error: “Unable to locate host”:
• Check that you are connected to the Internet.
• Check that the web address typed into the address bar is correct and for a valid site. Try a different web address, or URL.
• If the error message still appears, disconnect from the ISP and close the browser. Reconnect and open the browser.
• If the error message still appears, your ISP may be experiencing technical difficulties.
Website connection is slow
Internet performance can be affected by the following factors:
• The condition of the telephone or network cables being used.
• The condition of the network equipment at your ISP.
• The graphics or multimedia on web pages.
• Multiple browsers, downloads, or programs open on your HD
Entertainment Center.
59
Alienware HD Entertainment Center Manual
Keyboard
The keyboard is not responding:
• Check that the keyboard or USB RF transceiver is properly plugged into the
back of your HD Entertainment Center.
• Clean the keyboard by using an aerosol can of compressed air with the proper extension to remove dust and lint trapped under the keys.
• If you have another keyboard that you know works, try it with the HD
Entertainment Center to make sure that the keyboard USB port works.
A keyboard character is repeating:
• Make sure that there is nothing resting on any of the keys.
• Check that no key on the keyboard is stuck. Press each key to loosen any keys that may be stuck and then restart your HD Entertainment Center.
Spills on the Keyboard:
If liquid of any kind is spilled on the keyboard, turn off the HD Entertainment Center
and unplug the keyboard. Clean the keyboard using the appropriate cleaning materials
and turn it upside down to drain it. Once the keyboard has dried, connect it to the HD
Entertainment Center. If the keyboard does not work, it needs to be replaced.
Keyboards damaged due to spills are not covered under warranty.
Monitor
There is no display on the screen:
• Check that the monitor cables are properly connected to the monitor, the HD Entertainment Center and the UPS, power strip or wall outlet. If the
monitor is receiving power, the LED should be lit.
• Check the port and the monitor cable for bent or damaged pins.
• Adjust the brightness and contrast controls to the center position.
• Reinstall the device driver if applicable.
60
Alienware HD Entertainment Center Manual
• Shut down your HD Entertainment Center and unplug the power cord, modem
cable (if applicable) and monitor cable.
• Reattach the power cord, modem cable (if applicable) and monitor cable. Restart your HD Entertainment Center.
• If there is still no picture on the display, try another monitor that you know works (if applicable).
The color is not uniform:
• Check that no speakers are placed too close to the monitor. If any speakers are placed too close to the monitor, move them at least 6 inches away from the monitor.
• Check that the monitor is not too close to another monitor, electric fan, fluorescent light, metal shelf, or laser printer.
Displayed text is dim, blurry, or otherwise difficult to read:
• Adjust the brightness and contrast controls.
• Change display settings.
• Move the monitor away from devices that may be causing electrical interference such as televisions, unshielded speakers, fluorescent lights and metal shelves.
Mouse
The mouse is not working:
• Check that the mouse cable is properly plugged into the USB port on the back
of your HD Entertainment Center.
• Check that the mouse cable is not damaged or there are no bent or broken pins. If the mouse cable is damaged, or there are bent or broken pins, the mouse will most likely need to be replaced.
• Restart your HD Entertainment Center.
• Try a mouse that you know works in the same port, to ensure that the mouse port is working.
• Reinstall the device driver.
61
Alienware HD Entertainment Center Manual
Power
When the HD Entertainment Center is turned on, nothing happens:
• If the HD Entertainment Center is plugged into a surge protector or UPS, make
sure that the surge protector or UPS is securely connected to an electrical
outlet, is switched on and working correctly.
• Check that the wall outlet is working properly by testing another device such as a radio or lamp that you know works. If the wall outlet is not working, please contact an electrician or your power company for further assistance.
• Check that all devices on the HD Entertainment Center are properly connected
to your HD Entertainment Center and that the HD Entertainment Center is
properly connected to the surge protector or UPS.
Speakers
There is no sound from the speakers (external):
• Check that you selected the appropriate speaker connection type in Vista Media Center (refer to page 34)
• Check the cables of the speakers and make sure they are properly connected to the appropriate jacks on the back of the HD Entertainment Center.
• Check that the speakers are on and receiving power.
• Check that the volume settings in Windows are turned on and adjusted to a medium level setting. Make sure that all mute controls are off.
• If possible, test another set of speakers on your HD Entertainment Center to
ensure that the audio is working.
• For further troubleshooting, refer to the speaker User Manual.
Game Controllers
The HD Entertainment Center does not recognize the game controller:
• Check that the cable connecting the game controller to the HD Entertainment
Center is not damaged and that it is properly connected.
• Reinstall the device driver for the game controller.
62
Alienware HD Entertainment Center Manual
WebGuide FAQ
Q. The WebGuide configuration tool is stalling during configuration of the UPnP router
settings. How do I fix this?
A. If your router supports UPnP, WebGuide will try to configure it automatically.
However, WebGuide may have issues with some routers and freeze during installation.
If this happens, clear the check-box on the “Network” tab labeled “Create ‘port
forwarding’ rule on your router.” You will then need to manually configure port
forwarding on your router.
More information on setting up routers and configuring port-forwarding can be found
at the following sites:
- http://www.portforward.com
- http://lifehacker.com
Microsoft has a useful tool to test your router:
http://www.microsoft.com/windows/using/tools/igd
Q. Do I need to have Microsoft IIS (Windows XP’s and Vista’s built-in web server)
installed to run WebGuide4?
A. No. WebGuide no longer requires IIS to operate. It now relies on a lightweight webserver called “Ultidev Cassini.”
If you choose to use IIS, WebGuide should still work, however, testing under this
configuration is limited. To run under IIS simply map a new virtual directory to your
installed WebGuide4 location.
Q. Why can’t I see my music album art or other media that is stored on a network
drive?
A. WebGuide runs under a user account that may not have access to that location. To
fix this, edit the “web.config” file in the WebGuide install directory and change the
entry near the top labeled “impersonation.” Change the “enable” setting to “true”
and set the username and password settings to a user who has access to the media
location (normally yourself).
63
Alienware HD Entertainment Center Manual
If you still have problems accessing the media, you can change the Cassini service
to run under a user who has access to the location. To do this, right-click on “My
Computer,” click “Manage” and find the “Ultidev Cassini” service in the service panel.
By editing the properties for this service, you can change the service login account.
Q. I’m using Internet Explorer 6 and I see many white areas that are hard to read. How
do I fix this?
A. Internet Explorer 6 does not support alpha-blended PNG files*, which WebGuide
uses extensively. WebGuide was designed for Internet Explorer 7, Mozilla 1.5 or 2.0
and Opera. IE7 is now available for download from the Microsoft site. If you want to
continue using IE6 with WebGuide, you can download the IE6 image pack from the
download page. This will replace several images and make it easier to read the white
text.
* IE6 can support alpha PNGs, but only by using special transparency filters that may
cause other visual issues.
Q. I am viewing WebGuide in a non-English language. Why do I still see some elements
in English?
A. WebGuide has been translated into many languages by beta-testers. However,
during the development process, new text-strings have been added that may not
have been translated yet. You can edit these strings yourself, if desired, using the
Configuration tool on the “Localization” tab. If you update a language, or translate
WebGuide to a new one, please submit it to us, and we will include it in the next
update.
Q. What do I do if I receive an error message when attempting to view the music
pages?
A. WebGuide uses “Component Services” to access the Windows Media Player library,
which defaults to using the “currently logged on user”. If there is not a user logged
onto the machine, then an error will be reported. If there will not always be a user
logged into the machine, then you may want to specify a user account for the package
in Component Services. To do this, follow these directions:
Go to Start | Programs | Administrative Tools | Components Services (or type “comexp.
msc” in the Start/Run box). Expand Component Services until you see COM+
Applications. Highlight WebGuideServicedComponent package. Right click and then
select Properties. Select the Identity tab, choose the ‘This User’ option, and then
select a Windows user that has a configured Windows Media Player library (probably
yourself). If you wish to keep the Default Identity, then you have to make sure your web
server has an account logged into it.
For all Other WebGuide Questions and Information Please Visit: http://www.
asciiexpress.com/webguide/default.aspx.
64
Alienware HD Entertainment Center Manual
65
Alienware HD Entertainment Center Manual
APPENDIX A: GENERAL AND ELECTRICAL SAFETY PRECAUTIONS
HD Entertainment Center Setup
• Read all instructions marked on the product and in the documentation before operating your HD Entertainment Center.
• Retain all safety and operating instructions.
• Never use this product near water or a heat source.
• Only set-up the HD Entertainment Center on a stable work surface.
• Only operate the HD Entertainment Center using the power source type
indicated on the rating label.
• Never block or cover any openings or fans in the HD Entertainment Center
case. These are required for ventilation.
• Never insert objects of any kind into the ventilation openings.
• Make sure that the HD Entertainment Center is properly grounded when in
use. Do not attempt to plug the HD Entertainment Center into an outlet not
properly grounded.
• If an extension cord is used with your HD Entertainment Center, ensure that
the total ampere rating on the HD Entertainment Center does not exceed the
maximum rating on the extension cord.
HD Entertainment Center Use
• Do not step or place any objects on the power cord.
• Do not spill anything on or into the HD Entertainment Center.
• To avoid electrical shock, always unplug all power, modem, and any other cables from the wall outlets before handling the HD Entertainment Center.
66
Alienware HD Entertainment Center Manual
When You Should Contact Alienware
• The power cord or plug is damaged.
• The HD Entertainment Center has had liquid spilled into it.
• The HD Entertainment Center was dropped or the case was damaged.
• Normal operation of the HD Entertainment Center does not occur when the operating instructions are followed.
Replacement Components or Accessories
It is only advised to use replacement parts or accessories recommended by Alienware.
67
Alienware HD Entertainment Center Manual
68
Alienware HD Entertainment Center Manual
APPENDIX B: TERMS AND CONDITIONS AGREEMENT
Please visit http://www.alienware.com/terms/ to view the terms and conditions
agreement. We recommend that you print a copy and file it with your invoice for future
reference.
69
Alienware HD Entertainment Center Manual
70
Alienware HD Entertainment Center Manual
APPENDIX C: LIMITED PRODUCT WARRANTY: DISCLAIMER OF
WARRANTIES; AND LIMITATION OF LIABILITY
Limited Product Warranty
Please visit http://www.alienware.com/warranty/ to view the Limited Product
Warranty, Disclaimer of Warranties and Limitation of Liability.
Obtaining Warranty Service
Please contact Alienware Customer Support. Have the manual, warranty number and
proof of purchase information available. The Technical Support staff will assist you
in diagnosing the problem over the phone. If the problem cannot be resolved over
the phone, a Technical Support representative will explain your options which may
include on site service, sending your system back for repair or sending part(s) back to
Alienware for exchange. In most cases, Alienware will make all shipping arrangements
for the return for repair of your system and/or components and you will be issued a
printable online label which will arrive via email.
71
Alienware HD Entertainment Center Manual
Systems Returned to Alienware for Repair
If the Technical Support representative determines that your system must come back
to Alienware for repair, you will be issued an RMA number. Be sure to follow all of the
return instructions completely as all systems arriving at Alienware without a valid RMA
number will be refused and returned to sender.
The expected turn around time for system repairs is 10 to 12 business days from the
time the package is received in our Service Center to the time it is shipped from our
Service Center. If you are sending your HD Entertainment Center to the Service Center,
all you need to send is the unit itself. DO NOT send your monitor, speakers, keyboard,
mouse, joystick, other peripherals, cables or software unless advised otherwise
by your Alienware Technician. We have everything to test your system in-house. Be
advised that your HD Entertainment Center will be formatted and reintegrated. This is
necessary to purge your system of any viruses or worms that may be present on your
system and to protect our diagnostics network. Please back up all your important data
before sending it in. Alienware will not be responsible for any lost information. All
systems that come into our Service Centers for repair will be configured with only the
software necessary to restore your system to its original performance. This will include
your original OS and any software necessary for benchmarking your system.
Please use the original box and foam inserts to pack your HD Entertainment Center.
If you no longer have the original box, you must purchase the necessary packing
material to insure that your system is protected during shipping. Also, in the event
that you decide to use the original box- remember to remove or black out any previous
shipping labels and/ or barcodes. Alienware Corporation is not responsible for any
computers/components that may suffer damage due to improper packaging.
Return your system using the small package carrier specified by Alienware. Include
the following: a brief description of the problem, RMA number, your name, contact
information and current shipping address.
The carrier’s shipping document must be printed clearly and include:
1.
2.
3.
4.
The RMA number next to your name
Total declared value (Insurance)
Package weight
Your return address
Alienware will not be responsible for the contents of under insured packages. Please
contact Alienware support to schedule a pick-up.
72
Alienware HD Entertainment Center Manual
Replacing a Defective Component
If a Technical Support representative determines that a component is defective, you
will be issued an RMA number. All components arriving at Alienware without a valid
RMA number will be refused and returned to sender. The two options for returning
defective components are:
Return First
Return the defective part using the small package carrier specified by Alienware.
Simply package the component along with any corresponding documentation and/or
accessories. Include the following: a brief description of the problem you are having,
RMA number, your name, contact information, account number and current shipping
address. Including this information will speed up the replacement process.
The carrier’s shipping document must be printed clearly and include:
1. The RMA number next to your name
2. Total declared value (Insurance)
3. Package weight
4. Your return address
Alienware will not be responsible for the contents of under insured packages. Contact
Alienware support to schedule a pickup. Once Alienware has received the component,
it will be tested. If the component is deemed defective, a replacement will be shipped.
The entire replacement process will take approximately 5-7 business days from arrival
at Alienware to shipping from Alienware.
Replace First
If you would prefer to receive a replacement before returning the defective component,
a deposit – equal to the cost of the component – will be charged to your credit card.
This deposit will be refunded upon receipt of the defective component. It will take 2-3
business days to ship your component depending on inventory and approval of the
deposit charge.
After receiving the replacement component return the defective component using the
small package carrier specified by Alienware. Simply package the component along
with any corresponding documentation and/or accessories. Include the following:
a brief description of the problem you are having, RMA number, your name, contact
information, account number and current shipping address.
73
Alienware HD Entertainment Center Manual
The carrier’s shipping document must be printed clearly and include:
1. The RMA number next to your name
2. Total declared value (Insurance
3. Package weight
4. Your return address
Contact Alienware to schedule a pickup. You will have up to five business days to
ship the defective component(s) back to Alienware. No refunds will be issued if the
defective component(s) are not shipped within 5 days of receiving the replacement
component(s).
Keep in mind
In order to prevent any delays in the refund or replacement process, please be sure to
return all materials including manuals, CDs/disks and accessories corresponding to
the defective component. Incomplete materials will result in additional charges.
Most small package carriers will only pickup packages in the afternoon within a fourhour time window.
All returned components are tested for defects.
It is Alienware’s desire that your repair goes as smoothly as possible; once you
have received the replacement component(s), please contact us so that Alienware
technicians may assist you in its installation. When returning a component, be sure to
use Alienware’s preferred small package carrier. Alienware will not cover expenses for
any other shipping method.
Items to check before returning your system or component(s) to Alienware:
• The RMA number and personal contact information are on the carrier’s shipping document.
• The correct package weight and declared value (Insurance) has been clearly printed on the shipping bill.
• You have included a brief note explaining the problem encountered. Please include your RMA number, name, contact information, account number and current shipping address on this note.
• The system or component(s) is properly packaged and secured in its box.
• For components only - Include any corresponding documentation, CDs/disks and accessories with the component(s) being returned. Missing parts will result in an incomplete refund or credit.
74
Alienware HD Entertainment Center Manual
30-day Money Back Guarantee
In addition to the standard warranty, Alienware offers a 30-day money back guarantee
on every system. If you are not satisfied with your system, you may return it within
30 days for a refund. The refund will only be issued for the amount of the sale and
will not include shipping costs. All systems and parts will be subject to a 15%
restocking fee. To return merchandise, you must obtain an RMA number. Please call
the Alienware customer service department and provide the invoice number, item
description, and serial number(s) of the merchandise you wish to return. Returned
merchandise must be placed in original packaging, include product manuals and
other accessories. All sales on software items are final.
75
Alienware HD Entertainment Center Manual
76
Alienware HD Entertainment Center Manual
APPENDIX D: CONTACTING ALIENWARE
Sales
Our sales team is available Monday through Saturday to meet all your HD
Entertainment Center sales needs. They specialize in making sure you get exactly the
HD Entertainment Center you want.
US and Canada Sales: International Sales: Email: Hours of Operation: 800.ALIENWARE (800.254.3692) or 800.494.3382
786.388.5705
[email protected]
Monday-Friday 9:00 A.M. – 9:00 P.M. EST
Saturday 10:00 A.M. – 6:00 P.M. EST
Customer Service
For an instant response related to billing information, tracking information on returns,
or general questions, you may contact a support representative using the Alienware
chat system. Go to www.alienware.com and visit our Support Area.
Alienware Support Chat is available Monday through Friday. Please visit our web site
for current operational hours. Have your Alienware account number available on your
first visit to set up a support account.
Customer service representatives are also available by telephone. Please have your
account number on hand when calling.
US and Canada: International: Email: Hours of Operation: 866.287.6727
786.388.5705
[email protected]
Monday–Friday 10:00 A.M. – 7:00 P.M. EST
77
Alienware HD Entertainment Center Manual
Technical Support
We have compiled an extensive Knowledge Base of Frequently Asked Questions and
their Solutions. You are able to search by key words, categories or both. It is likely
that you will find the information needed here. This area is open and does not require
warranty coverage. Go to www.alienware.com and visit our support area.
For an instant response related to technical issues and troubleshooting for your HD
Entertainment Center, you may contact a support representative using the Alienware
chat system. Go to www.alienware.com and visit our Support Area.
Alienware Support Chat is available Monday through Friday. Please visit our web site
for current operational hours. Have your Alienware account number available on your
first visit to set up a support account. Chat support is available for computers under
warranty.
Technical support representatives are also available by telephone. Telephone support
is available for HD Entertainment Center systems under warranty. Please have your
account number on hand when calling.
US and Canada: International: Email: Hours of operation: 866.287.6727
786.388.5705
[email protected]
24 hours a day / 7 days a week
Corporate Headquarters
Mailing address:
Alienware Corporation
14591 S.W. 120th Street
Miami, FL 33186
78
Alienware HD Entertainment Center Manual
79
Alienware HD Entertainment Center Manual
APPENDIX E: IMPORTANT INFORMATION
•PLEASE BACKUP ANY DATA YOU HAVE BEFORE INITIATING A SYSTEM RECOVERY OR SENDING YOUR SYSTEM IN FOR REPAIR OR UPGRADES.
•PLEASE RETAIN ALL BOXES THAT WERE ORIGINALLY SHIPPED TO YOU IN CASE YOU NEED TO RETURN ANY MERCHANDISE.
•PLEASE CONTACT OUR SUPPORT DEPARTMENT AT 866-287-6727 WHEN UPGRADING ANY COMPONENTS ON YOUR SYSTEM. WE FULLY DOCUMENT CUSTOMER UPGRADES FOR FUTURE SUPPORT PURPOSES.
80