1
English
1
ER
COV
LDER
HO
ACE
L
IC P
PH
GRA
Owner’s Manual
RCC-1055
CD Multi-Disc Changer
�����
������������������������������
����
�������
����
����
�����
�����
Register your product at
www.Rotel.com/register
RCC-1055 CD Multi-Disc Changer
2
Important Safety
Information
Immediately stop using the component and have it inspected
and/or serviced by a qualified
service agency if:
WARNING: There are no user serviceable parts inside. Refer all servicing to
qualified service personnel.
• Objects have fallen or liquid has been spilled
into the unit.
WARNING: To reduce the risk of fire or
electric shock, do not expose the unit
to moisture or water. Do not allow foreign objects to get into the enclosure.
If the unit is exposed to moisture, or a
foreign object gets into the enclosure,
immediately disconnect the power cord
from the wall. Take the unit to a qualified service person for inspection and
necessary repairs.
Read all the instructions before connecting or
operating the component. Keep this manual so
you can refer to these safety instructions.
This Class B digital apparatus complies with
Canadian ICES-003.
Cet appareil numérique de la classe B est conforme à la norme NMB-003 du Canada.
IMPORTANT FOR LASER PRODUCTS
1. CLASS 1 LASER PRODUCT
2. DANGER: Visible laser radiation when open
and interlock failed or bypassed. Avoid direct
exposure to beam.
3. CAUTION: Do not open the top cover. There are
no user serviceable parts inside the player; leave
all servicing to qualified service personnel.
WARNING!
To reduce the risk of electrical shock, fires, etc.:
1. Do not remove screws, covers or cabinet.
2. Do not expose the unit to rain or moisture.
3. Do not touch the power cord or plug with
wet hands.
Heed all warnings and safety information in these
instructions and on the product itself. Follow all
operating instructions.
Clean the enclosure only with a dry cloth or a
vacuum cleaner.
You must allow 10 cm or 4 inches of
unobstructed clearance around the
unit. Do not place the unit on a bed, sofa, rug,
or similar surface that could block the ventilation
slots. If the component is placed in a bookcase or
cabinet, there must be ventilation of the cabinet
to allow proper cooling.
Keep the component away from radiators, heat
registers, stoves, or any other appliance that
produces heat.
The unit must be connected to a power supply
only of the type and voltage specified on the rear
panel of the unit.
Connect the component to the power outlet only
with the supplied power supply cable or an exact
equivalent. Do not modify the supplied cable in
any way. Do not attempt to defeat grounding
and/or polarization provisions. Do not use
extension cords.
Do not route the power cord where it will be
crushed, pinched, bent at severe angles, exposed
to heat, or damaged in any way. Pay particular
attention to the power cord at the plug and where
it exits the back of the unit.
Main plug is used as the mains disconnect device
and shall remain ready accessible.
The power cord should be unplugged from the
wall outlet if the unit is to be left unused for a
long period of time.
������������������������������
����
�������
����
This symbol means that this unit
is double insulated. An earth
connection is not required.
����
�����
�����
• The power supply cord or plug
has been damaged.
• The unit has been exposed to rain.
• The unit shows signs of improper operation
• The unit has been dropped or damaged in any
way
Place the unit on a fixed, level surface strong
enough to support its weight. Do not place it on
a moveable cart that could tip over.
Notice
The COMPUTER I/O connection should be
handled by authorized person only.
FCC Information
This equipment has been tested and found to
comply with the limits for a Class B digital device,
pursuant to Part 15 of the FCC Rules. These limits
are designed to provide reasonable protection
against harmful interference in a residential
installation. This equipment generates, uses
and can radiate radio frequency energy and,
if not installed and used in accordance with the
instruction, may cause harmful interference to
radio communications.
However, there is no guarantee that interference
will not occur in a particular installation. If this
equipment does cause harmful interference to
radio or television reception, which can be determined by turning the equipment off and on, the
user is encouraged to try to correct the interference
by one or more of the following measures:
• Reorient or relocate the receiving antenna.(TV,
radio, etc.)
• Increase the separation between the equipment
and receiver
• Connect the equipment to an outlet on circuit
different from that to which the receiver is
connected.
• Consult the dealer or an experienced radio/TV
technician for additional help.
Caution
This device complies with part 15 of the FCC Rules
operation is subject to the following to conditions:
(1) This device may not cause harmful interference,
and (2) this device must accept any interference
received, including interference that may cause
undesired operation.
Rotel products are designed to comply
with international directives on the
Restriction of Hazardous Substances
(RoHS) in electrical and electronic
equipment and the disposal of Waste
Electrical and Electronic Equipment
(WEEE). The crossed wheelie bin
symbol indicates compliance and that
the products must be appropriately
recycled or processed in accordance
with these directives.
English
3
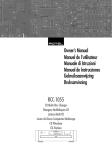
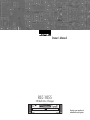
Figure 1: Controls and Connections
�
�
�
�
� �
�������
����
�
�
������������������������������
�����
�
�
�
��������
���
�������
��
��
����
�����
�����
���
� �
��������
����
�
�
�����������
����������
����
�������
�������������
�����
�������
����������������������
������������
��������������������
������������������
���������������������
����������������������������������
����������������������������������������������
, HDCD , High Definition Compatible Digital and Pacific Microsonics™
are either registered trademarks or trademarks of Pacific Microsonics, Inc. in the
United States and/or other countries. HDCD system manufactured under license
from Pacific Microsonics, Inc. This product is covered by one or more of the
following: In the USA: 5,479,168, 5,638,074, 5,640,161, 5,808,574, 5,838,274,
5,854,600, 5,872,531, and in Australia 669114. Other patents pending.
®
®
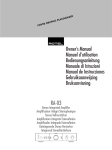
Figure 2: Display Panel
�
�� �
�
�������������������������������
���������������������������������
���������������������������
����������������������������
����������������������������
���������������������
���
Figure 3: RR-D92 Remote Control
�
�
�������
�
�
�
�
�
�
�
�
�
�
�
�
�
����
�
����
�
�
�
�
����
�
�
�
������
�
�
�
������
�
�
�
�
���
����
������ ����
������
�
�
��
�
�
�
�
�
RCC-1055 CD Multi-Disc Changer
4
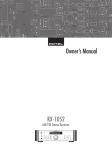
Figure 4: Analog Signal Connection
�������������
�����
�
��
����������������������������
����������������������������
����������������������������
�������������������
�
�����
�������
���
������
������
����������������������
�����������
���
���������
����
�����
��������������������
�����������������
�����������������������
�����������������������������������
�����������������������������������������������
�������
����
�����������
�����
���������
����
�����
����
�����
��
���
��
���
�����������������
������������������������
�����������������������
��������������
��������
���
��������
�������
��
��
�����������
����������
����
�������
�������������
�����
�������
����������������������
������������
��������������������
������������������
���������������������
����������������������������������
����������������������������������������������
, HDCD , High Definition Compatible Digital and Pacific Microsonics™
are either registered trademarks or trademarks of Pacific Microsonics, Inc. in the
United States and/or other countries. HDCD system manufactured under license
from Pacific Microsonics, Inc. This product is covered by one or more of the
following: In the USA: 5,479,168, 5,638,074, 5,640,161, 5,808,574, 5,838,274,
5,854,600, 5,872,531, and in Australia 669114. Other patents pending.
®
®
���������������������������
�������������������������������
���������������������������������
����������������������������
����������������������������
���������������������
���
Figure 5: Digital Signal Connection
��������������
��������
���
��������
�������
��
��
�����������
����������
����
�������
����������������������
������������
�������
�������������
�����
����������������������������������
����������������������������������������������
, HDCD®, High Definition Compatible Digital® and Pacific Microsonics™
are either registered trademarks or trademarks of Pacific Microsonics, Inc. in the
United States and/or other countries. HDCD system manufactured under license
from Pacific Microsonics, Inc. This product is covered by one or more of the
following: In the USA: 5,479,168, 5,638,074, 5,640,161, 5,808,574, 5,838,274,
5,854,600, 5,872,531, and in Australia 669114. Other patents pending.
��������������������
������������������
���������������������
���������������������������
�������������������������������
���������������������������������
����������������������������
����������������������������
���������������������
���
�������������
�������������
����
����������
�����
Important Notes
When making connections be sure to:
✔ Turn off all the components in the system before hooking up any components, including loudspeakers.
✔ Turn off all components in the system before changing
any of the connections to the system.
It is also recommended that you:
✔ Turn the volume control of the amplifier all the way down
before the amplifier is turned on or off.
English
5
Contents
About Rotel
Important Safety Information ..........................2
Figure 1: Controls and Connections
Figure 2: Display Panel
Figure 3: RR-D92 Remote Control
Figure 4: Analog Signal Connection
Figure 5: Digital Signal Connection
Important Notes
3
3
3
4
4
4
About Rotel ....................................................5
Getting Started ...............................................6
A Few Precautions
6
Placement
6
Cables
6
Handling Compact Discs ...................................7
AC Power and Control ....................................7
AC Power Input y
7
Power Switch 1 and Power Indicator 2
7
Output Connections .........................................7
Analog Outputs q
7
Digital Output t
7
Remote Control ...............................................7
Remote Sensor 4
7
External Remote Input r
8
Remote Control Batteries
8
12 Volt Trigger Input e
8
Repeat Play Button f.................................10
Repeat 1 Track
10
Repeat 1 Disc
10
Repeat All Discs
10
Random Play Button g ...............................11
Intro Scan Button h........................................11
Programmed Disc Play ...................................11
Program Button j
11
Track Programming
11
Adding Tracks to a Program
12
Review Button k
12
Playing Programmed Tracks ...........................12
Troubleshooting.............................................13
Display Is Not Lit
13
Fuse Replacement
13
Disc Does Not Play
13
No Sound
13
Sound Skips
13
Hum
13
Specifications ................................................13
A family whose passionate interest in music led
them to manufacture high fidelity components
of uncompromising quality founded Rotel over
45 years ago. Through the years that passion
has remained undiminished and the family goal
of providing exceptional value for audiophiles
and music lovers regardless of their budget, is
shared by all Rotel employees.
The engineers work as a close team, listening
to, and fine tuning each new product until it
reaches their exacting musical standards. They
are free to choose components from around
the world in order to make that product the
best they can. You are likely to find capacitors
from the United Kingdom and Germany, semi
conductors from Japan or the United States,
while toroidal power transformers are manufactured in Rotel’s own factory.
Rotel’s reputation for excellence has been
earned through hundreds of good reviews and
awards from the most respected reviewers in
the industry, who listen to music every day.
Their comments keep the company true to its
goal - the pursuit of equipment that is musical,
reliable and affordable.
All of us at Rotel, thank you for buying this
product and hope it will bring you many hours
of enjoyment.
Computer I/O Connector w ...........................8
Loading Discs ..................................................8
Disc Tray 8 and Open/Close Buttons 6 and u 8
Disc Skip Buttons 7 and ]
8
Selecting a Disc to Play ...................................8
Disc 1-5 Buttons s
8
Playing Discs ..................................................9
Play Buttons 9 and o
9
Pause Button -p
9
Stop Button 0a
9
Track Skip Buttons =i
9
Track Selection Buttons d
9
Search Buttons [
9
About HDCD® 3
9
Display Panel 5 ...........................................9
Time Display Button \ ...............................10
Each/Remain Mode
10
Total/Remain Mode
10
, HDCD®, High Definition Compatible
Digital® and Pacific Microsonics™ are either
registered trademarks or trademarks of Pacific
Microsonics, Inc. in the United States and/or
other countries. HDCD system manufactured
under license from Pacific Microsonics, Inc.
This product is covered by one or more of the
following: In the USA: 5,479,168, 5,638,074,
5,640,161, 5,808,574, 5,838,274,
5,854,600, 5,864,311, 5,872,531 and in
Australia: 669114. Other patents pending.
RCC-1055 CD Multi-Disc Changer
Getting Started
Thank you for purchasing the Rotel RCC-1055
CD Multi-Disc Changer. When used in a highquality music audio system, it will provide years
of musical enjoyment.
The RCC-1055 is a full featured, high performance component. It is the ideal choice
for those who want the convenience of a CD
changer, but who will not accept compromised
sound quality. The RCC-1055 features high
precision 8-times oversampling digital filters.
In addition, it can play MP3 encoded discs
and incorporates HDCD circuitry.
6
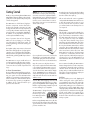
NOTE: There are 2 screws that hold the
disc drawer securely in place during shipment. The screws have red plastic handles
that make them easy to identify and remove.
Gently turn the RCC-1055 on its side and
turn the screws counterclockwise to remove
them. If the screws are not removed the disc
drawer will not open.
The RCC-1055 is easy to install and use. If
you have experience with other stereo systems,
you shouldn’t find anything perplexing. Simply
connect it to the associated components and
enjoy.
A Few Precautions
Please read this manual carefully. It provides information on how to incorporate the RCC-1055
into your system as well as information that
will help you get optimum sound performance.
Please contact your authorized Rotel dealer
for answers to any questions you might have.
In addition, all of us at Rotel welcome your
questions and comments.
Fill out and send in the owner’s registration
card packed with the RCC-1055. Also be sure
to keep the original sales receipt. It is your
best record of the date of purchase, which
you will need in the event warranty service is
ever required.
Placement
Ease of operation has not been forgotten.
While one disc is playing you can change
any of the other four. Full remote control, 32
track programming, and track scanning are
provided.
The highest quality components, such as metal
film resistors and polystyrene or polypropylene
capacitors are used in important signal paths.
All aspects of this design have been examined
with the final goal being faithful reproduction
of music.
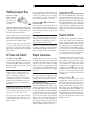
Keep the disc tray closed except when loading
or unloading discs. This helps keep dust away
from the sensitive laser pick up.
If you neglected to remove the screws before
attempting to use the RCC-1055, turn the
unit off and unplug it from the wall outlet.
Then remove the screws as described above.
Keep the screws in a safe place because
they must be replaced when the RCC-1055
is moved. Before the RCC-1055 is moved,
remove all the CDs from the disc tray and
close the disc drawer. Wait until the display
shows “0 00 00:0” then turn off the power
switch and unplug the power cord from the
wall outlet. Turn the unit on its side and reinstall the screws.
Save the RCC-1055 shipping carton and all
enclosed packing material for future use. Shipping or moving the RCC-1055 in anything other
than the original packing material may result
in severe damage to your amplifier.
The RCC-1055 is designed to play compact
discs bearing the identification logo shown
here. Other types of disc
must not be used.
Before moving the RCC-1055, remove all discs
from the unit. This will prevent possible damage should the discs shift out of their normal
positions inside the unit.
Like all audio components that handle lowlevel signals, the RCC-1055 can be affected
by its environment. To minimize the chance
the RCC-1055 will pick up hum or interference, do not place it on top of an amplifier
or any other device that has a large power
transformer. Keep the RCC-1055 away from
devices that have motors for the same reason.
Do not place the RCC-1055 where it will be
exposed to direct sunlight. Finally do not use
the RCC-1055 where the temperature will be
above 95°F/35°C or below 41°F/5°C. If the
RCC-1055 is moved from a cold environment
to a warm one, condensation can form on the
optical components, which will prevent proper
operation. Do not use the RCC-1055 for at
least 30 minutes after it is moved from a cold
environment.
We recommend installing the RCC-1055 in
furniture designed to house audio components.
Such furniture is designed to reduce or suppress
vibration which can adversely affect sound
quality. Ask your authorized Rotel dealer for
advice about component furniture and proper
installation of audio components.
Cables
Be sure to keep the power cords, digital signal
cables and regular audio signal cables in
your installation away from each other. This
will minimize the chance of the regular audio
signal cables picking up noise or interference
from the power cords or digital cables. Using
only high quality, shielded cables will also help
to prevent noise or interference from degrading the sound quality of your system. If you
have any questions see your authorized Rotel
dealer for advice about the best cable to use
with your system.
English
7
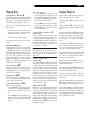
Handling Compact Discs
Handle CDs carefully.
Hold them by their
edges, as shown
here, and avoid
touching the playing surface.
If you are going to be away from home for an
extended period of time such as a month-long
vacation, it is a sensible precaution to unplug
your CD player (as well as other audio and
video components) while you are away.
Power Switch
Indicator 2
Fingerprints and dust should be carefully wiped
off the disc’s signal surface (glossy surface) with
a soft cloth. Wipe in a straight motion from
the inside to the outside of the disc.
Never use chemicals, such as record cleaning
sprays, anti-static sprays or fluids, benzine or
thinner to clean compact discs. These chemicals
will damage the disc’s plastic surface.
1 and Power
The Power Switch is located on the left side of
the front panel. Push the switch button in to
turn on the RCC-1055. To turn the RCC-1055
off, push the button again to return it to the
“out” position.
NOTE: If you are using a switched outlet to
turn on and off your CD player, you should
leave the power switch in the “on” position.
When AC power is applied to the unit, it
will power up in fully active mode.
Keep discs in their storage cases when not in
use to protect them from dust and scratches.
Do not expose compact discs to direct sunlight,
high humidity or high temperatures for extended
periods of time.
When the Power Switch is turned on the disc
in position 1 in the tray is selected. The Disc
and Track Displays illuminate and show Disc 1/
Track 1. The Time Indicator also illuminates.
AC Power and Control
Output Connections
AC Power Input
The RCC-1055 gives you a choice of analog
or digital output signals. The analog output
signal from the built-in Digital to Analog
converter is used with conventional analog
audio components. The digital output, which
provides an unprocessed digital data signal, is
used with outboard D/A converters or digital
processors.
y
Your RCC-1055 is configured at the factory for
the proper AC voltage in the country where
you purchased it (either 120 volts or 230 volts.
The AC line configuration is noted on a decal
on the back panel.
NOTE: Should you move your CD player to
another country, it may be possible to reconfigure it for use on a different line voltage. Do not attempt to perform this
conversion yourself. Opening the enclosure
of the RCC-1055 exposes you to dangerous
voltages. Consult a qualified service person
or the Rotel factory service department for
information.
The RCC-1055 should be plugged directly into a
2-pin polarized wall outlet or into the switched
outlet on another component in your audio
system. Do not use an extension cord.
Be sure the power switch on the front panel
of the RCC-1055 is turned off (in the “out”
position). Then plug the power cord into an
AC power outlet.
NOTE: To prevent loud noises that neither
you nor your speakers will appreciate, make
sure all the system components are turned
off when you make any signal connections.
Analog Outputs
q
[See Figure 4 for wiring illustration]
A pair of standard RCA jacks supplies a conventional unbalanced analog output signal
from the RCC-1055 to the source inputs of
an audio preamplifier, integrated amplifier,
or receiver. RCA connections are found on
virtually all components. Select high quality
audio interconnect cables. Connect the left
channel output of the RCC-1055 to the left
channel source input on the preamplifier or
other component. Connect the right output of
the RCC-1055 to the right channel source input
on the preamplifier or other component.
Digital Output
t
[See Figure 5 for connection illustration]
If you are using the RCC-1055 as a disc transport with an outboard D/A converter or other
digital processor, you need an unprocessed
digital data stream from the RCC-1055, taken
before the built-in D/A converter. This signal
is supplied by the back-panel coaxial digital
output jack. Using a standard 75 ohm coax
cable, connect the digital output jack to the
digital input connector on the outboard D/A
converter.
Remote Control
The RCC-1055 is supplied with an RR-D92
remote control. When using the RR-D92 the
emitter on the front of the control must be
pointed at the RCC-1055 front panel. The basic
disc play functions are controlled by the button
located near the front of the RR-D92. There is
a cover over the lower portion of the RR-D92
that slides down to reveal buttons that control
secondary functions, such as programming,
disc scanning and direct disc selection.
The RR-D92 duplicates the basic disc play
control functions of the front panel control
buttons. When a disc play control is on both
the front panel and the remote control, both
control identifiers are shown in the related
instruction text. For example, to play a disc
you can press either 9 on the front panel
or o on the remote control. There are some
functions, such as programmed track play
functions, that are operated exclusively by
the RR-D92.
Remote Sensor
4
The Remote Sensor picks up the infrared
signals from the remote control. Do not cover
or block the sensor. It must be unobstructed or
the remote control will not work properly. The
operation of the Remote Sensor can also be
affected if it is exposed to bright light, particularly sunlight. Certain types of lighting, such
as halogen lights, that emit a fair amount of
infrared light, can also interfere with proper
operation. In addition remote control functions
may not work reliably if the batteries in the
RR-D92 are weak.
RCC-1055 CD Multi-Disc Changer
External Remote Input
r
This connector is designed to be used in conjunction with Xantech™ brand Video Link™
IR signal pick ups (sold separately by custom
system installers). This feature enables you to
operate the RCC-1055 with the hand held
remote control even when it is installed where
it is not visible from your listening location.
Contact your authorized Rotel dealer for more
information.
Video Link and Xantech are Trademarks of
Xantech Corporation.
Remote Control Batteries
The supplied batteries must be installed before
the remote control can be used. Slide the secondary control cover down until it stops. Then
gently press the small triangular symbol on the
cover and slide the cover down to expose the
battery well. Install the batteries with the terminals
as shown in the illustration in the battery well.
Test the control for proper operation, then slide
the cover back into place. When the batteries
become weak the remote control won’t operate
the RCC-1055 consistently. Installing fresh batteries should eliminate the problem.
NOTE: Remove the batteries from the remote control if it will not be used for a long
period of time. Do not leave run down batteries in the remote control. Exhausted batteries can leak corrosive chemicals which
will damage the unit.
12 Volt Trigger Input
e
The RCC-1055 can be activated by a 12 volt
trigger signal. The trigger input accepts any
control signal (AC or DC) ranging from 3 volts
to 30 volts. When a cable is connected to the
12V input and a trigger signal is present,
the RCC-1055 is activated. When the trigger
signal is turned off, the unit goes into standby
mode. The front panel power indicator remains
lit, but the display goes dark and the unit will
not operate.
NOTE: When using the 12V Trigger feature, leave the POWER button in the ON position.
8
Computer I/O Connector w
The RCC-1055 can be operated from a personal
computer running audio system control software
from third-party developers. This control is
accomplished by sending the operating codes
normally sent by the RR-D92 remote control
over a hard-wired network connection from
the computer.
The COMPUTER I/O input provides the necessary connection on the back panel. It accepts
standard RJ-45 8-pin modular plugs, such
as those commonly used in 10-BaseT UTP
Ethernet cabling.
For additional information on the connections,
software, and operating codes for computer
control of the RCC-1055, contact your authorized Rotel dealer.
Loading Discs
Disc Tray 8 and Open/Close
Buttons 6 and u
Press the Open/Close button on either the front
panel or the remote control to open the Disc
Tray. Place discs in the numbered recesses in
the Disc Carousel with the label sides up. Be
sure the discs are centered in the recesses in
the Disc Carousel. Both standard 12cm discs
and 8cm discs may be loaded. There is a
separate recessed area in the carousel for 8cm
discs. When the Disc Tray is open discs can be
loaded into the three disc positions at the front
of the tray. To load discs into the remaining
positions press the Disc Skip button 7]
to rotate the carousel. Press the Open/Close
button again to close the Disc Tray when you
are done loading discs.
NOTE: Do not push the Disc Tray in manually. Doing so could cause damage. Use the
Open/Close buttons. Do not touch the Disc
Carousel while it is turning or attempt to turn
it by hand, as this also could cause damage.
Use the Disc Skip buttons and let the Disc
Carousel come to a stop before loading or
removing discs.
You can also load discs into the RCC-1055
while a disc is playing. Press the Open/Close
button to open the Disc Tray. Three of the four
disc positions will be available for disc loading.
To access the remaining position press the Disc
Skip button. The disc tray will turn to allow access to the remaining disc position. Press the
Open/Close button again to close the Disc
Tray when you are done loading discs.
Disc Skip Buttons
7 and ]
The Disc Skip buttons have two functions. One is
to turn the Disc Carousel when you are loading
discs, as described in the previous section.
NOTE: Do not turn the carousel by hand;
use the Disc Skip button. Do not touch the
carousel while it is turning.
The other function of the Disc Skip button is
to select a disc to be played. The next higher
numbered disc is selected each time the Disc
Skip button is pressed. If disc 5 is selected,
pressing the Disc Skip button selects disc 1.
Pressing the Disc Skip button when a disc is
not playing selects the next disc. If the Disc
Skip button is pressed when a disc is playing,
the RCC-1055 stops playing the current disc,
selects the next disc, and begins playing track
1 of that disc.
Selecting a Disc to Play
In addition to the Disc buttons described
above, the remote control may also be used
to select discs.
Disc 1-5 Buttons
(remote only)
s
Press the button that corresponds to the disc
you want to select. Pressing one of the Disc
1-5 buttons when a disc is not playing simply
selects the corresponding disc. If one of the Disc
1-5 buttons is pressed when a disc is playing,
the RCC-1055 stops playing the current disc,
selects the corresponding disc, and begins
playing track 1 of the disc.
English
9
Playing Discs
Play Buttons
When a disc is playing:
• Press the
button to skip the rest of
track being played and begin playing at
the beginning of the next track on the disc.
Press and hold the
button to advance
more than one track on the disc.
}
9 and o
Press the Play Button to play the disc indicated
in the Disc Display. The disc will begin playing
with Track 1, unless another track has been
selected before the Play button is pressed.
}
{
{
Unless one of the Repeat Play functions has
been selected:
button to return to the begin• Press the
ning of the track being played. Press and
hold the
button to go back more than
one track on the disc.
• After the last track on discs 1 through 4 is
played, the next disc is selected and play
continues with track 1 of the disc.
Track Selection Buttons
• At the end of disc 5 disc play stops.
See the Repeat Play section for more information.
Notes About MP3 Discs
The RCC-1055 can play discs recorded with
the MP3 (Mpeg1, Layer3) format. Either CD-R
or CD-RW discs may be used. The maximum
allowable number of folders on the disc is 255.
The maximum allowable number of files on the
disc is 999, with a maximum of 255 in any
folder. The bit rate for the disc must be between
32Kbps and 320Kbps. It is also possible to
play discs recorded with the Mpeg2, Layer3
and Mpeg2.5, Layer3 format.
Pause Button
-p
Press the Pause Button to temporarily stop
playing the disc. Press the Pause Button again,
or the Play Button, to resume playing the disc
at the same track and time.
Stop Button
0a
Press the Stop Button to stop playing the disc.
The disc will remain selected but the track
selection will go back to track 1.
Track Skip Buttons
=i
When a disc is not playing:
• Press the
button to select the next track
on the disc. Press and hold the
button
to advance more than one track on the
disc.
}
{
}
button to select the previous
• Press the
track on the disc. Press and hold the
button to go back more than one track on
the disc.
{
(remote only)
d
To select a specific track on a disc, press the
corresponding Track Selection buttons. The
selected track immediately begins playing. To
select tracks higher than number 9 simply press
the appropriate buttons in quick succession.
For example, to select track 17, press the “1”
button then the “7” button.
NOTE: When the RCC-1055 is in Programmed Play mode, the Track Selection
buttons are used to select tracks to be added
to the program. See the Programmed Disc
Play section.
Search Buttons
(remote only)
[
] [
Press and hold the
or
buttons to quickly
search a disc in the forward or reverse direction.
For the first five seconds the search speed will
be approximately four times normal playing
speed. After three seconds the search speed
will increase to approximately 20 times normal
playing speed. The sound volume is reduced
while the search function is being used. The
search function may be used when disc play
has been temporarily stopped with the Pause
function, however no sound is heard. The
Search function will not go past the beginning
or end of the selected disc.
About HDCD®
3
HDCD discs are encoded with a high density
data stream. During playback this high density data stream is decoded to a conventional
digital signal. This HDCD encode/decode
system greatly reduces the errors that are normally generated during the analog-to-digital,
and then digital-to-analog, conversions. The
HDCD system is automatically activated, and
the HDCD Indicator 3 lights, whenever an
HDCD disc is played.
Display Panel 5
The Disc Indicators A shows the positions in
the Disc Tray that have discs in them.
The Play Indicator
is playing.
B is lit whenever a disc
The Pause Indicator C is lit when disc play
has been temporarily stopped with the Pause
button.
The Disc Selection Indicator H typically shows
the number of the disc currently selected. If the
Remaining Disc Playing Time display option
has been selected the Disc Selection Indicator changes to a “–”. See the Time Display
section.
The Track Indicator I shows either the track
that is selected, the total number of tracks on
the disc, or the number of tracks that remain
on the disc. See the Time Button section.
One of the Repeat Play Mode Indicators F
will light if one of the repeat play options has
been selected. See the Repeat Play Button
section for more information.
The Random Play Indicator E is lit when one
of the random play options is being used. See
the Random Play section.
The Program Play Indicator D lights whenever
the track programming function is activated.
See the Programed Play Section.
The Intro Scan Indicator G is lit when the
Intro Scan feature is activated. See the Intro
Scan section.
One of the Total/Each/Remain Time Indicators
J will light indicating what is shown in the
Time Display. See the Time Display Section.
The Time Display K shows either the total playing time of the disc that is selected, the amount
of time the current track has been playing, the
remaining playing time of the current track, or
the remaining time of the disc that is playing.
See the Time Button section.
RCC-1055 CD Multi-Disc Changer
Track Calendar Display L shows the total
number of tracks on the disc that is playing
and the track that is currently playing.
10
Total/Remain Mode
When a disc is selected, the Track Calendar
Display shows the total number of tracks on the
disc. The number of the track that is playing
flashes. After a track is played the number for
that track is turned off.
Press the Time button again to select the Total/
Remain mode. The Remaining Time Indicator
remains lit. The Track Indicator shows the
number of tracks remaining to be played. The
Disc Display changes from the number of the
disc that is playing to a “–”. The Time Display
shows the amount of time remaining on the
disc.
If there are more than 20 tracks on the disc
after track 20 there is no track indication in
the calendar display. The Track Indicator shows
the number of the track being played, or the
number of tracks remaining, depending on
the Time Display mode selected.
Pressing the Time button when the Total/Remain mode is selected changes the Time/Track
Display back to the Normal Display mode. The
Time/Track Display also reverts to the normal
display mode when disc play is stopped and
started again.
When programmed tracks are played, only
the number(s) of the programmed track(s)
are illuminated. The number of the track that
is playing flashes, and is turned off after the
track is played. See the Programmed Play
section.
Repeat Play Button f
Time Display Button \
(remote only)
When a disc is selected, but not playing, the
Time Display shows the total playing time of
the disc and the number of tracks on the disc.
When a disc is playing, the Time Display
shows the track number and the amount of
time the track has been playing. Press the
Time Display button to change the Time/Track
Display mode.
Each/Remain Mode
Press the Time button once to select the Each/
Remain mode. The Remaining Time Indicator
lights. The Track Indicator shows the track being
played. The Time Display shows the amount of
time remaining on the track that is playing.
(remote only)
Normally discs 1 through 5 play in sequence
and play stops at the end of disc 5. Press the
Repeat Play button to select the Repeat 1 Track
mode. Press it again to select the Repeat 1
Disc mode. Press it again to select the Repeat
All Disc mode. Press it once more to return to
normal disc play mode. Repeat Play functions
may be turned on or off at any time, even
when a disc is playing.
Repeat 1 Track
When the Repeat 1 Track function is selected the
“Repeat” and “1” indicators in the display light.
If the Repeat 1 Track option is selected when
a disc is not playing, the track that is selected
when the play button is pressed is repeated.
If the Repeat 1 Track option is selected while
a track is playing, that track continues to play
and is then repeated.
The Track Skip buttons function normally when
the Repeat 1 Track option is selected. If a new
track is selected with the Track Skip buttons,
it is repeated until the Repeat Playing option
is turned off. The Search buttons function
normally when the Repeat 1 Track option is
selected. You can search forward to the next
track, and backward to the previous track. The
new track is then repeated.
If the Programed Play feature is being used the
Repeat 1 Track feature cannot be selected.
Repeat 1 Disc
When the Repeat 1 Disc function is selected
the “Repeat”, “1” and “Disc” indicators in
the display light. If the Repeat 1 Disc option
is selected when a disc is not playing, the disc
that is selected when the play button is pressed
begins playing track 1. After the last track on
the disc, play continues, starting with track 1 of
the disc. If the Repeat 1 Disc option is selected
while a track is playing, that track continues
to play. After the last track on the disc, play
continues, starting with track 1 of the disc.
The Track Skip buttons function normally when
the Repeat 1 Disc option is selected. If a new
track is selected with the Track Skip buttons,
it is repeated until the Repeat Playing option
is turned off. The Search buttons function
normally when the Repeat 1 Disc option is
selected. You can search forward to the next
track, and backward to the previous track. The
new track is then repeated.
If the Programed Play feature is being used the
Repeat 1 Disc feature can be selected.
Repeat All Discs
When the Repeat All Discs option is selected
the “Repeat Disc” indicators in the display are
lit. All the tracks on all the discs are played
in sequence, beginning with the track that is
selected or playing. After the last track on disc
5 is played, track 1 of disc 1 is played. All
the discs continue to play in sequence until the
Repeat All Discs function is turned off.
The Disc Skip and Disc Search feature work
normally when the Repeat All Discs function
is turned on.
If the Programmed Play feature is being used,
the programmed tracks are played in sequence.
When the last programmed track is played,
play continues with the first programmed
track. See the Programmed Play section for
more information.
The Track Skip and Search functions work
normally when the Repeat All Discs feature
is being used.
English
11
Random Play Button g
Intro Scan Button h
Programmed Disc Play
(remote only)
(remote only)
The Random Play feature randomly selects
tracks to be played. Press the Random button
to turn the feature on. Press it again to turn
Random Play off. When the Random Play is
active the Random Indicator E in the display
is illuminated.
The Intro Scan feature lets you listen to a short
section of the beginning of musical tracks.
Press the Scan button to turn on the Intro Scan
feature. Press the Scan button again, or the
Stop button, to turn Intro Scan off. When the
Intro Scan feature is active the Intro indicator
G in the display is lit.
Up to 32 tracks, on any of the loaded discs,
can be in selected for playback. After a group
of tracks have been programmed, they are
played back in the programmed order. All
programming and programmed play functions
are done with the remote control.
If Random Play is turned on when a disc is not
playing, a track is randomly selected when
the play button is pushed. If a disc is playing
when Random Play is turned on, another
track is randomly selected immediately and
begins playing.
The Random Play feature can be set to select
only tracks from a single disc or from all discs.
While a disc is not playing, press the Random
Play button g once to play tracks from only the
current disc. Press the Random Play button twice
to play tracks from all the discs. The display
will show “Random 1 Disc” or “Random Disc”
to indicate the mode selected. When you press
the Play button random tracks are played from
the selected disc or from all discs.
}
is pressed
If the Track Skip Forward button
when a disc is playing and Random Play
is turned on, another track is immediately
randomly selected. The Track Skip Back button
does not work when Random Play is
turned on.
{
]
The Search Forward button
functions normally when Random Play is turned on. If you
search forward to the end of a track another
track is randomly selected. The Search Reverse
button
will allow you to search back to the
beginning of the track that is playing.
[
Random Play can be used in conjunction with
Programmed Play. If Random Play is turned on
after a set of tracks has been programmed,
the programmed tracks are played in random
order.
NOTE: In order to use these two together
the Random Play must be turned on after
tracks have been programmed. If Random
Play is turned on the Programmed Play feature cannot be selected.
If the Repeat 1 Track or Repeat 1 Disc feature
is on, it is deactivated when Random Play is
turned on. The Random Play and Repeat All
Discs features may be used together.
If Programmed Play is not being used, the first
10 seconds of each track on each loaded disc is
played in sequence, beginning with the currently
selected track. After the first 10 seconds of the
last track on disc 5 is played, Intro Scan playing
stops. If Programmed Play is being used, the
first 10 seconds of each programmed track is
played, beginning with the currently selected
programmed track. After the first 10 seconds
of the last programmed track is played, Intro
Scan playing stops.
If Intro Scan is turned on when a disc is not
playing, scanning begins with the track that is
selected. If a disc is playing when Intro Scan
is turned on, the RCC-1055 skips to the next
track, plays the first 10 seconds of that track,
and each of the following tracks. There is one
exception - if Intro Scan is turned on while the
first 10 seconds of a track is playing. In that
instance the remainder of the first 10 seconds
of that track is played. The RCC-1055 then
skips to the beginning of the next track and
continues scanning.
The Intro Scan feature is interactive with Random Play, Programmed Play and Repeat Play.
Such combined functions will rarely be used.
For example, if both Intro Scan and Repeat
Play/All are turned on, the first ten seconds of
each disc is played continually in sequence. If
both Intro Scan and Random Play are turned on,
the first ten seconds of randomly selected tracks
are played. If Intro Scan and Programmed
Play are active, the first ten seconds of each
programmed track are played in sequence. If
Repeat Playing/All is also active the first ten
seconds of each programmed track are played
in sequence continually. Other combinations of
functions are possible, but again are unlikely
to be used.
Program Button
(remote only)
j
The Program Button is used to turn the Programmed Play feature on and off. When
Programmed Play is turned on the Program
Play Indicator D in the display is lit.
Once a group of tracks have been programmed, only those tracks may be played
until the Programmed Play feature is turned off.
Press the Program Button to temporarily turn
off Programmed Play, clear the programmed
tracks and return to normal play mode. Programmed tracks are also cleared whe n the
Disc Tray is opened, when the Stop button is
pressed for 3 seconds and when the power
is turned off.
Track Programming
While a disc is not playing press the Program
Play button j, the Program Indicator D in
the display will light. If the track you want to
select first is on the disc that is already selected
simply press the Track Selection button(s) d
to select the first track. The Time display K
will briefly change to display “P-01” indicating
the track is now programmed selection 1. If the
track you want to program first is on a different
disc from one selected use the Disc Selection
buttons s to select a different disc, then select
the track with the Track Selections buttons. If the
second track you want to add to the program
list is on the same disc simply use the Track
Selection buttons to select the next track. If the
second track you want to add to the program
list is on a different disc use the Disc Selection
buttons to select the next disc. The Track and
Time displays will change to indicate another
selection is being made. The Time display K
will briefly change to display “P-02” indicating the track is now programmed selection 2.
Continue selecting new discs (if necessary)
and tracks until you have programmed all the
tracks you want.
See the following page for a programming
example.
RCC-1055 CD Multi-Disc Changer
Programming Example
While disc 3 is selected but not playing . . .
Pressing Button(s)
Results In
Program Button
Program Mode is activated
Track Button 3
Disc 3 / Track 3 becomes selection 1
Track Button 7
Disc 3 / Track 7 becomes selection 2
Disc Button 4, then Track Buttons 1 then 4
Disc 4 / Track 14 becomes selection 3
Disc Button 5, then Track Button 9
Disc 5 / Track 9 becomes selection 4
Track buttons 1 then 2
Disc 5 / Track 12 becomes selection 5
Disc Button 1, then Track Button 8
Disc 1 / Track 8 becomes selection 6
Disc Button 2, then Track Button 4
Disc 2 / Track 4 becomes selection 7
Track Button 1
Disc 2 / Track 1 becomes selection 8
Adding Tracks to a Program
You can add track selections to the programmed
list when disc played is stopped. If the track you
want to add is on the disc that is selected, just
select the new track with the Track Selection
buttons. Or use the Disc Selection buttons and
the Track Selection buttons to add new tracks
from another disc to the program.
12
Review Button
Remote Only
k
Press the Review button to review the programmed tracks. Each time the button is
pressed the next disc/track selection, and
the program position number, is displayed.
This function can be used at any time – when
programming, while playing programmed
tracks or while programmed tracks are not
playing. If you review the programmed tracks
while programming or playing programmed
tracks, the display temporarily changes to show
the programmed selections and then returns
to normal mode.
To remove a programmed track press the Review button until the track you want to delete
is displayed. Then press Stop to remove the
track from the program.
Playing Programmed
Tracks
Once a group of tracks has been programmed
press the Play button to begin playing the
tracks, starting with programmed selection
1. The selected tracks will play in sequence
until the last selected track is over. Then disc
play stops.
When programmed tracks are playing, the
Track Calendar L in the display shows only
the numbers of the programmed tracks. The
number of the track that is playing flashes.
The Pause button functions normally when
playing programmed tracks. If you press the
stop button while playing programmed tracks,
play resumes with programmed selection 1
when the play button is pressed again.
The Track Skip buttons function normally when
playing programmed tracks. Press the
button to skip to the next programmed track.
Press the
button to return to the beginning
of the track that is playing. Press the
again
to go back to the previous programmed track.
The track skip function will not go past the first
or last programmed track unless the Repeat
play function is turned on.
}
{
{
The Search Buttons also function when playing
programmed tracks. Pressing the
button
searches forward. If you search to the end of
the track the next programmed track is played.
If you search to the end of the last programmed
track play stops unless the Repeat function is
turned on. Pressing the
button searches
backwards, but the search will not go beyond
the beginning of the track that is playing.
]
[
The Repeat All Disc function works when
programmed tracks are playing. The other
Repeat functions cannot be selected. When
the Repeat function is turned on the first programmed track begins playing after the last
programmed track has been played. Similarly,
the first programmed track begins playing if you
press the
when the last programmed track
is playing or if you press the
until you reach
the end of the last programmed track.
}
]
English
13
Troubleshooting
Most difficulties in audio systems are the result
of incorrect connections, or improper control
settings. If you encounter problems, isolate the
area of the difficulty, check the control settings,
determine the cause of the fault and make the
necessary changes. If you experience problems
with the RCC-1055, refer to the suggestions
for the following conditions:
Display Is Not Lit
The Disc, Track and Time indicators in the display should be lit whenever the power switch
of the RCC-1055 is pushed in. If the display
does not light, test the power outlet with another
electrical device, such as a lamp. Be sure the
power outlet being used is not controlled by
a switch that has been turned off.
Hum
Hum is caused by electrical interference from
other devices. It is most often picked up by the
audio signal cables. Use high-quality cables.
Low quality cables often have inadequate
shielding. Check to be sure the cables are
solidly connected to both the RCC-1055 and
the amplifier. Try moving the cables to a position
farther away from other electrical components,
especially power amplifiers which have large
power transformers. Other devices that commonly cause interference are fluorescent lights
and light dimmer controls.
Fuse Replacement
If another electrical device works when plugged
into the power outlet, but the RCC-1055 display
will not light when the power switch is pushed
in, it indicates that the internal power fuse may
have blown. If you believe this has happened,
contact your authorized Rotel dealer to get the
fuse replaced.
Disc Does Not Play
If a disc does not begin playing when the Play
button is pressed, open the disc tray and be
sure the disc is loaded with the label side up.
If a disc is properly loaded, inspect the playing
side of the disc for contamination or damage.
If the disc is dirty, clean it as described in the
Handling Compact Discs section. If a disc is
damaged it should be replaced.
No Sound
Check the input selector on the amplifier to be
sure it is properly set. Check the tape monitor
switches to be sure they are properly set. Check
other signal sources to be sure the amplifier
is operating properly. Finally check the audio
cables between the RCC-1055 and the amplifier
to be sure they are properly connected.
Sound Skips
If the sound from the RCC-1055 skips or jumps
around, the disc may be defective or dirty. If
the disc is clean, try another disc. If a problem
persists it could be caused by vibrations reaching the RCC-1055. Sound vibrations, especially
from a subwoofer, can interfere with the laser
reading a disc surface. Move the RCC-1055 to
a more stable surface, or to a location farther
away from the speakers.
Specifications
Frequency Response (±0.5dB)
20-20,000 Hz
Signal to Noise Ratio
>100 dB
Total Harmonic Distortion + Noise
0.0045% @ 1kHz
Intermodulation Distortion
0.0045% @ 1kHz
Dynamic Range
>96 dB
Channel Separation
>98 dB @ 1kHz
Channel Balance
± 0.5 dB
Phase Linearity
± 0.5 degree
Speed Accuracy, Wow & Flutter
Quartz Crystal Precision
Digital to Analog Converters
18 bit equivalent, multi-level Delta-Sigma DAC with
8x oversampling digital filter and HDCD
Maximum Audio Line Output/Impedance
2 Volts/100 Ohms
Digital Output Level (coax)/Impedance
0.5 Volt, Peak to Peak/75 Ohms
Power Requirements
USA Version
120 Volts, 60 Hz;
European Version
230 Volts, 50 Hz
Power Consumption
Dimensions (W x H x D)
15 Watts
432 x 121 x 410 mm
17 x 43/4 x 161/8 inches
Panel Height
109 mm / 49/32 inches
Weight (net)
7.8 kg, 17.2 lb.
All specifications are accurate at the time of printing.
Rotel reserves the right to make improvements without notice.
ER
COV
LA
IC P
PH
GRA
The Rotel Co. Ltd.
10-10 Shinsen-Cho
Shibuya-Ku
Tokyo 150-0045
Japan
Phone: +81 3-5458-5325
Fax: +81 3-5458-5310
Rotel of America
54 Concord Street
North Reading, MA 01864-2699
USA
Phone: +1 978-664-3820
Fax: +1 978-664-4109
Rotel Europe
Dale Road
Worthing, West Sussex BN11 2BH
England
Phone: +44 (0)1903 221 600
Fax: +44 (0)1903 221 525
Rotel Deutschland
Kleine Heide 12
D-33790 Halle/Westf.
Germany
Phone: +49 05201-87170
Fax: +49 05201-73370
www.rotel.com
082 OMRB1092v2 010807
English
DER
OL
CEH