1
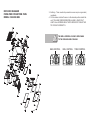
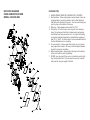
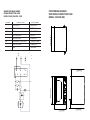
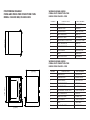
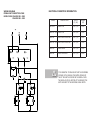
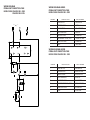
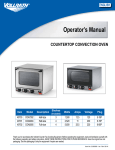
LIMITED WARRANTY
All equipment which is sold under ANVIL trademark and used for
commercial purposes is warranted against defects in materials and
workmanship. The warranty runs for one year from the date of original installation and is for the benefit of the original purchaser only.
All other Warranties ,expressed or implied , statutory or otherwise,
including without limitations any implied Warranty of Merchantability
or fitness for purpose are excluded .The Seller shall in no event be
liable for direct,indirect or consequential damages in connection with
ANVIL commercial products.
COUNTER-TOP CONVECTION OVENS
The Sellers obligation under this Warranty is limited to the repair of defects without charge. Defective units must be taken or
shipped,transportation charges prepaid,to ANVIL.
This Warranty is not effective if damage occurs because of
accident,carelessness,improper installation,lack of proper setup,supervision when required or if the equipment is installed or
operated in any manner contrary to the installation and operating
instructions. In these cases,repairs will be made at a reasonable
cost. Work performed by unauthorized personnel or unauthorized
service agencies voids this Warranty. INSTALLATION OPERATION AND CARE OF
COUNTER-TOP CONVECTION OVENS
MODELS: COA1001 R01/COA1002 R01/ COA1003 R02
COA1004 R02
NB:
REGISTER ON-LINE TODAY
Register your warranty on-line now at www.anvilworld.com
NO WEB ACCESS
If you do not have access to the Web. Kindly register by completing
the warranty registration form and fax it to the ANVIL office in the
country of purchase.
Failure to do so will invalidate your warranty.
4-INS-COA1001R01
UNPACKING
Unpack the product and check for any damage incurred during
transit. This should be reported to the responsible carrier, railway or
postal authority, and a request for a damage report should be made.
THESE INSTRUCTIONS MUST BE FOLLOWED FOR US TO
GUARANTEE OUR FULL SUPPORT OF YOUR CLAIM FOR
PROTECTING AGAINST LOSS FROM CONCEALED DAMAGE. THE FORM FOR FILING SUCH A CLAIM WILL BE
PROVIDED BY THE CARRIER.
GENERAL INSTALLATION AND OPERATION
INSTRUCTIONS
These Countertop convection ovens have been designed for
the following uses
•
•
•
Baking of fresh or frozen bakery and pastry products
Cooking of gastronomy products, either fresh or frozen
Regeneration of fresh or frozen food
1. Protective Film - Carefully remove the protective film from the
stainless steel before using oven for the first time. If any glue
residue should remain, remove it with a suitable solvent reco- mended for stainless steel. It is important to remove this film
before installation and use otherwise it will stick onto the stain less steel and become very difficult to remove thereafter.
2. Positioning - Install the counter top oven in the most convenient
location for ease of cleaning, maintenance and general opera tion. The unit should be placed a minimum distance of 100mm
from any adjacent wall. If this appliance is to be positioned in
close proximity to a wall, partitions, kitchen furniture, decorative
finishes, etc. It is recommended that they be made of non –
combustible materials. If not, they shall be clad with a suitable non – combustible heat insulating material, and the closest at tention be paid to the fire prevention regulations. It is important
to observe the recommended space at the back of the oven due
to the exhaust air vent duct being positioned at the rear of the
unit. Hot exhaust gas can create a fire hazard.
MODEL: PRIMA PRO CONVECTION OVEN
MODEL CODE : COA1004 R02
Part
No.
1
2
3
4
5
6
7
8
9
10
11
12
13
14
15
16
17
18
19
20
21
22
23
24
25
26
27
28
29
30
31
32
33
34
35
36
37
38
39
40
41
42
43
44
Description
BAKEELEMENTS
GRILLELEMENTSUPPORTTOP
GRILLELEMENT
GRILLELEMENTCLAMP
OVENSHELFRUNNERTHUMBSCREW
FANCOVER
PRIMASHELFRUNNER
PRIMASHELF
INNERGLASSDOOR
INNERGLASSGASKET
DOORHANDLEPLASTICNODE
DOORHANDLETUBE
OUTERDOORFRAME
PRIMAPROOUTERGLASSDOOR
INNERDOORFRAME
PRIMADOORHINGE
PRIMADOORSEAL
BAKETHERMOSTAT
SELECTORSWITCH
PILOTLIGHT
KNOB
CONVECTIONBEZEL
FACIAINSERTTIMER
BEZEL
FACIAINSERTTIMER
BEZEL
TIMERINSERT
FACIA
GRILLERTHERMOSTAT
TIMER
LARGERUBBERFEET
BOTTOMCOVER
OUTERBODYWRAPPER
OVENLIGHTBULB
OVENLIGHTHOLDER
CABLEGRIP
POWERCORD
TERMINALBLOCK
FANMILLBOARD
PRIMAFANMOTOR
BACKCOVER
CHIMNEYASSEMBLY
INNERSHELLASSEMBLY
CONTROLPANELENCLOSURE
EXPLODED DIAGRAM
PRIMA PRO CONVECTION OVEN
MODEL: COA1004 R02
3. Earthing - These countertop convection ovens require a grounded,
receptacle.
4. Fit the shelves and shelf runners in the desired position inside the
unit. TO ALLOW PROPER OPERATION, ALLOW A SPACE OF AT
LEAST 40mm BETWEEN EACH TRAY IN ORDER FOR THE HOT AIR
TO CIRCULATE CORRECTLY.
THE GRILL CONTROL IS ONLY APPLICABLE
TO THE COA1002 AND COA1004
BAKE CONTROL
GRILL CONTROL
TIMER CONTROL
SPECIFIC OPERATING INSTRUCTIONS
1. Model COA1001/ COA1001-120/ COA1003 only
Set the BAKE CONTROL to the desired temperature and the TIMER CONTROL to the desired time or bypass the timer to the ‘ON’ position
as marked on timer control knob. The fans and the oven light will operate continuously. The BAKE pilot light will indicate when the heating
elements are energized. The desired temperature is reached when the
pilot light starts to switch on and off.
2. Model COA1002 /COA1004 only Set the BAKE CONTROL to the desired temperature. Set the TIMER
CONTROL to the desired time. The fans and the oven light will operate continuously. The elements however will switch off at the end of
the timed cycle. The BAKE pilot light will indicate when the heating
elements are energized. The desired temperature is reached when the
pilot light starts to switch on and off.
The GRILL function is used to grill or gratinate the food and give it a
golden colour after normal cooking. To operate the GRILL, switch the
BAKE control knob to the GRILL FUNCTION indicated by the icon on the BAKE selector knob. Set the GRILL to the desired temperature.
The signal lamp will indicate when the GRILL elements are energized.
Please note that fans will not run when in grill mode.
TIP : COOKING AT A HIGHER TEMPERATURE WILL NOT REDUCE YOUR COOKING TIME ! IT WILL
PRODUCE UNSATISFACTORY BAKING AND
ROASTING RESULTS.
The temperature range of the BAKE or GRILL function is
thermostatically controlled between the range of 60°C/140°F
to 300°C/ 570°F. The BAKE CONTROL switch acts as the
selector switch for the oven fans, light, bake and grill function (Provided the unit is fitted with a grill function). A signal
lamp next to the BAKE thermostat indicates when the heating elements are energized. The pilot light next to the TIMER
CONTROL indicates that the time cycle is in operation.
MODEL: PRIMA CONVECTION OVEN
MODEL CODE : COA1003 R02
Part
No.
Description
1
BAKEELEMENT
2
FANCOVER
3
PRIMASHELFRUNNER
4
OVENSHELFRUNNERTHUMBSCREW
5
PRIMASHELF
6
INNERGLASSDOOR
7
INNERGLASSGASKET
8
DOORHANDLEPLASTICNODE
9
DOORHANDLETUBE
10
OUTERDOORFRAME
11
PRIMAPROOUTERGLASSDOOR
12
INNERDOORFRAME
13
PRIMADOORHINGE
14
PRIMADOORSEAL
15
BAKETHERMOSTAT
16
SELECTORSWITCH
17
PILOTLIGHT
18
KNOB
19
BEZEL
20
FACIAINSERT
21
BEZEL
22
FACIAINSERTTIMER
23
FACIA
24
2HRTIMER
25
LARGERUBBERFEET
26
BOTTOMCOVER
27
OUTERBODYWRAPPER
28
OVENLIGHTBULB
29
OVENLIGHTHOLDER
30
TERMINALBLOCK
31
CABLEGRIP
32
POWERCORD
33
FANMILLBOARD
34
PRIMAFANMOTOR
35
BACKCOVER
36
CHIMNEYASSEMBLY
37
INNERSHELLASSEMBLY
38
CONTROLPANELENCLOSURE
EXPLODED DIAGRAM
PRIMA CONVECTION OVEN
MODEL: COA1003 R02
COOKING TIPS
1. ALWAYS PREHEAT OVEN FOR A MINIMUM OF 10 MINUTES.
2. Shelf positions – When cooking larger volume foods, it may not
be appropriate to use all the shelves. Use the shelf positions
that best centre the food in the oven. You may use a sheet pan
as a drip tray on the bottom of the oven.
3. Warming – Set temperatures around 80°C/176ºF.
4. Re-heating – If food is frozen, cook longer at lower tempera tures. This will ensure that food is heated evenly and prevent
food fillings from being served too hot. For proper food safety,
be sure that internal temperature of reheated food reaches at
least 73ºC / 165ºF. For best results it is recommended that the
food be defrosted prior to re-heating.
5. For even cooking – Always space food evenly on your cooking
pans, space pans evenly in the oven, and leave space between
shelves for proper air circulation.
6. When preparing meat – Always put a sheet pan on the bottom
of the oven cavity to catch any spillage.
7. DO NOT cover any part of the oven or a sheet pan used as drip
tray with aluminium foil. This can cause the oven to overheat
and loose foil may get caught in the fans.
WARNING
Burn Hazard.
Do not touch hot food,liquid or heating surfaces
while equipment is heating or operating
Hot surfaces and food can burn skin. Allow the hot surfaces to cool
before handling
CLEANING AND MAINTENANCE INSTRUCTIONS
1. Always ensure that the unit is disconnected from the main power
supply before cleaning.
2. The unit should not be cleaned with a water jet or immersed in
water. Use only a damp cloth or sponge dipped in soapy water.
3. Always clean equipment thoroughly before first use. However,
do not use chlorine or chloride – based products to clean the
unit. These may lead to corrosion and pitting and will result in
voiding the warranty on the unit.
4. Wipe off the unit with a dry cloth and wait at least half an hour
before re – connecting to the main power outlet.
5. The unit is fitted with Low ‘E’ on the inside of the door glass
which reflects heat inward making heat retention more efficient.
Scouring with abrasive cleaners will damage coating and invali date warranty.
THIS APPLIANCE SHOULD NOT BE CLEANED WITH
A WATER JET OR IMMERSED IN WATER. USE ONLY
A DAMP CLOTH OR SPONGE DIPPED IN SOAPY
WATER. DO NOT USE STEEL-WOOL WHICH WILL
MARK THE BRIGHT STAINLESS STEEL FINISH
MODEL:MINI PRIMA CONVECTION OVEN
MODEL CODE : COA1002 R01
Part
No.
1
2
3
4
5
6
7
8
9
10
11
12
13
14
15
16
17
18
19
20
21
22
23
24
25
26
27
28
29
30
31
32
33
34
35
36
37
38
39
40
41
42
43
Description
BAKEELEMENT
GRILLELEMENTSUPPORTBRACKET
PROBECLAMP
GRILLELEMENT
GRILLELEMENTCLAMPINGBRACKET
ELEMENTCLAMPSCREW
FANCOVERASSEMBLY
MINIPRIMASHELFRUNNER
MINIPRIMASHELF
OVENDOORHANDLENODE
DOORHANDLETUBE
MINIPRIMAOUTERGLASSPRINTED
DOORCOMPLETE
MINIPRIMAOVENDOORHINGE
MINIPRIMAINNERGLASS
MINIPRIMADOORSEAL
THERMOSTAT
SELECTORSWITCH
BAKEFACIAINSERT
PILOTLIGHT
KNOB
CONTROLBEZEL
GRILLBEZEL
TIMERFACIAINSERT
TIMERBEZEL
CONTROLFACIAINSERT
FACIA
2HRTIMER
THERMOSTAT
LARGERUBBERFEET
BOTTOMCOVER
OUTERBODYWRAPPER
OVENLIGHTBULB
OVENLIGHTBULBHOLDER
CABLEGRIP
POWERCORD
TERMINALBLOCK
MINIPRIMAFANMOTOR
BACKCOVERPANEL
FANMILLBOARD
CHIMNEYASSEMBLY
INSIDESHELLASSEMBLY
CONTROLPANELENCLOSURE
EXPLODED DIAGRAM
MINI PRIMA CONVECTION OVEN
MODEL: COA1002 R01
The doors can be removed for cleaning.
(Assembly instructions)
Step 1
(side view)
Open the door fully
Hinge lock - in "down/unlocked"
position
Side of Oven
Door (fully opened; does not open flat)
Step 2
Step 3
(side view)
Rotate the Hinge Lock
to up position (both sides)
(side view)
Top Hook Roller
Hinge lock - must be in
up/locked position
Hinge lock - in
up/locked position
Side of Oven
(2)
(1)
Hinge Arm
Side of Oven
1) Tilt door up at about 45° angle until the Top Hook
on the Hinge Arm is lower than the Top Hook Roller,
2) then pull out of Hinge Slots
MAINTENANCE
Replacement of the internal lamp
1. Disconnect the appliance from the power supply and let it cool
down if hot.
2. Remove the shelf support grid.
3. Unscrew the glass cover and replace the lamp with the correct
specification – 230V/ 25 W or 120V/ 15 W in case of the
COA1001-120 & COA1002-120.
4. Reassemble in the reverse order.
MODEL:PRIMA LITE CONVECTION OVEN
MODEL CODE : COA1001 R01
WARNING
Electric Shock Hazard.
Keep water and other liquids from entering the inside
of the equipment. Liquid inside the equipment could
cause an electrical shock
Part
No.
Description
1
BAKEELEMENT
2
PRIMALITEFANCOVER
3
PRIMALITESHELFRUNNERS
4
SHELFRUNNERSCREWS
5
PRIMALITESHELF
6
STAINLESSSTEELDOORHANDLE
SAFETY
7
DOORHANDLEPLASTICNODES
8
PRIMALITEDOOROUTERGLASS
READ ALL INSTRUCTIONS BEFORE USE. FAILURE TO FOLLOW
THESE PRECAUTIONS COULD RESULT IN INJURY TO YOURSELF AND OTHERS
9
PRIMALITESTAINLESSSTEELDOORFRAME
Do not spray water or cleaning products. Liquid could contact the electrical components and cause a short circuit or an electrical shock. Do not use equipment if power cord is damaged or has been modified
1. When this appliances is to be positioned in close proximity
to a wall, partitions, kitchen furniture, decorative finishes, etc.
it is recommended that they be made of non-combustible mate rial. If not, they shall be clad with a suitable non-combustible
heat insulating material, and the closest attention be paid to fire
prevention regulations.
2. Use the appliances on an individual 15A mains outlet only.
DO NOT OVERLOAD THE CIRCUIT.
3. Ensure that the equipment and the power supply cord does not come into contact with hot surfaces.
4. Supervision is necessary when the appliance is used in close
proximity to children.
5. If the supply cord is damaged, it must be replaced with a new
cord assembly available from the suppliers agent.
6. Use only earthed outlets matching the serial plate voltage.
7. Have equipment installed by a qualified personnel in accordance
with local codes and ordinances.
8. Use equipment in a flat level position.
9. Do not operate unattended
10
PRIMALITEDOORINNERGLASS
11
DOORSEAL
12
BAKETHERMOSTAT
13
SELECTORSWITCH
14
PILOTLIGHT
15
FACIABAKEINSERT
16
KNOB
17
CONTROLBEZEL-THERMOSTAT
18
BEZEL120MIN
19
FACIATIMERINSERT
20
CONTROLFACIAPANEL
21
2HRTIMER
22
DOORHINGE
23
LARGERUBBERFEET
24
GALVANISEDBOTTOMCOVER
25
STAINLESSSTEELOUTERCOVER
26
OVENLIGHTBULB
27
OVENLIGHTHOLDER
28
CABLEGLAND
29
POWERCORD
30
TERMINALBLOCK
31
FANMOTOR
32
GALVANISEDBACKCOVER
33
INSIDESHELLASSEMBLY
34
CONTOLPANEL
EXPLODED DIAGRAM
PRIMA LIGHT CONVECTION OVEN
MODEL: COA1001 R01
10. The equipment may be hot, even though the pilot light is not on.
11. Do not operate if equipment has been damaged or is malfunc tioning in any way.
12. These appliances are designed to run only on alternating current
(A.C.) DO NOT CONNECT TO DIRECT CURRENT (D.C)
13. Extreme caution should be exercised when using containers
other than the intended proper heat tempered metal and glass
pans for baking.
14. Do not cover any part of the oven or a sheet pan used as a drip
tray with aluminium foil as this may cause overheating of the
oven.
POSITIONING DIAGRAM
PRIMA LIGHT CONVECTION OVEN
MODEL: COA1001 R01
442 (17.40")
LEGEND
DESCRIPTION
S
STAGE SWITCH
1-SEL-SWITCH
L
INTERIOR LIGHT
1-OVEN-LH
F1/F2
FAN PRIMA
1-FAN-COA1003
B1
BAKE THERMOSTAT
1-EGO-150
H2
BAKE PILOT LIGHT
1-PL-BMA0001
E1/E2
BAKE ELEMENT 1200W /230V
5-1200W-CAT -BAK
B2
GRILL THERMOSTAT
1-EGO-150
H1
TIMER PILOT LIGHT
1-PL-BMA0001
E3
GRILL ELEMENT
5-2400W-CAT-GR1
T
TIMER
1-2HR-TIMER
H3
GRILL PILOT LIGHT
1-PL-BMA0001
WIRING DIAGRAM
PRIMA PRO CONVECTION OVEN
MODEL CODE: COA1004 R02
477 (18.78")
PART NUMBER
497 (19.57")
399 (15.71")
POSITIONING DIAGRAM
MINI PRIMA CONVECTION OVEN
MODEL: COA1002 R01
WIRING DIAGRAM LEGEND
PRIMA CONVECTION OVEN
MODEL CODE: COA1003 -230V
DESCRIPTION
PART NUMBER
S
STAGE SWITCH
1-SEL-SWITCH
L
INTERIOR LIGHT
1-OVEN-LH
M1/M2
FANS
1-FAN-COA1003
B1
BAKE THERMOSTAT
1-EGO-150
H
BAKE PILOT LIGHT
1-PL-BMA0001
E1/E2
BAKE ELEMENT 1200W /230V
5-1200W-CAT -BAK
H
TIMER PILOT LIGHT
1-PL-BMA0001
T
TIMER
1-2HR-TIMER
535mm (21.06")
LEGEND
WIRING DIAGRAM
230V
N
L
MODEL : PRIMA CONVECTION OVEN - 230V
E
MODEL CODE : COA1003
S
P3
2
3
1
4
S
L
M1/M2
B1
H1
E1 / E2
T
H2
PART NUMBER
STAGE SWITCH
INTERIOR LIGHT
FANS
BAKE THERMOSTAT
BAKE PILOT LIGHT
BAKE ELEMENTS 1200W / 230V
1-SEL-SWITCH
1-OVEN-LH
1-FAN-COA1003
1-EGO-150
1-PL-GP
5-1200W-CAT-BAK
TIMER - 2HR
TIMER PILOT LIGHT
1-TIMER-2HR
1 - PL - GP
M1
595mm (23.43")
T
L
H2
B1
E1
H1
E2
DATE
SIGN
DIR
PROD ELEC
DWG ADMIN
DEPARTMENT
REV - 10/11/2008
458mm (18.03")
M1
622mm (24.49")
5
P2
P1
DESCRIPTION
577mm (22.72")
LEGEND
POSITIONING DIAGRAM
PRIMA AND PRIMA PRO CONVECTION OVEN
MODEL: COA1003 R02/COA1004 R02
WIRING DIAGRAM LEGEND
PRIMA LIGHT CONVECTION OVEN
MODEL CODE: COA1002 -230V
535mm (21.06")
LEGEND
DESCRIPTION
PART NUMBER
S
STAGE SWITCH
1-SEL-SWITCH
L
INTERIOR LIGHT
1-OVEN-LH
F1
FAN MINI PRIMA
1-FAN-CAT-OVEN
B1
BAKE THERMOSTAT
1-EGO-150
H2
BAKE PILOT LIGHT
1-PL-BMA0001
E1
BAKE ELEMENT 1200W /230V
5-1200W-CAT -BAK
B2
GRILL THERMOSTAT
1-EGO-150
H1
TIMER PILOT LIGHT
1-PL-BMA0001
E2
GRILL ELEMENT
5-2400W-CAT-GL
T
TIMER
1-2HR-TIMER
H3
GRILL PILOT LIGHT
1-PL-BMA0001
WIRING DIAGRAM LEGEND
PRIMA LIGHT CONVECTION OVEN
MODEL CODE: COA1002 -120V
LEGEND
577mm (22.72")
595mm (23.43")
DESCRIPTION
PART NUMBER
S
STAGE SWITCH
1-SEL-SWITCH
L
INTERIOR LIGHT
1-OVEN-LH-120V
F1
FAN MINI PRIMA
1-FAN-COA7002
B1
BAKE THERMOSTAT
1-EGO-150
H2
BAKE PILOT LIGHT
1-PL-BMA7102
E1
BAKE ELEMENT 1400W /120V
5-120V-1400W -BA
B2
GRILL THERMOSTAT
1-EGO-150
H1
TIMER PILOT LIGHT
1-PL-BMA7102
E2
GRILL ELEMENT
5-120V-1400W-GL
T
TIMER
1-2HR-TIMER
H3
GRILL PILOT LIGHT
1-PL-BMA7102
622mm (24.49")
590mm (23.23")
WIRING DIAGRAM
PRIMA LIGHT CONVECTION OVEN
MODEL CODE: COA1002 R01 -230V
COA1002 R01 -120V
230V - 120V
ELECTRICAL CONNECTION INFORMATION
MODEL
COA 1001
DESCRIPTION
VOLTS
(V /Hz)
POWER
(W)
PRIMA LITE
230 / 50 1200
COA1001-120 PRIMA LITE
120 / 60 1400
COA1002
MINI PRIMA PRO-OVEN
230 / 50
2400
COA1002-120 MINI PRIMA PRO-OVEN
120 / 60
1400
COA1003
PRIMA OVEN
230 / 50
2400
COA1004
PRIMA PRO OVEN
230 / 50
2400
IT IS ESSENTIAL TO MAKE SURE THAT THE INCOMING
VOLTAGE IS THE SAME AS THE RATED VOLTAGE OF
THE OF THE UNIT AS FOUND ON THE SERIAL PLATE.
THE SERIAL PLATE IS LOCATED AT THE REAR OF THE
UNIT ADJACENT TO THE INCOMING CABLE ENTRY.
WIRING DIAGRAM
PRIMA LIGHT CONVECTION OVEN
MODEL CODE: COA1001 R01 -230V
COA1001 R01-120V
WIRING DIAGRAM LEGEND
PRIMA LIGHT CONVECTION OVEN
MODEL CODE: COA1001 R01 -230V
LEGEND
DESCRIPTION
PART NUMBER
S
STAGE SWITCH
1-SEL-SWITCH
L
INTERIOR LIGHT
1-OVEN-LH
F1
FAN MINI PRIMA
1-FAN-CAT-OVEN
S1
BAKE THERMOSTAT
1-EGO-150
H2
BAKE PILOT LIGHT
1-PL-BMA0001
E1
BAKE ELEMENT 1200W /230V
5-1200W-CAT -BAK
H1
TIMER PILOT LIGHT
1-PL-BMA0001
T
TIMER
1-2HR-TIMER
WIRING DIAGRAM LEGEND
PRIMA LIGHT CONVECTION OVEN
MODEL CODE: COA1001 R01- 120V
LEGEND
DESCRIPTION
PART NUMBER
S
STAGE SWITCH
1-SEL-SWITCH
L
INTERIOR LIGHT
1-OVEN-LH-120V
F1
FAN MINI PRIMA
1-FAN-COA7002
S1
BAKE THERMOSTAT
1-EGO-150
H2
BAKE PILOT LIGHT
1-PL-BMA7102
E1
BAKE ELEMENT 1200W /230V
5-120V-1400W-BA
H1
TIMER PILOT LIGHT
1-PL-BMA7102
T
TIMER
1-2HR-TIMER