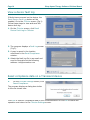
1
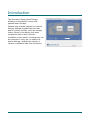
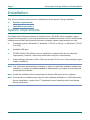
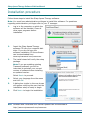
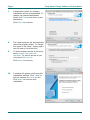
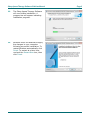
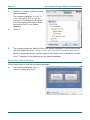
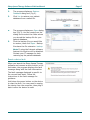
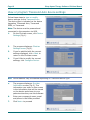
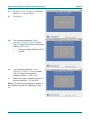
Sleep Apnea Therapy Software Clinician Manual Page ii Sleep Apnea Therapy Software Clinician Manual Notices Revised Sleep Apnea Therapy Software Clinician Manual 103391 Rev A Published February 8, 2013 and supersedes all previous versions. Notice The information contained in this document is subject to change without notice. Trademark Somnetics® and Transcend® are registered trademarks of Somnetics International, Inc.; all rights reserved. Copyright © Copyright 2013 Somnetics International, Inc.; all rights reserved. Contact Somnetics International, Inc. Corporate headquarters Somnetics International, Inc. Email [email protected] Web http://www.mytranscend.com/ Telephone 651.621.1800 Toll-free telephone 877.621.9626 Fax 651.204.0064 Somnetics International, Inc. 33 5th Avenue NW, Suite 500 New Brighton, Minnesota 55112 USA Authorized Representative (MDD 93/42/EEC) Methodize Europe Drieblad 11 NL-2811EG Reeuwijk The Netherlands Telephone +31 6 2129 4150l Rx Only Sleep Apnea Therapy Software Clinician Manual Page iii About this user guide Note This user guide is designed to be duplex-printed (printed on both sides of each sheet). If not printed in this manner, you will find blank pages in your printout. Note For purposes of this manual, some software screen images may differ from the actual screen display. This is only for clear printing and on-screen display of this manual. Important notes The information contained in this document is subject to change without notice. Note Indicates a tip or feature to aid efficient operation of the device. General Guidelines and Precautions This section contains information that is essential for safe operation of this product. Read and understand these instructions before using this product or any optional equipment. For more warning instructions, refer to additional materials supplied with the device. Somnetics products are designed and manufactured for use in conjunction with accessories supplied and recommended by Somnetics. Accessories designed by other manufacturers have not been tested and should not be used with Somnetics products. Page iv Sleep Apnea Therapy Software Clinician Manual Contents Introduction .............................................................................................. 1 Installation ................................................................................................ 2 System requirements ..........................................................................................2 Installation procedure ..........................................................................................3 Using the Sleep Apnea Therapy Software .................................................. 6 Common procedures ...........................................................................................8 Manage patients .............................................................................................9 Manage the patient database ......................................................................... 15 Reset a device fault ...................................................................................... 17 View or Program Transcend Auto™ settings ..................................................... 17 View or Program Transcend EZEX™ settings .................................................... 21 View or Program Transcend® settings ............................................................ 23 Calibrate the device ...................................................................................... 27 Retrieve compliance data .............................................................................. 28 Adjusting data in compliance reports .............................................................. 31 View a device fault log .................................................................................. 33 Reset compliance data on a Transcend device .................................................. 33 Import compliance files ................................................................................. 34 Exit the program .......................................................................................... 35 Introduction The Somnetics Sleep Apnea Therapy software is intended for use by both patients and clinicians. Patients may use the program to view the therapy settings programmed into their device by their clinician, view the therapy history stored in the device, and send compliance data to their clinician. In addition to the above, clinicians may use the program to view, set, or modify the device settings; calibrate the device; or retrieve compliance data from the device. Page 2 Sleep Apnea Therapy Software Clinician Manual Installation This section includes instructions for installing the Sleep Apnea Therapy software. • System requirements • Installation procedure System requirements The Sleep Apnea Therapy software is installed from a CD-ROM, which contains a setup program to help guide you through the setup and installation process. Before installing the software ensure that the following minimum computer system requirements are met: • Operating system: Windows XP, Windows 7 (32-bit or 64-bit), or Windows 8 (32-bit or 64-bit) • Available USB port • 512MB of RAM (the software can be installed on systems that do not meet this requirement; however, speed and performance may be compromised) • Video settings of at least 1024 x 768, and at least 32-bit color (lower settings might impair readability) Note You must have administrator privileges in order to install this software, update this software, or restore the patient database. Administrator privileges are not required to operate the software. Note Install the software before connecting the device USB cable to the computer. Note Some antivirus software may interfere with software installation. If difficulties arise during installation, consult your IT department about disabling antivirus software during installation. Sleep Apnea Therapy Software Clinician Manual Page 3 Installation procedure Follow these steps to install the Sleep Apnea Therapy software. Note: You must have administration privileges to install this software. For questions regarding administration privileges refer to your IT manager. 1. Log in to the computer on which the software will be installed. Close all other open programs before installation. 2. Insert the Sleep Apnea Therapy software CD into your computer disk drive. If you do not have the software installation CD the software can be downloaded from www.mytranscend.com/resources. 3. The install wizard will verify the setup package. Note: If you are updating existing Transcend software you will be instructed to uninstall your current version of software before installing an updated version. Select Next> to proceed. 4. Select your language from the menu and click OK. 5. A dialog box similar to the one shown will appear notifying the user that the installation setup is ready to begin. 6. Click Next> to begin the installation. Note Software and Transcend user manual updates can be download at http://www.mytranscend.com/resources Page 4 7. Sleep Apnea Therapy Software Clinician Manual A destination folder for software installation will be recommended. To change the selected destination folder click Change and enter a new destination. Click Next> to continue. 8. The install program will automatically name the program folder. To change the name of the folder, simply type a new file name in the text box. 9. To allow software access to all users, select Anyone who uses this computer. To restrict access to you only select Only for me. Click Next> to continue. 10. A window will appear confirming the installation settings. Click <Back to edit the settings or Cancel to exit. Click Next> to continue with installation. Sleep Apnea Therapy Software Clinician Manual 11. The Sleep Apnea Therapy Software will now initiate installation. A progress bar will appear indicating installation progress. 12. Windows must be restarted to apply the changes to your computer following successful installation. To restart Windows automatically click Finish. To restart at a later time uncheck the Restart Now box, then click Finish. Page 5 Page 6 Sleep Apnea Therapy Software Clinician Manual Using the Sleep Apnea Therapy Software Note You can open the software to review the patient database at any time. However, to program a device you must have the device connected to your computer with the USB cable. Note You must close all other open programs before launching the Transcend Sleep Apnea Therapy Software. 1. 2. There are two ways to launch the Sleep Apnea Therapy software: ♦ Choose StartProgramsSomneticsSleep Apnea Therapy SoftwareSleep Apnea Therapy Software. ♦ Double-click the Somnetics Sleep Apnea Therapy Software icon on your computer desktop. The program opens with a Welcome screen similar to the one shown here. From this window you have the option to select a different language. Note If the Transcend device is in a fault state, the program displays a fault message when you connect the device to the computer with the USB cable and launch the Sleep Apnea Therapy software. See Reset a device fault for more information. Sleep Apnea Therapy Software Clinician Manual 3. Click Clinician. The first time you use the clinician functionality the program displays a Password screen (Fig 1). Enter the password and click Next>. 4. The program displays the initial clinician screen (Fig 2). See Common procedures for information on how to carry out the most common procedures. Page 7 Note The clinician password will be provided to you with your first product order. If you forget or do not have access to the password call (877)-621-9626 to speak with a Somnetics customer service representative. Note The password is stored by the system so it will not have to be entered again. The clinician password is designed to deter patients from changing compliance therapy settings without clinician permission. The clinician password is not provided to patients. Note If the password has been entered for use with a previous version of the software the password permission will be present upon startup. Page 8 Sleep Apnea Therapy Software Clinician Manual Common procedures This section presents information about the following common procedures: • Manage patients • Manage the patient database • Reset a device fault • View or Program Transcend Auto • View or Program Transcend EZEX • View or Program Transcend • Calibrate the device • Retrieve compliance data • Adjusting data in compliance reports • Reset compliance data • Exit the program Sleep Apnea Therapy Software Clinician Manual Manage patients This section presents the following topics: • Add a patient • Edit a patient • Delete a patient Add a patient Follow these steps to add a new patient. 1. On the initial clinician screen, click Patient Database. (Fig 1). 2. The program displays the patient database screen (Fig 2). 3. Click Create Patient from the list of programmed devices. Page 9 Page 10 Sleep Apnea Therapy Software Clinician Manual 4. The program displays a patient information screen (Fig 3). 5. Enter patient information in the fields shown on the Patient Information screen. Note: Some fields will be disabled depending on the type of device. The following fields are required: ♦ ♦ First Name: enter the patient’s first name. Last Name: enter the patient’s last name. The following fields are optional: ♦ ♦ ♦ ♦ ♦ ♦ ♦ ♦ ♦ ♦ ♦ ♦ ♦ Birth Date: must be entered in MM/DD/YYYY format or selected from the popup calendar. Gender: choose from drop-down menu. Address 1: enter the first line of the patient’s address. Address 2: enter the second line of the patient’s address. City: enter the patient’s city of residence. State: select from drop-down list. Zip: enter the patient’s zip code. Phone: enter the patient’s 10 digit telephone number. Email Address: enter the patient’s email address. Country: enter the patient’s country of residence. ♦ ♦ ♦ Relationship to Policy Holder: enter the relationship of the patient to the policy holder. Group Number: enter the group number of the patient’s insurance coverage. Prescription Date: must be entered in MM/DD/YYYY format or selected from the popup calendar. The following fields are automatically populated once the device is programmed: ♦ ♦ ♦ ♦ Insurance Provider: enter the name of the patient’s insurance provider. ♦ Policy Holder ID: enter the ID of the policy holder for the patient’s insurance. ♦ Policy Holder Name: enter the name of the policy holder for the patient’s insurance. ♦ ♦ Min Pressure: populated with the minimum set therapy pressure (cmH2O). Max Pressure: populated with the maximum set therapy pressure (cmH2O). Starting Pressure: populated with set starting pressure (cmH2O). Starting Ramp Pressure: populated with set starting ramp pressure (cmH2O). Expiratory Relief Setting (EZEX): populated with the EZEX setting (Off, 1,2,3) Ramp Time: populated with set Ramp time (min). Date Programmed: populated with the date that the device was programmed. Serial Number: populated with the serial number of the device. Sleep Apnea Therapy Software Clinician Manual 6. Click Next> to save the patient record to the database. The program displays a message (Fig 4) to confirm that the patient record was saved. Edit a patient Follow these steps to edit a patient. 1. On the initial clinician screen, click Patient Database (Fig 1). 2. The program displays the patient database screen. From this screen you can monitor patient compliance or edit the patient information (Fig 2). 3. Click the name of the patient you wish to edit. Page 11 Page 12 4. The program displays the patient record screen (Fig 3). Edit the patient record as desired. For information about the fields on this screen, see Add a patient. Click Next> to save the patient record to the database. 5. The program displays a message to confirm that the patient record was saved (Fig 4). Sleep Apnea Therapy Software Clinician Manual Sleep Apnea Therapy Software Clinician Manual Delete a patient Follow these steps to edit a patient. 1. On the initial clinician screen, click Patient Database (Fig 1). 2. The program displays the patient database screen (Fig 2). Click the name of the patient you wish to delete. 3. The program displays the patient record screen (Fig 3). Click Delete patient from database. Page 13 Page 14 4. Sleep Apnea Therapy Software Clinician Manual The program displays a dialog box requesting that you confirm you wish to delete the patient from the database. Click Yes to delete the patient from the database; click No to return to the patient record screen without deleting the patient from the database. Note If using the Intranet software feature this function will be disabled. Contact your IT manager to delete a patient from the patient database. Sleep Apnea Therapy Software Clinician Manual Manage the patient database This section presents the following topics: • • Back up the patient database Restore the patient database Back up the patient database Follow these steps to back up the patient database. 1. On the initial clinician screen, click Backup Database (Fig 1). 2. The program displays a Backup Database dialog box (Fig 2). Page 15 Page 16 3. Sleep Apnea Therapy Software Clinician Manual Click the Yes button to back up your patient database. The program displays a Browse For Folder dialog box (Fig 3). Use the controls on the dialog box to select the folder where you’d like to store the backup file for your patient database. 4. Click OK. 5. The program saves the backup file for your patient database in the selected folder with the default file name <today’s date> SomneticsPatientDatabase.sdf.backup Note: If using the Intranet software feature this function will be disabled. Contact your IT manager for help backing up the patient database. Restore the patient database Follow these steps to back up the patient database. 1. The program displays a Restore Database dialog box (Fig 2). Sleep Apnea Therapy Software Clinician Manual 2. The program displays a Restore Database dialog box (Fig 2). 3. Click Yes to restore your patient database from a saved file. 4. The program displays an Open dialog box (Fig 3). Use the controls on the dialog box to select the folder where you stored the backup file for your patient database. 5. Click the backup file you would like to restore, then click Open. Backup files have the file extension .backup Note: If using the Intranet software feature this function will be disabled. Contact your IT manager for help restoring up the patient database. Reset a device fault When you launch the Sleep Apnea Therapy software and connect a device which is in a fault state, the program displays the fault message along with the fault information. The fault message displayed is specific to the current fault state. Follow the instructions in the fault message for guidance. Hold down the power button on the device to clear the fault. You may need to unplug the device from the computer, then plug it back in after the device is reset. Page 17 Page 18 Sleep Apnea Therapy Software Clinician Manual View or program Transcend Auto device settings Follow these steps to view or modify device settings on the Transcend Auto. The device type is indicated on the device keypad as Transcend Auto, Transcend EZEX, or Transcend. Note: The device must be powered and connected to the computer via USB. 1. On the Clinician screen, click Device Settings (Fig 1). 2. The program displays a Clinician Settings screen (Fig 2). 3. If you’re satisfied with the current settings displayed, click <Back to return to the Clinician screen. 4. If you’d like to modify the current settings, click Configure Device. Note Some features may be disabled depending on Transcend device type 5. The program displays a Provider Information screen (Fig 3). The information you enter on this screen is the information that will be stored on the device and shown to your patients when they use this software. 6. Enter your company’s name, email and phone in the fields provided. 7. Click Next> to proceed Sleep Apnea Therapy Software Clinician Manual 8. On the Device Therapy Mode screen select Auto Adjust (Fig 4). 9. Click Next> 10. The program displays a Select Minimum Therapy Pressure screen (Fig 5). Select the minimum pressure setting. Click Next>. • Minimum range: Between 4-20 cmH2O 11. The program displays a Select Maximum Therapy Pressure screen (Fig 6). Select the maximum pressure setting. Click Next>. • Maximum range: Between minimum therapy pressure – 20 cmH2O Note: If the minimum pressure is equal to the maximum pressure, advance to step 13. Page 19 Page 20 The program displays a Starting Therapy Pressure screen. 12. Select a starting pressure (Fig 7). Click Next>. • Starting Range: Between Min-Max pressure values • Default starting pressure is equal to minimum pressure. • The sliding bar allows for fine adjustments between single integer settings (such as 10.5). 13. The program displays a Ramp Feature screen (Fig 8). Enable or disable the ramp feature by pressing Yes or No. If Yes is selected, continue; if No is selected, skip to step 17. Note: If the starting pressure is less than 5 cmH2O, ramp will not be available. Skip to step 17. 14. Click Next>. 15. The program displays a Select Ramp Duration and Starting Pressure screen (Fig 9). Select the duration and the starting pressure for the ramp feature. 16. Click Next>. Sleep Apnea Therapy Software Clinician Manual Sleep Apnea Therapy Software Clinician Manual 17. The program displays a Select EZEX Pressure Relief Setting screen (Fig 10). Select an EZEX setting of Off, 1, 2 or 3. A setting of 3 provides the greatest level of expiratory relief. 18. Click Next>. 19. The program displays a Final Settings screen (Fig 11). This screen presents a summary of the settings that you have specified. Review them before you save them to the device. 20. If the settings displayed on the Final Settings Screen are correct, click Save new settings on Device to accept your selections and save the settings to the device. If you wish to make changes to any of the settings, click <Back to navigate to the appropriate screen to make the change. 21. The program displays a success message box once the settings have been saved to the device (Fig 12). Click OK to dismiss the message. 22. After saving the settings, you will be brought back to the review screen. Page 21 Page 22 Sleep Apnea Therapy Software Clinician Manual View or program Transcend EZEX device settings 1. Follow these steps to view or modify Transcend EZEX device settings. The device type is indicated on the device keypad as Transcend Auto, Transcend EZEX, or Transcend. 2. On the Clinician screen, click Device Settings (Fig 1). 3. The program displays a Clinician Settings screen (Fig 2). 4. If you’re satisfied with the current settings, click <Back to return to the Clinician screen. 5. If you’d like to modify the current settings, click Configure device. Note: Some features may be disabled depending on Transcend device type. 6. The program displays a Provider Information screen (Fig 3). The information you enter on this screen is the information that will be stored on the device and shown to your patients when they use this software. 7. Enter your company’s name, email and phone number in the field provided. 8. Click Next> to proceed. Sleep Apnea Therapy Software Clinician Manual 9. The program displays a Therapy Pressure screen (Fig 4). Select a therapy pressure and click Next>. Select a therapy pressure, then click Next>. Note: The sliding bar allows for fine adjustments between single integer settings (such as 10.5). 10. The next screen is the Ramp feature (Fig 5). Select Yes or No to allow or deny the use of the ramp feature. If Yes is selected, continue; if No is selected, skip to step 14. 11. Click Next>. 12. The program displays a Select Ramp Duration and Starting Pressure screen (Fig 6). Select the ramp duration and starting pressure. 13. Click Next>. Page 23 Page 24 14. The program displays a Select EZEX Pressure Relief Setting screen (Fig 7). Select an EZEX setting of Off, 1, 2 or 3. A setting of 3 provides the greatest level of expiratory relief. 15. Click Next>. 16. The program displays a Final Settings screen (Fig 8). This screen presents a summary of the settings that you have specified. Review them before you save them to the device. 17. If the settings displayed on the Final Settings Screen are correct, click Save new settings on Device to accept your selections and save the settings to the device. If you wish to make changes to any of the settings, click <Back to navigate to the appropriate screen to make the change. 18. The program displays a success message box once the settings have been saved to the device (Fig 9). Click OK to dismiss the message. 19. After saving the settings you will be brought back to the review screen. Sleep Apnea Therapy Software Clinician Manual Sleep Apnea Therapy Software Clinician Manual Page 25 View or program Transcend device settings 1. Follow these steps to view or modify Transcend device settings. The device type is indicated on the device keypad as Transcend Auto, Transcend EZEX, or Transcend. 2. On the Clinician screen click Device Settings (Fig 1). 3. If you’re satisfied with the current settings, click Back> to return to the Clinician screen. 4. If you’d like to modify the current settings, click Configure Device (Fig 2). Note: Some features may be disabled depending on Transcend device type. 5. The program displays a Provider Information screen (Fig 3). The information you enter on this screen is the information that will be stored on the device and shown to your patients when they use this software. 6. Enter the Company name, email, and phone number in the fields provided. Click Next> to proceed. Page 26 7. The program displays a Therapy Pressure screen (Fig 4). Select a therapy pressure between 4-20 cmH2O. Click Next>. Note: The sliding bar allows for fine adjustments between single integer settings (such as 10.5). 8. The next screen is the Ramp feature (Fig 5). Select Yes or No to allow or deny the use of the ramp feature. If Yes is selected, continue; if No is selected, skip to step 10. Click Next>. 9. The program displays a Select Ramp Duration and Starting Pressure screen (Fig 6). Select the ramp duration and starting pressure. Click Next>. Sleep Apnea Therapy Software Clinician Manual Sleep Apnea Therapy Software Clinician Manual 10. The program displays a Final Settings Screen (Fig 7). This screen presents a summary of the settings that you have specified. Review them before you save them to the device. 11. If the settings displayed on the Final Settings Screen are correct, click Save new settings on device to accept your selections and save the settings to the device. If you wish to make changes to any of the settings click <Back to navigate to the appropriate screen to make the change. 12. The program displays a success message box once the settings have been saved to the device (Fig 8). Click OK to dismiss the message. 13. After saving the settings you will be brought back to the review screen. Page 27 Page 28 Sleep Apnea Therapy Software Clinician Manual Calibrate the Device Follow these steps to calibrate the Transcend device: 1. Attach a manometer and 4mm leak to the device using standard procedures. 2. Plug the power supply into the device and connect the device to the computer using the USB cord. 3. Navigate to the Clinician Settings screen and click Calibrate Device (Fig 1). 4. The program displays a Pressure Calibration screen (Fig 2). 5. Click Start Blower. The button changes to Stop Blower and you may use it at any time during the calibration to turn off the blower. 6. Use the Pressure Offset slider control to adjust the therapy pressure to the correct value. 7. When you’re satisfied with the therapy pressure as shown on the manometer, click Stop Blower. 8. Click OK to accept the changes, save them to the device, and return to the Clinician Settings screen. Sleep Apnea Therapy Software Clinician Manual Retrieve compliance data Follow these steps to retrieve compliance data. There are two ways to retrieve compliance data. 1. Navigate to the patient database and click on the status symbol (Fig 1). 2. With a device powered and connected to the computer: • Click Clinician • Click Patient setup • Click Retrieve Compliance (Fig 2). 3. he program retrieves the available compliance data and displays a Compliance Overview screen (Fig 3). Page 29 Page 30 Sleep Apnea Therapy Software Clinician Manual 4. The Compliance Overview screen shows the following information: ♦ Compliance Summary The Compliance Summary section shows an analysis of the compliance data for the period selected: date range, average hours/night, median hours/night, 90th Percentile Pressure, 95th Percentile Pressure, days of therapy use. ♦ Patient Therapy Settings The Patient Therapy Information section shows the therapy settings in use for the period selected: Therapy pressure (minimum/ maximum/ starting), Ramp starting pressure, Ramp duration, and EZEXTM setting. ♦ Therapy Pressure Summary The Therapy Pressure Summary displays the minimum achieved pressure, maximum achieved pressure and time-weighted average pressure. ♦ AHI Events per Hour AHI stands for Apnea Hypopnea Index. The AHI Events per Hour section displays an index of the calculated average number of apnea and hypopnea events per hour. ♦ Leak Summary The Leak Summary section displays the average leakage, median leak, 90% leak in liters per hour, and 95% leak in liters per hour (L/h). Note Some of the reporting may show up as N/A or disabled depending on Transcend device type. Note Altitude change affects leakage and the Leak Summary section may report inaccurate results after a change in altitude. The unit self-adjusts after three days to the correct leakage rate. 5. Click the Compliance Detail tab to display detailed compliance information for the selected date range. The program displays a Compliance Detail screen (Fig 4). Sleep Apnea Therapy Software Clinician Manual Page 31 6. Scroll down in the Compliance Detail screen to view a graph of each therapy session (Fig 5). ♦ Red lines indicate apneas; when they happened and how long they lasted. ♦ Dark green lines with triangles indicate occurrence of hypopneas. ♦ The black line indicates active pressure. ♦ The dark blue line indicates the minimum pressure setting and the light blue line indicates the maximum pressure setting. ♦ The light green line indicates leak in liters per minute (L/m). ♦ The orange line with the ‘up’ arrow indicates the start of therapy. ♦ The maroon line with the ‘down‘ arrow indicates the end of therapy. 7. If you’d like to generate a PDF report of the compliance data, click Save Report. 8. The program displays a Save As dialog box (Fig 6). The default file name is <SerialNumber><Today’sDate>.pdf. You may modify the file name in the File name field. The default storage location is My Documents. Use the controls on the dialog box to browse to your preferred location, then click Save to save the file and return to the Compliance Detail screen. 9. When you are finished, click Back to return to the Clinician Settings screen. Page 32 Sleep Apnea Therapy Software Clinician Manual Adjusting data in compliance reports 1. To change the date range of the compliance data report: A. Go to the Compliance Overview screen and select Report Range (Fig 1). Note: Report Range is also available on the Compliance Detail screen and on every screen during Clinician Mode. B. You have the option of modifying the report to see all data, last 24 hours, last week, last month, last year, or select a custom date range (Fig 2). C. Go to the Compliance Overview screen and select Report Range (Fig 1). 2. The compliance report defaults to an analysis of how many nights the patient used the device for 4 hours, 4-6 hours, 6-8 hours and 8 or more hours. You have the ability to change the report hours. To adjust compliance report hours: A. Go to the Welcome screen (Fig 3). B. Click Set Report Hours (Fig 3). Sleep Apnea Therapy Software Clinician Manual C. Select the hours that will be shown on the compliance report (Fig 4). D. Click Apply Changes to Report. Note: Making changes to the compliance date range or the compliance report hours will apply to all reports in the software. Note: Reports within the software will default to the last change made. Page 33 Page 34 Sleep Apnea Therapy Software Clinician Manual View a device fault log If faults have occurred on the device, the Email Device Fault Log button will be enabled. Go to the Clinician screen (Fig 1). Follow these steps to view and send the device fault log: 1. On the Clinician screen, click Email Device Fault Log to Clinician. 2. The program displays a Fault Log screen (Fig 2). 3. A copy is saved in the location referenced in the Email Compliance window. 4. Attach the fault log file to an email and send to Somnetics at the following address: [email protected] Reset compliance data on a Transcend device 1. On the Clinician Settings screen, click Reset Compliance. The program displays a dialog box similar to the one shown here. Click Yes to clear all compliance data on the connected device or click No to cancel the operation and return to the Clinician Settings screen. Sleep Apnea Therapy Software Clinician Manual Page 35 Importing compliance files When a patient compliance file is received by email (or provided on a mass storage device, such as a flash drive) save the compliance file on your computer desktop. Then, do the following to import the data from the file into the software: 1. Locate the compliance file on your desktop. 2. Double click on the compliance file. 3. The compliance files information will automatically upload into the software. 4. Delete the file from your desktop. Exit the program On the Clinician Settings screen, click Close to exit the program. Somnetics International, Inc. 33 5th Avenue NW, Suite 500 New Brighton, Minnesota 55112 USA http://www.mytranscend.com/ Phone: 651.621.1800 Toll-free: 877-621-9626 Fax: 651.204.0064 Sleep Apnea Therapy Software Clinician Manual 103391 Rev B