1
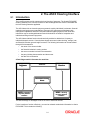
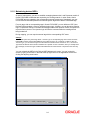
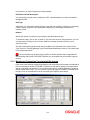
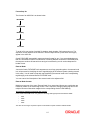
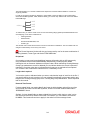
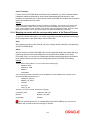
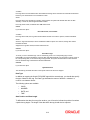
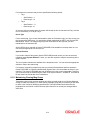
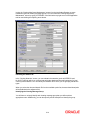
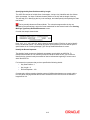
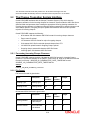
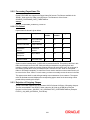
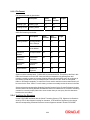
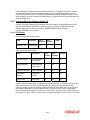
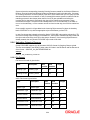
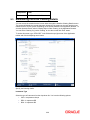
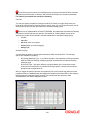
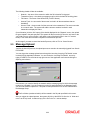
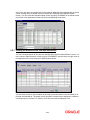
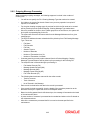
Clearing Interface
Version-1.0
9NT1425-ORACLE FCUBSV.UM.11.0.IN.1.0.0.0
[November] [2010]
Oracle Part Number E51713-01
Document Control
Author: Documentation Team
Group: UBPG
Created on: October 01, 2008
Revision No: Final
Updated by: Documentation Team
Reviewed by: Development/
Testing teams
Approved by: Software Quality
Assurance Team
Updated on: November 12, 2010
Reviewed on: November 12,
2010
Approved on: November 12, 2010
Clearing Interface
Table of Contents
1.
ABOUT THIS MANUAL................................................................................................................................ 1-1
1.1
1.2
1.3
1.4
1.5
1.6
1.7
2.
INTRODUCTION ........................................................................................................................................... 1-1
AUDIENCE .................................................................................................................................................. 1-1
ACRONYMS AND ABBREVIATIONS .............................................................................................................. 1-1
ORGANIZATION .......................................................................................................................................... 1-1
CONVENTIONS USED IN THIS MANUAL ....................................................................................................... 1-2
GLOSSARY OF ICONS .................................................................................................................................. 1-2
RELATED DOCUMENTS ............................................................................................................................... 1-3
THE ASCII CLEARING INTERFACE........................................................................................................ 2-1
2.1
INTRODUCTION ........................................................................................................................................... 2-1
2.1.1
Maintaining Clearing Transaction Types .......................................................................................... 2-2
2.1.2
Maintaining derived UDFs ................................................................................................................ 2-3
2.1.3
Maintaining Transaction Type hand-off file formats ......................................................................... 2-4
2.1.4
Mapping sub-nodes with the corresponding nodes in the External System ....................................... 2-9
2.1.5
Maintaining Clearing Msg Group ................................................................................................... 2-13
2.2
THE CHEQUE TRUNCATION SYSTEM INTERFACE ...................................................................................... 2-19
2.2.1
Processing Incoming Cheque Clearance......................................................................................... 2-19
2.2.2
Processing Payee Name File ........................................................................................................... 2-21
2.2.3
Rejection of Outgoing Cheque ......................................................................................................... 2-21
2.2.4
Verifying the Signature .................................................................................................................... 2-22
2.2.5
Incoming Rejected Cheques from CTS............................................................................................. 2-23
2.2.6
Uploading Outgoing Cheques.......................................................................................................... 2-24
2.2.7
Processing Small Clearing Account Number................................................................................... 2-26
2.2.8
Creating Extract File ....................................................................................................................... 2-26
2.2.9
Generating Notifications.................................................................................................................. 2-26
2.2.10 Generating Handoff Files ................................................................................................................ 2-27
2.3
MAINTAINING INTERFACE CLEARING DETAILS ........................................................................................ 2-29
2.4
MESSAGE HANDOFF ................................................................................................................................. 2-30
2.5
MESSAGE UPLOAD ................................................................................................................................... 2-32
2.5.1
Viewing the details of Files that were Handed-off........................................................................... 2-33
2.6
PROCESSING FOR THE INTERFACE ............................................................................................................. 2-34
2.6.1
Incoming Message Processing......................................................................................................... 2-34
2.6.2
Outgoing Message Processing......................................................................................................... 2-35
2.7
TRIGGERING THE IC CLEARING BATCH PROCESS ..................................................................................... 2-36
1. About this Manual
1.1
Introduction
This manual is designed to help acquaint you with the interface between Oracle FLEXCUBE and
the relevant clearing networks.
This manual provides you extensive explanations about the various maintenances required for
the smooth exchange of data between Oracle FLEXCUBE and the networks applicable. It also
gives you an insight into the processes involved in the actual exchange of data. Besides this User
Manual, while maintaining the interface related details, you can invoke the context sensitive help
available for each field. This help encapsulates the purpose of each field within a screen. Placing
the cursor on the relevant field and striking the <F1> key on the keyboard can obtain information
specific to a particular field.
1.2
Audience
This manual is intended for the following User/User Roles:
1.3
1.4
Role
Function
Back office data entry Clerks
Input functions for maintenance related to the interface
Back office Managers/Officers
Authorization functions
Acronyms and Abbreviations
Abbreviation
Description
System
Unless and otherwise specified, it shall always refer to Oracle FLEXCUBE
system
UDF
User Defined Fields
ACH
Automated Clearing House
Organization
This document talks about the maintenance required for data exchange between Oracle
FLEXCUBE and the relevant clearing networks. This includes the following
•
Maintaining Clearing Message Types
•
Maintaining File Formats
•
Maintaining Clearing Message Groups
•
Derived and Rejection UDF Maintenance
•
Message Status Browser
The manual also talks about the following processes:
•
Message hand-off to the clearing network
•
Message upload into Oracle FLEXCUBE
•
Online message processing
1-1
1.5
Conventions Used in this Manual
Important information is preceded with the
1.6
symbol.
Glossary of Icons
This User Manual may refer to all or some of the following icons.
Icons
Function
New
Copy
Save
Delete
Unlock
Print
Close
Re-open
Reverse
Template
Roll-over
Hold
Authorize
Liquidate
Exit
Sign-off
Help
Add
Delete
1-2
Refer the Procedures User Manual for further details about the icons.
1.7
Related Documents
You can refer to the XML Interface document, which outlines the details of the interface
mechanism between Oracle FLEXCUBE and an External System.
1-3
2. The ASCII Clearing Interface
2.1
Introduction
The Local Payments module supports the local clearing of payments. The Oracle FLEXCUBE
Clearing Gateway is the common channel for data exchange between Oracle FLEXCUBE and
the local clearing networks applicable.
The ACH Network is an electronic payments network used by individuals, businesses, financial
institutions and government organizations. Electronic ACH payments provide better cash
management capabilities and lower costs than traditional paper payments. Both funds and
information may be exchanged between financial institutions on behalf of companies and
individuals utilizing electronic payments.
The ACH Network allows funds to be electronically credited or debited to a Company or
individual's deposit account. Currently these deposit accounts include checking, savings, loan
and financial institution general ledger accounts. The following information can be transmitted
through ACH transactions:
•
the name of the account holder
•
the financial institution’s routing number
•
the account number involved in the transaction
•
the party initiating the transaction and the amount
•
the date of the transaction
A Data Diagram which illustrates the work-flow
Originator
Authorizer
Receiver
Automated Clearing
House
ODFI –
RDFI – Receiving
Originating
Depository Financial
Institution
Depository Financial
Institution
The data exchange of messages will be in the form of ASCII file formats.
For the interface to function effectively, you need to maintain certain basic information in Oracle
FLEXCUBE. This includes the following:
2-1
•
Maintaining Clearing Transaction Types
•
Maintaining Interface hand-off file formats for individual transaction types
•
Maintaining Clearing Transaction Groups for transaction type
2.1.1 Maintaining Clearing Transaction Types
A Clearing Transaction/Message Type is a Payment Order belonging to a Transfer Category.
These Clearing Message Types / Categories will be specific to the Network (example BankGiro
etc).
You can maintain the clearing message Type/Category details through the ‘Clearing Message
Type’ maintenance screen. You can invoke this screen by typing ‘IFDTXNTY’ in the field at the
top right corner of the Application tool bar and clicking the adjoining arrow button.
In this screen you can capture the following attributes about the clearing message
Type/Category:
•
Network ID – a valid network code from a pre-defined set of Network Codes. For instance
you can define a network code called INTERPAY.
•
Clearing Message Type – a valid name to identify the clearing message type which is to
be associated with the Network ID. You can also capture a brief description to identify the
clearing message type.
•
Process Direction – specify whether the payment order which you are defining belongs to
the Incoming transfer order or whether it belongs to the Outgoing transfer category.
•
Product Category/Product Restriction – If the process direction of the transaction type,
which you are defining, is Incoming, you will associate existing PC Product Categories
with each transaction type. Conversely, if the process direction is Outgoing, you will need
to associate existing PC Products with each transaction type. You can specify product
category/product restrictions in the form of allowed lists or disallowed lists.
2-2
2.1.2 Maintaining derived UDFs
As part of maintenance, you have to establish a mapping between the Local Payments module of
Oracle FLEXCUBE to fields that are required by the clearing network. In other words, Oracle
FLEXCUBE tags are mapped to the corresponding external system tags. Sometimes, you may
not find a direct relationship between an external system tag and the Oracle FLEXCUBE tags.
For such tags, with no corresponding tags in Oracle FLEXCUBE, you can define an UDF (User
Defined Field) and obtain a value by writing derivation logic. Likewise, you can also write rejection
logic. If a particular contract in the hand-off message satisfies the rejection criteria, the system will
reject the entire contract. The rejection logic will filter the contracts within the message that is
being handed-off.
During mapping, you can map the external tag with the corresponding UDF name.
Example
The external system may have a tag called – Account Type. A corresponding tag does not exist in Oracle
FLEXCUBE. Instead, Oracle FLEXCUBE has a tag called ‘Account_No’. Therefore, to obtain a value for
‘Account Type’, you can derive a logic such that if the first character of the Account No. is ‘C’, the Account
Type would be ‘Normal’ else it will be considered as a ‘Special’ account. Therefore, when you actually handoff a message, the Account Type would be associated with the value ‘Normal’ or ‘Special’ as the case may
be.
You can maintain the UDFs in the ‘Derived UDF Maintenance’ screen. You can invoke this
screen by typing ‘IFDCLDUD’ in the field at the top right corner of the Application tool bar and
clicking the adjoining arrow button.
2-3
In this screen, you have to specify the following details:
UDF Name and UDF Description
You can specify a unique name to identify the UDF. A brief description can also be provided in
the adjacent field.
UDF Type
Additionally, you should also specify the type of the UDF being defined – whether you are writing
a logic to derive a tag value or for filtering the transactions (in a message file) based on a
rejection criteria.
Network
Specify the network for which you are writing the derivation/rejection logic.
To execute the logic, click on the ‘X’ button. If you encounter any error during execution, you can
view the same by clicking on the ‘E’ button. Make the necessary corrections before you reexecute the logic.
The UDFs defined through this screen will be available in the drop-down menu of the ‘Derive
Type’ field in the ‘Clearing Message Type’/’Group Details Maintenance’ screen. This is discussed
in the section that follows.
You can maintain only 25 derived logics (UDFs) for all the networks that are applicable for
data exchange with Oracle FLEXCUBE. Likewise, you can maintain only one rejection logic per
network.
2.1.3 Maintaining Transaction Type hand-off file formats
Each network and clearing message type/category has a fixed format that needs to be handed off
from or uploaded into Oracle FLEXCUBE. Therefore you will need to specify the format in which
data is to uploaded and handed-off. You can do this through the ‘Clearing Message Type/Group
details maintenance’ screen. You can invoke this screen by typing ‘IFDTXNDT’ in the field at the
top right corner of the Application tool bar and clicking the adjoining arrow button.
2-4
Through this screen you can establish a mapping between the Local Payments module of Oracle
FLEXCUBE to fields that are required by the network. A predefined set of Clearing Message
Types will be shipped along with the software. You can change the default attributes of these
message types to suit the requirements of your bank.
Network ID
The Oracle FLEXCUBE Clearing Gateway is a common channel for data exchange between
Oracle FLEXCUBE and the local clearing networks applicable. The details of the applicable local
clearing networks are maintained in Oracle FLEXCUBE. You can define the process direction for
each of these clearing networks, through the ‘Clearing Message Type Maintenance’ screen
You can select the ID assigned to the Network whose tag names need to correspond with those
maintained in Oracle FLEXCUBE.
On selection of the network from the available option-list, the description gets defaulted
alongside.
Process Direction
The format for hand-off from Oracle FLEXCUBE is different from the format for upload into Oracle
FLEXCUBE. Therefore, you need to indicate the process direction for which the format is being
defined.
The options are:
•
Incoming (for upload into Oracle FLEXCUBE)
•
Outgoing (for hand-off from Oracle FLEXCUBE)
Clearing Message Group / Type
Incoming message (uploads) formats are defined for a Clearing Message Group. When you
select the ‘Incoming’ option, the set of Clearing Message Groups supported in Oracle FLEXCUBE
are made available to you in the option-list provided. Select the appropriate Group from the list.
The format will be applicable to all product categories belonging to the transaction types linked to
the selected Message Group.
Likewise, outgoing message (hand-offs) formats are defined for a Clearing Message Type. On
selection of the ‘Outgoing’ option, all the Clearing Message Types supported in Oracle
FLEXCUBE become available in the option-list provided. The outgoing message forma Oracle
FLEXCUBE t being defined will be applicable to all products that fall within the selected Clearing
Message Type.
Number Padding/Direction
The messages that are uploaded to or handed-off from Oracle FLEXCUBE consists of fields of a
specific length. Most often, the maximum field length is not utilized when you capture the actual
field values. Therefore, you need to specify a padding character to fill the gaps.
You also need to indicate the direction of the padding characters – whether you would like to pad
to the left of the actual field value or to its right. Normally, for numeric fields, you would choose to
pad to the left of the numeric value.
Example
Assume that the length of a numeric field, say ‘Amount’ is 10 and the actual field value is ‘100’, consisting of
only 3 digits. Further, you select ‘0’ (zero) as the padding character and choose to pad to the left of the field
value.
2-5
If the message consists of this numeric field, zero will be used to fill the gaps and the value will be displayed
as: ‘0000000100’.
Alpha Padding/Direction
Similarly, you have to select the padding character for the alphanumeric fields in Oracle
FLEXCUBE. You also need to indicate the padding direction for the same. Normally, for
alphanumeric fields, you would choose to pad to the right of the actual value.
Oracle FLEXCUBE Nodes
Just like in Oracle FLEXCUBE, the clearing network too may have a set of its own Tag
definitions. Consequently, it becomes necessary to maintain a mapping between the information
tags within Oracle FLEXCUBE with those required by the clearing network.
The Oracle FLEXCUBE node represents a set of tags grouped together. It is known as the parent
node/record from which the sub records/sub nodes (tags) are derived for mapping to the external
tags.
Format Type
As stated earlier, the messages that are handed off and uploaded into Oracle FLEXCUBE are in
the ASCII file format. An ASCII file consists of the following sections (in the order specified):
1. File Header
2. Batch Header
3. Batch Body
4. Batch Footer
5. File Footer
You can maintain a format for each section of the ASCII file.
The file header marks the beginning of a file. Every batch begins with a batch header and ends
with the batch footer. The batch body is the actual content of the message that is being handed
off or uploaded. The file footer marks the end of the file. A file can consist of several file headers,
file footers, batch footers and so on. You can maintain a format for each occurrence of a format
type within the ASCII file.
2-6
Format Seq. No
The format of an ASCII file is as shown below:
File Header
Batch Header
Batch Body
Batch Footer
File Footer
To recall, a file can consist of multiple file headers, batch headers, file footers and so on. The
sequence number determines the manner in which multiple formats (of the same format type)
appear in the ASCII file.
Oracle FLEXCUBE automatically sequences these formats for you. If you are maintaining more
than one file header format for a combination of Clearing Network and Oracle FLEXCUBE Node,
the sequence number will start with one and get incremented by one for each subsequent file
header format.
External Node
Just as the Oracle FLEXCUBE node represents a set of tags grouped together, the external node
is a unique name for identifying the set of tags belonging to the external system (clearing network
in this case). You will need to map each tag identified by the external node to the corresponding
tag belonging to the selected Oracle FLEXCUBE node.
You can enter a brief description of the external node in the adjacent field.
External Node Counter
Multiple occurrences of the same ‘External Node’ for a network and format type combination are
tracked by means of an external tag counter. This is required if a single external tag has to hold
multiple columns of data when mapped to the corresponding Oracle FLEXCUBE tag.
The following example will illustrate this concept:
In the Oracle FLEXCUBE node ‘Cust_Add’, the following child tags represent the address details:
•
Add1
•
Add2
•
Add3
•
Add4
The value for each tag is required to upload or handoff the complete customer address details.
2-7
The External Node ‘211’ consists of maintenance required for customer address details. It consists of a
single tag ‘Address’.
In order for the external system tag ‘Address’ to hold multiple columns of data (from the corresponding
Oracle FLEXCUBE tags Add1, Add2, Add3 and Add4), you need to map ‘Address’ with each of the Oracle
FLEXCUBE tags.
Add1
Address
Add2
Add3
Add4
To achieve this, you need to create a new record in the Clearing Msg Type/Group Details Maintenance for
each mapping, for the same combination of:
•
Clearing Network,
•
External Node,
•
Oracle FLEXCUBE Node, and
•
Format Type
The external node counter will track each occurrence of the above combination. The count starts from one
and gets incremented by one for every new record.
The Format Sequence Number will also get incremented by one for the same combination of
Clearing Network, Format Type and Oracle FLEXCUBE Node.
IS Optional
On occasion you may need to send additional payment information with an ACH payment by
using extended record formats called addenda. Addenda may include payment related
information such as Customer Addresses or Reject Codes. While maintaining Clearing Message
Group/Type maintenance record for addenda you can indicate whether the record is optional or
mandatory. Check the option box to indicate that the format you are maintained is an optional
one. Leave the box unchecked to indicate that it is a mandatory record.
Length check required
You have the option to indicate whether you want to calculate the length of each line in the file. If
you specify that line check is required, you can maintain line attributes such as start position and
length for the clearing message group in the ‘Clearing Msg Group Maintenance’ screen explained
later in this manual.
Date and Time Format
For date related fields, you need to identify the format in which the date value will be sent from
and received into Oracle FLEXCUBE. By default, Oracle FLEXCUBE sends all date fields in
‘RRRRMMDD’ format.
Similarly, for time related fields you have to identify the format in which the time value is to be
sent from and received into Oracle FLEXCUBE. For instance, you can maintain a format like
HHMMSS. This format will continue to apply for the entire line of the message format.
2-8
Value Translation
For each Oracle FLEXCUBE Node and External Tag combination, you have to indicate whether
translations should be performed for all tag values associated with the tag names. A value
translation is required only if the values sent by Oracle FLEXCUBE do not match with the external
system specifications and vice versa.
Example
Assume that Oracle FLEXCUBE recognizes only USD (for US Dollars). The external system requires the
value of US dollars as Dollar. When you upload into Oracle FLEXCUBE, if the value of the tag ‘CCY’ is
Dollar, it gets translated to USD. Likewise, during handoff, USD gets translated to Dollar. However, it takes
place only if translation is set for the external system and Oracle FLEXCUBE tag combination.
2.1.4 Mapping sub-nodes with the corresponding nodes in the External System
As part of the format maintenance, you need to ensure that each child tag defined in the External
Node corresponds to a pre-defined tag in Oracle FLEXCUBE.
Step I
After capturing the name of the ‘External Tag’ of the clearing network, identify the corresponding
‘Oracle FLEXCUBE Node’.
Step II
After you select the Oracle FLEXCUBE node, the sub-nodes/child nodes (also called child tags)
linked to the selected node will be displayed in the drop-down list available for the ‘Oracle
FLEXCUBE Tags’. You can key in the appropriate external sub-node (belonging to the External
Node specified earlier) and map it to the corresponding Oracle FLEXCUBE sub-node/tag.
Example
Assume that the External Node is ‘10’ and consists of the following tags:
•
RECORD CODE
•
CONTRACT_NUM
•
BRANCH
•
CUSTOMER
The corresponding Oracle FLEXCUBE node is PAYMENTS_COLLECTIONS and the following are the
Oracle FLEXCUBE tags that belong to it:
•
CONTRACT_REF_NO
•
BRANCH_OF_INPUT
•
CUSTNO
•
CPTY_NO
•
CUST_AC_NO
Therefore, you need to maintain the following mappings:
CONTRACT_NUM
-
CONTRACT_REF_NO
BRANCH
-
BRANCH_OF_INPUT
CUSTOMER
-
CUSTNO
If for an external tag, there is no corresponding Oracle FLEXCUBE tag, you can use the
derivation logic to obtain a value for such tags, if required.
2-9
Indicating whether data pertaining to a specific tag should be made Mandatory
You have the option of specifying whether the data pertaining to a specific information tag should
necessarily be made available in the incoming/outgoing message. Check the box available under
the column head titled Mandatory.
Specifying the Default Value
You can associate a default value with each information tag.
While uploading or handing off messages suppose an information tag within the
incoming/outgoing message does not have a value associated with it, the system automatically
appends the default value with the particular information tag only if the translation type is set up
for it.
Translation details for the specific Oracle FLEXCUBE and external tag combinations
If you have indicated that ‘Value Translation’ is required for all Oracle FLEXCUBE and external
tag combinations, this specification will be defaulted to all the tag mappings within the Oracle
FLEXCUBE and external node combination. However, you have the option of changing this for
individual tag mappings by choosing the appropriate translation option from the available list. The
seven options available are:
1. No Translation
2. Translate, null returns error
3. Null returns default, else no translation
4. Null returns default, else translate
5. Null returns Null, else translate
6. Derivation Logic
7. System Elements
If you select any other option apart from No Translation, NULL return default, else no
translation, Derivation Logic and System Element, you will have to capture the Oracle
FLEXCUBE Value and the corresponding External Value in the ‘Translation Values’ screen.
Let us assume, that you are maintaining the translation details for an information tag called CCY
(currency). The value of this tag in Oracle FLEXCUBE is USD. But the external system uses
Dollar for the same.
2-10
In the ‘Translation Values’ screen, the information that you capture will look as follows:
Oracle FLEXCUBE
Value
External
Value
USD
Dollar
The example given below illustrates the manner in which the system will behave when you
choose any one of the Translation options:
Example
We have specified the following parameters for the External Tag named CCY (currency).
•
•
The Translation Value for:
¾
Oracle FLEXCUBE – USD
¾
External System - Dollar
The Default Value is GBP, which is the local currency.
Case I
If you select the option No Translation, the system will not perform any translation.
As a result, if the message involves the tag ‘CCY’ with value USD, both the incoming and the outgoing
messages will retain the value USD.
Case II
If you select the option:
Translate, null returns error
Condition
The tag value will be translated based on your maintenance in the ‘Translation’ screen. If you fail to send the
corresponding value to the system (i.e. if the value of the tag is null), an error message will be displayed
informing you of the same.
Suppose you had failed to associate a corresponding Oracle FLEXCUBE value (USD) for the External
Value (Dollar) in the ‘Translation’ screen, the system would have displayed an error message informing you
of the same. You would have been allowed to maintain the record only after having maintained the
corresponding translation value.
Case III
If you select the option:
Null returns default, else no translation.
Condition
If the tag value is null, the system will not translate it. However, the default value associated with the tag will
be used.
Result
As stated earlier the Tag Value associated with the external system is Dollar and the corresponding tag
value in Oracle FLEXCUBE is USD. Let us assume that the Tag Value associated with the Tag Name ‘CCY’
is Null. In such a case, the system will use the default value GBP.
Case IV
If you select the option:
Null returns default, else translate.
2-11
Condition
If the tag value is null the default value associated with the tag will be used else the value will be translated
based on your maintenance in the ‘Translation’ screen.
Result
If the tag value in the external tag is ‘Dollar’, during upload, the system will translate this value to USD.
Similarly, or hand-off, USD will get translated to Dollar.
If the Tag Value is Null, the default value GBP will be used.
Case V
If you select the option:
Null returns Null, else translate
Condition
If the tag value is Null, the Tag Value will be retained as Null. If the value is present, it will be translated.
Result
Since the Tag Value is Dollar, it will be translated to USD for upload. For hand-off, the tag value will be
translated to Dollar.
Suppose the Tag Value is Null, it will be retained as null.
Case VI
If you select the option:
Derivation Logic
To recall, you use a derivation logic if for an external tag, there is no corresponding tag in Oracle
FLEXCUBE. The logic is identified by a unique UDF (User Defined Field). You will need to map the name of
the corresponding UDF, to the external tag. During handoff, the system will associate the value obtained
from the derivation logic maintained for the associated UDF.
Case VII
If you select the option
System Element
The external tag will inherit the value of the system element to which it is mapped.
Data Type
In addition to mapping the Oracle FLEXCUBE tags with the external tags, you should also specify
the type of data for each tag. The Data Type indicates the nature of the data – whether it is
numeric or a character format.
The following options are available:
•
CHAR.
•
NUMBER
•
DATE, and
•
TIME
Start Position and Data Length
To differentiate the data of one tag from another, you will need to indicate the position from where
a particular tag begins. The length of the data within the tag should also be captured.
2-12
For instance let us assume that you have specified the following details:
•
Tag 1
¾
¾
•
Start Position – 1
Data Length – 10
Tag 2
¾
¾
Start Position – 11
Data Length - 10
As a result, while processing data, the system will identify the first 10 characters as Tag 1 and the
next 10 characters (11 to 20) for Tag 2.
Derive Type
For an external tag, if you choose the translation option as ‘Derivation Logic’ you have to map it to
the corresponding UDF name. You would have already maintained the UDF in the ‘Derived UDF
Maintenance’ screen. The external tag will get the value based on the logic that you have
maintained for the selected UDF.
All the UDFs that you maintain in Oracle FLEXCUBE will be available in the drop-down list. You
can select the appropriate one from the list.
System Elements
If you need to hand-off the system (Oracle FLEXCUBE) derived values, you have to select the
translation option System Element. Further, you are also required to map the external tag with a
system element.
The set of system elements are available in the drop-down menu. You can select the appropriate
element to map to the external tag.
For instance, the clearing network may want you to hand-off transactions that were entered in
Oracle FLEXCUBE on a specific calendar date (System Date - the current date as shown in your
machine). The Oracle FLEXCUBE date may be different from the current system date. Therefore,
you will need to map the external tag say ‘Date’ to the system element – SYSDATE. The hand-off
file will contain the actual date of the transactions.
2.1.5 Maintaining Clearing Msg Group
Transaction types having common attributes should be grouped together into Clearing Message
Groups for ease of processing. For each clearing message group that you maintain you will need
to define a set of uniquely identifying specifications. These specifications will determine the
parameters for the manner in which contracts (also referred to as records) are arranged within
ASCII files.
2-13
Invoke the ‘Clearing Msg Group Maintenance’ screen from the Application Browser to group
transaction types into clearing message groups. You can invoke the ‘Clearing Msg Group
Maintenance’ screen by typing ‘IFDTXNGR’ in the field at the top right corner of the Application
tool bar and clicking the adjoining arrow button.
Indicating the Network ID
In the ‘Clearing Networks’ screen, you can maintain the networks (such as INTERPAY and
HLAYOUT) through which you communicate with other banks and financial institutions for local
currency funds transfers. You can identify the Network ID for which you are grouping transaction
types.
When you select the relevant Network ID from the available option list, the associated description
will be defaulted to the adjacent field.
Identifying the Clearing Message Group
You will have to uniquely identify each clearing message group that you define with an
appropriate name. Additionally, you can also specify a brief description to identify the group.
2-14
Specifying the Key Start Position and Key Length
The ASCII file consists of multiple lines of messages. A unique ‘key’ identifies each line of data
within a message. You have to indicate the start position of the key and the length of the key.
This will help you in identifying the key in the message, and subsequently in deciphering the data
that follows.
The key actually denotes an External Node. The values that appear after the key are
assigned to the external tags, as per the format maintained for that external node in the Clearing
Message Type/Group Details Maintenance screen.
Consider the sample shown below:
Here, ‘210’, ‘211’, ‘212’, and ‘213’ are the keys (or external nodes). Each key is used to identify
the line of data that follows. The external tag values will be picked up from the data as per the
specifications in the ‘Clearing Message Type’/’Group Details Maintenance’ screen.
Identify the Record Separator
The details of each contract are displayed as separate records within an ASCII file. To
differentiate the details of one contract (record) from another within the file, you will need to
identify the key (external node) that would be used to indicate the beginning of a new record
within the ASCII file.
For instance let us assume that you have specified the following details:
•
Key Start Position – 1
•
Key Length – 3
•
Record Separator - 210
Consequently, while processing data the system will differentiate between one record and the
next only after verifying whether the first three characters of the record is three characters in
length and is 210.
2-15
Given below is a sample of how record separators are used to distinguish between details of one
contract and another.
Going by our example, in the sample shown above, the details from line 1 to line 10 are
construed to be details of a single record or contract. The details available from line 11 to 21 will
be treated as a second record/contract and so on.
Specifying the Masks and other attributes of the File
The File Mask is the nomenclature in which the external system names the ASCII file. You will
need to capture the corresponding Process File Mask, which is the format in which you have
named the file in Oracle FLEXCUBE.
Example
File Mask: BETOPD04
Process File Mask: BETOPD%d%t### (d is the date, t denotes the time and ### indicates a running serial
number)
If you check the ‘Use Process File Mask’ box, the external system will name the ASCII file based
on the file mask specified for Oracle FLEXCUBE.
File Extension
In addition to specifying the file masks you have to indicate the manner in which each file is to be
stored. Typically, you can store these files with a ‘btc’ extension. However, you have the choice of
specifying any extension you wish to generate these files in.
File Path
The file path is the directory or area in your system where the ASCII files are to be stored.
Field Separator
You have the option of using delimiters to separate data within a file. The options available are:
•
$ S – indicating that a space needs to be used as a delimiter.
•
S T – indicating that a tab needs to be used as a delimiter.
2-16
Alternatively, you can also choose to have a comma, a semi-colon, a hyphen etc.
Clearing Message Type Separator
To recall, in this screen you are grouping clearing transaction/message types which share similar
attributes. You have the option of differentiating messages within a group with delimiters.
Session Timeout
The session timeout is the maximum time limit that Oracle FLEXCUBE will wait for a response to
a request sent to the external system. You can indicate in terms of minutes, the time within which
an outgoing file should be processed by the External System and sent back to Oracle
FLEXCUBE. Each time the external system fails to send a response to a request sent by Oracle
FLEXCUBE, within the maximum time limit maintained, Oracle FLEXCUBE will recreate the
message and send it to the external system again. You can maintain a count for the number of
times a message can be resent.
Resend Count
An outgoing message can be resent any number of times. You have to indicate the resend count
in this field. As a result, all messages for the given Network ID and Clearing Message Group
combination can be resent only the specified number of times. For instance, you have indicated 3
as the resend count. A specific message has failed to parse through all three times. Since the
resend count has been busted you will not be able to send the message one more time. The
message will be logged as an error message.
Specifying the Handoff Parameters
Since a single hand-off file can have multiple batches you can indicate the number of batches
that should be sent in a single file. Similarly, you have to indicate the number of
transactions/messages types, which should be sent within a batch.
Additionally, you can also specify manner in which message/transaction types are to be sorted.
The options available are:
1. By Clearing Message Type
2. By Account Number
If you select the second option, the transactions/messages will be sorted by the Account Number
involved in the transaction. Else, the sorting will be based on the transactions themselves. For
instance, assume there are 12 transactions within a file. Out of these 12 transactions four involve
the same account number and the other eight involve a different account number. For the given
Clearing Group you have indicated that messages should be sorted as per the Account Number.
As a result the details of eight messages involving the same account will be listed first and the
details of the other four messages will be listed subsequently.
Restricting specific Clearing Transaction Type from a group
A list of all the transaction types you have maintained in the system are displayed in the Available
column. For each Clearing Group that you define you can choose to restrict or allow specific
transaction types in the form of allowed or disallowed lists.
2-17
Indicating the Process Direction and the related attributes
A Message Group can be defined to group transaction types maintained for the upload of
messages into Oracle FLEXCUBE (Incoming) or for the hand-off of messages from Oracle
FLEXCUBE (Outgoing). You have to indicate the process direction of the message group. You
will need to specify the process attributes depending upon the process direction that you specify.
Outgoing attributes:
If you are maintaining the details of an outgoing message group you have to specify the attributes
of the batch hand-off file that is sent. These include:
•
Include/Reject – indicates whether the details of the rejected contracts need to be part of
the outgoing file.
•
Block Enabled – indicates whether the outgoing file needs to be block enabled.
•
Line Length – indicate the length of a line within a block.
•
Block Filler – specifies the identifier, which should be used to identify the block.
•
Block Factor - specifies the factor by which the line length should be multiplied. This in
turn will provide the total number of characters in the block.
Incoming attributes:
Automatic Auth – if enabled indicates that the incoming file should be automatically authorized
upon receipt.
Transaction Basis – specifies the basis on which transactions are grouped in an incoming file.
The options available are:
¾
¾
Record Based
Batch Based
If the records are batch based you have to capture the Batch Key Start position and the Batch
Key Length to uniquely identify the batch.
Length Attributes
•
Length Check Required
If you have opted for this facility in ‘Clearing Message Type’ screen and also check this box here,
the system will calculate the length of the particular line and subsequently writes the calculated
value from the length starting position maintained for the particular message group.
•
Starting Position
This field indicates the position from which the calculated value has to be written into.
•
Length
This indicates the length for the line.
Example:
Let us assume that the length of the transaction line is about 300. The line attributes indicated are:
•
Start position - 6
•
Length of position – 5
2-18
The calculated value will be 300 and positions 6 to 10 will denote the length of the line.
Oracle FLEXCUBE automatically writes the calculated value from position 6 to 10 as 00300.
2.2
The Cheque Truncation System Interface
Oracle FLEXCUBE interfaces with the Cheque Truncation System (CTS) which does the
signature verification for the incoming cheques for clearance. System reads the ASCII files from a
specified folder and processes them creating the appropriate incoming clearing transaction for
incoming cheque clearance or initiates an outgoing clearing transaction for outgoing cheques and
also handles rejection of outgoing cheques. System also interfaces with the CTS to process
rejection of incoming cheques.
Oracle FLEXCUBE supports the following:
•
80 character and 100 character ASCII file formats for incoming cheque clearance
•
Payee name file upload
•
120 character ASCII file format for reject of outgoing cheques
•
54 character ASCII file for technical rejected cheques from CTS
•
186 ASCII file upload format for Outgoing Cheque upload
•
Outgoing cheque extracts 80 character ASCII file format
•
Incoming reject 120 character ASCII file format
2.2.1 Processing Incoming Cheque Clearance
Oracle FLEXCUBE supports the 80 & 100 character ASCII file formats for Incoming Cheque
Clearance. The files are available in the ‘READY’ folder under ‘IN’ folder in the DB Server and the
filename is of format – SOURCE_80_CLEARINGTYPE_DATE_TIMESTAMP.txt and
SOURCE_100_CLEARINGTYPE_DATE_TIMESTAMP.txt
Example
EXTSYS_100_MICR_01FEB2010_14:00:00.txt
2.2.1.1 File Format
File format of Header is given below:
Field
Description
Start
Position
End
Position
Length
Clearing Type
Clearing Type
37
41
5
Clearing House
Clearing House
42
44
3
80 character ASCII file format is given below:
Field
Description
Start
Position
End
Position
Length
Routing Number
Routing Number
of the Cheque
1
16
16
Account Number
Account Number
to be debited
17
32
16
2-19
Instrument Number
Cheque Number
33
48
16
Transaction
mnemonic
Transaction
mnemonic
49
64
16
Transaction
Amount
Transaction
Amount
65
80
16
100 character ASCII file format is given below:
Field
Description
Start
Position
End
Position
Length
Routing Number
Routing Number of
the Cheque
1
16
16
Account
Number
Account Number to
be debited
17
32
16
Instrument
Number
Cheque Number
33
48
16
Transaction
mnemonic
Transaction
mnemonic
49
64
16
Transaction
Amount
Transaction Amount
65
80
16
Document Id
Document Identifier
81
100
20
System runs the intraday batch - CGUPLOAD to process these file. This picks up the files in this
folder and moves them to the ‘WIP’ folder and then processes them by parsing them and
inserting a record to create an Incoming Clearing Contract for each of the entry (for a cheque) in
the clearing upload table. Once processed the file is moved from ‘WIP’ folder to ‘Completed’
folder on successful completion. In case if the file can not be read due to some reason then it will
be moved to the ‘Error’ folder. For such cases, you have to manually correct the errors in the files.
System processes records from the upload tables and then based on the transaction mnemonic
does the following:
•
If the transaction mnemonic represents a cheque, then create an Incoming Clearing
Contract for each of the record (Cheque).The product used for creating the Incoming
Clearing Contract is picked up from the mapping maintenance - static maintenance of the
Clearing House, Clearing Type and the Incoming Clearing Product, based on the
Clearing House and Clearing Type got from the header of the incoming file
•
If the transaction mnemonic represents a DD(Demand Draft) or a BC (Banker’s Cheque)
then create an Instrument Contract for each of the record (DD or BC)
•
If creation of clearing contract for a record (cheque), fails due to some reason then it can
be queried from the upload table based on the error status. In case if the processing of
the clearing contract fails dues to any reason, it gets rejected with appropriate reject
code/reason and it will get added to the Incoming Reject extract file (when the intra-day
batch CGXTRACT is run).
2-20
2.2.2 Processing Payee Name File
Oracle FLEXCUBE also supports the Payee Name file formats. The files are available in the
‘READY’ folder under ‘IN’ folder in the DB Server. The filename is of the format –
SOURCE_PAYEENAME_DATE_TIMESTAMP.txt
Example
EXTSYS_PAYEENAME_01FEB2010_14:00:00.txt
2.2.2.1 File Format
Payee Name file format is given below:
Field
Description
Start
Position
End
Position
Length
Account Number
Account Number
to be debited
1
16
16
Instrument Number
Cheque Number
17
28
12
Transaction
Amount
Transaction
Amount
29
42
14
Transaction
Description
Payee Name
43
82
40
Instrument Date
Instrument Date
83
90
8
System runs the intraday batch - CGUPLOAD to process these file. This picks up the files in this
folder and moves them to the ‘WIP’ folder and then processes them by parsing them and
inserting a record to create an Incoming Clearing Contract for each of the entry (for a cheque) in
the clearing upload table. Once processed the file is moved from ‘WIP’ folder to ‘Completed’
folder on successful completion. In case if the file can not be read due to some reason then it will
be moved to the ‘Error’ folder. For such cases, you have to manually correct the errors in the files.
This payee name detail is used while generating account statement for a customer. The system
refers to this data store and displays the corresponding payee name for the accounting entries
posted while processing this cheque.
2.2.3 Rejection of Outgoing Cheque
Oracle FLEXCUBE supports the 120 character ASCII file format for Reject of Outgoing cheques.
The files are available in the ‘READY’ folder under the ‘IN’ folder in the DB Server and the
filename is of the format – SOURCE_120_CLEARINGTYPE_DATETIMESTAMP.txt (Example:
EXTSYS_120_MICR_01FEB2010_14:00:00.txt).
2-21
2.2.3.1 File Format
File format of Header is given below:
Field
Description
Start
Position
End
Position
Length
Clearing Type
Clearing Type
37
41
5
Clearing House
Clearing House
42
44
3
ASCII file format is given below:
Field
Description
Start
Position
End
Position
Length
Routing Number
Routing Number
of the Cheque
1
16
16
Account Number
Account Number
to be debited
17
32
16
Instrument
Number
Cheque Number
33
48
16
Transaction
mnemonic
Transaction
mnemonic
49
64
16
Transaction
Amount
Transaction
Amount
65
80
16
Reject Reason
Reason for
Rejection
81
120
40
System runs the intraday batch - CGUPLOAD to process these file. This picks up the files in this
folder and moves them to the ‘WIP’ folder and then processes them by parsing them and
inserting a record to create an Incoming Clearing Contract for each of the entry (for a cheque) in
the clearing upload table. Once processed the file is moved from ‘WIP’ folder to ‘Completed’
folder on successful completion. In case if the file can not be read due to some reason then it will
be moved to the ‘Error’ folder. For such cases, you have to manually correct the errors in the files.
System rejects the corresponding Outgoing Clearing Contract for the Cheque Reference Number,
Account Number & Routing Number combinations found in this data store. If reversal of a clearing
contract for a record (cheque) fails due to some reason then you can query from the data store
based on the error status.
2.2.4 Verifying the Signature
Oracle FLEXCUBE interfaces with the Check Truncation System (CTS). Signature Verification is
done by CTS for the cheques incoming for clearance. CTS verifies the signature in the cheque
with the corresponding Customer/Customer Account Signature stored in Oracle FLEXCUBE.
2-22
For this purpose, the system exposes a Web Service which is invoked by the CTS by providing
the Customer/Customer Account number and getting the corresponding Signature(s) for the
Customer/Customer Account. The signatures are encoded in base64 so that they can be stored
as binary data in the Xml returned by the Web Service. The Web Client/CTS system decodes it to
obtain the signatures.
2.2.5 Incoming Rejected Cheques from CTS
Oracle FLEXCUBE supports the 54 character ASCII file format for Incoming Rejects from CTS.
The files are available in the ‘READY’ folder under the ‘IN’ folder in the DB Server and the
filename adheres to the format – SOURCE_54_DATETIMESTAMP.txt (Example:
CTS_54_01FEB2010_14:00:00.txt).
2.2.5.1 File Format
File format of Header is given below:
Field
Description
Start
Position
End
Position
Length
Clearing Type
Clearing Type
15
17
3
ASCII File format is given below:
Field
Description
Start
Position
End
Position
Length
Account Number
Account Number
to be debited
1
16
16
Routing Number
Routing Number
of the Cheque
17
25
9
Instrument Number
Cheque Number
26
37
12
Transaction
Amount
Transaction
Amount
38
51
14
Reject Code
Reject Code
52
54
16
System runs the intraday batch - CGUPLOAD to process these file. This picks up the files in this
folder and moves them to the ‘WIP’ folder and then processes them by parsing them and
inserting a record to create an Incoming Clearing Contract for each of the entry (for a cheque) in
the clearing upload table. Once processed the file is moved from ‘WIP’ folder to ‘Completed’
folder on successful completion. In case if the file can not be read due to some reason then it will
be moved to the ‘Error’ folder. For such cases, you have to manually correct the errors in the files.
2-23
System rejects the corresponding Incoming Clearing Contract created for the Cheque Reference
Number, Account Number and Routing Number combinations found in this data store. If reversal
of a clearing contract for a record (cheque), fails due to some reason then you can query from the
data store based on the error status. In case if reversal fails because system is unable to find the
matching contract for the cheque (when the file from CTS gets uploaded even before the
incoming file for clearance is processed), then they will be marked as unprocessed. These
records are tried again. The next time the intraday batch is run on the same day. If the batch is
not run on the same day, or if the contract can not be found on that day, then it will be marked as
error.
On successful reversal, it will get added to the Incoming Reject extract file (when the intra-day
batch CGXTRACT is run) with the appropriate reject code/reason got from CTS.
In case if a cheque that is already rejected by Oracle FLEXCUBE is also getting rejected by CTS,
and if the Incoming Reject Extract is not created for it, then system overwrites the reject code with
the reject code returned by the CTS for that cheque. However, if the Incoming Reject Extract is
already created, then only Oracle FLEXCUBE reject code will be hold.
2.2.6 Uploading Outgoing Cheques
Oracle FLEXCUBE supports the 186 character ASCII file format for Outgoing Cheque upload.
The files are available in the ‘READY’ folder under ‘IN’ folder in the DB Server and the filename is
of the format – SOURCE_186_DATETIMESTAMP.txt
Example
EXTSYS_186_01FEB2010_14:00:00.txt
2.2.6.1 File Format
File format of Header is given below:
Field
Description
Start
Position
End
Position
Length
Clearing Type
Clearing Type
37
41
5
Clearing House
Clearing House
42
44
3
ASCII File format is given below:
Field
Description
Start
Position
End
Position
Length
Record Type
Record Type
1
1
1
Transaction Type
Transaction Type
2
3
2
Account Number
Account Number
4
19
16
Account Branch
Account Branch
20
25
6
Transaction Code
Transaction Code
26
30
5
Transaction Date
Transaction Date
31
38
8
2-24
Field
Description
Start
Position
End
Position
Length
Debit/Credit
Indicator
Debit/Credit
Indicator
39
39
1
Cheque Date
Cheque Date
40
47
8
Transaction
Currency
Transaction
Currency
48
52
5
Amount in Local
Currency
Amount in Local
Currency
53
66
14
Amount in
Account Currency
Amount in
Account Currency
67
80
14
Conversion Rate
Conversion Rate
81
88
8
Cheque Number
Cheque Number
89
100
12
Reference
Document
Number
Reference
Document
Number
101
112
12
Transaction
Description
Transaction
Description
113
152
40
Transaction
Mnemonic
Transaction
Mnemonic
153
154
2
Outward Clearing
Type
Outward Clearing
Type
155
157
3
Routing Number
Routing Number
158
166
9
Drawee Account
Number
Drawee Account
Number
167
182
16
Clearing Product
Outgoing Clearing
Product
183
186
4
System runs the intraday batch to process these file. This picks up the files in this folder and
moves them to the ‘WIP’ folder and then processes them by parsing them and inserting a record
to create an Incoming Clearing Contract for each of the entry (for a cheque) in the clearing upload
table. Once processed the file is moved from ‘WIP’ folder to ‘Completed’ folder on successful
completion. In case if the file can not be read due to some reason then it will be moved to the
‘Error’ folder. For such cases, you have to manually correct the errors in the files.
System processes the records from the upload tables and then creates an Outgoing Clearing
Contract for each of the record (Cheque). It also gets added to the Outgoing Extract file (when the
intra-day batch CGXTRACT is run). If creation of clearing contract for a record (cheque) fails due
to some reason then you can query from the upload table based on the error status,
2-25
2.2.7 Processing Small Clearing Account Number
The Account Number that is used in the files is 6-digit ‘Small Clearing Account Number’, as this
number is only available in the Cheque. This is a unique number for a customer account which is
created while issuing the first cheque book for that account. It is generated by the system and
stored. While processing this file it fetches the corresponding Customer Account Number for the
Small Clearing Account Number (for both incoming as well as outgoing). It is padded in the files.
2.2.8 Creating Extract File
System has an intra-day batch CGXTRACT which have to be run to generate the Incoming
Reject & Outgoing Extract files.
For generating the Incoming Reject Extract file, it picks up all the clearing contracts that have got
rejected (by Oracle FLEXCUBE, by CTS and by both) but not yet added to the extract. Based on
the Clearing Type of the cheques (got from the file header), the cheque reject details is added to
different extract files – one each for each clearing type. The file name is of the format SOURCE_120_CLEARINGTYPE_DATETIMESTAMP.txt
Example
FCUBS_MICR_120_01FEB2010_14:00:00.txt
It is placed in the ‘OUT’ folder in the DB Server.
Similarly for generating the Outgoing Extract file, it picks up all the Outgoing clearing contracts
that have not yet been added to the extract. Based on the Clearing Type of the cheques (got from
the file header), the outgoing cheque details will be added to different extract files – one each for
each clearing type. The file name is of the format SOURCE_80_CLEARINGTYPE_DATETIMESTAMP.txt
Example
FCUBS_80_MICR_01FEB2010_14:00:00.txt
It is placed in the ‘OUT’ folder in the DB Server.
2.2.9 Generating Notifications
Oracle FLEXCUBE generates notifications to CTS as part of the online handoff process. These
notifications can either be configured as primary key notifications or full message /screen
notifications. If configured as primary key notifications, the system will handoff a file containing
the primary key fields alone viz., customer id and signature id. The system will also extract the
stored signatures from the database and save them as individual files in the pre-defined folder
with filename as CIFID_SignID_SpecimenID. CTS will take these files from the pre-configured
folder.
If the notifications are configured as a full message, then the system will extract the stored
signatures from the database and save them as individual files in the pre-defined folder and send
the filenames also to CTS. CTS will take these files from the pre-configured folder.
You are required to configure CTS as an external system in Oracle FLEXCUBE and also
configure the folder from where it should pick up the customer signature image files. The system
will trigger the handoff (both primary & full) each time a signature is created, amended or closed.
The notifications that are generated by the system are listed below:
2-26
2.2.9.1 Notification for Customer Closure
For closure of Customer, a notification called ‘NOTIF_CA_CUST_CLOSE’ is used. This indicates
that the customer identifier is closed.
2.2.9.2 Notification for Customer Account Closure
For closure of Customer Account, a notification called ‘NOTIF_CA_CUSTACC_CLOSE’ is used.
This indicates that the customer account identifier is closed.
2.2.9.3 Notifications for Customer Signature
For creation, modification and closure of Customer Signatures, notifications called –
‘NOTIF_CA_CUSTSIG_NEW’, ‘NOTIF_CA_CUSTSIG_MOD’ and
‘NOTIF_CA_CUSTSIG_CLOSE’ respectively are used. These notifications indicate that
signature(s) are captured or modified or closed for the sent customer identifier.
2.2.10 Generating Handoff Files
Oracle FLEXCUBE also generates handoff files containing the following information to CTS:
•
All customer signatures
•
Incremental customer signatures
•
Incremental customers
•
Incremental customer accounts
2.2.10.1 The Customer Signature Handoff
This handoff will contain details of all the customer signatures available in the system and can be
generated on an ad-hoc basis. However, this must be generated the first time the interface set-up
with CTS. To generate the handoff, you must define the interface ‘CUSTSIGN’ in the ‘Interface
Definition’ screen. The generated file will be a delimited file (with the ‘:’ delimiter) and will be
generated with the date-time stamp. The name of the file will follow the
‘CUSTSIGN_DDMMYYYYHHMMSS’
The components and fields of the file are given below:
Components
Fields
Header
Application Date
Batch Header
Customer Id, Signature Id
Batch Body
Specimen No, File Name
Batch Footer
No of Records in the batch
Footer
No of Records in the file
2.2.10.2 The Incremental Handoff for Customer Signatures
This handoff will contain details of all incremental customer signatures (created, modified or
deleted) and should be run daily during EOD. To generate the handoff, you must define the
interface ‘INCRSIGN’ in the ‘Interface Definition’ screen with the ‘Where Clause’ being defined to
restrict the generation to the records for the current day only.
2-27
The generated file will be a delimited file (with the ‘:’ delimiter) and will be generated with the
date-time stamp. The name of the file will follow the ‘INCRSIGN_DDMMYYYYHHMMSS’.
The components and fields of the file are given below:
Components
Fields
Header
Application Date
Batch Header
Customer Id, Signature Id
Batch Body
Specimen No, File Name
Batch Footer
No of Records in the batch
Footer
No of Records in the file
2.2.10.3 The Incremental Handoff for Customers
This handoff will contain details of all incremental customers (created, modified or deleted) and
should be run daily during EOD. To generate the handoff, you must define the interface
‘INCRCUST’ in the ‘Interface Definition’ screen with the ‘Where Clause’ being defined to restrict
the generation to the records of the current day only.
The generated file will be a delimited file (with the ‘:’ delimiter) and will be generated with the
date-time stamp. The name of the file will follow the ‘INCRCUST_DDMMYYYYHHMMSS’.
The components and fields of the file are given below:
Components
Fields
Header
Application Date
Body
Customer Id, Name, Type, Status
Footer
No of Records in the file
2.2.10.4 The Incremental Handoff for Customer Account
This handoff will contain details of all incremental customer accounts (created, modified or
deleted) and should be run daily during EOD. To generate the handoff, you must define the
interface ‘INCRCUSACC’ in the ‘Interface Definition’ screen with the ‘Where Clause’ being
defined to restrict the generation to the records of the current day only.
The generated file will be a delimited file (with the ‘:’ delimiter) and will be generated with the
date-time stamp. The name of the file will follow the ‘CUSTACCT_DDMMYYYYHHMMSS’.
The components and fields of the file are given below:
Components
Fields
Header
Application Date
Body
Customer Id, Account No, Status
2-28
2.3
Components
Fields
Footer
No of Records in the file
Maintaining Interface Clearing Details
You can correct the records that are in error status through the Interface Clearing Details screen.
This screen will display the records that were rejected (by the system or the user) and the ones
marked as ‘Error’ by the system, depending on the option selected in the Application Browser. To
view the rejected records, select ‘Clearing Reject’ under ‘Clearing’ in the Application Browser.
You can select ‘Clearing Log’ under ‘Clearing’ to view the records with ‘Error’ status.
To invoke this screen, type ‘IFDCLGDT’ in the field at the top-right corner of the Application
toolbar and click the adjoining arrow button.
Specify the following details:
Instrument Type
Select the type of instrument from the drop-down list. You have the following options:
•
CHQ - It represents cheque
•
DDA - It represents DD
•
BCA - It represents BC
2-29
For more information, refer the ‘Maintaining Interface Clearing Details’ section in the ‘Maintaining
Reference Information’ chapter in the ‘Clearing’ User Manual.
2.4
Message Handoff
For the actual message hand-off, you have to manually trigger the event from Oracle
FLEXCUBE. You also need to specify the network and the clearing message group for which the
hand-off file has to be created. This file (in ASCII format) is eventually handed-off by Oracle
FLEXCUBE.
You can trigger the message hand-off event through the ‘Dispatch Details’ screen invoked from
the Application Browser. You can invoke the ‘Dispatch Details’ screen by typing ‘IFHFDETS’ in
the field at the top right corner of the Application tool bar and clicking the adjoining arrow button.
For message hand-off, you need to select the network and the clearing message group as
mandatory information.
Additionally, you can also specify one or all of the following options for hand-off:
•
Single Branch – if you want to hand-off messages from a specific branch for the selected
network and message group combination. You can select the branch from the option-list
available.
•
Single Customer – if you want to hand-off transactions for a specific customer, for the
selected network and message group combination, choose the name of the customer
from the option-list provided. Transactions involving all the accounts of the selected
customer will be handed-off.
•
Single Account – select this option if you want to hand-off transactions involving a
specific customer account, for the selected network and message group combination.
You can select the account from the option-list provided.
•
Single Contract – will hand-off details of a specific contract.
2-30
If you select only the network and message group, the system will hand-off all the contracts
(irrespective of the branches, customers, and accounts involved) for the selected combination.
For hand-off, you should also specify the following:
File Path
You can also specify the path for storing the hand-off file. When you trigger the process, the
hand-off file will be picked up from the path you specify here. If you do not specify a path, the file
will be picked up from the path specified for the selected message group.
At the time of implementation of Oracle FLEXCUBE, the implementer will create the following
five folders in the file path that you specify in the Handoff of ‘Clearing Details’ screen (if not
specified, the folders will be created in the path maintained for selected message group):
•
in folder
•
out folder
•
wip folder (work in progress)
•
fccarea folder (for Internal logging)
•
debug folder
Handoff Grouping
You also have the option of grouping the transactions within the hand-off file. The following
options are available for grouping:
•
By Clearing Message Type – if you select this option, the transactions will be grouped as
batches of different clearing message types that are allowed for the selected clearing
message group.
•
By Account Type – this option will do the grouping based on the customer accounts
involved in the transactions. All contracts involving a specific customer account will be
grouped under a single batch file.
After you trigger the hand-off process, the system will pick up the relevant tag values for all the
transactions from the database table and display the contents of the hand-off file in the Outgoing
Message Browser (‘Dispatch Details’ screen). The contracts that are rejected or have
encountered an error will be highlighted in RED.
2-31
The following details will also be available:
•
Network – the name of the network to which the file is hand-off is triggered
•
Transaction Group – the clearing message group for which the hand-off is taking place
•
File Name – The name of the hand-off file (in ASCII format)
•
Amount Total – the sum total of the amount involved in all the transactions that are
handed off
•
Account Total – the sum total of all the accounts in the transactions. The account number
is a numeric value. The system will add the account numbers involved in each
transaction to display this value.
On confirmation (click the ‘Ok’ button) of the details displayed in the ‘Dispatch’ screen, the upload
file gets created in the path specified. The system will then move the file from the ‘wip area’ to the
‘out’ folder. Prior to moving the file, it will retain a copy of the hand-off file in the ‘fcc’- area as
backup. This marks the successful completion of the hand-off process.
At this stage if you want to cancel the hand-off process, click on ’Exit’ or ‘Cancel’ button.
2.5
Message Upload
Just like the hand-off process, the upload process too needs to be manually triggered from Oracle
FLEXCUBE.
You can trigger the message upload event through the Incoming ‘Incoming File Details’ screen
invoked from the Application Browser. You can invoke the ‘Incoming File Details’ screen by
typing ‘IFINDETS’ in the field at the top right corner of the Application tool bar and clicking the
adjoining arrow button.
In this screen, you need to identify the network and the message group for which the message
needs to be uploaded. If you do not want to use the file path specified for the Message Group,
you can enter a different path here. This path will take precedence over the one maintained for
the Message Group.
The five folders (mentioned earlier) will be created in the file path specified in this screen.
After you trigger the upload process, the system will pick up the ASCII file from the ‘in’ folder and
move it to the ‘wip’ area. It retains a copy of the file in the ‘fcc’ -area as backup.
2-32
Once in the ‘wip’ area, the contents are resolved and the database gets populated with the actual
values. Subsequently, the details of all the contracts are displayed in the ‘Dispatch Details’
screen). You can invoke the ‘Dispatch Details’ screen by typing ‘IFCLRBWR’ in the field at the top
right corner of the Application tool bar and clicking the adjoining arrow button.
2.5.1 Viewing the details of Files that were Handed-off
You can view the details of all files that were handed-off through the ‘Status Browser’ screen. You
can invoke the ‘Status Browser’ screen by typing ‘IFCLRBWR’ in the field at the top right corner of
the Application tool bar and clicking the adjoining arrow button.
You can either choose to view the details of files with a particular status or view the details of all
files that were handed-off. The details of each file within a network will be displayed in a different
color depending on its status. For instance, a file with errors will be displayed in red.
2-33
Double click on a file to view the details of contracts included in it.
2.6
Processing for the Interface
The interface can either be Online or in a Batch format. For the online mode each contract in
Oracle FLEXCUBE will be handed off as a separate file.
2.6.1 Incoming Message Processing
While processing incoming messages, contracts are uploaded using the following process
stages:
•
You will initiate the process of uploading files.
•
The system checks if any recovery operation is required. If required, it is handled first.
•
The file name is logged into the log table before the contents of the file are processed.
The file name can be used for recovery and reporting.
•
After this, the entire file is read into memory in chunks.
•
The key identifier for the message is derived from the position and the number of
characters maintained at the file level. For the Identifier thus derived, the subsequent
details are picked from the message maintenance.
•
Next, the system processes each line and populates it into a row type. Whenever the
beginning of a new contract is found, the system inserts the row type into the
corresponding table with a particular flag. This process goes on till the end of file is
reached.
•
The following totals will be kept for each file (driven by a flag)
¾
¾
¾
¾
¾
Total for Debits
Total for Credits
Total for Accounts
Total of Amounts
No of Records in the Message
•
After processing all the records, the file is moved into the ‘fcc’-area.
•
All the status for the contracts uploaded will be changed for booking and these data are
processed using a batch function.
2-34
2.6.2 Outgoing Message Processing
While processing outgoing messages, the following stages are involved in the creation of
Clearing files:
•
You will have to specify the File / Clearing Message Type that needs to be created
•
On initiation, the system first checks if there is any recovery operation is required. If
required, it is handled first.
•
For the given clearing message type, all products for which the file needs to be created
will be picked up from the Product Mapping- Clearing Message Type maintenance.
•
Since it is possible for the file to have a batch grouped on an account too, the system will
pick up the corresponding flag for the file.
•
The system will select the relevant records from the Message Maintenance for a given
message type.
•
The file level attributes that are maintained will be picked up from File/Clearing Message
Type. These are:
¾
¾
¾
¾
¾
¾
¾
File Name
File Extension
File Path
Session Timeout
Number of Resends
Number of Transactions in a file
Number of Transaction in a Batch
•
Contracts pertaining to each product selected from the Product Mapping- Clearing
Message Type maintenance will be picked up for processing for the Clearing File.
•
The sequence that is followed during the processing is:
¾
¾
¾
¾
¾
•
File Header Records (FH)
Message Header Records (MH)
Message Records (MR)
Message Footer Records (MF)
File Trailer Records (FF)
The following batch totals are assumed for the trailer records:
¾
¾
¾
Total for Accounts
Total of Amounts
No of Records in the Message
•
Each record is locked before the data in the record is processed.
•
If the record is locked successfully, then the details of the record are passed on to the
Business Rule layer to update the record to the dispatch status.
•
Based on the flag passed from the Business layer, the message is formatted on the basis
of the maintenance done.
•
A preset number of contracts is processed and committed and written to the file based on
the maintenance done.
•
After all the contracts are processed the file is moved to the area specified in the
maintenance.
2-35
The above processes are also responsible for converting the data formats and tag formats from
the Oracle FLEXCUBE standard format to the formats as required by the external systems. The
above set of processes also translates the fields that require a translation as per the maintenance
for the particular interface.
2.7
Triggering the IC Clearing Batch Process
The IC Clearing Batch Process is triggered after the IC End of Day batch process has been
executed. During the Clearing batch process the system picks up all interest liquidation
accounting entries for the IC module for an IC bridge account and uploads them as Outgoing
Payments in the PC module.
You can trigger the IC Clearing batch process through the IC ‘Clearing Batch Process’ screen.
You can invoke the ‘Clearing Batch Process’ screen by typing ‘IFICBAT’ in the field at the top
right corner of the Application tool bar and clicking the adjoining arrow button.
In addition to creating Outgoing Payments for all interest liquidation entries this process also
handles principal and interest liquidation to CASA accounts.
2-36
Clearing Interface
[November] [2010]
Version 1.0
Oracle Corporation
World Headquarters
500 Oracle Parkway
Redwood Shores, CA 94065
U.S.A.
Worldwide Inquiries:
Phone: +1.650.506.7000
Fax: +1.650.506.7200
www.oracle.com/ financial_services/
Copyright © [2010] Oracle Financial Services Software Limited. All rights reserved.
No part of this work may be reproduced, stored in a retrieval system, adopted or transmitted in any form or by any means,
electronic, mechanical, photographic, graphic, optic recording or otherwise, translated in any language or computer
language, without the prior written permission of Oracle Financial Services Software Limited.
Due care has been taken to make this document and accompanying software package as accurate as possible. However,
Oracle Financial Services Software Limited makes no representation or warranties with respect to the contents hereof and
shall not be responsible for any loss or damage caused to the user by the direct or indirect use of this document and the
accompanying Software System. Furthermore, Oracle Financial Services Software Limited reserves the right to alter,
modify or otherwise change in any manner the content hereof, without obligation of Oracle Financial Services Software
Limited to notify any person of such revision or changes.
All company and product names are trademarks of the respective companies with which they are associated.