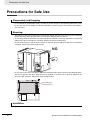
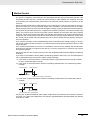
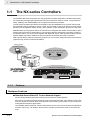
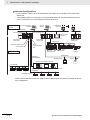
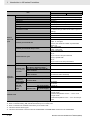
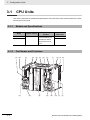
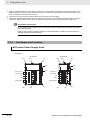
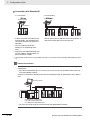
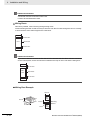
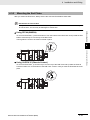
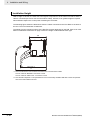
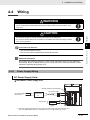
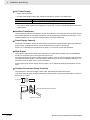
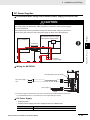
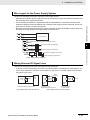
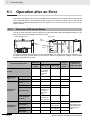
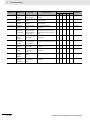
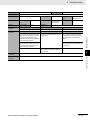
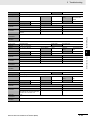
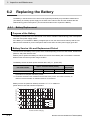
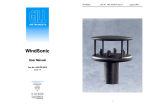
1
Machine Automation Controller NX-series CPU Unit Hardware User’s Manual NX701-1 NX-PA9001/PD7001 CPU Unit Power Supply Unit W535-E1-01 NOTE All rights reserved. No part of this publication may be reproduced, stored in a retrieval system, or transmitted, in any form, or by any means, mechanical, electronic, photocopying, recording, or otherwise, without the prior written permission of OMRON. No patent liability is assumed with respect to the use of the information contained herein. Moreover, because OMRON is constantly striving to improve its high-quality products, the information contained in this manual is subject to change without notice. Every precaution has been taken in the preparation of this manual. Nevertheless, OMRON assumes no responsibility for errors or omissions. Neither is any liability assumed for damages resulting from the use of the information contained in this publication. Trademarks • Sysmac and SYSMAC are trademarks or registered trademarks of OMRON Corporation in Japan and other countries for OMRON factory automation products. • Microsoft, Windows, Windows Vista, Excel, and Visual Basic are either registered trademarks or trademarks of Microsoft Corporation in the USA and other countries. • EtherCAT® is registered trademark and patented technology, licensed by Beckhoff Automation GmbH, Germany. • ODVA, CIP, CompoNet, DeviceNet, and EtherNet/IP are trademarks of ODVA. • The SD and SDHC logos are trademarks of SD-3C, LLC. Other company names and product names in this document are the trademarks or registered trademarks of their respective companies. Copyrights Microsoft product screen shots reprinted with permission from Microsoft Corporation. Introduction Introduction Thank you for purchasing an NX-series CPU Unit. This manual contains information that is necessary to use the NX-series CPU Unit. Please read this manual and make sure you understand the functionality and performance of the NX-series CPU Unit before you attempt to use it in a control system. Keep this manual in a safe place where it will be available for reference during operation. Intended Audience This manual is intended for the following personnel, who must also have knowledge of electrical systems (an electrical engineer or the equivalent). • Personnel in charge of introducing FA systems. • Personnel in charge of designing FA systems. • Personnel in charge of installing and maintaining FA systems. • Personnel in charge of managing FA systems and facilities. For programming, this manual is intended for personnel who understand the programming language specifications in international standard IEC 61131-3 or Japanese standard JIS B 3503. Applicable Products This manual covers the following products. • NX-series CPU Units NX701-17 NX701-16 Part of the specifications and restrictions for the CPU Units are given in other manuals. Refer to Relevant Manuals on page 5 and Related Manuals on page 29. NX-series CPU Unit Hardware User’s Manual (W535) 1 CONTENTS CONTENTS Introduction .............................................................................................................. 1 Intended Audience....................................................................................................................................... 1 Applicable Products ..................................................................................................................................... 1 CONTENTS................................................................................................................ 2 Relevant Manuals ..................................................................................................... 5 Manual Structure ...................................................................................................... 6 Page Structure ............................................................................................................................................. 6 Special Information ...................................................................................................................................... 7 Precaution on Terminology .......................................................................................................................... 7 Terms and Conditions Agreement .......................................................................... 8 Warranty, Limitations of Liability .................................................................................................................. 8 Application Considerations .......................................................................................................................... 9 Disclaimers .................................................................................................................................................. 9 Safety Precautions ................................................................................................. 10 Definition of Precautionary Information...................................................................................................... 10 Symbols ..................................................................................................................................................... 10 Warnings.................................................................................................................................................... 11 Cautions..................................................................................................................................................... 13 Precautions for Safe Use ....................................................................................... 14 Precautions for Correct Use.................................................................................. 22 Regulations and Standards ................................................................................... 25 Conformance to EC Directives .................................................................................................................. 25 Conformance to UL and CSA Standards ................................................................................................... 26 Conformance to KC Standards .................................................................................................................. 26 Software Licenses and Copyrights ............................................................................................................ 26 Versions .................................................................................................................. 27 Checking Versions ..................................................................................................................................... 27 Unit Versions of CPU Units and Sysmac Studio Versions ......................................................................... 28 Related Manuals ..................................................................................................... 29 Terminology ............................................................................................................ 32 Revision History ..................................................................................................... 37 Sections in this Manual ......................................................................................... 39 Section 1 1-1 Introduction to NX-series Controllers The NX-series Controllers .................................................................................................... 1-2 1-1-1 1-1-2 1-2 Specifications ........................................................................................................................ 1-8 1-3 Overall Operating Procedure for the NX-series Controller.............................................. 1-12 1-3-1 1-3-2 2 Features ...................................................................................................................................... 1-2 Introduction to the System Configurations .................................................................................. 1-5 Overall Procedure ..................................................................................................................... 1-12 Procedure Details...................................................................................................................... 1-13 NX-series CPU Unit Hardware User’s Manual (W535) CONTENTS Section 2 2-1 System Configuration Basic System Configuration................................................................................................. 2-2 2-1-1 EtherCAT Network Configuration................................................................................................ 2-3 2-2 Connecting to the Sysmac Studio ....................................................................................... 2-6 2-3 Network Configuration.......................................................................................................... 2-7 Section 3 3-1 Configuration Units CPU Units ............................................................................................................................... 3-2 3-1-1 3-1-2 3-2 SD Memory Cards................................................................................................................ 3-10 3-2-1 3-2-2 3-3 Section 4 Processing at Power ON and Power OFF ........................................................................... 4-2 Installation in a Control Panel ................................................................................................... 4-10 Preparations for Installation ...................................................................................................... 4-14 Installing the CPU Module ........................................................................................................ 4-16 Mounting the End Cover ........................................................................................................... 4-20 Mounting the End Plates........................................................................................................... 4-21 Installing and Removing the SD Memory Card......................................................................... 4-23 Removing the CPU Module ...................................................................................................... 4-27 Assembled Appearance and Dimensions................................................................................. 4-29 Wiring ................................................................................................................................... 4-31 4-4-1 4-4-2 4-4-3 4-4-4 4-5 Order of Powering Up the Controller and Controlled System ..................................................... 4-7 Mounting Units ...................................................................................................................... 4-9 4-3-1 4-3-2 4-3-3 4-3-4 4-3-5 4-3-6 4-3-7 4-3-8 4-4 Power ON Operation .................................................................................................................. 4-2 Power OFF Operation................................................................................................................. 4-3 Resetting the Controller from the Sysmac Studio ....................................................................... 4-5 Fail-safe Circuits.................................................................................................................... 4-6 4-2-1 4-3 Model Numbers ........................................................................................................................ 3-15 Connection................................................................................................................................ 3-15 Installation and Wiring 4-1-1 4-1-2 4-1-3 4-2 Models and Specifications .........................................................................................................3-11 Part Names and Functions ....................................................................................................... 3-12 Sysmac Studio..................................................................................................................... 3-15 3-4-1 3-4-2 4-1 Models and Specifications ........................................................................................................ 3-10 Purpose .................................................................................................................................... 3-10 Power Supply Units ............................................................................................................. 3-11 3-3-1 3-3-2 3-4 Models and Specifications .......................................................................................................... 3-2 Part Names and Functions ......................................................................................................... 3-2 Power Supply Wiring ................................................................................................................ 4-31 Grounding ................................................................................................................................. 4-35 Wiring the Built-in EtherCAT Port ............................................................................................. 4-38 Wiring the Built-in EtherNet/IP Port .......................................................................................... 4-38 Control Panel Installation ................................................................................................... 4-39 4-5-1 4-5-2 4-5-3 4-5-4 4-5-5 4-5-6 Temperature.............................................................................................................................. 4-39 Humidity.................................................................................................................................... 4-41 Vibration and Shock.................................................................................................................. 4-41 Atmosphere .............................................................................................................................. 4-41 Electrical Environment .............................................................................................................. 4-42 Grounding ................................................................................................................................. 4-46 NX-series CPU Unit Hardware User’s Manual (W535) 3 CONTENTS Section 5 5-1 Troubleshooting Operation after an Error ........................................................................................................ 5-2 5-1-1 5-1-2 5-1-3 5-2 Troubleshooting .................................................................................................................. 5-11 5-2-1 5-2-2 5-2-3 5-2-4 Section 6 6-1 Cleaning and Maintenance ................................................................................................... 6-2 Cleaning ...................................................................................................................................... 6-2 Periodic Inspections .................................................................................................................... 6-2 Unit Replacement Precautions.................................................................................................... 6-5 Replacing the Battery............................................................................................................ 6-6 6-2-1 6-2-2 6-3 Checking to See If the CPU Unit Is Operating .......................................................................... 5-11 Troubleshooting Flowchart for Non-fatal Errors ........................................................................ 5-12 Error Table................................................................................................................................. 5-13 Error Descriptions ..................................................................................................................... 5-23 Inspection and Maintenance 6-1-1 6-1-2 6-1-3 6-2 Overview of NX-series Status ..................................................................................................... 5-2 Fatal Errors in the CPU Unit........................................................................................................ 5-3 Non-fatal Errors in the CPU Unit ................................................................................................. 5-4 Battery Replacement................................................................................................................... 6-6 Operation without a Battery....................................................................................................... 6-10 Replacing the Fan Unit........................................................................................................ 6-11 6-3-1 6-3-2 6-3-3 6-3-4 Purpose of Attaching the Fan Unit ............................................................................................ 6-11 Fan Unit Replacement Period ................................................................................................... 6-11 Fan Unit Used for Replacement................................................................................................ 6-11 Procedure of Fan Unit Replacement......................................................................................... 6-12 Appendices A-1 Specifications ........................................................................................................................A-2 A-2 Dimensions ............................................................................................................................A-3 A-2-1 A-2-2 A-2-3 A-2-4 NX-series CPU Units...................................................................................................................A-3 End Cover ...................................................................................................................................A-4 NX-series Power Supply Units ....................................................................................................A-4 SD Memory Card ........................................................................................................................A-5 A-3 Version Information...............................................................................................................A-6 Index 4 NX-series CPU Unit Hardware User’s Manual (W535) Relevant Manuals Relevant Manuals The following table provides the relevant manuals for the NX-series CPU Units. Read all of the manuals that are relevant to your system configuration and application before you use the NX-series CPU Unit. Most operations are performed from the Sysmac Studio Automation Software. Refer to the Sysmac Studio Version 1 Operation Manual (Cat. No. W504) for information on the Sysmac Studio. Manual Basic information NJ/NX-series Troubleshooting Manual NJ/NX-series CPU Unit Built-in EtherNet/IP Port User’s Manual NJ/NX-series CPU Unit Built-in EtherCAT Port User’s Manual NJ/NX-series Motion Control Instructions Reference Manual NJ/NX-series CPU Unit Motion Control User’s Manual NJ/NX-series Instructions Reference Manual NJ/NX-series CPU Unit Software User’s Manual Introduction to NX-series Controllers NX-series CPU Unit Hardware User’s Manual Purpose of use z Setting devices and hardware Using motion control Using EtherCAT z z z Using EtherNet/IP z Software settings Using motion control z z Using EtherCAT z Using EtherNet/IP z Writing the user program Using motion control z Using EtherCAT z z z z Using EtherNet/IP z Programming error processing z Testing operation and debugging Using motion control z Using EtherCAT z z Using EtherNet/IP Learning about error management and corrections*1 Maintenance Using motion control Using EtherCAT z S z Using EtherNet/IP S S S S z z z z *1. Refer to the NJ/NX-series Troubleshooting Manual (Cat. No. W503) for the error management concepts and an overview of the error items. Refer to the manuals that are indicated with triangles for details on errors for the corresponding Units. NX-series CPU Unit Hardware User’s Manual (W535) 5 Manual Structure Manual Structure Page Structure The following page structure is used in this manual. Mounting Units Level 1 heading Level 2 heading Level 3 heading Connecting Controller Components Gives the current headings. 4 Installation and Wiring Level 2 heading Level 3 heading 4-3 4-3-1 The Units that make up an NJ-series Controller can be connected simply by pressing the Units together and locking the sliders by moving them toward the back of the Units. The End Cover is connected in the same way to the Unit on the far right side of the Controller. A step in a procedure 1 Join the Units so that the connectors fit exactly. Hook Indicates a procedure. Hook holes Connector 4-3 Mounting Units 4 The yellow sliders at the top and bottom of each Unit lock the Units together. Move the sliders toward the back of the Units as shown below until they click into place. Move the sliders toward the back until they lock into place. Lock Release Slider Special information Icons indicate precautions, additional information, or reference information. Manual name 4-3-1 Connecting Controller Components 2 Page tab Gives the number of the main section. Precautions for Correct Use The sliders on the tops and bottoms of the Power Supply Unit, CPU Unit, I/O Units, Special I/O Units, and CPU Bus Units must be completely locked (until they click into place) after connecting the adjacent Unit connectors. NJ-series CPU Unit Hardware User’s Manual (W500) 4-9 Note This illustration is provided only as a sample. It may not literally appear in this manual. 6 NX-series CPU Unit Hardware User’s Manual (W535) Manual Structure Special Information Special information in this manual is classified as follows: Precautions for Safe Use Precautions on what to do and what not to do to ensure safe usage of the product. Precautions for Correct Use Precautions on what to do and what not to do to ensure proper operation and performance. Additional Information Additional information to read as required. This information is provided to increase understanding or make operation easier. Version Information Information on differences in specifications and functionality for CPU Units with different unit versions and for different versions of the Sysmac Studio is given. Note References are provided to more detailed or related information. Precaution on Terminology In this manual, “download” refers to transferring data from the Sysmac Studio to the physical Controller and “upload” refers to transferring data from the physical Controller to the Sysmac Studio. For the Sysmac Studio, synchronization is used to both upload and download data. Here, “synchronize” means to automatically compare the data for the Sysmac Studio on the computer with the data in the physical Controller and transfer the data in the direction that is specified by the user. NX-series CPU Unit Hardware User’s Manual (W535) 7 Terms and Conditions Agreement Terms and Conditions Agreement Warranty, Limitations of Liability Warranties z Exclusive Warranty Omron’s exclusive warranty is that the Products will be free from defects in materials and workmanship for a period of twelve months from the date of sale by Omron (or such other period expressed in writing by Omron). Omron disclaims all other warranties, express or implied. z Limitations OMRON MAKES NO WARRANTY OR REPRESENTATION, EXPRESS OR IMPLIED, ABOUT NON-INFRINGEMENT, MERCHANTABILITY OR FITNESS FOR A PARTICULAR PURPOSE OF THE PRODUCTS. BUYER ACKNOWLEDGES THAT IT ALONE HAS DETERMINED THAT THE PRODUCTS WILL SUITABLY MEET THE REQUIREMENTS OF THEIR INTENDED USE. Omron further disclaims all warranties and responsibility of any type for claims or expenses based on infringement by the Products or otherwise of any intellectual property right. z Buyer Remedy Omron’s sole obligation hereunder shall be, at Omron’s election, to (i) replace (in the form originally shipped with Buyer responsible for labor charges for removal or replacement thereof) the non-complying Product, (ii) repair the non-complying Product, or (iii) repay or credit Buyer an amount equal to the purchase price of the non-complying Product; provided that in no event shall Omron be responsible for warranty, repair, indemnity or any other claims or expenses regarding the Products unless Omron’s analysis confirms that the Products were properly handled, stored, installed and maintained and not subject to contamination, abuse, misuse or inappropriate modification. Return of any Products by Buyer must be approved in writing by Omron before shipment. Omron Companies shall not be liable for the suitability or unsuitability or the results from the use of Products in combination with any electrical or electronic components, circuits, system assemblies or any other materials or substances or environments. Any advice, recommendations or information given orally or in writing, are not to be construed as an amendment or addition to the above warranty. See http://www.omron.com/global/ or contact your Omron representative for published information. Limitation on Liability; Etc OMRON COMPANIES SHALL NOT BE LIABLE FOR SPECIAL, INDIRECT, INCIDENTAL, OR CONSEQUENTIAL DAMAGES, LOSS OF PROFITS OR PRODUCTION OR COMMERCIAL LOSS IN ANY WAY CONNECTED WITH THE PRODUCTS, WHETHER SUCH CLAIM IS BASED IN CONTRACT, WARRANTY, NEGLIGENCE OR STRICT LIABILITY. Further, in no event shall liability of Omron Companies exceed the individual price of the Product on which liability is asserted. 8 NX-series CPU Unit Hardware User’s Manual (W535) Terms and Conditions Agreement Application Considerations Suitability of Use Omron Companies shall not be responsible for conformity with any standards, codes or regulations which apply to the combination of the Product in the Buyer’s application or use of the Product. At Buyer’s request, Omron will provide applicable third party certification documents identifying ratings and limitations of use which apply to the Product. This information by itself is not sufficient for a complete determination of the suitability of the Product in combination with the end product, machine, system, or other application or use. Buyer shall be solely responsible for determining appropriateness of the particular Product with respect to Buyer’s application, product or system. Buyer shall take application responsibility in all cases. NEVER USE THE PRODUCT FOR AN APPLICATION INVOLVING SERIOUS RISK TO LIFE OR PROPERTY WITHOUT ENSURING THAT THE SYSTEM AS A WHOLE HAS BEEN DESIGNED TO ADDRESS THE RISKS, AND THAT THE OMRON PRODUCT(S) IS PROPERLY RATED AND INSTALLED FOR THE INTENDED USE WITHIN THE OVERALL EQUIPMENT OR SYSTEM. Programmable Products Omron Companies shall not be responsible for the user’s programming of a programmable Product, or any consequence thereof. Disclaimers Performance Data Data presented in Omron Company websites, catalogs and other materials is provided as a guide for the user in determining suitability and does not constitute a warranty. It may represent the result of Omron’s test conditions, and the user must correlate it to actual application requirements. Actual performance is subject to the Omron’s Warranty and Limitations of Liability. Change in Specifications Product specifications and accessories may be changed at any time based on improvements and other reasons. It is our practice to change part numbers when published ratings or features are changed, or when significant construction changes are made. However, some specifications of the Product may be changed without any notice. When in doubt, special part numbers may be assigned to fix or establish key specifications for your application. Please consult with your Omron’s representative at any time to confirm actual specifications of purchased Product. Errors and Omissions Information presented by Omron Companies has been checked and is believed to be accurate; however, no responsibility is assumed for clerical, typographical or proofreading errors or omissions. NX-series CPU Unit Hardware User’s Manual (W535) 9 Safety Precautions Safety Precautions Definition of Precautionary Information The following notation is used in this manual to provide precautions required to ensure safe usage of an NX-series Controller. The safety precautions that are provided are extremely important to safety. Always read and heed the information provided in all safety precautions. The following notation is used. WARNING Caution Indicates a potentially hazardous situation which, if not avoided, could result in death or serious injury. Additionally, there may be severe property damage. Indicates a potentially hazardous situation which, if not avoided, may result in minor or moderate injury, or property damage. Symbols The circle and slash symbol indicates operations that you must not do. The specific operation is shown in the circle and explained in text. This example indicates prohibiting disassembly. The triangle symbol indicates precautions (including warnings). The specific operation is shown in the triangle and explained in text. This example indicates a precaution for electric shock. The triangle symbol indicates precautions (including warnings). The specific operation is shown in the triangle and explained in text. This example indicates a general precaution. The filled circle symbol indicates operations that you must do. The specific operation is shown in the circle and explained in text. This example shows a general precaution for something that you must do. The triangle symbol indicates precautions (including warnings). The specific operation is shown in the triangle and explained in text. This example indicates a precaution for high temperatures. 10 NX-series CPU Unit Hardware User’s Manual (W535) Safety Precautions Warnings WARNING During Power Supply Do not touch any of the terminals or terminal blocks while the power is being supplied. Doing so may result in electric shock. Do not attempt to take any Unit apart. In particular, high-voltage parts are present in the Power Supply Unit while power is supplied or immediately after power is turned OFF. Touching any of these parts may result in electric shock. There are sharp parts inside the Unit that may cause injury. Fail-safe Measures Provide safety measures in external circuits to ensure safety in the system if an abnormality occurs due to malfunction of the CPU Unit, slaves, or Units or due to other external factors affecting operation. Not doing so may result in serious accidents due to incorrect operation. Emergency stop circuits, interlock circuits, limit circuits, and similar safety measures must be provided in external control circuits. The Controller outputs may remain ON or OFF due to deposition or burning of the output relays or destruction of the output transistors. As a countermeasure for such problems, external safety measures must be provided to ensure safe operation of the system. The CPU Unit will turn OFF all outputs from Digital Output Units in the following cases. The slaves will operate according to the settings in the slaves. • • • • If an error occurs in the power supply If a CPU error or CPU reset occurs If a major fault level Controller error occurs While the CPU Unit is on standby until RUN mode is entered after the power is turned ON • If a system initialization error occurs External safety measures must be provided to ensure safe operation of the system in such cases. If external power supplies for slaves or other devices are overloaded or short-circuited, the voltage will drop, outputs will turn OFF, and the system may be unable to read inputs. Provide external safety measures in controls with monitoring of external power supply voltage as required so that the system operates safely in such a case. NX-series CPU Unit Hardware User’s Manual (W535) 11 Safety Precautions Unintended outputs may occur when an error occurs in variable memory. As a countermeasure for such problems, external safety measures must be provided to ensure safe operation of the system. Provide measures in the communications system and user program to ensure safety in the overall system even if errors or malfunctions occur in data link communications or remote I/O communications. If there is interference in remote I/O communications or if a major fault level error occurs, output status will depend on the products that are used. Confirm the operation that will occur when there is interference in communications or a major fault level error, and implement safety measures. Correctly set all of the settings in the slaves and Units. The NX-series Controller continues normal operation for a certain period of time when a momentary power interruption occurs. This means that the NX-series Controller may receive incorrect signals from external devices that are also affected by the power interruption. Accordingly, take suitable actions, such as external fail-safe measures and interlock conditions, to monitor the power supply voltage of the external device as required. You must take fail-safe measures to ensure safety in the event of incorrect, missing, or abnormal signals caused by broken signal lines, momentary power interruptions, or other causes. Not doing so may result in serious accidents due to incorrect operation. Voltage and Current Inputs Make sure that the voltages and currents that are input to the slaves and Units are within the specified ranges. Inputting voltages or currents that are outside of the specified ranges may cause accidents or fire. Downloading Always confirm safety at the destination before you transfer a user program, configuration data, setup data, or device variables from the Sysmac Studio. The devices or machines may perform unexpected operation regardless of the operating mode of the CPU Unit. Actual Operation Check the user program, data, and parameter settings for proper execution before you use them for actual operation. 12 NX-series CPU Unit Hardware User’s Manual (W535) Safety Precautions Cautions Caution Application Do not touch any Unit when power is being supplied or immediately after the power supply is turned OFF. Doing so may result in burn injury. Wiring Be sure that all terminal screws and cable connector screws are tightened to the torque specified in the relevant manuals. The loose screws may result in fire or malfunction. When you connect a computer or other peripheral device to a Controller that has a non-isolated DC Power Supply Unit, either ground the 0-V side of the external power supply or do not ground it at all. If the peripheral devices are grounded incorrectly, the external power supply may be short-circuited. Never ground the 24-V side of the power supply, as shown in the following figure. Non-isolated DC power supply (internal power supply circuit) Peripheral device (e.g., computer) Peripheral device cable 24 V 0V External power supply Online Editing Execute online editing only after confirming that no adverse effects will be caused by deviations in the timing of I/O. If you perform online editing, the task execution time may exceed the task period, I/O may not be refreshed with external devices, input signals may not be read, and output timing may change. NX-series CPU Unit Hardware User’s Manual (W535) 13 Precautions for Safe Use Precautions for Safe Use Disassembly and Dropping • Do not attempt to disassemble, repair, or modify any Units. Doing so may result in malfunction or fire. • Do not drop any Unit or subject it to abnormal vibration or shock. Doing so may result in Unit malfunction or burning. Mounting • The sliders on the tops and bottoms of the Power Supply Unit and CPU Unit must be completely locked (until they click into place) after connecting the adjacent Unit connectors. • Do not apply labels or tape to the Unit. When the Unit is installed or removed, adhesive or scraps may adhere to the pins in the NX bus connector, which may result in malfunctions. • Do not touch the pins in the NX bus connector on the Unit. Dirt may adhere to the pins in the NX bus connector, which may result in malfunctions. NG PORT1 Ethe rNet/IP PORT2 Ethe rNet/IP PORT3 Ethe rCAT • Do not write on the CPU Unit with ink within the restricted region that is shown in the following figure. Also do not get this area dirty. When the Unit is installed or removed, ink or dirt may adhere to the pins in the NX connector, which may result in malfunctions. Restricted region (shaded portion) Installation • Always connect to a ground of 100 Ω or less when installing the Units. 14 NX-series CPU Unit Hardware User’s Manual (W535) Precautions for Safe Use Wiring • Follow the instructions in this manual to correctly perform wiring. Double-check all wiring and switch settings before turning ON the power supply. • Use crimp terminals for wiring. Do not connect bare stranded wires directly to terminals. • Do not pull on the cables or bend the cables beyond their natural limit. Do not place heavy objects on top of the cables or other wiring lines. Doing so may break the cables. • Mount terminal blocks and connectors only after checking the mounting location carefully. • Be sure that the terminal blocks, expansion cables, and other items with locking devices are properly locked into place. • Before you connect a computer to the CPU Unit, disconnect the power supply plug of the computer from the AC outlet. Also, if the computer has an FG terminal, make the connections so that the FG terminal has the same electrical potential as the GR terminal on the Power Supply Unit. A difference in electrical potential between the computer and Controller may cause failure or malfunction. • If the external power supply to an Output Unit or slave has polarity, connect it with the correct polarity. If the polarity is reversed, current may flow in the reverse direction and damage the connected devices regardless of the operation of the Controller. Power Supply Design • Do not exceed the rated supply capacity of the Power Supply Units in the NX-series Controller. The rated supply capacities are given in the NX-series CPU Unit Hardware User’s Manual (Cat. No. W535). If the capacity is exceeded, operation may stop, malfunctions may occur, or data may not be backed up normally for power interruptions. • Do not apply voltages or connect loads to the Output Units or slaves in excess of the maximum ratings. • Surge current occurs when the power supply is turned ON. When selecting fuses or breakers for external circuits, consider the above precaution and allow sufficient margin in shut-off performance. Refer to the relevant manuals for surge current specifications. Refer to the NX-series CPU Unit Hardware User’s Manual (Cat. No. W535) for surge current specifications. • If the full dielectric strength voltage is applied or turned OFF using the switch on the tester, the generated impulse voltage may damage the Power Supply Unit. Use the adjustment on the tester to gradually increase and decrease the voltage. • Apply the voltage between the Power Supply Unit’s L1 or L2 terminal and the GR terminal when testing insulation and dielectric strength. • Do not supply AC power from an inverter or other device with a square-wave output. Internal temperature rise may result in smoking or burning. Always input a sinusoidal wave with the frequency that is given in the NX-series CPU Unit Hardware User’s Manual (Cat. No. W535). • Install external breakers and take other safety measures against short-circuiting in external wiring. Turning ON the Power Supply • It takes up to approximately 10 to 20 s to enter RUN mode after the power is turned ON. The outputs during this time behave according to the slave or Unit specifications. Use the RUN output on the Power Supply Unit, for example, to implement fail-safe circuits so that external devices do not operate incorrectly. • Configure the external circuits so that the power supply to the control system turns ON only after the power supply to the Controller has turned ON. If the power supply to the Controller is turned ON after the control power supply, temporary errors may result in incorrect control system signals because the output terminals on Output Units may momentarily turn ON when power supply is turned ON to the Controller. NX-series CPU Unit Hardware User’s Manual (W535) 15 Precautions for Safe Use • If you transfer data from a backup file on an SD Memory Card to the Controller when the power supply is turned ON, properly select the data groups to transfer. If the data for an unintended data group is transferred to the Controller, it may cause the equipment to operate unpredictably. Turning OFF the Power Supply • Never turn OFF the power supply to the Controller when the BUSY indicator is flashing. While the BUSY indicator is lit, the user program and settings in the CPU Unit are being backed up in the built-in non-volatile memory. This data will not be backed up correctly if the power supply is turned OFF. Also, a major fault level Controller error will occur the next time you start operation, and operation will stop. • Do not turn OFF the power supply or remove the SD Memory Card while SD Memory Card access is in progress (i.e., while the SD BUSY indicator flashes). Data may become corrupted, and the Controller will not operate correctly if it uses corrupted data. To remove the SD Memory Card from the CPU Unit while the power supply is ON, press the SD Memory Card power supply switch and wait for the SD BUSY indicator to turn OFF before you remove the SD Memory Card. • Do not disconnect the cable or turn OFF the power supply to the Controller when downloading data or the user program from Support Software. • Always turn OFF the power supply to the Controller before you attempt any of the following. a) Mounting or removing the Units b) Assembling the Units c) Setting DIP switches or rotary switches d) Connecting cables or wiring the system e) Connecting or disconnecting the connectors f) Mounting or removing the Fan Unit The Power Supply Unit may continue to supply power to the rest of the Controller for a few seconds after the power supply turns OFF. The PWR indicator is lit during this time. Confirm that the PWR indicator is not lit before you perform any of the above. Operation • Confirm that no adverse effect will occur in the system before you attempt any of the following. a) Changing the operating mode of the CPU Unit (including changing the setting of the Startup Mode) b) Changing the user program or settings c) Changing set values or present values d) Forced refreshing • After you change any slave or Unit settings, carefully check the safety of the controlled system before you restart the Unit. • If two different function modules are used together, such as when you use EtherNet/IP and EtherCAT slaves, take suitable measures in the user program and external controls to ensure that safety is maintained in the controlled system if one of the function modules stops. The relevant outputs will behave according to the slave or Unit specifications if a partial fault level error occurs in one of the function modules. • Always confirm safety at the connected equipment before you reset Controller errors with an event level of partial fault or higher for the EtherCAT Master Function Module. When the error is reset, all slaves that were in any state other than Operational state due to a Controller error with an event level of partial fault or higher (in which outputs are disabled) will go to Operational state and the outputs will be enabled. Before you reset all errors or restart a slave, confirm that no Controller errors with an event level of partial fault have occurred for the EtherCAT Master Function Module. 16 NX-series CPU Unit Hardware User’s Manual (W535) Precautions for Safe Use Battery Backup • The user program and initial values for the variables are stored in non-volatile memory in the CPU Unit. The present values of variables with the Retain attribute are backed up by a Battery. If the Battery is not connected or the Battery is exhausted, the CPU Unit detects a Battery-backup Memory Check Error. If that error is detected, variables with a Retain attribute are set to their initial values. Perform thorough verifications and provide sufficient measures to ensure that the devices perform safe operation for the initial values of the variables with Retain attributes and the resulting operation. • The absolute encoder home offsets are backed up by a Battery. If the CPU Unit detects a low battery voltage or the absence of a mounted battery when the power supply to the Controller is turned ON, the absolute encoder home offsets are cleared to zeros and an Encoder Home Offset Read Error occurs. Reset the error and perform homing to define home. If you do not define home, unintended operation of the controlled system may occur. Debugging • Forced refreshing ignores the results of user program execution and refreshes I/O with the specified values. If forced refreshing is used for inputs for which I/O refreshing is not supported, the inputs will first take the specified values, but they will then be overwritten by the user program. This operation differs from the force-set/reset functionality of the CJ-series PLCs. • You cannot upload or download information for forced refreshing with the Sysmac Studio. After downloading data that contains forced refreshing, change to RUN mode and then use the Sysmac Studio to perform the operation for forced refreshing. Depending on the difference in the forced status, the control system may operate unexpectedly. • Do not specify the same address for the AT specification for more than one variable. Doing so would allow the same entity to be accessed with different variable names, which would make the user program more difficult to understand and possibly cause programming mistakes. General Communications • When you use data link communications, check the error information that is given in _ErrSta (Controller Error Status) to make sure that no error has occurred in the source device. Create a user program that uses reception data only when there is no error in the source device. If there is an error in the source device, the data for the data link may contain incorrect values. • Unexpected operation may result if inappropriate data link tables are set. Even if appropriate data link tables have been set, confirm that the controlled system will not be adversely affected before you transfer the data link tables. The data links start automatically after the data link tables are transferred. EtherNet/IP Communications • Make sure that the communications distance, number of nodes connected, and method of connection for EtherNet/IP are within specifications. Do not connect EtherNet/IP communications to EtherCAT or other networks. An overload may cause the network to fail or malfunction. • All related EtherNet/IP nodes are reset when you transfer settings for the built-in EtherNet/IP port (including IP addresses and tag data links settings). The settings can only be enabled after the reset. Confirm that the system will not be adversely affected by resetting nodes before you transfer the settings. • If EtherNet/IP tag data links (cyclic communications) are used with a repeating hub, the communications load on the network will increase. This will increase collisions and may prevent stable communications. Do not use repeating hubs on networks where tag data links are used. Use an Ethernet switch instead. • When you use two EtherNet/IP networks separately, provide separate hubs to connect nodes in each network. NX-series CPU Unit Hardware User’s Manual (W535) 17 Precautions for Safe Use • Be careful not to mix nodes that belong different EtherNet/IP networks when you connect them. EtherCAT Communications • Make sure that the communications distance, number of nodes connected, and method of connection for EtherCAT are within specifications. Do not connect EtherCAT communications to EtherNet/IP, a standard in-house LAN, or other networks. An overload may cause the network to fail or malfunction. • Malfunctions or unexpected operation may occur for some combinations of EtherCAT revisions of the master and slaves. If you disable the revision check in the network settings, use the Sysmac Studio to check the slave revision settings in the master and the actual slave revisions, and then make sure that functionality is compatible in the slave manuals or other references. You can check the actual slave revisions from the Sysmac Studio or on slave nameplates. • After you transfer the user program, the CPU Unit is restarted and communications with the EtherCAT slaves are cut off. During that period, the slave outputs behave according to the slave specifications. The time that communications are cut off depends on the EtherCAT network configuration. Before you transfer the user program, confirm that the system will not be adversely affected. • If the Fail-soft Operation parameter is set to stop operation, process data communications will stop for all slaves when an EtherCAT communications error is detected in a slave. At that time, the Servo Drive will operate according to the Servo Drive specifications. For this reason, if Servo Drives are connected, the Servos for all axes will be turned OFF. Make sure that the Fail-soft Operation parameter setting results in safe operation when a device error occurs. • EtherCAT communications are not always established immediately after the power supply is turned ON. Use the system-defined variables in the user program to confirm that communications are established before attempting control operations. • If noise occurs or an EtherCAT slave is disconnected from the network, any current communications frames may be lost. If frames are lost, slave I/O data is not communicated, and unintended operation may occur. The slave outputs will behave according to the slave specifications. If a noise countermeasure or slave replacement is required, perform the following processing. a) Program the Input Data Invalid system-defined variable as an interlock condition in the user program. b) Set the PDO communications timeout detection count setting in the EtherCAT master to at least 2. Refer to the NJ/NX-series CPU Unit Built-in EtherCAT Port User’s Manual (Cat. No. W505) for details. • When an EtherCAT slave is disconnected or disabled, communications will stop and control of the outputs will be lost not only for the disconnected slave, but for all slaves connected after it. Confirm that the system will not be adversely affected before you disconnect or disable a slave. • I/O data communications of NX bus are not always established immediately after the power supply is turned ON. Use the system-defined variables and the EtherCAT Coupler Unit device variables in the user program to confirm that I/O data communications are established before attempting control operations. • You cannot use standard Ethernet hubs or repeater hubs with EtherCAT communications. If you use one of these, a major fault level error or other error may occur. 18 NX-series CPU Unit Hardware User’s Manual (W535) Precautions for Safe Use Motion Control • Confirm the axis number carefully before you perform an MC Test Run. • The motor is stopped if communications are interrupted between the Sysmac Studio and the CPU Unit during an MC Test Run. Connect the communications cable between the computer and CPU Unit securely and confirm that the system will not be adversely affected before you perform an MC Test Run. • Always execute the Save Cam Table instruction if you change any of the cam data from the user program in the CPU Unit or from the Sysmac Studio. If the cam data is not saved, the previous condition will be restored when the power is turned ON again, possibly causing unexpected machine operation. • The positive drive prohibit input (POT), negative drive prohibit input (NOT), and home proximity input (DEC) of the Servo Drive are used by the MC Function Module as the positive limit input, negative limit input, and home proximity input. Make sure that the signal widths for all of these input signals are longer than the control period of the MC Function Module. If the input signal widths are shorter than the control period, the MC Function Module may not be able to detect the input signals, resulting in incorrect operation. • If you make any changes in the Detailed Settings Area of the Axis Basic Settings Display of the Sysmac Studio, make sure that the devices or machines perform the expected operation before you start actual operation. If the relationship between the functions of the Motion Control Function Module and the EtherCAT slave process data that is assigned to the axes is not correct, the devices or machines may perform unexpected operation. • Always use the axis at a constant velocity for the MC_DigitalCamSwitch (Enable Digital Cam Switch) instruction. If you set the Count Mode to Rotary Mode, the following operation will occur if you use OnCompensation or OffCompensation and the axis velocity changes abruptly. a) If the value of OnCompensation or OffCompensation is equivalent to the time for half a rotation or more, InOperation will be FALSE. b) If the value of OnCompensation results in exceeding LastOnPosition, the output timing will be unstable. FirstOnPosition LastOnPosition OnCompensation FirstOnPosition after compensation c) If the value of OffCompensation results in exceeding FirstOnPosition, the output timing will be unstable. FirstOnPosition LastOnPosition OffCompensation LastOnPosition after compensation • Use the NX_AryDOutTimeStamp (Write Digital Output Array with Specified Time Stamp) instruction only after you confirm that InOperation from the MC_DigitalCamSwitch (Enable Digital Cam Switch) instruction is TRUE. NX-series CPU Unit Hardware User’s Manual (W535) 19 Precautions for Safe Use Restoring Data • You cannot back up, restore, or compare some or all of the settings for certain slaves and Units. Also, you cannot back up, restore, or compare data for disabled slaves or Units. After you restore data, sufficiently confirm that operation is correct before you start actual operation. • The absolute encoder home offsets are backed up with a Battery in the CPU Unit as absolute encoder information. If any of the following conditions is met, clear the absolute encoder home offsets from the list of data items to restore, and then restore the data. Then, define the absolute encoder home again. If you do not define home, unintended operation of the controlled system may occur. a) The Servomotor or Servo Drive was changed since the data was backed up. b) The absolute encoder was set up after the data was backed up. c) The absolute data for the absolute encoder was lost. Battery Replacement • The Battery may leak, rupture, heat, or ignite. Never short-circuit, charge, disassemble, heat, or incinerate the Battery or subject it to strong shock. • Dispose of any Battery that has been dropped on the floor or otherwise subjected to excessive shock. Batteries that have been subjected to shock may leak if they are used. • Apply power for at least five minutes before changing the Battery. Install a new Battery within five minutes (at 25°C) of turning OFF the power supply. If power is not supplied for at least 5 minutes, the saved data may be lost. • We recommend replacing the Battery with the power turned OFF to prevent the CPU Unit’s sensitive internal components from being damaged by static electricity and to prevent malfunctions. The Battery can be replaced without turning OFF the power supply. To do so, always touch a grounded piece of metal to discharge static electricity from your body before you start the procedure. After you replace the Battery, connect the Sysmac Studio and clear the Low Battery Voltage error. Fan Unit Replacement • Do not touch the heatsink inside the CPU Unit immediately after turning OFF the power supply. Doing so may result in burn injury. Unit Replacement • Make sure that the required data, including the user program, configurations, settings, and variables, is transferred to a CPU Unit that was replaced and to externally connected devices before restarting operation. Be sure to include the tag data link settings and routing tables, which are stored in the CPU Unit. • The absolute encoder home offsets are backed up with a Battery in the CPU Unit as absolute encoder information. When you change the combination of the CPU Unit and Servomotor, e.g., when you add or replace a Servomotor, define the absolute encoder home again. 20 NX-series CPU Unit Hardware User’s Manual (W535) Precautions for Safe Use Disposal • Dispose of the product and Batteries according to local ordinances as they apply. • The following information must be displayed for all products that contain primary lithium batteries with a perchlorate content of 6 ppb or higher when shipped to or transported through the State of California, USA. Perchlorate Material - special handling may apply. See www.dtsc.ca.gov/hazardouswaste/perchlorate. • The CPU Unit contains a primary lithium battery with a perchlorate content of 6 ppb or higher. Place the above information on the individual boxes and shipping boxes when shipping finished products that contain a CPU Unit to the State of California, USA. NX-series CPU Unit Hardware User’s Manual (W535) 21 Precautions for Correct Use Precautions for Correct Use Storage and Installation • Follow the instructions in this manual to correctly perform installation. • Do not operate or store the Controller in the following locations. Operation may stop or malfunctions may occur. a) Locations subject to direct sunlight b) Locations subject to temperatures or humidity outside the range specified in the specifications c) Locations subject to condensation as the result of severe changes in temperature d) Locations subject to corrosive or flammable gases e) Locations subject to dust (especially iron dust) or salts f) Locations subject to exposure to water, oil, or chemicals g) Locations subject to shock or vibration • Take appropriate and sufficient countermeasures when installing the Controller in the following locations. a) Locations subject to strong, high-frequency noise b) Locations subject to static electricity or other forms of noise c) Locations subject to strong electromagnetic fields d) Locations subject to possible exposure to radioactivity e) Locations close to power lines • Before touching a Unit, be sure to first touch a grounded metallic object in order to discharge any static build-up. • Install the Controller away from sources of heat and ensure proper ventilation. Not doing so may result in malfunction, in operation stopping, or in burning. Mounting • When you install the Unit, be careful not to touch or bump the pins in the NX bus connector. • When you handle the Unit, be careful not to apply stress to the pins in the NX bus connector. If the Unit is installed and the power supply is turned ON when the pins in the NX bus connector are deformed, contact failure may cause malfunctions. • Always mount an End Cover to the end of the CPU Rack to protect the last Unit on the CPU Rack. Not mounting the End Cover may result in malfunction or failure of the CPU Unit. • After you mount the Unit, always secure it with End Plates at both sides. If you do not secure it, the Unit may be damaged or malfunction. • If you use DIN Track Insulation Spacers to install a CPU Rack, the height will be increased by approximately 10 mm. Make sure that the CPU Rack and connecting cables do not come into contact with other devices. Wiring • Do not allow foreign matter to enter the openings in the Unit. Doing so may result in Unit burning, electric shock, or failure. • Do not allow wire clippings, shavings, or other foreign material to enter any Unit. Otherwise, Unit burning, failure, or malfunction may occur. Cover the Units or take other suitable countermeasures, especially during wiring work. 22 NX-series CPU Unit Hardware User’s Manual (W535) Precautions for Correct Use • For EtherCAT and EtherNet/IP, use the connection methods and cables that are specified in the NJ/NX-series CPU Unit Built-in EtherCAT Port User’s Manual (Cat. No. W505) and the NJ/NX-series CPU Unit Built-in EtherNet/IP Port User’s Manual (Cat. No. W506). Otherwise, communications may be faulty. • Use the rated power supply voltage for the Power Supply Units. Take appropriate measures to ensure that the specified power with the rated voltage and frequency is supplied in places where the power supply is unstable. • Make sure that the current capacity of the wire is sufficient. Otherwise, excessive heat may be generated. When cross-wiring terminals, the total current for all the terminals will flow in the wire. When wiring cross-overs, make sure that the current capacity of each of the wires is not exceeded. • Do not touch the terminals on the Power Supply Unit immediately after turning OFF the power supply. Residual voltage may cause electrical shock. • If you use reed switches for the input contacts for AC Input Units, use switches with a current capacity of 1 A or greater. If the capacity of the reed switches is too low, surge current may fuse the contacts. Error Processing • In applications that use the results of instructions that read the error status, consider the affect on the system when errors are detected and program error processing accordingly. For example, even the detection of a minor error, such as Battery replacement during operation, can affect the system depending on how the user program is written. • If you change the event level of a Controller error, the output status when the error occurs may also change. Confirm safety before you change an event level. Restoring and Automatically Transferring Data • When you edit the restore command file or the automatic transfer command file, do not change anything in the file except for the “yes” and “no” specifications for the selectable data groups. If you change anything else in the file, the Controller may perform unexpected operation when you restore or automatically transfer the data. Replacing Slaves and Units • If you replace a slave or Unit, refer to the operation manual for the slave or Unit for information on the data required for individual slaves or Units and redo the necessary settings. Task Settings • If a Task Period Exceeded error occurs, shorten the programs to fit in the task period or increase the setting of the task period. Motion Control • Use the system-defined variable in the user program to confirm that EtherCAT communications are established before you attempt to execute motion control instructions. Motion control instructions are not executed normally if EtherCAT communications are not established. • Use the system-defined variables to monitor for errors in communications with the slaves that are controlled by the motion control function module. Motion control instructions are not executed normally if an error occur in slave communications. • Before you start an MC Test Run, make sure that the operation parameters are set correctly. • Do not download motion control settings during an MC Test Run. NX-series CPU Unit Hardware User’s Manual (W535) 23 Precautions for Correct Use EtherCAT Communications • If you need to disconnect the cable from an EtherCAT slave during operation, first disconnect the software connection to the EtherCAT slave or disable the EtherCAT slave and all of the EtherCAT slaves that are connected after it. • Set the Servo Drives to stop operation if an error occurs in EtherCAT communications between the Controller and a Servo Drive. • Make sure that all of the slaves to be restored are participating in the network before you reset a Network Configuration Verification Error, Process Data Communications Error, or Link OFF Error in the EtherCAT Master Function Module. If any slave is not participating when any of these errors is reset, the EtherCAT Master Function Module may access slave with a different node address than the specified node address or the error may not be reset correctly. • Always use the specified EtherCAT slave cables. If you use any other cable, the EtherCAT master or the EtherCAT slaves may detect an error and one of the following may occur. a) Continuous refreshing of process data communications will not be possible. b) Continuous refreshing of process data communications will not end during the set cycle. Battery Replacement • Be sure to install a replacement Battery within two years of the production date shown on the Battery label. • Turn ON the power after replacing the Battery for a CPU Unit that has been unused for a long time. Leaving the CPU Unit unused again without turning ON the power even once after the Battery is replaced may result in a shorter Battery life. • When you replace the Battery, use the CJ1W-BAT01 Battery Set. SD Memory Cards • Insert the SD Memory Card all the way. • Do not turn OFF the power supply to the Controller during SD Memory Card access. The files may be corrupted. If there is a corrupted file in the SD Memory Card, the file is automatically deleted by the restoration function when the power supply is turned ON. • If you use an OMRON SD Memory Card, the end of the life of the SD Memory Card can be detected in the following ways. a) _Card1Deteriorated (SD Memory Card Life Warning Flag) system-defined variable b) SD Memory Card Life Exceeded event in the event log When the end of the life is detected in any of the above ways, replace the SD Memory Card. Online Editing • When performing online editing, the CPU Unit saves a program updated by the online editing to built-in non-volatile memory. Sysmac Studio shows a message that it is in a backup operation. Do not turn OFF the power supply to the Controller while this message is displayed. If the power supply to the Controller is turned OFF, a Controller error will occur when the power supply is turned ON next time. 24 NX-series CPU Unit Hardware User’s Manual (W535) Regulations and Standards Regulations and Standards Conformance to EC Directives Applicable Directives • EMC Directives • Low Voltage Directive Concepts z EMC Directives OMRON devices that comply with EC Directives also conform to the related EMC standards so that they can be more easily built into other devices or the overall machine. The actual products have been checked for conformity to EMC standards.*1 Whether the products conform to the standards in the system used by the customer, however, must be checked by the customer. EMC-related performance of the OMRON devices that comply with EC Directives will vary depending on the configuration, wiring, and other conditions of the equipment or control panel on which the OMRON devices are installed. The customer must, therefore, perform the final check to confirm that devices and the overall machine conform to EMC standards. *1. Applicable EMC (Electromagnetic Compatibility) standards are as follows: EMS (Electromagnetic Susceptibility): EN 61131-2 EMI (Electromagnetic Interference): EN 61131-2 (Radiated emission: 10-m regulations). z Low Voltage Directive Always ensure that devices operating at voltages of 50 to 1,000 VAC and 75 to 1,500 VDC meet the required safety standards. The applicable directive is EN 61131-2. z Conformance to EC Directives The NX-series Units comply with EC Directives. To ensure that the machine or device in which the NX-series Units are used complies with EC Directives, the following precautions must be observed. • The NX-series Units must be installed within a control panel. • The SELV requirements must be satisfied for the DC power supplies connected to the DC Power Supply Units of NX-series Units. EMC standard compliance was confirmed for the OMRON S8VS-18024 DC Power Supplies. • NX-series Units that comply with EC Directives also conform to the Common Emission Standard. Radiated emission characteristics (10-m regulations) may vary depending on the configuration of the control panel used, other devices connected to the control panel, wiring, and other conditions. You must therefore confirm that the overall machine or equipment in which the NX-series Units are used complies with EC Directives. • This is a Class A product (for industrial environments). In a residential environment, it may cause radio interference. If radio interference occurs, the user may be required to take appropriate measures. NX-series CPU Unit Hardware User’s Manual (W535) 25 Regulations and Standards Conformance to UL and CSA Standards Some NX-series products comply with UL and CSA standards. If you use a product that complies with UL or CSA standards and must apply those standards to your machinery or devices, refer to the Instruction Sheet that is provided with the product. The Instruction Sheet provides the application conditions for complying with the standards. Conformance to KC Standards Observe the following precaution if you use NX-series Units in Korea. Class A Device (Broadcasting Communications Device for Office Use) This device obtained EMC registration for office use (Class A), and it is intended to be used in places other than homes. Sellers and/or users need to take note of this. Software Licenses and Copyrights This product incorporates certain third party software. The license and copyright information associated with this software is available at http://www.fa.omron.co.jp/nj_info_e/. 26 NX-series CPU Unit Hardware User’s Manual (W535) Versions Versions Unit versions are used to manage the hardware and software in NX-series Units and EtherCAT slaves. The unit version is updated each time there is a change in hardware or software specifications. Even when two Units or EtherCAT slaves have the same model number, they will have functional or performance differences if they have different unit versions. Checking Versions You can check versions in the ID information indications on the product or with the Sysmac Studio. Checking Unit Versions on ID Information Indications The unit version is given on the ID information indication on the side of the product. The ID information on an NX-series NX701- CPU Unit is shown below. ID information indication Lot number Serial number Unit version LOT No. DDMYY xxxx Ver.1. PORT1 : PORT2 : MAC address Checking Unit Versions with the Sysmac Studio z Checking the Unit Version of a Unit You can use the Production Information while the Sysmac Studio is online to check the unit version of a Unit. You can do this only for the CPU Unit. Use the following procedure to check the unit version. 1 Right-click CPU Rack under Configurations and Setup - CPU/Expansion Racks in the Multiview Explorer and select Production Information. The Production Information Dialog Box is displayed. NX-series CPU Unit Hardware User’s Manual (W535) 27 Versions 2 Click the Show Detail or Show Outline Button at the lower right of the Production Information Dialog Box. The view will change between the production information details and outline. Outline View Detail View The information that is displayed is different for the Outline View and Detail View. The Detail View displays the unit version, hardware version, and software versions. The Outline View displays only the unit version. z Checking the Unit Version of an EtherCAT Slave You can use the Production Information while the Sysmac Studio is online to check the unit version of an EtherCAT slave. Use the following procedure to check the unit version. 1 Double-click EtherCAT under Configurations and Setup in the Multiview Explorer. Or, right-click EtherCAT under Configurations and Setup and select Edit from the menu. The EtherCAT Tab Page is displayed for the Controller Configurations and Setup Layer. 2 Right-click the master on the EtherCAT Tab Page and select Display Production Information. The Production Information Dialog Box is displayed. The unit version is displayed after “Rev.” Unit Versions of CPU Units and Sysmac Studio Versions The functions that are supported depend on the unit version of the NX-series CPU Unit. The version of Sysmac Studio that supports the functions that were added for an upgrade is also required to use those functions. Refer to A-3 Version Information on page A-6 for the relationship between the unit versions of the CPU Units and the Sysmac Studio versions, and for the functions that are supported by each unit version. 28 NX-series CPU Unit Hardware User’s Manual (W535) Related Manuals Related Manuals The following manuals are related. Use these manuals for reference. Manual name NX-series CPU Unit Hardware User’s Manual Cat. No. W535 Model numbers NX701- Application Learning the basic specifications of the NX-series CPU Units, including introductory information, designing, installation, and maintenance. Mainly hardware information is provided. NJ/NX-series CPU Unit Software User’s Manual W501 NX701NJ501NJ301NJ101- Learning how to program and set up an NJ/NX-series CPU Unit. Mainly software information is provided. NJ/NX-series Instructions Reference Manual W502 NX701NJ501NJ301NJ101- NJ/NX-series CPU Unit Motion Control User’s Manual W507 NX701NJ501NJ301NJ101- NX-series CPU Unit Hardware User’s Manual (W535) Learning detailed specifications on the basic instructions of an NJ/NX-series CPU Unit. Description An introduction to the entire NX-series system is provided along with the following information on a Controller built with a CPU Unit. • Features and system configuration • Introduction • Part names and functions • General specifications • Installation and wiring • Maintenance and inspection Use this manual together with the NJ/NX-series CPU Unit Software User’s Manual (Cat. No. W501). The following information is provided on a Controller built with an NJ/NX-series CPU Unit. • CPU Unit operation • CPU Unit features • Initial settings • Programming based on IEC 61131-3 language specifications Use this manual together with the NX-series CPU Unit Hardware User’s Manual (Cat. No. W535). The instructions in the instruction set (IEC 61131-3 specifications) are described. When programming, use this manual together with the NX-series CPU Unit Hardware User’s Manual (Cat. No. W535) and NJ/NX-series CPU Unit Software User’s Manual (Cat. No. W501). The settings and operation of the CPU Learning about motion control set- Unit and programming concepts for tings and program- motion control are described. When programming, use this manual ming concepts. together with the NX-series CPU Unit Hardware User’s Manual (Cat. No. W535) and NJ/NX-series CPU Unit Software User’s Manual (Cat. No. W501). 29 Related Manuals Manual name NJ/NX-series Motion Control Instructions Reference Manual Cat. No. W508 Model numbers NX701NJ501NJ301NJ101- NJ/NX-series CPU Unit Built-in EtherCAT® Port User’s Manual NJ/NX-series CPU Unit Built-in EtherNet/IP™ port User’s Manual W505 NX701NJ501NJ301NJ101- W506 NX701NJ501NJ301NJ101- NJ/NX-series W503 Troubleshooting Manual NX701NJ501NJ301NJ101- Sysmac Studio Version 1 Operation Manual W504 SYSMACSE2 NX-series EtherCAT® Coupler Unit User’s Manual W519 NX-ECC20 NX-series Data Reference Manual W525 NX- 30 Application Learning about the specifications of the motion control instructions. Using the built-in EtherCAT port on an NJ/NX-series CPU Unit. Using the built-in EtherNet/IP port on an NJ/NX-series CPU Unit. Learning about the errors that may be detected in an NJ/NX-series Controller. Learning about the operating procedures and functions of the Sysmac Studio. Leaning how to use an NX-series EtherCAT Coupler Unit and EtherCAT Slave Terminals Referencing lists of the data that is required to configure systems with NX-series Units Description The motion control instructions are described. When programming, use this manual together with the NX-series CPU Unit Hardware User’s Manual (Cat. No. W535), NJ/NX-series CPU Unit Software User’s Manual (Cat. No. W501) and NJ/NX-series CPU Unit Motion Control User’s Manual (Cat. No. W507). Information on the built-in EtherCAT port is provided. This manual provides an introduction and provides information on the configuration, features, and setup. Use this manual together with the NX-series CPU Unit Hardware User’s Manual (Cat. No. W535) and NJ/NX-series CPU Unit Software User’s Manual (Cat. No. W501). Information on the built-in EtherNet/IP port is provided. Information is provided on the basic setup, tag data links, and other features. Use this manual together with the NX-series CPU Unit Hardware User’s Manual (Cat. No. W535) and NJ/NX-series CPU Unit Software User’s Manual (Cat. No. W501). Describes concepts on managing errors that may be detected in an NJ/NX-series Controller and information on individual errors. Use this manual together with the NX-series CPU Unit Hardware User’s Manual (Cat. No. W535) and NJ/NX-series CPU Unit Software User’s Manual (Cat. No. W501). Describes the operating procedures of the Sysmac Studio. The following items are described: the overall system and configuration methods of an EtherCAT Slave Terminal (which consists of an NX-series EtherCAT Coupler Unit and NX Units), and information on hardware, setup, and functions to set up, control, and monitor NX Units through EtherCAT. Lists of the power consumptions, weights, and other NX Unit data that is required to configure systems with NX-series Units are provided. NX-series CPU Unit Hardware User’s Manual (W535) Related Manuals Manual name NX-series Digital I/O Units User’s Manual Cat. No. W521 Model numbers NX-ID NX-IA NX-OC Application Description The hardware, setup methods, and Learning how to use NX-series Dig- functions of the NX-series Digital I/O Units are described. ital I/O Units NX-OD NX-MD NX-AD NX-series Analog I/O Units User’s Manual W522 NX-series System Units User’s Manual W523 NX-series Position Interface Units User’s Manual W524 NX-series Safety Control Unit User’s Manual Z930 NX-series Safety Control Unit Instructions Reference Manual Z931 NA-series Programmable Terminal Software User’s Manual V118 NA5- W NS-series Programmable Terminals Programming Manual V073 NS15- NX-DA NX-TS NX-PD1 NX-PF0 NX-PC0 NX-TBX01 NX-EC0 NX-ECS NX-PG0 NX-SL NX-SI NX-SO NX-SL NS12NS10NS8- Learning how to use NX-series Analog I/O Units and Temperature Input Units Learning how to use NX-series System Units Learning how to use NX-series Position Interface Units Learning how to use NX-series Safety Control Units Learning about the specifications of instructions for the Safety CPU Unit. Learning about NA-series PT pages and object functions. Learning how to use the NS-series Programmable Terminals. The hardware, setup methods, and functions of the NX-series Analog I/O Units and Temperature Input Units are described. The hardware and functions of the NX-series System Units are described. The hardware, setup methods, and functions of the NX-series Incremental Encoder Input Units, SSI Input Units, and Pulse Output Unit are described. The hardware, setup methods, and functions of the NX-series Safety Control Unit are described. The instructions for the Safety CPU Unit are described. When programming, use this manual together with the NX-series Safety Control Unit User’s Manual (Cat. No. Z930). Describes the pages and object functions of the NA-series Programmable Terminals. Describes the setup methods, functions, etc. of the NS-series Programmable Terminals. NS5- NX-series CPU Unit Hardware User’s Manual (W535) 31 Terminology Terminology Term absolute encoder home offsets array specification AT axes groups Axes Group Variable axis Axis Variable basic data type cam data variable CJ-series Unit Communications Coupler Unit Constant Controller Controller error Controller event Controller information 32 Description This data is used to restore in the CPU Unit the actual position of a Servo Drive with an absolute encoder. The offset is the difference between the command position after homing and the absolute data that is read from the absolute encoder. One of the variable specifications. An array variable contains multiple elements of the same data type. The elements in the array are specified by serial numbers called subscripts that start from the beginning of the array. One of the attributes of a variable. This attribute allows the user to specify what is assigned to a variable. An I/O port or an address in memory used for CJ-series Units can be specified. A functional unit that groups together axes within the Motion Control Function Module. A system-defined variable that is defined as a structure and provides status information and some of the axes parameters for an individual axes group. An Axes Group Variable is used to specify an axes group for motion control instructions and to monitor the command interpolation velocity, error information, and other information for the axes group. A functional unit within the Motion Control Function Module. An axis is assigned to the drive mechanism in an external Servo Drive or the sensing mechanism in an external Encoder Input Slave Unit. A system-defined variable that is defined as a structure and provides status information and some of the axis parameters for an individual axis. An Axis Variable is used to specify an axis for motion control instructions and to monitor the command position, error information, and other information for the axis. Any of the data types that are defined by IEC 61131-3. They include Boolean, bit string, integer, real, duration, date, time of day, date and time, and text string data types. “Basic data type” is used as opposed to derivative data types, which are defined by the user. A variable that represents the cam data as a structure array. A cam data variable is an array structure that consists of phases and displacements. Any of the CJ-series Units that can be used with an NJ-series Controller. The generic name of an interface unit for remote I/O communications on a network between NX Units and a host network master. For example, an EtherCAT Coupler Unit is a Communications Coupler Unit for an EtherCAT network. One of the attributes of a variable. If you specify the Constant attribute for a variable, the value of the variable cannot be written by any instructions, ST operators, or CIP message communications. The range of devices that are directly controlled by the CPU Unit. In the NX-series System, the Controller includes the CPU Rack and EtherCAT slaves (including general-purpose slaves and Servo Drives). In the NJ-series System, the Controller includes the CPU Rack, Expansion Racks, and EtherCAT slaves (including general-purpose slaves and Servo Drives). Errors that are defined by the NJ/NX-series System. “Controller error” is a collective term for major fault level, partial fault level, minor fault level, and observation Controller events. One of the events in the NJ/NX-series System. Controller events are errors and information that are defined by the system for user notification. A Controller event occurs when the system detects a factor that is defined as a Controller event. Information that is defined by the NJ/NX-series System that is not an error. It represents an information Controller event. NX-series CPU Unit Hardware User’s Manual (W535) Terminology Term CPU Unit derivative data type device variable download edge enumeration enumerator EtherCAT Master Function Module EtherNet/IP Function Module event log Event Setup event task FB forced refreshing FUN function function block function module general-purpose slave global variable I/O map settings I/O port I/O refreshing information Initial Value Description The Unit that serves as the center of control for a Machine Automation Controller. The CPU Unit executes tasks, refreshes I/O for other Units and slaves, etc. The NJ/NX-series CPU Units include NX701, NJ501, and NJ301. A data type that is defined by the user. Structures, unions, and enumerations are derivative data types. A variable that is used to access a specific device through an I/O port. To transfer data from the Sysmac Studio to the Controller with the synchronization operation of the Sysmac Studio. One of the attributes of a variable. This attribute makes a BOOL variable pass TRUE to a function block when the variable changes from FALSE to TRUE or when it changes from TRUE to FALSE. One of the derivative data types. This data type takes one item from a prepared name list of enumerators as its value. One of the values that an enumeration can take expressed as a character string. The value of an enumeration is one of the enumerators. One of the function modules. This function module controls the EtherCAT slaves as the EtherCAT master. One of the function modules. This function module controls the built-in EtherNet/IP port. A function that recognizes and records errors and other events. Settings that define user-defined errors and user-defined information. A task that executes a user program only once when the task execution conditions are met. An acronym for “function block.” Forcing the refreshing of an input from an external device or an output to an external device, e.g., when the user debugs a program. Addresses that are subject to forced refreshing can still be overwritten from the user program. An abbreviation for “function.” A POU that is used to create an object that determines a unique output for the same input, such as for data processing. A POU that is used to create an object that can have a different output for the same input, such as for a timer or counter. One of the functional units of the software configuration of the CPU Unit. Any of the EtherCAT slaves that cannot be assigned to an axis. A variable that can be read or written from all POUs (programs, functions, and function blocks). Settings that assign variables to I/O ports. Assignment information between I/O ports and variables. A logical interface that is used by the CPU Unit to exchange data with an external device (slave or Unit). Cyclic data exchange with external devices that is performed with predetermined memory addresses. One of the event levels for Controller events or user-defined events. These are not errors, but appear in the event log to notify the user of specific information. One of the attributes of a variable. The variable is set to the initial value in the following situations. • When power is turned ON • When the CPU Unit changes to RUN mode • When you specify to initialize the values when the user program is transferred inline ST • When a major fault level Controller error occurs ST programming that is included within a ladder diagram program. NX-series CPU Unit Hardware User’s Manual (W535) 33 Terminology Term instruction literal local variable main memory major fault level Controller error MC Test Run memory used for CJ-series Units minor fault level Controller error Motion Control Function Module motion control instruction Description The smallest unit of the processing elements that are provided by OMRON for use in POU algorithms. There are ladder diagram instructions (program inputs and outputs), function instructions, function block instructions, and ST statements. A constant expression that is used in a user program. A variable that can be accessed only from inside the POU in which it is defined. “Local variable” is used as opposed to “global variable.” Local variables include internal variables, input variables, output variables, in-out variables, and external variables. The memory inside the CPU Unit that is used by the CPU Unit to execute the OS and user program. An error for which all NJ/NX-series Controller control operations stop. The CPU Unit immediately stops user program execution and turns OFF the loads for all slaves and Units (including remote I/O). A function to check motor operation and wiring from the Sysmac Studio. One type of I/O memory in an NJ-series CPU Unit. It contains addresses that can be directly specified by the user. It can be accessed only with variables with an AT attribute. This memory is used to access CJ-series Units and CJ-series networks. An error for which part of the control operations for one of the function modules in the NJ/NX-series Controller stop. The NJ/NX-series CPU Unit continues operation even after a minor fault level Controller error occurs. One of the function modules. The MC Function Module performs motion control based on commands from the motion control instructions that are executed in the user program. A function block instruction that executes motion control. The Motion Control Function Module supports instructions that are based on func- namespace Network Publish NX Units observation partial fault level Controller error PDO communications periodic task PLC Function Module POU 34 tion blocks for PLCopen® motion control as well as instructions developed specifically for the Motion Control Function Module. A system that is used to group and nest the names of functions, function block definitions, and data types. One of the attributes of a variable. This attribute allows you to use CIP message communications or tag data links to read/write variables from another Controller or from a host computer. Any of the NX-series Units that perform I/O processing with connected external devices. The Communications Coupler Units are not included with the NX Units. One of the event levels for Controller events or user-defined events. These are minor errors that do not affect control operations, but appear in the event log to notify the user of specific information. An error for which all of the control operations for one of the function modules in the NJ/NX-series Controller stop. An NJ/NX-series CPU Unit continues operation even after a partial fault level Controller error. An abbreviation for process data communications. Data is exchanged between the master and slaves on a process data communications cycle. (The process data communications cycle is the same as the task period of the primary periodic task.) A task for which user program execution and I/O refreshing are performed each period. One of the function modules. This function module executes the user program, sends commands to the Motion Control Function Module, and provides an interface to the USB and SD Memory Card. An acronym for “program organization unit.” A POU is a unit in a program execution model that is defined in IEC 61131-3. A POU contains an algorithm and a local variable table and forms the basic unit used to build a user program. There are three types of POUs: programs, functions, and function blocks. NX-series CPU Unit Hardware User’s Manual (W535) Terminology Term primary periodic task process data communications program Range Specification Retain Description The task with the highest priority. One type of EtherCAT communications in which process data objects (PDOs) are used to exchange information cyclically and in realtime. Process data communications are also called PDO communications. Along with functions and function blocks, one of the three types of POUs. Programs are assigned to tasks to execute them. One of the variable specifications. You can specify a range for a variable in advance. The variable can take only values that are in the specified range. One of the attributes of a variable. The values of variables with a Retain attribute are held at the following times. (Variables without a Retain attribute are set to their initial values.) • When power is turned ON after power interruption • When the CPU Unit changes to RUN mode SDO communications Servo Drive/encoder input slave slave slave and Unit configurations Slave Terminal Special Unit Setup structure synchronization Sysmac Studio system common processing system service system-defined variable task task period union Unit Unit configuration upload user program user-defined event • When you specify to not initialize the values when the user program is transferred One type of EtherCAT communications in which service data objects (SDOs) are used to transmit information whenever required. Any of the EtherCAT slaves that is assigned to an axis. In the NJ/NX-series System, it would be a Servo Drive or Encoder Input Slave Unit. A device that performs remote I/O for a master. A generic term for the EtherCAT configuration and Unit configuration. A building-block remote I/O terminal to which a Communications Coupler Unit and NX Units are mounted. A Slave Terminal is one type of slave. A generic term for the settings for a Special Unit, including the settings in allocated DM Area words. One of the derivative data types. It consists of multiple data types placed together into a layered structure. A function that automatically compares the information in the NJ/NX-series Controller with the information in the Sysmac Studio, displays any differences and locations in a hierarchical form, and can be used to synchronize the information. A computer software application for setting, programming, debugging, and troubleshooting NJ/NX-series Controllers. It also provides operations for motion control and a Simulator. System processing that is performed by the CPU Unit to perform I/O refreshing and the user program execution within a task. Exclusive control of variables between tasks, data trace processing, and other processing is performed. Processing that is performed by the CPU Unit in unused time between task processing. The system service includes communications processing, SD Memory Card access processing, self-diagnosis processing, and other processing. A variable for which all attributes are defined by the system and cannot be changed by the user. An attribute that defines when a program is executed. The interval at which the primary periodic task or a periodic task is executed. One of the derivative data types. It allows you to handle the same data as different data types. A device that mounts to the CPU Rack or an Expansion Rack. The configuration information for the Units that are set on the Sysmac Studio. This information tells what Unit models are connected to the CPU Unit and where they are connected. To transfer data from the Controller to the Sysmac Studio with the synchronization operation of the Sysmac Studio. All of the programs in one project. One of the events in the NJ/NX-series System. These events are defined by the user. “User-defined events” is a generic term for user-defined errors and user-defined information. NX-series CPU Unit Hardware User’s Manual (W535) 35 Terminology Term user-defined variable variable variable memory 36 Description A variable for which all of the attributes are defined by the user and can be changed by the user. A representation of data, such as a numeric value or character string, that is used in a user program. You can change the value of a variable by assigned the required value. “Variable” is used as opposed to “constant,” for which the value does not change. A memory area that contains the present values of variables that do not have AT specifications. It can be accessed only with variables without an AT attribute. NX-series CPU Unit Hardware User’s Manual (W535) Revision History Revision History A manual revision code appears as a suffix to the catalog number on the front and back covers of the manual. Cat. No. W535-E1-01 Revision code Revision code 01 Date April 2015 Revised content Original production NX-series CPU Unit Hardware User’s Manual (W535) 37 Revision History 38 NX-series CPU Unit Hardware User’s Manual (W535) Sections in this Manual Sections in this Manual 1 1 2 Introduction to NX-series Controllers 3 2 System Configuration 4 3 Configuration Units 4 Installation and Wiring 6 5 Troubleshooting A I 6 Inspection and Maintenance A Appendices I 5 Index NX-series CPU Unit Hardware User’s Manual (W535) 39 Sections in this Manual 40 NX-series CPU Unit Hardware User’s Manual (W535) 1 Introduction to NX-series Controllers This section describes the features, basic system configuration, specifications, and overall operating procedure of an NX-series Controller. 1-1 The NX-series Controllers . . . . . . . . . . . . . . . . . . . . . . . . . . . . . . . . . . . . . . . 1-2 1-1-1 1-1-2 Features . . . . . . . . . . . . . . . . . . . . . . . . . . . . . . . . . . . . . . . . . . . . . . . . . . . . . . 1-2 Introduction to the System Configurations . . . . . . . . . . . . . . . . . . . . . . . . . . . . 1-5 1-2 Specifications . . . . . . . . . . . . . . . . . . . . . . . . . . . . . . . . . . . . . . . . . . . . . . . . . 1-8 1-3 Overall Operating Procedure for the NX-series Controller . . . . . . . . . . . 1-12 1-3-1 1-3-2 Overall Procedure . . . . . . . . . . . . . . . . . . . . . . . . . . . . . . . . . . . . . . . . . . . . . . 1-12 Procedure Details . . . . . . . . . . . . . . . . . . . . . . . . . . . . . . . . . . . . . . . . . . . . . . 1-13 NX-series CPU Unit Hardware User’s Manual (W535) 1-1 1 Introduction to NX-series Controllers 1-1 The NX-series Controllers The SYSMAC NX-series Controllers are next-generation machine automation controllers that provide the functionality and high-speed performance that are required for machine control. They provide the safety, reliability, and maintainability that are required of industrial controllers. The NX-series Controllers provide the functionality of previous OMRON PLCs, and they also provide the functionality that is required for motion control. Synchronized control of I/O devices on high-speed EtherCAT can be applied to safety devices, vision systems, motion equipment, discrete I/O, and more. OMRON offers the new Sysmac Series of control devices designed with unified communications specifications and user interface specifications. The NX-series Machine Automation Controllers are part of the Sysmac Series. You can use them together with EtherCAT slaves, other Sysmac products, and the Sysmac Studio Automation Software to achieve optimum functionality and ease of operation. With a system that is created from Sysmac products, you can connect components and commission the system through unified concepts and usability. Sysmac Studio Automation Software Multitasking, Synchronized Control Sequence control Motion control IEC Programming NX-series Controller EtherCAT control network Safety devices 1-1-1 I/O controls Servo Drivers and Inverters Machine vision Features Hardware Features z Standard-feature EtherCAT Control Network Support All CPU Units provide an EtherCAT master port for EtherCAT communications. EtherCAT is an advanced industrial network system that achieves faster, more-efficient communications. It is based on Ethernet. Each node achieves a short fixed communications cycle time by transmitting Ethernet frames at high speed. The standard-feature EtherCAT control network allows you to connect all of the devices required for machine control (e.g., I/O systems, Servo Drives, Inverters, and machine vision) to the same network. 1-2 NX-series CPU Unit Hardware User’s Manual (W535) 1 Introduction to NX-series Controllers You can use EtherCAT Slave Terminals to save space. You can also flexibly build systems with the wide variety of NX Units. z Achieving a Safety Subsystem on EtherCAT You can use NX-series Safety Control Units to integrate safety controls in a sequence and motion control system as a subsystem on EtherCAT. 1 z Standard-feature Two EtherNet/IP Communications Ports EtherNet/IP is a multi-vendor industrial network that uses Ethernet. You can use it for networks between Controllers or as a field network. The use of standard Ethernet technology allows you to connect to many different types of general-purpose Ethernet devices. z Standard-feature USB Port You can connect a computer that runs the Support Software directly to the CPU Unit with a USB connection. z Standard-feature SD Memory Card Slot You can access an SD Memory Card that is mounted in the CPU Unit from the user program. z Highly Reliable Hardware The NX-series Controllers provide the hardware reliability and RAS functions that you expect of a PLC. z Parallel Execution of Tasks with a Multi-core Processor CPU Unit has a multi-core processor that can execute more than one task in parallel. This enables high-speed control of even large-scale devices. Software Features z Integrated Sequence Control and Motion Control An NX-series CPU Unit can perform both sequence control and motion control. You can simultaneously achieve both sequence control and multi-axes synchronized control. Sequence control, motion control, and I/O refreshing are all executed in the same control period. The same control period is also used for the process data communications cycle for EtherCAT. This enables precise sequence and motion control in a fixed period with very little deviation. z Multitasking You assign I/O refreshing and programs to tasks and then specify execution conditions and execution order for them to flexibly combine controls that suit the application. z Programming Languages Based on the IEC 61131-3 International Standard The NX-series Controllers support language specifications that are based on IEC 61131-3. To these, OMRON has added our own improvements. Motion control instructions that are based on PLCopen® standards and an instruction set (POUs) that follows IEC rules are provided. NX-series CPU Unit Hardware User’s Manual (W535) 1-3 1-1-1 Features All CPU Units provide two EtherNet/IP ports for EtherNet/IP communications. The NX701- 1-1 The NX-series Controllers z Support for EtherCAT Slave Terminals 1 Introduction to NX-series Controllers z Programming with Variables to Eliminate Worrying about the Memory Map You access all data through variables in the same way as for the advanced programming languages that are used on computers. Memory in the CPU Unit is automatically assigned to the variables that you create so that you do not have to remember the physical addresses. z A Wealth of Security Features The many security features of the NX-series Controllers include operation authority settings and restriction of program execution with IDs. z Complete Controller Monitoring The CPU Unit monitors events in all parts of the Controller, including mounted Units and EtherCAT slaves. Troubleshooting information for errors is displayed on the Sysmac Studio or on an NS-series PT. Events are also recorded in logs. z Sysmac Studio Automation Software The Sysmac Studio provides an integrated development environment that covers not only the Controller, but also covers peripheral devices and devices on EtherCAT. You can use consistent procedures for all devices regardless of the differences in the devices. The Sysmac Studio supports all phases of Controller application, from designing through debugging, simulations, commissioning, and changes during operation. z A Wealth of Simulation Features The many simulation features include execution, debugging, and task execution time estimates on a virtual controller. 1-4 NX-series CPU Unit Hardware User’s Manual (W535) 1 Introduction to NX-series Controllers Introduction to the System Configurations The NX Series supports the following system configurations. z Basic System Configurations The NX-series basic configurations include the EtherCAT network configuration and the Support Software. • EtherCAT Network Configuration • Support Software The Support Software is connected to the peripheral USB port on the CPU Unit with a commercially available USB cable. You can also connect it through an Ethernet cable that is connected to the built-in EtherNet/IP port. Refer to 3-4-2 Connection on page 3-15 for details on the connection configuration of the Support Software. Support Software NX-series Controller Power Supply Unit LAN Peripheral USB port CPU Unit CPU Rack USB Or EtherNet/IP Built-in EtherNet/IP port Built-in EtherCAT port EtherCAT Slave Terminal Servo Drive/encoder input slaves EtherCAT Network Configuration General-purpose slaves Precautions for Correct Use NX Units should be connected to Slave Terminals. The NX bus connector of the CPU Unit is provided for future expansion so that it cannot be used to connect any NX Unit. Additional Information You can connect the Sysmac Studio directly to the Communications Coupler Unit to set up the Slave Terminal. Refer to the NX-series EtherCAT Coupler Units User’s Manual (Cat. No. W519) for details. NX-series CPU Unit Hardware User’s Manual (W535) 1-5 1 1-1-2 Introduction to the System Configurations You can use the built-in EtherCAT port to connect to EtherCAT Slave Terminals, to general-purpose slaves for analog and digital I/O, and to Servo Drives and encoder input slaves. An EtherCAT network configuration enables precise sequence and motion control in a fixed cycle with very little deviation. 1-1 The NX-series Controllers 1-1-2 1 Introduction to NX-series Controllers z Network Configurations • Host computers, HMIs, and other NJ/NX-series Controllers are connected to the built-in EtherNet/IP port. • A DeviceNet network is connected to a CJ-series DeviceNet Unit. A serial communications network is connected to a CJ-series Serial Communications Unit. FA Communications Software Information Level Sysmac Studio FA Wireless LAN Unit EtherNet/IP Built-in EtherNet/IP port Built-in EtherNet/IP port Programmable Terminal NJ-series CPU Unit NX-series CPU Unit Built-in EtherCAT port EtherCAT Serial Communications Unit CompoNet Master Unit DeviceNet Unit EtherCAT Slave Terminal Field Level NJ/NX-series CPU Unit General-purpose slaves Servo Drives Vision Systems EtherNet/IP RS-232C, RS-422A/485 RFID Systems Robots Serial communications devices CompoNet MS NS WORD NODE ADR 0 1 2 3 4 5 6 7 8 9 10 11 12 13 14 15 MS NS WORD NODE ADR OUT OD16 CRT1-OD16 CRT1 REMOTE TERMINAL 0 1 2 3 4 5 6 7 8 9 10 11 12 13 14 15 MS NS WORD NODE ADR OUT OD16 CRT1-OD16 CRT1 REMOTE TERMINAL 0 1 2 3 4 5 6 7 8 9 10 11 12 13 14 15 OUT OD16 CRT1-OD16 CRT1 REMOTE TERMINAL General-purpose components or OMRON components DeviceNet CompoNet slaves DeviceNet slaves Refer to the NJ/NX-series CPU Unit Software User’s Manual (Cat. No. W501) for details on the network configuration. 1-6 NX-series CPU Unit Hardware User’s Manual (W535) 1 Introduction to NX-series Controllers You can use the following Support Software to set up, monitor, and debug an NX-series Controller. • Sysmac Studio The Sysmac Studio is the main Support Software that you use for an NX-series Controller. On it, you can set up the Controller configurations, parameters, and programs, and you can debug and simulate operation. 1-1 The NX-series Controllers z Support Software • Other Support Software The following Support Software is also included in the Sysmac Studio Software Package Standard Edition. Sysmac Studio Network Configurator CX-Integrator CX-Protocol CX-Designer Application The Sysmac Studio is used for sequence control, motion control, and all other operations except those described below. The Network Configurator is used for tag data links on EtherNet/IP ports. *1 The CX-Integrator is used for remote I/O communications with a CJ-series DeviceNet Unit or CJ-series CompoNet Master Unit. The CX-Protocol is used for protocol macros with the CJ-series Serial Communications Units. The CX-Designer is used to create screens for NS-series PTs. *1. If the NJ/NX-series Controller is a target device, you may also use Sysmac Studio version 1.10 or higher. Use the Network Configurator if a CS/CJ-series PLC operates as the originator device. NX-series CPU Unit Hardware User’s Manual (W535) 1-7 1-1-2 Introduction to the System Configurations Configuration software 1 1 Introduction to NX-series Controllers 1-2 Specifications This section gives the main specifications of the NX-series Controllers. Item Processing time Programming LD instruction Instruction exeMath instructions (for long real cution times data) Size Number of POU Program capacdefinitions Quantity ity*1 Number of POU Instances Size Retain attriNumber of vaributes*2 ables Memory capacity for variables Size No Retain attriNumber of vaributes*3 ables Data types Number of data types Memory for CIO Area CJ-series Units Work Area (Can be speciHolding Area fied with AT DM Area specifications EM Area for variables.) Maximum number of controlled NX70117 0.37 ns or more 3.2 ns or more 16 80 MB 6,000 48,000 4 MB 40,000 256 MB 360,000 8,000 ----------256 axes 128 axes 256 axes 128 axes 256 axes 128 axes axes*4 Maximum number of used real axes*5 Motion control Number of con- Maximum number of axes for sintrolled axes gle-axis control Maximum number of axes for linear interpolation axis control Number of axes for circular interpolation axis control Maximum number of axes groups Motion control period Cams Peripheral USB port 1-8 Maximum points Number of cam per cam table data points Maximum points for all cam tables Maximum number of cam tables Position units Override factors Supported services Physical layer Transmission distance 4 axes per axes group 2 axes per axes group 64 axes groups The same control period as that is used for the process data communications cycle for EtherCAT. 65,535 points 1,048,560 points 640 tables Pulse, mm, μm, nm, degree, and inch 0.00% or 0.01% to 500.00% Sysmac Studio connection USB 2.0-compliant B-type connector 5 m max. NX-series CPU Unit Hardware User’s Manual (W535) 1 Introduction to NX-series Controllers NX70117 Number of ports Physical layer Frame length Media access method Modulation Topology Baud rate Transmission media Maximum transmission distance between Ethernet switch and node Maximum number of cascade connections Maximum number of connections Packet interval*6 Built-in EtherNet/IP port CIP service: Tag data links (cyclic communications) 16 2 10BASE-T, 100BASE-TX, or 1000BASE-T 1,514 bytes max. CSMA/CD Baseband Star 1 Gbps (1000BASE-T) STP (shielded, twisted-pair) cable of Ethernet category 5, 5e or higher 100 m There are no restrictions if an Ethernet switch is used. 256 per port 512 total Can be set for each connection. 0.5 to 10,000 ms in 0.5-ms increments Permissible communications band 40,000 pps*7 (including heartbeat) 256 per port Maximum number of tag sets 512 total Tag types Network variables Number of tags per connection 8 (7 tags if Controller status is included in the tag (i.e., per tag set) set.) 256 per port Maximum number of tags 512 total Maximum link data size per node 369,664 bytes (total size for all tags) Maximum data size per connection 1,444 bytes 256 per port Maximum number of registrable 512 total tag sets (1 connection = 1 tag set) 1,444 bytes (Two bytes are used if Controller status Maximum tag set size is included in the tag set.) *8 Supported. Multi-cast packet filter 128 per port Class 3 (number of connections) CIP message service: Explicit messages UCMM (non-connection type) Number of TCP sockets NX-series CPU Unit Hardware User’s Manual (W535) Maximum number of clients that can communicate at one time Maximum number of servers that can communicate at one time 256 total (clients plus server) 32 per port 64 total 32 per port 64 total 30 1-9 1-2 Specifications Item 1 1 Introduction to NX-series Controllers Item Communications standard EtherCAT master specifications Physical layer Modulation Baud rate Duplex mode Topology Transmission media Built-in EtherCAT port Maximum transmission distance between nodes Maximum number of slaves Range of node addresses that can be set Maximum process data size Maximum process data size per slave NX70117 16 IEC 61158 Type12 Class B (Feature Pack Motion Control compliant) 100BASE-TX Baseband 100 Mbps (100BASE-TX) Auto Line, daisy chain, and branching Twisted-pair cable of category 5 or higher (double-shielded straight cable with aluminum tape and braiding) 100 m 512 1 to 512 Input: 11,472 bytes Output: 11,472 bytes However, the maximum number of process data frames is 8. Input: 1,434 bytes Output: 1,434 bytes Primary periodic task 125 μs Communications cycle 250 μs to 8 ms in 250-μs increments Priority-5 periodic task 125 μs Sync jitter Maximum number of connectable Units Unit configuration Maximum number of CJ Units per CPU Rack or Expansion Rack Maximum number of CJ Units for entire controller Maximum number of NX Units for entire controller Maximum number of Expansion Racks Maximum number of I/O points on I/O capacity CJ-series Units Power Supply Model Unit for CPU Rack and AC power supply Power OFF Expansion detection time DC power supply Racks Internal clock 250 μs to 100 ms in 250-μs increments 1 μs max. ----4,000 (On EtherCAT Slave Terminals) 0 --NX-PA9001 NX-PD7001 30 to 45 ms 5 to 20 ms At ambient temperature of 55°C: -3.5 to 0.5 min error per month At ambient temperature of 25°C: -1.5 to 1.5 min error per month At ambient temperature of 0°C: −3 to 1 min error per month *1. Execution objects and variable tables (including variable names) *2. Does not include Holding, DM, and EM Area memory for CJ-series Units. *3. Does not include CIO and Work Area memory for CJ-series Units. *4. This is the total for all axis types. *5. This is the total number of axes that are set as servo axes or encoder axes and are also set as used axes. 1 - 10 NX-series CPU Unit Hardware User’s Manual (W535) 1 Introduction to NX-series Controllers *6. Data will be refreshed at the set interval, regardless of the number of nodes. *8. As the EtherNet/IP port implements the IGMP client, unnecessary multi-cast packets can be filtered by using an Ethernet switch that supports IGMP Snooping. 1-2 Specifications *7. “pps” means packets per second, i.e., the number of communications packets that can be sent or received in one second. 1 NX-series CPU Unit Hardware User’s Manual (W535) 1 - 11 1 Introduction to NX-series Controllers 1-3 Overall Operating Procedure for the NX-series Controller This section gives the overall operating procedure of the NX-series Controllers and then describes it in more detail. 1-3-1 Overall Procedure The overall procedure to use an NX-series Controller is given below. Step 1. Software Design Design the overall system configuration, task configuration, programs, and variables. Step 1-1 Designing I/O and Processing Step 1-2 Designing Tasks Step 1-3 Designing Programs Step 2. Software Setups and Programming Create the system configurations that you designed in step 1 on the Support Software and assign the variables. Create the tasks and programs, and debug them, e.g., with simulations. Step 2-1 Slave and Unit Configurations Step 2-2 Controller Setup Step 2-3 Programming Step 2-4 Offline Debugging Step 3. Mounting and Setting Hardware Mount the Units and make the required hardware settings. Step 4. Wiring Connect the network cables and wire the I/O. Step 5. Confirming Operation and Starting Actual System Operation Connect the Support Software to the physical system and download the project. Check operation on the physical system and then start actual system operation. 1 - 12 NX-series CPU Unit Hardware User’s Manual (W535) 1 Introduction to NX-series Controllers Procedure Details Step 1. Software Design Step Step 1-1 Designing I/O and Processing Description • External I/O devices and unit configuration Step 1-2 Designing Tasks • Task configuration Reference Section 3 Configuration Units • Refresh periods for external devices NJ/NX-series CPU Unit Software User’s Manual (Cat. No. W501) • Exclusive control methods for variables between tasks • Programs • Functions and function blocks • Determining the algorithm languages • Defining variables that you can use in more than one POU and variables that you use in only specific POUs • Defining the variables names for the device variables that you use to access slaves and Units NJ/NX-series CPU Unit Software User’s Manual (Cat. No. W501) NJ/NX-series CPU Unit Software User’s Manual (Cat. No. W501) • Defining the attributes of variables, such as the Name and Retain attributes • Designing the data types of variables Step 2. Software Setups and Programming Step Description Project Creation 1. Create a project in the Sysmac Studio. 2. Insert a Controller. Sysmac Studio Operations New Project Button Insert − Controller Reference Sysmac Studio Version 1 Operation Manual (Cat. No. W504) The following Controller Configurations and Setup and the Programming and Task Settings can be performed in either order. Step 2-1 Slave and Unit configurations EtherCAT Slave NJ/NX-series CPU Unit Soft1. Creating the slave configuration and 1) Creating the Slave Setting Editor ware User’s Manual (Cat. No. Unit configuration either offline or and Unit ConfiguraW501) online. (For online configuration, tions Unit Editor NX-series EtherCAT Coupler make the online connection that is Unit User’s Manual (Cat. No. described in step 5.) W519) 2. Setting up any Slave Terminals that are used. NX-series CPU Unit Hardware User’s Manual (W535) 1 - 13 1-3-2 Procedure Details • Relationship between tasks and programs • Slave and Unit refresh times Variable Design 1 • Program contents • Task periods Step 1-3 Designing Programs POU (Program Organization Unit) Design 1-3 Overall Operating Procedure for the NX-series Controller 1-3-2 1 Introduction to NX-series Controllers I/O Map Registering device variables in variable table 2) Assigning Device Variables to I/O Ports (Variable names are user defined or automatically created.) (The following step is for motion control.) Creating the axes and setting them as real 3) Creating the Axes and Assigning Them axes or virtual axes. to the Servo Creating axes groups to perform interpoDrive/Encoder Input lated axes control. Slaves Step 2-2 Controller Setup Setting the following parameters from the Sysmac Studio Setting the initial values for the PLC Function Module (To use motion control) Setting the initial settings for the Motion Control Function Module Setting the initial values for the EtherCAT Function Module Setting the initial values for the EtherNet/IP Function Module Configurations and Setup − Motion Control Setup Configurations and Setup − Controller Setup − Operation Settings Configurations and Setup − Motion Control Setup Configurations and Setup − EtherCAT Configurations and Setup − Controller Setup − Built-in EtherNet/IP Port Settings NJ/NX-series CPU Unit Software User’s Manual (Cat. No. W501) NJ/NX-series CPU Unit Software User’s Manual (Cat. No. W501) NJ/NX-series CPU Unit Software User’s Manual (Cat. No. W501) Step 2-3 Programming 1) Registering Variables • Registering the variables used by more than one POU in the global variable table with Sysmac Studio • Registering the local variable table for each program 2) Writing Algorithms for POUs 1 - 14 • Registering the local variable table for each function block and function Writing the algorithms for the POUs (programs, function blocks, and functions) in the required languages Global variable Table Editor Local Variable Table Editor Programming Editor Sysmac Studio Version 1 Operation Manual (Cat. No. W504) NJ/NX-series CPU Unit Software User’s Manual (Cat. No. W501) NJ/NX-series CPU Unit Software User’s Manual (Cat. No. W501) NJ/NX-series Instructions Reference Manual (Cat. No. W502) NJ/NX-series Motion Control Instructions Reference Manual (Cat. No. W508) NX-series CPU Unit Hardware User’s Manual (W535) 1 Introduction to NX-series Controllers Making task settings Step 2-4 Checking the algorithms and task execution times on the Simulator (virtual controller) Offline Debugging Configurations and Setup − Task Settings NJ/NX-series CPU Unit Software User’s Manual (Cat. No. W501) NJ/NX-series CPU Unit Software User’s Manual (Cat. No. W501) 1-3 Overall Operating Procedure for the NX-series Controller 3) Setting the Tasks 1 Step 1) Mounting Description • Connecting adjacent Units 2) Setting Hardware • Mounting to DIN Track • Setting the node addresses of the EtherCAT slaves Reference 4-3 Mounting Units on page 4-9 Operation manuals for the EtherCAT slaves Step 4. Wiring Step 1) Connecting Ethernet Cable 2) Wiring I/O Description • Connecting the built-in EtherCAT port Reference 4-4 Wiring on page 4-31 • Connecting the built-in EtherNet/IP port • Wiring I/O to EtherCAT slaves Operation manuals for the EtherCAT slaves 4-4 Wiring on page 4-31 Sysmac Studio Version 1 Operation Manual (Cat. No. W504) Sysmac Studio Version 1 Operation Manual (Cat. No. W504) • Checking wiring 3) Connecting the Computer That Runs the Sysmac Studio • Connecting USB Cable • Connecting the built-in EtherNet/IP port Step 5. Checking Operation and Starting Operation on the Actual System Step Description 1) Online Connection to Sysmac Studio and Project Download Turn ON the power supply to the Controller and place the Sysmac Studio online. Then, download the project. *1 Perform this step before you create the slave configuration or Unit configuration from the mounted Units in step 2-1. NX-series CPU Unit Hardware User’s Manual (W535) Sysmac Studio Operations Controller − Communications Setup − Reference NJ/NX-series CPU Unit Software User’s Manual (Cat. No. W501) Controller − Synchronization 1 - 15 1-3-2 Procedure Details Step 3. Mounting and Setting Hardware 1 Introduction to NX-series Controllers 2) Operation Check on Controller 1. Check the wiring by using forced refreshing of real I/O from the I/O Map or Watch Tab Page. 2. For motion control, use the MC Test Run operations in PROGRAM mode to check the wiring. Then check the motor rotation directions for jogging, travel distances for relative positioning (e.g., for electronic gear settings), and homing operation. 3. Change the Controller to RUN mode and check the operation of the user program. --- NJ/NX-series CPU Unit Software User’s Manual (Cat. No. W501) 3) Actual Controller Operation Start actual operation. --- --- *1. Use the Synchronize Menu of the Sysmac Studio to download the project. 1 - 16 NX-series CPU Unit Hardware User’s Manual (W535) 2 System Configuration This section describes the basic system configuration used for NX-series Controllers. 2-1 Basic System Configuration . . . . . . . . . . . . . . . . . . . . . . . . . . . . . . . . . . . . . 2-2 2-1-1 EtherCAT Network Configuration . . . . . . . . . . . . . . . . . . . . . . . . . . . . . . . . . . . 2-3 2-2 Connecting to the Sysmac Studio . . . . . . . . . . . . . . . . . . . . . . . . . . . . . . . . 2-6 2-3 Network Configuration . . . . . . . . . . . . . . . . . . . . . . . . . . . . . . . . . . . . . . . . . 2-7 NX-series CPU Unit Hardware User’s Manual (W535) 2-1 2 System Configuration 2-1 Basic System Configuration An NX-series Controller supports the following two types of configurations. • Basic Configuration The basic configurations include the CPU Unit and the Configuration Units that are controlled directly by the CPU Unit. There are two basic configurations. a) EtherCAT network configuration • Other Network Configurations These are the configurations of the systems that are connected to the CPU Unit’s built-in EtherNet/IP port and Communications Units. z Basic Controller Configuration With an NX-series CPU Unit, you can use an EtherCAT network as a basic system. With the EtherCAT network system of the NX-series CPU Unit, the period for sequence processing and motion processing in the CPU Unit is the same as the EtherCAT communications period. This enables high-precision sequence control and motion control with a constant period and little fluctuation. For information on EtherCAT, refer to the NJ/NX-series CPU Unit Built-in EtherCAT Port User’s Manual (Cat. No. W505). 2-2 NX-series CPU Unit Hardware User’s Manual (W535) 2 System Configuration EtherCAT Network Configuration The EtherCAT network configuration consists of an NX-series CPU Unit, an NX-series Power Supply Unit, an End Cover, and the EtherCAT slaves. You use the built-in EtherCAT master port on the NX-series CPU Unit to connect EtherCAT slaves. EtherCAT Network Configuration NX-series Power Supply Unit NX-series CPU Unit SD Memory Card End Cover 2-1 Basic System Configuration 2-1-1 2 CPU Rack 2-1-1 EtherCAT Network Configuration Built-in EtherNet/IP port EtherCAT slaves Built-in EtherCAT port ADR ADR EtherCAT Slave Terminal Servo Drive/encoder input slaves General-purpose slaves For information on the system configuration of an EtherCAT network, refer to the NJ/NX-series CPU Unit Built-in EtherCAT Port User’s Manual (Cat. No. W505). Configuration Units z NX-series CPU Units The Unit that serves as the center of control for a Machine Automation Controller. It executes tasks, refreshes I/O for other Units and slaves, etc. The NX-series CPU Unit includes the NX701. Refer to 3-1 CPU Units on page 3-2 for the models and specifications of individual NX-series CPU Units. NX-series CPU Unit Hardware User’s Manual (W535) 2-3 2 System Configuration z NX-series Power Supply Units The Unit that supplies power to a CPU Rack including an NX-series CPU Unit. AC type and DC type are provided for the Power Supply Unit. Refer to 3-3 Power Supply Units on page 3-11 for the models and specifications of individual NX-series Power Supply Units. Precautions for Safe Use Do not use the Power Supply Units in the system beyond the rated supply capacity ranges. Doing so may result in operation stopping, incorrect operation, or failure to correctly back up required data at power interruptions. z SD Memory Card With the NX-series CPU Unit, various data can be saved, backed up, restored and compared using the SD Memory Card. Refer to 3-2 SD Memory Cards on page 3-10 for the models and specifications of individual SD Memory Card. z End Cover A cover to protect the NX-series CPU Unit. z EtherCAT Slaves A device that exchanges data with the EtherCAT master built into NX-series Controller through the EtherCAT network. The device provides non-synced slaves and synced slaves. Refer to the manuals for the specific EtherCAT slaves for details. z USB Cable A cable to connect the CPU Unit and the Sysmac Studio. Name Connecting cable for peripheral USB port Model Commercially available USB cable Specifications USB 2.0 certified cable, A connector - B connector, 5.0 m max. z Recommended Communications Cables for EtherCAT and EtherNet/IP For EtherCAT, use a shielded twisted-pair cable (double shielding with aluminum tape and braiding) of Ethernet category 5 (100BASE-TX) or higher, and use straight wiring. For EtherNet/IP, required specification for the communications cables varies depending on the baud rate. For 100BASE-TX/10BASE-T, use an STP (shielded twisted-pair) cable of Ethernet category 5 or higher. You can use either a straight or cross cable. For 1000BASE-T, use an STP (double shielding with aluminum tape and braiding) cable of Ethernet category 5e or higher. You can use either a straight or cross cable. The following table lists wiring materials used for the EtherCAT and EtherNet/IP communications cables. In the table, materials indicated available for EtherNet/IP 100BASE-TX are available for both of 100BASE-TX and 10BASE-T. 2-4 NX-series CPU Unit Hardware User’s Manual (W535) 2 System Configuration Products for EtherCAT Size and number of pairs: AWG27 × 4P*1 Size and number of pairs: AWG22 × 2P*2 Size and number of pairs: AWG24 × 4P Products for EtherCAT or EtherNet/IP (100BASETX) Size and number of pairs: Products for EtherNet/IP (100BASETX) Size and number of pairs: 0.5 mm × 4P OMRON Corporation [m] 0.3 XS6W-6LSZH8SS30CM-Y 0.5 XS6W-6LSZH8SS50CM-Y 1 XS6W-6LSZH8SS100CM-Y 10 XS6W-6LSZH8SS1000CM-Y 0.3 XS5W-T421-AMD-K 0.5 XS5W-T421-BMD-K 1 XS5W-T421-CMD-K 2 XS5W-T421-DMC-K 5 XS5W-T421-GMC-K 10 XS5W-T421-JMC-K 0.3 XS5W-T422-AMC-K 0.5 XS5W-T422-BMC-K 1 XS5W-T422-CMC-K Rugged type Cables with Connectors on Both Ends (RJ45/RJ45) OMRON Corporation Rugged type Cables with Connectors on Both Ends (M12/RJ45) OMRON Corporation Rugged type Cable with Connectors on Both Ends (M12L/RJ45) OMRON Corporation Cables Tonichi Kyosan Cable, Ltd. Kuramo Electric Co. SWCC Showa Cable Systems Co. Panduit Corporation Kuramo Electric Co., Ltd. Nihon Electric Wire&Cable Co.,Ltd OMRON Corporation RJ45 Connectors Cables AWG22 × 2P*3 RJ45 Assembly Connectors Cable RJ45 Connector Model Fujikura Panduit Corporation 2 2-1-1 EtherCAT Network Configuration Products for EtherCAT or EtherNet/IP (1000BASET/100BASETX) Standard type Cable with Connectors on Both Ends (RJ45/RJ45) Cable length NETSTAR-C5E SAB 0.5 × 4P KETH-SB FAE-5004 MPS588 KETH-PSB-OMR PNET/B XS6G-T421-1 F-LINK-E 0.5 mm × 4P MPS588 *1. Cables are available in the following lengths: 0.2, 0.3, 0.5, 1, 1.5, 2, 3, 5, 7.5, 10, 15, and 20 m. Refer to the XS5/XS6 Industrial Ethernet Connectors Catalog (Cat. No. G019). *2. Cables are available in the following lengths: 0.3, 0.5, 1, 2, 3, 5, 10, and 15 m. Refer to the XS5/XS6 Industrial Ethernet Connectors Catalog (Cat. No. G019). *3. We recommend that you use combinations of the above Cables and Connectors. Note When making cables, connect the shield to the connectors at both ends for EtherCAT. For how to connect the shield for EtherNet/IP, refer to the NJ/NX-series CPU Unit Built-in EtherNet/IP Port User’s Manual (Cat. No. W506). NX-series CPU Unit Hardware User’s Manual (W535) 2-1 Basic System Configuration Manufacturer Product 2-5 2 System Configuration 2-2 Connecting to the Sysmac Studio Connect the NX-series CPU Unit and the Sysmac Studio through USB or EtherNet/IP. Refer to 3-4-2 Connection on page 3-15 for information on how to make the connection between the NX-series CPU Unit and the Sysmac Studio. 2-6 NX-series CPU Unit Hardware User’s Manual (W535) 2 System Configuration 2-3 Network Configuration For details on communications networks that you can connect to, refer to the NJ/NX-series CPU Unit Software User’s Manual (Cat. No. W501). FA Communications Software Information Level Sysmac Studio FA Wireless LAN Unit 2-3 Network Configuration You can make networks in the following layers with an NJ/NX-series Controller. EtherNet/IP Built-in EtherNet/IP port 2 Built-in EtherNet/IP port Programmable Terminal NJ-series CPU Unit Built-in EtherCAT port NX-series CPU Unit EtherCAT Serial Communications Unit CompoNet Master Unit DeviceNet Unit EtherCAT Slave Terminal Field Level NJ/NX-series CPU Unit General-purpose slaves Servo Drives Vision Systems EtherNet/IP RS-232C, RS-422A/485 RFID Systems Robots Serial communications devices CompoNet MS NS WORD NODE ADR 0 1 2 3 4 5 6 7 8 9 10 11 12 13 14 15 MS NS WORD NODE ADR OUT OD16 CRT1-OD16 CRT1 REMOTE TERMINAL 0 1 2 3 4 5 6 7 8 9 10 11 12 13 14 15 MS NS WORD NODE ADR OUT 0 1 2 3 4 5 6 7 8 9 10 11 12 13 14 15 OUT OD16 CRT1-OD16 CRT1 REMOTE TERMINAL OD16 CRT1-OD16 CRT1 REMOTE TERMINAL General-purpose components or OMRON components DeviceNet CompoNet slaves DeviceNet slaves Connection Sysmac Studio Between Controllers Devices NJ/NX-series Controller or CJ-series PLC Servo Drives, general-purpose slaves and Vision Systems Ethernet communications devices Connection method Use USB or the built-in EtherNet/IP port. Use the built-in EtherNet/IP port or a port on an EtherNet/IP Unit.*1 Use the built-in EtherCAT port. Use the built-in EtherNet/IP port or a port on an EtherNet/IP Unit.*1 Serial communications devices Mount a Serial Communications Unit*2 and use RS-232C port or RS-422A/485 ports. DeviceNet slaves Mount a DeviceNet Unit*2 and use DeviceNet. CompoNet slaves Programmable Terminals Mount a CompoNet Master Unit*2 and use CompoNet. Use the built-in EtherNet/IP port or a port on an Eth- Servers erNet/IP Unit.*1 Use the built-in EtherNet/IP port or a port on an Eth- Connections to BOOTP server, DNS server, or NTP server NX-series CPU Unit Hardware User’s Manual (W535) erNet/IP Unit.*1 2-7 2 System Configuration *1. Use a CJ-series EtherNet/IP Unit with a unit version of 2.1 or later. Also, mount the EtherNet/IP Unit to an NJ-series CPU Unit with unit version 1.01 or later, and use Sysmac Studio version 1.02 or higher. Refer to the NJ/NX-series CPU Unit Software User’s Manual (Cat. No. W501) for information on version upgrades. *2. Mount to an NJ-series CPU Unit. 2-8 NX-series CPU Unit Hardware User’s Manual (W535) Configuration Units 3 This section describes configuration devices in the NX-series Unit configuration. 3-1 CPU Units . . . . . . . . . . . . . . . . . . . . . . . . . . . . . . . . . . . . . . . . . . . . . . . . . . . . 3-2 3-1-1 3-1-2 Models and Specifications . . . . . . . . . . . . . . . . . . . . . . . . . . . . . . . . . . . . . . . . 3-2 Part Names and Functions . . . . . . . . . . . . . . . . . . . . . . . . . . . . . . . . . . . . . . . . 3-2 3-2 SD Memory Cards . . . . . . . . . . . . . . . . . . . . . . . . . . . . . . . . . . . . . . . . . . . . 3-10 3-2-1 3-2-2 Models and Specifications . . . . . . . . . . . . . . . . . . . . . . . . . . . . . . . . . . . . . . . 3-10 Purpose . . . . . . . . . . . . . . . . . . . . . . . . . . . . . . . . . . . . . . . . . . . . . . . . . . . . . 3-10 3-3 Power Supply Units . . . . . . . . . . . . . . . . . . . . . . . . . . . . . . . . . . . . . . . . . . . 3-11 3-3-1 3-3-2 Models and Specifications . . . . . . . . . . . . . . . . . . . . . . . . . . . . . . . . . . . . . . . .3-11 Part Names and Functions . . . . . . . . . . . . . . . . . . . . . . . . . . . . . . . . . . . . . . . 3-12 3-4 Sysmac Studio . . . . . . . . . . . . . . . . . . . . . . . . . . . . . . . . . . . . . . . . . . . . . . . 3-15 3-4-1 3-4-2 Model Numbers . . . . . . . . . . . . . . . . . . . . . . . . . . . . . . . . . . . . . . . . . . . . . . . 3-15 Connection . . . . . . . . . . . . . . . . . . . . . . . . . . . . . . . . . . . . . . . . . . . . . . . . . . . 3-15 NX-series CPU Unit Hardware User’s Manual (W535) 3-1 3 Configuration Units 3-1 CPU Units This section describes the models and specifications of the NX-series CPU Units as well as the names and functions of the parts. 3-1-1 Models and Specifications Model NX701-1700 NX701-1600 3-1-2 Memory capacity for variables 4 MB (Retained during power interruptions) or 256 MB (Not retained during power interruptions) Program capacity 80 MB Number of motion axes 256 axes 128 axes Part Names and Functions (A) (B) (C) (D) (E) (F) (G) (H) (I) (E) (J) (K) RUN RUN ERRO ERROR R BUSY BUSY SHTDWN SDPWR PWR SD SDBUSY SD BUSY PORT PORT1 1 EtherNet/IP Ether Net/IP NET NETRUN RUN NET NETERR ERR PORT1 EtherNet/IP LINK/ACT LINK /ACT PORT PORT2 2 EtherNet/IP Ether Net/IP NET NETRUN RUN NET NETERR ERR LINK/ACT LINK /ACT PORT POR T33 Ether EtherCAT CAT NETRUN NET RUN NET NETERR ERR LINK LINK/ACT /ACT PORT2 EtherNet/IP PORT3 EtherCAT (R) 3-2 (Q) (P) (O) (N) (M) (J) (L) NX-series CPU Unit Hardware User’s Manual (W535) 3 Configuration Units Function Connects to the Sysmac Studio via a USB cable. C D E F G H Push switch Power supply connector DIN Track mounting hooks Fan Unit Battery SD Memory Card power supply switch I J K L M SD Memory Card connector Unit hookup guides Connector Battery connector ID information indication N O P USB host port Built-in EtherCAT port (port 3) Operation status indicators Q R Built-in EtherNet/IP port (port 2) Built-in EtherNet/IP port (port 1) Used in Safe Mode*1 or when backing up data*2. Normally, turn OFF all of the pins. Unused. For future expansion, leave it unoperated. Connects to the Power Supply Unit. These hooks are used to mount the Unit to a DIN Track. Cools the CPU Unit internally. Refer to Fan Unit on page 3-8. Battery for backup. Refer to Battery on page 3-8. Turns OFF the power supply so that you can remove the SD Memory Card. Refer to 4-3-6 Installing and Removing the SD Memory Card on page 4-23. Connects the SD Memory Card to the CPU Unit. These guides are used to mount the End Cover. Unused. For future expansion, leave it unoperated. Connector to mount the backup battery. Shows the ID information of the CPU Unit. Refer to ID Information Indication on page 3-9. Unused. For future expansion, leave it unoperated. Connects the built-in EtherCAT with an Ethernet cable. Shows the operation status of the CPU Unit. Refer to Operation Status Indicators on page 3-4. Connects the built-in EtherNet/IP with an Ethernet cable. Connects the built-in EtherNet/IP with an Ethernet cable. *1. To use Safe Mode, set the DIP switch as shown below and then turn ON the power supply to the Controller. OFF ON OFF If the power supply to the Controller is turned ON with the CPU Unit in Safe Mode, the CPU Unit will start in PROGRAM mode. Use the Safe Mode if you do not want to execute the user program when the power supply is turned ON or if it is difficult to connect the Sysmac Studio. For information on Safe Mode, refer to the NJ/NX-series Troubleshooting Manual (Cat. No. W503). *2. Refer to the NJ/NX-series CPU Unit Software User’s Manual (Cat. No. W501) for details on backing up data. NX-series CPU Unit Hardware User’s Manual (W535) 3-3 3 3-1-2 Part Names and Functions Name Peripheral USB port DIP switch 3-1 CPU Units Letter A B 3 Configuration Units Operation Status Indicators There are the indicators to show the operation status of Unit in the center of the front side of the CPU Unit. RUN ERROR BUSY Indicators at the top SD PWR SD BUSY PORT1 EtherNet/IP NET RUN NET ERR LINK/ACT Indicators at the bottom PORT2 EtherNet/IP NET RUN PORT3 EtherCAT NET RUN NET ERR NET ERR LINK/ACT LINK/ACT z Indicators at the Top RUN ERROR BUSY SD PWR SD BUSY These indicators show the main operation status of the CPU Unit. 3-4 NX-series CPU Unit Hardware User’s Manual (W535) 3 Configuration Units The following table describes these indicators. Indicator RUN Color Green Status Lit. 3-1 CPU Units Flashing at 2-s intervals, then flashing at 0.5-s intervals. Flashing at 2-s intervals continues for 30 seconds or longer. Not lit. Meaning The CPU Unit is in normal operation in RUN mode. (The user program is in execution.) The CPU Unit is starting (entering RUN mode or PROGRAM mode at startup). System initialization error occurs. Operation is stopped in PROGRAM mode, when a CPU Unit reset is in progress, or when any of the following errors occurs. ERROR Red Lit. • CPU error (WDT error) Self-diagnosis found one of the following errors. • Controller error in the major fault level Flashing at 1-s intervals. • CPU error Self-diagnosis found one of the following errors. • Controller error in the partial fault level (an error in which all control of a Function Module is disabled) • Controller error in the minor fault level (an error in which partial control of a Function Module is disabled) CPU Unit operation will continue for either of these errors. Operation will stop for the Function Module in which a Controller error in the partial fault level occurred. Not lit. BUSY Yellow Flashing Not lit. SD PWR Green Lit. Flashing Not lit. SD BUSY Yellow Flashing Not lit. Operation will continue for the Function Module in which a Controller error in the minor fault level occurred. The CPU Unit is in normal operation, a CPU reset is in progress, or monitored information occurred. (CPU Unit operation will continue.) Built-in non-volatile memory access in progress. Other than the above. Power is being supplied to the SD Memory Card and the SD Memory Card can be used. A backup, restore or verification operation is in progress.*1 The power supply for the SD Memory Card is stopped, an SD Memory Card is not mounted, or the file format of the mounted SD Memory Card is not supported. SD Memory Card access in progress. SD Memory Card access not in progress. *1. Refer to the NJ/NX-series CPU Unit Software User’s Manual (Cat. No. W501) for details on backing up data. NX-series CPU Unit Hardware User’s Manual (W535) 3-5 3-1-2 Part Names and Functions • Controller error in the major fault level 3 3 Configuration Units Precautions for Safe Use • Do not turn OFF the power supply to the Controller while the BUSY indicator flashes. While the BUSY indicator is lit, the user program and settings in the CPU Unit are being backed up in the built-in non-volatile memory. The data will not be backed up if the power supply is turned OFF. The next time that the Controller is started, a Controller error in the major fault level will occur and operation will stop. • Do not turn OFF the power supply or remove the SD Memory Card while SD Memory Card access is in progress (i.e., while the SD BUSY indicator flashes). Data may become corrupted, and the Controller will not operate correctly if it uses corrupted data. To remove an SD Memory Card from the CPU Unit when power is supplied to the CPU Unit, press the SD Memory Card power supply switch and wait for the SD PWR indicator to turn OFF before you remove the SD Memory Card. You can check the operation status of the CPU Unit with the PWR, RUN, and ERROR indicators at the top of the front panels of the Power Supply Unit and CPU Unit. Refer to 5-1 Operation after an Error on page 5-2 for the procedures to check the operation status of the CPU Unit. z Indicators at the Bottom PORT1 EtherNet/IP NET RUN NET ERR LINK/ACT Built-in EtherNet/IP port indicators PORT2 EtherNet/IP NET RUN PORT3 EtherCAT NET RUN NET ERR NET ERR LINK/ACT LINK/ACT Built-in EtherCAT port indicators These indicators show the operation status of the built-in ports of the CPU Unit. Port 1 and port 2 are the indicators for the built-in EtherNet/IP ports, while port 3 is the indicators for the built-in EtherCAT port. • Built-in EtherNet/IP Ports (Port 1 and Port 2) Indicators Indicator NET RUN Color Green Status Not lit. Meaning You cannot perform Ethernet communications. • The power supply is OFF or the CPU Unit was reset. Flashing • A MAC address error or communications Controller error occurred. Ethernet communications are in progress. • Tag data link connection establishment in progress. Lit. 3-6 • IP address acquisition with BOOTP in progress. Normal startup status. NX-series CPU Unit Hardware User’s Manual (W535) 3 Configuration Units Indicator NET ERR Color Red Status Not lit. Flashing Meaning There are no Ethernet communications errors. • The power supply is OFF or the CPU Unit was reset. An error for which the user can recover operation occurred. • An error occurred in TCP/IP communications or CIP communications. • FTP server setting error, NTP server setting error, etc. LINK/ACT Yellow Not lit. • Tag data link setting error, tag data link verification error, etc. An error for which the user cannot recover operation occurred. 3-1 CPU Units Lit. • A MAC address error or communications Controller error occurred. A link was not established. • The cable is not connected. Flashing Lit. • The power supply is OFF or the CPU Unit was reset. The link is established, and data communications are in progress. The link was established. 3-1-2 Part Names and Functions • Built-in EtherCAT Port (Port 3) Indicators Indicator NET RUN Color Green Status Lit. Flashing Meaning EtherCAT communications are in progress. • Inputs and outputs for I/O data are in operation. EtherCAT communications are established. This indicator shows either of the following conditions. • Only message communications are in operation. Not lit. • Only message communications and I/O data inputs are in operation. EtherCAT communications are stopped. • The power supply is OFF or the CPU Unit was reset. NET ERR Red Lit. Flashing LINK/ACT Yellow • A MAC address error, communications Controller error, or other error occurred. A hardware error or unrecoverable error occurred, such as for exception processing. A recoverable error occurred. Not lit. There are no errors. Lit. A link is established. Flashing Not lit. NX-series CPU Unit Hardware User’s Manual (W535) 3 Data communications are in progress after establishing link. Flashes every time data is sent or received. The link was not established. 3-7 3 Configuration Units Battery The following Battery is built in as a standard feature. Model CJ1W-BAT01 Appearance Specification Service life: 5 years*1 For the battery lifetime, refer to Battery Service Life and Replacement Period on page 6-6. The following values are retained during power interruptions. • Values of variables with a Retain attribute • Clock information • Some system-defined variables • Event logs *1. The Battery installed at the time of purchase is only for monitoring purpose to test the battery backup function. The Battery is exhausted depending on the period from factory checking to actual operation, thus it may not satisfy specified battery lifetime. Fan Unit The following Fan Unit is built in as a standard feature. Model NX-FAN01 Appearance Specification Life: 10 years at ambient temperature of 55°C Storage limitation with no power supplied: 1 year Cools the CPU in the CPU Unit. 3-8 NX-series CPU Unit Hardware User’s Manual (W535) 3 Configuration Units ID Information Indication You can check the followings in the ID information indications on the right side of the CPU Unit. (A) (B) 3-1 CPU Units LOT No. DDMYY xxxx Ver.1. PORT1 : PORT2 : (C) Letter A Unit version MAC addresses 3 Function Shows the lot number and the serial number of the CPU Unit. DDMYY: Lot number, : For use by OMRON, xxxx: Serial number M is 1 to 9 for January to September, X for October, Y for November, and Z for December. Shows the unit version of the CPU Unit. Shows the MAC addresses of the built-in EtherNet/IP ports on the CPU Unit. NX-series CPU Unit Hardware User’s Manual (W535) 3-9 3-1-2 Part Names and Functions B C Name Lot number and serial number 3 Configuration Units 3-2 SD Memory Cards This section describes the models, specifications, and application of the SD Memory Cards. 3-2-1 Models and Specifications SD cards and SDHC cards are supported, but use one of the following OMRON Cards. OMRON is not responsible for the operation, performance, or write life of any other SD or SDHC card. Model HMC-SD291 HMC-SD491 Card type SD Card SDHC Card Capacity [GB] Format 2 FAT16 4 FAT32 Number of overwrites 100,000 Weight 2 g max. Additional Information Write Protection Key You will not be able to write to the SD Memory Card if the key is set to the LOCK position. Use this setting to prevent overwriting. 3-2-2 Purpose You can use the SD Memory Card for the following applications. • Read and write files in the SD Memory Card with instructions. • Read and write files in the SD Memory Card from an FTP client on EtherNet/IP. • Back up, restore, and verify data in the Controller. • Transfer data from the SD Memory Card to the Controller when the power is turned ON. Refer to the NJ/NX-series CPU Unit Software User’s Manual (Cat. No. W501) for details on the functions for SD Memory Cards. 3 - 10 NX-series CPU Unit Hardware User’s Manual (W535) 3 Configuration Units 3-3 Power Supply Units This section describes the models and specifications of the Power Supply Units as well as the names and functions of the parts. 3-3 Power Supply Units 3-3-1 Models and Specifications NX7-series Power Supply Units Use an NX7-series Power Supply Unit to supply power to an NX7-series CPU Unit. Item Weight Power supply voltage Power consumption Inrush current*1 NX-PA9001 80 × 100 × 100 mm (W × H × D) 570 g 100 to 240 VAC (wide-range), 50/60 Hz (85 to 264 VAC, 47 to 63 Hz) 150 VA max. At 100 VAC: 85 W max. At 24 VDC: 20 A*2/8 ms max. for cold start at room tempera- 30 A/2 ms max. for cold start at room temperature ture 7 A*3/3 s max. for cold start at room temperature At 200 VAC: Output capacity*4 Output terminal (service supply) RUN Output 40 A*2/8 ms max. for cold start at room temperature Total: 90 W max. Total: 70 W max. Not provided. Contact configuration: SPST-NO Switch capacity: 250 VAC, 2 A (resistive load) Replacement notification function Insulation resistance 120 VAC, 0.5 A (inductive load), 24 VDC, 2A (resistive load) Not provided. 20 MΩ min. (at 500 VDC) --- *6 terminals*5 Dielectric strength between AC external and GR 2,300 VAC 50/60 Hz for 1 min between AC external and GR terminals*5 *7 --- *6 Leakage current: 5 mA max. *1. The inrush current may vary depending on the operating condition and other conditions. Therefore, select fuses, breakers, and external power supply devices that have enough margin in characteristic and capacity, considering the condition under which the devices are used. *2. If the ambient temperature is higher or the Controller is hot-started, the inrush current given in the table may be exceeded by up to twice the given value because the thermistor element with a low-temperature current control characteristic is not sufficiently cool. *3. Of the inrush current values, the latter value varies depending on the input voltage and may rise to approx. 8.3 A at 20.4 VDC. *4. Internal components in the Power Supply Unit will deteriorate or be damaged if the Power Supply Unit is used for an extended period of time exceeding the power supply output capacity or if the outputs are shorted. NX-series CPU Unit Hardware User’s Manual (W535) 3 - 11 3-3-1 Models and Specifications Model Dimensions 3 Specification NX-PD7001 51 × 100 × 100 mm (W × H × D) 290 g 24 VDC (20.4 to 28.8 VDC) 3 Configuration Units *5. Apply the voltage between the Power Supply Unit’s L1 or L2 terminal and the GR terminal when testing insulation and dielectric strength. The tests can also be performed with the LG terminal and GR terminal connected to each other. In this case, the leakage current will be 10 mA or less. *6. The primary DC power supply and the secondary DC power supply are not isolated. *7. Change the applied voltage gradually using the adjuster on the Tester. If the full dielectric strength voltage is applied or turned OFF using the switch on the Tester, the generated impulse voltage may damage the Power Supply Unit. Precautions for Safe Use Do not use the Power Supply Units in the system beyond the rated supply capacity range given in the specifications. Doing so may result in operation stopping, incorrect operation, or failure to correctly back up required data at power interruptions. 3-3-2 Part Names and Functions NX7-series Power Supply Units • Front View NX-PA9001 (A) (B) NX-PD7001 (C) (A) (B) (C) (D) (D) (E) (E) AC input L1 AC input L2 L1 DC input + DC input - L1 AC100-2 INPUT L2/N L2/N DC24V INPUT LG GR LG GR RUN OUTPUT AC240V DC24V RUN output (G) 3 - 12 + (F) RUN OUTPUT AC240V DC24V RUN output (C) (G) (F) (C) NX-series CPU Unit Hardware User’s Manual (W535) 3 Configuration Units • Back View Common in NX-PA9001/PD7001 (C) (A) (B) 3-3 Power Supply Units (E) (I) 3 Letter A B C D E F G H Name Dropout prevention lock release lever DIN Track mounting hooks Sliders PWR indicator Connector Terminal block cover Terminal block Dropout prevention lock I DIN Track contact plate NX-series CPU Unit Hardware User’s Manual (W535) (H) Function Releases the dropout prevention lock. These hooks are used to mount the Unit to a DIN Track. Holds the Units together. Indicates that the power supply is operating. Connects to the CPU Unit. Covers the terminal block. The terminal block is used to connect to the power supply. Prevents the CPU Unit and other devices from accidentally dropping out, when you remove them from the DIN Tracks. This plate is used to contact the protective ground terminal with a DIN Track. 3 - 13 3-3-2 Part Names and Functions (C) 3 Configuration Units z Terminal Block Terminal number (1) (2) (3) Appear ance Function Name NX-PA9001 NX-PD7001 Power sup- Supply 100 to 240 VAC.*1 ply input LG Supply 24 VDC.*1 Ground to a resistance of 100 Ω or less to increase noise resistance and avoid electric shock.*2 (4) GR Ground to a resistance of 100 Ω or less to avoid electric shock.*2 (5) (6) RUN Output Turns ON when the CPU Unit is operating.*3 *1. For details, refer to 4-4-1 Power Supply Wiring on page 4-31. *2. For details, refer to 4-4-2 Grounding on page 4-35. *3. Details of the operation are given in the following table. Status Operation In operation (RUN mode). The CPU Unit is starting (until entering the operating status that is specified in the Startup Mode setting). Operation stopped (PROGRAM mode). Controller error in the major fault level occurred. 3 - 14 ON OFF NX-series CPU Unit Hardware User’s Manual (W535) 3 Configuration Units 3-4 Sysmac Studio The Sysmac Studio is a Support Software package that provides an integrated development environment to design, program, debug, and maintain SYSMAC NJ/NX-series Controllers. This section describes the models and connecting methods of the Sysmac Studio. Model Numbers The model numbers of the Sysmac Studio Standard Edition are given in the following table. The model numbers are different for the media and licenses. Product Configuration software Sysmac Studio The following Support Software is also included. DVD Licenses Network Configurator Number of user licenses --1 3 10 Model 3 SYSMAC-SE200D SYSMAC-SE201L SYSMAC-SE203L SYSMAC-SE210L 3-4-1 Model Numbers Sysmac Studio Standard Edition Media CX-Integrator CX-Protocol CX-Designer 3-4-2 Connection With an NJ/NX-series CPU Unit, you can connect the Sysmac Studio online in the following ways. Configuration z Connecting by USB • Direct Connection Sysmac Studio USB • Connection to CPU Unit on EtherNet/IP with USB Sysmac Studio USB EtherNet/IP The connection device does not need to be specified. Directly specify the IP address of the remote device or select the remote device from the node list. Note Connect a computer and the CPU Unit with a USB 2.0 certified cable. Do not use a USB hub to connect them. NX-series CPU Unit Hardware User’s Manual (W535) 3-4 Sysmac Studio 3-4-1 3 - 15 3 Configuration Units z Connection with EtherNet/IP • 1:1 Connection • 1:N Connection Sysmac Studio Sysmac Studio EtherNet/IP EtherNet/IP • A direct connection is made from the Sysmac Studio. The IP address and connection device do not need to be specified.*1 Directly specify the IP address of the remote device or select the remote device from the node list. • You can make the connection whether or not a switching hub is used. • Support for Auto-MDI enables the use of cross cables or straight cables if a direct connection is made. *1. With the NX7-series CPU Unit, it is possible only when you connect the Unit to the built-in EtherNet/IP port (port 1). Additional Information The Sysmac Studio cannot connect online to an NJ/NX-series CPU Unit in the following type of configuration. • If the built-in EtherNet/IP port is not used, you cannot connect to an NJ/NX-series CPU Unit on an EtherNet/IP network. Example: Connection to NJ/NX-series CPU Unit Routing through an EtherNet/IP Unit or Built-in Port Sysmac Studio USB EtherNet/IP CS1W-EIP21, CJ1W-EIP21, CJ2 built-in EtherNet/IP port, or CJ2M built-in EtherNet/IP port • You cannot route through any networks other than EtherNet/IP networks. 3 - 16 NX-series CPU Unit Hardware User’s Manual (W535) Installation and Wiring This section describes how to install and wire the NX-series CPU Unit as well as details on installation locations. 4-1 Processing at Power ON and Power OFF . . . . . . . . . . . . . . . . . . . . . . . . . . 4-2 4-1-1 4-1-2 4-1-3 Power ON Operation . . . . . . . . . . . . . . . . . . . . . . . . . . . . . . . . . . . . . . . . . . . . 4-2 Power OFF Operation . . . . . . . . . . . . . . . . . . . . . . . . . . . . . . . . . . . . . . . . . . . . 4-3 Resetting the Controller from the Sysmac Studio . . . . . . . . . . . . . . . . . . . . . . . 4-5 4-2 Fail-safe Circuits . . . . . . . . . . . . . . . . . . . . . . . . . . . . . . . . . . . . . . . . . . . . . . 4-6 4-2-1 Order of Powering Up the Controller and Controlled System . . . . . . . . . . . . . . 4-7 4-3 Mounting Units . . . . . . . . . . . . . . . . . . . . . . . . . . . . . . . . . . . . . . . . . . . . . . . . 4-9 4-3-1 4-3-2 4-3-3 4-3-4 4-3-5 4-3-6 4-3-7 4-3-8 Installation in a Control Panel . . . . . . . . . . . . . . . . . . . . . . . . . . . . . . . . . . . . . Preparations for Installation . . . . . . . . . . . . . . . . . . . . . . . . . . . . . . . . . . . . . . Installing the CPU Module . . . . . . . . . . . . . . . . . . . . . . . . . . . . . . . . . . . . . . . Mounting the End Cover . . . . . . . . . . . . . . . . . . . . . . . . . . . . . . . . . . . . . . . . . Mounting the End Plates . . . . . . . . . . . . . . . . . . . . . . . . . . . . . . . . . . . . . . . . . Installing and Removing the SD Memory Card . . . . . . . . . . . . . . . . . . . . . . . . Removing the CPU Module . . . . . . . . . . . . . . . . . . . . . . . . . . . . . . . . . . . . . . Assembled Appearance and Dimensions . . . . . . . . . . . . . . . . . . . . . . . . . . . . 4-10 4-14 4-16 4-20 4-21 4-23 4-27 4-29 4-4 Wiring . . . . . . . . . . . . . . . . . . . . . . . . . . . . . . . . . . . . . . . . . . . . . . . . . . . . . . 4-31 4-4-1 4-4-2 4-4-3 4-4-4 Power Supply Wiring . . . . . . . . . . . . . . . . . . . . . . . . . . . . . . . . . . . . . . . . . . . Grounding . . . . . . . . . . . . . . . . . . . . . . . . . . . . . . . . . . . . . . . . . . . . . . . . . . . . Wiring the Built-in EtherCAT Port . . . . . . . . . . . . . . . . . . . . . . . . . . . . . . . . . . Wiring the Built-in EtherNet/IP Port . . . . . . . . . . . . . . . . . . . . . . . . . . . . . . . . 4-31 4-35 4-38 4-38 4-5 Control Panel Installation . . . . . . . . . . . . . . . . . . . . . . . . . . . . . . . . . . . . . . 4-39 4-5-1 4-5-2 4-5-3 4-5-4 4-5-5 4-5-6 Temperature . . . . . . . . . . . . . . . . . . . . . . . . . . . . . . . . . . . . . . . . . . . . . . . . . . Humidity . . . . . . . . . . . . . . . . . . . . . . . . . . . . . . . . . . . . . . . . . . . . . . . . . . . . . Vibration and Shock . . . . . . . . . . . . . . . . . . . . . . . . . . . . . . . . . . . . . . . . . . . . Atmosphere . . . . . . . . . . . . . . . . . . . . . . . . . . . . . . . . . . . . . . . . . . . . . . . . . . Electrical Environment . . . . . . . . . . . . . . . . . . . . . . . . . . . . . . . . . . . . . . . . . . Grounding . . . . . . . . . . . . . . . . . . . . . . . . . . . . . . . . . . . . . . . . . . . . . . . . . . . . NX-series CPU Unit Hardware User’s Manual (W535) 4-39 4-41 4-41 4-41 4-42 4-46 4-1 4 4 Installation and Wiring 4-1 Processing at Power ON and Power OFF WARNING • Do not touch the terminal section while power is ON. Electrical shock may occur. • Do not disassemble any of the Units. Particularly the Power Supply Units contain parts with high voltages when power is ON or immediately after power is turned OFF. Electrical shock may occur. There are also sharp internal parts that may cause injury. 4-1-1 Power ON Operation Precautions for Safe Use It takes approximately 10 to 20 seconds to enter RUN mode after the power supply is turned ON. The outputs during this period will behave according to the slave and Unit specifications. Use the RUN output on the Power Supply Unit, for example, to implement fail-safe circuits so that external devices do not operate incorrectly. Operation until Operation Ready Status Once power supply to the Power Supply Unit starts, approximately 10 to 20 seconds elapses before the CPU Unit enters the operation-ready status. This period is called the startup status. The startup time depends on the slave/Unit configuration*1, user program, SD Memory Card usage, SD Memory Card self-diagnosis usage*2, etc. While the CPU Unit is in the startup status, the RUN indicator flashes at a one second interval. *1. Some EtherCAT slaves can set a maximum standby time of 1 to 200 seconds. For the CPU Unit, however, the operation-ready status exists as soon as the EtherCAT Master Function Module is functioning, regardless of the standby time of the EtherCAT slaves. For the EtherCAT Master Function Module, slaves that do not start within the maximum waiting time are treated as having an error. *2. This function performs self-diagnosis on the inserted SD Memory Card. This is executed if the self-diagnosis at startup is enabled in the Operation Settings under Configurations and Setup − Controller Setup in the Sysmac Studio. The following processing is performed during the startup status. Process Self diagnosis at startup Data check Recording Power Turned ON and Power Interrupted events Description Operation is monitored for the following errors: Power Supply Error, CPU Unit Reset, CPU Unit Watchdog Timer Error.*1 The _RetainFail (Retention Failure Flag) system-defined variable changes to TRUE when the values of variables for which the Retain attribute was set to retain the values were not retained after a power interruption. The Power Turned ON and Power Interrupted events are recorded. *1. Refer to 5-1-2 Fatal Errors in the CPU Unit on page 5-3 for information on the following errors: Power Supply Error, CPU Unit Reset, and CPU Unit Watchdog Timer Error. 4-2 NX-series CPU Unit Hardware User’s Manual (W535) 4 Installation and Wiring Operating Mode at Startup • RUN Mode Set as Startup Mode • PROGRAM Mode Set as Startup Mode Power supply Power supply CPU Unit Startup Time at Power ON CPU Unit Startup Time at Power ON Operating mode Startup RUN mode RUN indicator Flashing RUN output on Power Supply Unit Startup PROGRAM mode Lit RUN indicator Flashing Not lit ON RUN output on Power Supply Unit 4 OFF 4-1-2 Power OFF Operation 4-1-2 Operating mode Power OFF Operation WARNING The NX-series Controller continues normal operation for a specific period of time even when a momentary power interruption occurs. The Controller may therefore receive incorrect signals from external devices that are affected by the momentary power interruption. Take suitable actions, such as external fail-safe measures and interlock conditions, to monitor the power supply voltage of the external devices as required. Different operations will be performed when the power is turned OFF depending on whether the power interruption time is longer than the power OFF detection time, as described below. The following table gives the voltage conditions for a power interruption. Power Supply Unit model NX-PA9001 NX-PD7001 Power supply input 100 to 200 VAC 24 VDC Power interruption voltage 85 VAC max. 20.4 VDC max. The setting ranges for the power OFF detection time are given in the following table. Power supply type AC power supply DC power supply Power OFF detection time 30.5 to 45.5 ms 5.0 to 20.5 ms NX-series CPU Unit Hardware User’s Manual (W535) 4-1 Processing at Power ON and Power OFF The system will immediately enter RUN mode if RUN mode (default) is set as the startup operating mode. The system will immediately enter PROGRAM mode if PROGRAM mode is set as the startup operating mode. 4-3 4 Installation and Wiring Operation at Power OFF Operation Execution of the user program is ended if a power interruption exceeds the time shown in the table below. The processing after power interruption confirmation (described below) is performed, and then the system (i.e., CPU Unit) stops. Power supply type AC power supply DC power supply Time required for a power interruption 45.5 ms or longer 20.5 ms or longer Voltage drop AC: 85 V max. DC: 20.4 V max. Power interruption confirmed. System stops. (CPU Unit stops.) Executing user program Power OFF detection time AC: 30.5 to 45.5 ms DC: 5.0 to 20.5 ms System reset Processing after power interruption is confirmed. As shown in the following figure, the system (i.e. CPU Unit) will stop even if the voltage recovers after the power interruption detection time. Voltage drop AC: 85 V max. DC: 20.4 V max. Power System stops. interruption Voltage confirmed. recovery (CPU Unit stops.) disabled Executing user program Power OFF detection time AC: 30.5 to 45.5 ms DC: 5.0 to 20.5 ms System reset Processing after power interruption is confirmed. After stopping, the system will restart if the power supply remains recovery. The table below defines the time that is used in the above two figures. Item Power OFF detection time 4-4 Description The time from when the power supply voltage drops until the CPU Unit starts processing after the power interruption is confirmed. The CPU Unit continues to operate normally until the power interruption is confirmed. NX-series CPU Unit Hardware User’s Manual (W535) 4 Installation and Wiring Momentary Power Interruption with Continued Operation Execution of the user program will continue if a momentary power interruption is less than the following 4-1 Processing at Power ON and Power OFF times. Power supply type AC power supply DC power supply Momentary power interruption time with continued operation 30.5 ms max. 5.0 ms max. Momentary power interruption time from voltage drop until recovery Voltage drop AC: 85 V max. DC: 20.4 V max. Voltage recovery Executing user program The CPU Unit will not interrupt execution of user program 4 Processing After Power Interruption Is Confirmed After a power interruption is confirmed, the CPU Unit performs the following processing and then stops. Item I/O refresh Processing SD Memory Card access in progress Transferring user program (including online editing) User program execution Saving event log 4-1-3 Description Load outputs are turned OFF. Tag data links stop. Any writing is interrupted, files are closed, and the Card is unmounted. Interrupted. As a result, an error will occur the next time that the power is turned ON. The Controller will not operate. User program execution is aborted even during execution of an instruction. The time that a power interruption occurs and the cause (primary power interruption of Power Supply Unit) of the interruption are recorded. Resetting the Controller from the Sysmac Studio You can reset the CPU Unit from the Sysmac Studio. A reset from the Sysmac Studio performs the same operation as cycling the power supply of the Power Supply Unit. Resetting is possible, however, only when the CPU Unit is in PROGRAM mode. Confirm the following status before resetting the CPU Unit. • Check the status of output loads. • Make sure that SD Memory Card access is not in progress. NX-series CPU Unit Hardware User’s Manual (W535) 4-5 4-1-3 Resetting the Controller from the Sysmac Studio Power OFF detection time AC: 30.5 to 45.5 ms DC: 5.0 to 20.5 ms 4 Installation and Wiring 4-2 Fail-safe Circuits WARNING Provide safety measures in external circuits to ensure safety in the system if an abnormality occurs due to malfunction of the CPU Unit, other Units, or slaves or due to other external factors affecting operation. Not doing so may result in serious accidents due to incorrect operation. • Emergency stop circuits, interlock circuits, limit circuits, and similar safety measures must be provided in external control circuits. • The outputs may remain ON or OFF due to deposition or burning of the output relays or destruction of the output transistors. As a countermeasure for such problems, external safety measures must be provided to ensure safe operation of the system. • The CPU Unit will turn OFF all outputs from Digital Output Units in the following cases. The slaves will operate according to the settings in the slaves. • If a power supply error occurs. • If a CPU error or CPU reset occurs. • If a Controller error in the major fault level occurs. • While the CPU Unit is in startup status until RUN mode is entered after the power is turned ON. • If a system initialization error occurs. External safety measures must be provided to ensure safe operation of the system in such cases. • If external power supplies for slaves or other devices are overloaded or short-circuited, the voltage will drop, outputs will turn OFF, and the system may be unable to read inputs. Provide external safety measures in controls with monitoring of external power supply voltage as required so that the system operates safely in such a case. • Unintended outputs may be performed when an error occurs in variable memory. As a countermeasure for such problems, external safety measures must be provided to ensure safe operation of the system. • Provide measures in the communications system and user program to ensure safety in the overall system even if errors or malfunctions occur in data link communications or remote I/O communications. • If a communications interference occurs for remote I/O or if a major fault level error occurs, output status will be determined by the specifications of the external output device. Confirm the operating specifications for communications errors and major fault level errors and implement suitable safety measures. Correctly set all of the settings in the slaves and Units. • You must implement fail-safe circuits to provide sufficient protection in the event that abnormal signals occur as the result of broken signal lines or momentary power interruptions. Not doing so may result in serious accidents due to incorrect operation. 4-6 NX-series CPU Unit Hardware User’s Manual (W535) 4 Installation and Wiring 4-2-1 Order of Powering Up the Controller and Controlled System Outputs from Units, such as DC Output Units, may malfunction momentarily when the power to the Controller is turned ON. This may cause problems in the system if the Controller power supply is turned ON after the controlled system’s power supply. To prevent possible malfunctions, add an external circuit that prevents the power supply to the controlled system from going ON before the power supply to the Controller itself. Precautions for Safe Use Use the RUN output on the Power Supply Unit, for example, to implement fail-safe circuits so that external devices do not operate incorrectly. Output Unit Failure 4-2 Fail-safe Circuits It takes approximately 10 to 20 seconds to enter RUN mode after the power supply is turned ON. During that time, outputs will be OFF or the values will be according to settings in the Units or slaves. Also, external communications cannot be performed. 4 Power Supply Wiring and Emergency Stop Circuit The following emergency stop circuit controls the power supply to the controlled system so that power is supplied to the controlled system only when the Controller is operating and the RUN output is ON. An external relay (CR1) is connected to the RUN output from the Power Supply Unit as shown in the following diagram. MCB1 Power supply MCB2 CR1 Controlled system Transformer or noise filter Controller Twisted-pair wires DC voltage regulator + - DC input/output Controller RUN output CR1 NX-series CPU Unit Hardware User’s Manual (W535) Surge suppressor 4-7 4-2-1 Order of Powering Up the Controller and Controlled System It is possible for an output to remain ON due to a malfunction in the internal circuitry of the Output Unit, such as a relay or transistor malfunction. Be sure to add any circuits necessary outside of the Controller to ensure the safety of the system in the event that an output fails to go OFF. 4 Installation and Wiring Interlock Circuits When the Controller controls an operation such as the clockwise and counterclockwise operation of a motor, provide an external interlock such as the one shown in the following example to prevent both the forward and reverse outputs from turning ON at the same time if required by the application. Example: Interlock circuit ON_MC1 MC2 ON_MC2 MC1 MC1 Motor clockwise Controller MC2 Motor counterclockwise This circuit prevents outputs MC1 and MC2 from both being ON at the same time even if both Controller outputs ON_MC1 and ON_MC2 are ON due to a malfunction. 4-8 NX-series CPU Unit Hardware User’s Manual (W535) 4 Installation and Wiring 4-3 Mounting Units This section describes how to mount Units to the NX-series Controller. In this description, the combination of the NX-series CPU Unit and the NX-series Power Supply Unit is called a CPU Module. Precautions for Safe Use • Mounting or removing NX Units or CPU Units. • Assembling the Units. • Setting DIP switches or rotary switches. • Connecting cables or wiring the system. 4-3 Mounting Units • Always turn OFF the power supply to the Controller before attempting any of the following. • Connecting or disconnecting the connectors. • Mounting or removing the Fan Unit. • The Power Supply Unit continues to supply power to the Controller for up to several seconds after the power supply is turned OFF. The PWR indicator remains lit as long as power is supplied. Make sure that the PWR indicator is not lit before you perform any of the above operations. Precautions for Correct Use • Follow the instructions in this manual to correctly perform installation. • Do not operate or store the Units in the following locations. Doing so may result in malfunction or in operation stopping. • Locations subject to direct sunlight • Locations subject to temperatures or humidity outside the range specified in the specifications • Locations subject to condensation as the result of severe changes in temperature • Locations subject to corrosive or flammable gases • Locations subject to dust (especially iron dust) or salts • Locations subject to exposure to water, oil, or chemicals • Locations subject to shock or vibration • Take appropriate and sufficient countermeasures during installation in the following locations. • Locations subject to strong, high-frequency noise • Locations subject to static electricity or other forms of noise • Locations subject to strong electromagnetic fields • Locations subject to possible exposure to radioactivity • Locations close to power lines NX-series CPU Unit Hardware User’s Manual (W535) 4-9 4 4 Installation and Wiring 4-3-1 Installation in a Control Panel Installation in Cabinets or Control Panels When the NX-series Controller is being installed in a cabinet or control panel, be sure to provide proper ambient conditions as well as access for operation and maintenance. z Temperature Control The ambient temperature within the NX-series Controller must be within the operating range of 0 to 55°C. When necessary, take the following steps to maintain the proper temperature. • Provide enough space for good air flow. • Do not install the Controller directly above equipment that generates a large amount of heat such as heaters, transformers, or high-capacity resistors. • If the ambient temperature exceeds 55°C, install a cooling fan or air conditioner. Control panel Fan NX-series Controller Louver z Accessibility for Operation and Maintenance • To ensure safe access for operation and maintenance, separate the Controller as much as possible from high-voltage equipment and power machinery. • It will be easy to operate the Controller if it is mounted at a height of 1.0 to 1.6 m above the floor. z Improving Noise Resistance • Do not mount the Controller in a control panel containing high-voltage equipment. • Install the Controller at least 200 mm away from power lines. Power lines 200 mm min. NX-series Controller 200 mm min. • Ground the mounting plate between the Controller and the mounting surface. 4 - 10 NX-series CPU Unit Hardware User’s Manual (W535) 4 Installation and Wiring z Controller Orientation • Each Rack must be mounted in an upright position to provide proper cooling. 4-3 Mounting Units • Do not install a Rack in any of the following positions. Mounting with the DIN Track on the Bottom Mounting with the DIN Track on the Top DIN Track 4 4-3-1 Installation in a Control Panel DIN Track Mounting with the DIN Track Installed Vertically Mounting with the Rack Upside down Installation Method in Control Panels An NX-series Controller must be mounted inside a control panel on DIN Track. • Consider the width of wiring ducts, wiring, ventilation, and Unit replacement when determining the space between the CPU Rack and other devices. NX-series CPU Unit Hardware User’s Manual (W535) 4 - 11 4 Installation and Wiring Additional Information A Controller must be mounted on DIN Track. It cannot be mounted with screws. z Wiring Ducts Whenever possible, route I/O wiring through wiring ducts. Install mounting bracket so that it is easy to fish wire from the I/O Units through the duct. It is handy to have the duct at the same height as the CPU Rack. Duct 20 mm min. DIN Track Unit 20 mm min. Duct Additional Information If you want to attach or remove the Fan Unit of CPU Unit while the CPU Rack remains mounted on the control panel, ensure at least 50 mm between the tops of CPU Unit and the wiring duct. Duct 50 mm min. CPU Unit DIN Track 20 mm min. Duct z Wiring Duct Example 100 mm CPU Rack 30 mm 30 mm 40 mm Duct 4 - 12 Mounting bracket Other devices NX-series CPU Unit Hardware User’s Manual (W535) 4 Installation and Wiring Precautions for Correct Use Tighten terminal block screws and cable screws to the following torques. Terminal Screws M4: 1.2 N·m M3: 0.5 N·m Cable Connector Screws M2.6: 0.2 N·m Install the wiring ducts at least 20 mm away from the tops of the Rack and any other objects (e.g., ceiling, wiring ducts, structural supports, devices, etc.) to provide enough space for air circulation and replacement of Units. Input duct Output duct Power duct 4 200 mm min. 4-3-1 Installation in a Control Panel NX-series Controller Breakers, fuses EtherCAT Slave Terminal, etc. Power equipment such as transformers and magnetic relays Fuses, relays, timers, etc. (Do not install devices that Terminal blocks generate heat or power for PLC equipment.) NX-series CPU Unit Hardware User’s Manual (W535) 4-3 Mounting Units z Routing Wiring Ducts Terminal blocks for power equipment 4 - 13 4 Installation and Wiring 4-3-2 Preparations for Installation We recommend using the following products to install the Unit on a DIN Track. Name 35-mm DIN Track Model PFP-50N Manufacturer OMRON Corporation Remarks • Length: 50 cm • Material: Aluminum PFP-100N • Surface treatment: Insulated • Length: 100 cm OMRON Corporation • Material: Aluminum NS 35/ 7,5 PERF • Surface treatment: Insulated • Length: 75.5, 95.5, 115.5, or 200 cm Phoenix Contact • Material: Steel NS 35/ 15 PERF • Surface treatment: Conductive • Length: 75.5, 95.5, 115.5, or 200 cm Phoenix Contact • Material: Steel End Plate PFP-M OMRON Corporation CLIPFIX 35 Phoenix Contact • Surface treatment: Conductive Two End Plates are required for each CPU Rack. Two End Plates are required for each CPU Rack. Not all of the combinations of the DIN Tracks and End Plates listed above are possible. Confirm applicability of the combinations in the following table. PFP-M (OMRON) DIN Track model PFP-50N PFP-100N NS 35/ 7,5 PERF NS 35/ 15 PERF CLIPFIX 35 (Phoenix Contact) Possible. Possible. Possible. Not possible. Possible. Possible. Possible. Possible. Also, use screws and washers of the following sizes to fix the DIN Tracks. (a): Dimensions from the screw head to the fastening surface DIN Track model PFP-50N NS 35/ 7,5 PERF NS 35/ 15 PERF Applicable screw size M4 M6 M6 (a) (a) 4.1 mm max. 4.6 mm max. 10 mm max. If you use any DIN Track other than those listed in the table above, refer to the dimensions shown in 4-3-8 Assembled Appearance and Dimensions on page 4-29 and use proper screws and washers. 4 - 14 NX-series CPU Unit Hardware User’s Manual (W535) 4 Installation and Wiring z DIN Tracks PFP-100N/50N DIN Track 7.3±0.15 4.5 35±0.3 15 25 10 25 25 1,000 (500) *1 10 25 15 (5) *1 27±0.15 1 *1. PFP-50N dimensions are given in parentheses. NS 35/ 7,5 PERF 4-3 Mounting Units R0.8 25 6.2 R0.8 27 35 1 15 7.5 NS 35/ 15 PERF 4 15° 25 R1.25 0.8 6.2 15 1.5 27 35 4-3-2 Preparations for Installation R1.25 15 z End Plate PFP-M (Two) CLIPFIX 35 (Two) NX-series CPU Unit Hardware User’s Manual (W535) 4 - 15 4 Installation and Wiring 4-3-3 Installing the CPU Module This section describes how to install the CPU Module. Precautions for Safe Use • Do not apply labels or tape to the Unit. When the Unit is installed or removed, adhesive or scraps may adhere to the pins in the NX bus connector, which may result in malfunctions. • Do not touch the pins in the NX bus connector on the Unit. Dirt may adhere to the pins in the NX bus connector, which may result in malfunctions. NG PORT1 Ethe rNet/IP PORT2 Ethe rNet/IP PORT3 Ethe rCAT • Do not write on the CPU Unit with ink within the restricted region that is shown in the following figure. Also do not get this area dirty. When the Unit is installed or removed, ink or dirt may adhere to the pins in the NX bus connector, which may result in malfunctions in the Unit. Restricted region (shaded portion) Precautions for Correct Use • When you install the Unit, be careful not to touch or bump the pins in the NX bus connector. • When you handle the Unit, be careful not to apply stress to the pins in the NX bus connector. If the Unit is installed and the power supply is turned ON when the pins in the NX bus connector are deformed, contact failure may cause malfunctions. 4 - 16 NX-series CPU Unit Hardware User’s Manual (W535) 4 Installation and Wiring 1 Install the DIN Track. • Using a PFP-50N/100N DIN Track Use one M4 screw for each three holes in the DIN Track. There must be a screw for each interval of 105 mm or less. The screw tightening torque is 1.2 N·m. DIN Track • Using an NS 35/ 7,5 PERF or NS 35/ 15 PERF DIN Track Use one M6 screw for each four holes in the DIN Track. There must be a screw for each interval of 100 mm or less. The screw tightening torque is 5.2 N·m. 4-3 Mounting Units Use one screw for each three holes. DIN Track 4 2 Connect the Power Supply Unit and the CPU Unit and lock them with the sliders. (1) Join the Units so that the connectors fit exactly. (2) The yellow sliders one each at the top and bottom of each Unit lock the Units together. Move the sliders toward the back of the Units as shown below until they click into place. (2) (1) NX-series CPU Unit Hardware User’s Manual (W535) 4 - 17 4-3-3 Installing the CPU Module Use one screw for each four holes. 4 Installation and Wiring 3 Make sure that the DIN Track mounting hooks on each Unit of the CPU Module are in the unlocked position. DIN Track mounting hooks 9.5 mm 4.5 mm DIN Track Mounting Hooks in Locked Position DIN Track Mounting Hooks in Unlocked Position If the DIN Track mounting hooks are pulled up, they are in the unlocked position. If the DIN Track mounting hooks are pressed down, they are in the locked position. Use a flat-blade screwdriver to pull up the DIN Track mounting hook on the Unit to release the locked position. 4 Mount the CPU Module on the DIN Track and lock it. (1) Press the CPU Module straight against the DIN Track. 4 - 18 NX-series CPU Unit Hardware User’s Manual (W535) 4 Installation and Wiring (2) Press the DIN Track mounting hooks down to the locked position. After mounting, check to be sure that the CPU Module and the End Cover securely mounted on the DIN Track. 4-3 Mounting Units 4 4-3-3 Installing the CPU Module NX-series CPU Unit Hardware User’s Manual (W535) 4 - 19 4 Installation and Wiring 4-3-4 Mounting the End Cover Use the following procedure to mount the End Cover if you removed it when mounting the Unit or if it is displaced from the CPU Unit. Precautions for Correct Use Always mount an End Cover to the end of the CPU Rack to protect the last Unit on the CPU Rack. Not mounting the End Cover may result in malfunction or failure of the CPU Unit. 1 2 From the front of the CPU Unit, slide the End Cover along the Unit hookup guides on the Unit. Press the End Cover firmly against the DIN Track until you hear it lock into place on the DIN Track. After you mount the End Cover, check to be sure that it is securely mounted on the DIN Track. 4 - 20 NX-series CPU Unit Hardware User’s Manual (W535) 4 Installation and Wiring 4-3-5 Mounting the End Plates After you mount the End Cover, always secure the Unit with End Plates at both sides. Precautions for Correct Use After you mount the Unit on the DIN Track, always secure it with End Plates at both sides. If you do not secure it, the Unit may be damaged or malfunction. To mount an End Plate, 1) hook the bottom of it on the bottom of the DIN Track and 2) rotate the End Plate to hook the top of it on the top of the DIN Track. Then tighten the screw to lock the End Plate in place. 4-3 Mounting Units z Using PFP-M (OMRON) 2) 4 1) To mount an End Plate, 1) hook the top of it on the top of the DIN Track and 2) rotate the Plate to hook the bottom of it on the bottom of the DIN Track. Press in until you hear the End Plate lock into place. 1) 2) NX-series CPU Unit Hardware User’s Manual (W535) 4 - 21 4-3-5 Mounting the End Plates z Using CLIPFIX 35 (Phoenix Contact) 4 Installation and Wiring To remove an End Plate 1) insert the tip of a flat-blade screwdriver into groove “a” and 2) use “b” as a fulcrum and lift the end of the screwdriver, as shown in the following diagram. b 2) 1) a Flat-blade screwdriver 4 - 22 NX-series CPU Unit Hardware User’s Manual (W535) 4 Installation and Wiring 4-3-6 Installing and Removing the SD Memory Card Before Using an SD Memory Card • Observe the following precautions while the SD Memory Card is being accessed. The SD Memory Card may become unusable if these precautions are not followed. a) Make sure that the SD BUSY indicator is OFF (i.e., the SD Memory Card is not being accessed) before you turn OFF the power supply to the Controller. b) Never remove the SD Memory Card while the CPU is accessing the SD Memory Card. Press the SD Memory Card power supply switch and wait for the SD BUSY indicator to go OFF before removing the SD Memory Card. • Never insert the SD Memory Card facing the wrong way. If the SD Memory Card is inserted forcibly, it may become unusable. • To format the SD Memory Card (e.g., to delete all of the data), insert the SD Memory Card in the CPU Unit and perform the operation from the Sysmac Studio. • The service life may be extremely short if a non-OMRON SD Memory Card is used. Also, operation may be affected due to deterioration in writing performance. • If you use an OMRON SD Memory Card, the end of the life of the SD Memory Card can be detected in the following ways. a) _Card1Deteriorated (SD Memory Card Life Warning Flag) system-defined variable b) SD Memory Card Life Exceeded event in the event log Installing the SD Memory Card 1 Pull the upper side of the right CPU Unit cover forward and remove from the Unit. NX-series CPU Unit Hardware User’s Manual (W535) 4 - 23 4 4-3-6 Installing and Removing the SD Memory Card • The SD Memory Card uses flash memory, and so its service life is limited. When the end of the SD Memory Card’s service life approaches, the ability to write data is lost, and data is sometimes not retained after writing. The service life depends on the size of the data that is written and on the ambient temperature. For the unlikely event that data is lost, it is recommended to periodically back up data. 4-3 Mounting Units The SD BUSY indicator is lit when the SD Memory Card is accessed from the user program or from a computer through FTP. 4 Installation and Wiring 2 Insert the SD Memory Card with the label facing to the right. Insert the SD Memory Card with the label facing the right side of the CPU Unit. Model number label 3 4 - 24 Push the SD Memory Card securely into the compartment. NX-series CPU Unit Hardware User’s Manual (W535) 4 Installation and Wiring Removing the SD Memory Card 1 Press the SD Memory Card power supply switch. SD PWR 2 4-3 Mounting Units SD Memory Card power supply switch 4 Press the SD Memory Card after the SD BUSY indicator is no longer lit. 4-3-6 Installing and Removing the SD Memory Card SD Memory Card The SD Memory Card will be ejected from the compartment. 3 Pull out the SD Memory Card. NX-series CPU Unit Hardware User’s Manual (W535) 4 - 25 4 Installation and Wiring 4 4 - 26 Close the CPU Unit cover when an SD Memory Card is not being used. NX-series CPU Unit Hardware User’s Manual (W535) 4 Installation and Wiring 4-3-7 Removing the CPU Module This section describes how to remove the CPU Module. Precautions for Safe Use • Do not apply labels or tape to the Unit. When the Unit is installed or removed, adhesive or scraps may adhere to the pins in the NX bus connector, which may result in malfunctions. NG 4-3 Mounting Units • Do not touch the pins in the NX bus connector on the Unit. Dirt may adhere to the pins in the NX bus connector, which may result in malfunctions. 4 PORT1 Ethe rNet/IP PORT3 Ethe rCAT • Do not write on a CPU Unit with ink within the restricted region that is shown in the following figure. Also do not get this area dirty. When the Unit is installed or removed, ink or dirt may adhere to the pins in the NX bus connector, which may result in malfunctions in the Unit. Restricted region (shaded portion) Precautions for Correct Use When you remove a Unit, be careful not to touch or bump the pins in the NX bus connector. NX-series CPU Unit Hardware User’s Manual (W535) 4 - 27 4-3-7 Removing the CPU Module PORT2 Ethe rNet/IP 4 Installation and Wiring 1 Unlock the DIN Track mounting hook. Use a flat-blade screwdriver to pull up the DIN Track mounting hook on the CPU Module to unlocked position. At this point, be sure not to drop the CPU Module. 2 Remove the CPU Module from the DIN Track. (1) Press the dropout prevention lock release lever on the front left side of the Power Supply Unit to release the dropout prevention lock. (2) Press and hold the release lever, pull the CPU Module straight forward to remove it. (1) (2) 4 - 28 NX-series CPU Unit Hardware User’s Manual (W535) 4 Installation and Wiring 4-3-8 Assembled Appearance and Dimensions Installation Dimensions End Cover Power Supply Unit (A) 1.35 End Plate 4.1 CPU Unit DIN Track 32.5 100 104.5 35 4-3 Mounting Units End Plate 32.5 4 1.5 (C) (C) W 94.2 (B) W+(C)+(C) Unit: [mm] Unit: [mm] W: Total width of the Power Supply Unit and CPU Unit (the End Cover is included in the CPU Unit width) • Unit width Model NX-PA9001 NX-PD7001 NX701-1700 NX701-1600 Unit width [mm] 80 51 144 144 • DIN Track dimension DIN Track model PFP-100N PFP-50N NS 35/ 7,5 PERF NS 35/ 15 PERF (A) DIN Track dimension 7.3 mm 7.3 mm 7.5 mm 15 mm (B) Dimension from the back of the Unit to the back of the DIN Track 1.5 mm 1.5 mm 1.7 mm 9.2 mm • End Plate dimension End Plate model PFP-M CLIPFIX 35 NX-series CPU Unit Hardware User’s Manual (W535) (C) End Plate dimension 10 mm 9.5 mm 4 - 29 4-3-8 Assembled Appearance and Dimensions 100 4 Installation and Wiring Installation Height With a height of 100 mm, the CPU Unit is the highest component in an NX-series CPU Rack. When a cable is connected (such as a Unit communications cable), however, even greater height is required. Allow sufficient depth in the control panel containing the Controller. The following figure shows the dimensions from the cables connected to the CPU Rack to the back of the Unit. The unit of dimension is millimeter. The height from the mounting surface of the DIN Track varies depending on the DIN Track to be used. Refer to Installation Dimensions on page 4-29 for the height of individual DIN Track type. 100 130 to 155 *1 *2 *1. This is the dimension from the back of the Unit to the communications cables. 130 mm: When an MPS588-C Connector is used. 155 mm: When an XS6G-T421-1 Connector is used. *2. This dimension depends on the specifications of the commercially available USB cable. Check the specifications of the USB cable that is used. 4 - 30 NX-series CPU Unit Hardware User’s Manual (W535) 4 Installation and Wiring 4-4 Wiring WARNING • Do not input a voltage or current that exceeds the specified range into a Unit or slave. If a voltage or current that is outside the specified range is input, the Unit or slave may fail or a fire may occur. CAUTION 4-4 Wiring • Tighten terminal block screws and cable screws to the torques specified in this manual or in the reference manuals. The loose screws may result in fire or malfunction. • Do not touch devices while power is supplied or immediately after the power supply is turned OFF. You may be burnt. 4 Precautions for Safe Use • Do not connect bare stranded wires directly to terminals. Additional Information Do not allow wire clippings, shavings, or other foreign material to enter any Unit. Otherwise, Unit burning, failure, or malfunction may occur. Cover the Units or take other suitable countermeasures, especially during wiring work. 4-4-1 Power Supply Wiring AC Power Supply Units z NX-PA9001 Power Supply Unit PA9001 PWR M4 self-raising screw terminals AC power supply 100 to 240 V AC power supply Isolation transformer 1:1 RUN output L1 L1 AC100-2 INPUT L2/N *1 L2/N RUN OUTPUT AC240V DC24V Power supply *1. The RUN output is ON when the CPU Unit is in RUN mode and OFF when the CPU Unit is in PROGRAM mode or a Controller error in the major fault level occurs. NX-series CPU Unit Hardware User’s Manual (W535) 4 - 31 4-4-1 Power Supply Wiring • Use crimp terminals for wiring. 4 Installation and Wiring z AC Power Supply • Supply 100 to 240 VAC. • Use the Power Supply Unit of the voltage and frequency shown in the table below. Model NX-PA9001 Power supply voltage 100 to 240 VAC 50/60 Hz (85 to 264 VAC, 47 to 63 Hz) • If one power supply phase of the equipment is grounded, connect the grounded phase side to the L2/N terminal. z Isolation Transformer The Controller’s internal noise isolation circuits are sufficient to control typical noise in power supply lines. Noise between the Controller and ground can be significantly reduced by connecting a 1- to-1 isolation transformer. Do not ground the secondary coil of the transformer. z Power Supply Capacity The power consumption will be 150 VA maximum per Rack for the NX-PA9001. When you select the power supply, consider that inrush current will flow when the power is turned ON. Refer to 3-3-1 Models and Specifications on page 3-11 for inrush current specifications. z RUN Output This output is ON when the CPU Unit is operating; it is OFF when the CPU Unit is in PROGRAM mode or a Controller error in the major fault level occurs. The RUN output can be used to control external systems, such as in an emergency stop circuit that turns OFF the power supply to external systems when the CPU Unit is not operating. (Refer to 4-2 Fail-safe Circuits on page 4-6 for more information.) Refer to NX7-series Power Supply Units on page 3-11 for switching capacity specifications for contacts. z Terminal Screws and Crimp Terminals The terminals on the Power Supply Unit are M4, self-raising terminals with screws. Use crimp terminals (M4) having the dimensions shown below. Tighten the terminal block screws to the torque of 1.2 N·m. 7 mm max. 20 mm max. M4 self-raising screw terminals Torque to 1.2 N⋅m 4 - 32 NX-series CPU Unit Hardware User’s Manual (W535) 4 Installation and Wiring DC Power Supplies z Precautions When Using A Non-isolated Power Supply Unit NX-PD7001 CAUTION When you connect a computer or other peripheral device to a Controller that has a non-isolated DC Power Supply Unit NX-PD7001, either ground the 0-V side of the external power supply or do not ground it at all. If the peripheral devices are grounded incorrectly, the external power supply may be short-circuited. Never ground the 24-V side of the power supply, as shown in the following figure. 4-4 Wiring Non-isolated DC power supply (internal power supply circuit) Peripheral device (e.g., computer) Peripheral device cable 4 4-4-1 Power Supply Wiring 24 V 0V External power supply z Wiring for NX-PD7001 PD7001 PWR M4 self-raising screw terminals DC power supply 24 V + RUN output*1 DC24V INPUT RUN OUTPUT AC240V DC24V Power supply *1. The RUN output is ON when the CPU Unit is in RUN mode and OFF when the CPU Unit is in PROGRAM mode or a Controller error in the major fault level occurs. z DC Power Supply • Supply 24 VDC. • Use the Power Supply Unit of the voltage shown in the table below. Model NX-PD7001 Power supply voltage 24 VDC (20.4 to 28.8 VDC) NX-series CPU Unit Hardware User’s Manual (W535) 4 - 33 4 Installation and Wiring z Power Supply Capacity The power consumption will be 85 W maximum per Rack for the NX-PD7001. When you select the power supply, consider that inrush current will flow when the power is turned ON. Refer to 3-3-1 Models and Specifications on page 3-11 for inrush current specifications. We recommend that you use the OMRON S8JX-series or S8VS-series Power Supplies, all of which have the capacity of 180 W or greater. z RUN Output This output is ON when the CPU Unit is operating; it is OFF when the CPU Unit is in PROGRAM mode or a Controller error in the major fault level occurs. The RUN output can be used to control external systems, such as in an emergency stop circuit that turns OFF the power supply to external systems when the CPU Unit is not operating. (Refer to 4-2 Fail-safe Circuits on page 4-6.) Refer to NX7-series Power Supply Units on page 3-11 for switching capacity specifications for contacts. z Terminal Screws and Crimp Terminals The terminals on the Power Supply Unit are M4, self-raising terminals with screws. Use crimp terminals (M4) having the dimensions shown below. Tighten the terminal block screws to the torque of 1.2 N·m. Crimp Terminals for DC Power Supplies 7 mm max. 4 - 34 7 mm max. NX-series CPU Unit Hardware User’s Manual (W535) 4 Installation and Wiring 4-4-2 Grounding This section describes how to ground the CPU Rack. Units with Ground Terminals and Type of Ground Terminals z Power Supply Units Power Supply Units NX-PA9001 and NX-PD7001 PA9001 PWR AC100-2 INPUT L2/N L2/N RUN OUTPUT AC240V DC24V GR Grounding type LG (Noise-filter neutral terminal) Ground this terminal to less than 100 Ω to improve noise resistance and prevent electric shock. 4 GR (Ground terminal) Ground this terminal to less than 100 Ω to prevent electric shock. Symbol 4-4-2 Grounding Terminal name LG 4-4 Wiring L1 L1 Function Functional Grounding Functional grounding is done to protect device and system functions, including prevention of noise from external sources, or prevention of noise from devices or equipment that could have harmful effects on other devices or equipment. Protective grounding is done to ensure safety. It is intended to prevent electrical shock by grounding the electrical potential that is generated by factors such as leakage, induction, or failure. Protective Grounding • Terminal Screws and Crimp Terminals The terminals on the Power Supply Unit are M4, self-raising terminals with screws. Use crimp terminals (M4) having the dimensions shown below. Tighten the terminal block screws to the torque of 1.2 N·m. 7 mm max. NX-series CPU Unit Hardware User’s Manual (W535) 7 mm max. 4 - 35 4 Installation and Wiring DIN Track Contact Plates A Unit that has a ground terminal also has a DIN Track contact plate on the back of the Unit. The DIN Track contact plate is connected internally to the ground terminal on the Unit. This means that the ground terminal will be electrically connected to the DIN Track. Unit side Protective ground terminal DIN Track contact plate Connected inside the Unit. Additional Information The CPU Unit has no ground terminals, thus no DIN Track Contact Plates. Therefore, the grounding part of the CPU Unit will be grounded through the Power Supply Unit. Grounding the CPU Rack This section describes how to ground the ground terminals on the CPU Rack. The protective ground terminals on the Power Supply Units, the functional ground terminals that are provided on some Units, and the DIN Track are grounded. Power Supply Unit Electrically connected to the DIN Track through the DIN Track contact plate. DIN Track Ground terminal Ground • To help prevent electrical shock, ground the ground terminal (GR: ) of the Power Supply Unit with a ground resistance of less than 100 Ω using a 14-gauge wire (minimum cross-sectional area of 2 mm2). • The line ground terminal (LG: ) of the Power Supply Unit is a noise filter neutral terminal. If noise is a significant source of errors or electrical shocks are a problem, connect the line ground terminal to the ground terminal and ground both with a ground resistance of less than 100 Ω. • If the LG and GR terminals of the Power Supply Unit are connected, ground to a resistance of 100 Ω or less to prevent electric shock. • The ground wire should not be more than 20 m long. 4 - 36 NX-series CPU Unit Hardware User’s Manual (W535) 4 Installation and Wiring • When wiring an AC Power Supply Unit, if one power supply phase of the equipment is grounded, always connect the grounded phase to the L2/N terminal. L1 L2/N When using the DC Power Supply Unit, you can omit grounding the ground terminals. • If the DIN Track is made of steel and its surface is not insulated. Power Supply Unit 4-4 Wiring Electrically connected to the DIN Track through the DIN Track contact plate. DIN Track 4 Ground If the surface of the DIN Track is treated to produce an insulating material (e.g., anodized aluminum), the DIN Track contact plate will not be electrically connected to the DIN Track even if they are in physical contact. Isolating the CPU Rack from the Control Panel If the ground wire for a Unit with a ground terminal is shared with power equipment, noise will adversely affect the Units. You can use OMRON NX-AUX01 DIN Track Insulation Spacers with PFP-50N or PFP-100N DIN Tracks to isolate the CPU Rack from the control panel. z Installing DIN Track Insulation Spacers and DIN Track Secure the DIN Track Insulation Spacers to the control panel with screws, and then secure the DIN Track to the DIN Track Insulation Spacers. The recommended tightening torque for M4 screws is 1.2 N·m. DIN Track Insulation Spacers Screws, M4 × 10 DIN Track Control panel NX-series CPU Unit Hardware User’s Manual (W535) 4 - 37 4-4-2 Grounding Ground terminal 4 Installation and Wiring • DIN Track Insulation Spacers NX-AUX01 (OMRON Corporation) 35 10 10 14.8 10 dia. 4.5 dia. 32.7 6 M4 Precautions for Correct Use If you use DIN Track Insulation Spacers to install a CPU Rack, the height will be increased by approximately 10 mm. Make sure that the CPU Rack and connecting cables do not come into contact with other devices. 4-4-3 Wiring the Built-in EtherCAT Port For information on wiring the built-in EtherCAT port, refer to the NJ/NX-series CPU Unit Built-in EtherCAT Port User’s Manual (Cat. No. W505). 4-4-4 Wiring the Built-in EtherNet/IP Port For information on wiring the built-in EtherNet/IP port, refer to the NJ/NX-series CPU Unit Built-in EtherNet/IP Port User’s Manual (Cat. No. W506). 4 - 38 NX-series CPU Unit Hardware User’s Manual (W535) 4 Installation and Wiring 4-5 Control Panel Installation To ensure system reliability and safety, the system must be designed and configured according to the installation environment (temperature, humidity, vibration, shock, corrosive gases, overcurrent, noise, etc.). Temperature Panels have been reduced in size due to space-saving and miniaturization in devices and systems, and the temperature inside the panel may be at least 10 to 15°C higher than outside the panel. Implement the following measures against overheating at the installation site and in the panel, and allow a sufficient margin for the temperature. High Temperatures 4-5 Control Panel Installation 4-5-1 Use the following cooling methods as required, taking into account the ambient temperature and the amount of heating inside the panel. 4 z Natural Cooling 4-5-1 Temperature • Natural cooling relies on natural ventilation through slits in the panel, rather than using cooling devices such as fans or coolers. When using this method, observe the following points. • Do not install the Controller at the top of the panel, where hot air tends to stagnate. • To provide ventilation space above and below the Controller, leave sufficient distance from other devices, wiring ducts, etc. • Do not mount the Units in the wrong direction (e.g., vertically or upside down). Doing so may cause abnormal heating in the Controller. • Do not install the Controller directly above any heat-generating equipment, such as heaters, transformers, and devices with high resistance. • Do not install the Controller in a location exposed to direct sunlight. Controller Controller Natural Cooling NX-series CPU Unit Hardware User’s Manual (W535) 4 - 39 4 Installation and Wiring z Forced Ventilation (by Fan at Top of Panel) Fan Controller Controller Air filter Forced Ventilation Method z Forced Air Circulation (by Fan in Closed Panel) Fan Controller Controller Forced Air Circulation z Room Cooling (Cooling the Entire Room Where the Control Panel Is Located) Cooler Control panel Room Cooling Low Temperatures The Controller may not start normally if the temperature is below 0°C when the power is turned ON. Maintain an air temperature of at least approximately 5°C inside the panel, by implementing measures such as installing a low-capacity space heater in the panel. Alternatively, leave the Controller power ON to keep the Controller warm. 4 - 40 NX-series CPU Unit Hardware User’s Manual (W535) 4 Installation and Wiring 4-5-2 Humidity Rapid temperature changes can cause condensation to occur, resulting in malfunctioning due to short-circuiting. When there is a possibility of this occurring, take measures against condensation, such as leaving the Controller power ON at night or installing a heater in the control panel to keep it warmer. 4-5 Control Panel Installation Control panel Moisture absorber Controller Power ON Heater Examples of Measures against Condensation 4-5-3 4 Vibration and Shock • Separate the control panel from the source of the vibration or shock. Or secure the Controller and the panel with rubber padding to prevent vibration. • Make the building or the floor vibration-resistant. • To prevent shock when other devices in the panel such as electromagnetic contactors operate, secure either the source of the shock or the Controller with rubber padding. 4-5-4 Atmosphere Using the Controller in any of the following locations can cause defective contact with connectors and corrosion of components. Implement countermeasures such as purging the air as required. • In locations exposed to dust, dirt, salt, metal powder, soot, or organic solvents, use a panel with an airtight structure. Be careful of temperature increases inside the panel. • In locations exposed to corrosive gas, purge the air inside the panel to clear the gas and then pressurize the inside of the panel to prevent gas from entering from outside. • In locations where flammable gas is present, either use an explosion-protected construction or do not use the Controller. NX-series CPU Unit Hardware User’s Manual (W535) 4 - 41 4-5-2 Humidity The Controller is tested for conformity with the sine wave vibration test method (IEC 60068-2-6) and the shock test method (IEC 60068-2-27) of the Environmental Testing for Electrotechnical Products. It is designed so that malfunctioning will not occur within the specifications for vibration and shock. If, however, the Controller is to be used in a location in which it will be directly subjected to regular vibration or shock, then implement the following countermeasures: 4 Installation and Wiring 4-5-5 Electrical Environment When installing or wiring devices, make sure that there will be no danger to people and that noise will not interfere with electrical signals. Controller Installation Location Install the Controller as far away as possible from high-voltage (600 V or higher) and power devices to ensure safe operation and maintenance. Example of Recommended Equipment Arrangement OK Controller Control panel Control panel High-voltage power panel Example of Poor Equipment Arrangement NG Controller Control panel Control panel High-voltage power panel Examples of Equipment Arrangement in Panel with High-voltage Devices Arrangement of Controller and Units The coils and contacts in electromagnetic contacts and relays in an external circuit are sources of noise. Do not install them close to the Controller. Locate them at least 100 mm away from the Controller. Controller DC I/O device AC I/O device Terminal block Example of Arrangement in Panel 4 - 42 NX-series CPU Unit Hardware User’s Manual (W535) 4 Installation and Wiring Wire Layout for the Power Supply System Observe the following points when wiring the power supply system. • Separate the Controller power supply from the I/O device power supply and install a noise filter near the Controller power supply feed section. • Keep the wiring between the transformer and the Controller as short as possible, twist the wires well, and keep the wiring separate from high-voltage and power lines. Power circuits Power supply for general operations circuits 4-5 Control Panel Installation • Use an isolating transformer to significantly reduce noise between the Controller and the ground. Install the isolating transformer between the Controller power supply and the noise filter, and do not ground the secondary coil of the transformer. 4 I/O power supply for Controller I/O power supply for Controller 4-5-5 Electrical Environment Noise filter Unit power supply for Controller Outlet (for peripheral devices) Power Supply System Diagram Wiring External I/O Signal Lines Observe the following points when wiring external I/O signal lines. • To absorb reverse electromotive force when an inductive load is connected to an output signal, connect a surge suppressor near the inductive load in an AC circuit, or connect a diode near the inductive load in a DC circuit. Surge suppressor Inductive load Diode DC Input Unit Output Unit Connect a diode in a DC circuit. Input Signal Noise Countermeasures NX-series CPU Unit Hardware User’s Manual (W535) Inductive load Inductive load Diode Output Unit Connect a surge suppressor in an AC circuit. Connect a diode in a DC circuit. Output Signal Noise Countermeasures 4 - 43 4 Installation and Wiring • Never bundle output signal lines with high-voltage or power lines, and do not route them in close proximity or parallel to such lines. If output signal lines must be routed in close proximity to such lines, place them in separate ducts or conduits. Be sure to ground the ducts or conduits. I/O cables I/O cables Power lines Power lines Suspended ducts I/O cables Floor ducts Power lines Conduits I/O Cable Arrangement • If the signal lines and power lines cannot be routed in separate ducts, use shielded cable. Connect the shield to the ground terminal at the Controller, and leave it unconnected at the input device. • Wire the lines so that common impedance does not occur. Such wiring will increase the number of wires, so use common return circuits. Use thick wires with sufficient allowance for the return circuits, and bundle them with lines of the same signal level. • For long I/O lines, wire the input and output signal lines separately. • Use twisted-pair wires for pilot lamps (and particularly lamps with filaments). • Use countermeasures, such as CR surge absorbers and diodes, for input device and output load device noise sources, as required. External Wiring Wiring, and noise countermeasures in particular, are based on experience, and it is necessary to closely manage wiring based on experience and information in the manuals. z Wiring Routes Each of the following combinations includes different signal types, properties, or levels. They will cause the signal-to-noise ratio to drop due to factors such as electrical induction. As a general rule when wiring, either use separate cables or separate wiring routes for these items. Future maintenance operations and changes to the system will also be made easier by carefully organizing the wiring from the start. • Power lines and signal lines • Input signals and output signals • Analog signals and digital signals • High-level signals and low-level signals • Communications lines and power lines • DC signals and AC signals • High-frequency devices (such as Inverters) and signal lines (communications) 4 - 44 NX-series CPU Unit Hardware User’s Manual (W535) 4 Installation and Wiring z Wiring Observe the following points when wiring power supply and signal cables. • When routing signal cables with differing characteristics through the same duct, always keep them separated. • As much as possible, avoid routing multiple power supply lines through the same duct. If it cannot be avoided, then construct a partition between them in the duct and ground the partition. 4-5 Control Panel Installation Partition Signal Signal cables cables (group A) (group B) Signal cables (group C) Power supply cables Signal cables (a) (b) Signal cables Signal cables Power supply cables Power supply cables (c) 4 (d) • To avoid overheating the conduits when using conduits for wiring, do not place wires for a single circuit in separate conduits. Power supply NG Conduits Load Incorrect Power supply OK Conduits Load Correct Power supply Conduits OK Load Correct Parallel Wiring (Single Phase) • Power cables and signal cables adversely affect each other. Do not wire them in parallel. • Noise induction may occur if the Controller is installed in a panel that includes high-voltage devices. Wire and install them as far apart as possible. (Refer to Controller Installation Location on page 4-42.) NX-series CPU Unit Hardware User’s Manual (W535) 4 - 45 4-5-5 Electrical Environment Partitioning Methods for Signal and Power Supply Cables 4 Installation and Wiring • Either install the Controller a minimum of 200 mm away from high-voltage lines or power lines, or place the high-voltage lines or power lines in metal tubing and completely ground the metal tubing to 100 Ω or less. High-voltage power panel Metal tubing Power lines Power lines 200 mm Controller Controller Ground to 100 Ω or less 200 mm Example: Separating Controller from Power Lines z Other Precautions • Basic I/O Units have both plus and minus commons, so pay attention to the polarity when wiring. 4-5-6 Grounding This section describes the earthing methods and precautions. Considerations for Earthing Methods Local potential fluctuations due to lightning or noise occurred by power devices will cause potential fluctuations between ground terminals of devices. This potential fluctuation may result in device malfunction or damage. To prevent this, it is necessary to suppress the occurrence of a difference in electrical potential between ground terminals of devices. You need to consider the earthing methods to achieve this objective. The recommended earthing methods for each usage condition are given in the following table. Earthing methods Star earthing Connecting Connecting devices and devices and Daisy chain noise sources noise sources to separate to a common earth elecearth electrode trodes Recommended Not recomNot recommended mended Specification of communications cables for EtherCAT and EtherNet/IP Equipotential bonding system The cable shield connected to the connector hood at both ends of the communications Recommended cable*1 The cable shield connected to the connector hood at only one end of the communications Recommended Recommended Not recommended Not recommended Recommended Recommended Not recommended Not recommended cable*2 Neither EtherCAT nor EtherNet/IP used *1. Use this cable when using EtherCAT or when using EtherNet/IP with 1000BASE-T. *2. You can use either of cables when not using EtherCAT or when using EtherNet/IP with 100BASE-TX or 10BASE-T. 4 - 46 NX-series CPU Unit Hardware User’s Manual (W535) 4 Installation and Wiring Additional Information • In a country or region where the earthing method is regulated, you must comply with the regulations. Refer to the applicable local and national ordinances of the place where you install the system, or other international laws and regulations. • Ethernet switches are used with the EtherNet/IP. For information on the environmental resistance of the Ethernet switch to use, the grounding between Ethernet switches, or the specifications of cables, ask the Ethernet switch manufacturer. Each of these earthing methods is given below. z Equipotential Bonding System Equipotential bonding is an earthing method in which steel frames and building structures, metal ducts and pipes, and metal structures in floors are connected together and make connections to the earth trunk line to achieve a uniform potential everywhere across the entire building. We recommend this earthing method. Connect the main earthing terminal and building structures together with equipotential bonding conductors and embed the mesh ground line in each floor. Connect the ground line of each control panel to the equipotential bonding system. Earth trunk line Power device Information device Control panel Control panel Hub Metal duct and pipe Control panel Noise source Metal structure in floor Equipotential bonding conductor Building structure Main earthing terminal Earth electrode z Star Earthing If the earthing method used for the building is not equipotential bonding or the earthing system is unknown, choose a) from among the earthing methods given below. NX-series CPU Unit Hardware User’s Manual (W535) 4 - 47 4 4-5-6 Grounding The following figure shows an example of an equipotential bonding system. 4-5 Control Panel Installation • For details on wiring EtherCAT or EtherNet/IP, refer to the NJ/NX-series CPU Unit Built-in EtherCAT Port User’s Manual (Cat. No. W505) or the NJ/NX-series CPU Unit Built-in EtherNet/IP Port User’s Manual (Cat. No. W506). 4 Installation and Wiring a) Connecting devices and noise sources to separate earth electrodes This is an earthing method to separately ground an earth electrode of the device that is connected with a communications cable or other devices and an earth electrode of a high-power device that could be a noise source, such as a motor or inverter. Each earth electrode must be ground to 100 Ω or less. Connect the ground lines of the device that is connected with a communications cable and other devices as a bundle to a single earth electrode. Be sure that the earth electrode is separated by a minimum of 10 m from any other earth electrode of a device that could be a noise source. Control panel Other device NX-series CPU Units NX-AUX01 A device that could be a noise source PLC Hub 10 m min. b) Connecting devices and noise sources to a common earth electrode This is an earthing method to connect the device that is connected with a communications cable, other devices, and a device that could be a noise source, to a common earth electrode. This earthing method is not recommended because the device that could be a noise source may interfere electromagnetically with other devices. Control panel Other device NX-series CPU Units NX-AUX01 A device that could be a noise source PLC Hub z Daisy Chain This is an earthing method to connect the device that is connected with a communications cable, other devices, and a device that could be a noise source using a daisy-chain topology to a common earth electrode. This earthing method is not recommended because the device that could be a noise source may interfere electromagnetically with other devices. 4 - 48 NX-series CPU Unit Hardware User’s Manual (W535) 4 Installation and Wiring Control panel Other device NX-series CPU Units NX-AUX01 A device that could be a noise source PLC Hub 4-5 Control Panel Installation Precautions for Grounding z General Precautions 4 • To prevent electrical shock, do not connect devices to ground poles (or steel frames) with non-equalized potential to which multiple devices are connected. • If the same ground is used for both the signal lines and the enclosure, isolate the channel base (a grounded metal plate inside a control panel) with an insulating material. Independent ground Refer to Isolating the CPU Rack from the Control Panel on page 4-37 for how to isolate the NX-series Controllers. Insulating material Channel base Example: Insulating and Grounding an Enclosure • To prevent influence from leakage current from other electrical devices, electrically isolate the panel in which the Controller is housed from other devices. • If high-frequency equipment is present, then ground not only the high-frequency equipment but also the panel itself in which the Controller is housed. • As shown in the following diagram, when using shielded cable for I/O wiring, connect the shield near the Controller to the enclosure ground terminal. Follow the instructions in the Communications Unit manual for preparing shielded communications cable. Controller Input Output Common Common Shielded Cable Ground NX-series CPU Unit Hardware User’s Manual (W535) 4 - 49 4-5-6 Grounding • Use a ground pole as close to the Controller as possible and keep the ground line as short as possible. 4 Installation and Wiring z Controller Ground Terminals The Controller has the following two ground terminals. Terminal name LG Grounding type Functional Grounding GR Protective Grounding Symbol Connection Ground this terminal when power supply noise causes malfunctioning. Always ground this terminal to prevent electrical shock. When the functional ground terminal is correctly grounded, it is generally effective in suppressing power supply common noise. Occasionally, however, grounding this terminal will result in picking up more noise, so be careful when using it. AC side Controller side Controller Ground Terminals z When wiring to an AC Power Supply Unit, if one power supply phase of the equipment is grounded, always connect the grounded phase to the L2/N terminal. L1 L2/N 4 - 50 NX-series CPU Unit Hardware User’s Manual (W535) Troubleshooting This section describes the confirmation methods and corrections for errors that occur in the NX-series Controller and describes hardware-related errors that can occur in the PLC Function Module. 5-1 Operation after an Error . . . . . . . . . . . . . . . . . . . . . . . . . . . . . . . . . . . . . . . . 5-2 5-1-1 5-1-2 5-1-3 Overview of NX-series Status . . . . . . . . . . . . . . . . . . . . . . . . . . . . . . . . . . . . . .5-2 Fatal Errors in the CPU Unit . . . . . . . . . . . . . . . . . . . . . . . . . . . . . . . . . . . . . . .5-3 Non-fatal Errors in the CPU Unit . . . . . . . . . . . . . . . . . . . . . . . . . . . . . . . . . . . .5-4 5-2 Troubleshooting . . . . . . . . . . . . . . . . . . . . . . . . . . . . . . . . . . . . . . . . . . . . . . 5-11 5-2-1 5-2-2 5-2-3 5-2-4 Checking to See If the CPU Unit Is Operating . . . . . . . . . . . . . . . . . . . . . . . . .5-11 Troubleshooting Flowchart for Non-fatal Errors . . . . . . . . . . . . . . . . . . . . . . . .5-12 Error Table . . . . . . . . . . . . . . . . . . . . . . . . . . . . . . . . . . . . . . . . . . . . . . . . . . . .5-13 Error Descriptions . . . . . . . . . . . . . . . . . . . . . . . . . . . . . . . . . . . . . . . . . . . . . .5-23 NX-series CPU Unit Hardware User’s Manual (W535) 5-1 5 5 Troubleshooting 5-1 Operation after an Error This section describes the error status of the NX-series Controller and the operation that occurs after an error is detected. Refer to 5-2 Troubleshooting for details on corrections for specific errors. Refer to the NJ/NX-series Troubleshooting Manual (Cat. No. W503) for all of the errors that may occur in an NXseries Controller. 5-1-1 Overview of NX-series Status You can check the operating status of the CPU Unit with the PWR, RUN, and ERROR indicators on the front panels of the Power Supply Unit and CPU Unit. Power Supply Unit CPU Unit RUN indicator PWR indicator RUN ERROR BUSY SHTDWN ERROR indicator L1 SD PWR SD BUSY PORT1 EtherNet/IP NET RUN L1 AC100-2 INPUT L2/N NET ERR L2/N LINK/ACT The following table shows the status of front-panel indicators, the status of user program execution, and the ability to connect communications to the Sysmac Studio or an HMI during startup, during normal operation, and when errors occur. CPU Unit operating status Power Supply Unit PWR (green) Fatal error in CPU Unit Lit Flashing (2-s intervals followed by 0.5-s intervals) Not lit Stopped. Not possible. RUN mode Lit Lit Not lit Continues. Possible. PROGRAM mode Lit Not lit Not lit Stopped. Power Supply Error*1 Not lit Not lit Not lit Stopped. CPU Unit Reset*1 Lit Not lit Not lit Stopped. Lit Not lit or Flashing (2-s intervals or 0.5-s intervals) Lit Stopped. Lit Flashing (2-s intervals) for 30 s or longer Not lit Stopped. Lit Not lit Lit Stopped. Lit Lit Flashing (1-s intervals) Continues.*3 Lit Lit Flashing (1-s intervals) Continues. Lit Lit Not lit Continues. CPU Unit Error*1 Major fault*2 Partial fault*2 Minor fault*2 Observation*2 5-2 Communications with Sysmac Studio or an HMI ERROR (red) System Initialization Error*1 Non-fatal error in CPU Unit User program execution status RUN (green) Startup Normal operation CPU Unit Not possible. Possible. (Communications can be connected from an HMI if EtherNet/IP is operating normally.) NX-series CPU Unit Hardware User’s Manual (W535) 5 Troubleshooting *1 Refer to 5-1-2 Fatal Errors in the CPU Unit for information on individual errors. *2 Refer to 5-1-3 Non-fatal error in CPU Unit for information on individual errors. *3 The function module where the error occurred stops. 5-1-2 Fatal Errors in the CPU Unit Types of Fatal Errors Some errors are fatal and prevent the CPU Unit from operating. This section describes the errors that cause the operation of the CPU Unit to stop. Communications with the Sysmac Studio or an HMI are not possible if there is a fatal error in the Controller. Power is not supplied, the voltage is outside of the allowed range, or the Power Supply Unit is faulty. z CPU Unit Reset The CPU Unit stopped operation because of a hardware error. z CPU Unit Error This error occurs in the CPU Unit. It indicates that there is a hardware failure or that the CPU is running out of control due to temporary data corruption. This error occurs in the CPU Unit. It indicates a hardware failure. The RUN indicator will flash at 2-second intervals while the CPU Unit is starting, but if it flashes for 30 seconds or longer, then this error occurs. Checking for Fatal Errors You can identify fatal errors based on the status of the PWR indicator on the Power Supply Unit and the RUN and ERROR indicators on the CPU Unit, as well as by the ability to connect communications to the Sysmac Studio. Indicator PWR (green) Not lit RUN (green) ERROR (red) Communications with Sysmac Studio Not possible.* CPU Unit operating status Not lit Not lit Power Supply Error Lit Not lit Not lit CPU Unit Reset Lit Not lit or Flashing (2-s intervals or 0.5-s intervals) Lit CPU Unit Error Lit Flashing (2-s intervals) for 30 s or longer Not lit System Initialization Error * An online connection to the Sysmac Studio is necessary to differentiate between CPU Unit Resets, CPU Unit Errors, and non-fatal errors in the CPU Unit. Power Supply Errors and System Initialization Errors can be differentiated with the indicators. There is no need to see if you can go online with the CPU Unit from the Sysmac Studio. NX-series CPU Unit Hardware User’s Manual (W535) 5-3 5 5-1-2 Fatal Errors in the CPU Unit z System Initialization Error 5-1 Operation after an Error z Power Supply Error 5 Troubleshooting 5-1-3 Non-fatal Errors in the CPU Unit Event Levels Non-fatal errors that occur are managed as Controller events in the NX-series Controller. Controller events are classified into levels according to the degree of the effect that the events have on control. When an event occurs, the Sysmac Studio or HMI will display the level. Refer to the NJ/NX-series Troubleshooting Manual (Cat. No. W503) for details on Controller events. • Major Fault Level These errors prevent control operations for the entire Controller. If a major fault level error is detected, user program execution is stopped immediately and the loads for all slaves (including remote I/O) are turned OFF. With EtherCAT slaves and some NX Units, you can set the slave settings or Unit settings to select whether outputs will go OFF or retain their previous status. You cannot reset major fault level errors from the user program, the Sysmac Studio or an HMI. To recover from a major fault level error, remove the cause of the error, and either cycle the power supply to the Controller or reset the Controller from the Sysmac Studio. • Partial Fault Level These errors prevent control operations in a certain function module in the Controller. The NX-series CPU Unit continues to execute the user program even after a partial fault level error occurs. You can include error processing in the user program to safely stop any devices in operation. After you remove the cause of the error, execute one of the following to return to normal status. • Reset the error from the user program, the Sysmac Studio, or an HMI. • Cycle the power supply. • Reset the Controller from the Sysmac Studio. • Minor Fault Level These errors prevent part of the control operations in a certain function module in the Controller. The troubleshooting for minor fault level errors is the same as the processing for partial fault level errors. • Observations These errors do not affect the control operations of the Controller. Observations serve as warnings to the user so that the error does not develop into an error at a higher level. • Information Events that are classified as information do not indicate errors. You can change the event level for some events. Refer to NJ/NX-series CPU Unit Software User’s Manual (Cat. No. W501) for information on changing event levels. Refer to 5-2 Troubleshooting in this manual to see the events for which you can change the event level. 5-4 NX-series CPU Unit Hardware User’s Manual (W535) 5 Troubleshooting z Operation for Each Level The operation that is performed when an error occurs depends on the error level of the Controller event. Event level Item Major fault level Partial fault level Minor fault level Definition Information These errors are serious errors that prevent control operations for the entire Controller. These errors prevent all of the control in a function module other than PLC Function Module. Errors that prevent a portion of control in one of the function modules. Errors that do Information level not affect control. events are not errors, but information provided to the user in the event log. • Non-volatile Memory Data Corrupted (PLC Function) • Motion Control Period Exceeded (Motion Control Function Module) • Communications Controller Error (EtherCAT Master Function Module) • Positive Limit Input Detected (Motion Control Function Module) • Low Battery Voltage (PLC Function Module) • Packet Discarded Due to Full Receive Buffer (EtherNet/IP Function Module) • Power Turned ON • Power Interrupted • Memory All Cleared 5 PWR (green) Lit. Lit. Lit. Lit. Lit. RUN (green) Not lit. Lit. Lit. Lit. Lit. ERROR (red) Lit. Flashes at 1-s intervals. Flashes at 1-s intervals. Not lit. Not lit. NX-series CPU Unit Hardware User’s Manual (W535) 5-1-3 Non-fatal Errors in the CPU Unit Frontpanel indicators*1 Observation 5-1 Operation after an Error Event examples (Only a few examples are provided here. Refer to the NJ/NXseries Troubleshooting Manual (Cat. No. W503) for a complete list of errors.) Controller information Controller errors 5-5 5 Troubleshooting Event level Item Major fault level Partial fault level Minor fault level Operation of NXseries CPU Unit Controller information Controller errors Observation Information RUN output on Power Supply Unit OFF ON ON ON ON User program execution status Stops. Continues.*2 Continues. Continues. Continues. No No No No Not possible. Depends on the nature of the error. Depends on the nature of the error. --- --- Recorded. (Some errors are not recorded.) Recorded. Recorded. Recorded. Recorded. Refer to the I/O Operation for Major Fault Level Controller Errors on page 5-7. • Errors in EtherCAT Master Function Module: Depends on settings in the slave. • Errors in other function modules: Depends on user program. Depends on the user program. Depends on the user program. Depends on the user program. Outputs Yes turned OFF Error reset Event logs Outputs from EtherCAT slaves and Basic Output Units Sysmac Studio display (while online) Error messages are automatically displayed. You can display detailed information in the Troubleshooting Dialog Box. These items are not displayed in the error display in the Controller Status Pane. *1 If multiple Controller errors have occurred, the indicators show the error with the highest error level. *2 Operation stops in the function module (Motion Control Function Module, EtherCAT Master Function Module, or EtherNet/IP Function Module) in which the error occurred. 5-6 NX-series CPU Unit Hardware User’s Manual (W535) 5 Troubleshooting z Operation in the Function Module Where an Error Event Occurred Function module PLC Function Module Event level Major fault level Partial fault level --- Operation continues. All axes stop. (The stop method depends on the error.) All axes stop. (The stop method depends on the error.) • The affected • Axis operation continaxis/axes group ues. stops. (The stop • The motion control method depends on instructions that are the settings.) not related to axis • The motion control operation are not instructions that are executed. related to axis operation are not executed. I/O refreshing for EtherCAT communications stops. (The slaves operate according to the settings in the slaves.) EtherCAT communications stop. (The slaves operate according to the settings in the slaves.) I/O refreshing for Ether- I/O refreshing for EtherCAT communications CAT communications stops or continues continues. according to the failsoft operation settings in the master. (If I/O refreshing stops, the slaves operate according to the settings in the slaves.) EtherNet/IP communications stop. (A software connection from the Sysmac Studio or an HMI is not possible.) Part of EtherNet/IP communications stop. (A software connection from the Sysmac Studio or an HMI is possible if the communications connection is not the cause of the error.) EtherNet/IP communications continue. z I/O Operation for Major Fault Level Controller Errors The following table gives the operation of the CPU Unit and the I/O devices. Unit CPU Unit operation Unit or slave operation EtherCAT Slave Terminal The EtherCAT Slave Terminal moves to Safe-Operational state. Depends on the NX Unit settings. EtherCAT slave *1 The slave is placed in the SafeOperational state. Depends on the slave settings. *2 Servo Drive or NX Unit assigned to an axis Updating the command values is stopped. All axes stop immediately. Devices connected with EtherNet/IP • For the originators of tag data links, the variables and I/O memory addresses for input (consume) tags are not refreshed. • For the targets of tag data links, operation depends on the settings of the tags sets for the output (produce) tags. *3 Depends on the specifications of the connected devices. *1 Excluding Servo Drives assigned to an axis. *2 Settings and setting methods depend on the slave. Refer to the manual for the slave. For a Servo Drive, operation depends on the setting of object 605E hex (Fault Reaction Option Code). NX-series CPU Unit Hardware User’s Manual (W535) 5-7 5 5-1-3 Non-fatal Errors in the CPU Unit Part of the EtherNet/IP communications stop. (Online connection to the Sysmac Studio and communications connection with an HMI are possible. (Output (produce) tags in the tag data links operate according to the tag set settings.) 5-1 Operation after an Error EtherNet/IP Function Module Observation User program execution stops. Motion Control Function Module EtherCAT Master Function Module Minor fault level 5 Troubleshooting *3 You can set whether to clear output or maintain the data from before the error occurred. Refer to the NJ/NXseries CPU Unit Built-in EtherNet/IP Port User’s Manual (Cat. No. W506) for details. Checking for Non-fatal Errors Use the following methods to check for non-fatal errors. Checking method What you can check Checking the indicators You can use the indicators to confirm the Controller error level, the error status of the EtherCAT Master Function Module, and the error status of the EtherNet/IP Function Module. Checking with the troubleshooting function of Sysmac Studio You can check for current Controller errors, a log of past Controller errors, error sources, error causes, and corrections. Checking with the Troubleshooter of an HMI*1 You can check for current Controller errors, a log of past Controller errors, error sources, error causes, and corrections. Checking with instructions that read function module error status You can check the highest-level status and highest-level event code in the current Controller errors. Checking with system-defined variables You can check the current Controller error status for each function module. *1 To perform troubleshooting from an HMI, connect the HMI to the built-in EtherNet/IP port on the CPU Unit. Refer to the appendices of the NJ/NX-series Troubleshooting Manual (Cat. No. W503) for the applicable range of the HMI Troubleshooter. This section describes the above checking methods. Checking the Indicators z Checking the Level of a Controller Error You can use the PWR indicator on the Power Supply Unit and the RUN and ERROR indicators on the CPU Unit to determine the event level for an error. The following table shows the relationship between the Controller’s indicators and the event level. Indicator PWR (green) RUN (green) ERROR (red) Event level Lit Not lit Lit Major fault level Lit Lit Flashing (1-s intervals) Partial fault level Minor fault level Lit 5-8 Lit Not lit Observation NX-series CPU Unit Hardware User’s Manual (W535) 5 Troubleshooting z Checking the Status of EtherCAT and EtherNet/IP Ports For the EtherCAT and EtherNet/IP ports, use the EtherCAT and EtherNet/IP NET ERR indicators to determine whether an error that affects process data communications has occurred and whether a minor fault level error or higher-level error has occurred. The indicator lets you check the status given in the following table. Indicator EtherCAT NET ERR Indicated status EtherCAT Port Status EtherNet/IP NET ERR EtherNet/IP Port Status • Lit: An error for which normal status cannot be recovered through user actions (i.e., errors for which you must replace the CPU Unit or contact your OMRON representative) has occurred. • Flashing: An error for which normal status can be recovered through user actions has occurred. • Not lit: There is no minor fault level or higher-level error. 5 Checking with the Troubleshooting Function of Sysmac Studio z Current Errors Open the Sysmac Studio’s Controller Error Tab Page to check the current error’s level, source, source details, event name, event code, details, attached information 1 to 4, cause, and correction. Errors are not displayed for observations. z Log of Past Errors Open the Sysmac Studio’s Controller Log Tab Page to check the time of occurrence, level, source, source details, event name, event code, details, attached information 1 to 4, and corrections for past errors. Refer to the Sysmac Studio Version 1 Operation Manual (Cat. No. W504) for details on troubleshooting with the Sysmac Studio. 5-9 5-1-3 Non-fatal Errors in the CPU Unit When an error occurs, you can connect the Sysmac Studio online to the Controller to check current Controller errors and the log of past Controller errors. NX-series CPU Unit Hardware User’s Manual (W535) 5-1 Operation after an Error • Lit: An error for which normal status cannot be recovered through user actions (i.e., errors for which you must replace the CPU Unit or contact your OMRON representative) has occurred. • Flashing: An error for which normal status can be recovered through user actions has occurred. • Not lit: An error that affects process data communications has not occurred. 5 Troubleshooting Checking with the Troubleshooter of an HMI If you can connect communications between an HMI and the Controller when an error occurs, you can check for current Controller errors and the log of past Controller errors. To perform troubleshooting from an HMI, connect the HMI to the built-in EtherNet/IP port on the CPU Unit. Precautions for Correct Use Refer to the appendices of the NJ/NX-series Troubleshooting Manual (Cat. No. W503) for the applicable range of the HMI Troubleshooter. z Current Errors You can check the current error’s event name, event code, level, source, source details, details, and attached information 1 to 4. Observations are not displayed as errors. z Log of Past Errors You can check the time of occurrence, level, source, source details, event name, event code, details, attached information 1 to 4 for past errors. Refer to the relevant HMI manual for information on the HMI Troubleshooter. Checking with Instructions That Read Function Module Error Status Instructions are provided that allow you to read the error status of each function module from the user program. These instructions get the status and the event code of the error with the highest level. Applicable function module Instruction name Instruction PLC Function Module Get PLC Controller Error Status GetPLCError Motion Control Function Module Get Motion Control Error Status GetMCError EtherCAT Function Module Get EtherCAT Error Status GetECError EtherNet/IP Function Module Get EtherNet/IP Error Status GetEIPError For details on the instructions that get error status, refer to the NJ/NX-series Instructions Reference Manual (Cat. No. W502). Checking with System-defined Variables You can check the error status variables in the system-defined variables to determine the status of errors in a Controller. You can read the error status variables from an external device by using communications. Refer to NJ/NX-series CPU Unit Software User’s Manual (Cat. No. W501) for the systemdefined variables. 5 - 10 NX-series CPU Unit Hardware User’s Manual (W535) 5 Troubleshooting 5-2 Troubleshooting This section provides basic error identification and troubleshooting flowcharts. Use them when an error occurs in the NX-series Controller. This section also describes the hardware errors that are related to the PLC Function Module and corrections for those errors. 5-2-1 Checking to See If the CPU Unit Is Operating When an error occurs in the NX-series Controller, use the following flowchart to determine whether the error is a fatal error or a non-fatal error. A fatal error occurred in the CPU Unit. Refer to the NJ/NX-series Troubleshooting Manual (Cat. No. W503) for the correction. Error occurs. 5-2 Troubleshooting Whenever possible, set the Sysmac Studio’s communications connection in the flowchart to a direct USB connection. If you use Ethernet, there are many reasons that prevent a communications connection for the Sysmac Studio, so time is required to determine if a fatal or non-fatal error has occurred. If a communications connection from the Sysmac Studio is not possible, perform the troubleshooting procedure that is provided in the NJ/NX-series Troubleshooting Manual (Cat. No. W503) before you assume that the error is a fatal error. 5 Not lit. Power Supply Error PWR indicator (green)? 5-2-1 Checking to See If the CPU Unit Is Operating Lit. Flashing (2-s intervals) for 30 s or longer Not lit. Flashing. ERROR indicator (red)? PWR indicator (green)? System Initialization Error Not lit. Lit. Communications with Sysmac Studio? Flashing (at 2-s intervals or 0.5-s intervals) Not possible. CPU Unit Reset Possible. RUN indicator (green)? CPU Unit Error Not lit. Communications with Sysmac Studio? Not possible. Possible. A A non-fatal error occurred. Refer to 5-2-2 Troubleshooting Flowchart for Non-fatal Errors. NX-series CPU Unit Hardware User’s Manual (W535) 5 - 11 5 Troubleshooting 5-2-2 Troubleshooting Flowchart for Non-fatal Errors For a non-fatal error, use the Sysmac Studio or an HMI to troubleshoot the error with the following flowchart. You can use the indicators to check the following: • Level • Whether the error is in the EtherNet/IP port or the EtherCAT port • If the sources of the error is the EtherNet/IP port or the EtherCAT port, whether you can restore normal status yourself A Non-fatal error in CPU Unit To immediately check the specific error To check error status with the indicators Lit. ERROR indicator (red)? Flashing. Not lit. Partial fault level or minor fault level Check all of the following branches that correspond to the status of the EtherNet/IP NET ERR and EtherCAT NET ERR indicators. EtherNet/IP NET ERR indicator is lit or flashing. Both indicators are not lit. EtherCAT NET ERR indicator is lit or flashing. EtherNet/IP NET ERR indicator (red)? Flashing. Lit. Major fault level Observation Error in the EtherNet/IP port for which you cannot restore normal status by yourself. EtherCAT NET ERR indicator (red)? Flashing. Lit. Error in the EtherNet/IP port for which you can restore normal status by yourself. Error in the EtherCAT port for which you cannot restore normal status by yourself. Error in the EtherCAT port for which you can restore normal status by yourself. Error in PLC Function Module or MC Function Module Refer to the NJ/NX-series Troubleshooting Manual (Cat. No. W503) for the procedures to check for errors and corrections with the Sysmac Studio or an HMI. Precautions for Correct Use Refer to the appendices of the NJ/NX-series Troubleshooting Manual (Cat. No. W503) for the applicable range of the HMI Troubleshooter. 5 - 12 NX-series CPU Unit Hardware User’s Manual (W535) 5 Troubleshooting 5-2-3 Error Table The hardware errors (i.e., events) and the Controller operation errors (i.e., events) that involve hardware that can occur in the PLC Function Module are given on the following pages. The following abbreviations and symbols are used in the event level column. Abbreviation Name Maj Major fault level Prt Partial fault level Min Minor fault level Obs Observation Info Information Meaning S Event levels that are defined by the system. U Event levels that can be changed by the user.* * This symbol appears only for events for which the user can change the event level. Refer to the NJ/NX-series Troubleshooting Manual (Cat. No. W503) for all NX-series event codes. 5 Errors for Self Diagnosis Event name Meaning 00090000 hex DIP Switch Setting Error An error was detected in the DIP switch setting. • There is an error in the DIP switch setting. S page 5-24 000D0000 hex Internal Bus Check Error A fatal error was detected on the internal bus. • Conductive material has gotten inside. S page 5-24 Maj Prt Min Obs Info Reference • Noise • The CPU Unit has failed. 000E0000 hex Non-volatile Memory Life Exceeded The specified number of deletions for non-volatile memory was exceeded. Or, the number of bad blocks in memory exceeded the specified value. • Non-volatile memory life expired. S page 5-25 00110000 hex CPU Unit Overheat (Operation Stopped) Operation was stopped because the temperature inside the CPU Unit was too high. • The ambient operating temperature is too high. S page 5-25 10010000 hex Non-volatile Memory Restored or Formatted An error was detected in the nonvolatile memory check and file system recovery or formatting was executed. Previous files may have been deleted. • The Controller power supply was turned OFF while the BUSY indicator was lit. S page 5-26 • The power supply to the Controller was interrupted momentarily while the BUSY indicator was lit. 5 - 13 5-2-3 Error Table Assumed cause Level Event code NX-series CPU Unit Hardware User’s Manual (W535) 5-2 Troubleshooting Symbol 5 Troubleshooting Event code Event name Meaning 10020000 hex Non-volatile Memory Data Corrupted A file that must be in non-volatile memory is missing or corrupted. Level Assumed cause Maj • The Controller power supply was turned OFF while the BUSY indicator was lit. Prt Min Obs Info Reference S page 5-27 S page 5-28 • The power supply to the Controller was interrupted momentarily while the BUSY indicator was lit. • The CPU Unit has failed. 10080000 hex Main Memory Check Error An error was detected in the memory check of the main memory in the CPU Unit. • Conductive material has gotten inside. • Noise • There is a software error. • The CPU Unit has failed. 100A 0000 hex Data Not Saved to Battery-backup Memory An error occurred in the software and data could not be saved in batterybackup memory during power-OFF processing. • An error occurred in the software. S page 5-29 100B 0000 hex Non-volatile Memory Data Corrupted A file that must be in non-volatile memory is missing or corrupted. • The Controller power supply was turned OFF while the BUSY indicator was lit. S page 5-30 S page 5-31 • The power supply to the Controller was interrupted momentarily while the BUSY indicator was lit. • The CPU Unit has failed. 100C0000 hex Event Level Setting Error The settings in the event level setting file are not correct. • The event level settings are not correct because the power supply to the Controller was interrupted or communications with the Sysmac Studio were disconnected during a download of the event level settings. • The event level settings are not correct because the power supply to the Controller was interrupted during a Clear All Memory operation. • Non-volatile memory failed. 40020000 hex PLC System Processing Error A fatal error was detected in the PLC Function Module. • An error occurred in the software. S page 5-32 40030000 hex PLC System Processing Error A fatal error was detected in the PLC Function Module. • An error occurred in the software. S page 5-32 40040000 hex PLC System Processing Error A fatal error was detected in the PLC Function Module. • An error occurred in the software. S page 5-32 40050000 hex PLC System Processing Error A fatal error was detected in the PLC Function Module. • An error occurred in the software. S page 5-33 00070000 hex Real-Time Clock Stopped The oscillation of the real-time clock stopped. The realtime clock is set to an illegal time. • The battery voltage is low. The real-time clock in the CPU Unit failed. • The CPU Unit clock has failed. 00080000 hex 5 - 14 Real-Time Clock Failed S U page 5-33 • The battery connector has come loose. • The Battery is missing. S page 5-34 NX-series CPU Unit Hardware User’s Manual (W535) 5 Troubleshooting Event code 000B 0000 hex Event name Low Battery Voltage Meaning The voltage of the Battery has dropped. Assumed cause • The battery voltage is low. Level Maj Prt Min Obs S U Info Reference page 5-34 • The battery connector has come loose. • The Battery is missing. 000C0000 hex CPU Unit Overheat The temperature inside the CPU Unit exceeded the specified value. • The ambient operating temperature is too high. S 00120000 hex Slow Fan The speed of the fan dropped to a specified level or lower. • Something is interfering with fan operation, such as dust, wire scraps, or cuttings. S U page 5-35 S U page 5-36 S page 5-36 5-2 Troubleshooting S page 5-37 5 S page 5-37 5-2-3 Error Table U S page 5-38 U S page 5-39 page 5-35 • The fan has reached the end of its service life. • The fan is faulty. 10090000 hex Batterybackup Memory Check Error An error was detected in the memory check of the battery-backup memory in the CPU Unit. • The battery voltage is low. 000F 0000 hex SD Memory Card Invalid Type The current SD Memory Card is not supported. • An SD Memory Card that is not supported was inserted into the CPU Unit. 00100000 hex SD Memory Card Life Exceeded The specified number of deletions for the SD Memory Card was exceeded. Or, the number of bad blocks exceeded the specified value. • The service life of the SD Memory Card was exceeded. 10030000 hex SD Memory Card Invalid Format The file format of the SD Memory Card is not FAT16 or FAT32. • The file format of the SD Memory Card inserted in the CPU Unit is not FAT16 or FAT32. 10040000 hex SD Memory Card Restored or Formatted An error was detected during the file system check and the file system was restored. Files may have been deleted. • The Controller power supply was turned OFF while the SD BUSY indicator was lit. • The battery connector has come loose. • The Battery is missing. U • The power supply to the Controller was interrupted momentarily while the SD BUSY indicator was lit. • The SD Memory Card was removed while the SD PWR indicator was lit. • The SD Memory Card is damaged. 10060000 hex SD Memory Card Data Corrupted A file that must be in the SD Memory Card is missing or corrupted. • The Controller power supply was turned OFF while the SD BUSY indicator was lit. • The power supply to the Controller was interrupted momentarily while the SD BUSY indicator was lit. • The SD Memory Card was removed while the SD PWR indicator was lit. • The SD Memory Card is damaged. NX-series CPU Unit Hardware User’s Manual (W535) 5 - 15 5 Troubleshooting Meaning Level Event code Event name Assumed cause 10070000 hex SD Memory Card Access Power OFF Error The power supply • The Controller power supply to the Controller was turned OFF while the SD was interrupted durBUSY indicator was lit. ing access to the • The power supply to the ConSD Memory Card. troller was interrupted momentarily while the SD BUSY indicator was lit. S page 5-39 10310000 hex Incorrect SD Memory Card Removal SD Memory Card removal processing failed. S page 5-40 Maj Prt Min • The SD Memory Card was removed while the SD PWR indicator was lit. Obs Info Reference Errors Related to Controller Operation Event code Event name 10200000 hex User Program/Controller Configurations and Setup Transfer Error Meaning The user program or Controller Configurations and Setup were not transferred correctly. Level Assumed cause Maj • The user program or Controller Configurations and Setup are not correct because the power supply to the Controller was interrupted during a download of the user program or the Controller Configurations and Setup. Prt Min Obs Info Reference S page 5-41 S page 5-42 • The user program or Controller Configurations and Setup are not correct because the power supply to the Controller was interrupted during online editing. • The user program or Controller Configurations and Setup are not correct because the power supply to the Controller was interrupted during a Clear All Memory operation. • The user program or Controller Configurations and Setup are not correct because the power supply to the Controller was interrupted during a restore operation. • Non-volatile memory failed. 10210000 hex Illegal User Program Execution ID The user program execution IDs set in the user program and in the CPU Unit do not match. • The user program execution IDs set in the user program and in the CPU Unit do not match. • A user program execution ID is set in the CPU Unit but not in the user program. 10240000 hex Illegal User Program The user program is not correct. • The limit to the number of nesting levels for functions or function blocks was exceeded. S page 5-42 10250000 hex Illegal User Program/Controller Configurations and Setup The upper limit of the usable memory was exceeded or the user program or Controller Configurations and Setup is corrupted. • The upper limit of the data size was exceeded. S page 5-43 5 - 16 • The main memory capacity was exceeded. • Non-volatile memory is deteriorating or has failed. NX-series CPU Unit Hardware User’s Manual (W535) 5 Troubleshooting Event code Event name Meaning 10270000 hex Error in Starting Automatic Transfer An error was detected in pre-execution checks for automatic transfer. Assumed cause • An SD Memory Card is not inserted. Level Maj S Prt Min Obs Info Reference page 5-44 • The SD Memory Card type is not correct. • The format of the SD Memory Card is not correct. • There is no autoload folder on the SD Memory Card. • There are no backup files in the autoload folder on the SD Memory Card. 5-2 Troubleshooting • Either the backup files in the autoload folder on the SD Memory Card are corrupted or required data is not in the backup files on the SD Memory Card. • The unit version of the CPU Unit to which to transfer the files is older than the unit version of the backup files on the SD Memory Card. • The model of the CPU Unit to which to transfer the files is not the same as the model of the CPU Unit of the backup files on the SD Memory Card. 5 5-2-3 Error Table • Recovery was executed for the SD Memory Card. • The CPU Unit is write-protected. • The settings in the automatic transfer command file (AutoloadCommand.ini) are not correct. • Reading the data for automatic transfer failed because the SD Memory Card is faulty or not formatted correctly. • The SD Memory Card is damaged. • The database connection service version of the CPU Unit to which to transfer the files is older than the database connection service version of the backup files on the SD Memory Card. • The robot version of the CPU Unit to which to transfer the files is older than the robot version of the backup files on the SD Memory Card. NX-series CPU Unit Hardware User’s Manual (W535) 5 - 17 5 Troubleshooting Event code Event name Meaning 10280000 hex Error in Executing Automatic Transfer The automatic transfer ended in an error. Level Assumed cause Maj • It was not possible to read the data for automatic transfer. Prt Min Obs Info Reference S page 5-46 • The SD Memory Card was removed during an automatic transfer. • There are no backup files in the autoload folder on the SD Memory Card. • The backup files in the autoload folder on the SD Memory Card are corrupted. • The SD Memory Card is damaged. 40110000 hex PLC Function Processing Error A fatal error was detected in the PLC Function Module. • An error occurred in the software. S page 5-47 44420000 hex PLC Function Processing Error A fatal error was detected in the PLC Function Module. • An error occurred in the software. S page 5-47 40120000 hex PLC Function Processing Error A fatal error was detected in the PLC Function Module. • An error occurred in the software. 40130000 hex PLC Function Processing Error A fatal error was detected in part of the PLC Function Module. • An error occurred in the software. 10230000 hex Event Log Save Error Saving the event log failed. • A low battery voltage prevented retention of memory during a power interruption. S page 5-49 10260000 hex Trace Setting Transfer Failure The power supply was interrupted while transferring the trace settings. • The power supply was interrupted while transferring the trace settings. S page 5-49 10290000 hex Backup Failed to Start An error was detected in pre-execution checks for a backup operation. • An SD Memory Card is not inserted. S page 5-50 S page 5-48 S page 5-48 • The SD Memory Card type is not correct. • The format of the SD Memory Card is not correct. • The SD Memory Card is write protected. • The Prohibiting backing up data to the SD Memory Card parameter is set to prohibit backing up data to an SD Memory Card. • Another backup operation is in progress. • Synchronization, online editing, or the Clear All Memory operation is in progress. • The backup was canceled by the user. • The online connection with the Sysmac Studio was disconnected. • The SD Memory Card is damaged. 5 - 18 NX-series CPU Unit Hardware User’s Manual (W535) 5 Troubleshooting Event code 102A 0000 hex Event name Backup Failed Meaning Assumed cause The backup operation ended in an error. • The capacity of the SD Memory Card is insufficient. Level Maj Prt Min Obs S Info Reference page 5-52 • It was not possible to save the data that was specified for backup. • The SD Memory Card was removed during a backup operation. • Failed to back up Unit or slave. • The backup was canceled by the user. 5-2 Troubleshooting • Execution of the Save Cam Table instruction or changing the CPU Unit name is in progress. • The online connection with the Sysmac Studio was disconnected. • It was not possible to save the data that was specified for backup to the computer. • The SD Memory Card is damaged. 5 5-2-3 Error Table NX-series CPU Unit Hardware User’s Manual (W535) 5 - 19 5 Troubleshooting Event code 102B 0000 hex Event name Restore Operation Failed to Start Meaning An error was detected in pre-execution checks for a restore operation. Level Assumed cause Maj • An SD Memory Card is not inserted. Prt Min Obs Info Reference S page 5-53 S page 5-55 • The SD Memory Card type is not correct. • The format of the SD Memory Card is not correct. • There are no backup files on the SD Memory Card. • Either the backup files on the SD Memory Card are corrupted or required data is not in the backup files on the SD Memory Card. • The unit version of the CPU Unit to which to restore the files is older than the unit version of the backup files on the SD Memory Card. • The model of the CPU Unit to which to restore the files is not the same as the model of the CPU Unit of the backup files on the SD Memory Card. • Recovery was executed for the SD Memory Card. • The CPU Unit is write-protected. • The settings in the restore command file (RestoreCommand.ini) are not correct. • A backup operation is in progress. • Synchronization, online editing, or the Clear All Memory operation is in progress. • The online connection with the Sysmac Studio was disconnected. • Reading the data for restoration failed because the SD Memory Card is faulty or not formatted correctly. • The SD Memory Card is damaged. • The database connection service version of the CPU Unit to which to restore the files is older than the database connection service version of the backup files on the SD Memory Card. • The robot version of the CPU Unit to which to restore the files is older than the robot version of the backup files on the SD Memory Card. 102C0000 hex Restore Operation Failed The restore operation ended in an error. • It was not possible to read the data to restore. • The SD Memory Card was removed during a restore operation. • Failed to restore Unit or slave. • The SD Memory Card is damaged. 5 - 20 NX-series CPU Unit Hardware User’s Manual (W535) 5 Troubleshooting Level Event code Event name Meaning Assumed cause 40140000 hex PLC System Information This event provides internal information from the PLC Function Module. • This event provides internal information from the PLC Function Module. It is recorded to provide additional information for another event. S page 5-56 40170000 hex Safe Mode The Controller started in Safe Mode. • The power supply was turned ON to the Controller when Safe Mode was set on the DIP switch on the CPU Unit. S page 5-56 80230000 hex NX Message Communications Error An error has occurred in message communications. • The communications cable is broken. S page 5-57 Maj Prt Min Obs Info Reference • The communications cable connector is disconnected. 40150000 hex PLC System Information This event provides internal information from the PLC Function Module. • This event provides internal information from the PLC Function Module. It is recorded to provide additional information for another event. S page 5-57 44430000 hex PLC System Information This event provides internal information from the PLC Function Module. • This event provides internal information from the PLC Function Module. It is recorded to provide additional information for another event. S page 5-58 5 Clock Changed The clock time was changed. • The clock time was changed. S page 5-58 90020000 hex Time Zone Changed The time zone was changed. • The time zone was changed. S page 5-58 90050000 hex User Program/Controller Configurations and Setup Download The user program and the Controller configurations and setup were downloaded. • The user program and the Controller configurations and setup were downloaded. S page 5-59 90070000 hex Online Edits Transferred The user program was edited online. • The user program was edited online and the edits were transferred to the Controller. S page 5-59 90080000 hex Variable Changed to TRUE with Forced Refreshing Changing a variable to TRUE with forced refreshing was specified. • Changing a variable to TRUE with forced refreshing was specified by the user. S page 5-60 90090000 hex Variable Changed to FALSE with Forced Refreshing Changing a variable to FALSE with forced refreshing was specified. • Changing a variable to FALSE with forced refreshing was specified by the user. S page 5-60 900A 0000 hex All Forced Refreshing Cleared Clearing all forced refreshing values was specified. • Clearing all forced refreshing values was specified by the user. S page 5-60 900B0000 hex Memory All Cleared All memory was cleared. • A user with Administrator rights cleared all of the memory. S page 5-61 900C0000 hex Event Log Cleared The event log was cleared. • The event log was cleared by the user. S page 5-61 900F 0000 hex Automatic Transfer Completed The automatic transfer was completed. • The automatic transfer was completed. S page 5-61 90110000 hex Power Turned ON The power supply was turned ON. • The power supply was turned ON. S page 5-62 5 - 21 5-2-3 Error Table 90010000 hex NX-series CPU Unit Hardware User’s Manual (W535) 5-2 Troubleshooting • The NX message communications load is high. 5 Troubleshooting Event code Event name Meaning Level Assumed cause Maj Prt Min Obs Info Reference 90120000 hex Power Interrupted The power supply was interrupted. • The power supply was interrupted. S page 5-62 90130000 hex Operation Started Operation was started. • A command to start operation was received. S page 5-62 90140000 hex Operation Stopped Operation was stopped. • A command to stop operation was received. S page 5-63 90150000 hex Reset Executed A reset was executed. • A reset command was received. S page 5-63 90160000 hex User Program Execution ID Write The user program execution ID was set or changed in the CPU Unit. • A user with Administrator rights changed the user program execution ID that is set in the CPU Unit. S page 5-63 90180000 hex All Controller Errors Cleared All current errors were cleared. • All current errors were changed by the user. S page 5-64 90190000 hex Forced Refreshing Cleared Clearing a forced refreshing value was specified. • Clearing a forced refreshing value was specified by the user. S page 5-64 901A 0000 hex Backup Started A backup operation was started. • A backup operation was started. S page 5-64 901B 0000 hex Backup Completed The backup operation ended normally. • The backup operation ended normally. S page 5-65 901C0000 hex Restore Operation Started A restore operation started. • A restore operation started. S page 5-65 901D0000 hex Restore Operation Completed The restore operation ended normally. • The restore operation ended normally. S page 5-66 5 - 22 NX-series CPU Unit Hardware User’s Manual (W535) 5 Troubleshooting 5-2-4 Error Descriptions This section describes the information that is given for individual errors. Controller Error Descriptions The items that are used to describe individual errors (events) are described in the following copy of an error table. Gives the name of the error. Meaning Gives a short description of the error. Source Gives the source of the error. Error attributes Level Effects User program Indicators Gives the status of the built-in EtherNet/IP port and built-in EtherCAT port indicators. Indicator status is given only for errors in the EtherCAT Master Function Module and the EtherNet/IP Function Module. System-defined variables Variable Gives the code of the error. Source details Gives details on the source of the error. Detection timing Tells when the error is detected. Tells the level of influence on control.*1 Recovery Gives the recovery method.*2 Log category Tells which log the error is saved in.*3 Tells what will happen to execution of the user program.*4 Operation Provides special information on the operation that results from the error. Data type Name Lists the variable names, data types, and meanings for system-defined variables that provide direct error notification, that are directly affected by the error, or that contain settings that cause the error. Assumed cause Correction Prevention Lists the possible causes, corrections, and preventive measures for the error. Attached information This is the attached information that is displayed by the Sysmac Studio or an HMI.*5 Precautions/ Remarks Provides precautions, restrictions, and supplemental information. If the user can set the event level, the event levels that can be set, the recovery method, operational information, and other information is also provided. *1 One of the following: Major fault: Major fault level Partial fault: Partial fault level Minor fault: Minor fault level Observation Information *2 One of the following: Automatic recovery: Normal status is restored automatically when the cause of the error is removed. Error reset: Normal status is restored when the error is reset after the cause of the error is removed. Cycle the power supply: Normal status is restored when the power supply to the Controller is turned OFF and then back ON after the cause of the error is removed. Controller reset: Normal status is restored when the Controller is reset after the cause of the error is removed. Depends on cause: The recovery method depends on the cause of the error. *3 One of the following: System: System event log Access: Access event log *4 One of the following: Continues: Execution of the user program will continue. Stops: Execution of the user program stops. Starts: Execution of the user program starts. *5 Refer to the appendices of the NJ/NX-series Troubleshooting Manual (Cat. No. W503) for the applicable range of the HMI Troubleshooter. NX-series CPU Unit Hardware User’s Manual (W535) 5 - 23 5 5-2-4 Error Descriptions Cause and correction Event code 5-2 Troubleshooting Event name 5 Troubleshooting Errors for Self Diagnosis Event name DIP Switch Setting Error Event code 00090000 hex Meaning An error was detected in the DIP switch setting. Source PLC Function Module Source details None Detection timing At power ON or Controller reset Error attributes Level Major fault Recovery Cycle the power supply. Log category System Effects User program Stops. Operation Stops.* System-defined variables Variable Data type Name None --- --- Cause and correction Assumed cause Correction Prevention There is an error in the DIP switch setting. Turn OFF all pins on the DIP switch. Make sure that the DIP switch settings are correct. Attached information Attached information 1: DIP switch readout value (00000000 hex to 0000000F hex) Precautions/ Remarks None * For details, refer to I/O Operation for Major Fault Level Controller Errors on page 5-7. Event name Internal Bus Check Error Meaning A fatal error was detected on the internal bus. Event code 000D0000 hex Source PLC Function Module Source details None Detection timing Continuously Error attributes Level Major fault Recovery Cycle the power supply. Log category System Effects User program Stops. Operation Stops.* A connection to the Sysmac Studio may not be possible. System-defined variables Variable Data type Name None --- --- Cause and correction Assumed cause Correction Prevention Conductive material has gotten inside. If there is conductive material nearby, blow out the CPU Unit with air. Do not do any metal working in the vicinity of the control panel. Also, make sure that the operating environment is free of dirt and dust. Close the control panel. Noise If the error occurs even after making the above correction, check the FG, and power supply lines, and other noise entry paths, and implement noise countermeasures as required. Implement noise countermeasures. If this error persists even after you make the above two corrections, replace the CPU Unit. None • There is data corruption in bus signals. • There is malfunctioning in bus interface circuits. The CPU Unit has failed. • The internal bus is disconnected. Attached information Attached information 1: System information Precautions/ Remarks When this error occurs, the CPU Unit stops and the error is recorded in the event log. If cycling the power to the Controller clears the error, you will be able to see whether this error occurred by checking the event log. However, a restart is sometimes not possible depending on the error location. * For details, refer to I/O Operation for Major Fault Level Controller Errors on page 5-7. 5 - 24 NX-series CPU Unit Hardware User’s Manual (W535) 5 Troubleshooting Event name Non-volatile Memory Life Exceeded Meaning The specified number of deletions for non-volatile memory was exceeded. Or, the number of bad blocks in memory exceeded the specified value. Source PLC Function Module Source details None Detection timing Continuously Error attributes Level Major fault Recovery Cycle the power supply. Log category System Effects User program Stops. Operation Stops.* System-defined variables Variable Data type Name None --- --- Assumed cause Correction Prevention Non-volatile memory life expired. Replace the CPU Unit. --- Cause and correction None Precautions/ Remarks None 000E0000 hex 5-2 Troubleshooting Attached information Event code * For details, refer to I/O Operation for Major Fault Level Controller Errors on page 5-7. CPU Unit Overheat (Operation Stopped) Meaning Operation was stopped because the temperature inside the CPU Unit was too high. Source PLC Function Module Source details None Detection timing Continuously Error attributes Level Major fault Recovery Cycle the power supply or reset the Controller. Log category System Effects User program Stops. Operation Stops.* A connection to the Sysmac Studio is not possible. System-defined variables Variable Data type Name None --- --- Assumed cause Correction Prevention The ambient operating temperature is too high. Make sure that the ambient operating temperature stays between 0 and 55°C. Make sure that the ambient temperature stays between 0 and 55°C. Cause and correction Event code 00110000 hex • Provide enough space for good air flow. • Do not install the Controller directly above equipment that generates a large amount of heat, such as heaters, transformers, or high-capacity resistors. • If the ambient temperature exceeds 55°C, install a cooling fan or air conditioner. Attached information None Precautions/ Remarks None * For details, refer to I/O Operation for Major Fault Level Controller Errors on page 5-7. NX-series CPU Unit Hardware User’s Manual (W535) 5 - 25 5 5-2-4 Error Descriptions Event name 5 Troubleshooting Event name Non-volatile Memory Restored or Formatted Meaning An error was detected in the non-volatile memory check and file system recovery or formatting was executed. Previous files may have been deleted. Source PLC Function Module Source details None Detection timing At power ON or Controller reset Error attributes Level Major fault Recovery Cycle the power supply or reset the Controller. Log category System Effects User program Stops. Operation Stops.* System-defined variables Variable Data type Name None --- --- Cause and correction Assumed cause Correction Prevention The Controller power supply was turned OFF while the BUSY indicator was lit. Compare the project with the project on the Sysmac Studio. If they match, cycle the power supply to the Controller or reset the Controller to see if that clears the error. If the error is cleared, check that the device operates correctly. If the comparison shows a mismatch, if the error is not cleared, or if the device does not operate correctly, clear all of memory and then download the project from the Sysmac Studio again. If cycling the power supply to the Controller or resetting the Controller does not clear the error, the memory is corrupted. Replace the CPU Unit. Unexpected operation may occur and can be very dangerous if the power to the Controller is cycled or the Controller is reset before you download the project again. Do not turn OFF the power supply while the BUSY indicator is lit. The power supply to the Controller was interrupted momentarily while the BUSY indicator was lit. Event code 10010000 hex Take appropriate measures to ensure that the specified power with the rated voltage and frequency is supplied in places where the power supply is unstable. Attached information Attached information 1: Recovered content (00000000 hex: File system recovery successful, 00000001 hex: Formatted) Precautions/ Remarks Make sure that the projects match and that the device operates correctly, or transfer the project again. If you cycle the power to the Controller or reset the Controller before you do this, unexpected operation may occur and can be very dangerous. * For details, refer to I/O Operation for Major Fault Level Controller Errors on page 5-7. 5 - 26 NX-series CPU Unit Hardware User’s Manual (W535) 5 Troubleshooting Event name Non-volatile Memory Data Corrupted Meaning A file that must be in non-volatile memory is missing or corrupted. Source PLC Function Module Source details None Detection timing At power ON or Controller reset Error attributes Level Major fault Recovery Cycle the power supply or reset the Controller. Log category System Effects User program Stops. Operation Stops.* System-defined variables Variable Data type Name None --- --- Assumed cause Correction Prevention The Controller power supply was turned OFF while the BUSY indicator was lit. Clear all of memory and then download the project from the Sysmac Studio. Do not turn OFF the power supply while the BUSY indicator is lit. Cause and correction Event code The CPU Unit has failed. Attached information None Precautions/ Remarks None Take appropriate measures to ensure that the specified power with the rated voltage and frequency is supplied in places where the power supply is unstable. If this error remains even after making the above corrections, replace the CPU Unit. None 5 5-2-4 Error Descriptions * For details, refer to I/O Operation for Major Fault Level Controller Errors on page 5-7. NX-series CPU Unit Hardware User’s Manual (W535) 5-2 Troubleshooting The power supply to the Controller was interrupted momentarily while the BUSY indicator was lit. 10020000 hex 5 - 27 5 Troubleshooting Event name Main Memory Check Error Event code 10080000 hex Meaning An error was detected in the memory check of the main memory in the CPU Unit. Source PLC Function Module Source details None Detection timing Continuously Error attributes Level Major fault Recovery Cycle the power supply. Log category System Effects User program Stops. Operation Stops.* System-defined variables Variable Data type Name None --- --- Cause and correction Assumed cause Correction Prevention Conductive material has gotten inside. If there is conductive material nearby, blow out the CPU Unit with air. Do not do any metal working in the vicinity of the control panel. Use the control panel only when it is closed. Noise If the error did not result from the above causes, cycle the power to the Controller and see if that clears the error. If the error occurs frequently, check the FG, power supply lines, and other noise entry paths, and implement noise countermeasures as required. Implement noise countermeasures. • Data corruption in memory • Microcomputer malfunctioning • Memory write circuit malfunctioning There is a software error. If the error did not result from the • Data corruption was caused by cos- above causes, and cycling the power to the Controller or resetting the Conmic rays or radiation. troller does not clear the error, The CPU Unit has failed. replace the CPU Unit. • Memory element failure None Perform regular inspections. • Memory peripheral circuit failure Attached information Attached information 1: System information Precautions/ Remarks None * For details, refer to I/O Operation for Major Fault Level Controller Errors on page 5-7. 5 - 28 NX-series CPU Unit Hardware User’s Manual (W535) 5 Troubleshooting Event name Data Not Saved to Battery-backup Memory Event code 100A 0000 hex Meaning An error occurred in the software and data could not be saved in battery-backup memory during power-OFF processing. Source PLC Function Module Source details None Detection timing At power ON or Controller reset Error attributes Level Major fault Recovery Cycle the power supply. Log category System Effects User program Stops. Operation Stops.* The variables with a Retain attribute and memory for CJseries Units in the DM, EM, and Holding Areas do not contain the values from just before the power supply was turned OFF. Unless suitable processing countermeasures are implemented, normal user program execution or normal Unit operation may not be possible when the power is turned ON next time. Cause and correction Variable Data type Name None --- --- Assumed cause Correction Prevention An error occurred in the software. Perform the following: None 5-2 Troubleshooting System-defined variables • Check the values of retained variables and the retained areas in the memory used for CJ-series Units and change them to the correct values. 5 Attached information None Precautions/ Remarks If this error occurs, the values of the following will be the values from the previous time the power supply was turned ON. • Retained variables (variables with a Retain attribute or variables in retained areas with AT specifications) • Retained areas in the memory used for CJ-series Units • Absolute encoder home offset data * For details, refer to I/O Operation for Major Fault Level Controller Errors on page 5-7. NX-series CPU Unit Hardware User’s Manual (W535) 5 - 29 5-2-4 Error Descriptions • If the system uses a Servomotor with an absolute encoder, turn ON the power supply, and then turn ON the Servo and check the actual current position of the axis. 5 Troubleshooting Event name Non-volatile Memory Data Corrupted Event code 100B 0000 hex Meaning A file that must be in non-volatile memory is missing or corrupted. Source PLC Function Module Source details None Detection timing At power ON or Controller reset Error attributes Level Major fault Recovery Cycle the power supply or reset the Controller. Log category System Effects User program Stops. Operation Stops.* System-defined variables Variable Data type Name None --- --- Cause and correction Assumed cause Correction Prevention The Controller power supply was turned OFF while the BUSY indicator was lit. Clear all of memory and then download the project from the Sysmac Studio. Do not turn OFF the power supply while the BUSY indicator is lit. The power supply to the Controller was interrupted momentarily while the BUSY indicator was lit. The CPU Unit has failed. Attached information None Precautions/ Remarks None Take appropriate measures to ensure that the specified power with the rated voltage and frequency is supplied in places where the power supply is unstable. If this error remains even after making the above corrections, replace the CPU Unit. None * For details, refer to I/O Operation for Major Fault Level Controller Errors on page 5-7. 5 - 30 NX-series CPU Unit Hardware User’s Manual (W535) 5 Troubleshooting Event name Event Level Setting Error Meaning The settings in the event level setting file are not correct. Source PLC Function Module Error attributes Level Effects User program System-defined variables Cause and correction Event code 100C0000 hex Source details None Detection timing At power ON or Controller reset Major fault Recovery Cycle the power supply or reset the Controller. Log category System Stops. Operation Stops.*1 Variable Data type Name None --- --- Correction Prevention Perform a Memory All Clear operation and then transfer the event level setting file again. Do not interrupt the power supply to the Controller or disconnect communications with the Sysmac Studio during a download of the event level settings. The event level settings are not correct because the power supply to the Controller was interrupted during a Clear All Memory operation. Non-volatile memory failed. None Precautions/ Remarks None If the error persists even after you make the above correction, replace the CPU Unit. None 5 5-2-4 Error Descriptions Attached information Do not interrupt the power supply to the Controller during a Clear All Memory operation. *1 For details, refer to I/O Operation for Major Fault Level Controller Errors on page 5-7. NX-series CPU Unit Hardware User’s Manual (W535) 5-2 Troubleshooting Assumed cause The event level settings are not correct because the power supply to the Controller was interrupted or communications with the Sysmac Studio were disconnected during a download of the event level settings. 5 - 31 5 Troubleshooting Event name PLC System Processing Error Event code 40020000 hex Meaning A fatal error was detected in the PLC Function Module. Source PLC Function Module Source details None Detection timing Continuously Error attributes Level Major fault Recovery Cycle the power supply. Log category System Effects User program Stops. Operation Stops.* System-defined variables Variable Data type Name None --- --- Cause and correction Assumed cause Correction Prevention An error occurred in the software. Contact your OMRON representative. None Attached information None Precautions/ Remarks None * For details, refer to I/O Operation for Major Fault Level Controller Errors on page 5-7. Event name PLC System Processing Error Event code 40030000 hex Meaning A fatal error was detected in the PLC Function Module. Source PLC Function Module Source details None Detection timing Continuously Error attributes Level Major fault Recovery Cycle the power supply. Log category System Effects User program Stops. Operation Stops.* System-defined variables Variable Data type Name None --- --- Cause and correction Assumed cause Correction Prevention An error occurred in the software. Contact your OMRON representative. None Attached information Attached information 1: System information Precautions/ Remarks None * For details, refer to I/O Operation for Major Fault Level Controller Errors on page 5-7. Event name PLC System Processing Error Meaning A fatal error was detected in the PLC Function Module. Event code 40040000 hex Source PLC Function Module Source details None Detection timing Continuously Error attributes Level Major fault Recovery Cycle the power supply. Log category System Effects User program System-defined variables Variable Stops. Operation Data type Stops.* A connection to the Sysmac Studio is not possible. Name None --- --- Cause and correction Assumed cause Correction Prevention An error occurred in the software. Contact your OMRON representative. None Attached information None Precautions/ Remarks None * For details, refer to I/O Operation for Major Fault Level Controller Errors on page 5-7. 5 - 32 NX-series CPU Unit Hardware User’s Manual (W535) 5 Troubleshooting Event name PLC System Processing Error Meaning A fatal error was detected in the PLC Function Module. Source PLC Function Module Error attributes Level Effects User program System-defined variables Cause and correction Event code 40050000 hex Source details None Detection timing Continuously Major fault Recovery Cycle the power supply. Log category System Stops. Operation Stops.* A connection to the Sysmac Studio is not possible. Variable Data type Name None --- --- Assumed cause Correction Prevention An error occurred in the software. Contact your OMRON representative. None None Precautions/ Remarks None 5-2 Troubleshooting Attached information * For details, refer to I/O Operation for Major Fault Level Controller Errors on page 5-7. Real-Time Clock Stopped Meaning The oscillation of the real-time clock stopped. The real-time clock is set to an illegal time. Source PLC Function Module Source details None Detection timing At power ON or Controller reset Error attributes Level Minor fault Recovery Error reset Log category System Effects User program Continues. Operation The System Time is not defined. The clock information recorded by CJ-series Units is also not defined. System-defined variables Variable Data type Name _CurrentTime DATE_AND_TIME System Time Assumed cause Correction Prevention The battery voltage is low. Replace the Battery. Then adjust the real-time clock time. Regularly replace the Battery. The battery connector has come loose. Reconnect the connector and make sure it is mated correctly. Then adjust the real-time clock time. Check for vibration and shock. The Battery is missing. Install a Battery. Then adjust the realtime clock time. Install a Battery. Cause and correction Event code 00070000 hex Attached information None Precautions/ Remarks This error is checked only when the power is turned ON. You can change the event level to the observation level. If you change the level to the observation level, recovery procedures are not required. NX-series CPU Unit Hardware User’s Manual (W535) 5 - 33 5 5-2-4 Error Descriptions Event name 5 Troubleshooting Event name Real-Time Clock Failed Event code 00080000 hex Meaning The real-time clock in the CPU Unit failed. Source PLC Function Module Source details None Detection timing At power ON or Controller reset Error attributes Level Minor fault Recovery Cycle the power supply. Log category System Effects User program Continues. Operation The System Time is not defined. The clock information recorded by CJ-series Units is also not defined. System-defined variables Variable _CurrentTime DATE_AND_TIME System Time Cause and correction Assumed cause Correction Prevention The CPU Unit clock has failed. Replace the CPU Unit. None Attached information None Precautions/ Remarks None Event name Low Battery Voltage Data type Name Event code 000B 0000 hex Meaning The voltage of the Battery has dropped. Source PLC Function Module Source details None Detection timing Continuously Error attributes Level Minor fault Recovery Error reset Log category System Effects User program Continues. Operation No affected System-defined variables Variable Data type Name _SelfTest_LowBattery BOOL Low Battery Flag Cause and correction Assumed cause Correction Prevention The battery voltage is low. Replace the Battery. Regularly replace the Battery. The battery connector has come loose. Reconnect the connector and make sure it is mated correctly. Check for vibration and shock. The Battery is missing. Install a Battery. Install a Battery. Attached information None Precautions/ Remarks You may loose the user data the next time that the power supply is interrupted. You can change the event level to the observation level. If you change the level to the observation level, recovery procedures are not required. 5 - 34 NX-series CPU Unit Hardware User’s Manual (W535) 5 Troubleshooting Event name CPU Unit Overheat Meaning The temperature inside the CPU Unit exceeded the specified value. Source PLC Function Module Source details None Detection timing Continuously Error attributes Level Minor fault Recovery Cycle the power supply or reset the Controller. Log category System Effects User program Continues. Operation Not affected. System-defined variables Variable Data type Name _SelfTest_HighTemperature BOOL CPU Unit High Temperature Flag Assumed cause Correction Prevention The ambient operating temperature is too high. Make sure that the ambient operating temperature stays between 0 and 55°C. Make sure that the ambient temperature stays between 0 and 55°C. Cause and correction Event code 000C0000 hex 5-2 Troubleshooting • Provide enough space for good air flow. • Do not install the Controller above equipment that generates a large amount of heat, such as heaters, transformers, or high-capacity resistors. • If the ambient temperature exceeds 55°C, install a cooling fan or air conditioner. 5 None Precautions/ Remarks None Event name Slow Fan Meaning The speed of the fan dropped to a specified level or lower. Source PLC Function Module Error attributes Level Effects User program System-defined variables Variable Data type Name _SelfTest_LowFanRevolution BOOL Low Fan Revolution Flag Assumed cause Correction Prevention Something is interfering with fan operation, such as dust, wire scraps, or cuttings. Remove the material that is interfering with fan operation. Make sure that nothing is interfering with the fan during operation. The fan has reached the end of its service life. Replace the Fan Unit.* Regularly replace the Fan Unit.* Cause and correction Event code 00120000 hex Source details None Detection timing Continuously Minor fault Recovery Error reset Log category System Continues. Operation Operation is not affected. The fan is faulty. Attached information None Precautions/ Remarks You can change the event level to the observation level. If you change the level to the observation level, recovery procedures are not required. * Refer to NTLPxREF 7-3 Replacing the Fan Unit on page 7-3 for the Fan Unit replacement procedure and life. NX-series CPU Unit Hardware User’s Manual (W535) 5 - 35 5-2-4 Error Descriptions Attached information 5 Troubleshooting Event name Battery-backup Memory Check Error Event code 10090000 hex Meaning An error was detected in the memory check of the battery-backup memory in the CPU Unit. Source PLC Function Module or Motion Control Function Module Source details PLC Function Module: None Detection timing At power ON or Controller reset Log category System Motion Control Function Module: MC Common Error attributes Level Minor fault Recovery Error reset Effects User program Continues. Operation The variables with a Retain attribute and memory for CJseries Units in the DM, EM, and Holding Areas were corrupted. Normal user program execution or normal Unit operation may not be possible. System-defined variables Variable Data type Name _RetainFail BOOL Retention Failure Flag Cause and correction Assumed cause Correction Prevention The battery voltage is low. Replace the Battery. Regularly replace the Battery. The battery connector has come loose. Reconnect the connector and make sure it is mated correctly. Check for vibration and shock. The Battery is missing. Install a Battery. Install a Battery. Attached information None Precautions/ Remarks After you implement the above countermeasures, set the correct data for the variables with a Retain attribute and memory for CJ-series Units in the DM, EM, and Holding Areas. You can change the event level to the observation level. If you change the level to the observation level, recovery procedures are not required. Event name SD Memory Card Invalid Type Event code 000F 0000 hex Meaning The current SD Memory Card is not supported. Source PLC Function Module Source details None Detection timing At power ON, at Controller reset, or when SD Memory Card is inserted Error attributes Level Observation Recovery --- Log category System Effects User program Continues. Operation SD PWR indicator is not lit. Power supply to SD Memory Card is stopped. System-defined variables Variable Data type Name _Card1Ready BOOL SD Memory Card Ready Flag Cause and correction Assumed cause Correction Prevention An SD Memory Card that is not supported was inserted into the CPU Unit. Replace the SD Memory Card with an SD/SDHC card with a capacity of 32 GB or less. Use an SD/SDHC card with a capacity of 32 GB or less for the SD Memory Card. Attached information None Precautions/ Remarks None 5 - 36 NX-series CPU Unit Hardware User’s Manual (W535) 5 Troubleshooting Event name SD Memory Card Life Exceeded Meaning The specified number of deletions for the SD Memory Card was exceeded. Or, the number of bad blocks exceeded the specified value. Source PLC Function Module Source details None Detection timing At power ON, at Controller reset, or periodically Error attributes Level Observation Recovery --- Log category System Effects User program Continues. Operation Not affected. System-defined variables Variable Data type Name _Card1Deteriorated BOOL SD Memory Card Life Warning Flag Assumed cause Correction Prevention The service life of the SD Memory Card was exceeded. Back up necessary files in the SD Memory Card. Or replace the SD Memory Card. Regularly replace the SD Memory Card. Cause and correction Event code 00100000 hex None Precautions/ Remarks The data on the SD Memory Card may be corrupted. Normal user program operation may not be possible. You can change the event level to the minor fault level. If you change the level to the minor fault level, the Recovery column above will be changed to “Error reset.” SD Memory Card Invalid Format Meaning The file format of the SD Memory Card is not FAT16 or FAT32. Source PLC Function Module Source details None Detection timing At power ON, at Controller reset, or when SD Memory Card is inserted Error attributes Level Observation Recovery --- Log category System Effects User program Continues. Operation SD PWR indicator is not lit. You can format the SD Memory Card from the Sysmac Studio. System-defined variables Cause and correction Event code 10030000 hex Variable Data type Name _Card1Ready BOOL SD Memory Card Ready Flag Assumed cause Correction Prevention The file format of the SD Memory Card inserted in the CPU Unit is not FAT16 or FAT32. Make sure that the correct SD Memory Card is inserted in the CPU Unit. If an incorrect SD Memory Card is inserted, replace it with the correct one. If the correct SD Memory Card is inserted, format it correctly before you use it. Use an OMRON SD Memory Card. Do not format the SD Memory Card on a computer. Attached information None Precautions/ Remarks None NX-series CPU Unit Hardware User’s Manual (W535) 5 - 37 5 5-2-4 Error Descriptions Event name 5-2 Troubleshooting Attached information 5 Troubleshooting Event name SD Memory Card Restored or Formatted Meaning An error was detected during the file system check and the file system was restored. Files may have been deleted. Source PLC Function Module Source details None Detection timing At power ON or Controller reset Error attributes Level Observation Recovery --- Log category System Effects User program Continues. Operation If the file is deleted, normal user program operation may not be possible. System-defined variables Variable Data type Name None --- --- Cause and correction Assumed cause Correction Prevention The Controller power supply was turned OFF while the SD BUSY indicator was lit. Check that the correct file is on the SD Memory Card, or that the device operates correctly. If the correct file is not on the SD Memory Card, or if the device does not operate correctly, download the correct file to the SD Memory Card. Cycle the power supply to the Controller or reset the Controller and confirm that the system operates correctly. Do not turn OFF the power supply while the SD BUSY indicator is lit. The power supply to the Controller was interrupted momentarily while the SD BUSY indicator was lit. The SD Memory Card was removed while the SD PWR indicator was lit. The SD Memory Card is damaged. Event code If this error occurs even though the above problem does not exist, replace the SD Memory Card and download the correct files to it. 10040000 hex Take appropriate measures to ensure that the specified power with the rated voltage and frequency is supplied in places where the power supply is unstable. Do not remove the SD Memory Card while the SD PWR indicator is lit. None Attached information None Precautions/ Remarks The error is detected at power ON or at a Controller reset only when SD Memory Card diagnosis at startup is enabled. You can change the event level to the minor fault level. If you change the level to the minor fault level, the Recovery column above will be changed to “Error reset.” 5 - 38 NX-series CPU Unit Hardware User’s Manual (W535) 5 Troubleshooting Event name SD Memory Card Data Corrupted Meaning A file that must be in the SD Memory Card is missing or corrupted. Source PLC Function Module Source details None Detection timing At power ON or Controller reset Error attributes Level Observation Recovery --- Log category System Effects User program Continues. Operation SD PWR indicator is not lit. You can format the SD Memory Card from the Sysmac Studio. Normal user program operation may not be possible. System-defined variables Variable Cause and correction Event code 10060000 hex Data type Name _Card1Ready BOOL SD Memory Card Ready Flag Assumed cause Correction Prevention The Controller power supply was turned OFF while the SD BUSY indicator was lit. Format the SD Memory Card and download the correct file. Do not turn OFF the power supply while the SD BUSY indicator is lit. Take appropriate measures to ensure that the specified power with the rated voltage and frequency is supplied in places where the power supply is unstable. The SD Memory Card was removed while the SD PWR indicator was lit. Do not remove the SD Memory Card while the SD PWR indicator is lit. The SD Memory Card is damaged. If the error cannot be cleared with the above corrections, replace the SD Memory Card with one that operates normally. None 5 None Precautions/ Remarks The error is detected at power ON or at a Controller reset only when SD Memory Card diagnosis at startup is enabled. You can change the event level to the minor fault level. If you change the level to the minor fault level, the Recovery column above will be changed to “Error reset.” Event name SD Memory Card Access Power OFF Error Meaning The power supply to the Controller was interrupted during access to the SD Memory Card. Source PLC Function Module Source details None Detection timing At power ON or Controller reset Error attributes Level Observation Recovery --- Log category System Effects User program Continues. Operation Operation is controlled by the user program when the file is corrupted. System-defined variables Variable Data type Name _Card1PowerFail BOOL SD Memory Card Power Interruption Flag Assumed cause Correction Prevention The Controller power supply was turned OFF while the SD BUSY indicator was lit. Check that the correct file is on the SD Memory Card, or that the device operates correctly. If the correct file is not on the SD Memory Card, or if the device does not operate correctly, download the correct file to the SD Memory Card. Cycle the power supply to the Controller or reset the Controller and confirm that the system operates correctly. When you have finished the corrections, set the SD Memory Card Access Power Interruption Flag (_Card1PowerFail) to FALSE. Do not turn OFF the power supply while the SD BUSY indicator is lit. Cause and correction The power supply to the Controller was interrupted momentarily while the SD BUSY indicator was lit. 10070000 hex Take appropriate measures to ensure that the specified power with the rated voltage and frequency is supplied in places where the power supply is unstable. Attached information None Precautions/ Remarks When the measure is completed, change the SD Memory Card Access Power Interruption Flag to FALSE. NX-series CPU Unit Hardware User’s Manual (W535) 5 - 39 5-2-4 Error Descriptions Attached information Event code 5-2 Troubleshooting The power supply to the Controller was interrupted momentarily while the SD BUSY indicator was lit. 5 Troubleshooting Event name Incorrect SD Memory Card Removal Event code 10310000 hex Meaning SD Memory Card removal processing failed. Source PLC Function Module Source details None Detection timing At SD Memory Card removal Error attributes Level Observation Recovery --- Log category System Effects User program Continues. Operation Not affected. System-defined variables Variable Data type Name None --- --- Cause and correction Assumed cause Correction Prevention The SD Memory Card was removed while the SD PWR indicator was lit. Check the files on the SD Memory Card to see if they are correct. If the files on the SD Memory Card are not correct, download the correct files to the SD Memory Card. Press the SD Memory Card power supply switch and confirm that the SD PWR indicator goes out before you remove the SD Memory Card. Attached information None Precautions/ Remarks None 5 - 40 NX-series CPU Unit Hardware User’s Manual (W535) 5 Troubleshooting Errors Related to Controller Operation Event name User Program/Controller Configurations and Setup Transfer Error Meaning The user program or Controller Configurations and Setup were not transferred correctly. Source PLC Function Module Source details None or I/O bus master Detection timing At power ON or Controller reset Error attributes Level Major fault Recovery Cycle the power supply or reset the Controller. Log category System Effects User program Stops. Operation Stops.* System-defined variables Variable Data type Name None --- --- Assumed cause Correction Prevention The user program or Controller Configurations and Setup are not correct because the power supply to the Controller was interrupted during a download of the user program or the Controller Configurations and Setup. Clear all of memory and then download the project from the Sysmac Studio. If attached information is registered, cycle the power supply to the Controller and then implement the above correction. Do not turn OFF the power supply to the Controller during a download of the user program or the Controller Configurations and Setup. The user program or Controller Configurations and Setup are not correct because the power supply to the Controller was interrupted during online editing. If you cannot perform a Clear All Memory operation from the Sysmac Studio, transfer the project to the Controller with a restore operation from an SD Memory Card. Do not interrupt the power supply to the Controller during online editing. 5 Do not interrupt the power supply to the Controller during a Clear All Memory operation. The user program or Controller Configurations and Setup are not correct because the power supply to the Controller was interrupted during a restore operation. Do not interrupt the power supply to the Controller during a restore operation. If the error persists even after you make the above correction, replace the CPU Unit. None Attached Information 1: Cause Details None: Power was interrupted during a download, during online editing, or during restoration. Downloading/Predownloading: For other causes, the timing of error occurrence (during download or during download preparations) is given. Precautions/ Remarks None * For details, refer to I/O Operation for Major Fault Level Controller Errors on page 5-7. NX-series CPU Unit Hardware User’s Manual (W535) 5 - 41 5-2-4 Error Descriptions The user program or Controller Configurations and Setup are not correct because the power supply to the Controller was interrupted during a Clear All Memory operation. Non-volatile memory failed. Attached information 10200000 hex 5-2 Troubleshooting Cause and correction Event code 5 Troubleshooting Event name Illegal User Program Execution ID Event code 10210000 hex Meaning The user program execution IDs set in the user program and in the CPU Unit do not match. Source PLC Function Module Source details None Detection timing At user program download, power ON, or Controller reset Error attributes Level Major fault Recovery Cycle the power supply or reset the Controller. Log category System Effects User program Stops. Operation Stops.* System-defined variables Variable Data type Name None --- --- Cause and correction Assumed cause Correction Prevention The user program execution IDs set in the user program and in the CPU Unit do not match. Set the same user program execution ID in the user program and CPU Unit. A user program execution ID is set in the CPU Unit but not in the user program. If user program execution ID is not set in the user program, clear the user program execution ID set in the CPU Unit by clearing all memory in the CPU Unit. Set the same user program execution ID in the user program and CPU Unit. Keep a record of the user program execution IDs set in the user program and in the CPU Unit. They are not displayed. Attached information None Precautions/ Remarks None * For details, refer to I/O Operation for Major Fault Level Controller Errors on page 5-7. Event name Illegal User Program Meaning The user program is not correct. Event code 10240000 hex Source PLC Function Module Source details None Detection timing At download, power ON, or Controller reset Error attributes Level Major fault Recovery Cycle the power supply or reset the Controller. Log category System Effects User program System-defined variables Variable Stops. Operation Data type Stops.* Name None --- --- Cause and correction Assumed cause Correction Prevention The limit to the number of nesting levels for functions or function blocks was exceeded. Find the location in the user program that exceeds the limit to the number of nesting levels for functions or function blocks and reduce the number of nesting levels to within the limit. Then, download the user program again. Write the user program so that the limit to the number of nesting levels for functions or function blocks is not exceeded. Use the program check on the Sysmac Studio to confirm that the limit to the number of nesting levels is not exceeded. Attached information None Precautions/ Remarks None * For details, refer to I/O Operation for Major Fault Level Controller Errors on page 5-7. 5 - 42 NX-series CPU Unit Hardware User’s Manual (W535) 5 Troubleshooting Illegal User Program/Controller Configurations and Setup Meaning The upper limit of the usable memory was exceeded or the user program or Controller Configurations and Setup is corrupted. Source PLC Function Module Source details None Detection timing At download, power ON, or Controller reset Error attributes Level Major fault Recovery Cycle the power supply or reset the Controller. Log category System Effects User program Stops. Operation Stops.* System-defined variables Variable Data type Name None --- --- Assumed cause Correction Prevention The upper limit of the data size was exceeded. If an event on restrictions on the number of items used occurred at the same time as this event, correct the user program and settings so that the number of items used is not exceeded and then download the data again. None The main memory capacity was exceeded. If an event on restrictions on the number of items used did not occur at the same time as this event, perform the Clear All Memory operation, cycle the power supply, and then confirm that this event was cleared. If it was cleared, reduce the size of the project, e.g., by sharing programming, and then download the project again. Cause and correction Attached information None Precautions/ Remarks None 10250000 hex 5 5-2-4 Error Descriptions Non-volatile memory is deteriorating or has failed. Event code 5-2 Troubleshooting Event name If this error persists even after you implement the above two corrections, replace the CPU Unit. * For details, refer to I/O Operation for Major Fault Level Controller Errors on page 5-7. NX-series CPU Unit Hardware User’s Manual (W535) 5 - 43 5 Troubleshooting Event name Error in Starting Automatic Transfer Event code 10270000 hex Meaning An error was detected in pre-execution checks for automatic transfer. Source PLC Function Module Source details None Detection timing At power ON Error attributes Level Major fault Recovery Cycle the power supply or reset the Controller. Log category System Effects User program Stops. Operation Stops.*1 System-defined variables Variable Data type Name None --- --- Cause and correction Assumed cause Correction Prevention An SD Memory Card is not inserted. Insert an SD Memory Card. Insert an SD Memory Card. The SD Memory Card type is not correct. Replace the SD Memory Card with an SD or SDHC card. Use an SD or SDHC card. The format of the SD Memory Card is not correct. Format the SD Memory Card with the Sysmac Studio and then create an autoload folder and place the backup files in it. There is no autoload folder on the SD Memory Card. Create an autoload folder on the SD Memory Card and place the backup files in it. Use a formatted SD Memory Card, create an autoload folder on the SD Memory Card, and place the backup files in it. Also, do not remove the SD Memory Card or turn OFF the power supply while the SD BUSY indicator is lit. There are no backup files in the autoload folder on the SD Memory Card. Place the backup files in the autoload folder on the SD Memory Card. Either the backup files in the autoload folder on the SD Memory Card are corrupted or required data is not in the backup files on the SD Memory Card. Replace the backup files in the autoload folder on the SD Memory Card. If this error occurs again even after replacing the files, create the backup files again and place them in the autoload folder. The unit version of the CPU Unit to which to transfer the files is older than the unit version of the backup files on the SD Memory Card. Replace the CPU Unit with a CPU Unit that has a unit version that is the same as or newer than the unit version of the CPU that was used to create the backup files. Or, place the backup files with the correct unit version for the CPU Unit in the autoload folder. 5 - 44 Make sure that the unit version of the CPU Unit and the unit version of the backup files are compatible. NX-series CPU Unit Hardware User’s Manual (W535) 5 Troubleshooting Cause and correction Make sure that the model of the CPU Unit is the same as the model of the CPU Unit that was used to create the backup files. Recovery was executed for the SD Memory Card. If there are no backup files or no automatic transfer command file in the autoload folder, place the files in the folder again. None The CPU Unit is write-protected. If you use automatic transfers, select the Do not use Option for the Write protection at startup setting of the CPU Unit. If you use automatic transfers, select the Do not use Option for the Write protection at startup setting of the CPU Unit. The settings in the automatic transfer command file (AutoloadCommand.ini) are not correct. Make sure that the required files are set to “Yes” in the automatic transfer command file. Make sure that the required files are set to “Yes” in the automatic transfer command file. Reading the data for automatic transfer failed because the SD Memory Card is faulty or not formatted correctly. Perform the same corrective measures as for when the format of the SD Memory Card is not correct or the SD Memory Card is damaged. Perform the same preventive measures as for the following events: SD Memory Card Invalid Format or Faulty SD Memory Card. The SD Memory Card is damaged. If none of the above causes applies, replace the SD Memory Card. Do not remove the SD Memory Card or turn OFF the power supply while the SD BUSY indicator is lit. Or, replace the SD Memory Card periodically according to the write life of the SD Memory Card. The database connection service version of the CPU Unit to which to transfer the files is older than the database connection service version of the backup files on the SD Memory Card. Replace the CPU Unit with a CPU Unit that has a database connection service version that is the same as or newer than the database connection service version of the CPU Unit that was used to create the backup files. Or, place the backup files with the correct database connection service version for the CPU Unit in the autoload folder. Make sure that the database connection service version of the CPU Unit and the database connection service version of the backup files are compatible. The robot version of the CPU Unit to which to transfer the files is older than the robot version of the backup files on the SD Memory Card. Replace the CPU Unit with a CPU Unit that has a robot version that is the same as or newer than the robot version of the CPU Unit that was used to create the backup files. Or, place the backup files with the correct robot version for the CPU Unit in the autoload folder. Make sure that the robot version of the CPU Unit and the robot version of the backup files are compatible. Attached information Attached Information 1: Error Details Precautions/ Remarks None 0001 hex:An SD Memory Card is not inserted. 0002 hex:The SD Memory Card is faulty, the format of the SD Memory Card is not correct, or the SD Memory Card is not the correct type of card. 0004 hex:Recovery was executed for the SD Memory Card. 0101 hex:There is no autoload folder on the SD Memory Card. 0102 hex:There are no backup files in the autoload folder on the SD Memory Card. 0103 hex:The backup files are corrupted. 0104 hex:The contents of the automatic transfer command file are not correct. 0105 hex:The required transfer data is not in the backup file. 0201 hex:The unit version of the CPU Unit is old. 0202 hex:The model numbers of the CPU Unit are not the same. 0203 hex:The CPU Unit is write-protected. 0211 hex: The database connection service or robot version of the CPU Unit is old. 0301 hex:Reading data for automatic transfer failed or the SD Memory Card is faulty. *1 For details, refer to I/O Operation for Major Fault Level Controller Errors on page 5-7. NX-series CPU Unit Hardware User’s Manual (W535) 5 - 45 5 5-2-4 Error Descriptions Replace the CPU Unit with a CPU Unit that has the same model as the CPU Unit that was used to create the backup files. Or, place the backup files with the same model of CPU Unit in the autoload folder. 5-2 Troubleshooting The model of the CPU Unit to which to transfer the files is not the same as the model of the CPU Unit of the backup files on the SD Memory Card. 5 Troubleshooting Event name Error in Executing Automatic Transfer Event code 10280000 hex Meaning The automatic transfer ended in an error. Source PLC Function Module Source details None Detection timing At power ON Error attributes Level Major fault Recovery Cycle the power supply or reset the Controller. Log category System Effects User program Stops. Operation Stops.*1 System-defined variables Variable Data type Name None --- --- Cause and correction Assumed cause Correction Prevention It was not possible to read the data for automatic transfer. Format the SD Memory Card with the Sysmac Studio and then create an autoload folder and place the backup files in it. Do not remove the SD Memory Card or turn OFF the power supply while the SD BUSY indicator is lit. Replace the SD Memory Card periodically according to the write life of the SD Memory Card. The SD Memory Card was removed during an automatic transfer. Insert an SD Memory Card that contains the backup files in an autoload folder, and then cycle the power supply to execute the automatic transfer again. Do not remove the SD Memory Card during the automatic transfer. There are no backup files in the autoload folder on the SD Memory Card. Create an autoload folder in the SD Memory Card and store the backup files in it. The backup files in the autoload folder on the SD Memory Card are corrupted. Store the backup files in the autoload folder again. If this error occurs again even after replacing the files, create the backup files again and place them in the autoload folder. Use a formatted SD Memory Card, create an autoload folder in the SD Memory Card, and store the backup files in the folder. Do not turn OFF the power supply or remove the SD Memory Card while the SD BUSY indicator is lit. The SD Memory Card is damaged. If none of the above causes applies, replace the SD Memory Card. Attached information Do not remove the SD Memory Card or turn OFF the power supply while the SD BUSY indicator is lit. Replace the SD Memory Card periodically according to the write life of the SD Memory Card. Attached Information 1: Error Details 0001 hex: The SD Memory Card was removed. 0102 hex: There are no backup files in the autoload folder on the SD Memory Card. 0103 hex: The backup files are corrupted. 0301 hex: Reading data for automatic transfer failed or the SD Memory Card is damaged. Precautions/ Remarks None *1 For details, refer to I/O Operation for Major Fault Level Controller Errors on page 5-7. 5 - 46 NX-series CPU Unit Hardware User’s Manual (W535) 5 Troubleshooting Event name PLC Function Processing Error Meaning A fatal error was detected in the PLC Function Module. Source PLC Function Module Error attributes Level Effects User program System-defined variables Cause and correction Event code 40110000 hex Source details None Detection timing Continuously Major fault Recovery Cycle the power supply. Log category System Stops. Operation Stops.* Variable Data type Name None --- --- Assumed cause Correction Prevention An error occurred in the software. Contact your OMRON representative. None Attached information 1: System information Attached Information 2: System information Attached information 3: System information Attached information 4: System information Precautions/ Remarks None 5-2 Troubleshooting Attached information * For details, refer to I/O Operation for Major Fault Level Controller Errors on page 5-7. PLC Function Processing Error Meaning A fatal error was detected in the PLC Function Module. Source PLC Function Module Error attributes Level Effects User program System-defined variables Variable Data type Name None --- --- Cause and correction Event code 44420000 hex Source details None Detection timing Continuously Major fault Recovery Cycle the power supply or reset the Controller. Log category System Stops. Operation Stops.*1 Assumed cause Correction Prevention An error occurred in the software. Contact your OMRON representative. None Attached information Attached information 1: System information Attached Information 2: System information Attached information 3: System information Attached information 4: System information Precautions/ Remarks None *1 For details, refer to I/O Operation for Major Fault Level Controller Errors on page 5-7. NX-series CPU Unit Hardware User’s Manual (W535) 5 5-2-4 Error Descriptions Event name 5 - 47 5 Troubleshooting Event name PLC Function Processing Error Event code 40120000 hex Meaning A fatal error was detected in the PLC Function Module. Source PLC Function Module Source details None Detection timing Continuously Error attributes Level Partial fault Recovery Cycle the power supply. Log category System Effects User program Stops. Operation Stops.*1 System-defined variables Variable Data type Name None --- --- Cause and correction Assumed cause Correction Prevention An error occurred in the software. Contact your OMRON representative. None Attached information Attached information 1: System information Attached Information 2: System information Attached information 3: System information Attached information 4: System information Precautions/ Remarks None *1 Operation is the same as for a major fault level error. For details, refer to I/O Operation for Major Fault Level Controller Errors on page 5-7. Event name PLC Function Processing Error Event code 40130000 hex Meaning A fatal error was detected in part of the PLC Function Module. Source PLC Function Module Source details None Detection timing Continuously Error attributes Level Minor fault Recovery Cycle the power supply or reset the Controller. Log category System Effects User program Continues. Operation Operation is not affected. System-defined variables Variable Data type Name None --- --- Cause and correction Assumed cause Correction Prevention An error occurred in the software. Contact your OMRON representative. None Attached information Attached information 1: System information Attached Information 2: System information Attached information 3: System information Attached information 4: System information Precautions/ Remarks None 5 - 48 NX-series CPU Unit Hardware User’s Manual (W535) 5 Troubleshooting Event name Event Log Save Error Meaning Saving the event log failed. Source PLC Function Module Error attributes Level Effects User program System-defined variables Cause and correction Event code 10230000 hex Source details None Detection timing At power ON or Controller reset Observation Recovery --- Log category System Starts. Operation Not affected. However, part or all of the past event log cannot be read. Variable Data type Name None --- --- Assumed cause Correction Prevention A low battery voltage prevented retention of memory during a power interruption. Replace the Battery. Replace the battery periodically. Attached information1: Error Details 0: Failure to save all categories of logs, 1: Failure to save system event log, 2: Failure to save access event log, 100: Failure to save user-defined event log Precautions/ Remarks None Event name Trace Setting Transfer Failure Meaning The power supply was interrupted while transferring the trace settings. Source PLC Function Module Source details None Detection timing At power ON or Controller reset Error attributes Level Observation Recovery Cycle the power supply or reset the Controller. Log category System Effects User program Continues. Operation Not affected. System-defined variables Variable Data type Name None --- --- Assumed cause Correction Prevention The power supply was interrupted while transferring the trace settings. Transfer the trace settings again. Do not interrupt the power supply while transferring the trace settings. Attached information None Precautions/ Remarks All trace settings are initialized when this error occurs. NX-series CPU Unit Hardware User’s Manual (W535) 10260000 hex 5 5-2-4 Error Descriptions Cause and correction Event code 5-2 Troubleshooting Attached information 5 - 49 5 Troubleshooting Event name Backup Failed to Start Meaning An error was detected in pre-execution checks for a backup operation. Source PLC Function Module Source details None Detection timing When backup is specified by the user Error attributes Level Observation Recovery --- Log category System Effects User program Continues. Operation Not affected. System-defined variables Variable Data type Name None --- --- Cause and correction Assumed cause Correction Prevention An SD Memory Card is not inserted. Insert an SD Memory Card. Insert an SD Memory Card. The SD Memory Card type is not correct. Replace the SD Memory Card with an SD or SDHC card. Use an SD or SDHC card. The format of the SD Memory Card is not correct. Format the SD Memory Card with the Sysmac Studio. Use a formatted SD Memory Card. Also, do not remove the SD Memory Card or turn OFF the power supply while the SD BUSY indicator is lit. The SD Memory Card is write protected. Remove write protection from the SD Memory Card. Make sure that the SD Memory Card is not write protected. The Prohibiting backing up data to the SD Memory Card parameter is set to prohibit backing up data to an SD Memory Card. Change the setting of the Prohibiting backing up data to the SD Memory Card parameter to enable backing up data to an SD Memory Card. Set the Prohibiting backing up data to the SD Memory Card parameter to enable backing up data to an SD Memory Card. Another backup operation is in progress. Wait for the other backup operation to end and then perform the backup operation again. Do not attempt to perform other backup operation during a backup operation. Synchronization, online editing, or the Clear All Memory operation is in progress. Wait for the synchronization, online editing, or the Clear All Memory operation to end and then perform the backup operation again. Do not attempt to perform a backup operation during a synchronization, online editing, or the Clear All Memory operation. The backup was canceled by the user. None None The online connection with the Sysmac Studio was disconnected. Check the cable connections. Go offline and then go back online and execute the backup again. Check the cable to see if it is disconnected or broken. Make sure the cable is connected properly. 5 - 50 Event code 10290000 hex NX-series CPU Unit Hardware User’s Manual (W535) 5 Troubleshooting Cause and correction The SD Memory Card is damaged. Attached information Attached information 1: Operation type If none of the above causes applies, replace the SD Memory Card. Do not remove the SD Memory Card or turn OFF the power supply while the SD BUSY indicator is lit. Replace the SD Memory Card periodically according to the write life of the SD Memory Card. 0101 hex: Controller to SD Memory Card for switch operation on front of CPU Unit 0102 hex: Controller to SD Memory Card for system variable operation 0103 hex: Controller to SD Memory Card for Sysmac Studio operation 0201 hex: Controller to computer Attached Information 2: Error Details 0001 hex: An SD Memory Card is not inserted. 0002 hex: The SD Memory Card is faulty, the format of the SD Memory Card is not correct, or the SD Memory Card is not the correct type of card. 0204 hex: SD Memory Card backup is prohibited. 0205 hex: Another backup operation is in progress. 0206 hex: Synchronization, online editing, or the Clear All Memory operation is in progress. 0207 hex: A prohibited character is used in the directory name that is specified in the system-defined variable. 0401 hex: The backup was canceled by the user. 0501 hex: The online connection with the Sysmac Studio was disconnected. Precautions/ Remarks 5-2 Troubleshooting 0003 hex: The SD Memory Card is write protected. None 5 5-2-4 Error Descriptions NX-series CPU Unit Hardware User’s Manual (W535) 5 - 51 5 Troubleshooting Event name Backup Failed Event code 102A 0000 hex Meaning The backup operation ended in an error. Source PLC Function Module Source details None Detection timing During backup operation Error attributes Level Observation Recovery --- Log category System Effects User program Continues. Operation Not affected. System-defined variables Variable Data type Name None --- --- Cause and correction Assumed cause Correction Prevention The capacity of the SD Memory Card is insufficient. Replace the SD Memory Card for one with sufficient available space. Use an SD Memory Card that has sufficient available space. It was not possible to save the data that was specified for backup. Perform the backup operation again when no data write operation to the CPU Unit is in progress. Do not write to the CPU Unit when a backup operation is in progress. The SD Memory Card was removed during a backup operation. Insert an SD Memory Card. Insert an SD Memory Card. Failed to back up Unit or slave. Refer to the corrections for the following events: CJ-series Unit Backup Failed (102D0000 hex) or EtherCAT Slave Backup Failed (102F0000 hex). Refer to the prevention information for the following events: CJ-series Unit Backup Failed (102D0000 hex) or EtherCAT Slave Backup Failed (102F0000 hex). The backup was canceled by the user. None None Execution of the Save Cam Table instruction or changing the CPU Unit name is in progress. Perform the operation after execution of the Save Cam Table instruction or changing the CPU Unit name is completed. Do not perform a backup during execution of the Save Cam Table instruction or while changing the CPU Unit name. The online connection with the Sysmac Studio was disconnected. Check the cable connections. Go offline and then go back online and execute the backup again. Check the cable to see if it is disconnected or broken. Make sure the cable is connected properly. It was not possible to save the data that was specified for backup to the computer. Increase the available space on the hard disk on the computer. Make sure there is sufficient space available on the hard disk before you perform a backup. The SD Memory Card is damaged. If none of the above causes applies, replace the SD Memory Card. Do not remove the SD Memory Card or turn OFF the power supply while the SD BUSY indicator is lit. Replace the SD Memory Card periodically according to the write life of the SD Memory Card. Attached information Attached information 1: Operation type 0101 hex: Controller to SD Memory Card for switch operation on front of CPU Unit 0102 hex: Controller to SD Memory Card for system variable operation 0103 hex: Controller to SD Memory Card for Sysmac Studio operation 0201 hex: Controller to computer Attached Information 2: Error Details 0001 hex: The SD Memory Card was removed. 0005 hex: There is not sufficient space available on the SD Memory Card. 0206 hex: Execution of the Save Cam Table instruction or changing the CPU Unit name is in progress. 0302 hex: Saving the backup data failed or the SD Memory Card is faulty. 0304 hex: The Unit or slave could not be backed up. 0401 hex: The backup was canceled by the user. 0501 hex: The online connection with the Sysmac Studio was disconnected. 0502 hex: It was not possible to save the data that was specified for backup to the computer. Precautions/ Remarks 5 - 52 None NX-series CPU Unit Hardware User’s Manual (W535) 5 Troubleshooting Event name Restore Operation Failed to Start Meaning An error was detected in pre-execution checks for a restore operation. Source PLC Function Module Source details None Detection timing When restoring data is specified by the user Error attributes Level Observation Recovery --- Log category System Effects User program --- Operation Not affected. System-defined variables Cause and correction Event code 102B 0000 hex Variable Data type Name None --- --Prevention Insert an SD Memory Card. The SD Memory Card type is not correct. Replace the SD Memory Card with an SD or SDHC card. Use an SD or SDHC card. The format of the SD Memory Card is not correct. Format the SD Memory Card with the Sysmac Studio and then place the backup files on it. There are no backup files on the SD Memory Card. Place the backup files in the specified folder on the SD Memory Card. Use a formatted SD Memory Card and place the backup files on it. Also, do not remove the SD Memory Card or turn OFF the power supply while the SD BUSY indicator is lit. Either the backup files on the SD Memory Card are corrupted or required data is not in the backup files on the SD Memory Card. Create the backup files again. The unit version of the CPU Unit to which to restore the files is older than the unit version of the backup files on the SD Memory Card. Replace the CPU Unit with a CPU Unit that has a unit version that is the same as or newer than the unit version of the CPU Unit that was used to create the backup files. Or, specify backup files with the correct unit version for the CPU Unit. Make sure that the unit version of the CPU Unit and the unit version of the backup files are compatible. The model of the CPU Unit to which to restore the files is not the same as the model of the CPU Unit of the backup files on the SD Memory Card. Replace the CPU Unit with a CPU Unit that has the same model as the CPU Unit that was used to create the backup files. Or, specify backup files with the correct model for the CPU Unit. Make sure that the model of the CPU Unit is the same as the model of the CPU Unit that was used to create the backup files. Recovery was executed for the SD Memory Card. If there are no backup files or no restore command file in the specified folder on the SD Memory Card, place the files in the folder again. None The CPU Unit is write-protected. If you use the restore function, select the Do not use Option for the Write protection at startup setting of the CPU Unit. If you use the restore function, select the Do not use Option for the Write protection at startup setting of the CPU Unit. The settings in the restore command file (RestoreCommand.ini) are not correct. Make sure that the required files are set to “Yes” in the restore command file. Make sure that the required files are set to “Yes” in the restore command file. A backup operation is in progress. Wait for the backup operation to end and then perform the restore operation again. Do not attempt to perform a restore operation during a backup operation. Synchronization, online editing, or the Clear All Memory operation is in progress. Wait for the synchronization, online editing, or the Clear All Memory operation to end and then perform the restore operation again. Do not attempt to perform a restore operation during a synchronization, online editing, or the Clear All Memory operation. The online connection with the Sysmac Studio was disconnected. Check the cable connections. Go offline and then go back online and execute the backup again. Check the cable to see if it is disconnected or broken. Make sure the cable is connected properly. Reading the data for restoration failed because the SD Memory Card is faulty or not formatted correctly. Perform the same corrective measures as for when the format of the SD Memory Card is not correct or the SD Memory Card is damaged. Perform the same preventive measures as for the following events: SD Memory Card Invalid Format or Faulty SD Memory Card. NX-series CPU Unit Hardware User’s Manual (W535) 5 - 53 5 5-2-4 Error Descriptions Correction Insert an SD Memory Card. 5-2 Troubleshooting Assumed cause An SD Memory Card is not inserted. 5 Troubleshooting Cause and correction Attached information The SD Memory Card is damaged. If none of the above causes applies, replace the SD Memory Card. Do not remove the SD Memory Card or turn OFF the power supply while the SD BUSY indicator is lit. Replace the SD Memory Card periodically according to the write life of the SD Memory Card. The database connection service version of the CPU Unit to which to restore the files is older than the database connection service version of the backup files on the SD Memory Card. Replace the CPU Unit with a CPU Unit that has a database connection service version that is the same as or newer than the database connection service version of the CPU Unit that was used to create the backup files. Or, specify backup files with the correct database connection service version for the CPU Unit. Make sure that the database connection service version of the CPU Unit and the database connection service version of the backup files are compatible. The robot version of the CPU Unit to which to restore the files is older than the robot version of the backup files on the SD Memory Card. Replace the CPU Unit with a CPU Unit that has a robot version that is the same as or newer than the robot version of the CPU Unit that was used to create the backup files. Or, specify backup files with the correct robot version for the CPU Unit. Make sure that the robot version of the CPU Unit and the robot version of the backup files are compatible. Attached information 1: Operation type 0101 hex: SD Memory Card to Controller for switch operation on front of CPU Unit 0201 hex: Computer to Controller Attached Information 2: Error Details 0001 hex: An SD Memory Card is not inserted. 0002 hex: The SD Memory Card is faulty, the format of the SD Memory Card is not correct, or the SD Memory Card is not the correct type of card. 0004 hex: Recovery was executed for the SD Memory Card. 0102 hex: There are no backup files. 0103 hex: The backup files are corrupted. 0104 hex: The contents of the restore command file are not correct. 0105 hex: The required transfer data is not in the backup file. 0201 hex: The unit version of the CPU Unit is old. 0202 hex: The model numbers of the CPU Unit are not the same. 0203 hex: The CPU Unit is write-protected. 0205 hex: Another backup operation is in progress. 0206 hex: Synchronization, online editing, or the Clear All Memory operation is in progress. 0211 hex: The database connection service or robot version of the CPU Unit is old. 0301 hex: Reading data for restoration failed or the SD Memory Card is faulty. 0501 hex: The online connection with the Sysmac Studio was disconnected. Precautions/ Remarks 5 - 54 None NX-series CPU Unit Hardware User’s Manual (W535) 5 Troubleshooting Meaning The restore operation ended in an error. Source PLC Function Module Error attributes Level Effects User program System-defined variables Variable Data type Name None --- --- Assumed cause Correction Prevention It was not possible to read the data to restore. Format the SD Memory Card with the Sysmac Studio and then place the backup files on it. Do not remove the SD Memory Card or turn OFF the power supply while the SD BUSY indicator is lit. Replace the SD Memory Card periodically according to the write life of the SD Memory Card. The SD Memory Card was removed during a restore operation. Insert an SD Memory Card that contains the backup files, and then execute the restore operation again. Do not remove the SD Memory Card during the restore operation. Failed to restore Unit or slave. Refer to the corrections for the following events: CJ-series Unit Restore Operation Failed (102E0000 hex) or EtherCAT Slave Restore Operation Failed (10300000 hex). Refer to the prevention information for the following events: CJ-series Unit Restore Operation Failed (102E0000 hex) or EtherCAT Slave Restore Operation Failed (10300000 hex). The SD Memory Card is damaged. If none of the above causes applies, replace the SD Memory Card. Do not remove the SD Memory Card or turn OFF the power supply while the SD BUSY indicator is lit. Replace the SD Memory Card periodically according to the write life of the SD Memory Card. Cause and correction Attached information Event code 102C0000 hex Source details None Detection timing During restore operation Observation Recovery --- Log category System --- Operation Not affected. Attached information 1: Operation type 0101 hex: SD Memory Card to Controller for switch operation on front of CPU Unit 0201 hex: Computer to Controller Attached Information 2: Error Details 0001 hex: The SD Memory Card was removed. 0102 hex: There are no backup files. 0103 hex: The backup files are corrupted. 0301 hex: Reading data for restoration failed or the SD Memory Card is faulty. 0303 hex: The Unit or slave could not be restored. Precautions/ Remarks None NX-series CPU Unit Hardware User’s Manual (W535) 5 - 55 5 5-2-4 Error Descriptions Restore Operation Failed 5-2 Troubleshooting Event name 5 Troubleshooting Event name PLC System Information Event code 40140000 hex Meaning This event provides internal information from the PLC Function Module. Source PLC Function Module Source details None Detection timing Continuously Error attributes Level Observation Recovery --- Log category System Effects User program Continues. Operation Operation is not affected. System-defined variables Variable Data type Name None --- --- Cause and correction Assumed cause Correction Prevention This event provides internal information from the PLC Function Module. It is recorded to provide additional information for another event. --- --- Attached information Attached information 1: System information Attached Information 2: System information Attached information 3: System information Attached information 4: System information Precautions/ Remarks None Event name Safe Mode Meaning The Controller started in Safe Mode. Source PLC Function Module Source details Error attributes Level Observation Effects User program Stops. System-defined variables Variable Data type Name None --- --- Cause and correction Assumed cause Correction Prevention The power supply was turned ON to the Controller when Safe Mode was set on the DIP switch on the CPU Unit. --- --- Attached information None Precautions/ Remarks If the Controller is started when the CPU Unit is in Safe Mode, the CPU Unit will start in PROGRAM mode even if the startup mode is set to RUN mode. 5 - 56 Event code 40170000 hex None Detection timing At power ON or Controller reset Recovery --- Log category System Operation --- NX-series CPU Unit Hardware User’s Manual (W535) 5 Troubleshooting Event name NX Message Communications Error Meaning An error has occurred in message communications. Source PLC Function Module Event code 80230000 hex Source details None Detection timing During NX message communications Log category System EtherCAT Master Function Module EtherNet/IP Function Module Level Observation Recovery --- Effects User program Continues. Operation --- System-defined variables Variable Data type Name None --- --- Assumed cause Correction Prevention The communications cable is broken. Check the communications cable and replace it if it is broken. Check the communications cable to see if it is operating properly. The communications cable connector is disconnected. Reconnect the connector and make sure it is mated correctly. Make sure the communications cable is connected properly. The NX message communications load is high. Reduce the number of times that instructions are used to send NX messages. Or, increase the value of the TimeOut input variable to the instruction. If more than one copy of the Sysmac Studio is connected, reduce the frequency of simultaneous operations. Reduce the number of times that instructions are used to send NX messages. Or, increase the value of the TimeOut input variable to the instruction. If more than one copy of the Sysmac Studio is connected, reduce the frequency of simultaneous operations. Cause and correction Attached information Attached information 1: System information 5-2 Troubleshooting Error attributes 5 Attached Information 2: Type of communications 0: NX bus 5-2-4 Error Descriptions 1: EtherCAT 65,535: Unit internal communications (routing) Precautions/ Remarks None Event name PLC System Information Meaning This event provides internal information from the PLC Function Module. Source PLC Function Module Source details None Detection timing Continuously Error attributes Level Information Recovery --- Log category System Effects User program Continues. Operation Operation is not affected. System-defined variables Variable Data type Name None --- --- Assumed cause Correction Prevention This event provides internal information from the PLC Function Module. It is recorded to provide additional information for another event. --- --- Cause and correction Event code Attached information Attached information 1: System information Attached Information 2: System information Attached information 3: System information Attached information 4: System information Precautions/ Remarks None NX-series CPU Unit Hardware User’s Manual (W535) 40150000 hex 5 - 57 5 Troubleshooting Event name PLC System Information Event code 44430000 hex Meaning This event provides internal information from the PLC Function Module. Source PLC Function Module Source details None Detection timing Continuously Error attributes Level Information Recovery --- Log category System Effects User program Continues. Operation Operation is not affected. System-defined variables Variable Data type Name None --- --- Cause and correction Assumed cause Correction Prevention This event provides internal information from the PLC Function Module. It is recorded to provide additional information for another event. --- --- Attached information Attached information 1: System information Attached Information 2: System information Attached information 3: System information Attached information 4: System information Precautions/ Remarks None Event name Clock Changed Meaning The clock time was changed. Source PLC Function Module Error attributes Level Effects User program System-defined variables Variable Data type Name _CurrentTime DATE_AND_TIME System Time Cause and correction Assumed cause Correction Prevention The clock time was changed. --- --- Attached information Attached information 1: Time before change Precautions/ Remarks Clock changes by the Set Time instruction (SetTime) are not recorded in the event log. Event name Time Zone Changed Event code 90010000 hex Source details None Detection timing Commands from user Information Recovery --- Log category Access Continues. Operation Not affected. The time stamp for this event will be for the time after the change. Event code 90020000 hex Meaning The time zone was changed. Source PLC Function Module Source details None Detection timing When downloading Error attributes Level Information Recovery --- Log category Access Effects User program Continues. Operation Not affected. System-defined variables Variable _CurrentTime DATE_AND_TIME System Time Cause and correction Assumed cause Correction Prevention The time zone was changed. --- --- Attached information None Precautions/ Remarks None 5 - 58 Data type Name NX-series CPU Unit Hardware User’s Manual (W535) 5 Troubleshooting Event name User Program/Controller Configurations and Setup Downloaded Meaning The user program and the Controller configurations and setup were downloaded. Source PLC Function Module Source details None Detection timing During user program/Controller configurations and setup download Error attributes Level Information Recovery --- Log category Access Effects User program Continues. Operation Operation starts according to the user program and the Controller setup data that were downloaded. System-defined variables Attached information 90050000 hex Variable Data type Name None --- --- Assumed cause Correction Prevention The user program and the Controller configurations and setup were downloaded. --- --- 5-2 Troubleshooting Cause and correction Event code Attached Information 1: Connection method 1: Direct USB connection 2: Direct Ethernet connection 3: Remote USB connection or Ethernet hub connection Attached Information 2: Connecting IP address, Connection through proxy: Proxy IP address (When attached information 1 is 2 or 3) Precautions/ Remarks 5 None Online Edits Transferred Meaning The user program was edited online. Source PLC Function Module Error attributes Level Effects User program System-defined variables Cause and correction Attached information Event code 90070000 hex Source details None Detection timing When transferring online edits is started Information Recovery --- Log category Access Continues. Operation Operation is performed according to the changed user program. Variable Data type Name None --- --- Assumed cause Correction Prevention The user program was edited online and the edits were transferred to the Controller. --- --- Attached Information 1: Connection method 1: Direct USB connection 2: Direct Ethernet connection 3: Remote USB connection or Ethernet hub connection Attached Information 2: Connecting IP address, Connection through proxy: Proxy IP address (When attached information 1 is 2 or 3) Precautions/ Remarks None NX-series CPU Unit Hardware User’s Manual (W535) 5 - 59 5-2-4 Error Descriptions Event name 5 Troubleshooting Event name Variable Changed to TRUE with Forced Refreshing Event code 90080000 hex Meaning Changing a variable to TRUE with forced refreshing was specified. Source PLC Function Module Source details None Detection timing Commands from user Error attributes Level Information Recovery --- Log category Access Effects User program Continues. Operation Operation is performed according to the forced refreshing values. System-defined variables Variable Data type Name None --- --- Cause and correction Assumed cause Correction Prevention Changing a variable to TRUE with forced refreshing was specified by the user. --- --- Attached information None Precautions/ Remarks None Event name Variable Changed to FALSE with Forced Refreshing Meaning Changing a variable to FALSE with forced refreshing was specified. Source PLC Function Module Source details None Detection timing Commands from user Error attributes Level Information Recovery --- Log category Access Effects User program Continues. Operation Operation is performed according to the forced refreshing values. System-defined variables Variable Data type Name None --- --- Cause and correction Assumed cause Correction Prevention Changing a variable to FALSE with forced refreshing was specified by the user. --- --- Attached information None Precautions/ Remarks None Event name All Forced Refreshing Cleared Meaning Clearing all forced refreshing values was specified. Source PLC Function Module Error attributes Level Effects User program System-defined variables Variable Data type Name None --- --- Cause and correction Assumed cause Correction Prevention Clearing all forced refreshing values was specified by the user. --- --- Attached information None Precautions/ Remarks None 5 - 60 Event code 90090000 hex Event code 900A 0000 hex Source details None Detection timing Commands from user Information Recovery --- Log category Access Continues. Operation Forced refreshing values are all cleared and operation is performed according to the user program. NX-series CPU Unit Hardware User’s Manual (W535) 5 Troubleshooting Event name Memory All Cleared Meaning All of memory was cleared. Source PLC Function Module Error attributes Level Effects User program System-defined variables Variable Data type Name None --- --- Assumed cause Correction Prevention A user with Administrator rights cleared all of the memory. --- --- Cause and correction None Precautions/ Remarks None 900B 0000 hex Source details None Detection timing Commands from user Information Recovery --- Log category Access --- Operation Operation returns to the factory state. Event name Event Log Cleared Meaning The event log was cleared. Source PLC Function Module Error attributes Level Effects User program System-defined variables Variable Data type Name None --- --- 900C0000 hex Source details None Detection timing Commands from user Information Recovery --- Log category Access Continues. Operation Not affected. 5 Assumed cause Correction Prevention The event log was cleared by the user. --- --- Attached information Attached information 1: Cleared events 0: 1: 2: 100: Precautions/ Remarks None All log categories were cleared The system event log was cleared. The access event log was cleared. The user-defined event log was cleared. Event name Automatic Transfer Completed Meaning The automatic transfer was completed. Source PLC Function Module Error attributes Level Effects User program System-defined variables Variable Data type Name None --- --- Assumed cause Correction Prevention The automatic transfer was completed. --- --- Cause and correction Attached information None Precautions/ Remarks None 5-2-4 Error Descriptions Cause and correction Event code Event code 900F0000 hex Source details None Detection timing At power ON Information Recovery --- Log category System Continues. Operation Operation starts according to the Controller Configurations and Setup data that was automatically transferred. NX-series CPU Unit Hardware User’s Manual (W535) 5-2 Troubleshooting Attached information Event code 5 - 61 5 Troubleshooting Event name Power Turned ON Event code 90110000 hex Meaning The power supply was turned ON. Source PLC Function Module Source details None Detection timing At power ON Error attributes Level Information Recovery --- Log category System Effects User program ---- Operation Operation starts. System-defined variables Variable Data type Name None --- --- Cause and correction Assumed cause Correction Prevention The power supply was turned ON. --- --- Attached information None Precautions/ Remarks None Event name Power Interrupted Event code 90120000 hex Meaning The power supply was interrupted. Source PLC Function Module Source details None Detection timing At power interruption Error attributes Level Information Recovery --- Log category System Effects User program Stops. Operation All operations stops. System-defined variables Variable Data type Name None --- --- Cause and correction Assumed cause Correction Prevention The power supply was interrupted. --- --- Attached information None Precautions/ Remarks None Event name Operation Started Meaning Operation was started. Source PLC Function Module Error attributes Level Effects User program System-defined variables Variable Data type Name None --- --- Cause and correction Assumed cause Correction Prevention A command to start operation was received. --- --- Attached information None Precautions/ Remarks None 5 - 62 Event code 90130000 hex Source details None Detection timing When changing to RUN mode Information Recovery --- Log category System Starts. Operation User program execution starts. NX-series CPU Unit Hardware User’s Manual (W535) 5 Troubleshooting Event name Operation Stopped Meaning Operation was stopped. Source PLC Function Module Error attributes Level Effects User program System-defined variables Cause and correction Event code 90140000 hex Source details None Detection timing When changing to PROGRAM mode Information Recovery --- Log category System Stops. Operation User program execution stops. Variable Data type Name None --- --- Assumed cause Correction Prevention A command to stop operation was received. --- --- None Precautions/ Remarks None Event name Reset Executed Meaning A reset was executed. Source PLC Function Module Error attributes Level Effects User program System-defined variables 90150000 hex Source details None Detection timing Commands from user Information Recovery --- Log category Access --- Operation Operation is started after a reset is executed. Variable Data type Name None --- --- Assumed cause Correction Prevention A reset command was received. --- --- Attached information None Precautions/ Remarks None Event name User Program Execution ID Write Meaning The user program execution ID was set or changed in the CPU Unit. Source PLC Function Module Source details None Detection timing When downloading Error attributes Level Information Recovery --- Log category Access Effects User program Continues. Operation Not affected. System-defined variables Cause and correction Event code 5 5-2-4 Error Descriptions Cause and correction Event code 90160000 hex Variable Data type Name None --- --- Assumed cause Correction Prevention A user with Administrator rights changed the user program execution ID that is set in the CPU Unit. --- --- Attached information None Precautions/ Remarks None NX-series CPU Unit Hardware User’s Manual (W535) 5-2 Troubleshooting Attached information 5 - 63 5 Troubleshooting Event name All Controller Errors Cleared Event code 90180000 hex Meaning All current errors were cleared. Source PLC Function Module Source details None Detection timing Commands from user Error attributes Level Information Recovery --- Log category Access Effects User program Continues. Operation Clearing all errors for which the causes have been removed. System-defined variables Variable Data type Name None --- --- Cause and correction Assumed cause Correction Prevention The user cleared all current errors. --- --- Attached information None Precautions/ Remarks None Event name Forced Refreshing Cleared Meaning Clearing a forced refreshing value was specified. Source PLC Function Module Error attributes Level Effects User program System-defined variables Variable Data type Name None --- --- Cause and correction Assumed cause Correction Prevention Clearing a forced refreshing value was specified by the user. --- --- Attached information None Precautions/ Remarks None Event name Backup Started Event code 90190000 hex Source details None Detection timing Commands from user Information Recovery --- Log category Access Continues. Operation Forced refreshing values are cleared and operation is performed according to the user program. Event code 901A 0000 hex Meaning A backup operation was started. Source PLC Function Module Source details None Detection timing At start of backup operation Error attributes Level Information Recovery --- Log category System Effects User program Continues. Operation Not affected. System-defined variables Variable Data type Name None --- --- Cause and correction Assumed cause Correction Prevention A backup operation was started. --- --- Attached information Attached information 1: Operation type 0101 hex: Controller to SD Memory Card for switch operation on front of CPU Unit 0102 hex: Controller to SD Memory Card for system variable operation 0103 hex: Controller to SD Memory Card for Sysmac Studio operation 0201 hex: Controller to computer Precautions/ Remarks 5 - 64 None NX-series CPU Unit Hardware User’s Manual (W535) 5 Troubleshooting Event name Backup Completed Meaning The backup operation ended normally. Source PLC Function Module Error attributes Level Effects User program System-defined variables Variable Data type Name None --- --- Assumed cause Correction Prevention The backup operation ended normally. --- --- Cause and correction Attached information Event code 901B 0000 hex Source details None Detection timing At end of normal backup operation Information Recovery --- Log category System Continues. Operation Not affected. Attached information 1: Operation type 0101 hex: Controller to SD Memory Card for switch operation on front of CPU Unit 5-2 Troubleshooting 0102 hex: Controller to SD Memory Card for system variable operation 0103 hex: Controller to SD Memory Card for Sysmac Studio operation 0201 hex: Controller to computer Precautions/ Remarks None Event name Restore Operation Started Meaning A restore operation started. Source PLC Function Module Error attributes Level Effects User program System-defined variables Variable Data type Name None --- --- Assumed cause Correction Prevention A restore operation started. --- --- 901C0000 hex Source details None Detection timing At start of restore operation Information Recovery --- Log category System --- Operation Not affected. Attached information Attached information 1: Operation type Precautions/ Remarks None 0101 hex: SD Memory Card to Controller for switch operation on front of CPU Unit 0201 hex: Computer to Controller NX-series CPU Unit Hardware User’s Manual (W535) 5 5-2-4 Error Descriptions Cause and correction Event code 5 - 65 5 Troubleshooting Event name Restore Operation Completed Event code 901D0000 hex Meaning The restore operation ended normally. Source PLC Function Module Source details None Detection timing At end of normal restore operation Error attributes Level Information Recovery --- Log category System Effects User program --- Operation Operation does not start after the completion of a restore operation. To start operation according to the restored user program and settings, turn OFF the power supply to the Controller, turn OFF all pins on the DIP switch on the CPU Unit, and then turn ON the power supply again. System-defined variables Variable Data type Name None --- --- Cause and correction Assumed cause Correction Prevention The restore operation ended normally. --- --- Attached information Attached information 1: Operation type 0101 hex: SD Memory Card to Controller for switch operation on front of CPU Unit 0201 hex: Computer to Controller Precautions/ Remarks 5 - 66 None NX-series CPU Unit Hardware User’s Manual (W535) Inspection and Maintenance This section describes the required inspections and maintenance. It also describes the service lives and replacement procedures for the Battery and Power Supply Units. 6-1 Cleaning and Maintenance . . . . . . . . . . . . . . . . . . . . . . . . . . . . . . . . . . . . . . 6-2 6-1-1 6-1-2 6-1-3 Cleaning . . . . . . . . . . . . . . . . . . . . . . . . . . . . . . . . . . . . . . . . . . . . . . . . . . . . . . 6-2 Periodic Inspections . . . . . . . . . . . . . . . . . . . . . . . . . . . . . . . . . . . . . . . . . . . . . 6-2 Unit Replacement Precautions . . . . . . . . . . . . . . . . . . . . . . . . . . . . . . . . . . . . . 6-5 6-2 Replacing the Battery . . . . . . . . . . . . . . . . . . . . . . . . . . . . . . . . . . . . . . . . . . 6-6 6-2-1 6-2-2 Battery Replacement . . . . . . . . . . . . . . . . . . . . . . . . . . . . . . . . . . . . . . . . . . . . 6-6 Operation without a Battery . . . . . . . . . . . . . . . . . . . . . . . . . . . . . . . . . . . . . . 6-10 6-3 Replacing the Fan Unit . . . . . . . . . . . . . . . . . . . . . . . . . . . . . . . . . . . . . . . . 6-11 6-3-1 6-3-2 6-3-3 6-3-4 Purpose of Attaching the Fan Unit . . . . . . . . . . . . . . . . . . . . . . . . . . . . . . . . . .6-11 Fan Unit Replacement Period . . . . . . . . . . . . . . . . . . . . . . . . . . . . . . . . . . . . . .6-11 Fan Unit Used for Replacement . . . . . . . . . . . . . . . . . . . . . . . . . . . . . . . . . . . .6-11 Procedure of Fan Unit Replacement . . . . . . . . . . . . . . . . . . . . . . . . . . . . . . . 6-12 NX-series CPU Unit Hardware User’s Manual (W535) 6-1 6 6 Inspection and Maintenance 6-1 Cleaning and Maintenance This section describes daily maintenance and the cleaning and inspection methods. Inspect the NX-series CPU Unit daily or periodically in order to keep it in optimal operating condition. 6-1-1 Cleaning Perform the following cleaning procedures periodically to ensure the NX-series CPU Unit is maintained in the best operating condition. Always turn OFF the power supply to the Controller before performing the cleaning procedures. • Wipe off the dust or dirt on the front, top or bottom of the Unit over with a dry, soft cloth when doing daily cleaning. • If dust or dirt remains even after wiping with a soft, dry cloth, wipe over with a cloth that has been wet with a sufficiently diluted detergent (2%) and wrung dry. • Perform the following procedure when you clean a Fan Unit used in a dusty environment. a) Remove the Fan Unit, and clean it with a dry, soft cloth. Do not blow the fan blade strongly with tools such as a gas duster. Doing so may cause a Fan Unit failure. b) Remove the dust on the heatsink inside the CPU Unit with tools such as an antistatic gas duster. Do not touch the inside of the CPU Unit. • A smudge may remain on the Unit from gum, vinyl, or tape that was left on for a long time. Remove the smudge when cleaning. Precautions for Safe Use • Always turn OFF the power supply to the Controller before attaching or removing the Fan Unit. The Power Supply Unit may continue to supply power to the rest of the Controller for a few seconds after the power supply turns OFF. The PWR indicator is lit during this time. Confirm that the PWR indicator is not lit before you perform any of the above. • Do not touch the heatsink inside the CPU Unit immediately after turning OFF the power supply. Doing so may result in burn injury. Precautions for Correct Use • Never use volatile solvents, such as paint thinner, benzene, or chemical wipes. • Do not touch the connectors. 6-1-2 Periodic Inspections Although the major components in NX-series Controllers have an extremely long life time, they can deteriorate under improper environmental conditions. Periodic inspections are thus required to ensure that the required conditions are being kept. Inspection is recommended at least once every six months to a year, but more frequent inspections may be necessary depending on the severe environments. Take immediate steps to correct the situation if any of the conditions in the following table are not met. 6-2 NX-series CPU Unit Hardware User’s Manual (W535) 6 Inspection and Maintenance Periodic Inspection Items Check for voltage fluctuations at the power supply terminals. The voltage must be within the allowable voltage fluctuation range. 2 I/O power supply Check for voltage fluctuations at the I/O terminals. Voltages must be within specifications for each Unit. 3 Ambient environment Check the ambient temperature. 0 to 55°C 1 Inspection details (Inside the control panel if the Controller is in a control panel.) Check the ambient humidity. (Inside the control panel if the Controller is in a control panel.) Check for noise sources near the Controller. 4 Installation and wiring Check that each Unit is connected and locked to the next Unit securely. Check that cable connectors are fully inserted and locked. Check for loose screws in external wiring. Check crimp connectors in external wiring. Check for damaged external wiring cables. NX-series CPU Unit Hardware User’s Manual (W535) Relative humidity must be 10% to 95% with no condensation. Not in direct sunlight Correction Use a voltage tester to check the power supply at the terminals. Take necessary steps to bring voltage of the supplied power to within the allowable voltage fluctuation range. Use a voltage tester to check the I/O power supply at the terminals. Take necessary steps to bring voltage fluctuations within limits. Use a thermometer to check the temperature and ensure that the ambient temperature remains within the allowed range of 0 to 55°C. Use a hygrometer to check the humidity and ensure that the ambient operating humidity remains between 10% and 95%. Make sure that condensation does not occur due to rapid changes in temperature. Protect the Controller if necessary. No accumulation Clean and protect the Controller if necessary. No spray Clean and protect the Controller if necessary. No corrosive or flammable gases Check by smell or use a gas sensor. Vibration resistance and shock resistance must be within specifications. No significant noise sources Install cushioning or shock absorbing equipment if necessary. No looseness No looseness No looseness Adequate spacing between connectors No visible damage Either separate the Controller and noise source or protect the Controller. Press the connectors together completely and lock them with the sliders. Correct any improperly installed connectors. Tighten loose screws with a Phillips-head screwdriver. Check visually and adjust if necessary. Check visually and replace cables if necessary. 6-3 6 6-1-2 Periodic Inspections Check that the Controller is not in direct sunlight. Check for accumulation of dirt, dust, salt, metal powder, etc. Check for water, oil, or chemical sprays hitting the Controller. Check for corrosive or flammable gases in the area of the Controller. Check the level of vibration or shock. Criteria 6-1 Cleaning and Maintenance Inspection item External power supply No. 6 Inspection and Maintenance No. 5 Inspection item User-serviceable parts Inspection details Battery Set CJ1W-BAT01 Criteria Correction Service life expectancy is 5 years at 25°C. Replace the battery when its service life has passed even if a battery error has not occurred. (Battery life depends upon the model, and ambient conditions.) Refer to 6-2-1 Battery Replacement on page 6-6 for the service life of individual model. Replace the Fan Unit when its service life has passed even if the fan speed has not decreased. Refer to 6-3-3 Fan Unit Used for Replacement on page 6-11 for the service life, and 6-3-4 Procedure of Fan Unit Replacement on page 6-12 for how to replace the Fan Unit. Check whether the battery has reached its service life. Depending on model and ambient temperature. Check whether the NX-FAN01 Fan Unit has reached its service life, or whether it is rotated during power supply. Service life expectancy is 10 years at 55 °C. Tools Required for Inspections z Required Tools • Flat-blade screwdriver • Phillips screwdriver • Voltage tester or digital voltmeter • Industrial alcohol and pure cotton cloth • Antistatic gas duster z Tools Required Occasionally • Oscilloscope • Thermometer and hygrometer 6-4 NX-series CPU Unit Hardware User’s Manual (W535) 6 Inspection and Maintenance 6-1-3 Unit Replacement Precautions Check the following after replacing any faulty Unit. • Do not replace a Unit until the power is turned OFF. • Check the new Unit to make sure that there are no errors. • If you return a faulty Unit for repair, describe the problem in as much detail as possible, enclose this description with the Unit before returning it. • For poor contact, take a clean cotton cloth, soak the cloth in industrial alcohol, and carefully wipe the contacts clean. Be sure to remove any lint prior to remounting the Unit. Precautions for Correct Use • The absolute encoder home offsets are backed up with a Battery in the CPU Unit as absolute encoder information. When you change the combination of the CPU Unit and Servomotor, e.g., when you add or replace a Servomotor, define the absolute encoder home again. • If you replace a slave or Unit, refer to operation manual for the slave or Unit for information on the data required for individual slaves or Units and redo the necessary settings. 6-1 Cleaning and Maintenance • Make sure that the required data, including the user program, settings and variables is transferred to a CPU Unit that was replaced and to externally connected devices before restarting operation. Be sure to include the tag data link settings and routing tables, which are stored in the CPU Unit. 6 6-1-3 Unit Replacement Precautions NX-series CPU Unit Hardware User’s Manual (W535) 6-5 6 Inspection and Maintenance 6-2 Replacing the Battery The Battery in the NX-series CPU Unit must be replaced periodically as preventative maintenance. (The Battery is a backup power supply for the CPU Unit’s internal clock and the variables that are retained during power interruptions.) This section describes how to replace the Battery. 6-2-1 Battery Replacement Purpose of the Battery The Battery maintains the CPU Unit internal clock and the variables retained during power interruptions while the main power supply is OFF. If the Battery is not installed or Battery voltage drops too low, the internal clock will stop and the variables that are retained for power interruptions will be lost when the main power supply goes OFF. Battery Service Life and Replacement Period The service life of a Battery is five years, which varies depending on the CPU Unit model, ambient temperature, and power ON time rate. Make a plan to replace the Battery so that the service life of the Battery will not exceed the minimum lifetime under the normal product usage condition. The Battery service life when power ON time rate is 0% (i.e., power OFF) Approx. minimum lifetime [month]*1 Unit model number 25°C 31 NX701- 40°C 17 55°C 10 Reference lifetime [month]*2 25°C 60 *1. The minimum lifetime we warrant is based on the calculation with the worst case values within the specifications for the parts used in the product. *2. The lifetime is based on the calculation with test data of the product. This value is used only for reference because deviation for individual model is not considered. Battery service life (minimum lifetime) of NX701power ON time rate and ambient temperature Service life [month] 60 57 in relation to 55 50 40 40 31 32 32 30 22 Ambient temperature 20 17 18 10 10 13 25°C 40°C 55°C 0 0 6-6 25 50 75 Power ON time rate [%] 100 NX-series CPU Unit Hardware User’s Manual (W535) 6 Inspection and Maintenance Unit model number NX701- Power ON time rate 0% 25% 50% 75% 100% Battery service life (minimum lifetime) [month] 25°C 40°C 55°C 31 17 10 40 22 13 57 32 18 60 55 32 60 60 60 Additional Information The Battery installed at the time of purchase is only for monitoring purpose to test the battery backup function. The Battery is exhausted depending on the period from factory checking to actual operation, thus it may not satisfy specified battery lifetime. If the Controller Setup has been set to detect a low-battery error, the ERROR indicator on the front of the CPU Unit will flash when the battery is nearly discharged. If the ERROR indicator flashes, connect the Sysmac Studio, and then check the CPU Unit’s Battery connection if the Sysmac Studio shows a Low Battery Voltage, Battery-backup Memory Check Error, or Clock Oscillator Stopped event. If the Battery is properly connected, replace the Battery with a new one as soon as possible. 6-2 Replacing the Battery Low Battery Indicators 6 6-2-1 Battery Replacement Once a low-battery error has been detected, it will take 5 days (at an ambient temperature of 25°C) before the battery fails if power has been supplied at least once a day. Clock data and variables that are retained during power interruptions can be retained by ensuring that the CPU Unit power is not turned OFF until the Battery has been replaced. Precautions for Correct Use The Battery will lose its charge faster at high ambient temperatures. NX-series CPU Unit Hardware User’s Manual (W535) 6-7 6 Inspection and Maintenance z Replacement Battery Use the Battery CJ1W-BAT01 for replacement. Precautions for Correct Use Be sure to install a replacement Battery within two years of the production date shown on the Battery label. Production Date CJ1W-BAT01 15-03 Manufactured in March 2015. Replacement Procedure Use the following procedure to replace the battery. Precautions for Safe Use We recommend replacing the battery with the power OFF to prevent the CPU Unit’s sensitive internal components from being damaged by static electricity. The battery can be replaced without turning OFF the power supply. To do so, always touch a grounded piece of metal to discharge static electricity from your body before starting the procedure. After you replace the Battery, connect the Sysmac Studio and clear the Low Battery Voltage event. Additional Information UL standards require that batteries be replaced by experienced technicians. Always place an experienced technician in charge of battery replacement. 1 Turn OFF the power supply to the Controller. If the CPU Unit has not been ON, turn it ON for at least five minutes and then turn it OFF. Additional Information If power is not turned ON for at least five minutes before replacing the Battery, the capacitor that backs up memory when the battery is removed will not be fully charged and memory may be lost before the new battery is inserted. 6-8 NX-series CPU Unit Hardware User’s Manual (W535) 6 Inspection and Maintenance 2 Replace the battery. (1) Pull the upper side of the right CPU Unit cover forward and remove from the Unit. (2) Draw out the battery from the battery connector and replace a new battery. 6-2 Replacing the Battery 6 Protrusion for placing wires NX-series CPU Unit Hardware User’s Manual (W535) 6-9 6-2-1 Battery Replacement When placing the new battery, hanging battery wires on the protrusion for placing wires will allow for compact storage of wires. 6 Inspection and Maintenance Precautions for Safe Use • Before you replace the Battery, you must first supply power to the Controller for at least 5 minutes, and then you must complete this procedure within 5 minutes at 25°C after turning OFF the power to the CPU Unit to ensure memory backup. • Never short-circuit the battery terminals; never charge the battery; never disassemble the battery; and never heat or incinerate the battery. Doing any of these may cause the battery to leak, heat, ignite, or rupture. • Never use a battery that has been dropped on the floor or otherwise subject to shock. It may leak. • Turn ON the power after replacing the Battery for a CPU Unit that has been unused for a long time. Leaving the CPU Unit unused again without turning ON the power even once after the battery is replaced may result in a shorter battery life. Additional Information The Low Battery Voltage event is cleared automatically the next time the Controller is turned ON after replacing the Battery. 6-2-2 Operation without a Battery The NX-series CPU Units do not support a battery-free operation function such as CJ-series CPU Units. If a Battery is not connected or the Battery voltage is too low, the following operation occurs. • A Low Battery Voltage, Battery-backup Memory Check Error, and Clock Oscillator Stopped events are detected. • The _RetainFail (Power Retention Failure Flag) system-defined variable will be TRUE. z Retaining or Not Retaining Data in the CPU Unit Data in the CPU Unit will be retained or not retained as described in the following table according to whether there is a Battery. Type of data User program Controller Configurations and Setup Event log Clock data Values of variables No Retain attribute Retain attribute Power turned ON Battery No Battery Values before power interruption will be retained by the built-in non-volatile memory. Values before power interruption will be retained. Correct values Values before power interruption will not be retained. Illegal values Initial values*1 Values before power interruption will be retained. Initial values*1 Initial values*1 *1. If the initial value setting is blank, the initial value for the data type is used. For example, the initial value of BOOL data is FALSE and the initial value of integer data is 0. Refer to the NJ/NX-series CPU Unit Software User’s Manual (Cat. No. W501) for details on the initial values. 6 - 10 NX-series CPU Unit Hardware User’s Manual (W535) 6 Inspection and Maintenance 6-3 Replacing the Fan Unit This section describes how to replace the Fan Unit, a part of the NX7-series CPU Unit that allows replacement as preventive maintenance. 6-3-1 Purpose of Attaching the Fan Unit A CPU that is incorporated in an NX7-series CPU Unit requires forced cooling to maintain its performance. A Fan Unit is used to cool the CPU. If the Fan Unit is not mounted, or if rotation of the fan stops or the rotation speed decreases due to a failure or other causes, a Slow Fan error occurs in the Controller. If you continue the operation without taking measures, a CPU Unit Overheat error (a minor fault level Controller error) or a CPU Unit Overheat (Operation Stopped) error may occur. The latter will stop operation of the Controller. Fan Unit Replacement Period The Fan Unit has a high resistance to wear and a long service life that corresponds to the life of an NX7-series CPU Unit. However, an accidental failure may be caused by entry of foreign particles or other factors. The NX7-series CPU Units employ a replaceable Fan Unit that allows preventative maintenance. You need to replace the Fan Unit if the Fan Unit stops or a Slow Fan error occurs and operation is not recovered after you remove the obstacle from the Fan Unit. When you replace the Fan Unit, stop the operation and turn OFF the power supply to the Controller. Fan Unit Used for Replacement Use an NX-FAN01 Fan Unit. The service life of a Fan Unit is 10 years at the ambient temperature of 55°C, and the storage limitation for a Fan Unit that is not energized is 1 year. Select a Fan Unit which was manufactured less than 10 years ago and has been stored for less than a year without being energized. Perform operation check for the Fan Unit before you use it in normal operation. Precautions for Correct Use • Do not use a Fan Unit which was subject to a strong impact, such as dropping on the floor. A damaged bearing may cause a failure. • Perform periodic cleaning procedures and remove dust from the Fan Unit. The service life of the Fan Unit may be reduced due to dust. NX-series CPU Unit Hardware User’s Manual (W535) 6 - 11 6 6-3-1 Purpose of Attaching the Fan Unit 6-3-3 6-3 Replacing the Fan Unit 6-3-2 6 Inspection and Maintenance Additional Information The date of manufacturing can be checked on the side of the Fan Unit. DDMYY gives the lot number, and “M” gives the following meaning. 1 to 9: January to September, X: October, Y: November, Z: December DDMYY 6-3-4 Procedure of Fan Unit Replacement Precautions for Safe Use Always turn OFF the power supply to the Controller before replacing the Fan Unit. The Power Supply Unit may continue to supply power to the rest of the Controller for a few seconds after the power supply turns OFF. The PWR indicator is lit during this time. Confirm that the PWR indicator is not lit before you perform any of the above. 1 2 Turn OFF the power supply to the Controller. Remove the Fan Unit while you push back the lever on top of the CPU Unit using a tool such as a flat-blade screwdriver. Precautions for Safe Use Do not touch the heatsink inside the CPU Unit immediately after turning OFF the power supply. Doing so may result in burn injury. 6 - 12 NX-series CPU Unit Hardware User’s Manual (W535) 6 Inspection and Maintenance 3 Attach the new Fan Unit. (1) Put the locating part of the Fan Unit to the locating part on the back of the CPU Unit. 6-3 Replacing the Fan Unit (2) Use the locating part as a supporting point and push the Fan Unit into the CPU Unit. 6 6-3-4 Procedure of Fan Unit Replacement Make sure that the lever is securely locked and there is no lifting-off of the Fan Unit. The power supply connection for the Fan Unit is established when it is attached to the CPU Unit. Wiring is not required. 4 Turn ON the power supply to the Controller and check the operation for about a minute. Make sure that the fan does not generate abnormal noise or vibration, and a Slow Fan error does not occur. NX-series CPU Unit Hardware User’s Manual (W535) 6 - 13 6 Inspection and Maintenance 6 - 14 NX-series CPU Unit Hardware User’s Manual (W535) Appendices The appendices provide the general specifications of the CPU Unit and Unit dimensions. A-1 Specifications . . . . . . . . . . . . . . . . . . . . . . . . . . . . . . . . . . . . . . . . . . . . . . . . . A-2 A-2 Dimensions . . . . . . . . . . . . . . . . . . . . . . . . . . . . . . . . . . . . . . . . . . . . . . . . . . . A-3 A-2-1 A-2-2 A-2-3 A-2-4 NX-series CPU Units . . . . . . . . . . . . . . . . . . . . . . . . . . . . . . . . . . . . . . . . . . . . End Cover . . . . . . . . . . . . . . . . . . . . . . . . . . . . . . . . . . . . . . . . . . . . . . . . . . . . . NX-series Power Supply Units . . . . . . . . . . . . . . . . . . . . . . . . . . . . . . . . . . . . . SD Memory Card . . . . . . . . . . . . . . . . . . . . . . . . . . . . . . . . . . . . . . . . . . . . . . . A-3 A-4 A-4 A-5 A-3 Version Information . . . . . . . . . . . . . . . . . . . . . . . . . . . . . . . . . . . . . . . . . . . . A-6 NX-series CPU Unit Hardware User’s Manual (W535) A-1 A Appendices A-1 Specifications This section gives the specifications of the NX-series CPU Units. Item Enclosure Grounding method Dimensions (height × depth × width) Weight Current consumption Ambient operating temperature Ambient operating humidity Atmosphere Ambient storage temperature Altitude Pollution degree Noise immunity Operating Overvoltage category environment EMC immunity level NX7Mounted in a panel Ground to less than 100 Ω. 100 mm × 100 mm × 132 mm 880 g (including the End Cover) 40 W (including SD Memory Card and End Cover) 0 to 55°C 10% to 95% (with no condensation) Must be free from corrosive gases. -25 to 70°C (excluding battery and Fan Unit) 2,000 m max. 2 or less: Conforms to JIS B 3502 and IEC 61131-2. 2 kV on power supply line (Conforms to IEC 61000-4-4.) Category II: Conforms to JIS B 3502 and IEC 61131-2. Zone B Conforms to IEC 60068-2-6. 5 to 8.4 Hz with 3.5-mm amplitude, 8.4 to 150 Hz, acceleration Vibration resistance Shock resistance Battery Applicable standards*1 Life Model EC Directives cULus Shipbuilding Standards Other than the above. of 9.8 m/s2 100 min each in X, Y, and Z directions (10 sweeps of 10 min each = 100 min total) Conforms to IEC 60068-2-27. 147 m/s2, 3 times in X, Y, and Z directions 2.5 years (at 25°C, Power ON time rate 0% (power OFF)) CJ1W-BAT01 EN61131-2 Listed UL508 and ANSI/ISA 12.12.01 --KC *1. Refer to the OMRON website (http://www.ia.omron.com/) or consult your OMRON representative for the most recent applicable standards for each model. A-2 NX-series CPU Unit Hardware User’s Manual (W535) Appendices A-2 Dimensions Dimensions of the CPU Units are shown as follows. The unit of dimension is millimeter. A-2-1 NX-series CPU Units NX7014.5 RUN ERROR BUSY SHTDWN SD PWR SD BUSY PORT1 EtherNet/IP NET RUN 100 NET ERR LINK/ACT PORT1 EtherNet/IP PORT2 EtherNet/IP NET RUN PORT3 EtherCAT NET RUN NET ERR NET ERR LINK/ACT LINK/ACT A-2 Dimensions PORT2 EtherNet/IP PORT3 EtherCAT 132 100 When a cable is connected (such as a communications cable) A 100 A-2-1 NX-series CPU Units 130 to 155 *1 *2 *1. This is the dimension from the back of the Unit to the communications cables. 130 mm: When an MPS588-C Connector is used. 155 mm: When an XS6G-T421-1 Connector is used. *2. This dimension depends on the specifications of the commercially available USB cable. Check the specifications of the USB cable that is used. NX-series CPU Unit Hardware User’s Manual (W535) A-3 Appendices A-2-2 End Cover 12 1.5 100 1.5 71 A-2-3 NX-series Power Supply Units NX-PA9001 4.5 PWR 100 2.3 A-4 80 100 NX-series CPU Unit Hardware User’s Manual (W535) Appendices NX-PD7001 4.5 PWR 100 2.3 100 SD Memory Card A-2 Dimensions A-2-4 51 A 32±0.1 NX-series CPU Unit Hardware User’s Manual (W535) A-2-4 SD Memory Card 24±0.1 2.1±0.15 A-5 Appendices A-3 Version Information This section describes the relationship between the unit versions of the NX-series CPU Units and the Sysmac Studio versions, and the functions that are supported for each unit version. This section also describes how the unit version of NX-series CPU Units correspond to Sysmac Studio versions. Normally use the corresponding versions. Unit Versions and Corresponding Sysmac Studio Versions This following table gives the relationship between the unit versions of the NX-series CPU Units and the corresponding Sysmac Studio versions. Unit version of CPU Unit Ver.1.10 Corresponding version of Sysmac Studio Ver.1.13 Specifications When Not Using the Sysmac Studio Version That Corresponds to the Unit Version of the CPU Unit The specifications when you do not use the Sysmac Studio version that corresponds to the unit version of the NX-series CPU Unit are given in this section. z Using an Sysmac Studio Version 1.12 or Lower You cannot use an NX-series CPU Unit with Sysmac Studio version 1.12 or lower. A-6 NX-series CPU Unit Hardware User’s Manual (W535) Index I NX-series CPU Unit Hardware User’s Manual (W535) I-1 Index Index A Applicable standards ......................................................A-2 Assumed causes ................................................. 5-13, 5-16 B Basic System Configuration .................................... 1-5, 2-2 Battery ...................................................... 3-3, 3-8, 6-8, A-2 Battery connector ........................................................... 3-3 Battery Replacement Procedure .................................... 6-8 Battery Service Life and Replacement Period ................ 6-6 Battery-backup Memory Check Error ........................... 5-36 Built-in EtherCAT port .....................................1-10, 2-3, 3-3 Built-in EtherNet/IP port ....................................1-9, 2-7, 3-3 BUSY .............................................................................. 3-5 C Checking for errors .................................................. 5-3, 5-8 Cleaning ......................................................................... 6-2 Communications Cable ...........................................2-4, A-3 Configuration Units ......................................................... 2-3 Controller errors ............................................................. 5-5 Controller events ............................................................ 5-4 Controller information ..................................................... 5-5 CPU Module .................................................4-9, 4-16, 4-27 CPU Rack ................................................................ 1-5, 2-3 CPU Unit ................................................................. 2-3, 3-2 CPU Unit Error ............................................................... 5-3 CPU Unit operating status .............................................. 5-2 CPU Unit Overheat ....................................................... 5-35 CPU Unit Reset .............................................................. 5-3 D Daisy chain .......................................................... 4-46, 4-48 DIN Track ...................................................4-14, 4-15, 4-17 DIN Track Contact Plate ...................................... 3-13, 4-36 DIN Track Insulation Spacer ......................................... 4-37 DIN Track mounting hook .............................3-3, 3-13, 4-18 DIP switch ...................................................................... 3-3 DIP Switch Setting Error ............................................... 5-24 Dropout prevention lock ............................................... 3-13 Dropout prevention lock release lever ................. 3-13, 4-28 E Earthing Methods ......................................................... 4-46 Emergency Stop Circuit .................................................. 4-7 End Cover ............................................................. 2-4, 4-20 End Plate ....................................................4-14, 4-15, 4-21 Equipotential bonding system ............................. 4-46, 4-47 ERROR ................................................................... 3-5, 5-2 I-2 Error reset ...................................................................... 5-6 Error status variables ................................................... 5-10 EtherCAT Network Configuration ............................ 1-5, 2-3 EtherCAT Slave .............................................................. 2-4 Event codes ........................................................ 5-13, 5-16 Event levels .................................................................... 5-4 Event log ................................................................. 4-5, 5-6 Event Log Save Error ................................................... 5-49 Event names ....................................................... 5-13, 5-16 F Fail-safe Circuits ............................................................. 4-6 Fan Unit .......................................................... 3-3, 3-8, 4-12 Fatal Errors in the CPU Unit ........................................... 5-3 Functional Grounding .......................................... 4-35, 4-50 G Get EtherCAT Error Status ........................................... 5-10 Get EtherNet/IP Error Status ........................................ 5-10 Get Motion Control Error Status ................................... 5-10 Get PLC Controller Error Status ................................... 5-10 GetECError (Get EtherCAT Error Status) ..................... 5-10 GetEIPError (Get EtherNet/IP Error Status) ................. 5-10 GetMCError (Get Motion Control Error Status) ............ 5-10 GetPLCError (Get PLC Controller Error Status) ........... 5-10 GR .............................................................. 3-14, 4-35, 4-50 Grounding ........................................................... 4-35, 4-46 I ID Information Indication ......................................... 3-3, 3-9 Illegal User Program .................................................... 5-42 Illegal User Program Execution ID ............................... 5-42 Indicator ........................................................... 3-4, 5-2, 5-8 Information ..................................................................... 5-4 Inrush current ............................................................... 3-11 Installation Dimensions ................................................ 4-29 Installation Height ......................................................... 4-30 Installation in Cabinets or Control Panels .................... 4-10 Installation Method in Control Panels ........................... 4-11 Instructions that read error status ................................. 5-10 Interlock Circuits ............................................................. 4-8 Internal Bus Check Error .............................................. 5-24 L LG .............................................................. 3-14, 4-35, 4-50 LINK/ACT ....................................................................... 3-7 Lot number ..................................................................... 3-9 Low Battery Voltage ..................................................... 5-34 NX-series CPU Unit Hardware User’s Manual (W535) Index M MAC addresses ..............................................................3-9 Main Memory Check Error ............................................5-28 Major Fault Level .................................................... 5-4, 5-7 Minor Fault Level ............................................................5-4 N NET ERR ................................................................ 3-7, 5-9 NET RUN ................................................................ 3-6, 3-7 Network Configuration ............................................ 1-6, 2-7 Non-fatal Errors in the CPU Unit .....................................5-4 Non-volatile Memory Data Corrupted ................. 5-27, 5-30 Non-volatile Memory Life Exceeded .............................5-25 Non-volatile Memory Restored or Formatted ................5-26 O Observations ...................................................................5-4 Operating environment .................................................. A-2 Operating Mode at Startup ..............................................4-3 Operating Procedure .....................................................1-12 Operation Status Indicators .............................................3-4 Operation until Operation Ready Status .........................4-2 Order of Powering ...........................................................4-7 Output capacity .............................................................3-11 Outputs turned OFF ........................................................5-6 P Partial Fault Level ...........................................................5-4 Periodic Inspection Items ................................................6-3 Peripheral USB port ........................................................3-3 Power consumption .............................................. 3-11, A-2 Power OFF detection time ..............................................4-3 Power OFF Operation .....................................................4-3 Power ON time rate ................................................ 6-6, A-2 Power supply connector ..................................................3-3 Power Supply Error .........................................................5-3 Power supply input ........................................................3-14 Power Supply Unit ................................................ 2-4, 3-11 Power supply voltage ....................................................3-11 Power Supply Wiring ............................................. 4-7, 4-31 Protective Grounding .......................................... 4-35, 4-50 PWR ...................................................................... 3-13, 5-2 SD BUSY ........................................................................3-5 SD Memory Card ...................................................2-4, 4-23 SD Memory Card Access Power OFF Error .................5-39 SD Memory Card connector ...........................................3-3 SD Memory Card Data Corrupted .................................5-39 SD Memory Card Invalid Format ..................................5-37 SD Memory Card Invalid Type ......................................5-36 SD Memory Card Life Exceeded ..................................5-37 SD Memory Card power supply switch ...........................3-3 SD Memory Card Restored or Formatted .....................5-38 SD PWR .........................................................................3-5 Slider ....................................................................3-13, 4-17 Star earthing ........................................................4-46, 4-47 Startup ............................................................................3-5 Support Software .....................................................1-5, 1-7 Sysmac Studio ..............................................................3-15 System Initialization Error ...............................................5-3 System-defined variables .............................................5-10 T Terminal Block ..............................................................3-14 Troubleshooter ..............................................................5-10 Troubleshooting Function ...............................................5-9 U Unit hookup guides ................................................3-3, 4-20 Unit Version ............................................................ 3-9, A-6 User Program/Controller Configurations and Setup Transfer Error ..................................................5-41 W Wiring Duct ...................................................................4-12 Write Protection Key .....................................................3-10 R Real-Time Clock Failed .................................................5-34 Real-Time Clock Stopped .............................................5-33 Restricted region ................................................. 4-16, 4-27 RUN ........................................................................ 3-5, 5-2 RUN Output ...................................... 3-11, 3-14, 4-32, 4-34 S Safe Mode .......................................................................3-3 NX-series CPU Unit Hardware User’s Manual (W535) I-3 I Index I-4 NX-series CPU Unit Hardware User’s Manual (W535) Terms and Conditions of Sale 1. Offer; Acceptance. These terms and conditions (these "Terms") are deemed part of all quotes, agreements, purchase orders, acknowledgments, price lists, catalogs, manuals, brochures and other documents, whether electronic or in writing, relating to the sale of products or services (collectively, the "Products") by Omron Electronics LLC and its subsidiary companies (“Omron”). Omron objects to any terms or conditions proposed in Buyer’s purchase order or other documents which are inconsistent with, or in addition to, these Terms. 2. Prices; Payment Terms. All prices stated are current, subject to change without notice by Omron. Omron reserves the right to increase or decrease prices on any unshipped portions of outstanding orders. Payments for Products are due net 30 days unless otherwise stated in the invoice. 3. Discounts. Cash discounts, if any, will apply only on the net amount of invoices sent to Buyer after deducting transportation charges, taxes and duties, and will be allowed only if (i) the invoice is paid according to Omron’s payment terms and (ii) Buyer has no past due amounts. 4. Interest. Omron, at its option, may charge Buyer 1-1/2% interest per month or the maximum legal rate, whichever is less, on any balance not paid within the stated terms. 5. Orders. Omron will accept no order less than $200 net billing. 6. Governmental Approvals. Buyer shall be responsible for, and shall bear all costs involved in, obtaining any government approvals required for the importation or sale of the Products. 7. Taxes. All taxes, duties and other governmental charges (other than general real property and income taxes), including any interest or penalties thereon, imposed directly or indirectly on Omron or required to be collected directly or indirectly by Omron for the manufacture, production, sale, delivery, importation, consumption or use of the Products sold hereunder (including customs duties and sales, excise, use, turnover and license taxes) shall be charged to and remitted by Buyer to Omron. 8. Financial. If the financial position of Buyer at any time becomes unsatisfactory to Omron, Omron reserves the right to stop shipments or require satisfactory security or payment in advance. If Buyer fails to make payment or otherwise comply with these Terms or any related agreement, Omron may (without liability and in addition to other remedies) cancel any unshipped portion of Products sold hereunder and stop any Products in transit until Buyer pays all amounts, including amounts payable hereunder, whether or not then due, which are owing to it by Buyer. Buyer shall in any event remain liable for all unpaid accounts. 9. Cancellation; Etc. Orders are not subject to rescheduling or cancellation unless Buyer indemnifies Omron against all related costs or expenses. 10. Force Majeure. Omron shall not be liable for any delay or failure in delivery resulting from causes beyond its control, including earthquakes, fires, floods, strikes or other labor disputes, shortage of labor or materials, accidents to machinery, acts of sabotage, riots, delay in or lack of transportation or the requirements of any government authority. 11. Shipping; Delivery. Unless otherwise expressly agreed in writing by Omron: a. Shipments shall be by a carrier selected by Omron; Omron will not drop ship except in “break down” situations. b. Such carrier shall act as the agent of Buyer and delivery to such carrier shall constitute delivery to Buyer; c. All sales and shipments of Products shall be FOB shipping point (unless otherwise stated in writing by Omron), at which point title and risk of loss shall pass from Omron to Buyer; provided that Omron shall retain a security interest in the Products until the full purchase price is paid; d. Delivery and shipping dates are estimates only; and e. Omron will package Products as it deems proper for protection against normal handling and extra charges apply to special conditions. 12. Claims. Any claim by Buyer against Omron for shortage or damage to the Products occurring before delivery to the carrier must be presented in writing to Omron within 30 days of receipt of shipment and include the original transportation bill signed by the carrier noting that the carrier received the Products from Omron in the condition claimed. 13. Warranties. (a) Exclusive Warranty. Omron’s exclusive warranty is that the Products will be free from defects in materials and workmanship for a period of twelve months from the date of sale by Omron (or such other period expressed in writing by Omron). Omron disclaims all other warranties, express or implied. (b) Limitations. OMRON MAKES NO WARRANTY OR REPRESENTATION, EXPRESS OR IMPLIED, ABOUT NON-INFRINGEMENT, MERCHANTABIL- 14. 15. 16. 17. 18. ITY OR FITNESS FOR A PARTICULAR PURPOSE OF THE PRODUCTS. BUYER ACKNOWLEDGES THAT IT ALONE HAS DETERMINED THAT THE PRODUCTS WILL SUITABLY MEET THE REQUIREMENTS OF THEIR INTENDED USE. Omron further disclaims all warranties and responsibility of any type for claims or expenses based on infringement by the Products or otherwise of any intellectual property right. (c) Buyer Remedy. Omron’s sole obligation hereunder shall be, at Omron’s election, to (i) replace (in the form originally shipped with Buyer responsible for labor charges for removal or replacement thereof) the non-complying Product, (ii) repair the non-complying Product, or (iii) repay or credit Buyer an amount equal to the purchase price of the non-complying Product; provided that in no event shall Omron be responsible for warranty, repair, indemnity or any other claims or expenses regarding the Products unless Omron’s analysis confirms that the Products were properly handled, stored, installed and maintained and not subject to contamination, abuse, misuse or inappropriate modification. Return of any Products by Buyer must be approved in writing by Omron before shipment. Omron Companies shall not be liable for the suitability or unsuitability or the results from the use of Products in combination with any electrical or electronic components, circuits, system assemblies or any other materials or substances or environments. Any advice, recommendations or information given orally or in writing, are not to be construed as an amendment or addition to the above warranty. See http://www.omron247.com or contact your Omron representative for published information. Limitation on Liability; Etc. OMRON COMPANIES SHALL NOT BE LIABLE FOR SPECIAL, INDIRECT, INCIDENTAL, OR CONSEQUENTIAL DAMAGES, LOSS OF PROFITS OR PRODUCTION OR COMMERCIAL LOSS IN ANY WAY CONNECTED WITH THE PRODUCTS, WHETHER SUCH CLAIM IS BASED IN CONTRACT, WARRANTY, NEGLIGENCE OR STRICT LIABILITY. Further, in no event shall liability of Omron Companies exceed the individual price of the Product on which liability is asserted. Indemnities. Buyer shall indemnify and hold harmless Omron Companies and their employees from and against all liabilities, losses, claims, costs and expenses (including attorney's fees and expenses) related to any claim, investigation, litigation or proceeding (whether or not Omron is a party) which arises or is alleged to arise from Buyer's acts or omissions under these Terms or in any way with respect to the Products. Without limiting the foregoing, Buyer (at its own expense) shall indemnify and hold harmless Omron and defend or settle any action brought against such Companies to the extent based on a claim that any Product made to Buyer specifications infringed intellectual property rights of another party. Property; Confidentiality. Any intellectual property in the Products is the exclusive property of Omron Companies and Buyer shall not attempt to duplicate it in any way without the written permission of Omron. Notwithstanding any charges to Buyer for engineering or tooling, all engineering and tooling shall remain the exclusive property of Omron. All information and materials supplied by Omron to Buyer relating to the Products are confidential and proprietary, and Buyer shall limit distribution thereof to its trusted employees and strictly prevent disclosure to any third party. Export Controls. Buyer shall comply with all applicable laws, regulations and licenses regarding (i) export of products or information; (iii) sale of products to “forbidden” or other proscribed persons; and (ii) disclosure to non-citizens of regulated technology or information. Miscellaneous. (a) Waiver. No failure or delay by Omron in exercising any right and no course of dealing between Buyer and Omron shall operate as a waiver of rights by Omron. (b) Assignment. Buyer may not assign its rights hereunder without Omron's written consent. (c) Law. These Terms are governed by the law of the jurisdiction of the home office of the Omron company from which Buyer is purchasing the Products (without regard to conflict of law principles). (d) Amendment. These Terms constitute the entire agreement between Buyer and Omron relating to the Products, and no provision may be changed or waived unless in writing signed by the parties. (e) Severability. If any provision hereof is rendered ineffective or invalid, such provision shall not invalidate any other provision. (f) Setoff. Buyer shall have no right to set off any amounts against the amount owing in respect of this invoice. (g) Definitions. As used herein, “including” means “including without limitation”; and “Omron Companies” (or similar words) mean Omron Corporation and any direct or indirect subsidiary or affiliate thereof. Certain Precautions on Specifications and Use 1. Suitability of Use. Omron Companies shall not be responsible for conformity with any standards, codes or regulations which apply to the combination of the Product in the Buyer’s application or use of the Product. At Buyer’s request, Omron will provide applicable third party certification documents identifying ratings and limitations of use which apply to the Product. This information by itself is not sufficient for a complete determination of the suitability of the Product in combination with the end product, machine, system, or other application or use. Buyer shall be solely responsible for determining appropriateness of the particular Product with respect to Buyer’s application, product or system. Buyer shall take application responsibility in all cases but the following is a non-exhaustive list of applications for which particular attention must be given: (i) Outdoor use, uses involving potential chemical contamination or electrical interference, or conditions or uses not described in this document. (ii) Use in consumer products or any use in significant quantities. (iii) Energy control systems, combustion systems, railroad systems, aviation systems, medical equipment, amusement machines, vehicles, safety equipment, and installations subject to separate industry or government regulations. (iv) Systems, machines and equipment that could present a risk to life or property. Please know and observe all prohibitions of use applicable to this Product. NEVER USE THE PRODUCT FOR AN APPLICATION INVOLVING SERIOUS RISK TO LIFE OR PROPERTY OR IN LARGE QUANTITIES WITHOUT ENSURING THAT THE SYSTEM AS A WHOLE HAS BEEN DESIGNED TO 2. 3. 4. 5. ADDRESS THE RISKS, AND THAT THE OMRON’S PRODUCT IS PROPERLY RATED AND INSTALLED FOR THE INTENDED USE WITHIN THE OVERALL EQUIPMENT OR SYSTEM. Programmable Products. Omron Companies shall not be responsible for the user’s programming of a programmable Product, or any consequence thereof. Performance Data. Data presented in Omron Company websites, catalogs and other materials is provided as a guide for the user in determining suitability and does not constitute a warranty. It may represent the result of Omron’s test conditions, and the user must correlate it to actual application requirements. Actual performance is subject to the Omron’s Warranty and Limitations of Liability. Change in Specifications. Product specifications and accessories may be changed at any time based on improvements and other reasons. It is our practice to change part numbers when published ratings or features are changed, or when significant construction changes are made. However, some specifications of the Product may be changed without any notice. When in doubt, special part numbers may be assigned to fix or establish key specifications for your application. Please consult with your Omron’s representative at any time to confirm actual specifications of purchased Product. Errors and Omissions. Information presented by Omron Companies has been checked and is believed to be accurate; however, no responsibility is assumed for clerical, typographical or proofreading errors or omissions. OMRON AUTOMATION AND SAFETY • THE AMERICAS HEADQUARTERS • Chicago, IL USA • 847.843.7900 • 800.556.6766 • www.omron247.com OMRON CANADA, INC. • HEAD OFFICE Toronto, ON, Canada • 416.286.6465 • 866.986.6766 • www.omron247.com OMRON ARGENTINA • SALES OFFICE Cono Sur • 54.11.4783.5300 OMRON ELECTRONICS DE MEXICO • HEAD OFFICE México DF • 52.55.59.01.43.00 • 01-800-226-6766 • [email protected] OMRON CHILE • SALES OFFICE Santiago • 56.9.9917.3920 OMRON ELECTRONICS DE MEXICO • SALES OFFICE Apodaca, N.L. • 52.81.11.56.99.20 • 01-800-226-6766 • [email protected] OTHER OMRON LATIN AMERICA SALES 54.11.4783.5300 OMRON ELETRÔNICA DO BRASIL LTDA • HEAD OFFICE São Paulo, SP, Brasil • 55.11.2101.6300 • www.omron.com.br OMRON EUROPE B.V. • Wegalaan 67-69, NL-2132 JD, Hoofddorp, The Netherlands. • +31 (0) 23 568 13 00 • www.industrial.omron.eu Authorized Distributor: Automation Control Systems • Machine Automation Controllers (MAC) • Programmable Controllers (PLC) • Operator interfaces (HMI) • Distributed I/O • Software Drives & Motion Controls • Servo & AC Drives • Motion Controllers & Encoders Temperature & Process Controllers • Single and Multi-loop Controllers Sensors & Vision • Proximity Sensors • Photoelectric Sensors • Fiber-Optic Sensors • Amplified Photomicrosensors • Measurement Sensors • Ultrasonic Sensors • Vision Sensors Industrial Components • RFID/Code Readers • Relays • Pushbuttons & Indicators • Limit and Basic Switches • Timers • Counters • Metering Devices • Power Supplies Safety • Laser Scanners • Safety Mats • Edges and Bumpers • Programmable Safety Controllers • Light Curtains • Safety Relays • Safety Interlock Switches W535-E1-01 04/15 Note: Specifications are subject to change. Printed on recycled paper. © 2015 Omron Electronics LLC Printed in U.S.A.