1
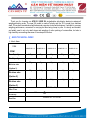
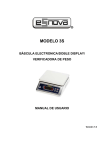
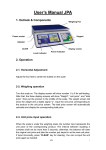
ACS-3S/NEW SU
ELECTRONIC SINGLE/DUAL
DISPLAY WEIGHING/ COUNTING SCALE
TEL- 0915.999.111
USER MANUAL
Thank you for choosing our ACS-3S / NEW SU single/double side display electronic waterproof
weighing/counting scale. The new SU model is made of plastic and the 3S is made from stainless
steel. The scale is manufactured with advanced computer-controlled techniques. It exhibits hi accuracy
weighing performance, convenient for carrying but also being cheap in price. It is sturdy and durable,
and widely used in not only retail stores and weighing of ration packing of commodities, but also in
high humidity surroundings because of its waterproof function.
Ⅰ. MAIN TECHNICAL INDEX
1 . Basic Data
TYPE
ITEM
Max. Capacity
3S/NEW SU -1.5
3S/NEW SU -3
3S/NEW SU -6
3S/NEW SU -15
3S/NEW SU -30
1.5kg
3kg
6kg
15kg
30kg
Min. Capacity
Division size
20e
0.5g
1g
2g
5g
10g
0.2g
0.5g
1g
2g
5g
0.1g
0.2g
0.5g
1g
2g
(Option 1)
Division size
(Option 2)
Division size
(Option 3)
100% Max. Cap.
Max. Tare
Accuracy
Pan Size
III
3S/NEW SU 19×23 cm
2.
3.
4.
5.
6.
Working Temperature : -5℃ to +35℃
Storage Temperature: -25℃ to +50℃
Power: 6V4Ah rechargeable battery.
Net Weight: 3.6kg/pc
Dimension: 4pcs/ctn, 58x35x30cm
Ⅱ. KEYBOARD AND CHARACTER PROMPT
1. Keyboard
ON/
ZERO
TARE
Turns the scale on and zero.
Tare key.
OFF
Power off.
SET
0~9
Set up / Configuration key. Set parameter and input configuration.
2. Error Messages
dc x.xx Means the voltage of battery is x.xx V.
------
(with buzzer sounding)
Weight is over 100% full scale + 9e – scale is overloaded. Reduce the weight on the
scale.
-AdC-
(with buzzer sounding)
A/D unstable. Possible load cell fault.
-BATLo- Low battery - charge immediately.
C_End Charging complete.
Err-0
Overload zero of load cell. Please re-adjust or change load cell.
III. OPERATION GUIDE
1.
Preparation
Level the scale and make sure the pan is horizontal by adjusting the base feet, and using the builtin spirit level for accuracy.
2.
Turn on
Press the [ON/ZERO] key. The buzzer will sound and the display will show the battery voltage
level, followed by the machine version number, and then a countdown from 9 to 0. The machine
will then show ‘0’ and the scale is ready to use.
2.1 Turn off
Turn the machine off by holding down the [OFF] key.
2.2 Auto-off (Optional)
After 10 minutes of inactivity, the machine will automatically turn itself off.
2.3 Low voltage auto-off
When the battery voltage falls below 5.6V, the machine will power-off.
3.
Zero
When the weight displayed is lower than 4% of maximum capacity, the [ON/ZERO] key, will, when
pressed, zero the display.
4. Weighing
Put weight on pan.
5.
Tare weighing
Place container or item on scale and press the [TARE] key. The display will then tare off and will
show ‘0’, and the tare LED light will be on. To clear the tare, press the [TARE] key, and the LED
light will turn off.
6.
Save power function
After 40 seconds of inactivity, the machine will switch to auto power save and the display will show
“ 0 ”. Put a weight on the scale to start weighing again.
7. Battery indication
Battery lamp: “High” means voltage higher than 6.3V, “Mid” means voltage between 6V and
6.3V, “Low” means voltage lower than 6V.
8.
Charge
The power is supplied by an internal rechargeable lead acid battery (6V/4Ah). When the display
shows “-bAtLo-”, please connect the machine to a mains supply and charge immediately. The
time of full charging is 12 hours.
9. Set parameters
Press [SET/0~9] key for 3 seconds. The display will now enter into the parameter menu. Press
[SET/0~9] continuously to scroll through each parameter, as follows :
rAngE
UnItS
A- OFF
FILt
Zero
bUZZEr
d
On-rA
d-dP
(set limit)
(choose unit)
(choose auto power off)
(set display mode)
(set auto zero)
(set buzzer)
(choose division)
(choose range of power on)
(choose single or dual display)
9.1 Set range of auto-zero:
9.1.1
Range (check weighing)
Press the [SET] key for 3 seconds. The display shows ‘range’. Press the [TARE] key.
The display shows ‘off’. Press the [SET] key. The display shows ‘on’. Press the [TARE]
key. The display shows ‘00000’, and the under LED will flash. Enter the lower limit of the
product, eg, 995. Press the [TARE] key to move right, and the [ZERO] key to increment
up. After entering the last digit, the display shows ‘00000’, and the over LED will flash.
Enter the over limit of the product, eg, 1005. After entering the last digit, the display will
show ‘0’. Place the product on the scale. When the scale displays a stable weight, the
under accept over LED will be illuminated.
To return to normal weighing, press [SET] for 3 seconds. The display shows ‘range’.
Press [SET] key until ‘units’ is displayed. Press the [TARE] key. Press the [SET] key
until ‘g’ is displayed. Press the [TARE] key. The scale is now in normal weighing.
Caution:When the display is not stable, no Led lamp will be on.
9.2 Changing weighing units
9.2.1 When “units” is displayed, press [TARE], then press [SET/0~9] to choose, then press
[TARE] to confirm and exit.
Unit: H9(kg), 9(g),Lb,oz,pcs(counting).
calibrating).
(Imperial units may not be chosen when
9.2.2 Pcs Counting: Press [SET] key for 3 seconds. The display will show ‘Range’. Press
[SET] key until ‘units’ is displayed. Press the [TARE] key. The display shows ‘g’. Press
the [SET] key until ‘pcs’. Press the [TARE] key. The ‘pcs’ LED will be on. Put the sample
quantity onto the scale. Press and hold the [ZERO] key. The display shows ‘00000’, and
the ‘pcs’ LED will be flashing. Press the [TARE] key. The display shows ‘00000’ with the
left hand digit flashing. Use the [TARE] key to move right and the [ZERO] key to
increment up. Enter the sample quantity, eg, 200. Press [TARE]. The display will now be
in count mode and show the sample quantity measured, eg, 200.
To return to normal weighing mode, press [SET] for 3 seconds until ‘units’ is displayed.
Press the [TARE] key. The display shows ‘pcs’. Press the [SET] key until ‘g’ is displayed.
Press the [TARE] key.
9.3 A-oFF(choose auto power off)
When menu displays A-oFF,press [TARE] to enter,then press [SET/0~9] to choose ‘n’ or ‘y’.
‘n’ is auto power off,’y’ is auto power off after 10 minutes of inactivity.
9.4 Change display filtering
When the display shows “FILtX” (FILt1 means one step to display, FILt2 means 3-4 steps to
display, FILt3 means 6-8 steps to display, FILt4 is the fastest filter setting). Press [SET/0~9] to
change, press [TARE] to confirm and exit.
9.5 Set range of auto-zero:
When ‘zero’ is displayed, press [TARE]. The display will show zero x.x(x.x is the
range:0.5d,1d,1.5d,2d,2.5d,3d,3.5d,4d,4.5d,5d. d is the division value when n=3000). Press
[SET/0~9] to choose and [TARE] to confirm.
9.6 bUZZEr (set buzzer sound on or off)
When menu displays bUZZEr,press [TARE] to enter,press [SET/0~9] to choose on or off,
and then press [TARE] to confirm.
9.7 Change division size
When menu displays d,press [TARE] to enter,and then press [SET/0~9] to choose division
increment size.
9.8 On-rA (choose range of power on)
When menu displays On-rA,press [TARE] to enter,press [SET/0~9] to choose 20 or 100, 20
is 20% max. capacity, 100 is 100% capacity. Press [TARE] to confirm.
9.9 d-dP (choose single or dual display)
When menu displays d-dP,press [TARE] to enter,press [SET/0~9] to choose ‘n’ or ‘y’, ‘n’ is
single display,’y’ is dual display, Press [TARE] to confirm.
10.0 Power save LED lighting
On powering on, press and hold [zero/on] key. The display shows LC-,press [SET/0~9] to
choose LU-1 or LU-2,LU-1 is saving mode (recommended). Press [TARE] to confirm.
11.0 Super SS Calibration
1.
Remove calibration cover under scale and turn on the calibration switch.
2.
Switch on the scale and while the display counts down, press and hold the [TARE] key.
The display will show ‘CAL’ and then go into zero counts mode. With nothing on the scale the
display should show ‘0’; if not press the [ZERO] key.
3.
When the display shows ‘0’ press the [TARE] key
4.
The display will then keep flashing the weight to be used for calibration, eg. 6000g
5.
Put on the correct weight, eg 6000g, and press the [TARE] key
6.
The display will show ‘CAL END’ and then return to normal weighing
7.
Switch the calibration switch back to off position and replace the calibration cover under
the scale
8.
Switch the scale back on and check with test weights
IV. SCALE MAINTENANCE
1.
Take care not to overload the scale. Do not place heavy things on the scale violently. The
damage for overloading is not within the range of the guarantee.
2. Do not use sharp objects to operate the keypad. If the rubber is damaged it will influence the
performance of the waterproof seal.
3. Keep the scale clean in order to maintain performance.
4. There is a lead seal on the bottom of the scale. Users are not allowed to remove the seal. If the
seal is damaged the guarantee is void.
5. a. You must charge the battery at least once every 3 months during periods of scale inactivity.
b. Please take care to correctly connect the battery terminals (ie, black to black, red to red).
c. If the battery life seems short, even after frequent charging, please replace with a new battery.