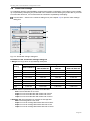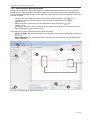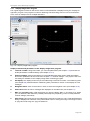
1
Instruction Manual scanCONTROL Configuration Tools 4.2 MICRO-EPSILON MESSTECHNIK GmbH & Co. KG Königbacher Straße 15 D-94496 Ortenburg / Germany Tel. +49 (0) 8542 /168-0 Fax +49 (0) 8542 /168-90 e-mail: [email protected] www.micro-epsilon.com Certified acc. to DIN EN ISO 9001: 2008 X9751213-A101085ALI LA Contents 1. 1.1 1.2 1.3 1.4 1.5 Introduction ......................................................................................................................... 6 Using this Manual ...................................................................................................................... 6 Overview of the Complete System ............................................................................................ 6 Application Examples for scanCONTROL ................................................................................. 7 Definition of Basic Terms ........................................................................................................... 9 Functions of the Measuring Programs .................................................................................... 10 2. 2.1 2.2 2.3 2.4 2.5 2.6 Installation and Preparation for Measurement Operation ............................................... 11 Installation Requirements ........................................................................................................ 11 Installation of Configuration Tools ........................................................................................... 11 Connecting scanCONTROL to the PC (Ethernet) ................................................................... 12 Connecting scanCONTROL to the PC (IEEE1394) ................................................................. 13 Installation of the Driver for IEEE1394 on Windows 8 ............................................................. 13 Installation of the Driver for IEEE1394 on Windows 7 ............................................................. 15 3. 3.1 3.2 3.3 3.4 3.5 3.6 3.7 3.8 3.9 3.10 3.11 3.12 3.12.1 3.12.2 3.12.3 3.12.4 3.12.5 3.12.6 3.13 3.13.1 3.13.2 3.13.3 3.13.4 3.13.5 3.13.6 3.14 3.14.1 3.14.2 3.14.3 3.14.4 3.14.5 3.14.6 3.14.7 3.15 3.16 3.17 3.18 3.19 3.20 3.21 Working with scanCONTROL Configuration Tools .......................................................... 16 Starting scanCONTROL Configuration Tools .......................................................................... 16 Elements of the Main View ....................................................................................................... 16 Configuring scanCONTROL Step by Step .............................................................................. 17 Structure of the Measuring Programs...................................................................................... 18 Selecting the Data Source ....................................................................................................... 19 Saving Profile Sequences ........................................................................................................ 19 Scanner Settings ...................................................................................................................... 21 Profile Filter Settings ................................................................................................................ 23 Advanced Scanner Settings .................................................................................................... 25 File Settings ............................................................................................................................. 33 Displaying scanCONTROL Parameters in Offline Mode ......................................................... 34 Mouse Interaction in the 2D-Display ........................................................................................ 36 Reset 2D-Display ..................................................................................................................... 36 Automatic Scaling of the 2D-Display ....................................................................................... 37 Keep Aspect Ratio ................................................................................................................... 37 Zoom in 2D-Display ................................................................................................................. 37 Move Profile ............................................................................................................................. 38 Display Extended Information of a Profile Point ...................................................................... 38 Configuring the Measurement ................................................................................................. 39 Specifying the Measurement Task .......................................................................................... 39 Cutting Out ............................................................................................................................... 39 Remove Range for Cutting Out ................................................................................................ 42 Setting Straight Lines ............................................................................................................... 43 Setting a Minimum Height ....................................................................................................... 46 Activating the Dynamic Tracking of the Ranges ...................................................................... 48 Saving and Loading Parameters ............................................................................................. 50 Saving Parameters to File ........................................................................................................ 50 Loading Parameters from File ................................................................................................. 50 Reset Parameters to Default Settings ...................................................................................... 51 Store Parameters permanently on scanCONTROL ................................................................. 52 Load Parameters from scanCONTROL ................................................................................... 53 Backup scanCONTROL Parameters ....................................................................................... 53 Restore Parameters from a file to scanCONTROL .................................................................. 54 Menu Bar .................................................................................................................................. 55 Functions of the "General" Toolbar .......................................................................................... 56 Functions of the "Display" Toolbar ........................................................................................... 57 Functions of the "Measurement" Toolbar ................................................................................ 57 Navigation in Configuration Tools ........................................................................................... 58 Basic Settings .......................................................................................................................... 59 Adjusting scanCONTROL Network Settings (Ethernet Configurator) ..................................... 60 Page 3 3.22 Exiting scanCONTROL Configuration Tools ............................................................................ 61 4. 4.1 4.1.1 4.1.2 4.1.3 4.1.4 4.2 4.2.1 4.2.2 4.2.3 4.2.4 4.2.5 4.3 4.3.1 4.3.2 4.3.3 4.3.4 4.3.5 4.4 4.4.1 4.4.2 4.4.3 4.4.4 4.5 4.5.1 4.5.2 4.5.3 4.5.4 4.6 4.6.1 4.6.2 4.6.3 4.6.4 4.7 4.7.1 4.7.2 4.7.3 4.7.4 4.8 Description of the Measuring Programs .......................................................................... 62 "Extrema" Group ...................................................................................................................... 62 "Maximum Point" Measuring Program ..................................................................................... 63 "Minimum Point" Measuring Program ...................................................................................... 65 "First Point" Measuring Program .............................................................................................. 67 "Last Point" Measuring Program .............................................................................................. 69 "Angle" Group .......................................................................................................................... 71 "Absolute Angle" Measuring Program ..................................................................................... 72 "Absolute Angle/Offset" Measuring Program ........................................................................... 74 "Double Angle" Measuring Program ........................................................................................ 76 "Difference Angle" Measuring Program ................................................................................... 78 "Intersection Point" Measuring Program .................................................................................. 81 "Edge/Step" Group ................................................................................................................... 83 "Single Offset" Measuring Program ......................................................................................... 84 "Double Offset" Measuring Program ........................................................................................ 87 "Step Height" Measuring Program ........................................................................................... 89 "Edge Left" Measuring Program............................................................................................... 91 "Edge Right" Measuring Program ............................................................................................ 93 "Surface" Group ....................................................................................................................... 95 "Deviation" Measuring Program ............................................................................................... 96 "Double Deviation" Measuring Program .................................................................................. 98 "Surface Maximum" Measuring Program ............................................................................... 100 "Surface Minimum" Measuring Program ................................................................................ 102 "Seam" Group ........................................................................................................................ 104 "Seam Start/End" Measuring Program .................................................................................. 105 "Seam Maximum" Measuring Program .................................................................................. 107 "Seam Width/Height" Measuring Program ............................................................................. 109 "Seam Area" Measuring Program .......................................................................................... 111 "Groove" Group ...................................................................................................................... 113 "Groove Start/End" Measuring Program ................................................................................ 114 "Groove Minimum" Measuring Program ................................................................................ 116 "Groove Width/Depth" Measuring Program ........................................................................... 118 "Groove Area" Measuring Program ........................................................................................ 120 "Tools" Group ......................................................................................................................... 122 "Display Image Data" Program .............................................................................................. 123 "Display Profiles" Program ..................................................................................................... 125 "Save Profiles" Program ......................................................................................................... 126 “Calibrate Position” program ................................................................................................. 128 "Export Profiles" Program ....................................................................................................... 130 5. 5.1 5.2 5.3 Combining Results from Measuring Programs .............................................................. 132 Algorithms available for the Combination of Measured Values ............................................. 134 Defining Operands and Constants for a Combined Signal ................................................... 135 Defining a new Signal for Calculation .................................................................................... 135 6. 6.1 6.2 6.3 6.4 6.5 6.6 6.7 Filtering and Evaluating Measured Values and Configuring Outputs ........................... 138 Configuration of the Filters for Measured Values .................................................................. 139 Configuration of the Digital Outputs ...................................................................................... 140 Configuration of the Analog Outputs ..................................................................................... 142 Configuration of the Serial Port .............................................................................................. 142 Configuration of the Outputs using UDP ............................................................................... 144 Configuration of the Outputs using Modbus ......................................................................... 146 Logging Measured Values ..................................................................................................... 147 7. "Result Monitor" Analysis Program................................................................................. 150 8. 8.1 8.1.1 8.1.2 Working with the scanCONTROL Smart Measurement System .................................... 154 Operating Modes ................................................................................................................... 154 Continuous Measurement ..................................................................................................... 154 Triggered Measurement ........................................................................................................ 154 Page 4 8.2 8.2.1 8.2.2 8.2.3 8.2.4 8.2.5 8.2.6 8.3 8.3.1 8.3.2 8.3.3 Measurement Value Output ................................................................................................... 155 Pin Assignment of the Analog Outputs (scanCONTROL 26X0/27X0/29X0) .......................... 155 Pin Assignment of the Analog Outputs (scanCONTROL 2810) ............................................ 155 Pin Assignment of the Digital Outputs (scanCONTROL 26X0/27X0/29X0) ........................... 155 Pin Assignment of the Digital Outputs (scanCONTROL 2810).............................................. 155 Pin Assignment of the Serial Interface ................................................................................... 156 Convert the Measured Values to real Coordinates ................................................................ 157 Loading of “User Modes” ...................................................................................................... 158 Loading of User Modes using the Serial Port (ASCII) ........................................................... 158 Loading of User Modes using Modbus ................................................................................. 158 Loading of User Modes via Ethernet (TCP) ........................................................................... 159 9. 9.1 9.2 9.3 9.4 9.4.1 9.4.2 9.4.3 Appendix.......................................................................................................................... 160 Status- and Error Messages, Error Codes ............................................................................. 160 Notes and Tips on Using scanCONTROL ............................................................................. 163 Key Shortcuts ......................................................................................................................... 164 Manual/Subsequent Installation of the Driver for IEEE1394 .................................................. 165 Subsequent Installation of the Driver for IEEE1394 on Windows 8 ....................................... 165 Manual Installation of the Driver for IEEE1394 on Windows 8 .............................................. 166 Manual Installation of the Driver for IEEE1394 on Windows 7 .............................................. 168 Page 5 Introduction 1. Introduction This user manual gives an overview of the functions of the “scanCONTROL Configuration Tools” software, referred to in short as Configuration Tools in the following. This provides you with the possibility to configure and parameterize the scanCONTROL measurement system for your measurement task in order to examine and solve typical measurement tasks with it. The scanCONTROL measurement system is a laser line sensor which is designed for applications in the industrial environment. This product is characterized by high speed and accuracy of measurement. Configuration Tools provide you with ways to solve different applications combined with maximum precision. The scanCONTROL measurement systems are split into three product series. The following types of sensors are available: - - - scanCONTROL Compact: Laser scanner for customer's own integration: scanCONTROL 2600-25/2600-50/2600-100 scanCONTROL 2700-25/2700-50/2700-100 scanCONTROL 2900-10/2900-25/2900-50/2900-100 scanCONTROL High-Speed: Laser scanner with particular high measuring rates: scanCONTROL 2650-25/2650-50/2650-100 scanCONTROL 2750-25/2750-50/2750-100 scanCONTROL 2800-10/2800-25/2800-100 scanCONTROL 2950-10/2950-25/2950-50/2950-100 scanCONTROL Smart: Laser scanner with integrated profile calculation for measurement tasks: scanCONTROL 2610-25/2610-50/2610-100 scanCONTROL 2660-25/2660-50/2660-100 scanCONTROL 2710-25/2710-50/2710-100 scanCONTROL 2760-25/2760-50/2760-100 scanCONTROL 2810-10/2810-25/2810-100 scanCONTROL 2910-10/2910-25/2910-50/2910-100 scanCONTROL 2960-10/2960-25/2960-50/2960-100 Note: In the following the term scanCONTROL stands for all measurement systems listed above. 1.1 Using this Manual The user manual contains general information on the installation and use of Configuration Tools and on the use of the scanCONTROL measurement system. As a user of the software it is important that you read Chapter 2 "Installation and Preparation for Measurement Operation". Chapter 3 "Working with scanCONTROL Configuration Tools" and Chapter 4 "Description of the Measuring Programs" explain how to use the functions offered by the software. Chapter 5 "Combining Results from Measuring Programs" describes how to combine measured values. In Chapter 6 "Filtering and Evaluating Measured Values and Configuring Outputs" you will find a description about filtering measured values and configuring the output ports of scanCONTROL Smart. Chapter 8 "Working with the scanCONTROL Smart Measurement System" describes how to use the scanCONTROL Smart product series. Note: Please refer to the contact address printed on the inside cover for any issues relating to queries and support or any other technical information. 1.2 Overview of the Complete System scanCONTROL Configuration Tools transfers profile data from the scanCONTROL measurement system in a simple way and displays these graphically. These profile data are further processed and evaluated in measuring programs. All data are transferred either via IEEE1394 (FireWire, iLink) or via Ethernet, depending on the type of sensor, and can be stored with the software if needed. Depending on the measurement system used, scanCONTROL Configuration Tools is used as follows: - scanCONTROL Compact/High Speed: The scanCONTROL measurement system measures twodimensional profile data and transfers them to the PC. Configuration Tools evaluates the profile data, determines measured values and evaluates them. scanCONTROL Smart: The scanCONTROL measurement system measures two-dimensional profile data, evaluates the profile data, determines measured values and evaluates them. The measured values are output at various ports (see below). Configuration Tools is used for parameterizaPage 6 Introduction tion of the measurement system and for the visualization of the measurement results. If the parameterization has been completed, the software can be closed and the measurement system can be disconnected from the PC. The scanCONTROL Smart measurement system then continues to operate as an independent unit and performs the measurements. scanCONTROL 26X0/29X0 half-duplex half-duplex yes yes 4x* 8x* RS422 (ASCII format) RS422 (Modbus RTU protocol) RS232 (ASCII format) Ethernet (UDP protocol) Ethernet (Modbus TCP protocol) Analog out Digital out * scanCONTROL 27X0 full-duplex full-duplex yes yes 4x* 8x* scanCONTROL 28X0 full-duplex yes 2x 3x optional, scanCONTROL Output Unit is required Fig. 1.1: Measured values output ports Configuration Tools can be operated as a demonstration or as full version. There are two possibilities for licensing the software and thus operating as full version: - scanCONTROL Smart: When using the scanCONTROL Smart product series, this is automatically used as license for the full version Dongle: A USB dongle can be used for licensing. Function Data transmission via scanCONTROL (online operation) Loading a stored profile sequence (offline operation) Visualization of measurement results scanCONTROL parameterization Synchronization (triggered operation) Filter functions Restore factory settings Load scanCONTROL parameters offline Offline logging of measurement results Loading and saving parameters Store parameters permanently on scanCONTROL * Read parameters from scanCONTROL * Statistical evaluation of measured values Calibration of the mounting position Online logging of measurement results Output of the measured values * Demo Version X X X X X X X X X X X X X X Full Version X X X X X X X X X X X X X X X X In order to store and read all measurement parameters please use the scanCONTROL Smart product series. In case of using the scanCONTROL Compact or scanCONTROL High-Speed product series, only a subset of the parameters is stored/read (see Chapter 3.14.4 and 3.14.5). Fig. 1.2: Functional scope of scanCONTROL Configuration Tools 1.3 Application Examples for scanCONTROL The following are just some examples of measuring tasks for which scanCONTROL is designed (On the right the measuring programs needed for solving the respective measuring task are illustrated): Width at several positions Page 7 Introduction Several extreme values Angles and intersections Features of a v-profile Positions and step heights Height and width of several profile sections Several geometric data (1) Several geometric data (2) Fig. 1.3: Examples of applications Page 8 Introduction 1.4 - Definition of Basic Terms Profile: A profile consists of a maximum of 1280 individual measuring points. Each of these points is defined by its X and Z coordinate. X coordinate: The horizontal coordinate of a point. Z coordinate: The vertical coordinate of a point. Profile sequence: A chronologically consecutive series of profiles is called a profile sequence. Measurement operation: This describes the operation in which a profile is scanned by scanCONTROL and all the measured values are determined. Series of measurements: A chronologically consecutive series of measurement operations is called a series of measurements. Scan rate: This refers to the number of measurement operations performed per second. Page 9 Introduction 1.5 Functions of the Measuring Programs This list of functions should only be used as a brief overview. The measuring programs are split into 7 groups. A detail description of all measuring programs can be found in Chapter 4. - - - - - - - Extrema: Programs for determining extreme values can be found in this group. Maximum Point: Determination of the point with maximum Z coordinate. Minimum Point: Determination of the point with minimum Z coordinate. First Point: Determination of the point with minimum X coordinate. Last Point: Determination of the point with maximum X coordinate. Angle: Programs for angle measurement can be found in this group. Absolute Angle: Determination of the angle of a straight line to the X axis. Absolute Angle / Offset: Determination of a straight line and calculation of the offset and the angle to the X axis. Double Angle: Determination of two independent straight lines and calculation of the respective angle to the X axis. Difference Angle: Determination of two independent straight lines and calculation of the angle between the two lines. Intersection Point: Determination of two independent straight lines and calculation of the coordinates of the intersection point between both lines. Edge/Step: Programs for edge and step measurement can be found in this group. Single Offset: Determination of a straight line and calculation of the offset of the line. Double Offset: Determination of two independent straight lines and calculation of the offsets of the lines. Step Height: Determination of the height of a step. Edge Left: Determination of the position of a rising or falling edge with an edge orientation from left to right. Edge Right: Determination of the position of a rising or falling edge with an edge orientation from right to left. Surface: Programs for surface inspection can be found in this group. Deviation: Determination of a straight line and calculation of the number of points and the average deviation of the points from the line. Double Deviation: Determination of two independent straight lines and calculation of the average deviation of the points from the respective line. Surface Maximum: Determination of a straight line and calculation of the distance and the X coordinate of the point with maximum positive distance from the line. Surface Minimum: Determination of a straight line and calculation of the distance and the X coordinate of the point with maximum negative distance from the line. Seam: Programs for inspecting heightenings, for example of beading or welds, can be found in this group. Start/End: Determination of a heightening and calculation of the X coordinates of the start and end point. Maximum: Determination of a heightening and calculation of the coordinates of the point with maximum height. Width/Height: Determination of a heightening and calculation of its width and height. Area: Determination of a heightening and calculation of its area Groove: Programs for inspecting deepenings, for example of a groove or a gap, can be found in this group. Start/End: Determination of a deepening and calculation of the X coordinates of the start and end point. Minimum: Determination of a deepening and calculation of the coordinates of the point with maximum depth. Width/Depth: Determination of a deepening and calculation of its width and depth. Area: Determination of a deepening and calculation of its area. Tools: Useful utilities can be found in this group. Display Image Data: Visualization of the image data recorded by the sensor matrix. Display Profiles: Display of the profile data. Save Profiles: Save profile sequences for later offline analysis. Calibrate Position: Adjusting the mounting position of the measurement system. Page 10 Installation and Preparation for Measurement Operation 2. Installation and Preparation for Measurement Operation 2.1 Installation Requirements The following minimum system specification is necessary for the operation of Configuration Tools: - Windows 7 (32 bit and 64 bit), Windows 8 or 8.1 (32 bit and 64 bit) 1-GHz or faster (32 bit and 64 bit) processor 1 GB RAM Screen resolution: 1024 x 768 To be able to use Configuration Tools the following steps must be followed: 1. Install the IEEE 1394 and the Ethernet interface hardware respectively, if not already installed. 2. Install Configuration Tools (see Chapter 2.2). 3. Connect and license the ICONNECT USB dongle (if present). 4. Connect the scanCONTROL measurement system to the PC via IEEE1394 and Ethernet respectively. 5. Install the driver for the scanCONTROL measurement system (only for IEEE1394, refer to Chapters 2.5, 2.6). [CD]:\Documentation [CD]:\Program\scanCONTROL Configuration Tools 4.2 [CD]:\Examples [CD]:\License [CD]:\Support\Ethernet [CD]:\Support\Driver-CMU1394 [CD]:\Support\Adobe Reader 10 [CD]:\Support\FImageFilter [CD]:\Support\Sentinel System Driver 7.5.0 [CD]:\Support\VCRedist2008 Contains manuals, installation instructions and Quick Reference Contains scanCONTROL Configuration Tools 4.2 Contains examples of profile sequences Contains license information for scanCONTROL Configuration Tools Contains a software tool for configuration of the IP addresses of scanCONTROL devices with an Ethernet interface Contains the driver files (version 6.4.6) for the scanCONTROL measurement system Contains Adobe Reader 10 Contains filter files for integrating DirectX Contains the dongle driver Contains the "Microsoft Visual C++ 2008" Redistributable Package Fig. 2.1: Contents of the Software CD 2.2 Installation of Configuration Tools When you insert the Software CD an installation window appears which offers you a number of options. Alternatively you can start the window with the [CD]:\setup.exe file. Before you start to install Configuration Tools, please ensure that the scanCONTROL measurement system isn't connected to the computer (only for IEEE1394, only for Windows 7). Click on the "Install“ button to start installing the software. Now the installation wizard installs the software and necessary components. Note: You need administrator rights in order to install the software and the driver for the scanCONTROL measurement system (only IEEE1394). Note: For scanCONTROL measurement systems with an IEEE1394 interface, activate the "Disable default windows driver for IEEE1394 imaging devices" option to make the scanCONTROL driver installation easier. Note: For scanCONTROL measurement systems with an Ethernet interface, activate the "Configure windows firewall" option in order to enable the data transfer between scanCONTROL and the PC in case of an active windows firewall. Page 11 Installation and Preparation for Measurement Operation During the installation process the driver for scanCONTROL will be installed (only IEEE1394, only Windows 8, see Chapter 2.5). You may be requested to restart the computer. In order to license the software for operation with a dongle and to use the full version of scanCONTROL Configuration Tools (see Chapter 1.2), use the "License" entry in the Windows Start menu. The dialog box for licensing Configuration Tools appears: Fig. 2.2: Dialog box for licensing Configuration Tools To do this, insert the license CD in the drive and press the "..." button. A standard file selection dialog appears. Select the "License.dat" file on the CD and press "OK". Then press the "Start" button on the dialog to begin licensing. Note: To use the demonstration version of scanCONTROL Configuration Tools no license is required. 2.3 Connecting scanCONTROL to the PC (Ethernet) In order to connect scanCONTROL via Ethernet to the PC, proceed as follows: Finish the installation of scanCONTROL Configuration Tools completely. This procedure is described in Chap. 2.2. Connect scanCONTROL via the Ethernet interface to the PC and switch on the power supply. Please wait until the device is recognized by the PC. This may take a few seconds. The system is now ready to operate the scanCONTROL measurement system with scanCONTROL Configuration Tools. Note: scanCONTROL must be connected directly with the PC. Do not use hubs or switches. Note: In case of using a network adapter which supports the "VLAN" option, this option must be inactive in order to use the scanCONTROL measurement system. Note: The PC and the measurement system must be located in the same subnet in order to operate the scanCONTROL measurement system with Configuration Tools. Use the "Ethernet Configurator" dialog box (see Chapter 3.21) in order to adjust the network settings of the measurement system, if necessary. Page 12 Installation and Preparation for Measurement Operation 2.4 Connecting scanCONTROL to the PC (IEEE1394) In order to connect scanCONTROL via IEEE1394 to the PC, proceed as follows: Using Windows 8 or 8.1: Connect scanCONTROL via the IEEE1394 interface to the PC and switch on the power supply. Start the installation of scanCONTROL Configuration Tools. This procedure is described in Chap. 2.2. During the installation process the driver for scanCONTROL will be installed (see Chapter 2.5). Using Windows 7: Finish the installation of scanCONTROL Configuration Tools completely. This procedure is described in Chap. 2.2. Connect scanCONTROL via the IEEE1394 interface to the PC and switch on the power supply. Install the driver for scanCONTROL (see Chap. 2.6). The system is now ready to operate the scanCONTROL measurement system with scanCONTROL Configuration Tools. Note: You need administrator rights in order to install the driver for the scanCONTROL measurement system. 2.5 Installation of the Driver for IEEE1394 on Windows 8 Note: The driver only has to be installed for using the IEEE1394 interface. No driver is required for scanCONTROL devices with an Ethernet interface. Preparing the installation: Start the installation of scanCONTROL Configuration Tools. This procedure is described in Chap. 2.2. During the installation process you will be requested to connect scanCONTROL to the PC (see Fig. 2.3). Fig. 2.3: Windows 8 automatic driver installation - step 1 Connect scanCONTROL to the PC and click on ”Continue” to confirm (see Fig. 2.3). First, the driver files will be installed. A dialog is displayed during this process (see Fig. 2.4): Page 13 Installation and Preparation for Measurement Operation Fig. 2.4: Windows 8 automatic driver installation - step 2 The "Windows Security" dialog appears: Fig. 2.5: Windows 8 automatic driver installation - step 3 Click on ”Install” to confirm this dialog (see Fig. 2.5). Now, the installation of the driver will be finished. After completing the installation of the driver the installation of Configuration Tools will be continued. If you want to install the driver at a later date or in case of an incorrect installation of the driver, you may install the driver for scanCONTROL subsequently. This procedure is described in Chapter 9.4.1. You also have the possibility to install the driver manually. This procedure is described in Chapter 9.4.2. Note: Only use version 6.4.6 of the CMU driver which is delivered on the CD. If a different driver or a different version of the CMU driver for scanCONTROL is installed later, it will not be possible to operate the scanCONTROL measurement system with scanCONTROL Configuration Tools. Page 14 Installation and Preparation for Measurement Operation 2.6 Installation of the Driver for IEEE1394 on Windows 7 Note: The driver only has to be installed for using the IEEE1394 interface. No driver is required for scanCONTROL devices with an Ethernet interface. Preparing the installation: Finish the installation of Configuration Tools completely. This procedure is described in Chapter 2.2. Connect scanCONTROL via the IEEE1394 interface to the PC. Switch on scanCONTROL and the power supply. Fig. 2.6: Windows 7 automatic driver installation - step 1 The operating system automatically installs the driver for scanCONTROL. The installation process is displayed in the task bar (see Fig. 2.6). The following message is displayed after completing the installation successfully (see Fig. 2.7): Fig. 2.7: Windows 7 automatic driver installation - step 2 In case of an incorrect installation of the driver, you have to install the driver manually. This procedure is described in Chapter 9.4.3. Note: Only use version 6.4.6 of the CMU driver. If a different driver or a different version of the CMU driver for scanCONTROL is installed later, it will not be possible to operate the scanCONTROL measurement system with scanCONTROL Configuration Tools. Page 15 Working with scanCONTROL Configuration Tools 3. Working with scanCONTROL Configuration Tools 3.1 Starting scanCONTROL Configuration Tools Once the installation of the software and the driver is completed you can start the software. To do this, use the program shortcut on your desktop or select "scanCONTROL Configuration Tools" in the Startup menu. Once you have started the program, the main window for starting the measuring programs will be displayed. Note: If you use a dongle for Configuration Tools, the software control elements are barred initially (this is shown by a mouse pointer with a picture of a key). Press a mouse button or a key on the keyboard to activate the login dialog box. Now log in with the user name "ME" and the password "ME". 3.2 Elements of the Main View 1 Fig. 3.1: Main View 2 4 3 5 Main View 1 Menu bar: Invoke various settings (mainly used in the individual measuring programs) and start the "Export Profiles" program. 2 Toolbar: Use the toolbar for loading and saving parameters and for restoring them to default settings. 3 Selection panel: Select the desired measuring programs. The measuring programs are split into several groups. The selected programs are shown in the "Active programs" input field. 4 Active programs: Open the views for configuring the active measuring programs, for combining measured values, for configuring the output ports of scanCONTROL and for the statistical evaluation of the measurement. Additionally, you may change the order of the programs and you may remove active programs. Page 16 Working with scanCONTROL Configuration Tools 5 Tools: Open several useful utilities. Note: - Never disconnect the IEEE 1394 connection between scanCONTROL and the PC while using the software. Never disconnect the power supply of scanCONTROL while the software is running. Never press the reset/user mode button on the controller while the software is running (scanCONTROL 2800/2810). Never activate the standby mode or hibernation of your computer when the measurement system is connected to the computer. This may cause the operating system to shut down unintentionally. 3.3 Configuring scanCONTROL Step by Step The basic steps for configuring scanCONTROL in order to solve a measuring task are described below: - Use the "Program selector" input field (see Fig. 3.1) in order to select up to eight measuring programs. The selected programs are shown in the "Active programs" input field. Configure the individual measuring programs. To do this, press the according buttons in the "Active programs" input field (see Fig. 3.1) or use the navigation menu (see Chapter 3.19). The view of the selected measuring program will be shown (see Chapter 4). Combine measured values, if necessary. You will access the "Result Combination" view (see Chapter 5) by pressing the "Result Combination" button in the "Active programs" input field (see Fig. 3.1) or by using the navigation menu (see Chapter 3.19). Configure the filters for measured values and the output ports of scanCONTROL. You will access the "Outputs and Results" view (see Chapter 6) by pressing the "Outputs and Results" button in the "Active programs" input field (see Fig. 3.1) or by using the navigation menu (see Chapter 3.19). After completing the configuration of scanCONTROL, save the parameters of scanCONTROL to file (see Chapter 3.14.1). You will be able to load the stored file again later on. Store the parameters permanently on scanCONTROL (see Chapter 3.14.4). scanCONTROL always starts with the configuration stored last. Exit Configuration Tools and disconnect scanCONTROL from the PC. scanCONTROL continues to operate as an independent unit and performs the measurements using your defined settings. Page 17 Working with scanCONTROL Configuration Tools 3.4 Structure of the Measuring Programs 1 7 2 3 10 4 5 8 6 9 Fig. 3.2: Structure of a measuring program The illustration shows the typical structure of a measuring program and the common input and display fields of the measuring programs. Each field is described in detail later in this user manual. 1 Menu bar: Using the menu bar, you can select the data source, return to the Main View, close Configuration Tools, save and load parameters, reset selected parameters to default settings, access the help and make basic settings (see Chapter 3.15). 2 “General” toolbar: Using this toolbar, you can select the data source, save profile sequences, save and load parameters and reset selected parameters to default settings (see Chapter 3.16). 3 Scanner settings: You change the settings of scanCONTROL with these values (see Chapter 3.7). In Offline mode (see Chapter 3.5) this input field will be replaced by the "File settings" input field (see Chapter 3.10). 4 2D-display: This display shows the last measured profile. Either a scanCONTROL measurement system which transfers data to the PC or a file in which profiles of a scanCONTROL measurement system have been recorded previously is used as data source for the profile. Using the toolbars (see below), you can adjust search areas in the 2D-display directly with the mouse and scale the display. 5 “Display” toolbar: Using this toolbar, you scale the 2D-display and activate various options for mouse interaction (see Chapter 3.17). 6 “Measurement” toolbar: Using this toolbar, you adjust the various search areas and limits for the measurement and activate or deactivate the dynamic tracking of the search areas (see Chapter 3.18). 7 Measurement setting: You select various measurement settings in this area (see Chapter 3.13.1). 8 Results display: The results of the current valid measurement are displayed. Page 18 Working with scanCONTROL Configuration Tools 9 Status line: Status and error messages are displayed on the status line. Refer to Chapter 9.1 "Status and error messages” for more detailed information. 10 Navigation menu: Press this button in order to display the navigation menu (see Chapter 3.19). Note: The individual display elements vary depending on the measuring program. Note: The settings in a measuring program are saved and used again when restarting the measuring program. You reset the parameters back to the factory settings by selecting the function "Parameters Reset..." from the menu bar or by pressing the corresponding button (see Fig. 3.3) in the “General” toolbar. Fig. 3.3: "Reset" button Note: In order to save the parameters of the active measuring programs select the "Parameters Save parameters to file..." menu item or press the corresponding button in the "General" toolbar. Note: The settings for scanCONTROL in the “Scanner settings” area of the current measuring program used are applied in all other measuring programs and views. 3.5 Selecting the Data Source When starting a measuring program, the measuring program uses the currently connected scanCONTROL measurement system as data source. In order to load and display profiles from a previously saved file, either select the menu item “File Load profiles” or press the corresponding button (see Fig. 3.4) in the “General” toolbar. Fig. 3.4: “Load profiles” button A standard Windows dialog is displayed for selection of the path and file name. The profile sequence is loaded after confirmation of the dialog. The measurement system now uses the loaded profile sequence as data source. The "Scanner settings" input field will be replaced by the "File settings" input field. You can control the playback of the loaded profile sequence in the File Settings input field (see Chapter 3.10). In order to use the connected scanCONTROL measurement system as data source again, either select the menu item “File scanCONTROL” or press the corresponding button (see Fig. 3.5) in the “General” toolbar. Fig. 3.5: “scanCONTROL” button The measuring program now uses the connected scanCONTROL measurement system as data source again. The "File settings" input field will be replaced by the "Scanner settings" input field. You can make settings for the measurement system in the “Scanner settings” input field (see Chapter 3.7). 3.6 Saving Profile Sequences In order to save profile sequences for later offline analysis (see Chapter 3.5), either select the menu item “File Save profiles” or press the corresponding button (see Fig. 3.6) in the “General” toolbar. Fig. 3.6: “Save profiles” button A standard Windows dialog is displayed for selection of the path and file name for saving the profile sequence. After confirmation, the profiles transferred from scanCONTROL to the PC are stored in the selected file. This process is displayed in a status dialog (see Fig. 3.7). Page 19 Working with scanCONTROL Configuration Tools Fig. 3.7: “Save profiles” status dialog box Press the “Stop” button to finish the saving process. Note: In order to save profile sequences at high speed or to reduce the size of the target file, select the “Save Profiles” measuring program (see Chapter 4.7.3). Page 20 Working with scanCONTROL Configuration Tools 3.7 Scanner Settings The parameters in this input field are used to configure the scanCONTROL measurement system for your measuring task. Note: The parameters “Exposure time“/“No. of profiles“ are dependent on each other. E.g. setting the "No. of profiles" parameter to 50 profiles per second limits the "Exposure time" parameter to a maximum value of 20 ms. 1 2 3 4 5 Fig. 3.8: "Scanner settings" input field Parameters in the "Scanner settings" input field 1 Exposure time [ms]: With this parameter you select the exposure time for scanCONTROL. In the bottom area of the dialog the saturation is displayed. This is influenced by the exposure time and should be between 60 % and 80 % for a measurement. - Minimum: 0.01 ms - Maximum: 40.0 ms 2 No. of profiles [1/s]: This parameter regulates the number of measurements per second. This value has priority over the entry in the "Exposure time" box. - Minimum: 25 - Maximum: depends on the type of sensor: scanCONTROL 2600/2610/2900/2910: 300 scanCONTROL 2700/2710: 100 scanCONTROL 2650/2660/2750/2760/2800/2810: 4000 scanCONTROL 2950/2960: 2000 / Start/Stop data transfer from scanner: Starts/stops the data transfer from the scanner. Refresh profile data: Use this button in order to transfer a current profile from the scanner in case of an interrupted data transfer. 3 Filter...: With this button you access the "Filter settings" dialog for configuring the profile filter (see Chapter 3.8). 4 Advanced...: With this button you access the "Advanced scanner settings" dialog (see Chapter 3.9) 5 Scanner status: In the bottom area of the "Scanner settings" input field status information of the scanCONTROL measurement system are displayed: - Exposure time [ms]: The currently used exposure time. - Saturation [%]: The saturation of the current signal in the region of interest marked green in the 2D-display (see Chapter 3.13.2). This can be precisely adjusted by changing the parameter "Exposure time". A saturation value between 60 % and 80 % is recommended. - No. of profiles [1/s]: This display shows the effective scan rate being used for evaluation of the scanner data. The scan rate may deviate from the "No. of profiles [1/s]" parameter if the computer does not have sufficient processing power. Note: The "Scanner settings" input field is only available when using a scanCONTROL measurement system (see Chapter 3.5). Page 21 Working with scanCONTROL Configuration Tools Note: For further information on the configuration of the measurement system, please refer to the instruction manual of the measurement system used and to the documents "Quick Reference scanCONTROL" and "Manual scanCONTROL (Part B)" (see Chapter 3.15, Section 4 "Documentation"). Page 22 Working with scanCONTROL Configuration Tools 3.8 Profile Filter Settings In combination with the scanCONTROL measurement system Configuration Tools offers you the possibility of equidistantly resampling the profile data in the X direction and of filtering the profile data. If you want to use the filter functions, it is recommended to activate the equidistantly resampling. Use the "Filter..." button in the "Scanner settings" box (see Chapter 3.7) to open the "Filter settings" dialog box. 1 4 3 2 Fig. 3.9: "Profile filter settings" dialog box Parameters in the "Profile filter settings" dialog box 1 Range: The range which is equidistantly resampled. Setting none 28x0-10/29x0-10 deactivated Resampled range 26x0-25/27x0-25/ 26x0-50/27x0-50/ 28x0-25/29x0-25 29x0-50 deactivated deactivated 26x0-100/27x0-100/ 28x0-100/29x0-100 deactivated tiny ±0.4 mm ±0.8 mm ±1.6 mm ±4.0 mm very small ±0.5 mm ±1.0 mm ±2.0 mm ±5.0 mm small ±1.0 mm ±2.0 mm ±4.0 mm ±10.0 mm medium ±2.0 mm ±4.0 mm ±8.0 mm ±20.0 mm large ±4.0 mm ±8.0 mm ±16.0 mm ±40.0 mm very large ±5.0 mm ±10.0 mm ±20.0 mm ±50.0 mm huge ±10.0 mm ±20.0 mm ±40.0 mm ±100.0 mm 2 Median: With this parameter you activate a median filter. - none: The median filter is not used. - 3 taps: You use a median filter with a filter size of three. - 5 taps: You use a median filter with a filter size of five. - 7 taps: You use a median filter with a filter size of seven. 3 Average: With this parameter you activate an average filter. - none: The average filter is not used. - 3 taps: You use an average filter with a filter size of three. - 5 taps: You use an average filter with a filter size of five. - 7 taps: You use an average filter with a filter size of seven. Page 23 Working with scanCONTROL Configuration Tools 4 Interpolate invalid points: If equidistantly resampling is active, this specifies whether invalid points will be replaced by neighboring valid points using linear interpolation. Gaps will be closed if this parameter is active. In order to leave gaps open you must not activate this parameter. Resample all info: If equidistantly resampling is active, this parameter specifies which data will be recalculated according to the equidistantly resampling. Deactivate this parameter to recalculate the X and Z coordinates only. Activate this parameter to recalculate all data (X / Z coordinates, width, intensity, threshold, moment 0 th and 1st order). This parameter has no influence on the 2D-display. Note: Activate the “Resample all info” parameter to store a profile sequence (see Chapter 3.6) and analyze it later with the “scanCONTROL 3D-View” software. Confirm your settings with the "OK" button. Note: To be able to use the filter functions, scanCONTROL requires a firmware version >= 17. Check the firmware version on the status line if necessary (See Chapter 3.4 and 9.1). Note: When using a file as data source (see Chapter 3.5), the filter functions are only available if the filter and resampling functions have been disabled during saving the profile sequence. Page 24 Working with scanCONTROL Configuration Tools 3.9 Advanced Scanner Settings The "Advanced scanner settings" dialog box offers you extended settings for the scanCONTROL measurement system. 1 2 3 4 5 Fig. 3.10: "General" tab sheet in the "Advanced scanner settings" dialog box Note: Only experienced users of the scanCONTROL measurement system should adjust any settings in this dialog box. Parameters in the "General" tab sheet in the "Advanced scanner settings" dialog box 1 - Type: The currently used type of measurement system and the associated firmware version are displayed. SN: The serial number of the currently used measurement system is displayed. IP address: In case of using scanCONTROL with an Ethernet interface, the IP address of scanCONTROL is displayed. Scanner selection: This list contains all scanCONTROL measurement systems connected to the PC via Ethernet and IEEE1394. Use this selection and the Connect/Disconnect button (see below) in order to activate a desired measurement system. Connect/Disconnect: Depending on the selection of the scanner list this button behaves as follows: Disconnect: If the currently active measuring system is selected in the scanner selection, you may disconnect the selected measuring system using the "Disconnect" button. Connect: If a measuring system is selected which isn't currently connected to Configuration Tools, you may use the "Connect" button in order to connect to the selected measuring system. In doing so, the previously connected measuring system gets disconnected. Page 25 Working with scanCONTROL Configuration Tools 2 - Find...: Press this button in order to identify all scanCONTROL measurement systems which are connected to the PC via Ethernet and IEEE1394. This function is performed automatically with starting the software. After completing this procedure the scanner selection list will be refreshed and you may change between the individual measurement systems. - Measuring field: Select one of the values to set the measuring field of scanCONTROL. For detailed information please refer to the instruction manual of the measurement system used. The following values are available, depending on the type of sensor: scanCONTROL 26X0/27X0: small: Measuring field index 7, 640 x 120 pixels standard: Measuring field index 2, 640 x 360 pixels large: Measuring field index 0, 640 x 480 pixels custom...: You can select the measuring field index (0 - 127) scanCONTROL 28X0: small: Measuring field index 95, 256 x 256 pixels standard: Measuring field index 50, 512 x 768 pixels large: Measuring field index 18, 768 x 768 pixels huge: Measuring field index 0, 1024 x 1024 pixels custom...: You can select the measuring field index (0 - 95) scanCONTROL 29X0: small: Measuring field index 7, 1280 x 256 pixels standard: Measuring field index 2, 1280 x 768 pixels large: Measuring field index 0, 1280 x 1024 pixels custom...: You can select the measuring field index (0 - 127) Points per profile: This parameter defines the number of points that make up a profile. Depending on the type of sensor you can choose between the following values: scanCONTROL 26X0/27X0: 80 160 320 640 max (640): The maximum number of points per profile, which is provided by the measurement system used. scanCONTROL 2800/2810: 64 (optional) 128 (optional) 256 512 1024 max (1024): The maximum number of points per profile, which is provided by the measurement system used. scanCONTROL 29X0: 160 320 640 1280 max (1280): The maximum number of points per profile, which is provided by the measurement system used. With this parameter you specify the resolution in the direction of the X axis. The value for the X axis is also influenced by the "Measuring field" parameter! Invert in X direction: The signal is inverted on the Z axis. Invert in Z direction: The signal is inverted in the middle of the measurement range parallel to the X axis. This function is enabled in the default settings. - - Page 26 Working with scanCONTROL Configuration Tools 3 - - - - 4 - Threshold: This value specifies the level of intensity at which scanCONTROL recognizes a reflection. In the bottom area of the "Scanner settings" input field the saturation is displayed (see Chapter 3.7). The saturation is influenced mainly by the threshold and should be between 60 % and 80 % for a measurement. absolute: The chosen threshold (0-1023) is used as absolute threshold. dynamic: The chosen threshold (0-1023) is used as a percentage of the maximum intensity of a reflection (value[%] = 100*threshold/1024). If you want to use a threshold which corresponds to 25 % of the maximum intensity, for example, you have to set the threshold parameter to 256. Reflections: This parameter is for specifying which reflection is recognized as a profile point and is only of importance for multiple reflections. first: The reflection closest to the scanner. last: The reflection furthest away from the scanner. largest area: The reflection with the largest area. This function is enabled in the default settings. highest intensity: The reflection with the highest intensity. only single: The reflection is processed only if there is only a single reflection for this profile point. Laser power [mW]: You can operate the laser of scanCONTROL at two different power levels or switch it off. Depending on the type of sensor the following options are available: scanCONTROL 26X0/29X0: off: Laser is switched off. reduced: 2 mW, if not specified otherwise. standard: 8 mW, if not specified otherwise. reduced (pulsed): pulsating with 2 mW, if not specified otherwise. This option is used to synchronize two scanCONTROL measurement systems with alternately pulsed lasers. The "RS422 mode" parameter must be set to "ext. trigger input" or "ext. trigger output". standard (pulsed): pulsating with 8 mW, if not specified otherwise. This option is used to synchronize two scanCONTROL measurement systems with alternately pulsed lasers. The "RS422 mode" parameter must be set to "ext. trigger input" or "ext. trigger output". scanCONTROL 27X0: off: Laser is switched off. reduced: 2 mW, if not specified otherwise. standard: 10 mW, if not specified otherwise. scanCONTROL 28X0: off: Laser is switched off. reduced: 1 mW, if not specified otherwise. standard: 15 mW, if not specified otherwise. Switch off laser: With this parameter you configure the laser safety interlock of scanCONTROL depending on the protective circuit of pins 3 and 13 of the synchronous input (This parameter is only available using scanCONTROL 2800/2810). if left open: The laser is switched off with the pins open. if short circuit: The laser is switched off with the pins connected. This parameter is only effective for laser class 2M (IIM). Auto exposure: Use these parameters to configure the automatic exposure time control. Active: Select this input field to activate the automatic exposure time control of the scanCONTROL measurement system. This setting is recommended for scanning single-colored, alternating surfaces. Mode: Use this parameter to specify the algorithm for the automatic exposure time control raw data: The automatic exposure time control is computed based on the raw data (Sensor matrix). profile: The automatic exposure time control is computed based on the profile data. filtered profile: The automatic exposure time control is computed based on the filtered profile data. Shutter alignment: With this parameter you determine how the specified scan rate is maintained with active automatic exposure time control. Page 27 Working with scanCONTROL Configuration Tools 5 - center: The intervals are in each case aligned to the center of the interval. right: The intervals are in each case aligned to the end of the interval. left: The intervals are in each case aligned to the start of the interval. none: The intervals are not aligned. Peak Min. width: Minimum width of a reflection to be detected as a valid profile point. Peak Max. width: Maximum width of a reflection to be detected as a valid profile point. Peak Min. intensity: Minimum intensity of a reflection to be detected as a valid profile point. Peak Max. intensity: Maximum intensity of a reflection to be detected as a valid profile point. Note: The "Switch off laser" parameter is only available using the scanCONTROL 2800 or scanCONTROL 2810 measurement system. Note: The "raw data" option of the "Auto exposure - Mode" parameter is only available using a scanCONTROL 26X0 or 29X0 measurement system. 1 2 3 4 5 6 Fig. 3.11: "Interface" tab sheet in the "Advanced scanner settings" dialog box Parameters in the "Interface" tab sheet in the "Advanced scanner settings" dialog box 1 - Interface/protocol: With this parameter you select which interface is used for output of measured values (see Chapter 1.2): output unit + serial: The measured values are supplied via scanCONTROL Output Unit (digital and analog) and the serial interface (ASCII) (see Chapters 6.2, 6.3 and 6.4). output unit + UDP: The measured values are supplied via scanCONTROL Output Unit (digital and analog) and via Ethernet (UDP) (see Chapters 6.2, 6.3 and 6.5). modbus: The Modbus protocol is used to output the measured values (see Chapter 6.6). The measured values are supplied via serial output and Ethernet. Page 28 Working with scanCONTROL Configuration Tools - IP address output unit: In case of using scanCONTROL Output Unit with an Ethernet interface, you specify the IP address of scanCONTROL Output Unit with this parameter. Note: The "IP address output unit" parameter is used to establish a connection between the measurement system and Output Unit and is not used to set the IP address of the scanCONTROL Output Unit. Note: For detailed information on the configuration of the IP address of scanCONTROL Output please refer to the documentation of the Output Unit (Fieldbus coupler) used. - - - - 2 - 3 - Output unit mode: With this parameter you activate or deactivate scanCONTROL Output Unit for supplying digital and analog signals (see Chapter 6.2 and 6.3). Selecting the "default" setting you use the default setting of scanCONTROL Smart (scanCONTROL 26X0/27X0/29X0: active; scanCONTROL 2810: inactive). This parameter is only effective using the scanCONTROL Smart product series. Check connection to output unit…: Use this button in order to check the connection of the scanCONTROL measuring system to the Output unit. This function is only available in the "Result Combination", "Outputs and Results" and "Result Monitor" views. Digital out default: Specifies the behavior of the criteria set to "None". OK: The criterion is evaluated as OK. nOK: The criterion is evaluated as nOK. keep last value: The previous valid value is used. Digital out: invert level: In case of activating this parameter, the electrical signal, output at the digital outputs, is inverted (OK = low level, nOK = high level). In case of deactivating this parameter, the logical value corresponds to the electrical level (OK = high level, nOK = low level). Analog out: keep last value: Specifies the behavior of the analog outputs in case of an erroneous measurement. On activating this parameter the result of the previous valid measurement is output. When deactivating this parameter the signal is pulled to the lower limit of the voltage/current range. IP address client: In case of transferring the measured values using UDP, you specify the IP address of the receiver (client) with this parameter. Port: Specifies the UDP port of the receiver (client). RS422 mode: Use this parameter to configure the function of the RS422 interface of scanCONTROL. Depending on the type of sensor you can choose between the following values: scanCONTROL 26X0/29X0 serial: The RS422 interface is used as serial port. Measurement values are output and commands are received (see Chapter 6.4). ext. trigger input: The RS422 interface is used as synchronization and trigger input (see below, parameter "Trigger mode"). ext. trigger output: The RS422 interface is used as synchronization and trigger output. CMM trigger: Activate this setting in order to use the RS422 interface as programmable trigger output (see below, parameter "Enable CMM trigger"). scanCONTROL 27X0 automatic: scanCONTROL configures the function of the RS422 interface automatically. serial: The RS422 interface is used as serial port. Measurement values are output and commands are received (see Chapter 6.4). external trigger: The RS422 interface is used to synchronize and trigger the scanCONTROL measurement system (see below, parameter "Trigger mode"). CMM trigger: Activate this setting in order to use the RS422 interface as programmable trigger output (see below, parameter "Enable CMM trigger"). encoder/counter: Activate this function in order to access the internal counter of scanCONTROL via the RS422 interface (see below, input field "Counter (Encoder)"). pulsed laser: The RS422 interface is used to synchronize two scanCONTROL measurement systems. The lasers are alternately pulsed. Page 29 Working with scanCONTROL Configuration Tools - - 4 - 5 - Serial baudrate: The baudrate at which the serial port is operated. This parameter is only available if the " RS422 mode" parameter is set to "serial". 9600 19200 38400 57600 115200 No RS422 termination: Disables the termination resistor of the RS422 circuit. When deactivating this parameter, the default termination is used (serial: Termination active; ext. trigger input: Termination active; ext. trigger output: Termination inactive; CMM trigger: Termination inactive). Digital input mode: Use this parameter to configure the function of the digital inputs of scanCONTROL. encoder + reset: Inputs 2 (A) and 3 (B) are used to access the internal counter of scanCONTROL. Input 1 (index N) is used to reset the counter. encoder + trigger: Inputs 2 (A) and 3 (B) are used to access the internal counter of scanCONTROL. Input 1 is used as trigger input. trigger: Input 1 is used as trigger input. user modes + trigger: Input 1 is used as trigger input. Inputs 2 (bit 0) and 3 (bit 1) are used to load user modes. user modes: Inputs 1 (bit 0), 2 (bit 1) and 3 (bit 2) are used to load user modes. timestamp: The state of the digital inputs is included as bit sequence in the timestamp of the profiles. Digital input logic: Defines the logic of the digital inputs: low level logic (5V): TTL high level logic (24V): HTL Trigger mode: This function enables you to control the scanCONTROL measurement system via the RS422 interface (scanCONTROL 26X0/27X0/29X0), via the digital inputs (scanCONTROL 26X0/29X0) and via the synchronous input on the controller (scanCONTROL 28X0) respectively. internal: scanCONTROL transfers continuously according to the setting "No. of profiles [1/s]“ Please use the following trigger settings only when you control scanCONTROL externally: pos. edge: scanCONTROL is triggered with positive edges whereas the exposure time corresponds to the parameter "Exposure time". neg. edge: scanCONTROL is triggered with negative edges whereas the exposure time corresponds to the parameter "Exposure time". pos. pulse: scanCONTROL is triggered with positive edges whereas the exposure time corresponds to the length of the positive trigger-pulse. neg. pulse: scanCONTROL is triggered with negative edges whereas the exposure corresponds to the length of the negative trigger-pulse. pos. gate: On applying a logical "1" signal to the trigger input scanCONTROL transfers continuously according to the setting "No. of profiles [1/s]“. When applying a logical "0" signal to the trigger input no profiles are transferred. neg. gate: On applying a logical "0" signal to the trigger input scanCONTROL transfers continuously according to the setting "No. of profiles [1/s]“. When applying a logical "1" signal to the trigger input no profiles are transferred. encoder: scanCONTROL is triggered using the internal counter (encoder). A measurement operation is triggered after N encoder steps (N is defined by the "Encoder step" parameter, see below). Note: The maximum frequency available for triggering corresponds to the "No. of profiles [1/s]" parameter. Note: More information about the trigger function of scanCONTROL can be found in the instruction manual of the measurement system used. Page 30 Working with scanCONTROL Configuration Tools - 6 - Trigger source: Select the type of inputs used for synchronization and triggering: RS422 digital inputs Encoder step: Specifies the number of encoder steps being necessary to trigger a measurement operation. This parameter is only available if the "Trigger mode" parameter is set to "encoder" Counter (Encoder): Use these parameters to activate the internal counter of scanCONTROL. With using a scanCONTROL 2800 or scanCONTROL 2810 measurement system, the counter input is only available as an option for scanCONTROL. Depending on the type of sensor the following parameters are available: scanCONTROL 26X0/27X0/29X0 Encoder active: Activates the encoder input of scanCONTROL. It is possible to increment and decrement the counter. scanCONTROL 28X0 Count positive edges. Activates the counter input of scanCONTROL. Ii is possible to increment the counter applying positive edges to the counter input. Count negative edges: Activates the counter input of scanCONTROL. It is possible to increment the counter applying negative edges to the counter input. Note: The "keep last value" option of the "Digital out default" parameter is not available using the Modbus protocol. Note: The "Output unit mode", "IP address output unit" and "Analog out: keep last value" parameters are not available using the Modbus protocol. Note: The "Output unit mode" and "IP address output unit" parameters are only effective using the scanCONTROL Smart product series. With using the scanCONTROL Compact or scanCONTROL High-Speed product series the parameters have no effect. Note: The "RS422 mode" parameter is only available using a scanCONTROL 26X0, 27X0 or 29X0 measurement system. Note: The "pos. gate", "neg. gate" and "encoder" options of the "Trigger mode" parameter are only available using a scanCONTROL 26X0, 27X0 or 29X0 measurement system. Note: The "No RS422 termination", "Digital input mode", "Digital input logic" and "Trigger source" parameters are only available using a scanCONTROL 26X0 or 29X0 measurement system. Page 31 Working with scanCONTROL Configuration Tools 1 2 3 4 Fig. 3.12: "Advanced" tab sheet in the "Advanced scanner settings" dialog box Parameters in the "Advanced" tab sheet in the "Advanced scanner settings" dialog box 1 - Suppress backlight: With this entry field you activate the automatic backlight compensation. Video filter: Activate this parameter to improve the image quality. High resolution: With this parameter you activate the subpixel resolution for the Z values. Calibration: Use this parameter to activate the calibration. 2 - Packet delay [µs]: Specifies the delay time of transferred data packets via Ethernet. This parameter is of importance in case of synchronizing multiple sensors in one subnet. 3 - Enable CMM trigger: Select this box to activate the programmable trigger output of scanCONTROL. With using a scanCONTROL 2800 measurement system, the programmable trigger output is only available as an option for scanCONTROL. This Parameter isn't available using a scanCONTROL 2810 measurement system. Invert trigger output: With this parameter you invert the trigger output. Trigger output: The port at which the trigger signal is issued. Port 1 Port 3 Port 2 Port 4 Trigger divisor: This gives the division ratio between the trigger signals and the profiles. Select a value "n" to issue one trigger signal for every nth profile. Min: 1 Max: 255 Mark-space ratio: This gives the mark-space ratio for the decreasing edge. 1:4 2:1 1:3 3:1 1:2 4:1 1:1 - - Page 32 Working with scanCONTROL Configuration Tools 4 - Skew correction [µs]: This parameter provides a time correction of the trigger signal in increments of 0.5 µs. Minimum: -256.0 µs Maximum: 255.5 µs - Estimated processing time [ms]: Shows an estimation of the required time for a measurement operation. This information is only available for scanCONTROL Smart and only in the "Result Combination", "Output and Results" and "Result Monitor" views. Confirm your settings with the "OK" button. Note: For further information on the parameters for the measurement system described here, please refer to the documents “Quick Reference scanCONTROL” and “Manual scanCONTROL (Part B)” (see Chapter 3.15, Section 4 "Documentation"). Note: The "Advanced scanner settings" dialog box is only available when using a scanCONTROL measurement system (see Chapter 3.5). 3.10 File Settings When using a saved profile sequence as data source the "File settings" input field is used to control the playback of the profile sequence. 1 2 3 4 5 6 Fig. 3.13: "File settings" input field Parameters and information in the "File settings" input field: 1 - Name: The name of the profile sequence. Info: You press this button to display the scanCONTROL settings selected when the profile sequence was saved (see Chapter 3.11). 2 - Mark profile sequence: You may mark a partial range of the loaded profile sequence using these input fields. When starting the playback only the marked range is played back. : Use this button in order to use the profile currently displayed as lower limit of the marked range. Use the edit field in order to change the lower limit manually. : Resets the marked range. When starting the playback the complete profile sequence is played back. : Use this button in order to use the profile currently displayed as upper limit of the marked range. Use the edit field in order to change the upper limit manually. 3 - Slider control: Shows the progress of the playback of the profile sequence. When the playback is stopped you can activate individual profiles by dragging the slider. The display bar below represents the marked range for the playback of the profile sequence. The partial range may be modified using the parameters described in section 2. 4 - Play/Pause / : This starts/pauses the playback of the selected profile sequence. Stop : This stops the playback of the selected profile sequence. Current profile : While a profile sequence is being played you will see a run-through of the profile numbers in this box. If you stop the playback you can activate any individual profile directly by entering the profile number. Page 33 Working with scanCONTROL Configuration Tools - - 5 - 6 - Pause if nOK : If you activate this option, the playback of the profile sequence is paused if at least one digital output is evaluated as nOK (see Chapter 6.2) in the displayed profile. This option is only available in the "Outputs and results" view (see Chapter 6). Endless mode : Use this button in order to activate the endless playback mode. After reaching the upper limit of the partial range for playback, the playback restarts automatically at the lower limit of the range. Invert signal in X: The signal is inverted on the Z axis. Invert signal in Z: The signal is inverted in the middle of the measurement range parallel to the X axis. Filter: With this button you access the "Filter settings" dialog for configuring the profile filter (see Chapter 3.8). Scanner status: In the bottom area of the "File settings" input field the following information of the actual profile is shown: Exposure time [ms]: The used exposure time of scanCONTROL when the profile sequence was saved. Saturation [%]: The saturation of the current signal in the region of interest marked green in the 2D-display (see Chapter 3.13.2). A saturation value between 60 % and 80 % is recommended. Note: The "File settings" input field is only available with loading a profile sequence (see Chapter 3.5). 3.11 Displaying scanCONTROL Parameters in Offline Mode When playing back saved profile sequences, you have the possibility of displaying the scanCONTROL settings used during saving. Press the info button in the "File settings" input field (see Chapter 3.10). You then access the "Scanner settings" dialog box. In the dialog box you can choose between the following tabs: Scanner: The standard settings of the measurement system are displayed. You will find a detailed description of the individual parameters in Chapter 3.7. Additionally the following information is shown: - - Name: The name of the profile sequence. Path: The path of the file. Type: The type of measurement system used for recording the profile sequence. SN: The serial number of the measurement system used for recording the profile sequence. File format: This indicates which information is contained in the saved profile sequence. x/z only: The X and Z coordinates of the individual measurement points are saved. x/z + data: A complete reflection is saved in the profile sequence. In a reflection the following information is contained for each measurement point: X/Z coordinates, width, intensity, threshold, moment of 0th and 1st order. x/z + [texture]: The X and Z coordinates of the individual measurement points, their textures (e.g. "intensity") and the parameters used while saving the profile sequence have been saved. full set: All four reflections, the time stamp and, where applicable, the measurement system parameters used during saving. Changed: The modification date of the profile sequence. Buffered profiles: The number of profiles contained in the loaded profile sequence. Page 34 Working with scanCONTROL Configuration Tools Fig. 3.14: "Scanner " tab sheet in the "Scanner settings dialog" General: General settings of scanCONTROL are displayed. You will find a detailed description of the individual parameters in Chapter 3.9. Fig. 3.15: "General " tab sheet in the "Scanner settings dialog" Interface: The interface settings of scanCONTROL are displayed. You will find a detailed description of the individual parameters in Chapter 3.9. Fig. 3.16: "Interface " tab sheet in the "Scanner settings dialog" Advanced: The extended settings of scanCONTROL are displayed. You will find a detailed description of the individual parameters in Chapter 3.9. Page 35 Working with scanCONTROL Configuration Tools Fig. 3.17: "Advanced " tab sheet in the "Scanner settings" dialog Filter: The profile filter settings of scanCONTROL are displayed. You will find a detailed description of the individual parameters in Chapter 3.8. Fig. 3.18: "Filter " tab sheet in the "Scanner settings" dialog Note: The following software packages save the scanCONTROL parameters: - scanCONTROL Configuration Tools - scanCONTROL Demo-Software (version 1.2 and above) - scanCONTROL2810 Sensor Edition - scanCONTROL Setup-Software 2X10 - DeveloperDemo (version 2.0 and above, option must be activated). Note: The information used during saving is only available in the file format "full set". 3.12 Mouse Interaction in the 2D-Display scanCONTROL Configuration Tools offers several functions for mouse interaction in the 2D-display. Thus you have the possibility of scaling the 2D-display or getting detailed information about a profile point, for example. The individual modes are activated via the "Display" toolbar (see Chapter 3.17). You will find detailed descriptions of the individual options in the following. 3.12.1 Reset 2D-Display Fig. 3.19: Button "Reset 2D-display" Press this button in order to reset the 2D-display. Thus the settings of the 2D-display are reset so that the complete measuring field is shown and the profiles transferred by scanCONTROL are displayed. Page 36 Working with scanCONTROL Configuration Tools 3.12.2 Automatic Scaling of the 2D-Display Fig. 3.20: Button "Auto scaling" You activate or deactivate the automatic scaling of the 2D-display by pressing this button. If automatic scaling is activated, the 2D-display will be automatically adapted to the minimum and maximum coordinates of the displayed profile. 3.12.3 Keep Aspect Ratio Fig. 3.21: Button "Keep aspect ratio" Press this button in order to activate or deactivate the “Keep aspect ratio” option. Activating this option the display is scaled so that the real aspect ratio of the displayed profile is retained. Deactivating this option the scaling is adapted separately to the actual values for the X and Y axes. 3.12.4 Zoom in 2D-Display Fig. 3.22: Button "Zoom" You activate or deactivate the “Zoom” mode by pressing this button. In the “Zoom” mode you can zoom in parts of the 2D-display and so directly set the scaling of the 2D-display with your mouse. Proceed as follows: Move the mouse pointer to any corner of the desired range to be zoomed in. Now mark the range to be zoomed in. Hold the left mouse button pressed and move the mouse pointer to the opposite corner of the range to be zoomed in. Release the mouse button. The marked range will be zoomed in. Page 37 Working with scanCONTROL Configuration Tools Fig. 3.23: Zoom in 2D-display Note: Alternatively you may use the mouse wheel in order to zoom in and out the 2D-display. 3.12.5 Move Profile Fig. 3.24: Button "Move" You activate or deactivate the “Move profile” mode by pressing this button. You can move the profile on the 2D-display with an active "Move profile" mode. Proceed as follows: Move the mouse pointer into the 2D-display. Press the left mouse button and keep it pressed. Now move the mouse pointer in order to move the profile. 3.12.6 Display Extended Information of a Profile Point Fig. 3.25: Button "Point information" Press this button to activate or deactivate the "Display extended information of a profile point" mode. Proceed as follows: Move the mouse pointer onto the desired profile point. Hold the left mouse button pressed on the profile point. The information for the point will now be displayed in a tooltip next to the mouse pointer. Page 38 Working with scanCONTROL Configuration Tools Fig. 3.26: Extended information of a profile point The following information is displayed: - X: The X coordinate of the point. Z: The Z coordinate of the point. Intensity: The maximum intensity of the reflection from which the point has been calculated. Width: The width of the reflection from which the point has been calculated. 3.13 Configuring the Measurement In order to perform the desired measurements in the individual measuring programs, you must set measuring ranges and threshold values. Thereby, the setting options in the individual measuring programs vary. The configuration of the measurement is divided into five steps: - Specify the measurement task (optional, depending on the measuring program). Cutting out (optional): Selection of a range in which the measurement should be performed. Determination of (reference) straight lines. Set a minimum height/depth (optional, depending on the measuring program). Setting and activating the dynamic tracking of the ranges (optional). 3.13.1 Specifying the Measurement Task Some measuring programs require a more exact specification of the measurement task. You can make this specification in the corresponding input fields of the individual measuring programs (see Fig. 3.27). The specification of the measurement task is explained in the following using the "Single Offset" example. Fig. 3.27: “Offset type” input field in the “Single offset” measuring program The “Single Offset” measuring program is used for the measurement of the offset of a line. In the "Offset type" input field you select the algorithm for calculating the offset (Z coordinate of the barycenter of the points located in the fitting range or Z coordinate of the intersection point of the line with the Z axis). 3.13.2 Cutting Out The individual measuring programs provide the possibility to specify a range in which the measurement should take place and to hide the rest of the measuring field. Profile points which are outside the range will not be considered for the measurement and are displayed in grey. This step is necessary, for example, if parts of the mounting of the measurement object or the supporting surface of the target are located in the measuring field or if reflections occur which do not originate from the target. There are two modes available: - Select inside points: Define a rectangular range in the 2D-display. Profile points which are inside the range will be considered for the measurement. Profile points which are outside the range will not be considered. Select outside points: Define a rectangular range in the 2D-display. Profile points which are outside the range will be considered for the measurement. Profile points which are inside the range will not be considered. If there are no interfering influences in the profile, you can skip this step and use the complete measuring range for the measurement. Page 39 Working with scanCONTROL Configuration Tools Proceed as follows to select the mode (Select inside/outside points) for cutting out: Open the "Options for region of interest" context menu. To do this, press the corresponding button located right to the "Set region of interest" button (see Fig. 3.28) Use the context menu to select the desired mode (see Fig. 3.28) Fig. 3.28: "Set region of interest" button Note: The "select inside points" mode is active in the default settings. After selecting the mode for cutting out you may specify the range for the measurement: If not already done, press the button "Set region of interest" (see Fig. 3.29) in the "Measurement" toolbar. You are now in the "Set region of interest" mode. The button remains pressed and the measuring range is shown dark green in the 2D-display if it is located in the displayed range. Fig. 3.29: "Set region of interest" button (Select inside points/Select outside points) Note: The default setting is that the range for the measurement is larger than the range shown in the 2Ddisplay. Thus, the range for the measurement is initially not visible after activating the "Set region of interest" mode. You can now set the measuring range in the 2D-display with the mouse. There are two possibilities for doing this: - Setting the complete range: Move the mouse pointer to any corner of the range you want to set. Now mark the range to be modified. Press the left mouse button and keep it pressed. Move the mouse pointer to the opposite corner of the range you want to set. Release the mouse button. The selected range will now be applied. Page 40 Working with scanCONTROL Configuration Tools Fig. 3.30: Setting complete measuring range - Changing the range (drag and drop): Move the mouse pointer to any corner or side of the displayed range so that the mouse pointer is located in one of the small marking rectangles. Press the left mouse button and keep it pressed. Now move the mouse pointer to the desired position. The side or corner of the range changes with the position of the mouse pointer. Release the mouse button. Page 41 Working with scanCONTROL Configuration Tools Fig. 3.31: Changing measuring range As well as the mouse interaction, you also have the possibility to manually edit the values for the range in which the measurement should take place. If not already done so, activate the "Set Region of Interest" mode (see above, Fig. 3.29). Press the right mouse button in the 2D-display. The "Edit region of interest" dialog is displayed where you can manually edit the values of the range. Fig. 3.32: "Edit region of interest" dialog box 3.13.3 Remove Range for Cutting Out By using the "Reset region of interest" button (see Fig. 3.33) you will remove the range for cutting out (see Chap. 3.13.2) and use the complete measuring range for the measurement again. Fig. 3.33: "Reset region of interest" button Page 42 Working with scanCONTROL Configuration Tools 3.13.4 Setting Straight Lines In order to be able to perform measurements in the individual measuring programs, you must define ranges in which straight lines can be fitted to the points from the profile. These straight lines are used for example for the angle measurement as the basis for determination of the angle or for the weld measurement as reference lines where, for example, the height is measured. A more detailed description can be found in the respective chapters for the individual measuring programs. Proceed as follows in order to specify the range/ranges for the line fitting. If not already done, press one of the "Set reference line" buttons (see Fig. 3.34) in the "Measurement" toolbar. There are various buttons, depending on the measuring program, for the line fitting. After you have pressed a button, you are in the "Set reference line" mode. The button remains pressed and the range for line fitting is shown with red and blue vertical lines in the 2D-display if it is located in the displayed range. Fig. 3.34: "Set reference line" buttons You can now set the range for the line fitting in the 2D-display with the mouse. There are two possibilities for doing this: - Setting the complete range: Move the mouse pointer to the left or right side of the range you want to set. Now mark the range to be modified. Press the left mouse button and keep it pressed. Move the mouse pointer to the opposite side of the range you want to set. Release the mouse button. The selected range will now be applied. Page 43 Working with scanCONTROL Configuration Tools Fig. 3.35: Setting complete range for the line fitting - Changing the range (drag and drop): Move the mouse pointer to the right or left side of the displayed range so that the mouse pointer is located in one of the small marking rectangles. Press the left mouse button and keep it pressed. Now move the mouse pointer to the desired position. The side of the range is moved with the mouse pointer. Release the mouse button. Page 44 Working with scanCONTROL Configuration Tools Fig. 3.36: Changing the range for the line fitting As well as the mouse interaction, you have the possibility to manually edit the values for the range for the line fitting. If not already done so, activate the "Set reference line" mode (see above, Fig. 3.34). Press the right mouse button in the 2D-display. The "Edit reference" dialog is displayed where you can manually edit the values of the ranges for the line fitting. Fig. 3.37: "Edit reference" dialog box Page 45 Working with scanCONTROL Configuration Tools 3.13.5 Setting a Minimum Height It is necessary to specify a minimum height for the measurement in some measuring programs. For example, for the measurement of a weld, only those points whose distance from the reference line is greater than the minimum height are considered for the measurement. A more detailed description can be found in the respective chapters for the individual measuring programs. Proceed as follows in order to specify the minimum height for the measurement: If not already done, press the button "Set minimum height" (see Fig. 3.38) in the "Measurement" toolbar. You are now in the "Set minimum height" mode. The button remains pressed and the minimum height is shown in the 2D-display as a blue line parallel to the reference line. Fig. 3.38: "Set minimum height" button You can now set the minimum height for the measurement with the mouse. Proceed as follows: Move the mouse pointer on the blue line which represents the minimum height. Press the left mouse button and keep it pressed. Now move the mouse pointer to the desired position. The minimum height is moved with the mouse pointer. Release the mouse button. Fig. 3.39: Setting minimum height Page 46 Working with scanCONTROL Configuration Tools As well as the mouse interaction, you have the possibility to manually edit the minimum height. If not already done so, activate the "Set minimum height" mode (see above, Fig. 3.38). Press the right mouse button in the 2D-display. The "Edit threshold" dialog is displayed where you can manually edit the minimum height. Fig. 3.40: "Edit threshold“ dialog box Page 47 Working with scanCONTROL Configuration Tools 3.13.6 Activating the Dynamic Tracking of the Ranges scanCONTROL Configuration Tools makes it possible for you to dynamically track the range for cutting out, the ranges for the line fitting and the measurement ranges resulting from these. In this way, the measurement can also be performed correctly in case of position change in the X/Z direction, e.g. for curves of the beading track or bulges and indentations in the material. The ranges are coupled to an assigned point of the profile, the so-called anchor point, for the dynamic tracking. This point is also used as a reference characteristic in order to create orientation at the target. Fig. 3.41: "Dynamic tracking" button Proceed as follows in order to parameterize and activate the dynamic tracking: Set the ranges for the line fitting (see Chapter 3.13.4) and, if necessary, the range for cutting out (see Chapter 3.13.2). Press the "Dynamic tracking" button in the "Measurement" toolbar (see Fig. 3.41). The "Dynamic tracking" dialog is displayed (see Fig. 3.42). The potential candidates for the anchor point are highlighted in turquois in the 2D-display (see Fig. 3.44). Fig. 3.42: "Dynamic tracking" dialog box Make the following settings: - Tracking target: Select the measurement ranges to be tracked: Region of interest: The range for cutting out. References: The ranges for line fitting. Region of interest + References: The range for cutting out and the ranges for line fitting. Note: The "Region of interest" and "Region of interest + References" options are only available if there are active measuring programs being processed previously to the current measuring program and providing anchor points. Note: If using the "Maximum point", "Minimum point", "First point" or "Last point" measuring program, only the "Region of interest" option is available. - Tracking source (Anchor point): Select the anchor point. The following options are available: Measurement results: Points which are provided as anchor points by previous measuring programs. Extreme points: The extreme points inside the range for cutting out of the current measuring program (First, Last, Minimum, Maximum Point). The extreme points are only available if the "Tracking target" parameter is set to "References". Note: The following dialog is displayed in case of no anchor points being available: Fig. 3.43: Information dialog box in case of missing anchor points Page 48 Working with scanCONTROL Configuration Tools An overview of the available measuring programs which are providing anchor points is shown below: - Maximum Point - Minimum Point - First Point - Last Point - Absolute Angle/Offset (if using "Center of gravity") - Intersection Point - Single Offset (if using "Center of gravity") - Double Offset (if using "Center of gravity") - Edge Left - Edge Right - Surface Maximum - Surface Minimum - Seam Start/End - Seam Maximum - Groove Start/End - Groove Minimum 4 1 3 6 2 5 Fig. 3.44: Possible candidates for the anchor point 1-2: Results from previous measuring programs. 3-6: Extreme points of the current measuring program. In the "Dynamic tracking" dialog (see Fig. 3.42), select the ranges to be tracked and the desired anchor point and confirm with "OK". The dynamic tracking is now active. The "dynamic tracking" button (see Fig. 3.41) remains pressed. The coupling of the ranges to the anchor point is symbolized with turquois lines in the 2D-display. In order to deactivate the dynamic tracking, press the "Dynamic tracking" button again (see Fig. 3.41). The dynamic tracking is now deactivated. Page 49 Working with scanCONTROL Configuration Tools 3.14 Saving and Loading Parameters Configuration Tools allows you to save and load parameters. For example, you can save parameters for different measuring settings and therefore configure the measurement system for different measuring tasks. In addition, you can also specify different tolerances for a single measuring task. You can simplify the configuration of a new measuring task by making stepwise refinements. Once you have saved all the parameters for measurement settings you can load them again later on. You can save the parameters for as many measuring tasks as you like. 3.14.1 Saving Parameters to File In order to save the parameters of all active measuring programs, either select the menu item "Parameters Save parameters to file..." or press the corresponding button (see Fig. 3.45) in the "General" toolbar. Fig. 3.45: "Save parameters to file" button A standard Windows dialog is displayed for selection of the path and file name for saving the parameters. As standard, the file name has the extension ".sc1". You can use a different file extension by selecting the "All files (*.*)" option in the Windows dialog in the "File type" selection field. The parameters are saved in the selected file after confirmation of the dialog. 3.14.2 Loading Parameters from File In order to load previously saved parameters of measuring programs, either select the menu item "Parameters Load parameters from file..." or press the corresponding button (see Fig. 3.46) in the "General" toolbar. Fig. 3.46: "Load parameters from file" button A standard Windows dialog is displayed for selection of the path and file name from which the parameters should be loaded. As standard, the file name has the extension ".sc1". You can use a different file extension by selecting the "All files (*.*)" option in the Windows dialog in the "File type" selection field. The parameters are loaded into the current measuring program after confirmation of the dialog. Note: In case of loading parameters which don't contain the active measuring program or if the position of the program doesn't match with the position in the loaded parameter set, a warning dialog appears. After confirming the dialog Configuration Tools returns to the Main View and loads the desired parameter file. Fig. 3.47: Warning dialog "Load parameters from file" Page 50 Working with scanCONTROL Configuration Tools 3.14.3 Reset Parameters to Default Settings In order to reset the parameters of the current measuring program and of all active measuring programs respectively to their default settings, either select the menu item "Parameters Reset..." or press the corresponding button (see Fig. 3.48) in the "General" toolbar. Fig. 3.48: "Reset" button A dialog is displayed (see Fig. 3.49) where you can select which parameters should be reset. Fig. 3.49: "Reset" dialog box (Example 1: "Seam Width/Height", Example 2: "Outputs and Results") The following parameters can be reset: - Scanner settings: The parameters of the scanCONTROL measurement system (see Chapter 3.7, 3.8, 3.9). Display settings: The settings of the 2D-display (see Chapter 3.12). Region of interest: The range for cutting out a profile (see Chapter 3.13.2). Reference lines: The range for determination of the (reference) straight lines (see Chapter 3.13.4). Minimum height: The threshold value for the detection of significant profile sections (see Chapter 3.13.5). Dynamic tracking: The settings for the dynamic tracking of the search ranges (see Chapter 3.13.6). Combined signals: The signals for combining measured values (see Chapter 5). Filter/Outputs: The settings for filtering measured values (see Chapter 6.1) and for evaluation and output of the measured values (see Chapter 6.2, 6.3, 6.4, 6.5 and 6.6). Result monitor: The settings for the statistical evaluation of measured values (see Chapter 7). Press the "Check all" button in order to select all parameter types. Press the "Uncheck all" button in order to deselect all parameter types. Press "OK" in order to reset the selected parameters. Note: The possible settings in the "Reset" dialog vary depending on the measuring program. Page 51 Working with scanCONTROL Configuration Tools 3.14.4 Store Parameters permanently on scanCONTROL Configuration Tools makes it possible for you to permanently store the parameters of all active measuring programs and the configuration of the output ports on the connected scanCONTROL measurement system. So, in combination with the scanCONTROL Smart product series which operates as an independent unit and without a connected PC, measurements can also be performed after a failure and recovery of the power supply without having to connect the measurement system to the PC again. Note: Saving parameters to scanCONTROL is only available in the "Result Combination", "Outputs and Results" and "Result Monitor" views. In order to save the parameters of all active measuring programs and the configuration of the output ports on the connected scanCONTROL Smart measurement system, either select the menu item "Parameters Save parameters to scanCONTROL..." or press the corresponding button (see Fig. 3.50) in the "General" toolbar. Fig. 3.50: "Save parameters to scanCONTROL" button The "Save parameters to scanCONTROL" dialog (see Fig. 3.51) is displayed. In this dialog, select the storage location on the scanCONTROL measurement system where the current parameters should be saved. These storage locations are called "User modes". Depending on the sensor type, the maximum number of "User modes" is 15 (scanCONTROL 26X0/27X0/29X0) or 3 (scanCONTROL 28X0). The parameters are saved in the selected user mode after confirmation of the dialog. Fig. 3.51: "Save parameters to scanCONTROL" dialog box Note: Details for loading a user mode can be found in Chapter 3.14.5, 8.3 and in the instruction manual of the measurement system used. Note: In case of using the scanCONTROL Compact or scanCONTROL High-Speed product series, only the parameters located in the "Scanner settings" (see Chapter 3.7, 3.8 and 3.9) section are stored. In order to save all measurement parameters please use the scanCONTROL Smart product series. Page 52 Working with scanCONTROL Configuration Tools 3.14.5 Load Parameters from scanCONTROL Use the "Load parameters from scanCONTROL" function in order to read the current parameter settings or parameter settings which have been saved on the measurement system (see Chapter 3.14.4) back into the software. To do this, either select the menu item "Parameters Load parameters from scanCONTROL..." or press the corresponding button (see Fig. 3.52) in the "General" toolbar. Note: Loading parameters from scanCONTROL is only available in the main view and in the "Result Combination", "Outputs and Result" and "Result Monitor" views. Fig. 3.52: "Load parameters from scanCONTROL" button The "Read settings from scanCONTROL" dialog appears. Select the parameter set (User mode) or the current parameter settings to load. After you have confirmed the dialog with OK, the selected parameters on the scanCONTROL measurement system are activated and the software reads the parameter set from the measurement system and returns to the recently opened view. Fig. 3.53: "Read Settings from scanCONTROL" dialog box If the parameters couldn't be read out from the selected user mode, an error message appears. In the following possible warning and error messages and their reasons are listed: - The selected user mode contains no measuring parameters. You can only read user modes which were saved with the function "Save parameters to scanCONTROL" (see Chapter 3.14.4). You are using the scanCONTROL Compact or scanCONTROL High-Speed product series. Only the parameters located in the "Scanner settings" (see Chapter 3.7, 3.8 and 3.9) section are loaded. In order to load all measurement parameters please use the scanCONTROL Smart product series. The scanCONTROL firmware doesn't support saving and reading user modes. To be able to use this function, scanCONTROL requires a firmware >= 24. An older version of scanCONTROL Configuration Tools was used to store the parameters. Only parameters stored with version 2.0 and above can be read out. The number of points per profile stored in the user mode is too small. Only user modes stored with a sufficient number of points per profile can be read out. 3.14.6 Backup scanCONTROL Parameters Use the "Parameters Backup user modes to file ..." menu entry in order to save all parameter sets, which are stored on the scanCONTROL measurement system (User modes) (see Chapter 3.14.4) to a file. A standard Windows dialog is displayed for selection of the path and file name for saving the parameters. As standard, the file name has the extension ".bin". The parameters are saved in the selected file after confirmation of the dialog. The progress of the process is showed in an information dialog box. Fig. 3.54: "Backup user modes" dialog box Note: Backing up user modes is only available for scanCONTROL devices with an Ethernet interface. Note: Backing up user modes is only available in the main view (see Chapter 3.2). Page 53 Working with scanCONTROL Configuration Tools 3.14.7 Restore Parameters from a file to scanCONTROL Use the "Parameters Restore user modes from file..." menu entry in order to restore saved parameter sets (User modes, see Chapter 3.14.6) to the scanCONTROL measurement system. A standard Windows dialog is displayed for selection of the path and file name from which the parameters should be restored. As standard, the file name has the extension ".bin". After confirming the dialog, the parameters of the selected file are read and transferred to the connected scanCONTROL measurement system. Empty parameter sets (User modes) are filled with the factory settings. The progress of the process is showed in an information dialog box. Fig. 3.55: "Restore user modes" dialog box Note: The settings can be restored only if the same type of measurement system was used when saving the settings. Note: Restoring user modes is only available for scanCONTROL devices with an Ethernet interface Note: Restoring user modes is only available in the main view (see Chapter 3.2). Note: When you restore user modes from a file all existing user modes on the scanCONTROL measurement system will be overwritten. Page 54 Working with scanCONTROL Configuration Tools 3.15 Menu Bar A summary of the menu bar functions (see Fig. 3.56) can be seen in the following. 1 2 3 4 Fig. 3.56: Menu bar 1 - File: Fig. 3.57: "File" menu scanCONTROL: Selects the scanCONTROL measurement system connected to the PC as data source (see Chapter 3.5). Save profiles: Saves profiles which are transferred by scanCONTROL to a file (see Chapter 3.6). Load profiles: Selects a file in which profiles have been saved previously as data source (see Chapter 3.5). Activate protocol results: Activates the logging of measured values (see Chapter 6.7). Deactivate protocol results: Deactivates the logging of measured values (see Chapter 6.7). Load program selector: Closes the current measuring program and returns to the Main View (see Chapter 3.2). Export profiles: Starts the "Export profiles" program (see Chapter 4.8). Exit: Closes scanCONTROL Configuration Tools (see Chapter 3.22). 2 - Parameters: Fig. 3.58: "Parameters" menu Load parameters from file...: Loads parameters of measuring programs from a file (see Chapter 3.14.2). Save parameters to file...: Saves the parameters of all active measuring programs to a file (see Chapter 3.14.1). Load parameters from scanCONTROL: Loads parameters which have been saved on the scanCONTROL measurement system (see Chapter 3.14.5). Save parameters to scanCONTROL: Saves the parameters of all active measuring programs permanently on the scanCONTROL measurement system (see Chapter 3.14.4). Backup user modes to file…: Backs up all parameter sets stored on the measuring system (user modes) to a file (see Chapter 3.14.6). Restore user modes from file…: Restores saved parameter sets (User modes) from a file to the scanCONTROL measurement system (see Chapter 3.14.7). Page 55 Working with scanCONTROL Configuration Tools Reset...: Resets the parameters to default settings (see Chapter 3.14.3). 3 - Options: Fig. 3.59: "Options" menu Settings: Activates a dialog where you can make basic settings (see Chapter 3.20). Ethernet configurator: Activates a dialog where you can modify the network settings of scanCONTROL measurement systems with an Ethernet interface (see Chapter 3.21). 4 - ?: Fig. 3.60: "?" menu Info about scanCONTROL Configuration Tools: Displays an information window about scanCONTROL Configuration Tools. Info about ICONNECT: Displays an information window about ICONNECT, the development environment for scanCONTROL Configuration Tools. Online help: Opens the documentation for the current view. Manual scanCONTROL Configuration Tools: Opens the instruction manual of scanCONTROL Configuration Tools. Shortcuts: Opens an overview of the available key shortcuts (see Chapter 9.3). Documentation: Opens an overview where you can call up various help and documentation about scanCONTROL. Note: Using the function key <F1>, you can open the documentation for the current measuring program. 3.16 Functions of the "General" Toolbar A summary of the functions of the "General" toolbar (see Fig. 3.61) can be seen in the following. Fig. 3.61: "General" toolbar Selects the scanCONTROL measurement system connected to the PC as data source (see Chapter 3.5). Selects a file in which profiles have been saved previously as data source (see Chapter 3.5). Saves profiles which are transferred by scanCONTROL to a file (see Chapter 3.6). Activates/Deactivates the logging of measured values (see Chapter 6.7). Loads parameters of measuring programs from a file (see Chapter 3.14.2). Saves the parameters of all active measuring programs to a file (see Chapter 3.14.1). Loads parameters which have been saved on the scanCONTROL measurement system (see Chapter 3.14.5). Page 56 Working with scanCONTROL Configuration Tools Saves the parameters of all active measuring programs permanently on the scanCONTROL measurement system (see Chapter 3.14.4). Resets parameters to default settings (see Chapter 3.14.3). 3.17 Functions of the "Display" Toolbar A summary of the functions of the "Display" toolbar (see Fig. 3.62) can be seen in the following. Fig. 3.62: "Display" toolbar Resets the 2D-display to the complete measuring range (see Chapter 3.12.1). Activates or deactivates the automatic scaling of the 2D-display (see Chapter 3.12.2). Activates or deactivates the "Keep aspect ratio" mode (see Chapter 3.12.3). Activates or deactivates the "Zoom" mode (see Chapter 3.12.4). Activates or deactivates the "Move profile" mode (see Chapter 3.12.5). Activates or deactivates the "Display extended information of a profile point" mode (see Chapter 3.12.6). 3.18 Functions of the "Measurement" Toolbar A summary of the functions of the "Measurement" toolbar can be seen in the following. Note: The elements of the "Measurement" toolbar vary depending on the measuring program. Activates or deactivates the "Cutting out" mode (Select inside points, see Chapter 3.13.2). Activates or deactivates the "Cutting out" mode (Select outside points, see Chapter 3.13.2). Resets the range for "Cutting out" (see Chapter 3.13.3). Activates or deactivates the "Set reference line" mode (see Chapter 3.13.4). Activates or deactivates the "Set reference line (left)" mode (see Chapter 3.13.4). Activates or deactivates the "Set reference line (right)" mode (see Chapter 3.13.4). Activates or deactivates the "Set reference line (right)" mode (see Chapter 3.13.4). Activates or deactivates the "Set minimum height" mode (see Chapter 3.13.5). Activates or deactivates the dynamic tracking of the ranges (see Chapter 3.13.6). Page 57 Working with scanCONTROL Configuration Tools 3.19 Navigation in Configuration Tools In scanCONTROL Configuration Tools, you can use the navigation menu to switch to the following programs and views: - Main View (Program Selector) Result Combination Outputs and Results Result Monitor Active measuring programs Display Image Data Display Profiles Save Profiles To show the navigation menu (see Fig. 3.64), click on the "Navigation" button (see Fig. 3.63) Fig. 3.63: "Navigation" button Fig. 3.64: "Navigation" menu Page 58 Working with scanCONTROL Configuration Tools 3.20 Basic Settings Select the menu item "Options Settings..." to make basic settings for the software. The "Settings" dialog is displayed (see Fig. 3.65). Parameters in the "Settings" dialog 1 2 3 4 5 Fig. 3.65: "Settings" dialog box 1 Decimal precision of measurement values: Specify the number of decimal places displayed for the measured values. 2 Display update rate with using scanCONTROL: Edit the update rate of the display when using a scanCONTROL measurement system. 3 Profile rate of playback with a loaded profile sequence: Edit the speed at which offline profile sequences are played back. 4 Display additional data: Specify whether additional data are shown: - Show center of measuring range: Shows the center of measuring range in the 2D-display. - Show recently loaded parameters: Shows the recently loaded parameters in the 2D-display. 5 Warnings: Specify whether warnings are shown: - Show warning before removing active programs: Shows a warning before removing a program from the active program list. - Show warning before removing combined signals: Shows a warning before removing a combined signal. Page 59 Working with scanCONTROL Configuration Tools 3.21 Adjusting scanCONTROL Network Settings (Ethernet Configurator) When using a scanCONTROL measurement system with an Ethernet interface you may adjust the system network settings (IP address, etc.) by selecting the "Options Ethernet Configurator" menu item. The "Ethernet Configurator" dialog will be opened. Note: To be able to operate a scanCONTROL measurement system via Ethernet with Configuration Tools, the measurement system and your PC must be located in the same subnet. Adjust any relevant network settings for the measurement system in the "Ethernet Configurator" dialog. 1 2 4 3 5 6 Fig. 3.66: "Ethernet Configurator" dialog Display elements and parameters in the "Ethernet Configurator" dialog: 1 Device list: This section lists all available measurement systems. Click "Scan" to refresh the list. Select the desired measurement system. 2 Scan: Click this button to search for scanCONTROL measurement systems in all subnets connected to the PC. The scan progress is displayed. When the scanning is complete, any found measurement systems are displayed in the list. 3 Device info: Displays the current settings for the selected scanCONTROL measurement system: - Device: Device name - SN: Serial number - MAC address: Physical address - IP address: IP address - Subnet mask: Subnet mask - Default gateway: Default gateway - Static IP: "Static IP" address option enabled - DHCP: "DHCP" option enabled - Link local address: "Link local address" option enabled - IP configuration: Indicates whether the network configuration is valid. If the network configuration is not valid, the measurement system cannot be used with Configuration Tools. Page 60 Working with scanCONTROL Configuration Tools 4 Desired configuration: Use the following input fields to enter the network configuration for the selected scanCONTROL measurement system: - IP address: IP address - Subnet mask: Subnet mask - Default gateway: Default gateway - Static IP: "Static IP" option – if this option is enabled, dynamic address allocation is disabled. The IP address entered is used as IP address. This parameter takes precedence over the "DHCP" and "Link local address" options. - DHCP: "DHCP" option – if this option is enabled, the IP address is allocated dynamically through a DHCP server. This parameter takes precedence over "Link local address". - Link local address: "Link local address" option – if this option is enabled, the IP address is allocated dynamically in the local subnet 169.254.x.x. This option is always enabled. 5 Suggest a configuration: Click this button to have a suitable configuration for the selected scanCONTROL measurement system determined automatically. After the process is complete, the system automatically completes the input fields in the "Desired configuration" section. 6 Apply to selected device: Click this button to apply the network configuration specified in the "Desired configuration" section to the selected scanCONTROL measurement system. Proceed as follows to manually enter the network configuration parameters for a scanCONTROL measurement system: When the "Ethernet Configurator" dialog is opened, the system automatically searches for available measurement systems. If the measurement system is not connected to your subnet yet, establish a connection, and click the "Scan" button. When scanning is complete, the measurement system is displayed in the device list. Select the required measurement system from the device list. Specify the required network settings in the input fields in the "Desired configuration" section. Click "Apply to selected device" to apply the settings to the selected measurement system. Click OK to confirm the selections in the "Ethernet Configurator" dialog. Proceed as follows to automatically specify network configuration parameters for a scanCONTROL measurement system: When the "Ethernet Configurator" dialog is opened, the system automatically searches for available measurement systems. If the measurement system is not connected to your subnet yet, establish a connection, and click the "Scan" button. When scanning is complete, the measurement system is displayed in the device list. Select the required measurement system from the device list. Click the "Suggest a configuration" button to have a suitable network configuration for the selected scanCONTROL measurement system determined automatically. After the process is complete, the system automatically completes the input fields in the "Desired configuration" section. Click "Apply to selected device" to apply the settings to the selected measurement system. Click OK to confirm the selections in the "Ethernet Configurator" dialog. 3.22 Exiting scanCONTROL Configuration Tools Select the menu item "File Exit" or press the standard Windows button "x" in the title bar of the program window in order to exit scanCONTROL Configuration Tools. Page 61 Description of the Measuring Programs 4. Description of the Measuring Programs The functions of the individual measuring programs are described in detail in the following. The measuring programs are split into 6 groups. Additionally a "Tools" group is available which provides useful utilities. The individual group views are activated from the Main View (see Chapter 3.2). 4.1 "Extrema" Group Programs for determining extreme values can be found in the "Extrema" group. Fig. 4.1: "Extrema" group Measuring programs in the "Extrema" group: - Maximum Point: Determination of the point with maximum Z coordinate. Minimum Point: Determination of the point with minimum Z coordinate. First Point: Determination of the point with minimum X coordinate. Last Point: Determination of the point with maximum X coordinate. Page 62 Description of the Measuring Programs 4.1.1 "Maximum Point" Measuring Program Use the "Maximum Point" measuring program to determine the maximum point of a profile. Proceed as follows: - Configure the scanCONTROL measurement system ("Scanner settings", see Chapter 3.7). If necessary, limit the measuring range in order to eliminate interfering points ( see Chapter 3.13.2). If necessary, activate the dynamic tracking for the measuring range ( see Chapter 3.13.6). The measuring program outputs the following measured values: - Maximum X [mm]: The X coordinate of the maximum point of the currently transferred profile. Maximum Z [mm]: The Z coordinate of the maximum point of the currently transferred profile. A D B E C 1 G F H Fig. 4.2: "Maximum Point" measuring program Page 63 Description of the Measuring Programs Display elements and parameters in the "Maximum Point" measuring program: A “General” toolbar: Using this toolbar, you can select the data source (see Chapter 3.5), save profile sequences (see Chapter 3.6), save and load parameters (see Chapter 3.14) and reset selected parameters to default settings (see Chapter 3.14.3). B Scanner settings: Change the settings of scanCONTROL with these values (see Chapter 3.7). In Offline mode (see Capter 3.5) this input field will be replaced by the "File settings" input field (see Chapter 3.10) for controlling the playback of a loaded profile sequence. C 2D-display: This display shows the last measured profile, the measuring ranges and measurement results. D “Display” toolbar: Using this toolbar, you scale the 2D-display and activate various options for mouse interaction (see Chapter 3.17). E “Measurement” toolbar: Set the various search ranges and limits for the measurement using this toolbar (see Chapter 3.18). F Navigation menu: Click on this button in order to show the navigation menu (see Chapter 3.19). G Results display: The results of the current valid measurement are displayed. H Status line: Status and error messages are displayed on the status line (see Chapter 9.1). 1 Display of the maximum point: In the 2D-display, the maximum point determined by the measuring program is represented by an orange cross. Page 64 Description of the Measuring Programs 4.1.2 "Minimum Point" Measuring Program Use the "Minimum Point" measuring program to determine the lowest point of a profile. Proceed as follows: - Configure the scanCONTROL measurement system ("Scanner settings", see Chapter 3.7). If necessary, limit the measuring range in order to eliminate interfering points ( see Chapter 3.13.2). If necessary, activate the dynamic tracking for the measuring range ( see Chapter 3.13.6). The measuring program outputs the following measured values: - Minimum X [mm]: The X coordinate of the minimum point of the currently transferred profile. Minimum Z [mm]: The Z coordinate of the minimum point of the currently transferred profile. A D B E C 1 G F H Fig. 4.3: "Minimum Point" measuring program Page 65 Description of the Measuring Programs Display elements and parameters in the "Minimum Point" measuring program: A “General” toolbar: Using this toolbar, you can select the data source (see Chapter 3.5), save profile sequences (see Chapter 3.6), save and load parameters (see Chapter 3.14) and reset selected parameters to default settings (see Chapter 3.14.3). B Scanner settings: Change the settings of scanCONTROL with these values (see Chapter 3.7). In Offline mode (see Capter 3.5) this input field will be replaced by the "File settings" input field (see Chapter 3.10) for controlling the playback of a loaded profile sequence. C 2D-display: This display shows the last measured profile, the measuring ranges and measurement results. D “Display” toolbar: Using this toolbar, you scale the 2D-display and activate various options for mouse interaction (see Chapter 3.17). E “Measurement” toolbar: Set the various search ranges and limits for the measurement using this toolbar (see Chapter 3.18). F Navigation menu: Click on this button in order to show the navigation menu (see Chapter 3.19). G Results display: The results of the current valid measurement are displayed. H Status line: Status and error messages are displayed on the status line (see Chapter 9.1). 1 Display of the minimum point: In the 2D-display, the minimum point determined by the measuring program is represented by an orange cross. Page 66 Description of the Measuring Programs 4.1.3 "First Point" Measuring Program Use the "First Point" measuring program to determine the first point (left) of a profile. Proceed as follows: - Configure the scanCONTROL measurement system ("Scanner settings", see Chapter 3.7). If necessary, limit the measuring range in order to eliminate interfering points ( see Chapter 3.13.2). If necessary, activate the dynamic tracking for the measuring range ( see Chapter 3.13.6). The measuring program outputs the following measured values: - First point X [mm]: The X coordinate of the first point of the currently transferred profile. First point Z [mm]: The Z coordinate of the first point of the currently transferred profile. A D A B E C A D 1 1 B G F H Fig. 4.4: "First Point" measuring program Page 67 Description of the Measuring Programs Display elements and parameters in the "First Point" measuring program: A “General” toolbar: Using this toolbar, you can select the data source (see Chapter 3.5), save profile sequences (see Chapter 3.6), save and load parameters (see Chapter 3.14) and reset selected parameters to default settings (see Chapter 3.14.3). B Scanner settings: Change the settings of scanCONTROL with these values (see Chapter 3.7). In Offline mode (see Capter 3.5) this input field will be replaced by the "File settings" input field (see Chapter 3.10) for controlling the playback of a loaded profile sequence. C 2D-display: This display shows the last measured profile, the measuring ranges and measurement results. D “Display” toolbar: Using this toolbar, you scale the 2D-display and activate various options for mouse interaction (see Chapter 3.17). E “Measurement” toolbar: Set the various search ranges and limits for the measurement using this toolbar (see Chapter 3.18). F Navigation menu: Click on this button in order to show the navigation menu (see Chapter 3.19). G Results display: The results of the current valid measurement are displayed. H Status line: Status and error messages are displayed on the status line (see Chapter 9.1). 1 Display of the first point: In the 2D-display, the first point determined by the measuring program is represented by an orange cross. Page 68 Description of the Measuring Programs 4.1.4 "Last Point" Measuring Program Use the "Last Point" measuring program to determine the last point (right) of a profile. Proceed as follows: - Configure the scanCONTROL measurement system ("Scanner settings", see Chapter 3.7). If necessary, limit the measuring range in order to eliminate interfering points ( see Chapter 3.13.2). If necessary, activate the dynamic tracking for the measuring range ( see Chapter 3.13.6). The measuring program outputs the following measured values: - Last point X [mm]: The X coordinate of the last point of the currently transferred profile. Last point Z [mm]: The Z coordinate of the last point of the currently transferred profile. A D B E C 1 G F H Fig. 4.5: "Last Point" measuring program Page 69 Description of the Measuring Programs Display elements and parameters in the "Last Point" measuring program: A “General” toolbar: Using this toolbar, you can select the data source (see Chapter 3.5), save profile sequences (see Chapter 3.6), save and load parameters (see Chapter 3.14) and reset selected parameters to default settings (see Chapter 3.14.3). B Scanner settings: Change the settings of scanCONTROL with these values (see Chapter 3.7). In Offline mode (see Capter 3.5) this input field will be replaced by the "File settings" input field (see Chapter 3.10) for controlling the playback of a loaded profile sequence. C 2D-display: This display shows the last measured profile, the measuring ranges and measurement results. D “Display” toolbar: Using this toolbar, you scale the 2D-display and activate various options for mouse interaction (see Chapter 3.17). E “Measurement” toolbar: Set the various search ranges and limits for the measurement using this toolbar (see Chapter 3.18). F Navigation menu: Click on this button in order to show the navigation menu (see Chapter 3.19). G Results display: The results of the current valid measurement are displayed. H Status line: Status and error messages are displayed on the status line (see Chapter 9.1). 1 Display of the last point: In the 2D-display, the last point determined by the measuring program is represented by an orange cross. Page 70 Description of the Measuring Programs 4.2 "Angle" Group Programs for angle measurement can be found in the "Angle" group. Fig. 4.6: "Angle" group Measuring programs in the "Angle" group: - Absolute Angle: Determination of the angle of a straight line to the X axis. Absolute / Offset: Determination of a straight line and calculation of the offset and the angle to the X axis. Double Angle: Determination of two independent straight lines and calculation of the respective angle to the X axis. Difference Angle: Determination of two independent straight lines and calculation of the angle between the two lines. Intersection Point: Determination of two independent straight lines and calculation of the coordinates of the intersection point between both lines. Page 71 Description of the Measuring Programs 4.2.1 "Absolute Angle" Measuring Program Use the "Absolute Angle" measuring program to determine the angle of a straight line to the X axis. The program determines the best fitting line to the profile points in an adjustable range and measures the angle of this line to the X axis. Proceed as follows: - - Configure the scanCONTROL measurement system ("Scanner settings", see Chapter 3.7). Select the type of line fitting (see Fig. 4.7 and Chapter 3.13.1): One range is used for the determination of the fitting line. The line is fitted to the profile points located in the adjustable range . Two ranges are used for the determination of the fitting line. The line is fitted to the profile points located in at least one of the two adjustable ranges . If necessary, limit the measuring range in order to eliminate interfering points ( see Chapter 3.13.2). Define the range or the ranges in which the line should be fitted to the profile points ( see Chapter 3.13.4). If necessary, activate the dynamic tracking for the measuring range and for the range for the line fitting respectively ( see Chapter 3.13.6). The measuring program outputs the following measured value: - Angle [°]: The measured angle between the fitted line and the X axis. A D E B 2 C 1 G F H Fig. 4.7: "Absolute Angle" measuring program Page 72 Description of the Measuring Programs Display elements and parameters in the "Absolute Angle" measuring program: A “General” toolbar: Using this toolbar, you can select the data source (see Chapter 3.5), save profile sequences (see Chapter 3.6), save and load parameters (see Chapter 3.14) and reset selected parameters to default settings (see Chapter 3.14.3). B Scanner settings: Change the settings of scanCONTROL with these values (see Chapter 3.7). In Offline mode (see Capter 3.5) this input field will be replaced by the "File settings" input field (see Chapter 3.10) for controlling the playback of a loaded profile sequence. C 2D-display: This display shows the last measured profile, the measuring ranges and measurement results. D “Display” toolbar: Using this toolbar, you scale the 2D-display and activate various options for mouse interaction (see Chapter 3.17). E “Measurement” toolbar: Set the various search ranges and limits for the measurement using this toolbar (see Chapter 3.18). F Navigation menu: Click on this button in order to show the navigation menu (see Chapter 3.19). G Results display: The results of the current valid measurement are displayed. H Status line: Status and error messages are displayed on the status line (see Chapter 9.1). 1 Type of line fitting: Select the type of line fitting in this input field (one range or two ranges). 2 Display of the angle: In the 2D-display, the angle determined by the measuring program is represented by an orange arc. Page 73 Description of the Measuring Programs 4.2.2 "Absolute Angle/Offset" Measuring Program Use the "Absolute Angle/Offset" measuring program to determine the 2D position of a straight line. The program determines the best fitting line to the profile points in an adjustable range and measures the angle and offset of this line. Proceed as follows: - - - Configure the scanCONTROL measurement system ("Scanner settings", see Chapter 3.7). Define the algorithm for the calculation of the offset (see Fig. 4.8, Chapter 4.3.1 and Chapter 3.13.1): The Z coordinate of the barycenter of the points located in the fitting area is calculated . The Z coordinate of the intersection point of the fitted line with the Z axis is calculated . Select the type of line fitting (see Fig. 4.8 and Chapter 3.13.1) One range is used for the determination of the fitting line. The line is fitted to the profile points located in the adjustable range . Two ranges are used for the determination of the fitting line. The line is fitted to the profile points located in at least one of the two adjustable ranges . If necessary, limit the measuring range in order to eliminate interfering points ( see Chapter 3.13.2). Define the range or the ranges in which the line should be fitted to the profile points ( see Chapter 3.13.4). If necessary, activate the dynamic tracking for the measuring range and for the range for the line fitting respectively ( see Chapter 3.13.6). The measuring program outputs the following measured values: - Angle [°]: The angle between the fitted line and the X axis. Offset [mm]: The offset of the fitted line. A D B E C 3 1 2 G F H Fig. 4.8: "Absolute Angle/Offset" measuring program Page 74 Description of the Measuring Programs Display elements and parameters in the "Absolute Angle/Offset" measuring program: A “General” toolbar: Using this toolbar, you can select the data source (see Chapter 3.5), save profile sequences (see Chapter 3.6), save and load parameters (see Chapter 3.14) and reset selected parameters to default settings (see Chapter 3.14.3). B Scanner settings: Change the settings of scanCONTROL with these values (see Chapter 3.7). In Offline mode (see Capter 3.5) this input field will be replaced by the "File settings" input field (see Chapter 3.10) for controlling the playback of a loaded profile sequence. C 2D-display: This display shows the last measured profile, the measuring ranges and measurement results. D “Display” toolbar: Using this toolbar, you scale the 2D-display and activate various options for mouse interaction (see Chapter 3.17). E “Measurement” toolbar: Set the various search ranges and limits for the measurement using this toolbar (see Chapter 3.18). F Navigation menu: Click on this button in order to show the navigation menu (see Chapter 3.19). G Results display: The results of the current valid measurement are displayed. H Status line: Status and error messages are displayed on the status line (see Chapter 9.1). 1 Offset type: Select the algorithm for the calculation of the offset in this input field (see Chapter 4.3.1). 2 Type of line fitting: Select the type of line fitting in this input field (one range or two ranges). 3 Display of the angle and offset: In the 2D-display, the angle determined by the measuring program is represented by an orange arc. The offset is displayed using an orange arrow. Page 75 Description of the Measuring Programs 4.2.3 "Double Angle" Measuring Program Use the "Double Angle" measuring program to determine the angle of two straight lines to the X axis. The program determines the best fitting line to the profile points in two adjustable ranges and measures the angle of this line to the X axis in each case. Proceed as follows: - Configure the scanCONTROL measurement system ("Scanner settings", see Chapter 3.7). If necessary, limit the measuring range in order to eliminate interfering points ( see Chapter 3.13.2). Define the ranges in which the lines should be fitted to the profile points ( see Chapter 3.13.4). If necessary, activate the dynamic tracking for the measuring range and for the ranges for the line fitting respectively ( see Chapter 3.13.6). The measuring program outputs the following measured values: - Left Angle [°]: The angle between the left fitted line and the X axis. Right Angle [°]: The angle between the right fitted line and the X axis. A D B E C 1 G F H Fig. 4.9: "Double Angle" measuring program Page 76 Description of the Measuring Programs Display elements and parameters in the "Double Angle" measuring program: A “General” toolbar: Using this toolbar, you can select the data source (see Chapter 3.5), save profile sequences (see Chapter 3.6), save and load parameters (see Chapter 3.14) and reset selected parameters to default settings (see Chapter 3.14.3). B Scanner settings: Change the settings of scanCONTROL with these values (see Chapter 3.7). In Offline mode (see Capter 3.5) this input field will be replaced by the "File settings" input field (see Chapter 3.10) for controlling the playback of a loaded profile sequence. C 2D-display: This display shows the last measured profile, the measuring ranges and measurement results. D “Display” toolbar: Using this toolbar, you scale the 2D-display and activate various options for mouse interaction (see Chapter 3.17). E “Measurement” toolbar: Set the various search ranges and limits for the measurement using this toolbar (see Chapter 3.18). F Navigation menu: Click on this button in order to show the navigation menu (see Chapter 3.19). G Results display: The results of the current valid measurement are displayed. H Status line: Status and error messages are displayed on the status line (see Chapter 9.1). 1 Display of the angles: In the 2D-display, the angles determined by the measuring program are represented by orange arcs. Page 77 Description of the Measuring Programs 4.2.4 "Difference Angle" Measuring Program Use the "Difference Angle" measuring program to determine the angle between two straight lines. The program determines the best fitting line to the profile points in two adjustable ranges and measures the angle between the two lines. During the configuration of the measurement, you have the possibility to configure the measurement manually or automatically: Manual configuration: - Configure the scanCONTROL measurement system ("Scanner settings", see Chapter 3.7). - Define how the angle between both lines is calculated (angle between left and right range or angle between right and left range , see Fig. 4.11 and Chapter 3.13.1). - If necessary, limit the measuring range in order to eliminate interfering points ( see Chapter 3.13.2). - Define the ranges in which the lines should be fitted to the profile points ( see Chapter 3.13.4). - If necessary, activate the dynamic tracking for the measuring range and for the ranges for the line fitting respectively ( see Chapter 3.13.6). Automatic configuration: - Configure the scanCONTROL measurement system ("Scanner settings", see Chapter 3.7). - Define how the angle between both lines is calculated (angle between left and right range or angle between right and left range , see Fig. 4.11 and Chapter 3.13.1). - If necessary, limit the measuring range in order to eliminate interfering points ( see Chapter 3.13.2). - Press the "Angle autodetect..." button (see Fig. 4.11) in order to configure the ranges for line fitting automatically. Note: The automatic configuration of the ranges only works if the maximum (angle between left and right range) or minimum (angle between right and left range) of the profile points in each case is also the intersection point of the lines (see Fig. 4.10) Auto configuration OK Auto configuration OK Auto configuration not possible Fig. 4.10: Automatic configuration in the "Difference Angle" measuring program The measuring program outputs the following measured value: - Angle [°]: The angle between the two fitted lines. Page 78 Description of the Measuring Programs A D B E C 3 1 2 G F H Fig. 4.11: "Difference Angle" measuring program Display elements and parameters in the "Difference Angle" measuring program: A “General” toolbar: Using this toolbar, you can select the data source (see Chapter 3.5), save profile sequences (see Chapter 3.6), save and load parameters (see Chapter 3.14) and reset selected parameters to default settings (see Chapter 3.14.3). B Scanner settings: Change the settings of scanCONTROL with these values (see Chapter 3.7). In Offline mode (see Capter 3.5) this input field will be replaced by the "File settings" input field (see Chapter 3.10) for controlling the playback of a loaded profile sequence. C 2D-display: This display shows the last measured profile, the measuring ranges and measurement results. D “Display” toolbar: Using this toolbar, you scale the 2D-display and activate various options for mouse interaction (see Chapter 3.17). E “Measurement” toolbar: Set the various search ranges and limits for the measurement using this toolbar (see Chapter 3.18). F Navigation menu: Click on this button in order to show the navigation menu (see Chapter 3.19). G Results display: The results of the current valid measurement are displayed. H Status line: Status and error messages are displayed on the status line (see Chapter 9.1). Page 79 Description of the Measuring Programs 1 Angle type: Select the angle type in this input field (angle between left and right range or angle between right and left range). 2 Angle autodetect...: Press this button in order to configure the ranges for the line fitting automatically. 3 Display of the angle: In the 2D-display, the angle determined by the measuring program is represented by an orange arc. Page 80 Description of the Measuring Programs 4.2.5 "Intersection Point" Measuring Program Use the "Intersection Point" measuring program to determine the intersection point between two straight lines. The program determines the best fitting line to the profile points in two adjustable ranges and calculates the coordinates of the intersection point. Proceed as follows: - Configure the scanCONTROL measurement system ("Scanner settings", see Chapter 3.7). If necessary, limit the measuring range in order to eliminate interfering points ( see Chapter 3.13.2). Define the ranges in which the lines should be fitted to the profile points ( see Chapter 3.13.4). If necessary, activate the dynamic tracking for the measuring range and for the ranges for the line fitting respectively ( see Chapter 3.13.6). The measuring program outputs the following measured values: - Intersection X [mm]: The X coordinate of the intersection point between the two lines. Intersection Z [mm]: The Z coordinate of the intersection point between the two lines. A D B E C 1 G F H 1 Fig. 4.12: "Intersection Point" measuring program Page 81 Description of the Measuring Programs Display elements and parameters in the "Intersection Point" measuring program: A “General” toolbar: Using this toolbar, you can select the data source (see Chapter 3.5), save profile sequences (see Chapter 3.6), save and load parameters (see Chapter 3.14) and reset selected parameters to default settings (see Chapter 3.14.3). B Scanner settings: Change the settings of scanCONTROL with these values (see Chapter 3.7). In Offline mode (see Capter 3.5) this input field will be replaced by the "File settings" input field (see Chapter 3.10) for controlling the playback of a loaded profile sequence. C 2D-display: This display shows the last measured profile, the measuring ranges and measurement results. D “Display” toolbar: Using this toolbar, you scale the 2D-display and activate various options for mouse interaction (see Chapter 3.17). E “Measurement” toolbar: Set the various search ranges and limits for the measurement using this toolbar (see Chapter 3.18). F Navigation menu: Click on this button in order to show the navigation menu (see Chapter 3.19). G Results display: The results of the current valid measurement are displayed. H Status line: Status and error messages are displayed on the status line (see Chapter 9.1). 1 Display of the intersection point: In the 2D-display, the intersection point determined by the measuring program is represented by an orange cross. Page 82 Description of the Measuring Programs 4.3 "Edge/Step" Group Programs for edge and step measurement can be found in the "Edge/Step" group. Fig. 4.13: "Edge/Step" group Measuring programs in the "Edge/Step" group: - Single Offset: Determination of a straight line and calculation of the offset of the line. Double Offset: Determination of two independent straight lines and calculation of the offsets of the lines. Step Height: Determination of the height of a step. Edge Left: Determination of the position of a rising or falling edge with an edge orientation from left to right. Edge Right: Determination of the position of a rising or falling edge with an edge orientation from right to left. Page 83 Description of the Measuring Programs 4.3.1 "Single Offset" Measuring Program Use the "Single Offset" measuring program to determine the offset of a straight line. The program determines the best fitting line to the profile points in an adjustable range and determines the offset of the line. Proceed as follows: - - Configure the scanCONTROL measurement system ("Scanner settings", see Chapter 3.7). Define the algorithm for the calculation of the offset (see Fig. 4.14, Fig. 4.15 and Chapter 3.13.1): The Z coordinate of the barycenter of the points located in the fitting area is calculated . The Z coordinate of the intersection point of the fitted line with the Z axis is calculated . Select the type of line fitting (see Fig. 4.15 and Chapter 3.13.1) One range is used for the determination of the fitting line. The line is fitted to the profile points located in the adjustable range . Two ranges are used for the determination of the fitting line. The line is fitted to the profile points located in at least one of the two adjustable ranges . If necessary, limit the measuring range in order to eliminate interfering points ( see Chapter 3.13.2). Define the range or the ranges in which the line should be fitted to the profile points ( see Chapter 3.13.4). If necessary, activate the dynamic tracking for the measuring range and for the range for the line fitting respectively ( see Chapter 3.13.6). Z Z X X Fig. 4.14: Algorithms for the offset calculation The measuring program outputs the following measured value: - Offset [mm]: The offset of the fitted line. Page 84 Description of the Measuring Programs A D B E C 1 3 2 G F H Fig. 4.15: "Single Offset" measuring program Display elements and parameters in the "Single Offset" measuring program: A “General” toolbar: Using this toolbar, you can select the data source (see Chapter 3.5), save profile sequences (see Chapter 3.6), save and load parameters (see Chapter 3.14) and reset selected parameters to default settings (see Chapter 3.14.3). B Scanner settings: Change the settings of scanCONTROL with these values (see Chapter 3.7). In Offline mode (see Capter 3.5) this input field will be replaced by the "File settings" input field (see Chapter 3.10) for controlling the playback of a loaded profile sequence. C 2D-display: This display shows the last measured profile, the measuring ranges and measurement results. D “Display” toolbar: Using this toolbar, you scale the 2D-display and activate various options for mouse interaction (see Chapter 3.17). E “Measurement” toolbar: Set the various search ranges and limits for the measurement using this toolbar (see Chapter 3.18). F Navigation menu: Click on this button in order to show the navigation menu (see Chapter 3.19). G Results display: The results of the current valid measurement are displayed. H Status line: Status and error messages are displayed on the status line (see Chapter 9.1). Page 85 Description of the Measuring Programs 1 Offset type: Select the algorithm for the calculation of the offset in this input field (see Fig. 4.14). 2 Type of line fitting: Select the type of line fitting in this input field (one range or two ranges). 3 Display of the offset: In the 2D-display, the offset determined by the measuring program is represented by an orange arrow. Page 86 Description of the Measuring Programs 4.3.2 "Double Offset" Measuring Program Use the "Double Offset" measuring program to determine the respective offset of two straight lines. The program determines the best fitting line to the profile points in two adjustable ranges and determines the offset of the line in each case. Proceed as follows: - - Configure the scanCONTROL measurement system ("Scanner settings", see Chapter 3.7). Define the algorithm for the calculation of both offsets (see Fig. 4.16, Chapter 4.3.1 and Chapter 3.13.1): The Z coordinate of the barycenter of the points located in the fitting area is calculated . The Z coordinate of the intersection point of the fitted line with the Z axis is calculated . Define the type of lines (parallel or not parallel , see Fig. 4.16 and Chapter 3.13.1). This selection is only available if the algorithm for the calculation of the offset is set to "Z coordinate of the intersection point of the fitted line with the Z axis" If necessary, limit the measuring range in order to eliminate interfering points ( see Chapter 3.13.2). Define the ranges in which the lines should be fitted to the profile points ( see Chapter 3.13.4). If necessary, activate the dynamic tracking for the measuring range and for the ranges for the line fitting respectively ( see Chapter 3.13.6). The measuring program outputs the following measured values: - Left Offset [mm]: The offset of the left line. Right Offset [mm]: The offset of the right line. A D B E C 1 3 2 G F H Fig. 4.16: "Double Offset" measuring program Page 87 Description of the Measuring Programs Display elements and parameters in the "Double Offset" measuring program: A “General” toolbar: Using this toolbar, you can select the data source (see Chapter 3.5), save profile sequences (see Chapter 3.6), save and load parameters (see Chapter 3.14) and reset selected parameters to default settings (see Chapter 3.14.3). B Scanner settings: Change the settings of scanCONTROL with these values (see Chapter 3.7). In Offline mode (see Capter 3.5) this input field will be replaced by the "File settings" input field (see Chapter 3.10) for controlling the playback of a loaded profile sequence. C 2D-display: This display shows the last measured profile, the measuring ranges and measurement results. D “Display” toolbar: Using this toolbar, you scale the 2D-display and activate various options for mouse interaction (see Chapter 3.17). E “Measurement” toolbar: Set the various search ranges and limits for the measurement using this toolbar (see Chapter 3.18). F Navigation menu: Click on this button in order to show the navigation menu (see Chapter 3.19). G Results display: The results of the current valid measurement are displayed. H Status line: Status and error messages are displayed on the status line (see Chapter 9.1). 1 Offset type: Select the algorithm for the calculation of the offsets in this input field (see Chapter 4.3.1). 2 Line type: In this input field, select the type of the two lines ("parallel" or "not parallel"). 3 Display of the offsets: In the 2D-display, the offsets determined by the measuring program are represented by orange arrows. Page 88 Description of the Measuring Programs 4.3.3 "Step Height" Measuring Program Use the "Step Height" measuring program to determine the height of a step. The program determines the best fitting line to the profile points in two adjustable ranges where both lines are parallel to each other. The measuring program then determines the difference of the offsets of the lines in Z direction. Proceed as follows: - - Configure the scanCONTROL measurement system ("Scanner settings", see Chapter 3.7). Define the algorithm for the calculation of the height (see Fig. 4.17, Fig. 4.18 and Chapter 3.13.1): The perpendicular distance of the two lines is calculated . Initially the barycenters are calculated in both fitting ranges. The difference between the Z coordinates of the barycenters is used as height . The distance between the two lines in Z axis direction is calculated . If necessary, invert the sign of the height (see Fig. 4.18). If necessary, limit the measuring range in order to eliminate interfering points ( see Chapter 3.13.2). Define the ranges in which the lines should be fitted to the profile points ( see Chapter 3.13.4). If necessary, activate the dynamic tracking for the measuring range and for the ranges for the line fitting respectively ( see Chapter 3.13.6). Fig. 4.17: Algorithms for height calculation The measuring program outputs the following measured value: - Height [mm]: The height calculated according to the selected algorithm. A D B E C 2 1 G F H Fig. 4.18: "Step Height" measuring program Page 89 Description of the Measuring Programs Display elements and parameters in the "Step Height" measuring program: A “General” toolbar: Using this toolbar, you can select the data source (see Chapter 3.5), save profile sequences (see Chapter 3.6), save and load parameters (see Chapter 3.14) and reset selected parameters to default settings (see Chapter 3.14.3). B Scanner settings: Change the settings of scanCONTROL with these values (see Chapter 3.7). In Offline mode (see Capter 3.5) this input field will be replaced by the "File settings" input field (see Chapter 3.10) for controlling the playback of a loaded profile sequence. C 2D-display: This display shows the last measured profile, the measuring ranges and measurement results. D “Display” toolbar: Using this toolbar, you scale the 2D-display and activate various options for mouse interaction (see Chapter 3.17). E “Measurement” toolbar: Set the various search ranges and limits for the measurement using this toolbar (see Chapter 3.18). F Navigation menu: Click on this button in order to show the navigation menu (see Chapter 3.19). G Results display: The results of the current valid measurement are displayed. H Status line: Status and error messages are displayed on the status line (see Chapter 9.1). 1 Height type: In this input field, select the algorithm for the calculation of the height (see Fig. 4.17) and invert the sign of the height, if necessary. 2 Display of the height: In the 2D-display, the height determined by the measuring program is represented by an orange arrow. Page 90 Description of the Measuring Programs 4.3.4 "Edge Left" Measuring Program Use the "Edge Left" measuring program to determine the position of an edge. Thereby, the program determines an edge which runs from left to right. The possible position of the edge is limited by two fitting ranges and must be between these ranges. The program determines the best fitting line to the profile points in each of the fitting ranges. A threshold relative to the left fitting line is specified and thus a parallel intersecting line is produced. If the intersecting line intersects the profile, an edge is detected and the measuring program determines the coordinates of the edge. Proceed as follows: - - Configure the scanCONTROL measurement system ("Scanner settings", see Chapter 3.7). Define the type of the edge (see Fig. 4.19 and Chapter 3.13.1): The edge is rising and located between two reference ranges which are parallel . The edge is rising. The range for the fitting line is located left of the edge . The edge is falling and located between two reference ranges which are parallel . The edge is falling. The range for the fitting line is located left of the edge . If necessary, limit the measuring range in order to eliminate interfering points ( see Chapter 3.13.2). Define the ranges in which the lines should be fitted to the profile points ( see Chapter 3.13.4). Define the position of the intersecting line ( see Chapter 3.13.5). If necessary, activate the dynamic tracking for the measuring range and for the ranges for the line fitting respectively ( see Chapter 3.13.6). The measuring program outputs the following measured values: - Edge X [mm]: The X coordinate of the calculated edge. Edge Z [mm]: The Z coordinate of the calculated edge. A D B E C 1 2 G F H Fig. 4.19: "Edge Left" measuring program Page 91 Description of the Measuring Programs Display elements and parameters in the "Edge Left" measuring program: A “General” toolbar: Using this toolbar, you can select the data source (see Chapter 3.5), save profile sequences (see Chapter 3.6), save and load parameters (see Chapter 3.14) and reset selected parameters to default settings (see Chapter 3.14.3). B Scanner settings: Change the settings of scanCONTROL with these values (see Chapter 3.7). In Offline mode (see Capter 3.5) this input field will be replaced by the "File settings" input field (see Chapter 3.10) for controlling the playback of a loaded profile sequence. C 2D-display: This display shows the last measured profile, the measuring ranges and measurement results. D “Display” toolbar: Using this toolbar, you scale the 2D-display and activate various options for mouse interaction (see Chapter 3.17). E “Measurement” toolbar: Set the various search ranges and limits for the measurement using this toolbar (see Chapter 3.18). F Navigation menu: Click on this button in order to show the navigation menu (see Chapter 3.19). G Results display: The results of the current valid measurement are displayed. H Status line: Status and error messages are displayed on the status line (see Chapter 9.1). 1 Type of the edge: Select the type of the edge (see above) in this input field. 2 Display of the edge position: In the 2D-display, the edge position determined by the measuring program is represented by an orange cross. Page 92 Description of the Measuring Programs 4.3.5 "Edge Right" Measuring Program Use the "Edge Right" measuring program to determine the position of an edge. Thereby, the program determines an edge which runs from right to left. The possible position of the edge is limited by two fitting ranges and must be between these ranges. The program determines the best fitting line to the profile points in each of the fitting ranges. A threshold relative to the right fitting line is specified and thus a parallel intersecting line is produced. If the intersecting line intersects the profile, an edge is detected and the measuring program determines the coordinates of the edge. Proceed as follows: - - Configure the scanCONTROL measurement system ("Scanner settings", see Chapter 3.7). Define the type of the edge (see Fig. 4.20 and Chapter 3.13.1): The edge is rising and located between two reference ranges which are parallel . The edge is rising. The range for the fitting line is located right of the edge . The edge is falling and located between two reference ranges which are parallel . The edge is falling. The range for the fitting line is located right of the edge . If necessary, limit the measuring range in order to eliminate interfering points ( see Chapter 3.13.2). Define the ranges in which the lines should be fitted to the profile points ( see Chapter 3.13.4). Define the position of the intersecting line ( see Chapter 3.13.5). If necessary, activate the dynamic tracking for the measuring range and for the ranges for the line fitting respectively ( see Chapter 3.13.6). The measuring program outputs the following measured values: - Edge X [mm]: The X coordinate of the calculated edge. Edge Z [mm]: The Z coordinate of the calculated edge. A D B E C 1 2 G F H Fig. 4.20: "Edge Right" measuring program Page 93 Description of the Measuring Programs Display elements and parameters in the "Edge Right" measuring program: A “General” toolbar: Using this toolbar, you can select the data source (see Chapter 3.5), save profile sequences (see Chapter 3.6), save and load parameters (see Chapter 3.14) and reset selected parameters to default settings (see Chapter 3.14.3). B Scanner settings: Change the settings of scanCONTROL with these values (see Chapter 3.7). In Offline mode (see Capter 3.5) this input field will be replaced by the "File settings" input field (see Chapter 3.10) for controlling the playback of a loaded profile sequence. C 2D-display: This display shows the last measured profile, the measuring ranges and measurement results. D “Display” toolbar: Using this toolbar, you scale the 2D-display and activate various options for mouse interaction (see Chapter 3.17). E “Measurement” toolbar: Set the various search ranges and limits for the measurement using this toolbar (see Chapter 3.18). F Navigation menu: Click on this button in order to show the navigation menu (see Chapter 3.19). G Results display: The results of the current valid measurement are displayed. H Status line: Status and error messages are displayed on the status line (see Chapter 9.1). 1 Type of the edge: Select the type of the edge (see above) in this input field. 2 Display of the edge position: In the 2D-display, the edge position determined by the measuring program is represented by an orange cross. Page 94 Description of the Measuring Programs 4.4 "Surface" Group Programs for surface inspection can be found in the "Surface" group. Fig. 4.21: "Surface" group Measuring programs in the "Surface" group: - Deviation: Determination of a straight line and calculation of the number of points and the average deviation of the points from the line. Double Deviation: Determination of two independent straight lines and calculation of the average deviation of the points from the respective line. Surface Maximum: Determination of a straight line and calculation of the distance and the X coordinate of the point with maximum positive distance from the line. Surface Minimum: Determination of a straight line and calculation of the distance and the X coordinate of the point with maximum negative distance from the line. Page 95 Description of the Measuring Programs 4.4.1 "Deviation" Measuring Program Use the "Deviation" measuring program to determine the average deviation of points from a straight line. The program determines the best fitting line to the profile points in an adjustable range and calculates the standard deviation of the distances of the points from the line. Proceed as follows: - Configure the scanCONTROL measurement system ("Scanner settings", see Chapter 3.7). If necessary, limit the measuring range in order to eliminate interfering points ( see Chapter 3.13.2). Define the range in which the line should be fitted to the profile points ( see Chapter 3.13.4). If necessary, activate the dynamic tracking for the measuring range and for the range for the line fitting respectively ( see Chapter 3.13.6). The measuring program outputs the following measured values: - No. of points: The number of profile points in the fitting range. Sigma [mm]: The standard deviation of the distances of the points in the fitting range from the fitted line. A D B E C 1 G F H Fig. 4.22: "Deviation" measuring program Page 96 Description of the Measuring Programs Display elements and parameters in the "Deviation" measuring program: A “General” toolbar: Using this toolbar, you can select the data source (see Chapter 3.5), save profile sequences (see Chapter 3.6), save and load parameters (see Chapter 3.14) and reset selected parameters to default settings (see Chapter 3.14.3). B Scanner settings: Change the settings of scanCONTROL with these values (see Chapter 3.7). In Offline mode (see Capter 3.5) this input field will be replaced by the "File settings" input field (see Chapter 3.10) for controlling the playback of a loaded profile sequence. C 2D-display: This display shows the last measured profile, the measuring ranges and measurement results. D “Display” toolbar: Using this toolbar, you scale the 2D-display and activate various options for mouse interaction (see Chapter 3.17). E “Measurement” toolbar: Set the various search ranges and limits for the measurement using this toolbar (see Chapter 3.18). F Navigation menu: Click on this button in order to show the navigation menu (see Chapter 3.19). G Results display: The results of the current valid measurement are displayed. H Status line: Status and error messages are displayed on the status line (see Chapter 9.1). 1 Display of the standard deviation: In the 2D-display, the standard deviation determined by the measuring program is represented by two orange lines and arrows. Page 97 Description of the Measuring Programs 4.4.2 "Double Deviation" Measuring Program Use the "Double Deviation" measuring program to determine the average deviation of points from two straight lines. The program determines the best fitting line to the profile points in two adjustable ranges and calculates the standard deviation of the distances of the points from the associated line in each case. Proceed as follows: - Configure the scanCONTROL measurement system ("Scanner settings", see Chapter 3.7). If necessary, limit the measuring range in order to eliminate interfering points ( see Chapter 3.13.2). Define the ranges in which the lines should be fitted to the profile points ( see Chapter 3.13.4). If necessary, activate the dynamic tracking for the measuring range and for the ranges for the line fitting respectively ( see Chapter 3.13.6). The measuring program outputs the following measured values: - Sigma Left [mm]: The standard deviation of the distances of the points in the left fitting range from the left line. Sigma Right [mm]: The standard deviation of the distances of the points in the right fitting range from the right line. A D B E C 1 G F H Fig. 4.23: "Double Deviation" measuring program Page 98 Description of the Measuring Programs Display elements and parameters in the "Double Deviation" measuring program: A “General” toolbar: Using this toolbar, you can select the data source (see Chapter 3.5), save profile sequences (see Chapter 3.6), save and load parameters (see Chapter 3.14) and reset selected parameters to default settings (see Chapter 3.14.3). B Scanner settings: Change the settings of scanCONTROL with these values (see Chapter 3.7). In Offline mode (see Capter 3.5) this input field will be replaced by the "File settings" input field (see Chapter 3.10) for controlling the playback of a loaded profile sequence. C 2D-display: This display shows the last measured profile, the measuring ranges and measurement results. D “Display” toolbar: Using this toolbar, you scale the 2D-display and activate various options for mouse interaction (see Chapter 3.17). E “Measurement” toolbar: Set the various search ranges and limits for the measurement using this toolbar (see Chapter 3.18). F Navigation menu: Click on this button in order to show the navigation menu (see Chapter 3.19). G Results display: The results of the current valid measurement are displayed. H Status line: Status and error messages are displayed on the status line (see Chapter 9.1). 1 Display of the standard deviations: In the 2D-display, the standard deviations determined by the measuring program are each represented by two orange lines and arrows. Page 99 Description of the Measuring Programs 4.4.3 "Surface Maximum" Measuring Program Use the "Surface Maximum" measuring program to determine the maximum positive deviation of a surface and its position. The program determines the best fitting line to the profile points in an adjustable range and determines the point with maximum positive distance from the line. Proceed as follows: - Configure the scanCONTROL measurement system ("Scanner settings", see Chapter 3.7). If necessary, limit the measuring range in order to eliminate interfering points ( see Chapter 3.13.2). Define the range in which the line should be fitted to the profile points ( see Chapter 3.13.4). If necessary, activate the dynamic tracking for the measuring range and for the range for the line fitting respectively ( see Chapter 3.13.6). The measuring program outputs the following measured values: - Position X [mm]: The X coordinate of the point with maximum positive distance from the line. Height [mm]: The maximum positive distance from the line. A D B E C 1 G F H Fig. 4.24: "Surface Maximum" measuring program Page 100 Description of the Measuring Programs Display elements and parameters in the "Surface Maximum" measuring program: A “General” toolbar: Using this toolbar, you can select the data source (see Chapter 3.5), save profile sequences (see Chapter 3.6), save and load parameters (see Chapter 3.14) and reset selected parameters to default settings (see Chapter 3.14.3). B Scanner settings: Change the settings of scanCONTROL with these values (see Chapter 3.7). In Offline mode (see Capter 3.5) this input field will be replaced by the "File settings" input field (see Chapter 3.10) for controlling the playback of a loaded profile sequence. C 2D-display: This display shows the last measured profile, the measuring ranges and measurement results. D “Display” toolbar: Using this toolbar, you scale the 2D-display and activate various options for mouse interaction (see Chapter 3.17). E “Measurement” toolbar: Set the various search ranges and limits for the measurement using this toolbar (see Chapter 3.18). F Navigation menu: Click on this button in order to show the navigation menu (see Chapter 3.19). G Results display: The results of the current valid measurement are displayed. H Status line: Status and error messages are displayed on the status line (see Chapter 9.1). 1 Display of the results: In the 2D-display, the point determined by the measuring program is represented by an orange cross. The maximum positive distance is indicated by an arrow. Page 101 Description of the Measuring Programs 4.4.4 "Surface Minimum" Measuring Program Use the "Surface Minimum" measuring program to determine the maximum negative deviation of a surface and its position. The program determines the best fitting line to the profile points in an adjustable range and determines the point with maximum negative distance from the line. Proceed as follows: - Configure the scanCONTROL measurement system ("Scanner settings", see Chapter 3.7). If necessary, limit the measuring range in order to eliminate interfering points ( see Chapter 3.13.2). Define the range in which the line should be fitted to the profile points ( see Chapter 3.13.4). If necessary, activate the dynamic tracking for the measuring range and for the range for the line fitting respectively ( see Chapter 3.13.6). The measuring program outputs the following measured values: - Position X [mm]: The X coordinate of the point with maximum negative distance from the line. Depth [mm]: The maximum negative distance from the line. A D B E C 1 G F H Fig. 4.25: "Surface Minimum" measuring program Page 102 Description of the Measuring Programs Display elements and parameters in the "Surface Minimum" measuring program: A “General” toolbar: Using this toolbar, you can select the data source (see Chapter 3.5), save profile sequences (see Chapter 3.6), save and load parameters (see Chapter 3.14) and reset selected parameters to default settings (see Chapter 3.14.3). B Scanner settings: Change the settings of scanCONTROL with these values (see Chapter 3.7). In Offline mode (see Capter 3.5) this input field will be replaced by the "File settings" input field (see Chapter 3.10) for controlling the playback of a loaded profile sequence. C 2D-display: This display shows the last measured profile, the measuring ranges and measurement results. D “Display” toolbar: Using this toolbar, you scale the 2D-display and activate various options for mouse interaction (see Chapter 3.17). E “Measurement” toolbar: Set the various search ranges and limits for the measurement using this toolbar (see Chapter 3.18). F Navigation menu: Click on this button in order to show the navigation menu (see Chapter 3.19). G Results display: The results of the current valid measurement are displayed. H Status line: Status and error messages are displayed on the status line (see Chapter 9.1). 1 Display of the results: In the 2D-display, the point determined by the measuring program is represented by an orange cross. The maximum negative distance is indicated by an arrow. Page 103 Description of the Measuring Programs 4.5 "Seam" Group Programs for inspecting heightenings, for example of beading or welds, can be found in the "Seam" group. Fig. 4.26: "Seam" group Measuring programs in the "Seam" group: - Start/End: Determination of a heightening and calculation of the X coordinates of the start and end point. Maximum: Determination of a heightening and calculation of the coordinates of the point with maximum height. Width/Height: Determination of a heightening and calculation of its width and height. Area: Determination of a heightening and calculation of its area. Page 104 Description of the Measuring Programs 4.5.1 "Seam Start/End" Measuring Program Use the "Seam Start/End" measuring program to determine the start and end point of a significant heightening. For example, such a heightening can be a bead or weld. The program first determines a reference line which is determined by line fitting in up to two adjustable ranges (so-called reference ranges). A minimum height relative to the reference line is specified. A heightening is detected for existing profile points above the minimum height and the measuring program then determines the start and the end point of the heightening. Proceed as follows: - - Configure the scanCONTROL measurement system ("Scanner settings", see Chapter 3.7). Define the type of the heightening (see Fig. 4.27 and Chapter 3.13.1): The heightening is located between two reference ranges which are on the same level . The heightening is located between two reference ranges which are on different, parallel levels . There is a reference range which is located on the left side of the heightening . There is a reference range which is located on the right side of the heightening . If necessary, limit the measuring range in order to eliminate interfering points ( see Chapter 3.13.2). Define the range/ranges in which the reference line should be fitted to the profile points ( see Chapter 3.13.4). Define the minimum height for the detection of the heightening ( see Chapter 3.13.5). If necessary, activate the dynamic tracking for the measuring range, for the ranges for the line fitting and for the detection of the heightening ( see Chapter 3.13.6). The measuring program outputs the following measured values: - Start X [mm]: The X coordinate of the start point of the heightening. End X [mm]: The X coordinate of the end point of the heightening. A D B E C 2 1 G F H Fig. 4.27: "Seam Start/End" measuring program Page 105 Description of the Measuring Programs Display elements and parameters in the "Seam Start/End" measuring program: A “General” toolbar: Using this toolbar, you can select the data source (see Chapter 3.5), save profile sequences (see Chapter 3.6), save and load parameters (see Chapter 3.14) and reset selected parameters to default settings (see Chapter 3.14.3). B Scanner settings: Change the settings of scanCONTROL with these values (see Chapter 3.7). In Offline mode (see Capter 3.5) this input field will be replaced by the "File settings" input field (see Chapter 3.10) for controlling the playback of a loaded profile sequence. C 2D-display: This display shows the last measured profile, the measuring ranges and measurement results. D “Display” toolbar: Using this toolbar, you scale the 2D-display and activate various options for mouse interaction (see Chapter 3.17). E “Measurement” toolbar: Set the various search ranges and limits for the measurement using this toolbar (see Chapter 3.18). F Navigation menu: Click on this button in order to show the navigation menu (see Chapter 3.19). G Results display: The results of the current valid measurement are displayed. H Status line: Status and error messages are displayed on the status line (see Chapter 9.1). 1 Type of the heightening: Select the type of the heightening (see above) in this input field. 2 Display of the start and end point: In the 2D-display, the start and end point determined by the measuring program are each represented by an orange cross. Page 106 Description of the Measuring Programs 4.5.2 "Seam Maximum" Measuring Program Use the "Seam Maximum" measuring program to determine the maximum point of a significant heightening. For example, such a heightening can be a bead or weld. The program first determines a reference line which is determined by line fitting in up to two adjustable ranges (so-called reference ranges). A minimum height relative to the reference line is specified. A heightening is detected for existing profile points above the minimum height and the measuring program then determines the point with maximum distance from the reference line. Proceed as follows: - - Configure the scanCONTROL measurement system ("Scanner settings", see Chapter 3.7). Define the type of the heightening (see Fig. 4.28 and Chapter 3.13.1): The heightening is located between two reference ranges which are on the same level . The heightening is located between two reference ranges which are on different, parallel levels . There is a reference range which is located on the left side of the heightening . There is a reference range which is located on the right side of the heightening . If necessary, limit the measuring range in order to eliminate interfering points ( see Chapter 3.13.2). Define the range/ranges in which the reference line should be fitted to the profile points ( see Chapter 3.13.4). Define the minimum height for the detection of the heightening ( see Chapter 3.13.5). If necessary, activate the dynamic tracking for the measuring range, for the ranges for the line fitting and for the detection of the heightening ( see Chapter 3.13.6). The measuring program outputs the following measured values: - Maximum X [mm]: The X coordinate of the maximum point of the heightening. Maximum Z [mm]: The Z coordinate of the maximum point of the heightening. A D B E C 2 1 G F H Fig. 4.28: "Seam Maximum" measuring program Page 107 Description of the Measuring Programs Display elements and parameters in the "Seam Maximum" measuring program: A “General” toolbar: Using this toolbar, you can select the data source (see Chapter 3.5), save profile sequences (see Chapter 3.6), save and load parameters (see Chapter 3.14) and reset selected parameters to default settings (see Chapter 3.14.3). B Scanner settings: Change the settings of scanCONTROL with these values (see Chapter 3.7). In Offline mode (see Capter 3.5) this input field will be replaced by the "File settings" input field (see Chapter 3.10) for controlling the playback of a loaded profile sequence. C 2D-display: This display shows the last measured profile, the measuring ranges and measurement results. D “Display” toolbar: Using this toolbar, you scale the 2D-display and activate various options for mouse interaction (see Chapter 3.17). E “Measurement” toolbar: Set the various search ranges and limits for the measurement using this toolbar (see Chapter 3.18). F Navigation menu: Click on this button in order to show the navigation menu (see Chapter 3.19). G Results display: The results of the current valid measurement are displayed. H Status line: Status and error messages are displayed on the status line (see Chapter 9.1). 1 Type of the heightening: Select the type of the heightening (see above) in this input field. 2 Display of the maximum point: In the 2D-display, the maximum point determined by the measuring program is represented by an orange cross. Page 108 Description of the Measuring Programs 4.5.3 "Seam Width/Height" Measuring Program Use the "Seam Width/Height" measuring program to determine the width and height of a significant heightening. For example, such a heightening can be a bead or weld. The program first determines a reference line which is determined by line fitting in up to two adjustable ranges (so-called reference ranges). A minimum height relative to the reference line is specified. A heightening is detected for existing profile points above the minimum height and the measuring program then determines the width and height of the heightening. Proceed as follows: - - Configure the scanCONTROL measurement system ("Scanner settings", see Chapter 3.7). Define the type of the heightening (see Fig. 4.29 and Chapter 3.13.1): The heightening is located between two reference ranges which are on the same level . The heightening is located between two reference ranges which are on different, parallel levels . There is a reference range which is located on the left side of the heightening . There is a reference range which is located on the right side of the heightening . If necessary, limit the measuring range in order to eliminate interfering points ( see Chapter 3.13.2). Define the range/ranges in which the reference line should be fitted to the profile points ( see Chapter 3.13.4). Define the minimum height for the detection of the heightening ( see Chapter 3.13.5). If necessary, activate the dynamic tracking for the measuring range, for the ranges for the line fitting and for the detection of the heightening ( see Chapter 3.13.6). The measuring program outputs the following measured values: - Width [mm]: The width of the heightening. Height [mm]: The height of the heightening. A D B E C 2 1 G F H Fig. 4.29: "Seam Width/Height" measuring program Page 109 Description of the Measuring Programs Display elements and parameters in the "Seam Width/Height" measuring program: A “General” toolbar: Using this toolbar, you can select the data source (see Chapter 3.5), save profile sequences (see Chapter 3.6), save and load parameters (see Chapter 3.14) and reset selected parameters to default settings (see Chapter 3.14.3). B Scanner settings: Change the settings of scanCONTROL with these values (see Chapter 3.7). In Offline mode (see Capter 3.5) this input field will be replaced by the "File settings" input field (see Chapter 3.10) for controlling the playback of a loaded profile sequence. C 2D-display: This display shows the last measured profile, the measuring ranges and measurement results. D “Display” toolbar: Using this toolbar, you scale the 2D-display and activate various options for mouse interaction (see Chapter 3.17). E “Measurement” toolbar: Set the various search ranges and limits for the measurement using this toolbar (see Chapter 3.18). F Navigation menu: Click on this button in order to show the navigation menu (see Chapter 3.19). G Results display: The results of the current valid measurement are displayed. H Status line: Status and error messages are displayed on the status line (see Chapter 9.1). 1 Type of the heightening: Select the type of the heightening (see above) in this input field. 2 Display of the width and height: In the 2D-display, the width and height determined by the measuring program are each represented by an orange arrow. Page 110 Description of the Measuring Programs 4.5.4 "Seam Area" Measuring Program Use the "Seam Area" measuring program to determine the area of a significant heightening. For example, such a heightening can be a bead or weld. The program first determines a reference line which is determined by line fitting in up to two adjustable ranges (so-called reference ranges). A minimum height relative to the reference line is specified. A heightening is detected for existing profile points above the minimum height and the measuring program then determines the area of the heightening. Proceed as follows: - - Configure the scanCONTROL measurement system ("Scanner settings", see Chapter 3.7). Define the type of the heightening (see Fig. 4.30 and Chapter 3.13.1): The heightening is located between two reference ranges which are on the same level . The heightening is located between two reference ranges which are on different, parallel levels . There is a reference range which is located on the left side of the heightening . There is a reference range which is located on the right side of the heightening . If necessary, limit the measuring range in order to eliminate interfering points ( see Chapter 3.13.2). Define the range/ranges in which the reference line should be fitted to the profile points ( see Chapter 3.13.4). Define the minimum height for the detection of the heightening ( see Chapter 3.13.5). If necessary, activate the dynamic tracking for the measuring range, for the ranges for the line fitting and for the detection of the heightening ( see Chapter 3.13.6). The measuring program outputs the following measured value: - Area [mm²]: The area of the heightening. A D B E C 2 1 G F H Fig. 4.30: "Seam Area" measuring program Page 111 Description of the Measuring Programs Display elements and parameters in the "Seam Area" measuring program: A “General” toolbar: Using this toolbar, you can select the data source (see Chapter 3.5), save profile sequences (see Chapter 3.6), save and load parameters (see Chapter 3.14) and reset selected parameters to default settings (see Chapter 3.14.3). B Scanner settings: Change the settings of scanCONTROL with these values (see Chapter 3.7). In Offline mode (see Capter 3.5) this input field will be replaced by the "File settings" input field (see Chapter 3.10) for controlling the playback of a loaded profile sequence. C 2D-display: This display shows the last measured profile, the measuring ranges and measurement results. D “Display” toolbar: Using this toolbar, you scale the 2D-display and activate various options for mouse interaction (see Chapter 3.17). E “Measurement” toolbar: Set the various search ranges and limits for the measurement using this toolbar (see Chapter 3.18). F Navigation menu: Click on this button in order to show the navigation menu (see Chapter 3.19). G Results display: The results of the current valid measurement are displayed. H Status line: Status and error messages are displayed on the status line (see Chapter 9.1). 1 Type of the heightening: Select the type of the heightening (see above) in this input field. 2 Display of the area: In the 2D-display, the area determined by the measuring program is displayed hatched. Page 112 Description of the Measuring Programs 4.6 "Groove" Group Programs for inspecting deepenings, for example of a groove or a gap, can be found in the "Groove" group. Fig. 4.31: "Groove" group Measuring programs in the "Groove" group: - Start/End: Determination of a deepening and calculation of the X coordinates of the start and end point. Minimum: Determination of a deepening and calculation of the coordinates of the point with maximum depth. Width/Depth: Determination of a deepening and calculation of its width and depth. Area: Determination of a deepening and calculation of its area. Page 113 Description of the Measuring Programs 4.6.1 "Groove Start/End" Measuring Program Use the "Groove Start/End" measuring program to determine the start and end point of a significant deepening. For example, such a deepening can be a groove or gap. The program first determines a reference line which is determined by line fitting in up to two adjustable ranges (so-called reference ranges). A minimum depth relative to the reference line is specified. A deepening is detected for existing profile points below the minimum depth and the measuring program then determines the start and the end point of the deepening. Proceed as follows: - - Configure the scanCONTROL measurement system ("Scanner settings", see Chapter 3.7). Define the type of the deepening (see Fig. 4.32 and Chapter 3.13.1): The deepening is located between two reference ranges which are on the same level . The deepening is located between two reference ranges which are on different, parallel levels . There is a reference range which is located on the left side of the deepening . There is a reference range which is located on the right side of the deepening . If necessary, limit the measuring range in order to eliminate interfering points ( see Chapter 3.13.2). Define the range/ranges in which the reference line should be fitted to the profile points ( see Chapter 3.13.4). Define the minimum depth for the detection of the deepening ( see Chapter 3.13.5). If necessary, activate the dynamic tracking for the measuring range, for the ranges for the line fitting and for the detection of the deepening ( see Chapter 3.13.6). The measuring program outputs the following measured values: - Start X [mm]: The X coordinate of the start point of the deepening. End X [mm]: The X coordinate of the end point of the deepening. A D B E C 2 1 G F H Fig. 4.32: "Groove Start/End" measuring program Page 114 Description of the Measuring Programs Display elements and parameters in the "Groove Start/End" measuring program: A “General” toolbar: Using this toolbar, you can select the data source (see Chapter 3.5), save profile sequences (see Chapter 3.6), save and load parameters (see Chapter 3.14) and reset selected parameters to default settings (see Chapter 3.14.3). B Scanner settings: Change the settings of scanCONTROL with these values (see Chapter 3.7). In Offline mode (see Capter 3.5) this input field will be replaced by the "File settings" input field (see Chapter 3.10) for controlling the playback of a loaded profile sequence. C 2D-display: This display shows the last measured profile, the measuring ranges and measurement results. D “Display” toolbar: Using this toolbar, you scale the 2D-display and activate various options for mouse interaction (see Chapter 3.17). E “Measurement” toolbar: Set the various search ranges and limits for the measurement using this toolbar (see Chapter 3.18). F Navigation menu: Click on this button in order to show the navigation menu (see Chapter 3.19). G Results display: The results of the current valid measurement are displayed. H Status line: Status and error messages are displayed on the status line (see Chapter 9.1). 1 Type of the deepening: Select the type of the deepening (see above) in this input field. 2 Display of the start and end point: In the 2D-display, the start and end point determined by the measuring program are each represented by an orange cross. Page 115 Description of the Measuring Programs 4.6.2 "Groove Minimum" Measuring Program Use the "Groove Minimum" measuring program to determine the minimum point of a significant deepening. For example, such a deepening can be a groove or gap. The program first determines a reference line which is determined by line fitting in up to two adjustable ranges (so-called reference ranges). A minimum depth relative to the reference line is specified. A deepening is detected for existing profile points below the minimum depth and the measuring program then determines the point with maximum distance from the reference line. Proceed as follows: - - Configure the scanCONTROL measurement system ("Scanner settings", see Chapter 3.7). Define the type of the deepening (see Fig. 4.33 and Chapter 3.13.1): The deepening is located between two reference ranges which are on the same level . The deepening is located between two reference ranges which are on different, parallel levels . There is a reference range which is located on the left side of the deepening . There is a reference range which is located on the right side of the deepening . If necessary, limit the measuring range in order to eliminate interfering points ( see Chapter 3.13.2). Define the range/ranges in which the reference line should be fitted to the profile points ( see Chapter 3.13.4). Define the minimum depth for the detection of the deepening ( see Chapter 3.13.5). If necessary, activate the dynamic tracking for the measuring range, for the ranges for the line fitting and for the detection of the deepening ( see Chapter 3.13.6). The measuring program outputs the following measured values: - Minimum X [mm]: The X coordinate of the minimum point of the deepening. Minimum Z [mm]: The Z coordinate of the minimum point of the deepening. A D B E C 1 2 G F H Fig. 4.33: "Groove Minimum" measuring program Page 116 Description of the Measuring Programs Display elements and parameters in the "Groove Minimum" measuring program: A “General” toolbar: Using this toolbar, you can select the data source (see Chapter 3.5), save profile sequences (see Chapter 3.6), save and load parameters (see Chapter 3.14) and reset selected parameters to default settings (see Chapter 3.14.3). B Scanner settings: Change the settings of scanCONTROL with these values (see Chapter 3.7). In Offline mode (see Capter 3.5) this input field will be replaced by the "File settings" input field (see Chapter 3.10) for controlling the playback of a loaded profile sequence. C 2D-display: This display shows the last measured profile, the measuring ranges and measurement results. D “Display” toolbar: Using this toolbar, you scale the 2D-display and activate various options for mouse interaction (see Chapter 3.17). E “Measurement” toolbar: Set the various search ranges and limits for the measurement using this toolbar (see Chapter 3.18). F Navigation menu: Click on this button in order to show the navigation menu (see Chapter 3.19). G Results display: The results of the current valid measurement are displayed. H Status line: Status and error messages are displayed on the status line (see Chapter 9.1). 1 Type of the deepening: Select the type of the deepening (see above) in this input field. 2 Display of the minimum point: In the 2D-display, the minimum point determined by the measuring program is represented by an orange cross. Page 117 Description of the Measuring Programs 4.6.3 "Groove Width/Depth" Measuring Program Use the "Groove Width/Depth" measuring program to determine the width and depth of a significant deepening. For example, such a deepening can be a groove or gap. The program first determines a reference line which is determined by line fitting in up to two adjustable ranges (so-called reference ranges). A minimum depth relative to the reference line is specified. A deepening is detected for existing profile points below the minimum depth and the measuring program then determines the width and depth of the deepening. Proceed as follows: - - Configure the scanCONTROL measurement system ("Scanner settings", see Chapter 3.7). Define the type of the deepening (see Fig. 4.34 and Chapter 3.13.1): The deepening is located between two reference ranges which are on the same level . The deepening is located between two reference ranges which are on different, parallel levels . There is a reference range which is located on the left side of the deepening . There is a reference range which is located on the right side of the deepening . If necessary, limit the measuring range in order to eliminate interfering points ( see Chapter 3.13.2). Define the range/ranges in which the reference line should be fitted to the profile points ( see Chapter 3.13.4). Define the minimum depth for the detection of the deepening ( see Chapter 3.13.5). If necessary, activate the dynamic tracking for the measuring range, for the ranges for the line fitting and for the detection of the deepening ( see Chapter 3.13.6). The measuring program outputs the following measured values: - Width [mm]: The width of the deepening. Depth [mm]: The depth of the deepening. A D B E C 1 2 G F H Fig. 4.34: "Groove Width/Depth" measuring program Page 118 Description of the Measuring Programs Display elements and parameters in the "Groove Width/Depth" measuring program: A “General” toolbar: Using this toolbar, you can select the data source (see Chapter 3.5), save profile sequences (see Chapter 3.6), save and load parameters (see Chapter 3.14) and reset selected parameters to default settings (see Chapter 3.14.3). B Scanner settings: Change the settings of scanCONTROL with these values (see Chapter 3.7). In Offline mode (see Capter 3.5) this input field will be replaced by the "File settings" input field (see Chapter 3.10) for controlling the playback of a loaded profile sequence. C 2D-display: This display shows the last measured profile, the measuring ranges and measurement results. D “Display” toolbar: Using this toolbar, you scale the 2D-display and activate various options for mouse interaction (see Chapter 3.17). E “Measurement” toolbar: Set the various search ranges and limits for the measurement using this toolbar (see Chapter 3.18). F Navigation menu: Click on this button in order to show the navigation menu (see Chapter 3.19). G Results display: The results of the current valid measurement are displayed. H Status line: Status and error messages are displayed on the status line (see Chapter 9.1). 1 Type of the deepening: Select the type of the deepening (see above) in this input field. 2 Display of the width and depth: In the 2D-display, the width and depth determined by the measuring program are each represented by an orange arrow. Page 119 Description of the Measuring Programs 4.6.4 "Groove Area" Measuring Program Use the "Groove Area" measuring program to determine the area of a significant deepening. For example, such a deepening can be a groove or gap. The program first determines a reference line which is determined by line fitting in up to two adjustable ranges (so-called reference ranges). A minimum depth relative to the reference line is specified. A deepening is detected for existing profile points below the minimum depth and the measuring program then determines the area of the deepening. Proceed as follows: - - Configure the scanCONTROL measurement system ("Scanner settings", see Chapter 3.7). Define the type of the deepening (see Fig. 4.35 and Chapter 3.13.1): The deepening is located between two reference ranges which are on the same level . The deepening is located between two reference ranges which are on different, parallel levels . There is a reference range which is located on the left side of the deepening . There is a reference range which is located on the right side of the deepening . If necessary, limit the measuring range in order to eliminate interfering points ( see Chapter 3.13.2). Define the range/ranges in which the reference line should be fitted to the profile points ( see Chapter 3.13.4). Define the minimum depth for the detection of the deepening ( see Chapter 3.13.5). If necessary, activate the dynamic tracking for the measuring range, for the ranges for the line fitting and for the detection of the deepening ( see Chapter 3.13.6). The measuring program outputs the following measured value: - Area [mm²]: The area of the deepening. A D B E C 2 1 G F H Fig. 4.35: "Groove Area" measuring program Page 120 Description of the Measuring Programs Display elements and parameters in the "Groove Area" measuring program: A “General” toolbar: Using this toolbar, you can select the data source (see Chapter 3.5), save profile sequences (see Chapter 3.6), save and load parameters (see Chapter 3.14) and reset selected parameters to default settings (see Chapter 3.14.3). B Scanner settings: Change the settings of scanCONTROL with these values (see Chapter 3.7). In Offline mode (see Capter 3.5) this input field will be replaced by the "File settings" input field (see Chapter 3.10) for controlling the playback of a loaded profile sequence. C 2D-display: This display shows the last measured profile, the measuring ranges and measurement results. D “Display” toolbar: Using this toolbar, you scale the 2D-display and activate various options for mouse interaction (see Chapter 3.17). E “Measurement” toolbar: Set the various search ranges and limits for the measurement using this toolbar (see Chapter 3.18). F Navigation menu: Click on this button in order to show the navigation menu (see Chapter 3.19). G Results display: The results of the current valid measurement are displayed. H Status line: Status and error messages are displayed on the status line (see Chapter 9.1). 1 Type of the deepening: Select the type of the deepening (see above) in this input field. 2 Display of the area: In the 2D-display, the area determined by the measuring program is displayed hatched. Page 121 Description of the Measuring Programs 4.7 "Tools" Group In the bottom area of the main view you will find the "Tools" group which provides useful utilities. Fig. 4.36: "Tools" group Programs in the "Tools" group: - Display Image Data: Visualization of the image data recorded by the sensor matrix. Display Profiles: Display of the profile data. Save Profiles: Save profile sequences for later offline analysis. Calibrate Position: Adjusting the mounting position of the measurement system. Page 122 Description of the Measuring Programs 4.7.1 "Display Image Data" Program The original signal recorded on the sensor matrix of scanCONTROL is displayed using the “Display Image Data” program. This program is useful for detecting and eliminating sources of errors and interference, such as overexposure or multiple reflections. A B C 1 2 D Fig. 4.37: "Display Image Data" program Display elements and parameters in the "Display Image Data" program: E G D A “General” toolbar: Using this toolbar, you can load parameters (see Chapter 3.14) and reset selected parameters to default settings (see Chapter 3.14.3). B Scanner settings: Change the settings of scanCONTROL with these values. Detail information about each parameter can be found in the Chapter 3.7 “Scanner settings”. Only a part of the scanner settings is available in the “Display image data” measuring program. C 2D-display: This display shows the just recorded image of the sensor matrix. The measuring field (see Chapter 3.9) selected with the “Measuring field” parameter is shown on the display as a red rectangle. D Navigation menu: Click on this button in order to show the navigation menu (see Chapter 3.19). E Status line: Status and error messages are displayed on the status line (see Chapter 9.1). 1 Max. no. of profiles [1/s]...: With this button you open the dialog “Max. no of profiles [1/s]” where you can determine the maximum possible profile frequency depending on the currently selected scanner settings (see below). 2 Save image: This saves the just recorded image of the sensor matrix to a file. A standard Windows dialog is displayed for selection of the path and file name for saving the image. The image is saved in "png" file format using the ".png" file extension. Page 123 Description of the Measuring Programs Fig. 4.38: "Max. no. of profiles [1/s]" dialog box The maximum possible profile frequency which scanCONTROL can be operated with depends on various scanner settings and the number of scanners being operated in parallel. You can determine the maximum possible profile frequency in this dialog. - No. of sensors: With this setting you determine the effect of the number of scanCONTROL sensors to be operated simultaneously on the Fire Wire controller (see below). Measuring field: The maximum profile frequency resulting from the setting of the “Measuring field” parameter. Processing: The maximum profile frequency resulting from the setting in the “Processing” (see Chapter 3.9) input field. Number of sensors: The maximum profile frequency resulting from the setting of the “No. of sensors” parameter (see above). Exposure time: The maximum profile frequency resulting from the setting of the “Exposure time” parameter. Result: The maximum profile frequency resulting from the above restrictions. Note: Further information about maximum profile frequency can be found in the document "Quick Reference scanCONTROL". Note: It is not possible in the "Display image data" program to save parameters in a file or to save them permanently on scanCONTROL. Page 124 Description of the Measuring Programs 4.7.2 "Display Profiles" Program Use the "Display Profiles" program to display profiles. A D B E C F G Fig. 4.39: "Display Profiles" program Display elements and parameters in the "Display Profiles" program: A “General” toolbar: Using this toolbar, you can select the data source (see Chapter 3.5), save profile sequences (see Chapter 3.6), load parameters (see Chapter 3.14) and reset selected parameters to default settings (see Chapter 3.14.3). B Scanner settings: Change the settings of scanCONTROL with these values (see Chapter 3.7). In Offline mode (see Chapter 3.5) this input field will be replaced by the "File settings" input field (see Chapter 3.10) for controlling the playback of a loaded profile sequence. C 2D-display: This display shows the last measured profile. D “Display” toolbar: Using this toolbar, you scale the 2D-display and activate various options for mouse interaction (see Chapter 3.17). E “Measurement” toolbar: Set the various search ranges and limits for the measurement using this toolbar (see Chapter 3.18). F Navigation menu: Click on this button in order to show the navigation menu (see Chapter 3.19). G Status line: Status and error messages are displayed on the status line (see Chapter 9.1). Note: It is not possible in the "Display profiles" program to save parameters in a file or to save them permanently on scanCONTROL. Page 125 Description of the Measuring Programs 4.7.3 "Save Profiles" Program You create recordings of profile sequences with the "Save Profiles" program. Configuration Tools creates a file which can later be loaded into any measuring program. Use this function to save profile sequences with a high scan rate. In doing so, the profiles are first buffered in the RAM of the PC and then saved in a file. Note: It is also possible in the measuring programs described above to save profile sequences ("General" toolbar). However, only low scan rates are possible there as the data are written to the file immediately. C A B 1 2 3 4 D E Fig. 4.40: "Save Profiles" program Display elements and parameters in the "Save Profiles" program: A Scanner settings: Change the settings of scanCONTROL with these values (see Chapter 3.7). B 2D-display: This display shows the last measured profile. C “Display” toolbar: Using this toolbar, you scale the 2D-display and activate various options for mouse interaction (see Chapter 3.17). D Navigation menu: Click on this button in order to show the navigation menu (see Chapter 3.19). E Status line: Status and error messages are displayed on the status line (see Chapter 9.1). 1 Freeze 2D-display/Trigger mode - Freeze 2D-display: Deactivates the 2D-display. When the display is deactivated, the performance of the system is better and profiles can be saved with a higher scan rate. This option is automatically deactivated when the measuring program is started. - Trigger mode: You activate the trigger mode (see below, "Record" section) with this input field. Page 126 Description of the Measuring Programs 2 File/Buffer - Path: The directory in which the file is stored. - Name: Input the name for the profile sequence to be saved here. - No. of profiles: Maximum number of profiles which should be saved in the file. This number should not be selected higher than necessary as the reserved part of the RAM for the profiles is dependent on it. The upper limit for this parameter depends on the number of points per profile (see Chapter 3.9). - Data: Using this input field, select which information is saved in the profile file. This setting is crucial for the resulting file size of the profile file. x/z only: The X and Z coordinates of the individual measuring points will be saved. This setting minimizes the file size. x/z + data: The information of the selected reflection is saved (X/Z coordinates, width, maximum, threshold, moment 0th and 1st order). full set: All four reflections, the timestamp and the scanCONTROL settings are saved. This setting results in an enlarged file, however it is recommended as no information is lost with this setting. 3 System info - RAM total/required: Two values are displayed. The first value indicates the size of the physical RAM of your system. The second value indicates the size of the memory which is necessary for saving the profile sequences. This value depends, among other things, on the settings of the parameters "No. of profiles" (File/Buffer) and "Points per profile" (Advanced scanner settings). If the value of used memory exceeds the available memory, the system may accept user inputs only very slowly and error-free behavior is no longer guaranteed. 4 Record - Trigger mode, inactive: Start the recording of the profile sequences with the red "Record" button. The profiles are now buffered in the RAM. The program shows you the status of this process in the field "buffered: [profile number]". If the maximum number of profiles is reached, the profiles are saved in the selected file. The buffering can be ended prematurely and the saving started by pressing the "Stop" button. The time required for the operation varies according to the size of the profile sequence. The program shows you the status of this process in the field "saved: [profile number]". - Trigger mode, active: Press the red "Record" button. The measuring program is now ready to buffer profiles in the RAM. Press the "Trigger" button in order to buffer individual profiles. If the maximum number of profiles is reached, the profiles are saved in the selected file. The buffering can be ended prematurely and the saving started by pressing the "Stop" button. The time required for the operation varies according to the size of the profile sequence. The program shows you the status of this process in the field "saved: [profile number]". Note: It is not possible in the "Save profile" program to load profile sequences, log measured values, load parameters from a file, save them in a file or to save them permanently on scanCONTROL or to reset default settings. Note: In order to save the scanCONTROL settings in the profile file, select "full set" as file format. Note: There may be a discrepancy between the setpoint value and the actual value for the scan rate used for saving if the number of scans is set too high or the processing power of the PC is insufficient. Page 127 Description of the Measuring Programs 4.7.4 “Calibrate Position” program Use the "Calibrate Position" program in order to adjust tilting and displacements which are caused by the mounting position of the measurement system. You may rotate and translate the profile data and store the resulting transformation permanently on the scanCONTROL measurement system. Proceed as follows: - Configure the scanCONTROL measurement system ("Scanner settings", see Chapter 3.7). If necessary, limit the measuring range in order to eliminate interfering points ( see Chapter 3.13.2). If necessary, define a range in which a line should be fitted to the profile points ( see Chapter 3.13.4). The current angle and offset of the fitted line will be shown in the results display and will make the setting of the rotation angle and the translation offset easier for you. Use the "Rotation angle" and "Translation X/Z" input fields in order to rotate and translate the profile (Transformation). The 2D-display shows the current and the transformed profile. The results display shows the angle and offset of the current and the transformed fitted lines. Use the "Calibrate scanCONTROL" button in order to store the transformation permanently on scanCONTROL. The original profile will disappear and only the transformed profile and the transformed angle and offset will be displayed. The "Calibrate scanCONTROL" button will be replaced by the "Reset calibration" button. The status line will show the hint "Calibration active". A D B E C 1 G F H Fig. 4.41: "Calibrate Position" program Display elements and parameters in the "Calibrate Position" program: A “General” toolbar: Using this toolbar, you can load parameters (see Chapter 3.14) and reset selected parameters to default settings (see Chapter 3.14.3). B Scanner settings: Change the settings of scanCONTROL with these values (see Chapter 3.7). C 2D-display: This display shows the last measured profile. D “Display” toolbar: Using this toolbar, you scale the 2D-display and activate various options for mouse interaction (see Chapter 3.17). Page 128 Description of the Measuring Programs E “Measurement” toolbar: Set the various search ranges and limits for the measurement using this toolbar (see Chapter 3.18). F Navigation menu: Click on this button in order to show the navigation menu (see Chapter 3.19). G Results display: The results of the current and of the transformed profile are displayed. H Status line: Status and error messages are displayed on the status line (see Chapter 9.1). 1 Transformation settings: - Rotation angle [°]: The angle by which the profile is rotated. The center of the measurement range is used as center of rotation. - Translation X [mm]: The offset by which the profile is translated in X direction. - Translation Z [mm]: The offset by which the profile is translated in Z direction. - Reset values: Resets the "Rotation angle" and "Translation X/Z" values to zero. - Calibrate scanCONTROL: Stores the transformation permanently on the scanCONTROL measurement system. - Reset calibration: Deletes the stored transformation from the scanCONTROL measurement system. Note: In order to adjust the transformation or to store a new transformation on the scanCONTROL measurement system, initially use the "Reset calibration" button (see Fig. 4.42) in order to clear the current transformation. Note: The transformation is performed as follows: At first the rotation through the center of the measurement range is performed, and then the translation of the profile is performed. Fig. 4.42: "Reset calibration" button Note: It is not possible in the "Calibrate Position" program to save parameters. Note: The "Calibrate Position" program is only available using a scanCONTROL 26X0, 27X0 or 29X0 measurement system. Note: The "Calibrate Position" program is only available for scanCONTROL devices with an Ethernet interface. Page 129 Description of the Measuring Programs 4.8 "Export Profiles" Program Use the "Export Profiles" program to save profiles in an Excel-compatible format. The profiles are saved as "slk" files. Use the "File Export profiles" menu entry in order to start the "Export Profiles" program. A D B E C 1 2 F G Fig. 4.43: "Export Profiles" program Display elements and parameters in the "Export Profiles" program: A “General” toolbar: Using this toolbar, you can select the data source (see Chapter 3.5), save profile sequences (see Chapter 3.6), load parameters (see Chapter 3.14) and reset selected parameters to default settings (see Chapter 3.14.3). B Scanner settings: Change the settings of scanCONTROL with these values (see Chapter 3.7). In Offline mode (see Chapter 3.5) this input field will be replaced by the "File settings" input field (see Chapter 3.10) for controlling the playback of a loaded profile sequence. C 2D-display: This display shows the last measured profile. D “Display” toolbar: Using this toolbar, you scale the 2D-display and activate various options for mouse interaction (see Chapter 3.17). E “Measurement” toolbar: Set the various search ranges and limits for the measurement using this toolbar (see Chapter 3.18). F Navigation menu: Click on this button in order to show the navigation menu (see Chapter 3.19). G Status line: Status and error messages are displayed on the status line (see Chapter 9.1). Page 130 Description of the Measuring Programs 1 Export settings - Trigger mode: You activate the trigger mode (see below, "Record" section) with this input field. - Path: The directory in which the files are stored. - Name: The name of the profile files which the profile data are exported to. 2 Record - Trigger mode, inactive: Start the recording of the profile sequences with the red "Record" button. The transferred profiles are exported now. The process can be finished by pressing the "Stop" button. - Trigger mode, active: Press the red "Record" button. The measuring program is now ready to export profiles. Press the "Trigger" button in order to export individual profiles. The process can be finished by pressing the "Stop" button. Note: The program stores the profiles as "slk" files. This format can be imported into other programs, for example Microsoft Excel. One profile is stored in each file whereby the file names are automatically incremented. For example, if the profile name is specified as “profile”, the files “profile_00001.slk”, “profile_00002.slk” etc. are created. The profile counter is reset after 99999 profiles. Note: Only profile points being inside the region of interest (Cutting out, see Chapter 3.13.2) are stored. Note: It is not possible in the "Export profiles" program to save parameters in a file or to save them permanently on scanCONTROL. Page 131 Combining Results from Measuring Programs 5. Combining Results from Measuring Programs After completing the configuration of the individual measuring programs, use the "Result Combination" view to combine the results defined in the measuring programs. You can define up to eight signals for combination purposes. For each signal, choose up to two results from the active measuring programs or already combined results and the algorithm for calculation. In addition, you can add a constant value to each signal defined this way. Use the "Result Combination" button in the main view (see Chapter 3.2) or the navigation menu (see Chapter 3.19) in order to access the "Result Combination" view. This view first displays all the signals defined for calculation, along with the corresponding results: A D B C 3 1 2 E F H Fig. 5.1: "Result Combination" view - summary Display elements and parameters in the "Result Combination" view: A “General” toolbar: Using this toolbar, you can select the data source (see Chapter 3.5), save profile sequences (see Chapter 3.6), save parameters to a file and load parameters from a file (see Chapter 3.14), store parameters permanently on scanCONTROL and load parameters from scanCONTROL (see Chapter 3.14) and reset selected parameters to default settings (see Chapter 3.14.3). B Scanner settings: Change the settings of scanCONTROL with these values (see Chapter 3.7). In Offline mode (see Chapter 3.5) this input field will be replaced by the "File settings" input field (see Chapter 3.10) for controlling the playback of a loaded profile sequence. C 2D-display: This display shows the last measured profile and measurement results. D “Display” toolbar: Using this toolbar, you scale the 2D-display and activate various options for mouse interaction (see Chapter 3.17). E Navigation menu: Click on this button in order to show the navigation menu (see Chapter 3.19). F Status line: Status and error messages are displayed on the status line. If errors occur in several active measuring programs, the first error found is displayed in the order of the measuring programs (see Chapter 9.1). Page 132 Combining Results from Measuring Programs 1 Combined signals (setting): In this field, you can enable the editing of any signals that have already been defined or add new signals in order to combine measured values. 2 Combined signals (overview): Shows the signals combined and the associated results from the currently valid measurement. 3 Display of the measurement results: The signals combined (orange) and their operands (grey) are shown in the 2D display. Use the "combined signals" input field (see 1, Fig. 5.1), to define signals for calculation. Press the button of a previously defined signal, or add a new signal. In the "Result Combination" view, appropriate input fields are enabled: 4 2 1 3 Fig. 5.2: "Result Combination" view - defining signals for calculation Display elements and parameters in "Result Combination" view: 1 Combined signals (setting): In this field, activate the editing of any signals that have already been defined or add new signals to be combined using measured values. The selected signal is highlighted in blue. 2 Algorithm: In this field, select the algorithm for calculating the measured values (see Chapter 5.1). The button of the selected algorithm is highlighted in blue. 3 Combined signal x: In this field, enter the name for the selected signal x (x = 1 ... 8) and select the measured values (operands), which are used for calculation. If necessary, specify a constant which is added to the result of the calculation (see Chapter 5.2). 4 Display of the measurement results: In the 2D display the result of the calculation is shown (in purple), as well as the selected operands (orange) and other possible operands (grey). To return to the overview after defining a combined signal and to display all the signals, press on the active signal (blue) in the "Combined signals" input field (see Fig. 5.2). Page 133 Combining Results from Measuring Programs 5.1 Algorithms available for the Combination of Measured Values The following algorithms are available for combining measured values: Distance Z: Calculates the difference of the Z-coordinates of two points. Distance X: Calculates the difference of the X-coordinates of two points. Distance euclidean: Calculates the euclidean distance between two points. Center of gravity: Calculates the center of gravity of two points. Difference of distances: Calculates the difference between two distances. Sum of distances: Calculates the sum of two distances. Difference of angles: Calculates the difference between two angles. Sum of angles: Calculates the sum of two angles. Distance point to line: Calculates the shortest distance from a point to a line. Perpendicular point: Calculates the foot point of a dropped perpendicular to a straight line at a point. Single value: You can select a measured value from the active measuring programs. It is used for the addition of constants to measured values from measuring programs. An overview of the available measured values (operands) and measuring programs that provide these operands is shown below: - Points: Maximum Point Minimum Point First Point Last Point Absolute Angle/Offset (if using algorithm "Center of gravity") Intersection Point Single Offset (if using algorithm "Center of gravity") Double Offset (if using algorithm "Center of gravity") Edge Left Edge Right Surface Maximum Surface Minimum Seam Start/End Seam Maximum Groove Start/End Groove Minimum Page 134 Combining Results from Measuring Programs - Distances: Absolute Angle/Offset Single Offset Double Offset Step Height Surface Maximum Surface Minimum Seam Width/Height Groove Width/Height - Angles: Absolute Angle Absolute Angle/Offset Double Angle Difference Angle Intersection Point - Lines: Absolute Angle Absolute Angle/Offset Double Angle Difference Angle Intersection Point Single Offset Double Offset Step Height 5.2 Defining Operands and Constants for a Combined Signal Use the "Combined signal x" input field (see Fig. 5.2 and Fig. 5.3) to select the measured values (operands) for the calculation. In addition, you can also define a constant to be added to the result of the calculation. Fig. 5.3: "Combined signal x" input field Make the following settings: - Signal name: Enter a name for the combined signal. 1st Operand: Select the first operand for the calculation. 2nd Operand: Select the second operand for the calculation. + Constant: Define a constant to be added to the result of the calculation. The currently valid values for the operands and the result of the calculation (including the constant) are shown in the lower part of the input field. 5.3 Defining a new Signal for Calculation The following example explains how to define a new signal for calculation: Page 135 Combining Results from Measuring Programs Fig. 5.4: Defining a new signal for calculation - step 1 Press the "Add Signal" button to add a new signal for calculation (see Fig. 5.4). The "Algorithm" input field (see Fig. 5.5) will be displayed: Fig. 5.5: Defining a new signal for calculation - step 2 Select the desired algorithm for the calculation in the "Algorithm" input field (see Chapter 5.1 and Fig. 5.5). The "Combined signal x" input field is displayed (see Fig. 5.6): Fig. 5.6: Defining a new signal for calculation - step 3 Use the "Combined signal x" input field (x = 1...8) to define the signal name and to select the operand for the calculation (see Chapter 5.2 and Fig. 5.6). If necessary, define a constant to be added to the result of the calculation. Page 136 Combining Results from Measuring Programs Fig. 5.7: Defining a new signal for calculation - step 4 Press the button of the active signal (marked in blue, see Fig. 5.7) in the "Combined signals" input field to finish defining the new signal. This takes you back to the overview; all the signals defined for calculation are shown. Page 137 Filtering and Evaluating Measured Values and Configuring Outputs 6. Filtering and Evaluating Measured Values and Configuring Outputs Use the "Outputs and Results" view in order to configure the measured values output ports of the scanCONTROL smart product series. Additionally you may choose to filter measured values, to save the configurations of the active measuring programs and of the output ports permanently on scanCONTROL (see Chapter 3.14.4) and to activate the logging of measured values (see Chapter 6.7). Use the "Outputs and Results" button in the main view (see Chapter 3.2) or the navigation menu (see Chapter 3.19) in order to access the "Outputs and Results" view. A D C B 1 4 2 3 E F H Fig. 6.1: "Outputs and Results" view Display elements and parameters in the "Outputs and Results" view: A “General” toolbar: Using this toolbar, you can select the data source (see Chapter 3.5), save profile sequences (see Chapter 3.6), activate and deactivate the logging of measured values (see Chapter 6.7), save parameters to a file and load parameters from a file (see Chapter 3.14), store parameters permanently on scanCONTROL and load parameters from scanCONTROL (see Chapter 3.14) and reset selected parameters to default settings (see Chapter 3.14.3). B Scanner settings: Change the settings of scanCONTROL with these values (see Chapter 3.7). In Offline mode (see Chapter 3.5) this input field will be replaced by the "File settings" input field (see Chapter 3.10) for controlling the playback of a loaded profile sequence. C 2D-display: This display shows the last measured profile and measurement results. D “Display” toolbar: Using this toolbar, you scale the 2D-display and activate various options for mouse interaction (see Chapter 3.17). E Navigation menu: Click on this button in order to show the navigation menu (see Chapter 3.19). F Status line: Status and error messages are displayed on the status line (see Chapter 9.1). If errors occur in several active measuring programs, the first error found is displayed in the order of the measuring programs. Page 138 Filtering and Evaluating Measured Values and Configuring Outputs 1 Protocol status: Indicates whether logging is active. 2 Active programs: Displays all active measuring programs. By pressing the corresponding button the "Outputs and Results" view is closed and you enter the selected measuring program. You also may choose to show or hide the measurement results of the individual measuring programs in the 2D-display using the "symbolic eye" buttons. 3 Filter/Output: Using these tabs you can make settings to filter measured values and select the measured values to be output at the available output ports of scanCONTROL (only available for scanCONTROL Smart, see Fig. 1.1, Chapter 6.1, 6.2, 6.3, 6.4, 6.5 and 6.6). 4 Display of the measurement results: In the 2D-display, the measurement results determined by the active measuring programs are shown. 6.1 Configuration of the Filters for Measured Values Configuration Tools provides the possibility to filter measured values chronologically. It is possible to filter up to eight measured values. To do so, select the "Filter" tab. The measured values of all active measuring programs and the signals defined in the "Result Combination" view (see Chapter 5) are available. Fig. 6.2: "Filter" tab The current filtered values are listed in the "Filter" tab (see Fig. 6.2). Press the "Filter x" button to configure the respective filter. The following dialog box will be displayed: Fig. 6.3: "Result filter settings" dialog box Make the following settings: - - Filter x: Select the measured value to be filtered. Filter type: average: Activate an average filter with this parameter. delay: This parameter activates the delayed output of a measured value. It is possible to delay the output of a measured value by up to 31 measurement operations. median: Activate a median filter with this parameter. Filter size [tap]: Enter the filter size. Memory block required / total: The allocation of the filter memory block is displayed in this information field. The filter memory space of the scanCONTROL measurement system is limited. Confirm your settings with the "OK" button. The filtered measurement values are labeled as follows: The filter type (avg, del or med) and filter size are added to the name of the filtered measurement in curved brackets. For example, (med_3) stands for a median filter of size 3. Page 139 Filtering and Evaluating Measured Values and Configuring Outputs 6.2 Configuration of the Digital Outputs Depending on the type of sensor and configuration, scanCONTROL Smart has up to 8 digital outputs. In the "Digital out" tab, select the signals to be issued at the digital outputs. The measured values and status signals of all active measuring programs, a status signal for the complete measurement, the signals defined in the "Result Combination" view (see Chapter 5), the filtered measured values and already configured digital outputs are available. Fig. 6.4: "Digital out" tab The "Digital out" tab (see Fig. 6.4) shows the actual values for the digital outputs of scanCONTROL. Use the "Port x" buttons in order to configure the according output ports. The "Digital port settings" dialog is displayed. Fig. 6.5: "Digital port settings" dialog The following settings are available: - - Signal name: Enter a name for the evaluated signal. Value x: Select the measured value to be evaluated. Min: The lower limit of the range for the evaluation of the selected measured value. Max: The upper limit of the range for the evaluation of the selected measured value. Invert: Dependent on the setting of this parameter the selected digital out port behaves as follows: Inactive: If the signal is within the specified range a logical 1 (OK) will be issued at the digital output, otherwise a logical 0 (nOK) will be issued. If the measurement value is equal to the range limits a logical 1 (OK) will be issued. In the case of output of a status signal, a logical 1 (OK) will be issued at the digital output if no error has occurred during the measurement. If an error occurs during the measurement, a logical 0 (nOK) will be issued. Active: If the signal is within the specified range a logical 0 (nOK) will be issued at the digital output, otherwise a logical 1 (OK) will be issued. If the measurement value is equal to the range limits a logical 0 (nOK) will be issued. In the case of output of a status signal, a logical 0 (nOK) will be issued at the digital output if no error has occurred during the measurement. If an error occurs during the measurement, a logical 1 (OK) will be issued. Logical link: Specify whether the current result of the evaluation has to be logical linked with another signal. You may link up to eight signals. The following algorithms are available for linking measured values: Page 140 Filtering and Evaluating Measured Values and Configuring Outputs AND: Logical AND link. OR: Logical OR link. XOR: Logical XOR link. In addition to the evaluation, you can specify whether the signal must meet an adjusted condition over several measurements before it will be issued at the digital output (evaluation of a measurement series). This is, for example, for the elimination of individual measurements, which are irrelevant for the evaluation of the measurement series. To do so, press the "Counter settings…" button (see Fig. 6.5) in order to show the "Digital port counter settings" dialog box (see Fig. 6.6). If the evaluation of a measurement series is active for the current port, the font of the "Counter settings..." button appears red or green. Fig. 6.6: "Digital port counter settings" dialog Make the following settings: - - Counted criteria: Define the condition for the evaluation of the measurement series: OK: The Measurement series is OK if at least N consecutive measurements have been evaluated as OK. nOK: The Measurement series is nOK if at least N consecutive measurements have been evaluated as nOK. Number of events: Enter the number N of measurements for the evaluation of the measurement series. Confirm your settings with the "OK" button. Example: Digital output is nOK when the measurement is NOK for five times. This results in the following developing: Measurement evaluation Measurement series evaluation (Digital output) OK nOK Fig. 6.7: "Digital port counter" example Confirm your settings with the "OK" button. Note: By default, the logical value corresponds to the electrical level (OK = high level, nOK = low level). In case of activating the "Invert level" parameter (see Chapter 3.9), the electrical signal, output at the digital outputs, is inverted (OK = low level, nOK = high level). Page 141 Filtering and Evaluating Measured Values and Configuring Outputs 6.3 Configuration of the Analog Outputs Depending on the type of sensor and configuration, scanCONTROL Smart has up to 4 analog outputs. In the "Analog out" tab, select the signals to be issued at the analog outputs. The measured values of all active measuring programs, the signals defined in the "Result Combination" view (see Chapter 5) and all filtered measured values are available. Fig. 6.8: "Analog out" tab The "Analog out" tab (see Fig. 6.8) shows the actual values for the analog outputs of scanCONTROL. Use the "Port x" buttons in order to configure the according output ports. The "Analog port settings" dialog is displayed. Fig. 6.9: "Analog port settings" dialog The following settings are available: - - Port x: Select the measurement result which should be issued at the respective port x (x = 1..4). Voltage: scanCONTROL 26X0/27X0/29X0: Specify the analog output clamp of the scanCONTROL Output Unit you are using. The specified range of measured values (“Range min” and “Range max”) is mapped to the voltage or current range of the output clamp: [-10; 10] V [0; 10] V [0; 20] mA [4; 20] mA scanCONTROL 28X0: Select the voltage range which the specified range of measured values (“Range min” and “Range max”) should be mapped to: [-10; 10] V [-5; 5] V [-10; 0] V [0; 10] V Range: Input the possible range of the measured value. The output signal will be scaled so that the range of the measured value is mapped to the voltage range. Min: The lower limit of the measured value range. Max: The upper limit of the measured value range. Note: The scaling resolution of scanCONTROL is limited. Configuration Tools calculates the range next in size from the settings in the "Range" input field for the respective signal. The range actually used is shown in the display "--> [min; max]". Confirm your settings with the "OK" button. 6.4 Configuration of the Serial Port scanCONTROL Smart has a serial port to output measured values. Depending on the type of sensor, the port is present as a RS422 or RS232 port (see Chapter 1.2 and 8.2.5). The measured values of all active Page 142 Filtering and Evaluating Measured Values and Configuring Outputs measuring programs, the signals defined in the "Result Combination" view (see Chapter 5) and all filtered measured values (see Chapter 6.1) are available. Also the error codes (see Chapter 9.1) of all active measuring programs, the number of the current profile and the states of the digital outputs are available. The measured values are transmitted as an ASCII string. The states of the digital outputs can be transmitted as ASCII string or in binary format (see Chapter 8.2.6). Fig. 6.10: "Serial out" tab Note: The "Serial out" tab is only available if the "Interface/protocol" parameter in the "Advanced scanner settings" dialog box is set to "output unit + serial" (see Chapter 3.9). The number of output measured values and the configuration of the serial interface are displayed in the "Serial out" tab (see Fig. 6.10). Use the "Signals" button in order to configure the serial port. The "Serial settings" dialog is displayed. Fig. 6.11: "Serial settings" dialog The following settings are available: - Min. signal size: The minimum number of characters which will be transferred per measured value. If the number of characters which are needed for the transmission of a measured value is smaller than the specified parameter, leading spaces will be inserted for the measured value. If the length of the measured value is greater than the specified parameter, the measured value is transferred unchanged. Separator for measured values: - Signals: Define a separator which will be inserted after each measured value: tabulator: A tabulator will be inserted as separator. line feed: A line feed character will be inserted as separator. user defined: Define up to 4 characters which will be inserted after each measured value. Separator for measurements - Measurements: Define a separator which will be inserted before or after each measurement: tabulator: A tabulator will be inserted as separator. line feed: A line feed character will be inserted as separator. user defined: Define up to 4 characters which will be inserted before or after each measurement. - As prefix: On activating this parameter the separator will be inserted before each measurement. When deactivating this parameter the separator will be inserted after each measurement. Page 143 Filtering and Evaluating Measured Values and Configuring Outputs Note: Use the "Interface" tab sheet in the "Advanced scanner settings" dialog (see Chapter 3.9) in order to set the baudrate for the serial interface. The following port parameters are preset in scanCONTROL and cannot be changed: - Data bits: 8 Parity: none Stop bits: 2 Flow control: none In the signals area located on the right side of the dialog select the signals which should be issued at the serial port. All available signals which are not currently output to the serial port are shown in the “Available signals” list. The signals which will be transmitted via the port are shown in the “Output signals” list. Proceed as follows to select a signal for output to the serial port: Select the desired signal in the “Available signals” list. Press the button. The desired signal is now moved to the “Output signals” list. Proceed as follows to deactivate the output of a signal: Select the desired signal in the “Output signals” list. Press the button. The desired signal is now removed from the “Output signals” list and is available in the "Available signals" list again. Using the buttons you can move a selected signal in the "Output signals" list up or down and thus change the order of the output signals. Depending on the sensor type, the port is present as an RS422 port (scanCONTROL 26X0/27X0/29X0) or as an RS232/RS422 port (scanCONTROL 2810). The measured values are transferred as an ASCII string. Note: A maximum of 80 characters per measurement can be transmitted via the serial port. If more characters are transmitted, the residual characters are discarded. Note: The measured values are transmitted to the serial interface using sensor coordinates. Please refer to the table in Chapter 8.2.6 for the conversion of the measured values to real coordinates. 6.5 Configuration of the Outputs using UDP scanCONTROL Smart provides the possibility to output the results via Ethernet using UDP. The measured values of all active measuring programs, the signals defined in the "Result Combination" view (see Chapter 5) and all filtered measured values (see Chapter 6.1) are available. Also the error codes (see Chapter 9.1) of all active measuring programs, the number of the current profile and the states of the digital outputs are available. The measured values are transmitted as an ASCII string. The states of the digital outputs can be transmitted as ASCII string or in binary format (see Chapter 8.2.6). Fig. 6.12: "UDP out" tab Note: The "UDP out" tab is only available if the "Interface/protocol" parameter in the "Advanced scanner settings" dialog box is set to "output unit + UDP" (see Chapter 3.9). The number of output measured values and the configuration for the output using UDP are displayed in the "UDP out" tab (see Fig. 6.12). Use the "Signals" button in order to configure the output of the measured values using UDP. The "UDP settings" dialog is displayed. Page 144 Filtering and Evaluating Measured Values and Configuring Outputs Fig. 6.13: "UDP settings" dialog The following settings are available: - Min. signal size: The minimum number of characters which will be transferred per measured value. If the number of characters which are needed for the transmission of a measured value is smaller than the specified parameter, leading spaces will be inserted for the measured value. If the length of the measured value is greater than the specified parameter, the measured value is transferred unchanged. Separator for measured values: - Signals: Define a separator which will be inserted after each measured value: tabulator: A tabulator will be inserted as separator. line feed: A line feed character will be inserted as separator. user defined: Define up to 4 characters which will be inserted after each measured value. Separator for measurements - Measurements: Define a separator which will be inserted before or after each measurement: tabulator: A tabulator will be inserted as separator. line feed: A line feed character will be inserted as separator. user defined: Define up to 4 characters which will be inserted before or after each measurement. - As prefix: On activating this parameter the separator will be inserted before each measurement. When deactivating this parameter the separator will be inserted after each measurement. Note: Use the "Interface" tab sheet in the "Advanced scanner settings" dialog (see Chapter 3.9) in order to set the IP address and the UDP port of the receiver (client) of the measured values. Note: scanCONTROL uses source port 8000 for the UDP connection. In the signals area located on the right side of the dialog select the signals which should be transferred via Ethernet using UDP. All available signals which are not currently output are shown in the “Available signals” list. The signals which will be transmitted are shown in the “Output signals” list. Proceed as follows to select a signal for output: Select the desired signal in the “Available signals” list. Press the button. The desired signal is now moved to the “Output signals” list. Proceed as follows to deactivate the output of a signal: Select the desired signal in the “Output signals” list. Press the button. The desired signal is now removed from the “Output signals” list and is available in the "Available signals" list again. Page 145 Filtering and Evaluating Measured Values and Configuring Outputs Using the buttons you can move a selected signal in the "Output signals" list up or down and thus change the order of the output signals. Note: Outputting measured values using UDP is only available for scanCONTROL devices with an Ethernet interface. Note: A maximum of 80 characters per measurement can be transmitted. If more characters are transmitted, the residual characters are discarded. Note: The measured values are transmitted via Ethernet using sensor coordinates. Please refer to the table in Chapter 8.2.6 for the conversion of the measured values to real coordinates. 6.6 Configuration of the Outputs using Modbus Configuration Tools provides the possibility to output the results using Modbus. The results are output to the serial port and via Ethernet. The measured values of all active measuring programs, the signals defined in the "Result Combination" view (see Chapter 5) and all filtered measured values (see Chapter 6.1) are available. Also the error codes (see Chapter 9.1) of all active measuring programs, the number of the current profile and the states of the digital outputs are available. The states of the digital outputs are transmitted in binary format (see Chapter 8.2.6). Fig. 6.14: "Modbus out" tab Note: The "Modbus out" tab is only available if the "Interface/protocol" parameter in the "Advanced scanner settings" dialog box is set to "modbus" (see Chapter 3.9). The number of used Modbus registers is displayed in the "Modbus out" tab (see Fig. 6.14). Use the "Signals" button to configure the Modbus interface. The following dialog is displayed: Fig. 6.15: "Modbus settings" dialog All available signals which are not currently output are shown in the "Available signals" list. The signals which will be transmitted are shown in the "Output signals" list. Proceed as follows to select a signal for output: Page 146 Filtering and Evaluating Measured Values and Configuring Outputs Select the desired signal in the "Available signals" list. Press the button . The desired signal is now moved to the "Output signals" list. Proceed as follows to deactivate the output of a signal: Select the desired signal in the "Output signals" list. Press the button . The desired signal is now removed from the “Output signals” list and is available in the "Available signals" list again. Using the buttons you can move a selected signal in the "Output signals" list up or down and thus change the order of the output signals. Note: Up to 24 Modbus registers (16 bits each) can be used. Depending on the type a measured value requires 16 or 32 bits, i.e. one or two registers. When transmitting a 32 bit value the upper 16 bits are stored in the first and the lower 16 bits in the second register. Note: The measured values are transmitted in sensor coordinates. Please use the table in Chapter 8.2.6 to convert the measured values to real coordinates. 6.7 Logging Measured Values Configuration Tools makes it possible for you to log measured values to an ASCII file. You have the possibility to perform user-defined evaluations with your measurement data. Note: In order to run the logging in combination with a connected scanCONTROL measurement system, you need a full version of scanCONTROL Configuration Tools. Note: Logging of measured values is only available in the "Outputs and Results" view. Select the "File Activate protocol results..." menu item or press the corresponding button (see Fig. 6.16) in the "General" toolbar. Fig. 6.16: "Protocol results" button The "Protocol results" dialog is displayed (see Fig. 6.17). You may make the settings for logging there. Fig. 6.17: "Protocol results" dialog Page 147 Filtering and Evaluating Measured Values and Configuring Outputs - Path: Specify the filename and its complete path where the measured values should be saved. As standard, the file name has the extension ".txt". Use the button "..." in order to select the file using a standard Windows dialog. Condition: Define the logging condition using this parameter: always: All measurement operations are logged. nOK: All digital outs: Measurement operations where all digital outputs has been evaluated as nOK are logged. Any digital out: Measurement operations where at least one digital output has been evaluated as nOK are logged. Digital out x: Measurement operations where digital output x has been evaluated as nOK are logged. OK: All digital outs: Measurement operations where all digital outputs has been evaluated as OK are logged. Any digital out: Measurement operations where at least one digital output has been evaluated as OK are logged. Digital out x: Measurement operations where digital output x has been evaluated as OK are logged. Note: You can use the "%" wildcard in the file name. This is then replaced by a counter which is incremented by one for every new start of the logging. In this way you can automatically create a new file for each new log. The counter is reset if you start the "Outputs and Results" view or if you specify a new file name. All available values which are not currently logged are shown in the "Available values" list. The values which will be logged are shown in the "Active values" list. Proceed as follows to select a value for logging: Select the desired value in the "Available values" list. Press the button . The desired value is now moved to the "Active values" list. Proceed as follows to deactivate the logging of a value: Select the desired value in the "Active values" list. Press the button . The desired value is now moved to the "Available values" list. With the buttons you can move a selected value in the "Active values" list up or down and thus change the order of the logged value. Confirm your settings with the "OK" button in order to start the logging. In order to stop the logging, use the "File Deactivate protocol results..." menu item or press the corresponding button (see Fig. 6.16) in the "General" toolbar again. Note: The "Protocol status" area is located on the left side of the "Outputs and Results" view (see Fig. 6.1). The current logging status (active/inactive) is displayed in this area. Page 148 Filtering and Evaluating Measured Values and Configuring Outputs An example log file can be seen in Fig. 6.18. Fig. 6.18: Example log file Page 149 "Result Monitor" Analysis Program 7. "Result Monitor" Analysis Program Use the "Result Monitor" program for statistical analysis of the results of the active measuring program and to save the analysis data in an Excel-compatible format. The analysis data is saved as .csv file. The program includes two 2D-displays showing up to two measured values over time. The measured values of all active measuring programs, the signals defined in the "Result Combination" view (see Chapter 5), the filtered measured values (see Chapter 6.1) and the states of the digital outputs are available for analysis. Proceed as follows to carry out a statistical evaluation of measured values: Use the "Program selector" input field (see Fig. 3.1) in order to select up to eight measuring programs. The selected programs are shown in the "Active programs" input field. Configure the individual measuring programs. To do this, press the according buttons in the "Active programs" input field (see Fig. 3.1) or use the navigation menu (see Chapter 3.19). The view of the selected measuring program will be shown (see Chapter 4). Combine measured values, if necessary. You will access the "Result Combination" view (see Chapter 5) by pressing the "Result Combination" button in the "Active programs" input field (see Fig. 3.1) or by using the navigation menu (see Chapter 3.19). Configure the filters for measured values and the output ports of scanCONTROL. You will access the "Outputs and Results" view (see Chapter 6) by pressing the "Outputs and Results" button in the "Active programs" input field (see Fig. 3.1) or by using the navigation menu (see Chapter 3.19). Start the "Result Monitor" program by pressing the "Result Monitor" button in the "Active programs" input field (see Fig. 3.1) or by using the navigation menu (see Chapter 3.19). A C D B 1 2 3 4 F E Fig. 7.1: "Result Monitor" analysis program Display elements and parameters in the "Result Monitor" analysis program: A “General” toolbar: Using this toolbar, you can select the data source (see Chapter 3.5), save profile sequences (see Chapter 3.6), save and load parameters and reset selected parameters to default settings (see Chapter 3.14.3). Page 150 "Result Monitor" Analysis Program B Scanner settings: Change the settings of scanCONTROL with these values (see Chapter 3.7). In Offline mode (see Chapter 3.5) this input field will be replaced by the "File settings" input field (see Chapter 3.10) for controlling the playback of a loaded profile sequence. C "Display" toolbar: Using this toolbar, you scale the 2D-display and activate various options for mouse interaction (see Fig. 7.2). Fig. 7.2: "Display" toolbar in the "Result Monitor" analysis program Resets the 2D-display to the complete value range. This resets the settings of the 2Ddisplay such that the system visualizes the complete analysis over time of the selected measured values. Activates or deactivates automatic scaling of the vertical axis of the 2D-display. If automatic scaling is activated, the vertical axis of the 2D-display automatically adapts to the lowest and highest values of the measured values that you chose for analysis. Activates or deactivates "Zoom" mode. In this mode you can zoom in parts of the 2D-display and so directly set the scaling of the 2D-display with your mouse. Activates or deactivates "Move" mode. In this mode you can move the history of the measured values on the 2D-display. Activates or deactivates "Display extended information of a measuring point" mode. Note: Use the mouse wheel in order to zoom in and out the 2D-display. You can combine the mouse wheel with the Ctrl-key to scale the time axis of the 2D-display. Combine the mouse wheel with the Shift-key to scale the measurement value axis of the 2D-display. D "Measurement" toolbar: You can use this toolbar to set the various search areas and limits for measurement (see Fig. 7.3). Fig. 7.3: "Measurement" toolbar in the "Result Monitor" analysis program Activates or deactivates "Set evaluation lines" mode. Using the evaluation lines, you limit the measured values that are used for statistical evaluation in the 2D-display. Removes the evaluation range. All the recorded values are used for statistical evaluation. Activates or deactivates "Set marker lines" mode. Using this setting, you define two marker lines that are used to acquire undershoots or overshoots (peaks). Removes the marker lines. E Navigation menu: Click on this button in order to show the navigation menu (see Chapter 3.19). F Status line: Status and error messages are displayed on the status line (see Chapter 9.1). 1 2D-display: This display visualizes the analysis over time of the selected measured values. 2 Analysis of measured values: In this area, you can choose measured values and the algorithm for the statistical evaluation. 3 Data transfer: Specify the buffer size and control the data transfer. 4 Data export: Export the buffered measured values and the determined statistical characteristics. Page 151 "Result Monitor" Analysis Program Proceed as follows to analyze the developing of a measured value: Click on the "Signal x" button. The following dialog is displayed: Fig. 7.4: "Result Monitor" dialog box Make the following settings: - Signal x: Select the measured value to be analyzed. Evaluation: Select the algorithm for the statistical evaluation: Current value: The currently measured value. Minimum value: The lowest measured value. Maximum value: The highest measured value. Mean value: The average value. No. of min. peaks: The number of undershoots of the lower marker line. No. of max. peaks: The number of overshoots of the upper marker line. No. of peaks: Number of undershoots of the lower marker line and of overshoots of the upper one. Standard deviation: The standard deviation of the measured values. Capability gauge measurement (CGM): The capability index is calculated as follows: 0.2*abs(2* tolerance value)/(6* standard deviation). Note: For 50 measured values, the above specifications are sufficient for checking the measurement capability ("Statistical Procedures for Machine and Process Qualification"; 3rd edition; Edgar Dietrich, Alfred Schulze; Carl Hanser Verlag Munich Vienna) if the following condition is fulfilled: CGM >= 1.33 (method 1). - Tolerance +/-: The tolerance value for calculating the capability index. To control data transfer, proceed as follows (see Fig. 7.5): In the "Buffer size" area, enter the buffer size. The buffer size determines the maximum number of measured values that are used for statistical evaluation. If the maximum number of measured values is reached, the system deletes the oldest values from the buffer and inserts the current ones into it. Click on the "Start data transfer" button to start or resume measured value transfer. Click on the "Pause data transfer" button to stop measured value transfer. Click on the "Clear buffer" button to clear the contents of the buffer. Fig. 7.5: "Data transfer" dialog Proceed as follows to export the buffered measured values to be monitored and the determined statistical characteristics (see Fig. 7.6): In the "Path" field, enter the folder in which you want to save the file. In the "Name" field, enter the name of the file to which you want to export the data. In the "Append date and time to filename" field, specify whether you want the date and time to be appended to the filename. Press the "Export data" button to export the data. Page 152 "Result Monitor" Analysis Program Fig. 7.6: "Data export" dialog Page 153 Working with the scanCONTROL Smart Measurement System 8. Working with the scanCONTROL Smart Measurement System The scanCONTROL Smart product series measures two-dimensional profile data, evaluates the profile data, determines measured values and evaluates them. The measured values are output at various ports. Configuration Tools is used for parameterization of the measurement system and for the visualization of the measurement results. If the parameterization has been completed, the software can be closed and the measurement system can be disconnected from the PC. The scanCONTROL measurement system then continues to operate as an independent unit and performs the measurements. Handling the measurement system and the interfaces is described in the following. Note: Exit the software first and afterwards disconnect the connection between the measurement system and the PC. 8.1 Operating Modes In measuring mode there are two different operating modes available which can be configured in Configuration Tools (see Parameter "Trigger mode," Chapter 3.9). 8.1.1 Continuous Measurement scanCONTROL measures continuously at the specified scan rate. 8.1.2 Triggered Measurement Depending on the type of sensor, the following interfaces are available for triggering scanCONTROL: - scanCONTROL 26X0/29X0: RS422 interface (half-duplex), digital input scanCONTROL 27X0: RS422 interface (full-duplex) scanCONTROL 2810: Synchronous input on the controller Every trigger signal triggers a measurement operation. For technical details, please refer to the instruction manual of the measurement system used. RS422 interface Pin Assignment 4 GND-In1 11 RS422 12 RS422 + PC2600/2900-x wire color green gray-pink red-blue Digital input Pin Assignment 4 GND-In1 6 In1 PC2600/2900-x wire color green yellow Circular connector Fig. 8.1: scanCONTROL 26X0/29X0 trigger input (RS422 interface half-duplex and digital input, view on solder pin side of connector) Page 154 Working with the scanCONTROL Smart Measurement System Pin 1 2 5 Assignment RX + RX GND sc2700-x wire color white brown gray Counter-clockwise direction Fig. 8.2: scanCONTROL 27X0 trigger input ("RS422" jack, view on solder pin side of connector) Pin 1 7 Assignment Trigger in + Trigger in - sc2800-x wire color purple black Fig. 8.3: scanCONTROL 2810 trigger input ("synchronous" jack, view on solder pin side of connector) 8.2 Measurement Value Output 8.2.1 Pin Assignment of the Analog Outputs (scanCONTROL 26X0/27X0/29X0) For detailed information on the pin assignment and operating mode of the analog outputs please refer to the instruction manual of the measurement system used and to the documentation of the used fieldbus coupler and output clamp. 8.2.2 Pin Assignment of the Analog Outputs (scanCONTROL 2810) The scanCONTROL 2810 measurement system comes with two analog outputs for supplying selected measurement values (see Chapter 6.3). For technical details, please refer to the scanCONTROL 2800/2810 instruction manual. Pin 1 2 3 4 Assignment GND Analog output 2 Analog output 1 GND Analog output 1 Analog output 2 C2800-x wire color Screen 2 white Screen 1 brown Fig. 8.4: Analog outputs (view on solder pin side of connector) 8.2.3 Pin Assignment of the Digital Outputs (scanCONTROL 26X0/27X0/29X0) For detailed information on the pin assignment and operating mode of the digital outputs please refer to the instruction manual of the measurement system used and to the documentation of the used fieldbus coupler and output clamp. 8.2.4 Pin Assignment of the Digital Outputs (scanCONTROL 2810) The scanCONTROL 2810 measurement system comes with three digital outputs for supplying selected evaluated (OK/nOK) measurement values (see Chapter 6.2). For technical details, please refer to the scanCONTROL 2800/2810 instruction manual. Page 155 Working with the scanCONTROL Smart Measurement System Pin 15 5 10 4 14 9 Assignment Digital output 1 + Digital output 1 Digital output 2 + Digital output 2 Digital output 3 + Digital output 3 - sc2800-x wire color yellow green gray pink red blue Fig. 8.5: Digital outputs ("synchronous" jack, view on solder pin side of connector) 8.2.5 Pin Assignment of the Serial Interface The scanCONTROL Smart measurement system comes with a serial output for supplying selected measurement values (see Chapter 6.4). Depending on the type of sensor, the port is present as a RS422 port (scanCONTROL 26X0/29X0: half-duplex; scanCONTROL 27X0: full-duplex) or as a RS232/RS422 port (scanCONTROL 2810: full-duplex). Pin 4 11 12 Assignment GND-In1 RS422 RS422 + PC2600/2900-x wire color green gray-pink red-blue Circular connector Fig. 8.6: scanCONTROL 26X0/29X0 RS422 interface half-duplex (view on solder pin side of connector) Pin 1 2 3 4 5 6 Assignment RX1 + RX1 TX2 + TX2 GND1 GND2 sc2700-x wire color white brown green yellow gray pink Counter-clockwise direction Fig. 8.7: scanCONTROL 27X0 RS422 interface full-duplex (view on solder pin side of connector) Page 156 Working with the scanCONTROL Smart Measurement System Pin 2 3 5 Assignment TRS232 RRS232 GND Fig. 8.8: scanCONTROL 2810 RS232 port (view on solder pin side of connector) Pin 1 2 3 4 Assignment RRS422 + RRS422 TRS422 + TRS422 - Fig. 8.9: scanCONTROL 2810 RS422 port (view on solder pin side of connector) 8.2.6 Convert the Measured Values to real Coordinates The measured values are transferred to the serial port (ASCII or Modbus, see Chapter 6.4, 6.6) and to the Ethernet interface (UDP or Modbus, see Chapter 6.5 and 6.6). In doing so, the values are transferred in sensor coordinates. Please use the following table for the conversion of the measured values to real coordinates: Measured value X coordinates [mm] Z coordinates [mm] Angle [°] Offset [mm] Sigma [mm] Height/Width [mm] Area [mm²] Conversion y = (x - 32768) * a; y = (x - 32768) * a + b; y = 0.01 * x; y = (x - 32768) * a + b; y = x * a; y = x * a; y = x * a²; The constants a and b have the following values depending on the type of sensor: Type of sensor scanCONTROL 26X0-25 scanCONTROL 26X0-50 scanCONTROL 26X0-100 scanCONTROL 27X0-25 scanCONTROL 27X0-50 scanCONTROL 27X0-100 scanCONTROL 28X0-10 scanCONTROL 28X0-25 scanCONTROL 28X0-100 scanCONTROL 29X0-10 scanCONTROL 29X0-25 scanCONTROL 29X0-50 scanCONTROL 29X0-100 a 0.001 0.002 0.005 0.001 0.002 0.005 0.0005 0.001 0.005 0.0005 0.001 0.002 0.005 b 65 95 250 100 210 450 75 80 250 55 65 95 250 When transmitting the states of the digital outputs you may choose to transfer the states as ASCII string or in binary format (see Chapter 6.2). The states of all eight digital outputs are transmitted. Using the ASCII format one character ("0" or "1") is used for each output. Using the binary format one bit is used for each output; in other words, one byte is used to transmit the states of all eight outputs. Page 157 Working with the scanCONTROL Smart Measurement System 8.3 Loading of “User Modes” The scanCONTROL Smart product series is able to save parameter configurations (User modes, see Chapter 3.14.4). The individual configurations can be loaded via different interfaces. For further details, please refer to the instruction manual of the measurement system used. Available interfaces for loading user modes: RS422 (ASCII) RS422 (Modbus RTU) RS232 (ASCII) Ethernet (Modbus TCP) Ethernet (TCP) Digital in Mode key scanCONTROL 26X0/29X0 half-duplex half-duplex no yes scanCONTROL 27X0 scanCONTROL 28X0 full-duplex full-duplex no yes full-duplex no full-duplex no yes yes no yes no no no yes yes Note: Never press the mode key while Configuration Tools is active. This may cause the operating system to shut down unintentionally. Note: For further information on loading user modes please refer to the document "Manual scanCONTROL (Part B)" Note: scanCONTROL Configuration Tools provides the possibility of loading user modes. To do this, either select the menu item "Parameters Load parameters from scanCONTROL..." or press the corresponding button (see Fig. 3.52) in the "General" toolbar (see Chapter 3.14.5). 8.3.1 Loading of User Modes using the Serial Port (ASCII) Configuration of the serial port: - Data bits: 8 Parity: none Stop bits: 2 Flow control: none Baudrate: adjustable, see Chap. 3.9 Please use the following commands: - Load user mode: Use the following command in order to load an user mode: setq 0xf0f00624 0x[User mode no.]0000000 Example: Use the following command in order to load user mode 2: setq 0xf0f00624 0x20000000 - Get the actual user mode no.: Use the following command in order to retrieve the number of the user mode currently used: getq 0xf0f00624 scanCONTROL Smart replies as follows: #q 0xf0f00624 0x[User mode no.]0000000 Note: Specify [User mode nr.] in hexadecimal format. 8.3.2 Loading of User Modes using Modbus You may use the serial port (Modbus RTU) or the Ethernet interface (Modbus TCP) in order to load user modes using Modbus. The commands may be implemented as single write commands or as multiple write commands. Note: In case of using single write commands the register 32 has to be written last. Page 158 Working with the scanCONTROL Smart Measurement System Please use the following commands: - - Load user mode: Write the following holding registers in order to load an user mode: Register 37 Value 0x[User mode no.]000 36 35 34 33 32 0x0000 0xf0f0 0x0624 0x0000 0x0002 Description 0x0000 for user mode 0, 0x1000 for user mode 1, … , 0xf000 for user mode 15 scanCONTROL address for user modes (upper 16 bit) scanCONTROL address for user modes (lower 16 bit) Corresponds to "setq" Get the actual user mode no.: Write the following holding registers in order to retrieve the number of the user mode currently used: Register 35 34 33 32 Value 0xf0f0 0x0624 0x0000 0x0003 Description scanCONTROL address for user modes (upper 16 bit) scanCONTROL address for user modes (lower 16 bit) Corresponds to "getq" The user mode currently used is available at the register 37 now (Format: 0x[User mode no.]000, e.g. 0x2000 for user mode 2). 8.3.3 Loading of User Modes via Ethernet (TCP) Use a TCP Client (Port 502) in order to load user modes via Ethernet (TCP). Please use the following command: - Load user mode: Use the following binary byte sequence in order to load a user mode: Value 0xf4 0x06 0x00 0x00 0x00 0x13 0x01 0x10 0x00 0x20 0x00 0x06 0x0c 0x00 0x02 0x00 0x00 0x06 0x24 0xf0 0xf0 0x00 0x00 0x[User mode no.]0 0x00 Description Transaction identifier (arbitrary, you may use any number instead of 0xf406) Protocol identifier (always 0) Command length Unit identifier (adjustable: 1 - 247) Function code 16 (multiple write command) Start register Number of registers Number of bytes Corresponds to "setq" scanCONTROL address for user modes (lower 16 bit) scanCONTROL address for user modes (upper 16 bit) 0x00 for user mode 0, 0x10 for user mode 1, … , 0xf0 for user mode 15 - Page 159 Appendix 9. Appendix 9.1 Status- and Error Messages, Error Codes The status line in each of the measuring programs shows a range of status and error messages. The following messages can appear: Message Description Action Error code Active: LLT[Type] ([Option])[Version] Active: scanCONTROL [Type]([Option])[Version] No error. Measurement is active. - 0 The wrong version of the CMU Reinstall the driver as described in driver has been installed. Chapter 2.5, 2.6 and 9.4.1. Close Configuration Tools and An unknown error has ocreset the controller to the default Internal error curred. settings by pressing the reset button on the controller scanCONTROL-parameters The parameters transferred to (scanCONTROL 28X0) and by invalid scanCONTROL are invalid. reconnecting the power supply An error occurred during data (scanCONTROL 26X0/27X0/29X0) Error while data transfer transfer. respectively. Check the IEEE1394/Ethernet scanCONTROL is not conconnection and check whether nected to the computer via the scanner is switched on and IEEE1394 and Ethernet resupplied with power. Check the No scanCONTROL found spectively or the power supply IEEE1394/Ethernet cable for deof scanCONTROL is switched fects. Also check whether the off or the CMU-driver has not CMU driver for the system is inbeen installed. stalled (see Chapter 2.5, 2.6 and 9.4.1). All scanners connected to the No free scanCONTROL Close the other programs accesscomputer are already being found ing scanCONTROL. used by other programs. Open the "Advanced scanner Configuration Tools was last scanCONTROL S/N not settings" dialog box and press the used with a different model of found "Connect“ button to select the scanCONTROL. current scanCONTROL. Close the other programs accessThe currently used scanner is ing scanCONTROL or select anscanCONTROL is already already used by other proother scanner in the "Advanced in use grams. scanner settings" dialog and press "Connect". Select a scanCONTROL device in the "Advanced scanner settings" The currently operated device dialog and press "Connect" or Invalid device is no scanCONTROL measclose Configuration Tools and urement system. connect scanCONTROL to the PC. Check the IEEE1394/Ethernet connection between scanCONTROL and the PC. The data transfer between Check the IEEE1394/Ethernet Data transfer interrupted scanCONTROL and the PC cable for defects. Close has been interrupted. Configuration Tools, reconnect scanCONTROL to the PC and restart the software. Wrong driver version CMU - - - - - - - - Page 160 Appendix The selected value for the parameter "No. of profiles" is Inconsistent: No. of profiles Decrease the value for the too high. Please refer to Quick too high parameter "No. of profiles". Reference scanCONTROL to get more information. Decrease the value for the parameter "No. of profiles" or The selected value for the decrease the number of Inconsistent: No. of profiles parameter "No. of profiles" is measured values output via too high for evaluation too high for evaluation of the analog/digital/serial/ethernet measurement. interface or decrease the number of active measuring programs. The selected scanner settings Type in consistent values for the Inconsistent: Exposure “Exposure time” and “No. of parameters "Exposure time" and time / No. of profiles profiles” are mutually exclu"No. of profiles". (see Chap. 9.2 sive. Section 6). The selected scanner settings “Measuring field”, "Points per Type in consistent values for the Inconsistent: Meas. field / profile" and “No. of profiles” parameters "Measuring field", Points p. profile / No. of are mutually exclusive. Please "Points per profile" and "No. of profiles refer to Quick Reference profiles". scanCONTROL to get more information. Reduce the value for the parameter "No. of profiles" (see The profile frequency set is Chapter 3.7) or alter the Inconsistent: Serial out / too high for the transmission parameters of the serial interface No. of profiles of measurement data via the or reduce the number of serial interface. measured values transmitted (see Chapter 6.4). Inconsistent: Serial out / The number of characters Decrease the number of Length of output string > supplied at the serial port is measured values supplied at the 80 characters too high. serial port (see Chapter 6.4). Inconsistent: UDP out / The number of characters Decrease the number of Length of output string > transferred via Ethernet (UDP) measured values output using 80 characters is too high. UDP (see Chapter 6.5). The number of available Decrease the number of measInconsistent: Modbus out / modbus registers is exceedured values supplied via modbus. No. of registers ed. (see Chapter 6.6) The shown scanner parameType in consistent values for the Inconsistent […] ters […] are mutually exclushown parameters […]. sive. The transferred profile is corDeactivate the filter or reset the Corrupt profile rupt. parameters to the default settings. Enlarge the range for profile evalThere are no measuring No points in region of uation (Cut). Change the distance points in the range defined for interest to the object to be measured. profile evaluation (Cut). Increase the exposure time. Check the settings of the measurAnchor point couldn't be An error has occurred while ing program providing the anchor detected calculating the anchor point. point. There are not enough measurToo few points for refering points in the reference Enlarge the reference range (refence ranges for the calculation of a erence lines). reference line/auxiliary line. An intersection point couldn’t Parallel reference lines, no be calculated as the reference Check the areas for line fitting. intersection point lines are parallel. - - - - - 10 11 20 21 Page 161 Appendix Intersection point out of range Wrong parameters for reference Arithmetic error reference Too few points for Seam Too few points for Groove Too few points for Edge Seam not found Groove not found Edge not found Seam width too small Groove width too small Edge width too small Interpolation failed Wrong parameters for Seam Wrong parameters for Groove Wrong parameters for Edge Arithmetic error Seam Arithmetic error Groove Arithmetic error Edge Too much parameters for evaluation Too few points for evaluation Error combined signal x Invalid firmware for […] A Gigabit Ethernet connection is required Loading profiles Ready The calculated intersection point is outside the range to be displayed. The parameters transferred to scanCONTROL contain errors. An arithmetic error has occurred while calculating the reference line/auxiliary line. There are not enough measuring points in the profile section search range. Check the areas for line fitting. 22 Close and restart Configuration Tools. 28 Check the areas for line fitting. 29 Enlarge the profile section search range (Seam, Groove, Edge). 30 No profile section was found. Check the minimum height for the detection of the profile section. 31 The width of the found profile section is too small. Check the settings for the detection of the profile section. 32 The start/end point of the profile section could not be calculated. Reduce the range of the profile section search (Seam, Groove, Edge). 33 The parameters transferred to scanCONTROL contain errors. Close and restart Configuration Tools. 38 An arithmetic error has occurred while calculating the profile section. Check the settings of the measuring program. 39 Decrease the number of measThe number of required paured values supplied at the anarameters of the active measur- log/digital/serial port or decrease ing programs is too high. the number of measuring programs. The number of points per Increase the number of points per profile is too small in order to profile or decrease the number of evaluate the measurement. measuring programs. Open the "Result combination" An error has occurred while view (see Chapter 5) and check calculating a combined signal. the settings of the respective combined signal x (x = 1..8). The firmware of scanCONPlease refer to the contact adTROL doesn't support the dress printed on the inside cover desired feature […]. of this manual. When using the "Display Image Data" program scanUse a Gigabit Ethernet interface. CONTROL 29X0 requires a Gigabit Ethernet connection. The profile sequence is being Wait until the profile sequence has loaded in the RAM (Offline been completely loaded. mode). The system is ready to play Press the play button in the "File the loaded profile sequence settings" input field (see Chap. (Offline mode). 3.10) to play the profile sequence. - - - - - - Page 162 Appendix Play: LLT[Type] ([Option])[Version] Play: scanCONTROL [Type]([Option])[Version] No error. A profile sequence is being played (Offline mode). Couldn’t open file The specified name or path was incorrect. 9.2 Select the correct directory containing your recorded profile sequence. - - Notes and Tips on Using scanCONTROL Please note the following when operating the scanCONTROL Configuration Tools. 1 - Never disconnect the IEEE1394 connection between scanCONTROL and the PC while using the software. Never disconnect the power supply of scanCONTROL while the software is running. Never press the reset/user mode button on the controller while the software is running (scanCONTROL 28X0). Never activate the standby mode or hibernation of your computer when the measurement system is connected to the computer. This may cause the operating system to shut down unintentionally. 2 To use the full version of scanCONTROL Configuration Tools, either the scanCONTROL Smart product series or an ICONNECT dongle is required. You can license the ICONNECT dongle by using the "License" entry in the Windows Start menu. 3 Only use version 6.4.6 of the CMU driver which is delivered on the CD. If a different driver or a different version of the CMU driver for the scanCONTROL is installed at a later date then it will not be possible to operate the scanner with scanCONTROL Configuration Tools. 4 The measuring programs show the saturation in the "Scanner settings" input field. This is greatly influenced by the exposure time and affects the way in which the profile data are calculated. The saturation should be between 60 % and 80 % during a measurement. 5 There may be a discrepancy between the setpoint value and the actual value for the no. of scans per second if the number of scans is set too high or the processing power of the PC is insufficient. 6 The "Exposure time" parameter in the "Scanner settings" input field specifies the exposure time for the scanner. The value is also influenced by the "No. of profiles" parameter. The actual value of "No. of profiles" has priority over the "Exposure time" parameter. This results from the inequality "1/(No. of profiles) >= (Exposure time)". This means, for example, with the setting "Exposure time [ms]: 10" and "No. of profiles [1/s]: 200" the "Exposure time" value is adjusted. The new value for the "Exposure time" parameter is 5 ms. 7 Save the actual parameters before you start to record a profile sequence. You can then load them again before you play back the profile sequence. 8 Select the ? Help menu item or press the <F1> key directly in a measuring program to display help information about that measuring program. 9 Proceed as follows if you cannot see a profile in the "2D-display" and no error messages are displayed in the status line: Restore the default settings via the "Parameters Reset…" menu entry. Valid parameters are now loaded into the "Scanner settings", and the complete measuring range is displayed in the "2D-display". 10 The Configuration Tools CD contains examples of profile sequences in the directory "[CD]:\Examples". Page 163 Appendix 9.3 Key Shortcuts Use key shortcuts to work faster! The following shortcuts are available: Key combinations F1 Ctrl + Alt + F12 Action Open the online help for the current view Close Configuration Tools Ctrl + F5 F5 Toggle pause mode Transfer a current profile from the scanner when pause mode activated Ctrl + F1 Ctrl + F2 Ctrl + F3 Ctrl + F6 Online mode Offline mode Save profile Activate/Deactivate protocol results Ctrl + O Ctrl + S Ctrl + R Ctrl + Alt + O Ctrl + Alt + S Load parameters from file Save parameters to file Reset parameters Load parameters from scanCONTROL Save parameters to scanCONTROL Ctrl + F7 Ctrl + F8 Adjusting basic settings Adjusting scanCONTROL Network Settings Note: In case of a malfunction of some key shortcuts please check if these shortcuts are used by other programs. Page 164 Appendix 9.4 Manual/Subsequent Installation of the Driver for IEEE1394 9.4.1 Subsequent Installation of the Driver for IEEE1394 on Windows 8 If the installation of the driver wasn't completed successfully while installing Configuration Tools, you may install the driver subsequently. Note: The driver only has to be installed for using the IEEE1394 interface. No driver is required for scanCONTROL devices with an Ethernet interface. Fig. 9.1: Windows 8 subsequent driver installation - step 1 Open the overview of your Apps and select the "Install scanCONTROL driver (IEEE1394)" App (see Fig. 9.1). The "scanCONTROL driver (IEEE1394)" dialog will appear on the screen. Fig. 9.2: Windows 8 subsequent driver installation - step 2 Connect scanCONTROL to the PC and click on "OK" to confirm (see Fig. 9.2). Page 165 Appendix The "Windows Security" dialog appears: Fig. 9.3: Windows 8 subsequent driver installation - step 3 Click on ”Install” to confirm this dialog (see Fig. 9.3). Fig. 9.4: Windows 8 subsequent driver installation - step 4 Click on ”OK” (see Fig. 9.4). The scanCONTROL driver is now installed. Note: Only use version 6.4.6 of the CMU driver which is delivered on the CD. If a different driver or a different version of the CMU driver for scanCONTROL is installed later, it will not be possible to operate the scanCONTROL measurement system with Configuration Tools. 9.4.2 Manual Installation of the Driver for IEEE1394 on Windows 8 In case of an incorrect installation of the driver, you have to install the driver manually. Note: The driver only has to be installed for using the IEEE1394 interface. No driver is required for scanCONTROL devices with an Ethernet interface. Call up the installation dialog via the Device Manager (Windows Desktop Charms bar Settings Control Panel System and Security System Device Manager). scanCONTROL is located under "Imaging Devices" or under "Other Devices". Page 166 Appendix The installation dialog will then appear on the screen. Fig. 9.5: Windows 8 manual driver installation - step 1 Select "Browse my computer for driver software" (see Fig. 9.5). Fig. 9.6: Windows 8 manual driver installation - step 2 Select "Browse…" (see Fig. 9.6). A standard Windows dialog is displayed for the selection of the path containing the driver files. In the folder tree, select "C: Program Files CMU 1394Camera Driver" and confirm with "OK". Click on ”Next” to confirm the "Update Driver Software" dialog (see Fig. 9.6). Page 167 Appendix The "Windows Security" dialog appears: Fig. 9.7: Windows 8 manual driver installation - step 3 Click on ”Install” to confirm this dialog (see Fig. 9.7). Fig. 9.8: Windows 8 manual driver installation - step 4 Click on ”Close” in the next dialog (see Fig. 9.8). The scanCONTROL driver is now installed. Note: Only use version 6.4.6 of the CMU driver which is delivered on the CD. If a different driver or a different version of the CMU driver for scanCONTROL is installed later, it will not be possible to operate the scanCONTROL measurement system with Configuration Tools. 9.4.3 Manual Installation of the Driver for IEEE1394 on Windows 7 In case of an incorrect installation of the driver, you have to install the driver manually. Note: The driver only has to be installed for using the IEEE1394 interface. No driver is required for scanCONTROL devices with an Ethernet interface. Call up the installation dialog via the Device Manager (Control Panel System and Security System Device Manager). scanCONTROL is located under "Imaging Devices" or under "Other Devices". The installation dialog will then appear on the screen. Page 168 Appendix Fig. 9.9: Windows 7 manual driver installation - step 1 Select "Browse my computer for driver software" (see Fig. 9.9). Fig. 9.10: Windows 7 manual driver installation - step 2 Select "Let me pick from a list of device drivers on my computer" (see Fig. 9.10). Page 169 Appendix Fig. 9.11: Windows 7 manual driver installation - step 3 Select ”CMU 1394 Digital Camera Device” from the list and click on ”Next” to confirm (see Fig. 9.11). The "Windows Security" dialog appears: Fig. 9.12: Windows 7 manual driver installation - step 4 Select "Install this driver software anyway" in this dialog (see Fig. 9.12). Page 170 Appendix Fig. 9.13: Windows 7 manual driver installation - step 5 Click on ”Close” in the next dialog (see Fig. 9.13). The scanCONTROL driver is now installed. Note: Only use version 6.4.6 of the CMU driver. If a different driver or a different version of the CMU driver for scanCONTROL is installed later, it will not be possible to operate the scanCONTROL measurement system with Configuration Tools. Note: If you are requested to choose the driver files manually you will find the files in the installation directory of Configuration Tools: [Installation path]\Driver-CMU1394 Page 171 MICRO-EPSILON MESSTECHNIK GmbH und Co. KG Königbacher Str. 15 · D-94496 Ortenburg / Germany Tel. +49 (0) 8542 / 168-0 · Fax +49 (0) 8542 / 168-90 [email protected] · www.micro-epsilon.de X9751213-A101085ALI © MICRO-EPSILON MESSTECHNIK *X9751213-A10*