1
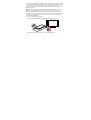
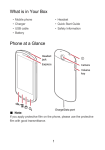
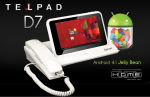
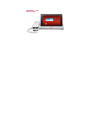
TELPAD S7 - LITE
USER GUIDE
i
Contents
1 Getting Started ......................................................................................... 1
1.1 Welcome ............................................................................................................ 1
1.2 Telpad at a Glance ............................................................................................ 2
1.3 Product Specifications ....................................................................................... 4
1.4 Installation .......................................................................................................... 6
1.4.1 Connecting the Dock ............................................................................... 6
1.4.2 Installing microSD Card .......................................................................... 7
1.4.3 Installing the Dock Battery ...................................................................... 8
1.4.4 Docking and Undocking the Tablet ......................................................... 9
1.5 Switching Your Telpad On or Off ..................................................................... 10
1.6 Charging the Battery ........................................................................................ 11
1.6.1 Charging the Tablet Battery .................................................................. 11
1.6.2 Charging the Dock Battery .................................................................... 12
1.7 Important Information About the Battery .......................................................... 12
1.8 Power-Saving Tips ........................................................................................... 13
1.9 Touchscreen Actions ....................................................................................... 14
ii
1.10 Home Screen ................................................................................................. 16
1.10.1 Home Screen at a Glance ................................................................... 16
1.10.2 Home Screen Extensions.................................................................... 17
1.10.3 Customizing the Home Screen ........................................................... 17
1.11 Locking and Unlocking the Screen ................................................................ 21
1.11.1 Locking the Screen ............................................................................. 21
1.11.2 Unlocking the Screen .......................................................................... 22
1.11.3 Setting the Screen Timeout Period ..................................................... 22
1.11.4 Setting the Screen Unlock Pattern ...................................................... 22
1.12 Navigation Icons ............................................................................................ 23
1.13 Opening the Settings List ............................................................................... 24
1.14 Connecting Your Tablet to a PC .................................................................... 26
1.15 Connecting the Tablet to a TV ....................................................................... 26
2 Voice Services ....................................................................................... 28
2.1 Making a call .................................................................................................... 28
2.1.1 Making a Call Without the Tablet .......................................................... 28
2.1.2 Making a Call Using the Handset and the Onscreen Dialer .................. 28
2.1.3 Making a Call in Hands-Free Mode Using the Onscreen Dialer ........... 29
2.1.4 Switching a Call from Handset to Hands-Free Mode and Vice-Versa .. 30
iii
2.1.5 Making a Call from Contacts ................................................................. 30
2.1.6 Making a Call from Call Log .................................................................. 30
2.2 Answering a Call .............................................................................................. 31
2.3 Ending a Call ................................................................................................... 31
2.4 Making a Call from Favorites ........................................................................... 31
2.5 Memo ............................................................................................................... 31
3 Text Input ............................................................................................... 32
3.1 Selecting a Text Input Method ......................................................................... 32
3.2 Android Keyboard ............................................................................................ 32
3.3 Huawei Input Method ....................................................................................... 33
3.4 Editing Text ...................................................................................................... 35
4 Wireless Networks ................................................................................. 36
4.1 Wi-Fi ................................................................................................................ 36
4.1.1 Turning the Wi-Fi On and Off ................................................................ 36
4.1.2 Configuring Wi-Fi Settings .................................................................... 36
4.1.3 Connecting to a Wi-Fi............................................................................ 37
4.2 Bluetooth .......................................................................................................... 38
4.2.1 Turning the Bluetooth On and Off ......................................................... 38
4.2.2 Configuring Bluetooth Settings.............................................................. 38
iv
4.2.3 Connecting to a Bluetooth Device ......................................................... 39
4.2.4 Disconnecting from or Unpairing with Another Bluetooth Device ......... 40
5 Browser .................................................................................................. 41
5.1 Browsing a Webpage ....................................................................................... 41
5.2 Bookmarks ....................................................................................................... 43
5.3 Downloading Files ........................................................................................... 43
6 Email ...................................................................................................... 44
6.1 Opening an Email ............................................................................................ 44
6.2 Adding and Deleting Email Accounts ............................................................... 44
6.2.1 Setting Up an Email Account ................................................................ 44
6.2.2 Deleting an Email Account .................................................................... 44
6.3 Sending and Receiving Emails ........................................................................ 44
6.3.1 Editing and Sending an Email ............................................................... 44
6.3.2 Reading an Email .................................................................................. 45
6.3.3 Other Operations................................................................................... 45
7 People ................................................................................................... 46
7.1 Accessing Contacts ......................................................................................... 46
7.2 Creating a Contact ........................................................................................... 46
7.3 Editing Detailed Contact Information ............................................................... 46
v
7.4 Deleting a Contact ........................................................................................... 46
7.5 Combining Contacts ........................................................................................ 47
8 Multimedia.............................................................................................. 48
8.1 Sound Recorder ............................................................................................... 48
8.2 Camera and Camcorder .................................................................................. 48
8.2.1 View Finder Screen for Photo Capture ................................................. 49
8.2.2 View Finder Screen for Video Capture.................................................. 51
8.3 Gallery ............................................................................................................. 52
8.3.1 Opening Gallery .................................................................................... 53
8.3.2 Viewing Pictures.................................................................................... 53
9 Applications............................................................................................ 54
9.1 Calendar .......................................................................................................... 54
9.2 Alarms .............................................................................................................. 55
10 Basic Troubleshooting for the Device .................................................. 56
10.1 Tablet Has No Power ..................................................................................... 56
10.2 No Dial Tone .................................................................................................. 56
10.3 Distorted Audio on Speaker ........................................................................... 56
10.4 Tablet Dialer Cannot Make a Call .................................................................. 57
10.5 Handset No Audio .......................................................................................... 57
vi
11 FAQs .................................................................................................... 58
12 Warnings and Precautions ................................................................... 66
13 Personal Information and Data Security .............................................. 75
14 Index .................................................................................................... 76
15 Legal Notice ......................................................................................... 79
_Toc332957980
vii
1 Getting Started
1.1 Welcome
Thank you for choosing Telpad S7-931wd to assist you in your daily life.
Your Telpad is a smart tablet that delivers high-quality images, audio and video, and
convenient network and information services.
The illustrations in this guide are provided for your reference only. The
appearance and display features may vary slightly depending on the actual
product.
1
1.2 Telpad at a Glance
1
3
5
7
9
Front camera
Speaker
Volume key
Earphone or microphone jack
Microphone
2
4
6
8
10
2
Rear camera
Power key
Memory card slot
Micro-USB port
Dock interface
11
12
13
14
15
Handset
Numeric keypad
Hands-free key
Microphone
Cradle
16
17
18
19
20
Loudspeaker
Ringer volume
Power
Slot for the main line
Slot for the extension line
3
1.3 Product Specifications
Dimensions
Display and resolution
System software
Air interface
Display color depth
Multi-touch panel
Primary keypad
(onscreen keypad of the
tablet)
Bluetooth
USB
Speaker
Microphone
Sensors
Audio-out interface
PSTN support (POTS)
Speaker
Microphone
microSD card
Built-in flash memory
General Specifications and Display
193.6 mm x 120 mm x 11.3 mm
7" TFT LCD, 1024 x 600 pixels
AndroidTM 4.0
Wi-Fi - 802.11b/g/n
24bit
Capacitive
Capacitive Touch Standard 3
Keys: Back, Home, and Menu
Tablet
Bluetooth 3.0, 2.1 + EDR compatible
Micro USB 2.0 OTG
Built-in (This speaker is not used for PSTN calls but for
multimedia playback purposes.)
Built-in (This microphone is not for PSTN calls but for
multimedia recording purposes.)
Gravity Sensor
Standard 3.5 mm headphone jack (not for PSTN calls)
Handset
RJ9 (4P4C)
Built-in (This speaker is used for PSTN calls.)
Built-in (This microphone is used for PSTN calls.)
Memory
up to 32 GB
1 GB NANO flash memory
4
PSTN
Email
Video formats
Video decoding
Audio decoding
Picture formats
Streaming media
Tablet battery
Dock battery
Power adapter
Social networking
service applications
Smart Dialer
Hands-free mode
Volume adjustment
Communication and Organizer
Protocols: SMTP, POP3, and IMAP4
Sync Contacts and Sync Calendar
Media Performance
3GP, 3G2, MP4, ASF, RM, RMVB, and WMV
H.264, H.263, MPEG4, RealVideo, WMV, and VC-1
H.264, MPEG4, or VC-1 720p at 30 fps
Real Video, WMV, or WVGA at 25 fps
MP3, AMR, AAC, AAC+, EAAC, PCM, OGG, MIDI, and
WMA
BMP, PNG, JPEG, WBMP, and GIF
RTSP and HTTP
Download Play
Progressive Playback
Battery and Power
Standard 4100 mAh rechargeable Lithium-ion polymer
battery
Standard 1000 mAh rechargeable battery
Input: 100–240 V AC
Output: 5 V DC/2 A/10 W
Built-In Third-Party Applications
YouTube and Facebook
5
1.4 Installation
1.4.1 Connecting the Dock
Before installing or removing the power adapter, telephone line, or dock battery,
ensure that the tablet is not mounted on the dock.
1
2
Telephone jack
Power adapter
Before using the dock, ensure that the power adapter is properly connected.
6
1.4.2 Installing microSD Card
Do not remove the cover for the rear camera.
1. Open the memory card slot cover.
2. Insert the microSD card.
3. Replace the memory card slot cover.
7
1.4.3 Installing the Dock Battery
1. Open the back cover by (a) lifting cover and (b) sliding it out.
2. Install the battery into slot.
3. Replace the back cover by (a) sliding cover into slot and (b) snapping it into place.
When installing the dock battery, ensure that the battery connector wires are
arranged neatly.
8
1.4.4 Docking and Undocking the Tablet
Dock the tablet as shown in the following figures.
a) Position tablet into center
of dock, sliding it gently into
slot.
b) Ensure tablet sits snugly in
cradle, with tablet properly
inserted into slot.
9
Undock the tablet as shown in the following figures.
a) Gently push it towards you.
b) Lift tablet off its slot to detach
from dock.
10
1.5 Switching Your Telpad On and Off
Press and hold the Power key until your Telpad vibrates to switch on your Telpad. The first
time you switch the tablet on, complete the setup by following the onscreen instructions.
To switch off your Telpad, press and hold the Power key until the screen displays a dialog
box. Follow the onscreen instructions.
.
To restart Telpad on standby mode or if it malfunctions, press and hold the Power
key for about 10 seconds until the display turns off. Press and hold the power key
until Telpad vibrates.
1.6 Charging the Battery
1.6.1 Charging the Tablet Battery
To charge the Telpad's battery, connect the charger to the charger port and plug the
charger into a power outlet, as shown in the following figure:
11
1.6.2 Charging the Dock Battery
Before charging the battery, make sure that the battery is properly installed in your dock.
To charge the battery, you can connect the dock to the power adapter, as shown in the
figure below:
1.7 Important Information About the Battery
When charging the battery for the first time, charge it for at least six hours to ensure
that your Telpad displays the battery information correctly.
If the battery has not been used for a long time or the battery power is exhausted,
you may not be able to turn the power on your tablet immediately after you begin
charging the battery. This is normal. Allow the battery to charge for a few minutes
with the tablet powered off before attempting to switch it on.
12
Using data services increases the power consumption of the tablet and will
therefore reduce the length of time that the tablet can be used between battery
charges.
The time required to fully charge the battery depends on the ambient temperature
and the age of the battery.
When the battery power is low, your Telpad will alert you and display a message.
When the battery power is almost exhausted, your Telpad will power off
automatically.
1.8 Power-Saving Tips
Turn off the screen backlight when your Telpad is not in use.
Reduce the time it takes for the screen backlight to turn off when your tablet is idle.
Decrease the screen brightness.
Decrease the volume.
Turn off Bluetooth when not in use.
Turn off Wi-Fi when not in use.
Turn off your tablet’s GPS receiver when not in use.
13
1.9 Touchscreen Actions
On the touchscreen, you can use your finger to operate the applications and screen
elements conveniently. Your Telpad supports the following actions:
Action
Description
Touch
Tap applications or other elements with your finger to open or select
them. For example, touch the on-screen keyboard to enter letters,
numbers and symbols.
Touch and
hold
Touch an item with your finger and do not release it until the tablet
responds. For example, touch and hold an item to open its shortcut
menu.
Drag
Touch and hold an item and move it to a desired position. For example,
drag a shortcut icon to the trash can to delete the icon.
Flick
Move your finger quickly either vertically or horizontally, across the
screen. For example, flick up and down to scroll through a list, or flick
left or right to switch between pictures.
14
Action
Description
Double-touch
Quickly touch the screen twice to zoom in or out. For example,
double-touch a webpage to zoom in on the webpage.
Pinch
Pinch your fingers together and move them apart. For example, when
viewing pictures, pinch your fingers together to zoom out and move
your fingers apart to zoom in.
15
1.10 Home Screen
1.10.1 Home Screen at a Glance
No.
Description
1
Touch
to open the Voice Search Box. Speak to search as prompted.
2
Touch
to see recently used applications.
3
Touch
to return to the Home screen.
4
Touch
to return to the previous screen.
Displays the time, Wi-Fi status and signals, battery power, and more. To
open the notification panel, touch the digital clock.
Displays widgets and application shortcuts.
5
6
7
Touch
to access the Apps screen.
Depending on the presets of the product you have purchased, your Home screen might look a
little different. The preceding figure is provided for your reference only.
16
1.10.2 Home Screen Extensions
Flick left or right across the Home screen to switch between Home screen extensions.
1.10.3 Customizing the Home Screen
If there is enough room, you can add items such as shortcuts and widgets to the Home
screen. You can also change the wallpaper to suit your preference.
Adding an Item
1. Flick to the Home screen or extension where you want to add an item.
2. Touch
on the upper right corner of the screen.
3. Touch an item type option from those displayed, for example App Shortcuts
or Widgets.
4. Touch and hold the item to be added to the Home screen. The icon for the
selected item will be automatically added to the Home screen.
17
Moving an Item
Touch and hold an icon on the Home screen, drag the icon to the desired position, and
then release it.
18
Removing an Item
1. Touch and hold the item you want to remove until the
2. Drag the item's icon to
.
3. When the icon turns red, release the icon.
19
appears.
Changing the Wallpaper
1. Touch and hold a blank area on the Home screen until an options menu
appears.
2. Touch Wallpapers, and select a picture to set as wallpaper.
20
1.11 Locking and Unlocking the Screen
1.11.1 Locking the Screen
When your Telpad is turned on, press the Power key to lock the screen.
If your Telpad is idle for a preset period of time, the screen will lock automatically.
21
1.11.2 Unlocking the Screen
1. Press the Power key to wake up the screen.
2. Drag the Lock icon to the
icon on the right.
If you have set up a screen unlock pattern, draw the pattern to unlock the screen.
1.11.3 Setting the Screen Timeout Period
To set the idle time after which the Telpad automatically turns off and locks the screen,
touch
> Settings > Display > Sleep.
22
1.11.4 Setting the Screen Unlock Pattern
1. Touch
> Settings.
2. Touch Security > Screen lock > Pattern.
3. Set the Screen Unlock pattern as prompted.
1.12 Navigation Icons
The following icons are commonly used on the Home screen or other application screens.
Touch the icons to perform the following operations.
Touch...
To...
Return to the Home screen.
Return to the previous screen.
Open the list of recently used applications.
View all applications installed on the tablet.
Open an options menu. (When starting an application, you can see this
icon in the upper right corner of the screen.)
Close the keyboard. (When the keyboard is displayed, you can see this
icon in the lower left corner of the screen.)
Open a drop-down menu. (This icon appears in the lower right corner of
some text boxes.)
23
1.13 Opening the Settings List
In the settings list, you can view and change the settings for the Telpad's Wi-Fi, sounds,
date and time, and more.
On the Home screen, touch the digital clock in the lower right corner. In the
displayed menu, touch
, then Settings.
24
On the Home screen, touch
screen.
, then Settings to directly go to the Settings
25
Date and time settings: Touch
Screen settings: Touch
> Settings > Date & time.
> Settings > Display.
Language settings: Touch
> Settings > Language & Input > Language.
1.14 Connecting Your Tablet to a PC
You can connect your Telpad to a PC to share resources between the devices. To set up a
USB connection between your Telpad and PC:
1. Connect your Telpad to a PC using the USB cable that comes with the Telpad.
2. The first time you connect the tablet to your PC, an installation wizard will run
automatically. Follow the wizard to install the driver. After installation,
reconnect the Telpad to the PC.
If the installation wizard does not run automatically when you connect your
Telpad to the PC, your Telpad will appear as an additional drive on your PC.
Double-click the corresponding drive to launch the installation wizard.
3. Select the Telpad's file transfer mode:
− Use Windows Explorer to browse files on Telpad.
− Use Windows Media Player (in Version 11 or later) to transfer media files
between your PC and Telpad.
1.15 Connecting the Tablet to a TV
You can connect your tablet to a TV to output audio and video from the tablet to the TV.
Viewing photos, videos, and music on your tablet via a TV brings you a better experience.
26
You must use a High-Definition Multimedia Interface (HDMI) cable to connect the tablet to
the TV. As the HDMI cable is an optional accessory, it may not be included in the packing
box. When you purchase an HDMI cable, check the connector type of the cable.
The connector that connects the HDMI cable to the HDMI interface of your tablet is a
Type D connector.
The connector that connects the HDMI cable to the HDMI interface of the TV varies
according to the HDMI interface of the TV. Typically, it is a Type A connector.
Your tablet's HDMI connection supports only 800 × 480 pixels resolution output format.
Due to the fact that some TVs may not support 800 × 480 pixels HDMI resolution, you may
not be able to view tablet display on the TV. Please consult your TV manufacture for
information on HDMI support.
Connect your tablet to the TV as follows:
1. Connect the HDMI cable to the HDMI interfaces of the tablet and the TV.
2. Select the TV’s correct program source for the HDMI interface.
27
2 Voice Services
You can access the onscreen dialer by tapping
on the PLDT Home screen.
The dialer is automatically launched when the tablet is docked on the cradle. Once the
tablet's dock interface comes into contact with the dock connector, the dock's keypad is
disabled and you can dial phone numbers only using the tablet's dialer.
When using the dialer, note that:
Line1 is a landline.
Line2 is a VoIP line, which requires network support.
2.1 Making a Call
When the tablet is docked, the dock's keypad and hands-free key are
automatically disabled and you can dial phone numbers only using the tablet's
dialer.
The on-screen dialer is your primary tool for dialing phone numbers. The handset's keypad
enables you to make calls when there is a power outage or the tablet is undocked.
2.1.1 Making a Call Without the Tablet
When the tablet is undocked, you can use the handset to make calls.
When the power adapter is not connected or when the dock battery runs out of
power, you can use the handset to make calls. In this case, the dock's hands-free
key is disabled.
2.1.2 Making a Call Using the Handset and the Onscreen Dialer
1. Pick up the handset from the dock.
28
2. Dial the number using the on-screen dialer.
3. Put down the handset to end the call.
For proper operation of the Telpad, you must set its Area Code. You can press the
Menu key and tap Settings, then set your current location and area code by choosing
from the list provided. The preset area code is for Metro Manila, Laguna-San Pedro,
Bulacan-Obando-(02).
2.1.3 Making a call in hands-free mode using the onscreen dialer
1. Tap
to enable hands-free mode.
2. Dial the number using the on-screen dialer.
3. Tap
to end the call.
29
You can dial the number first via the on-screen dialer and then tap
make a call.
to
2.1.4 Switching a Call from the Handset to Hands-Free Mode and Vice-Versa
1. Tap
if you wish to switch your call to hands-free mode.
2. Return the handset to the dock.
You can now continue your call using the speakerphone.
3. Pick up the handset if you wish to switch the call back to the handset.
You can now continue your call.
When you are in a call, either the tablet or the handset is active.
If you want to end a call, ensure that both the handset and the tablet are on-hook.
After you have switched to the tablet, you will be in hands-free mode.
2.1.5 Making a Call from Contacts
1. Tap Contacts above the on-screen dialer.
2. If there are saved entries already, tap the contact that you wish to call.
2.1.6 Making a Call from Call log
1. Tap Call Log above the onscreen dialer.
2. Scroll to the log entry that you wish to call.
3. Tap
.
While viewing the call log, press the Menu key and then Clear Call Log to delete all
entries. You can also tap and hold an entry, and tap Remove from Call Log to remove
that individual entry from the call log.
30
2.2 Answering a Call
When the phone rings and displays the incoming call image:
Pick up the handset to answer the call.
Tap
to answer the call.
2.3 Ending a Call
Put down the handset to end the call.
Tap
to end the call.
2.4 Making a call from Favorites
1. Tap Favorites above the on-screen dialer.
2. If there are saved entries already, tap the entry that you wish to call.
When you tap and hold an entry in the list of your favorite contacts, detailed
information about the entry will be displayed, and you can edit or delete the entry
using the onscreen keyboard
2.5 Memo
When you have an ongoing call, you can jot down notes using the Memo Pad. To create a
memo or scribble notes during your call, tap
31
on the lower right corner of the screen.
3 Text Input
Touch a text field to open the keyboard. Then touch letters and symbols on the keyboard to
enter text.
To close the keyboard, touch
in the lower left corner of the screen.
3.1 Selecting a Text Input Method
1. Touch
> Settings.
2. Touch Language & Input to select a text input method.
3.2 Android Keyboard
No.
Description
1
2
Switch between upper and lower cases.
Switch to the number/symbol input mode.
32
No.
Description
3
4
5
6
Move to next item.
Enter a space.
Start a new line.
Touch to delete the character to the left of the cursor.
Touch and hold to delete all characters to the left of the cursor.
3.3 Huawei Input Method
The Huawei Input Method is an optional application that may not be pre-installed
on your Telpad. To use the Huawei Input Method, you can download and install it.
33
No.
Description
1
2
3
4
5
6
7
Switch between upper and lower cases.
Switch to the symbol keyboard.
Select an input language.
Enter a space.
Switch to the numeric keyboard.
Start a new line.
Delete the character to the immediate left of the cursor.
Touch and hold to delete all characters to the left of the cursor.
34
3.4 Editing Text
1. Touch a text box to display
2. Move
beside the cursor.
to the position where you want to edit the text.
3. Touch and hold the text, then
and
will be displayed at the two ends
of the text.
4. Drag
and
to select the text you want to edit.
5. Touch Select All, Cut, or Copy to perform the corresponding operation, or
touch the Backspace key on the keyboard to delete the selected text.
35
4 Wireless Networks
Your Telpad allows you to connect to various wireless networks and devices via Wi-Fi or
Bluetooth.
Using a wireless device or accessory while driving may cause distraction and
may be illegal. Always obey local laws and drive safely.
4.1 Wi-Fi
Wi-Fi is a wireless networking technology that allows users to access the Internet through
wireless access points. Wi-Fi connectivity depends on wireless access points and your
surroundings. To use Wi-Fi on your Telpad, you must access a wireless access point or
"hotspot".
4.1.1 Turning the Wi-Fi On and Off
Touch
> Settings. Go to Wi-Fi, and touch On or Off.
4.1.2 Configuring Wi-Fi Settings
1. Touch
> Settings.
2. Go to Wi-Fi, and touch On.
3. Touch
> Advanced in the upper right corner. You can then configure
WI-FI settings, for example, whether to enable Network Notification.
36
4.1.3 Connecting to a Wi-Fi
1. Turn on Wi-Fi. Your Telpad will automatically search for available wireless
local area networks (WLANs).
2. Choose a Wi-Fi by touching it.
− If an open Wi-Fi is selected, you can connect to the Wi-Fi directly.
− If an encrypted Wi-Fi is selected, a password is required.
37
You can touch Scan or Add Network in the upper right corner to scan for or add
additional WLANs that are in range.
If you were previously connected to a particular Wi-Fi, your Telpad will connect to
that Wi-Fi automatically when the said function is turned on and the Telpad
detects the Wi-Fi.
After a Wi-Fi connection is set up, you can touch the Wi-Fi from the Wi-Fi
Networks menu to view its details such as the connection rate, security type, and
IP address.
4.2 Bluetooth
Your Telpad supports wireless connections between devices using Bluetooth.
When using Bluetooth, keep the Telpad within 10 meters of the other Bluetooth devices to
which you want to connect. Bluetooth connectivity is affected by the surroundings.
Obstacles like walls or other electronic equipment may interfere with your Bluetooth
connection.
4.2.1 Turning the Bluetooth On and Off
1. Touch
> Settings.
2. Go to Bluetooth, and touch On or Off.
4.2.2 Configuring Bluetooth Settings
1. Touch
> Settings.
2. Go to Bluetooth, and touch On.
38
3. Touch
in the upper right corner. From the displayed options menu, select
Rename tablet, Visibility timeout, or Show received files to change the
settings.
4.2.3 Connecting to a Bluetooth Device
To pair your Telpad with another Bluetooth device, ensure that the other
Bluetooth device is set to discoverable under its Bluetooth settings.
39
1. On the Telpad, turn on the Bluetooth function. The Telpad will start scanning
for Bluetooth devices that are in range.
2. Choose the device you want to pair with from the list of detected Bluetooth
devices by touching it.
4.2.4 Disconnecting from or Unpairing with Another Bluetooth Device
To disconnect the Telpad from another Bluetooth device, touch
device, and select Unpair.
40
on the right of the
5 Browser
Touch
> Browser.
To access more Browser settings, touch
screen.
in the upper right corner of the Browser
Your Browser also supports multi-webpage browsing. To open more webpages, touch
on the Browser screen.
5.1 Browsing a Webpage
1. Open Browser.
2. Enter a web address or touch
and speak a web address.
3. After opening the website, flick up or down to browse the webpage.
41
Touch...
To...
1
2
3
4
5
6
7
8
Open a new webpage.
Go back.
Go forward.
Stop loading a webpage.
Bookmark the current webpage.
Display the search box.
Access the bookmark screen.
View more menu options.
42
5.2 Bookmarks
When browsing a webpage, touch
You can also touch
to view more options.
to add the web address as a bookmark.
to open the bookmark screen. Then touch and hold a bookmark
5.3 Downloading Files
You can download files, images, and even applications from webpages. The downloaded
files will be stored on your Telpad or microSD card.
For example, to download an image, touch and hold the image on a webpage, and then
touch Save Image in the displayed menu; to download a file, touch and hold the link to a
file on a webpage, and then touch Save Link in the displayed menu.
To protect your Telpad and personal data, set your tablet to download applications only from
trusted sources: Touch
> Settings > Security, and then clear the Unknown Sources
check box.
43
6 Email
6.1 Opening an Email
To open an email, touch
> Email.
6.2 Adding and Deleting Email Accounts
6.2.1 Setting Up an Email Account
1. Touch
> Email.
2. Enter account information, and touch Next. You can also touch Manual Setup
to manually configure server settings.
If you touch Manual Setup to manually set up your email account, contact your
email service provider for specific settings.
3. Set up your account as prompted.
6.2.2 Deleting an Email Account
1. Touch
> Email.
2. Touch
> Settings.
3. Select the account to be deleted, and touch Remove Account > OK.
6.3 Sending and Receiving Emails
6.3.1 Editing and Sending an Email
1. Touch Email, then select the email account you want to use.
44
2. Touch
in the upper right corner of the screen.
3. Enter the recipient's email address, the email subject, and the email content.
4. Touch Send in the upper right corner of the screen.
6.3.2 Reading an Email
1. Touch Email, and select the email account you want to use.
2. Touch
on the upper right corner of the screen to refresh the Inbox, and
then select the email you want to read.
6.3.3 Other Operations
When reading an email, you can touch the icons listed in the following table to reply to or
forward the email.
Touch...
To...
Reply to the email sender.
Reply to the email sender and other recipients.
Forward the email.
45
7 People
People enables you to save and manage contact information such as the phone numbers
and email addresses of your contacts. After you save contact information on your tablet,
you have easy access to the people with whom you want to communicate.
7.1 Accessing Contacts
Touch
> People.
7.2 Creating a Contact
1. Touch People.
2. Touch All >
.
3. Enter the contact's information.
4. Touch Done to save the contact.
7.3 Editing Detailed Contact Information
1. Touch People.
2. Touch the contact for whom detailed contact information is to be edited, and
touch
on the upper right corner of the screen.
3. Edit contact information, and touch Done.
7.4 Deleting a Contact
1. Touch People.
2. Touch the contact to be deleted, and touch
the screen.
46
on the upper right corner of
3. Touch Delete,then OK.
7.5 Combining Contacts
1. Select a contact, and touch
2. Touch
.
> Join.
3. Touch the contact to be combined.
47
8 Multimedia
8.1 Sound Recorder
On the Apps screen, touch Sound Recorder to open the Sound Recorder screen. To use
the recorder:
Touch
to start recording.
Touch
to play the recording.
Touch
to stop recording.
8.2 Camera and Camcorder
On the Apps screen, touch Camera or Camcorder to launch the camera or the camcorder,
and take pictures or record videos.
Be sure to clean the protective lens cover with a microfiber cloth before you take
pictures and shoot videos. The lens cover with smudges from fingers can cause
blurry pictures with a “halo” effect.
48
8.2.1 View Finder Screen for Photo Capture
No.
Description
1
2
3
4
5
6
7
View photos or videos you have taken.
Switch between the front and rear cameras.
Take a photo.
Zoom in or zoom out.
Configure camera settings.
Enable photo capture mode.
Enable video capture mode.
49
On the Camera Settings screen, more options are available.
No.
Description
1
2
3
4
Return to the previous screen.
Set the white balance mode.
Set the scene mode.
Configure additional camera settings.
50
8.2.2 View Finder Screen for Video Capture
No.
Description
1
2
3
4
5
View videos you have taken.
Switch between the front and rear cameras.
Start video recording.
Zoom in or zoom out.
Configure video camera settings.
On the Video Camera Settings screen, more options are available.
51
No.
Description
1
2
3
4
5
Set the white balance mode.
Return to the previous screen.
Set the interval for delayed video recording.
Configure additional video camera settings.
Set the video quality.
8.3 Gallery
Gallery displays photos and videos stored in your Telpad and microSD card, and sorts
them into folders. Use Gallery to manage your pictures and videos.
52
8.3.1 Opening Gallery
Touch
> Gallery.
On the Gallery screen, touch Albums on the upper left corner of the screen for more
sorting modes.
If a large number of pictures are stored on your Telpad or microSD card, the
Telpad may take several minutes to detect and organize the pictures the first time
you open Gallery.
8.3.2 Viewing Pictures
1. Touch a folder in Gallery to display all pictures in the folder.
2. Touch a picture to display it in full screen mode. Flick left or right across the
screen to display the previous or next picture.
You can pinch your fingers together or bring them apart on the screen to zoom in or out on
a picture, or rotate your Telpad to change a picture's orientation using the tilt sensor.
53
9 Applications
9.1 Calendar
On the Calendar screen, you can create and manage your events such as meetings and
appointments. To access the calendar, touch Calendar on the Apps screen.
Touch...
To...
1
2
3
4
Display your calendar in day view.
Display your calendar in week view.
Display your calendar in month view.
Display the agenda.
54
Touch...
To...
5
6
7
Display today's calendar view.
Create a new event.
View more calendar settings.
9.2 Alarms
1. Touch
2. Touch
> Clock to display the Clock screen.
to display the Alarm screen.
3. Select an alarm to enable it.
4. Touch Done.
Touch an alarm to set it. To add more alarms, touch Add alarm.
55
10 Basic Troubleshooting for the Device
10.1 Tablet Has No Power
1. Press tablet power key and check whether the PLDT Telpad logo appeared upon
initialization.
2. If the Android tablet does not launch, connect the tablet to the power supply
through the power adapter.
3. If the problem still exists, contact the PLDT Business Office.
10.2 No Dial Tone
1. Make sure that phone connector is properly inserted in connecting block.
2. Remove any peripheral equipment such as DSL splitter, fax machine and connect
phone directly to the modular box.
3. Try another telephone unit, if possible, to check if it’s a line problem.
4. If the problem still exists, contact 171.
10.3 Distorted audio on speaker
1. Turn off or put away the electronic device from the tablet if there are any electronic
device emitting radio frequencies near you or the one you are talking to should
there be an ongoing call.
2. Unplug the jack if there is any peripheral device attached to the speaker.
3. If the problem still persists, contact the PLDT Business Office.
56
10.4 Tablet Dialer Cannot Make a Call
1. Check if there is a dial tone. If there is none, check your RJ11 connection and make
sure it is properly connected.
2. Look on your screen and make sure that the Dialer is set to Line 1. Make sure that
the screen is showing “Telpad is on the dock”.
3. If the problem still exists, contact the PLDT Business Office.
10.5 Handset No Audio
1. Check if RJ9 cable is properly connected.
2. Unplug and plug the coiled cable to eliminate the possibility of a loose RJ9
connector.
3. Try another telephone unit, if possible, to check if it’s a line problem.
4. If the problem still persists, contact the PLDT Business Office.
57
11 FAQs
What is a Telpad
S7-931wd? How is it
different from a
typical landline or
desk phone?
What is included in
the package?
About the Device
The Telpad S7-931wd is a combination of a wired landline
phone and an Android tablet. Unlike ordinary telephones,
the device allows you to do a lot more than just making
and receiving calls. Enjoy its other features such as
browsing the Internet, playing multimedia (audio and
video) files and games, and accessing exclusive PLDT
content like:
AskPLDT and PLDT@home.
The package includes:
Handset
Dock
Telpad
Power adapter
RJ9 telephone coiled cable
RJ11 telephone cable
Micro-USB cable
User guide
58
What are the Telpad's
specifications?
Does the Telpad
support 3G?
Can the Telpad
directly connect to a
modem to access the
Internet?
Can I connect the
Telpad to a TV?
Is the Caller ID
service available by
default?
What is the function
of the Telpad's dock
battery?
How long does it take
to charge the tablet
battery?
The specifications are:
7-inch touchscreen
1024 x 600 pixels with HD video playback capabilities
0.3-megapixel front camera and 3.2-megapixel CMOS
rear camera with fixed-focus lenses
8 GB built-in memory
microSD card slot supporting a microSD card of up to
32 GB
Android™ 4.0
Wi-Fi/Bluetooth connectivity
No.
No. The Telpad connects to the Internet using a Wi-Fi
connection only. It will work with any brand of Wi-Fi router
using 802.11b/g/n technologies.
Yes. But you can connect the Telpad only to a LCD TV
that supports the WVGA (1024 × 600 pixels) display
resolution.
No. The Caller ID service is available only after you have
subscribed to it.
The dock battery functions as a back-up power supply for
the Telpad.
The tablet battery will be fully charged in approximately
three to four hours. Check the battery status on the
taskbar.
59
How long will the
tablet battery work
continuously?
Can I charge the
tablet using the USB
port?
How can I charge the
Telpad?
The tablet will operate for 180 hours in standby mode and
approximately five hours if used for video playback.
Is there a limit on the
length of the sound
recordings that can
be made using the
sound recorder?
There is no limit to the length of sound recordings. They
depend on the Telpad's available memory.
What is Android™?
Can I upgrade my
Android™ version to
the latest version?
What are third-party
applications?
No.
You can charge the device using the Telpad's power or
dock interface.
About the Software
Android™ is an open-source mobile operating system
owned by Google. It allows a large community of
developers to write application programs that extend the
functionality of various devices. There are currently over
100,000 applications available for Android™ devices.
Users can readily download and enjoy these applications.
No.
They are the applications found in the Android Market.
(PLDT is not liable for the performance, support, and
maintenance of the third-party applications installed on the
device.)
60
What software or
applications does
PLDT support?
PLDT supports and maintains:
PLDT Home screen
Dialer
PLDT@home
AskPLDT
How do I restore the
device to its factory
settings?
What can I do if the
Telpad crashes after
an unauthorized
software upgrade?
Tap
Reset.
How do I lock and
unlock the Telpad?
What is the default
storage for contacts?
Can I adjust the
screen brightness?
> Settings > Backup & Reset > Factory Data
Send the Telpad to any Citylight branch for repair.
How to Use the Device
To lock the Telpad, press the tablet's power key. If the
backlight turns off, the Telpad is locked.
To unlock the Telpad, press the tablet's power key, tap the
lock icon on the screen, and then slide rightward. If the
PLDT Home screen is displayed, the Telpad is unlocked.
The Telpad's built-in memory is the default storage for
your contacts. Before restoring your device to its factory
settings, back up your contacts. If you do not do so, you
may lose important information.
Yes.
Tap
> Settings > Display > Brightness.
In the taskbar, slide the brightness bar.
61
Does my Telpad
screen orientation
change when I turn it
vertically or
horizontally?
My Telpad screen
orientation does not
change when some
applications are
running, why?
Can I connect a
mouse or a keyboard
to the Telpad?
What is the purpose
of the Quick fixes,
Show suggestions,
and Auto complete
options available
when you type?
Does the Telpad
come with a microSD
card?
When is the microSD
card used?
Yes. If the built-in tilt sensor and three-axis accelerometer
are enabled, your Telpad screen orientation changes
when you turn it vertically or horizontally.
The Telpad play does
not play some videos.
Why?
The Telpad's default player does not support some video
formats. You can download Flash Player from
Android™Market to play videos in these formats.
Some applications are not designed to support different
screen orientations.
No. The touchscreen is the only input device for the
Telpad.
These options can help you type more quickly and
accurately.
No. The Telpad already provides a built-in 8 GB memory
and an expandable microSD card slot supporting a
microSD card of up to 32 GB.
The microSD card is used as extra storage for your
applications, videos, music, photos, and other files.
62
Can I run multiple
applications at the
same time on the
Telpad?
Yes. Android™ supports multitasking and can run multiple
applications at the same time. Running too many
applications simultaneously, however, may affect the
Telpad's speed and performance and increase battery
consumption.
How do I view all my
applications?
Tap
How do I close an
application?
Tap
> Settings > Apps > Running, select the
application you want to close, and then click Force Close.
When can I remove
the microSD card
from the Telpad?
You can remove the microSD card at any time except
when it is being written to or read from.
Can I make a call
using the handset
and the tablet's dialer
at the same time?
I can't use the
handset keypad to
dial when the tablet is
docked. Why?
No. You can use only one of them at a time. During a call,
however, you can switch from the handset to hands-free
mode (tablet) and vice-versa.
Can I make a call
when the tablet is not
docked?
Yes. You can do so using the handset keypad.
> Apps
About Voice Services
When the tablet is docked, the handset keypad is
automatically disabled. This is because the tablet's dialer
serves as your primary choice for dialing. You can use the
handset for dialing only when there is a power outage or
when the tablet is removed from the dock.
63
While in a call, can I
switch from the
handset to hands-free
mode and vice versa?
The tablet's dialer
offers two lines. What
are they used for?
Does the tablet
support email?
How do I set up my
email account?
How do I set up
Yahoo! Mail?
Yes. To switch from the handset to hands-free mode,
simply tap
on the tablet's dialer screen and return
the handset to the dock. To switch back to the handset,
pick it up and tap
again.
Line1: Landline (PSTN)
Line2: VoIP line *Available Soon*
Using the Internet
Yes. The tablet's email application comes with an email
wizard that guides you through the steps to add POP3 or
IMAP email accounts from popular web-based email
service providers.
Tap Email > New Account. Select Gmail or another email
service. Configure your email account settings, such as
the username, password, mailbox type incoming POP
server, security type, and outgoing SMTP server. Then tap
Sign In.
To set up Yahoo! Mail:
1. Tap Email > New Account > Other.
2. Enter your Yahoo! Mail account, password, and
select POP3 for the mailbox type.
3. To configure incoming mail server settings, enter
imap.mail.yahoo.com for the POP server, enter
your email address and password, and then select
SSL for the security type.
4. To configure outgoing mail server settings, enter
smtp.mail.yahoo.com for the SMTP server, enter
your user name and password, and then select SSL
for the security type.
64
Can I open multiple
browser windows at
the same time?
Does the default
browser support
pinch operations on
the touchscreen?
Yes. You can open up to 11 browser windows at the same
time and you can manage these windows.
Does the Skype
application support
video calling or other
calling applications?
Skype does not support video calling. You can use it to
make voice calls only.
Yes, it does.
The Skype's video calling service is still under
development for Android™.
65
12 Warnings and Precautions
To use the device properly and safely, read these warnings and precautions carefully and
strictly observe them during operation. Unless otherwise specified, the term "device" refers
to the Telpad and its accessories.
Basic Requirements
During storage, transportation, and operation of the device, keep it dry and prevent
it from colliding with other objects.
Do not dismantle the device. In case of any fault, contact an authorized service
center for assistance or repair.
Without authorization, no organization or individual can change the mechanical,
safety, or performance design of the device.
When using the device, observe all applicable laws and regulations and respect the
legal rights of other people.
Medical Device
Follow rules and regulations set forth by hospitals and health care facilities. Do not
use your device when using the device is prohibited.
Pacemaker manufacturers recommend that a minimum distance of 15 cm be
maintained between a device and a pacemaker to prevent potential interference
with the pacemaker. If you are using a pacemaker, use the device on the opposite
side of the pacemaker and do not carry the device on your pocket.
Environmental Requirements for Using the Device
Keep the device far from sources of heat and fire, such as a heater or a candle.
Keep the device far from electronic appliances that generate strong magnetic or
electric fields, such as a microwave oven or a refrigerator.
Place the device on a stable surface.
66
Place the device in a cool and well-ventilated indoor area. Do not expose the device
to direct sunlight.
Keep the ambient temperature between 0°C and 35°C while the device is being
charged. Keep the ambient temperature between 0°C to 35°C for using the device
powered by a battery.
Do not place any object (such as candle or water container) on the device. If any
foreign object or liquid enters the device, stop using the device immediately, turn off
power it off, remove all the cables connected to it, and then contact an authorized
service center.
During thunderstorms, power off the device, and then remove all the cables
connected to it to prevent it from getting damaged due to lightning strikes.
Traffic Security
Observe local laws and regulations while using the device. In addition, if using the device
while driving a vehicle, comply with the following guidelines:
Concentrate on driving. Your first responsibility is to drive safely.
Do not talk on the device while driving. Use hands-free accessories.
When you have to make or answer a call, park the vehicle at the roadside before
using your device.
RF signals may affect electronic systems of motor vehicles. For more information,
consult the vehicle manufacturer.
In a motor vehicle, do not place the device over the air bag or in the air bag
deployment area. Otherwise, the device may hurt you owing to the strong force
when the air bag inflates.
Do not use your device while flying in an aircraft. Power off your device before
boarding an aircraft. Using wireless devices in an aircraft may cause danger to the
operation of the aircraft and disrupt the wireless telephone network. It may also be
considered illegal.
67
Precautions for Using Wireless Devices
The device complies with the RF specifications when the device is used in portable
exposure conditions or at a distance of 1.5 cm from your body.
Do not use the device where using wireless devices is prohibited or may cause
interference or danger.
The radio waves generated by the device may interfere with the operation of
electronic medical devices. If you are using any electrical medical device, contact
its manufacturer for the restrictions on the use of the device.
Do not take the device into operating rooms, intensive care units (ICUs), or
coronary care units (CCUs).
Areas with Inflammables and Explosives
Do not use the device where inflammables or explosives are stored, for example, in
a gas station, oil depot, or chemical plant. Otherwise, explosions or fires may occur.
In addition, follow the instructions indicated in text or symbols.
Do not store or transport the device in the same box as inflammable liquids, gases,
or explosives.
Accessory Requirements
Use only the accessories supplied or authorized by the device manufacturer.
Otherwise, the performance of the device may get affected, the warranty for the
device or the laws and regulations related to telecommunications terminals may
become null and void, or an injury may occur.
Do not use the power adapter if its cable is damaged. Otherwise, electric shocks or
fires may occur.
Ensure that the power adapter meets the specifications indicated on the device
nameplate.
68
Ensure that the power adapter meets the requirements of Clause 2.5 in
IEC60950-1/EN60950-1 and it is tested and approved according to national or local
standards.
For pluggable device, the socket-outlet shall be installed near the device and shall
be easily accessible.
Battery and Charger
The battery can be charged and discharged hundreds of times before it eventually
wears out.
Use the AC power supply defined in the specifications of the charger. An improper
power voltage may cause a fire or a malfunction of the charger.
If the power cable is damaged (for example, the cord is exposed or broken), or the
plug loosens, stop using the cable at once. Otherwise, it may lead to an electric
shock, a short circuit of the charger, or a fire.
Prevention of Hearing Damage
Using a headset at high volume can damage your hearing. To reduce the risk of damage to
hearing, lower the headset volume to a safe and comfortable level.
To prevent possible hearing damage, do not listen at high volume levels for long periods.
Safety of Children
Keep the device and its accessories out of the reach of children. Otherwise, they may
damage the device and its accessories by mistake, or they may swallow the small
components of the device, causing suffocation or other dangerous situations.
69
Maintenance
If the device is not used for a long time, power it off, and then remove all the cables
connected to it.
If any exception occurs, for example, if the device emits any smoke or unusual
sound or smell, stop using the device immediately, power it off, remove all the
cables connected to it, and then contact an authorized service center.
If the device screen is broken by colliding with hard objects, do not touch or try to
remove the broken part. In this case, stop using the device immediately, and then
contact an authorized service center in time.
Do not trample, pull, or overbend any cable. Otherwise, the cable may get damaged,
causing malfunction of the device.
Before cleaning the device, stop using it, power it off, and then remove all the
cables connected to it.
Use a clean, soft, and dry cloth to clean the device shell. Do not use any cleaning
agent or spray to clean the device shell.
Emergency Call
You can use your device for emergency calls in the service area. The connection, however,
cannot be guaranteed in all conditions. You should not rely solely on the device for
essential communications.
Disposal and Recycling Information
This symbol on the device (and any included batteries) indicates that the device
(and any included batteries) should not be disposed of as normal household garbage. Do
not dispose of your device or batteries as unsorted municipal waste. The device (and any
batteries) should be handed over to a certified collection point for recycling or proper
disposal at the end of its life.
70
For more detailed information about the recycling of the device or batteries, contact your
local city office, the household waste disposal service, or the retail store where you
purchased this device.
The disposal of this device is subject to the Waste from Electrical and Electronic
Equipment (WEEE) Directive of the European Union. The purpose for separating WEEE
and batteries from other waste is to minimize any environmental impact and health hazard
due to the presence of hazardous substances.
Reduction of Hazardous Substances
This device is compliant with the EU Registration, Evaluation, Authorisation and Restriction
of Chemicals (REACH) Regulation (Regulation No 1907/2006/EC of the European
Parliament and of the Council) and the EU Restriction of Hazardous Substances (RoHS)
Directive (Directive 2002/95/EC of the European Parliament and of the Council). For more
information about the REACH compliance of the device, visit the Web site
www.huaweidevice.com/certification. You are recommended to visit the Web site regularly
for up-to-date information.
EU Regulatory Conformance
This device should be installed and operated with a minimum distance of 20 cm between
the antenna and all persons.
Български: С настоящето Huawei Technologies Co., Ltd. декларира, че този уред
съответства на основните изисквания и другите разпоредби на Директива 1999/5/EC.
Česky: Huawei Technologies Co., Ltd., tímto prohlašuje, že toto zařízení je ve shodě se
základními požadavky a dalšími souvisejícími opatřeními směrnice 1999/5/EC.
Dansk: Huawei Technologies Co., Ltd. erklærer hermed at denne enhed er i
overensstemmelse med de obligatoriske krav og andre relevante bestemmelser i direktiv
1999/5/EF.
Nederlands: Hierbij verklaart Huawei Technologies Co., Ltd. dat dit apparaat in
overeenstemming is met de essentiële eisen en de andere relevante bepalingen van
richtlijn 1999/5/EC.
71
English: Hereby, Huawei Technologies Co., Ltd. declares that this device is in compliance
with the essential requirements and other relevant provisions of Directive 1999/5/EC.
Eesti: Käesolevaga kinnitab Huawei Technologies Co., Ltd., et see seade vastab Direktiivi
1999/5/EÜ põhinõudmistele ja teistele asjakohastele määrustele.
Suomi: Huawei Technologies Co., Ltd. vakuuttaa täten, että tämä laite on yhdenmukainen
direktiivin 1999/5/EY olennaisten vaatimusten ja direktiivin muiden asiaankuuluvien
lausumien kanssa.
Français (Européen) : Le fabricant déclare que ce produit est conforme aux exigences
essentielles et aux autres dispositions pertinentes de la directive 1999/5/CE.
Deutsch: Huawei Technologies Co., Ltd. erklärt hiermit, dass dieses Produkt die
erforderlichen Bestimmungen und andere relevante Verordnungen der Richtlinie
1999/5/EG einhält.
Ελληνικά: Δια της παρούσης η Huawei Technologies Co., Ltd. δηλώνει ότι αυτή η συσκευή
συµµορφώνεται µε τις βασικές απαιτήσεις και άλλες σχετικές διατάξεις της οδηγίας
1999/5/Ε.Κ.
Magyar: Jelen nyilatkozaton keresztül a Huawei Technologies Co., Ltd. kijelenti, hogy a
készülék megfelel az EC/5/1999 Irányelv összes lényeges követelményének és vonatkozó
előírásának.
Gaeilge: Fograíonn Huawei Technologies Co., Ltd leis seo go bhfuil an fheiste seo i
gcomhlíonadh leis na fíor-riachtanais agus na forálacha eile maidir le Treoir 1999/5/AE.
Italiano: Col presente documento, Huawei Technologies Co., Ltd. dichiara che questo
dispositivo è conforme ai requisiti essenziali e alle altre disposizioni applicabili della
Direttiva 1999/5/CE.
Latviski: Ar šo Huawei Technologies Co., Ltd. paziņo, ka šī ierīce atbilst Direktīvas
1999/5/EC pamatprasībām un piemērojamajiem nosacījumiem.
Lietuviškai: Šiuo Huawei Technologies Co., Ltd. praneša, kad šis įtaisas atitinka
Direktyvos 1999/5/EC pagrindinius reikalavimus ir taikomas sąlygas.
72
Malti: Hawnhekk, Huawei Technologies Co., Ltd. tiddikjara li dan it-tagħmir hu konformi
mal-ħtiġijiet essenzjali u provvedimenti rilevanti oħrajn ta’ Direttiva 1999/5/KE.
Polski: Wymieniona w tym dokumencie firma Huawei Technologies Co., Ltd. deklaruje, że
niniejsze urządzenie spełnia zasadnicze wymagania w zakresie zgodności oraz inne
odnośne postanowienia Dyrektywy 1999/5/EC.
Português (Europeu) : Deste modo, a Huawei Technologies Co., Ltd. declara que este
dispositivo está em conformidade com os requisitos essenciais e outras provisões
relevantes da Directiva 1999/5/CE.
Română: Prin prezenta Huawei Technologies Co., Ltd. declară că acest dispozitiv este
conform cu cerinţele esenţiale şi alte prevederi relevante ale directivei 1999/5/CE.
Slovenčina: Huawei Technologies Co., Ltd. týmto vyhlasuje, že zariadenie je v súlade so
základnými požiadavkami a inými relevantnými predpismi Smernice 1999/5/ES.
Slovenščina: Huawei Technologies Co., Ltd. izjavlja, da je ta naprava v skladu z
bistvenimi zahtevami in drugimi ustreznimi določbami Direktive 1999/5/ES.
Español (Europeo) : Con el presente documento, Huawei Technologies Co., Ltd. declara
que este dispositivo cumple con los requisitos esenciales y con las demás disposiciones
correspondientes de la Directiva 1999/5/CE.
Svenska: Huawei Technologies Co., Ltd. förklarar härmed att denna produkt
överensstämmer med de grundläggande kraven och andra relevanta föreskrifter i direktiv
1999/5/EG.
For the declaration of conformity, visit the Web site www.huaweidevice.com/certification.
0168
Notice: Observe the national local regulations in the location where the device is to be used.
This device may be restricted for use in some or all member states of the European Union
(EU).
Notice: This device may be operated in all member states of the EU.
73
France: Outdoor use limited to 10 mW e.i.r.p. within the band 2454-2483.5 MHz.
Italy: For private use, a general authorisation is required if WAS/RLAN's are used outside
own premises. For public use, a general authorisation is required.
Norway: This subsection does not apply for the geographical area within a radius of 20 km
from the centre of Ny-Ålesund.
74
13 Personal Information and Data Security
The use of some functions or third-party applications on your device could result in your
personal information and data being lost or becoming accessible to others. Several
measures are recommended to help you protect personal and confidential information.
Place your device in a safe area to prevent it from unauthorized use.
Set your device screen to lock and create a password or unlock pattern to open it.
Periodically back up personal information kept on your memory card, or stored in
your device memory. If you change to a different device, be sure to move or delete
any personal information on your old device.
If you are worried about viruses when you receive messages or emails from a
stranger, you can delete them without opening them.
If you use your device to browse the Internet, avoid websites that might pose a
security risk to avoid theft of your personal information.
If you use services such as Bluetooth, set passwords for these services to prevent
unauthorized access. When these services are not in use, turn them off.
Install or upgrade device security software and regularly scan for viruses.
Be sure to obtain third-party applications from a legitimate source. Downloaded
third-party applications should be scanned for viruses.
Install security software or patches released by Huawei or third-party application
providers.
Some applications require and transmit location information. As a result, a
third-party may be able to share your location information.
Your device may provide detection and diagnostic information to third-party
application providers. Third party vendors use this information to improve their
products and services.
75
If you have concerns about the security of your personal information and data,
please contact [email protected].
14 Index
15
A
C
Alarms, 56
Calendar, 55
Answering a call, 31
Call, 28
Applications, 55
Camcorder, 49
Camera, 49
B
copyright, 80
Bluetooth, 39
Bluetooth Settings, 39
D
Bookmarks, 43
Date, 26
Browser, 42
disclaimer of warranties, 82
dock battery, 8, 12
Double-touch, 15
76
H
Downloading, 44
Drag, 14
Home Screen, 16
E
I
Editing Text, 36
import regulations, 82
Email, 45
Installation, 6
Email Account, 45
Ending a call, 31
L
export regulations, 82
Landline, 28
F
Language settings, 26
limitations of liability, 82
FAQ, 59
Locking, 21
Favorites, 31
Flick, 14
M
G
Making a call, 28
Memo, 32
Gallery, 53
77
S
Memo Pad, 32
Multimedia, 49
Screen settings, 26
Settings List, 24
N
Sound Recorder, 49
Navigation, 23
Switching, 30
notice, 81
T
O
tablet battery, 11
Onscreen Dialer, 29
Text Input, 33
P
third-party software
statement, 81
People, 47
Touch, 14
permissions, 80
Touch and hold, 14
Photo Capture, 50
trademarks, 80
Pinch, 15
troubleshooting, 57
Power-Saving, 13
TV, 26
78
U
VoIP, 28
Unlocking, 21
W
V
Webpage, 42
Wi-Fi, 37
Video Capture, 52
Wi-Fi Settings, 37
16 Legal Notice
Copyright © Huawei Technologies Co., Ltd. 2012. All rights reserved.
No part of this document may be reproduced or transmitted in any form or by any means
without prior written consent of Huawei Technologies Co., Ltd.
The product described in this manual may include copyrighted software of Huawei
Technologies Co., Ltd. and possible licensors. Customers shall not in any manner
reproduce, distribute, modify, decompile, disassemble, decrypt, extract, reverse engineer,
lease, assign, or sublicense the said software, unless such restrictions are prohibited by
applicable laws or such actions are approved by respective copyright holders.
Trademarks and Permissions
,
, and
Technologies Co., Ltd.
are trademarks or registered trademarks of Huawei
Other trademarks, product, service and company names mentioned are the property of
their respective owners.
79
Notice
Some features of the product and its accessories described herein rely on the software
installed, capacities and settings of local network, and therefore may not be activated or
may be limited by local network operators or network service providers. Thus the
descriptions herein may not match exactly the product or its accessories you purchase.
Huawei Technologies Co., Ltd. reserves the right to change or modify any information or
specifications contained in this manual without prior notice and without any liability.
Third-Party Software Statement
Huawei Technologies Co., Ltd. does not own the intellectual property of the third-party
software and applications that are delivered with this product. Therefore, Huawei
Technologies Co., Ltd. will not provide any warranty of any kind for these third-party
software and applications. Neither will Huawei Technologies Co., Ltd. provide support to
customers who use these third-party software and applications, nor be responsible or liable
for the functions of these third-party software and applications.
Third-party software and applications services may be interrupted or terminated at any time.
Huawei Technologies Co., Ltd. does not guarantee that any content or service would be
maintained for any period during its availability. Third-party service providers provide
content and services through network or transmission tools outside of the control of
Huawei Technologies Co., Ltd. To the greatest extent permitted by applicable law, it is
explicitly stated that Huawei Technologies Co., Ltd. shall not compensate or be liable for
services provided by third-party service providers, or the interruption or termination of
third-party contents or services.
Huawei Technologies Co., Ltd. shall not be responsible for the legality, quality, or any other
aspects of any software installed on this product, or for any uploaded or downloaded
third-party works, such as texts, images, videos, or software. Customers shall bear the risk
for any and all effects, including incompatibility between the software and this product,
which result from installing software or uploading or downloading the third-party works.
This product uses the open-sourced Android operating system. Huawei Technologies Co.,
Ltd. has made necessary changes to the system. Therefore, this product may not support
80
all the functions that are supported by the standard Android operating system or may be
incompatible with third-party software. Huawei Technologies Co., Ltd. shall not be liable for
any of such situation.
DISCLAIMER OF WARRANTIES
THE CONTENTS OF THIS MANUAL ARE PROVIDED “AS IS”. EXCEPT AS REQUIRED
BY APPLICABLE LAWS, NO WARRANTIES OF ANY KIND, EITHER EXPRESS OR
IMPLIED, INCLUDING BUT NOT LIMITED TO, THE IMPLIED WARRANTIES OF
MERCHANTABILITY AND FITNESS FOR A PARTICULAR PURPOSE, ARE MADE IN
RELATION TO THE ACCURACY, RELIABILITY OR CONTENTS OF THIS MANUAL.
LIMITATIONS OF LIABILITY
TO THE MAXIMUM EXTENT PERMITTED BY APPLICABLE LAW, IN NO EVENT SHALL
HUAWEI TECHNOLOGIES CO., LTD. BE LIABLE FOR ANY SPECIAL, INCIDENTAL,
INDIRECT, OR CONSEQUENTIAL DAMAGES, OR LOST PROFITS, BUSINESS,
REVENUE, DATA, GOODWILL OR ANTICIPATED SAVINGS.
THE MAXIMUM LIABILITY (THIS LIMITATION SHALL NOT APPLY TO LIABILITY FOR
PERSONAL INJURY TO THE EXTENT APPLICABLE LAW PROHIBITS SUCH A
LIMITATION) OF HUAWEI TECHNOLOGIES CO., LTD. ARISING FROM THE USE OF
THE PRODUCT DESCRIBED IN THIS DOCUMENT SHALL BE LIMITED TO THE
AMOUNT PAID BY CUSTOMERS FOR THE PURCHASE OF THIS PRODUCT.
Import and Export Regulations
Customers shall comply with all applicable export or import laws and regulations and be
responsible to obtain all necessary governmental permits and licenses in order to export,
re-export or import the product mentioned in this manual including the software and
technical data therein.
Issue: 01 (2012–08–25)
Part Number: 31010KSV
81