1
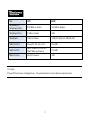
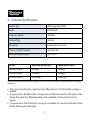
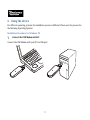
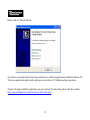
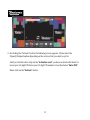
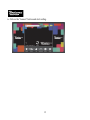
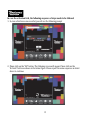
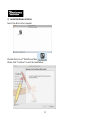
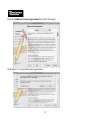
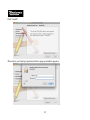
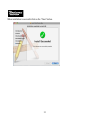
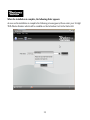
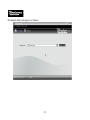
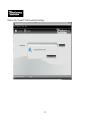
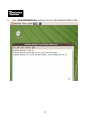
HUAWEI EC306 User Guide Table of Contents 1. Introduction ...........................................................................................................................................1 2. System Requirements ........................................................................................................................ 1 3. EC306 Appearance .............................................................................................................................. 3 4. Technical Specifications.................................................................................................................... 4 5. Inserting a microSD Card ................................................................................................................. 5 6. Using the device.................................................................................................................................... 6 Installation Procedure for Windows XP.....................................................................................6 Installation Procedure for Mac OS............................................................................................. 17 Installation Procedure for Linux ................................................................................................ 25 7. Activation of Tata Photon Max Services ................................................................................. 34 8. Services that you can enjoy with Tata Photon Max........................................................... 35 9. Troubleshooting ................................................................................................................................ 36 10. Care and Maintenance.................................................................................................................. 38 11. Warnings and Precautions......................................................................................................... 39 i 1. Introduction Congratulations on your purchase of Huawei EC306 Tata Photon Max USB Data Modem. With Tata Photon Max, you enjoy the following advantages Superior In‐building coverage Free Roaming across India Get enhanced signal reception on the move Dedicated data frequency for Data services and hence better internet experience The User Guide contains important information on the proper use and correct operation of your USB Data Modem. We recommend that you read this user manual carefully to ensure optimal performance. 2. System Requirements Tata Photon Max USB Modem works with Laptops as well as Desktops The system requirements are as follows PC with USB Port Hardware configuration should satisfy the demand of any of the following operating systems. o Windows XP SP2 / SP3, Windows Vista SP1 / SP2, Windows7 o Mac OS X 10.5 and 10.6 with latest upgrades o Linux Ubuntu 10.04/9.10/9.04, openSUSE 11.3/11.2, Fedora 13/12/11, Debian 5.0, Xandros 4.2, Mandriva 2010.1/2010.0, Red Flag 7.0 Display Resolution:Above 800x600 1 OS CPU RAM Windows XP Windows 2000 300 MHz or faster 128 MB or higher Windows Vista 1 GHz or faster 1GB Windows 7 1GHz or faster 1 GB (32‐bit) or 2 GB (64‐bit) MAC OS 10.4 PowerPC G3, G4 or G5 256 MB MAC OS 10.5 Intel, PowerPC G4 or G5 (867 MHz and faster) 512 MB MAC OS 10.6 Intel Processor 1GB Note: If your PC has lower configuration,the performance of your device may be lower. 2 3. EC306 Appearance Please find below the description that you need to know to start using your device. Name 1.USB Plug 2.RF Output Power Port 3.Indicator light 4. microSD card Slot Description It connects your device to the PC. It connects an RF cable to the USB Stick for RF tests. It indicates the status of the USB Stick. Green, blinking twice every 2s: The USB Stick is powered on. Green, blinking once every 0.2s: The software of the USB Stick is being upgraded. Green, blinking once every 2s: The USB Stick is registering with a Tata Photon Whiz network. Green, solid: The USB Stick is transmitting data on Tata Photon Whiz network. Blue, blinking once every 2s: The USB Stick is registering with a Tata Photon Plus or Tata Photon Max network. Blue, solid: The USB Stick is transmitting data on Tata Photon Plus or Tata Photon Max network. Off: The USB Stick is removed. To install a microSD and use it as a data storage device 3 4. Technical Specifications Modem Type USB Dongle NON‐RIUM Mode EVDO REV.B Frequency (Band ) 800 MHz Antenna Type Internal Dimension 89mm×28mm×13.5mm Memory Card Slot Support microSD card External Memory Support Up to 4GB Service Downlink Speeds Up to Uplink Speeds Up to Tata Photon Max 6.2 Mbps 3.6 Mbps Tata Photon Plus 3.1 Mbps 1.8 Mbps Tata Photon Whiz 153.6 Kbps 153.6 Kbps Actual internet speed would depend on multiple factors like time of day, number of simultaneous users, web pages accessed etc This connection will work on speeds up to 6.2 Mbps wherever Tata Photon Max coverage is available. In regions where Tata Photon Max coverage is not available the connection will work on Tata Photon Plus speeds (3.1 Mbps) depending on the availability of these services in those regions. In regions where Tata Photon Plus coverage is not available, the connection will work on Tata Photon Whiz speeds (153.6 Kbps) 4 5. Inserting a microSD Card 1. 2. 3. 4. 5. Slide the cover to remove it from the USB Stick. Slide the card holder down to unlock it, and then lift it up gently. Insert the microSD card into the card slot, as shown in the following figure. Close the card holder and slide the holder up to lock it in place. Replace the cover and slide it into place. 5 6. Using the device For different operating systems, the installation process is different. Please note the process for the following Operating Systems Installation Procedure for Windows XP 1. Connect the USB Modem with PC Connect the USB Modem with your PC via USB port 6 2.Install the Dialer & Driver If PC opens the “Auto Run” function, it will pop up an installation interface. If not, please go to the CD as shown in the figure below and open it and double click the “AutoRun.exe” file or right click and click on Auto play. Please refer to the following screenshots for the further steps of installation. 7 Click “Next ”and then to agree with the license agreement click “I Agree”. Click “Next”and then choose a location path for installation and click “Install”. In case you do not have any specific location preference you may choose to continue with the default location and click “Install”. 8 9 Please click on “Finish” button. You will see a prompt which will seek permission to install an application called Tata Photon TV. This is an application which will enable you to watch Live TV Online anytime, anywhere. “Setup” will only install the application on your system. To subscribe, please visit the website http://www.tataphoton.com/tata‐photon‐photontv.aspx 10 Once installation is finished, please go back to desktop, click on the icon “Tata Photon . Max” As soon as the installation is complete the default dialer will appear as follows 1. Please click on the “Continue” button. On clicking the button, the dialer appears as follows. Click on the “Activate” button as shown in the below figure. 11 2. On clicking the “Activate” button, the following screen appears. Please select the Prepaid/Postpaid option depending on the services that you wish to opt for. Gently scratch the silver strip on the “Activation card” you have received with the kit, to reveal your 14‐digit PIN. Enter your 14 digit PIN number in text box below “Enter PIN”. Please click on the “Activate” button 12 3. On clicking the “Activate” button, the following screen appears. The moving bars indicate that the activation is in progress. 13 4. You may have to wait for a couple of minutes. Once activation is successful, you will see the following screen 5. Once activation is successful and OK button is pressed, the following screen appears. Please enter your 10‐digit TATA Photon Number which will be available on the Activation card in the Starter Kit. 14 6. Click on the “Connect” button and start surfing. 15 In case the activation fails, the following sequence of steps needs to be followed 1. In case activation is unsuccessful, you will see the following prompt 2. Please click on the “OK” button. The following screen will appear. Please click on the “Activate” button as shown in the below figure. Please repeat the same sequence as stated above to continue. 16 Uninstallation of Application Software 1. 2. 3. 4. Exit Management procedures. Remove the device from the system then pull it out. Open “Add/Remove program” in the control panel. Accord the prompt, finish un‐installation. Installation Procedure for Mac OS 1.Connect the USB Modem with PC Connect the USB Modem with your PC via the USB port. 17 2.Install the Dialer & Driver Insert the device into computer Double click icon of “Tata Photon Max” Please click “Continue” to start the installation. , 18 Read the Software License Agreement then click “Continue”. Click “Agree” to accept the license agreement. 19 Click “Install”. Then enter your laptop’s password when pop up window appears. 20 When installation is successful click on the “Close” button. 21 When the installation is complete, the following dialer appears 1. As soon as the installation is complete the following screen appears. Please enter your 10‐ digit TATA Photon Number which will be available on the Activation Card in the Starter Kit. 22 2. The default dialer will appear as follows. 23 3. Click on the “Connect” button and start surfing. Uninstallation of Application Software 1. Exit Management procedures. 2. Open “uninstall Mobile Partner”, click “OK”>“OK”. 24 Installation Procedure for Linux 1. Connect the USB Modem with PC Connect the USB Modem with your PC via USB port. 25 2. Install the Dialer & Driver On inserting the modem, double click “Tata Photon Max”and open the folder. 26 Open new terminal go to the path cd /media/Tata\ Photn+ \ Max\ /. Type the command sh ./install to install Tata Photon+ dialer and press enter. 27 After pressing the Enter key you will get the below new terminal as shown below. Please press E nter key again. 28 When the installation is complete, the following dialer appears As soon as the installation is complete the following screen appears, Please enter your 10‐digit TATA Photon Number which will be available on the Activation Card in the Starter Kit. 29 The default dialer will appear as follows. 30 Click on the “Connect” button and start surfing. 31 Uninstallation of Application Software a. Go to the installed path [eg:‐ /usr/local/Tata_Photon_Max] as shown below. 32 b. Type ./UninstallMobilePartner and press enter key will uninstall Tata Photon Max. 33 7. Activation of Tata Photon Max Services • • • • The above mentioned activation process will fail in case the SMS activation request has not been sent by the authorized dealer Post the activation, connection will be enabled for 72 hours for Order Entry to be carried out. Within these 72 hours, a usage limit of 100 MB (Download + Upload) will be provided. This usage will be adjusted against your bundled usage in subsequent bills and will be not free. After 72 hours, activation of connection will be subject to verification of completed CAF (Customer Application Form), TEF (Tariff Enrollment Form) and other necessary documents as well as satisfactory address and credit verification, failing which connection will be discontinued and no refund will be made. For any information, call us at 1800 266 121 34 8. Services that you can enjoy with Tata Photon Max a. b. c. Dedicated Data Call Centre • Reach Photon Care on Toll free no – 1800 266 121 • An exclusive Tata Photon service desk set up to provide quick and quality resolution to all complaints and queries of Photon customers. My Account – Self Care Portal • URL ‐ www.tataphoton.com/myaccount.aspx • Update profile details such as email id and contact number • View usage details • Session‐wise • Peak / Off‐peak • View Unbilled amount Previous usage history • • Make online payments • Maintain e‐bill for 6 months for quick reference Website – www.tataphoton.com • Get access to all the information related to Tata Photon Max • Download User Manuals / Dialers 35 9. Troubleshooting If your USB Modem displays any of the conditions, please refer to the following table. Common problems Troubleshooting Steps Cannot automatically install the driver & Dialer tool in the first time The computer may not have opened the Auto Run function. Please go to “My Computer”‐>CD Rom with name “Tata Photon Max”, open it and run the autorun.exe manually. Cannot install driver successfully Please try to uninstall it and then install it again. Cannot find the device by Dialer tool Please check whether it can find the device from Device Manager. If not, please check whether you can see the CD “Tata Photon Max” from “My Computer”. If so, then eject the CD. Cannot search signal from Dialer tool Cannot connect to internet by Dialer tool Device is not detecting in MAC OS Device is detecting in MAC OS, But not showing signal strength Please check whether the number you used is activated or not. Please contact operator whether the parameters are configured correctly. Please check whether it can search signal by Dialer first. Please check whether the Modem configuration of PC is ok or not. Please check the drivers (HuaweiDataCardDriver.kext) are present in the following path /System/Library/Extensions . If not present please reinstall the application. Please check with the operater if the device is activated or not 36 Common problems Insert T‐Flash Card Micro‐SD card is not recognized PC not able to detect Device Troubleshooting Steps After Insert the T‐Flash Card in the Device, Connect Device to Computer, you need to Install the Dialer and then Open “My computer” – Removable Disk. The card is not inserted correctly or is of the wrong size / format. Re‐insert the card or try another Micro‐SD card and make sure the capacity and format is correct. Change to another USB Port or if the problem still exists, please contact local Operator Firewall Security Alert appears during Connection Device must be allowed to connect through your firewall. Please contact the vendor of your firewall software In order to work correctly. After restarting the computer, there is no signal indicated Please check if the Device is connected Properly, Check the Network Coverage or pull out the Device and reinsert the Device again. 37 10. Care and Maintenance Your USB Modem is a product of superior design and craftsmanship and should be treated with care. The suggestions below will help you to fulfill any warranty obligations and to enjoy this product for many years. Keep the radio card and all its parts and accessories out of small children's reach. Keep the radio card dry. Precipitation, humidity, and all types of liquids or moisture can contain minerals that will corrode electronic circuits. Do not use or store the radio card in dusty, dirty areas. Do not store the radio card in hot areas. High temperatures can shorten the life of electronic devices, and warp or melt certain plastics. Do not store the radio card in cold areas. When it warms up (to its normal temperature), moisture can form inside, which may damage electronic circuit boards. Do not attempt to open the radio card. Non‐expert handling may damage it. Do not drop, knock, or shake the radio card. Rough handling can break internal circuit boards. Do not use harsh chemicals, cleaning solvents, or strong detergents to clean the radio card. Do not paint the radio card. Paint can prevent proper operation. Use only the supplied antenna. Unauthorized antennas, modifications, or attachments could damage the radio card and may violate regulations governing radio devices. All of the above suggestions apply equally to your radio card or any accessory. If any of them is not working properly, take it to your nearest qualified service facility. The personnel there will assist you and, if necessary, arrange for service. 38 11. Warnings and Precautions This section contains important information pertaining to the operating instructions of your device. It also contains information about how to use your device safely. Read this information carefully before using the device. Electronic Device Do not use your device if using the device is prohibited. Do not use the device when using the device causes danger or interference with electronic devices. Medical Device Follow rules and regulations set forth by hospitals and health care facilities. Do not use your device when using the device is prohibited. Some wireless devices may affect the performance of hearing aids or pacemakers. For any such problems, consult your service provider. If you are using an electronic medical device, consult the doctor or the device manufacturer to confirm whether radio waves affect the operation of this device. Potentially Explosive Atmosphere Do not use your device in any area with a potentially explosive atmosphere, and comply with all signs and instructions. Areas that may have potentially explosive atmospheres include the areas where you would normally be advised to turn off your vehicle engine. Triggering of sparks in such areas could cause an explosion or a fire, resulting in bodily injuries or even deaths. Do not use your device at refueling points such as service stations. Comply with restrictions on the use of radio equipment in fuel depots, storage, and distribution areas, and chemical plants. In addition, adhere to restrictions in areas where blasting operations are in progress. Before using the device, watch out for areas that have potentially explosive atmospheres that are often, but not always, clearly marked. Such locations include areas below the deck on boats, chemical transfer or storage facilities, and areas where the air contains chemicals or particles such as grain, dust, or metal powders. Ask the manufacturers of vehicles using liquefied petroleum gas (such as propane or butane) whether this device can be safely used in their vicinity. 39 Traffic Security Observe local laws and regulations while using the device. To prevent accidents, do not use your wireless device while driving. RF signals may affect electronic systems of motor vehicles. For more information, consult the vehicle manufacturer. In a motor vehicle, do not place the device over the air bag or in the air bag deployment area. Otherwise, the device may hurt you owing to the strong force when the air bag inflates. Do not use your device while flying in an aircraft and before boarding an aircraft. Using wireless devices in an aircraft may cause danger to the operation of the aircraft and disrupt the wireless telephone network. It may also be considered illegal. Operating Environment Do not use the device in dusty, damp, and dirty places or places with magnetic fields. Otherwise, it may result in malfunction of the circuit. On a stormy day with thunder, do not use your device when it is being charged, to prevent any danger caused by lightning. While using the device, observe the local laws and regulations, and respect others' privacy and legal rights. Keep the ambient temperature between ‐10℃ to +45℃ for using the device. Safety of Children Comply with all precautions with regard to children's safety. Letting the child play with your device or its accessories, which may include parts that can be detached from the device, may be dangerous, as it may present a choking hazard. Ensure that small children are kept away from the device and accessories. Accessories Use the accessories delivered only by the manufacturer. Using accessories of other manufacturers or vendors with this device model may invalidate any approval or warranty applicable to the device, result in the non‐operation of the device, and cause danger. 40 Cleaning and Maintenance It is normal that your wireless device gets hot when you use or charge it. Before you clean or maintain the wireless device, stop all applications and disconnect the wireless device from your PC. Use your wireless device and accessories with care and in a clean environment. Keep the wireless device away from a fire or a lit cigarette. Protect your wireless device and accessories from water and vapor, and keep them dry. Do not drop, throw, or bend your wireless device. Clean your wireless device with a piece of damp and soft antistatic cloth. Do not use any chemical detergent, powder, or other chemical agents (such as alcohol and benzene) to clean the device. Certification Information (SAR) Your wireless device is a radio transmitter and receiver. It is designed not to exceed the limits for exposure to radio waves recommended by international guidelines. These guidelines are developed by the independent scientific organization International Commission on Non‐Ionizing Radiation Protection (ICNIRP) and include safety margins designed to assure the protection of all persons, regardless of age and health. The guidelines use a unit of measurement known as the Specific Absorption Rate, or SAR. The SAR limit for wireless devices is 2.0 watts/kilogram (W/kg) and the highest SAR value for this device when tested complies with this limit. Body Worn Operation Important safety information regarding radiofrequency (RF) radiation exposure is as follows: To ensure compliance with RF exposure guidelines, the device must be used with a minimum of 2.5cm distance from the body. Failure to observe these instructions could result in your RF exposure exceeding the relevant guideline limits. 41 Disposal and Recycling Information This symbol on the device (and any included batteries) indicates that they should not be disposed of as normal household garbage. Do not dispose of your device or batteries as unsorted municipal waste. The device (and any batteries) should be handed over to a certified collection point for recycling or proper disposal at the end of their life. For more detailed information about the recycling of the device or batteries, contact your local city office, the household waste disposal service, or the retail store where you purchased this device. The disposal of this device is subject to the Waste from Electrical and Electronic Equipment (WEEE) directive of the European Union. The reason for separating WEEE and batteries from other waste is to minimize the potential environmental impacts on human health of any hazardous substances that may be present. Reduction of Hazardous Substances This device is compliant with the EU Registration, Evaluation, Authorisation and Restriction of Chemicals (REACH) Regulation (Regulation No 1907/2006/EC of the European Parliament and of the Council) and the EU Restriction of Hazardous Substances (RoHS) Directive (Directive 2002/95/EC of the European Parliament and of the Council). For more information about the REACH compliance of the device, visit the Web site www.huaweidevice.com/certification. You are recommended to visit the Web site regularly for up‐to‐date information. EU Regulatory Conformance Български: С настоящето Huawei Technologies Co., Ltd. декларира, че този уред съответства на основните изисквания и другите разпоредби на Директива 1999/5/EC. Česky: Huawei Technologies Co., Ltd., tímto prohlašuje, že toto zařízení je ve shodě se základními požadavky a dalšími souvisejícími opatřeními směrnice 1999/5/EC. Dansk: Huawei Technologies Co., Ltd. erklærer hermed at denne enhed er i overensstemmelse med de obligatoriske krav og andre relevante bestemmelser i direktiv 1999/5/EF. Nederlands: Hierbij verklaart Huawei Technologies Co., Ltd. dat dit apparaat in overeenstemming is met de essentiële eisen en de andere relevante bepalingen van richtlijn 42 1999/5/EC. English: Hereby, Huawei Technologies Co., Ltd. declares that this device is in compliance with the essential requirements and other relevant provisions of Directive 1999/5/EC. Eesti: Käesolevaga kinnitab Huawei Technologies Co., Ltd., et see seade vastab Direktiivi 1999/5/EÜ põhinõudmistele ja teistele asjakohastele määrustele. Suomi: Huawei Technologies Co., Ltd. vakuuttaa täten, että tämä laite on yhdenmukainen direktiivin 1999/5/EY olennaisten vaatimusten ja direktiivin muiden asiaankuuluvien lausumien kanssa. Français (Européen) : Huawei Technologies Co., Ltd. déclare que ce produit est conforme aux exigences essentielles et aux autres dispositions pertinentes de la directive 1999/5/CE. Deutsch: Huawei Technologies Co., Ltd. erklärt hiermit, dass dieses Produkt die erforderlichen Bestimmungen und andere relevante Verordnungen der Richtlinie 1999/5/EG einhält. Ελληνικά: Δια της παρούσης η Huawei Technologies Co., Ltd. δηλώνει ότι αυτή η συσκευή συμμορφώνεται με τις βασικές απαιτήσεις και άλλες σχετικές διατάξεις της οδηγίας 1999/5/ΕΚ. Magyar: Jelen nyilatkozaton keresztül a Huawei Technologies Co., Ltd. kijelenti, hogy a készülék megfelel az EC/5/1999 Irányelv összes lényeges követelményének és vonatkozó előírásának. Gaeilge: Fograíonn Huawei Technologies Co., Ltd. leis seo go bhfuil an fheiste seo i gcomhlíonadh leis na fíor‐riachtanais agus na forálacha eile maidir le Treoir 1999/5/AE. Italiano: Col presente documento, Huawei Technologies Co., Ltd. dichiara che questo dispositivo è conforme ai requisiti essenziali e alle altre disposizioni applicabili della Direttiva 1999/5/CE. Latviski: Ar šo Huawei Technologies Co., Ltd. paziņo, ka šī ierīce atbilst Direktīvas 1999/5/EC pamatprasībām un piemērojamajiem nosacījumiem. Lietuviškai: Šiuo Huawei Technologies Co., Ltd. praneša, kad šis įtaisas atitinka Direktyvos 1999/5/EC pagrindinius reikalavimus ir taikomas sąlygas. Malti: Hawnhekk, Huawei Technologies Co., Ltd. tiddikjara li dan it‐tagħmir hu konformi mal‐ ħtiġijiet essenzjali u provvedimenti rilevanti oħrajn ta’ Direttiva 1999/5/KE. Polski: Wymieniona w tym dokumencie firma Huawei Technologies Co., Ltd. deklaruje, że niniejsze urządzenie spełnia zasadnicze wymagania w zakresie zgodności oraz inne odnośne postanowienia Dyrektywy 1999/5/EC. Português (Europeu) : Deste modo, a Huawei Technologies Co., Ltd. declara que este dispositivo 43 está em conformidade com os requisitos essenciais e outras provisões relevantes da Directiva 1999/5/CE. Română: Prin prezenta Huawei Technologies Co., Ltd. declară că acest dispozitiv este conform cu cerințele esențiale şi alte prevederi relevante ale directivei 1999/5/CE. Slovenčina: Huawei Technologies Co., Ltd. týmto vyhlasuje, že zariadenie je v súlade so základnými požiadavkami a inými relevantnými predpismi Smernice 1999/5/ES. Slovenščina: Huawei Technologies Co., Ltd. izjavlja, da je ta naprava v skladu z bistvenimi zahtevami in drugimi ustreznimi določbami Direktive 1999/5/ES. Español (Europeo) : Con el presente documento, Huawei Technologies Co., Ltd. declara que este dispositivo cumple con los requisitos esenciales y con las demás disposiciones correspondientes de la Directiva 1999/5/CE. Svenska: Huawei Technologies Co., Ltd. förklarar härmed att denna produkt överensstämmer med de grundläggande kraven och andra relevanta föreskrifter i direktiv 1999/5/EG. For the declaration of conformity, visit the Web site www.huaweidevice.com/certification. Notice: Observe the national local regulations in the location where the device is to be used. This device may be restricted for use in some or all member states of the European Union (EU). Version: V100R001_01 Part Number: 3101**** 44